Category Archives: ITALIAN CUISINE

RISI E BISI (ITALIAN RICE AND PEAS)

Sometimes you just need a quick and easy side dish. Nothing fancy, but still tasty. And for my money, this Italian staple fills the bill perfectly. But please note – this side dish is never going to be a rock star. But what it does deliver is simplicity and enough flavor to compliment any chicken, beef, pork, or seafood entrée. Basically, any main that requires a starchy companion.  

And don’t we all need that side dish that enhances the dining experience but doesn’t threaten to replace the main dish as the star of the show. Sometimes, all we need from a dish is for it to be a filler. Something to complete the meal, but not take away from the perfect chop, meatloaf, or fried chicken breast you are also serving.

Not all dishes need to be so exciting as to detract from the entrée. Think of all the wonderful meals you’ve eaten in restaurants. Not all the sides are fantastic. But rather, they are on the plate to be that other taste or texture needed so that your mouth doesn’t get bored.

I cannot count the number of times I have been halfway through a fantastic creamy rich pasta, for example, when all of a sudden, I would give anything for a whole different taste sensation. Perhaps a salad with a vinegar dressing or a hunk of crusty bread. Because, bottom line, too much of a wonderful flavor or mouth feel, no matter how much you like the dish, can suddenly become unappetizing.

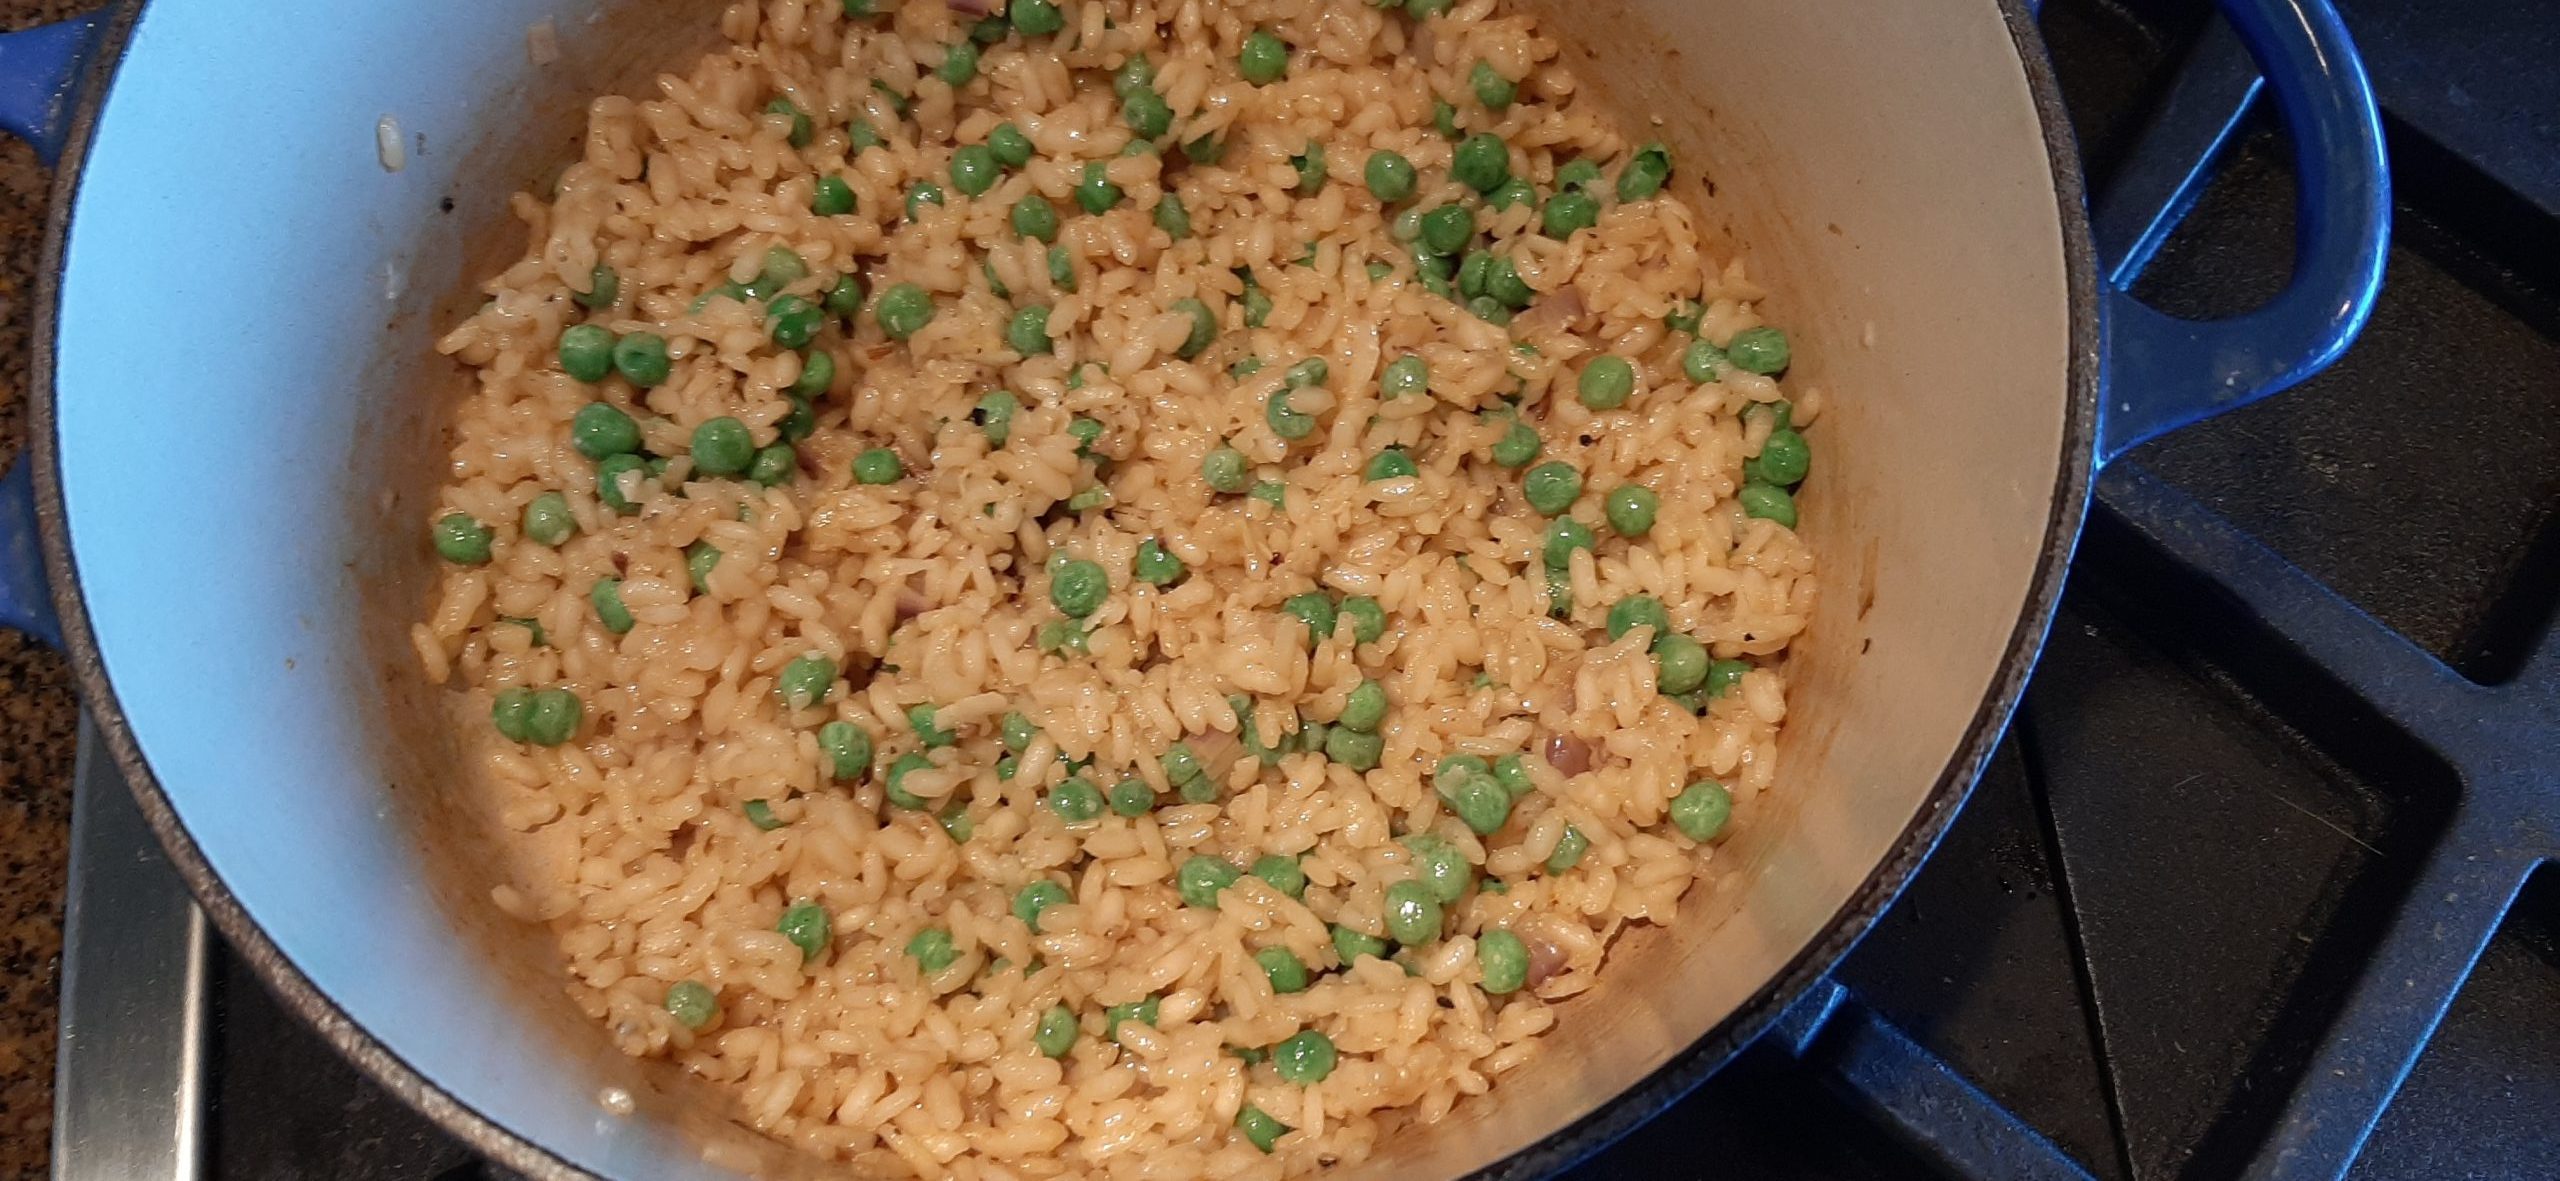
So, keep this recipe in mind when you need a delicious and easy to prepare filler. And no, when I discussed this with the Risi E Bisi I prepared the other evening, it took no offence at being considered a “filler” dish. In fact, it took great pride at being considered one of the tastiest and creamiest starch dishes ever to be served with baked, fried, or braised meat or fish. (I truly enjoy talking with intelligent and sophisticated ingredients like Arborio rice. So much better than talking to a rutabaga, for example. Kind of like discussing the state of our nation with liberal conservatives or conservative liberals rather than radical zealots on the far left or far right of the political spectrum.)    

Well, that’s all I have to say for today. And for some of you, you might feel I have already said too much. If I have offended you in any way, I apologize. But I am going to continue speaking my mind. For me there will always be gray. And if someone or some cause only sees matters in white or black, with no consideration for gray, I see red!

But as always, I still wish peace and love to everyone.  

2 c. chicken stock

1 T. extra virgin olive oil

1 T. finely chopped shallot

1 cloves garlic, chopped

½ rounded c. Arborio rice

1 T. dry white wine

pinch kosher salt

freshly ground black pepper

½ c. frozen petite peas

¼ c. grated Parmigiano-Reggiano  

Place chicken stock in a small pot and warm over low heat.

Heat a medium sized heavy pan over medium heat. Add extra-virgin olive oil and shallot. Cook for a couple of minutes. Add garlic. Sauté for 1 minute, then add the Arborio rice.

Toast the Arborio rice for about 2 minutes, then add the wine, salt, and pepper. Quickly ladle in ⅓ cup of the stock. Bring to a simmer. Stir rice occasionally, allowing the rice to get starchy and the stock to cook into the rice. Add more stock when rice starts to become dry. Continue stirring and ladling broth until rice is al dente, about 22 minutes.

Stir in peas and cheese and taste and adjust seasoning. Serve immediately.

EASY OVERNIGHT FOCACCIA TWO WAYS (ROSEMARY OR KALAMATA OLIVE AND ROASTED GARLIC)

Rosemary Focaccia on the left. Kalamata and Roasted Garlic Focaccia on the right.

Well, this was easy bread to build. Almost too easy to be real. But guess what? This is the best focaccia imaginable. Chewy and UNBELIEVABLY delicious. And did I mention this focaccia is ever so easy to prepare. Yes, I did. But I feel duty bound to state it again. And we all have Ali of alexandracooks.com to thank for this amazing recipe.

But to be truthful, I don’t follow Ali’s instructions to a tee. Ali often adds flavorings on top of her focaccias, but I worry about ingredients either burning, or getting too well cooked her way. So, I put additions in the dough itself. Just a personal preference. So, feel free to go wild and do whatever you want when it comes to additives or toppings when you make your focaccia. But the one thing you must do, especially if you are new to baking bread, is just do it. Make – this – bread. It is marvelous. And fool proof. (Not that you’re a fool, I’m not saying that. Well, yes, I guess I might be saying that if you don’t make this focaccia!) Anyway, just make the darn bread and be done with it!

Well, this is my second post for today. Mr. C. is in Seattle making beautiful music with some other gifted musicians for an upcoming concert, so I don’t have him to bug. The house is clean. The laundry is done, and I don’t have to make dinner tonight. So, I think I’ll just post this recipe and get back to trying to help my poor protagonist in the book I’m reading figure out who done it. I actually can’t imagine a better way to spend a winter afternoon than by turning pages in a book.

May you too have afternoons spent doing anything you darn well please.

Peace and love to all.

ROSEMARY FOCACCIA

3 c. bread flour

1½ tsp. kosher salt

1½ tsp. instant yeast

1 T. finely minced fresh rosemary

1½ c. lukewarm water

extra virgin olive oil

flaky sea salt   

In a medium sized bowl, whisk the flour, salt, instant yeast, and rosemary together. Add warm water. Using a rubber spatula, mix until the liquid is absorbed, and the ingredients form a sticky dough ball. Rub the surface of the dough with olive oil. (Use enough that the dough won’t dry out as it sits in the refrigerator.)

Cover the bowl with plastic wrap and place in the refrigerator immediately for at least 12 hours or for as long as three days. 

Pour about 3 tablespoons of olive oil into a 9×13-inch baking pan. Remove the dough from fridge and using a stiff spatula, transfer the dough to the baking pan and form it into a rough ball. Roll the dough ball in the oil to coat it all over, again forming a rough ball.

Let the dough rest uncovered for 3 to 4 hours or until it looks about doubled in size.  

Set a rack in the middle of the oven and preheat the oven to 425-degrees. Pour about 2 more tablespoons of olive oil over the dough. Rub your hands lightly in the oil to coat, then, using your fingers, press straight down to create deep dimples. The dough probably won’t fill the pan. No matter. Just press the dough as much as possible into an even thickness.  Sprinkle with flaky sea salt all over. (Be generous.)

Transfer the pan to the middle rack of your pre-heated 425-degree oven and bake for about 25 minutes, or until the underside is golden and crisp and the internal temperature of the bread reaches at least 200-degrees. 

Remove the pan from the oven and transfer the focaccia to a cooling rack. Let it cool before cutting into small squares.

KALAMATA OLIVE AND ROASTED GARLIC FOCACCIA

3 c. bread flour

1½ tsp. kosher salt

1½ tsp. instant yeast

8-10 cloves roasted garlic, smashed (see recipe for roasted garlic below)

½ c. chopped kalamata olives

1½ c. lukewarm water

extra virgin olive oil

flaky sea salt   

In a medium sized bowl, mix the flour, salt, instant yeast, roasted garlic, and kalamata olives together. Add warm water. Using a rubber spatula, mix until the liquid is absorbed, and the ingredients form a sticky dough ball. Rub the surface of the dough with olive oil. (Use enough that the dough won’t dry out as it sits in the refrigerator.)

Cover the bowl with plastic wrap and place in the refrigerator immediately for at least 12 hours or for as long as three days. 

Pour about 3 tablespoons of olive oil into a 9×13-inch baking pan. Remove the dough from fridge and using a stiff spatula, transfer the dough to the baking pan and form it into   a rough ball. Roll the dough ball in the oil to coat it all over, again forming a rough ball.

Let the dough rest uncovered for 3 to 4 hours or until it looks about doubled in size.

Set a rack in the middle of the oven and preheat it to 425-degrees. Pour about 2 more tablespoons of olive oil over the dough. Rub your hands lightly in the oil to coat, then, using your fingers, press straight down to create deep dimples. The dough probably will not completely fill the pan. No matter. Just press the dough as much as possible into an even thickness.  Sprinkle with flaky sea salt all over. (Be generous.)

Transfer the pan to the middle rack of your pre-heated 425-degree oven and bake for about 25 minutes, or until the underside is golden and crisp and the internal temperature of the bread reaches at least 200-degrees. 

Remove the pan from the oven and transfer the focaccia to a cooling rack. Let it cool before cutting into small squares.

How to roast garlic

Using a sharp knife, slice ¼ to ⅓ -inch off the top of the garlic bulb exposing the individual cloves. Remove any loose papery skin.

Place the garlic cut side up in the center of a piece of foil large enough to envelope the bulb. Drizzle with 1 tablespoon olive oil and sprinkle with salt and pepper. Fold the foil around the garlic.

Place in a small baking dish or ramekin and bake in a pre-heated 400-degree oven until the cloves inside the packet are light brown and soft, 40 to 70 minutes. Check on the garlic after about 50 minutes. Continue baking if necessary.   Remove from oven, carefully open the foil, and let the garlic cool until it’s easy to handle but still warm. Press on the uncut base of the bulb to squeeze the cloves out. Allow the cloves to cool completely before using in any of your favorite dishes. 

SIMPLE ITALIAN GREEN SALAD WITH LEMON AND PARMIGIANO REGGIANO DRESSING   

OK, now for something healthy and mind boggling delicious.

As some of you know, salad is usually my least favorite dish to prepare. Why that is, I still have no idea even after all these decades of putting food on a table. Perhaps it’s the repetitious chore of washing the veggies, chopping the veggies, and drying the veggies that holds no challenge for me. After all, it’s not like preparing a perfect Beurre Blanc Sauce (recipe on this site BTW) for heaven’s sake. Chopping veggies for a salad is simply a cut-and-dried task! Where’s the adventure?

So, for me, the only redeeming feature, apart from my love of a good salad, is in making the dressing. And if possible, like in this salad, keeping the veggie prep to a minimum.

So, below you will find a recipe for a salad that is easy to prepare and scrumptious. And reasonably healthy as well! And isn’t that a perfect combination.  

Well, that’s it for today. We have a busy week ahead of us, so I plan to take it kind of easy today. Read my book this afternoon until I fall asleep in my chair. Then try a couple new recipes this evening for Egg Foo Young and broccoli in an Asian inspired sauce. If the recipes work, I will share them with you. If not, I will chock the whole thing up to trial and error. (The error being me trying the recipes in the first place! Or me putting my own spin on someone else’s perfectly good recipes and ruining them in the process. That I’m sure has happened more often than I care to admit. Even to myself!)

But as always, I keep on experimenting with food. Some people make art. (I used to do that.) Some folks make music. (I used to do that too.) Now, I just make a mess in my kitchen. And for me that’s the perfect way to spend my time.

Peace and love to all.

¼ c. extra virgin olive oil

zest of 1 lemon

juice of 1 lemon, or more to taste  

tiny pinch crushed red pepper flakes

¼ tsp. kosher salt, or more to taste

freshly ground black pepper

2 hearts of romaine lettuce, chopped into bite sized pieces

1 head red leaf lettuce, chopped into bite sized pieces

1 c. finely grated Parmigiano Reggiano cheese

Whisk the olive oil, lemon zest, lemon juice, crushed red pepper flakes, salt, and pepper together in the bottom of a salad bowl. Taste and adjust seasoning.

Just before serving, toss in the lettuce.  Add the Parmigiano Reggiano cheese and toss again. Serve immediately.

SIMPLE LEFTOVER LAMB (OR MEAT OF CHOICE) RAGÙ

For this year’s extended family Christmas dinner, our dear friends Jim and Margo were the hosts and served us boneless leg of lamb. With all the trimmings. Jim and I had attended a cooking class decades ago at an Italian restaurant in Redmond, Washington and together we had learned to prepare this fantastic lamb dish. You can find the recipe on this site – Stuffed Boneless Leg of Lamb. And truly, it remains the best recipe for boneless leg of lamb that I have ever tasted.  

Anyway, there were leftovers offered, so I brought home 4 big slices. But then, what to do with the lamb? Given my druthers, I almost always think Italian. So, how about a ragù. I mean really, who doesn’t love a ragù? And yes, I already had a lamb ragù recipe on my blog. (Lamb Ragù with Penne Pasta.)  But when examined, I didn’t have one of the main ingredients, so, I started over and came up with this recipe.

And I must say, this ragù came out perfect. And the exciting part was that the ragù sauce was so very delicious even before I added the lamb. In fact, it’s a miracle I didn’t “taste” the sauce to extinction before I ever added the lamb and pasta. It was just that good. And it had been exceedingly easy and fast to prepare. And contained ingredients I almost always had on hand. (Can’t beat that!) So, if you are a vegetarian, this recipe would work for you. Just leave out the meat. Duh!

And since I’m sure you were wondering, according to foodandwine.com, Ragù is a class of Italian pasta sauces made with ground or minced meat, vegetables, and occasionally, tomatoes. Bolognese, for example, falls under the ragù umbrella”. 

So, there you have it. A ragù that is easy to fix and very tasty. And ever so versatile. You could easily use leftover beef, pork, or chicken in this recipe. Or go completely nuts and use baby goat. The options are endless. (Just let me know how this recipe works with baby goat. Since the chance of me ever having leftover baby goat is slim to nil.)

Well, that’s it for today. I feel like I’m still in recovery mode. Each year, the recovery period from all the fun and exciting holiday events is getting longer. 30 years ago, I could have bounced back and gone back to work with nary a backward glance. All I can see now for the immediate future is afternoon naps and thoughts of my pillow starting at about 8:30 pm.

But even with less energy and more time required to recover from all the fun, I still love the holidays. I love getting together with close friends and family. I love all the pretty holiday decorations both on the outside of houses and the Christmas trees that are on display through front room windows late at night. I love making homemade goodies for family and friends. I love how excited little kids get when they see Santa. Because I too am still a little kid when it comes to Santa.

But the best thing for me is seeing family and friends. Getting to spend time with people who have been a huge part of my life for decades. There is just nothing better than sharing the holidays with these loved ones even if it’s just for a short time.  

I hope you too had a chance to enjoy the company of loved ones this year. And that you can share your holidays and blessings with loved ones for many years to come.

Peace and love to all.

1 T. extra virgin olive oil

½ onion, chopped

⅓ c. shredded carrot

8-10 button mushrooms, thinly sliced

2 garlic cloves, crushed

½ tsp. dried oregano

pinch crushed red pepper flakes

pinch kosher salt

freshly ground black pepper

½ tsp. brown sugar

1 T. tomato paste

1 (8-oz.) can tomato sauce

2 T. water

½ tsp. Worcestershire sauce

1 c. finely diced leftover lamb (or meat of choice)  

1 c. rigatoni pasta, cooked al dente (or your favorite pasta shape)

grated Pecorino-Romano cheese, opt.

basil leaves, finely cut, opt.

Heat the olive oil in a large, heavy pan over medium heat. Add the onion and grated carrot. Cook for 5-10 minutes or until the onion is softened and turning golden. Add the garlic, oregano, crushed red pepper flakes, salt, and black pepper; cook for 2 more minutes.

Add the brown sugar, tomato paste, tomato sauce, water, and Worcestershire sauce. Simmer gently for about 20 minutes to combine the flavors.

Just before serving, add the lamb and al dente pasta. Cook just until the lamb is hot.

Pass the grated cheese and basil. Great served with garlic bread.

OVERNIGHT ITALIAN BREAD

OK all you bread bakers, have I got a quick and easy bread recipe for you where the dough positively MUST SPEND THE NIGHT IN YOUR REFRIGERATOR! I know, gasp! Must be refrigerated? Well, OK, I confess I haven’t tried to let it rise the usual way – 60 to 90-minutes on the counter. But to develop the lovely flavor I obtained by refrigerating the dough, you just need to trust me and put the darn dough in your refrigerator and walk away until the next day. Which for many of us who entertain over 4 people on a regular basis, is a God send.

Because all that needs to be done on the day of the event is to take the formed dough out of the refrigerator. Then allow it sit for a while on your counter and contemplate its very existence. Then heat your oven, make a few slits on top of each loaf, and pop the loaves in the oven.

While the oven is doing the hard work of turning raw dough into a work of art, you can be preparing every other dish you plan to serve while totally stressed to the max. (No wait, that might not be your situation. You might be the kind of person who has everything under control.) (I hate you BTW if that’s the case. Just kidding!) (Well, kind of kidding!)

But for me, one less menu item to worry about (on the day guests will be in my home at any minute) is ONE LESS MENU ITEM TO WORRY ABOUT! (And yes, I am a charter member of the Department of Redundancy Department. And proud as punch to be one too!)

Anyway, I came up with this recipe the other day when in late afternoon I invited our dear friends Jim and Margo over for dinner the next evening. Without any kind of idea what I was going to serve these fine people, I figured a nice bread would surely come in handy at some point. So, to the kitchen I proceeded with nary a recipe in hand. I just kind of winged it as I proceeded, writing down the recipe as I went along. Which BTW, brings me to a very good point.

Always, always, always WRITE DOWN YOUR LIST OF INGREDIENTS AND HOW MUCH OF SAID INGREDIENT YOU USED AS YOU INVENT A NEW DISH. Because, if the dish turns out to be the best stew, soup, casserole, bread etc. etc. you ever made, you are going to hate yourself if you didn’t write down how you created this masterpiece. Believe me, when you go to replicate the dish 6 months later because your family has been begging you for months to make it again, and you don’t remember what you did, YOU ARE GOING TO FEEL QUITE THE FOOL FOR NOT LISTENING TO MY WARNING/ADVICE.

Well, I’ve taken up enough of your time today. And I have been rather snarky, which really is unusual for me. (Right, Patti!) Anyway, you know that I love you all and only want the best for each and every one of you. And sometimes tough love is what’s required. My job therefore is done for the day.

Peace and love to all.  

1¾ c. warm water

1 T. granulated sugar

2½ tsp. instant yeast  

2 tsp. kosher salt

2 T. extra virgin olive oil, plus more for oiling the dough

1 T. unsalted butter, room temp.

5 c. unbleached all-purpose flour

2 T. cornmeal

Combine warm water, sugar, and yeast. Allow to sit for 10 minutes until the yeast foams. Add salt, olive oil, butter, and 4 cups of flour. Knead in your stand mixer using the dough hook, adding more flour as necessary to make a smooth, silky dough.

Form into 2 rectangles and roll into long loaves. Place on a baking sheet that has been sprinkled with corn meal. Oil the tops and place plastic wrap on top. Refrigerate overnight.

Remove from refrigerator and allow to rise on your counter for 1½ to 2 hours.

Pre-heat your oven to 425-degrees with a pan of hot water on the bottom rack. Just before placing the loaves in your oven, make 4-5 slits on the top of each loaf.

Bake for about 20 minutes or until the internal temperature reaches at least 210-degrees.

Remove from oven and allow to cool completely before slicing. Serve as is or dipped in OLIVE OIL AND BALSAMIC VINEGAR BREAD DIPPING SAUCE or sliced and toasted for CROSTINI. (See how to make both below.)

OLIVE OIL AND BALSAMIC VINEGAR BREAD DIPPING SAUCE

¼ c. extra virgin olive oil  

1 sm. garlic clove (finely minced)

¼ tsp. dried basil  

¼ tsp. dried oregano (Mexican oregano preferably)  

2-3 crushed red pepper flakes – more if you are so inclined

pinch of kosher salt

freshly ground black pepper

2-3 tsp. balsamic glaze or good balsamic vinegar

Whisk the olive oil, garlic, dried basil, dried oregano, crushed red pepper flakes, salt, and pepper together in a small serving bowl. Let the mixture sit for a bit.

When ready to serve with Italian bread, drizzle 2 -3 teaspoons of balsamic glaze or balsamic vinegar over the olive oil mixture.

CROSTINI

Italian Bread

extra-virgin olive oil

flaky or fine sea salt, to taste

Pre-heat your oven to 450-degrees. Line a rimmed baking sheet with parchment paper for easy clean-up. 

Slice the bread on the diagonal into pieces no wider than ½-inch. Lightly brush both sides of each slice with olive oil.

Place the slices in a single layer on your prepared baking sheet and bake them on the middle rack for about 9 minutes, or until they are crisp and nicely golden on top. Remove from oven and sprinkle lightly with salt. Serve immediately.

CACIO E PEPE (CHEESE AND PEPPER) PASTA

The other evening, I was in the mood for pasta. And lately I have been craving dishes that are either meatless or contain much less meat than I would have enjoyed a few years ago. Plus, I wasn’t in the mood to spend a great deal of time in the kitchen. So, I decided to make this recipe and a grilled romaine salad. We enjoyed the dressing I made for the grilled romaine, but my technique for grilling romaine halves leaves much to be desired. So, I will be posting the Lemony Vinaigrette recipe soon while continuing to perfect the grilled romaine part.

I had been looking at this recipe I had found online several years ago, but never made it because, well, it just seemed too good (and easy) to be true. But now I wonder why in the world I waited. Yes, it’s easy to fix. And it only takes a few minutes to prepare. Plus, the ingredient list could not be shorter. But does that make it less delicious than a dish with 46 ingredients. I think not! It just makes it perfect for weeknight meals and old ladies who upon occasion are not 100% in the mood to spend hours in the kitchen! (That would be me!)

Cacio e Pepe (pronounced ca-cho ee pepe) is a Roman pasta dish that translates to “cheese and pepper”. This simple 4 ingredient dish consists of butter, black pepper, Pecorino Romano cheese (or Parmesan if you prefer a milder flavor), and al dente spaghetti. It is truly the quickest and easiest pasta dish I have ever prepared. Used as a main dish, it’s perfect with a side salad. Used as a side dish, it would be perfect with a roasted pork tenderloin, baked chicken, flank steak, you name it. And did I mention that it is very quick and easy to prepare.

Anyway, next time you can’t think of anything to prepare for dinner, give this simple dish a try. Add a steamed green veggie or simple salad, and dinner is on the table in no time flat. What could be better than that!?

Peace and love to all.   

8 oz. dried spaghetti or bucatini

2 T. unsalted butter

½ tsp. cracked black pepper

½ c. finely grated Pecorino Romano cheese, plus more for garnish

Fill a pot with water and bring to a boil over high heat. Add a small bit of salt and pasta to boiling water.

Cook pasta, stirring occasionally until al dente, 6 to 8 minutes. While the pasta cooks, melt the butter in a frying pan. Add the pepper and let it bloom* for about 2 minutes. Over low heat.

Drain the al dente pasta, reserving 2/3 cup of the pasta water.

Pour the al dente pasta into the frying pan with the butter and pepper along with 1/3 cup of the reserved pasta water. Add the grated cheese and continue to toss together until cheese melts and the sauce is nice and creamy. Add additional hot pasta water as needed.

Top with more grated cheese and serve.

*Blooming (the heating of spices in fat) draws out and extends the spice flavor to spread throughout a dish. Blooming is most often done at the start of the cooking process because, once infused in oil, the spice flavors more easily permeate a dish as it cooks.

CREAMY CHICKEN MARSALA WITH EGG NOODLES  

And yes, I do already have a great Chicken Marsala recipe on this site. But this recipe is just a bit different, and a bit quicker and easier to prepare.

As you know, I’m always looking for ways to cut the time I spend in the kitchen without sacrificing the enjoyment both Mr. C. and I find in stuffing our faces. So, really, the difference between my two recipes is minimal. But then, who doesn’t want choices? And for me, there is always the hunt for and the fun in finding or creating a variation on a dish I already know I adore. Thus, this recipe.

Now, if you have never eaten chicken marsala, you are in for a treat. Even if you have been enjoying this dish since God was a child or your first visit to Italy (whichever came first) but have never made it at home, then you may not know how terribly easy this dish is to prepare. And since I am very adroit at stating the obvious, this dish costs a heck of a lot less to prepare at home than it does to order at a good Italian restaurant. And when you make this amazing dish at home, not only can you eat your fill at table, but you might just have terrific leftovers to fight over the next day! What’s better than that?

Anyway, this is one pasta dish that I can’t even name one person who doesn’t swoon when even hearing the name of this delicacy. So, you might consider giving this dish a try. Easy to make, contains normal ingredients (doesn’t everyone have dry marsala in their liquor collection), and tastes like it was prepared by Lidia Matticchio Bastianich herself. Don’t know who she is? Look her up!

Well, that’s it for now. It’s sunny outside. And all I have on my agenda for today is a doctor’s appointment this afternoon. Of course, I do! I’m turning 79 this month and going to the doctor is what people my age do for entertainment! Or so I have tried to convince myself. The reality is that as you get close to being in your golden years, your body starts to treat you like you are secretly housing an alien species who merely wants to escape its confinement. “Let me go or I’ll keep punching you in the stomach, or the back, or whatever causes you the most discomfort!”

So, if you are young – live it up! If you are older, don’t give up. You are not alone. We are all in this together.

Peace and love to all.  

1 boneless, skinless chicken breast, cut into thin, one bite pieces

¼ c. all-purpose flour

¼ tsp. kosher salt

freshly ground black pepper

4 T. (½ stick) unsalted butter, divided  

1 sm. shallot, finely minced

8 oz. button mushrooms, sliced

2 cloves garlic, finely minced

⅔ c. + 1 T. dry marsala, divided

⅔ c chicken stock 

¼ c. heavy cream

1 big handful thick egg noodles, cooked al dente

Place the flour, salt, and black pepper in a small zip-lock bag. Add the chicken and shake it all about.

Heat 2 tablespoons of the butter in a large skillet. Add the chicken and brown on both sides. Remove from pan and set aside.

Add the remaining 2 tablespoons butter to the skillet. Add the shallot and sauté a couple of minutes. Add the mushrooms, and sauté until beginning to brown. Add the garlic and cook for 1 minute.

Pour in the 2/3 cup marsala and chicken broth and bring to a boil. Reduce heat and stir in the heavy cream. Simmer for a few minutes until there is only about ¾ cup of sauce left. Stir in the cooked chicken, al dente egg noodles, and the remaining 1 tablespoon of marsala. Serve immediately.

SPAGHETTI ARRABBIATA WITH ANCHOVIES

This is a lighter version of my previously posted recipes for Pasta with Arrabiata Sauce and Spaghetti in a Spicy Arrabbiata (Angry) Sauce. Both recipes are wonderful and vegetarian, if that is a necessity in your world. But both include a bit of brown sugar. This recipe, although very similar, is just enough different to be interesting. No use of sugar, but with the addition of 4 anchovy fillets. Which of course, disqualifies todays recipe from being a vegetarian dish.

Now, if you happen to be the kind of person who simply must have meat with every meal, or are married to one, then I’ve also got you covered. Take a gander at my recipe for Italian Meatballs in Arrabiata Sauce.       

Whichever recipe you choose, you absolutely cannot go wrong fixing this delicious and easy to prepare pasta dish. It packs just a world of flavor in a short amount of preparation time. (No simmering the sauce for hours, for example.)

So, if you are a pasta lover like Mr. C. and me, you should jump on the “Arrabbiata bandwagon”. Quick and easy to prepare, containing ingredients that are available at most grocery stores, and absolutely delicious. What’s not to like?

And for all you English majors or folks who speak fluent Italian, I’m sure the age-old question “two Bs or not two Bs” came to mind. So, to set your mind at rest, arrabbiata can be spelled two different ways. Thus, you will find my recipes for this dish spelled both ways. The spelling on the menu in the cafe in Bernalda, Italy where we first discovered this culinary delight contained only one “B”. But after further research into the making of this amazing dish, I learned that it is more common for there to be two “Bs”. (Must be a regional thing.)

But believe me, either way you spell the name of this classic Italian pasta dish, it will make no difference to how much enjoyment you will experience with your very first bite. And every bite thereafter.

Well, that’s it for today. The sun is shining, or at least it is for the moment. Mr. C. is practicing a Bach classic. Miles is asleep in the cat bed on Andy’s desk. Max is holding down the mattress on our bed. And since it’s lunch time, I’m going to go hot up some of the yummy chili that our dear friends Jim and Margo gifted to us. We are both still feeling under the weather. So, a lovely hot bowl of chili is exactly what the doctor ordered. Or at least any doctor worth his or her salt would I’m sure highly recommend.

Peace and love to all.  

1 T. extra virgin olive oil, plus more for drizzling

1½ c. chopped yellow onion

3 garlic cloves, finely minced 

¼ – ½ tsp. crushed red pepper flakes

pinch sea salt

freshly ground black pepper  

4 anchovy fillets

2 T. tomato paste

½ c. vegetable broth

1 (14.5-oz.) can crushed tomatoes (preferably Italian)

1 T. chopped fresh basil, plus more for garnish

1 T. chopped fresh parsley

6 oz. spaghetti, cooked al dente (save some of the cooking water)

freshly grated pecorino-Romano cheese (Parmesan in a pinch)

Heat the olive oil in a medium-sized saucepan. Add the onion and sauté until the onion pieces are translucent. Add the garlic, crushed red pepper flakes, salt, black pepper, and anchovies to the saucepan. Stir everything together and let it all simmer for another minute or until the garlic is fragrant.

Add the tomato paste and vegetable broth; stir and bring to a simmer. Add the crushed tomatoes, fresh basil, and fresh parsley.

Bring the sauce to a simmer and let it burble on low for about 10 minutes. Taste the sauce and adjust seasoning.

Stir in the al dente spaghetti. If the sauce is too thick, add a bit of the pasta cooking water.  

Serve immediately with a drizzle of extra virgin olive oil and a garnish of fresh basil. Pass the pecorino-Romano at the table.

PERFECTLY SEASONED SPAGHETTI (OR PASTA SHAPE OF CHOICE)

So, this is not a low-fat, low calorie pasta recipe. This is an in-your-face, decadent, and indulgent way to appreciate one of the greatest culinary gifts ever presented to mankind. Pasta.

What you perhaps don’t know about me, is that I am a devoted fan of all things pasta. And although I mainly try to keep my recipes as low-fat and low-calorie as reasonable, this is not one of  them. This is the brain child of our dear friend Jim. Who BTW is a wonderful cook and could probably make the rusted bumper of a 1954 chevy taste good. Not kidding!

The other evening, Mr. C. and I had the opportunity to help out in Jim and Margo’s kitchen for an impromptu dinner where all 4 of us (Jim, Margo, Mr. C., and I) were assigned drink and food preparation tasks. (BTW, this was a fun way to get dinner on the table.)

Under Jim’s direction, I was put in charge of the pasta. And I must say, I was a bit aghast at the ingredient list. Wait! That’s a lot of butter and olive oil you’re telling me to throw in the al dente pasta. And 2 tablespoons of granulated garlic? Holy cow!

But being the good little minion that I am, I followed his instructions to a tee. And the result? Amazing pasta. Not only did I love the pasta with sauce on it, but I went back for seconds for just the pasta alone. It was just that delicious.

Now of course, it helped that the pasta used for this dish was made in Italy. Italian pasta typically has strict governmental quality and control standards. And it is made with 100% durum wheat (semolina flour), a hard grain. Hard grain contains much more fiber, more protein and also carotenoids (recognized by the fact that it is more yellow than other grains). Durum wheat also retains more starch during cooking which is essential for producing excellent al dente pasta. If the pasta releases starch too easily, it quickly becomes a sticky mess. So, pasta made in Italy is not only higher in protein, but it stands up better to submersion in boiling water.

So, whenever possible, bring home pasta made in Italy. And never, ever cook pasta more than al dente. According to Barilla, “Cooking pasta perfectly ‘al dente’ (still slightly firm) allows you to reap the full benefits of pasta’s already strong ability to increase satiety, delaying hunger pangs and providing fuel for working muscles long after meals.” “Plus, al dente pasta just plain tastes better.” (That quote is attributed to Patti Carr!) And as written up in the health section of U.S. News, “Prepare your pasta like they do in the Mediterranean – al dente, which means neither too hard nor too soft. When cooked correctly, pasta will have a lower glycemic index than when it’s cooked to be soft or mushy. The average GI of al dente penne pasta is 50, which is even lower than the GI of oatmeal or many whole-grain breakfast cereals. A lower GI can help keep blood sugar levels stable so you will stay fuller longer.”

Well, I’ve said all I’m going to say about pasta and this recipe. If you can’t conclude for yourself that pasta prepared this way is a treat, then I won’t bother you any further with additional information.

And as always, thank you Jim and Margo for your friendship and love, and for all the wonderful food we have shared together throughout the many years we have known each other. May there be many more good times to come.

And as always, peace and love to all.

1 lb. spaghetti (preferably made in Italy with 100% durum wheat semolina – organic Garofalo brand from Costco is fabulous)

2 T. kosher or coarse sea salt

¼ c. (½ stick) unsalted butter

¼ c. extra virgin olive oil

1-2 T. granulated garlic (I used a scant 2 tablespoons last evening)

2 T. freeze dried chives

1 c. pasta cooking water, or more as needed (I used about a cup and a half)

freshly ground black pepper, if desired

Bring a pot of water to a boil. Not too much water. Add the salt and pasta. Cook the spaghetti at a low boil, stirring periodically with a pair of tongs, until almost to the al dente stage. (Err on the side of not enough cooking time rather than too much.)

Drain the pasta, keeping at least 2 cups of pasta water in reserve.

Add the drained spaghetti back to the pot. Turn the burner on low and stir in the butter, olive oil, granulated garlic, and dried chives. Cook until the butter is melted. Then add a cup of the pasta water and cook until most of the water is gone. Taste the pasta. It should now be at a perfect al dente. If you prefer a moister pasta, add more pasta cooking water, a couple of tablespoons at a time.  

Please note: No additional salt should be required because of the amount of salted water in which the pasta was cooked. If you are a black pepper fan, go ahead and add as much as you like.

This pasta can be served as a stand-alone side dish (passing grated Greek mizithra, pecorino-Romano, or Parmigiano-Reggiano at table), or with inclusions such as thinly sliced prosciutto or petite green peas, or as a base for any of your favorite pasta sauces.

Leftovers can be stored in either the refrigerator or for longer storage, your freezer. If your pasta has been frozen, bring to room temp. before re-heating.

To re-heat your cooked pasta, coat the bottom of a frypan with water. Add the pasta and periodically give it a stir. Leave on heat only until the pasta is hot. Serve any way you wish.     

ITALIAN HAMBURGER SOUP WITH VEGGIES AND PASTA

The other evening, I was hungry for soup. (Actually, when do I not have a strong craving for soup would be a more accurate statement.) Anyway, I wanted soup for dinner. But I didn’t want a soup that would take a great deal of time to prepare or need to burble on the stove for hours. I wanted a quick, easy, yummy Italian flavored soup that contained pasta. Normally a veggie soup would contain chunks of potato. But I happen to be married to a guy who does not appreciate boiled potatoes. French fries, baked potatoes, and mashed potatoes are OK occasionally. But cut up potatoes in soup or chowder does not in any way, shape, or form appeal to this guy. But pasta? Absolutely!

For the soup, this time, I used extra wide egg noodles because I had just the right amount left in a big old bag that I really wanted to use up. I wanted it gone from my pantry. (One of my New Year’s projects is to clean out my pantry. This was a good beginning.) But next time I make this soup, I will be using a sturdier pasta.

And of course, because this was a beef vegetable soup, I began with a mirepoix (onion, carrot, and celery sautéed in oil). Then I added garlic and many of the other usual suspects you would find in any beef and veggie soup. A pretty simple preparation, but hearty and very tasty. You of course, could choose to add more veggies. But I found this to be the ideal balance of veggies, meat, and pasta.

I chose to serve the soup liberally sprinkled with pecorino-Romano cheese. We love this hard, salty Italian cheese made from sheep’s milk. It was the perfect complement to this brothy Italian soup, being an Italian cheese after all!

So, if you too would like to serve a soup that I feel everyone in your family would enjoy, this is probably the recipe for you. Simple, savory, and satisfying.

As always, peace and love to all.  

2 T. extra virgin olive oil 

¾ c. chopped onion

2 sm. carrots, thinly sliced

2 celery stalks, thinly sliced

3 garlic cloves, finely minced

1 lb. lean ground beef

1½ tsp. Italian seasoning

1 bay leaf

½ tsp. seasoned salt, or more to taste  

freshly ground black pepper   

4 c. beef broth

1 (15 oz.) container tomato sauce or diced tomatoes (Italian preferably)

1-2 T. tomato paste

1 tsp. Kitchen Bouquet, opt.   

1 c. dry pasta (I think Fusilli, Rotini, or penne are best)

grated pecorino-Romano cheese, opt. (for serving) (Parmesan in a pinch)

Heat olive oil in a large soup pot or Dutch oven. Add onion, carrots, and celery. Cook until the veggies are crisp tender. Add the garlic and cook until very fragrant, 1-2 minutes. Add the ground beef, Italian seasoning, bay leaf, seasoned salt, and pepper, breaking up the meat as it cooks.

When the meat is cooked, add the beef broth, tomato sauce, tomato paste, and Kitchen Bouquet. Bring soup to a boil, reduce heat, cover the pot, and allow to simmer for 30-40 minutes or until the carrot pieces are tender. Stir occasionally. Add more beef broth if you prefer a more brothy soup.  

Bring the soup to a boil and add the dry pasta. Cook until the pasta is al dente. Remove bay leaf, taste, and adjust seasoning. Serve piping hot. Pass the pecorino-Romano cheese.