Category Archives: CAMPING RECIPES

SAVORY ROASTED POTATOES COOKED ON A GRILL (perfect for camping)  

It is always so much fun planning the food for a trailer trip. Maybe it’s because of the challenge of serving great food from a kitchen the size of most people’s guest room closet. But for whatever reason, I can spend hours before a trip figuring out just what I plan to serve. And then things change. And often time for the better. As with this recipe.

While on our latest adventure, we had the good fortune to have lunch at the home of our dear friends Pete and Anne. One of the dishes served was potatoes that had been cooked on their grill. Never one to turn down an opportunity to learn new ways of preparing old standards, I watched very carefully as Pete prepared the potato dish for the grill. The only change I made was cutting up the fresh rosemary instead of just laying a sprig of rosemary on top of the cut potatoes. Other than that, we all have Pete to thank for this delightful recipe. And Mr. C., Craig, Marsha, and I will especially be grateful to Pete because of his recipe. How I had originally planned to serve the potatoes was in no way comparable. In fact, the potatoes would have been, boring, boring, boring!  But cooked this way they were a delight.  

Now, the fun part about this recipe is that it is cooked on a grill. Which of course makes it a great dish to fix while camping or if it’s too darn hot to fire up the oven in your kitchen. Just stir all the ingredients together, wrap tightly in aluminum foil, pop on the grill, and check off the side dish on your meal plan.

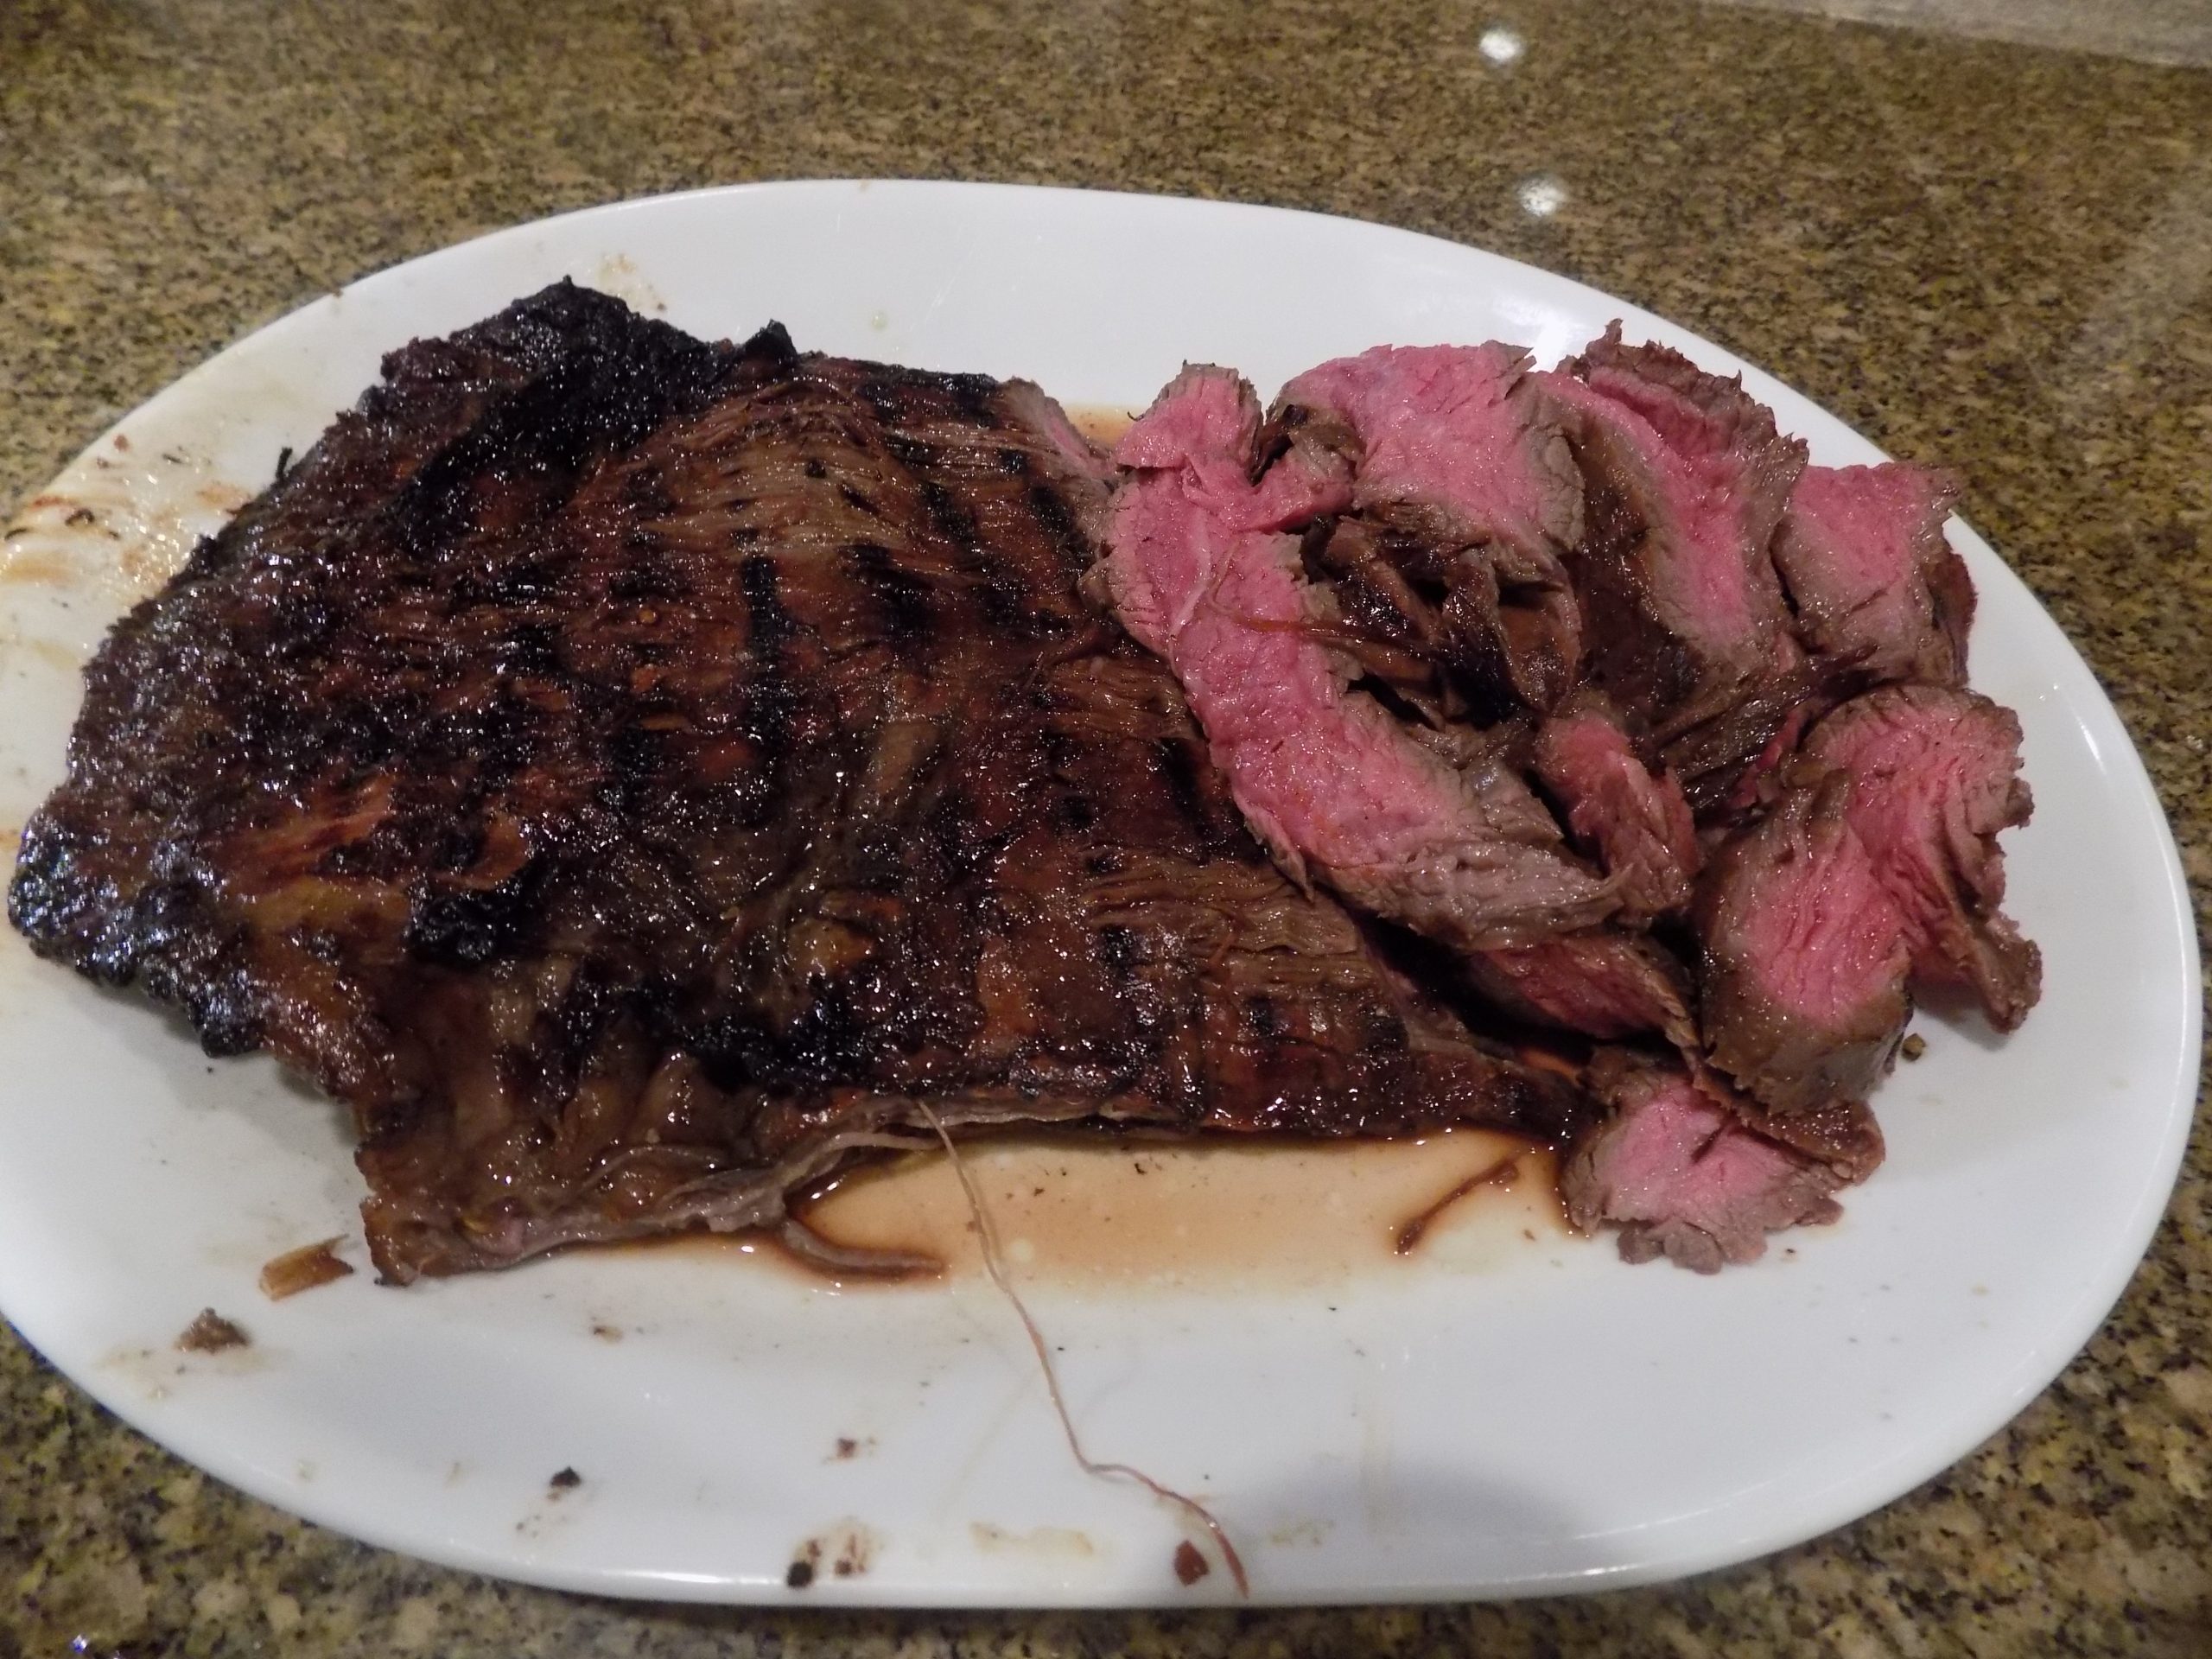
And just in case you were wondering what to serve with these potatoes, might I suggest my Quick and Easy Marinated Flank Steak. It too is cooked to perfection on a grill. And while you’ve got the grill going already for the potatoes and steak, you might as well use it to good advantage to cook some veggies. Then your whole meal is prepared without messing up your stove or heating up the kitchen. (Of course, grill racks are no treat to clean, but let’s not worry about that now. Let’s just live in the moment.)

Well, that’s it for today. It’s sunny, but we can’t see the Cascade Mountains because of the haze. (Looks like cumulus clouds on top with smoke underneath.) We read that there is a lot of smoke in the Methow Valley (think Winthrop) and that the smoke will soon be heading our way. Especially towards Whatcom and Skagit counties. And we are close enough to Skagit County to make us vulnerable too. So, it sounds like we are in for forest fire smoke again this year.

But even with that, we are still so much luckier than most. We haven’t lost our homes, our lives, or been adversely affected the way so many have been this summer. And summer isn’t even close to being over.

Just know that my good thoughts and prayers are being freely sent to all who are suffering.

And as always, peace and love to all.

2 T. extra virgin olive oil

¾ tsp. kosher salt

freshly ground black pepper

2 tsp. finely chopped fresh rosemary or about a half tsp. of dried rosemary

2-3 garlic cloves, thinly sliced

1½ lb. mixed baby potatoes (or potatoes of choice) cut in ¾ to 1-inch pieces (no need to peel the potatoes)

In a large mixing bowl, mix the olive oil, salt, pepper, chopped rosemary, sliced garlic, and cut potatoes. Stir everything together. Using a rubber spatula, arrange the coated potatoes in a single layer in a pan that can be set on your grill. Cover with heavy duty aluminum foil or 2 layers of regular aluminum foil. (Make sure the edges are tight so that steam can’t escape.)

Place on a pre-heated grill set at 300 to 350-degrees. If you don’t have a pan that is safe to place on a hot BBQ grill, make a package out of heavy aluminum foil and make sure the package is sealed airtight. Cook either in a pan or foil package for 20-25 minutes or until the potato pieces are fork tender. (Be careful when checking if the potatoes are done. Hot steam can be a nasty surprise.)

This is a great recipe to make and serve when camping. The potatoes are a great side dish with beef, chicken, fish, pork, whatever!

And of course, you don’t have to grill these potatoes. You can bake them in your oven. 350-degrees for 20-25 minutes or until fork tender.     


HUNGARIAN PAPRIKÁS WITH PORK AND EGG NOODLES  

Before leaving on our spring trailer vacation, I decided to take some pork tenderloin along with us. Mr. C. loves to grill, and pork tenderloin is so wonderful when BBQed. Plus, I had a new marinade recipe I wanted to try.

But this was not the vacation to do any grilling. It rained, it snowed, and the wind was exceedingly busy. So, I kept putting off using the tenderloin. Finally, the day our good friends Margo and Jim were due to arrive, and I had previously told them not to worry about dinner after their long drive, I decided to put the pork tenderloin to good use. It was either that or go to the local grocery store and try to find some other kind of meat to serve. And grilling was out of the question. So, I took inventory of what I had on hand that could work its’ way into a pork dish and decided on some type of pork stew. And what immediately came to mind was paprikash.

So, the recipe you find below is the result of me making do with what I had on hand. And it worked. All 4 of us declared it a winner and the stew had been so very easy to prepare. Even in our trailer.

Sure, I had to simmer the stew for about 90 minutes to tenderize the meat and break down both the onion and red bell pepper. While occasionally giving the whole mess a stir. But, really easy to do in a trailer. (Especially when you must remain in the trailer anyway because of inclement weather!) And as it was burbling away, it smelled so good that I was surprised some of the other campers weren’t lined up at supper time to claim their fair share! So, this is definitely a recipe I will be making in our trailer again. (And at home too, of course!)

So, if you too love Hungarian food and are particularly fond of tender pork in a paprika and sour cream sauce, this is the recipe for you. Easy to build, fairly inexpensive to produce, and totally yummy.

Well, that’s it for today. We are off to a piano recital this evening in Seattle. Works by Frédéric François Chopin. One of our favorite composers. So, I am stoked. What can be better than paprikash for dinner followed by Chopin for dessert? Not a thing I can think of.

Peace and love to all.

Since I am posting this recipe the day after I wrote the preface, I feel duty bound to mention that the concert was fantastic. And if you live in the Seattle area and love music, you might avail yourself of the concerts that are performed at Meany Hall on the U of W campus by the School of Music faculty. Since we are seniors, our concert tickets cost us $10 each. If you are not a senior or a U of W student, the cost is still reasonable – only $20. The best bang for your buck in town. And to hear and watch a world class pianist like Craig Sheppard is magic in and of itself. And hearing all of Chopin’s nocturnes played so beautifully was heavenly. To learn more about upcoming recitals etc., visit the U of W School of Music’s web site.

2 T. veggie oil

1 pork tenderloin, cut into ¾-inch cubes

1 tsp. salt

freshly ground black pepper

1 yellow onion, chopped

1 red bell pepper, chopped

2-3 garlic cloves, roughly chopped

4-6 tsp. paprika, or more to taste

2½ c. chicken stock

2 T. unsalted butter, room temp.

3 T. flour

1 c. sour cream, or more as needed

2-3 c. dry thick egg noodles, cooked al dente (I use Homemade Style Country Pasta Egg Pasta) (Costco)

In a large pot, heat the oil. Add the pork cubes, salt, and pepper. Brown the pork. Add the onion, red bell pepper, garlic, and paprika. Stir and cook for a couple minutes. Then add the chicken broth, bring to a boil, reduce heat, and simmer covered for about 90 minutes or until the pork is tender.

Meanwhile mash the butter and flour together. (I use a table fork) When the pork is fork-tender, stir the beurre manié (the French name for butter and flour mushed together as a thickening agent) into the pork. Let burble for a couple of minutes or until the sauce thickens. (If the sauce doesn’t thicken enough, add another beurre manié using 1 tablespoon butter and 1 tablespoon flour). Reduce the heat to very low and whisk in the sour cream.

Add the al dente noodles to the sauce and serve immediately.


THE WHOLE ENCHILADA (a card game)

OK, this is not a recipe for food. It’s a recipe for fun! And although I mainly post recipes for food, I have found that munching away on your favorite snacks and playing this game with family or friends is a smashing combination. (A drink on the side doesn’t hurt either!) And all the better if you are spending time with family or friends at one of your favorite campgrounds. (Of course, sitting in front of a fire after skiing all day would also be wonderful. But alas, for us, skiing vacations with family and friends are regrettably far behind us. (Sigh) But back to this game.

The first thing that is great about this game is that it is played with a single deck of cards. No fancy bits to keep track of and no problem finding storage space in your recreational vehicle or tenting equipment containers.

The next thing that makes this game especially appreciated by me is that it is easy to learn. And as with many simple and fun games, if you win it’s basically the luck of the draw. Of course, there is some skill involved. But really, you can become adroit after a round or two. (Seriously, if I can learn this game quickly, anyone can! Because truthfully, I don’t have a lot of experience playing card games.)

So, if you too want to add an easy and fun game to your “what to do on vacation” repertoire, I recommend this easy to learn game. This game was introduced to us by our new friend Phyliss while we were camping together in Entiat, Washington. We had such a fun time getting to know Phyllis and her husband Tim and spending time with them and our dear friends Margo and Jim. Good friends and good food equal good times. May you too be blessed with good friends. As for the food part, I trust you have that covered.  

And as always, peace and love to all.

THE WHOLE ENCHILADA (a card game)

a very fun and easy to learn card game for 3 to 5 players

The person with the lowest score wins!

This game uses a regular 52 card deck. No jokers allowed!

Each person gets dealt the same number of cards.

3 people playing, set aside 1 of the 2’s and deal out all the rest of the cards 

4 people playing, use the full deck and deal out all the rest of the cards   

5 people playing, set aside 2 of the 2’s and deal out all the rest of the cards 

You play the game by taking tricks.

Highest card in suit that is led takes the trick.

Each player must follow suit if possible.

The player who takes a trick, then puts down the first card for the next trick.

Aces are high.

The person to the left of the dealer leads the first trick.

After each hand, the deal passes to the left for the next hand.

The game is played in 6 rounds (6 hands)

Hand #1 – every trick you take awards you 10 POINTS

Hand #2 – every heart – 10 POINTS

Hand #3 – queens – 25 POINTS

Hand #4 – king of spades – 100 POINTS

Hand #5 – last trick – 100 POINTS

Hand #6THE WHOLE ENCHILADA – all of the point values from previous hands

So, for example, on hand number 6 if you took 3 tricks (30 points), 1 heart (10 points), 2 queens (50 points), the king of spades (100 points), and the last trick (100 points). That’s a total of 290 points. You have probably just lost the game!

CHOCOLATE CHIP SHORTBREAD REFRIGERATOR COOKIES

OK, this is basically the same recipe I use for Chocolate Chip Shortbread Cookies except that in this recipe, I roll the dough into logs (refrigerator cookies) because I am getting lazier and lazier. In my original recipe I scooped the dough into balls with one of my small ice cream scoops. So, if you prefer that method, ignore this recipe and bring up the original. Plus, since posting that recipe, I have learned to chill any cookie dough containing butter and flour before baking. Why you might ask.

Well, according to the kingarthurbaking.com site “Chilling cookie dough before baking solidifies the fat in the cookies. As the cookies bake, the fat in the chilled cookie dough takes longer to melt than room-temperature fat. And the longer the fat remains solid, the less cookies spread.

In addition, the sugar in the dough gradually absorbs liquid. If you bake the dough immediately, before sugar has a chance to absorb much liquid, that liquid remains “free” in the dough, and promotes spread.”

So, basically, I try to always give cookie dough a bit of a chilling experience before I subject it to a hot oven. But I do it a bit different than some cooks would suggest. Many recipes call for you to chill the dough before forming it. Well, that’s all well and good. But it ain’t easy to form cold dough into any semblance of a ball. And pressing hard dough into an ice cream scoop or rolling it into a ball is not good for my hands. So, simple solution. Form the balls then chill them. Ta da!

And truthfully, if I were a good person I’d go back and add the step of chilling the dough to all of my cookie recipes. But frankly, I’m just not that good a person! I figure it took me until I was 77 to learn this simple cookie baking trick. If it takes others a while to also figure it out, I’m sorry. But like I said, I’m getting indolent in my old age.

Anyway, these are wonderful cookies. They aren’t too sweet. And they are chock full of yummy chocolate. And really, who doesn’t like a great shortbread cookie?! Plus, they are perfect to take along on a camping trip or sending through the mail at Christmas time because they almost have the shelf life of a Twinkie. Well, not quite, but darn close!

Mr. C. has another gig tonight, so I am going to spend the rest of my afternoon reading rather than making some kind of culinary wonder with which to surprise and delight him. Instead, I’m going to make myself a big old plate of Fried Zucchini for dinner. That way I don’t have to share even one piece with him! But, please don’t feel too sorry for him. He’s playing at the Fairmont Olympic Hotel in Seattle, and they are going to feed the band. So, I don’t think he will mind in the least that he is missing out on fried zucchini.

Peace and love to all.

1 lb. unsalted butter, room temperature

2 c. powdered sugar + more for dusting/sprinkling

1 tsp. salt (only ½ tsp. salt if you use salted butter)

2 tsp. vanilla extract

4½ c. unbleached all-purpose flour

2 c. mini chocolate chips

Cream the butter and powdered sugar until light and fluffy. Add the salt, vanilla, and flour. Mix only until blended. Do not overmix. Add mini chocolate chips. Roll into logs on plastic wrap. Refrigerate for several hours or overnight. (Overnight is best.)

Cut into ½-inch circles and place on an ungreased baking sheet. (They can be fairly close together.)

Bake in a pre-heated 350-degree oven for 20-25 minutes or until the bottoms are a nice golden brown. Don’t under-bake.

Remove from oven and place on a wire rack. Sprinkle/dust* with powdered sugar while still warm. When completely cooled, store in an air-tight container.

These cookies will stay fresh for weeks. But, of course, these little darlins never last that long!

*An easy way to sprinkle/dust powdered sugar is to place a small amount in a fine mesh strainer and then shake the strainer over whatever you wish to decorate. This same technique works well with cocoa for chocolate dusting. 

PEANUT M&M PEANUT BUTTER OATMEAL COOKIES

OK, I know I should not be eating cookies, but I always build a batch (or two) before we leave on a trailer trip. And of course, this time was no exception. There was a difference, however. We didn’t go on our planned outing. Not because of health concerns, thank goodness, but because our destination was in Eastern Washington and the predicted weather while we would be camping in the desert was somewhere around 112-degrees. Yikes! That is just too hot to be sitting in our travel trailer waiting for the air conditioning or the motor on our refrigerator to experience a full-on meltdown. Not to mention that if that happened, I’d be right there with our appliances having my own tearful meltdown! (I do not do well in hot weather.) And hiking or even taking a nice leisurely walk would have been completely out of the question. Not to mention the conniption fit my dermatologist would have thrown had he found out that I had spent 12 hours a day in a lake, even with 50 SPF sunscreen slathered all over my body! (I simply can’t be in the sun more than 2 minutes anymore. I have become a sensitive flower in my golden years. Not by choice, believe me. But by necessity. Grrrr) Anyway, we cancelled our trip. Which of course left us with an abundance of these amazing cookies calling my name every time I got within 10 feet of our home cookie jar.

But I must say, if I have to be corrupted by cookies, I’d like it to be by the likes of these cookies. Because they are wonderful. Full of peanut butter and Peanut M&Ms. And who can resist Peanut M&Ms? Not me, that’s for darn sure!

So, next time you want to treat your friends or family to homemade cookies, I would advise giving this recipe a try. You will not be unhappy with the results. And to their credit, these delicious cookies contain a bit of rolled oat action. Even though you would be hard pressed to find anyone who could discern the presence of anything as healthy as rolled oats in the mix. But no one could possibly miss the abundance of Peanut M&Ms. They are forefront for all to appreciate.

As always, tackle your culinary endeavors with zest and zeal. Appreciate the fact that you not only have a kitchen, but the knowledge and skill to provide delicious and nutritious food for not only yourself, but also for your family and friends. Cooking takes time and effort, but the rewards far outweigh any alternative such as most prepared food found at your local grocery store or frequent visits to local restaurants. At least for me, going out to eat is great about once a week. More than that, and I find myself thinking about the quality of the food I can produce at home, compared to what we can find in most of our local dining establishments. And even as I am eating out, I often torture myself by wondering why I didn’t just stay home and cook dinner in the first place. (And yes, I am an enigma.) But then I must acknowledge that I probably like to cook more than a lot of folks. So, I’ll get off my high horse now and just stick to once again telling you how great these cookies are and how much you would enjoy biting into one. (Or two, if you’re like me.)

Peace and love to all.   

½ c. rolled or quick oats (see note below)

½ c. (1 stick) unsalted butter, room temperature

½ c. brown sugar, packed

¼ c. granulated sugar

¾ c. creamy peanut butter (not natural)

1 lg. egg

1 tsp. vanilla extract

1¼ c. unbleached all-purpose flour

½ tsp. baking soda

¼ tsp. kosher salt

2 c. Peanut M&Ms (I use the 10.57 oz. Fun Size for this recipe)

In the bowl of your stand mixer, cream the butter, brown sugar, and granulated sugar together until light and fluffy. Add the peanut butter and mix until well combined. Add the egg and vanilla and mix until well combined.

In a separate bowl, whisk the flour, baking soda, salt, and oats together. Add to the wet mixture just until incorporated. Do not overmix. Gently mix in most of the Peanut M&Ms.  

Form the dough into about 2-inch diameter balls. (I use my #30 teal blue-handled ice cream scoop to form the balls.) Place on a parchment paper lined cookie sheet and gently press the balls down slightly. (They won’t spread very much while baking, so they can be placed fairly close together. About 1½ inches apart works fine.) If there are any of the cookies that appear to need an additional Peanut M&M or two, gently poke the remaining M&Ms into the dough balls. (We want all our cookies to look pretty, now don’t we!) Place the cookie sheet in the refrigerator for about 30 minutes before baking in a pre-heated 350-degree oven for 13-16 minutes. (Cookies will be a bit soft and look undone. But don’t fret. They will firm up nicely as they cool.)

Remove from oven and allow to cool a couple minutes on the cookie sheet before transferring to a wire cooling rack to cool completely. Store in an airtight container at room temperature. Makes about 35 cookies.

Note: If using regular rolled oats, place in a food processor. Pulse a few times to break the oats down a bit. Set aside. Or use quick oats. (Quick oats don’t have to be messed with at all.)

SIMPLE MARINATED GRILLED FLANK STEAK

OK, let me just say this before I start writing about this recipe. It is hot outside. Terribly hot. And I live in Western Washington where it’s not supposed to be this hot! But it is! And I guess I’m only mentioning this new development because if you are anything like me, you do not do well in hot weather. I tend to get cranky, and my inherent laziness just seems to blossom when I become too warm. And any thought of too much effort in the kitchen leads me to want to tear into anyone whose ideas differ from mine with the vengeance of a mother bear protecting her cubs. So those of you who are anti-vaxxers, believe you are superior to others because of the color of your skin, want to deny others the right to have control over their own body, or feel your own true God is the one true God – please stay a safe distance from me so that no one will get hurt! It’s only for your own good that I admit to this uncharacteristic tendency of mine to verbally assault anyone with beliefs I find abhorrent when the weather outside becomes unbearable. Lucky for us we had a heat pump installed when we built our house. Or I would probably get into our air-conditioned car and vandalize any Trump sign I found still on display. Like I said, I don’t do well when it’s too damn hot!

So, with ease of preparation in mind, I offer up my rendition of a simple marinade for flank steak. I modified the original recipe I found on the simplyrecipes.com site to make the marinade even easier to prepare. And perfect for camping or trailering where kitchen and workspace can be limited. Throw a few ingredients into a Ziplock bag, along with the flank steak of course, and place it in your fridge or cooler overnight. Then place it on a hot grill, take it off the grill, let it rest a few minutes, then slice and serve. Terribly easy and terribly delicious.

So, that’s it for today. Have a great day and stay cool. And if you were appalled at my rant about people who have a different idea of humanity than I do, so be it. There are millions of great cooking sites out there. Be my guest.

Peace and love to all.

⅓ c. extra virgin olive oil

⅓ cup soy sauce

¼ c. honey

2 T. red wine vinegar

2 tsp. granulated garlic

1 tsp. granulated onion

1 flank steak

kosher salt

freshly ground black pepper

Combine the marinade ingredients in a large non-reactive bowl.

Place steak in the bowl and turn so that it is completely coated with the marinade. (You can also place the steak and marinade in a freezer bag and place it in a bowl.)

Chill and marinate for at least 2 hours and up to overnight. (Overnight is best.)

Heat your grill until very hot. (The grill is hot enough when you can hold your hand about an inch over the grill only for about a second.)

Remove the steak from the marinade and gently shake off the excess marinade from the steak (but make sure there is still a thin coating because the oil in the marinade helps to keep the steak from sticking to the grill).

Generously sprinkle steak with kosher salt and freshly ground pepper. (The salt and pepper will help form a savory crust on the steak.)

Place steak on the hot grill. Grill for a minute or two on each side to get a good sear, then turn down the heat on the grill, cover and cook a few more minutes or until the internal temperature reaches about 135-degrees for medium-rare. Remove from grill and cover with aluminum foil to hold in the heat while the steak rests for 10 to 15 minutes. Then slice diagonally against the grain into thin pieces with a very sharp knife and serve immediately.  

BRINED AND BAKED PORK CHOPS

Whenever I plan a trailer camping trip, the first meat I think to bring along is the other white meat. You know – pork. And because pork products come in many forms, for this post, I am only referring to pork chops and pork tenderloin. But why only chops and tenderloin? That’s simple to explain. They are both very easy to cook. Sometimes it takes a little prep work to coach the best out of these cuts, but never very much. But cooking either cut takes a gentle hand. Pork needs to be respected and of utmost importance, it should never be over cooked. (Of course, it can be over cooked, but not if you desire a tender piece of meat.)

For years I couldn’t fix a tender pork chop to save my soul. But then I discovered brining and learned that trichinosis is not the plague it once was, and therefore we no longer need to cook pork to death! So now, every camping trip includes pork chops and pork tenderloin. And both are always very well received with very little effort expended on my part.

Happily, last evening, we feasted on tender and succulent pork chops thanks to this recipe I found on the iwashyoudry.com site. I served the chops with Easy Fried Rice and Garlic Roasted Sugar Snap Peas. (Both recipes soon to be posted.)

So, if you too are a fan of pork chops but can’t stand it when your chops turn out dry and fit only for repairing the soles of your favorite leather boots, give this recipe a try. You will be glad you did.

As always, keep smiling, keep being tolerant of others even if their views differ radically from your own, and most importantly, thank your lucky stars that you were blessed with a mind that can discern fact from fiction. Because there is a lot of fiction being touted these days around the country, and especially in Washington DC. And unfortunately, not everyone was born with a healthy intellect or was taught critical thinking. That level of intelligence or skill is simply not possessed by everyone. So, be kind. Understand that you are just luckier than some.

Peace and love to all.

2 (4 oz. each) 1-inch or thicker boneless pork chops

2 c. warm water

2 tsp. kosher salt

2 tsp. seasoned salt

extra virgin olive oil

1 tsp. granulated garlic

½ tsp. paprika

freshly ground black pepper

Bring the pork chops to room temperature before preparing the brine.  

Place the warm water in a flat glass container that will allow the pork chops to not overlap. Stir in the kosher and seasoned salt until they are both dissolved. Place the pork chops in the salt water, making sure the chops are completely covered. (Add additional water if necessary). Let the pork chops sit in the water at room temperature for 30 to 45 minutes, or place in your fridge for up to 24 hours. (I brined and refrigerated our chops for 7 hours. They were perfect.)  

Line a baking sheet with foil or parchment paper.

Remove pork chops from salt water and pat dry with paper towels, making sure all moisture is removed. Drizzle both sides of pork chops with a bit of olive oil, then season both sides with the granulated garlic, paprika, and black pepper.  

Bake in a pre-heated 425-defree oven for about 8 minutes or until the internal temperature reaches about 143-degrees. Remove from oven and cover loosely with foil for 5 minutes before serving.


ISRAELI COUSCOUS WITH SHALLOTS, GARLIC, AND SHIITAKE MUSHROOMS

Let me begin with an apology. I have not posted for over 5 weeks now because I have been on vacation. I never announce that I will be gone, for all the obvious reasons. But so far, the good Lord has allowed me to come home with new recipes and a travel log of our adventure to share with everyone. But please know that I was thinking of you the whole time. (Do you really believe that? If so, I have a banana ranch on Camano I would love to sell you. At a reduced price of course.) But I do think of the blog periodically. And each of you of course. And always with fondness, I assure you. And with the hopes that whatever new recipes I tried along the way and subsequently post for your edification, might meet with satisfaction. But more about this recipe and how it came to be.

For this trailer trip, we added a new piece of equipment. It’s called a Koolatron. The only mission in its rather boring existence is to keep things cold. Or hot if you want to warm something. (Very versatile.) We purchased this exciting new piece of camping equipment because I wanted to carry more veggies and fruit than our trailer refrigerator can reasonably accommodate. Don’t get me wrong. There is quite a bit of room in our fridge, but not enough to hold a bag of mandarin oranges, large bunch of grapes, apples, various and sundry salad fixings, fresh asparagus, celery, shallots, and mushrooms. Plus, whatever else I might decide is a perishable necessity. (I really am trying to cook healthier food, even if it means one more thing for Mr. C. to drag in and out of the truck at every new site.)

The cool thing about a Koolatron, is that while we are driving it can be plugged in to the console of our truck (one of those ports for which their use is totally unknown to me) so that the fruit and veggies can stay cool regardless of the temperature inside the cab of the truck. Then, when we arrive at our camp site and Mr. C. attaches the trailer to a current bush, the Koolatron can happily reside right up against our trailer for easy access. I simply wish to never leave home again without my Koolatron by my side. It is one of the best investments I ever made! Thank you Amazon Prime! But on to this recipe.

Because of my Koolatron, I was able to keep shiitake mushrooms from moldering before I was ready to prepare this dish. And my shallot stayed perfect even though it had been along for the ride for over two weeks by the time I was ready to chop it into tiny little pieces. Which by the way, helped turn this simple dish into a thing of beauty. And perfect for camping. Easy to prepare and not too much time on the stove.  

I wish I had a picture to share with you. But I was too busy to think about taking a picture while simultaneously working on other dishes. As soon as I make this again, I will add a picture. Rest assured.

So as always, have fun in your kitchen, be kind to everyone you know or meet, and stay safe. We aren’t out of the woods yet with covid-19. And all though I make jokes about how I feel about you as readers, I actually do care about each and every one of you. Of course, I’ll never understand why you read my blog and put up with my foolishness, but I’m never-the-less very pleased that you do.

Peace and Love to all.   

2 tsp. extra virgin olive oil

1 sm. shallot, finely minced

2 garlic cloves, finely minced

1 c. thinly sliced shiitake mushrooms (cremini, button, or even canned mushrooms are just fine too)

1½ c. water

1 tsp. Montreal Steak Seasoning

1 tsp. beef base (I use Better Than Bouillon)

1 c. Israeli (pearl) couscous

Heat the olive oil in a small, covered pan. Add the shallot and sauté just until tender. Add the garlic and mushrooms, and sauté gently until the garlic is soft and aromatic. Add the water, Montreal seasoning, and beef base. Stir and bring to a boil. Add the couscous, bring back to a boil, reduce heat, cover, and simmer for 8-10 minutes.

Great with just about any grilled meat or seafood.

GROUND LAMB PATTIES WITH ROSEMARY AND THYME

I’m not known for keeping my opinions to myself. You should be quite aware of this if you are in the habit of reading my blog. There just doesn’t seem to be any way for me to keep my innermost, private, terribly biased, and probably offensive to some, thoughts inside my head where they belong. So, here goes another blast from me that shouldn’t be said, or in this case written down for everyone and their grandmother to read! But I’m going to say it anyway! “In my opinion, those who loudly proclaim that they hate lamb but have never even tasted said critter, should be made to ride the “It’s a small world” Disneyland ride for 10 hours straight!” (And no real offense to whomever is running the show for the Disney corporation now.  But whoever you are, I’d be willing to bet you couldn’t stand this ride for 10 hours straight, even if they doubled your yearly salary!) (I rode it once when I went to Disneyland with daughter Paula and kids. Once! And even then, I was almost screaming by the time the poor ride attendant “helped” me to the exit.) So, that’s how strongly I feel about the subject of lamb! And I stand behind my comment!

Now, for those who have tasted lamb, but don’t like the slightly gamey taste, that’s a different story. But just to arbitrarily decide that lamb is icky before even giving it a chance, well that’s just not right! I mean it’s not sea urchin or parsnips for goodness sake!

OK, I feel better now. And I know I am preaching to the choir about the marvels of lamb because you wouldn’t be reading this post if you weren’t interested in preparing a ground lamb dish. Of course, you could be just reading this post to find out what I felt compelled to rant, advise, or sweet talk you into today! Either way, I feel I have adequately fulfilled my responsibility for every type of reader.

But, if it’s a great recipe for ground lamb you are after, this recipe should make you happy. One thing you should know. I compiled this group of ingredients based on ease of preparation. I plan to serve these patties while traveling in our trailer. Because dried seasonings and herbs are much easier to use when I am trying to fix dinner in an area roughly the size of a linen closet. Without the shelves, of course! (Not complaining here, because I love our trailer. But too much of my hacking and slashing can become hazardous to Mr. C.  as he tries to navigate his way past me from the dining/reading/game playing area of the trailer to the bathroom or the bedroom area. (And I hope you realize that I am delineating both “bathroom” and “bedroom” very loosely in this context.) 

So, for trailering, it’s mostly dried herbs and spices all the way. But you will find that I have also listed fresh equivalents, which I too will be using when I have the luxury of a larger “kitchen” in which to prepare these lamb patties.  

As always, keep having fun. Laugh at yourself when it’s appropriate. And find the joy in everything you do. Peace and love to all.

1 lb. ground lamb

2 tsp. Montreal Seasoning

1½ tsp. granulated garlic or 1 large garlic clove, finely minced

½ tsp. dried rosemary, crushed or 1 tsp. finely chopped fresh rosemary  

¼ tsp. granulated onion or 2 tablespoons finely minced fresh onion

¼ tsp. dried thyme or ½ teaspoon fresh thyme leaves

Mix all together and form into 3 patties. Grill or pan fry in a bit of extra virgin olive oil. Great served with Hummus or Tzatziki. (Or both!)  

LOWFAT INDIAN CURRY SAUCE

Usually when I make an Indian curry sauce it contains a lot of delectable fat. But we are trying to eat healthier, so I came up with this low-fat version. And it not only tastes wonderful, it’s just as satisfying as my old standard. Well – almost. (My mouth still loves the richness of butter and sour cream. But I’m sure my heart is happier with a bit of veggie oil and fat free yogurt. As of course is my jubilant conscience whenever I make a more “advantageous to my body” decision!)

Anyway, I worked out this recipe mainly to take along with us on our most recent trailer trip. Therefore, I wanted a curry sauce that would freeze well, work well with an assortment of meats or seafood, of course be delicious, and able to assuage our possibly devastating hunger while parked in the wilds of the Canadian Rockies. (I mean seriously. You can get mighty hungry after a long day of looking at beautiful scenery or staying around camp and reading a good book!)

So one evening we feasted in style with this sauce combined with diced and sautéed chicken, ladled over cooked brown rice, then topped with the condiments listed below. A simple salad on the side and life was just about as good as it gets.

So if you too love Indian curry, give this recipe a try. It’s really tasty and a lot healthier than more traditional recipes that call for butter and sour cream.

But if you should happen to want a creamy, old fashioned curry sauce recipe, you should consider preparing my Curry Sauce for Chicken, Shrimp, Beef, or Lamb on this site. It’s amazingly good and I’ve been making it for decades. In fact, it was one of my children’s favorite foods. It even includes cream of mushroom soup. And if that doesn’t make you want to rush into your kitchen and prepare it this instant, I don’t know what would?

And if you have never eaten Indian curry, you are missing out on one of life’s culinary pleasures. Indian food is delicious. So try some soon. Remember – today, tomorrow and all the future days of your life are not dress rehearsal days. This is it! And it’s SHOW TIME! So try a new recipe. Or make an old favorite that you haven’t prepared in a long time. Or learn to play the ukulele if that has always been your dream. Just don’t prepare a recipe while playing a ukulele. Makes for a horrendous mess! Hugs to all.

1 T. vegetable oil

½ yellow onion, finely chopped

½ carrot, finely chopped

2 garlic cloves, finely minced

1 T. minced fresh ginger

2 tsp. curry powder, or more to taste

2 tsp. dried parsley

¼ tsp. kosher salt

1 can (15-oz.) crushed or petite diced tomatoes (Italian preferably)

1 c. fat free plain yogurt

In a large heavy pan, heat the veggie oil. Add the onion and carrot; cook until soft. Add the garlic and ginger and cook for 1 minute. Stir in the curry powder, dried parsley, and salt.

Add the canned tomatoes and yogurt; bring to a simmer and let burble for about 10 minutes. Remove from heat and add whatever cooked meat or seafood takes your fancy. Adjust seasoning. Or before adding meat or seafood, allow the sauce to cool and store in your freezer. Then when you are ready to use, heat over medium heat and add your meat, seafood or veggies of choice. Great for camping trips.

Condiments:

chopped cashew nuts

thinly sliced green onion

mango chutney