This past Sunday, we had our grandson Ivan up for dinner. I asked if there were any special requests. Without hesitation he answered the Chocolate Cherry Cake from my first cookbook. And since he had recently had a birthday, I decided a birthday cake would be absolutely perfect. So, instead of baking this cake in a bundt pan or a 9×13-inch cake pan, I used 2 (8-inch) square pans. One glass and 1 disposable aluminum that I could send home with him.
What a remarkable and wonderful young man he has become. We thoroughly enjoyed his company and can’t wait to spend more time with him. But I had to confess that this was not the original recipe from my cookbook. You can find that recipe using a cake mix under Chocolate Cherry Cake. Oh, and BTW, this recipe makes a much more delicious cake than when a cake mix is used. Go figure!
Now, having made chocolate cherry cakes using a cake mix for more years than I care to disclose, I decided to go online and see if other bakers more qualified than I am to play mad scientist had come up with an alternative to using a packaged cake mix containing preservatives, artificial flavors, and more sugar than necessary. Another consideration being that some of the leading manufacturers have reduced their cake mixes from around 18 ounces to around 15 ounces. So, using a cake mix at this point is a bit iffy because the proportion of dry ingredients to wet ingredients has now been altered.
Unlike bread dough, where yeast is the leavening agent and you can more easily play fast and loose with additives or deletions, cake batter is a precise combination of ingredients. In fact, a cake recipe is a scientific formula in which the ingredients are combined in a certain way to form the cake’s structure.
So, to the internet I proceeded. And with my guardian angel firmly affixed to my right shoulder, I found this recipe on thesouthernladycooks.com site. Of course, I changed things up a bit, but the main recipe is straight off the site.
The only thing I still want to do is figure out how to make 21 ounces of cherry pie filling from scratch. So, when, and if I succeed, I will add that homemade version to this recipe.
Well, that’s it for today. The morning rain shower has gone elsewhere, and the sun is now shining. There are still clouds in the sky and over the mountains, but Port Susan Bay is blue and calm. The cats are taking their morning siestas, Mr. C. is reading, and I am doing what I love best. Typing up another recipe and sending all of you my best wishes for continued peace and love in your life.
For the cake:
2 c. unbleached all-purpose flour, fluffed
1½ tsp. baking soda
½ tsp. sea salt
¾ c. pure cocoa
1¼ c. granulated sugar
2 lg. eggs
½ c. (1 stick) unsalted butter, melted
1 c. buttermilk
1 tsp. vanilla extract
1 tsp. almond extract
1 (21-oz.) can cherry pie filling
In a large mixing bowl whisk the flour, baking soda, salt, cocoa, and sugar together. Mix the eggs, melted butter, buttermilk, vanilla extract, almond extract, and cherry pie filling together in a separate mixing bowl. (I don’t use a mixer with this recipe.) Add the wet ingredients to the dry ingredients and mix just until all ingredients are wet.
Pour into a lightly greased 9 x 13-inch cake pan. Or prepared bundt pan. Or two 8-inch pans.
Bake in a preheated 350-degree oven for 40-50 minutes or until a pick comes out clean. Don’t overbake.
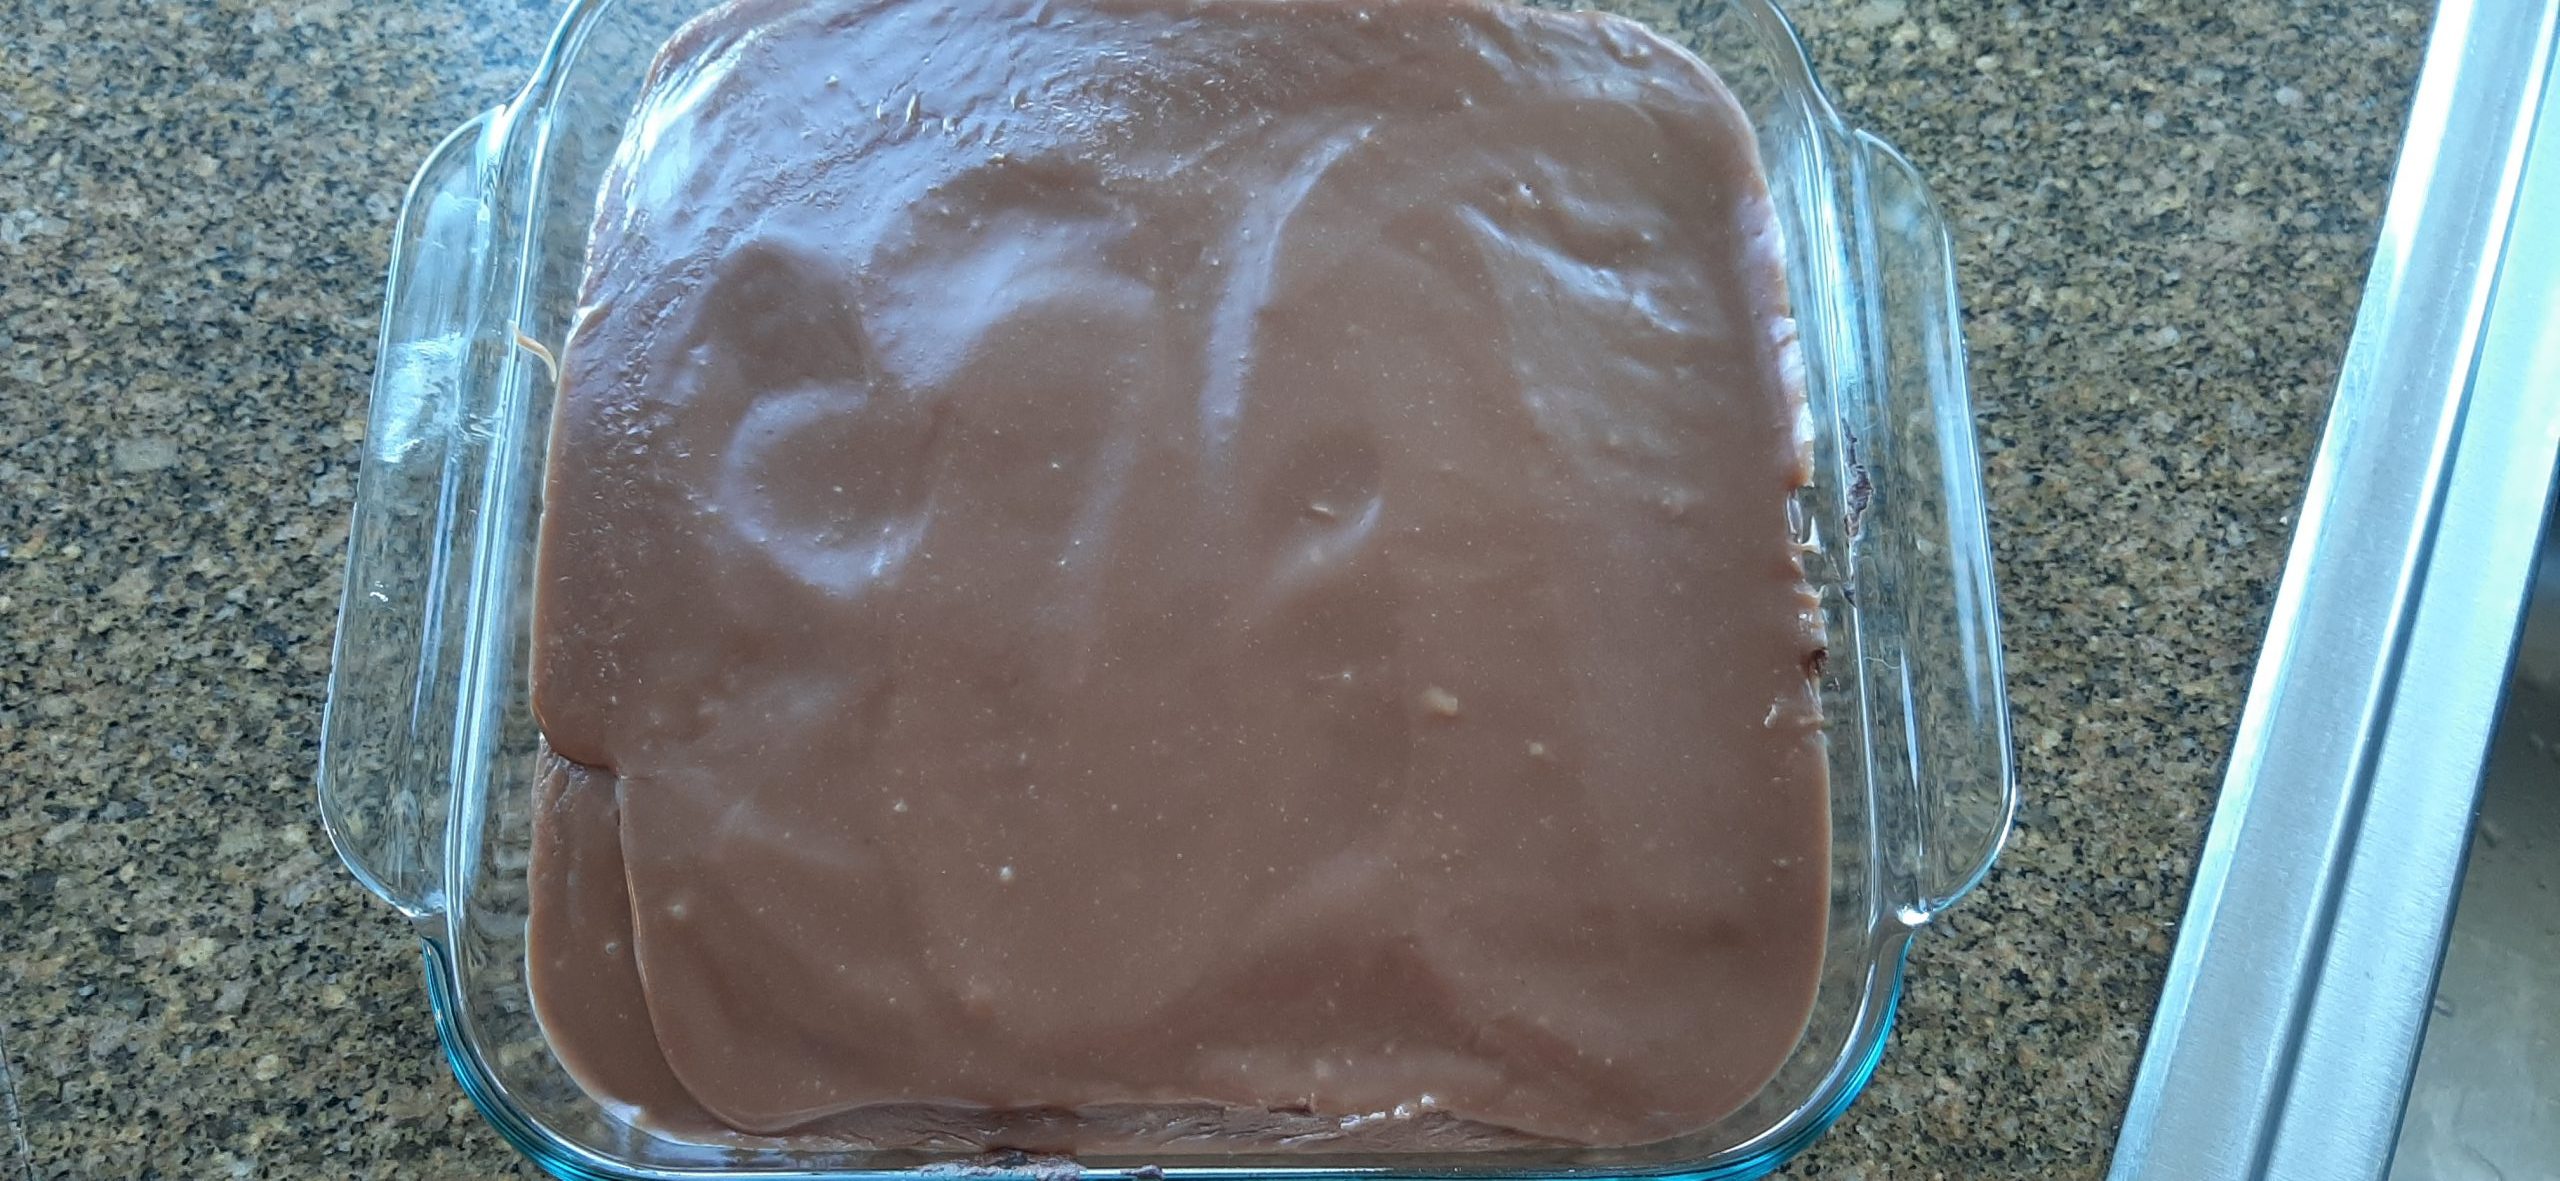
Remove from oven and let cake cool before frosting.
For the frosting:
¾ c. granulated sugar
¼ c. evaporated milk
3 T. unsalted butter
pinch salt
½ c. semi-sweet chocolate chips (or chocolate chips of choice)
1 tsp. vanilla extract
Combine sugar, milk, butter, and salt in pan on top of stove. Bring to boil and cook for 1 minute. Remove from heat and add chocolate chips and vanilla. Stir with spoon or whisk until chips are melted. Spread with an offset spatula evenly over cooled cake. Don’t doddle. This frosting sets up quickly.
I love cheesecake. But in my lazy old age, I prefer not to spend hours in its creation. Unless, of course, it’s a special occasion. Then I will do what needs to be done. But for a quick and easy cheesecake, that takes little effort, with no special ingredients required, this recipe works just fine. In fact, more than just fine. These bars are delicious.
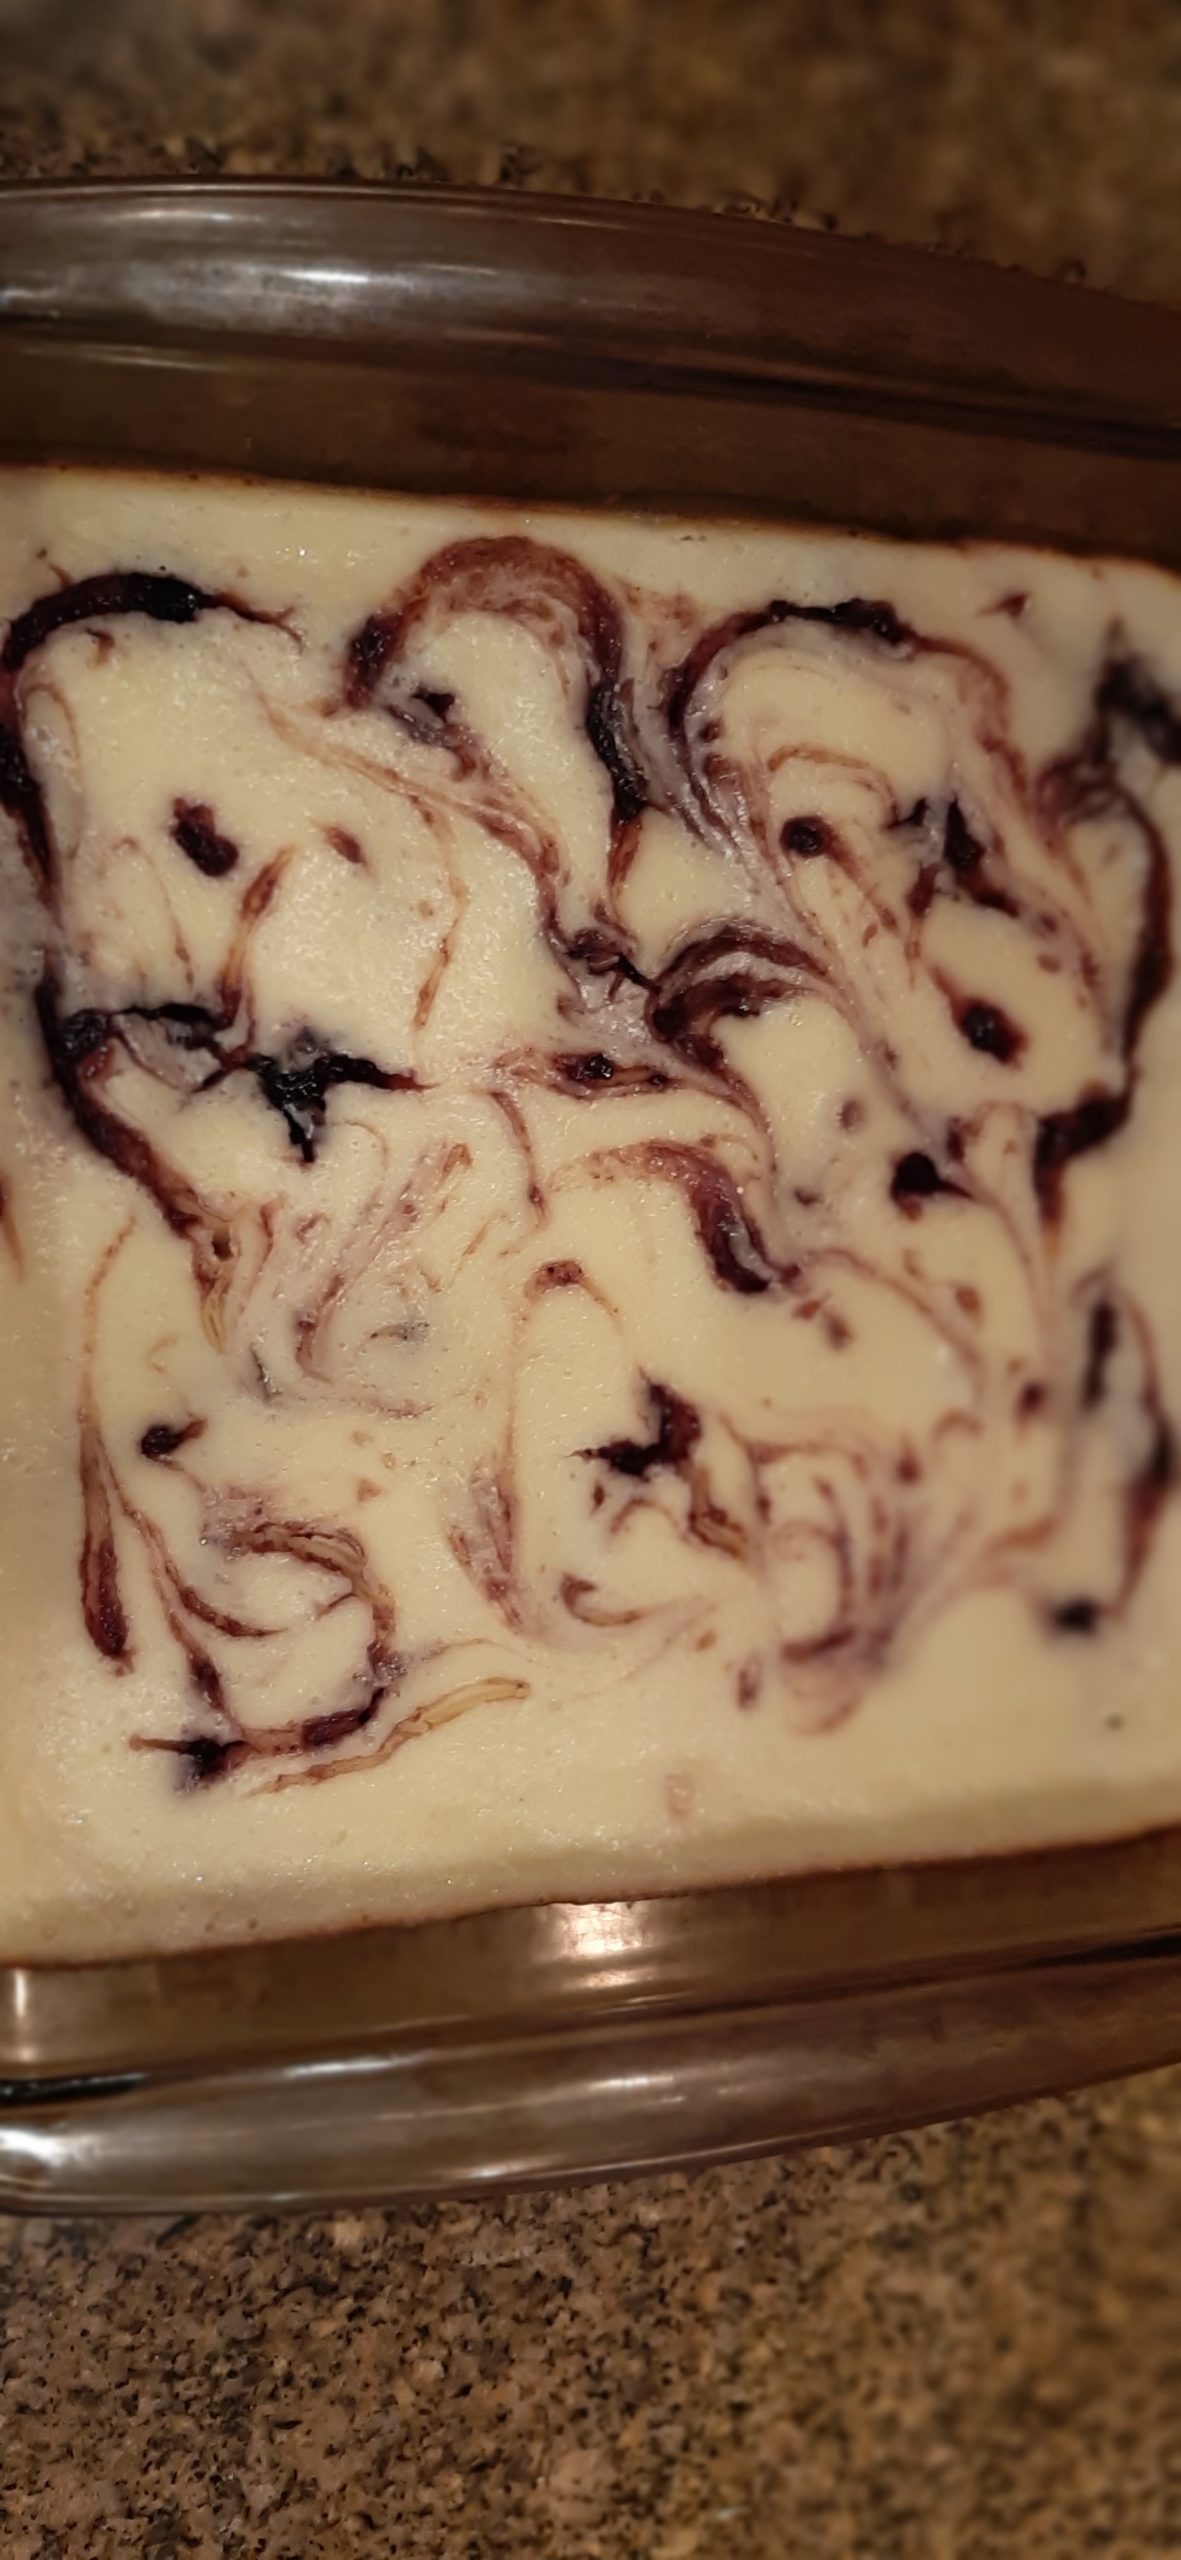
I wrote this recipe up years ago. And while culling my “recipes to be tried” pile (about a foot deep), I found this beauty patiently waiting to be tried. And why I waited several years to make these easy to prepare bars is a puzzle. Of course, I also have other cheesecake bars on this site. And they too are wonderful. (Strawberry Rhubarb Cheesecake Bars, Tart Cherry Topped Cheesecake Bars, and Lime or Lemon Curd Topped Cheesecake Bars) But this one is just simplicity itself. And you can vary the flavor by whatever jam, jelly, preserves, or curd you happen to have on hand. I used blackberry preserves and they were perfect. A little tart. A little sweet. Terrific!
So, next time you get a hankering to build a cheesecake but would prefer to save most of the fuss and bother for another time, give this recipe a try.
Well, another evening of live music is in store for me tonight. And believe me, I am not complaining. Listening to live music is just one of the best ways I know of to stay connected with good and positive things in today’s complicated world.
There is so much negative happening these days, that for me, clearing my mind by listening to music helps me cope with today’s reality and remain reasonably sane. (I will never be completely sane. Just not in my genes.) But music, along with reading books, cooking, posting recipes, spending time with friends, or just puttering around the house (I am an excellent putterer BTW) keeps me on almost an even keel. Almost!
I hope you too have pleasant ways to deal with some of the harsher realities of life today. Even if hard times don’t hurt you personally, they are still out there affecting masses of humanity. And at least for me, sometimes that’s harder to deal with because nothing I do can help the situation. I simply can’t make things OK. (But I would if I could!)
Peace and love to all.
Crust:
2 c. unbleached all-purpose flour, fluffed
½ c. brown sugar, packed
½ tsp. kosher salt
¾ c. (1½ sticks) unsalted butter, room temp., cut into small pieces
1¼ c. jam, jelly, preserves, or curd, divided
Place the flour, brown sugar, salt, and butter in the bowl of your food processor. Whirl until mixture begins to form small lumps. Sprinkle mixture evenly in a 9×13-inch pan. Pat down gently. Just enough to make an even surface. (No need to wash the food processor bowl or chopping blade at this point. Use them again for the filling.)
Bake the crust in a pre-heated 350-degree oven on the middle rack for 15-18 minutes, or until light golden brown. Remove from oven but leave the oven at 350-degrees.
Evenly spread the hot crust with 1 cup of the jam. (I use a small offset spatula for this task.)
While the crust is baking, prepare the filling.
Filling:
2 (8-oz. pkgs.) (2 cups) cream cheese, room temp.
2 lg. eggs
¾ c. granulated sugar
1 tsp. vanilla
In the same food processor bowl, whirl the cream cheese until smooth. Add the eggs, granulated sugar, and vanilla. Whirl until well combined.
Spread the filling evenly over the jam covered crust. (I use the same offset spatula again that I used to spread the jam.) (And yes, I already told you I was lazy!)
Drop small bits of the remaining quarter cup of jam over the cream cheese mixture. Then gently swirl it to make a nice pattern for the top of the bars. Hint: I find it helps to stir the jam a bit before dropping it onto the cream cheese mixture. It loosens the consistency of the jam which then makes it easier to swirl.
Bake the bars, still on the middle rack, for 28-30 minutes or until slightly puffed. Remove from oven, cool completely, and refrigerate until ready to serve.
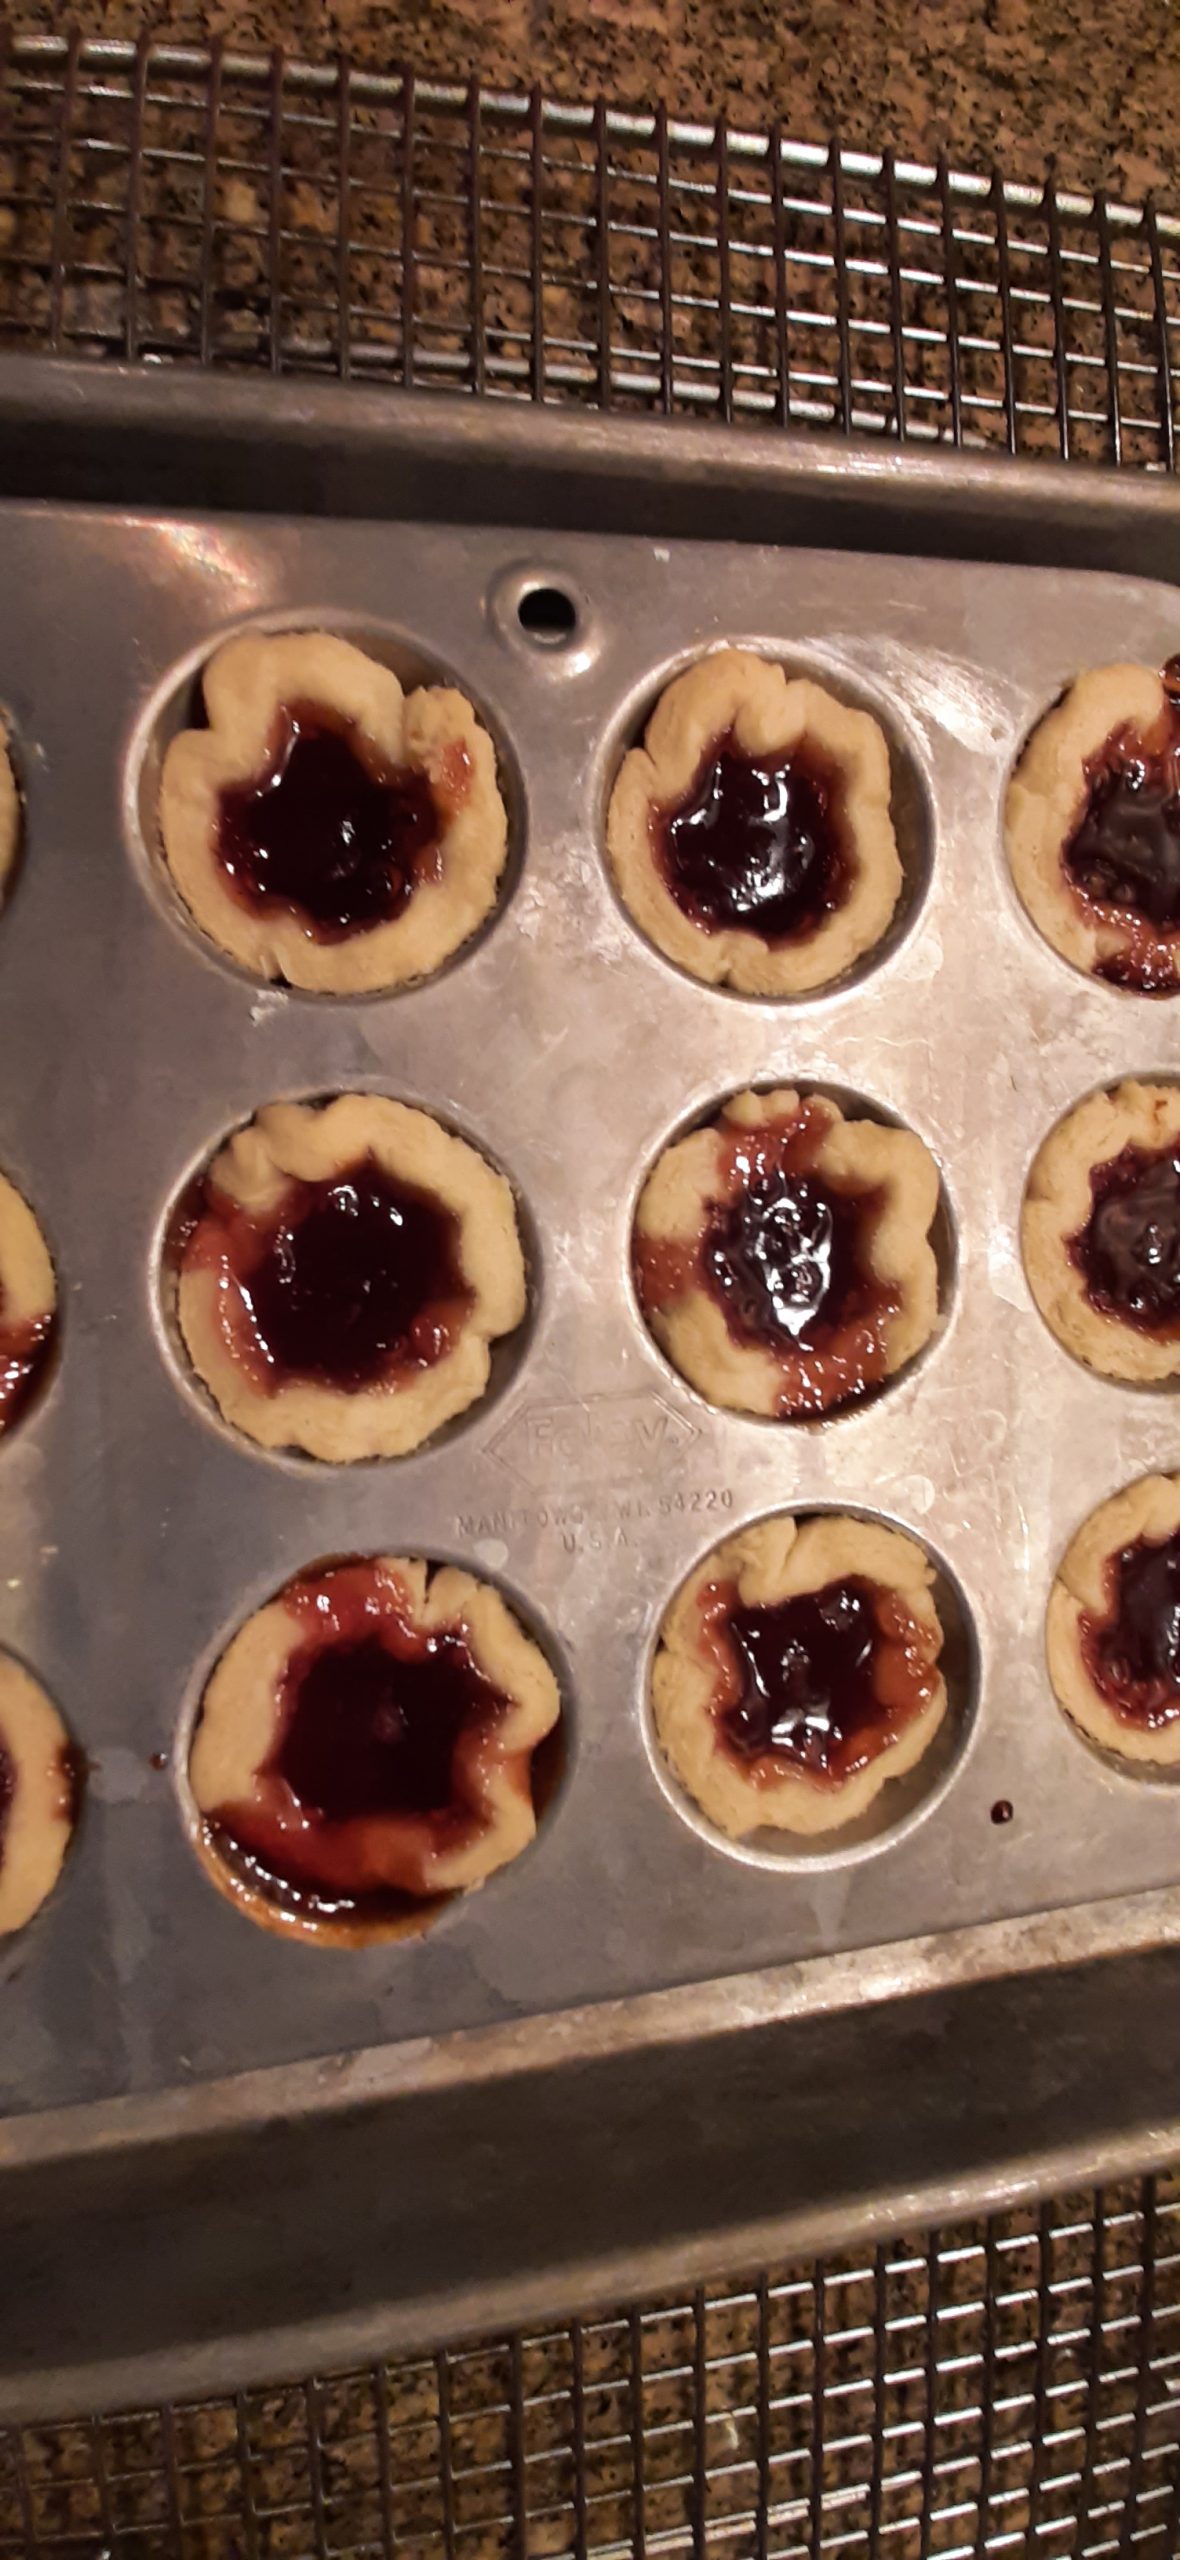
Yesterday I had this overwhelming desire to make quiche. Which happened. But after I had rolled out the crust for the quiche, I was left with a few pie crust scraps. Not enough to make another quiche or even a small pie. So, what to do with the bits that were left? I could always make Pie Crust Cookies. (See how-to below.) Then, I remembered that I owned at least 10 small tart pans. (I used to make mini quiches and tiny pecan tarts fairly frequently for parties or special events.) So, since we were having company for dinner, why not make some sweet, small, one bite tarts for dessert? But what to use as the filling that didn’t require more time in the kitchen? Plus, I didn’t have much dough to work with. So, even if I did have the time to make a filling, I would probably then have left over filling. Sometimes you just can’t win. But as it turns out, I did win. (This time!)
As I was debating what to use as a filling in these tart shells, I thought about using a bit of jam or jelly. But I had never actually used jam or jelly as a filling for small tarts. Or was there even such a thing as a jam tart?
Well, boy howdy, after searching the internet for jam tart recipes, I realized mini jam tarts were very popular. (About 16,200,000 results.) So, that’s just what I did. My only dilemma at this point was which jam to use. Since I had my own freezer rhubarb jam and gifted homemade strawberry jam already open in our fridge, I decided on the strawberry jam. And these little dessert bites turned out to be very delicious. Who knew?
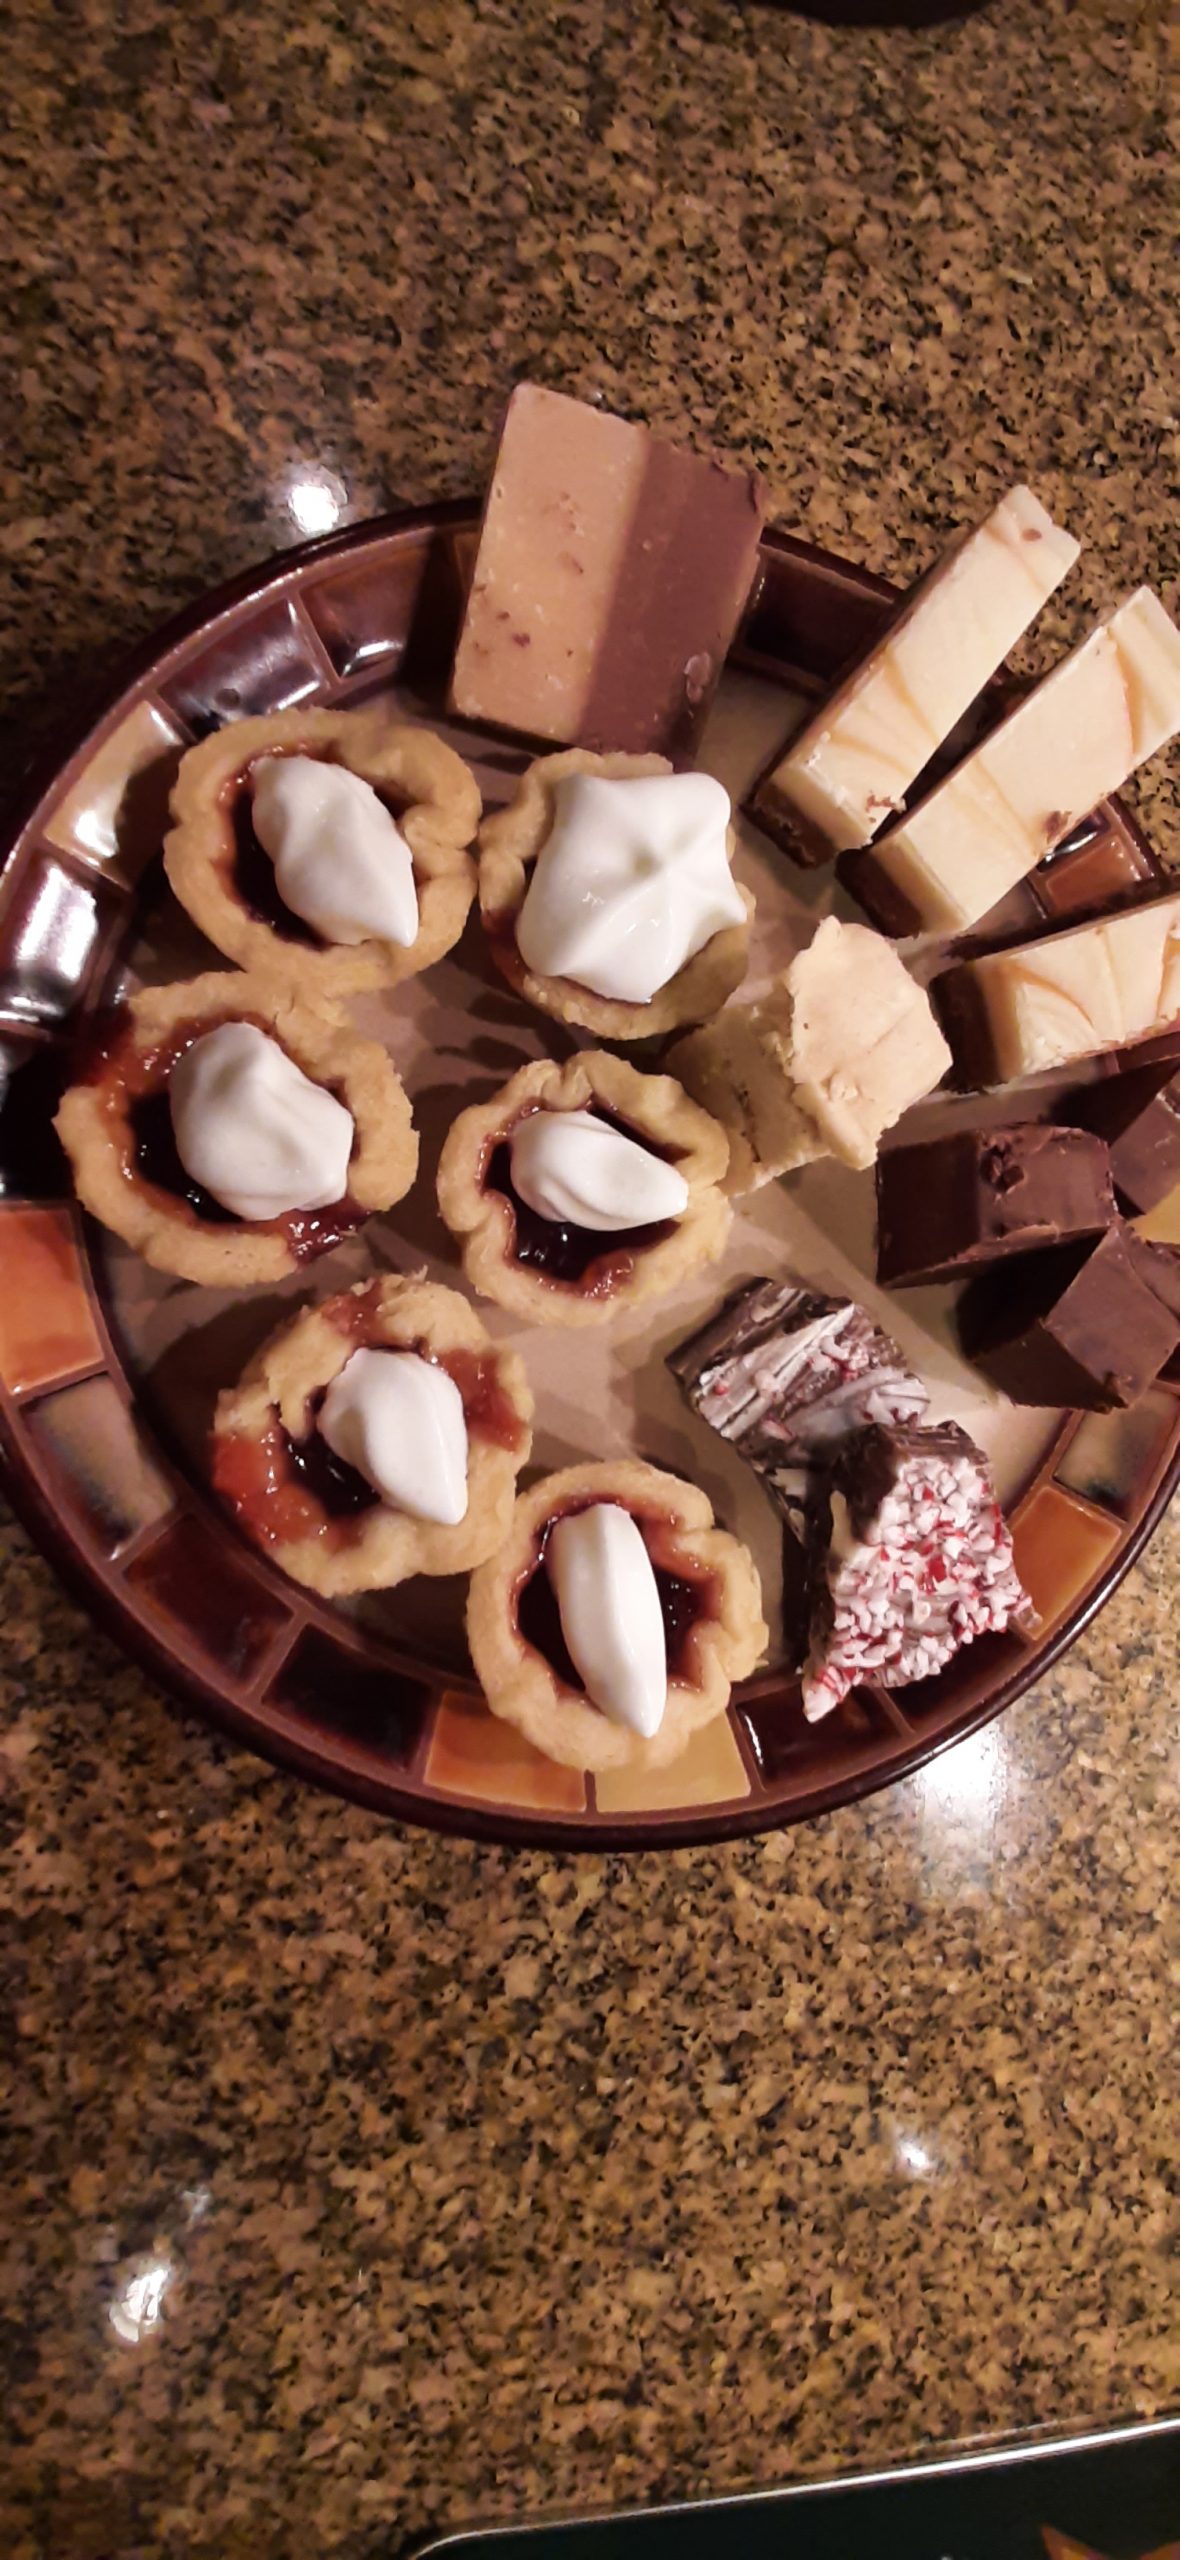
I plated them along with a few other miniature sweet bites of this and that left over from Christmas. And this became a very nice way to end a meal.
So, if you too ever find yourself with leftover pie crust dough, consider making some tiny jam tarts. They are just so cute. And they taste good too.
Well, it’s sunny here on Camano Island today. But cold. Very cold. So, we are hunkering down for the day. Mr. C. is writing out band charts for a local singer (our dear friend Joan), and I am trying to decide whether to prepare Pasta with Arrabiata Sauce or Puttanesca for dinner. (Both recipes on this site.) Darn hard choice because we both adore these dishes equally.
May you too only be burdened with choices like my simple quandary described above. The world would be in such a better place if people everywhere had nothing of greater significance to contemplate than what to serve for dinner. Which gave me pause to reflect on how very lucky I am. And to give thanks to whichever deity happened to be listening for my wonderful life. I am well and truly blessed. Which is always my hope for each of you too.
Peace and love to all.
JAM TARTS
leftover pie crust (find my favorite recipe for pie crust below)
jam, jelly, or curd
Roll out the pie crust. (Not too thin.) Using a 2½-inch round cutter, make as many circles as possible. Carefully transfer the circles to an ungreased tart pan. Place about 1 teaspoon of jelly, jam, or curd in each pastry cup. Don’t overfill, or the jam, jelly, or curd will leak out of its confines and possibly burn.
Bake in a pre-heated 350-degree oven for about 35 minutes. Remove from oven and using a small offset spatula or table knife, carefully transfer the tarts to a cooling rack.
To decorate, you can dollop with a bit of whipped cream or shake a bit of powdered sugar over each one. But really, these babies are just wonderful ungarnished.
PIE CRUST
¼ c. very cold water
2 c. unbleached all-purpose flour, fluffed
1 tsp. kosher salt
heaping 2/3 c. Crisco
Step 1 – Pour cold water into a small bowl.
Step 2 – Measure flour and salt into a mixing bowl.
Step 3 – Take 1/3 cup of the flour back out of the mixing bowl and stir it into the water. Make a paste. Set aside.
Step 4 – Add the Crisco (heaping 2/3 cup) to the flour and salt mixture. Mix together. (I use my KitchenAid mixer.)
Step 5 – Add the water/flour paste to the flour/shortening bowl and mix just until blended. Do not over-mix. Roll out dough and place on a pie plate. This recipe makes enough dough for a double crust pie, if using a regular sized pie plate, or one large bottom crust with a little left over for pie crust cookies or small tarts like the one shown below.
Helpful hint: Use a pastry cloth to roll out your pie crust. It really makes a difference. You can find pastry cloth in almost any kitchen wares shop. Well worth the $10 or so.
PIE CRUST COOKIES
leftover pie crust
cinnamon
granulated sugar
Roll out your leftover dough. Cut into fancy shapes if you must. But really, just cut into pieces large enough to handle. Transfer to a baking sheet. Sprinkle with cinnamon and sugar. (You decide how much.)
Bake in a pre-heated 350-degree oven for 9-11 minutes or just until beginning to turn a light golden brown.
Remove from oven and cool on a wire rack. Then prepare to enjoy one of the most delicious treats you will ever put in your mouth.
There are just those times when we as bakers desire to make a special occasion pastry, but don’t want to go to a lot of expense or effort. Well then, if you ever find yourself in that head space, this is the recipe for you.
When my kids were young, I made this pastry quite often at Christmas time. My daughter Paula especially adored this treat. And to this day, I totally love it too. And one of the main reasons is that it is delicious and ever so easy to make. And pretty, too.
And I know, I should have posted this recipe before Christmas, but I too was super busy. Why every year I add more things to my Christmas to-do list is a question best left for a trained counselor to determine. But the fact remains. Every year I think up at least one more goody to prepare for family and friends. So, basically, I’ve never had the time in December for even a quick trip to a trained professional to determine if there is any hope for people like me who suffer with MSS (Martha Stewart Syndrome). And it’s too bad. I seem to have a flaming case of this misunderstood but authentic condition, and I know plenty of others who also “yust go nuts at Christmas”. (Thank you, Stan Boreson.) The rest of the year, I seem to be able to contain my zest for producing prodigious amounts of goodies. So, who needs a counselor then? (For me it’s just a seasonal disorder. And maybe some time in the future, it will disappear just like my ability to drink wine has gone the way of the dinosaurs.) Grrrrrr
So, even though you may think you don’t really need this recipe until next Christmas, don’t forget about Easter morning, or for a Sunday brunch, or for a special Valentine’s Day breakfast for your honey. There are lots of occasions when this pastry would be a welcome addition to your menu.
And you can decorate this pastry any way you want. Valentines Day it would be fun to top the pastry with pink glaze and sprinkles. For Easter, pink glaze, pink coconut, and Cadbury mini eggs. The decorating choices are endless.
So, remember this recipe the next time you need to make something special for your family or friends. Think of this recipe as a gift from Betty Crocker. But who was Betty Crocker?
Well, according to bettycrocker.com “We got our start in 1921 — and thank you, we do look good for our age. Who could have guessed that a simple contest by The Washburn-Crosby Company would give birth to an icon? The contest called on home cooks to solve a jigsaw puzzle for the chance to win a pincushion in the shape of a bag of Gold Medal Flour (cute). Washburn, a flour-milling company and predecessor of General Mills, Inc., was surprised to find themselves suddenly inundated with questions from home cooks who used the competition as an opportunity to ask for expert baking advice.
But who could offer the public the spoonfuls of wisdom American cooks were so hungry for? Enter, Betty Crocker. Now, Betty was not a single person. The name was created as a way to personalize responses to questions, and if you guessed that the name has meaning behind it, you’re right. “Crocker” was chosen in honor of a popular company director, and “Betty” was selected because… well, she sounded friendly. We love a little history moment.
But there was one final element needed to bring Betty to life. The Washburn-Crosby Company invited their female employees to try their hand at a Betty Crocker signature. A distinctive winner was chosen and is still used today. Talk about an icon in iconography!”
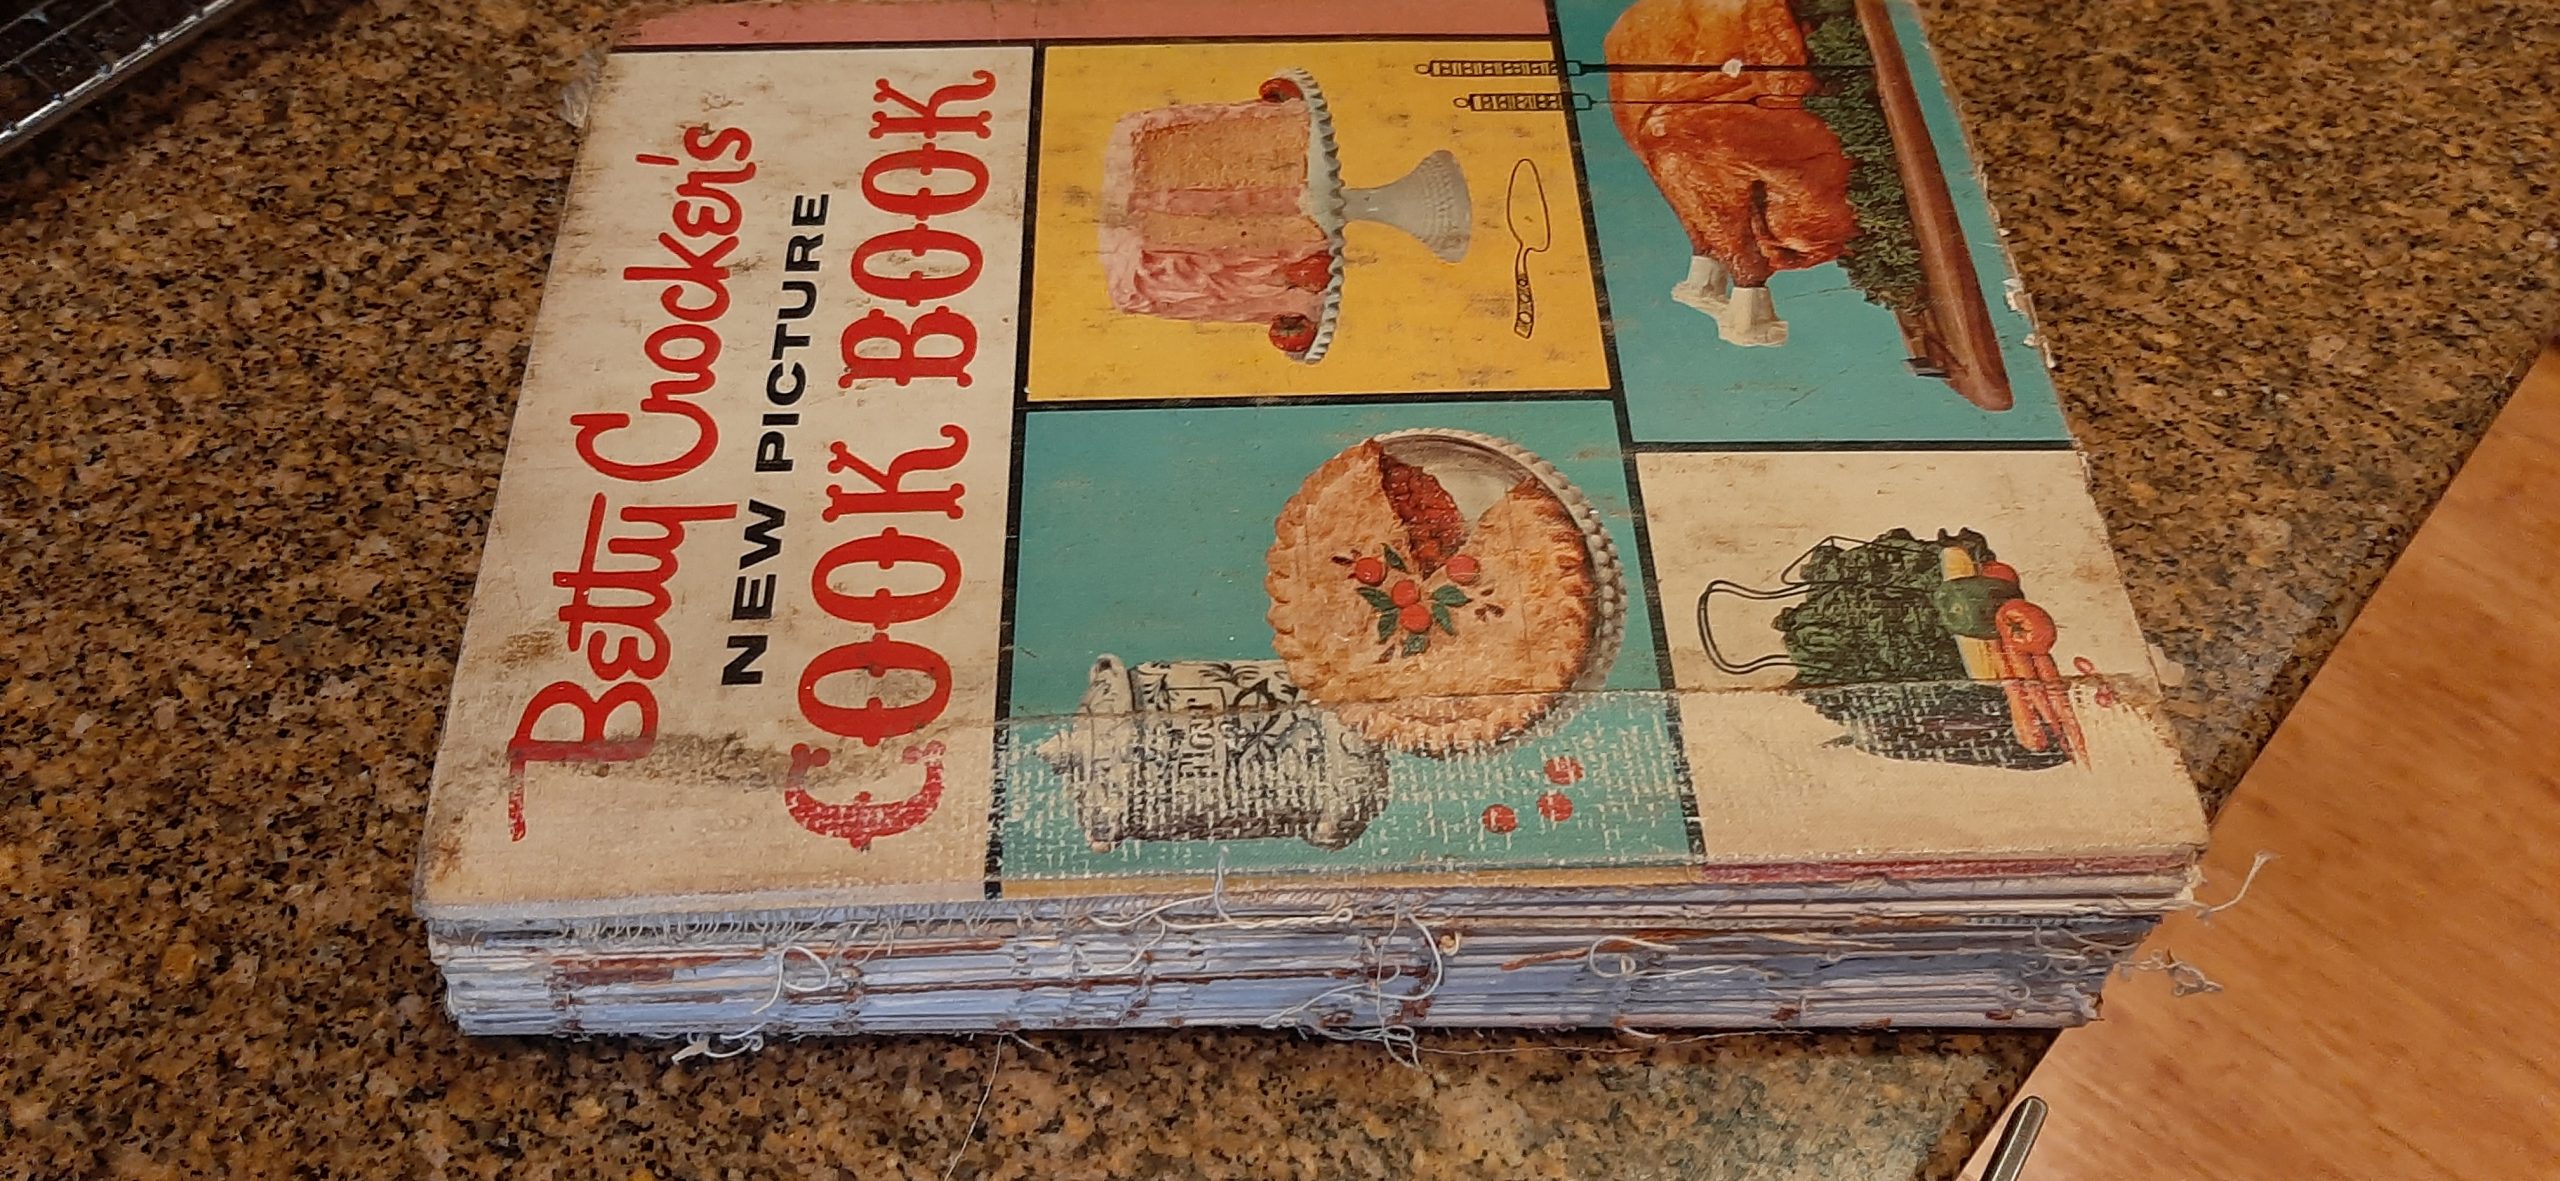
My Betty Crocker cookbook (1961 First Edition, Third Printing) given to me in 1964 by my Aunt Ruth along with several baking pans and cookie sheets. I still have all the bake ware, but I’d rather still have my aunt. She lived to be 90, but I still miss her. She was a great woman and a true friend.
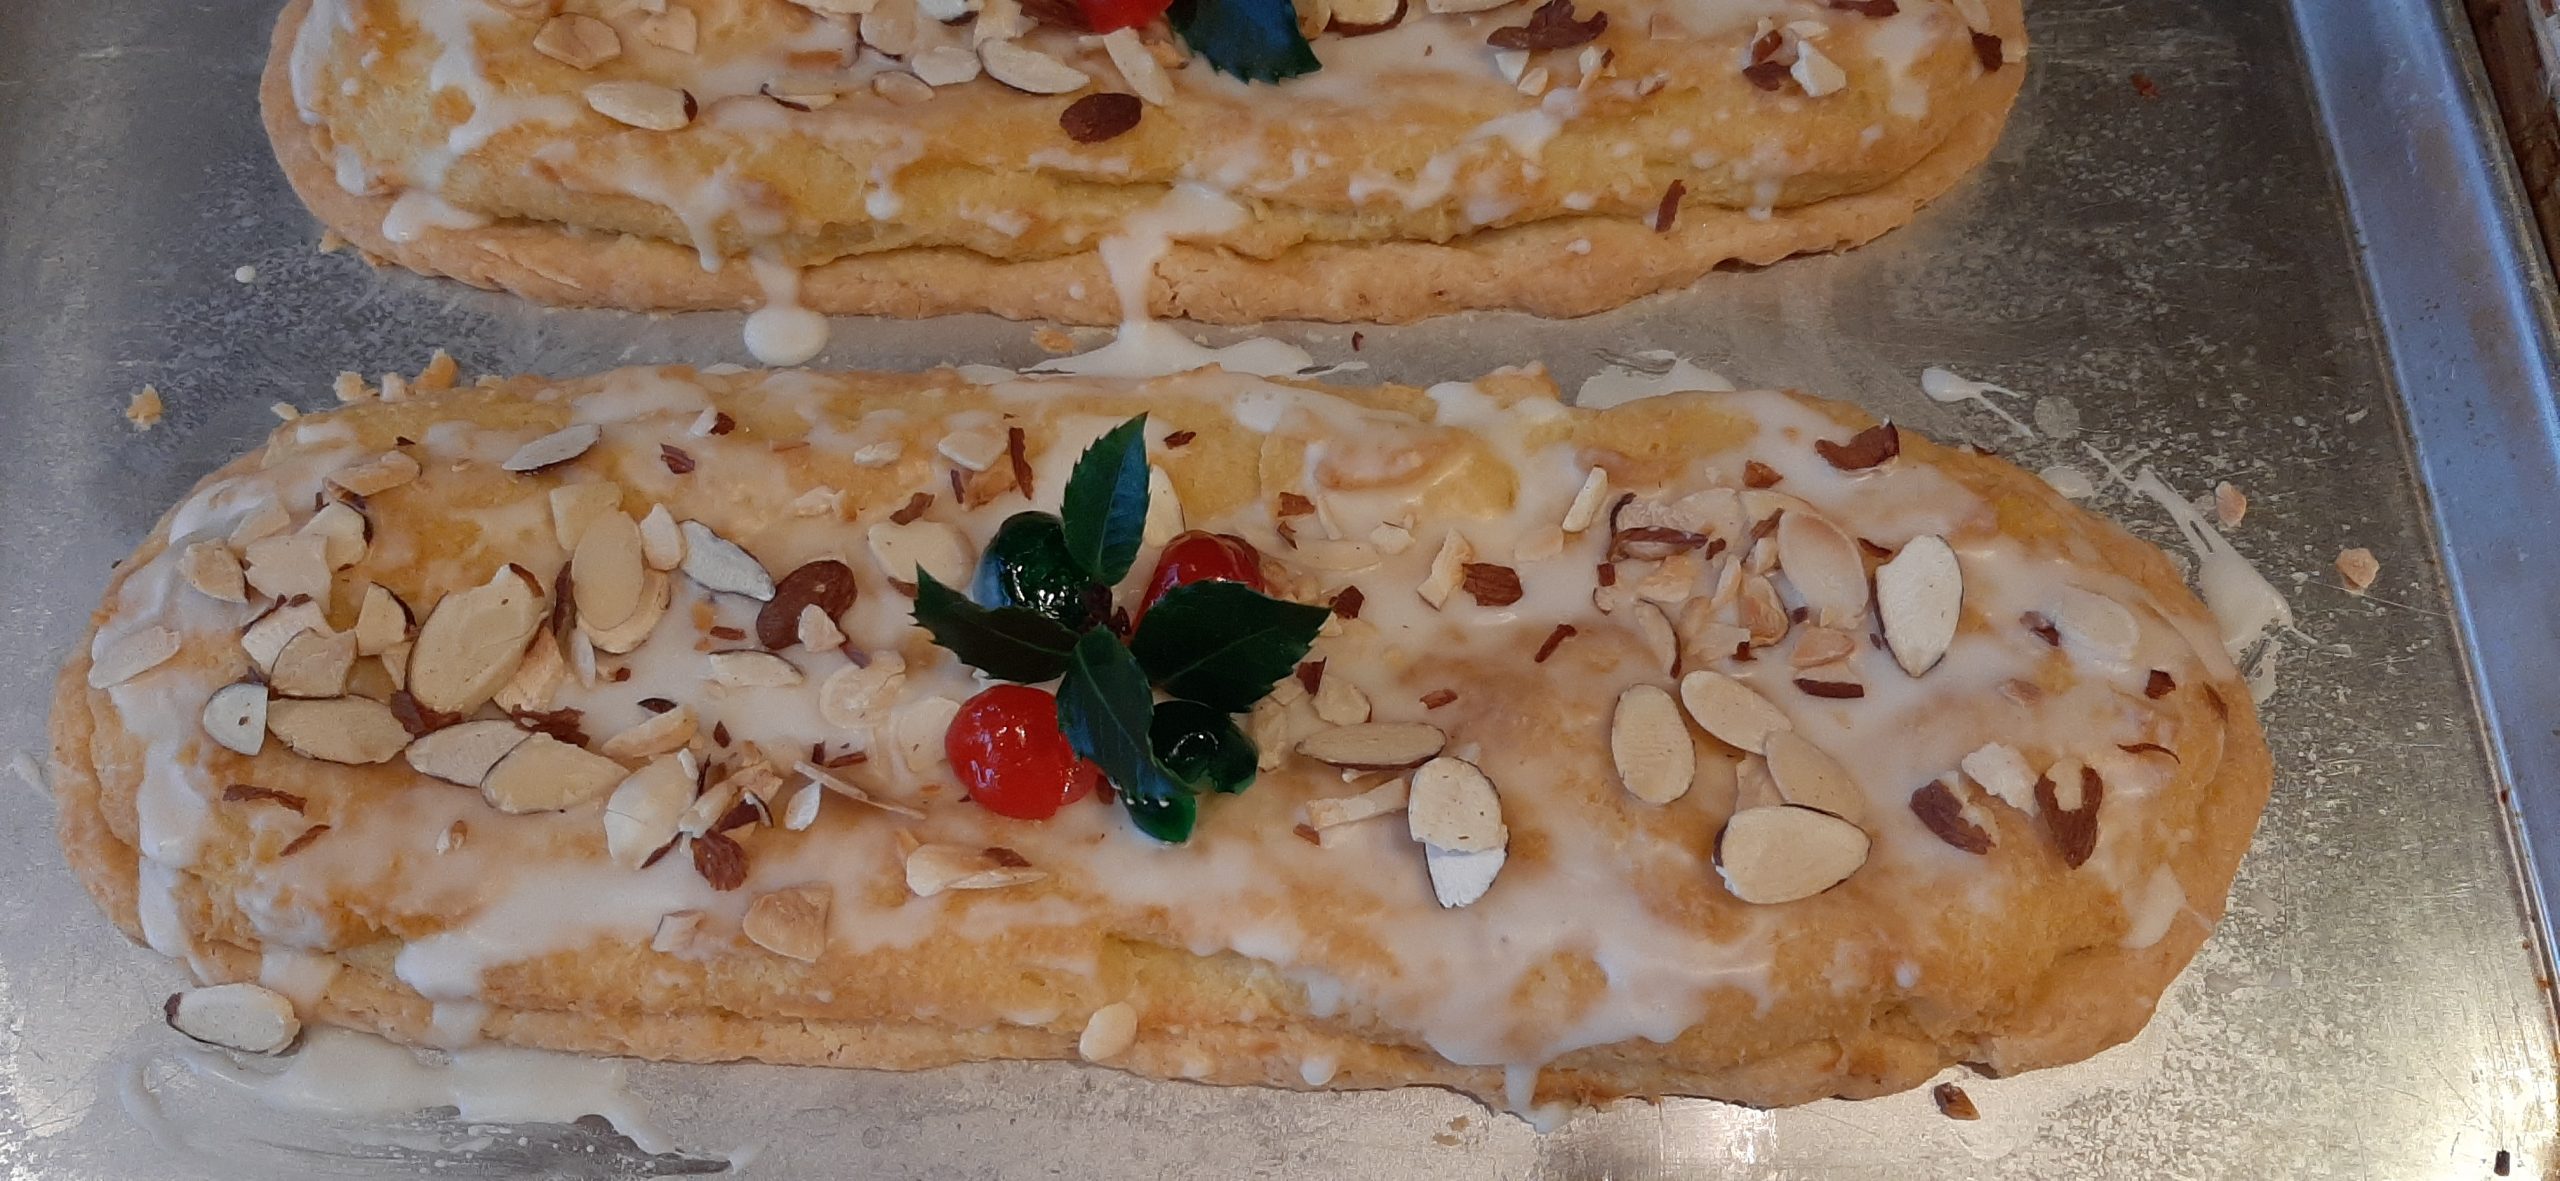
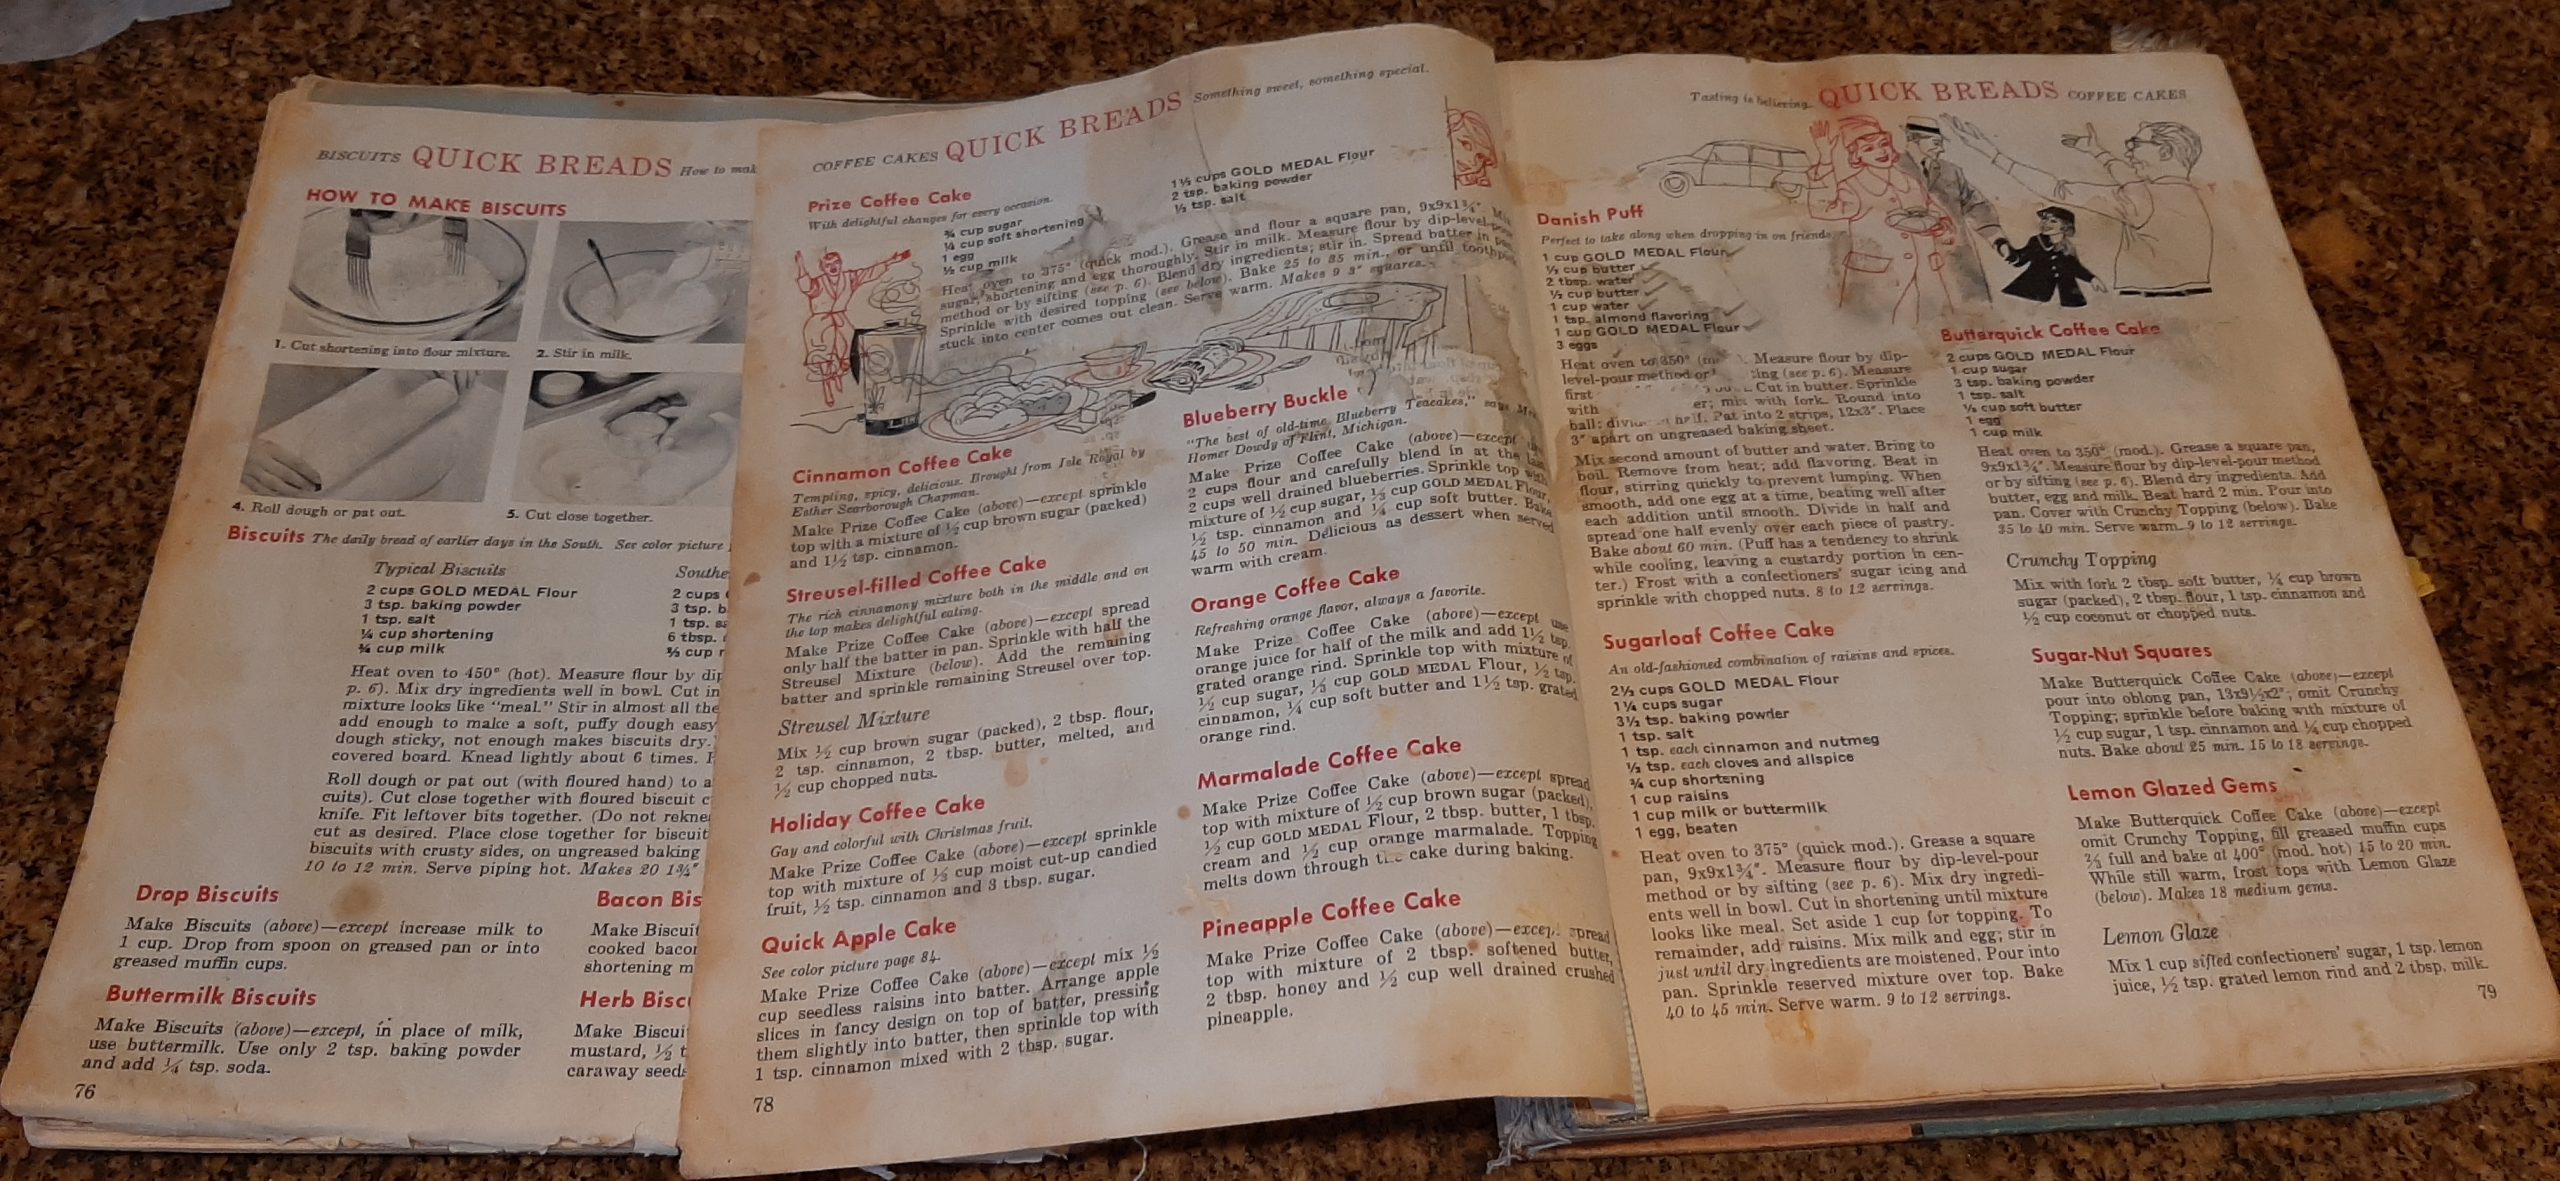
As you can see, the book is now in two parts. And if you look closely at the top left recipe on the right page, you will find the recipe for Danish Puff. As you can also see, this cookbook was very well used/loved. (Battered and bruised might be a better description.) And yes, I still consult it periodically. Old habits die hard.
So, to all of you who also learned to cook from reading a Betty Crocker cookbook (or any other cookbook for that matter) from cover to cover several times a year, congratulations. We did it. We read recipes, we made casseroles and soups and cookies, and were inspired to feed our family and friends both nutritious and delicious dishes. And has there ever been a better way to show our love. I think not! Keep up the good work everyone! Happy New Year.
And as always, peace and love to all.
Pastry:
1 c. unbleached all-purpose flour, fluffed
pinch fine sea salt
½ c. (1 stick) unsalted butter, room temp.
2 T. water
Place the flour and salt in the bowl of your food processor. Pulse a few times until the pieces are the size of coarse crumbs. Mix in the water.
Or in a medium sized mixing bowl, cut the softened butter into the flour mixture using a pastry blender or pulling 2 table knives through ingredients in opposite directions, until pieces are the size of coarse crumbs. Mix in the water.
Gather the pastry into a ball; divide in half. Pat each half into a 12×3-inch rectangle, about 3-inches apart, on an ungreased cookie sheet.
Topping:
½ c. (1 stick) unsalted butter
1 c. water
1 tsp. almond extract
1 c. unbleached all-purpose flour, fluffed
3 eggs
In a heavy 2-quart saucepan, heat the butter and water to a rolling boil; remove from heat. Quickly stir in almond extract and the 1 cup flour. (Stir as quickly as possible to prevent lumping.) When smooth, drop in 1 egg at a time, beating well after each addition. When smooth, spread half of the topping over each rectangle.
Bake in a pre-heated 350-degree oven for 50-60 minutes or until topping is crisp and a nice, light brown.
Remove from oven and transfer to a wire rack to cool completely before drizzling with glaze and garnishing with sliced almonds and maraschino cherries.
Vanilla Glaze:
½ c. powdered sugar
¼ tsp. almond extract
1-2 T. milk
In a small mixing bowl, whisk together the powdered sugar, almond extract, and enough milk to make a thin icing.
Since it is December, and along with December comes Christmas. And with Christmas, at least at our house, comes fruit cake and often mincemeat pies, tarts, galettes, or bars. So, of course this year again, homemade mincemeat is happily mellowing in my refrigerator. What recipe I decide to use containing this amazing mixture is still to be determined. But I do know that whatever I make will be topped with a hard sauce. And not just any hard sauce. A bourbon hard sauce. (I’m still working on the recipe.)
And since it happens to be Christmas time and I am in the process of re-posting some of my favorite recipes, I decided to post some of the dishes I most associate with the holiday. And mincemeat has been a part of my Christmas for as long as I can remember. So, for me, it isn’t really Christmas unless mincemeat is featured in one of the holiday desserts.
Now, some would argue that mincemeat without meat (beef in most cases) or even suet in the mix is not the real thing. Don’t care! And I only mention beef because that was the most common meat used in the making of mincemeat in the 19th century. But before chunks of beef, it might have been tongue, tripe, venison, lamb, or veal in with all the fruit and spices. None of which are ever going to be included as an ingredient in any mincemeat I make. I frankly see no reason to mess up perfectly good, dried fruit, apples, brown sugar, spices, and booze by adding meat of any variety. And suet – no way! I use butter! Because butter simply makes everything better!
Also, most mincemeat recipes call for brandy, rum, or whiskey. But not mine. I leave those liquors for someone else to use. Instead of brandy, rum, or whiskey, I use both bourbon and cognac. Why? Because I use bourbon a lot in cooking. Can’t stand to drink the stuff, but to cook with it for either sweet or savory dishes, bourbon is perfect. It’s the sweetness of bourbon, with hints of both caramel and vanilla, that I believe works so well in this recipe. And many other recipes for that matter. And as far as that little bit of Cognac I throw in at the last moment, well, when does Cognac not add an extra little bit of joy to any dish? Especially because of the flavor sensations that are unique to Cognac – sweet, spicy, fruity, and slightly bitter. So, there you have it. A recipe for homemade mincemeat that is easy to make and absolutely delicious.
But as with other Christmas treats like Holiday Fruitcake, Caribbean Black Fruitcake, and Christmas Berliner Stollen (all on this site BTW), it is best to let mincemeat contemplate the meaning of life for a few weeks, or months, in your refrigerator before using it in one of your favorite Christmas treats. Some things just get better with age. Like fine wine, many great cheeses, and men and women who cook. Cooking helps keep older minds remain active and bodies stay limber by making multiple trips into pantries trying to remember why they went there in the first place! Or second place, etc. etc.
So, from one old cook to all of you – Peace and Love. And happy Christmas preparations.
1½ c. dark raisins
1½ c. golden raisins
1½ c. dried currants
2/3 c. bourbon
2 tart apples, peeled, cored, and finely diced
8-oz. candied orange peel
½ c. (1 stick) unsalted butter, melted
¾ c. brown sugar
½ tsp. ground nutmeg
½ tsp. ground cinnamon
¼ tsp. ground mace
¼ tsp. ground allspice
1/8 tsp. ground cloves
finely grated zest and juice of 1 lemon
finely grated zest and juice of 1 orange
¼ c. cognac
Place the dark raisins, golden raisins, and dried currants in a small saucepan. Add the 2/3 cup bourbon, bring just to a boil, stir to coat all the fruit, remove from heat, and set aside to cool.
Meanwhile, combine the apples, candied orange peel, melted butter, brown sugar, spices, and the zest and juice of the lemon and orange in a large ovenproof dish. When the raisins and currents are cool, stir into the apple mixture. If there is any liquid left, throw it in too. Cover the dish and place in your refrigerator overnight.
The following day, place the ovenproof dish in a cold oven, bring the temperature to 200 degrees, and bake for three hours, stirring every hour or so. Remove from oven, let cool completely, and stir in the cognac. The mincemeat will look quite runny. But don’t be concerned. After it has rested in the refrigerator for a few days it will be perfect.
Store covered in your refrigerator until ready to use. (Best if left to mellow at least 4 weeks, but if you are like me, the mince only gets to age for about a week. It’s still good, so no worries.)
This recipe makes enough mincemeat for 2 10-inch tarts, 2 8-inch pies, or 3 10-inch galettes.
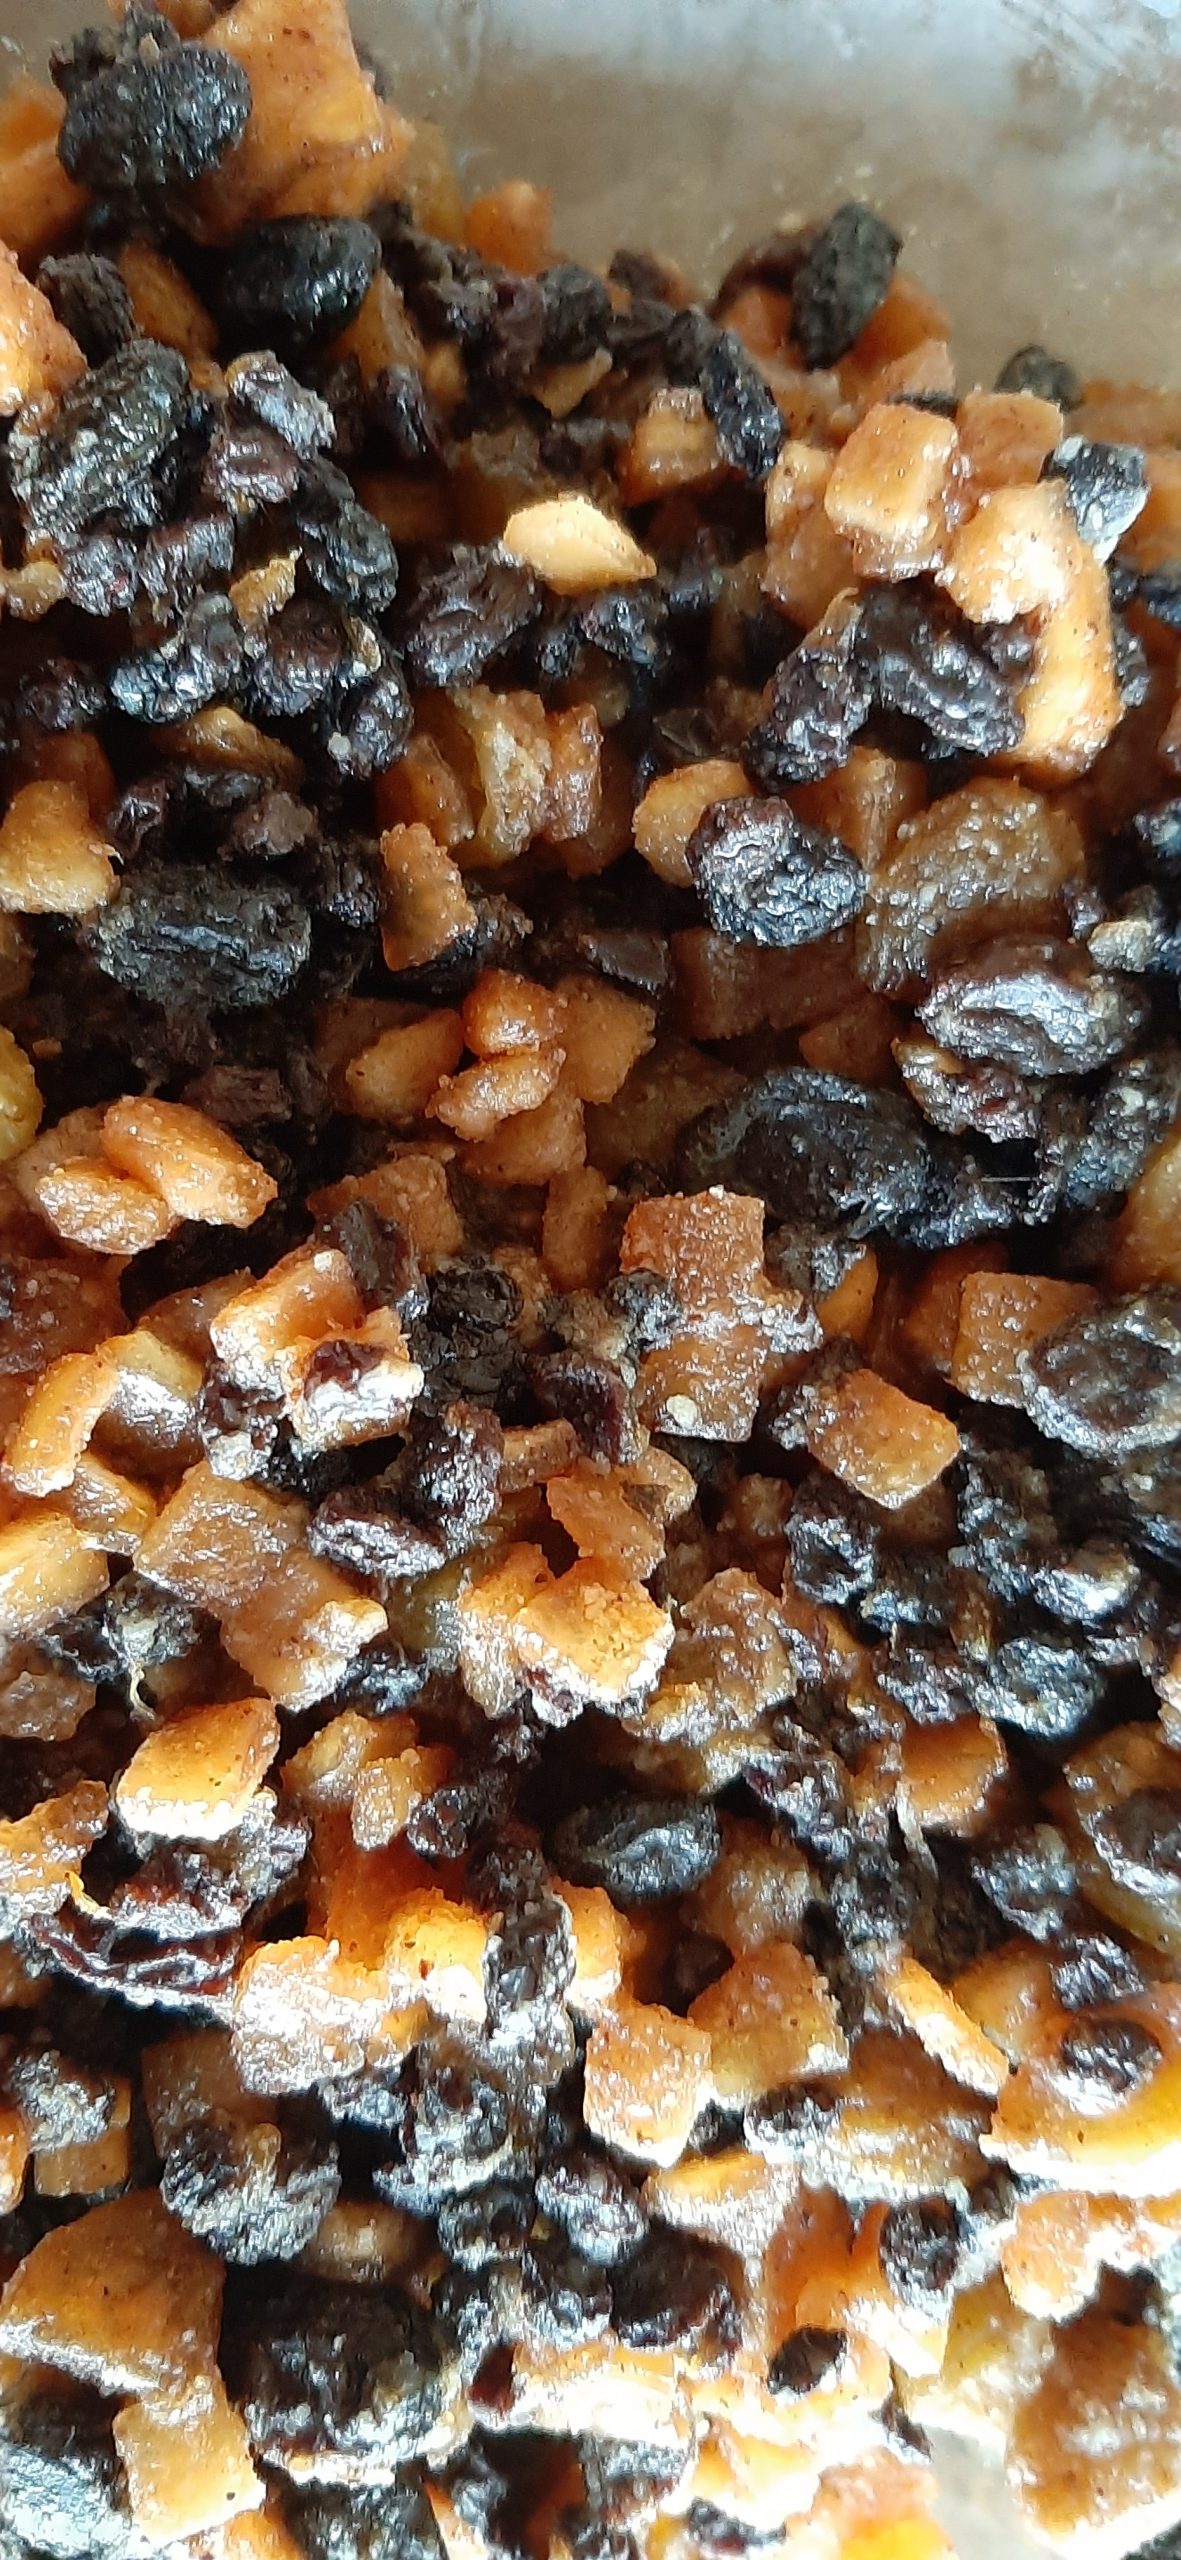
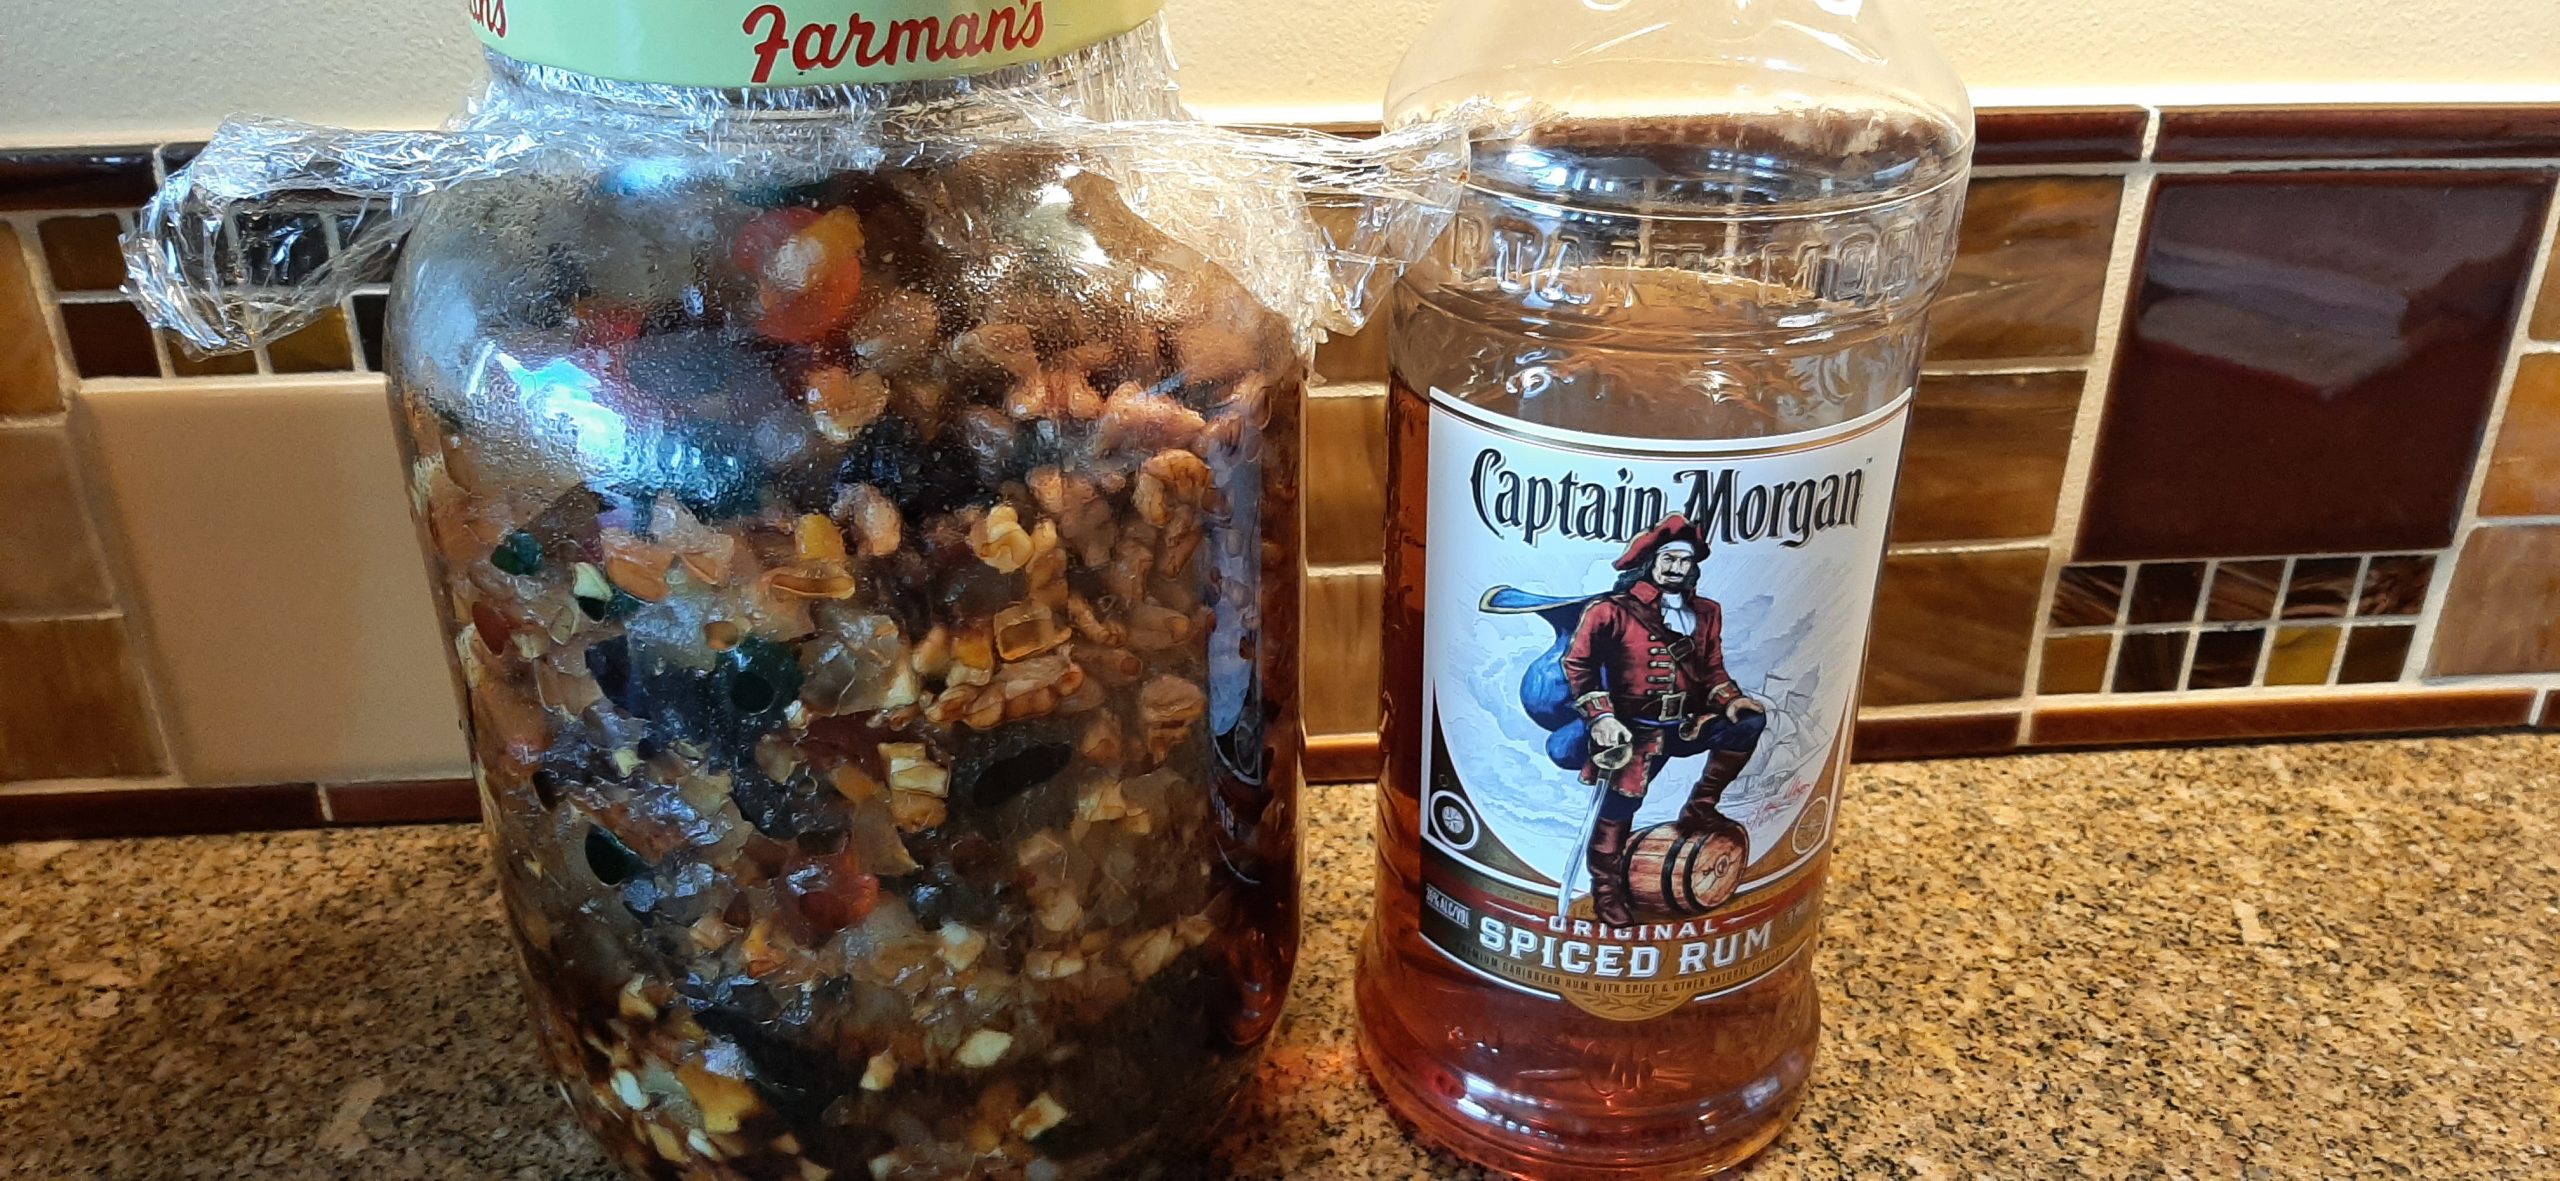
Notice the 1-gallon container for macerating the dried fruit, candied fruit, and pecans. It’s actually a jar I saved about 40 years ago that originally contained dill pickles. Never throw a one-gallon jar away. They store cookies and other assorted items that you want to keep airtight or keep something like spare silverware clean.
The finished product.
Well, in keeping with my decision to post my list of personal favorite edibles (by category) and re-publish some of my favorite recipes, I offer my previously posted recipe for Holiday Fruitcake. I also have a wonderful recipe for Caribbean Black Fruitcake on site, but this year I decided to make this fruitcake for gifts and to set aside for the year to come. (I love to bring out a fruitcake on a trailer trip, for example, because for us and our friends, fruitcake is a favorite treat.)
I hadn’t decided to start with fruitcake with my re-posting project because I am well aware that there are those among us who think fruitcake is a dreary dry brick-like- cake containing icky tasting candied fruit and burnt raisins. (That would be me from my grandmother’s fruitcake.) And, that there are people who still believe that anyone who actually likes fruitcake has a mental deficiency. I get that, because I too felt that way until about three decades ago when someone gave us a fabulous fruitcake they had purchased at great expense. And OMG, it was the best thing I had ever tasted.
Well, you know me! I immediately went to work developing a fruitcake recipe that would result in a fruitcake that was as good or maybe even better than the one we had been gifted. And I came up with this recipe.
But the real reason I am posting this recipe today, is because yesterday I fulfilled the first requirement in preparing this recipe. I filled a one-gallon glass container (as witnessed by picture above) with dried fruit, candied fruit, pecans, and 3 cups of spiced rum. This delightful assembly of ingredients would then spend the next few days being periodically turned upside down so every single tasty morel could become good friends with Captain Morgan. (See picture of Captain Morgan above.)
After I finished this hour and a half of cutting and chopping fruit and nuts, I went back to my computer and decided to see what was happening on Facebook.
OK, I’m not a woo-woo kind of gal. But right there on “Your Memories on Facebook” was my post from December 1, 2009, containing only the following words on my post: “One gallon of fruit and nuts soaking in 3 cups of spiced rum on my counter. I wonder what it will be when it grows up? Fruitcake perhaps?”
Now if that’s not a less than subtle hint from the beyond to post this recipe today, I don’t know what else it could be. Coincidence? I think not!
But in all reality, this is the perfect time to remind people that a) fruitcake can be amazingly delicious, b) fruitcake makes a perfect Christmas gift (but only to those we truly love), and c) if you are going to make fruitcake, now is the time. Because fruitcake only gets better the longer it is allowed to “ripen”. In fact, I should have started this process about 2 months ago. But I have yet to even think about making fruitcake before the first of December. I do, after all, have a life outside the kitchen!
But starting this year, I’m adding one more step to my original recipe. After the baked fruitcakes have cooled, and before I package them, I am going to poke holes in the top with a toothpick, and slowly slather (using a pastry brush) on more of the Captain’s finest. Not too much rum to make a soggy mess. But I believe this will give the fruitcake even more flavor (ya think?) and help its taste and texture to better resemble a fruitcake that has been allowed to age longer. That’s the plan at least.
Well, that’s it for today. I hope you too have plans for the holidays that include some homemade gifts. Our dear friend Vicki has the whole Christmas giving thing down pat. She always includes homemade jams, curds, stollen, and various and sundry other edibles that make her packages a real treat to receive.
And for me, giving is the real secret to enjoying Christmas. It’s not about receiving. It’s about the joy you can bring someone else by thoughtful and from-the-heart gifts. So, please don’t feel you must provide expensive gifts to your loved ones. Or that homemade gifts would be less appreciated than something purchased. In my humble opinion, homemade gifts best exemplify the spirit of Christmas.
So, happy yummy fruitcake to everyone and to all – peace and love.
1 lb. chopped dried fruit combination (peaches, pears, apricots, apples, golden raisins, currents, etc.)
½ lb. dried Bing cherries
1 lb. chopped dates
1 lb. candied/glazed pineapple, coarsely chopped
1 lb. or more red and/or green candied/glazed cherries, coarsely chopped
3 c. spiced rum, plus more for soaking
1 c. unsalted butter, room temperature
2 c. brown sugar
2 tsp. cinnamon
1½ tsp. ground allspice
1½ tsp. ground nutmeg
5 lg. eggs
2 c. unbleached all-purpose flour
2 tsp. baking powder
½ tsp. salt
1 lb. coarsely chopped pecans (about 4 cups)
Combine dried fruit, dried Bing cherries, chopped dates, candied pineapple, candied cherries, and rum in a covered glass container for 3 to 7 days. 7 days is best.
Cream butter, sugar, and spices until light and fluffy. Add eggs one at a time.
In a separate bowl whisk the flour, baking powder, and salt together. Stir into butter mixture just until combined. Stir in the macerated fruit and nuts, including any remaining liquid.
Place a large shallow pan of water on the bottom rack of your oven to prevent the cakes from baking too dry. Pre-heat the oven to 275-degrees.
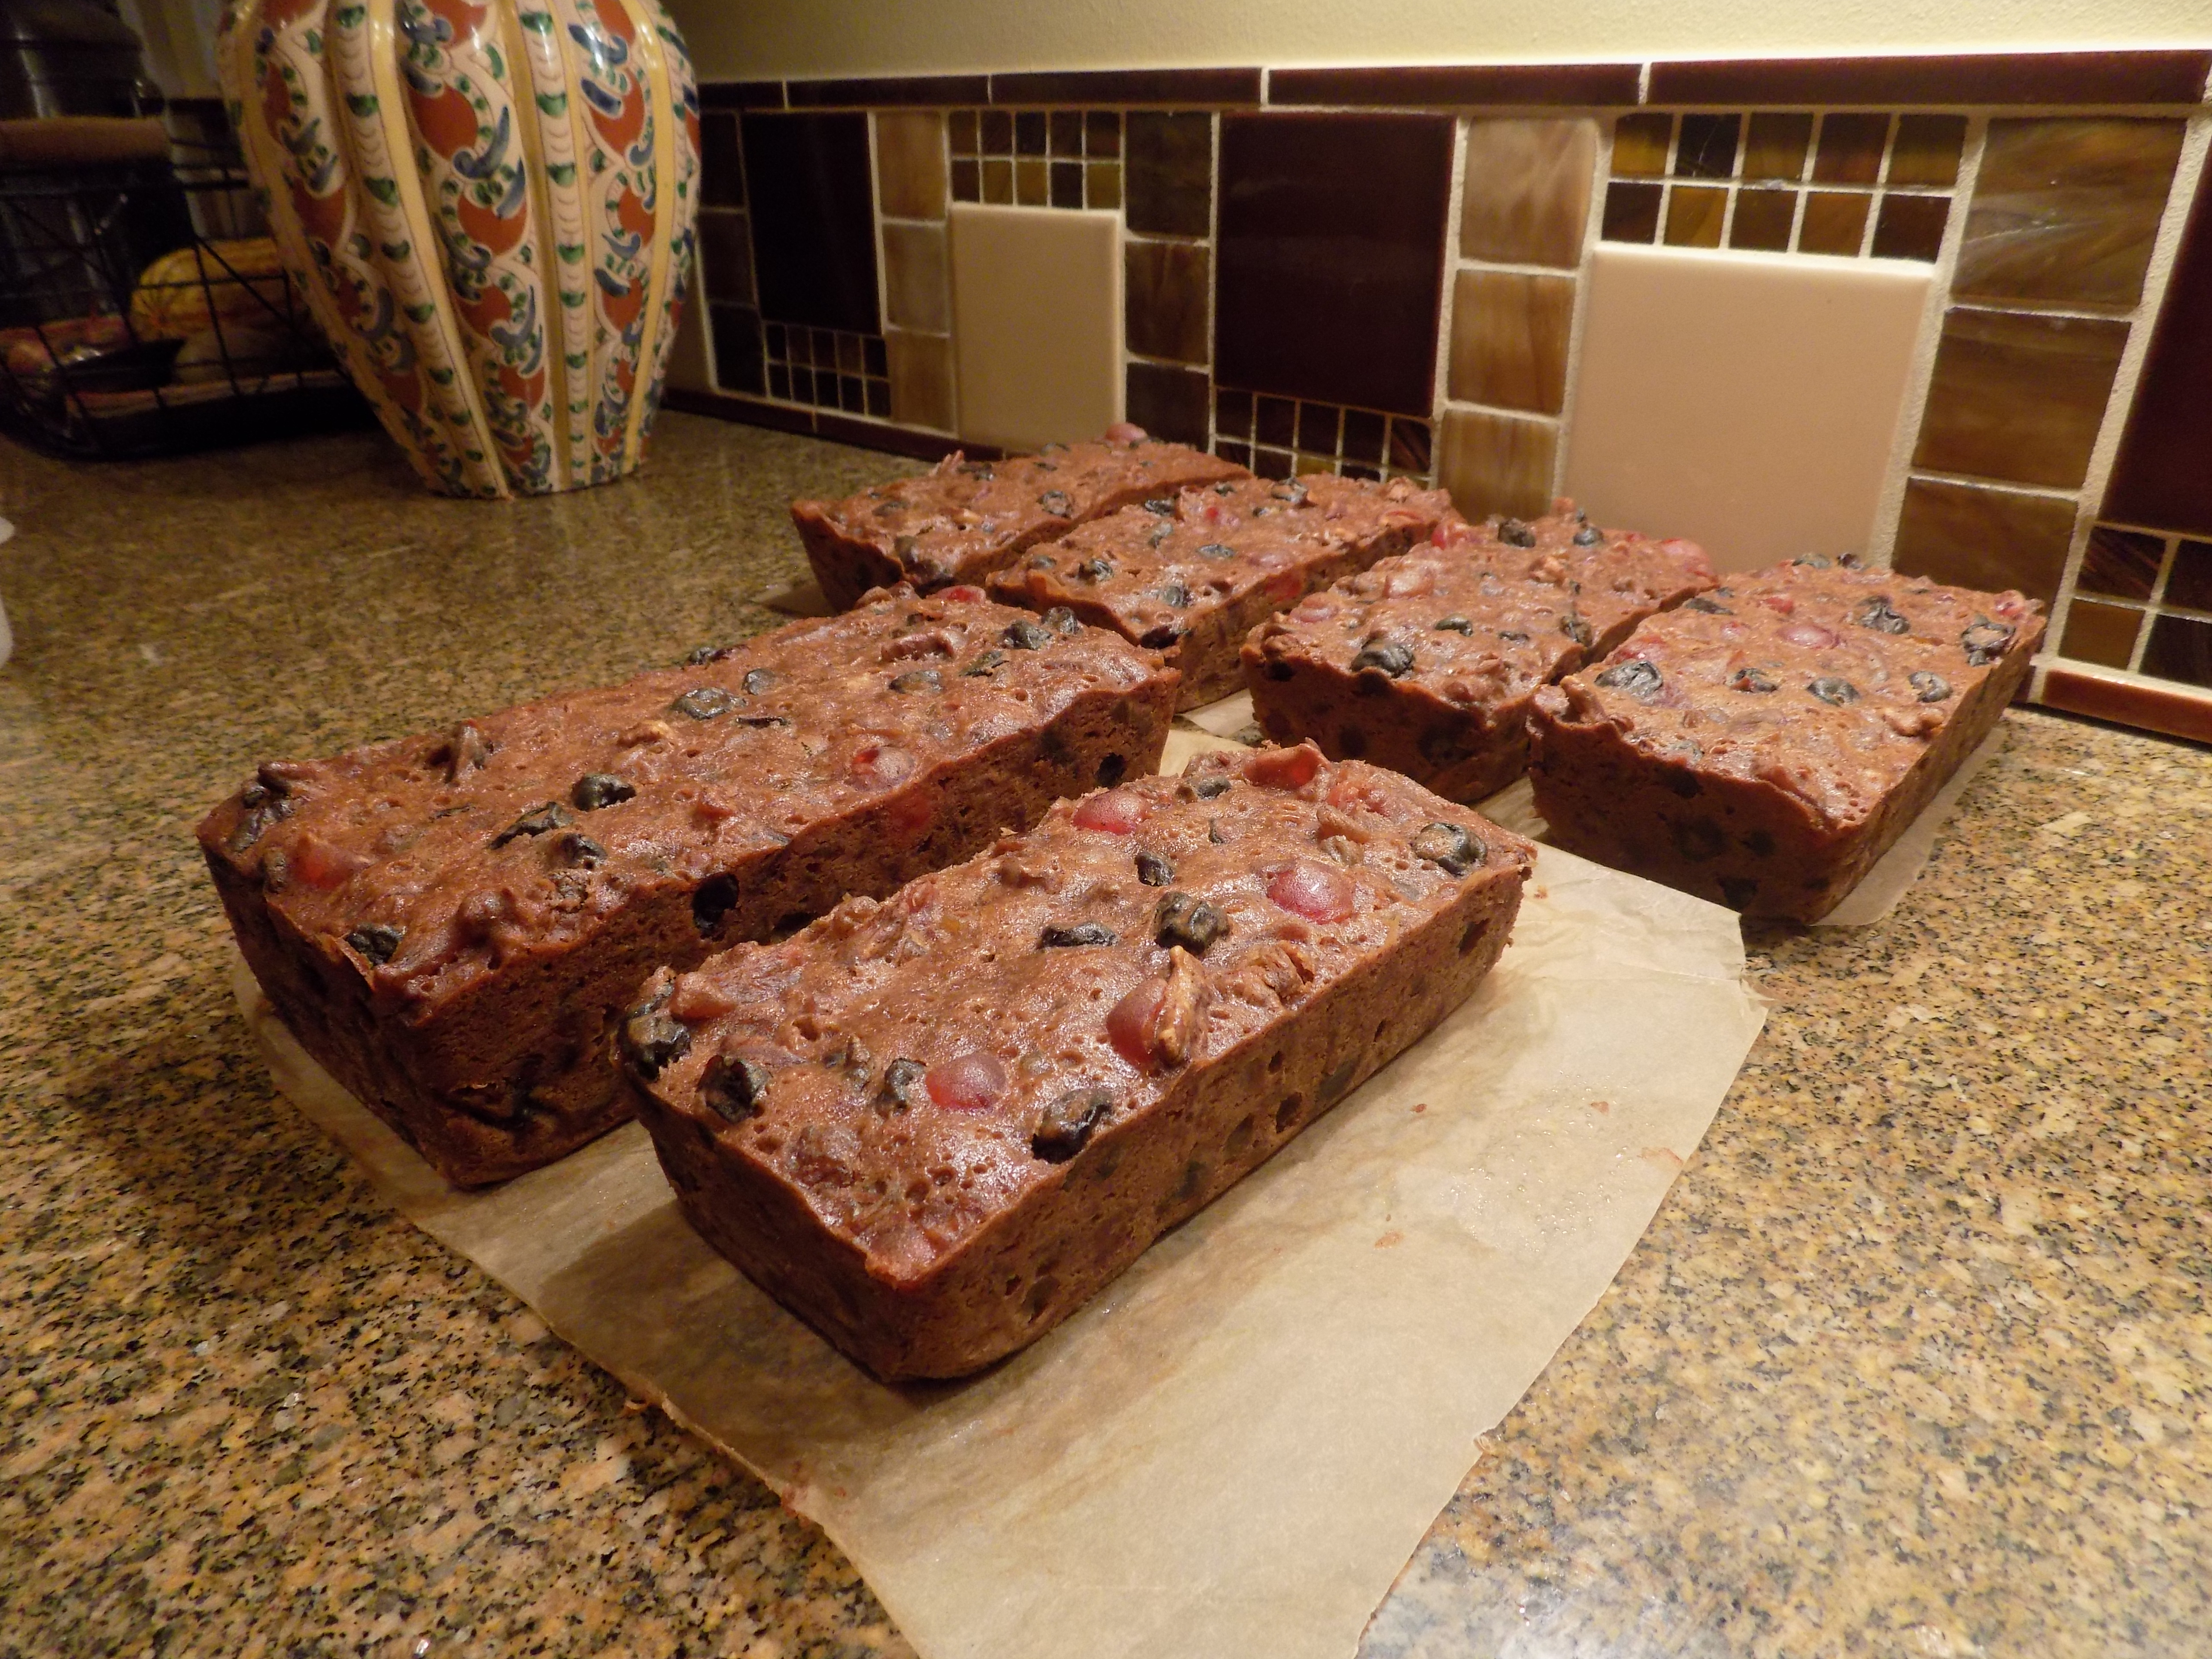
Line 3 (9×5-inch) loaf pans or 1 (9×5-inch) and 5 (7×4-inch) loaf pans with parchment paper and lightly grease paper. Divide the batter evenly between the pans and bake on the middle rack of the pre-heated oven for 2-2½ hours or until a toothpick inserted in the center comes out clean.
Remove from oven and cool on racks for one hour. Remove cakes from pans, and carefully peel off the parchment paper.
When completely cool, place on a rimmed baking sheet, poke lots of tiny holes in the top of each, and slowly slather with more spiced rum. Allow to sit for several hours while the cake absorbs the booze before tightly wrapping in plastic wrap and foil. Store for at least 1 month before serving. (Good luck with that!) (Haven’t had it happen yet!)
OK, this is really Sweet Potato Pie. But pumpkin pie looks just like this. I never took a picture of pumpkin pie because I thought I’d already posted the recipe. Duh!
While going through all my recipes to share my favorites with you, I realized I had never posted my recipe for pumpkin pie. What?! Sweet Potato Piewith Bourbon Caramel Whipped Cream, yes, but not my favorite pumpkin pie recipe. Whenever I want to make this pie, I just look up the recipe in my first self-published cookbook. So, I guess that’s why I never got around to publishing the recipe on this site. But I have to say that if you don’t already have a wonderful pumpkin pie recipe, you do now.
The filling is smooth and creamy with lots of warm spices to set this recipe a bit apart from others. And the bourbon spiked whipped cream just makes the whole dessert simply amazing.
And yes, I know. Thanksgiving has come and gone. But it is never too late to make a pumpkin pie.
And because I’m basically a good person (or try my best), I’ve provided you with the recipe for my favorite pie crust. (Recipe below.) The one pie crust recipe that has never, ever failed me. So, I hope you enjoy that recipe too, although it’s a bit different from most pie crust recipes. But I’m sure you will have figured that out for yourself once you have read the instructions.
Well, that’s it for today. I’m still working on my list of favorite recipes by category. And believe me, it’s quite a challenge. Narrowing my favorites out of hundreds of recipes, is just plain crazy. But then, well, you see where I’m going with that!
Anyway, it’s helping me figure out my list of goodies to send out in my Christmas packages to my kids. Which BTW, is one of my favorite things to do. Makes me feel like I’m still Santa Claus. Speaking of which, I read this the other day and thought I might share it with you. I believe the author was Robby Bennett, but I can’t be sure of that. But in my opinion, whoever wrote this lovely response to “Is there a Santa Claus” should be awarded the Pulitzer Prize.
ATTENTION TO ALL PARENTS WHO NEED TO TELL THE TRUTH ABOUT SANTA
Son: “Dad, I think I’m old enough now. Is there a Santa Claus?”
Dad: “Ok, I agree that you’re old enough. But before I tell you, I have a question for you. You see, the “truth” is a dangerous gift. Once you know something, you can’t unknow it.
Once you know the truth about Santa Claus, you will never again understand and relate to him as you do now.
So, my question is: Are you sure you want to know?”
Brief pause…
Son: “Yes, I want to know”
Dad: “Ok, I’ll tell you: Yes, there is a Santa Claus”
Son: “Really?”
Dad: Yes, really, but he’s not an old man with a beard in a red suit. That’s just what we tell kids. You see, kids are too young to understand the true nature of Santa Claus, so we explain it to them in a way that they can understand.
The truth about Santa Claus is that he’s not a person at all; he’s an idea.
Think of all those presents Santa gave you over the years.
I actually bought those myself.
I watched you open them.
And did it bother me that you didn’t thank me?
Of course not!
In fact, it gave me great pleasure.
You see, Santa Claus is THE IDEA OF GIVING FOR THE SAKE OF GIVING, without thought of thanks or acknowledgement.
When I saw that woman collapse on the subway last week and called for help, I knew that she’d never know that it was me that summoned the ambulance.
I was being Santa Claus when I did that.”
Son: “Oh.”
Dad: “So now that you know, you’re part of it. You have to be Santa Claus too now. That means you can never tell a young kid the secret, and you have to help us select Santa presents for them, and most important, you have to look for opportunities to help people. Got it?” Help each other this Christmas and…be kind.
And on that refreshing thought about how to approach Santa, gift giving, and the upcoming holiday in general, I wish you peace and love.
For the pie:
pie crust for 9-inch one crust pie (regular not deep-dish pie plate)
2 c. canned or pureed fresh pumpkin
¾ tsp. kosher salt
1 (14.5-oz.) can evaporated milk
2 lg. eggs
1 T. melted unsalted butter, cooled
¾ c. granulated sugar
1½ tsp. ground cinnamon
¼ tsp. ground ginger
¼ tsp. ground nutmeg
1/8 tsp. ground cloves
Line your pie plate with crust. Crimp the edges. Set aside.
In a large mixing bowl, combine the pumpkin, salt, evaporated milk, eggs, and melted butter. In a separate bowl, whisk the granulated sugar and spices together. Stir into the pumpkin mixture.
Pour into the pastry lined pie plate. Cover the crust with thin strips of aluminum foil to prevent excess browning. Remove the strips for the last 10 minutes of baking time so that the crust can obtain some color. (You don’t want a white crust. But you don’t want a crust that is too dark either.)
Bake in a pre-heated 375-degree oven for 40-45 minutes or until knife inserted near the edge comes out clean. (The middle will set as the pie cools.)
Remove from oven and let cool completely before cutting. Or refrigerate if not serving the pie until the next day. Serve dolloped with whipped cream
For the Bourbon Whipped Cream:
1 c. heavy cream
2-4 T. powdered sugar
2-3 tsp. bourbon
Whip the heavy cream to stiff peaks. Add the powdered sugar and bourbon. Serve dolloped on big old slices of cooled pie.
Please note: I have never in my life made only 1 pumpkin pie. So, I make 1½ times this recipe for 2 (8-inch) pies.
PIE CRUST
¼ c. very cold water
2 c. unbleached all-purpose flour
1 tsp. kosher salt
heaping 2/3 c. Crisco
Step 1 – Pour cold water into a small bowl. Step 2 – Measure flour and salt into a mixing bowl. Step 3 – Take 1/3 cup of the flour back out of the mixing bowl and stir it into the water. Make a paste. Set aside. Step 4 – Add the Crisco (heaping 2/3 cup) to the flour and salt mixture. Mix together. (I use my KitchenAid mixer.) Step 5 – Add the water/flour paste to the flour/shortening bowl and mix just until blended. Do not over-mix. Roll out dough and place in pie plate.
This recipe makes enough dough for a double crust pie, if using a regular sized pie plate, or one large bottom crust with a little left over for Pastry Cookies. See recipe below.
PASTRY COOKIES
pie crust scraps
ground cinnamon
granulated sugar
Place scraps on a parchment paper lined baking sheet. Sprinkle liberally with cinnamon and granulated sugar.
Bake along with your pie for 10-15 minutes depending on how thick you rolled your dough.
Remove from oven and allow to cool before devouring these tasty morsels. Don’t worry about storing them. There won’t be any left to store. This I promise you.
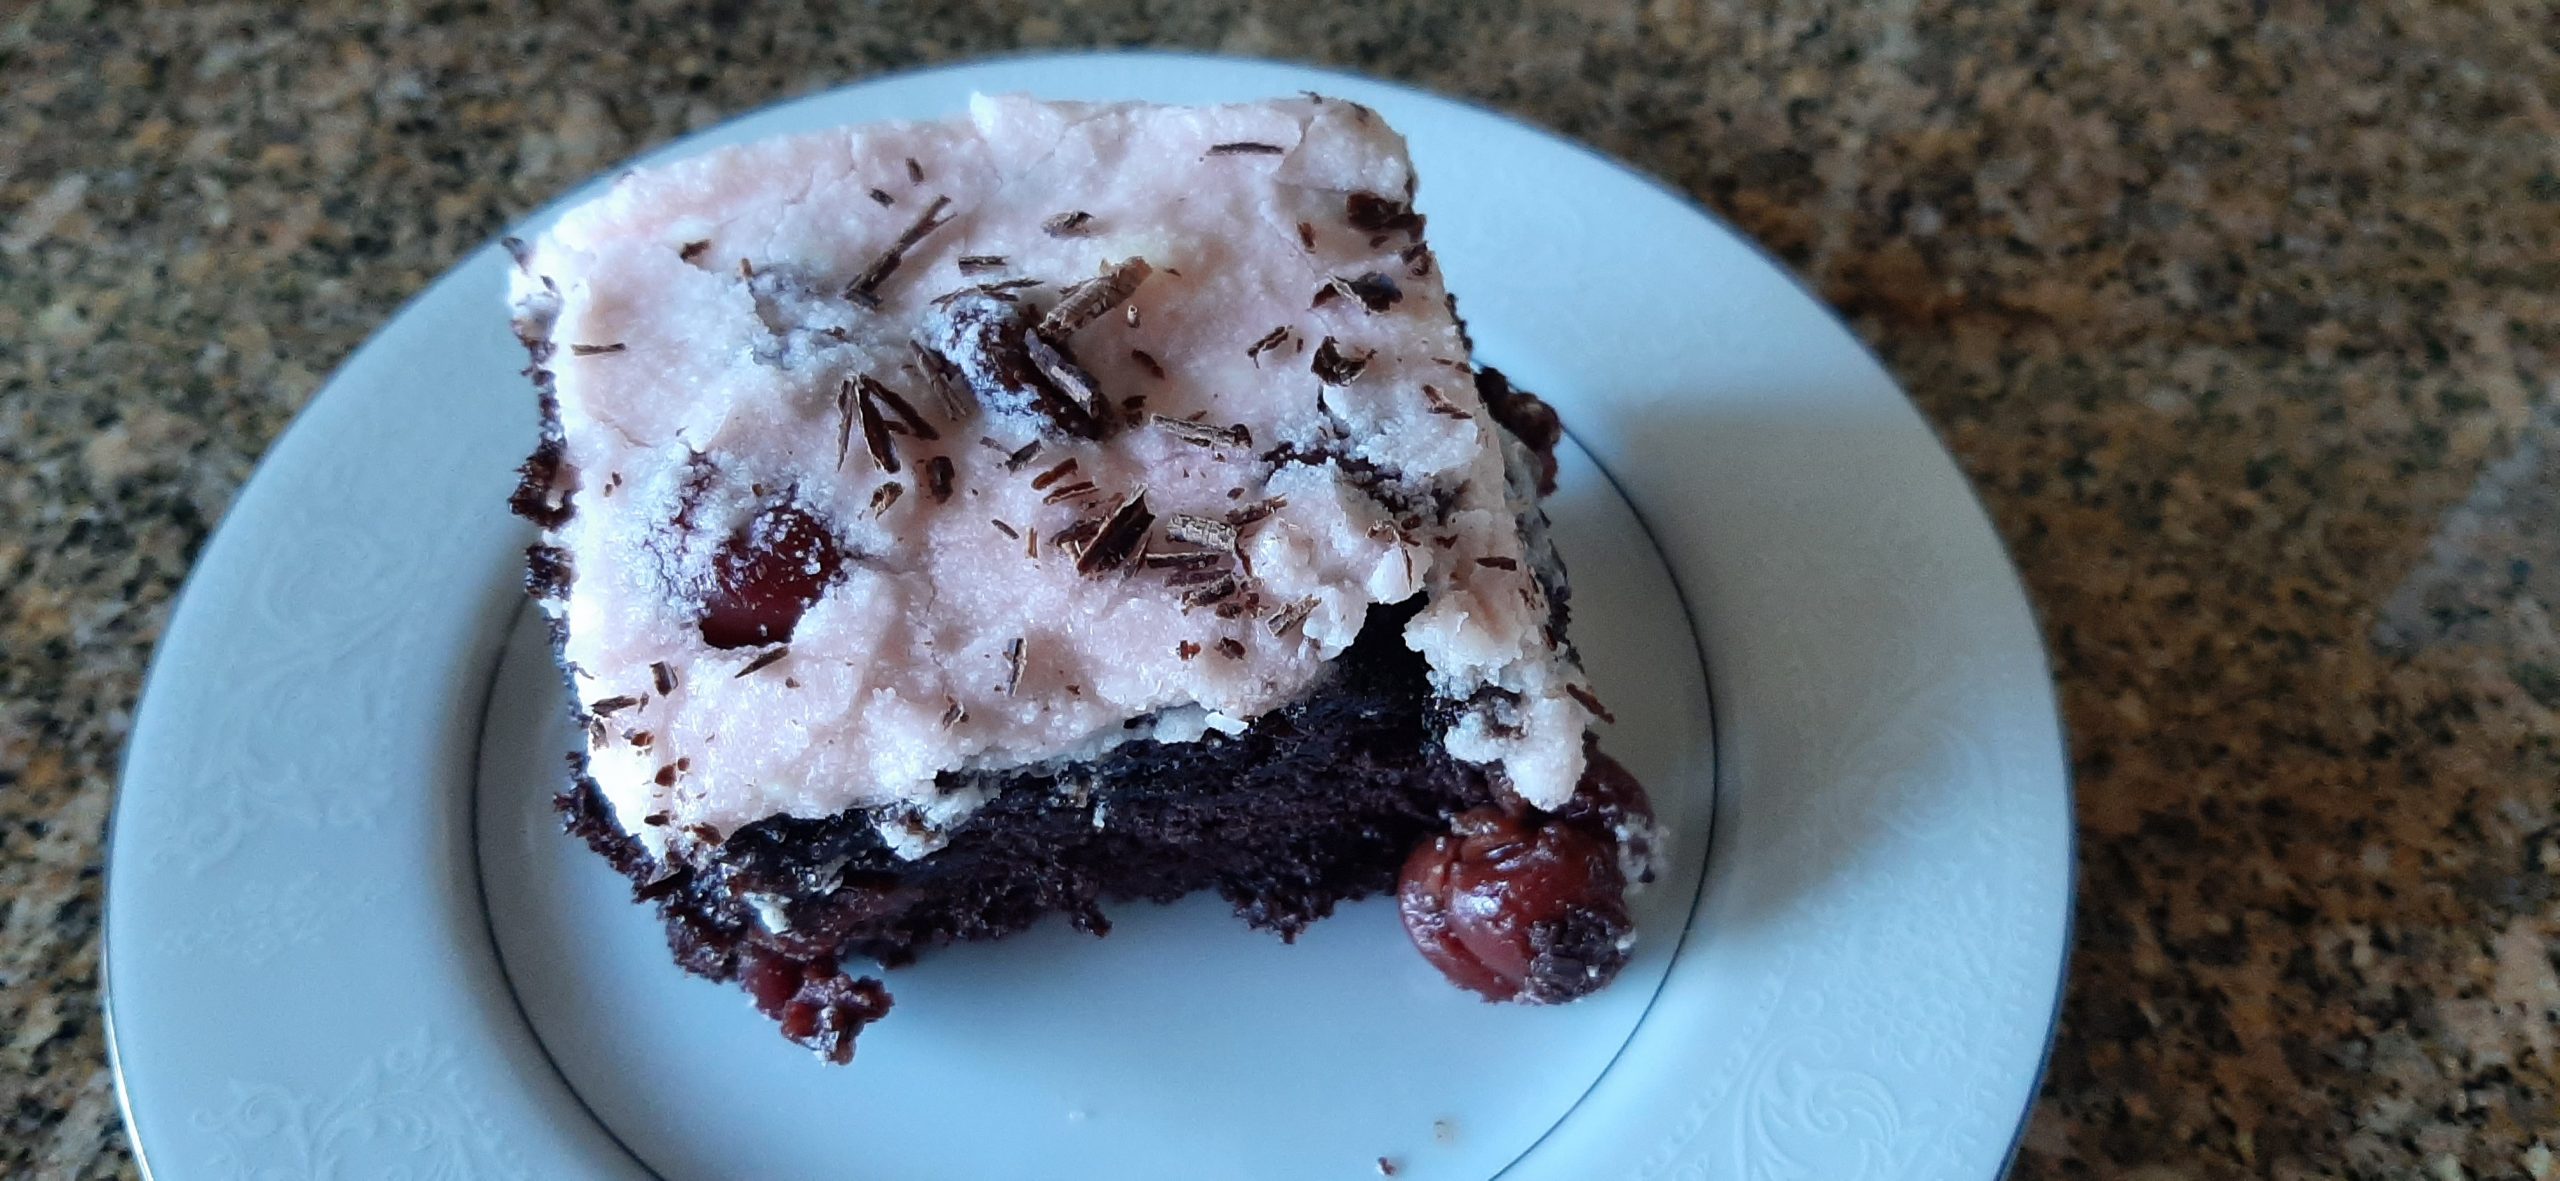
This Black Forest Cake can be made 2 ways. My way or my other way. Allow me to explain.
I needed a large sheet cake to serve roughly 40 people. I knew I wanted to make a Black Forest Cake because I was serving Octoberfest food. But making food for that many people requires planning. And refrigerator space.
So, I decided as the top layer of my Black Forest sheet cake, I would use frosting rather than whipped cream. Made sense at the time. (I would have to refrigerate this huge sheet cake if I used whipped cream. Whereas frosting would be fine sitting on top of the cake at room temperature for a few hours.)
So, as planned, I served this cake to 36 people yesterday. And not one of them told me they never wanted me to serve this dessert again. In fact, the guests I heard from proclaimed it a winner. And to top things off, my dear friend Margo requested this cake for her upcoming birthday. So, there you go.
What I told a few of our guests, and now I am telling you, was that I glommed this recipe together using my all-time favorite chocolate cake recipe. Then for the sauce, I agonized over whether to use some kind of cherry liqueur or cherry flavored brandy (think Kirschwasser) in the sauce. But finally, I chose to use bourbon, my favorite liquor to flavor everything from caramel sauce to BBQ sauce. And I think I made the right decision. Because bourbon lends such a lovely sweetness to all kinds of dishes, and it didn’t fail me in the cheery sauce either.
Since I was under cooking/baking time restraints, not to mention refrigerator space limitations, I made the cake on Wednesday and froze it. Then I made the cherry sauce on Thursday and refrigerated it. I left making the frosting until Sunday morning, the day of the home concert. And using frosting rather than whipped cream topping on the cake, I could leave the cake on a counter until needed.
At 5:00 am Sunday morning I woke up in a panic. How in the wide world of sports was I going to spread frosting over a sauce? (And why hadn’t I considered this aspect of putting the cake together a bit earlier?) But here I was on Sunday morning with 36 hungry mouths to feed (including Andy and me) and our guests due to arrive at 1:00 pm. And of course, with a lot of other last-minute food details that needed my attention.
So, Mr. C. took the cake out of the freezer when he first got up Sunday morning. A little while later I slathered on the cherry sauce, and then the fun began. (Just as I had predicted would happen at 5:00 am.)
Frosting absolutely does not like being spread over sauce. In fact, it rebels at the very thought of being accommodating to the poor cook who failed to take this fact of nature into consideration. But I won in the end. As will you if you decide to make this cake and use frosting instead of at the last-minute slathering on a thick coating of whipped cream. But truly, either using a butter cream frosting or a lovely cherry flavored whipped cream, it matters not. Both are going to make for one darn good piece of cake. And perfect for this time of year.
Well, that’s it for today. If you want to know how I made it work (spreading frosting over a sauce) you’ll just have to read the directions below. And yes, I made a double batch of the cake batter, cherry sauce, and the frosting to feed my guests. A bit left, but then that’s a win for Mr. C. and me!
And with that, as always, I wish you peace and love.
CHOCOLATE CAKE:
1 c. unsalted butter, room temperature
3 c. packed brown sugar
4 eggs, room temperature
1 T. vanilla extract
3 c. unbleached all-purpose flour. fluffed
¾ c. cocoa powder
1 T. baking soda
½ tsp. salt
1 rounded tsp. instant espresso powder
1½ c. water
1-1/3 c. sour cream
Cream the butter and brown sugar together. Add the eggs, one at a time, beating well after each addition. Beat in the vanilla. Whisk together the flour, cocoa powder, baking soda, salt, and espresso powder. Add to creamed mixture alternately with water and sour cream, beating well after each addition.
Pour into a greased and lightly floured 10×16-inch cake pan, or 1 9×13-inch cake pan and 1 8×8-inch cake pan. Bake in a pre-heated 350-degree oven for 25-35 minutes or until a toothpick inserted near the center comes out clean. Don’t over-bake! Remove from oven and place pan on a wire rack to cool completely. Or freeze until needed.
TART CHERRY SAUCE WITH BOURBON:
2 lbs. frozen pitted tart cherries, halved
¼ c. bourbon
6 T. cherry juice (from defrosted cherries)
2 T. cornstarch
¾ c. granulated sugar
Place the frozen cherries in a colander set over a bowl. Allow the cherries to thaw. (This takes several hours.) Save the juice for this recipe and for the buttercream frosting or whipped cream topping.
Whisk the bourbon, cherry juice, and cornstarch together in a large heavy pot. Add the sugar and defrosted cherries. Bring to a boil, stirring to avoid burning.
Once the sauce thickens up a bit, remove from heat, cool, and refrigerate until needed. (It will thicken up more as it cools.)
BUTTERCREAM FROSTING
½ c. unsalted butter, room temperature
1 tsp. vanilla extract
3 T. cherry juice (from thawing the frozen cherries), or more if needed
tiny pinch of kosher salt
4 c. powdered sugar, or more as needed
whole milk or heavy cream, if needed
Beat the butter until soft and fluffy. Add the vanilla, cherry juice, and kosher salt, mixing until thoroughly combined.
Add the powdered sugar on low speed. Add more cherry juice or milk or cream a few teaspoons at a time until the frosting is light and fluffy and to your desired consistency. (The frosting needs to be very soft to spread over the cherry sauce.) (And I use the term “spread” very lightly!)
WHIPPED CREAM TOPPING
2 c. (1 pint) heavy whipping cream, or more if you like lots of whipped cream
½ tsp. vanilla bean paste or vanilla extract, or more to taste
2 tsp. cherry juice, or more to taste
6 T. powdered sugar, or more to taste
Whip the cream to hard peaks. Add the vanilla bean paste, cherry juice, and powdered sugar. Whip until blended.
ASSEMBLE THE CAKE:
chocolate shavings
Top with Frosting:
Spread the cherry filling over the cooled cake with an offset spatula. Place the cake in your freezer and chill for 30 minutes to set.
Taking small dollops of frosting at a time, gently spread the frosting over cherry filling with an offset spatula. The sauce will come through during this process, but it looks nice and tastes wonderful. Top with chocolate shavings.
The cake can sit at room temperature for several hours.
Top with Whipped Cream:
Carefully spread the whipped cream evenly over the cherry sauce. Top with chocolate shavings. Serve immediately or refrigerate until ready to serve, but not more than 2-3 hours.
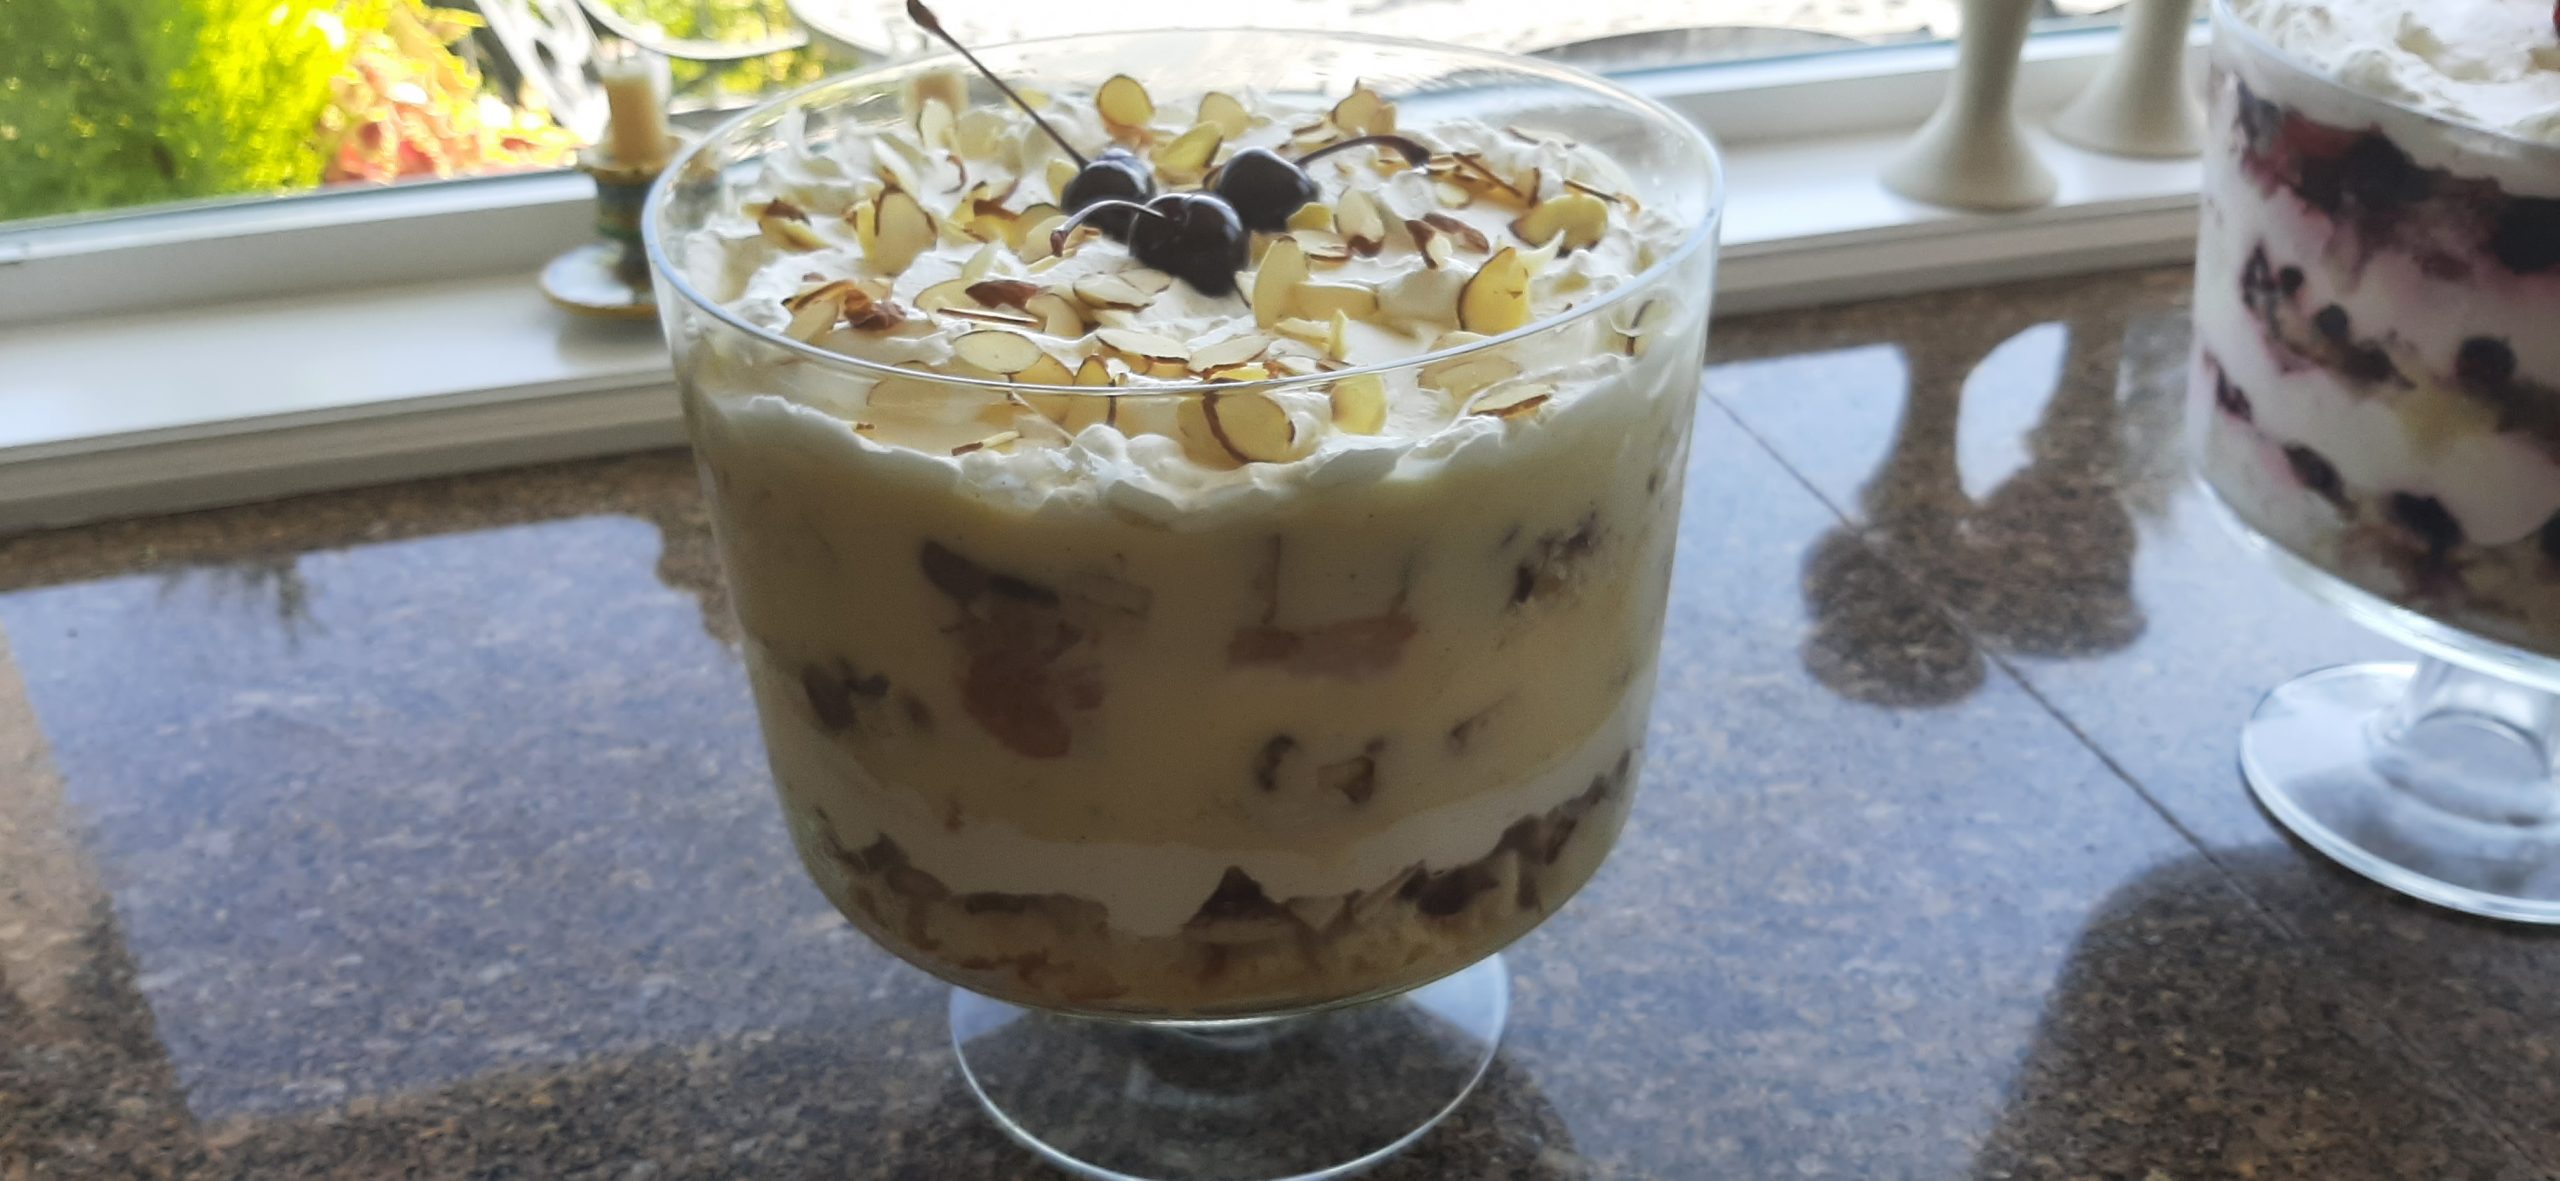
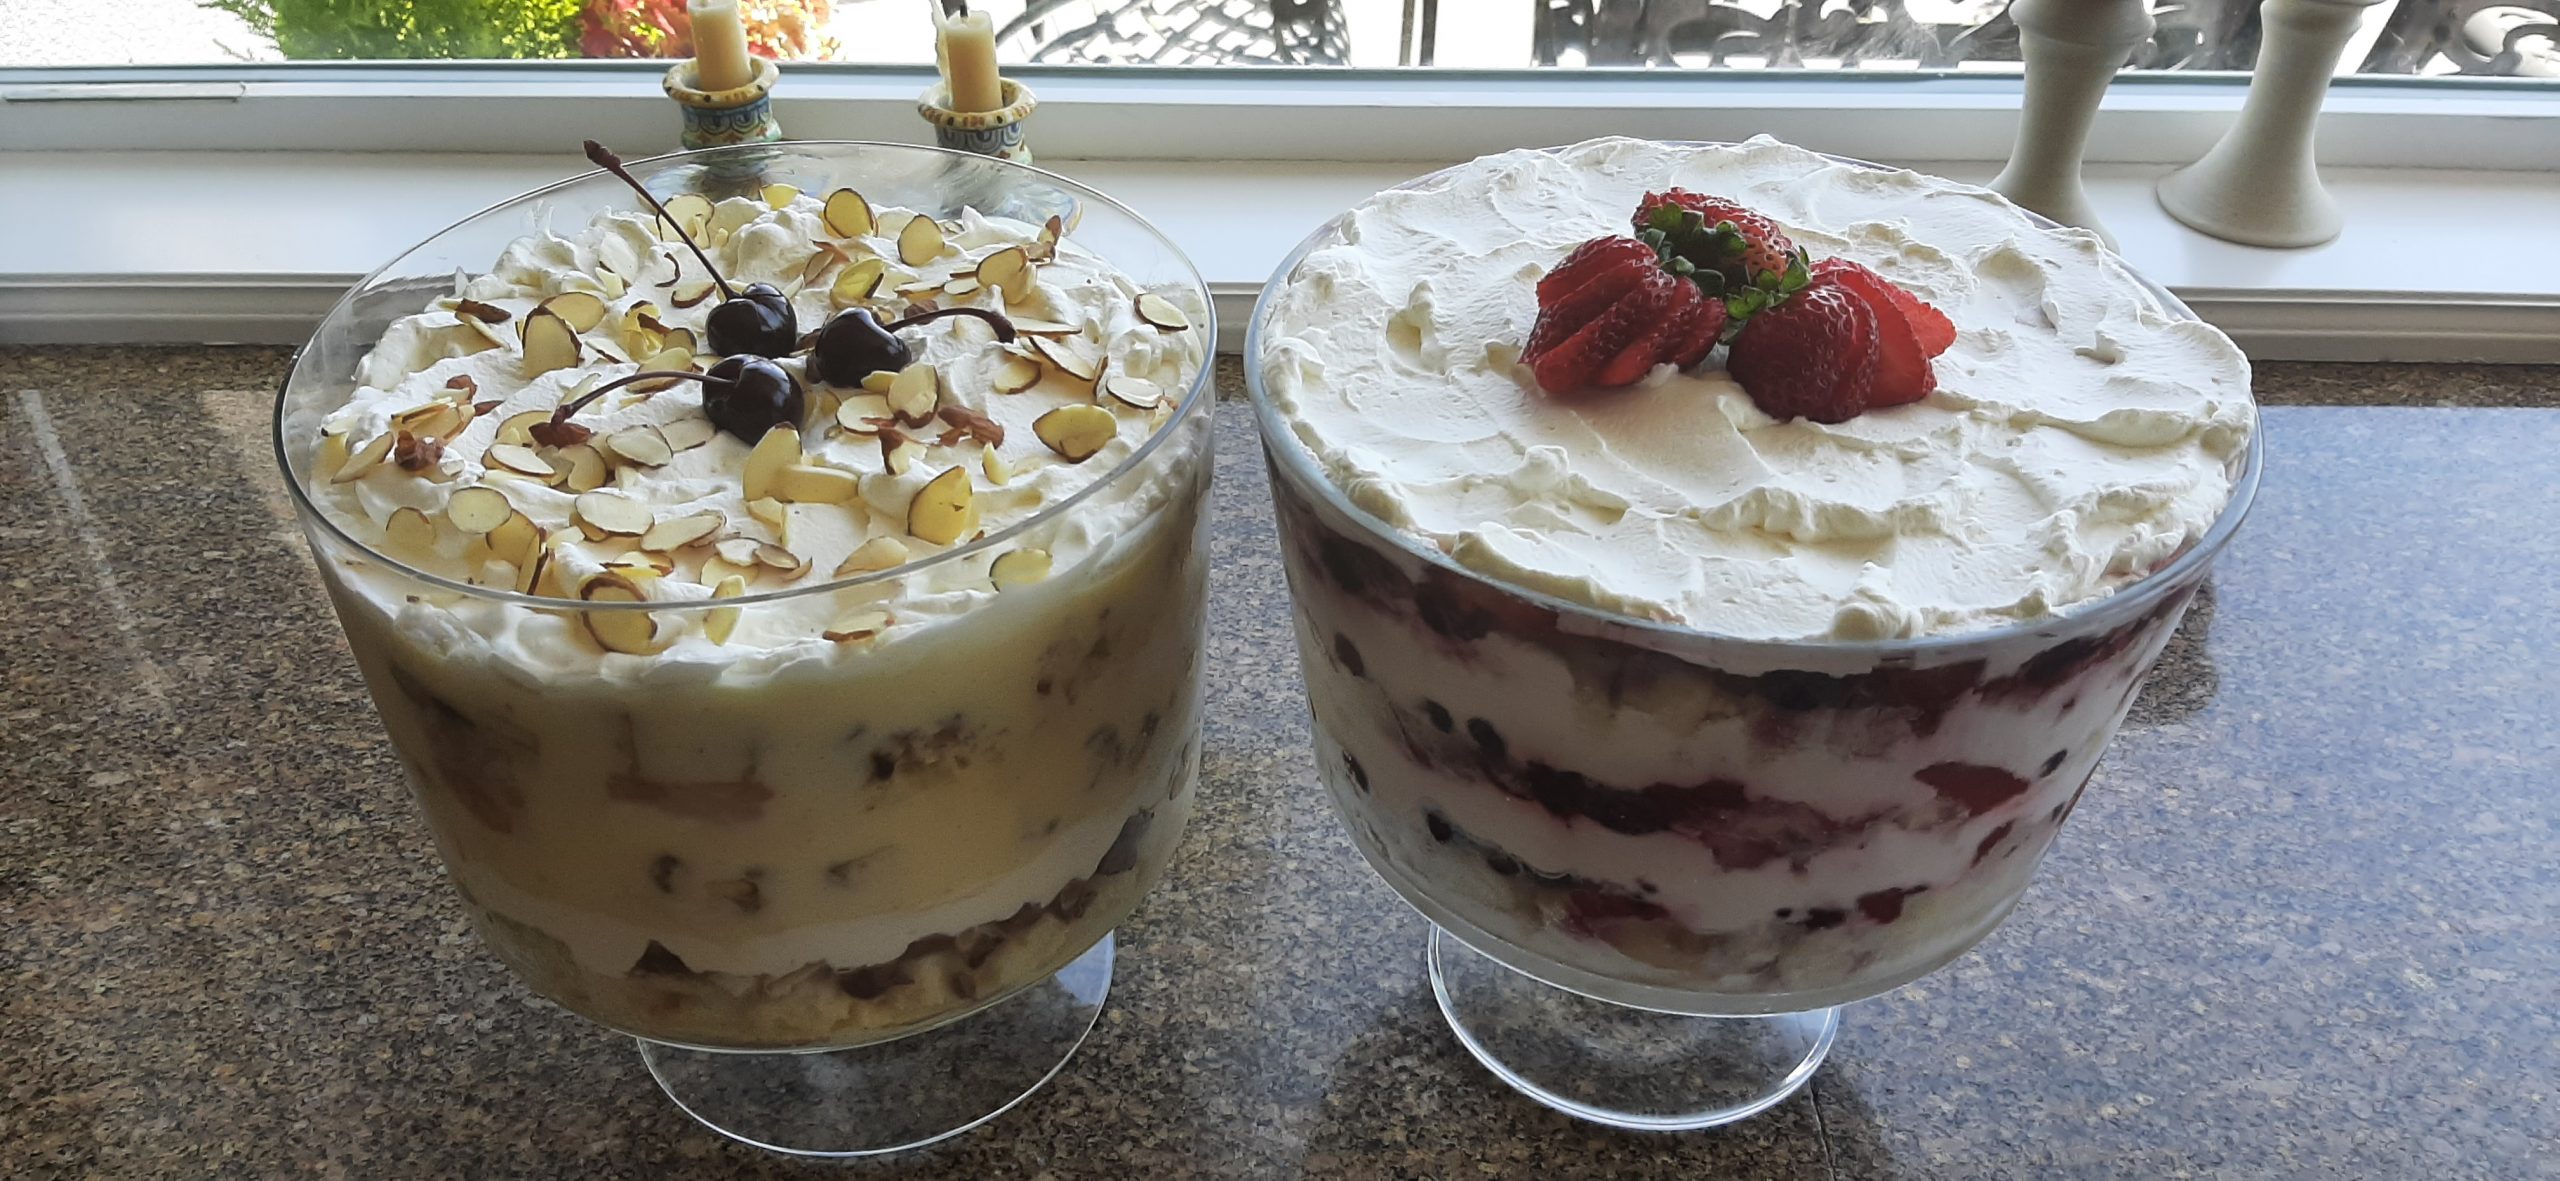
Banana Split Trifle on the left, Mixed Berry Trifle on the right
There are several meanings for the word “trifle”. A thing of little importance or value. To treat someone or something without seriousness or respect. Or my personal favorite – a layered dessert of English origin. The usual ingredients being a thin layer of sponge fingers or sponge cake soaked in sherry or another fortified wine, a fruit element, custard, and whipped cream layered in that order in a glass dish.
However, I do things a little differently when I make trifles. (Of course, I do!)
I use cream cheese pound cake rather than sponge cake for both this trifle and for my Mixed Berry Trifle. And I use pudding rather than custard if I use it at all. (My Mixed Berry Trifle doesn’t call for any pudding or custard.) For my Fudgy Brownie, Chocolate Mousse, and Raspberry Trifle, I use brownies instead of sponge cake and chocolate mousse instead of custard. So, like I said, I change things up a bit when I make trifles. But the basic idea is still the same. And since I’m sure you were wondering what the difference is between custard, pudding, and mousse – allow me to elucidate.
Most custard and pudding recipes contain eggs. After that, the main difference is that pudding uses starch for thickening, while in most instances, custard is thickened just by the eggs themselves. And the texture of custard tends to be firmer than pudding. But both pudding and custard get their thick consistency from being cooked. Mousse, on the other hand, never experiences any heat. Also, with mousse, the incorporation of air into the mixture leads to its fluffier consistency. Final analysis – both pudding and custard are semisolid and denser, while mousse offers a lighter, airier texture. But enough about puddings etc. and back to this recipe.
When I was a child, my grandmother used to make a banana cream pie which included chunks of chocolate and sliced almonds on top. She called it a banana split pie. I loved that pie. So, when I was deciding what to serve for a recent get-together, I decided to try my hand at making a banana split trifle. And the recipe below is what I came up with.
And since you might be wondering why I didn’t just make banana pudding, the answer is simple. Banana trifle is like banana pudding on steroids. Need I say more?
A huge consideration when planning a dinner party is time. Especially the couple of hours or so before guests are due to arrive. So, if I can do most of the prep work ahead of time, my anxiety level actually stays in the “safe” zone rather than spiking off the chart. So, one of the best things about serving trifle is that this delicious dessert mustbe made ahead. So, if I am hosting a large number of people, trifle is the perfect dessert. I can make the pound cake ahead and freeze it. I can also make the pudding ahead and let it sit in the fridge. Then two days before I plan to serve the trifle, I put the whole thing together, place it in the fridge, and walk away. I usually add a bit more whipped cream and decoration to the top of the trifle the same day I plan to serve it, but even that is an option.
So, yes it takes time to make a trifle. But it’s all done ahead so that I can concentrate on the other elements of the feast that require last-minute attention.
And I don’t plate trifle. I let my guests serve themselves. Fun for them, and less work for me. Because by dessert time, I’m usually wiped out. 20 years ago, I would have still had energy to burn. These days, after a gathering at our home and all the guests have taken their leave, I’m lucky to get my shoes off before I’m sound asleep!
But I still love every minute of being a hostess. And the main reason is that Mr. C. is like my silent entertaining partner. He does all the behind-the-scenes work. He does most of the grocery shopping. He brings dishes, pans, silverware, special equipment, etc. up from our downstairs storage room. He then sets up the tables and the bar and quietly does a hundred little things that make my part easier. And after everyone has left, he turns into the clean-up king. I am truly a very lucky lady. I only hope you are as lucky.
So, as always, from my kitchen to yours – peace and love to all.
For the French Vanilla Pudding:
3 c. whole milk, divided
3 T. cornstarch
pinch of salt
¾ c. granulated sugar
3 lg. egg yolks
1 T. unsalted butter
1 tsp. vanilla bean paste or pure vanilla extract
In a small bowl, whisk together ¼ cup of the milk with the cornstarch. Set aside.
In a medium saucepan, whisk together the remaining milk, salt, and sugar. Allow the mixture to heat over medium heat until it is steaming; do not let it boil.
While the milk heats, whisk the egg yolks in a separate small bowl. Once the milk is steaming, slowly stream 1½ cups of the hot milk mixture into the egg yolks, whisking constantly. Slowly add the egg yolk mixture back to the pot, followed by the cornstarch mixture. Continue to cook over medium heat, whisking constantly, until the mixture starts to simmer and has thickened.
Remove from the heat and whisk in the butter and vanilla. Allow it to cool completely. Then transfer the cooled pudding into a small bowl. Top with plastic wrap touching the top of the pudding to prevent a skin from forming and allow to chill for several hours before putting the trifle together.
For the Pound Cake:
½ c. unsalted butter, room temperature
4-oz. (½ pkg.) cream cheese, room temperature
1½ c. granulated sugar
½ tsp. salt
3 lg. eggs, room temperature
2 tsp. vanilla
1½ c. unbleached all-purpose flour
Cream the butter and cream cheese together in a large mixing bowl. Add the sugar and salt and whip until mixture is light and fluffy, about 5 minutes. Add eggs one at a time. Beat in vanilla. Add flour at low speed until well incorporated, but do not overbeat. Transfer batter to a buttered 9-inch baking pan.
Place pan in cold oven. Set temperature to 200-degrees; bake for 20 minutes. Increase temperature to 250-degrees; bake 20 minutes. Increase to 275; bake for 10 minutes. Increase temperature to 300 degrees and bake for 25 to 30-minutes or until a toothpick inserted near the middle of the cake comes out clean.
Remove from oven and cool on a rack before cutting into small chunks just before assembling the trifle. (Can be made ahead and frozen until needed.)
For the Whipped Cream:
1 c. heavy whipping cream
1 T. powdered sugar
¼ tsp. vanilla bean paste or vanilla extract
Whip the cream to stiff peaks. Add the powdered sugar and vanilla bean paste. Whip some more until well blended.
For the “banana split layers” and topping garnish:
5 bananas, cut into small chunks
¾ c. milk, semi-sweet, or dark chocolate chips, chopped
½ c. sliced almond
½ c. heavy cream
2 tsp. powdered sugar
3-5 maraschino cherries (I use Bada Bing cherries)
When ready to assemble, spread just about ½-¾ cup of the pudding in the bottom of the container. Then place ⅓rd of the cake chunks over the pudding in the bottom of a trifle bowl (straight sided glass bowl). (Actually, any glass bowl will work, but for the best presentation, a straight sided bowl is best.)
Spoon ⅓rd of the remaining pudding over the cake cubes. Place ⅓rd of the banana chunks on the pudding. Sprinkle ⅓rd of the chocolate chunks over the banana chunks and spread ⅓rd of the whipped cream over the chocolate chunks.
Add another ⅓rd of the cake, pressing down lightly to remove any air pockets in the layers below. Then repeat as directed above. Always press down a bit on the cake chunks as you assemble the dessert. After adding the last layer of whipped cream, smooth the surface with an offset spatula.
Cover with plastic wrap and refrigerate for at least 24 hours and up to two days.
Remove from refrigerator about an hour before serving. Garnish with additional whipped cream, sliced almonds, and 3 or 5 maraschino cherries.
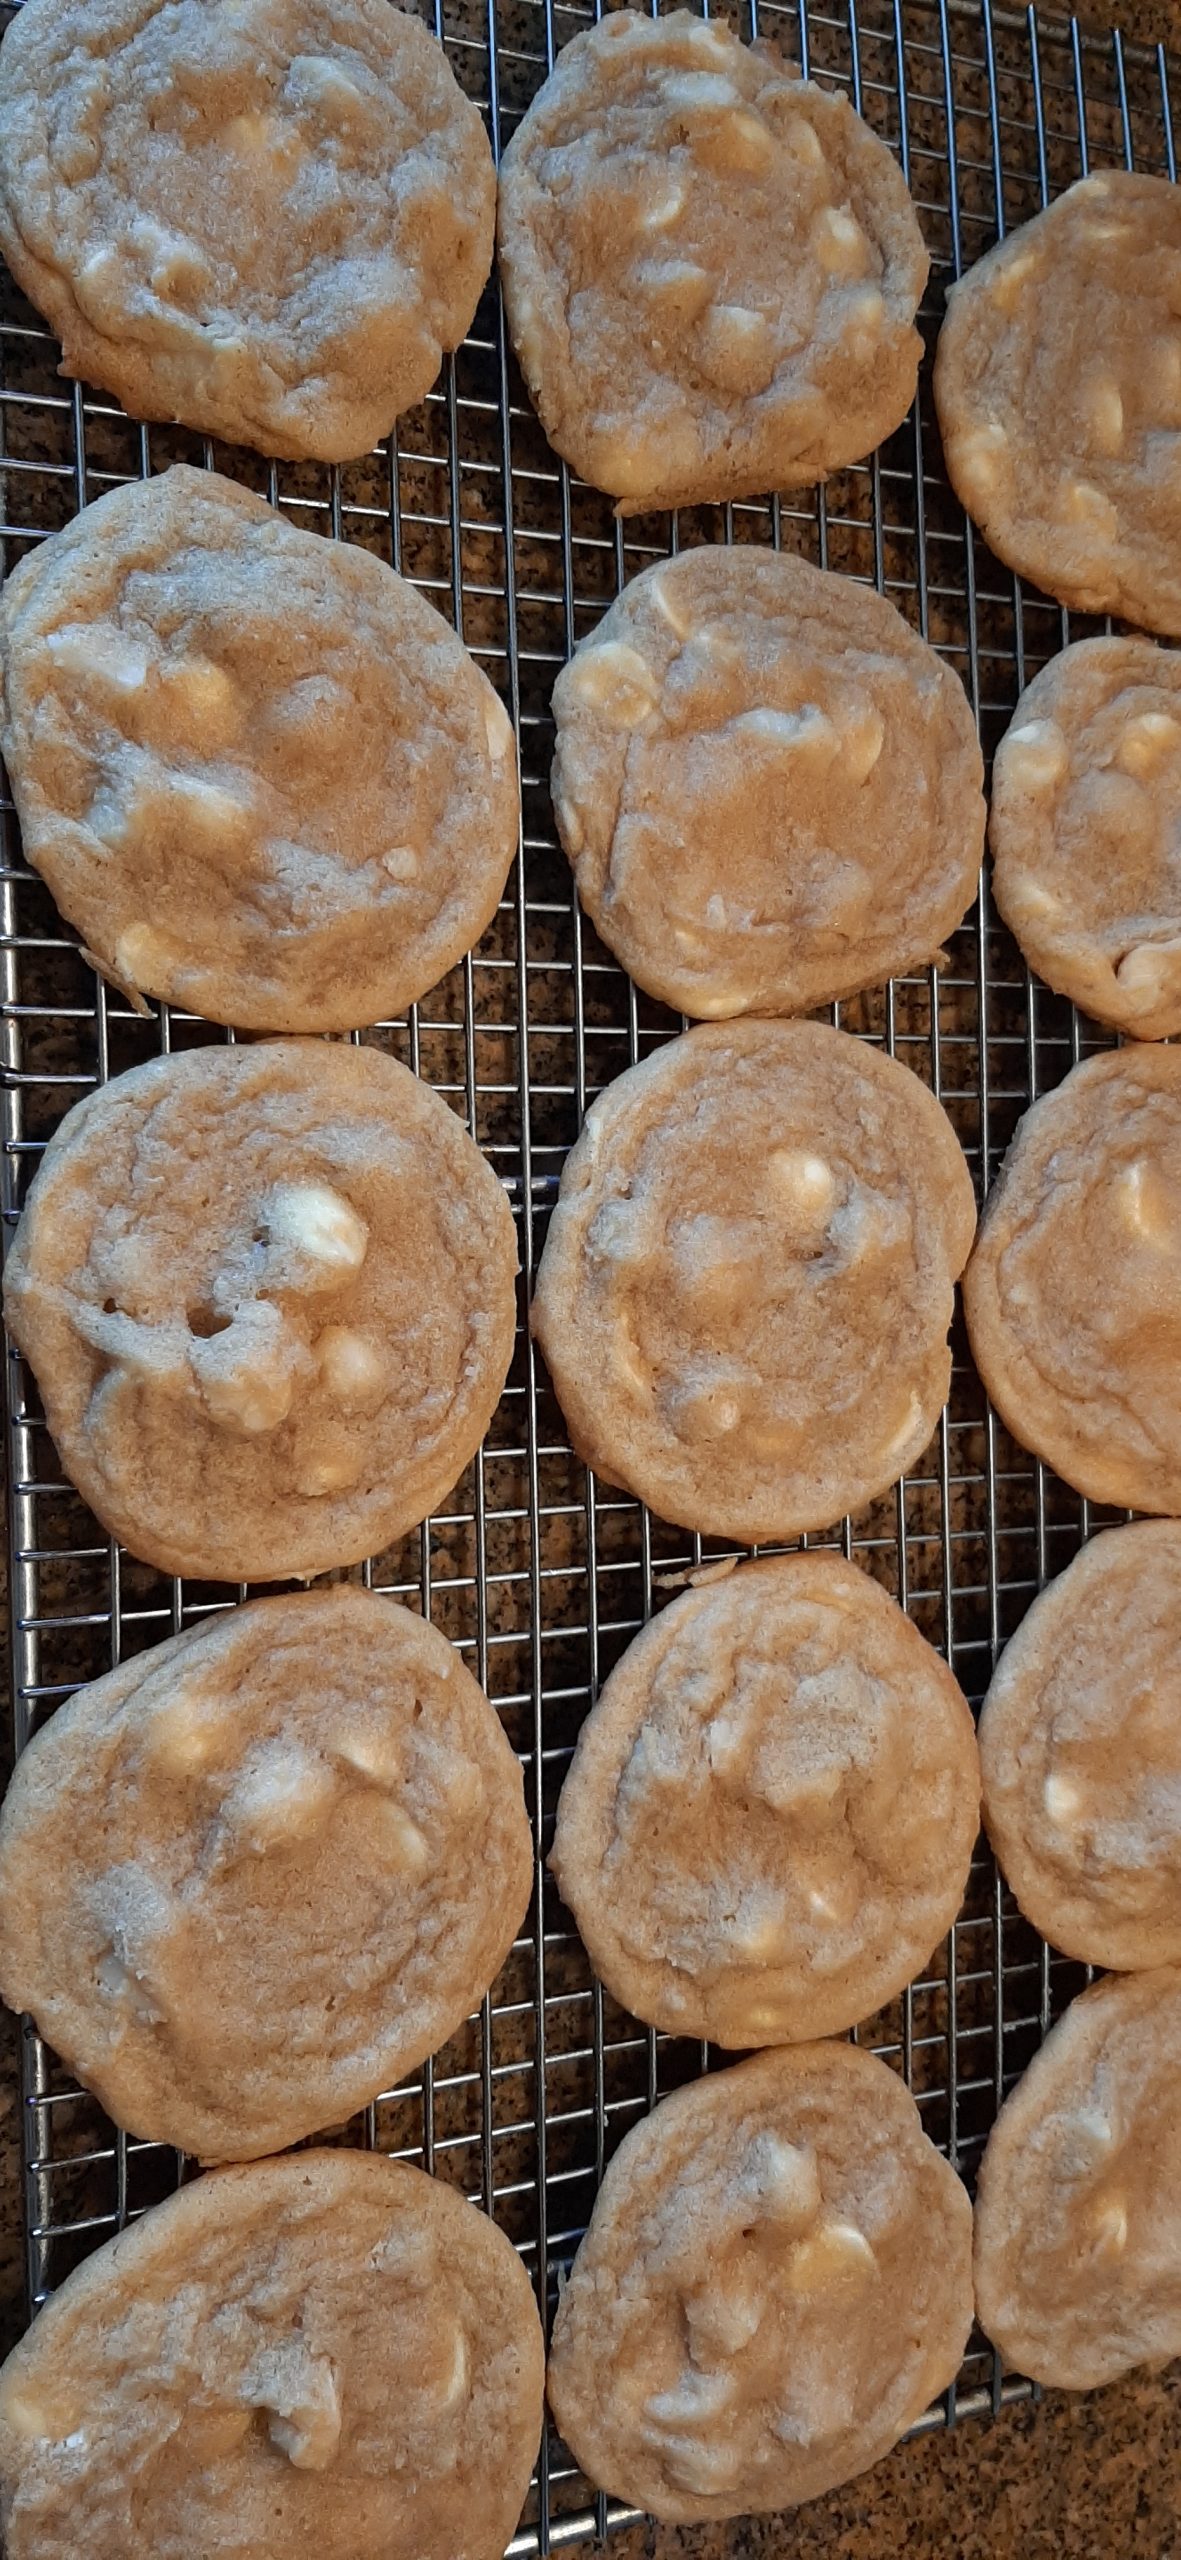
Well, the way I see it, if Subway can do it, so can I! Starting yesterday, I too can now make a mean white chocolate chip macadamia cookie. And it is all because of our good friends Jim and Margo.
These dear friends love white chocolate macadamia cookies. But they aren’t as fond of baking as I am. Jim, who does most of the cooking in their household, even goes so far as to profess the lack of the “gluten” gene. (He also states that he is also lacking the “grandmother” gene, which is why I can make really good gravy. But that’s a story for another time!) (Actually, he too can make great gravy. Even if he doesn’t possess the “grandmother” gene.) But I can’t really argue with his belief about gluten genes since I’m pretty sure I came with several extra “gluten” genes. (Thanks mom and dad.)
So, although this wonderful couple will undoubtedly continue buying these marvelous cookies at Subway, especially when they are on RV trips, I can at least do my part and build them my homemade version whenever the spirit moves.
So, if you too love a chewy white chocolate macadamia cookie, may I recommend this recipe. It is an extremely easy cookie to build. Except there is one part that is always a challenge. (As with other truly perfect cookies.) It’s the wait time.
Because, if you really want to bake the best cookies ever, the colder your dough is before it heads into the oven, the less the cookies will spread during baking. The time spent in the fridge gives the flour in your dough time to hydrate. This translates into cookies that are more chewy than cakey. And who doesn’t love a good and chewy cookie?!
And to take this whole cookie baking revelation one step further, and completely shatter your world, making cookie dough one day and baking it off the next day is pretty much the recommended practice by leading authorities if you want to bake truly wonderful cookies. And yes, that means you must plan ahead. And yes, I now am a strict adherent to this thinking. And yes, it has made a big difference in the quality of the cookies I bake.
So, if I can manage this change of thinking, so can you. Believe me, it just becomes a habit after a while. But I promise you will see a positive difference in just about every cookie you bake by giving the dough some time in a cold and dark environment before it is introduced into a hot oven.
So, cooking lesson for the day. Done. New cookie recipe for you to make for your family and friends. Done. Now, for me, it’s on to making pound cake for the trifles I’m serving at our home this next Sunday. So, if I don’t have time to post any new recipes for the next several days, know that I am doing what I love to do best. Making food for friends.
May you too take pleasure in offering hospitality. Because hospitality is a win/win situation for everyone involved. If you are the one providing the hospitality, it makes you feel good to welcome family or friends into your home. If you are the recipient, it just feels good to know that someone cares for you enough to want to entertain you in their home. And if there is food involved in the hospitality, it is even more of a win for all concerned.
So, offer hospitality whenever you can.
And as always, peace and love to all.
¾ c. (1½ sticks) cold unsalted butter
½ c. granulated sugar
1 c. light brown sugar, packed
2 tsp. pure vanilla extract
2 lg. eggs
2⅔ c. unbleached all-purpose flour, fluffed
rounded ½ tsp. kosher salt
1 tsp. baking soda
1⅓ c. white chocolate chips/callets (I use Callebaut White Chocolate Callets)
1⅓ c. roasted salted macadamia nuts, chopped
In the bowl of your stand mixer, beat the butter until no lumps remain. Then add the granulated sugar and brown sugar. Mix until well combined. Add the vanilla and eggs, one at a time, until well blended.
In a large mixing bowl, whisk the flour, salt, and baking soda together and add to the butter mixture. Mix until just blended. Do not over mix.
Stir in the nuts and white chocolate chips.
Using a #30 (2 tablespoons) ice cream or cookie scoop, drop balls of dough close together on a small parchment paper lined baking sheet. Place in your fridge for several hours to overnight. (Best overnight)
When ready to bake, place cookie balls about 1½-inches apart on a parchment paper lined baking sheet.
Bake in a pre-heated 325-degree oven for 12-13 minutes. The cookies should be a light golden brown around the bottom edges and the centers should not look shiny or doughy. Do not overbake.
Remove from oven and allow the cookies to rest on the baking sheet for a couple of minutes before transferring to a wire rack to cool completely.