Category Archives: THIS & THAT RECIPES

EASY OVERNIGHT CHEWY DINNER ROLLS (NO KNEAD)  

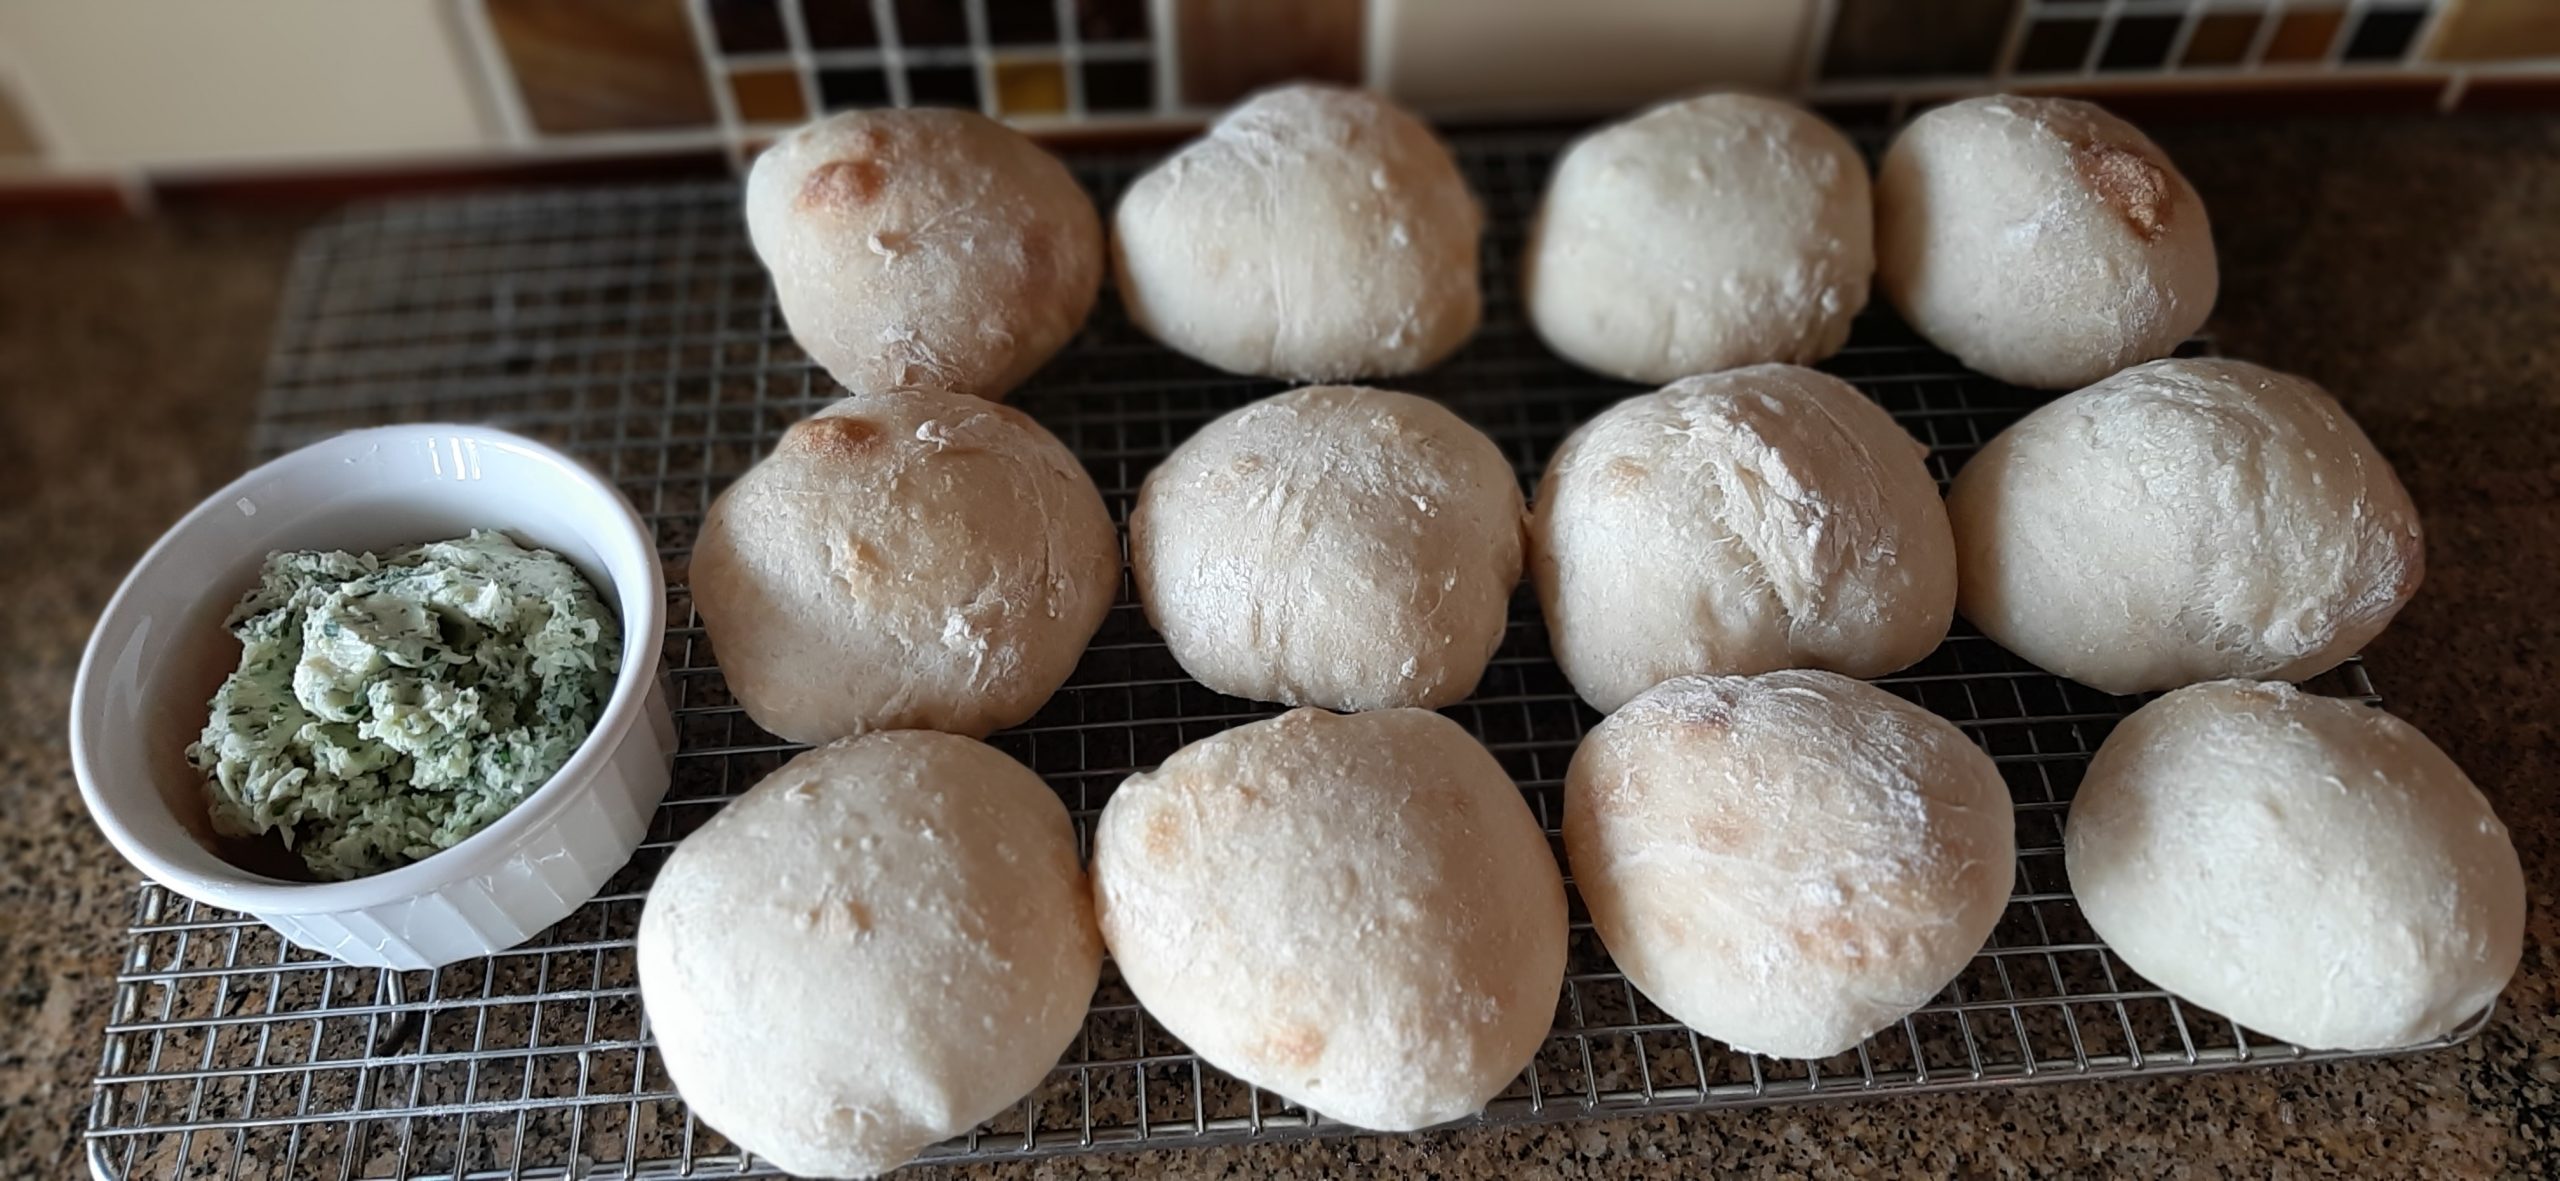
Garlic Herb Butter and rolls

In my quest to make bread baking easier for myself and of course for you too, I recently posted a fabulous recipe for Easy Overnight Chewy Bread (No Knead). And I love that bread. But there are just those times when instead of a boule (round loaf) you want individual rolls. So, I came up with this recipe that could not be easier to make. Thus, the title. But it is still a two-day process. Consider yourself warned.

But boy are these rolls delicious. Chewy and flavorful, especially when slathered with Garlic Herb Butter. (See recipe below.) And perfect for a beginning bread baker.

No kneading. No guessing how much flour to use. You don’t even need to worry about warming the water. Water right out of the tap is fine. You simply need to follow the simple instructions and prepare yourself for all the rave reviews you will receive from your family and friends. (Remember to remain humble.) (Good cooks are always humble.) (That’s the rule!)

So, if you too ever find yourself needing great dinner rolls with little time to spend on the effort, this is the recipe for you.

That being said, my work here is done.

Peace and love to all. And happy bread baking.

4 c. bread flour, fluffed, plus more for shaping the dough

2 tsp. kosher salt

1 tsp. instant dry yeast  

2 c. room-temperature water

In a large bowl, stir the bread flour, salt, and yeast together. Add the water and mix with a sturdy rubber spatula until all the flour is incorporated. The dough will be wet and sticky. Cover the bowl with plastic wrap and leave on your counter overnight. The following day the dough will have risen somewhat but will not look like other risen bread dough.

Line a baking sheet with parchment paper. Preheat oven to 425-degrees.

Spread a generous amount of flour on a work surface or pastry cloth. Using a stiff spatula remove the dough from the bowl to the floured surface and turn the dough several times to coat it with flour.

Coating your hands with flour, divide the dough into about 12 equal portions, turning each piece in the flour to coat. Shape each piece into a ball, pulling edges under and pinching together to make a smooth top. Place the balls on prepared pan a couple inches apart. Let the shaped rolls rise for 20 minutes. (The rolls will not rise a lot during this 20-minute rest.)

Bake for about 15 minutes or until the internal temperature reaches at least 205-degrees. They will not brown very much. That is just fine.

Remove from oven and transfer rolls to a wire rack to cool completely.

To serve, heat them for about 45 seconds in your microwave. Great served with Garlic Herb Butter. See recipe below.

GARLIC HERB BUTTER

½ c. unsalted butter, room temperature

1 scant T. fresh finely chopped parsley

1½ tsp. fresh finely chopped thyme leaves

1/8 tsp. granulated onion

1/8 tsp. granulated garlic

¼ tsp. kosher salt, or more to taste

freshly ground black pepper

Combine all ingredients. Store covered in your fridge but serve at room temperature.


DILL PICKLES

I can’t believe I haven’t already posted this recipe. Because truly, these are the best dill pickles you will ever eat. And yes, I know, this is not the time of year to make dill pickles. I got that. But, if I had realized earlier that I had been so remiss, you would already have the recipe. You see how that works? But in making My Favorite This and That Recipes list, I discovered my omission. But it’s never too late, as the old saying goes. Plus, better late than never! And sorry about no picture. But use your imagination and conjure up a picture of a small cucumber turned a lovely shade of dark green. You got it!

As I stated above, these are the best dill pickles ever. Plus, they are easy and inexpensive to make. But best made outdoors. Allow me to explain.

Many a time dill pickles were made at an afternoon Pickle Packin’ Party at our Bellevue home on a sunny early autumn afternoon. We would invite family and friends to come and share the fun and then stay for a BBQ dinner. Because bottom line, packing pickles is most fun when done with others. And since there is a lot of water involved with pickle making (washing the cucumbers and making the brine) watching out for friends and spouses coming close to you with a hose is always a concern. Sunny days and waterpower can easily (and did) turn a normally passive spouse or friend into a crazed adult. Of course, there may have been beer involved, but who can remember that far back! All I know is that fun was had by all. And the result was everyone went home with pickles a plenty.

So, if you too are into dill pickles, give this wonderful recipe from our dear family friend Charlotte a try. I’m not kidding – these pickles are amazing.

Also, hosting a party where some type of edible to share is being prepared is worth the effort. I don’t care if it’s Glögg, pickled herring, cookies, chicken stock, beef stock, demi-glace, or dill pickles. (All edibles that have been the theme of parties we have hosted in the past). Even the folks who are only interested enough in a kitchen to be able to find the dining table, refrigerator, coffee maker, and where the booze is stored are going to enjoy themselves. I mean really, who doesn’t have fun at a party? Especially if there’s food being made and food being eaten. And perhaps a drink in hand!

So, if you haven’t yet made a New Year’s resolution, hosting a food making party might be an easy “resolution” to fulfill. And who doesn’t appreciate even one resolution marked PAID.

As always, peace and love to all.      

12-14 wide mouth qt. jars and lids

12 lbs. pickling cucumbers 3-4 inches long

1 lg. bunch fresh dill, cut into 4-inch lengths

12-14 peeled garlic cloves

2-2½ tsp. alum

12-14 sm. dried hot red peppers

2 qt. white vinegar

6 qt. water

2 c. pickling salt (you can use kosher salt if it doesn’t contain anti-caking agents)

Thoroughly scrub the cucumbers and lightly pack them in jars. To each jar add a lot of fresh dill (stems and all), 1 garlic clove, ⅛ teaspoon alum, and 1 hot red pepper.

In a large pot, bring the vinegar, water, and salt to a boil.

In another pot, place the lids in water to cover and bring to a simmer (180-degrees) for at least 10 minutes. Do not let the lids boil. Keep the lids in the simmering water until ready for use.

One at a time, pour hot brine over the cucumbers up to the neck of the jar. Quickly wipe the rim with a clean cloth and pop on one of the lids. Tighten it down with a clean ring. Seal as tightly as possible. Store for about 3 weeks before enjoying the fruits of your labor. (And yes, cucumbers are botanically a fruit.)

Please note: Even if a couple of the jars don’t seal properly, they should be just fine. The brine for pickles being high in vinegar (acid) and salt, does not support the growth of Clostridium botulinum bacteria.   

KANSAS CITY STYLE BBQ SAUCE

Although I have 2 other BBQ sauces on this site, I decided last evening to look for a Kansas City style BBQ sauce recipe. Our good friends Jim and Margo swear by bottled KC Masterpiece BBQ Sauce. But it is not available at our local grocery store. So, I went online looking for a knock-off recipe. What I found was this recipe from heygrillhey.com. I changed a couple of the amounts because of personal preference, but the rest is straight off the site.

Now you may be wondering why I didn’t just make one of my regular recipes. Well, if truth be told, I was not in the mood to cook. I know. Doesn’t happen very often. But I was tired from trying to book our trailer trip in May and finding many of our favorite campgrounds already booked up solid. Grrrrr

So, I wanted a BBQ sauce where I didn’t have to chop a darn thing. Because in my current frustrated condition, I might have chopped off a finger. And not even realized it was gone! So, with this recipe, the hardest thing I had to do was get my small Le Creuset cast iron pan out of the drawer where it lives. After that it was all downhill.

And I am so glad I made this sauce. It is delicious and ever so simple to make. And it was perfect with the ribs I served. (Also stinkin’ easy to make.) (Savory Oven Baked Pork Loin Back Ribs.) I also served half a baked sweet potato to each of us along with some left-over baked beans. A fine meal if I do say so myself. (And so little time spent.)

So, if you too ever find yourself with limited energy but a desperate need for BBQ sauce, this is the recipe for you. (Even if you have all the energy in the world, this is still the recipe for you.)

Well, that’s it for today. I still have a few days to book for our May adventure, and it’s too early to start drinking. So, I better sign off and get back to work.

As always, peace and love to all.   

8 oz. can tomato sauce

½ c. ketchup

6 T. brown sugar

¼ c. apple cider vinegar

¼ c. molasses

1½ tsp. smoked paprika

1 tsp. kosher salt, or more to taste

freshly ground black pepper 

½ tsp. chili powder

½ tsp. granulated garlic  

½ tsp. granulated onion  

¼ tsp. dried mustard

⅛ tsp. crushed red pepper flakes, or more to taste

Whisk all ingredients together in a saucepan. Bring to a boil over medium heat, reduce heat, and gently simmer uncovered for 30 minutes.

Remove from heat and allow to cool completely before transferring to an airtight container. Store in your refrigerator.

This sauce can be used immediately, but best when made ahead. Can be served warm or at room temperature. Great with ribs.

CHICKEN OR TURKEY STOCK

I realized when I posted the Cassoulet recipe, that I had never posted my chicken or turkey stock recipe. (My bad!) So, please find my stock recipe attached.

4 lbs. chicken or turkey parts, pieces, giblets, and bones

1 onion, roughly chopped

1 leek, white and green part, roughly chopped

2 carrots, cut into 1-inch sections

2 celery ribs, plus leaves, cut into 1-inch pieces

2 garlic cloves

1 bay leaf

3 T. fresh parsley

1 tsp. dried thyme

6 peppercorns

3 qt. water

Spread the chicken or turkey bones, etc. on one very large or 2 smaller rimmed baking pans. Bake in a pre-heated 400-degree oven for 1 hour or until the chicken or turkey is well browned. Remove from oven and place the meat in a large, covered Dutch oven and pan.

Pour a small amount of water in the pan(s) and let sit for several minutes. Then using a sturdy spatula, lift all the browned bits off the bottom, along with the water, and add to meat. Then add all the remaining ingredients. Bring to a boil, cover, reduce heat, and simmer for at least 3 hours.  

When ready to use or store for future use, remove from heat and let cool for about 30 minutes. Then strain the liquid into a container. Discard all the meat and veggies. If you aren’t going to use the stock immediately, place covered in your refrigerator. Before using, if desired, remove the fat that has formed on the surface.

Use in any recipe calling for stock* or broth**.

*Stock is a rich, savory liquid prepared by simmering bones (and in my recipe – flesh) and vegetables in water for hours with herbs and spices until the flavor is extracted. Stock derives its flavor primarily from protein, not from heavy sodium. As a result, stock is usually healthier than broth and delivers a richer mouth feel and deeper flavor than broth.

**Broth, on the other hand, usually contains flesh (no bones) plus a lot of salt. It can be used any time stock is listed as an ingredient. But be aware that it might be quite salty. So, plan to adjust your recipe accordingly.

PEPPERMINT HOT CHOCOLATE MIX

As promised, another wonderful Christmas recipe. But this is a recipe for more of a cold weather treat than just a treat reserved for Christmas eve. Decadent hot chocolate. And when I say decadent, I mean DECADENT! I don’t even like most hot chocolate, but when made with this mix, I could easily become addicted. Seriously. Because this mix makes amazingly delicious hot chocolate. And all you add is boiling water to the mix. How cool is that?!

Now, what you need to realize right off the bat is that this is not an inexpensive hot chocolate mix to prepare. Because at least in my local grocery stores, I can never find powdered whole milk, really good unsweetened cocoa powder, or soft peppermint candy like See’s or King Leo’s. For these products I must go to Amazon or some other source that specializes in quality ingredients.   

And you know me. I’m not trying to be an elitist. It’s just that if you want good results from this recipe, you need to pay the price. You also need to know that the peppermint flavor is not going to knock you over. In fact, it’s almost unnoticeable. But what it brings to the mix is amazing. Then when topped with whipped cream and chocolate sprinkles (sometimes called “jimmies” or “shots”), life just becomes wonderful. It immediately starts to snow. Not enough to stick, but enough to make you happy to be alive. Your favorite music starts running through your head. And if you happen to be blessed with teenagers, they ask you if they can please do the dishes after dinner. Just kidding. That would never happen. But I do promise you that a cup of this hot chocolate will absolutely lift your spirits.

So, I hope you give this recipe a try. And do consider building a batch and gifting some of the mix to a friend. A nice way to let someone know how much you care.

Well, that’s it for now. Mr. C. has a holiday gig tonight and I’m going along to further get in the mood for all the upcoming festivities. Presents are ordered. Holiday goody packages are either already sent or ready to be hand delivered. The live Christmas tree has been purchased, but so far has not been brought into the house. (All in good time Patti. All in good time.) And I now have the time to further get ready for Christmas without any immediate deadlines. So, I am well pleased to be able to take the evening off and listen to fun Christmas music.

May you too take the time to enjoy the holidays. For many of us it’s a frantic time trying to get everything done that we feel should be done. No one is going to know if everything isn’t checked off our lists. So, cut yourself as much slack as you would cut someone else. Make it a Christmas present to yourself.

And as always, peace and love to all. And Merry Christmas.

1 c. powdered whole milk

1 c. good unsweetened cocoa powder (I use a combination of Valrhona, Ghirardelli, and Dagoba

1 c. granulated sugar

½ tsp. kosher salt

½ c. miniature semi-sweet chocolate chips

heaping ½ c. semi-crushed peppermint candy (I use King Leo’s Soft Peppermint sticks) (Do not use regular inexpensive candy canes. They have no resemblance to good peppermint candy.)

Whisk the powdered whole milk, cocoa powder, granulated sugar, salt, and mini chocolate chips together in a mixing bowl. Break the peppermint sticks up a bit and place in your food processor. Whirl until the peppermint candy is mostly crushed. There will still be a few small pieces. Not a problem. Add the candy to the other ingredients. Mix all together. Store in an airtight container.

For each serving, place ¼ – ⅓ cup hot chocolate mix (depends on how rich you like your hot chocolate) in a mug and add 1 cup boiling water. Stir slowly until the mini chocolate chips are dissolved.

If you are totally into decadent hot chocolate, top with whipped cream and chocolate sprinkles.  


MINCEMEAT  

Since it is December, and along with December comes Christmas. And with Christmas, at least at our house, comes fruit cake and often mincemeat pies, tarts, galettes, or bars. So, of course this year again, homemade mincemeat is happily mellowing in my refrigerator. What recipe I decide to use containing this amazing mixture is still to be determined. But I do know that whatever I make will be topped with a hard sauce. And not just any hard sauce. A bourbon hard sauce. (I’m still working on the recipe.)

And since it happens to be Christmas time and I am in the process of re-posting some of my favorite recipes, I decided to post some of the dishes I most associate with the holiday. And mincemeat has been a part of my Christmas for as long as I can remember. So, for me, it isn’t really Christmas unless mincemeat is featured in one of the holiday desserts.  

Now, some would argue that mincemeat without meat (beef in most cases) or even suet in the mix is not the real thing. Don’t care! And I only mention beef because that was the most common meat used in the making of mincemeat in the 19th century. But before chunks of beef, it might have been tongue, tripe, venison, lamb, or veal in with all the fruit and spices. None of which are ever going to be included as an ingredient in any mincemeat I make. I frankly see no reason to mess up perfectly good, dried fruit, apples, brown sugar, spices, and booze by adding meat of any variety. And suet – no way! I use butter! Because butter simply makes everything better!  

Also, most mincemeat recipes call for brandy, rum, or whiskey. But not mine. I leave those liquors for someone else to use.  Instead of brandy, rum, or whiskey, I use both bourbon and cognac. Why? Because I use bourbon a lot in cooking. Can’t stand to drink the stuff, but to cook with it for either sweet or savory dishes, bourbon is perfect. It’s the sweetness of bourbon, with hints of both caramel and vanilla, that I believe works so well in this recipe. And many other recipes for that matter. And as far as that little bit of Cognac I throw in at the last moment, well, when does Cognac not add an extra little bit of joy to any dish? Especially because of the flavor sensations that are unique to Cognac – sweet, spicy, fruity, and slightly bitter. So, there you have it. A recipe for homemade mincemeat that is easy to make and absolutely delicious.

But as with other Christmas treats like Holiday Fruitcake, Caribbean Black Fruitcake, and Christmas Berliner Stollen (all on this site BTW), it is best to let mincemeat contemplate the meaning of life for a few weeks, or months, in your refrigerator before using it in one of your favorite Christmas treats. Some things just get better with age. Like fine wine, many great cheeses, and men and women who cook. Cooking helps keep older minds remain active and bodies stay limber by making multiple trips into pantries trying to remember why they went there in the first place! Or second place, etc. etc.

So, from one old cook to all of you – Peace and Love. And happy Christmas preparations.  

1½ c. dark raisins

1½ c. golden raisins    

1½ c. dried currants

2/3 c. bourbon

2 tart apples, peeled, cored, and finely diced

8-oz. candied orange peel

½ c. (1 stick) unsalted butter, melted

¾ c. brown sugar

½ tsp. ground nutmeg

½ tsp. ground cinnamon

¼ tsp. ground mace

¼ tsp. ground allspice

1/8 tsp. ground cloves

finely grated zest and juice of 1 lemon

finely grated zest and juice of 1 orange

¼ c. cognac

Place the dark raisins, golden raisins, and dried currants in a small saucepan. Add the 2/3 cup bourbon, bring just to a boil, stir to coat all the fruit, remove from heat, and set aside to cool.

Meanwhile, combine the apples, candied orange peel, melted butter, brown sugar, spices, and the zest and juice of the lemon and orange in a large ovenproof dish. When the raisins and currents are cool, stir into the apple mixture. If there is any liquid left, throw it in too. Cover the dish and place in your refrigerator overnight.  

The following day, place the ovenproof dish in a cold oven, bring the temperature to 200 degrees, and bake for three hours, stirring every hour or so. Remove from oven, let cool completely, and stir in the cognac. The mincemeat will look quite runny. But don’t be concerned. After it has rested in the refrigerator for a few days it will be perfect.

Store covered in your refrigerator until ready to use. (Best if left to mellow at least 4 weeks, but if you are like me, the mince only gets to age for about a week. It’s still good, so no worries.)

This recipe makes enough mincemeat for 2 10-inch tarts, 2 8-inch pies, or 3 10-inch galettes.


HOMEMADE AU JUS (NO DRIPPINGS REQUIRED)  

You know you are getting old when…., but wait, I better start at the beginning.

The other evening, I served French dip ground beef sandwiches made with Easy French Baguettes (recipe to be posted in the next couple of days), Caramelized Onions (recipe below), and Homemade Au Jus (recipe below). And there was much rejoicing at our dinner table. Because every part of the sandwich was delicious.

Earlier that day I realized that I didn’t have a bottle of Johnny’s French Dip Au Jus Sauce in my pantry. I asked Mr. C. if he would mind running to the store, and had received an affirmative answer to my request. Then it dawned on me. Wait! I make homemade salad dressings, spice blends, gravies, and other sauces of every imaginable variety, why have I never thought to make a homemade au jus? Well to be honest, I do make homemade au jus when I am making a true French dip sandwich. The kind that begins by roasting a hunk of beef and then using the drippings to make the au jus. But that recipe I had never gotten around to posting. But after researching homemade au jus recipes online, making the au jus, serving the au jus, and writing up most of this preface, I remembered that I already had a recipe for homemade au jus on this site.  

Now granted, in self-publishing 2 cookbooks each containing over 400 recipes and having posted about 1,350 recipes on this blog, I should be able to forgive myself for forgetting about just one measly recipe. But why hadn’t I searched my own blog first in my desperate attempt to ferret out the secret to making homemade au jus? Thus, the realization that I am indeed getting old. And forgetful. And that maybe I should check my own recipes before automatically jumping on the internet for inspiration?! Grrrrrr!   

But since the au jus I made the other evening (based on a mamalovesfood.com  recipe I found on line) was so darn delicious, I decided to post this recipe too. It is very similar to the one already posted (Hamburger Dip Sandwiches with Onion and Dry Sherry Au Jus), but just enough different to give us all a choice. (If of course I remember to check my own site next time I want to make French dip sandwiches using hamburger instead of thinly sliced prime rib.) (I don’t hold out much hope!)

Anyway, I have forgiven myself and plan to just get on with life. Which means getting back to my current read – A Gentleman in Moscow by Amor Towles.

Thankfully I am only a little over half way through the book, because I don’t want this book to end. It is one of the best written and charming stories I have ever had the pleasure to read.

So, before I let you go, I am going to give you a short sample of Mr. Towles’s artistry.

(Paraphrased a tiny bit by me just for clarification.)

Mr. Towles description of jazz – “Jazz is a fistful of notes crammed higgledy-piggledy into thirty measures. And yet the art form can grow on a person. Jazz seems a naturally gregarious force – one that is a little unruly and prone to say the first thing that pops into its head. But generally, of good humor and friendly intent. In addition, jazz seems decidedly unconcerned with where it has been or where it is going. Exhibiting somehow simultaneously the confidence of the master and the inexperience of the apprentice. Was there any wonder that such an art had failed to originate in Europe?”

Every page of this book is filled with this kind of delightful prose. Exquisitely crafted, elegant, old-fashioned, and irresistible. A must read if there ever was one!       

As always, peace and love to all.  

HOMEMADE AU JUS

1 T. extra virgin olive oil

½ c. chopped onion

2 garlic cloves, finely minced  

¼ c. dry red or white wine (I’ve used both, and either one is great)

2 T. Worcestershire sauce

½ tsp. Kitchen Bouquet, or more to taste

freshly ground black pepper

4 c. water

2 T. Better Than Bouillon Beef base, or more to taste

Heat the olive oil in a heavy saucepan. Add the onion and cook until soft. Add the garlic and cook for a minute or two more.

Deglaze the pan with wine, then add the Worcestershire sauce, Kitchen Bouquet, and black pepper. Cook for another minute, stirring constantly.

Add water and beef base; bring to a light boil. Reduce heat and simmer uncovered for about 30 minutes.

Can be made ahead and warmed just before serving.

CARAMELIZED ONIONS

1 T. extra virgin olive oil

1 T. unsalted butter

1 lg. yellow onion, halved and thinly sliced

pinch kosher salt

freshly ground black pepper

pinch dried thyme leaves

Heat the olive oil and butter in a heavy saucepan over medium heat. Add the onion and cook, stirring occasionally, until soft and caramelized, about 30 minutes. Season with salt, pepper, and thyme and continue to cook for 3 minutes.

Caramelized onions can be made ahead and refrigerated. Warm before serving.   

QUICK AND EASY PARTY MIX

For those of us who are trying to eat less sugar and reduce the amount of salt in our diet, finding the right snack food can be a bit daunting. I mean really, who doesn’t get a bit of a craving for Cheetos, Fritos, Cheez-its, etc. periodically. Or yearn for a couple of homemade cookies while reading a great book late at night. We are after all, only human. And humans crave sugar and salt.

So, I decided to come up with a snack that was not only satisfying and delicious, but also contained no added sugar (besides what’s already built into the cereals), and less salt than in my favorite snacks. (Cheetos, etc.)

Of course, along with the wonderful savory flavor in this party mix and ease of preparation comes the temptation to nibble on it every chance you get. So, you need to know that it’s quite easy to justify eating just another tiny little bowl while you go about your business. So, do not be fooled. Less sugar and salt for sure. With its fabulous savory flavor plus delicious crunch, this snack might very easily turn into an addiction. Because, basically, there is a high quotient of self-indulgence that is inherent with this party mix. It is just that good.

I used my Not Your Mama’s Chex Party Mix recipe for the base of this recipe. I didn’t change that much, but enough to lighten the mix up a bit. But both recipes are wonderful.

So, if you too want a snack that is better for you than some that are on the market, may I suggest you give this recipe a try.

And as always, peace and love to all.

4 c. Corn Chex® cereal

4 c. Rice Chex® cereal

4 c. Wheat Chex® cereal

10 T. (1¼ sticks) unsalted butter

3 T. Worcestershire sauce

½ tsp. hot sauce (recommend Frank’s RedHot)

1½ tsp. granulated garlic

½ tsp. granulated onion  

1½ tsp. seasoned salt

1½ c. mixed nuts

1½ c. peanuts

In a very large bowl, combine the Chex (any combination of corn, rice, and wheat* is perfect). Melt the butter in a saucepan; stir in the Worcestershire sauce, hot sauce, granulated garlic, granulated onion, and seasoned salt

Gently stir the buttery mixture into the cereal mix until the dry mix is evenly coated. Stir in the nuts.

Spread on large baking sheets and bake for 1 hour in a pre-heated 250-degree oven, turning every 15 minutes. Remove from oven and allow to cool completely before storing in an airtight container.

*To make gluten free party mix, don’t use the Wheat Chex. Substitute with additional Rice Chex, Corn Chex, or nuts.  


MOCHA HOT COCOA MIX

These are the star ingredients I used for this mocha coffee mix. Unfortunately, I failed to take a picture of the mix itself. (Christmas is a crazy time at our house. That’s my only defense!)

Well, Christmas is past, the New Year is here and the only thing that remains unpleasant from 2022 for us personally are the lingering coughs from whatever possessed us the last couple of weeks of December. Flu, RSV, who knows! But whatever it was, I truly encourage you not to get it! It wasn’t the worse flu or cold we’ve ever experienced, but it just went on and on and on. And just when we thought we were getting rid of the darn thing, it sprang to life again. That is simply not fair! So, no Christmas eve with our dear friends Jim and Margo and no Christmas day with our extended family. What saved the whole Christmas holiday was getting to spend the 26th with daughter Paula. She braved our germy house and came to visit regardless of our lingering ailments. So far, she is still well. Thank goodness!

And, New Year’s Eve we were able to enjoy being wined and dined at Margo and Jim’s home. New Year’s Day, we spent a glorious few hours at Tim and Suzie’s home. While the guys (Whistle Lake Jazz Quartet) were practicing for an upcoming gig, we wives (plus our dear friend Diane) spent some quality time reflecting on our careers and how the role of women in business has changed through the decades. In many ways for the better. But in some cases, there is still a prejudice against “grey-haired middle-aged women”. Well, learning that this attitude was still alive and well, and in one case perpetuated by a younger woman executive, it was a good thing we were firmly ensconced in Suzie’s living room and this young lady who had made the comment wasn’t living and working in the vicinity. It could have gotten quite ugly for her. To say we were steamed, would be putting it mildly. But for me, it was almost cathartic to share our stories. To be reminded that I was not alone. Things in my years at the bank that had caused me pain, were also being experienced by other women in far different professions. And yet, we had or were still surviving, and mostly stronger for having been exposed to and confronted these difficult situations. And as we talked, I felt so blessed to not only know these amazing women, but to be able to call them friends. I have always had close woman friends. And I realized once again, how lucky that makes me feel. But enough about me and on to this mocha mix.

This Christmas was the year of the biscotti. For the Whistle Lake gang, I gave each couple a trio of my favorite Italian cookies, a couple of red mugs, and some of this mocha cocoa mix. It was so much fun to make different kinds of biscotti. (New recipes to be posted in the near future.) And even more fun to prepare this cocoa mix.

Now, if you have never made biscotti, you can’t possibly know how easy these delicious twice baked cookies are to build. And if you have never eaten a biscotti, well, you have no idea what you have been missing. Biscotti is just one of the yummiest things you will ever put in your mouth. In my estimation, biscotti should actually be its own food group!

Anyway, along with the biscotti, I wanted something that our friends could dunk their biscotti into, and I found this recipe on theyummylife.com site. I changed things up a bit, but then, that’s just what I do!

So, I hope you enjoy this recipe. But remember, this hot drink is always best served with a biscotti. And life is simply too short to continue depriving yourself of this wonderful combination. And it’s going to be winter for several more months. Need I say more? Except, Happy New Year.

And as always, peace and love to all.  

1 c. instant coffee (I use Mount Hagen Organic Fairtrade Coffee (instant decaffeinated) (Amazon prime)

1 c. cocoa powder (I use Valrhona Cocoa Powder (Amazon prime)  

3½ c. instant dry milk powder

2/3 c. powdered sugar

1 c. vanilla powder (see recipe below)

2 tsp. corn starch

¼ tsp. fine sea salt

Pulse all ingredients in food processor until well combined. Store in airtight container. Makes approximately 5 cups of mix.

To prepare mix: Add 3-4 tablespoons of mix to 8-oz. boiling water. Stir and top with whipped cream if desired. (Chocolate sprinkles are nice too.)  

Homemade vanilla powder:

1 c. granulated sugar

2 T. vanilla paste or extract (I use Rodelle all natural Vanilla Paste*) (Amazon)

Combine the sugar and vanilla paste in a small bowl. Stir to form a thick, uniform, coarse paste. Line baking sheet with parchment paper. Transfer sugar/vanilla mixture to baking sheet and spread into thin, even layer. Allow to set out until completely dry, 6-8 hours. Stir once during drying time to promote faster drying. It’s normal for there to be small, dried clumps.
Transfer dried mixture to food processor and pulse until all clumps are gone and texture is a fine powder. Store in an airtight container.
*Vanilla paste has a thicker consistency than vanilla extract because it includes specks of vanilla bean seeds. Whereas vanilla extract contains no specks from vanilla beans. With the inclusion of ground vanilla bean powder, vanilla paste has a slightly more intense flavor than vanilla extract.


DRIED CRANBERRY AND BRANDY TOPPING FOR BAKED BRIE

This time of year, it is always nice to have an easy appetizer recipe ready for any unforeseen eventuality. Like when you are invited spur of the moment to someone’s home for dinner and you offer to bring an appetizer, and they say yes. Yikes! Now what do you do?

Well, I’ll tell you what you can do. You can make this delicious topping for baked brie. (You can pick up the brie from your local grocery store on your way over to your friend’s home if you don’t already have some on hand. Crackers too.)

Anyway, this topping takes only minutes to prepare. And it tastes like you slaved over a hot stove for a great deal longer than 5 minutes!

So, during this busy holiday season, I suggest you at least have the ingredients on hand to make this delicious appetizer. And even if you don’t wind up taking this delightful dish with you, you can always make it for yourself. And I am here to tell you, you will not feel bad at all if you have to eat the whole thing by yourself. (Or decide to be magnanimous and share it with your spouse or partner.) You will earn points. That is a true fact.

Well, both Mr. C. and I have come down with whatever this nasty respiratory “thing” is that is going around. We don’t feel bad. We just keep coughing and hacking and keeping each other awake all night long. Hopefully whatever has got us will depart our bodies before Christmas eve, Christmas day, and the 26th. Because we have plans to spend the holiday with our family and extended family friends. And it just so happens that we really like these people. So, it would be a real bummer if we couldn’t participate in the revelries. (Not to mention the great food we would be missing!)

But like with everyone, it is completely out of our control. We are vaccinated against all most anything you can name, wear our masks when it seems prudent, and try our darndest not to pick up germs from, or leave germs with anyone with whom we come in contact. But as experience has shown, somewhere along the line we are all vulnerable.

In the grand scheme of things, we remain well and truly blessed. May you too be happy and thankful for the many blessings that have found their way into your lives.

Peace and love to all.

1 c. dried cranberries

½ c. brown sugar

¼ c. orange juice

pinch ground cinnamon

a few grains of coarse kosher salt

2 T. brandy

1 (8-oz.) round or wedge of brie

½ c. walnuts, opt.

Combine the dried cranberries, brown sugar, orange juice, cinnamon, and salt in a small heavy pan. Bring to boil, reduce heat, and simmer for about 2 minutes. Remove from heat and stir in the brandy. Allow to cool, then store in your refrigerator until ready to use.

When ready to serve, place the brie in an oven-proof container and bake in a pre-heated 350-degree oven for about 15 minutes or until the cheese is softened. (Or nuke the brie until soft. Either way works.)

While the brie is in the oven, re-heat the topping. When the brie is soft, remove from oven and slather the topping all over the cheese. Then sprinkle on the nuts. Serve with crackers or Crostini (See how to make crostini on this site.)