If there is one dish that everyone from a gourmet to a person who favors simple food can agree upon, it’s meatloaf. Now, the ingredients may differ a bit from one category of eater to the other, but the fact remains. Almost everyone loves a good meatloaf.
So, when I woke up yesterday morning wondering what to make for dinner, meatloaf immediately came to mind. It’s easy to prepare, and there are a wide variety of side dishes that compliment this entrée. One especially came to mind (Risi E Bisi – Italian Rice and Peas) since I had just read about the dish in the book I am currently reading.
The book takes place in Venice and what the family of the protagonist eats for lunch or dinner is often included in the narrative. Not the recipes unfortunately, but enough of a description to make me either reluctant to even think about fixing it or eager to go directly to my kitchen and make like a cook.
The mystery series is written by Donna Leon and the protagonist is Commissario Guido Brunetti. The title of the book I am currently reading is “Unto Us a Son Is Given”. (Great reading BTW. I highly recommend this series if you are a mystery nut like me!) (And Risi E Bisi turned out to be as delicious as suggested by the author. I will be sharing this recipe with you in the near future.) But back to meatloaf.
This is not a new recipe. In fact, it is already on this site under the tantalizing title – Old Fashioned Meatloaf.
But never-the-less, I thought it might be a good idea to remind you of the merits of meatloaf lest you had forgotten this simple dish in your quest for new and exciting taste sensations. Not that I don’t go that route myself at every opportunity. But sometimes it’s just nice to sink your teeth into an old favorite.
May you too have many favorite dishes from which to choose.
And as always, peace and love to all.
1 c. finely chopped onion
½ c. dried breadcrumbs (I use Italian breadcrumbs)
1 T. dehydrated parsley
1 tsp. seasoned salt
1 tsp. granulated garlic
freshly ground black pepper
¼ tsp. ground savory
1 lg. egg
¼ c. milk
1 lb. bulk sausage (breakfast or sweet Italian)
1 lb. lean ground beef
2 T. brown sugar
⅓ c. ketchup
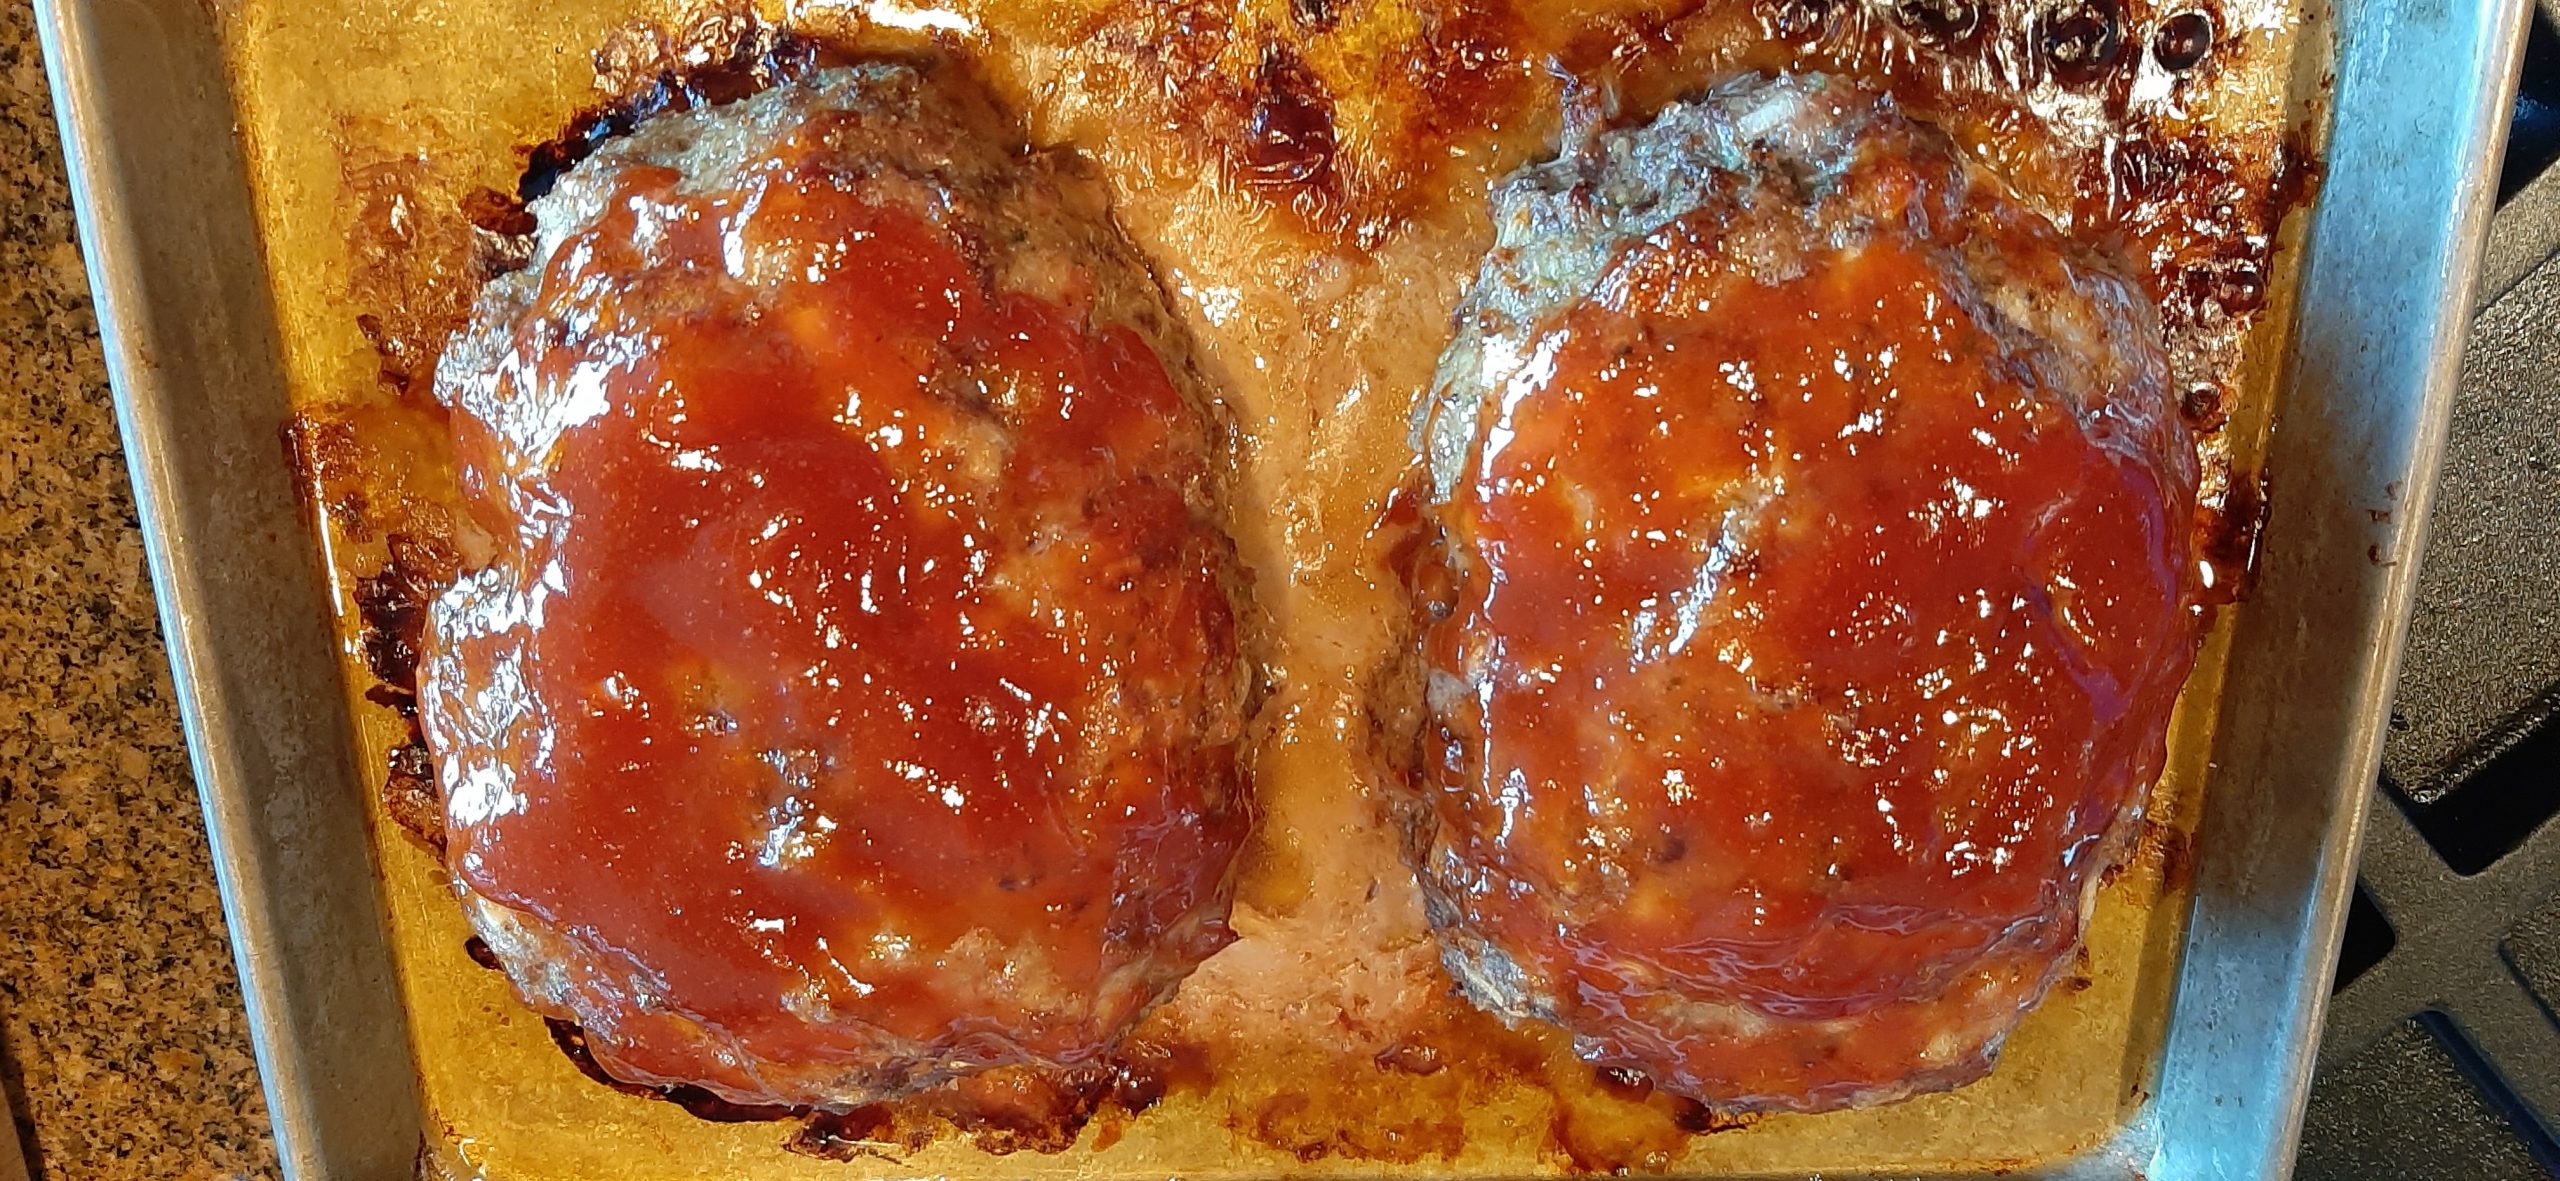
In a medium sized mixing bowl, stir the onion, breadcrumbs, parsley, seasoned salt, granulated garlic, pepper, savory, egg, and milk together. Gently stir in the sausage, then the ground beef. (Don’t overwork the mixture.) Form into 2 loaves and place on a small, rimmed baking sheet.
Bake for 30 minutes in a pre-heated 350-degree oven. Remove from oven and spread with brown sugar and ketchup that have been stirred together. Return pan to oven and bake for another 20 – 25 minutes. (Don’t over bake.) Internal temperature should be 155-160 degrees.
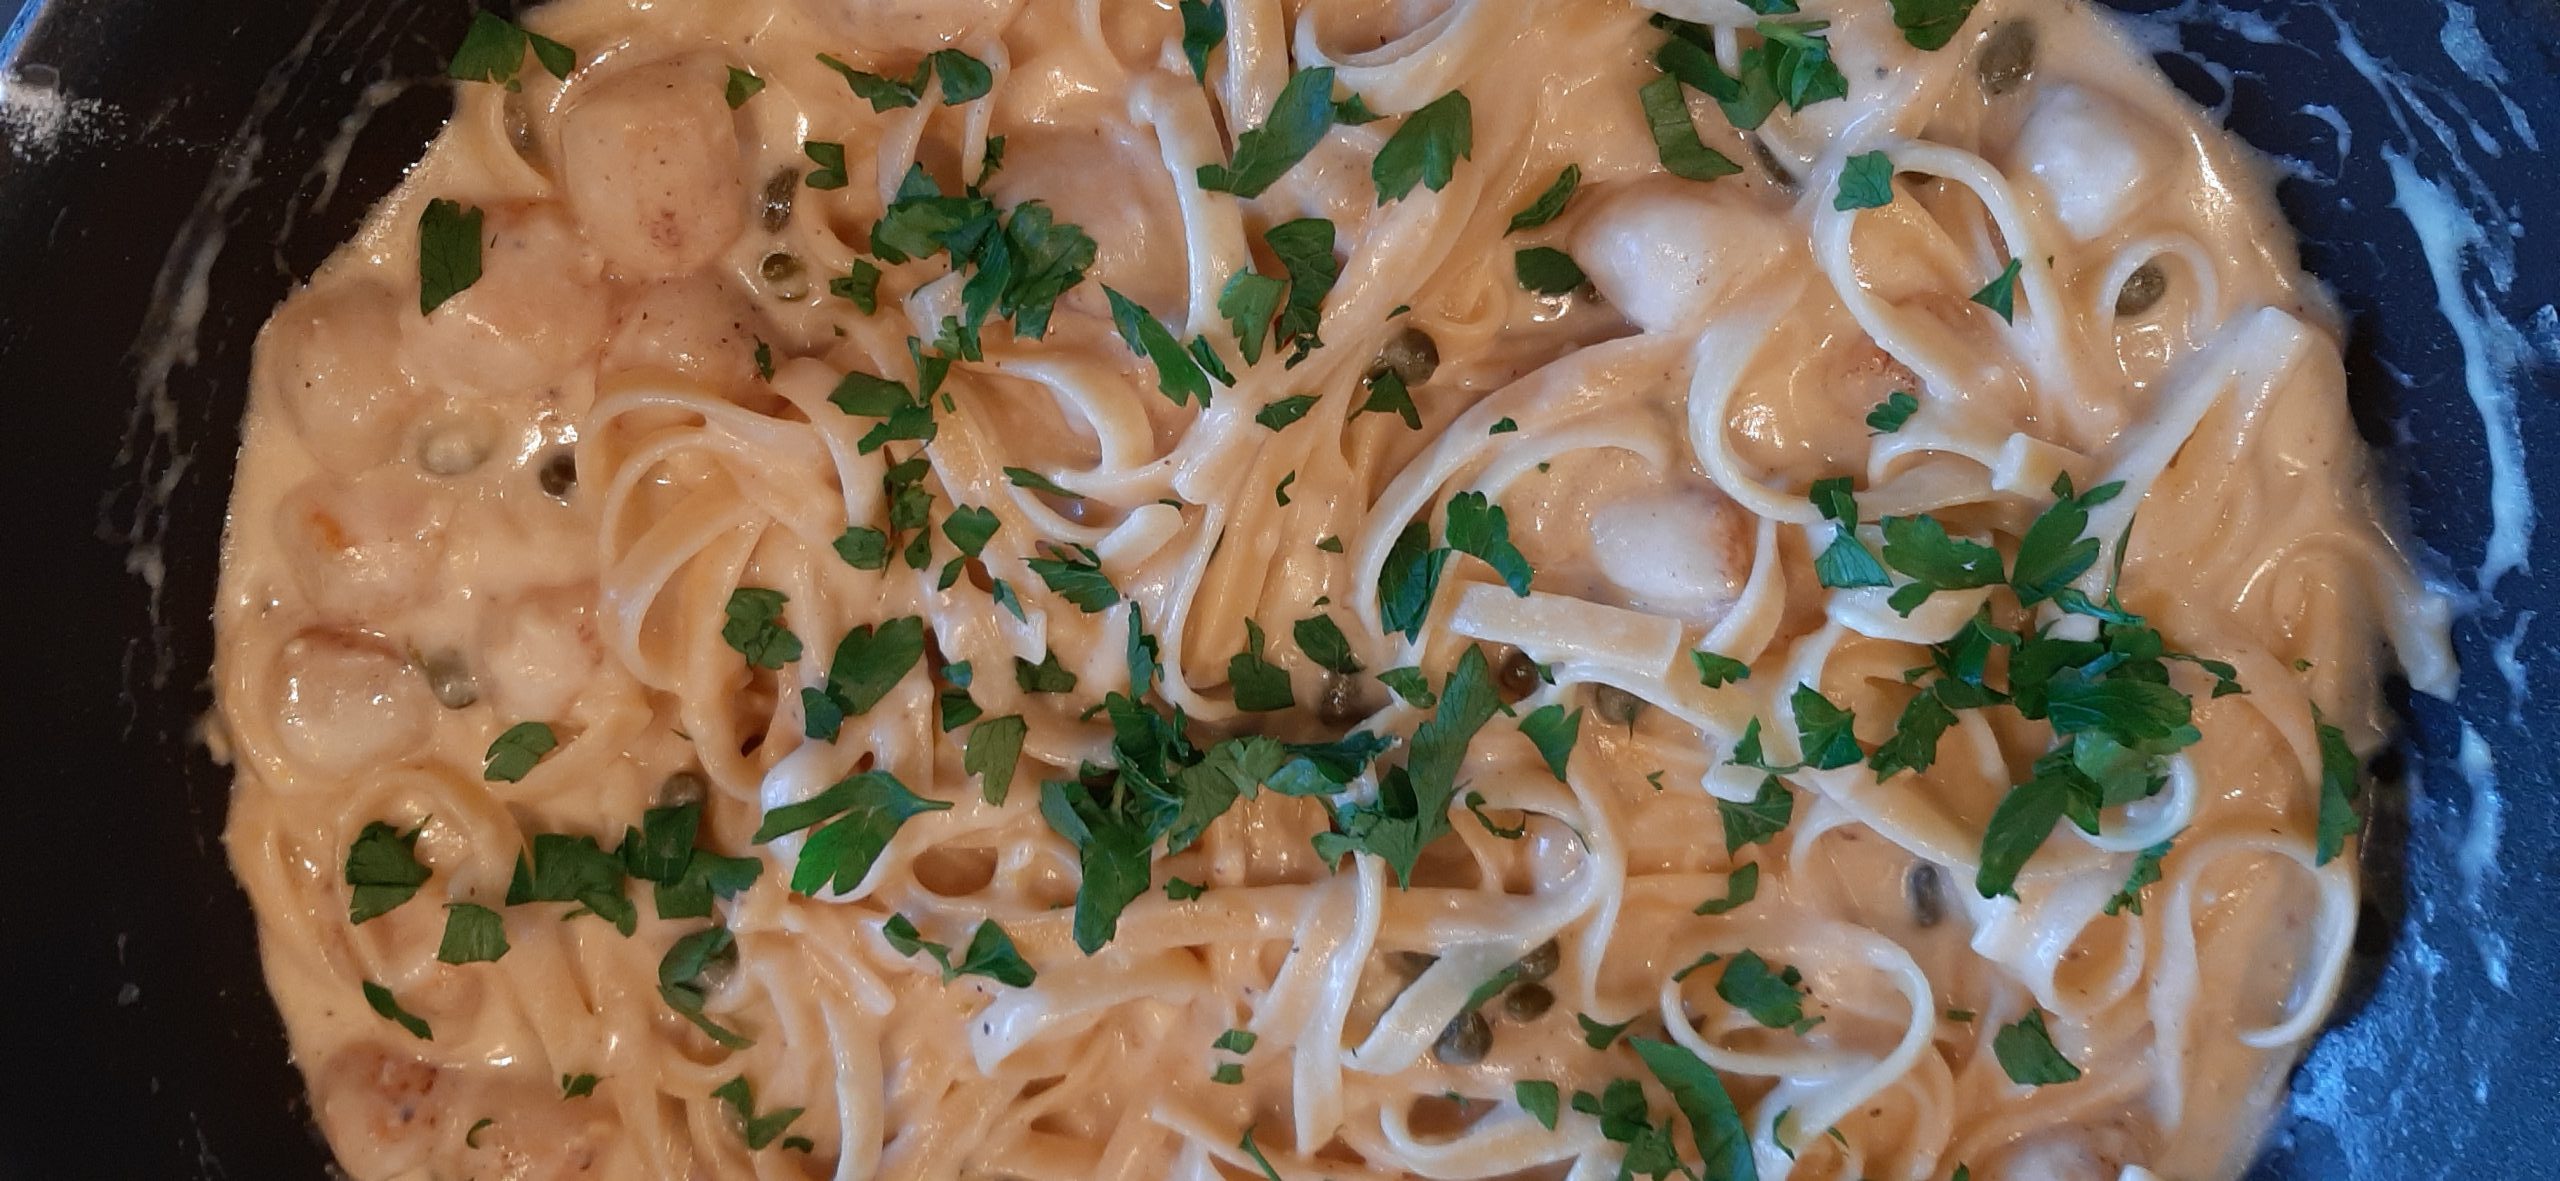
We love scallops. We love pasta. We love lemons. We love capers. Put ’em together and what have you got? Bibbidi-bobbidi-boo. (Feel free to sing along with Cinderella’s Fairy Godmother and me if you like.) But in this combination, instead of “Salagadoola Menchicka Boola”, you get “Scallops Nofoola Mucha to Droola” – Bibbidi-bobbidi-boo! (And no, I can’t help myself sometimes!)
But seriously, this simple recipe makes for some mighty fine eating. Serve a green salad or steamed veggie on the side, and dinner is ready before you can remember why in the world you still remember that stupid song from Cinderella and can’t remember why you walked in your pantry 75% of the time! Need I say more? I thought not!
Well, that’s it for today. We have nothing on our calendar today which is just fine with both of us. I mean really, is a bit of boredom too much to ask?
I hope you enjoy this recipe. (And in case you don’t notice immediately, there’s no heavy cream in this sauce. I gave myself a gold star for that very reason!)
And as always, from my kitchen to yours – peace, love, and fine dining to all.
½ lb. sea scallops (small flash frozen are perfect for this dish)
kosher salt
freshly ground black pepper
3 T. unsalted butter, divided
2 cloves garlic, minced
2 T. flour
1 c. chicken broth
1 c. whole milk
½ tsp. fresh lemon zest
3 – 4 T. fresh lemon juice
¼ c. freshly grated Parmesan cheese, plus more for garnish
2 T. capers, liquid drained
6-8 oz. fettuccini, cooked al dente (save some of the pasta water)
1 T. finely chopped fresh parsley
Pat scallops dry with a paper towel and lightly sprinkle with salt and pepper.
Melt 1 tablespoon of the butter in a large, heavy skillet over medium-high heat. Add seasoned scallops and sear for about 2 minutes on each side. The bottom and top should be a light golden brown. (You don’t want to cook scallops too long, or they will be tough. It’s actually better if they are a bit underdone.)
Transfer the scallops to a container and cover loosely with aluminum foil to keep warm.
Add the remaining 2 tablespoons of butter to the pan. Add the garlic and cook for 1 minute. Whisk in the flour and cook for 2 minutes.
Then whisk in the chicken broth and whole milk making sure there are no lumps. Raise heat to medium and let simmer for 2 – 4 minutes, or until the sauce thickens. Whisk the entire time.
Reduce heat to medium-low, and whisk in the lemon zest, lemon juice, and Parmesan cheese. Once fully combined, remove from heat and gently stir in the seared scallops, capers, and hot al dente pasta. Add pasta water if needed to achieve desired sauce consistency. Taste and adjust seasoning.
Serve immediately topped with fresh parsley and pass Parmesan cheese.
Confession time. I hardly ever make my own chicken or beef stock anymore. I used to be all gung-ho and make homemade stock all the time. But as I’ve gotten older and Better Than Bouillon bases have come into my life, I don’t feel the need to regularly go to all that work. And I know, preservatives Patti. Aren’t you the one always preaching homemade everything. And yes, that’s true. But sometimes it just makes better sense to use my time more productively. (How’s that for justification 101?)
I learned about this type of thinking from a friend who recently recited to me the first paragraph of the new bestseller “Justification for Dummies, An Insider’s Guide to the Thinking (or lack thereof) of former President – – – – – “. (Name withheld to protect the innocent. Me, in this case.) But back to this post.
Just so you know, when there are bones available, I do make my own stock. But that’s not what this post is all about.
This recipe is for the times when all you have is a package of chicken, a few fresh herbs and veggies, and you want a soup that tastes like it started with homemade bone broth and required hours of gentle simmering. Which, BTW, this recipe fulfills.
So, if you too love chicken noodle soup, you might want to give this recipe a try. It really is very flavorful.
And in case you might desire a copy of the “Dummies” book described above, you won’t be able to find one online or even at your local bookstore. They are literally flying off the shelves in blue states, mainly being used as insulation or to line kitty litter boxes. And in red states, this book has already been banned for speaking uncomfortable truths. So, no luck there!
On a serious note, may you continue to think intelligently and remain compassionate enough to decern truth from fiction, see preconceived opinion that is not based on reason or actual experience (prejudice) for what it is, and have the courage to stand up for what you believe. And always with your own rights and the rights of others foremost in every action you take.
As always, peace and love to all.
3 T. unsalted butter
1 lb. boneless, skinless chicken thighs or breasts, cut into bite sized pieces
½ med. yellow onion, finely chopped
¼ c. finely minced shallot
6 green onions, finely chopped, divided
2 lg. carrots, diced
2 ribs celery, diced
2 cloves garlic, finely minced
8 c. water
2-3 T. chicken base (I use Better Than Bouillon Chicken base)
¼ c. chopped fresh parsley
2 tsp. finely chopped fresh rosemary
1 tsp. chopped fresh thyme leaves
1 tsp. chopped fresh sage leaves
1 lg. bay leaf
1 tsp. seasoned salt
freshly ground black pepper
tiny pinch crushed red pepper flakes
2 c. chopped and massaged kale
2 c. egg noodles
Melt butter in a large, covered stockpot or Dutch oven over medium-high heat. Add the chicken pieces and fry until crispy brown. Remove to bowl leaving as much butter in the pan as possible. Set chicken aside in your fridge.
Add the onion, shallot, half of the chopped green onion, carrots, and celery to the pan. Sauté for 3-4 minutes or until the veggies soften a bit, stirring occasionally. Add garlic and sauté for 1 minute.
Add the water, chicken base, parsley, rosemary, thyme, and sage, and gently stir until combined. Then add the bay leaf, seasoned salt, black pepper, and crushed red pepper flakes. Bring soup to a boil, reduce heat, cover, and simmer for about an hour.
After an hour taste and adjust the seasoning.
Just before serving, bring soup just to a boil and stir in the egg noodles, cooked chicken, and kale. Cook until the noodles are al dente.
Taste the broth again and add seasonings if necessary.
Serve immediately garnished with remaining green onion.
Miles may not be comforted by chicken soup, but he sure does love the decorative pillows in our guest room.
There are just times when a gluten free main dish containing meat is required. And of course, many meat dishes are gluten free. But when the meat dish is going to be served to people at a large gathering, some of whom will not be sitting at a table, you need to serve a dish that does not require a knife. For example, a perfectly grilled steak or pork chop, or food that requires you to perhaps use your hands or a knife, like fried chicken or ribs. These wonderful entrees are delicious, but very hard to eat when your plate is on your lap. Not to mention messy.
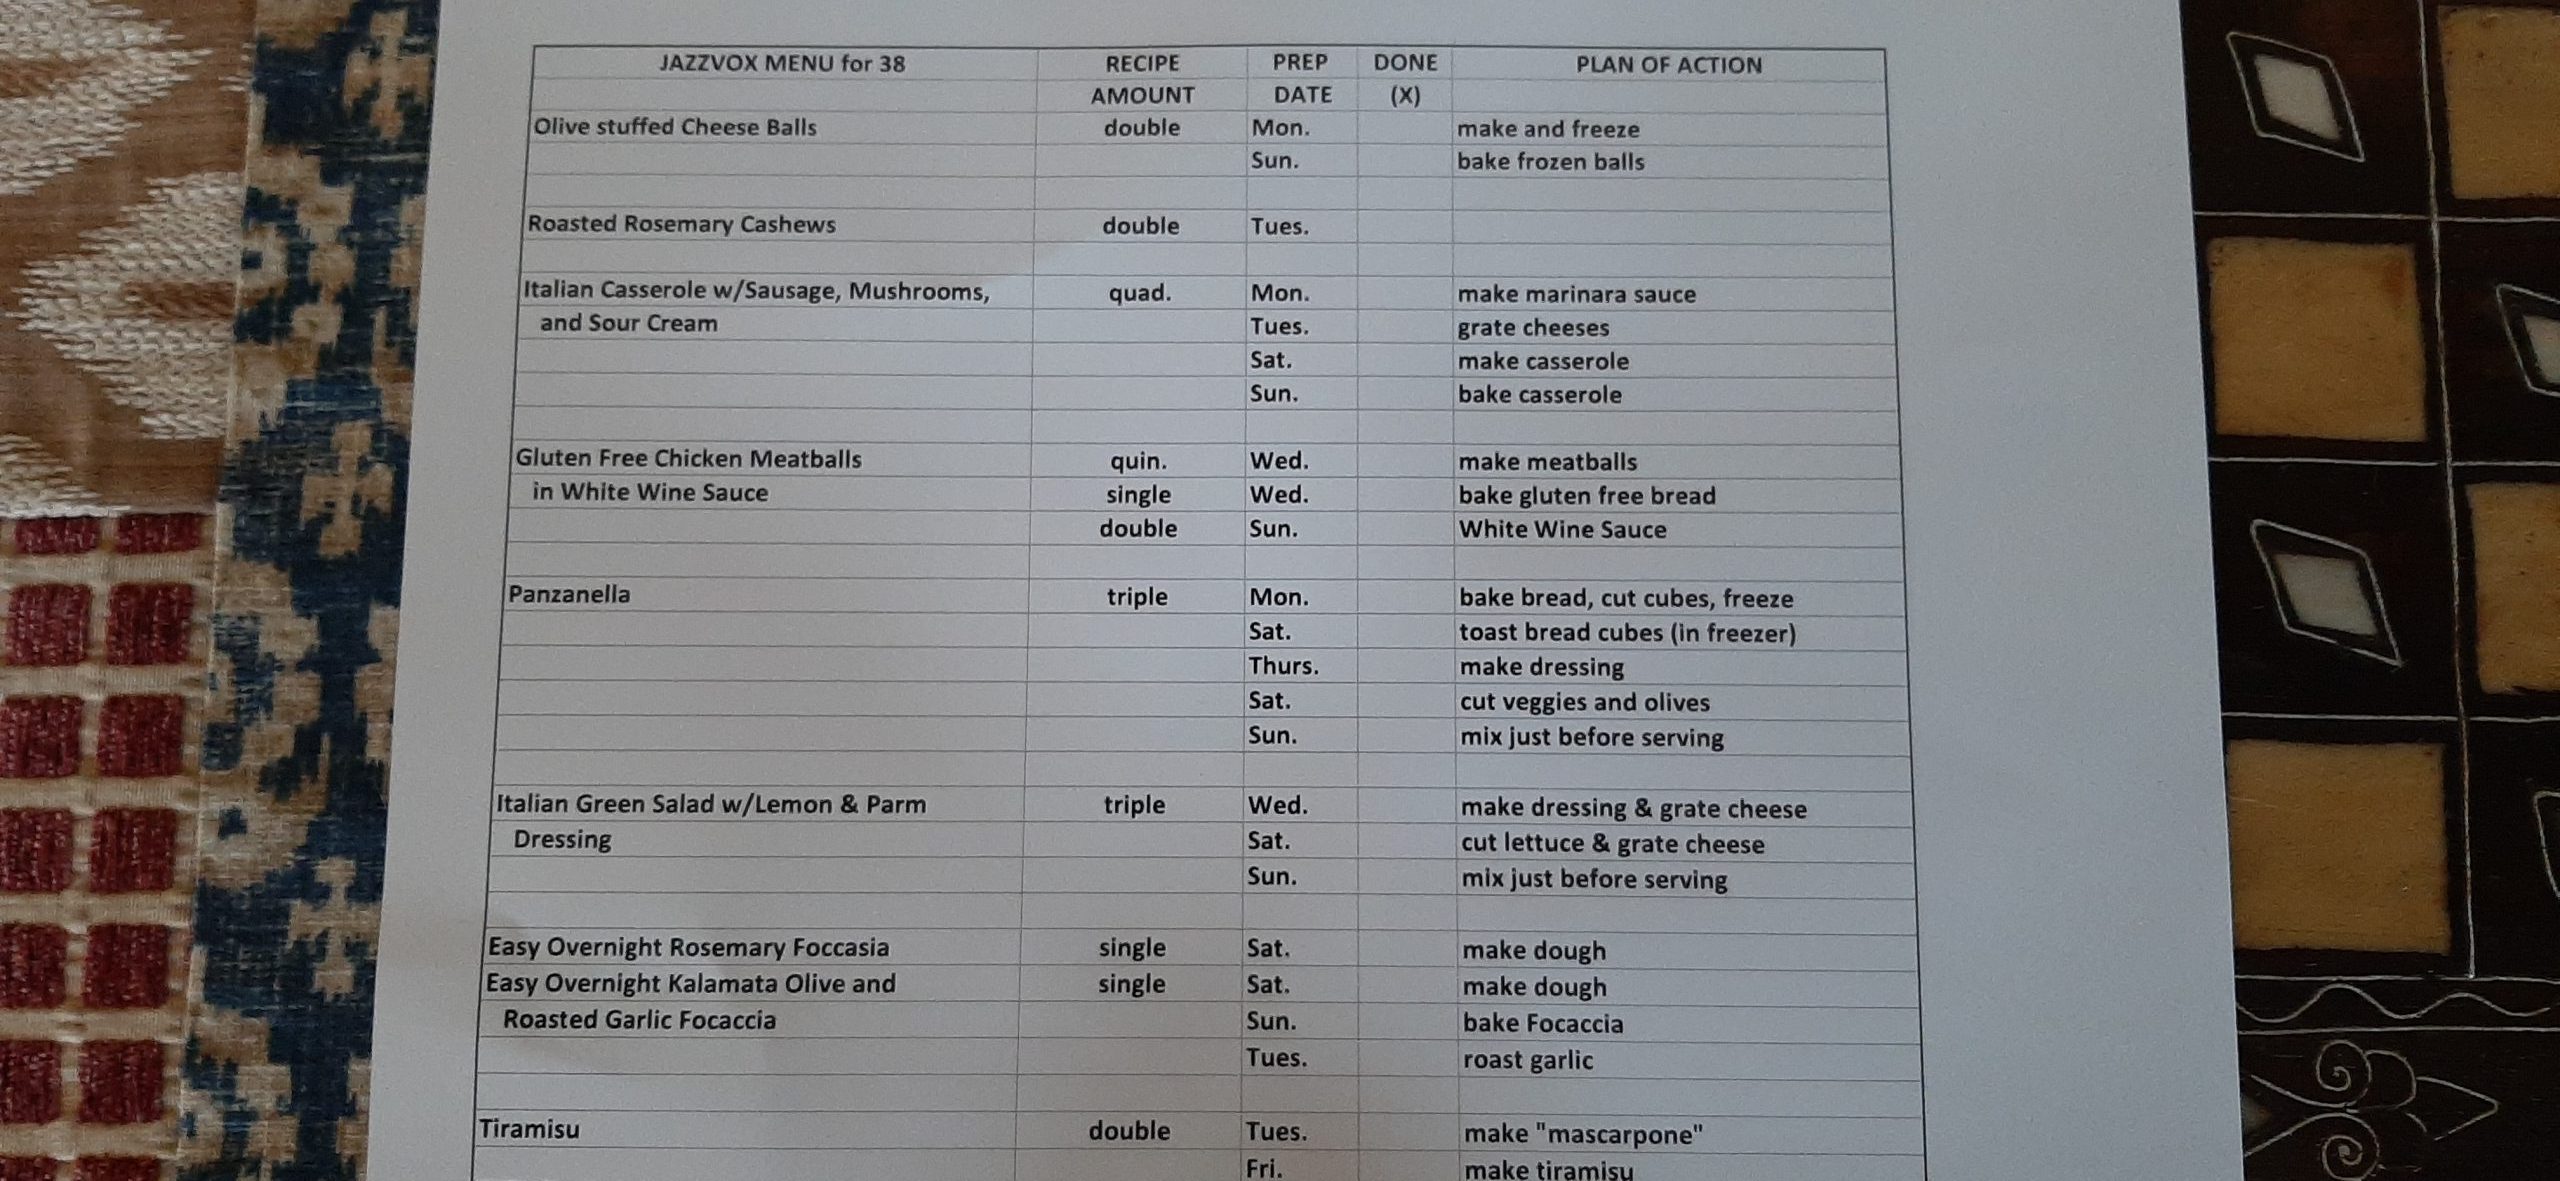
So many hosts don’t consider this when they are planning their menu. And believe me, I know how hard it is to plan a menu for a large event. So many things to be considered. Theme, flavor variety, dietary restrictions, texture (crunch for example), color variety, dishes that can be prepared ahead, and of course, the expense involved. These are all items that need a great deal of consideration before you start shopping for ingredients. Because I have had many occasions to feed large groups, I’ve learned to make spreadsheets for each of these events. (I’m too old to keep all the balls in the air like I used to. So, I rely on my Microsoft Excel spreadsheet to keep me on track!) Plus, then I can go back and reference what I served if need be. (At this point, I consider Excel spreadsheets an essential kitchen tool. Not as dear to me as my KitchenAid mixer, but darn close!) Anyway, I have attached the spreadsheet from our last JazzVox in home concert. Just the food prep portion. What I didn’t enclose was the next page that told me when to take things out of the freezer or fridge, and when to put them in the oven if necessary. (I didn’t want you to see how totally inept I have become. It’s embarrassing!)
But back to these meatballs and sauce.
They are good. Really good. And simple to prepare. And they can be baked. In fact, I’ve given up frying any kind of meatball. I bake them all.
And as for the white wine sauce, well, I would advise you to prepare it just before it’s needed. I made mine a couple days ahead because of time constraints. And I used gluten free flour as the thickener. Not a good choice. The sauce didn’t break down, but it wasn’t smooth. It tasted just fine, but I lost points on the presentation. Next time I will use either cornstarch or arrowroot.
Well, that’s it for today. Mr. C. has a gig in Seattle and I’m going along for the fun. The venue is in the Green Lake area, so that means we can have dinner at Spud Fish and Chips. Which BTW, has been in the Seattle area since 1935. I can hardly wait!
And sorry about no picture. But I was just too busy getting all the food out so that the hungry hoard could eat before the concert began. But next time I make these meatballs, I will add a picture. That is of course, if I remember. No guarantees.
Peace and love to all.
For the Meatballs:
¼ c. chicken broth
2 lg. eggs
1 tsp. kosher salt
freshly ground black pepper
1 tsp. Italian seasoning
½ tsp. dried basil
2 med. cloves garlic, minced
½ c. finely minced yellow or white onion
1 T. finely chopped, fresh Italian parsley
1½ c. gluten free fresh breadcrumbs* (crusts and all)
2 lb. ground chicken (or ground turkey)
extra virgin olive oil
Whisk the chicken broth, eggs, salt, pepper, Italian seasoning, and dried basil together in a bowl. Add the garlic, onion, parsley, breadcrumbs, and ground chicken. Gently mix all the ingredients together until thoroughly combined.
Using a #40 (orchid handle) (about 2 tablespoons) ice cream scoop, plop balls on a lightly olive oil greased baking sheet close together. Don’t pack the ice cream scoops. You want to handle the mixture lightly.
Bake in a pre-heated 400-degree oven until cooked through (internal temp at least 165-degrees), about 18 minutes. Don’t overbake.
Remove from oven and use right away, or let cool completely and store covered in your fridge for a couple of days, or freeze for future use.
When ready to serve, heat meatballs and carefully stir in the sauce. Garnish with parsley.
*I just cut thin slices of bread (crust and all), then cut into tiny cubes. I don’t pack them into a measuring cup. I just place the cubes in the cup until it is full.
Makes about 48 meatballs.
For the White Wine Sauce: (Gluten Free and Dairy Free)
2 T. extra virgin olive oil
⅓ c. finely chopped shallot
2 med. cloves garlic, finely minced
½ c. dry white wine – such as Pinot Grigio or Sauvignon Blanc
2 c. chicken broth (or 2 cups water and 2 heaping teaspoons chicken base)
¾ tsp. kosher salt
freshly ground black pepper
2 T. cornstarch or arrowroot powder
¼ c. water
1 T. fresh lemon juice
4 T. chopped fresh parsley, divided
Heatthe olive oil in a heavy pan. Add the shallot and gently sauté until tender. Add the garlic for about 1 minute, stirring the whole time.
Add the wine and cook until all but evaporated.
Add the chicken broth, salt, and pepper. Simmer for a few minutes to blend flavors.
Whisk the cornstarch or arrowroot powder with the water and lemon juice. Gradually stir into hot liquid until blended. Stirring constantly, bring to a boil and boil for one minute. If the sauce is not as thick as you would like, make another bit of slurry by whisking a bit more starch with water, and repeat the process.
Add 3 tablespoons of the parsley, taste, and adjust seasoning. Use remaining parsley as garnish.
As the Beatles sing “I get by with a little help from my friends”. In this case, “a lot of help from my friend”. My friend, this time, being Jim.
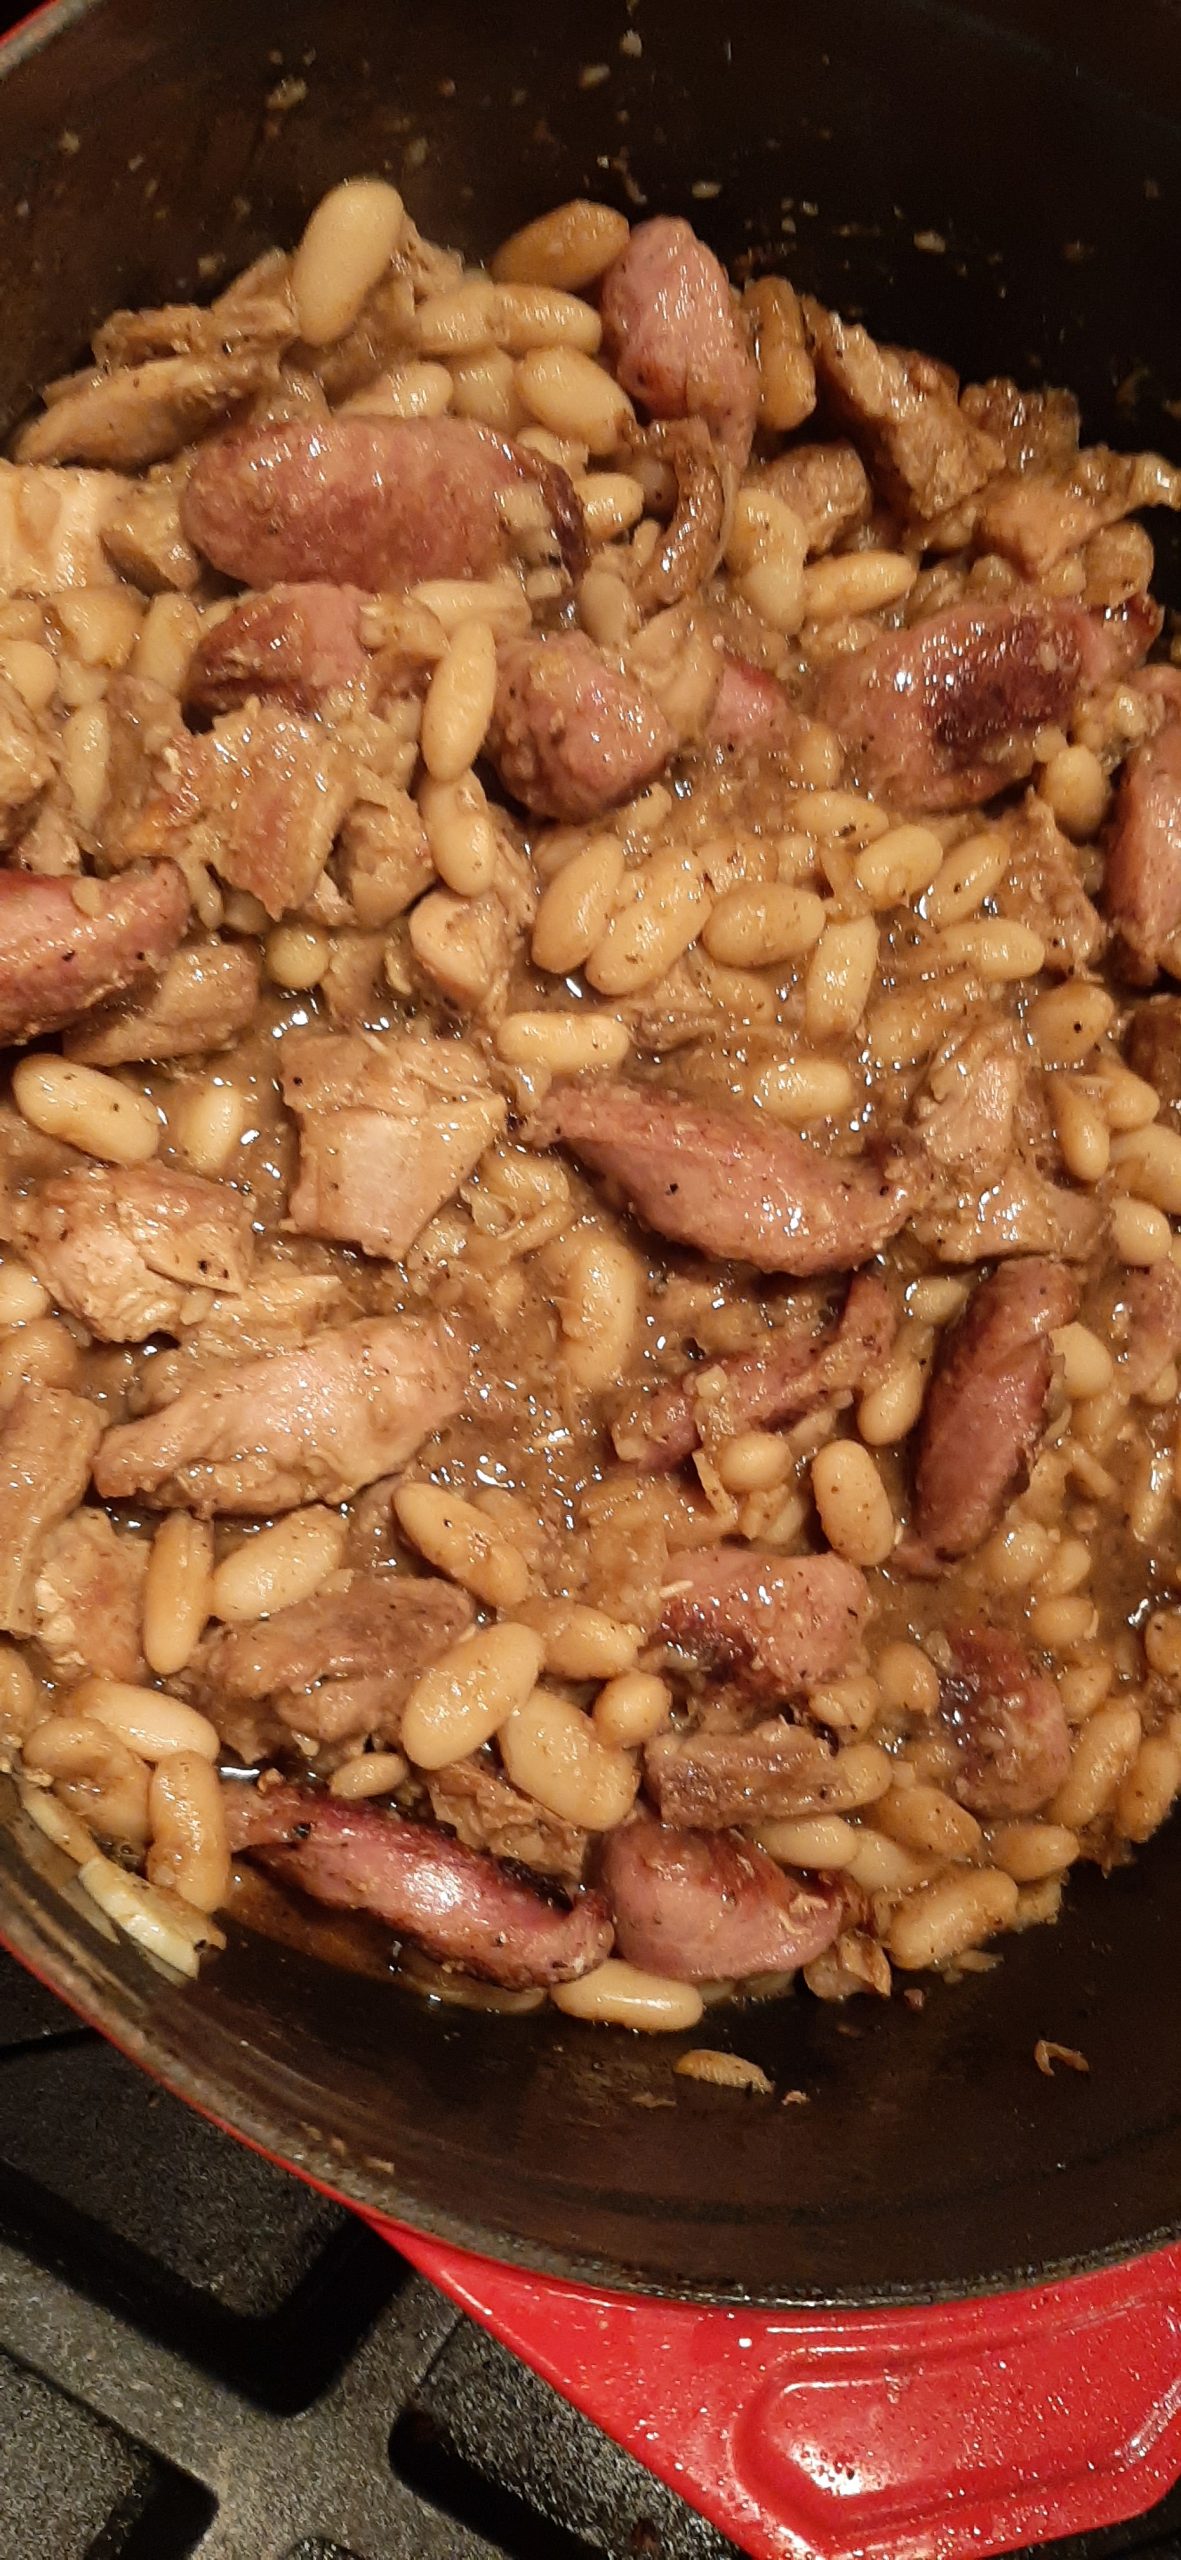
It all started with me buying all the meat for cassoulet about a year ago. Then of course, time went by and the ingredients for this classic French dish languished in the freezer portion of our basement refrigerator/freezer. Until one day when Mr. C. asked me for maybe the 4th time when I was going to use the expensive meat I had purchased to try my hand at making cassoulet? Well, I can take a hint! (Especially after 4 “reminders”.) Huh, perhaps I should get my act together and use the meat as planned. So, I called Jim and Margo and invited them to dinner.
My cassoulet was OK, but both Jim and I felt it needed some work. So, Jim suggested we prepare the dish together for our Christmas Eve dinner. What a grand idea! (It actually saved me coming up with a dinner plan. So, I was thrilled on two levels.)
So, the recipe you find below is the result of a joint venture. But I must confess, most of the reason the recipe turned out to be so delicious, is all on Jim. So, we all have Mr. H. to thank.
Well, that’s it for today. Last night Mr. C. had a gig which I attended. Tonight, we are driving to Seattle to hear “Nearly Dan” (a Steely Dan tribute band) at Jazz Alley. And tomorrow Mr. C. has another gig. (There truly is no rest for the wicked.) Anyway, keeping busy keeps us out of trouble. And that’s always a good thing.
And do try this cassoulet recipe. It contains far fewer ingredients than some and comes together fairly quickly. Not an inexpensive dish to make. Especially since it was originally considered peasant food. But how many people these days have ducks living in their backyard, or back bacon or duck fat, etc., just lying around? Not this couple, that’s for sure. And cannellini beans don’t grow on trees here either. So, many of the ingredients for this recipe must be purchased at a premium.
But for a special occasion, this is just the perfect comfort food to serve your family and friends. On that happy note – peace and love to all.
2 duck breasts patted dry with paper towels and the skin scored
6 oz. back bacon (unsmoked if possible) cut into ¾-inch cubes (sometimes referred to as “fat back”)
2-3 bone-less, skinless chicken thighs
½ lb. garlic sausage like Kielbasa or a French style, unsmoked garlic sausage, cut into 1-inch pieces on the diagonal
duck fat, if needed
kosher salt, if needed
freshly ground black pepper (quite a bit)
Day 1:
In a Dutch oven, cover beans with 1 quart chicken stock. Add the garlic, onion, and bay leaves. Cover and refrigerate overnight.
Day 2:
Remove beans from fridge. Add 2 cups of chicken stock and bring to a boil, reduce heat, and simmer until the beans are tender. (This could take a couple, three hours, so plan ahead.) Keep adding chicken stock as required.
While the beans are cooking, place the duck breasts, skin side down in a cold frying pan. Slowly fry the duck breasts over medium heat until the fat is rendered, and the skin is crispy. Flip and brown the second side. Remove from pan (keeping the pan on your stove) and place the duck breasts in an oven proof pan and bake in a pre-heated 350-degree oven only until the internal temperature reaches 125-degrees. Remove from oven and set aside. Pour any duck fat remaining in pan in with the beans. (You can even deglaze the pan with a bit of chicken stock and throw that in with the beans too. The more flavor base the better.) When cool, slice the duck breasts into thin strips.
While the duck is in the oven, cook the back bacon until crispy in the same pan you used to cook the duck. Remove from pan and set aside.
Add the chicken thighs to the same pan and cook until golden brown on both sides. Remove from pan and set aside. When cool cut into small pieces.
Next brown the sausage, adding more duck fat as needed. When browned, remove from pan. Set aside until needed.
Deglaze the pan with chicken stock and add the liquid plus brown bits to the pot of beans along with all the pieces of meat except the duck. Add stock as needed for desired consistency. Cook until the beans are tender. Taste and add salt if necessary and black pepper.
To serve, scoop the beans and meat into large flat soup bowls. Top with duck, skin side up so that it stays crispy. Serve with garlic bread or any toasted chewy bread.
Please note: This cassoulet can be served as a thick stew or as a soup. It all depends on how much stock you add to tenderize the beans. Either way, you are in for a treat.
CHICKEN OR TURKEY STOCK*
4 lbs. chicken or turkey parts, pieces, giblets, and bones
1 onion, roughly chopped
1 leek, white and green part, roughly chopped
2 carrots, cut into 1-inch sections
2 celery ribs, plus leaves, cut into 1-inch pieces
2 garlic cloves
1 bay leaf
3 T. fresh parsley
1 tsp. dried thyme
6 peppercorns
3 qt. water
Spread the chicken or turkey bones, etc. on one very large or 2 smaller rimmed baking pans. Bake in a pre-heated 400-degree oven for 1 hour or until the chicken or turkey is well browned. Remove from oven and place the meat in a large, covered Dutch oven and pan.
Pour a small amount of water in the pan(s) and let sit for several minutes. Then using a sturdy spatula, lift all the browned bits off the bottom, along with the water, and add to the pot with meat. Then add all the remaining ingredients. Bring to a boil, cover, reduce heat, and simmer for at least 3 hours.
When ready to use or store for future use, remove from heat and let cool for about 30 minutes. Then strain the liquid into a container. Discard all the meat and veggies. If you aren’t going to use the stock immediately, place covered in your refrigerator. Before using, if desired, remove the fat that has formed on the surface.
Use in any recipe calling for stock or broth**.
*Stock is a rich, savory liquid prepared by simmering bones (and in my recipe – flesh) and vegetables in water for hours with herbs and spices until the flavor is extracted. Stock derives its flavor primarily from protein, not from heavy sodium. As a result, stock is usually healthier than broth and delivers a richer mouth feel and deeper flavor than broth.
**Broth, on the other hand, usually contains flesh (no bones) plus a lot of salt. It can be used any time stock is listed as an ingredient. But be aware that it might be quite salty. So, plan to adjust your recipe accordingly if you are using broth rather than stock.
For this year’s extended family Christmas dinner, our dear friends Jim and Margo were the hosts and served us boneless leg of lamb. With all the trimmings. Jim and I had attended a cooking class decades ago at an Italian restaurant in Redmond, Washington and together we had learned to prepare this fantastic lamb dish. You can find the recipe on this site – Stuffed Boneless Leg of Lamb. And truly, it remains the best recipe for boneless leg of lamb that I have ever tasted.
Anyway, there were leftovers offered, so I brought home 4 big slices. But then, what to do with the lamb? Given my druthers, I almost always think Italian. So, how about a ragù. I mean really, who doesn’t love a ragù? And yes, I already had a lamb ragù recipe on my blog. (Lamb Ragù with Penne Pasta.) But when examined, I didn’t have one of the main ingredients, so, I started over and came up with this recipe.
And I must say, this ragù came out perfect. And the exciting part was that the ragù sauce was so very delicious even before I added the lamb. In fact, it’s a miracle I didn’t “taste” the sauce to extinction before I ever added the lamb and pasta. It was just that good. And it had been exceedingly easy and fast to prepare. And contained ingredients I almost always had on hand. (Can’t beat that!) So, if you are a vegetarian, this recipe would work for you. Just leave out the meat. Duh!
And since I’m sure you were wondering, according to foodandwine.com, “Ragù is a class of Italian pasta sauces made with ground or minced meat, vegetables, and occasionally, tomatoes. Bolognese, for example, falls under the ragù umbrella”.
So, there you have it. Aragù that is easy to fix and very tasty. And ever so versatile. You could easily use leftover beef, pork, or chicken in this recipe. Or go completely nuts and use baby goat. The options are endless. (Just let me know how this recipe works with baby goat. Since the chance of me ever having leftover baby goat is slim to nil.)
Well, that’s it for today. I feel like I’m still in recovery mode. Each year, the recovery period from all the fun and exciting holiday events is getting longer. 30 years ago, I could have bounced back and gone back to work with nary a backward glance. All I can see now for the immediate future is afternoon naps and thoughts of my pillow starting at about 8:30 pm.
But even with less energy and more time required to recover from all the fun, I still love the holidays. I love getting together with close friends and family. I love all the pretty holiday decorations both on the outside of houses and the Christmas trees that are on display through front room windows late at night. I love making homemade goodies for family and friends. I love how excited little kids get when they see Santa. Because I too am still a little kid when it comes to Santa.
But the best thing for me is seeing family and friends. Getting to spend time with people who have been a huge part of my life for decades. There is just nothing better than sharing the holidays with these loved ones even if it’s just for a short time.
I hope you too had a chance to enjoy the company of loved ones this year. And that you can share your holidays and blessings with loved ones for many years to come.
Peace and love to all.
1 T. extra virgin olive oil
½ onion, chopped
⅓ c. shredded carrot
8-10 button mushrooms, thinly sliced
2 garlic cloves, crushed
½ tsp. dried oregano
pinch crushed red pepper flakes
pinch kosher salt
freshly ground black pepper
½ tsp. brown sugar
1 T. tomato paste
1 (8-oz.) can tomato sauce
2 T. water
½ tsp. Worcestershire sauce
1 c. finely diced leftover lamb (or meat of choice)
1 c. rigatoni pasta, cooked al dente (or your favorite pasta shape)
grated Pecorino-Romano cheese, opt.
basil leaves, finely cut, opt.
Heat the olive oil in a large, heavy pan over medium heat. Add the onion and grated carrot. Cook for 5-10 minutes or until the onion is softened and turning golden. Add the garlic, oregano, crushed red pepper flakes, salt, and black pepper; cook for 2 more minutes.
Add the brown sugar, tomato paste, tomato sauce, water, and Worcestershire sauce. Simmer gently for about 20 minutes to combine the flavors.
Just before serving, add the lamb and al dente pasta. Cook just until the lamb is hot.
Pass the grated cheese and basil. Great served with garlic bread.
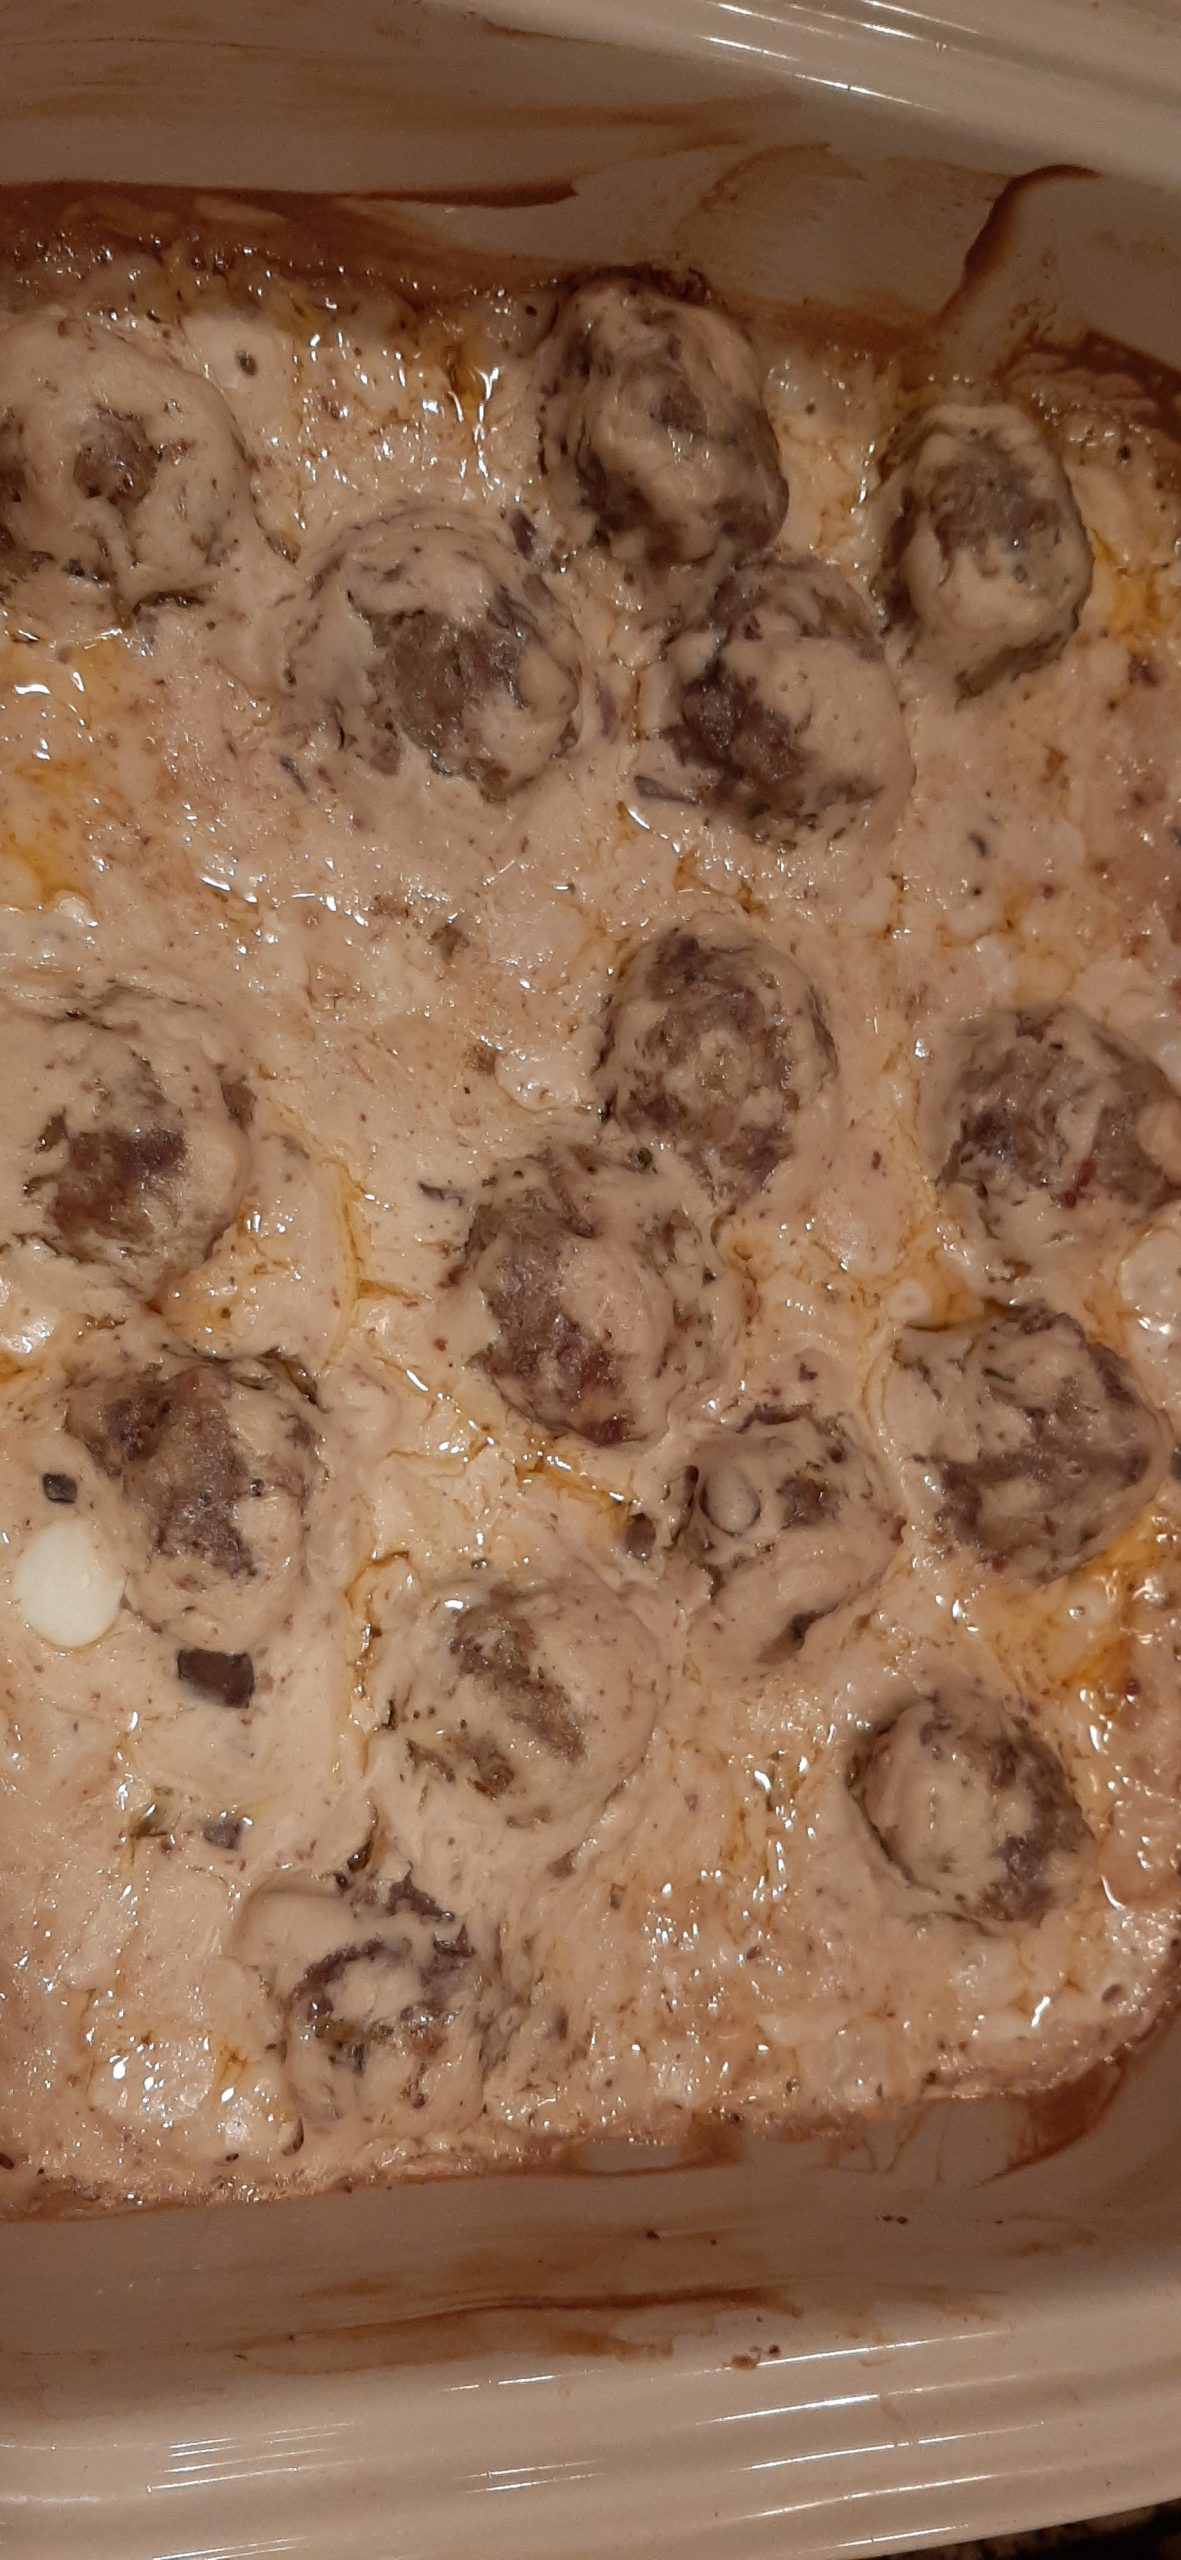
Staying on the theme of Christmas and my favorite recipes, I again offer you my recipe for Swedish Meatballs. Which BTW, was one of my kids’ favorite dishes. (Probably still is!) They would gobble the meatballs up every time I made them. And for me, they were easy to build. Especially if I’d made the meatballs ahead and either refrigerated them overnight or hid them in the freezer.
So, even on a work night, I could throw this dish in the oven and dinner would be ready in about an hour. That left me time to start a load of laundry, make a salad or steam a green veggie, and slowly unwind from my workday. And I often needed that little bit of time to transition from managing people at work, to managing kids at home. (Not that different BTW!) It also left me time to talk with the kids about their day, even though we would be sitting down to dinner together and every subject imaginable would be fodder for our conversations. With 4 kids there were always stories to be told. Sometimes even more information was provided than I wanted or felt I needed to know. But the discussions were always lively. And I learned a lot about what the kids were experiencing just by these easy and relaxed exchanges. But I bet you are wondering why Swedish Meatballs would be considered a Christmas dish.
Every Christmas Eve my sister-in-law Evelyn and brother-in-law Dan and their kids feast on homemade lefsa and Swedish Meatballs. They spend the day making the lefsa and the meatballs and it is a tradition cherished by one and all. So, I too think of Swedish Meatballs as a part of what makes Christmas special.
So, if you too are still making Christmas traditions, I offer this recipe for your consideration. But don’t stop at Christmas time to serve this dish to family and friends. Meatballs are good any old time of year.
Well, enough posting for today. There are presents still to be ordered. And Christmas goodies to be baked.
But before I leave you today, just a hint about making cookies. Especially if you are crazy like me and insist that there be several different types of cookies for family and friends to enjoy. Make all the dough one day and bake it off the next. Most cookies profit from time spent in the fridge anyway. And make refrigerator cookies whenever possible. Much easier slicing the dough rather than shaping it. And making all the dough in one day only makes sense.
I place all the ingredients I will be using that day on a kitchen counter or sometimes on my kitchen table. Then any recipe calling for room temperature butter, vanilla, all-purpose flour, etc. etc., is right at hand. No putting ingredients away just to have to get them out again for the next recipe. Plus, you only make a mess one time. And measuring cups and spoons if used for dry ingredients can be used repeatedly thus saving time for cleanup. And yes, it took me years to figure this out. But there is no looking back now. This system just plain makes cookie baking easier and faster.
OK Patti, enough pontificating. Let these fine folks get back to their real lives. And the real reason they are reading this post in the first place!
As always, may you find peace and love in your life. And Merry Christmas.
⅓ c. dehydrated chopped onion
½ tsp. granulated garlic
2 T. parsley (dried or fresh)
½ tsp. ground savory
¼ tsp. paprika
½ tsp. dried thyme leaves
¼ tsp. dried rosemary
pinch nutmeg
½ tsp. seasoned salt
freshly ground black pepper
2 eggs
2 T. milk
¾ c. uncooked oats
1 lb. ground beef
1 lb. pork sausage
1 can cream of mushroom soup
1 tsp. beef base
2 c. sour cream
Combine the onion, garlic, parsley, savory, paprika, thyme, rosemary, nutmeg, salt, pepper, eggs, and milk in a bowl. Add the oats, ground beef, and pork sausage. Form into balls with a small ice cream scoop. Place on a low sided baking pan and bake in a pre-heated 350-degree oven for 20 minutes or until cooked through.
Meanwhile whisk the cream of mushroom soup, beef base, and sour cream together. When meatballs are out of the oven, layer them with the sour cream mixture in a covered casserole.
Cover dish and bake at 350-degree for 30 minutes. Remove the cover and continue baking an additional 15 minutes.
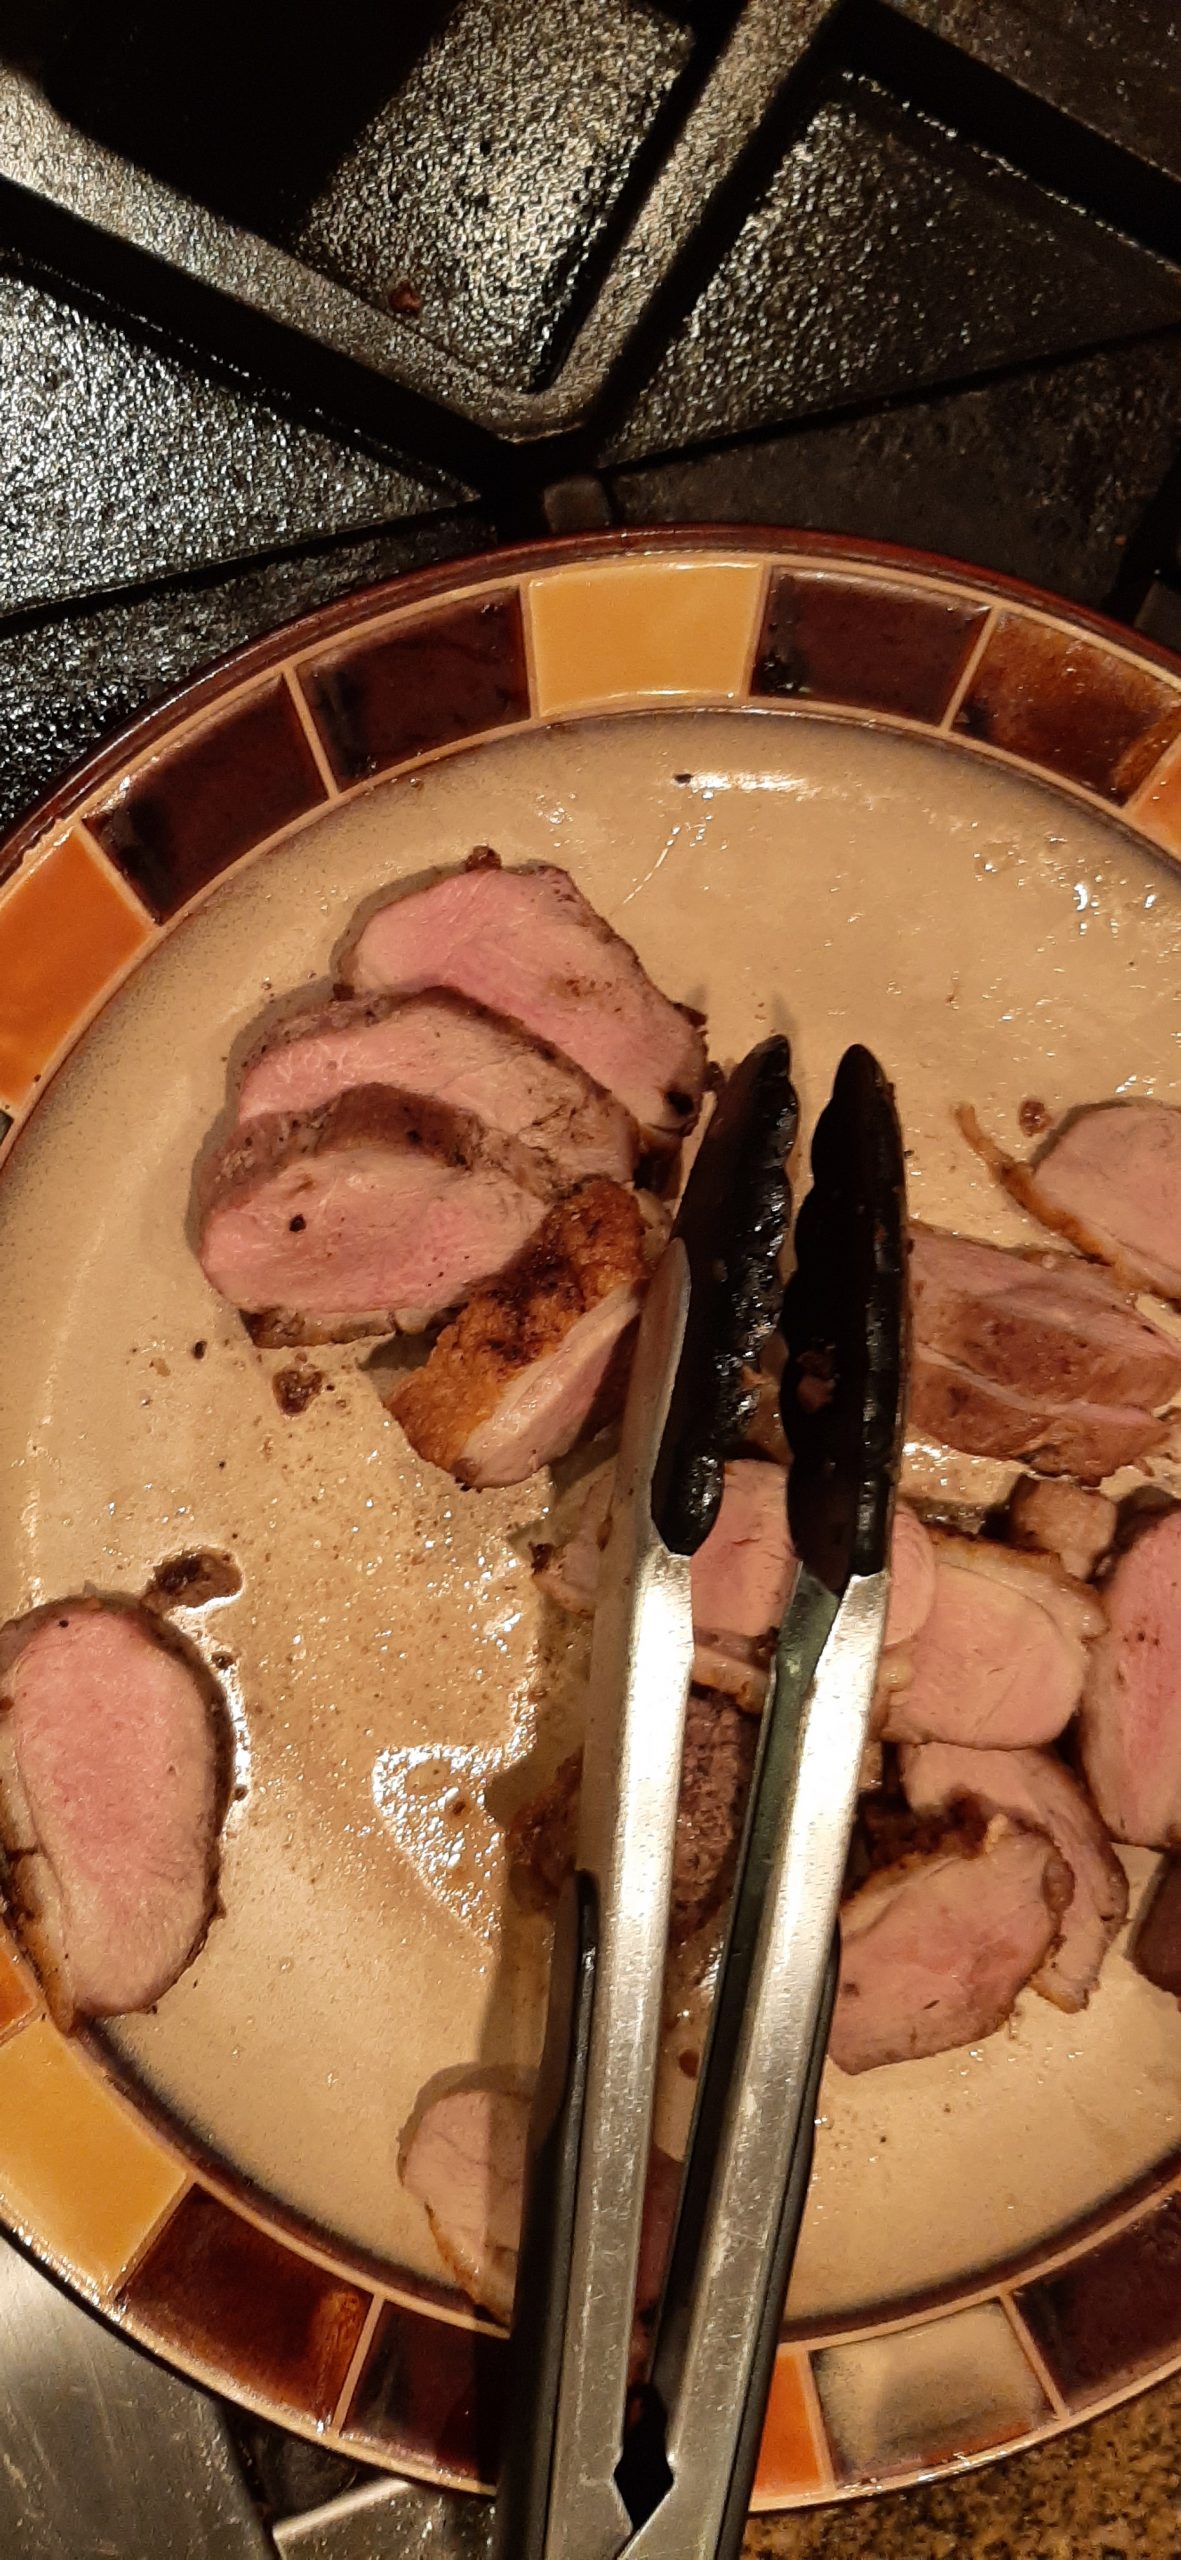
OK, I know I’m a food snob, but until a few years ago I couldn’t prepare a decent pork chop to save my life. Not that I didn’t try, because I did try. But I almost always produced a piece of meat that could have been used as shoe leather. Pork tenderloin, no problem. But pork chops, Yee Gods, what was I doing wrong? Well, I will gladly admit what I was doing wrong. I was cooking the chops until all semblance of tender and juicy was about 20 degrees ago. In other words, I was cooking my poor pork chops like my parents used to cook veggies when I was a kid. To death! But thankfully, I have now learned to not over fry or bake pork chops.
Now, part of the problem was that when I was young trichinosis was still a major concern when cooking pork. So, I learned – cook pork until it is beyond redemption (i.e. till no possible harm could come from eating a pig product). But those days are far behind us. And thankfully, it is now well known that if pork is cooked to about 145-degrees, there is nothing to worry about. So, below you will find a really good recipe for pork chop success.
I found this recipe, with a few minor changes from me, on the realsimplegood.com site. And as the name of the site implies, this recipe is truly really simple to prepare, and really, really tasty. And juicy. No shoe leather anywhere near these chops.
So, if you too love pork chops, then I recommend you give this recipe a try. And if you are lucky enough to have a meat department in your local grocery store that offers Berkshire Pork, I highly recommend you spend the extra nickel and go whole hog on this. Because Berkshire pork is really a cut above.
Well, it’s the day before Thanksgiving and my defrosted turkey is sitting in the fridge with a salty herb mix covering every inch of its inside and outside. I roasted some additional turkey parts today, and they are residing in the fridge waiting to become turkey stock tomorrow morning. I have homemade bread cubes toasted and eager to become stuffing. My new recipe for Savory Dried Corn Casserole is safely tucked in the refrigerator anticipating its possible insertion into the Carr family list of “must have” Thanksgiving dishes. And my new recipe for Creamy Grape Salad is also ready to be introduced and given either a thumbs up or down. And since I am married to the nicest man I know, a Papa Murphey’s pizza is baking in our oven.
This often happens at our house. I’m so busy during the day before a big event, that I forget about (or don’t have the strength left) to cook dinner. Mr. C. has absolutely no problem with either taking me out or bringing something home for us. So, with no further ado, please excuse me while I go enjoy someone else’s hard work on my behalf.
And to all, Happy Thanksgiving. And do try this recipe. It makes for two wonderful pork chops. Or four, if you double the recipe. Etc. etc.
And as always, peace and love to all.
½ tsp. chili powder
½ tsp. brown sugar
½ tsp. smoked paprika
½ tsp. dried thyme
½ tsp. dry mustard
½ tsp. sea salt
freshly ground black pepper
¼ tsp. granulated garlic
¼ tsp. granulated onion
2 (1½ to 2-inch-thick) bone-in pork chops (Berkshire pork preferred)
2 T. extra virgin olive oil
Make the seasoning mix by whisking the chili powder, brown sugar, smoked paprika, thyme, dry mustard, sea salt, black pepper, granulated garlic, and granulated onion together in a small bowl.
Place the pork chops on a low sided baking pan and drizzle the oil over each pork chop. Rub the oil over both sides of the pork chops. Season the pork chops on both sides with the seasoning mix.
Bake the chops in a pre-heated 350-degree oven for about 20-25 minutes, or until the internal temperature reaches 140-degrees. (The temperature will rise to 145-degrees as it rests.)
Remove from the oven and allow the chops to rest for at least 5 minutes before serving.
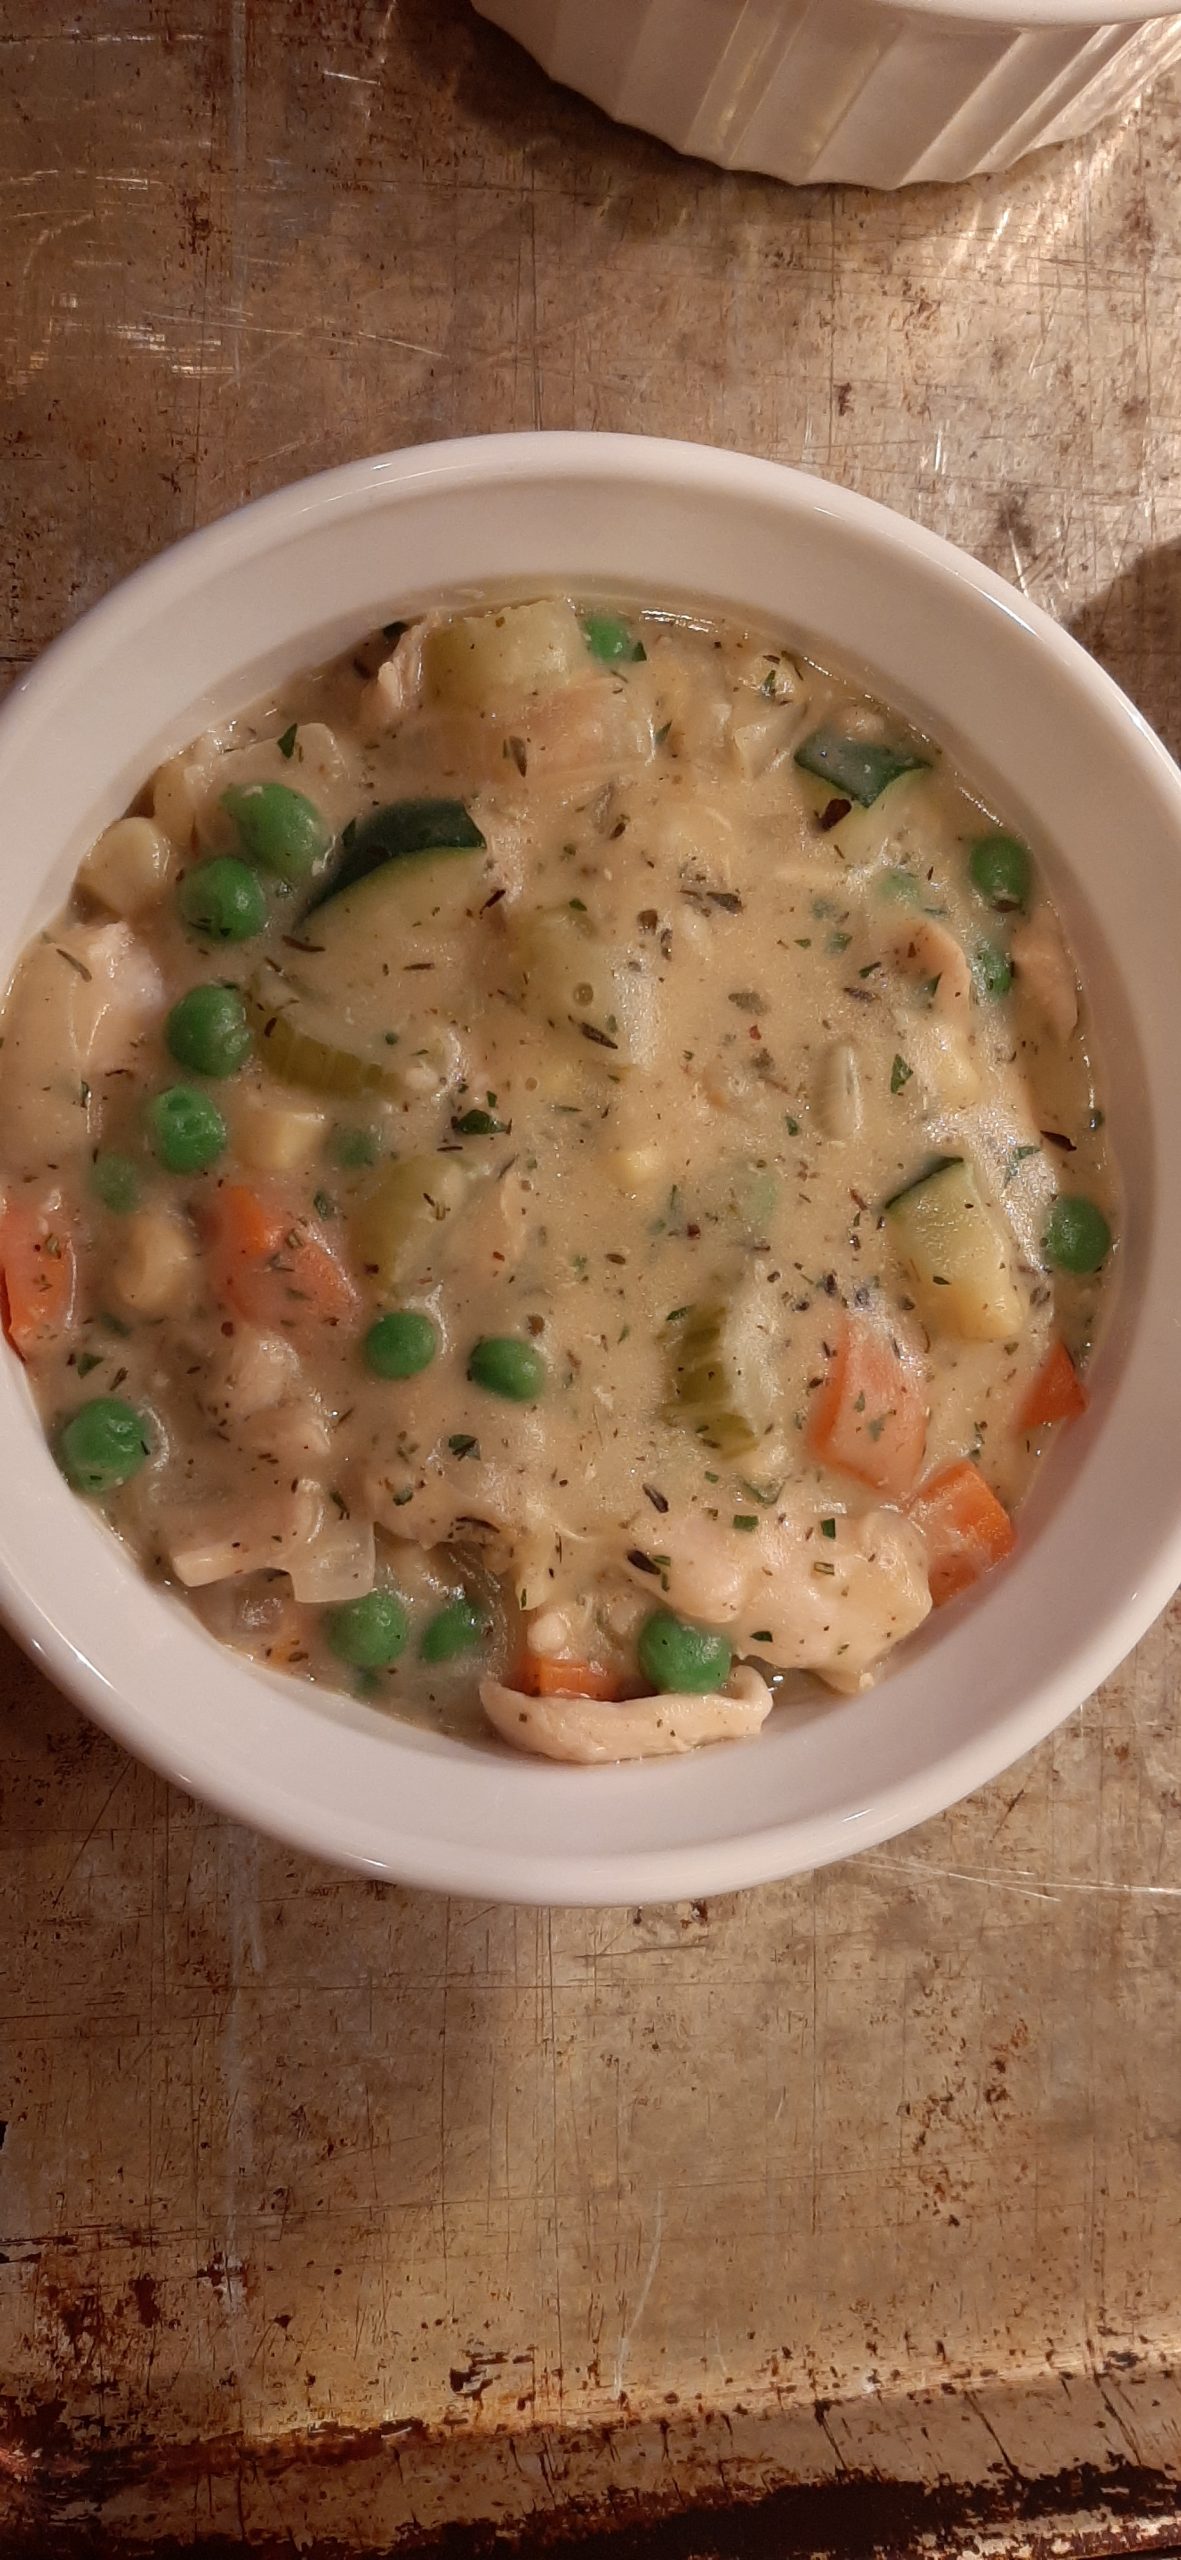
Comfort food. Oh, how I love comfort food. And if there is anything as comforting as a big old bowl of homemade soup, then it would have to be pot pie. And OK, I know! I already have several pot pie recipes on this site. But darn, I like experimenting with new flavor combinations and I love pot pies. So, when deciding to serve pot pie the other evening, I just had to play mad scientist again. And what I came up with turned out to be pretty darn good. Thus, the fact that I am sharing the recipe with you.
If you only knew how many recipes, I don’t share with you. Because like all creative cooks, some recipes you think might work, actually do work. Others are so wrong you wonder what you were thinking. Or perhaps what you were smoking? (I don’t smoke anything, so that isn’t ever going to be my excuse.) But rest assured, I have made every recipe you find on this site. And enjoyed it. Except for most of the drink recipes Mr. C. comes up with and wishes me to share with you. Because in the wide world of adult beverages, my taste buds are terribly particular. Some might even go so far as to call my taste buds plebian when it comes to alcohol. (I’m fine with that BTW!) Because unless it’s a Tanqueray martini, one of Mr. Cs Margaritas, a gin gimlet, or an ice-cold IPA in a frosted glass, I’m usually not interested. But for most adults, a wide variety of drink recipes from which to choose is especially delightful. And Mr. C. is a very good mixologist. So, all the drink recipes on this site are wonderful too (or so I’ve been told) and have the Andy Carr seal of approval. (I do also love wine and would happily partake, except that as I have gotten older, wine no longer seems to like me! Grrrrrr)
So, now that you know all about my drinking habits and that I am a true comfort food lover, I hope you enjoy this recipe for pot pie. It’s a bit time consuming to prepare, but well worth the effort.
Peace and love to all.
For the filling:
1½ c. chicken broth
1 lg. bone-in chicken breast
1 bay leaf
2 fresh sage leaves or a tiny pinch ground sage
¼ c. (½ stick) unsalted butter, divided
½ med. onion, chopped
½ c. diced carrot
½ c. diced celery
½ c. diced zucchini
½ tsp. seasoned salt
freshly ground black pepper
2 tsp. dried thyme leaves
1 tsp. finely chopped fresh parsley
½ tsp. finely chopped rosemary
pinch granulated garlic
¼ c. dry white wine
¼ c. all-purpose flour
2 T. half & half, or more as needed
¾ c. frozen peas
¾ c. frozen corn
Pour the chicken broth into a small pan. Add the chicken breast, bay leaf, and sage leaves. Bring to a boil, reduce heat, cover, and cook just until the chicken is completely cooked. Remove the chicken and set aside to cool. Cut away from the bone and into small dice when cool. Save the broth.
After removing the bay leaf and sage leaves from the cooking broth, add the seasoned salt, black pepper, thyme, parsley, rosemary, and granulated garlic. Cover the pan and let simmer gently over low heat.
Melt 2 tablespoons of the butter in the large frying pan over medium heat. Add the onion, carrot, and celery; cook and stir for 5-7 minutes or until the carrot is crisp tender. Add the zucchini; cook and stir for 1 minute. Add wine to skillet; bring to boil. Transfer the veggies and any remaining liquid into a small bowl and set aside. (If you have already cut up the chicken, you can add the veggies to the same bowl.) Don’t wash the fry pan.
Melt the remaining 2 tablespoons of butter in the frying pan over medium heat. Sprinkle with flour. Stir with whisk until mixture is well blended.
Reduce heat to medium-low; cook and stir for about 3 minutes. Immediately add 1 cup of the broth, whisking until the chicken pot pie filling mixture is smooth. Whisk in remaining broth and half & half. Whisking constantly, bring to boil over medium-high heat and boil 1 minute or until sauce is thick. Taste and adjust seasoning. Stir in the diced cooked chicken, veggie mixture, peas, and corn. If the sauce seems too thick, stir in a bit more half & half.
Fill 3 (5-inch wide and 2½-inch deep) Corning Ware French White casserole dishes or baking dishes of choice.
For the Crust:
1¼ c. unbleached all-purpose flour, fluffed
½ tsp. kosher salt
½ c. (1 stick) cold unsalted butter, diced
2-4 T. ice water (I used 3 tablespoons)
Combine the flour and salt in your food processor. Pulse once to mix. Add the butter and process until it resembles coarse crumbs. Add 2 tablespoons of water and pulse the mixture for a few seconds. If you find your mixture is too dry, you can add more water, one teaspoon at a time.
Turn the dough out onto a lightly floured surface. Divide dough into thirds. Roll out each piece of dough into about a 6½-inch circle or circles about 1½-inches wider than the top of the baking dishes you will be using. (This will allow dough to hang over the sides of the baking dish).
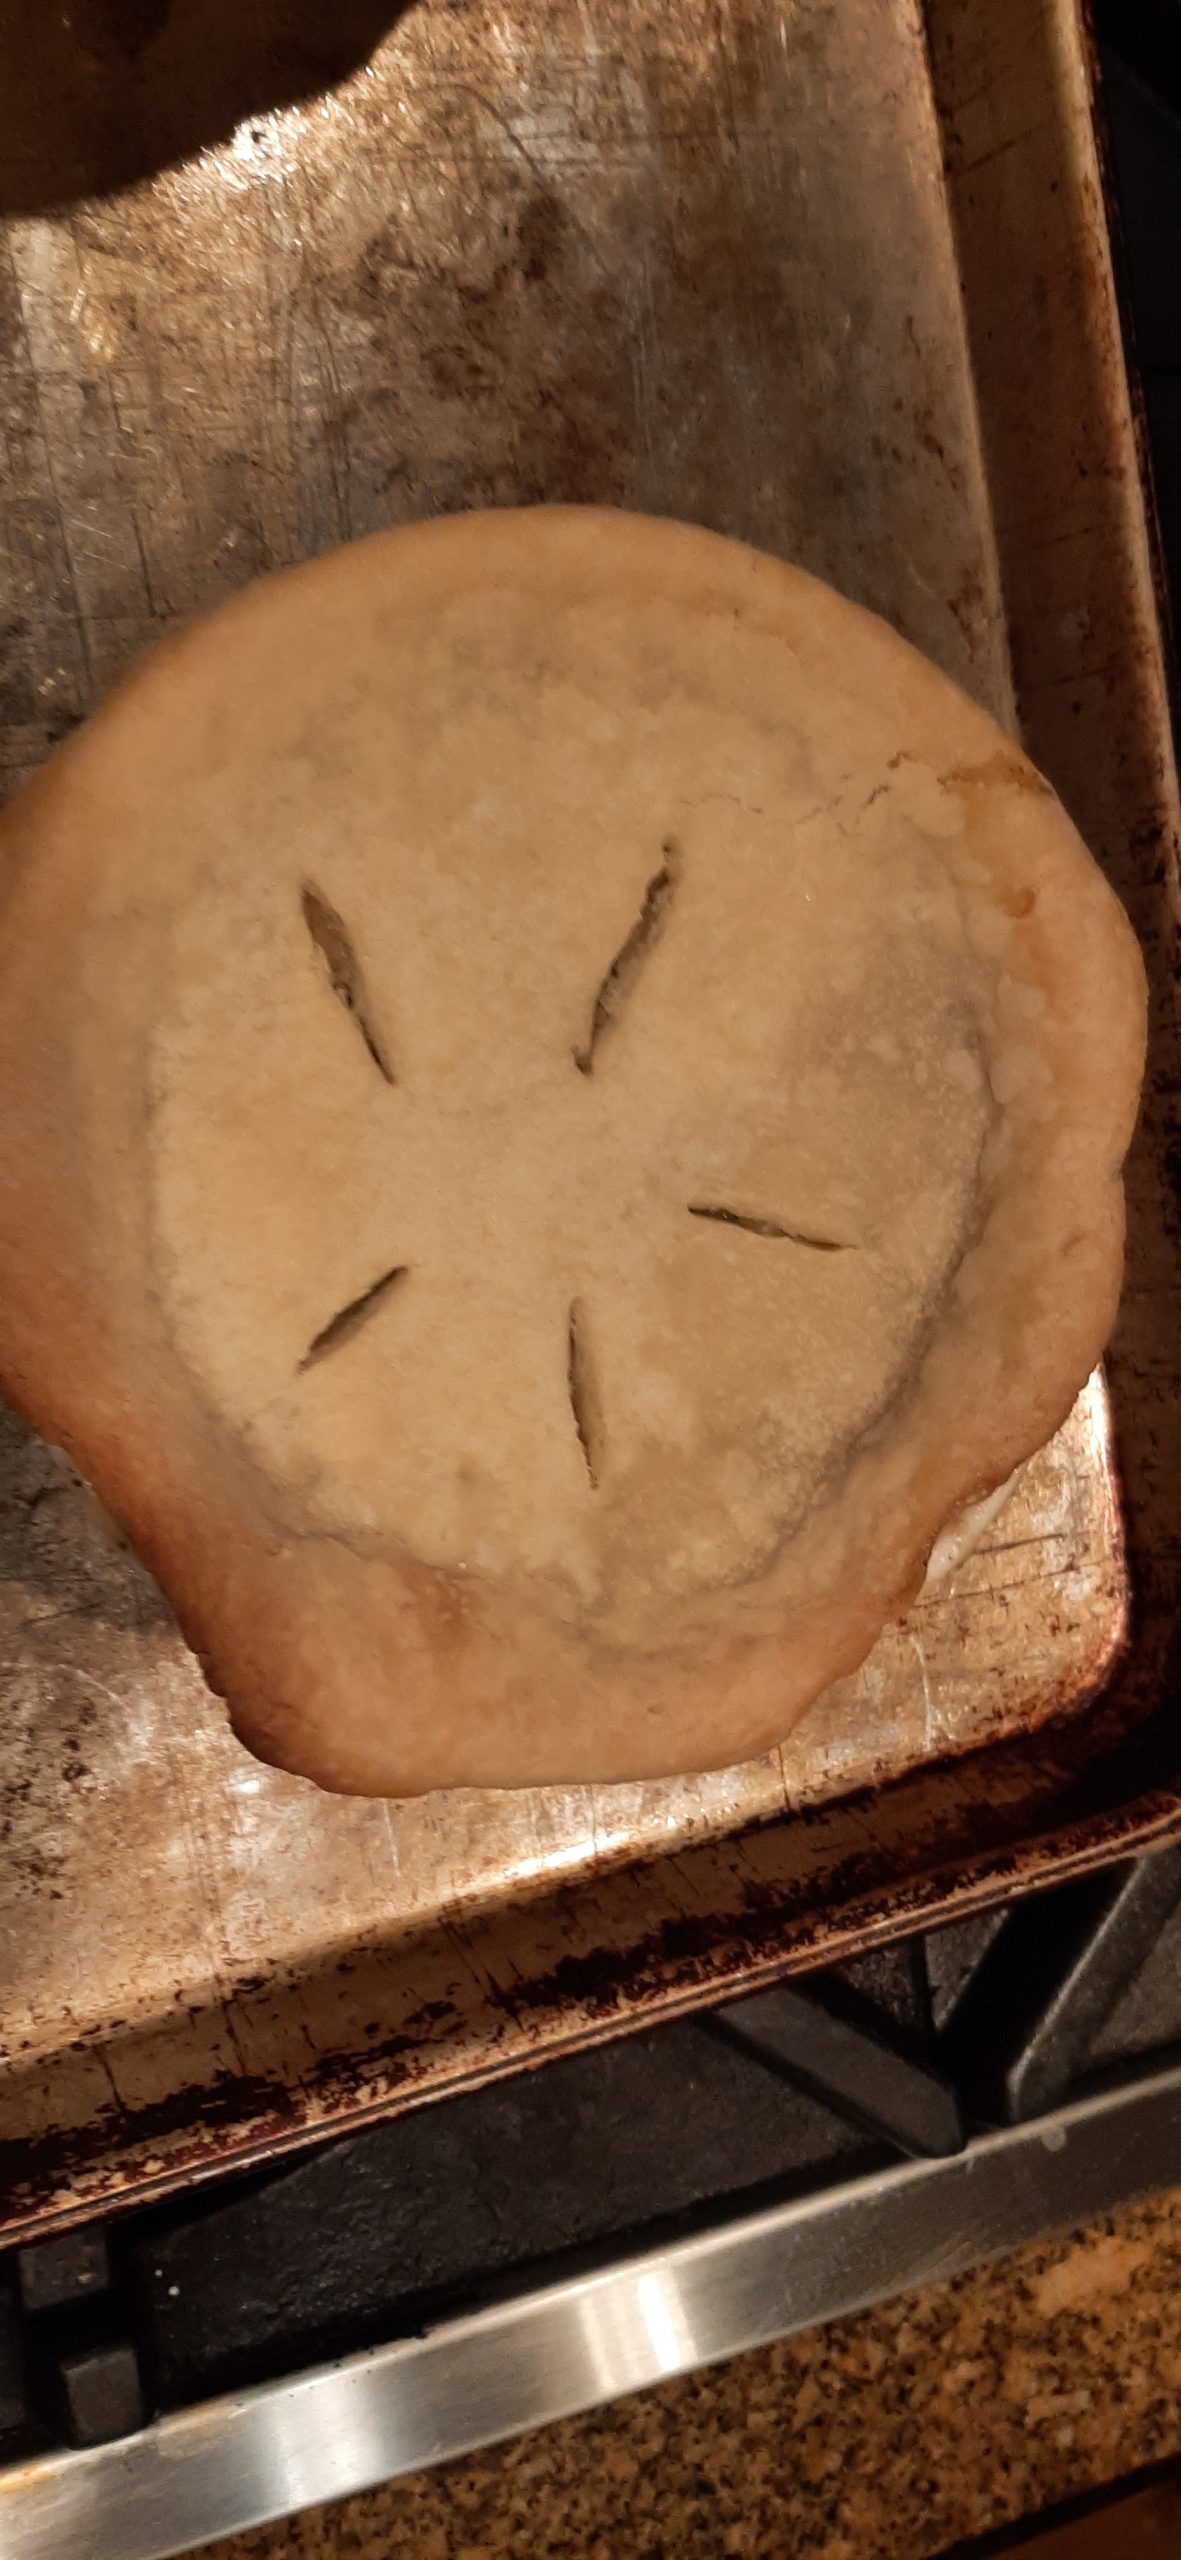
Place the pie crusts on top of the filled dishes and cut at least 4 slits in the pastry. (Make sure the slits go completely through the pastry allowing steam to escape.) Place the baking dishes on a baking sheet. (In case any of the filling manages to escape!)
Bake the potpies in a preheated 425-degree oven for 35 to 40 minutes or until the filling bubbles and the crust edges turn golden. (If you look at the pot pies about 20 minutes into the baking time and find that the crust edges are getting dark, cover with thin strips of aluminum foil for the last part of the baking.)
There is just something about stuffed green peppers that practically brings me to my knees. First of all, I am a veggie lover. Have been my entire life. My parents often told the story that as a toddler I preferred green onions to ice cream. I’m not sure I believe them, but I stole veggies out of the garden as a child, (especially peas and tomatoes) so, my parents may have been telling the truth. (They usually did!) Anyway, I have loved stuffed green peppers from my earliest recollection. What I didn’t have as a child, however, were sloppy Joes. And there’s a good reason for that.
Some attribute the original Sloppy Joe to a cafe in Sioux City, Iowa, where, in 1930 a cook named Joe added tomato sauce to his “loose meat” sandwiches. Voila: a new between-the-bread offering, and the sandwich’s official name.
Well, I didn’t grow up anywhere near Iowa, and Manwich, a portmanteau of man and sandwich, was the brand name for a canned sloppy joe sauce produced by ConAgra Foods and Hunt’s, introduced in 1969. And that was long after I had gone away to college.
Apparently, this canned product contained seasoned tomato sauce that was to be added to ground beef. It was marketed as a quick and easy one-pan meal for the whole family. Which, BTW, you can still buy at your local grocery store. But please don’t!
Sloppy Joes are just so much better made from scratch and don’t contain ingredients that no one can pronounce and require a PhD in food chemistry to analyze. So, if you are so inclined to make a real sloppy Joe some evening for dinner, you will find my recipe under the captivating title – Sloppy Joes. But back to these stuffed green peppers.
Since I already had several recipes for stuffed peppers on this site but am always up for changing things up a bit, I thought using meaty sloppy Joe sauce as the filling for stuffed peppers would make a nice change of pace. And boy howdy, were these babies tasty. And just the right amount of filling for 3 halved peppers. (And how often does that happen? In my case, never!) Anyway, we thoroughly enjoyed our dinner last night. Along with half a baked sweet potato each, we feasted in style.
And tonight, for dinner, I am going to serve the leftover peppers with Cheesy Grits (see recipe below) and Fried Zucchini (also find recipe below). So, another opportunity to eat like kings.
And isn’t that the way it should be. Good homemade food with just a minimum of processed ingredients. Of course, a true food snob would look askance at store-bought ketchup and bottled Worcestershire sauce. But you know, there is being reasonable and then there’s being crazy. And to the best of my knowledge, I haven’t reached the “crazy” classification yet. (I don’t make homemade mayonnaise either.) (But I do make homemade hollandaise, but then that’s entirely different!)
Anyway, for every person there is what works for them in the kitchen. And a lot of it depends on time, monetary, and physical constraints. For me, I can still make most things from scratch. But that doesn’t mean that in 5 years (or less), I won’t be eating the words I wrote above about serving only homemade this and that. We can only do what we can do.
So, if taking shortcuts here and there gets delicious and nutritious food on your table, then go for it. We are after all, only human.
Peace and love to all.
1 T. extra virgin olive oil
1 lb. lean ground beef
1 med. white or yellow onion, diced
2 lg. clove garlic, minced
1 tsp. dried marjoram
½ tsp. chili powder
1 tsp. kosher salt
freshly ground black pepper
¾ c. water
3 T. tomato paste
2 tsp. beef base (I use Better Than Bouillon Beef Base)
¼ c. ketchup
2 T. packed brown sugar
3 T. Worcestershire sauce
2 T. red wine vinegar
1 T. yellow mustard (don’t even think about using a fancy mustard)
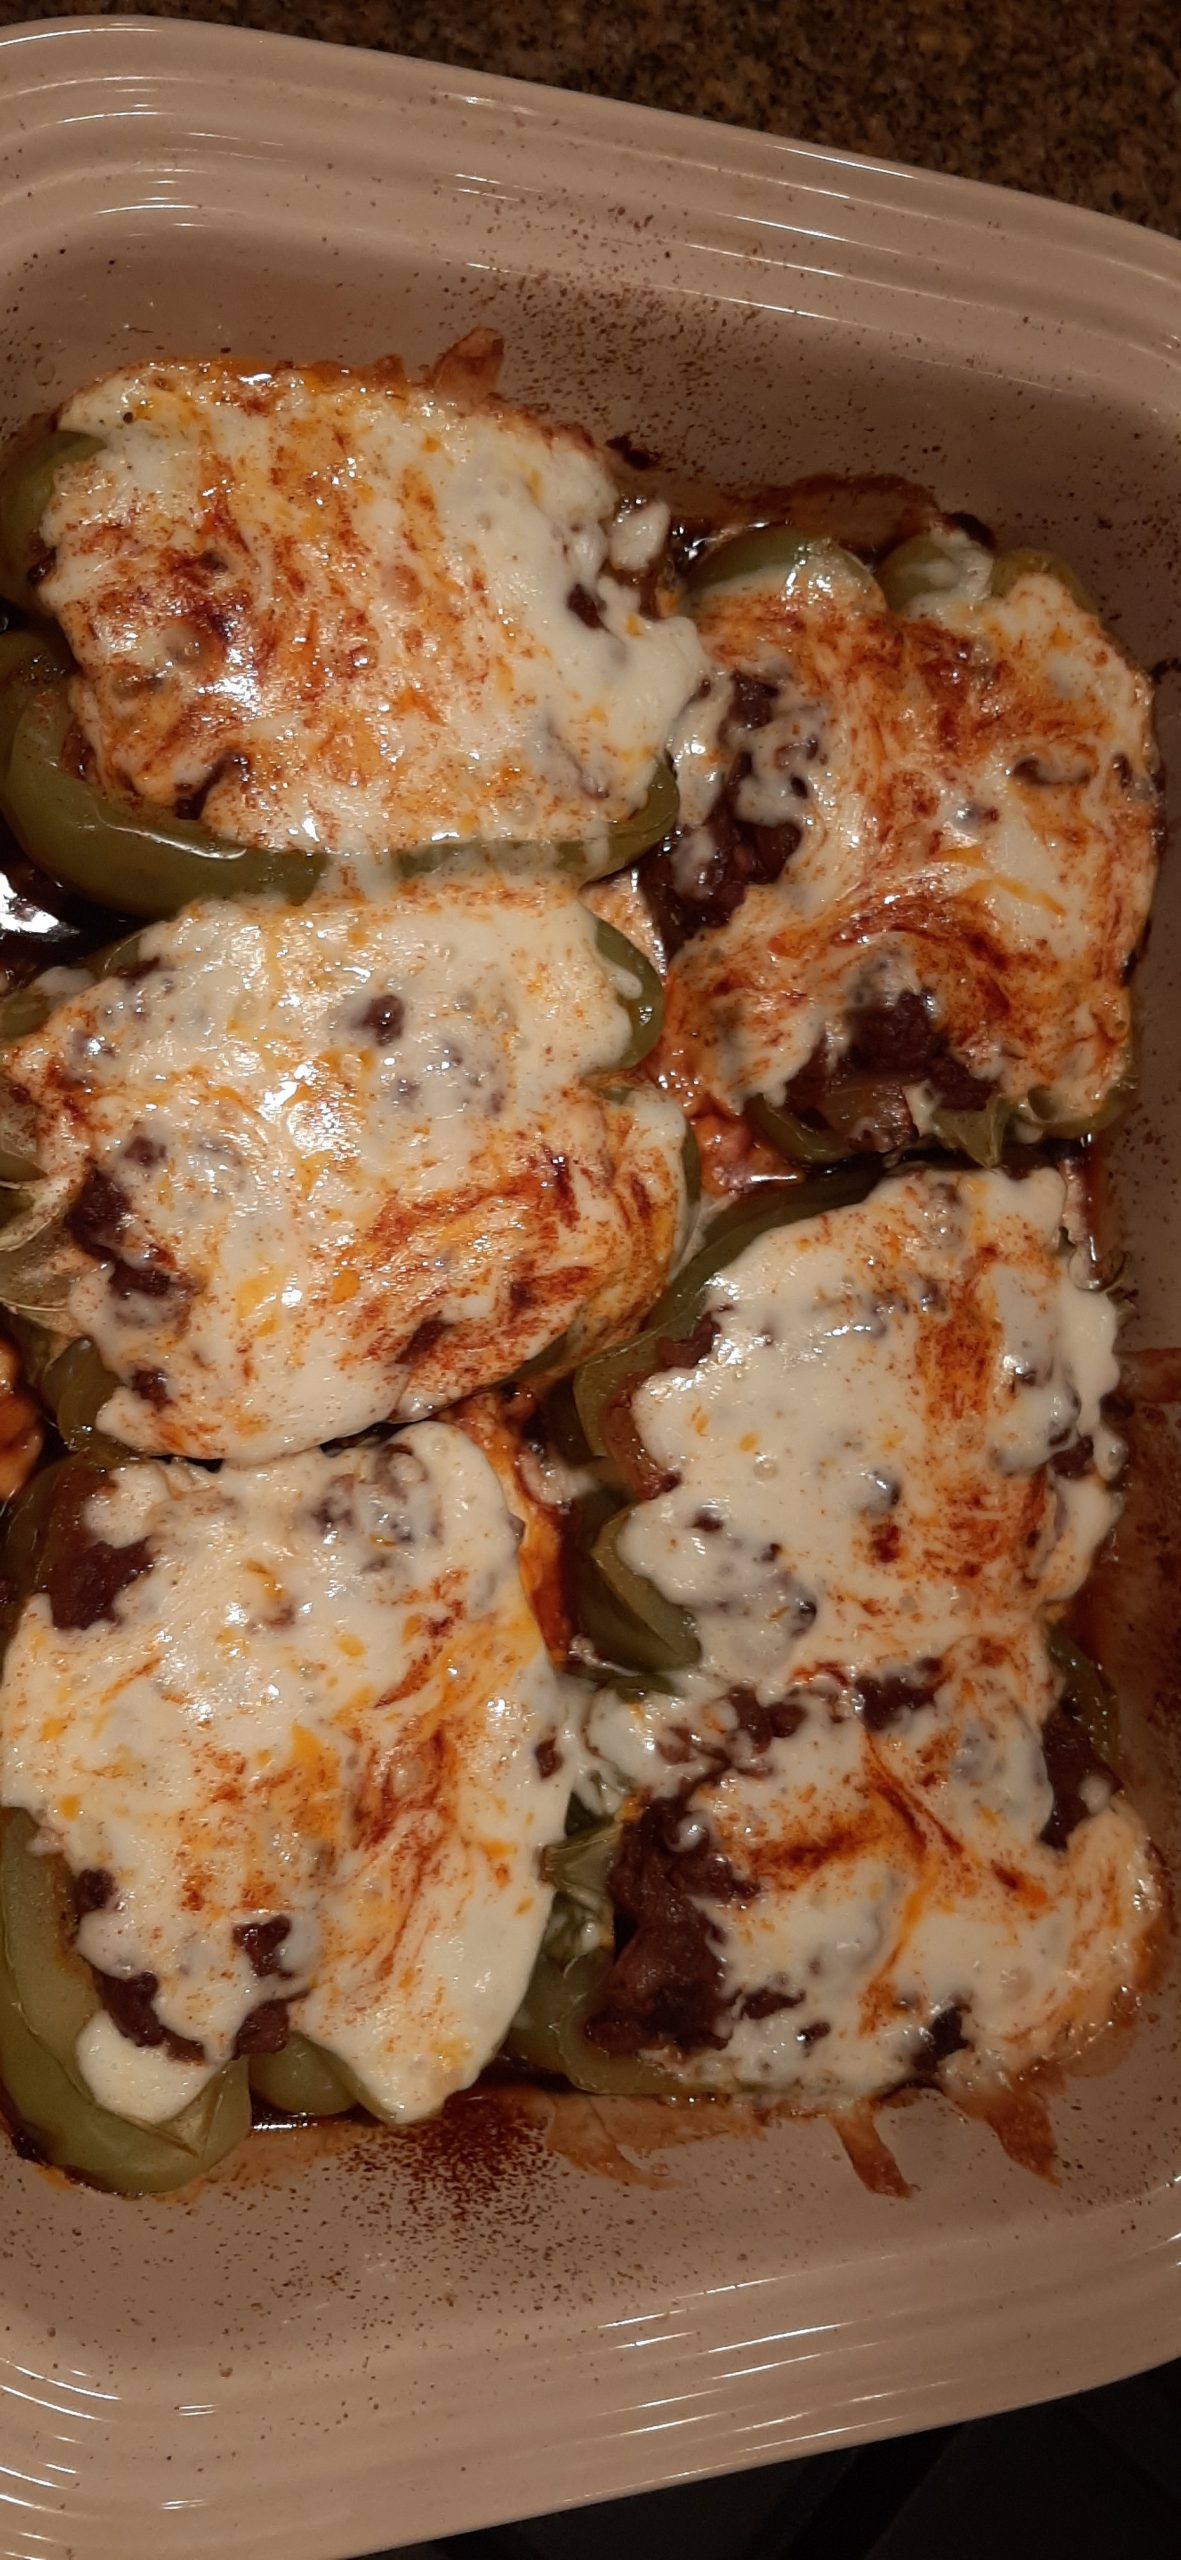
3 green bell peppers, cut lengthwise (or red, yellow, or orange bell peppers)
1/3 c. beef broth (or water and beef base)
1 c. grated Mozzarella cheese
paprika
In a large, covered pan, heat the oil over medium-low heat; add ground beef and sauté until browned. Add onion and garlic and continue cooking until onion translucent. Add marjoram, chili powder, salt, pepper, water, tomato paste, beef base, ketchup, brown sugar, Worcestershire sauce, vinegar, and mustard.
Bring to a boil, reduce heat, and let simmer until filling is thick, about 20 minutes.
Place the cut pepper halves in a large baking dish. Divide the beef mixture evenly between the 6 halves. Pour the beef broth into baking dish (to help peppers steam) and cover with foil.
Bake in a pre-heated 400-degree oven until peppers are tender, about 60 minutes. Uncover, and top with the mozzarella cheese. Bake another few minutes until the cheese is melted.
Remove from oven and lightly sprinkle with paprika. Serve immediately.
CHEESY GRITS
1½ c. whole milk
1 c. water
¾ tsp. kosher salt
freshly ground black pepper
½ tsp. granulated garlic
½ c. + 2 T. stone ground corn grits – not instant or quick-cooking grits
Mix the milk, water, salt, black pepper, and granulated garlic in a covered sauce pot. Set over medium-high heat and bring to a boil.
Once boiling, gradually whisk in the grits, until there are no clumps. Lower the heat to medium-low. Cover and simmer for 12-20 minutes, (depending on the package instructions), stirring occasionally.
Once the grits seem soft and thick, stir in the butter and grated cheese. Taste, then adjust seasonings as needed.
If the grits are thicker than desired, stir in ¼ – ¾ cup hot water. The grits will continue to thicken as they cool.
FRIED ZUCCHINI
1 egg, or more as needed
½ c. cornmeal, or more if required
butter
zucchini, cut into 1/3 inch thick slices
seasoned salt
freshly ground black pepper
Beat the egg in a shallow container. (I use an 8-inch round cake pan.) Pour cornmeal in another shallow container. (You got it, I use another cake pan.)
Melt as much butter as it takes to cover the bottom of a griddle or fry pan.
Dip the cut zucchini in the egg (both sides), then the corn meal (both sides), and place on the griddle.
Sprinkle on seasoned salt (don’t be shy) and a nice sprinkling of pepper. Using a paring knife, cut off small amounts of butter and tuck them in between each of the pieces of zucchini on the griddle. (This dish requires a bit more butter than is usually associated with a fried veggie dish. Thank you, grandma!)
Fry the zucchini until it is crispy brown on the bottom side. Carefully flip the pieces and fry the second side until crispy brown. Serve hot off the griddle.