Category Archives: THANKSGIVING DINNER RECIPES

MINCEMEAT BARS WITH BRANDY WHIPPED CREAM

OLYMPUS DIGITAL CAMERA

So for Mr. C and me, nothing says “the holidays” like pumpkin pie, French Apple Pie (recipe on site) and either mincemeat pie or mincemeat bars. I usually make bars because it’s nice to serve a different type of dessert rather than just all pies. (Although in reality, there is nothing nicer than a grand assortment of pies.) But truthfully, I’m kind of lazy and mincemeat bars are really a lot easier to prepare than mincemeat pie. And in our extended family, almost everyone wants a little taste of all the desserts, so these bar cookies make a lot of sense in that regard too. (You can cut them into really small pieces.) And for all of you who love mincemeat, you know it can be a bit rich. (That is an understatement if I ever heard one!)

So this holiday season, save yourself a little bit of time. Try making some of your favorites in the form of bar cookies rather than into pies. On this site you will find recipes for Apple Pie Bars and Pumpkin Pie Bars that feature the taste you love in a pie, but are truly a lot easier to prepare and serve.

Now if you are the type who buys your pie crust, all bets are off! You win in the time category hands down. But if you usually build your own pie crust like I do, you will find that these bars are a godsend; especially if you are the lucky one chosen to “bring the pies” to your families holiday dinners.

Nothing is more stressful than trying to get a pie or two safely and structurally intact to a location other than the closest surface in your kitchen. Cars are simply not designed to protect your precious pie crust. In fact, experts agree. Cars hate piecrust. Cars will actually go out of their way to break off chunks of your pie crust even though your poor spouse is driving at 30 miles an hour in a 70 mile an hour zone! But when you present your car with a 9 x 13 pan of bar cookies, the car doesn’t have a ghost of a chance to destroy your efforts.

So enjoy the holidays, bake up a storm, and try these mincemeat bars and the other delicious bar cookies I referenced above. Oh, and don’t hate your car for its predisposition to hate pie crust. It was programmed that way at the factory! (It was also programmd to hate deviled eggs (thanks Ursala for that reminder), wedding cakes, and any dish with even a modicum of liquid!)

  • ¾ c. unsalted butter, room temperature
  • 1 c. packed brown sugar
  • 1¾ c. flour
  • ½ tsp. baking soda
  • 1 tsp. salt
  • 1½ c. whole oats
  • 1 (28-oz.) jar Crosse and Blackwell mincemeat (do not settle for anything less!)
  • 1 pint whipping cream
  • 3 T. powdered sugar
  • 2 tsp. brandy

Cream the butter and brown sugar together. In a separate bowl, whisk together the flour, soda, salt, and oats. Add to the butter and beat until small clumps appear. Pat a little over half of the mixture into a 9 x 13-inch baking pan. (Glass preferably.) Spread mincemeat over bottom crust and top with remaining crumb mixture, patting it gently into place. Bake the bars in a pre-heated 400 degree oven for about 25 minutes or until the top is lightly browned.

OLYMPUS DIGITAL CAMERA

Cool and cut into bars.

Meanwhile whip the cream to stiff peaks. Add the powdered sugar and brandy and beat just until well combined. When ready to serve, place bar on plate and dollop with brandy whipped cream. Ah yes, the only other thing needed – a lovely cup of coffee. Enjoy!


SAVORY TURKEY DRESSING

OLYMPUS DIGITAL CAMERA

Since we are trying to cut down on the amount of meat in our diet, I decided I better start by modifying my dressing recipe which normally contains either sausage or oysters. Because when you really stop to think about it, meat or seafood is kind of redundant in dressing. Good, but truly not necessary. I mean honestly, dressing’s only purpose in life is to justify slurping down great quantities of gravy anyway. And where does gravy come from? You got it in one – meat juices. So there really is a lot of protein action going on already without the addition of more meat in the dressing!

Now for those of you who are not gravy fans (all 2 of you), this recipe will probably not have enough flavor or be salty enough. But for those of us for whom gravy and heaven are synonymous, the seasonings in this recipe are not going to overpower the flavor of your gravy or be too salty in combination with the gravy.

So next time you want a good base for your turkey gravy, in addition to mashed potatoes of course, give this recipe a try. Just don’t over-bake it. All you really need to do is hot it up. Then sit back (after of course setting out the appetizers you plan to serve, slicing the turkey, mashing the potatoes, hotting up the green bean and sweet potato casseroles, dressing the salad, warming the rolls, opening the wine, and whipping the cream for the pumpkin pies) and enjoy a lovely Thanksgiving dinner with your family and friends. In fact, my advice would be that now would be a good time for a martini, Cosmopolitan (see recipe on site), or glass of wine. After all, who better deserves a reward for a job well done?

So here’s a toast to all of you who routinely provide your family and friends with wonderful and healthy food. Good food not only nourishes our bodies, it feeds our souls as well. And on this Thanksgiving eve I would like to take the opportunity to thank you for your support. I love hearing from you, so never hesitate to “Leave a reply”. And tell your friends about this site. Why should you be the only one in your group who has to put up with my nonsensical rhetoric?

  • ½ c. unsalted butter
  • 1½ c. chopped celery (stalks and leaves)
  • 1 lg. onion, finely chopped
  • 8 lg. or 5 extra lg. mushrooms, chopped
  • 2 cloves garlic, finely minced
  • 1/3 c. chopped fresh Italian parsley
  • 1 T. minced fresh sage
  • 1 tsp. finely chopped fresh rosemary
  • 2 tsp. fresh thyme leaves
  • 2 T. poultry seasoning
  • 1 tsp. savory, either powdered or dried leaves
  • 1 tsp. kosher salt
  • freshly ground black pepper
  • 16-20 oz. dry bread cubes (I use inexpensive sliced sourdough bread cut into cubes and toasted)
  • 3 eggs
  • 3 c. turkey or chicken stock, or more as needed

In a large sauté pan, melt butter and add celery, onion, and mushrooms. Cook for about 5 minutes. Add the garlic, parsley, sage, rosemary, thyme (sound familiar?), poultry seasoning, savory, salt, and pepper. Remove from heat. Place dried bread cubes in a large mixing bowl. Add the sautéed vegetables; mix thoroughly. Beat eggs in a separate medium sized bowl. If you are using stock that is simmering happily on your stove, vigorously whisk 3 cups of the broth into the eggs. (The hot stock will scramble the eggs if you don’t stir vigorously.) Pour the hot liquid over the bread cubes and gently stir. Add more stock if the dressing is dry. (Remember, this is dressing, not stuffing, and therefore is not going into the cavity of the turkey. So any moisture needs to be added while it is being prepared.) Taste the dressing and add additional poultry seasoning and/or salt if needed.

Place dressing in a buttered casserole dish, cover and refrigerate until ready to bake in a pre-heated 275 degree oven for 45 minutes or until hot. (I put mine in the oven when the turkey comes out.)

Note: recipe for Turkey Stock can be found under Herb Salted Turkey with Cognac Gravy on this site.


SAVORY GERMAN BREAD PUDDING WITH MUSHROOMS

OLYMPUS DIGITAL CAMERA

This is the second savory bread pudding I have posted to my blog. They are basically very similar. The recipe entitled Wild Mushroom Bread Pudding however has more of an Italian bent to it. For example, Parmesan cheese is one of the ingredients.

This recipe is much more consistent with a dish that would be served in Germany. Both savory puddings are delicious and a wonderful addition to any meal where the starch needs to be a key player but not become a participant in a “who’s the star” battle with the meat. (I hate it when food starts fighting right on my dinner plate.)

This dish can also be served as a vegetarian main dish. The mushrooms provide that toothsome mouth feel that is so necessary to a good vegetarian entrée.

So by all means, give this bread pudding a try. The sourdough bread gives the pudding a special tang, and the truffle oil – OMG, it really puts the mushroom flavor over the top. And as you can see, you only need 1 teaspoon of truffle oil to enhance the entire dish. But please do not be tempted to add more because of the old theory that if some is good, more is better. (I have never been an advocate of that practice.) Truffle oil is very potent stuff. It must be treated carefully and with great respect. (Think approaching a yellow jacket’s nest without appropriate head gear!) Or if you need a cooking analogy, using too much thyme. Not a good thing even though thyme is a lovely herb and used in many wonderful recipes.

And I know some culinary arts experts are saying that truffle oil is passé. Or if it simply must be used, it should only be used as a drizzle. Well to these experts I say – fooey! In my opinion you can take many dishes to a new level of deliciousness with the judicious use of a drop or two of this amazing ingredient.

Wonderful drizzled over scrambled eggs, in vinaigrettes, almost any dish with mushrooms, and the most decadent use of all – over popcorn along with a little salt.

So if you don’t already own a bottle of truffle oil, don’t hesitate to get yourself a bottle at your earliest convenience. In my opinion, white truffle oil is great as an ingredient or a drizzle. I tend to use black truffle oil only as a finishing oil, in much the same way I might garnish a dish with a light sprinkling of Fleur de Sel.

  • 1 c. very hot water
  • ¼ c. chopped dried shiitake mushrooms
  • 2 T. butter
  • 1 medium onion, finely chopped
  • 1 lb. coarsely chopped mushrooms (cremini, shiitake, button)
  • 2 cloves garlic, finely minced
  • ½ tsp. kosher salt, div.
  • freshly ground black pepper
  • 1 c. milk
  • 1 c. whipping cream
  • 3 large eggs, room temp.
  • 1 tsp. white truffle oil (Trader Joe’s carries truffle oil certain times of the year or you can purchase on line)
  • ¼ tsp. dried thyme
  • 2 T. chopped fresh parsley
  • 4 c. packed cubed sourdough bread (1 or 2 day old bread is best for this recipe)

Place hot water and dried shiitake mushrooms in a small bowl. Set aside. Melt butter in a medium sized frying pan. Add onion and sauté until soft. Add mushrooms and cook until golden brown. Add the garlic and ¼ teaspoon salt and pepper; cook for one minute. Remove from heat and let cool. Meanwhile combine milk, cream, eggs, truffle oil, remaining ¼ teaspoon salt, pepper, thyme, and parsley in a large bowl. Gently fold in bread cubes and set aside. Scoop the reserved mushroom mixture into the bowl with the bread cubes. Drain the re-hydrated shiitake mushrooms and add to the mixture. Stir gently and pour mixture into a lightly buttered pan. Bake in a pre-heated 350 degree oven for 45 minutes or until a knife inserted into the middle comes out clean. Serve immediately.

Can be made a day ahead and kept in the refrigerator until about 30 minutes before baking.


HONEY AND SOY SAUCE GLAZED GREEN BEANS

OLYMPUS DIGITAL CAMERA

Getting your family to eat green vegetables can sometimes be difficult. But when you take a simple fresh green bean and dress it up with soy sauce and honey, well some kind of miracle occurs. Even the most veggie phobic member of your family will suddenly turn into an addict when presented with these babies. The sauce simply turns the beans from ho-hum to amazingly delicious.

You will notice that my adaptation of the original recipe from Fine Cooking.com calls for raw local honey. Of course you can use the stuff that comes in the plastic bear, but I would strongly advise against it. Almost every farmer’s market or fruit stand featuring local produce carries at least one local raw honey. If not, I bet you can find local honey if you do an on line search. Believe me, the taste and health benefits are worth the effort. For example, if you are lucky enough to live in the Camano Island/Stanwood area, Cats Paw honey is fabulous. For more information visit www.catspawbees.com

Now granted, some of the health benefits of raw honey are destroyed when you apply heat as in this recipe. But the flavor remains and that’s important too. So anytime any of my recipes call for honey, I use the real thing.

For more information than you ever wanted to know about honey, I have enclosed some words of wisdom regarding raw local honey below. (Not my words of course, but a couple of experts on the subject.) You don’t have to read the information, but what the heck, why not? You might just learn something that could help you or someone you love. No pressure intended.

  • 1 T. low-sodium soy sauce (I use organic reduced sodium Tamari)
  • 1 T. raw local honey*
  • 1 T. water
  • 1 T. unsalted butter
  • 2 T. extra virgin olive oil
  • 1 lb. fresh green beans, trimmed and cut into desired lengths
  • ¼ tsp. kosher salt
  • 2 cloves garlic, minced

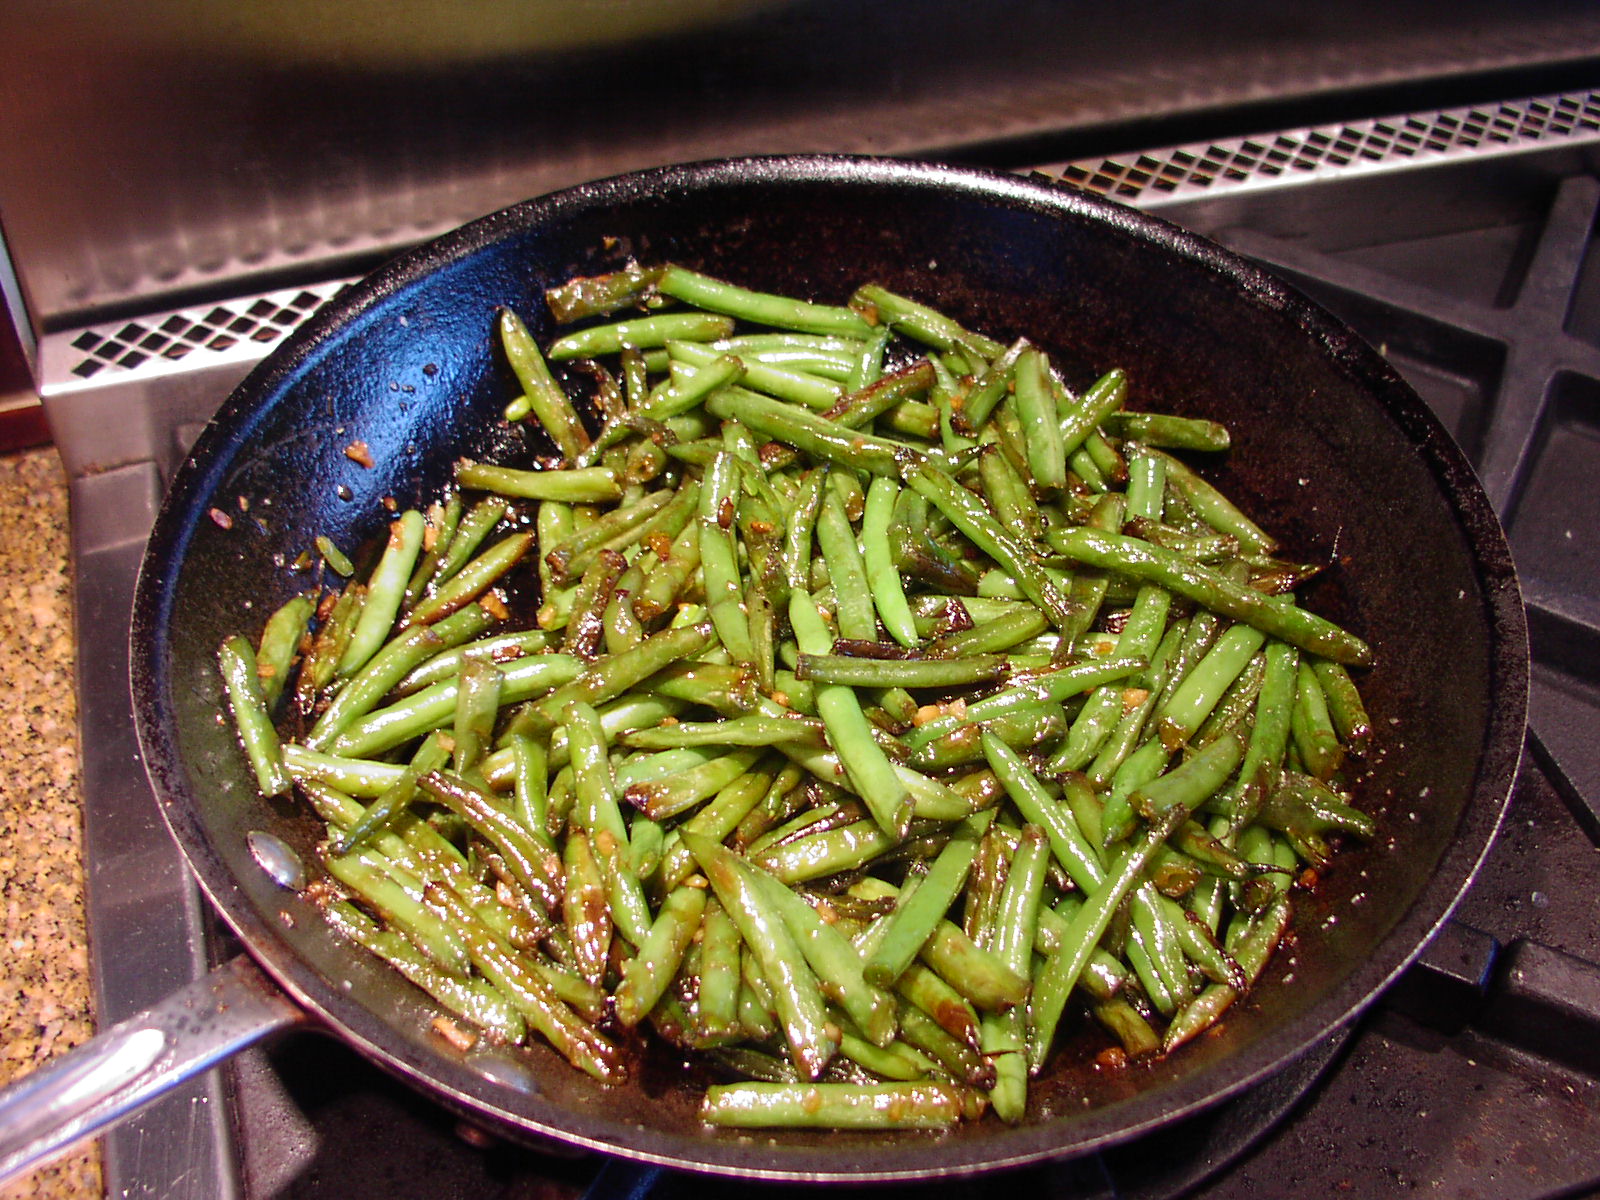
Whisk the soy sauce, honey, and water together in a small dish. Set aside. Heat the butter and olive oil in a medium sized sauté pan over medium-high heat. When the butter is melted, add the green beans and salt and toss with tongs to coat well. Sauté the beans, turning often, until most are well browned, shrunken, and tender, 8 to 10 minutes. (The butter will turn dark brown during this process.)

Reduce the heat to low, add the garlic, and cook, stirring constantly for about 20 seconds. Carefully add the reserved soy mixture. Cook, stirring constantly, until the liquid reduces to a glazy consistency that coats the beans, 30 to 45 seconds. Transfer the beans to a serving dish, scraping the pan with a spatula to get all of the wonderful garlicky sauce. Let sit for a few minutes and then serve warm. This dish can be served as a vegetarian main dish with rice or as a side vegetable.

*Raw Local Honey Information and Health Benefits:

According to the web site www.honeytraveler.com “raw honey is honey that is unheated and minimally processed. It is pure honey where nothing has been added or removed. To be raw, honey should not be heated above temperatures one would normal find in a hive (approximately 95 degrees F). Additionally it should not be ultra-finely filtered to the point of removing pollen and organic materials that are an intrinsic constituent of honey.

Unheated, “raw” honey contains all the vital ingredients that give it its healthful properties and wonderful aroma. Most commercial honey you see in supermarkets is not raw honey. This mass produced honey is often heated to temperatures far above the normal temperatures of the bee hive. Heating past the maximum hive temperature of 95 degrees Fahrenheit changes honey’s essential composition and degrades its quality. It partially destroys honey’s beneficial enzymes and ‘boils off’ volatile compounds that account for the unique, delicate floral aroma of the honey. This is done to make it easier to extract from the honey comb, to filter it, to package it, to ‘pasteurize’ it to kill benign yeast and prevent fermentation and to delay crystallization.

Micro-filtering also degrades the healthful properties of honey by removing beneficial pollen residue. Much commercial honey is micro-filtered, often using a diatomaceous earth (DE) process to eliminate even micron-sized particles. Why go to these lengths when a relatively coarse strain would result in a clear, visually beautiful product and not remove healthful pollen? The reason is to slow down the naturally occurring crystallization of honey. Tiny particles act as ‘seeds’ for the crystallization process, by removing them with micro-filtering, crystallization is delayed.

But crystallization is not a problem to be solved. Almost all honeys crystallize after time. It is actually a good sign the honey is raw. To re-liquify, simply heat the honey jar in warm water (104 F, 40 C) until it returns to the liquid state, stir occasionally to transfer heat, and replace the hot water if needed.”

And, according to the health.howstuffworks.com web site, “The idea behind eating honey is kind of like gradually vaccinating the body against allergens, a process called immunotherapy. Honey contains a variety of the same pollen spores that give allergy sufferers so much trouble when flowers and grasses are in bloom. Introducing these spores into the body in small amounts by eating honey should make the body accustomed to their presence and decrease the chance an immune system response like the release of histamine will occur [source: AAFP]. Since the concentration of pollen spores found in honey is low — compared to, say, sniffing a flower directly — then the production of antibodies shouldn’t trigger symptoms similar to an allergic reaction. Ideally, the honey-eater won’t have any reaction at all.

As innocuous as honey seems, it can actually pose health risks in some cases. Honey proponents warn that there is a potential for an allergic reaction to it. And since honey can contain bacteria that can cause infant botulism, health officials warn that children under 12 months of age whose immune systems haven’t fully developed shouldn’t eat honey at all [source: Mayo Clinic].

If a regimen is undertaken, however, local honey is generally accepted as the best variety to use. Local honey is produced by bees usually within a few miles of where the person eating the honey lives. There’s no real rule of thumb on how local the honey has to be, but proponents suggest the closer, the better [source: Ogren]. This proximity increases the chances that the varieties of flowering plants and grasses giving the allergy sufferer trouble are the same kinds the bees are including in the honey they produce. After all, it wouldn’t help much if you ate honey with spores from a type of grass that grows in Michigan if you suffer from allergies in Georgia.

At least one informal (unfunded) study on allergies and honey conducted by students at Xavier University in New Orleans produced positive results. Researchers divided participants into three groups: seasonal allergy sufferers, year-round allergy sufferers and non-allergy sufferers. These groups were further divided into three subgroups with some people taking two teaspoons of local honey per day, others taking the same amount of non-local honey each day and the final subgroup not taking honey at all. The Xavier students found that after six weeks, allergy sufferers from both categories suffered fewer symptoms and that the group taking local honey reported the most improvement [source: Cochran].

The study was never published, but the anecdotal evidence in favor of honey as an allergy reliever continues: Several of the study participants asked if they could keep the remaining honey after the experiment was concluded.”

And if you want to know why I haven’t been posting as many new recipes lately – well – Powell River, Sunshine Coast BC. Rough Life!

OLYMPUS DIGITAL CAMERA


CARAMELIZED ONION, GORGONZOLA CHEESE, AND WALNUT TART

OLYMPUS DIGITAL CAMERA

I have no idea why the combination of Gorgonzola cheese and walnuts is so delicious, but it is. And in this recipe, the thyme infused caramelized onions act as the perfect base for this dynamic duo. The creaminess of the cheese, the crunch of the walnuts, and of course the savory flavor of the onions absolutely sends your taste buds to their own special little happy place. (At least that’s what happens to my taste buds when I eat this tart.)

Now I realize that many tarts that call for Gorgonzola cheese and caramelized onions also include pears. But frankly, when you bake fairly mild flavored fruits like pears with strong flavored ingredients like Gorgonzola cheese and caramelized onions, the poor babies simply get lost and all but forgotten. The only thing that tends to remain is a very thin, kind of grainy and not too flavorful layer in an otherwise perfect tart. (And no, I do not hate pears. In fact, I like them very much. But you must admit they can become kind of grainy when they are cooked.) If I am going to eat pears, Gorgonzola cheese, and walnuts together, I am going to put them in a salad. In my opinion, pears have a much better chance of being appreciated when they are eaten raw. In fact, I feel so strongly about this, that I have included a bonus recipe at the bottom of this post that includes pears, Gorgonzola cheese, and walnuts. It is my friend Linda’s recipe for Pear and Blue Cheese (or Gorgonzola) Salad.

I hope you enjoy both of these wonderful recipes.

Disclaimer: the opinions expressed in this blog are those of mine alone. No one else, not even Mr. C, has even a remote chance of having his or her viewpoint taken into consideration, much less expressed!

  • 1½ c. unbleached all-purpose flour
  • ½ tsp. plus ¼ tsp. kosher salt
  • 1 tsp. sugar
  • ¼ tsp. baking powder
  • 1/3 c. plus 2 T. extra virgin olive oil, divided
  • ¼ c. milk
  • 2 onions, diced
  • freshly ground black pepper
  • 2 tsp. minced fresh thyme or ½ tsp. dried thyme
  • 2-3 oz. soft and creamy Gorgonzola cheese, crumbled (we love Black River Gorgonzola Cheese made in Wisconsin)
  • ¼ c. chopped walnuts or hazelnuts, lightly toasted

Whisk together the flour, the ½ teaspoon salt, sugar, and baking powder in a medium bowl. Whisk together the 1/3 cup olive oil and milk in another bowl, then pour over the dry ingredients. Stir with a fork until the dough is evenly moistened and no loose flour remains. Using your fingers, press the crust into a 7×11-inch glass baking dish, beginning with the bottom, then press a tiny bit up the sides of the pan. (Make sure there are no holes or cracks in the crust.) Bake for 12 minutes in a pre-heated 375 degree oven. Remove crust from oven and increase oven temperature to 425 degrees.

Please note: If you are making a tart recipe that does not call for baking the filling, bake for 20 minutes or until the crust is lightly golden and firm to the touch.

Meanwhile, heat the remaining 2 tablespoons olive oil in a large skillet and cook onions until caramelized, stirring frequently. (This step will take at least 30 minutes.) Season the onions with the remaining ¼ teaspoon salt, a small amount of pepper, and stir in the fresh thyme. Remove from heat and set aside to cool.

When ready to bake, spread the caramelized onions evenly over the crust. Add the crumbled gorgonzola, but not the walnuts. (You are going to add the walnuts after the tart has finished baking.)

Finish baking the tart in the pre-heated 425 degree oven for about 13-15 minutes or until the crust is a lovely light golden brown. Remove from the oven and scatter the walnut pieces over the top. Taking a table fork, gently press the walnut pieces into the cheese. (That way they won’t tend to fall off as quickly when people are devouring them!) Place pan on a rack to cool. When ready to serve, cut into desired sized pieces. Serve warm or at room temperature.

PEAR AND GORGONZOLA SALAD

  • 3 T. raspberry vinegar
  • 3 T. honey
  • 1/3 c. extra virgin olive oil
  • 8 very thin slices red onion
  • 12 c. coarsely chopped red leaf lettuce
  • 1 or 2 bosc pears, sliced
  • ¼ to 1/3 c. chopped toasted walnuts
  • ¼ to 1/3 c. crumbled Gorgonzola, blue or Roquefort cheese

Whisk vinegar, honey, and olive oil together in a large salad bowl until well emulsified. Add red onion slices, separated into rings. Just before serving, gently toss the lettuce, pears, walnuts, and crumbled cheese together with the dressing and onions.

CHOCOLATE MOUSSE WITH COINTREAU (MOUSSE AU CHOCOLAT AVEC COINTREAU)

OLYMPUS DIGITAL CAMERA

I don’t care who you are, or where you have roamed over God’s green earth, there is still one dish eaten at the end of a meal that even the most sophisticated sweets connoisseur adores. And that my dear friend is chocolate mousse. And if home cooks realized how terribly easy it is to prepare, more people would be enjoying it on a more frequent basis.

And this recipe from the Woodland Bakery blog is easy and the taste and consistency are simply perfection. The mousse isn’t too sweet (only 2 tablespoons of sugar), it’s amazingly light and fluffy, and the chocolate flavor, although intense, is not overpowering. And for people like myself who mainly only like milk chocolate, that’s saying a lot!

I discovered this recipe when I went in search of a mousse that didn’t contain eggs. (My old standby recipe contains whole uncooked eggs.) And although I love that recipe, I wanted to avoid the use of eggs if possible. (And yes, this recipe does include egg whites.) But as I was to learn, most recipes worth their chocolate contain eggs. So I decided to give this recipe a try, egg whites and all. (I quickly realized I could substitute Egg Beaters Just Whites, which are pasteurized by the way, for the kind of egg whites that come in a handy, roughly ellipsoid shaped calcium carbonate container.)

So next time you want to impress the pickles out of your family and friends, and not coincidentally remind them how lucky they are to have you cooking for them, serve this amazing mousse for dessert some evening. It’s just so delicious. And it can be changed up with just the use of a different alcohol as flavoring. Or you can add powdered espresso for a hint of coffee flavor. (Coffee always brings out the best in chocolate.) Or you want a little crunch to offset the soft and silky consistency of this mousse? Add some sliced almonds on top of an amaretto flavored mousse.

I know we all grew up hearing “don’t play with your food”! Well I am here to advocate playing with your food every opportunity you get. And what better fun than dessert! Enjoy!

  • ¼ tsp. cream of tartar
  • 2 T. sugar
  • 5 egg whites or equivalent in Egg Beaters Just Whites*
  • 3 c. heavy cream, divided
  • 1 lb. good semi sweet chocolate
  • ½ c. hot water
  • 1 T. Cointreau or liqueur of choice (If you don’t want to use liqueur add another tablespoon of hot water)
  • 2 T. powdered sugar
  • 1 tsp. Cointreau or liqueur of choice, opt.
  • grated orange rind, garnish, opt.

In a small bowl rub the cream of tartar into the granulated sugar to combine well. In a mixing bowl with the whisk attachment whip the egg whites until foamy. Sprinkle in the sugar mixture very slowly. (Do not dump all the sugar at once. You will deflate your egg whites.) Continue whipping until you reach medium-firm peaks, but don’t over-whip to the point of “styrofoam”. Set aside.

In a separate mixer bowl, whip 2 cups of the heavy cream to medium-firm peaks. Again be sure not to over-whip your cream. Set aside.

Melt the chocolate in a large glass bowl. (I use my microwave.) When the chocolate is melted, add the hot water all at once, whisking vigorously to incorporate the water into the chocolate. (The first time I made this mousse, I was worried that the water would thin out the chocolate too much. To the contrary, the chocolate actually became thicker.) Whisk in the 1 tablespoon of liqueur. Take a small portion of the egg whites and fold them into the chocolate mixture. Then fold in the remainder of the whites.

Next do the same thing with a small amount of the whipped cream, lightening and aerating the mixture by folding it through. Gently fold in the remainder of the whipped cream. (Some small streaks of chocolate or whipped cream may remain. That’s just fine.) Transfer mousse to a nice serving bowl** and cover tightly with plastic wrap.

OLYMPUS DIGITAL CAMERA

Refrigerate overnight or for up to 3 days. When ready to serve, beat the remaining 1 cup heavy cream to stiff peaks. Add the powdered sugar and remaining 1 teaspoon Cointreau. Spoon mousse into individual dishes and top with a dollop of whipped cream and a tiny bit of grated orange rind as garnish. Yields 2 quarts

*When I make this mousse for family and friends, I use regular egg whites. But if I am fixing mousse for a group of people I don’t know (like some of our JazzVox guests), I use Egg Beaters Just Whites because the whites are pasteurized. (Never know if one of our guests might be pregnant or fearful of raw eggs.)

**or individual bowls


CHEESE & PIMENTO SPREAD

OLYMPUS DIGITAL CAMERA

When I was a kid, my parents used to buy Kraft Pimento Spread in a juice glass. (At least, that’s how we used the containers after the cheese had been consumed.) I loved that stuff and could tidily polish off a whole jar by myself if my parents weren’t careful.

So when I discovered to my amazement that you can still buy cheese spreads in a jar, I was magically transported back to my childhood! And why I had never noticed these darling little nostalgic reminders of the good old days at my local grocery store before I began this segment is anyone’s guess. But Kraft Pimento Spread, as well as Old English Cheese and Roka Blue are apparently still going strong. Of course each jar is over $3, but because they are still appearing on the shelves, it seems that people must still be purchasing these products with regularity. (Now granted, I didn’t look to see if there was a pull date on the labels. For all I know those jars could still be around from the 50s. But for the sake of my sanity and yours, I’m going to assume that someone is monitoring the pull dates on these products as routinely as they are on the Hostess Twinkies labels!)

And what started this whole trip back to pimento cheese spread you wonder? Well it was my dear friend Vicki. Mr. C and I were over at her home for an afternoon band rehearsal (not Vicki and me, but our husbands doing the rehearsing) and one of the munchies she served was so simple, but so delicious, I had to make it for myself and share the results with all of you. In Vicki’s version, she simply mixed mayonnaise with finely grated cheddar cheese and diced pimentos. Lovely, and ready immediately.

In my version, I wanted something a little closer to my childhood memory of pimento cheese in a jar. So I decided to process the cheese and mayonnaise to a fine paste and then add the pimentos. And because I enjoy just a little bite to my cheese spreads, I added a wee bit of heat in the form of black pepper and creamy horseradish. And time. (My version is better after it has had a little time to mellow in the refrigerator.)

So if you too happen to be old enough or hip enough to enjoy cheese and pimentos together, give either or both of these cheesy pimento spreads a try. I promise you will not be disappointed by the flavor combination. Of course in making your own pimento spread, you will be missing out on some of the fascinating ingredients contained in the original product like carob bean gum, guar gum, annatto color, and sodium bisulfate. But this is just an example of the type of sacrifice one has to make in the quest for delicious food.

Thank you Vicki, not only for this recipe, but for all of your knowledge and inspiration into the world of delectable cuisine.

  • ½ c. mayonnaise
  • 1¼ c. grated sharp cheddar cheese
  • 1 grind black pepper
  • scant 1/8 tsp. creamy horseradish, opt.
  • 2 oz. jar diced pimentos

Combine the mayonnaise, cheese, pepper, and horseradish in the food processor. Whirl until smooth. Add the pimento and give it one or 2 quick pulses. (You don’t want the pimento too finely chopped or blended. Little pieces of pimento are desired.) Allow to rest in your refrigerator for a couple days. Serve at room temperature on buttery crackers.


SOUR CREAM AND CHIVE CRESCENT ROLLS

OLYMPUS DIGITAL CAMERA

Whenever I make these rolls I think about my mother-in-law Betty. She loved these rolls, so whenever we had a family get-together, and I was assigned the bread duty, I would make these especially for her. Not that all the rest of us didn’t love them too, it’s just that she was especially fond of them.

When you think how easy it is to make someone feel loved simply by fixing one of their favorite dishes, it’s a shame we don’t take the time to do it more often.  It’s such a simple way to say “I love you”. For example, all I have to say to Mr. C. to see his face light up is “would you prefer something with pesto or Chicken Paprika for dinner?” He practically starts to purr at the mere mention of either of these two favorites.

That’s why I feel particularly sad for children who don’t grow up with parents that make an effort to cook tasty and healthy food; children for whom fast food is their primary source of sustenance.  Not only are they undoubtedly not receiving the nourishment their bodies require, they aren’t receiving the nourishment I personally feel their souls need too. (Is there anything more reassuring or comforting to a person of any age than good smells emanating from the kitchen?) I can still hear my kids’ voices when they would ask me what was for dinner and I would answer with the name of one of their favorites. There would always be loud happy exclamations that for me were worth all the effort I had expended and more!

So next time you are thinking about what to fix for dinner, pick a dish that you know is one of your family’s favorite. The same thing goes for your elderly relatives. Make dishes that you know are their favorites too. I would love to be able to make another batch of these for my mother-in-law, but I’m glad I made as many as I did while I still had the opportunity.

I hope you enjoy this recipe. The rolls are easy to make and perfect for holidays or dinner parties because the mixing is done the day before. Then roll them out, leave them alone for a couple of hours and pop them in the oven just before dinner. Pillsbury dough boy – eat your heart out!

  • ½ c. butter
  • 1 c. sour cream
  • ½ c. warm water
  • 1 tsp. sugar
  • 1 tsp. salt
  • 2 (.25-oz.) pkgs. or scant 2 T. active dry yeast
  • 2 eggs, room temperature
  • 4 c. bread flour
  • ¼ c. chopped fresh chives

Melt butter in small saucepan. Remove from heat and whisk in sour cream. Meanwhile, pour water into a large mixing bowl, add the sugar, salt, and yeast. When the sour cream mixture is lukewarm, add to the yeast mixture. Add the eggs, flour, and the chives. Knead for about 3 minutes. Cover with plastic wrap and refrigerate overnight. (Dough can be left in refrigerator for up to 3 days before baking.)

Divide dough into 4 parts. Knead and roll each piece into a 10-inch circle.

OLYMPUS DIGITAL CAMERACut circle into 8 pie-shaped wedges. Roll each piece from and wide end to the point.

OLYMPUS DIGITAL CAMERAPlace on a lightly greased baking sheet pointy end down.

OLYMPUS DIGITAL CAMERACover with a light weight tea towel. Allow to rise until doubled in size, about 2 hours. Bake in a pre-heated 375 degree oven for 12 to 15 minutes. (I start the rolls in a regular oven and then turn the oven to the convection setting about the last 5 minutes of baking! This produces a nicely browned roll.) Best served within a few hours of baking with room temperature butter.

CHOCOLATE AND PECAN TOFFEE BARS

OLYMPUS DIGITAL CAMERA

OLYMPUS DIGITAL CAMERA

Mr. C. recently celebrated his birthday. We were scheduled to perform on the actual day, so I asked him ahead of time if he would like to go out to dinner the day after his birthday or would he like me to prepare some of his favorite dishes in the comfort of our own home?  He chose to stay home, which was just fine with me. (We tend to stay so busy that an evening at home is a treat!) I asked him what he would like me to prepare, and he provided me with the following list: Gruyere Soup, steak (because we hardly ever eat steak any more), White Cheddar Cheese Grits, buttered fresh green beans, and some kind of a caramel and chocolate bar cookie. He told me he didn’t really care how I prepared the steak or what I served for appetizers he just really wanted the 5 items listed above.

Sounded good to me, so I chose to make him Steak au Poivre (recipe to follow later this week) and try out a slightly modified version of a bar cookie recipe I found on the “taste and tell blog” web site. And then of course, why not invite our good buddies Jim and Margo over for the celebration – voilà – a dinner party.

So for appetizers I served crackers with a small piece of smoked salmon, soft cream cheese spread with ginger jam, and a small bowl of castelvetrano olives. First course was the Gruyere soup, followed by the steak, grits, and the fresh green beans. For dessert, coffee, liqueurs of choice, and some of these incredible toffee bars. They were just amazing and exactly what the birthday boy wanted. (Love it when a plan comes together.)

So next time you want to make an incredibly tasty and ever so easy (you don’t even need to dirty your mixer) bar cookie, bake up a pan of these little darlings. You will not believe how incredible just 6 ingredients can taste. And making your own caramel for this recipe – a snap! And perfect to serve at Christmas time – oh yah! There is just nothing about these cookies that isn’t OK. Well, maybe the number of calories. But let’s just not count those nasty little calories this time, alright. In fact, I’m going to park these babies in a “calorie free zone” and leave them there in perpetuity. Now doesn’t that make you feel better? I am nothing if not on your side!

  • 2 c. all-purpose flour
  • 1½ c. packed brown sugar, divided
  • pinch of salt
  • ½ c. + 2/3 c. unsalted butter, room temperature
  • 1½ c. chopped pecans, divided
  • 1 c. semi-sweet chocolate chips

Mix together the flour, 1 cup brown sugar, and pinch of salt. Using your fingers or a table fork, massage in the ½ cup butter until the mixture resembles fine crumbs. Mix in 1 cup of the chopped pecans. Press into the bottom of a 9×13-inch baking dish, preferably glass. (Although I don’t really grease the pan, I do use the butter wrappers to kind of leave a mere trace of butter on the pan before I scoop in the flour mixture.)

In a medium saucepan, combine the remaining 2/3 cup butter and the remaining ½ cup brown sugar. Cook over medium heat until the mixture comes to a full boil, stirring constantly. Continue to boil for 1 minute. Remove from heat and carefully pour evenly over the crust. Smooth out the caramel with an offset spatula. (The tool pictured above.)

Bake the bars in a pre-heated 325 degree oven (350 if you are not using a glass pan) for 20-22 minutes, or until the caramel is bubbly. Remove from oven and sprinkle with the chocolate chips. Allow to set for about 4 minutes while the chocolate melts. Spread the chocolate into a thin layer over the top of the bar cookie (again using your offset spatula) and sprinkle with remaining ½ cup chopped pecans. Gently press the pecans into the soft chocolate with one of your fingers. (If you happen to get a little chocolate on your finger as you are securing the pecans to the chocolate, you can treat yourself to a little taste before the bars are cool. I call this – quality control!)  Allow the bars to cool completely before cutting into fairly small pieces. These are very rich (really almost a candy), and oh so yum.

Note: This is one bar cookie that actually improves with age. Mr. C. said they were better the second day. (Haven’t reached the third day yet, so can’t advise you if they just keep getting better. And at the rate they are disappearing from the pan, I may never have that answer to share with you!)

2nd Note: Offset spatulas are one tool that isn’t used every day, but when it comes time to spread something (like frosting or as in this case, hot caramel) on to something else there is not a better tool for the job. They are fairly inexpensive, so treat yourself next time you are in a store that sells cooking equipment.

CRISPY SKINNED ROAST CHICKEN AND GRAVY

OLYMPUS DIGITAL CAMERA

For those of you who are addicted to chicken the way I am, there is just nothing that compares with a lovely roasted chicken with creamy rich gravy served over mashed potatoes and/or my Cornbread Dressing. Add a green veggie, Waldorf Salad with Dried Cranberries and Orange Zest, and dinner rolls, and you have a meal that will help you celebrate any special occasion in style. And coincidentally, will not break the bank or your budget.

For many people, the thought of massive amounts of leftovers after a large holiday dinner is overwhelming. With this fowl recipe (and yes, I got the spelling correct and the usage right if you consider that “fowl” is now used in colloquial speech to be nearly synonymous with “poultry”) you are almost guaranteed to have very few if any leftovers.

So treat yourself to this lovely roasted chicken anytime you want comfort food or to help celebrate a special occasion. In our house, any night we are actually home for dinner is a special occasion! Perhaps it’s time to slow down a wee bit. Yah think!?

  • 1 whole small chicken (4 1/2 – 5 lbs.)
  • 2 T. butter, room temperature
  • 1 ½ tsp. seasoned salt
  • freshly ground black pepper (just a couple of grinds)
  • 1/2 tsp. cornstarch (yep, cornstarch – it helps crisp the skin)
  • 2-3 (6-inch) sprigs fresh rosemary
  • ½ onion, rough chopped
  • 2 garlic cloves, rough chopped
  • 1 small lemon, rough chopped
  • 2-3 c. chicken broth, divided

Pat chicken dry with paper towels. Combine the butter, seasoned salt, pepper, and cornstarch together in a small bowl. Set aside. Stuff the cavity with rosemary, onion, garlic, and lemon. Tie legs together with kitchen twine.

Place chicken, breast side up, on rack in a low sided roasting pan or large oven proof frying pan. (You don’t want to use a Dutch oven or any other tall sided pan because you want the air to circulate freely around the bird as it bakes.) Tuck wings under. Rub the seasoned butter all over the skin of the chicken.

OLYMPUS DIGITAL CAMERA

Pour 1 1/2 cups of the chicken broth in the bottom of the pan. (Not only will the liquid absorb any fat drippings off the bird thus preventing a smoky, messy oven, it will form the base for your gravy.)  Roast for 30 minutes in a pre-heated 450 degree oven. Remove from oven, and add another 3/4 cup of chicken broth (or more if the pan was completely or almost dry). Return to oven, rotating pan. Roast until chicken juices run clear and an instant-read thermometer inserted into the thickest part of a thigh reaches 175 degrees, about 45 minutes more. Remove from oven and move chicken to a platter. Tent with aluminum foil and let rest for at least 15 minutes before carving. If you want gravy to serve with your roast chicken, see recipe below.

CREAMY CHICKEN GRAVY

OLYMPUS DIGITAL CAMERA

  • pan drippings from roasted chicken
  • flour
  • chicken stock
  • heavy cream or milk
  • ½-1 tsp. Kitchen Bouquet
  • freshly ground black pepper
  • 1-2 chicken gravy mixes (just in case)
  • 1-2 tsp. cognac, opt.

Place the roasting pan on the stove after the chicken has been removed. Turn the heat to very low and begin making your gravy immediately. (Good gravy flavor and consistency require time to develop.)    Do not remove any fat from the pan, do not strain the liquid, do not do any of the things most cook book writers tell you to do to make good gravy (except me, that is!)

Whisk in enough flour to absorb the fat. Let burble for a couple of minutes. (This process takes time, so be patient.) Slowly whisk in equal parts chicken stock and cream (or any combination you prefer) until you reach the desired thickness you like. Add the Kitchen Bouquet (gives the gravy great color) and some freshly ground black pepper. No salt yet! Taste the gravy. If you think it needs more depth of flavor, begin by adding one of the gravy mixes and a small amount of stock. Let it simmer for a couple of minutes and taste again. Add salt at this time if needed.

Turn heat as low as possible and let the gravy simmer away for the next 10 minutes or so, whisking periodically. (You will probably need to add more stock during this time.) Also, after the chicken is sliced and plated, don’t forget to add the juices that have accumulated to the gravy.

Just before serving (and gravy should be the last item plated), taste the gravy and make any final adjustments to the seasoning. Stir in the cognac and serve piping hot.