Category Archives: MEXICAN FOOD RECIPES

CORN AND BLACK BEAN SALSA


OLYMPUS DIGITAL CAMERA

There are very few edibles I like better than a really good salsa and tortilla chips. And for my 70th birthday party, I served taco/burritos with three types of meat and three types of salsa. And one of the salsas I served was this corn and black bean creation.  It was very well received, as were the other two salsas that were served. So along with this salsa, I will be posting my daughter Paula’s recipe for Mexican Salsa and my dear friend Jim’s recipe for Salsa Verde (Green Tomatillo Salsa).

All three of the salsas are very easy to prepare and include ingredients readily available in just about any grocery store. (If I can find them on Camano Island, you should be able to find them in your favorite grocery store.)

And although this is technically a salsa, it can be eaten as a salad. Or, if you are like my husband, it can be eaten straight out of the refrigerator container, while standing up, big old forkfuls at a time. After all, why dirty a dish when all you need is a few bites of corn and black bean salsa? Why even bother getting the tortilla chips out of the pantry? So, does Mr. C like this salsa? You might say so!! I hope you enjoy it too.

  • 2-3 c. frozen corn, thawed and patted dry  
  • ¼ red pepper, chopped
  • ¼ orange pepper, chopped
  • 2 T. chopped red onion
  • 1 can black beans, rinsed and drained
  • 1 tsp. very finely minced jalapeno pepper or more to taste
  • 1 T. fresh lime juice, or more to taste
  • ½ c. tomato salsa, medium hot
  • ½ tsp. chili powder
  • ¼ tsp. granulated garlic
  • ¼ tsp. kosher
  • freshly ground black pepper
  • 2-4 T. coarsely chopped fresh cilantro (depends on how much you like cilantro)

Combine the corn, red pepper, orange pepper, red onion, black beans, and jalapeno in a bowl. Whisk together the lime juice, salsa, chili powder, granulated garlic, salt, and pepper in another bowl. Pour the sauce over the veggies and stir gently. Make a day or two ahead if possible. Before serving adjust the seasonings and stir in the fresh cilantro and additional fresh lime juice to taste. Serve with tortilla chips. (We love Juanita’s Tortilla Chips.)


HUNK OF BEEF CHILI

OLYMPUS DIGITAL CAMERA

This is my answer to the age old question – “what to do with half a grilled London broil steak when the flavor of the new rub you tried rendered the final product almost inedible”? Yes ladies and gentlemen, I too try new recipes that look sensational in print and turn out to be, well how do I say this politely – not worth the ink used to print the recipe! And that’s exactly what happened when I tried a new recipe that appeared in our local paper. The steak rub/paste sounded oh so good, but unless you have only about 9% of your taste buds left, the taste of fresh herbs knocked your socks clear into next Tuesday! And you know how I feel about blended flavors. Each ingredient should compliment all the other ingredients. The only analogy I can draw is that the steak was like Wile E. Coyote, and the rub had the same characteristics as the Road Runner. And you know how that always turned out! – the steak, I mean  Wile E. never had a chance!

So, back to my original question; what to do with half a pound of highly spiced cooked beef on a cold and rainy spring day? And of course, the only answer that made perfect sense was chili. So after thinking on it for a few minutes, I came up with this recipe. And low and behold, it was good! No, not just good, it was really good.

So next time you get a hankering for chili, give this simple and tasty recipe a try. Serve it with corned bread and a good hearty beer, and life will become a bed of roses. (Just don’t over spice the chili, or you’ll end up like I did when I tried the rub recipe. Your bed of roses will have thorns large enough to use as knitting needles!)

  • 1 T. extra virgin olive oil
  • ½ lb. lean beef such as London broil, round steak, top sirloin (raw or cooked*), diced into bite sized pieces
  • kosher salt
  • freshly ground black pepper
  • 1 garlic clove, finely minced
  • ½ red pepper, chopped
  • 1 (28-oz. can) diced/chopped tomatoes (preferably Italian tomatoes)
  • 1 heaping tsp. beef base
  • 1 can black beans
  • pinch marjoram
  • pinch dried rosemary
  • 2 T. chili powder
  • 1 tsp. Mexican oregano
  • ¼ tsp. crushed aleppo pepper or pinch crushed red pepper flakes
  • 1/8 tsp. ground guajillo pepper, opt.
  • thinly sliced green onions, garnish, opt.
  • Mexican sour cream, garnish, opt.

Heat the olive oil in a medium large covered pan. Add the raw meat* that has been dried with paper towels and sprinkled with salt and pepper. Fry until brown on all sides. Add the onion and cook for about 3 minutes. Add the garlic and red bell pepper and cook for about a minute or until you can smell the garlic. Add the canned tomatoes, beef base, black beans, marjoram, rosemary, chili powder, oregano, Aleppo and guajillo peppers. Bring mixture to a boil. Reduce heat to low, cover pot, and cook for about 2 hours or until the beef is fork tender. Stir often during the cooking time. Adjust seasoning along the way. Serve sprinkled with green onions and sour cream.

*if you are using already cooked meat, add along with the black beans

Note: aleppo and guajillo peppers are both new to me, but both have quickly become near and dear to my heart. Finding them ground can be kind of an adventure, but if you live in the Seattle area, visit PFI (Pacific Food Importers). Heck, even if you live in Portland you should visit PFI! It’s worth the trip. And if you don’t live in the area, go on line and order a bit of each. They are simply head and shoulders more tasty than crushed red pepper flakes.


CHICKEN FAJITAS

OLYMPUS DIGITAL CAMERA

Well once again I have proven to one and all that my photographs of food will never make the rotogravure section of the Sunday Chronicle. Whoa Nellie – that was a thought blast from the past!  Maybe I thought about the long gone rotogravure* section of Sunday papers because I have been going half mad all day trying to get Irving Berlin’s melody for the song Easter Parade out of my head. (There is a reference to the rotogravure in the song lyrics.) Whatever the reason, the truth of what I said remains. I am simply a lousy food picture taker (can’t even refer to myself as a photographer) and I want to take this opportunity to apologize for my ineptitude.

OK, I got that off my chest; on to better and tastier subjects.

I don’t know about you, but I love fajitas. What I don’t appreciate is when fajitas are so highly seasoned that you can’t taste the flavor of the meat. (Just my old hang-up of wanting a blend of flavors in whatever dish I eat or prepare!) I also don’t like buying seasoning packets when I can jolly well produce a better and less expensive product at home! Of course, my spice blends don’t have the likes of monopotassium glutamate, disodium guanylate, or disodium inosinate (not making these names up folks), but I don’t really feel I’m missing anything by their absence!

So the following recipe is my answer to a not overly spiced fajita that can be made with chicken, beef** (skirt steak works great), or shrimp**.  This mélange of herbs is perfect for Mr. C and me. For those who prefer spicier fajitas, I recommend using a hot salsa to ramp up the heat.

*According to the Free Dictionary website, rotogravure is an intaglio printing process in which letters and pictures are transferred from an etched copper cylinder to a web of paper, plastic, or similar material in a rotary press. i.e. printed material, such as a newspaper section, produced by this process.

  • 1 T. cornstarch
  • 1 tsp. chili powder
  • ½ tsp. ground cumin
  • ½ tsp. onion powder
  • ½ tsp. granulated garlic
  • ¼ tsp. smoked paprika
  • scant 1/8 tsp. cayenne
  • 1 tsp. kosher salt
  • freshly ground black pepper
  • ¼ c. water
  • 3 T. extra virgin olive oil, divided
  • 1 lb. boneless skinless chicken breasts cut into 1/3-inch strips
  • 1 green pepper, thinly sliced (or half green, half red pepper)
  • 1 medium yellow onion, thinly sliced
  • 2 T. fresh lime juice
  • 8 warm flour tortillas
  • shredded lettuce, grated cheddar cheese, salsa, thin avocado slices, and sour cream (preferably Mexican) for serving

Note: Remember – you don’t have to buy your spices in those darling little jars at the grocery store. Buy your spices in bulk and save yourself mucho dinero (well we are talking fajitas here you know!)

Combine the cornstarch, chili powder, ground cumin, onion powder, granulated garlic, smoked paprika, cayenne, salt, and pepper. Place in an airtight container for storage. (I make about a triple batch at a time.)

When ready to prepare fajitas, whisk together the water, 2 tablespoons of the olive oil, and the chili powder mixture together in a small bowl. (If you have made a larger amount of the spice mixture, use about 4 tablespoons for this recipe.) Add the chicken, and stir together until the chicken is evenly coated. Refrigerate for about 20 minutes. **

After the chicken has had a chance to marinate, heat the remaining 1 tablespoon of olive oil in a large nonstick skillet until shimmering. Carefully empty the chicken into the skillet along with the green pepper and onion. Cook over medium high heat, stirring continually with a heavy spatula to remove browned bits off the bottom of the skillet, until the vegetables are crisp-tender and the chicken is just cooked through, about 4 minutes.

OLYMPUS DIGITAL CAMERA

Remove from the heat and stir in the lime juice. Serve in warmed tortillas, with lettuce, cheese, salsa, avocado slices, and sour cream.

OLYMPUS DIGITAL CAMERA

** 15 minutes for shrimp and about 1 hour for skirt steak

MEXICAN WEDDING COOKIES

So, who out there has never tasted a Russian Tea Cake, Swedish Tea Cake, Snowball, Butterball, Mexican Wedding Cookie or whatever name you use to identify these little 5 ingredient wonders? Probably no one, right? But on the off chance that you are among the half dozen or so people left in the United States that have not partaken of one of these incredibly tasty and easy to prepare cookies, I am going to provide you with this recipe so you too can come aboard the happy mouth train.

These cookies literally melt in your mouth. And cute? Who in their right mind could say no to such a darling little round ball liberally covered with powdered sugar? They look like little mini round pillows. (I’d have provided a picture but the cookies disappeared before I could get my camera out of the closet.)  Now granted, they are not the least expensive cookie to produce. But truly, you would have to be related to $crooge McDuck not to spend the money to make these little babies at least once a year.

Now some recipes I have made call for more flour, or less flour, or ground walnuts or almonds instead of pecans. But the 5 basic ingredients (butter, sugar, vanilla, flour, and nuts) remain the same in every recipe I have ever seen. Warning: don’t even think of using margarine or vegetable shortening instead of butter. You might find culinary experts from every country that has a version of this cookie appearing on your door step with strong words of displeasure at your disrespectful action. (We who are connoisseurs of these cookies take our use of the proper ingredients quite seriously.)

So next time you host an occasion that warrants a rich little dessert cookie (Christmas, wedding or baby shower, Monday night football, etc.) bake a batch of these cookies for your family and friends. I’m told they are the perfect end to any meal be it chicken cordon bleu or corn dogs and chips.

  • 1 c. (2 sticks) butter, room temperature
  • ½ c. powdered sugar, plus more for rolling
  • 1 tsp. vanilla
  • 2 c. all-purpose flour
  • 1 c. finely chopped pecans

Beat butter, powdered sugar, and vanilla until light and fluffy. Add the flour and pecans and beat until thoroughly combined. Shape dough into balls with small ice cream scoop or by hand. Place 1-inch apart on an ungreased baking sheet. Bake in a pre-heated 350 degree oven for 14-15 minutes or until bottoms of cookies are light brown. Transfer to wire rack and cool completely. Roll cookies in powdered sugar until evenly coated. Store cookies in an airtight container at room temperature.


MEXICAN BROWNIES

This wonderful brownie recipe comes from Aaron Sanchez. And unlike many of the recipes that I feature on this site, I have not changed one single solitary ingredient or amount in Aaron’s recipe. No need! However, I did change the assembly instructions a bit. I added the step of sieving the dry ingredients together to eliminate any possibility of lumps in the final product. This is not a difficult or very time consuming process, but one that guarantees that all your careful preparation work will not have been in vain. (No one appreciates biting into a lovely goody like this brownie and finding a small lump of cocoa or a wee chunk of cayenne, for example.)  Not a pleasant surprise. And dried ingredients are notorious for wanting to stick together. (And yes I know what you are thinking when it comes to dried spices. Fresh spices don’t clump together.)

But let’s be realistic here. Most of us who cook and bake a lot buy our spices in bulk. And regardless of what the experts say about only using fresh spices (they all work for large import companies, BTW), a dried spice older than 6 months is just as worthy of your regard as the fresh faced newcomer in your spice rack! Just because older spices have a little longevity going for them does not mean that they should be cast away like last year’s half  jar of Aunt Sarah’s homemade bread and butter pickles! (Note to self: clean the refrigerator!) Older spices just need to be understood.

So if using a sieve to break up little clumps of spice caused by repeated and infinitesimal exposure to moisture that robs the spice of essential oils, so be it. Beats the heck out of becoming “spice poor” or worse yet, “old spice phobic”! Just treat your older herbs and spices with the same kind of loving respect you afford your older loved ones. Visit them often, tell them how wonderful they are each time you reach for them, and treat them special. Nothing could be easier.

  • 1 c. unsalted butter (2 sticks), plus more for greasing
  • 2 c. sugar
  • 4 large eggs, room temperature
  • 2 tsp. vanilla
  • 2/3 c. good-quality unsweetened cocoa powder
  • 1 c. all-purpose flour
  • 1 tsp. ground cinnamon
  • ¼ tsp. ground cayenne pepper
  • ½ tsp. kosher salt
  • ½ tsp. baking powder

Place the butter in a large glass bowl and microwave at a low heat just until melted. Add the sugar, eggs, and vanilla; stir until well combined.

OLYMPUS DIGITAL CAMERA

In a separate bowl sieve the cocoa, flour, cinnamon, cayenne, salt, and baking powder together to eliminate any lumps. Add to the butter mixture and stir until smooth. Spread the batter in a lightly buttered glass 9×13-inch baking pan. Bake in a pre-heated 325 degree oven (350 if you are using a metal pan) for 20-25 minutes or until a toothpick inserted in the middle comes out fudgy. Cool completely before cutting into squares.

(And sorry about no picture of the brownies. They were gone before I could even think about reaching for my camera.)

JALAPEÑO POPPER DIP

OLYMPUS DIGITAL CAMERA

As I was planning the menu for our next in-home concert, I decided on Mexican food. Since the before concert meals are at 1:00pm (lunch really) I usually don’t serve appetizers. (Ok, when I serve Italian food I almost always have an antipasto platter for people to start munching on when they arrive, but other than Italian cuisine, I usually don’t feel the necessity.)

But thinking about Mexican food, I remembered that the first thing that happens when you arrive in a Mexican restaurant (lunch or dinner) is the magical appearance of warm tortilla chips and salsa. So, not one to be outdone by any Mexican restaurant worth their beans (that’s pinto beans of course) I decided my menu needed a “safe arrival” treat too.

And of course I could simply make a nice salsa (too messy) or guacamole (too de rigueur). But instead, I decided to serve an appetizer that was different enough to be of interest to everyone while at the same time keeping to the whole “south of the border” theme.

Now I truly have no idea if jalapeño poppers have any place in authentic Mexican cuisine, but they are certainly popular in America. But filling fresh jalapeños with cream cheese for 35 people seemed just a little more than my sanity could handle. That’s when the light bulb came on and I got the brilliant idea to serve a popper dip. So of course, I did what I always do when a flash of genius strikes me. I go on line, search for the dish I have in mind, let someone else do the basic work for me, refine their recipe to my liking, and take credit for the whole thing! (Now, you must admit, that’s brilliance personified! And no, I don’t feel even one little tug of remorse for my actions. I figure all is fair in love, honest income tax deductions, and adapting recipes to make them my own!)

So, in preparation for the upcoming luncheon, I made this dip last evening. (I don’t always try new recipes before I serve them to guests, but this time I decided not to “wing it”). Well boy howdy, this dip was an instant hit with Mr. C. It has that wonderful creamy mouth feel associates with cream cheese, a subtle cheesy background flavor from the Monterey Jack, cheddar, and Parmesan, and tons of jalapeño flavor without too much heat, that even the most chili-phobic person should find palatable. In other words, it’s really, really tasty without being too in-your-face hot.

So give this warm dip a try. It’s ever so easy to prepare and ever so easy to eat. And thank you American Food website for this wonderful recipe. I know I changed a few things, but that’s why I get paid the big bucks! And if you believe that (the big bucks part), I’ve got a great piece of property for sale right here on Camano Island that would be perfect for a banana plantation! The price is right too!

  • 1 (8-oz.) pkg. cream cheese, room temperature
  • ½ c. mayonnaise
  • ¼ c. grated Monterey Jack cheese
  • ¼ c. grated sharp cheddar cheese
  • ¼ c. grated Parmesan cheese
  • ¼ c. sliced pickled jalapeños (I use Mrs. Renfro’s) + a couple slices for garnish
  • ½ fresh jalapeño, seeded, de-veined, and finely chopped, or more to taste

Whirl the cream cheese, mayonnaise, Monterey Jack cheese, cheddar cheese, and Parmesan cheese together in a food processor until smooth. Add the pickled jalapeños and the finely chopped fresh jalapeño and whirl until only small bits of the fresh jalapeño remain visible. Do not over process. You want those little bits of green to remain. Spread the mixture into a lightly buttered casserole. Bake in a pre-heated 375 degree oven for about 20 minutes. You should be able to see the mixture gently bubbling around the edges and the top should be turning a light golden brown when the dip is hot. Allow to rest for about 5 minutes. Serve with tortilla chips.


MEXICAN COLESLAW WITH CILANTO LIME VINAIGRETTE

OLYMPUS DIGITAL CAMERA

I make slaw a lot. I love the crunch, taste, and especially the affordability of the ingredients. Now I am not a penny pincher, but I’m also not a spend thrift. But like everyone else, I like to get the most bang for my buck! And cabbage is one way to stretch the old dollar. And it’s good for us besides!

According to the Fitday blog site, and I paraphrase, “when eaten raw, cabbage delivers plenty of nutrients into the body. It is high in vitamin C and E. Other vitamins in cabbage include A, B1, B2, B6, K and folic acid. Mineral content includes calcium, sulfur, iron, magnesium, phosphorous and potassium. It also contains trace amounts of iron, copper, manganese, selenium and zinc. Cabbage also contains antioxidants and fiber.”

Another thing I like about slaw is that not only can the cabbage be shredded or sliced ahead of time, so can most of the other veggies. And for entertaining there is just nothing better to serve. First of all, many people do not routinely eat coleslaw, so a good (emphasis on good) coleslaw is a treat for your guests. And if you are the only one preparing and serving a large group of people, as I do regularly, not having to clean salad greens, chop delicate veggies, and dress a salad at the last moment is another excellent reason to choose a slaw.

But truly, the best reason to serve coleslaw is the flavor. If the simple veggies in a slaw are dressed with a yummy dressing, what’s not to like? Let’s get realistic here. Isn’t any salad mostly about the dressing anyway? (Well that, and maybe certain additives like bacon, cheese, croutons, nuts, dried cranberries, etc.) But here’s a news flash. There is often less dressing or dressing containing fat filled ingredients on coleslaw than on a typical lettuce based salad. Let’s use a hypothetical person like myself to illustrate my point.

When I go out to eat, I almost always order a salad with blue cheese dressing. And I’m not really happy unless there’s plenty of dressing on my salad. However, if I order fish and chips and it comes with coleslaw, the coleslaw is usually scantily clad. (Yes I know, the fried fish and French fries greatly make up for the lack of calories and fat in blue cheese dressing, but I’m simply making a point about coleslaw here folks, so cut me some slack!)

So next time you want to prepare a healthy salad to go along with a Mexican meal, or any meal for that matter, give this recipe a try. And don’t be afraid of the jalapeno. Yes it adds some heat, but not too much heat. If it still worries you, don’t use as much jalapeno, or leave it out all together. Now if you will excuse me, I’m going into my kitchen to prepare a jalapeno popper dip. (All this talk about jalapenos has my mouth watering!) If the recipe works, I’ll share it with you in the next few days. If not, it’s back to the drawing board, or in my case, the cutting board for me!

Dressing: 

  • ¼ c. fresh lime juice, or more to taste
  • 2 T. apple cider vinegar
  • ½ c. extra virgin olive oil
  • 1 c. loosely packed fresh cilantro, finely chopped
  • 2 cloves garlic, finely minced
  • 1 tsp. dried oregano (preferably Mexican oregano)
  • 1 tsp. kosher salt, or more to taste
  • freshly ground black pepper

Whisk together all the ingredients. Set aside. Or refrigerate until ready to use.

Slaw: 

  • 1 lg. head of green cabbage, finely shredded or sliced
  • 1 bunch radishes, trimmed and finely sliced
  • 2 medium sized carrots, peeled, cut in half lengthwise and thinly sliced into half moons
  • 1 stalk celery, cut in half lengthwise and thinly sliced into half moons
  • 2 medium sized jalapeno chilies, seeded, de-veined, and minced (or more to taste)
  • 1 small red or yellow onion, cut in half and very thinly sliced
  • 1 c. loosely packed fresh cilantro, finely chopped

Place the cabbage in a large bowl along with the radishes, carrots, celery, jalapeno, onion, cilantro, and most of the salad dressing. (Be sure to whisk the dressing or shake the container before using.) Toss, taste, and adjust seasoning. Add additional dressing as required. Serve the slaw with any of your favorite Mexican dishes. Try it along with my Tamale Pie or Cheese Enchiladas with Red Chili Sauce for a wonderful Mexican food dinner.

Note: If you have any leftover salad, cover with plastic wrap and store in the refrigerator. Will be great the second day too.


RED (ROJO) POSOLE WITH PORK

OLYMPUS DIGITAL CAMERA

Something you should know about me is that I am a wuss, at least when it comes to really hot (as in spicy) food. I can’t, for example, go into an Indian or Thai restaurant and order a dish with 5 stars. Yikes, I might end up in a hospital if I ever went that far. But a nice polite 2 stars is quite alright with me. You see, I have this old fashioned belief that a person should actually be able to taste the ingredients in a dish, not just consume a mouth full of fire. (I know, how “yesterday” is that?)

But seriously, when you add too much “hot” to a dish, you might as well be eating Kibbles and Bits for all the actual ingredients matter. And I have listened to people order incredible dishes that feature prawns or lobster for example, pay an arm and a leg for the privilege, and then tell their waiter they want a 4.5 or 5 star spice level. Now if they told me they could actually taste either of those two costly ingredients, I would stand right up and yell “liar, liar, pants on fire” at them, even in the most prestigious of restaurants! (I have my standards to uphold, after all.)

So when I tell you that this dish is amazing in the fact that it is spicy, but all of the ingredients are featured players and that this dish is not the least bit too spicy, I want you to trust me. This is one of the dishes I firmly believe God sent us to prove that chilies were at the top of his list when he thought of how best to flavor food. And really, isn’t flavor what it’s all about? Granted, there are those who merely eat to stay alive. But most of us stay alive to eat! What better reason, after all? Oh well, there might be better reasons, but this a cooking blog, after all! I’m not advocating storge (look it up), I’m touting good flavorful food!

So whatever you do, give this recipe a try. It’s low in fat, and a complete meal unto itself. And like I said, the flavor is simply amazing! I mean really, would I share it with you if it weren’t amazing? People, you know me better than that!

  • 2 (15-oz.) cans drained and rinsed hominy or ½ c. dried white corn posole (hominy)*  
  • 20 dried chiles de arbol, stems and seeds removed and cut up with a scissors
  • 2 dried ancho chiles or 1 guajillo chili (or a combination), stems and seeds removed and cut up with a scissors
  • 1 c. boiling water
  • 6 cloves garlic finely chopped, divided
  • kosher salt
  • 1½  lbs. boneless pork chops or pork shoulder, trimmed and cut into bite sized pieces
  • freshly ground black pepper
  • 2 T. corn or vegetable oil
  • 1 large white onion, chopped (save a small amount to use as a garnish)
  • 8 c. water
  • 8 tsp. Knorr Caldo de Pollo (chicken flavor bouillon- located in the ethnic food section of most grocery stores – yellow label, green lid) or regular chicken stock
  • 2 tsp. ground cumin
  • 1 T. dried oregano (preferably Mexican)
  • 2 small bay leaves
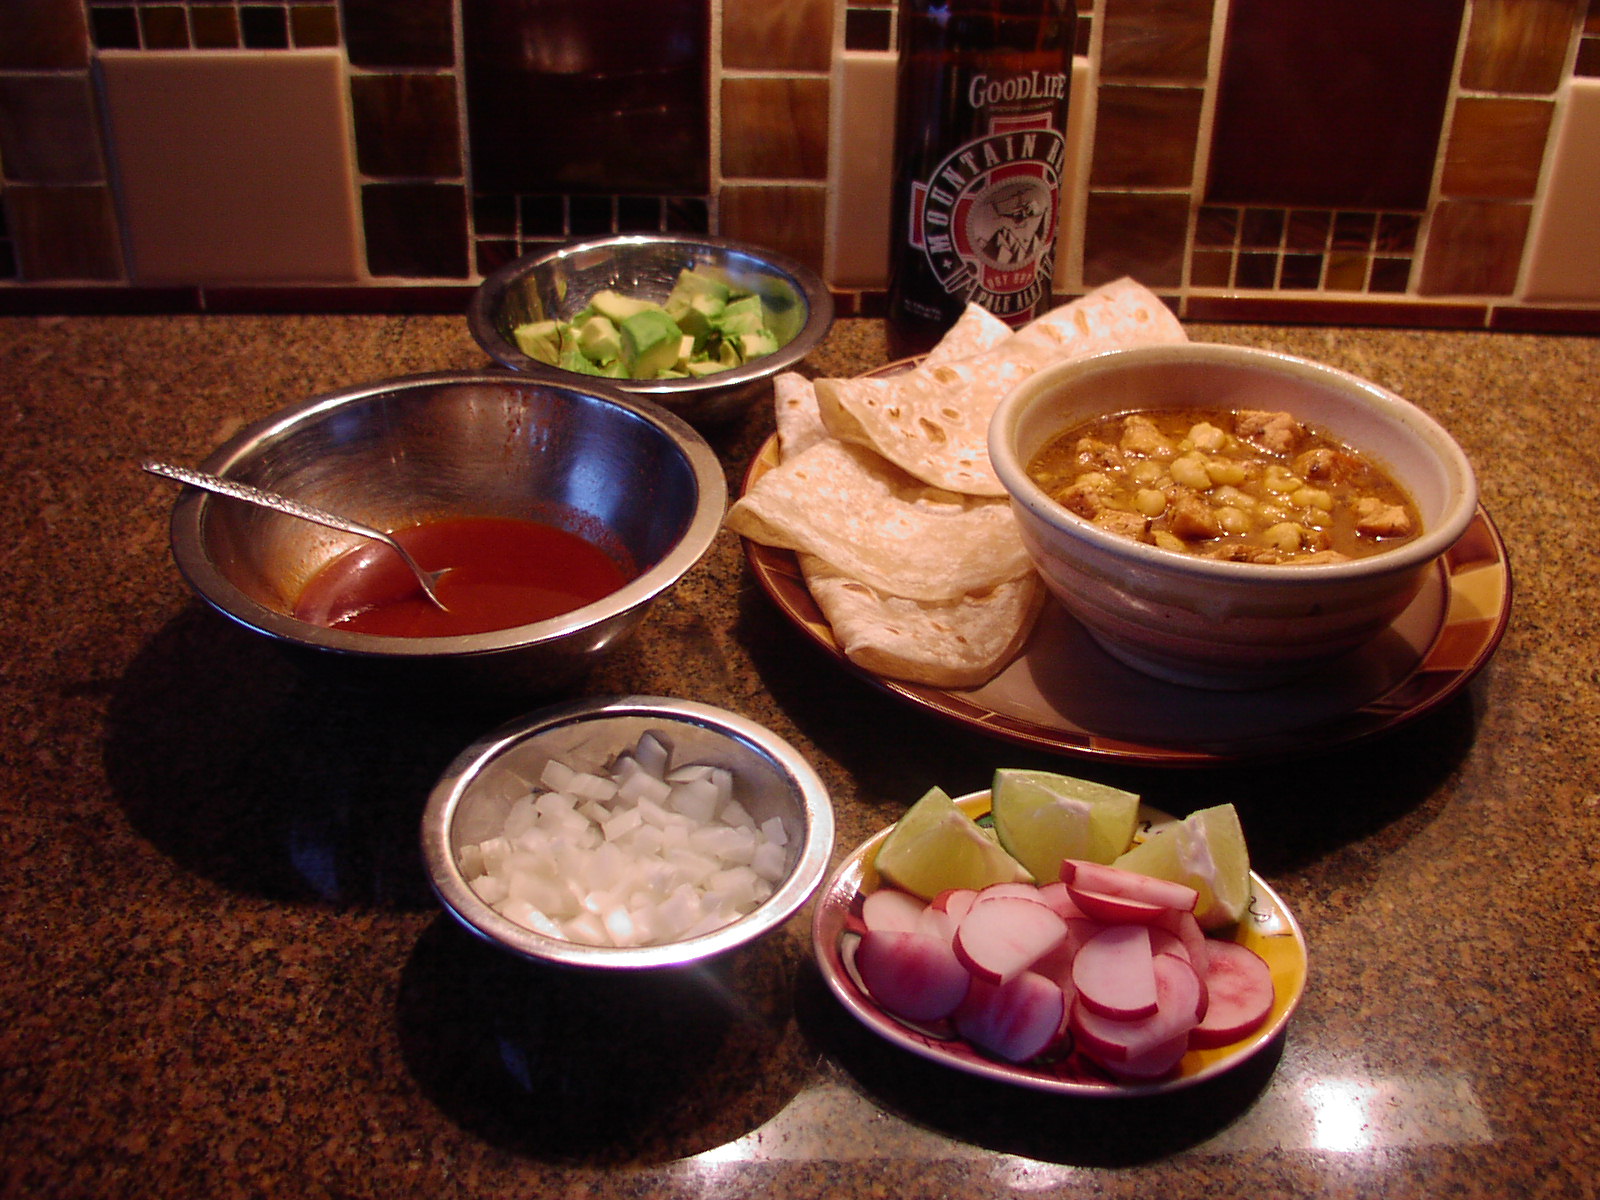
  • 2 avocados, diced, opt.
  • radish slices, opt.
  • lime wedges, opt.
  • warm flour or corn tortillas, opt.

*Use canned hominy if in a hurry, but taste and texture are just not as good as when you start with dried posole.

If using dried hominy, place it in a non-reactive container and cover with water; soak overnight. Next day, boil in salted water for approximately 2-2½ hours or until tender. Drain.

Meanwhile, place the de-seeded and chopped chilies in a bowl and cover with the boiling water; soak until soft, about 30 minutes. When soft, carefully pour the chilies and soaking liquid into a blender or food processor. Add 1/3 of the chopped garlic and 1 teaspoon salt; blend until smooth. Strain through a fine-mesh sieve into a bowl, pushing the sauce through with a rubber spatula; discard the solids. Set aside. (This sauce is very hot (as in spicy), so even the fumes can be overpowering. Be very careful handling this precious liquid. Think hazardous waste!)

Meanwhile, liberally sprinkle the pork with salt and pepper.  Heat the vegetable  oil in a Dutch oven or covered pot over medium heat. Add the pork and cook until browned on all sides. Add the onion and cook, stirring occasionally, until soft, about 4 minutes. Add the remaining 4 cloves of chopped garlic and cook for about a minute.

Stir in the 8 cups water and chicken flavored bouillon (or 8 cups chicken broth), cumin, oregano, bay leaves, and ½ cup of the reserved chili sauce or more as desired. (If you are extremely sensitive to spicy food, you might actually want to start with ¼ cup of the hot sauce.) Bring the stew to a boil, partially cover pan, reduce heat and maintain at a simmer until meat is tender, about 1½ hours.

Stir in the hominy (either canned or re-hydrated dry posole) and continue to simmer, uncovered, until the pork starts falling apart, about 30 minutes. Remove the bay leaf.  Adjust seasoning and serve with avocado, reserved chopped onion, radish slices, remaining chili sauce, and warm tortillas. Oh yes, and a nice cold beer is great with the posole too!

Note: This recipe is my interpretation of the recipe for Posole Rojo on the Food Network site. (A great site BTW.)


BAKED CHEESE OMELET WITH SPICY TOMATO SAUCE

OLYMPUS DIGITAL CAMERA

OLYMPUS DIGITAL CAMERA

Breakfasts have always been my bugaboo. What to serve that takes literally minutes to prepare, offers variety, while at the same time supplying enough protein and complex carbohydrates to jump start our day? (I know, many of you maintain that coffee fulfills that need, but some of us truly need more than caffeine to get our engine running!) So for me, preparing a breakfast that is both interesting and nutritious is a mighty big challenge; mainly because I don’t really start functioning productively until about 11:00am. (You guessed it – I am not a morning person!) So anytime I can prepare something as tasty as this omelet, I am in happy breakfast heaven.

This recipe is as close to a dish my mother used to serve, all too infrequently unfortunately, for Sunday dinners. We lived on a farm, and as many families did in the 40s, 50s, and 60s, we had our main meal after church and then a small repast in the evening. My mother was not a very good or inventive cook, but boy could she prepare a good omelet. And every time she would serve this dish, I would gobble it up like there was no tomorrow.

So the other day I decided to try and replicate her recipe. (I know – why did I wait so long?) So first I tried using Ro*Tel in my sauce, the second picture at the top, but it wasn’t the flavor I wanted. So this morning I made the sauce using plain old tomato sauce. Viola! Just as good as moms! So although the first picture shows the right sauce, I served it over simple scrambled eggs. Confused, let me paraphrase what I just said. The sauce in the first picture should be served with the omelet in the second picture. And yes, I am lazy and should have made the omelet again, but this is a really busy week for me. (Concert in two days and I’m still working on memorizing all the words.) Besides I know that only intelligent, busy, productive people follow my blog. No doubt in my mind that my efficiency measures would make complete sense to one and all!

So next time you want to serve a wonderful dish perfect for breakfast, lunch or dinner, whip up this easy omelet and the yummy sauce. Serve it with toast or warm tortillas and fresh fruit, and you will have a meal your entire family will enjoy.

  • 2 tsp. + 3 T. butter, divided
  • ¼ c. diced green bell pepper
  • ¼ c. minced onion
  • 1 lg. garlic clove, minced
  • 1 (8-oz.) can tomato sauce
  • 7-8 crushed red pepper flakes
  • pinch dried oregano (Mexican preferably)
  • freshly ground black pepper
  • 8 lg. eggs
  • ½ c. 2% milk
  • ½ tsp. kosher salt
  • 8-oz. grated cheddar cheese, Monterey Jack, or mozzarella cheese (or combination), divided
  • Mexican sour cream, opt.

In a small sauce pan, melt the 2 teaspoons butter over medium heat. Add green pepper and onion; sauté for about 3 minutes. Add garlic and cook for one minute or until garlic releases its aroma.  Stir in the tomato sauce, red pepper flakes, oregano, and black pepper.  Simmer until the sauce is thick, about 7-8 minutes.

Meanwhile, beat the eggs, milk, and salt together. Stir in about 2/3rd of the grated cheese. Melt the remaining 3 tablespoons butter in a heavy 10 to 11-inch ovenproof pan and pour in the egg mixture. Bake in a pre-heated 400 degree oven for 15 to 20 minutes. When the egg is set, the omelet is done.

OLYMPUS DIGITAL CAMERA

Serve generously slathered with Spicy Tomato Sauce and garnished with remaining cheese and sour cream. I like to serve freshly baked flour tortillas and fresh fruit on the side. Serves 4 adults very nicely.


CARNE ADOVADA (MEXICAN PORK AND RED CHILI STEW)

OLYMPUS DIGITAL CAMERA

When I started my latest mini-series on stews, the rain was beating down and snow was imminent. Today however, the sun is shining, the water in Port Susan Bay is a light dusky blue, and Mt. Baker*, Three Fingers, and Glacier Peak are out in all their glory. (I love the term “out” in connection with a mountain being visible. As if when it’s not visible it’s “in” or “gone”? Yet another example of the vagary consistent within the English language.) But back to the recipe. (Sometimes it’s almost impossible for me to stay on track.) Now, where was I? Ah yes – stew.

I came across this recipe (or my take on a combination of adovada recipes) while I was researching stews from around the world. What interested me the most about this dish was the use of different and totally unfamiliar chilies. So I went on line and ordered the chilies I needed from a specialty site. I patiently waited until they arrived, and taking the advice of several people who had made comments on the recipes I lifted, I began my journey into adovada land. It was wonderful, but I had used all the guajillo chilies I had ordered in just my first batch of this stew. So just for grins and giggles I decided to see if I could purchase more at one of my local grocery stores. Low and behold, I had no trouble finding them in Stanwood. Yeah team! Needless to say I was delighted.

Now something you should know. This is a very rich stew, and a small portion goes a long way. In fact, the next time I serve it, I am going to think of it as a side dish. Actually, a small serving would be just perfect, not to mention economical served with Refried Beans, Classic Coleslaw, warm flour or corn tortillas, and a Margarita or cold beer.

So next time you are hungry for traditional Mexican food and don’t want to make a trip to your local Mexican restaurant where pretty much everything tastes the same regardless of what you order (oh oops, did I say that out loud), give this dish a try. I promise you that it will have the authentic Mexican taste we all crave and typically can’t find at a restaurant. OK, if you live in Denver, New Mexico, or Texas you can probably find great Mexican food on every corner. But not so much in many parts of the US.

So take the time some rainy Saturday to create a Mexican fiesta for your family and friends. Good Mexican food takes time to build, but it is well worth the effort. Buen provecho!

*For those of you not familiar with the glorious northwestern part of Washington State, Mt. Baker is in the most northern part of the Cascade Range or North Cascades. Mt. Baker is the mountain shown at the top of my home page (using the zoom feature on my camera) as it appears from my kitchen sink. And yes, I do know how lucky I am!

  • 9 dried guajillo chili peppers* (about 2-oz.)
  • 4 dried chile de árbol **
  • 4 c. chicken broth
  • 1 tsp. ground cumin
  • 1/8 tsp. ground cloves
  • 2 lb. pork shoulder, cut into 1-inch cubes (extra fat and silver skin removed)
  • kosher salt
  • freshly ground black pepper
  • 2 T. corn or vegetable oil
  • 1 large yellow onion, chopped
  • 6 garlic cloves, minced
  • 1 T. dried oregano, preferably Mexican oregano

In a dry skillet, toast the chili peppers over medium high heat until they are slightly puffed and fragrant. (Be careful not to burn the pods or they will become bitter.) Let cool. Rip off the stems of the dried chili peppers and empty out all of the seeds. (Feel free to cut a slit into each chili if it helps to remove the seeds.) Pour 3 cups of the chicken broth into a pot; add the cumin, cloves, and the toasted chilies. Bring the mixture to a boil, reduce the heat and simmer for about 30 minutes or until both types of chili pods are fully rehydrated. Remove from heat and cool. When cool, carefully pour the liquid and re-hydrated chilies into a blender or food processor and process until smooth. Set chili sauce aside.

Meanwhile pat the meat dry with paper towels and season with salt and pepper. Heat oil in a heavy covered Dutch oven. Add the meat in single layers and brown thoroughly on all sides. Remove meat to a bowl. (Add more corn oil during the browning process if required.) When all the pork is browned and removed from the pan, add the onion and cook until soft. Next add the garlic and oregano and cook for about a minute or until the garlic releases its aroma. Add the browned meat back into the pot along with the chili sauce. Use the last cup of chicken stock to “wash out” the blender or food processor bowl and add liquid to the Dutch oven. Stir well to bring up all the browned bits from the bottom of the pan. Bring stew to a boil, remove from heat, cover, and place in a pre-heated 325 degree oven for 2 hours or until the meat is very tender. Stir after one hour, taste and adjust seasonings; add a small amount of water if necessary. (You want the stew to be moist but not so soupy that it can’t be served on a regular plate. See picture above.)  When the meat is fork tender, remove the pan from the oven and serve.

Note: Carne Adovada is also wonderful when used as a filling for burritos, enchiladas, or tacos.

*The Guajillo Chili Pepper is the most common chili in Mexico after the Ancho. The flavor is distinct, slightly fruity with a strong piney, berry under taste. The chili measures 3 to 5 inches in length and is about an inch wide. The color is a brick red with deep burgundy tones with a smooth, shiny skin. Dried Guajillo Chili peppers can be located in the ethnic food section of most grocery stores.

**The Chile de árbol is a small and potent Mexican chili pepper also known as bird’s beak chili and rat’s tail chili. These chilies are about 2 to 3 inches long, and ¼ to 3/8-inch in diameter. They can be purchased in most good sized grocery stores.