Category Archives: MEXICAN FOOD RECIPES

MEXICAN BLACK BEAN AND RICE CASSEROLE

Basically, I don’t like Mexican rice. Of course, as with almost everything, there are exceptions. One exception is my recipe for Mexican Rice (on this site) because it contains no tomatoes. (I don’t particularly like the taste of rice and tomatoes together.) So mainly when I place my order in a Mexican restaurant, I request no rice. But I do dearly love the combination of rice and beans. So recently I decided to work up a rice and black bean dish (sans tomato) with a decidedly Mexican flavor. And this recipe is the result.

Of course I have known for decades that rice and beans form a complete protein, so obviously this dish is perfect for vegetarians. But for those of us who are omnivores but appreciate a break from meat periodically, this dish is so filling and delicious, the lack of meat is not even noticed. And as a replacement for the mandatory Mexican rice and blob of refried beans served on every gigantic “be careful the plate is hot” entrée platter in America, there are very few rivals. (Well maybe in the Southwest, but sure as shootin’ not here in the Pacific NW!)

So next time you get a hankerin’ for Mexican food, give this dish a try. It is creamy and full of flavor. Absolutely perfect for children and adults alike. And please feel free to add your own spin to this dish. Just don’t add tomatoes. That would defeat all the hard work I put into researching and refining this dish, and that would make me sad.

  • 2 tsp. butter
  • 1 c. uncooked long grain white rice, washed thoroughly and drained  
  • 1½ c. vegetable broth
  • 3 garlic cloves, minced
  • 1/3 c. finely chopped onion
  • ¼ tsp. kosher salt
  • freshly ground black pepper (small amount)
  • juice of 1 lime
  • 1 can black beans – rinsed and drained
  • ½ c. sour cream
  • 1 (4-oz.) can diced green chiles  
  • 1 c. shredded cheese, divided (I use a combination of mozzarella and sharp cheddar)
  • ½ tsp. dried oregano (Mexican oregano is the best)
  • 2 tsp. chili powder

Heat butter in a medium sized covered saucepan. Add rice and sauté until all the rice is covered with butter and starting to brown. Add broth, garlic, onion, salt, and pepper. Bring to a boil. Reduce heat, cover, and simmer over low heat for 20 minutes or until liquid is almost absorbed. Add lime juice to rice, re-cover pan and continue to simmer for 2 additional minutes. Lightly fluff rice with fork and stir in black beans. Cover and heat additional 3 minutes or until beans are heated through. Remove from heat.

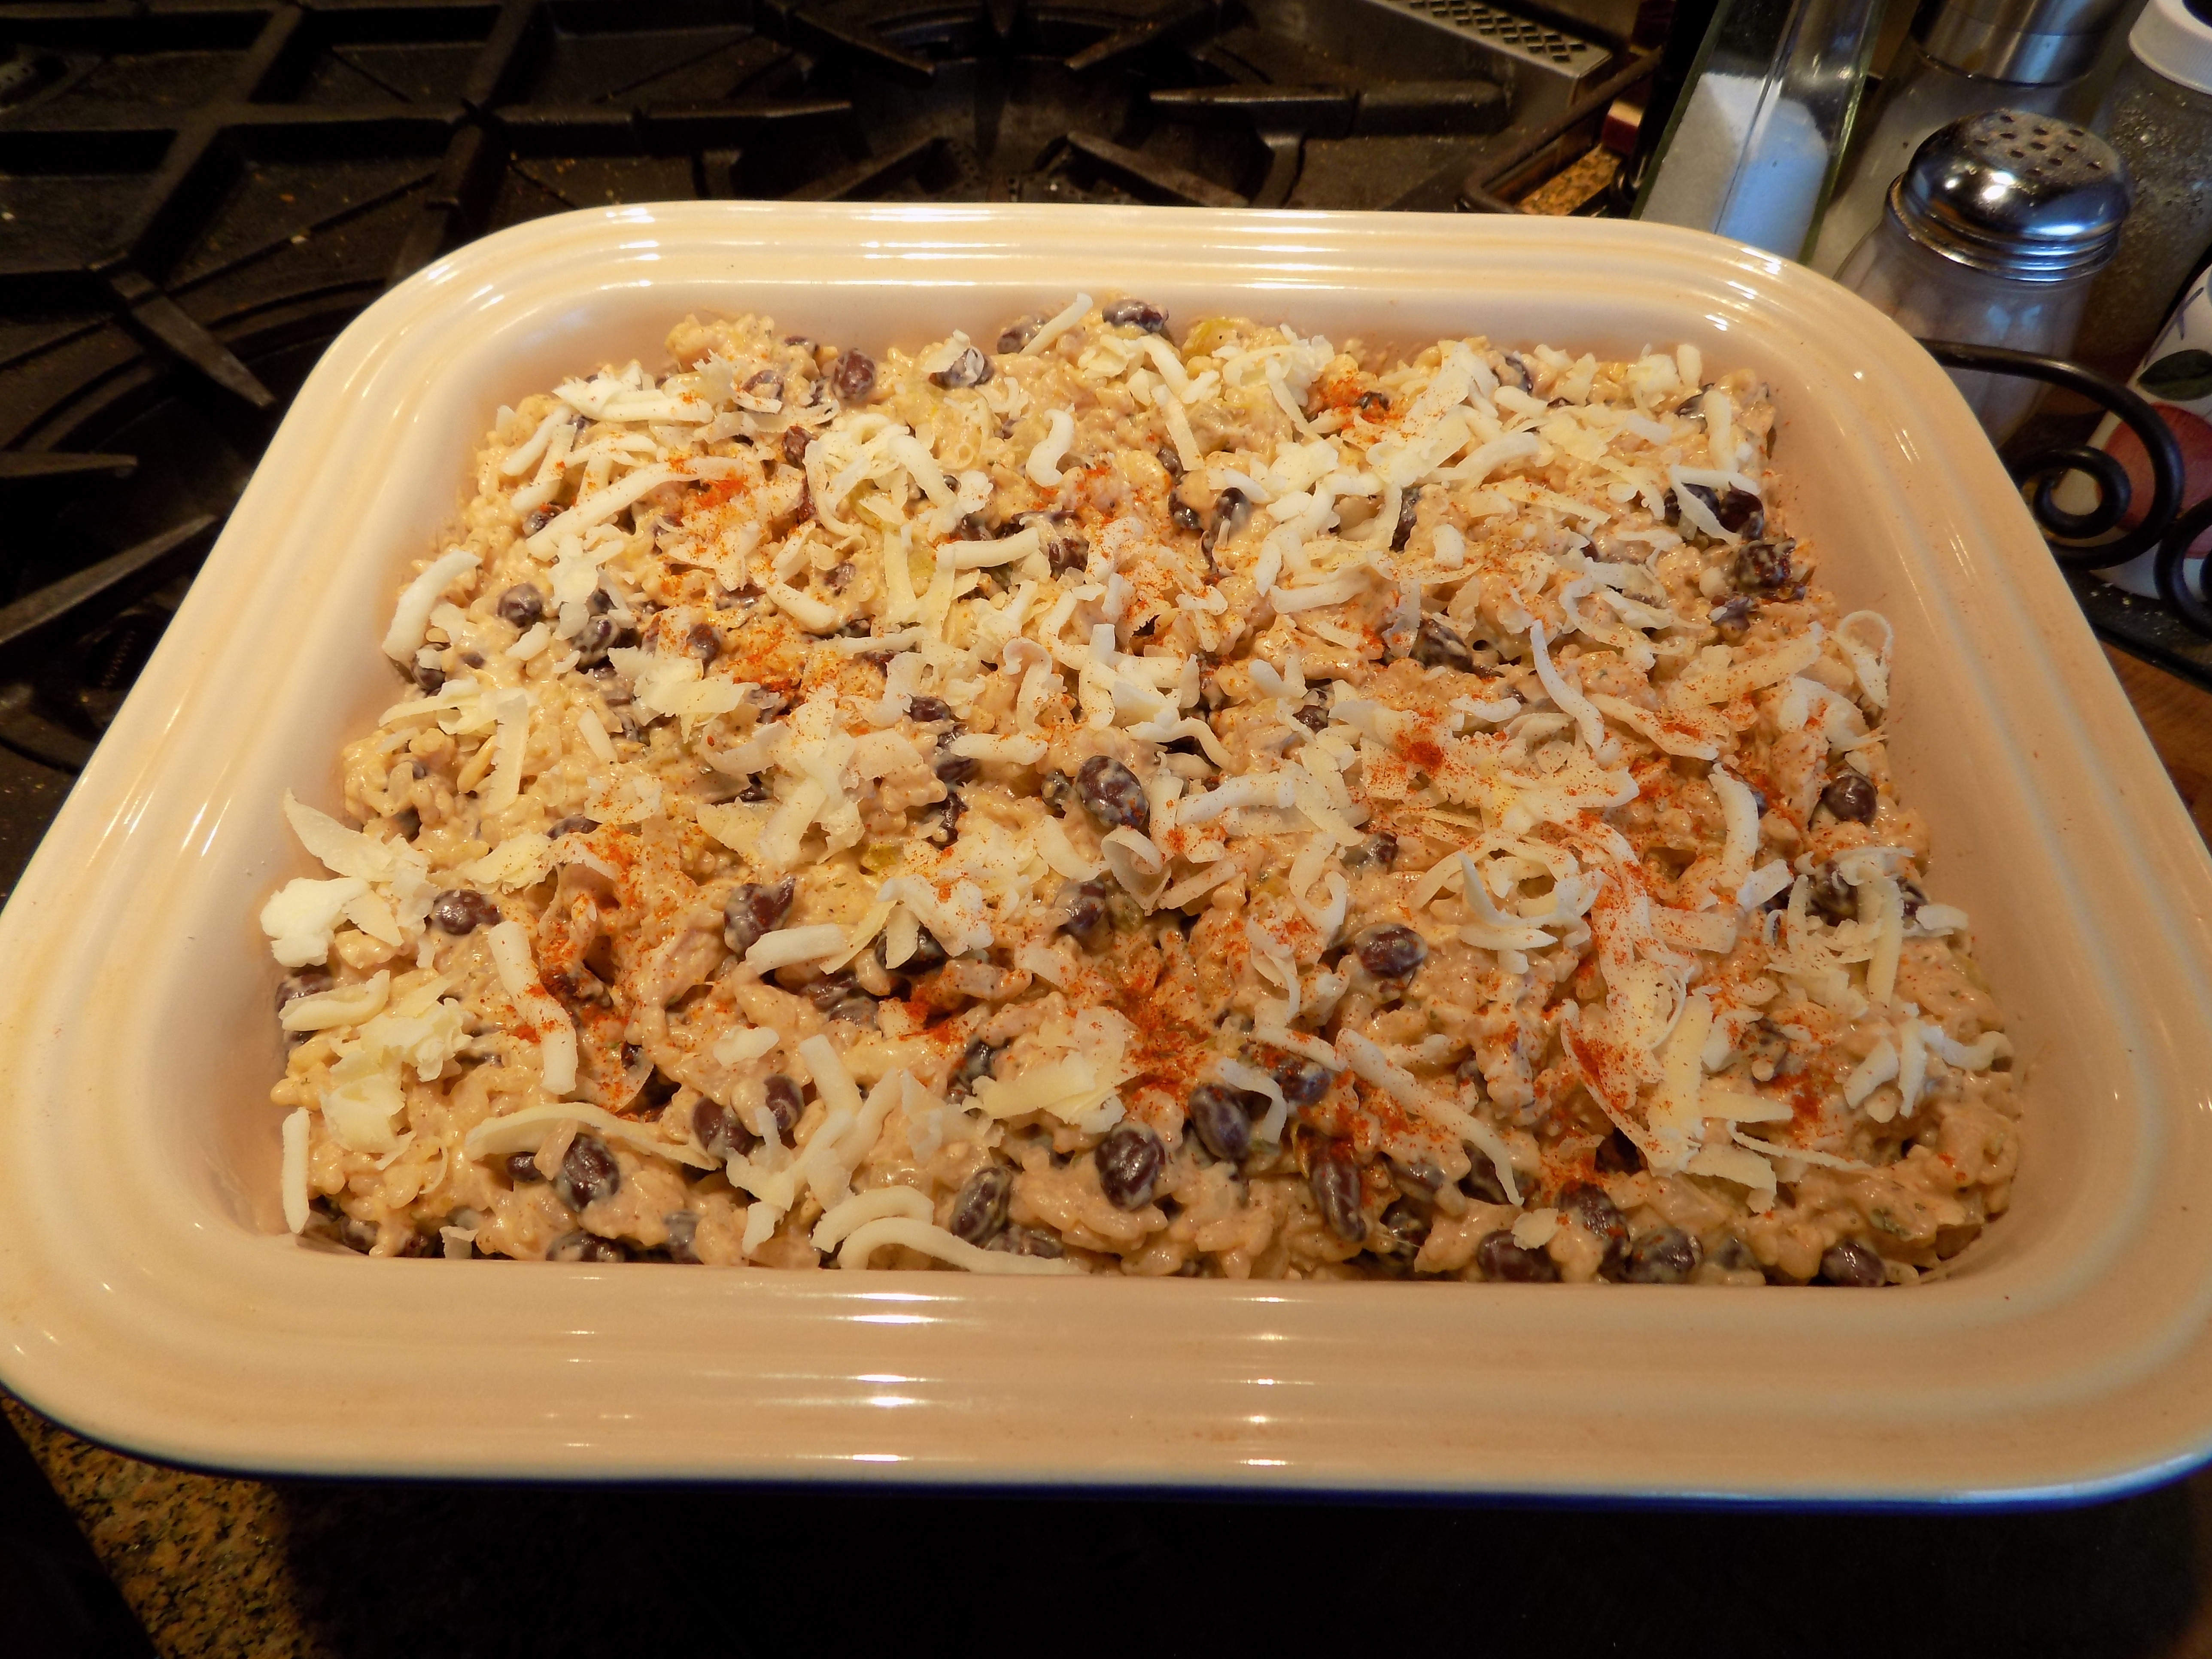
Meanwhile, whisk together the sour cream, green chiles, ¾ cup of the cheese, oregano, and chile powder. Gently stir into the rice mixture. Adjust seasoning. Scoop into a buttered casserole dish and sprinkle with the remaining ¼ cup cheese. Bake in a pre-heated 350 oven for 30 minutes or until the cheese on top is melted.

(And yes I know brown rice is better for us than white rice. But under the circumstances, I believe you should cut me some slack because of all the nutritional value contained in the black beans. Thank you.)


TACO SALAD

OLYMPUS DIGITAL CAMERA

Ok, this is not a fancy new recipe for taco salad. It doesn’t feature spectacular new ingredients, or a taco sauce that takes 14 ingredients, special equipment, and an hour to prepare. The meat is plain old ground beef, chicken, or turkey, and the toppings are just what you would expect if you ordered taco salad at any of your favorite restaurants.

What this recipe for Taco Salad does feature however, is an oven baked tortilla base, taco meat that is perfectly seasoned with dried herbs, spices, and ingredients that you should already have in your pantry, and a two ingredient taco sauce that is refreshingly light and delicious. And because you season the meat yourself; no more buying those expensive little packets of taco seasoning mix that contain unnecessary ingredients like too much salt and sugar that you wouldn’t even want your childhood nemesis to ingest, much less your family!

Oh, and did I mention that this salad is stinkin’ easy to prepare? Probably not! I get so excited about the ingredients and flavor of a dish sometimes that I forget to tell you about the ease of preparation. I also sometimes fail to mention that certain parts of the recipe, the taco meat and the taco sauce in this case, can be prepared ahead of time and sequestered on a shelf in your refrigerator.

So no matter how you want to look at this dish, as an easy to prepare one dish weekday meal, as an inexpensive one dish weekday meal, or as a delicious one dish weekday meal, you’re covered. (I’ve always got your back; don’t you ever forget it!)

  • 4 small (7½-inch) or 2 large (10-inch) flour tortillas
  • vegetable cooking spray
  • taco sauce (see recipe below)
  • taco meat (see recipe below)
  • chopped romaine lettuce (as much or as little as you want)
  • any of the following toppings for your salad:
  •     diced tomatoes
  •     halved black olives
  •     diced avocado
  •     diced yellow, white, red, or green onion
  •     grated sharp cheddar, Monterey Jack, or Cotija cheese
  •     canned black beans, drained and rinsed
  •     canned corn, drained and rinsed
  •     anything else that strikes your fancy

Preheat oven to 425 degrees. Place 4 oven-proof bowls or for larger tortillas, 2 6-inch cake pans on a large rimmed baking sheet. Warm the tortillas in your microwave for 20 seconds or until pliable. Spray both sides with cooking spray, then drape over the bowls (smaller tortillas) or nest the larger tortillas inside the cake pans. Bake until the tortillas are crisp and just starting to brown, 10 to 12 minutes. (Watch them carefully the last few minutes.) Set aside.

OLYMPUS DIGITAL CAMERA

Meanwhile prepare the Taco Sauce and the Taco Meat (recipes below).

OLYMPUS DIGITAL CAMERA

When ready to serve, place a taco shell on a large plate. Scatter lettuce in and around the shell. Scoop some of the taco meat into the shell and surround with your toppings of choice. Serve with taco sauce.

Taco Sauce:

  • 1 c. (8-oz.) sour cream
  • ½ c. salsa verde – I use Trader Joe’s Hatch Valley Salsa (which BTW contains no preservatives or ingredients that can’t be pronounced) when I’m feeling lazy. When I have time and inclination, I prepare the Salsa Verde recipe on this site.)

Whisk ingredients together, cover, and store in the refrigerator until needed.

Taco Meat:

OLYMPUS DIGITAL CAMERA

  • vegetable cooking spray
  • 1 lb. ground beef, chicken, or turkey
  • 2 T. dehydrated onion
  • 2 tsp. chili powder
  • 1 tsp. ground cumin
  • 1½ tsp. dried oregano (Mexican oregano if possible)
  • 1 tsp. granulated garlic
  • ½ tsp. seasoned salt
  • freshly ground black pepper
  • 1 T. tomato paste
  • ½ c. water

Spray a non-stick fry pan with cooking spray. Add the ground beef and cook slowly until the meat is just about brown. Add the remaining ingredients, bring to a high simmer, reduce heat, and cook for 5 minutes. Adjust seasoning.


NEW MEXICO STYLE WHOLE PINTO BEANS

(Sorry about no picture, but in accordance with the theme of this post, I decided a picture was unnecessary.)

One of the mistakes I feel many good cooks make when they are planning even a simple meal for family and friends, is to believe that every dish served has to sparkle with its own star quality flavor. And until recently I was just as guilty as the next cook in thinking this way. It wasn’t until I was on our latest trip to New Mexico that I got to thinking about what constitutes a truly memorable meal. And the lunch I ordered at the High Country Restaurant & Saloon in Chama, New Mexico will remain as memorable as any I have experienced because it was this delicious meal that started me thinking. (Well actually it was these beans that started the thought process that changed my entire way of thinking about meal planning, at least at a conscious level!)

Until then, I guess I never fully grasped the idea that even taste buds need a break. (And yes, I had read and understood about palate cleansing and serving small portions of many foods rather than large portions of a couple of dishes, etc., but I never categorized these concepts in relationship to every day meals.)

When I reflect on the average dinner I prepare for us, I think main dish, side, and veggie/salad. And until recently, I felt that all three needed to scream “I’m the star; I’m the star!!!” What I was forgetting was that our taste buds are also included in these little dinner parties. And like the rest of our body, need a periodic rest.

So after analyzing this amazing, 3 item lunch I ate in New Mexico, I concluded that what I enjoyed the most was the simple preparation used on the pinto beans. Not only did the flavor of the bean shine through, they were not laden with lard or smothered in sauce, cheese, or salsa. They were perfectly plain. And in combination with the fantastic cheese enchilada and the rich pozole, they were the “time out” place my taste buds craved.

So then I started thinking about other dishes that possess the same qualities as these beans. And I realized that sides like potatoes (mashed, baked, boiled or roasted), rice, pasta and the like are all “time out” places for our taste buds. And even though these dishes might be topped with some kind of gravy, sauce, condiment, or dressings, they still possessed the underlying bland flavor that is necessary for our taste buds to appreciate the more exotic flavors featured in other dishes.

And yes I know what some of you are thinking. It took you until age 71 to figure this out? Well yes, I guess it did! I think I knew at a sub-conscious level that I was slightly off track in some of my thinking. But until New Mexico, I hadn’t had a lesson in perfect meal planning presented to me in such a clear and precise manner.

Now what this all means for me, is that I have been over achieving when it wasn’t necessary. That always striving to find a new and exciting way to feature a potato, for example, is not always the best choice. Or when I do serve a fancy main and side dish, my veggie or salad should be very simply prepared. I think this will not only free up some of my time, it will also make for more enjoyable meals.

In much the same way you can’t tell a bed by its covers, you are not going to know if this spin on meal planning works for you, until you give it a try. And speaking of trying things, I hope you enjoy this recipe for delicious pinto beans. The flavor is not going to scream “I’m a star” at you when you bite into them. But rather the flavor will seduce you into enjoying the more predominant flavors featured in the other dishes being served. But never fear; your taste buds will lead you back to the beans over and over again throughout the meal. It’s as inevitable as rain in the spring.

  • 2 c. dried pinto beans
  • water
  • 1 tsp. kosher salt
  • a few grinds of freshly ground black pepper
  • pinch white pepper
  • 1 tsp. sugar
  • 1 tsp. granulated garlic
  • 1 T. vegetable oil

Spread the beans out in a baking pan. Discard any foreign matter such as small rocks, bits of dirt, or shriveled beans. Rinse the beans under cold water. Place in a bowl and cover with water by about 4 inches. Soak at room temperature or in your refrigerator for at least 8 hours or overnight. Thoroughly rinse the beans before proceeding. (If pressed for time, place the beans and water in a sauce pan, bring to a boil, remove from heat, cover, and let stand for 1-2 hours. Thoroughly rinse the beans before proceeding.)

Place in a large covered sauce pan. Add enough water to cover by about 2 inches. Bring to a boil; reduce heat to low, cover, and simmer for 1 hour. Stir the beans often as they cook and add water as needed. After the first hour, add the salt, black pepper, white pepper, sugar, granulated garlic, and oil. Continue to simmer for another hour or until the beans are very tender and the water has reduced to the consistency of thick gravy. (If the beans are too runny, remove the lid and let simmer until they reach the desired consistency.) Adjust seasonings and serve whole. (None of that mashed action for these beans!)


BIZCOCHITOS (OFFICIAL STATE COOKIE OF NEW MEXICO)

OLYMPUS DIGITAL CAMERA

There are two things that I am about to confess that could possibly make you uncomfortable or at the very least, lower what little esteem you might otherwise have for me. But I am willing to take that chance because I feel strongly about both issues. So, if you aren’t afraid of what I might say, continue reading. Just remember – you were warned.

First of all, I don’t like Snickerdoodles. (In my estimation, they’re boring.) Secondly, I tend to be a real cynic when it comes to politicians. (Maybe I listen to too much NPR?) But there – I’ve stated my position for all to see and I feel better for having done so. Now, you ask, what does all this have to do with a cookie recipe? (An excellent question BTW!)

Well first of all, these cookies are like Snickerdoodles, but as Mr. C remarked (BTW, he doesn’t like Snickerdoodles either), “the cookies are like Snickerdoodles, but on steroids”! (He loves them, in other words.)

And my remark about politicians, well my opinion of politicians was reaffirmed when I read about the New Mexico legislature that voted in 1989 to make Bizcochitos the state cookie of New Mexico. As with all legislative matters, it seems to me that there must be dissension. (Must be an implied amendment, probably tucked into the Bill of Rights somewhere between the right to keep and bear arms and the guarantee of a speedy, public trial with an impartial jury.) Anyway, it seems the New Mexico legislature agreed immediately that the Biscochitos/Bizcochitos should indeed be the state cookie. But in what seems to me to be typical legislative posturing, they had to argue about something. So they apparently duked it out over the spelling of the cookie name. Really?? The spelling??

Regardless, I must give them credit for their choice of the state cookie. Because if ever a cookie should receive accolades, or the title of “state cookie”, it is this amazing creation. And the best part, they are really easy to prepare.

So next time you want to make a cookie that is just a little different, has a taste that is very unique, and isn’t a Snickerdoodle, give this recipe a try. I promise you will become as hooked as we are.

And if anyone from the 1989 New Mexico legislature is reading this post, (like that’s even remotely probable) I offer sincere condolences for the sleep you must have lost over making such an important, life changing decision. Hopefully other issues on the docket that year didn’t require the expenditure of as much thought provoking, soul searching time to reach an adequate result.

  • 1 c. lard*, chilled (yep, lard!)
  • ½ c. (1 stick) unsalted butter*
  • 1 c. plus 3 T. sugar, divided
  • 2 eggs, room temperature
  • 4 c. unbleached all-purpose flour
  • 2 tsp. baking powder
  • ½ tsp. salt
  • 2 tsp. anise seeds, finely ground in a spice grinder
  • 3 T. good bourbon or brandy**
  • 2 tsp. ground cinnamon

Beat the lard, butter, and 1 cup of the sugar together until light and fluffy. Add the eggs and beat until well blended. In a separate bowl, whisk together the flour, baking powder, salt, and ground anise seeds. Add to creamed mixture along with the bourbon. Beat no longer than necessary to incorporate the dry ingredients. Chill for about 45 minutes or until the dough is no longer soft. Form the cookies using either of the methods described below.

1)      Using a small ice cream scoop, drop the cookies onto a plate covered with a combination of the remaining 3 tablespoons of sugar and the cinnamon. (Don’t roll the balls in the mixture.) Place the cookies on parchment paper lined baking sheets sugar side up. Flatten each ball to about a ¼-inch thickness with the bottom of a glass. Bake in a pre-heated 350 degree oven for 12-14 minutes or until tops of cookies are just set and a pale golden color. Cool cookies on wire racks. Store in an air-tight container for up to a week.

2)      Roll out the dough between waxed paper to just over ¼-inch thick. Cut with flour dusted cutters into desired shapes or cut into 2-inch rounds. Combine the remaining 3 tablespoons of sugar and the cinnamon on a small plate. Dip the unbaked cookies into the cinnamon-sugar mixture on one side. Place cookies on parchment paper lined baking sheets (sugar side up). Bake in a pre-heated 350 degree oven for 12-14 minutes or until tops of cookies are just set and a pale golden color. Cool cookies on wire racks. Store in an air-tight container for up to a week. This recipe is based on Jane Butel’s Biscochitos recipe.

*1 cup butter and ½ cup vegetable shortening can be substituted for the lard and butter amounts reflected in my recipe

**Apple juice or milk can be substituted for the bourbon or brandy, however the cookies won’t be nearly as tasty


TRES LECHE (THREE MILKS) CAKE

OLYMPUS DIGITAL CAMERA

OLYMPUS DIGITAL CAMERA

So for years I have been hearing about this cake. But there was just something about the whole concept that never really appealed to me. But because I was fixing a Southwestern meal for last Sunday’s JazzVox pre-concert meal, I decided what-the-heck, give it a try. Well, you know, sometimes I can be a real dummy! If this cake is beloved throughout Latin America, which is literally millions of people, why in the world did I hesitate? Like I said – sometimes I can be a real dummy! Because ladies and gentlemen, this is one of the best desserts you will ever sink a fork into. It is incredibly easy to prepare, beautiful to look at, needs no special ingredients, and has to be prepared ahead of time so that it can spend some quality time in a cold environment. What can be better than that?

And you want compliments? Holy cow, I had people coming at me from all sides telling me how amazing it was. Everyone absolutely loved it!

So next time you want to impress the pickles out of your family or guests, make this dessert. The texture is somewhere between cake and pudding; so very soft and delightful on the tongue. (Just don’t forget the whipped cream. It is an absolutely mandatory part of the whole experience.) And I say “experience”, because that’s what eating a piece of this cake is. It’s a taste treat unlike any other and definitely one not to be missed.

And to those of you who for years told me about this cake to no avail, I offer my sincere apologies. I was so very wrong not to try this delicacy when it was first brought to my attention. But I’m a smart girl. I can learn. Next time someone waxes poetic about a favorite dish, I will try to be more receptive. I still draw the line at pickled pig’s feet and certain innards, but I will endeavor to keep a more open mind to other new taste adventures.

  • 1 c. unbleached all-purpose flour
  • 1½ tsp. baking powder
  • ¼ tsp. salt
  • 5 large eggs, room temperature, separated
  • 1 c. granulated sugar, divided
  • 1/3 c. whole milk
  • 2 tsp. vanilla extract
  • 1 (14-oz.) can sweetened condensed milk
  • 1 (12-oz.) can evaporated milk
  • 1 pint heavy cream, divided
  • ¼ c. powdered sugar
  • 2 c. sliced fresh strawberries (or berry of choice)

Whisk together the flour, baking powder, and salt in a large bowl. Beat the egg yolks with 3/4 cup of the sugar on high speed until the yolks are pale yellow. Stir in the whole milk and the vanilla. Pour the egg yolk mixture over the flour mixture and stir very gently until combined.

Beat the egg whites on high until soft peaks form. With the mixer on, add the remaining ¼ cup sugar and beat until the egg whites are stiff but not dry. Gently fold the egg white mixture into the flour mixture until just combined. Spoon the batter into a lightly buttered 9×13-inch glass pan and even out the surface. Bake on the middle rack in a pre-heated 325 degree oven until the cake is lightly golden and reaches an internal temperature of 200 degrees, 30-35 minutes. Remove the cake to a cooling rack. Cool completely before proceeding. (While the cake is cooling, I kind of push down the edges so the top is of even thickness.)

Meanwhile whisk together the sweetened condensed milk, evaporated milk, and ¼ cup of the heavy cream in a small bowl. Poke the top of the cake all over with a fork. Gradually pour the milk mixture over the top of the cake, cover with plastic wrap, and refrigerate overnight.

Place the remaining heavy cream into the bowl of a stand mixer. Using the whisk attachment, whisk until stiff peaks form. Change to medium speed and whisk in the powdered sugar. Spread the whipped cream topping over the cake and allow to chill in the refrigerator until ready to serve topped with strawberries.

POSOLE (HOMINY) SIDE DISH WITH PORK AND GREEN CHILE

OLYMPUS DIGITAL CAMERA

So I guess the first order of business is to apologize for not posting for over a month. But we were on a trailer trip and I just didn’t have the time or the inclination. (How’s that for putting my priorities in the proper order?) But I did return from our visit to New Mexico with a couple of new and exciting recipes to share with you. But first, a little insight into New Mexico’s take on Southwestern cuisine.

Unlike most of the Mexican restaurants in the Seattle area, whole pinto beans are served in New Mexico restaurants rather than mashed or refried beans. And along with the whole beans, the two best restaurants we visited served posole (dried white corn hominy) as a side dish instead of rice. (I seriously dislike most Mexican rice, so this was just fine by me!)

In fact, I enjoyed the posole as a side dish so much, I couldn’t wait to get home and work up a recipe for myself.

Now as most of you know, most posole is served as a stew. In fact, I have both red and green posole stew recipes already posted on this site – Red (Rojo) Posole with Pork and Green Posole with Chicken. But when posole is served as a side dish, all the wonderful flavor of a stew is still right there; it just isn’t as “saucy”. But before I say more about this recipe, and because I know you are all just dying to know if we enjoyed our trip, the answer is yes, yes, yes! In fact, we can hardly wait to return. The quality of the art in the Santa Fe area was beyond belief! The pueblos, Aztec Ruins National Monument, and Mesa Verde were spectacular. And of course the food was wonderful. And the high road (scenic byway) between Taos and Santa Fe was an absolute delight. (Very reminiscent of driving through the hill towns in Italy.)

Along the way (all 5,327 miles) we visited other areas that were equally amazing. Our favorites were Craters of the Moon, Moab, Bandelier National Monument, and Vedauwoo.

But the area that captured our hearts and caught us completely by surprise was the Eagle Cap Wilderness in North-Eastern Oregon. What an absolutely enchanted and lovely part of the world. So much so, that I told Mr. C. that if we didn’t already live in paradise, I could actually see us living in a home somewhere between Enterprise and Joseph, Oregon. Beautiful mountain vistas, plenty of open space, creeks in abundance, a lovely lake, and the cost of living about half what it is here. (What’s not to love about that, right?!) The photos below were taken at our RV park outside Joseph, Oregon where we spent 3 fabulous nights.

OLYMPUS DIGITAL CAMERA

OLYMPUS DIGITAL CAMERA

(The “swimming” hole just beside our trailer)

OLYMPUS DIGITAL CAMERA

(The creek right behind our trailer)

OLYMPUS DIGITAL CAMERA

(The cow pasture and view of the mountains just behind our trailer)

But enough with the travel log and back to this recipe. Suffice it to say, that when I served this dish to Mr. C. last evening, he declared it a masterpiece. And of course I had to agree with his excellent evaluation. If there ever was a food that could awaken the spirits of the indigenous people from the region now known as New Mexico, it would have to be this combination of ingredients.

So if you too feel the need for a little awakening or just a change from your normal rotation of favorite dishes, give this recipe a try. It is simple to prepare, but it does take some planning and time to cook. So find yourself some dried white corn posole (QFC usually carries it) and take a culinary trip to the Southwest. You will not be disappointed.

For additional recipes from the Southwest, look under Mexican Food Recipes.

  • 2 c. dried posole
  • water
  • 1 T. vegetable oil
  • ½ lb. lean pork, cut into small pieces and dried with paper towels
  • kosher salt
  • freshly ground black pepper
  • 1 med. onion, chopped
  • 4 garlic cloves, minced
  • 1 c. canned mild diced green chiles or roasted, peeled, and chopped Anaheim chile
  • ½ tsp. dried oregano (Mexican oregano preferably)
  • 6 c. chicken broth

Place dried posole in a non-reactive container, cover with water by about 3 inches, and place in your refrigerator overnight. Drain well before proceeding.

Heat the oil in a large, covered pan. Season the meat well with salt and pepper. Add to the pan and fry, stirring frequently until brown. Add the onion and cook until transparent, about 4 minutes. Add the garlic and cook for 1 minute. Add the chile, oregano, and chicken broth. Bring to a boil, reduce heat, cover, and simmer for about 3 hours or until the posole is tender and some of the kernels have popped open or “blossomed”. (After about 2 hours of cooking, taste and adjust the seasoning.) Stir regularly and add water as needed. (Don’t add too much water, because you are not making stew. This recipe is served as a side dish, in much the same way you would serve whole or refried beans.) Adjust seasoning. Serve with any of your favorite Southwestern/Mexican dishes.


PICO DE GALLO

OLYMPUS DIGITAL CAMERA

What I miss most when I arrive home after visiting the Southwest is good Mexican food. And yes I know there are several Mexican restaurants in our area, but…..as much as I would like to say they all serve wonderful Mexican food, they do not! (At least in my humble opinion.)

Now darn it, there are times when I just really want to go out for lovely warm tortilla chips and a really fabulous salsa or pico de gallo. But that’s just not happenin’ north of the Stillaguamish. (If I were in Texas I could say north of the Pecos, which sounds so much more authentic, but we deal the hand we’re given!) So when I want good Mexican food, I have to fix it myself! (And yes as much as I love to cook, there are times when the last thing I want to do is spend time in the kitchen! I want to treat myself and let someone else do the cooking.)

So when I get the hankering for Mexican food and it just happens to be the same day I don’t want to spend all hours in the kitchen, I make it simple on myself. I fix this simple pico de gallo, warm up some Juanita’s tortilla chips and ask the resident mixologist for one of his special Margaritas. (See recipe below.) Then while sipping away on my drink, I whip up some Weeknight Tamale Pie (on blog) and call it good.

So next time you need a Mexican food fix, but don’t want to spend endless hours in the kitchen, give this recipe a go. Who knows, you may decide to open your own Mexican restaurant. If you do, would you please let me know? Mr. C and I will be your first customers.

  • 6 Roma tomatoes, seeded and diced
  • ½ c. chopped red onion
  • 2 garlic cloves, finely minced
  • 1 jalapeno, seeded, de-veined and finely minced
  • 3 T. minced cilantro leaves
  • 1 T. minced fresh Italian parsley
  • 1-2 limes, juiced (depends on size of the limes)
  • ½ tsp. kosher salt
  • freshly ground black pepper

Combine all ingredients, adjust seasonings and refrigerate until ready to serve.

MARGARITA

OLYMPUS DIGITAL CAMERA

  • 2 parts good quality tequila (like Cuervo Especial)
  • 1 part Cointreau (orange flavored liqueur)
  • 1 part fresh lime juice (don’t even think about using the stuff from a bottle or cute little plastic lime thingy)
  • ice
  • coarse salt (kosher works fine)

Combine tequila, Cointreau, lime juice, and ice in a martini shaker. Shake well and pour the liquid and a few of the ice cubes into prepared glasses. Garnish with a thin wedge of lime. To prepare the glasses, rub the rims with lime and dip into coarse salt. Chill glasses if time allows.


SALSA VERDE (GREEN TOMATILLO SALSA)

OLYMPUS DIGITAL CAMERA

What happens when you put 7 little ingredients in the hands of my dear friend Jim? Well, if they happen to be this combination of ingredients, you get the best darn tomatillo salsa you ever tasted.

For my birthday this year Jim made this salsa to go with the taco/burritos we were serving. And I am here to tell you, the salsa was an unqualified hit. And then the best part, he left the leftover salsa with us!  “Greater love hath no friend than to leave homemade salsa in your refrigerator!” (I know I am quoting some sage historian, but I can’t remember for the life of me who it was!)

Now, although Jim and I have been cooking together for decades, we still think differently when we prepare food. Jim is more analytical in his approach to food preparation. He considers things like the fact that adding an avocado to the salsa would not only add flavor but cause the mixture to emulsify. (In culinary terms, an emulsion happens when two liquids that wouldn’t ordinarily mix (like oil and vinegar) are whisked or blended into a mixture in which one of the ingredients is evenly distributed throughout the other substance. This is part one of the emulsion process. Step two involves keeping the mixture in an emulsified state. That requires an emulsifier. The most common emulsifiers are natural and modified starches such as cornstarch, mustard, egg yolks, garlic, and you guessed it – avocado.)

So Professor Jim, in using an avocado in the salsa, created a perfect blend of not only flavor but consistency. (And no, I would never have thought about adding the avocado because of the emulsion factor. If I had considered an avocado at all, it would have been merely a chance flash of brilliance. And flashes of brilliance just ain’t happening as often as they used to!)

The other difference in our cooking styles; Jim usually prefers bolder flavors. (Now you do realize there is no wrong or right here; just personal preference.)

So, in reading the ingredients list below, I presented the amounts that best worked for me first, with Jim’s amounts listed second. (My blog!) But I’m sure Jim will forgive me. Although we each have our own style, the ultimate outcome of our adventures in the kitchen is always the same – we aim to prepare darned tasty food.

Thank you my dear friend for sharing your recipe and educated culinary perspective with me and my readers.

  • 5-6 tomatillos, husks removed
  • 1 jalapeno or Serrano pepper
  • 3 T. olive oil (Jim uses about twice as much)
  • 2 large or 3 small garlic cloves, peeled (again, Jim uses about twice as much)
  • 1 c. rough chopped cilantro (partial bunch)
  • 1 small, ripe avocado, peeled and cut into chunks
  • kosher salt – start with about ¾ tsp.

Jim’s method of roasting tomatillos over an open flame: Sacrifice one small square cooling rack and place it over a gas burner. Lay the tomatillos and peppers on the cooling rack, turn the heat on as hot as you can stand, and char the veggies until they are good and black or start to get oozy, whichever comes first. Remove to a bowl or plate to cool.

OLYMPUS DIGITAL CAMERAOLYMPUS DIGITAL CAMERA(If you do not have a gas stove top, use the alternate charring methods provided below.)

Meanwhile, pour olive oil into a small pan. Turn heat to very low and add the garlic cloves. Gently heat the oil until you see bubbles start to form around the pan. (Jim cooks his garlic longer for a more mature roasted garlic flavor.)

OLYMPUS DIGITAL CAMERARemove from heat and allow to cool. (You are basically creating garlic infused oil.) When the tomatillos are cool, place them in the bowl of a food processor, along with the cooled oil, garlic, cilantro, avocado, and salt. (And no, do not carefully remove all the charred skin on the tomatillos. That charred skin is part of the flavor in the final product. Now doesn’t that make life easier for everyone?) Whirl to blend. Carefully remove the seeds and stems from the jalapeno pepper. Add the pepper to the salsa mixture and whirl just until finally chopped. Adjust seasoning. (This recipe actually takes more salt than you would expect.) Store salsa covered in your refrigerator. Best if made at least a day ahead. Serve with tortilla chips or as a condiment to any of your favorite Mexican dishes.

Alternate directions for charring tomatillos and pepper in the oven:

1)      Hold a tomatillo with a pair of long handled tongs over gas burner until well charred. (If the tomatillo starts to get oozy, call it good!) Place the charred tomatillos in a bowl or on a plate to cool while you char the rest of the veggies.

2)      Move an oven rack to the top position in your oven. Preheat broiler to high. Place tomatillos and pepper in an oven-safe baking dish. Place in oven, 4 inches from the preheated broiler, until the tomatillos are roasted and the peppers are charred, about 10-15 minutes. Turn veggies as necessary to char on all sides. Remove from oven and allow to cool. Proceed with recipe as described above.

3)      Place tomatillos and pepper on outdoor grill over high heat. Turn as needed to char the skins. Will take upwards of 30 minutes. Allow to cool and proceed with recipe as described above.


BAKED CHICKEN FAJITAS

OLYMPUS DIGITAL CAMERA

So once again I am going to prove to you how lazy I am. (I know confession is good for the soul, and I obviously have more to confess than most, but I seem to always be telling you of my deepest and darkest personal deficiencies.) And although laziness might not be up there on the list of the 10 most abhorrent habits known to mankind, it’s right up there on my own “must work on” list, second only to patience. But enough about my faults and on to Baked Chicken Fajitas!

As I wrote in my post entitled Chicken Fajitas, I love fajitas. And for my birthday party this year, I decided to follow my good friend Jim’s advice and serve taco/burritos with three types of meat filling. So I put my good friends Paul and Jim to work on the beef and pork (the two best meat cooks I know) while I concentrated on the chicken. I decided my chicken fajita recipe would taste great all wrapped up in a flour tortilla and slathered with all kinds of yummy condiments. But (and here comes the lazy part), I didn’t want to fry all the chicken and veggies necessary to feed 80 guests. (That’s a lot of chicken and veggies to fry, my friends. And although I might be lazy, I’m not crazy!) So I thought maybe there was a way to bake the chicken and veggies and still retain that lovely mixture of tender chicken and semi-crunchy veggies. So taking some good advice from several cooking sites I visited, while at the same time retaining the essence of my original recipe, I came up with this baked version.

Now I know it is in very poor taste to brag about oneself, but in this case I simply must! Not only did I turn my laziness into an inspiration, my inspiration resulted in nothing less than a fabulous new way to prepare one of my all time favorite dishes. The chicken remained tender and succulent and the veggies had that lovely semi-crunchy “roasted veggie” taste. Amazing! So in retrospect, maybe laziness (in certain circumstances) isn’t such a bad thing after all. I can live with that!

I hope you enjoy this new version of an all-American Mexican classic.

  • 2 tsp. cornstarch
  • 2 tsp. chili powder
  • ½ tsp. ground cumin
  • ½ tsp. onion powder
  • ½ tsp. granulated garlic
  • ¼ tsp. smoked paprika
  • scant 1/8 tsp. cayenne
  • 1 tsp. kosher salt
  • freshly ground black pepper
  • 2 T. extra virgin olive oil
  • 1 lb. boneless, skinless chicken breast meat, cut into 1/3-inch strips
  • 2 green peppers, thinly sliced
  • 1 red pepper, thinly sliced
  • 1 lg. yellow onion, thinly sliced
  • 2 T. fresh lime juice
  • warm flour tortillas
  • shredded lettuce, grated cheddar cheese, salsa, thin avocado slices, and sour cream (preferably Mexican) for serving

Combine the cornstarch, chili powder, ground cumin, onion powder, granulated garlic, smoked paprika, cayenne, salt, and pepper. Place the chicken, peppers, and onion in a 10×16-inch pan. Sprinkle the seasoning mix over the meat and vegetables. Drizzle the meat and veggies with the olive oil, and using your hands, toss the ingredients until everything is well coated in oil and seasoning. Bake the mixture in a pre-heated 400 degree oven for 15-20 minutes or just until the chicken is done. Stir once half way through the cooking process. Remove from oven and squeeze lime juice over all. Serve in warmed tortillas, with lettuce, cheese, salsa, avocado slices, and sour cream or whatever your heart desires.


MEXICAN SALSA

OLYMPUS DIGITAL CAMERA

This is my daughter Paula’s favorite salsa, and not coincidentally, my favorite red salsa. It is perfect served with tortilla chips or any type of Mexican dish that is usually served with a red (tomato based) salsa.

So, as promised, this is the second salsa in a series of three that I felt duty bound to share with you. And I know, there are thousands, probably millions of salsa recipes out there, but I have not sampled them all, or prepared them all, so you are stuck with these three (at least on this site), plus another one already on my blog simply entitled “Salsa”. But (there’s always a “but” right?) these are tried and true and enough above the ordinary to warrant a post on my blog. Each exhibits its own unique flavor. Where they share commonality is in their ease of preparation and use of readily accessible ingredients. (Hey, it’s hot out there, but it’s chips and salsa weather. Who wants to spend their valuable time searching for unusual ingredients or spending the afternoon making a salsa? Not me, that’s for sure!)

So in deference to the lovely weather, I am going to make this recipe introduction short and sweet. Look for Jim’s Salsa Verde (Green Tomatillo Salsa) recipe in the near future. Happy Summer!

  • 2-3 cloves garlic
  • 1-2 jalapeno, whole, seeds and all (but yes, remove the stem)
  • 1 T. dried oregano, Mexican oregano if possible
  • 1 T. sugar
  • 1 T. fresh lemon juice, or more to taste
  • ½ c. tomato juice, plus more to bring sauce to desired consistency
  • 1 onion, minced
  • 1 bunch cilantro, rough chopped
  • 1 (32-oz.) can crushed tomato*
  • 1 (32-oz.) can diced tomato*
  • kosher salt

Combine the garlic, jalapeno(s), oregano, sugar, lemon juice, and ½ cup tomato juice in a blender. Whirl until garlic and jalapeno are in very small chunks. Pour into a medium large bowl and add the onion, cilantro, crushed and diced tomatoes, and enough additional tomato juice to bring to desired consistency. Adjust amount of lemon juice and add salt to taste.

*Paula’s Comment: “I have made this with real tomatoes and while it is very good, it causes the salsa to become very watery and then it does not sit well on a chip, and I really hate that. So I stopped making it with fresh tomatoes. You end up with a perfect consistency when you use canned tomatoes.”

Note: The recipe entitled Salsa on this site is also Paula’s recipe. The difference in the two recipes is easy to explain. Salsa number 1 is best served immediately, while this recipe has lasting power. The tomatoes in this recipe will not break down and become watery even after 2-3 days in the refrigerator.