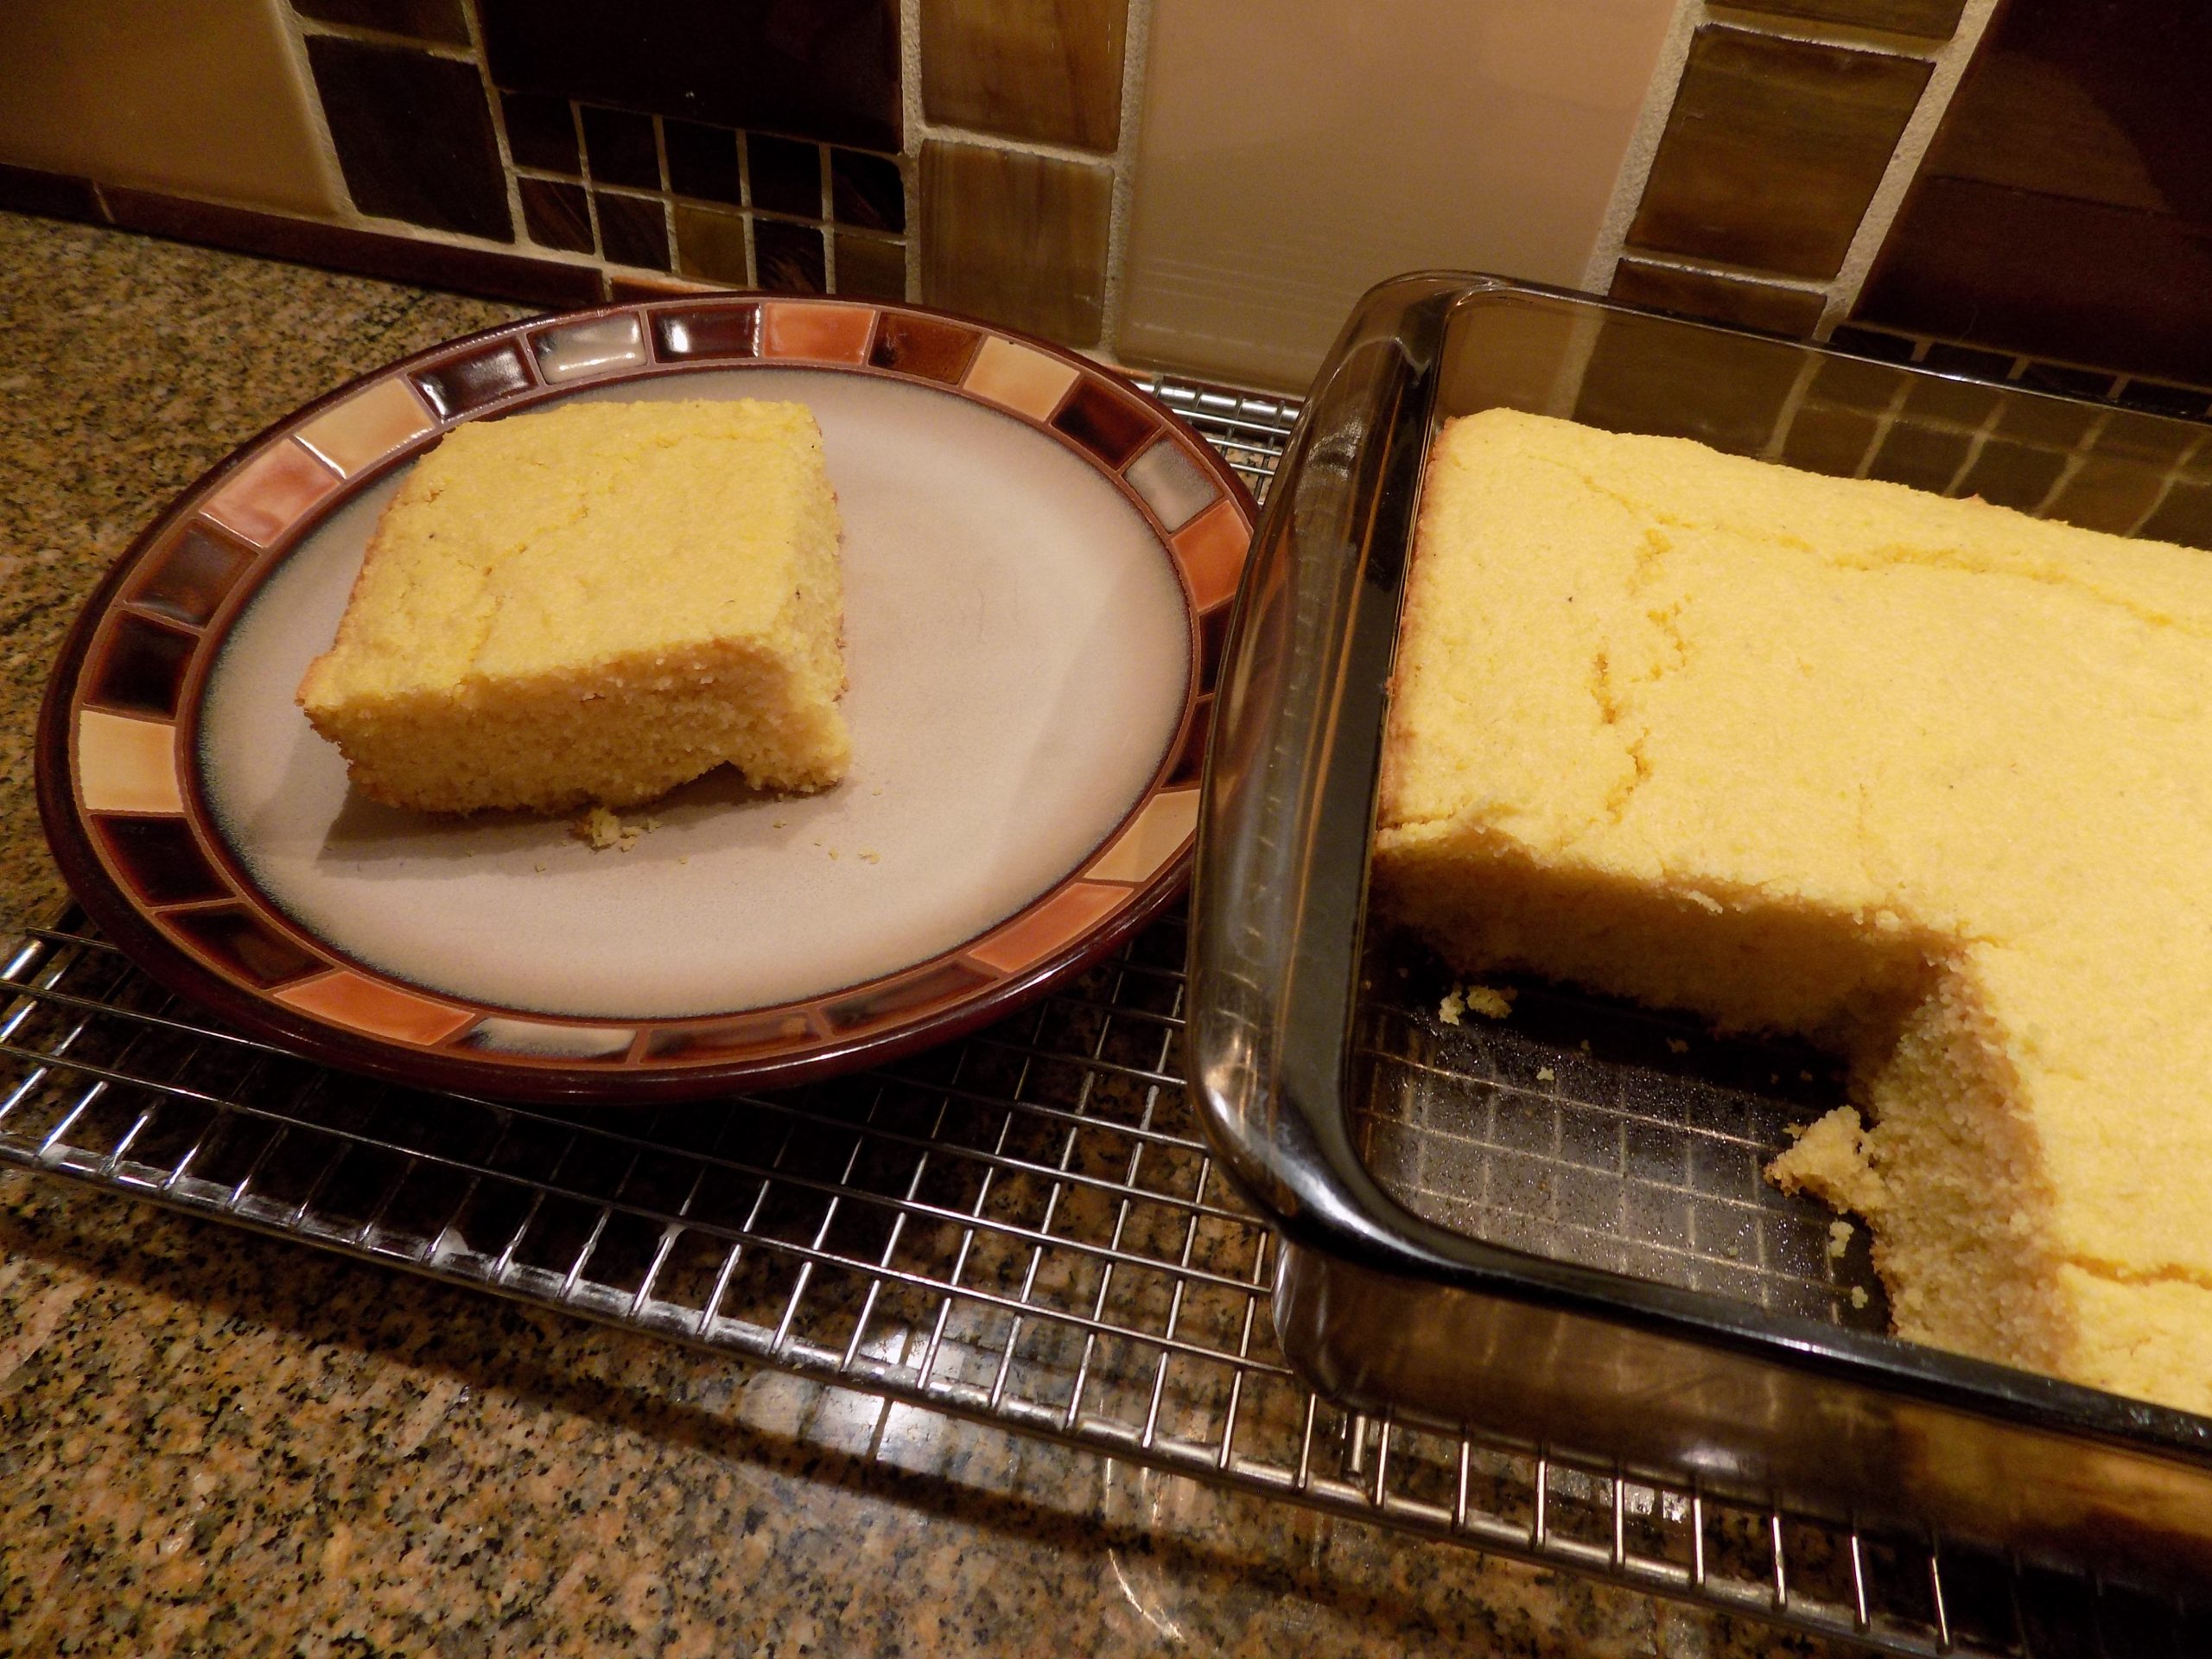
I am always trying (most times not terribly successfully) to remove added sugar from recipes. So, the other evening to accompany Vegetarian Lentil Soup, I decided to develop a sugar-free cornbread recipe. I perused a few sites looking for the perfect recipe, but some had bacon fat, or some other ingredient that just didn’t work for me. So, I cobbled together this recipe. And fortunately, it worked. Boy did it work! I can honestly say I had no feelings of guilt eating this cornbread. Of course, there was butter in the recipe. But the no additional sugar helped me from becoming guilt-ridden. And I really didn’t miss the sweetness that I always find appealing about this wonderful and easy to prepare bread. Of course, the next morning I did serve it drizzled with warm maple syrup for a special breakfast treat. But that’s a story for another time.
Anyway, this cornbread is inexpensive and easy to prepare (only 7 ingredients and no mixer required), and a dish that everyone in your family will love. And of course, if you must, you can gently warm the bread and slather it with butter to further enhance its enjoyment. (I can’t speak from experience on this myself. But I’m sure Mr. C. could attest to the fact if gently coerced.)
So, if you too are trying to avoid added sugar, but still want to enjoy life’s little pleasures like cornbread, give this recipe a try. It’s darn good. That’s all I’ve got to say!
Peace and love to all.
½ c. unbleached all-purpose flour
1½ c. cornmeal
1 tsp. baking soda
½ tsp. kosher salt
5 T. unsalted butter, melted
1¼ c. buttermilk
1 egg
Whisk the flour, cornmeal, baking soda, and salt in a large bowl.
In a microwave safe bowl, melt the butter. Then whisk in the buttermilk and egg until well combined.
Stir the buttermilk mixture into the dry ingredients just until blended.
Spoon the batter into a greased 9×9-inch square baking dish, smoothing the top before placing in the oven.
Bake in a pre-heated 400-degree oven for about 20 minutes, or until the edges turn golden brown and a toothpick inserted in the center comes out clean.
Remove from oven and let cool for 5 to 10 minutes before serving.
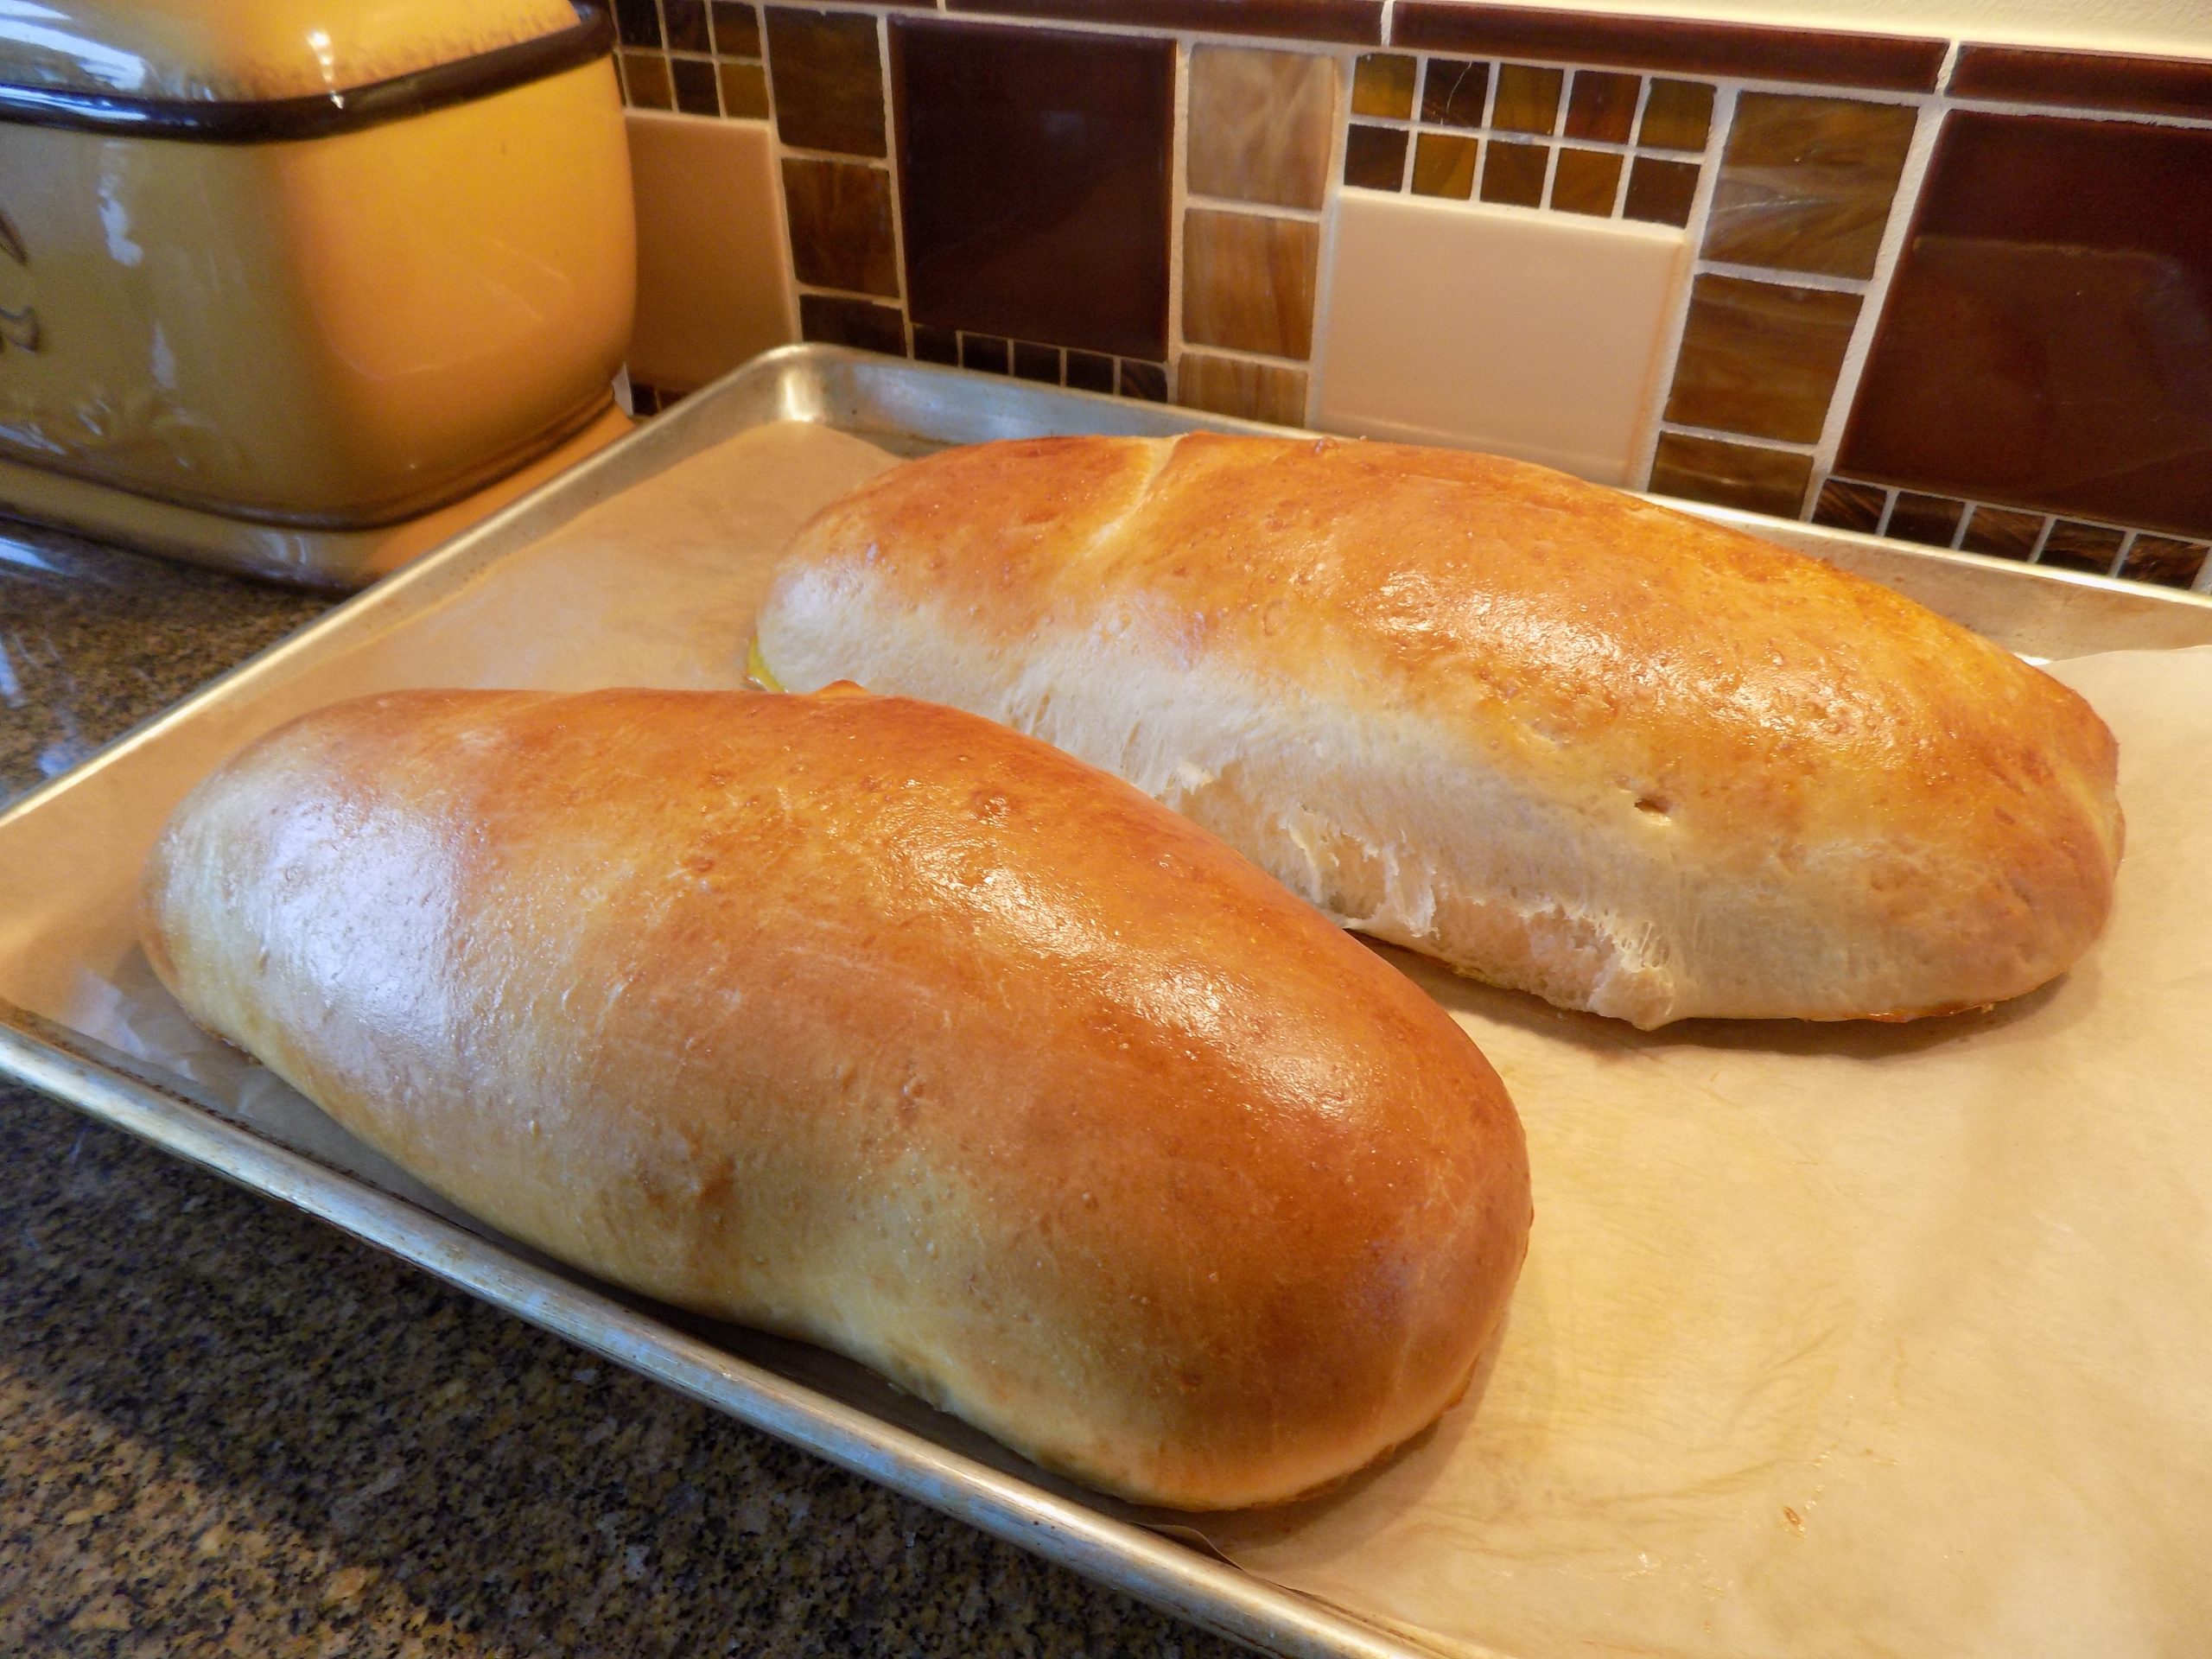
First let me say that I love the flavor and texture of challah. Toasted, buttered, and slathered with local honey is fantastic. But, with these two loaves, I cut them into small cubes and toasted/dried them in the oven for turkey dressing. (Of course, I did save 2 thick slices for toast one morning, but I still had plenty for the dressing.) And just like every other time I’ve made dressing, I over-achieved. Way too much dressing, and not up to my usual standard. I thought I didn’t have enough challah cubes for the dressing, so I used some whole wheat bread cubes, and even cut up a few slices of seed bread I had in the freezer.
So, I must say, the next time I make dressing, I will use only challah bread. The toasted whole wheat and seed bread cubes were just too heavy. Had I just used the challah cubes, the dressing would have been fine. (And a reasonable amount. What was I thinking?)
But please don’t limit your enjoyment of challah to using it in turkey dressing. It has so much more to offer. It is perfect just toasted, but when turned into French toast, even the dullest of mornings becomes special. Slathered in butter and topped with warm maple or berry syrup, absolutely nothing is more delicious. (And yes, always warm syrup before serving it to the most important people in your life. I mean really! Who could possibly be more important or deserving than the people sitting around your breakfast table?)
Well, that’s it for now. I’m not going to bore you any more rhetoric today, except to say, if you are a bread lover, give challah a try. You will forever be thankful for discovering this culinary treasure.
And a big thank you to Lora, from the savoringitaly.com site, for this splendid recipe.
And as always, peace and love to all.
1 c. warm water
1 pkg. or 1 scant T. active dry yeast
1 tsp. plus ⅓ c. granulated sugar, divided
2 tsp. fine sea salt
4½ to 5 c. bread flour, divided
4 lg. eggs, divided
¼ c. vegetable or canola oil, plus more for greasing the mixer bowl
1 c. room temperature sourdough discard
poppy or sesame seeds, opt.
In a mixer, with a dough hook attachment, combine the warm water, yeast, and the 1 teaspoon sugar. Let the yeast bloom for about 5 minutes. Then slowly mix in the salt and 1 cup of the bread flour until well combined.
Mix in 3 of the eggs, one at a time, mixing well after each addition. Add in the remaining one-third cup sugar, oil, and sourdough discard. Add enough remaining flour to create a dough that is a bit sticky, but soft and smooth. (This should take several minutes of kneading to achieve.)
Pour a bit of oil over the dough and form into a ball. There should be a film of oil over the entire surface. Cover with plastic wrap and let rise at room temperature until doubled in size (about 60-90 minutes).
When the dough has risen, punch it down. Shape each portion per instructions given below for either classic or batard shaped loaves.
Classic Challah Shape: (this method makes 2 challah loaves)
Divide the dough into 6 equal portions. Shape each portion into a ball and allow to rest covered with plastic wrap for 5-10 minutes.
With clean, lightly floured hands, begin to shape and gently stretch three of the dough balls into log shapes. Place the dough logs on a very lightly floured work surface and use your hands to roll and pull them into long rope-like strands. Use even pressure as you roll the dough to maintain an even thickness along the length of each rope. Place the challah dough ropes on a baking sheet that has been lightly greased or lined with parchment paper. (The ropes should be lined up, side by side, but not touching. Leave at least an inch between each rope so that you have enough room to braid. If one of your dough ropes is thicker or smaller than the others, make that one the center strand.
Firmly pinch the ends of the dough ropes together at the top end. This will hold the top of the loaf together while you braid the dough. Tuck the braid ends under the loaf to help hold them together while you braid, and while the challah bakes.
Begin to braid the challah by lifting the dough rope on the right and passing it over the center rope (the rope to the immediate left). The rope that was originally on the far right now becomes the center rope. The original center rope is now on the right. The rope on the left has not moved. Take the dough rope on the left and pass it over the center strand (the rope to the immediate right). The rope that had been on the left is now in the center. Continue braiding the challah by alternately placing the right rope over the center rope, then the left rope over the center rope. Try to keep the braid fairly tight as you work your way down the loaf. When you’ve braided all the way to the bottom of the loaf, pinch the ends of the dough ropes together, and tuck them under the loaf. This will give your challah an attractive, tapered shape, and help hold the braid together while the loaf rises and bakes.
Repeat the process with the other 3 strands of dough.
Cover with plastic wrap and let rise in a draft free place for about 45 minutes to 1 hour.
When ready to bake, brush with egg wash. (Egg wash is made with the remaining egg and a few drops of water whisked together). Sprinkle with poppy or sesame seeds if desired.
Bake the challah in a pre-heated 350-degree oven for 35-40 minutes. The internal temperature should reach 190-degrees. (Check after 30-minutes. If the bread is getting too brown, cover with aluminum foil for the remaining time in the oven.)
Remove from oven and allow to cool completely before slicing. Store in an airtight container at room temperature.
Batard (Football) Shaped Loaves: (this method makes 2 large loaves) (I bake the bread this way when I am using the bread for bread pudding, stuffing/dressing, or any recipe that calls for an egg rich bread.)
After the dough has doubled, punch it down and divide into 2 pieces. Shape into 2 elongated loaves and place on a lightly greased or parchment paper lined baking sheet. Cover, and allow the loaves to rise for 45-60 minutes. Brush with egg wash. (Egg wash is made with the remaining egg and a few drops of water whisked together).
Bake in a pre-heated 350-degree oven for 35-40 minutes. The internal temperature should reach 190-degrees. (Check after 30-minutes. If the bread is getting too brown, cover with aluminum foil for the remaining time in the oven.)
Remove from oven and allow to cool completely. Store in an airtight container at room temperature.
OK, Christmas is over, New Year’s Eve has come and gone, and all that’s left to do is undecorate the house, finish eating the Christmas goodies, and prepare for the long, cold, dreary days of winter. Sounds depressing, right? But it need not be. Because this is also the season of soup and bread. And of course, I mean homemade soup and homemade bread. And as much as I enjoy the lovely long and warm days of summer, I really think I prefer the stormy and rainy days of winter. It’s the coziness I love. Fireplace on go, no watering the yard responsibilities, and more of my favorite dishes, all in the “comfort food” category. So, for me, there is nothing like a hot bowl of soup and a slice of homemade bread to put me in my comfort zone. And I especially love a bread that is hearty and full of flavor. And this bread should be the poster child for the perfect bread to go with a big old steaming bowl of soup, or chowder, or chili.
And the best part, this is a very easy bread to prepare. In fact, most breads are easy to prepare if you get right down to it. They require time, but most of the time is taken up in allowing the little yeasty beasties to gobble up the sugars in the flour, which in turn releases the carbon dioxide that makes the dough rise. But the actual assembly time is only a matter of minutes.
And I know, you are probably tired of me expounding on the virtues of homemade bread. I do it only because I find homemade bread to be one of life’s simple pleasures. It’s not expensive to make, and if eaten in moderation, even someone with type 2 diabetes can enjoy the right kind of bread. The American Diabetes Association (ADA) puts it this way: “Starchy foods can be part of a healthy meal plan, but portion size is key. Breads, cereals, pasta, rice (whole-grain options are better), and starchy vegetables like potatoes, yams, peas, and corn can be included in your meals and snacks.”
And I know, for those of you who still work for a living, bread baking may only be accomplished on your days off. I get that. So, bake bread on your day off. Then work the rising and baking around the housework, laundry, grocery shopping, yard work, etc. etc. that also requires attention on your day(s) off. (Never forget, I’ve been there too.) But what a treat it will be for your family to sit down to dinner (oh yes, there’s dinner also to be made on your day(s) off) with homemade bread to fill all those hollow places in your kid’s legs.
Anyway, I know I am obsessed with bread baking. But I’d rather have a mania for bread baking than, say, gambling or watching Fox News. So, if you too love a great slice of bread, give this recipe a try.
As always, have fun in your kitchen. Keep trying new recipes. And always endeavor to eat healthy and if possible, locally sourced ingredients. And use your herbs and spices with shear abandon. Spicing dishes up a bit is rarely a bad thing.
Peace and love to all.
1 c. room temperature sourdough starter discard
1½ c. lukewarm water
1 pkg. or 1 scant T. active dry yeast
1 T. granulated sugar
2½ tsp. kosher salt
2 c. bread flour
1¾ c. whole wheat flour, plus more as needed
olive oil
Combine the room temperature sourdough starter, water, yeast, and sugar; let sit for 5 minutes. Add the salt, bread flour, and about 1½ cups of the whole wheat flour in the bowl of your stand mixer fitted with the dough hook.
Knead on slow speed until a smooth dough forms, about 4-6 minutes. Add additional bread flour as required. (If you are used to bread dough that forms a nice clean ball around the dough hook, pull back a little on the amount of flour you usually use. This dough is a bit different. It is perfect when you touch it with your finger and it’s not sticky, while some of the dough is still clinging to the bottom of the mixing bowl.)
Pour a bit of olive oil over the dough and using your hands and a stiff spatula, form a ball completely coated in the oil. Cover the bowl loosely with plastic wrap, and allow to double in size, about 60 minutes. (Could need up to 30 minutes more.)
Punch down the dough. Form into a boule, then place the dough ball, smooth side up on a piece of parchment paper long enough to allow you to lower the dough into a Dutch oven or cloche (clay baker). Cover the dough with greased plastic wrap and let rest for 60 minutes. (It should just about double as it rises.) Near the end of the rising time, place your Dutch oven or clay baker (cloche), lid and all, in your oven and pre-heat to 425-degrees.
When the dough has risen sufficiently, carefully remove the Dutch oven or clay baker from the hot oven. Immediately use a sharp knife or lame blade to score an X about ¼-inch deep into the surface of the bread dough. This allows the bread to expand without tearing as it bakes. (Don’t press down too hard. You don’t want to deflate the dough ball.)
Carefully remove the lid of the Dutch oven or cloche and place the parchment paper and loaf in the bottom of your Dutch oven or on the bottom portion of your cloche. Then cover and place in the pre-heated 425-degree oven for 30 minutes. Remove the lid and continue baking for an additional 10-13 minutes or until the crust is nicely browned and the loaf sounds hollow when tapped. (Your instant read thermometer should read between 200 to 205-degrees.)
Remove from oven and carefully transfer to a cooling rack. Cool completely before slicing.
Let me begin by saying that Mr. C. loves leftovers. So, one of the benefits of cooking too much food for Thanksgiving is having just what he loves at his disposal. (Remember that word – disposal, because it’s going to be used again in this post, but in a very different context!)
But after the first meal of all things leftover, and even a second attempt to present him with yet another opportunity to enjoy all the delicious flavors that make Thanksgiving such a special occasion, his desire to eat anymore of the leftovers began to wane. And I could hardly stand to open the refrigerator. So, that meant that I had to figure out a better way to use up the leftovers. Thus, this recipe.
So, with 3 cups of shredded turkey to use in a dish that would hopefully be welcome, even if the name included “leftover turkey”, I came up with this recipe. But what to serve it over? That part came next.
So, I went online to find a drop biscuit recipe that didn’t require getting out the food processor or my stand mixer. (I’m still recovering from all the cooking I did for Thanksgiving, so the simpler the food prep for now, the better.) I found this recipe on the cookingclassy.com site and the biscuits turned out perfect for the intended purpose. Split in two, they weren’t smooth surfaced like so many of my biscuit recipes produce. (Which is perfect in most cases.) However, these biscuits had the perfect crumb to absorb the lovely gravy base that makes this àla King so delicious. And, best of all, the drop biscuits had been super easy to prepare.
As for the leftover mashed potatoes, dressing, and corn pudding, well you remember that word I used above – disposal, that’s exactly where they ended up. Sometimes you just have to do what’s best for everyone concerned. And for my own sanity, not having the leftovers stare me down every time I opened the refrigerator, was a prudent move towards keeping me mentally healthy. Of course, the guilt is still there, but then, that’s another story for another time.
As always, keep staying healthy, keep making decisions that benefit not only yourself but those around you, and stay positive. Your positive outlook on life can be contagious. You never know who might need positive inspiration from time to time.
Peace and love to all.
¼ c. (½ stick) unsalted butter
½ c. minced onion
¼ c. shredded carrot
¼ c. finely diced celery
2 garlic cloves, finely minced
¼ c. unbleached all-purpose flour
1 tsp. seasoned salt
freshly ground black pepper
¼ tsp. poultry seasoning
1/8 tsp. dried thyme
¼ c. dry sherry
1½ c. turkey or chicken broth, or more as needed
¾ c. whole milk
¼ c. heavy cream
2-3 c. diced turkey (and yes of course, you can used cooked chicken in place of turkey)
1 sm. (4-oz.) jar sliced pimento, well drained
½ c. frozen petite peas
2 T. freshly chopped parsley
In a medium saucepan over medium heat, melt butter and sauté onion, carrot, and celery until tender, 3-5 minutes. Add the garlic and cook for 1 minute. Whisk in the flour, seasoned salt, pepper, poultry seasoning, and thyme and cook a minute or two. Add the dry sherry and let it evaporate for about 30 seconds.
Gradually whisk in the chicken broth, milk, and heavy cream. Cook until the mixture is thickened and bubbly. If too thick, add a bit more broth. Add the cooked turkey, drained pimento, frozen peas, and fresh parsley. Cook only until the chicken is hot. Taste and adjust seasoning.
Serve over halved biscuits, steamed rice, or mashed potatoes.
See recipe below for quick and easy Buttermilk Drop Biscuits.
BUTTERMILK DROP BISCUITS
2 c. unbleached all-purpose flour, fluffed
2 tsp. baking powder
½ tsp. baking soda
1 tsp. granulated sugar
¾ tsp. kosher salt
½ c. (1 stick) unsalted butter, cut into small pieces
1 c. buttermilk
In a small mixing bowl whisk the flour, baking powder, baking soda, sugar, and salt together.
Place the butter in a medium sized microwave safe dish and heat until about ¾ of the way melted. Remove and stir to melt fully.
Pour the buttermilk in with the butter and whisk until mixture appears lumpy.
Pour the flour mixture into the buttermilk mixture and stir gently just until all the flour is incorporated.
Using a #16 ice cream scoop that has been coated with cooking spray, scoop the dough onto a parchment paper lined baking pan at least 1½-inches apart. If you don’t own a #16 ice cream scoop, spray a quarter cup round measuring cup with non-stick cooking spray.
Bake in a pre-heated 475-degree oven until tops are golden brown and the internal temperature reaches 205 to 210-degrees, about 12 – 14 minutes. Remove from oven, split, and serve topped with plenty of the à la King.
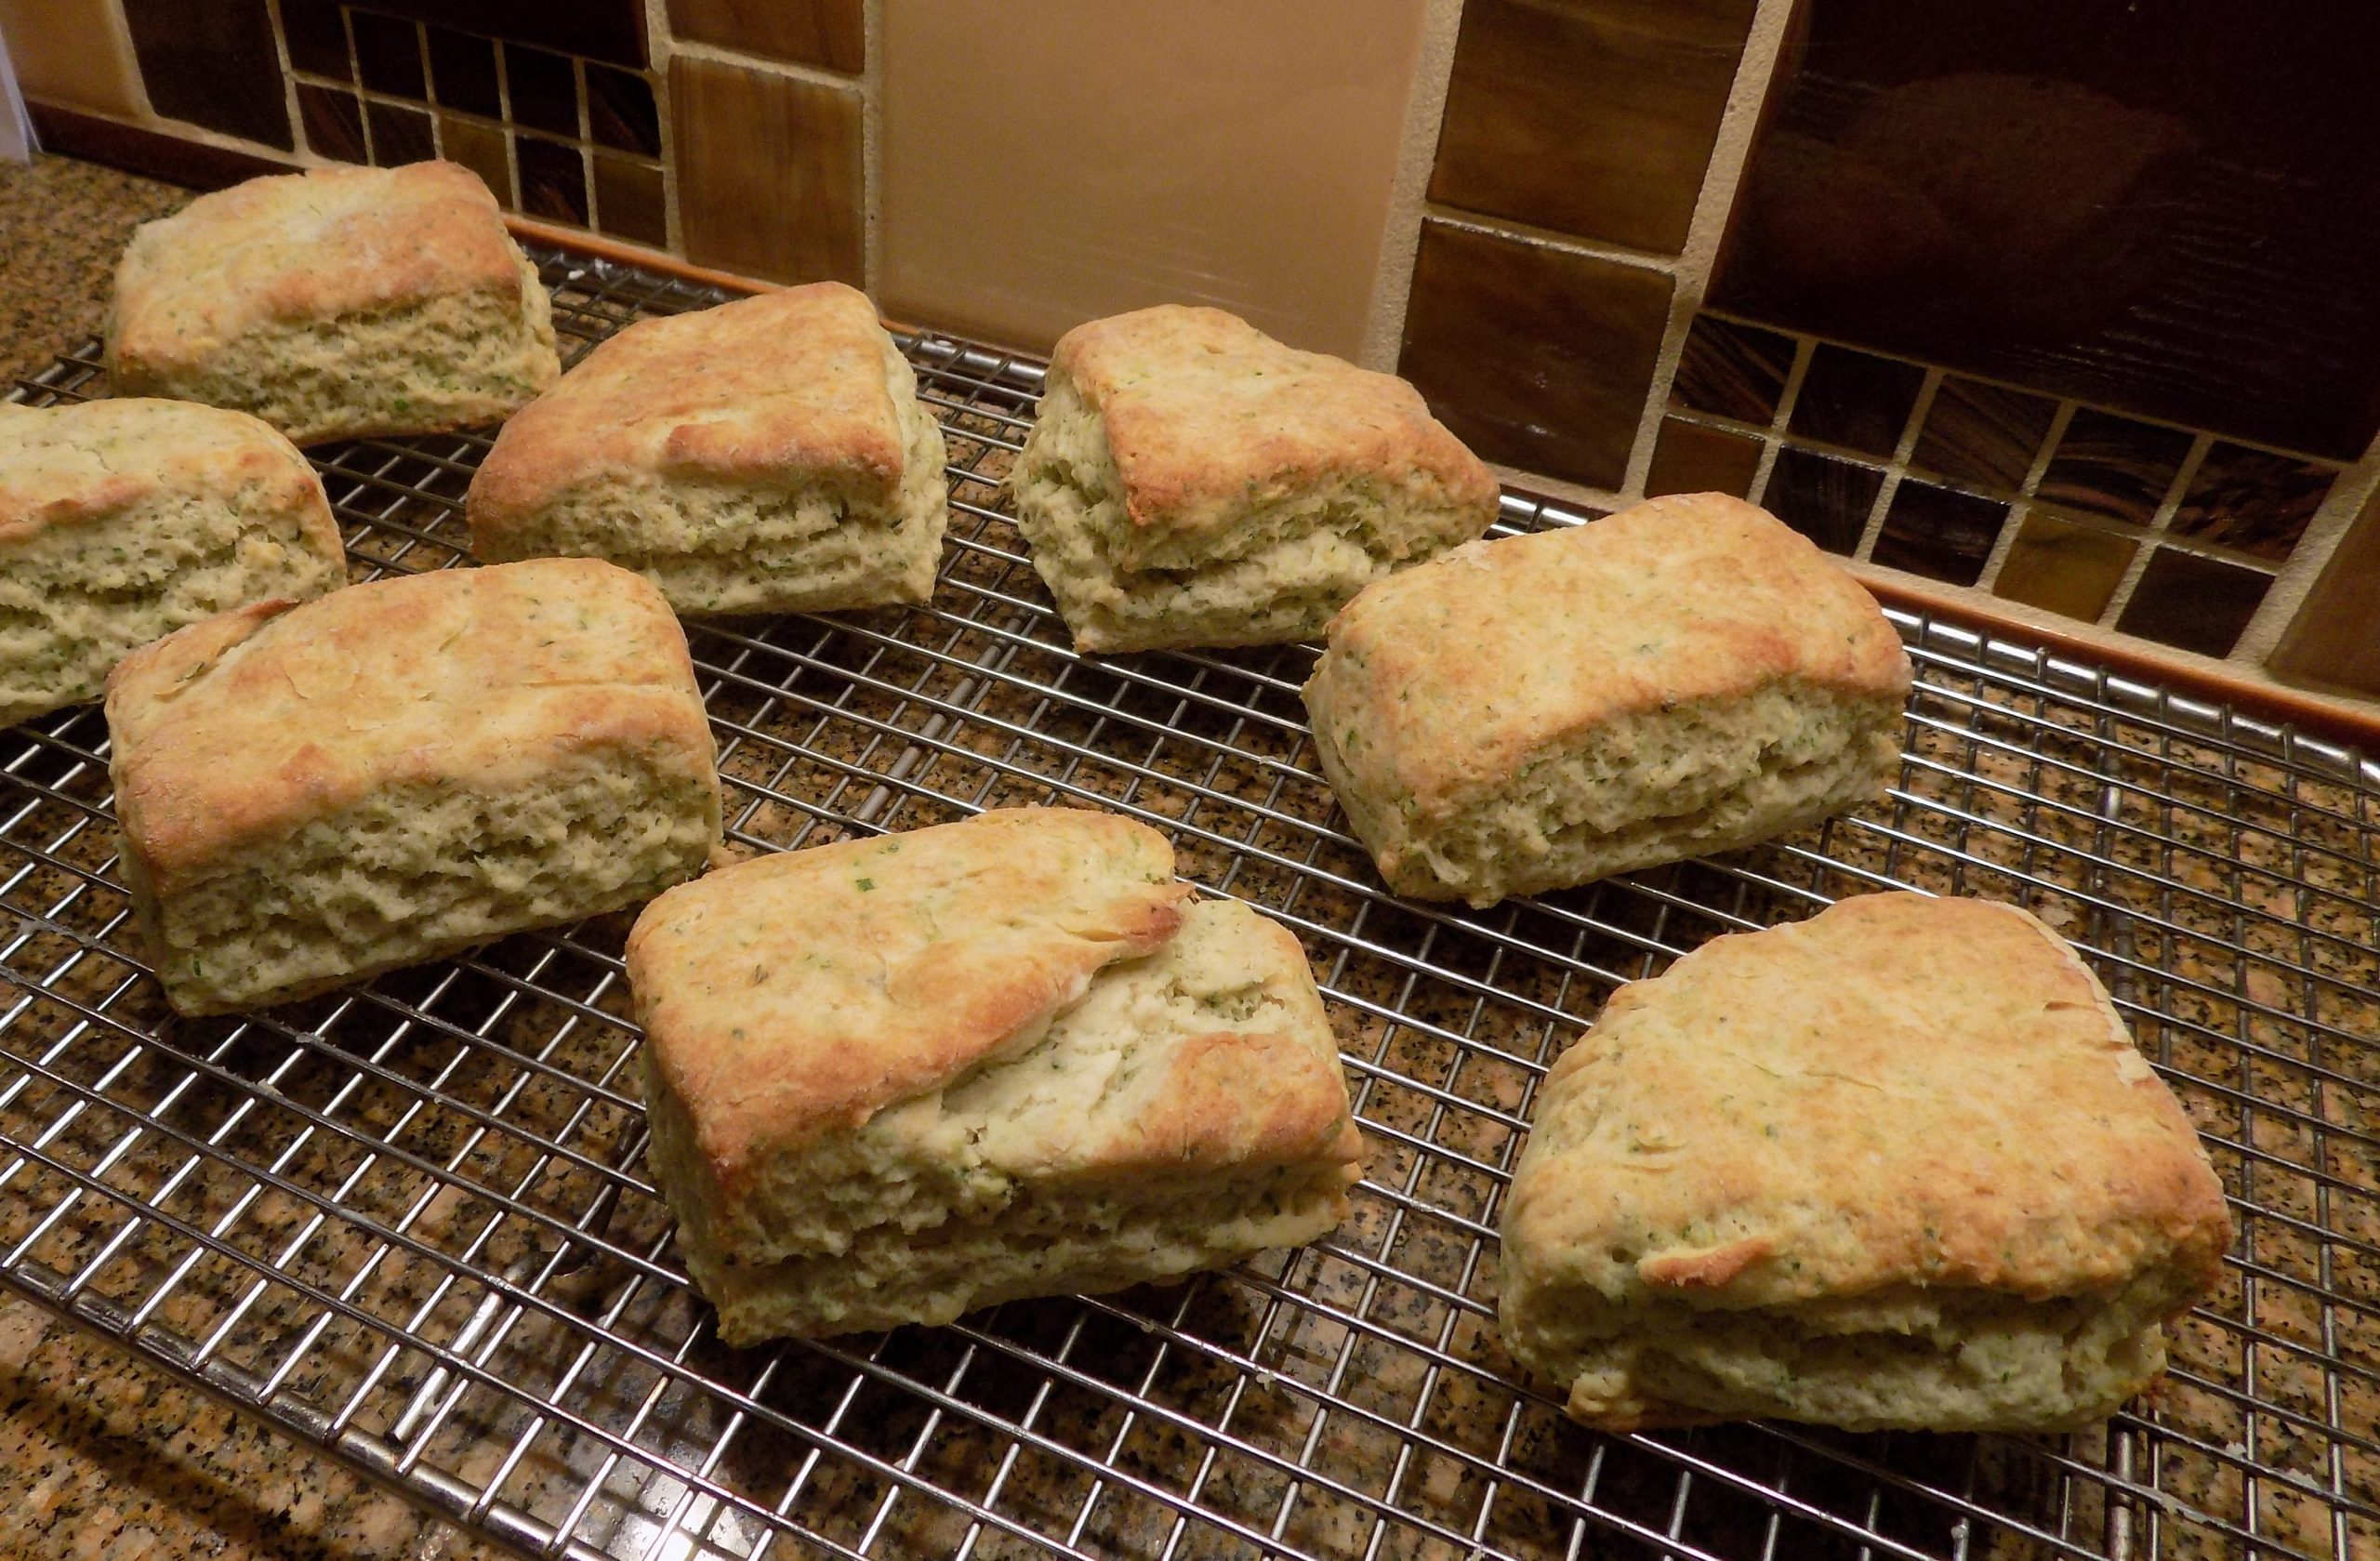
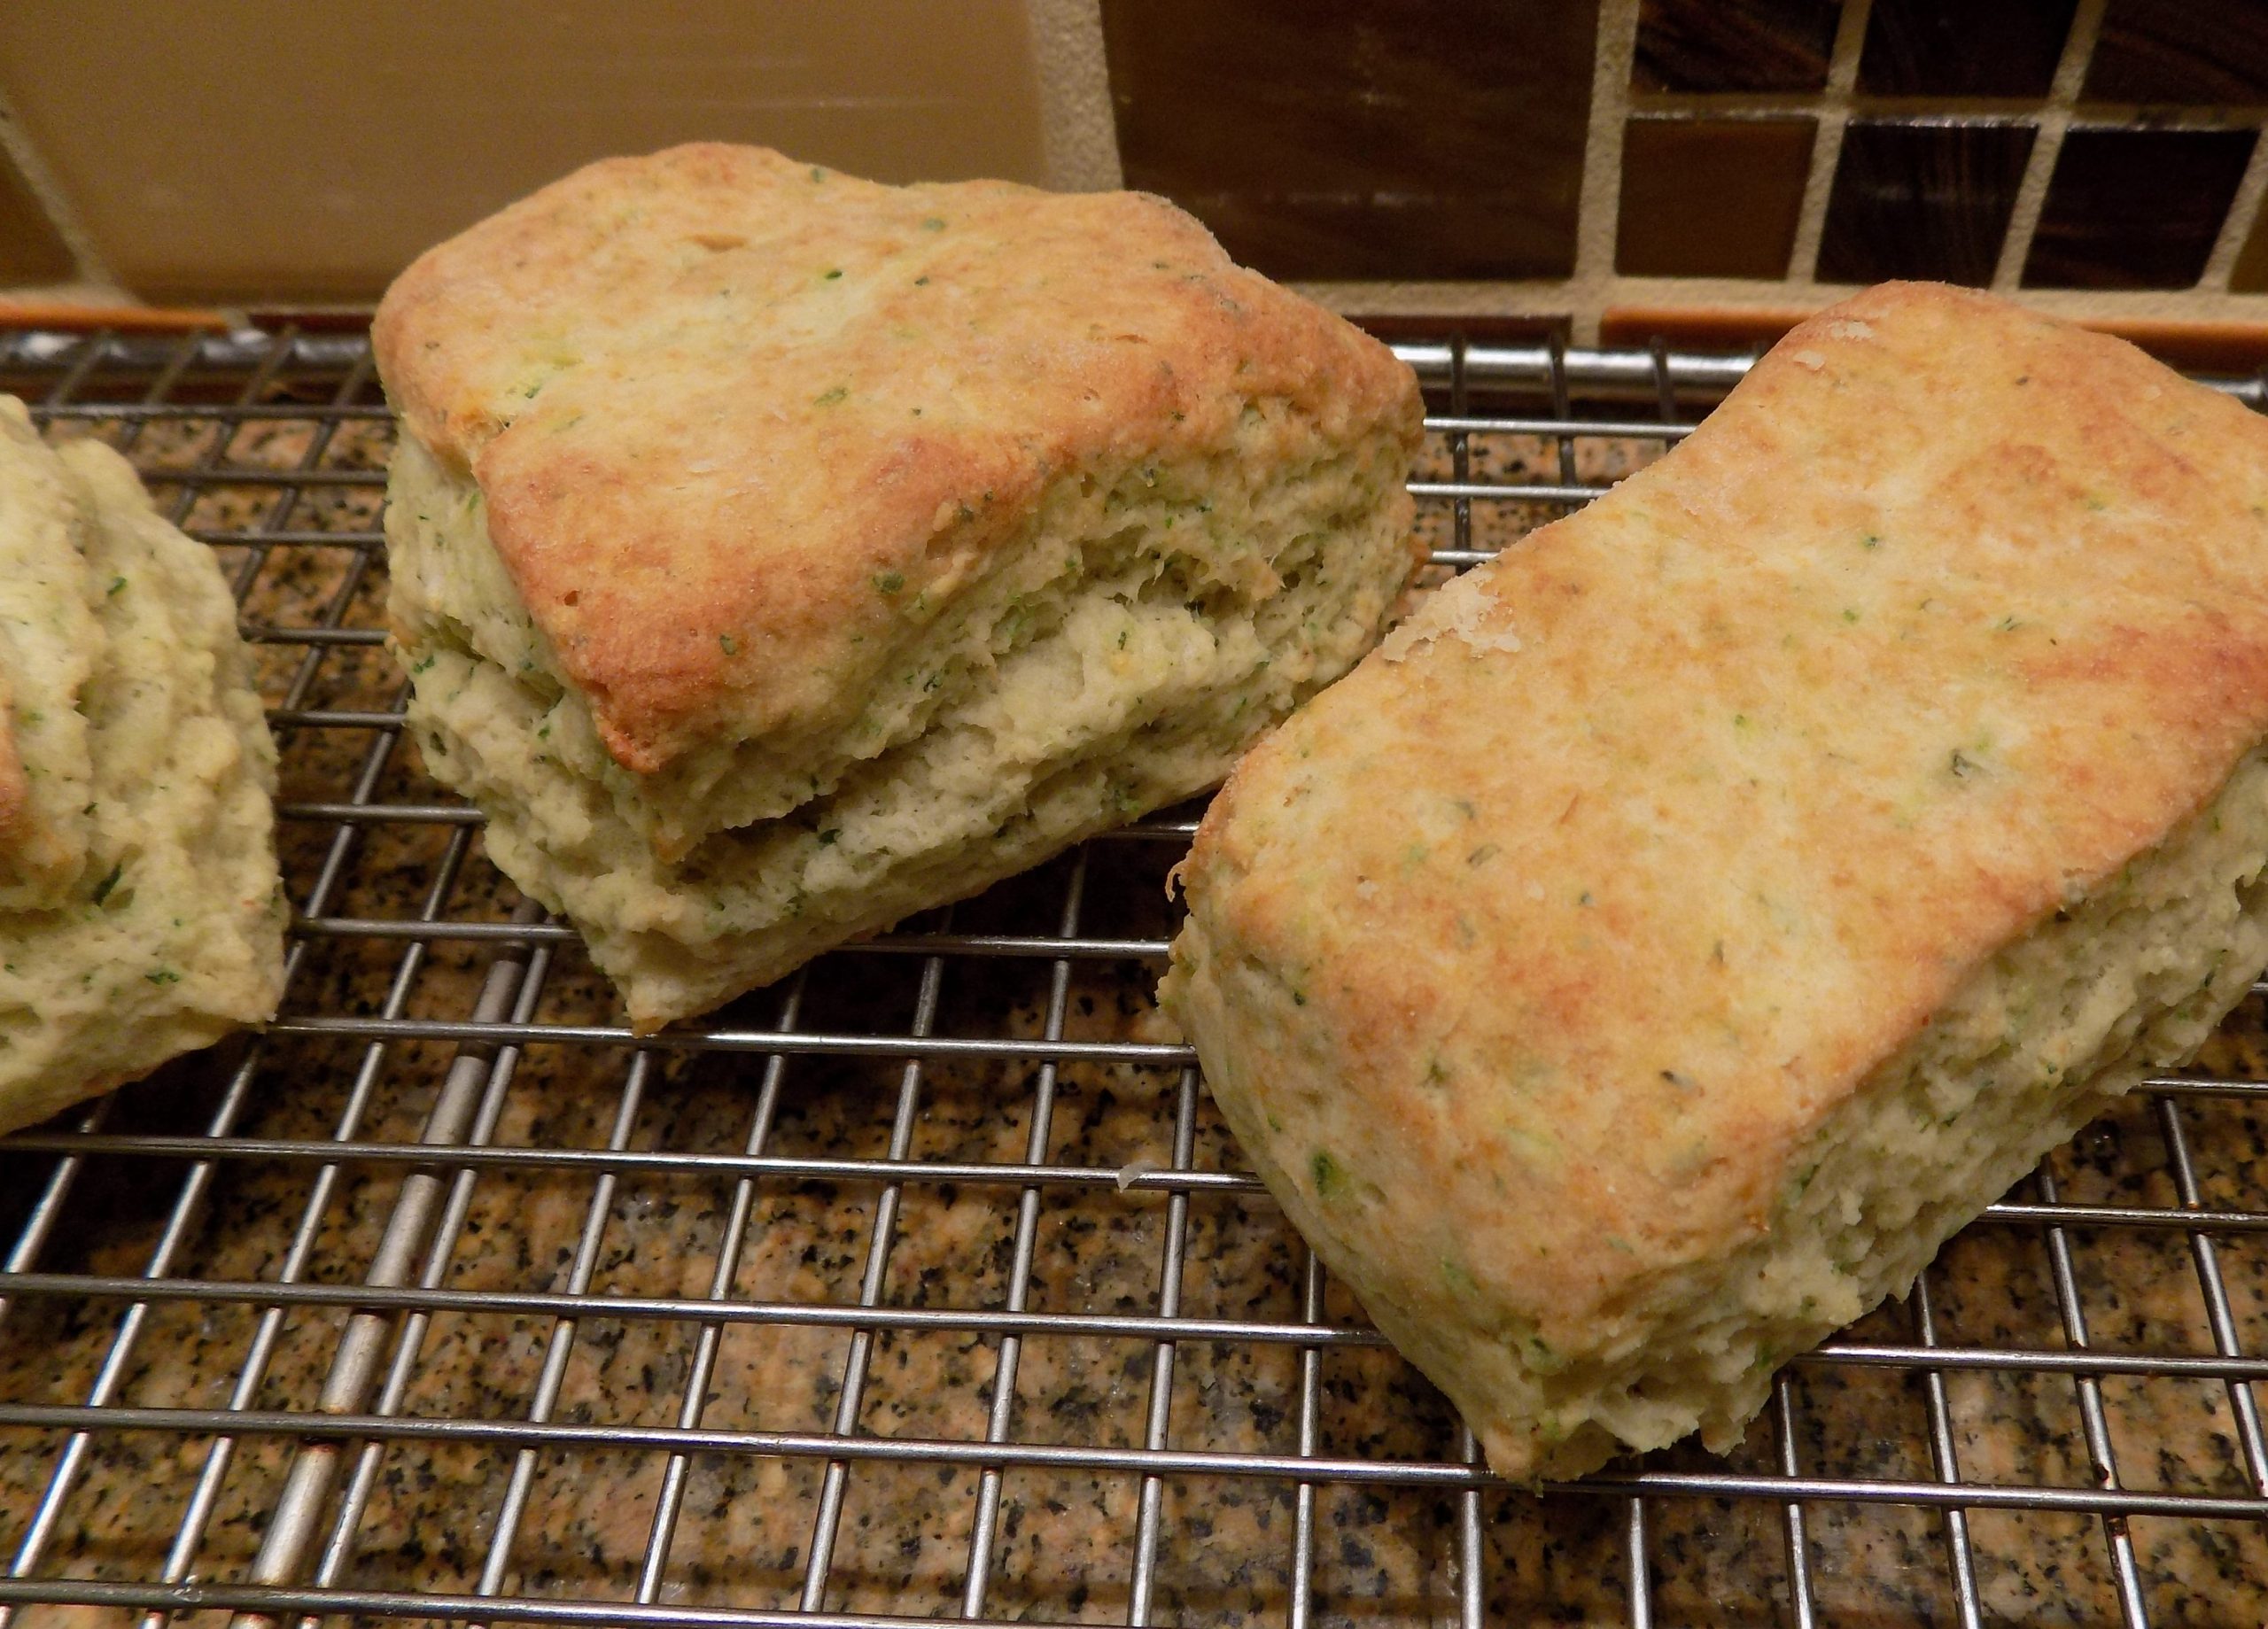
Some days are better than others. Because some days I have leftovers from the previous evenings dinner and only need to fix a little “something” new to make the second dinner a pleasure rather than a chore. So, the other evening I was thinking what would go nicely with leftover pot roast, veggies (plenty of veggies) and of course, pot roast gravy. (For my recipe, search under Pot Roast with Potatoes, Onions, and Carrots.) I decided some kind of herby buttermilk biscuit would be perfect. So, using a recipe I found on the justalittlebitofbacon.com site, with the addition of roasted garlic that really needed to be used up, I baked up a batch of these amazing biscuits. So, so delicious. And as tender as any biscuits I have ever had the pleasure of eating. And for those of you for whom turkey dressing/stuffing is a waste of ingredients (all 2 of you), these biscuits would make a perfect alternative for a “bready side” on your Thanksgiving table.
I think the secret to these savory biscuits lies in the fact that the recipe calls for all fresh vegetative ingredients. And because I happen to grow Italian parsley, chives, and rosemary it made using these terrific ingredients a snap. And thyme, well I’ve tried growing it, but for some unknown reason, I’ve had no luck with this herb. So, I always have one of those small plastic containers of thyme in my fridge. So, for me it was no problem to follow the instruction as written. But if you don’t happen to have all the fresh ingredients on hand, I would say use dried. But of course, only about a third as much since the flavor of dried herbs is so much more concentrated. And if you do use dried chives and herbs, and the biscuits come out perfect, please let me know so I can pass on your comments to anyone reading this recipe. But for now, I’m going to stick with fresh chives and herbs.
Well, that’s it for today. We are expecting at least 15 guests for Thanksgiving dinner, so I am busy strategizing for the event. Even though others are bringing a dish or 2 I still feel compelled to make sure everyone ends up with at least one of the dishes they hold sacred on any Thanksgiving table so that we can send everyone out the door, full and happy. At least, that’s my plan.
This feels like such a special Thanksgiving to me. We have received our covid-19 booster shots and will be with a good portion of our extended family for this day of thanks. And everything else in our lives seems to be happily perking along. So, we have a lot of positive in our lives to be extremely thankful for. May you be as similarly blessed.
Again, Happy Thanksgiving to all. And of course, peace and love.
2 c. unbleached all-purpose flour, fluffed
2 tsp. baking powder
½ tsp. baking soda
½ tsp. fine sea salt
2 T. chopped fresh parsley
2 T. chopped fresh chives
1 tsp. chopped fresh thyme
½ tsp. chopped fresh rosemary
4 cloves roasted garlic
8 T. (1 stick) very cold unsalted butter, (can even be frozen butter), cut into small pieces
¾ c. buttermilk
Pulse the flour, baking powder, baking soda, and salt together in the bowl of a food processor. Add the parsley, chives, thyme, and rosemary and pulse a few more times to distribute through the mix.
Add the roasted garlic and butter; process until the mixture resembles coarse cornmeal and there are no large lumps of butter left.
Add the buttermilk and pulse a few times, until the dough gathers into clumps. Scrape the biscuit dough out onto a lightly floured board.
Pat the dough into an oblong shape at an even 1-inch height. (This will give you 8 good sized biscuits.) Cut with a floured bench scraper or large butcher knife. Place on an ungreased baking sheet.
Bake in a pre-heated 450-degree oven for 10-12 minutes, or until lightly browned and puffed. Serve warm or toast for a wonderful breakfast bread.
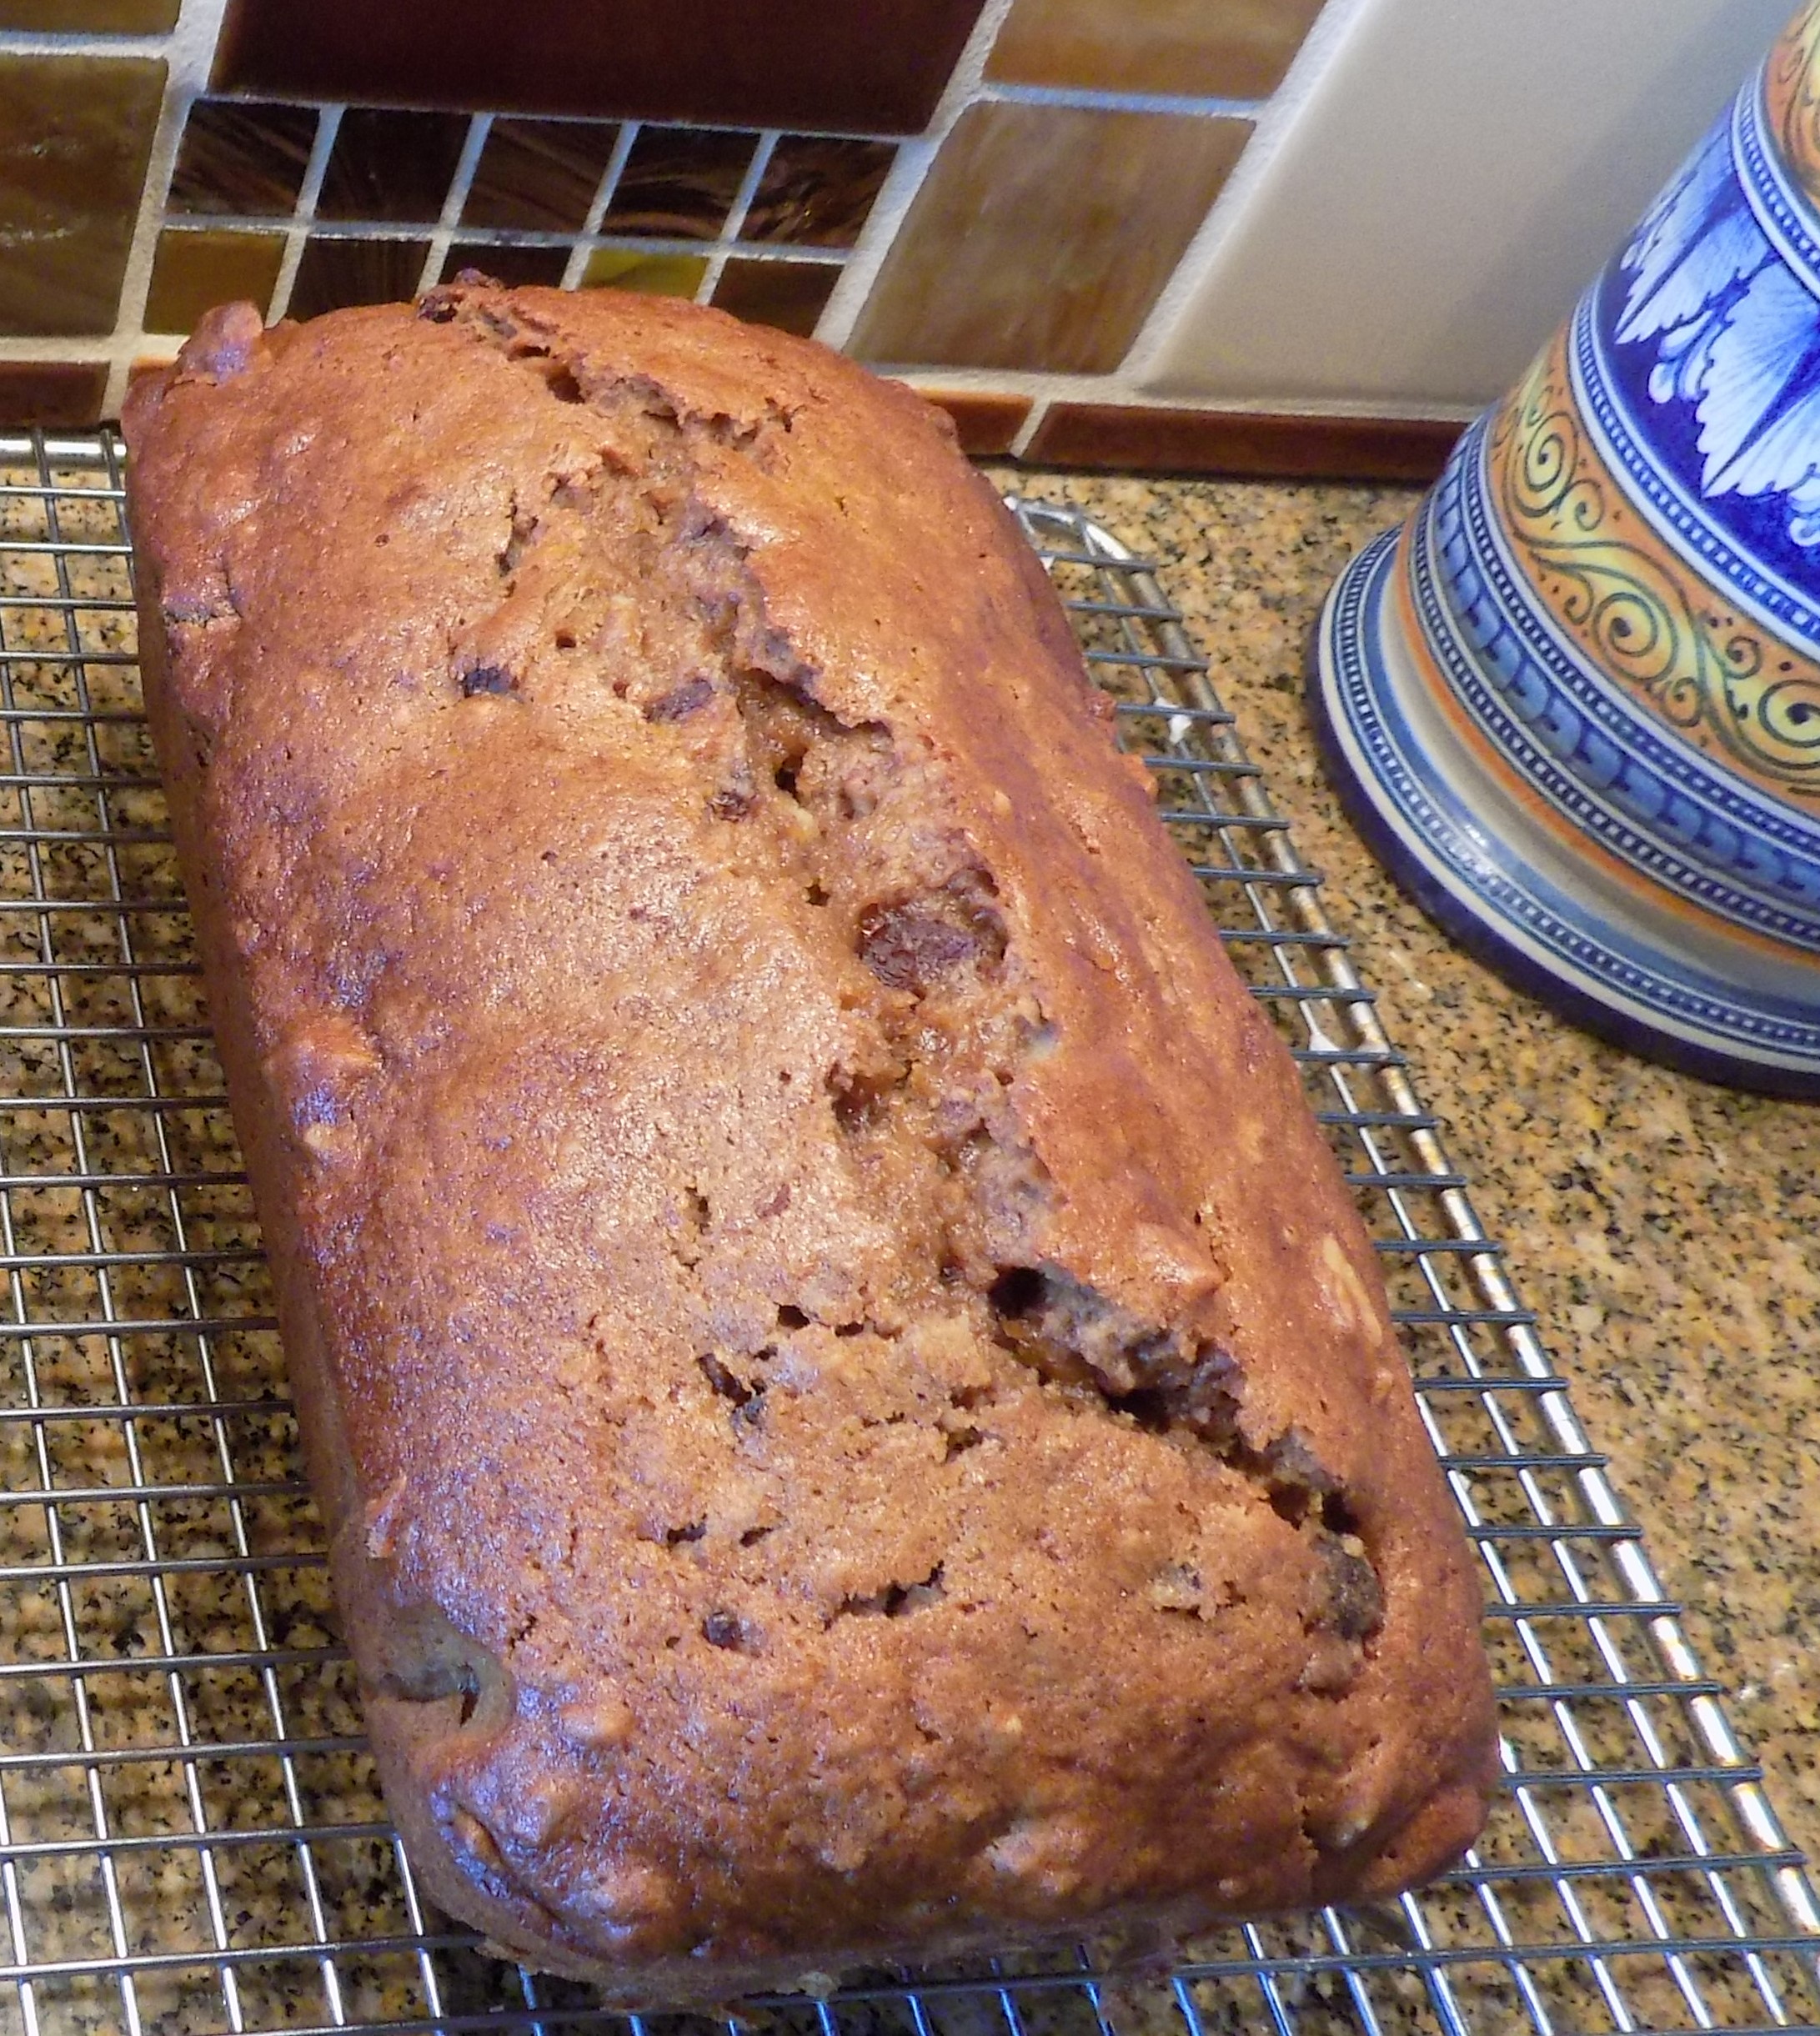
So, our good friend Rudi sent me this recipe. We didn’t happen to have any Jack Daniels on hand, so Mr. C. and I had a deep and informative (at least for me) discussion regarding the relative merits of Jack over Jim (Jim Beam that is!) (Both being bourbon whiskey, or so I was informed.) And whether it would be true enough to the recipe if I used Jim instead of Jack. We came to the conclusion that Jim could stand in for Jack this time, so, to the kitchen I proceeded.
Now one thing you should know. I have my own stash of liquor and liqueurs readily at hand in the pantry when a dish I am preparing requires a bit of booze. So, in my haste to prepare this bread, I grabbed the cognac bottle rather than the bottle of Jim Beam. So, not only did my mistake ignore all the fine facts I had learned regarding bourbon, my haste changed the flavor of the bread.
But, regardless of my error, the bread was delicious. Absolutely delicious! And knowing that the flavor of bourbon is fabulous in all kinds of dishes, I have no qualms about suggesting that you use Jack Daniels when you make this recipe. But of course, if all you have is cognac, go for it. Just make this bread. You will be so glad you did. And thank you so much Rudi for this awesome recipe. And Happy Thanksgiving to all.
Speaking of giving thanks, every year at this time I remember to be thankful for the many blessings I have received over the years. My husband, my family, my friends, the fact that I have a roof over my head, and more than enough to eat. But this year, I am especially aware of how lucky I am. I didn’t get covid-19, I haven’t lost a family member to this horrid virus, and we are still friends with people who have differing opinions from ours. And that isn’t easy. I tend to get on my high horse and think I am the one in the right. (And of course, that’s mainly true!) But I haven’t walked in the other person’s shoes, and they haven’t walked in mine. The very fact that we are still respectful of each other makes me thankful. And hopeful that we can all get through this dreadful time if we continue to think of the greater good for everyone.
So, as always – peace and love to all. And again, HAPPY THANKSGIVING.
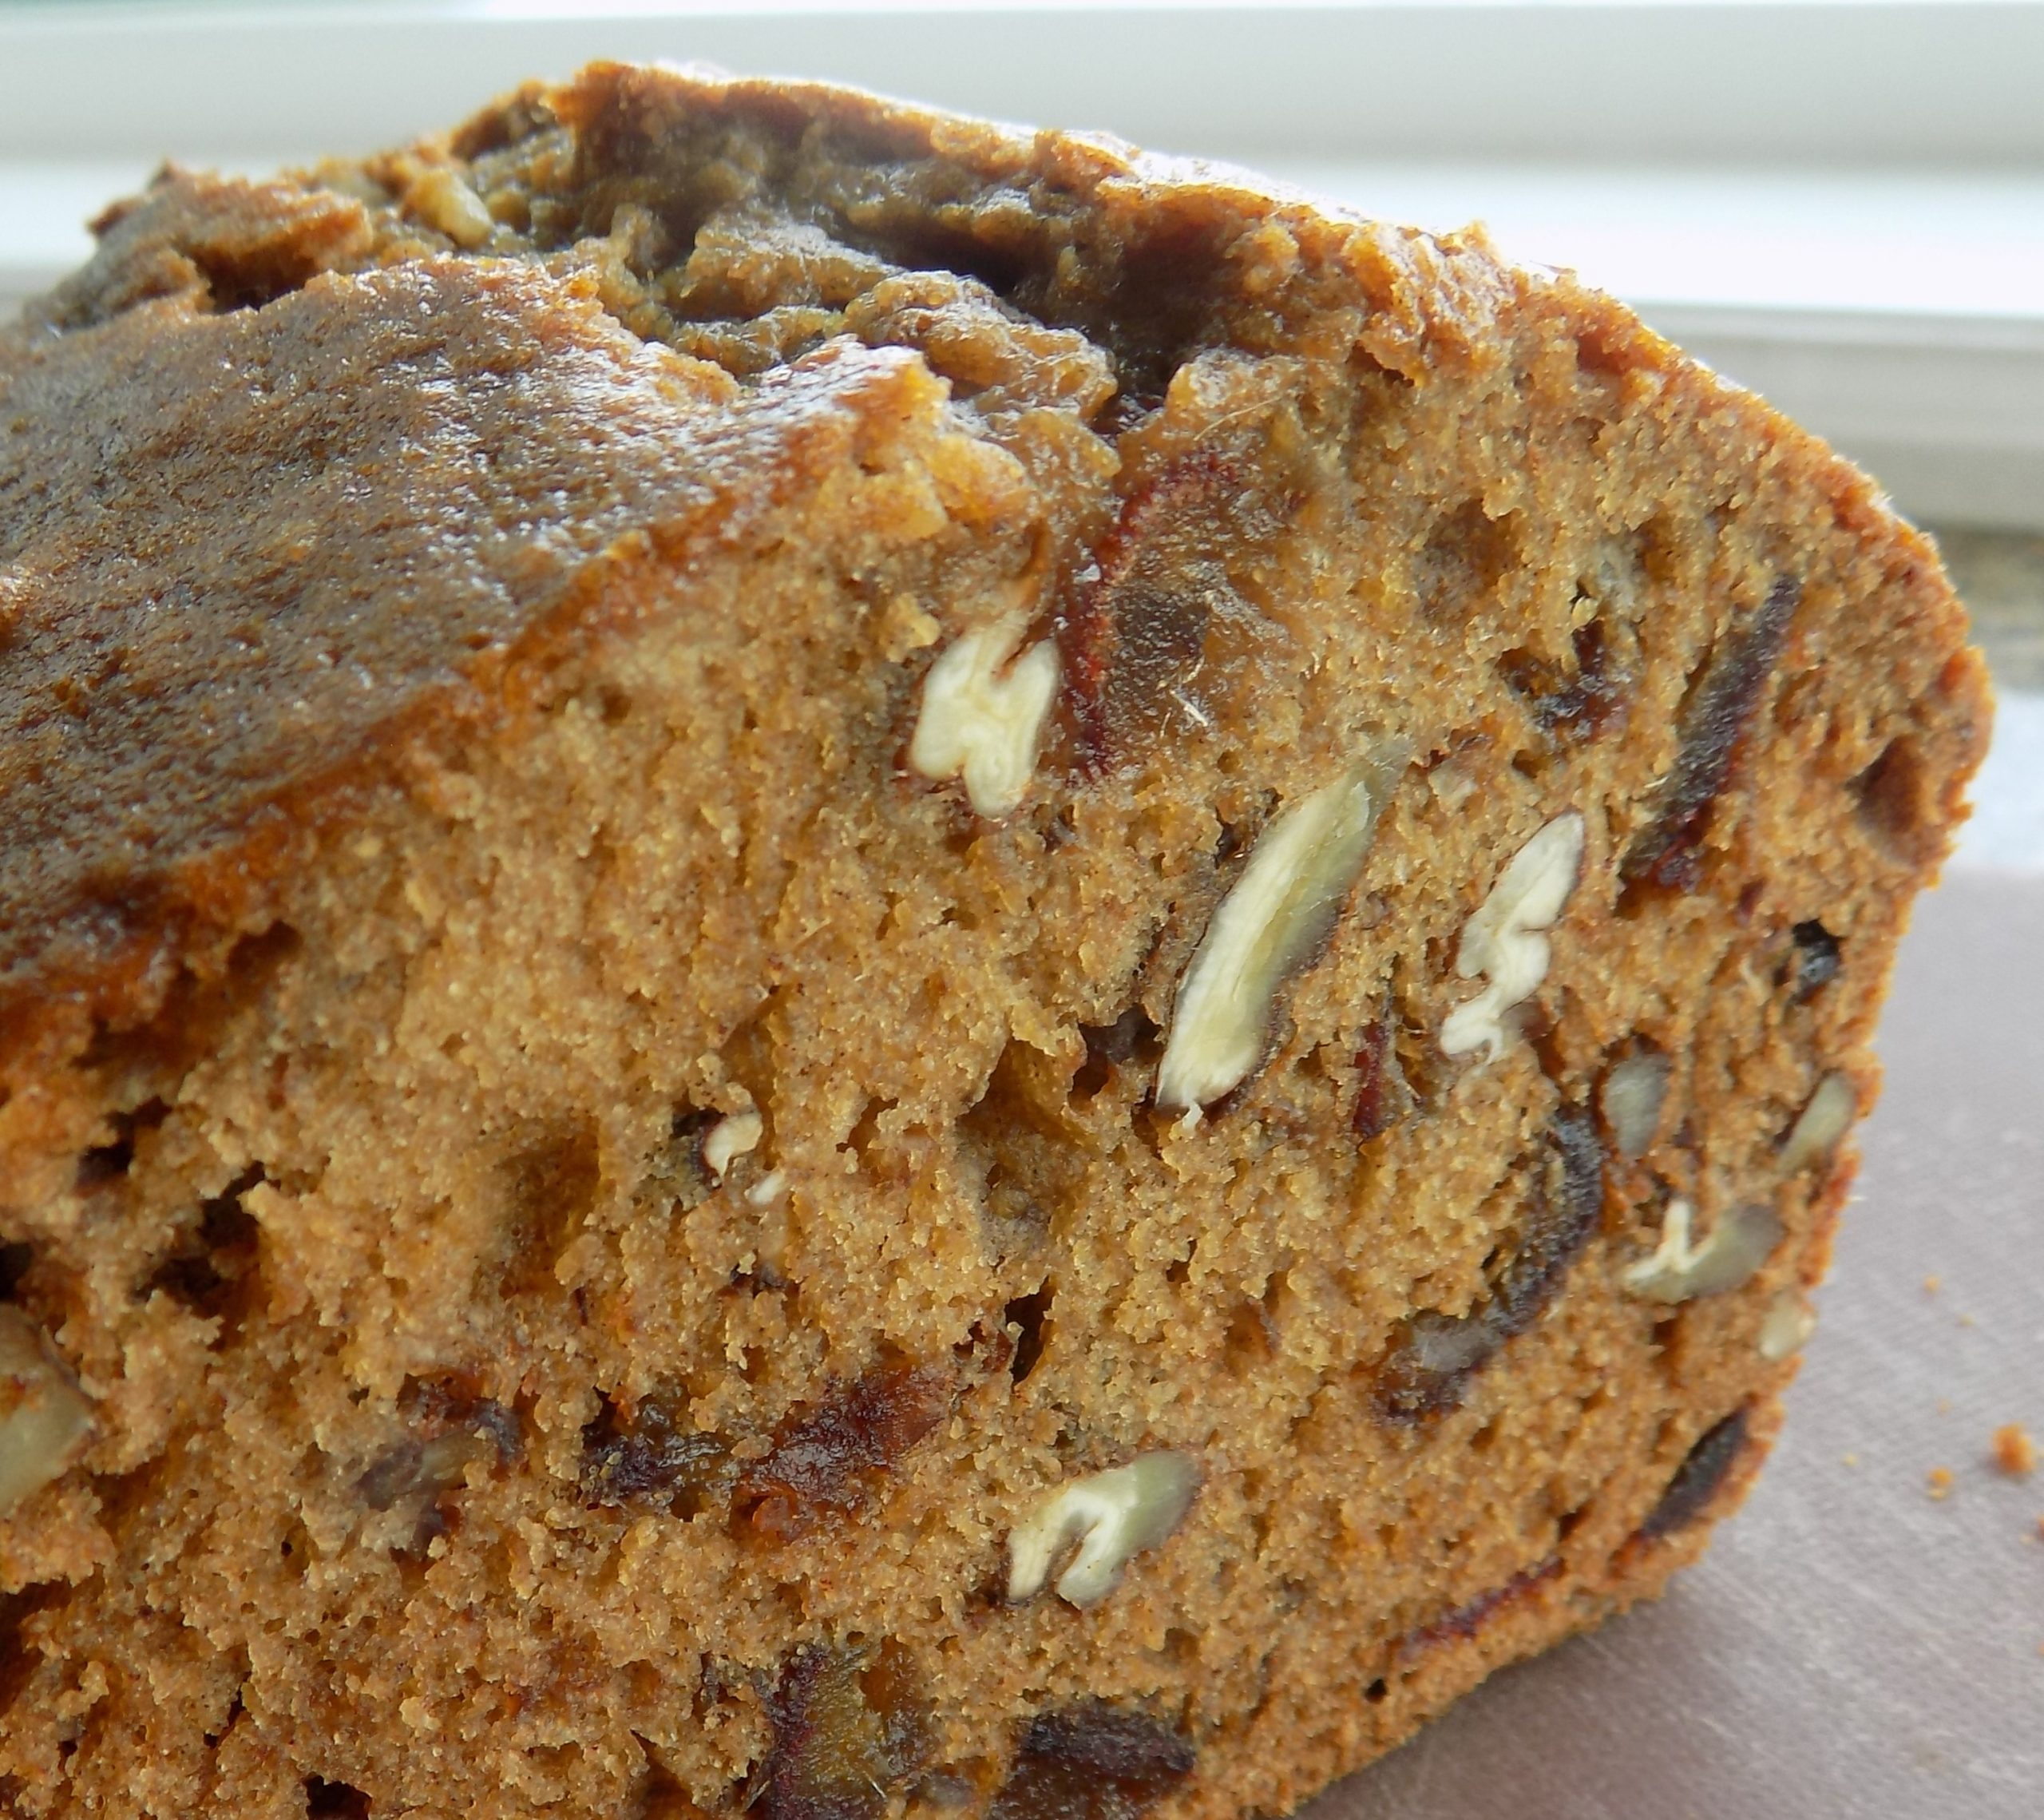
1½ – 2 c. chopped Medjool dates
4 T. (½ stick) unsalted butter, room temp., sliced into 4 pieces
1 tsp. baking soda
¾ tsp. kosher salt
¾ c. brown sugar, packed
1 c. hot brewed coffee or 1 c. hot water and 1 tsp. espresso powder
1 lg. egg
1 tsp. vanilla
2 T. Jack Daniels or other bourbon or cognac
½ tsp. baking powder
1¾ c. unbleached all-purpose flour, fluffed
1 c. coarsely chopped pecans
Preheat the oven to 350-degrees. Lightly grease an 8.5-inch x 4.5-inch or 5 x 9-inch loaf pan. Then line the pan with parchment paper. Set aside.
Place the chopped dates, butter, baking soda, salt, and brown sugar in a mixing bowl. Pour the hot coffee into the bowl, stirring to combine. Allow the mixture to cool for 15 minutes.
Add the egg, vanilla, liquor, baking powder, and flour, beating gently until smooth. Stir in the pecans.
Scoop the batter into the prepared pan, gently tapping the pan on the counter to settle the batter.
Bake the bread for 50 to 70 minutes or until a toothpick inserted into the center of the loaf comes out clean and the internal temperature reaches 200-degrees. (If you don’t own an instant-read thermometer, now is the time to get one! Just sayin’!) If the bread starts to get too brown, loosely cover with aluminum foil.
Remove from oven and let sit 10 minutes before gently turning the bread out of the pan and onto a wire rack to cool completely before slicing.
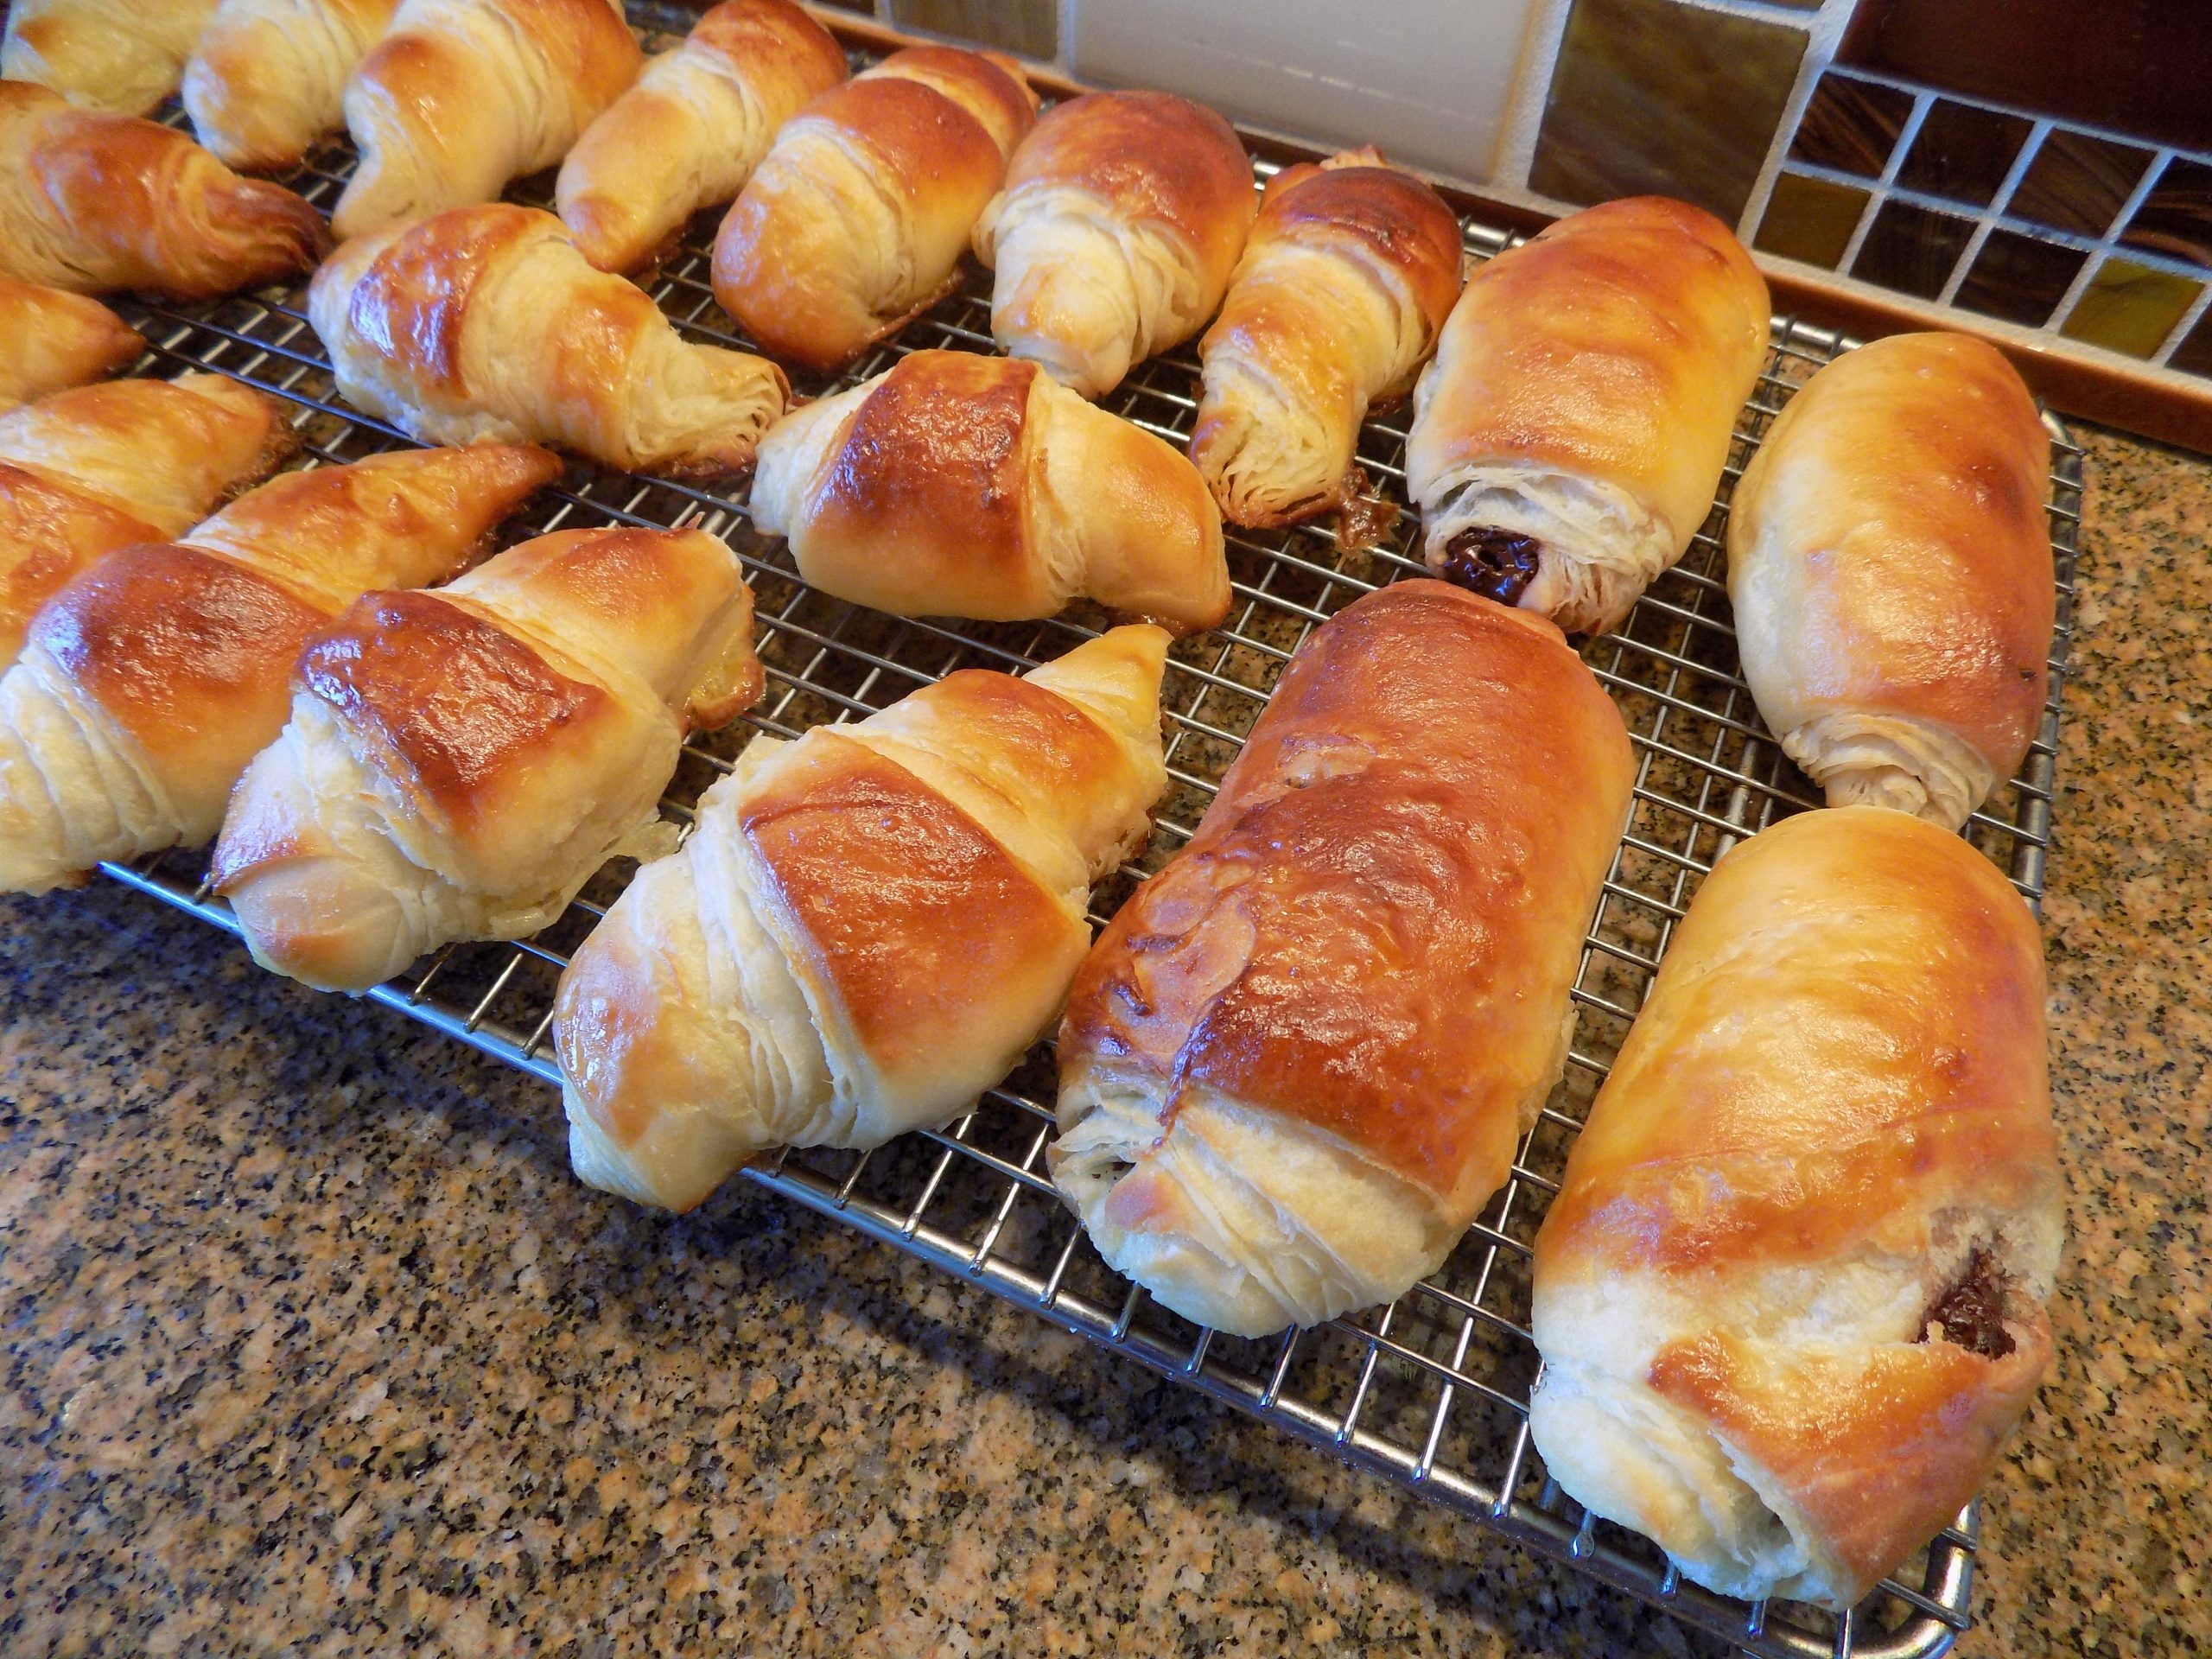
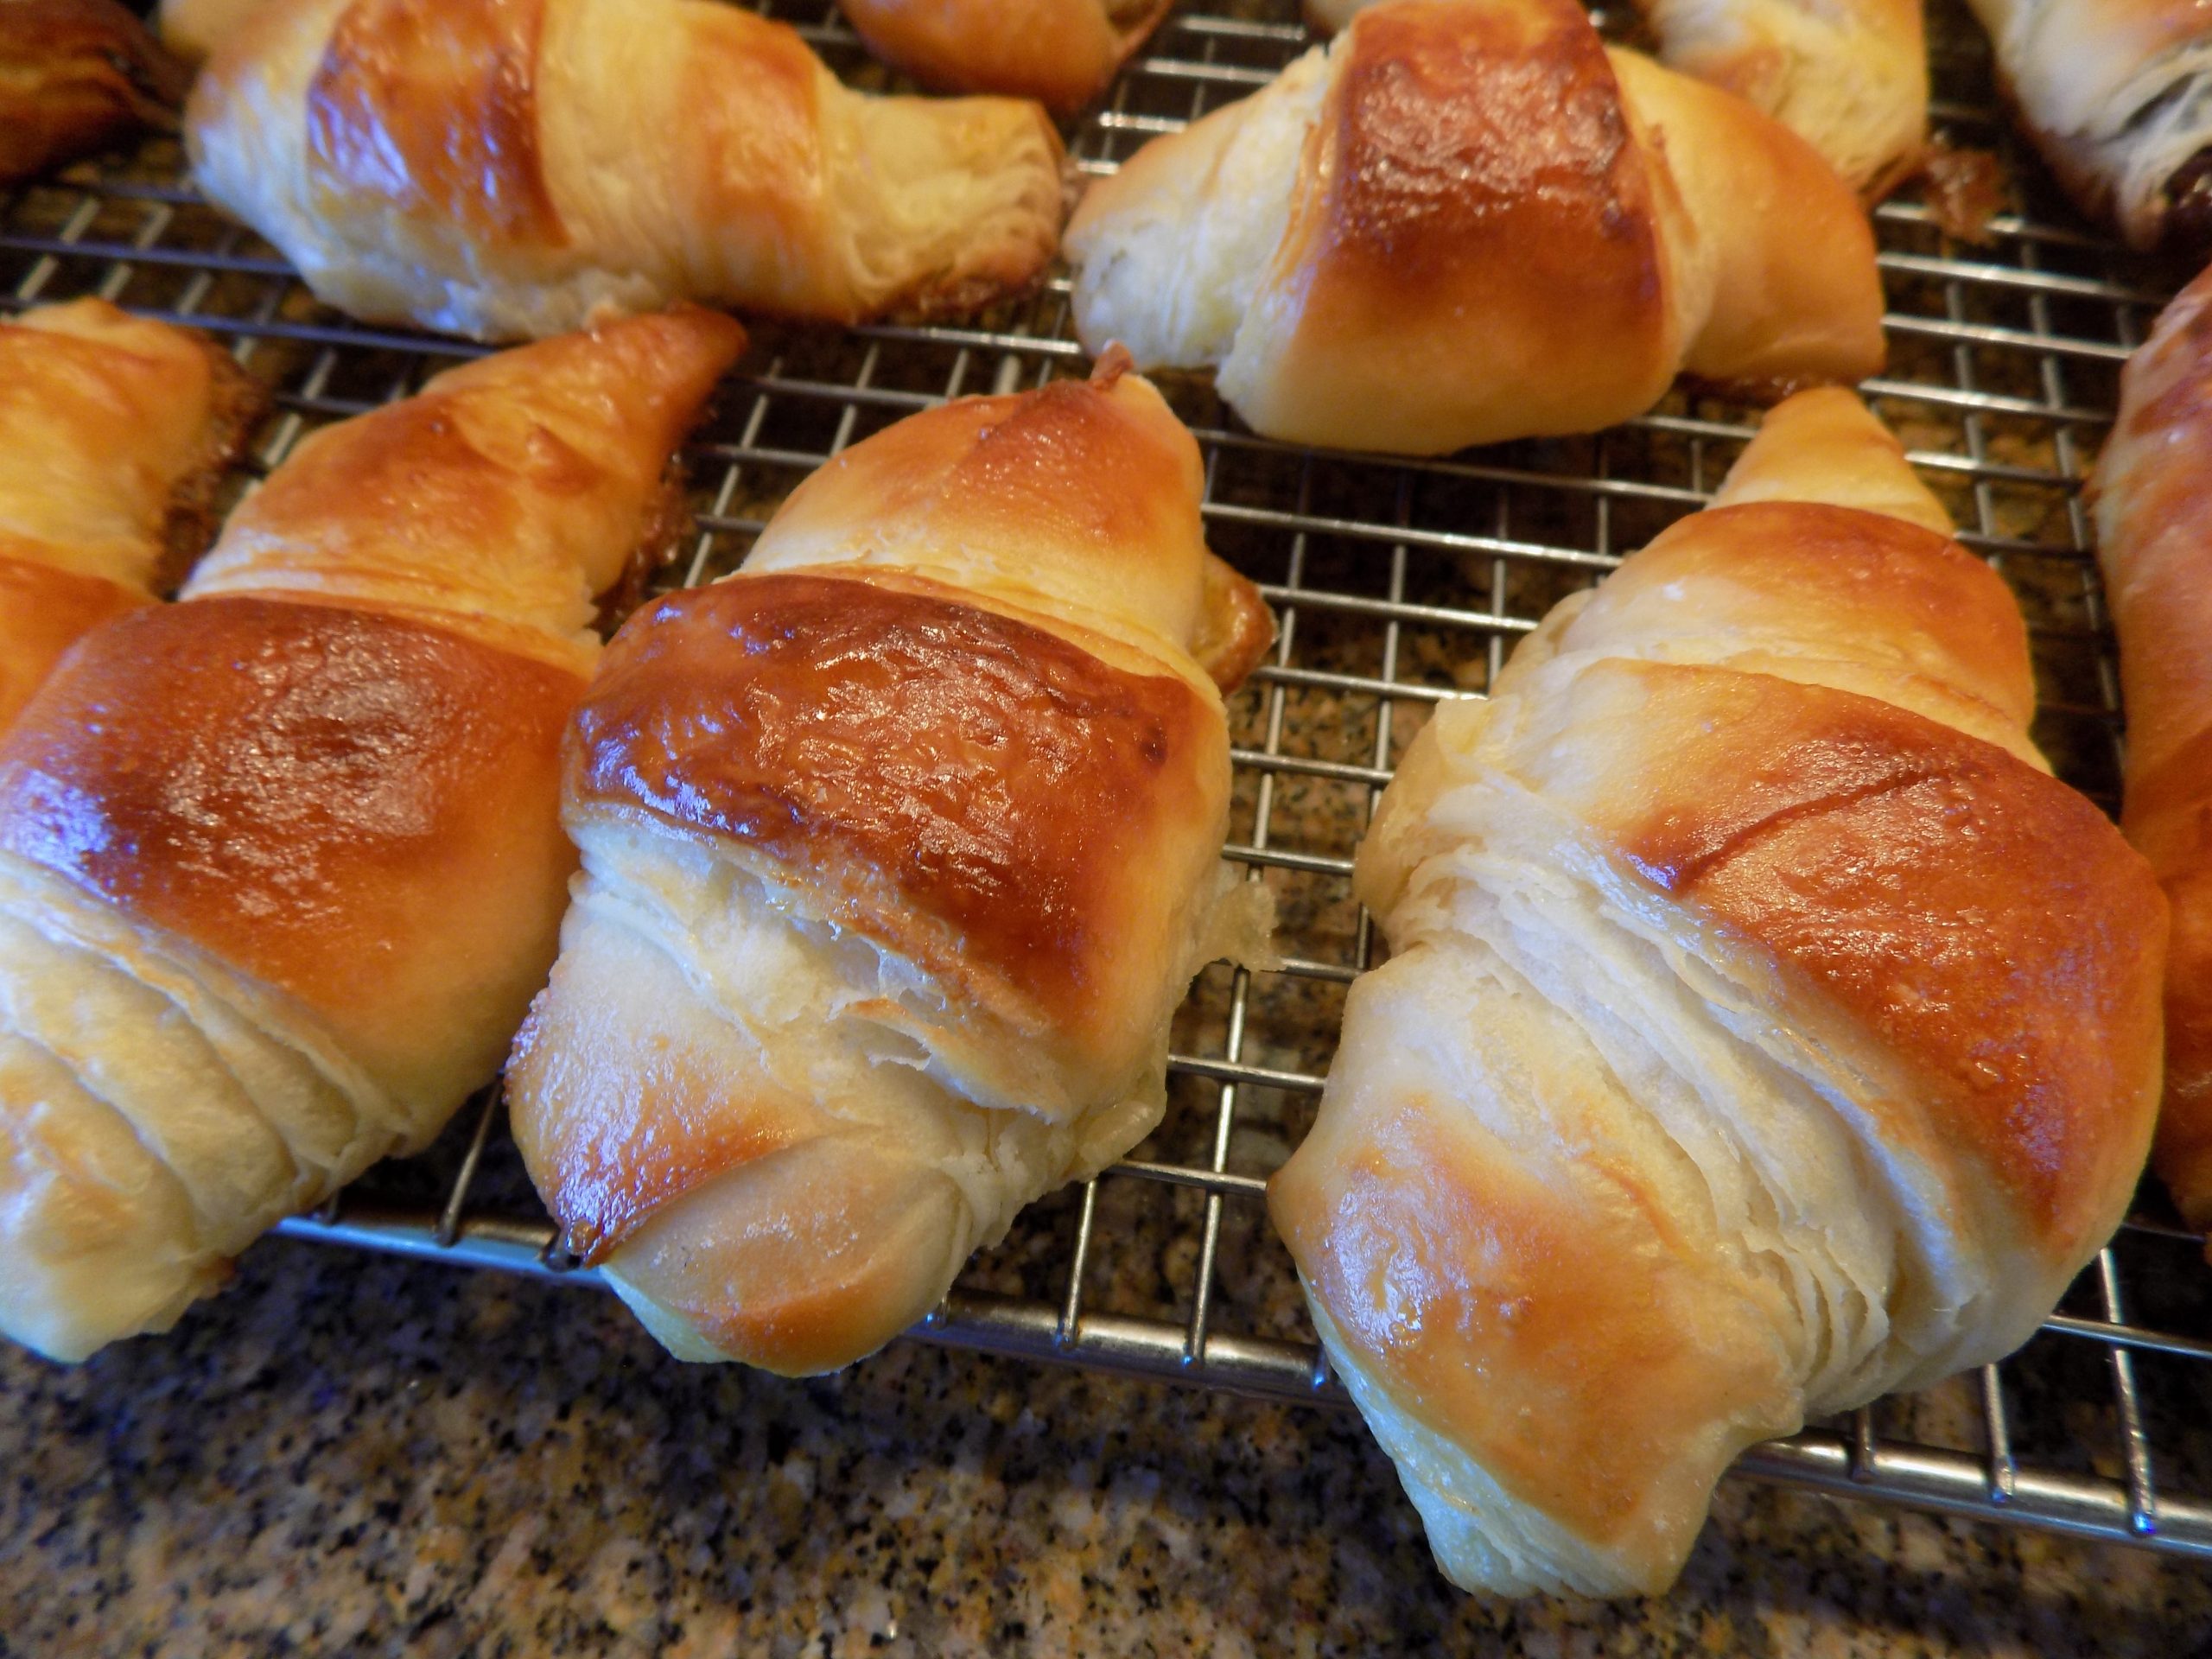
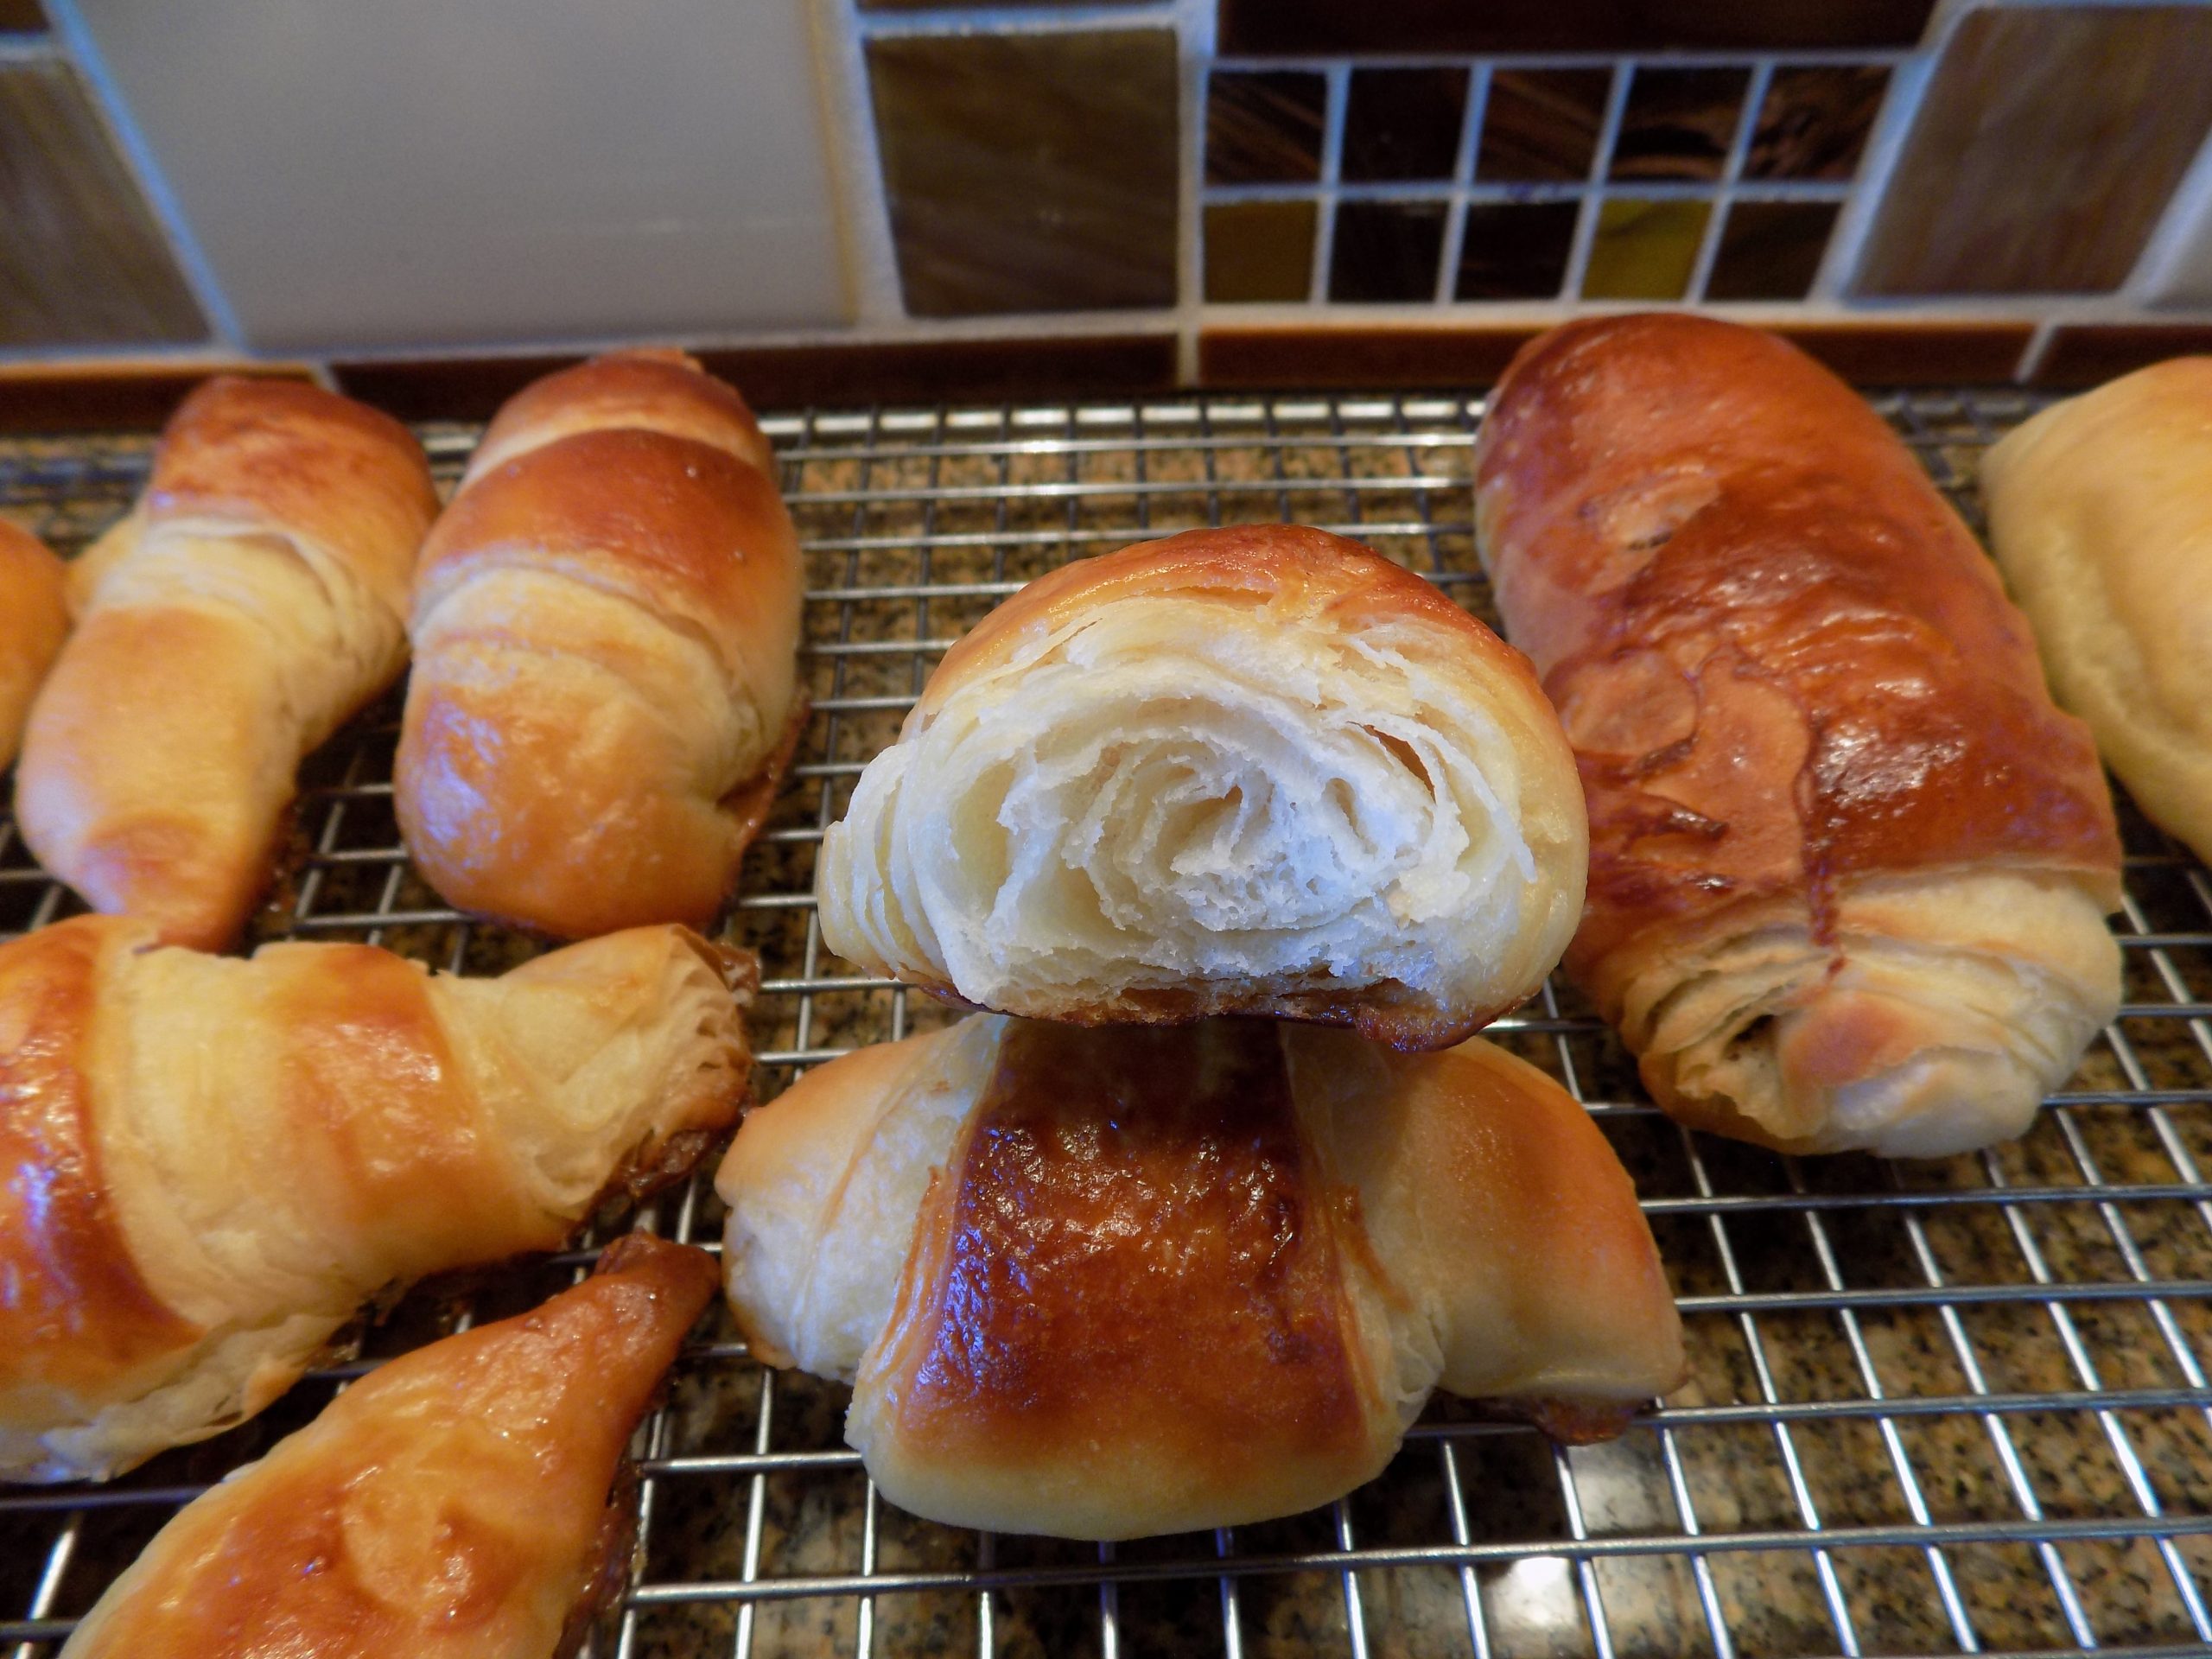
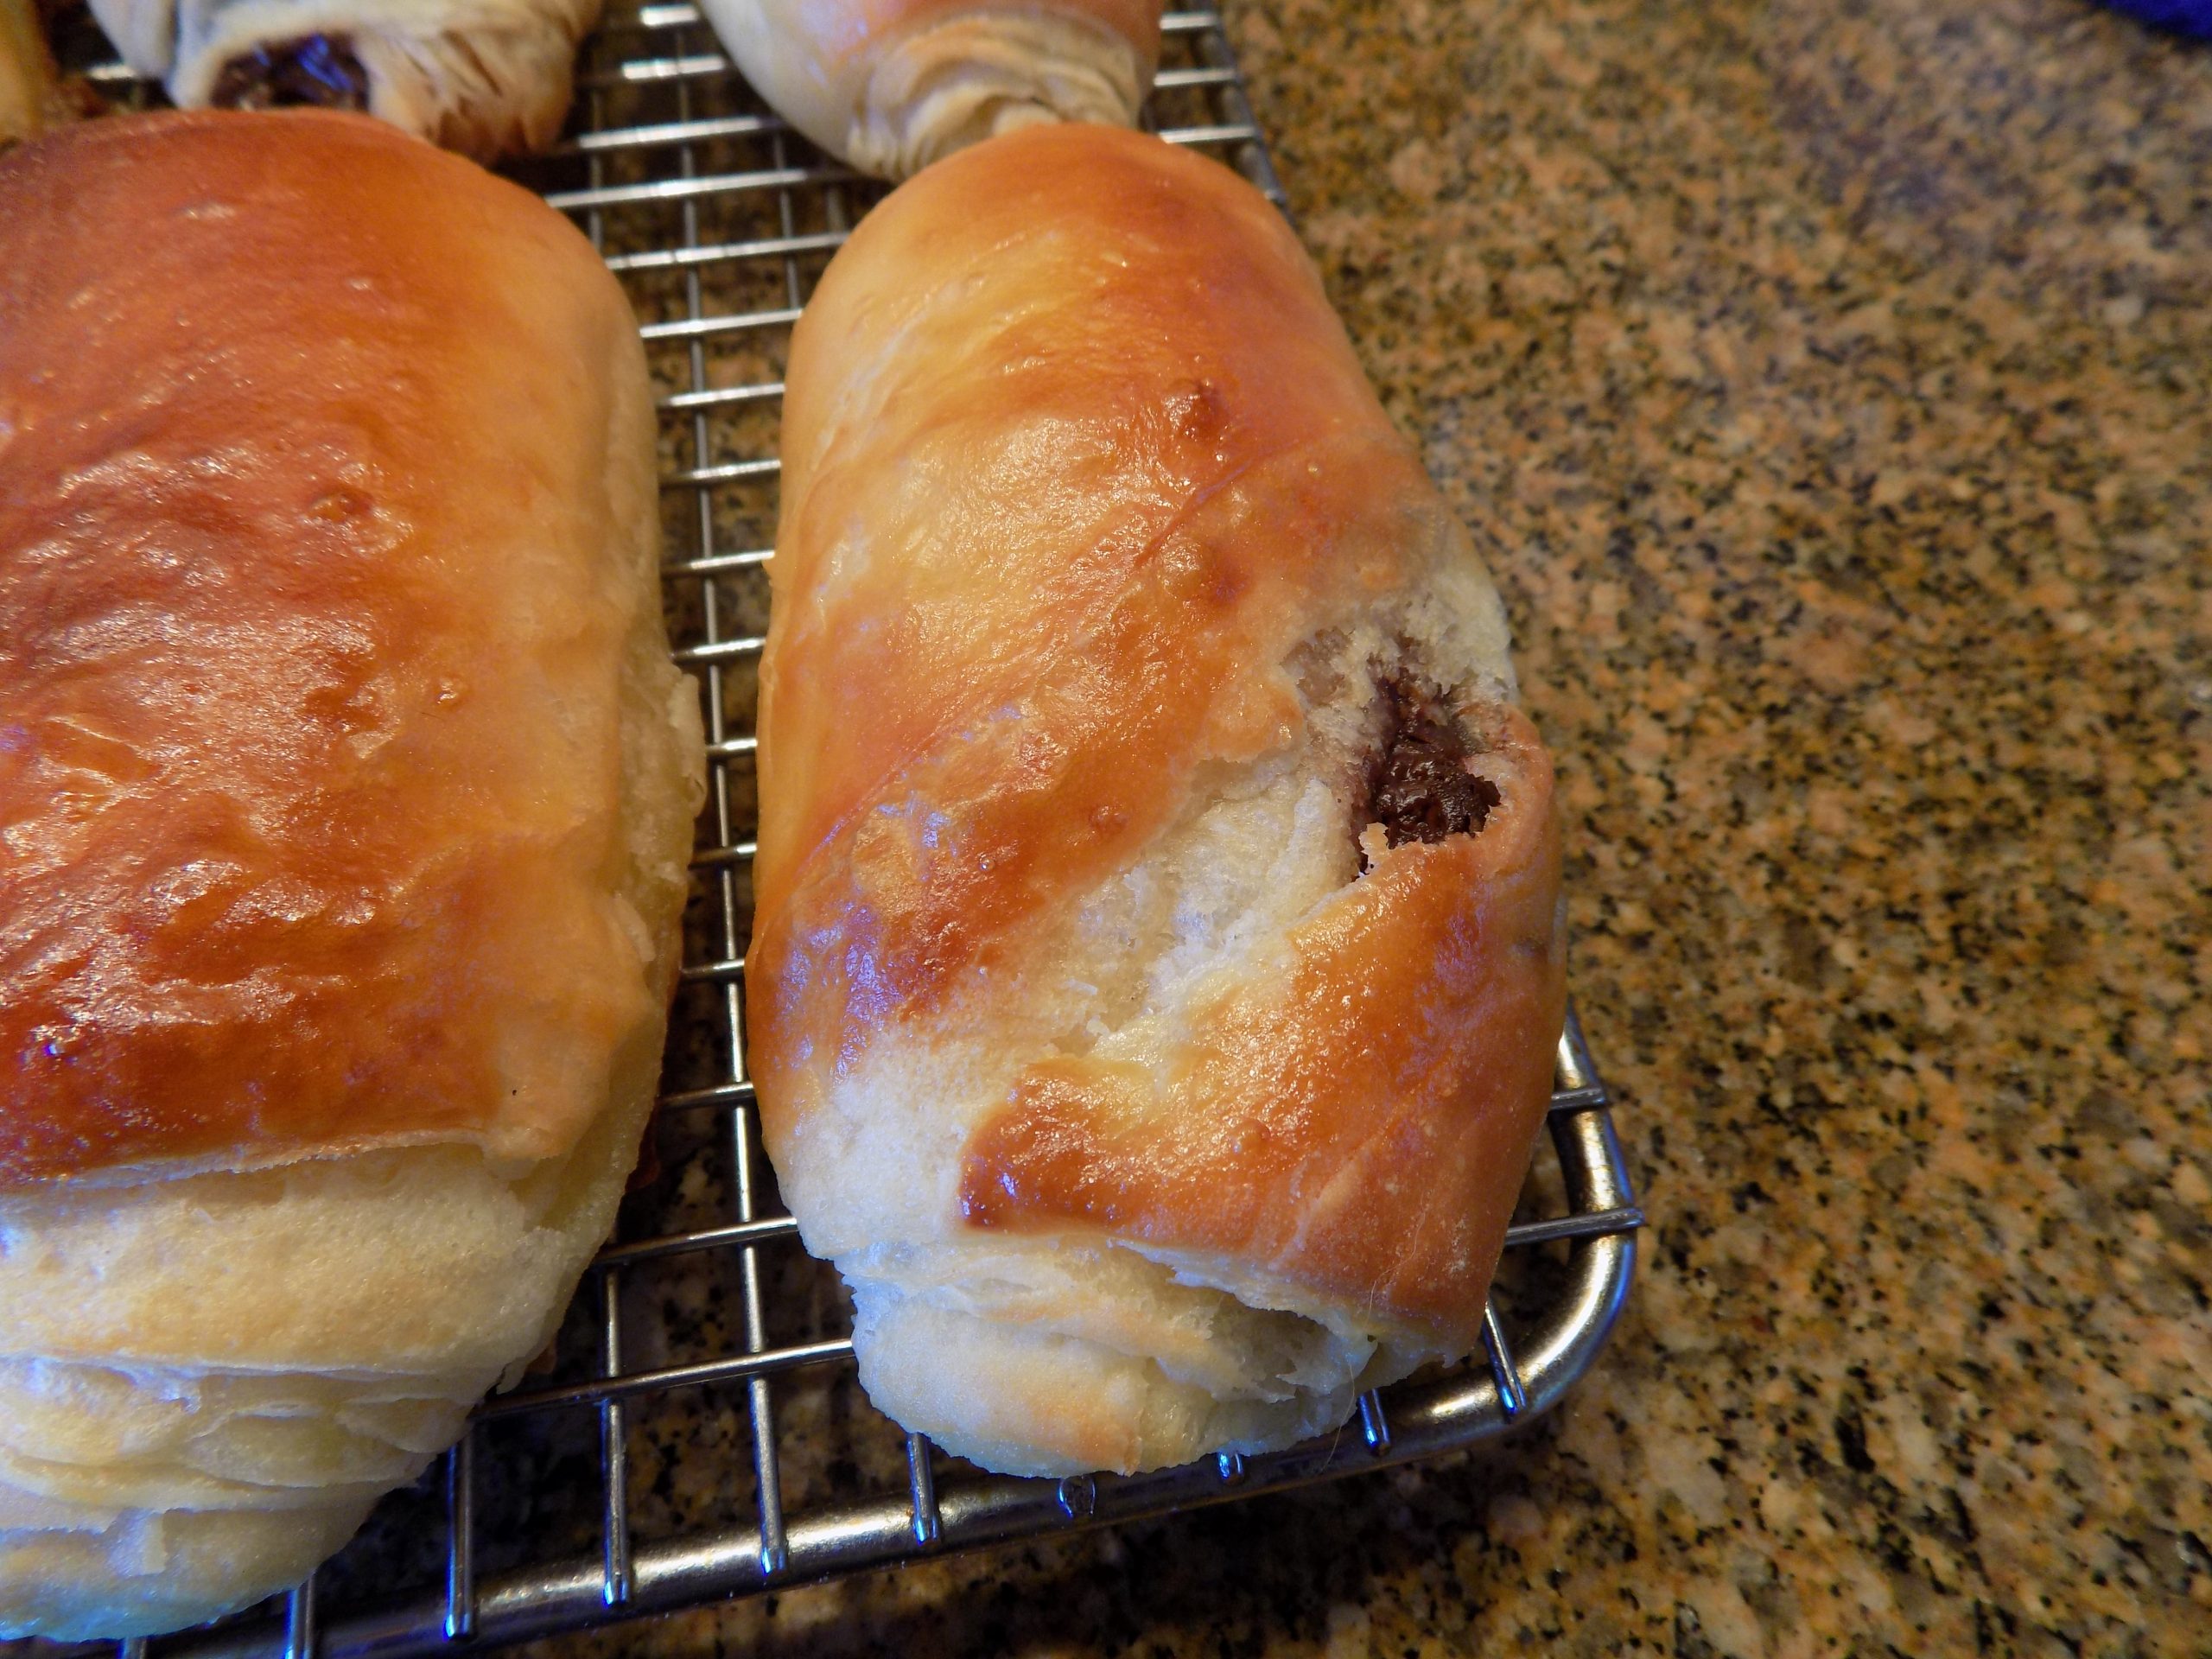
Croissants and pain au chocolatCroissantsView of the flaky interior of a croissantUp close look at pain au chocolat
Well, once again I stepped out of my comfort zone and made THE BEST croissants I have ever tasted. Of course, it didn’t hurt that the croissants were still warm when I bit into my first one. (And yes, I had two. OK, three. But in my defense, they were small croissants, by plan, I might add.) So, thanks to Bincy at merryboosters.com, I no longer have any reason to pay excruciating prices for my all-time favorite accompaniment to bacon and eggs. And the best part – the darn things were easy to prepare. Really!
First of all, you don’t need a mixer to make the dough. And no kneading required. But granted, it did take most of the day to prepare these delicacies because there is a lot of time the dough is busy rising. But so what?! I had nothing else planned yesterday. And during the time I wasn’t actively involved in the process, I dusted the house and cleaned the bathrooms, posted a recipe, and did research for another recipe I plan to present in the future. So, basically, no time wasted.
But patience required, I will certainly admit to that! Mainly because I could hardly wait to chomp into the final product. And of course, terribly concerned that the final product would not meet my expectations. Because little old me, unschooled baker that I am, actually trying my hand at building croissants and pain au chocolat (for Mr. C.)! How extraordinarily presumptuous of me! But still game enough to at least give it a try. And not only making croissants but pain au chocolat as well. (Frankly I don’t see what all the fuss is about when it comes to pain au chocolat. But Mr. C. is a devoted fan. And when it comes right down to it, I like making him happy.) So, 4 pain au chocolat were made along with 12 regular croissants. And since you are concerned with the disparity in my 12 to his 4, forget it! He loves regular croissants too.
And another thing we both really love, is that all 12 of the croissants and 4 pain au chocolat I made cost less than 2 croissants from our local French bakery. Because really, the only expensive ingredients are the European butter (which I buy at Grocery Outlet for $1.99 for 8-ounces), and the really good dark chocolate (about a third of a 3.5 oz. dark chocolate bar from Libeert (Belgian Chocolate Creators). (Probably about a dollars-worth of chocolate.) The rest of the ingredients, not appreciable.
So, for those of you who have been afraid of making homemade croissants – let it go! These are so easy to build. And so delicious. Yes, they take time. But boy are they worth the effort.
As always, have fun in your kitchen. Try new recipes because you may never know what amazing new discoveries you might make. And please don’t wait until you’re 77 (like me) to make homemade croissants and pain au chocolat. All I can think right now, is, why in the world did I wait so long? And should I make some more tomorrow, or wait a couple of days?
So, thank you again Bincy for this fabulous recipe. And for helping me keep my reputation as a “well-rounded” cook. (Define well-rounded any way you like!)
Peace and love to all.
1 c. + 1 tsp. slightly warm whole milk, divided
1 tsp. active dry yeast
¼ c. granulated sugar
2½ c. unbleached all-purpose flour, fluffed
¼ tsp. fine grained sea salt
¾ c. (1½ sticks) unsalted butter, room temperature (European butter* is best for this recipe or any other laminated** pastry for that matter)
1 tsp. vegetable oil (for coating the dough)
1 egg
semi-sweet chocolate, coarsely chopped (if making pain au chocolat)
Whisk 1 cup of the warm milk, yeast, and sugar together in a large mixing bowl. Let sit for 5 minutes to activate the yeast.
Add the salt and flour, and mix by hand until you have a smooth, evenly hydrated dough. Pour the veggie oil on the dough, and using your hands and a stiff rubber spatula, form the dough into a ball thoroughly coated with oil. Cover with plastic wrap and let the dough sit and rise for 1½ to 2 hours or until the dough doubles in size. (Mine took 2 hours.)
After the dough has doubled in size, punch it down, place it on a lightly floured surface and flatten it into a rectangle. Then roll it into a long log (like you were preparing cinnamon rolls) and divide the dough into 12 equal sized pieces.
Using a rolling pin, shape each piece of dough into a circle approximately 6½ to 7-inches in diameter. Spread the first dough circle liberally with butter, then place on a piece of plastic wrap, butter side up.
Then flatten the next piece of dough and slather with butter and stack, butter side up, directly on top of the first piece. Continue until all the dough circles have been buttered until the last piece. Place dough circle number 12 unbuttered on the top of the pile. Wrap securely with as much plastic wrap as it takes, and place in your freezer for about 35-40 minutes. (The time spent in the freezer will allow the butter to harden a bit, but still be pliable enough to roll the dough into a rectangle, 12×16-inches.)
Place the rectangle with one of the longer sides furthest away from you. Using a pizza cutter*** or knife, cut the long sides into 4 top-to-bottom rectangles, then the short sides into thirds, right to left. This will give you 12 (4×4-inch) equal size squares.
For Regular Croissants:
Cut each square into two triangles. With your hands, shape the triangle into a long pie shaped piece of dough. Cut a small incision into the triangle in the middle of the larger end. (This small incision helps keep the center of the croissant from becoming too thick.) Then starting at the larger end, gently force the cut apart while you roll the dough towards the thin pointed end, making sure you are rolling the croissant tightly, but without squeezing the dough. Place on a parchment paper lined baking sheet pointed ends down and about 2-inches apart.
Whisk the egg with the remaining 1 teaspoon milk and brush on each croissant. Cover with plastic wrap and allow to rise for 2 hours or until they puff up a little. (And yes, the plastic wrap will stick a bit to the croissants.) Then, gently but liberally brush each croissant again with a bit of the egg wash being careful not to deflate the dough.
Bake in a pre-heated 400-degree oven for 10 minutes, then reduce the temperature to 375-degress and bake for another 7-8 minutes or until the croissants are a deep golden brown and the internal temperature reaches 210-degrees. Don’t under-bake the croissants.
Remove from oven and cool on a wire rack. Store in an air-tight container at room temperature. Re-heat in a 350-degree oven for a few minutes.
For Pain Au Chocolate Croissants:
Do not cut the 4-inch squares. Place about 3 teaspoons of the chopped chocolate about half an inch up from one of the sides. Fold the dough up over the chocolate and continue rolling until you have created a cylindrical shape. Place on a parchment paper lined baking sheet, seam side down about 2-inches apart.
Whisk the egg with the remaining 1 teaspoon milk and brush on each croissant. Cover with plastic wrap and allow to rise for 2 hours or until they puff up a little. Then gently brush each croissant again with the egg wash being careful not to deflate the dough.
Bake in a pre-heated 400-degree oven for 10 minutes, then reduce the temperature to 375-degress and bake for another 7-8 minutes or until the pain au chocolat croissants are a deep golden brown and the internal temperature reaches 210-degrees. Don’t under-bake.
Remove from oven and cool on a wire rack. Store in an air-tight container at room temperature. Re-heat in a 350-degree oven for a few minutes.
*European-style butter: Excerptfrom an article on thekitchen.com. site “Overall, European-style butters are favored for their rich taste — a direct result of the higher butterfat content. More butterfat also means a softer texture, faster melt, and often, a saturated yellow hue. With less water, European-style butters are often the preferred butter for baking — especially when the flavor of butter is just as important as its function.”
And according to our good friend Keith, who spent many years as a professional baker (and I paraphrase) – “The best butter for the home baker making croissants, or any pastries, is slow-churned European style butter that contains at least 82% butterfat. This type of butter contains less air and water which makes it more pliable and resistant to being absorbed in dough during lamination**.”
**Lamination: Lamination is the process of folding and rolling butter into dough over and over again, or in the case of this recipe, spreading soft butter over layers of thin dough, to create super-thin layers. These layers, which alternate between butter and dough, are what give croissants their signature honeycomb interior structure and their fabulously flaky texture.
***Pizza cutter: My dear friend Vicki explained to me why she preferred using a pizza cutter rather than a knife when cutting dough. Cutting dough with a pizza cutter makes a nice, thin cut. And unlike using a knife, a pizza cutter doesn’t flatten the dough next to the cut. Plus, it doesn’t stretch the dough as it’s being cut. Thanks Vicki for sharing your experience with all of us.
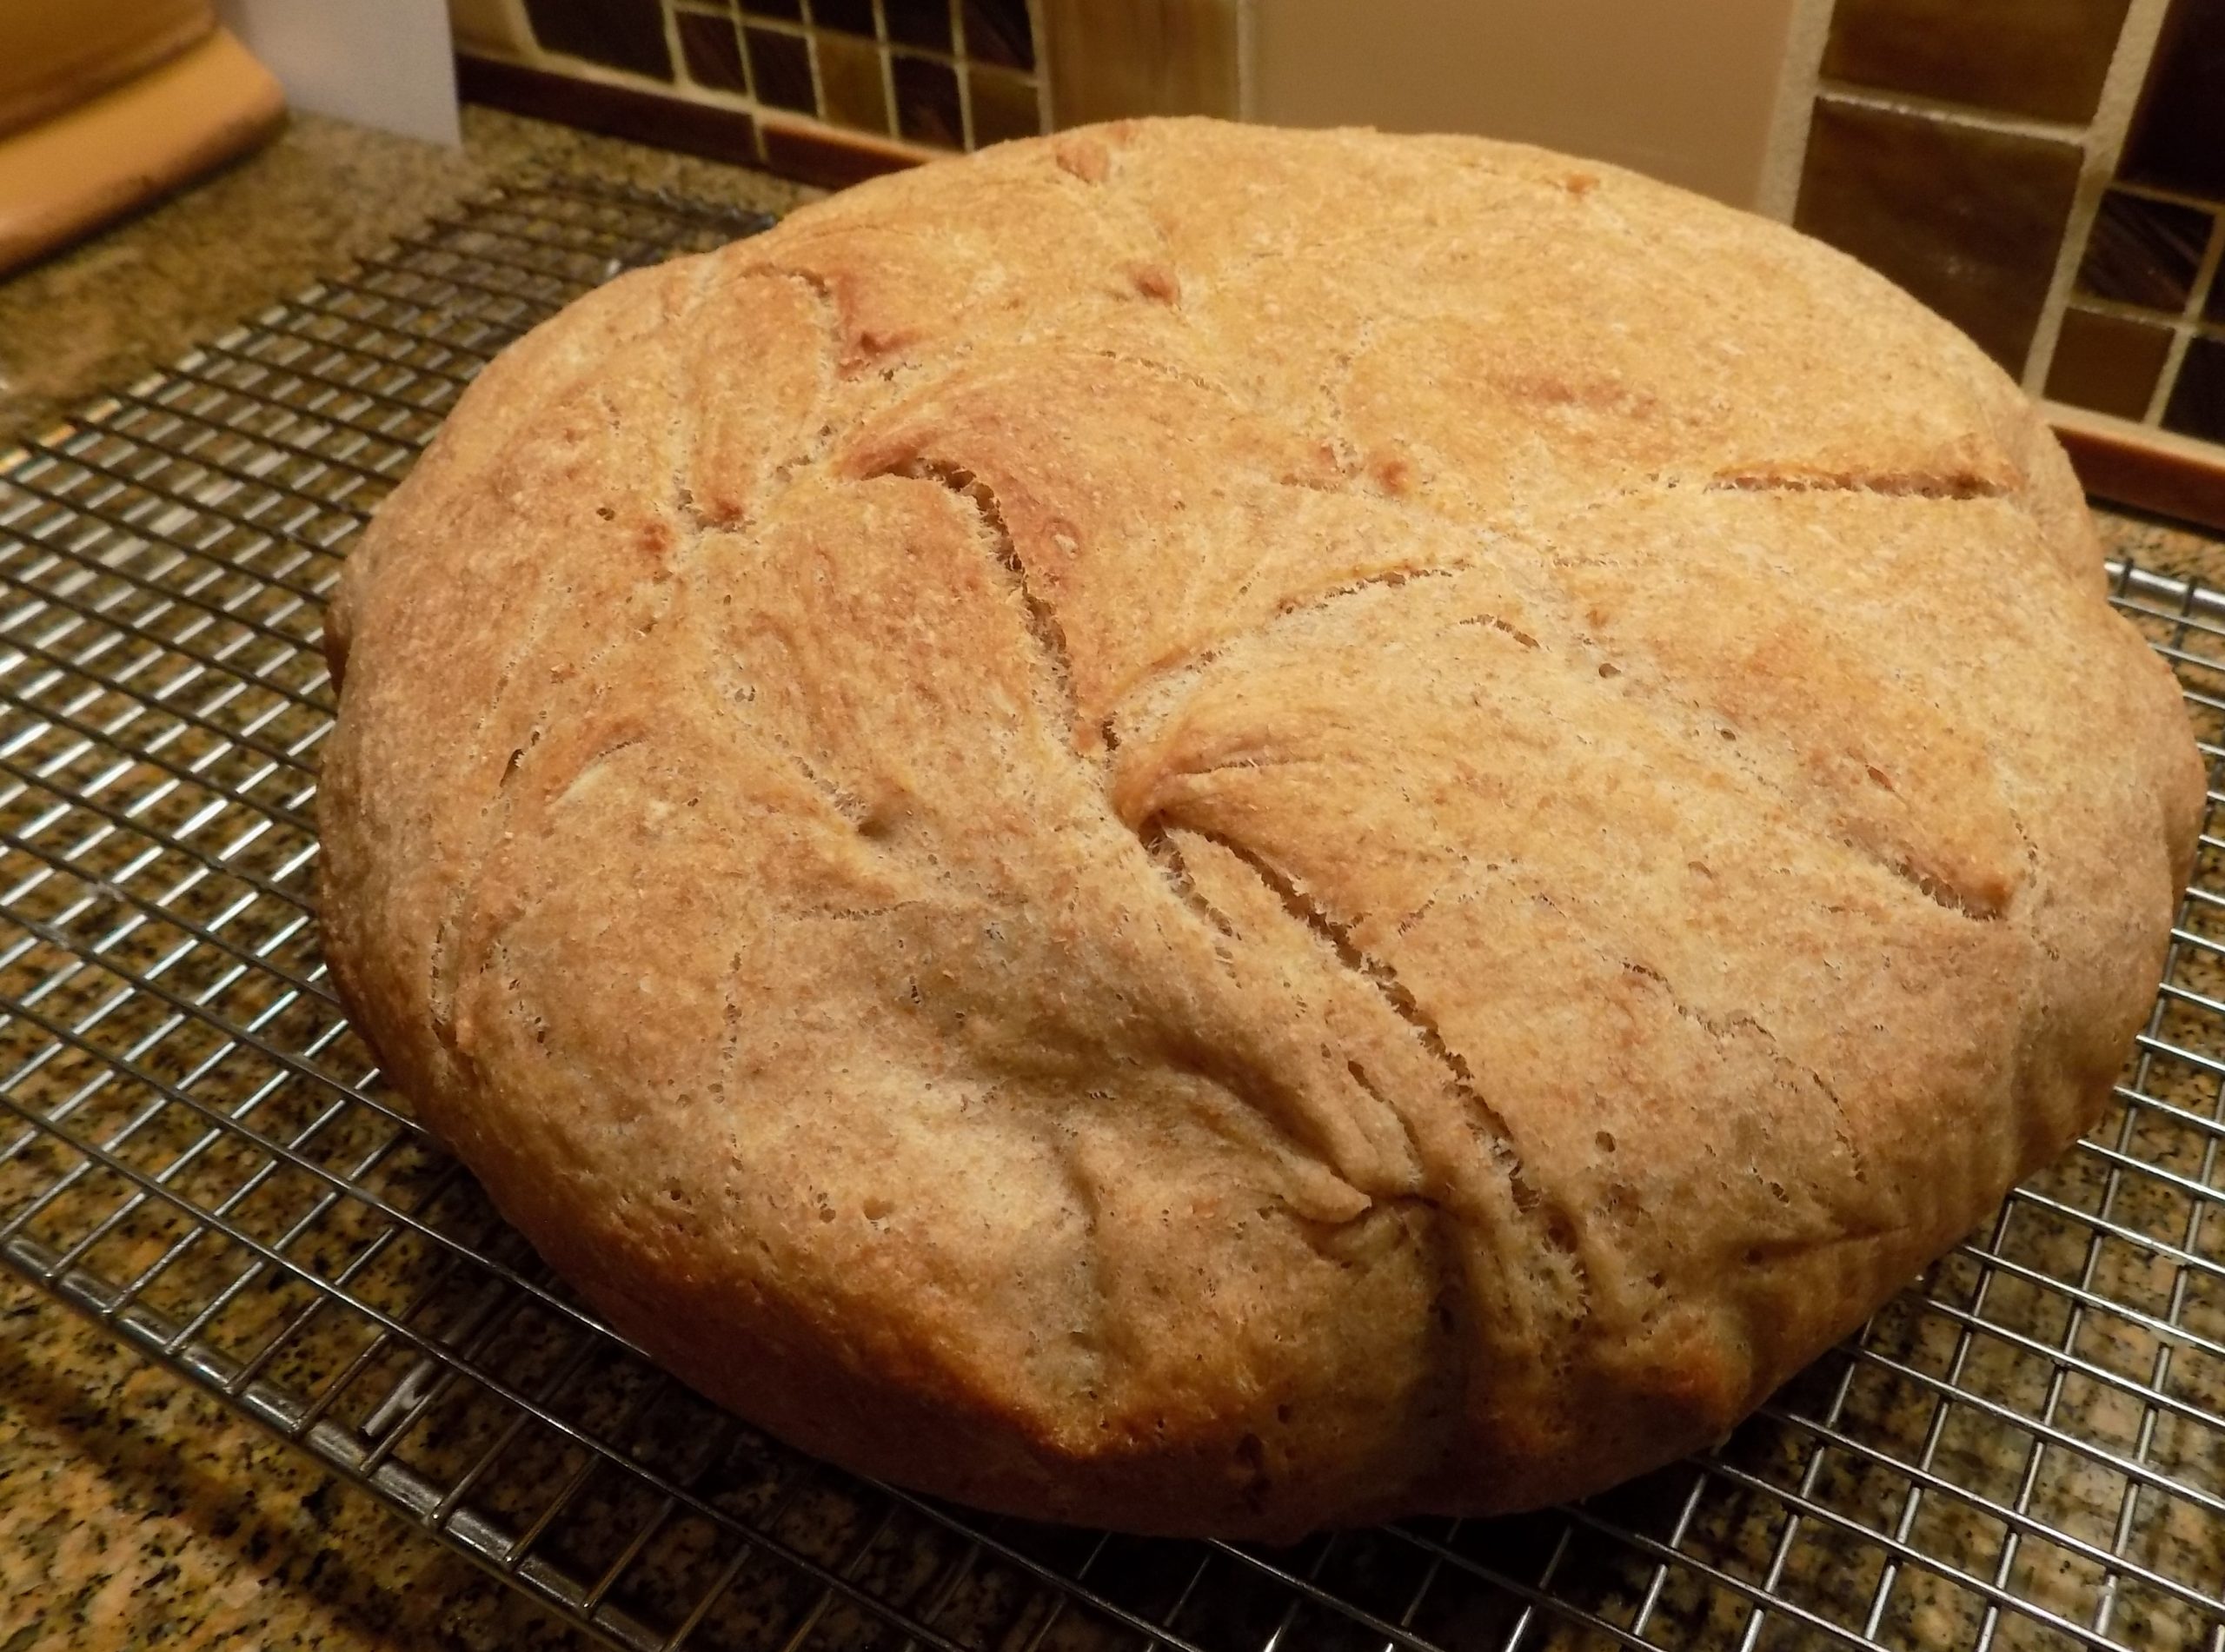
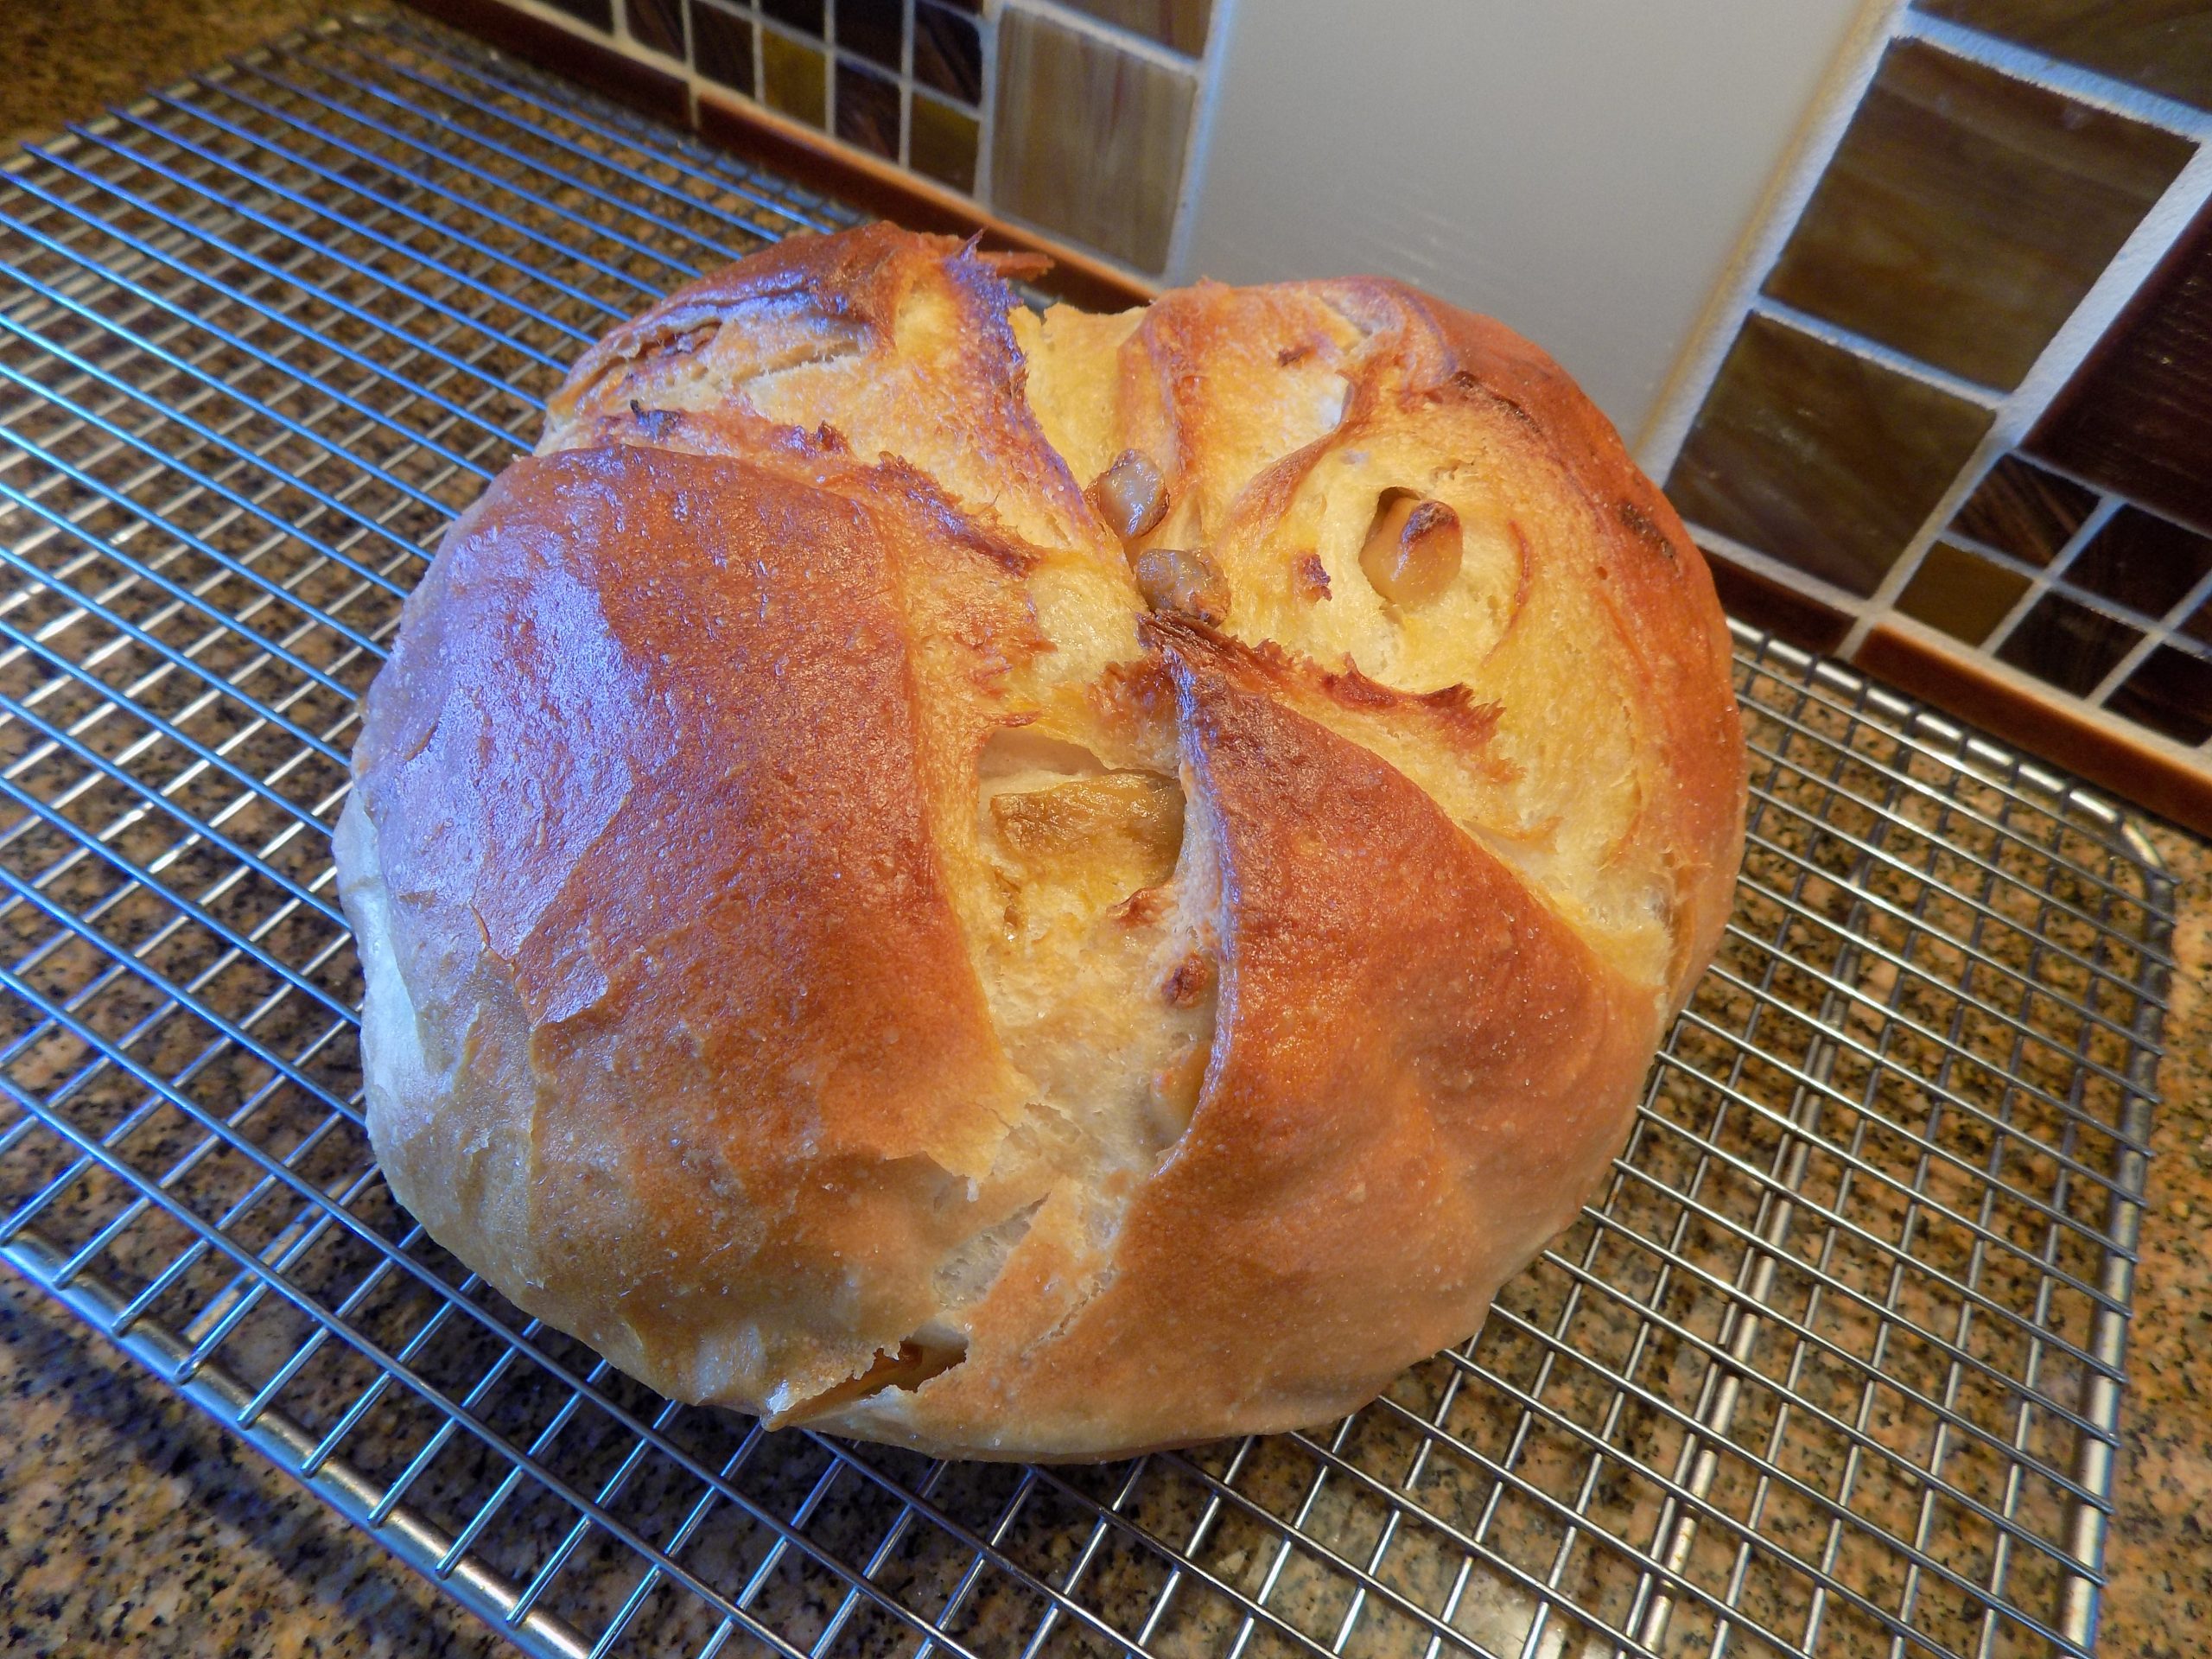
I am always amazed when I bake bread. Amazed that “we” actually produced such an awesome loaf. Me, myself, and I, that is! Of course, with the help of my little yeasty-beasty sourdough starter friends. But then, why shouldn’t they help me out? I’ve been feeding them conscientiously every 7-10 days for months. We’ve become buddies, comrades, and allies in my quest for the perfect sourdough loaf. And they’ve been very patient with me. Sometimes I have used them to less advantage. Other times they have shown their true colors. And this, dear friends, is one of those times. If I do say so myself, this is one darn good loaf of bread. Period! It’s flavorful, but not over the top garlicky. It’s chewy, but not too chewy. And the crust is divine. All and all, I’d give this bread a rating of 9.8 out of 10. (Nothings perfect, after all.) But this bread is about as good as it gets. And extremely easy to build. And let me tell you true, this bread makes the best ever toast. Lightly spread with soft butter, there is just nothing better to accompany bacon and eggs.
Plus, no fancy ingredients, not even bread flour required for this loaf. Just plain old unbleached all-purpose flour. And even if you don’t have a cast iron Dutch oven or a cloche (clay baker), you can simply bake the boule on a piece of parchment paper. It will still taste delicious. The crust might not be as fabulous, but the chewy texture and the light sourdough flavor will still be present. And of course, the lovely roasted garlic.
So, I see nothing stopping you from building a loaf that will knock your friends and family’s socks off. (They don’t need them on anyway. It’s SUMMER!)
As always, be the one who brings the entire family together around the dining table. With heaps of good and healthy food and lively conversation. Because these precious days together will not last forever.
I remember how I felt some days while my kids were young. I’d ask myself will this ever end? Will I ever have any peace and quiet? Will there ever be any milk left in the refrigerator?? But those days did end, and honestly, I’d bring a few of them back if that were possible. Because they were also joyous days. Hectic, frantic, but very gratifying. And always full of love. And the best times we experienced together almost always revolved around the heart of our home – the kitchen. Good food always makes for better companionship. And as cooks, we can make that happen.
Peace and love to all.
¾ c. sourdough starter discard
½ c. warm water
1½ tsp. instant dry yeast
1 tsp. granulated sugar
1¼ tsp. kosher salt
2½ c. unbleached all-purpose flour (more or less)
1 head garlic, roasted* then cloves roughly chopped
extra virgin olive oil, for greasing bowl and brushing on boule after baking
super-fine sea salt, for sprinkling over baked boule
Combine the sourdough starter discard, water, yeast, and sugar in the bowl of your stand mixer. Let stand for 5 minutes. Then add the salt and flour. Using your dough hook, knead until the dough is smooth, elastic, and quite stiff, about 6 minutes.
Pour a bit of olive oil around the dough, and using your fingers and a stiff rubber spatula, form dough into a ball. Cover with plastic wrap and let rise for an hour or until doubled. (If you gently poke a finger into the dough, an indentation should remain when you remove your finger.)
Turn the dough onto a lightly floured surface and pat into a rough rectangle or oval about ½-inch thick. Spread the chunks of roasted garlic evenly over the dough. Roll into a log starting with a short side.
To form into a boule, gently bend one end up towards the middle. Do the same with the other end. Then turn the dough over and tug and tuck towards the bottom of the ball until you’ve formed the dough into a tight ball shape. Place the dough ball, smooth side up on a piece of parchment paper long enough to allow you to lower the dough into a Dutch oven or cloche (clay baker). Cover the dough with greased plastic wrap and let rest for 60 minutes. (It should just about double as it rises.)
Meanwhile, place your Dutch oven or clay baker (cloche), lid and all, in your oven. After the dough has been rising for about 30 minutes, pre-heat your oven to 425-degrees. When the dough has risen sufficiently, carefully remove the Dutch oven or clay baker from the hot oven. Immediately use a sharp knife or lame blade to score an X about ¼-inch deep into the surface of the bread dough. This allows the bread to expand without tearing as it bakes. (Don’t press down too hard. You don’t want to deflate the dough ball.)
Carefully remove the Dutch oven or cloche lid and place the parchment paper and loaf in the bottom of your Dutch oven or on the bottom portion of your cloche. Then cover and place in the pre-heated 425-degree oven for 30 minutes. Remove the lid and continue baking for an additional 10-13 minutes or until the crust is nicely browned and the loaf sounds hollow when tapped. (Your instant read thermometer should read between 200 to 205-degrees.)
Remove from oven and carefully transfer to a cooling rack. Brush generously with extra virgin olive oil and sprinkle with super-fine sea salt. Let cool completely before slicing.
Please note: If you prefer a crisp, chewy crust, don’t slather with olive oil. Leave as is.
Store leftovers at room temperature wrapped in a tea towel.
*To roast a head of garlic, cut off the top of the garlic to expose the cloves. Drizzle with 1-2 teaspoons of olive oil. Cover and roast at 400-degrees for 60 minutes or until tender. Remove from oven and let cool until you can easily remove the golden, soft cloves from their paper-thin wrappers.
How can Miles possibly be comfortable with his back half on the desk surface? And a very comfortable amount of kitty bed still available to accommodate the rest of his big, fuzzy body. But there he lay as I wrote this post. My little buddy. My helper. And the guy who tells me not only is it lunch time, it’s kitty treat time too!
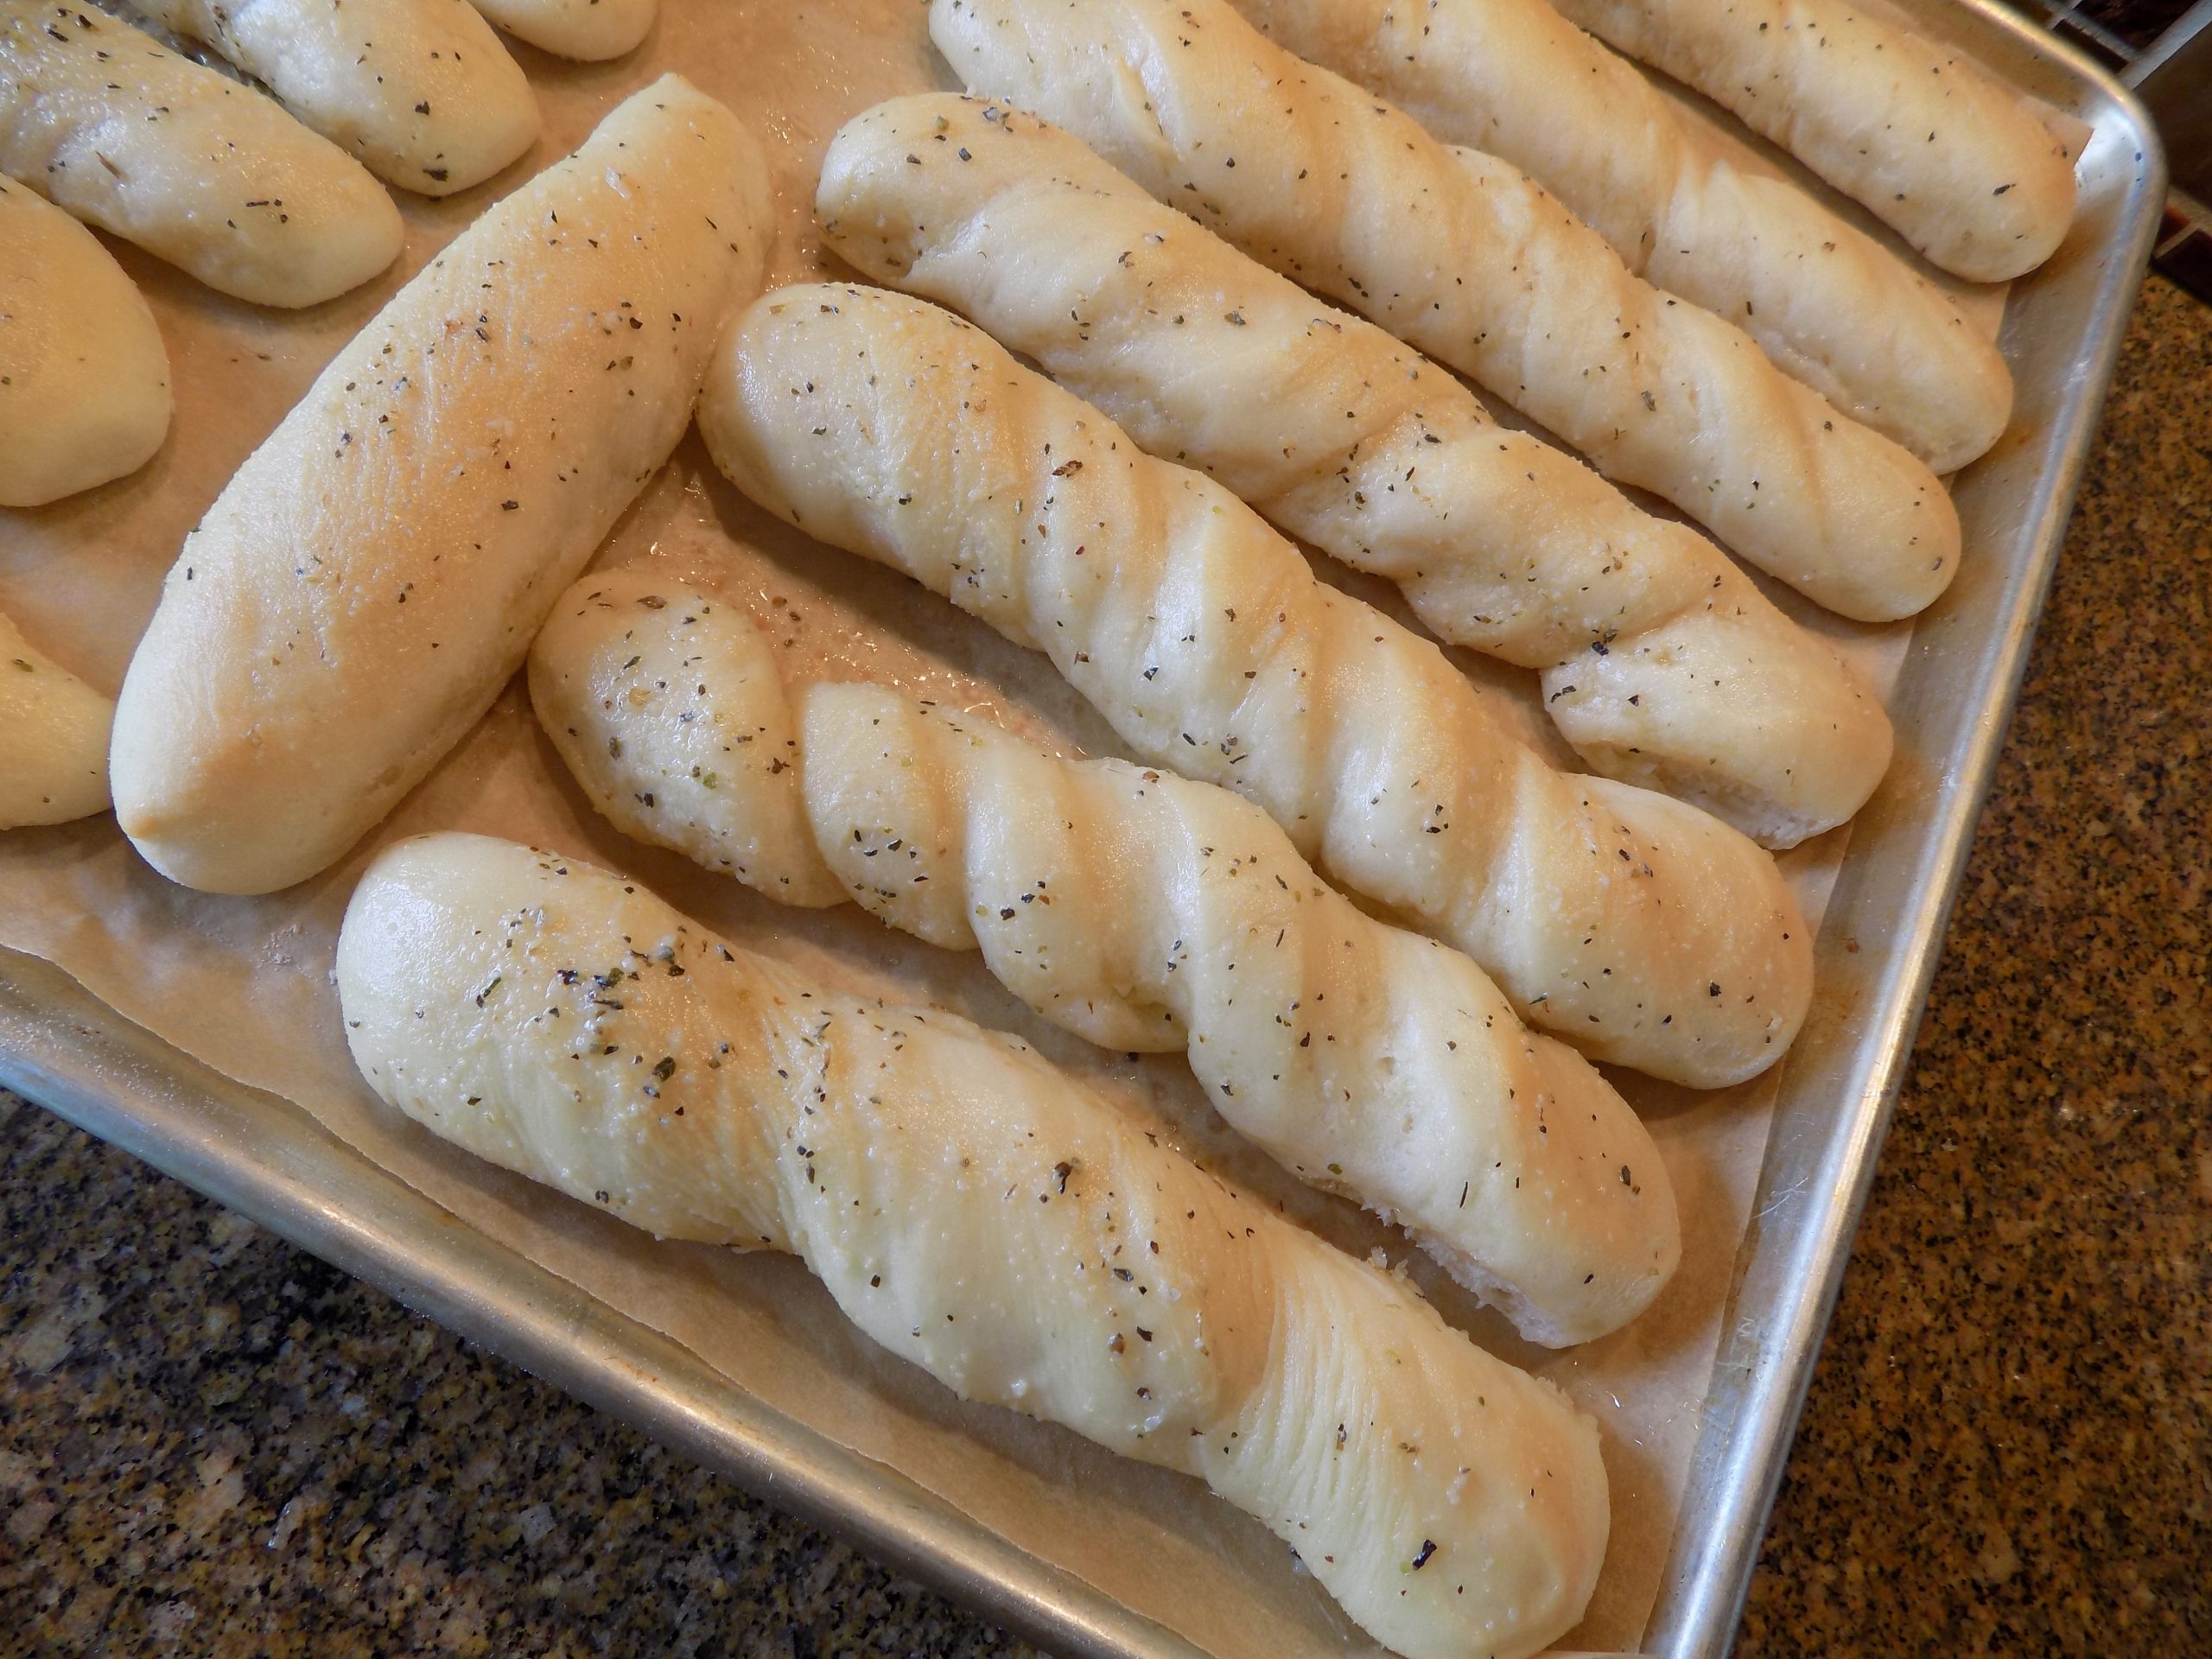
It isn’t often that I get to make a bread that’s as much fun to fix as it is to eat. But for me, breadsticks fit that statement perfectly. But breadsticks do have their limitations. They are not a utilitarian bread product. For example, you can’t put breadsticks in a toaster and serve them for breakfast. You can’t use them to make French toast or French dip sandwiches or any kind of sandwich for that matter. So, as a bread for all occasions, they are a bit lacking.
But when a piece of bread is needed to dip, dunk, or mop – soft breadsticks are unparalleled! First of all, they are the perfect shape. And if they are soft like these breadsticks, anything you dunk them in or slather on them is going to stick. And isn’t that a beautiful thing?!
And in the case of these breadsticks, you make the dough one day and bake it off the next day or the day after. (My favorite type of dough to make.) And just so you know, this is a very self-confident dough. It enjoys being alone in a cold and dark place. In fact, it absolutely insists on some time alone to contemplate whatever it is that bread dough considers worth its time to ponder. And if you forget about it for a day or two, it could care less. It knows full well that sooner or later it will be baked into perfect soft and tasty breadsticks. (We should all be blessed with this amount of confidence!)
So, the only thing left to say, is that these breadsticks are supremely easy to build, truly delicious, and go with all kinds of different dishes. And like every other type of bread we build in our own kitchens, an inexpensive alternative to the exorbitant or should I say extortionary price we are forced to pay for artisanal bread in a bakery or market. Just sayin’!
As always, play with your food and be creative. When you decide it’s time to spend some quality time in your home with your family, make it quality time spent in the kitchen. Believe me, your grown children will not remember that their childhood home was a bit dusty, or the garage was often cluttered. But they will remember the meals your family shared around the dinner table and the times you made cookies together. Let the dusting wait.
Peace and love to all.
1 c. warm water
½ c. whole milk
½ c. sourdough starter discard
2 tsp. instant yeast
1½ tsp. granulated sugar
2 tsp. kosher salt
3 T. olive oil, plus more for greasing the mixing bowl
4 c. unbleached all-purpose flour, more or less
4 T. (½ stick) unsalted butter, melted
½ tsp. kosher salt
¼ rounded tsp. granulated garlic
¼ rounded tsp. Italian seasoning
Combine the warm water, milk, sourdough starter discard, instant yeast, sugar, salt, and 3 tablespoons olive oil in the bowl of your stand mixer. Using the bread hook, add as much flour as necessary to make a soft dough. When the dough has been kneaded for several minutes, and there is still a bit of dough clinging to the bottom of the bowl, the dough is ready for the next step.
Pour a bit of olive oil around the edge of the mixing bowl. Using your fingers and a stiff rubber spatula, form the dough into a nicely greased ball. Cover with plastic wrap and place in your refrigerator overnight or up to three days. When ready to use, remove the dough from fridge and let sit on your counter for an hour.
On a nicely floured surface, shape the dough into a rectangle about 16×7-inches. (I use a rolling pin but patting out the dough with your fingers works too.) Cut the dough into 16 1-inch strips with a pizza cutter. Twist each piece gently and place on a parchment paper lined baking sheet. (They can be fairly close together.)
Cover with a tea towel or piece of plastic wrap sprayed with non- stick spray. Allow to rise until doubled (approximately an hour).
Bake in preheated 350-degree oven for 22-25 minutes or until a very light golden brown. The internal temperature should measure at least 200-degrees.
While the breadsticks are baking, combine the melted butter, kosher salt, granulated garlic, and Italian seasoning. Remove breadsticks from oven and immediately brush with butter mixture.
Serve warm or at room temperature. Great dunked in olive oil, soup, marinara sauce, or used to clean one’s plate or bowl. Or, if you are feeling really unorthodox, you can serve the breadsticks in place of dinner rolls. But, people will talk!
Store any leftovers in an airtight container at room temperature.
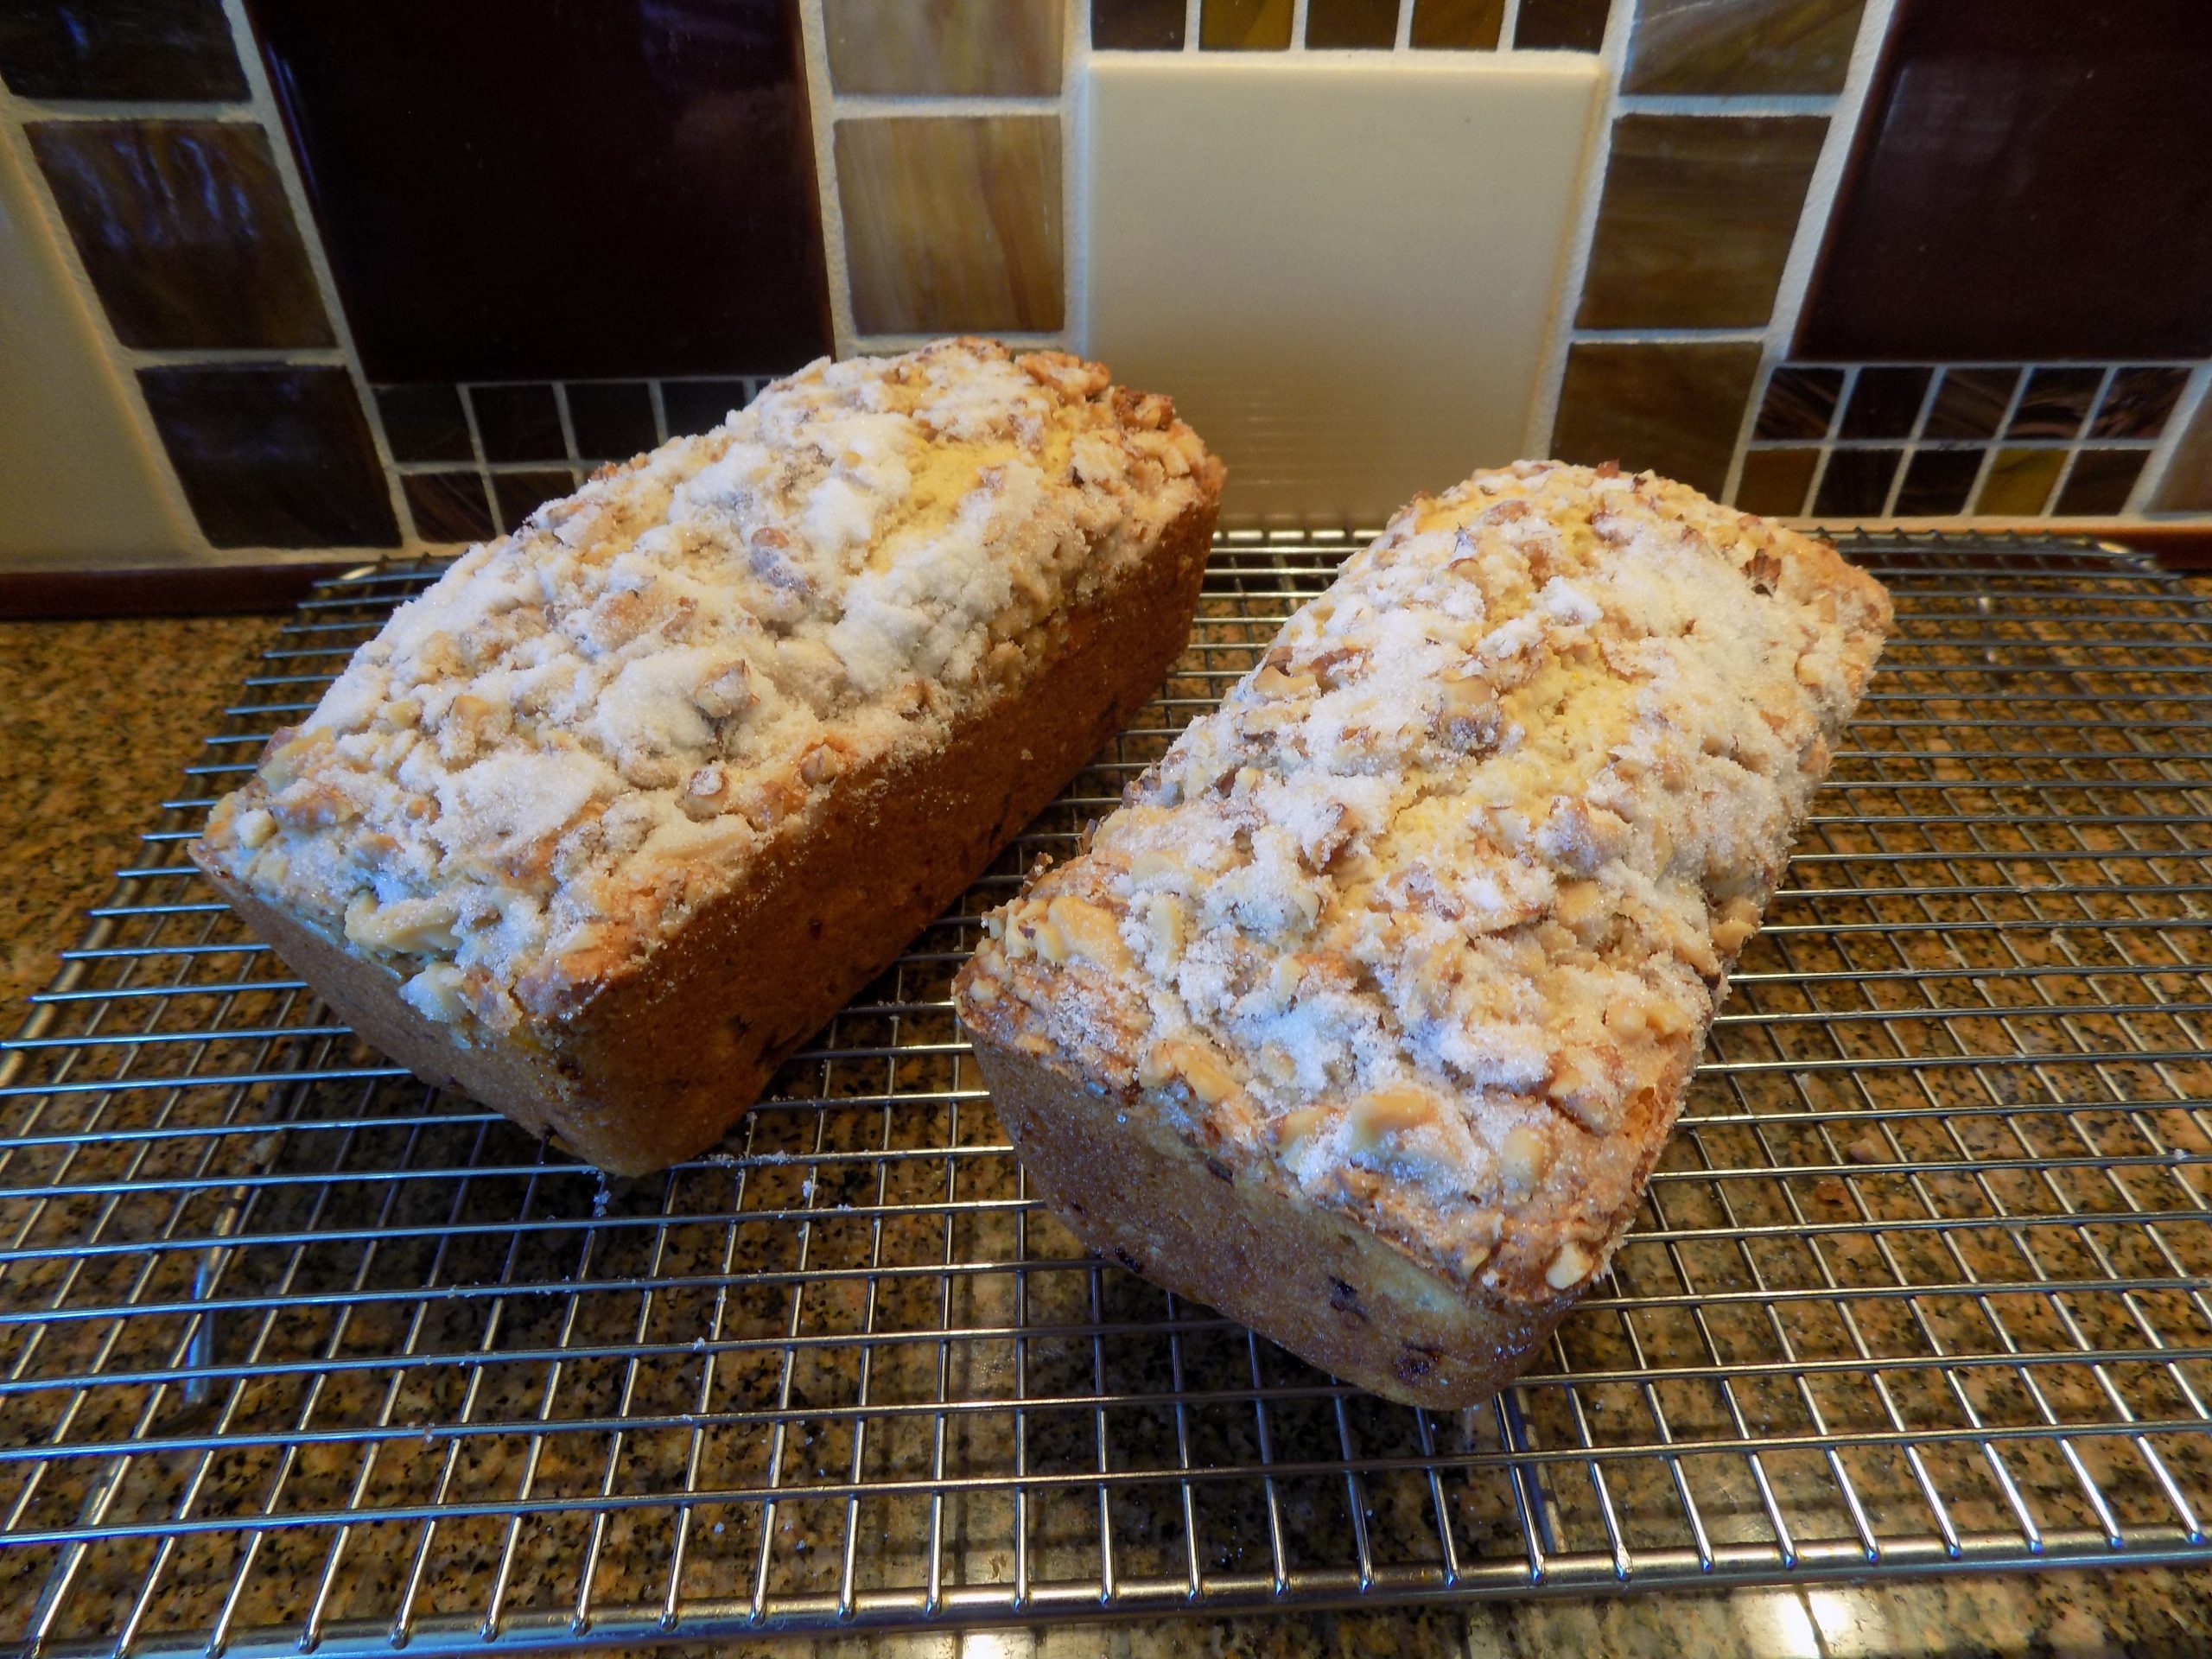
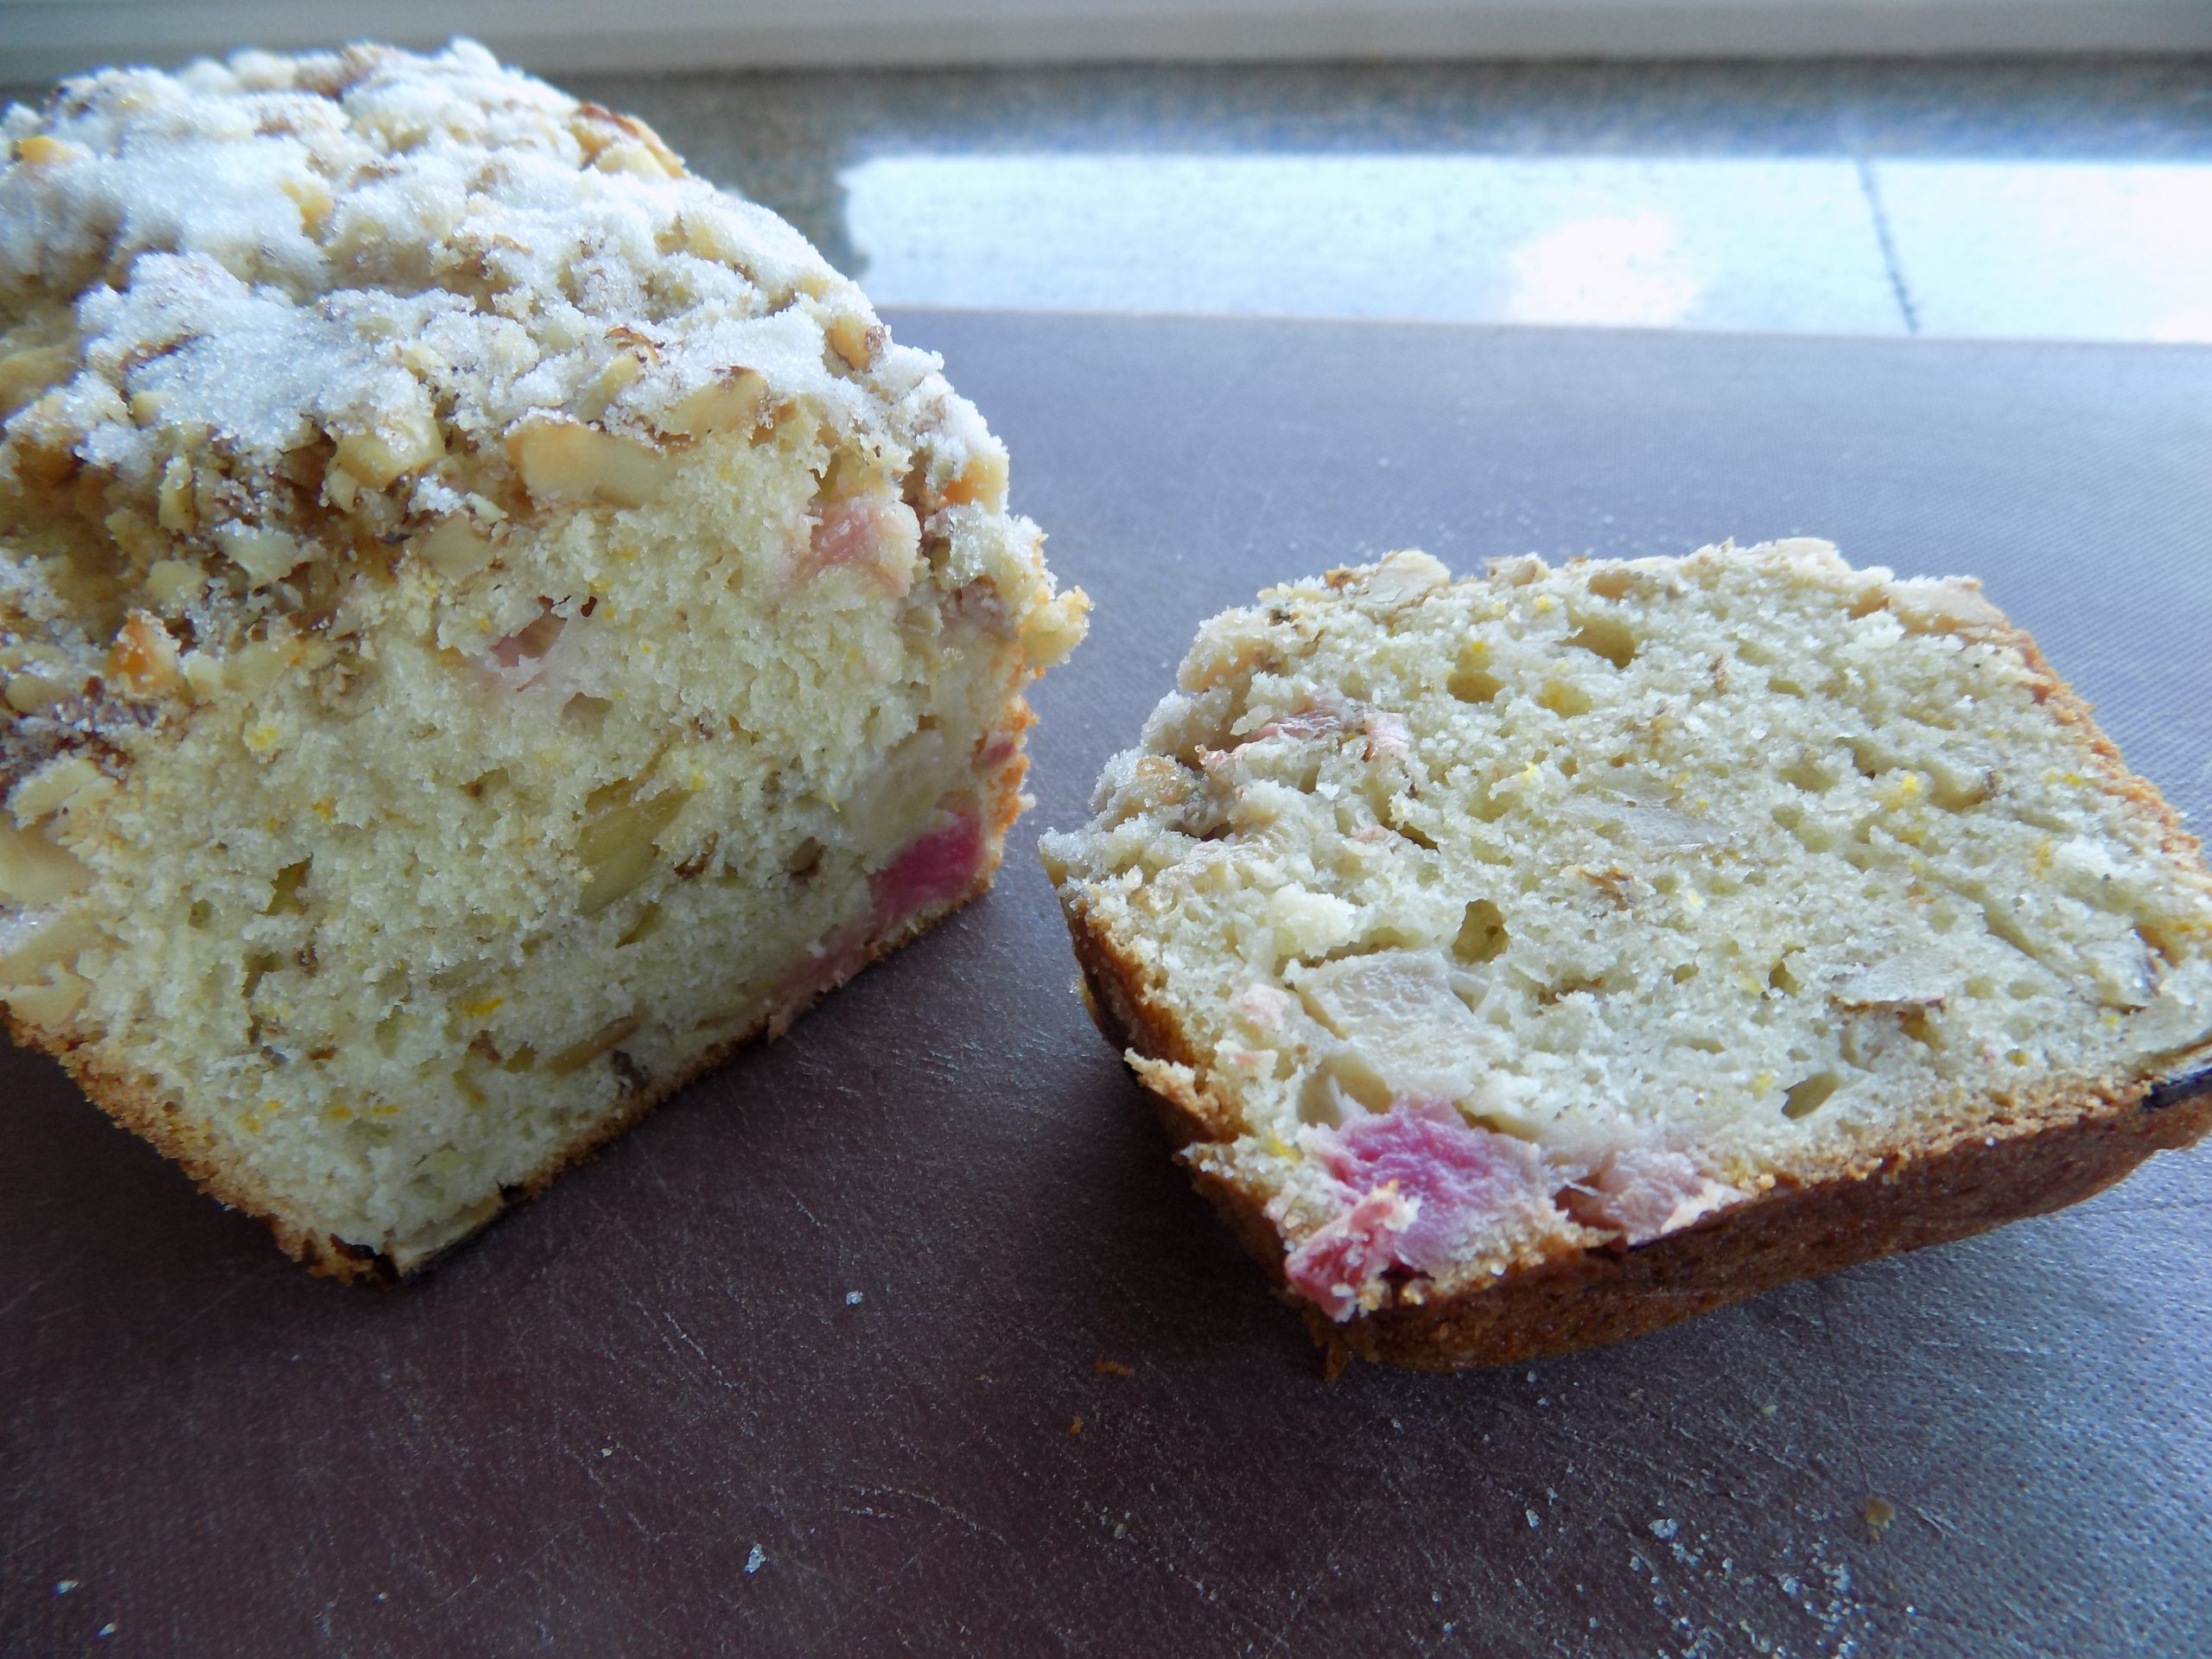
I found this incredible recipe for rhubarb quick bread on the cutco.com site. The topping I used for this bread, well that’s another story.
I read about the topping somewhere, but for the life of me I can’t remember on what site this marvelous suggestion for topping a quick bread was revealed. But I must state for all to read; this way of topping a quick bread is going to become standard procedure from now on at Chez Carr. If of course the batter contains nuts. But to make any sense out of what I just wrote, you should first read this recipe. Then afterwards, if you decide to make this bread, you will undoubtedly understand why I would make such an unequivocal statement about a topping. Because the topping is just that fantastic! Crunchy, nutty, and sweet. But enough about the topping. It’s time to talk about the bread itself.
Amazing. Delicious. Moist and tender. With just enough orange flavor to be interesting, but in no way pervasive. Not to mention, the bread is easy to prepare and beautiful in appearance. So, basically, a perfect quick bread. And I truly do hope you make this bread while fresh rhubarb is still available. It is one of the best fruit breads I have ever tasted.
As always, keep counting your blessings. Keep finding joy in family and friends. And if you are able, share your blessings with others. Last evening, we had our dear friends Jim and Margo over for dinner. It was such a joy to once again have people in our home. And tonight, we are going to a restaurant with our dear friends Mark and Vicki. And afterwards, they are coming over (they live next door) for dessert. After such a difficult year with covid looming in every direction, it is wonderful that we are finally free to invite a bit of normalcy back into our lives. Hopefully the same is true for each of you.
Peace and love to all.
½ c. (1 stick) unsalted butter, room temperature
2/3 c. + 2 T. granulated sugar, divided
2 eggs
2 tsp. grated orange peel
1½ tsp. vanilla extract
1½ c. unbleached all-purpose flour, fluffed
½ tsp. baking powder
½ tsp. cream of tartar
¼ tsp. baking soda
½ tsp. kosher salt
½ c. sour cream
2 generous c. finely diced fresh rhubarb
1¼ c. chopped walnuts, divided
Cream butter and the 2/3 cup granulated sugar in a large bowl until light and fluffy. Beat in eggs, orange peel, and vanilla. In a separate bowl, whisk the flour, baking powder, cream of tartar, baking soda, and salt together. Add to the butter mixture, alternating with the sour cream. Fold in the rhubarb and ¾ cup of the chopped walnuts.
Scoop into 2 8-inch loaf pans coated with cooking spray. Sprinkle the remaining ½ cup chopped walnuts evenly over the top of both loaves. Lightly press the nuts into the batter. Then sprinkle on the remaining 2 tablespoons of granulated sugar.
Bake in a pre-heated 350-degree oven for about 45 minutes or until a toothpick inserted in the middle of the bread comes out clean. Don’t overbake.
Cool for 10 minutes in the pan, then gently remove and place on a wire rack to cool completely before slicing into fairly thick pieces. If desired, gently warm before serving.
Best eaten within a couple of days. Or freeze the second loaf for later. Or even better, give the second loaf to a neighbor or friend.