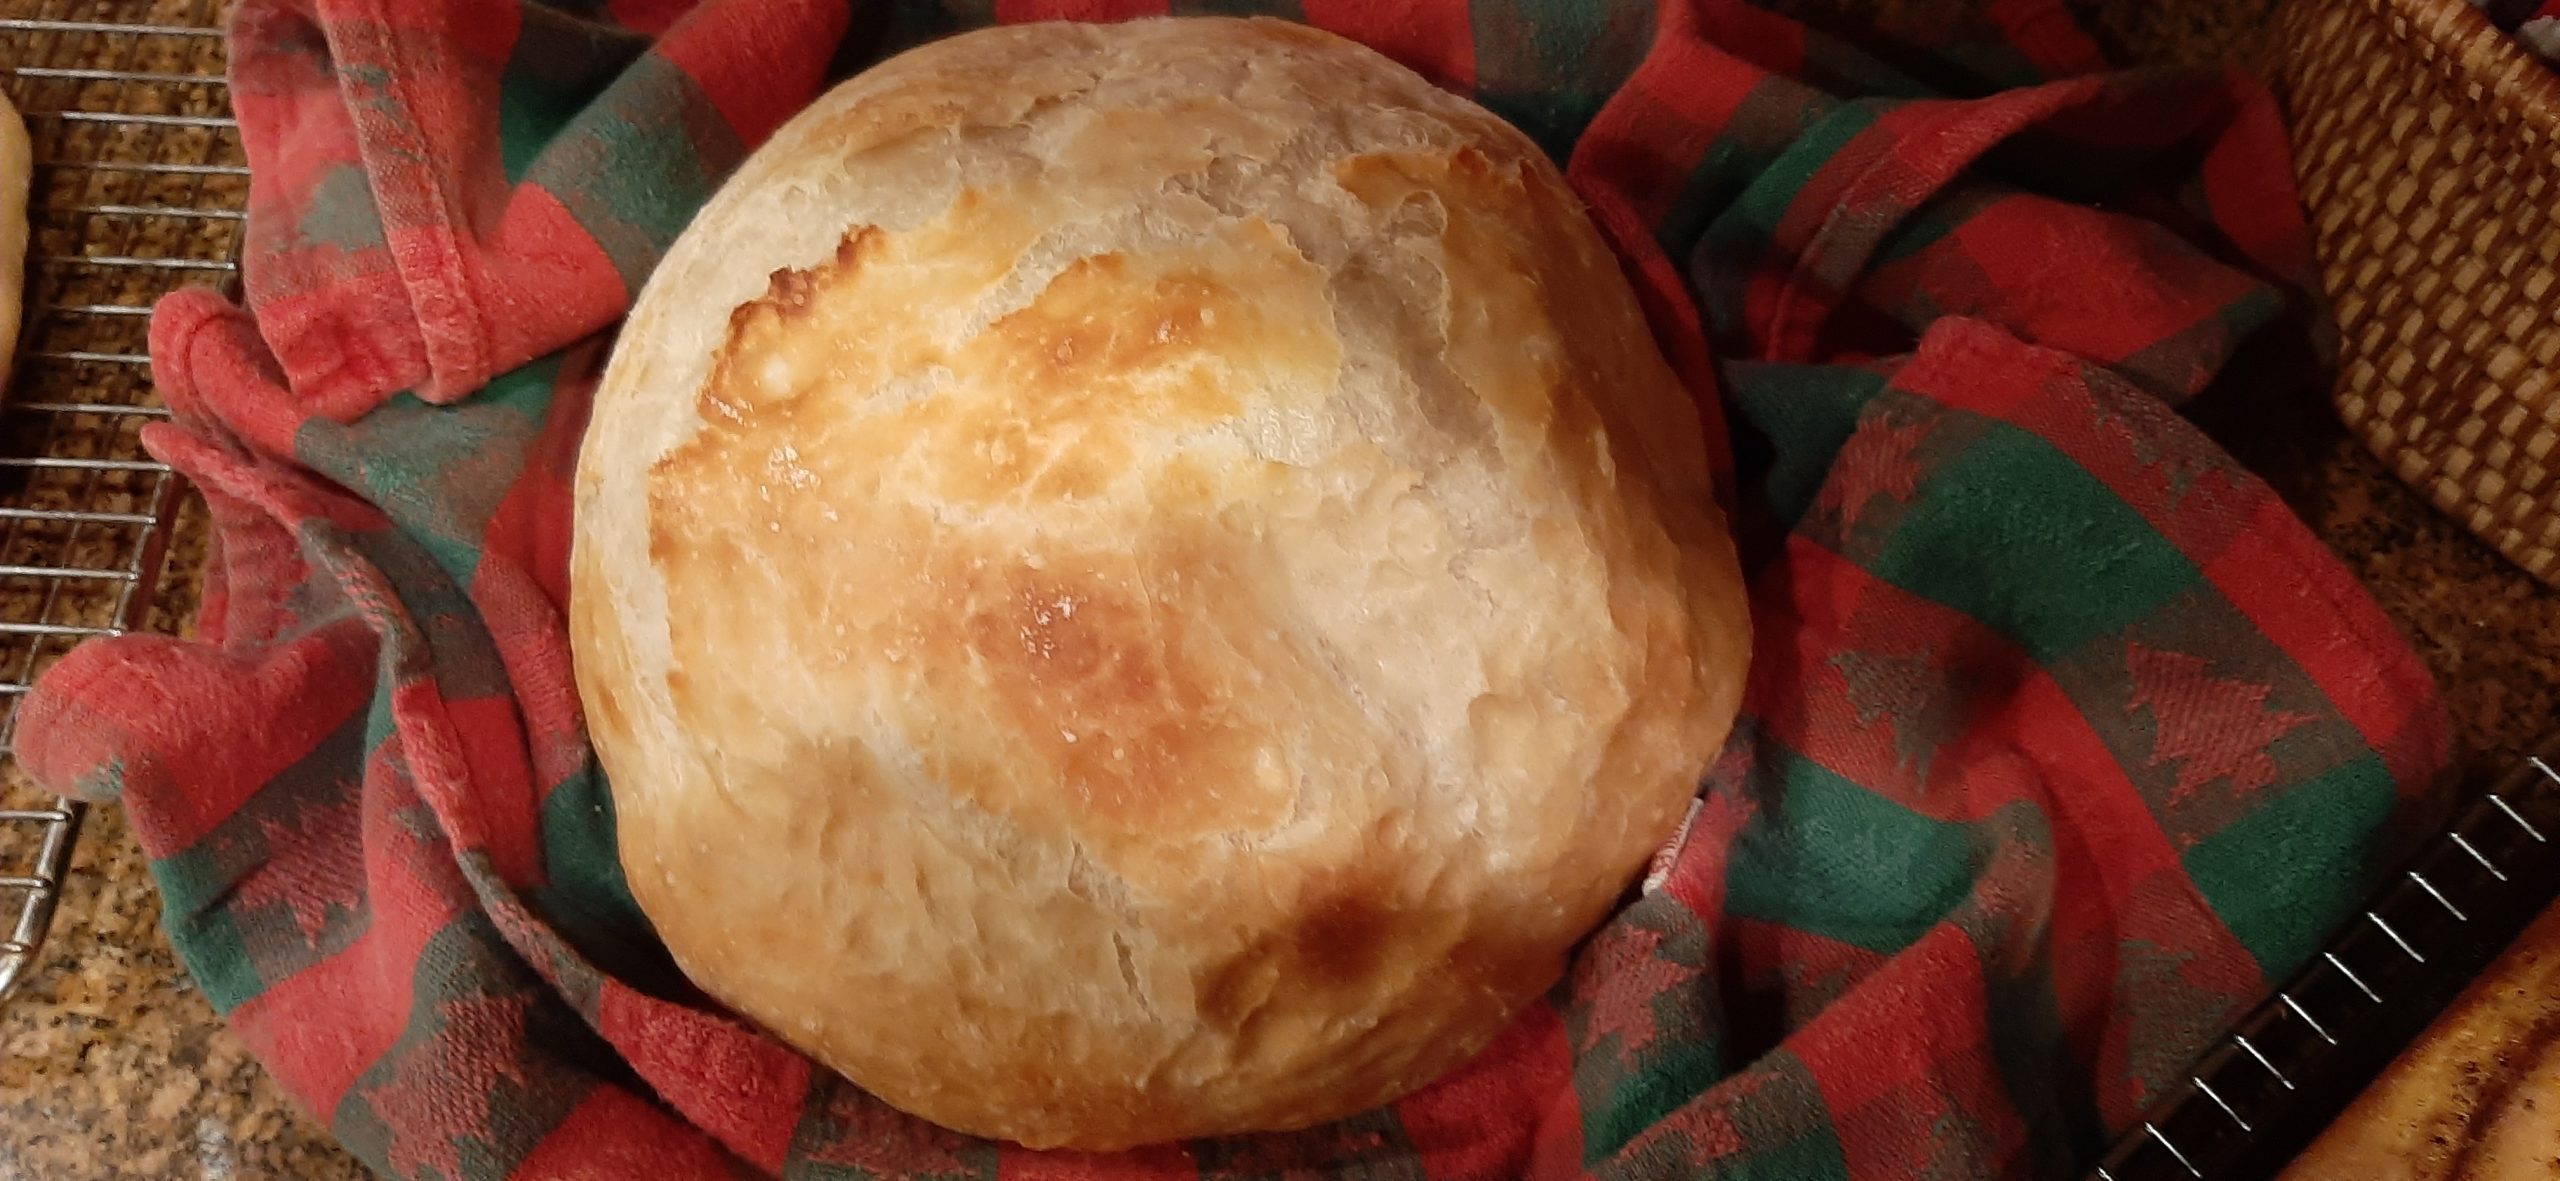
OK, I recently posted a recipe for Baked English Muffins, the easiest English muffins I have ever made. And now, I am posting a recipe for the easiest yeast bread I’ve ever had the pleasure to build. And if you also choose to make it, the easiest bread I believe you too will ever prepare. The bread, because of its round shape, should be referred to as a boule. That is if you are French and want to be fancy about it! And since I am and I do, this recipe results in a chewy and delicious boule. Which seems a bit too fancy for this bread because of the ease of preparation. But I’m going with it anyway because this bread is just that good! Such a small amount of effort involved as to be almost too good to be true. But please believe me, this is the bread recipe you need in your life if a) you hate to bake bread, b) you have no time to bake bread, c) you don’t even have enough time to go to the grocery store. Because bottom line, you can get the dough mixed in a shorter time than you can get your car out of your garage and down your driveway. Don’t believe me. Then stop reading this preface and look at the recipe itself.
Good – your back. I always miss you when you’re gone. Anyway – I used this bread the other evening to make garlic bread. And it was perfect. Nice and chewy and very much like the expensive chewy Italian bread we all adore. And the whole loaf (boule) only cost me a few pennies to make. (Aren’t I the thrifty one!)
So, don’t hesitate. Even if you’ve been baking bread for decades like I have, we all need a break occasionally. No one needs to know how easy this bread is to make. That can remain our little secret.
And as always, peace and love to all. And Happy, Happy New Year.
3 c. bread flour, fluffed, plus more for dusting
½ tsp. instant yeast
1¼ tsp. kosher salt
1½ c. warm water (about 110 degrees)
In a large bowl combine flour, yeast, and salt. Stir in the water. The dough will look like it needs more flour. Resist the temptation. Cover the bowl with plastic wrap. Let the dough rest at least 12 hours, preferably a few hours longer, at room temperature. (After a few hours the dough will look kind of caved in. That’s exactly what you want.)
After the dough has rested, place a piece of parchment paper in a medium sized bowl. Then, generously flour a work surface. (I use a floured pastry cloth on my kitchen counter.) Scoop the dough onto the floured surface. Sprinkle with a little flour and gently shape the floured dough into a ball. Then place the ball in the parchment paper lined bowl. Cover with a tea towel and let rest for at least 30 minutes.
While the dough is resting, place a covered Dutch oven (cast iron or enameled) or clay baker in your cold oven and set the temperature to 450-degrees. (You want your baking pan to get hot right along with your oven.)
After the dough has rested, carefully remove the pot from oven. Carefully take off lid. Pick up parchment paper with dough and place directly in pot. Cover with lid and bake 25 minutes with the lid on. Then remove the lid and bake another 12-15 minutes, or until the loaf is golden brown and the internal temperature reaches between 195 and 205-degrees.
Remove from oven and allow to cool before slicing. Great for garlic bread or sliced, toasted, and slathered with butter and jam.
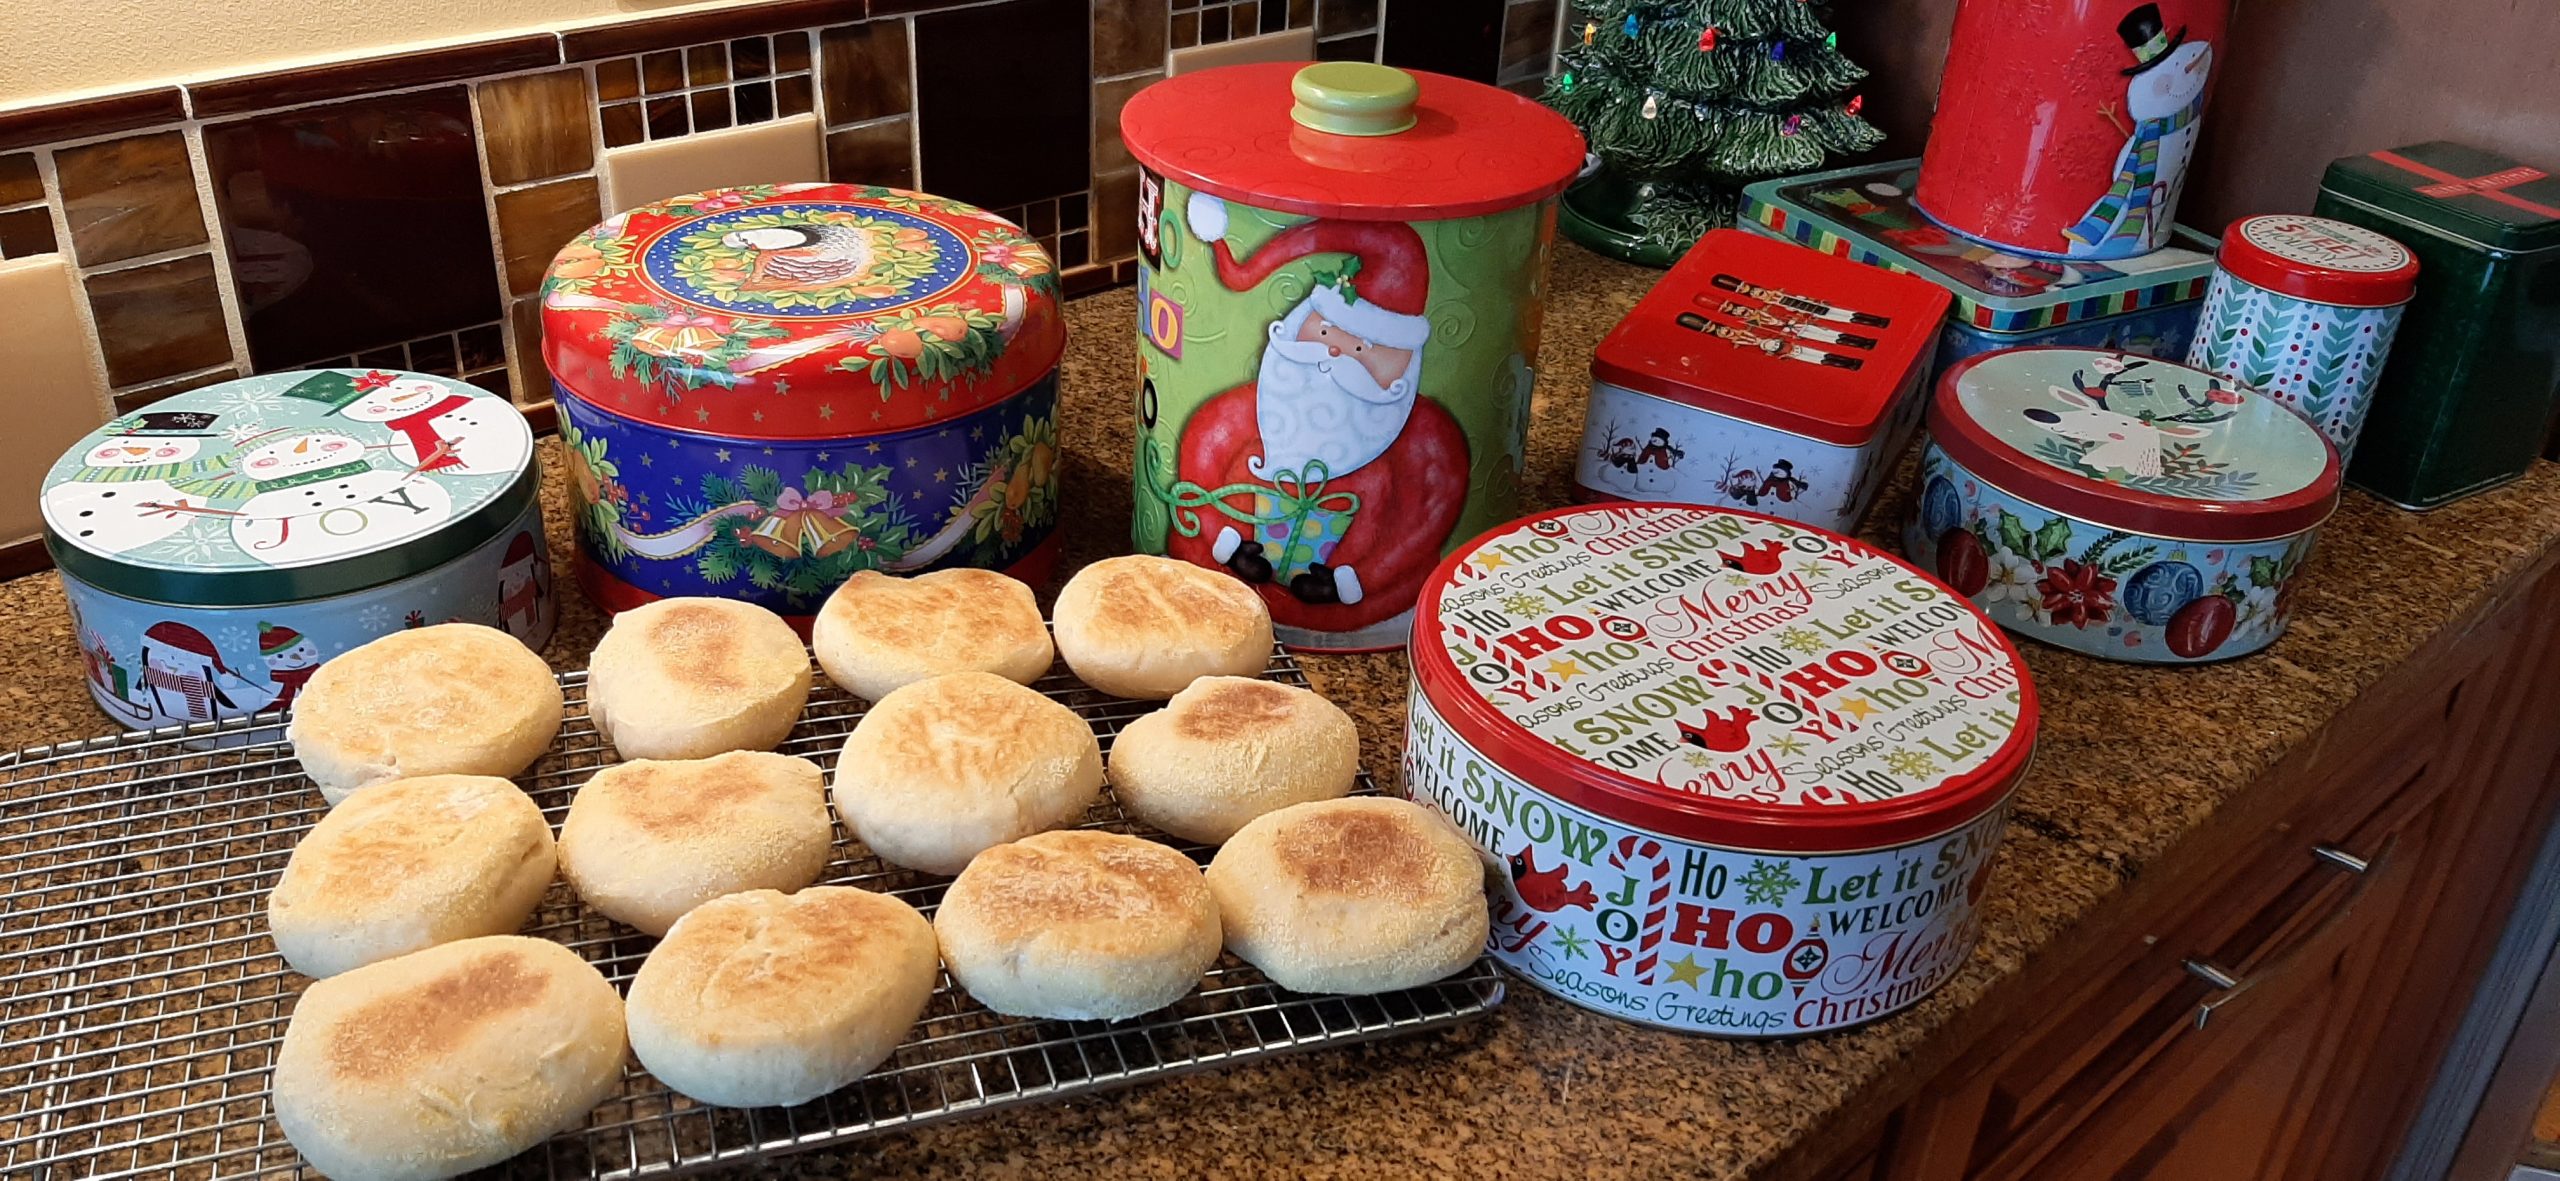
It must be Christmas at the Carr’s. Why else would there be all those cookie tins on the counter? And fresh English muffins.
OK, these have to be the easiest and tastiest English muffins I have ever made. And all the credit goes to DrDan from 101cookingfortwo.com.
It all started with me wanting to make something new for Christmas morning – Black Forest Ham Breakfast Casserole Topped with Blender Hollandaise. (Basically, the lazy man’s (in this case woman’s) answer to Eggs Benedict.) To go along with Light and Fluffy Cinnamon Rolls with Rum Raisin Cream Cheese Frosting. (recipe on site) (And yes, of course, there must be cinnamon rolls for Christmas morning! At least at our house.)
And I know. A bread-based casserole and cinnamon rolls. How can you possibly justify making two breakfast dishes with that much gluten, Patricia Ann? Well, you must remember – the two dishes are for Christmas morning. No further justification required!
Anyway, since I have never made the breakfast casserole, and although I hope it will be delightfully delicious, there is always the possibility that it won’t. But I decided I couldn’t go too far wrong if I started with homemade English muffins.
And I have a positive feeling about this casserole. I just know it’s going to be delicious. Anything slathered with my homemade Blender Hollandaise (recipe on site) is just bound to be tasty. Even shoe leather would taste fantastic topped with this creamy, buttery lemon sauce. (It is truly delicious and ever so easy to make.) But back to this recipe.
Easy, easy, EASY! No mixer required. But the dough must rest overnight. And I think it’s best if you have a set of English Muffin Rings*. I got mine in one day with Amazon Prime. The rings make the process almost foolproof.
And I can’t begin to tell you how delicious these muffins are. OMG – never will I buy English muffins again. They are just so good and so inexpensive to build.
And if the breakfast casserole turns out to be delicious, I promise to share the recipe with you. (Well, of course I will!)
That’s it for today. Mr. C. has a big band concert this evening in Anacortes. And of course, I am going along, even though I have heard the concert twice already. But can you ever get too much jingle jazz? I think not! Just like you can’t make too many cookies or too much candy for Christmas. Just isn’t possible.
So, happy holidays to all. Even though I might not personally know you, I still consider you a friend. A friend who shares my love of cooking. And isn’t that a great way to start any relationship. With a shared passion. So, thank you for your friendship, and may it continue for years to come.
And as always, peace and love to all.
1½ c. whole milk
2 T. unsalted butter, melted
4½ tsp. granulated sugar
4½ tsp. rapid rise or quick dry yeast
¾ tsp. kosher salt
3¾ c. unbleached all-purpose flour, fluffed
cornmeal
Warm the milk in a large glass mixing bowl in your microwave to about 105-degrees.
Stir the warmed milk, melted butter, granulated sugar, and yeast together. Mix well and allow the yeast to proof for about 5 minutes or until starting to foam. Add the flour and salt to the yeast mixture. Mix well, scraping the sides of the bowl to make a shaggy dough.
Cover the dough with plastic wrap. Allow it to sit overnight at room temperature. The dough will sink a bit rather than keep rising. (This is what you want!)
Lightly grease the inside of a dozen 3-inch baking rings* and set them on a large parchment paper lined baking sheet.
After sitting overnight on your counter, turn the dough onto a floured work surface, gently roll into a ball, and then cut into 12 equal pie shaped pieces. (First, I cut the ball in half, then in half again. Then with each quarter, I cut 3 equal (or as close as possible to equal) sized pie shaped pieces. (Be gentle with the dough. Do not work it too much.)
Place a small bit of cornmeal in a shallow bowl. Gently form each piece of dough into a rough ball and coat with cornmeal.
Place the cornmeal coated balls into the prepared rings and flatten each one gently to fill the ring. Then using a finger, “dimple” the center in about a quarter of an inch. This will help the muffins bake flatter. Allow the muffins to rest for about 30 minutes while you pre-heat your oven to 400-degrees with another parchment paper lined large baking pan heating along with the oven.
Remove the preheated baking sheet from the oven. Carefully remove the muffins from the rings and place them on the hot baking sheet. Sprinkle each muffin with a bit more cornmeal.
Bake for 10 minutes. Flip the muffins. Bake another 8 minutes or until the color is golden brown, and the internal temperature reaches at least 200-degrees.
Remove from oven and cool completely before storing in an airtight container in your refrigerator.
*I purchased Lyellfe – 20-piece English Muffin Rings from Amazon. $19.99. And I like them very much. I figure I will recover the cost of the rings after the next batch of muffins I make because they are so inexpensive to make and so expensive to buy.
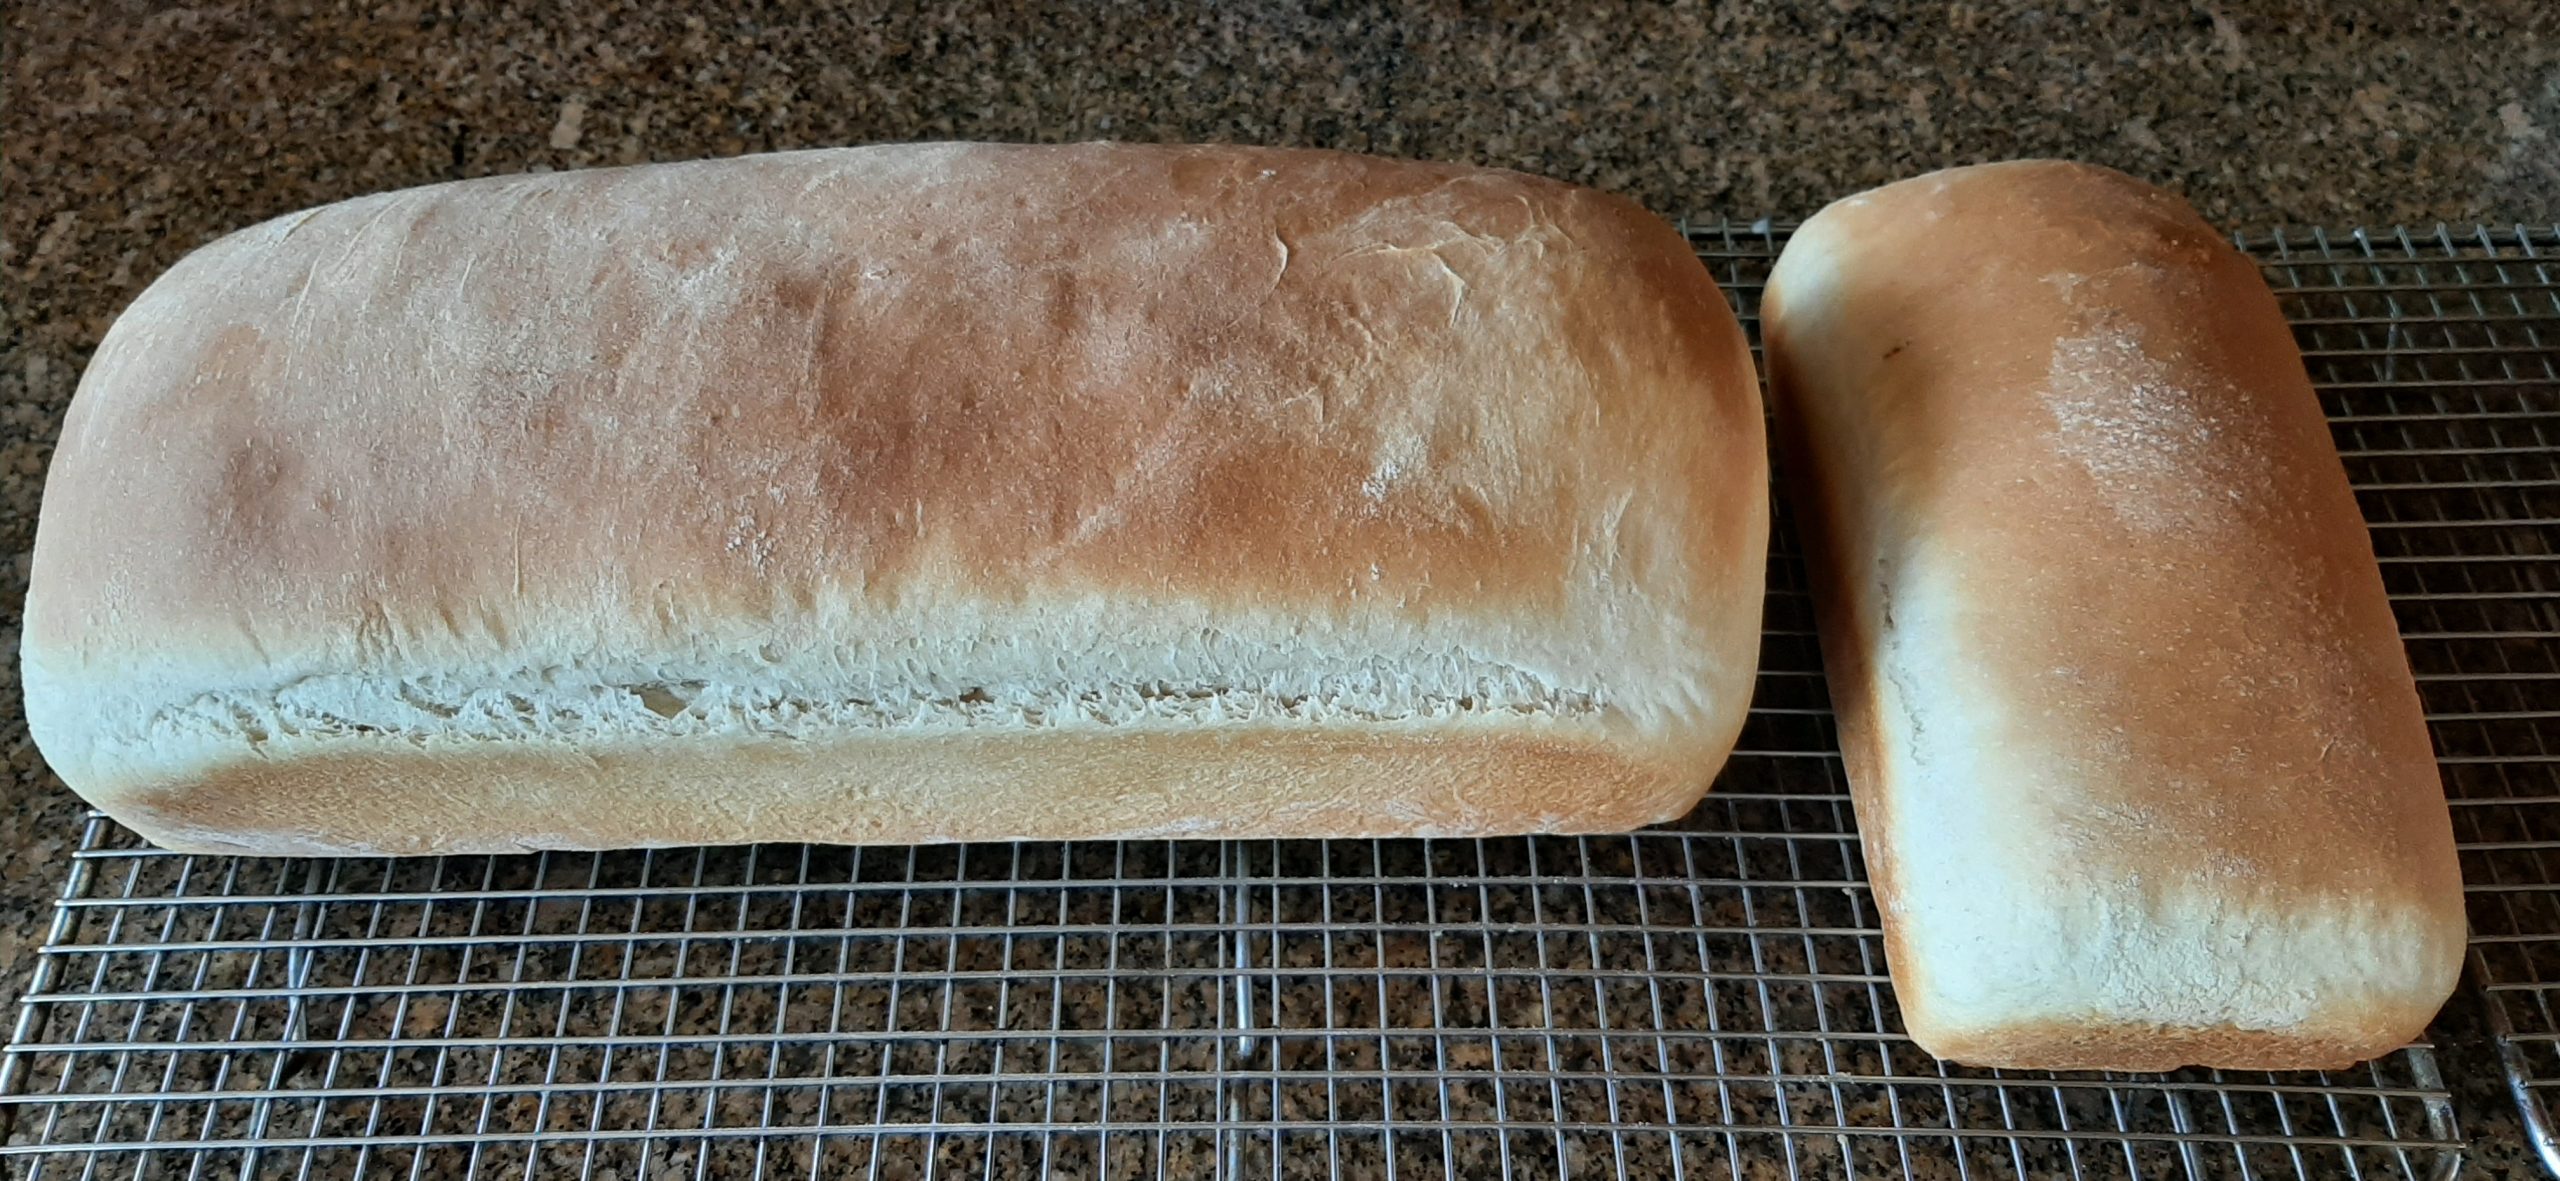
If you ever wanted to bake a simple white sandwich or part whole wheat sandwich bread for a gathering, then these two recipes would work well for you. They are both easy to prepare, taste terrific, and feed lots of people. Or as I am going to do with the leftover bread from yesterday’s JazzVox home concert, where I served 35 people Sloppy Joes (recipe on site) over toasted slices of both of these breads, use the leftovers for the dressing I am making this Thursday (Thanksgiving). So, kill two birds with one stone, or as in this case use the same breads for two meals, WHY THE HECK NOT? And hurray!
Not only did I save a great deal of money by making my own base for Sloppy Joes, but it is also now completely unnecessary for me to pay an exorbitant amount of money for dried bread cubes at the grocery store. And that brings up a good point.
Even if you don’t make your own bread, you can still buy a cheap loaf of white or whole wheat bread and simply cut the bread (crusts and all) into small cubes and dry them at a very low temperature in your oven. Why the people who package cut up days old bread charge such ridiculous prices (Brownberry Premium Unseasoned Cubed Stuffing 12 oz. for $12.25) and get away with it is beyond my comprehension! So, even if you don’t want to bake your own bread, just buy a loaf of Wonder Bread (a 20-oz. loaf of white sandwich bread from Walmart $2.92) and make the dried cubes yourself! OK, I’m done pontificating!
Anyway, both of these recipes make for very simple, but tasty and inexpensive sandwich bread. I hope you enjoy both the recipes.
And for all of you who are hosting Thanksgiving dinner, I’ve included my favorite recipe for Turkey Dressing at the bottom of this post. The dressing is savory and just a perfect base for Turkey Gravy with Cognac. (You can find that recipe on this site.)
So, to all of you who are hosting Thanksgiving dinner, bless you for all your hard work. And all of you attending Thanksgiving in someone else’s home, be sure and thank your host and hostess. They have put in a lot of work on behalf of you and all the others that participated in the dinner.
And for all of you who read my blog, thank you for being a part of my life. It remains a great joy for me to be able to share my love of cooking with each and every one of you. And for me to share with you my hopes for a better world for everyone, everywhere.
I leave you with the lyrics to What the World Needs Now by Hal David (lyricist) and music composed by Burt Bacharach.
What the world needs now is love, sweet love It’s the only thing that there’s just too little of What the world needs now is love, sweet love No not just for some, but for everyone
Lord, we don’t need another mountain There are mountains and hillsides enough to climb There are oceans and rivers enough to cross Enough to last ’til the end of time
What the world needs now is love, sweet love It’s the only thing that there’s just too little of What the world needs now is love, sweet love No, not just for some, but for everyone
Lord, we don’t need another meadow There are cornfields and wheatfields enough to grow There are sunbeams and moonbeams enough to shine Oh listen, Lord, if you want to know
What the world needs now is love, sweet love It’s the only thing that there’s just too little of What the world needs now is love, sweet love No, not just for some, oh, but just for every, every, everyone
PEACE AND LOVE TO ALL AND HAPPY THANKSGIVING
WHITE SANDWICH BREAD
2½ c. slightly warm milk
1 T. active dry or instant yeast
1 T. granulated sugar
6 – 6½ c. unbleached all-purpose flour
2 tsp. kosher salt
¼ c. (½ stick) unsalted butter, room temperature
veggie oil
Pour the warm milk into the bowl of your stand mixer and stir in the yeast and sugar. Let sit for 5 minutes, or until foamy.
Add about half of the flour. Stir until well blended. Add another couple cups of the flour, salt, and butter and knead for about 8 minutes or until the dough is smooth and elastic. Add enough more flour as needed.
Pour a bit of veggie oil in the bowl, and using your hands and a stiff spatula, form the dough into a lightly greased ball. Cover with plastic wrap and let sit for 1 – 1½-hours or until doubled in size. Lightly grease a 13×5-inch loaf pan and a 9×5-inch loaf pan and set aside. Or 3 9×5-inch loaf pans.
Turn the dough out onto a lightly floured surface. Punch it down and roll it into a rectangle about 20-inches long. Fold the long side of the rectangle toward the center, press to seal the edge. Fold the bottom of the rectangle to the top to make a cylinder. Cut a third of the loaf off. Place the longer piece in the 13-5-inch pan and the shorter piece in the smaller pan. Or if you are using 3 9×5-inch pans, divided the long piece in thirds. Place the dough in the prepared pans seam side down, tucking the ends in and pressing the dough into a flat piece of dough in each pan.
Cover with plastic wrap and leave for an hour, or until the dough almost doubles. As the dough rises, pre-heat the oven to 375-degrees with the rack in the middle of the oven.
Bake for 30-32 minutes or until the internal temperature reaches at least 190-degrees. Remove from oven and turn the loaves out of the pan onto a rack to cool.
Store covered at room temperature.
WHOLE WHEAT SANDWICH BREAD
2 c. whole milk ¼ c. honey 4 tsp. active dry yeast
4 T. (½ stick) unsalted butter, room temp.
2 tsp. kosher salt 3 c. whole wheat flour
3 T. vital wheat gluten, opt. (but recommended) 1½ to 2 c. bread flour extra virgin olive oil
Heat the milk slightly (about 105 degrees). Pour into the bowl of a stand mixer and add the honey and yeast. Let stand for about 5 minutes until the yeast bubbles.
Add the butter, salt, whole wheat flour, vital wheat gluten, and ½ of the bread flour. Mix until combined.
Cover and let stand for 15 minutes. Add in the remaining bread flour and with a mixer fitted with a dough hook, knead the dough on medium speed until the dough is smooth and springy. (about 6 minutes)
Pour a bit of olive oil in the bowl, and using your hands and a stiff spatula, form the dough into a lightly greased ball. Cover with plastic wrap and let double in volume (about 60 to 75 minutes).
Lightly grease a 13×5-inch loaf pan or 2 9×5-inch loaf pans. Set aside.
Turn the dough out onto a lightly floured surface. Punch it down and roll it into a 13-inch-long rectangle. Fold the top of the rectangle toward the center, press to seal the edge. Fold the bottom of the rectangle to the top to make a cylinder. Place the dough in the longer pan seam side down. (If you are making 2 loaves, cut the dough into 2 equal size pieces before placing in the pans.)
Cover with plastic wrap and let the dough rise for about 60 minutes.
Bake in a pre-heated 400-degree oven for about 25-30 minutes or until golden and the internal temperature reaches at least 190-degrees.
Remove from oven and immediately turn the loaf or loaves out of the pan(s) onto a cooling rack and let cool thoroughly before slicing.
TURKEY DRESSING (with or without cooked breakfast sausage)
1 c. butter
1½ c. chopped celery (stalks and leaves)
2 med. onions, finely chopped
12 to 14 lg. button mushrooms, chopped
1 c. chopped fresh Italian parsley
2 cloves garlic, finely minced
1 T. minced fresh sage
1 T. dried thyme leaves
2 T. poultry seasoning, or more to taste
1 tsp. savory, either powdered or dried leaves
2 tsp. kosher salt
freshly ground black pepper
16-20 c. dry bread cubes
1 lb. cooked breakfast or Italian sausage, opt.
3 eggs
5-7 c. turkey or chicken stock
In a large sauté pan, melt butter and add celery, onions, and mushrooms. Cook for about 5 minutes. Add the parsley, garlic, sage, thyme, poultry seasoning, savory, salt, and pepper. Remove from heat. Place dried bread cubes in a very large mixing bowl. Stir in the cooked sausage. Add the sautéed vegetables; mix thoroughly.
Beat eggs in a separate medium sized bowl. If you are using stock that is simmering happily on your stove, vigorously whisk 5 cups of the broth into the eggs. (The hot stock will scramble the eggs if you don’t stir vigorously.) Pour the hot liquid over the bread cubes and gently stir. Add more stock if the dressing is dry. (Remember, this is dressing, not stuffing and therefore is not going into the cavity of the turkey. So, any moisture needs to be added while it is being prepared.) Taste the dressing and add additional poultry seasoning and/or salt if needed.
Place dressing in a buttered casserole dish, cover and refrigerate until ready to bake in a pre-heated 350-degree oven for 45 minutes or until hot. (I put mine in the oven when the turkey comes out.)
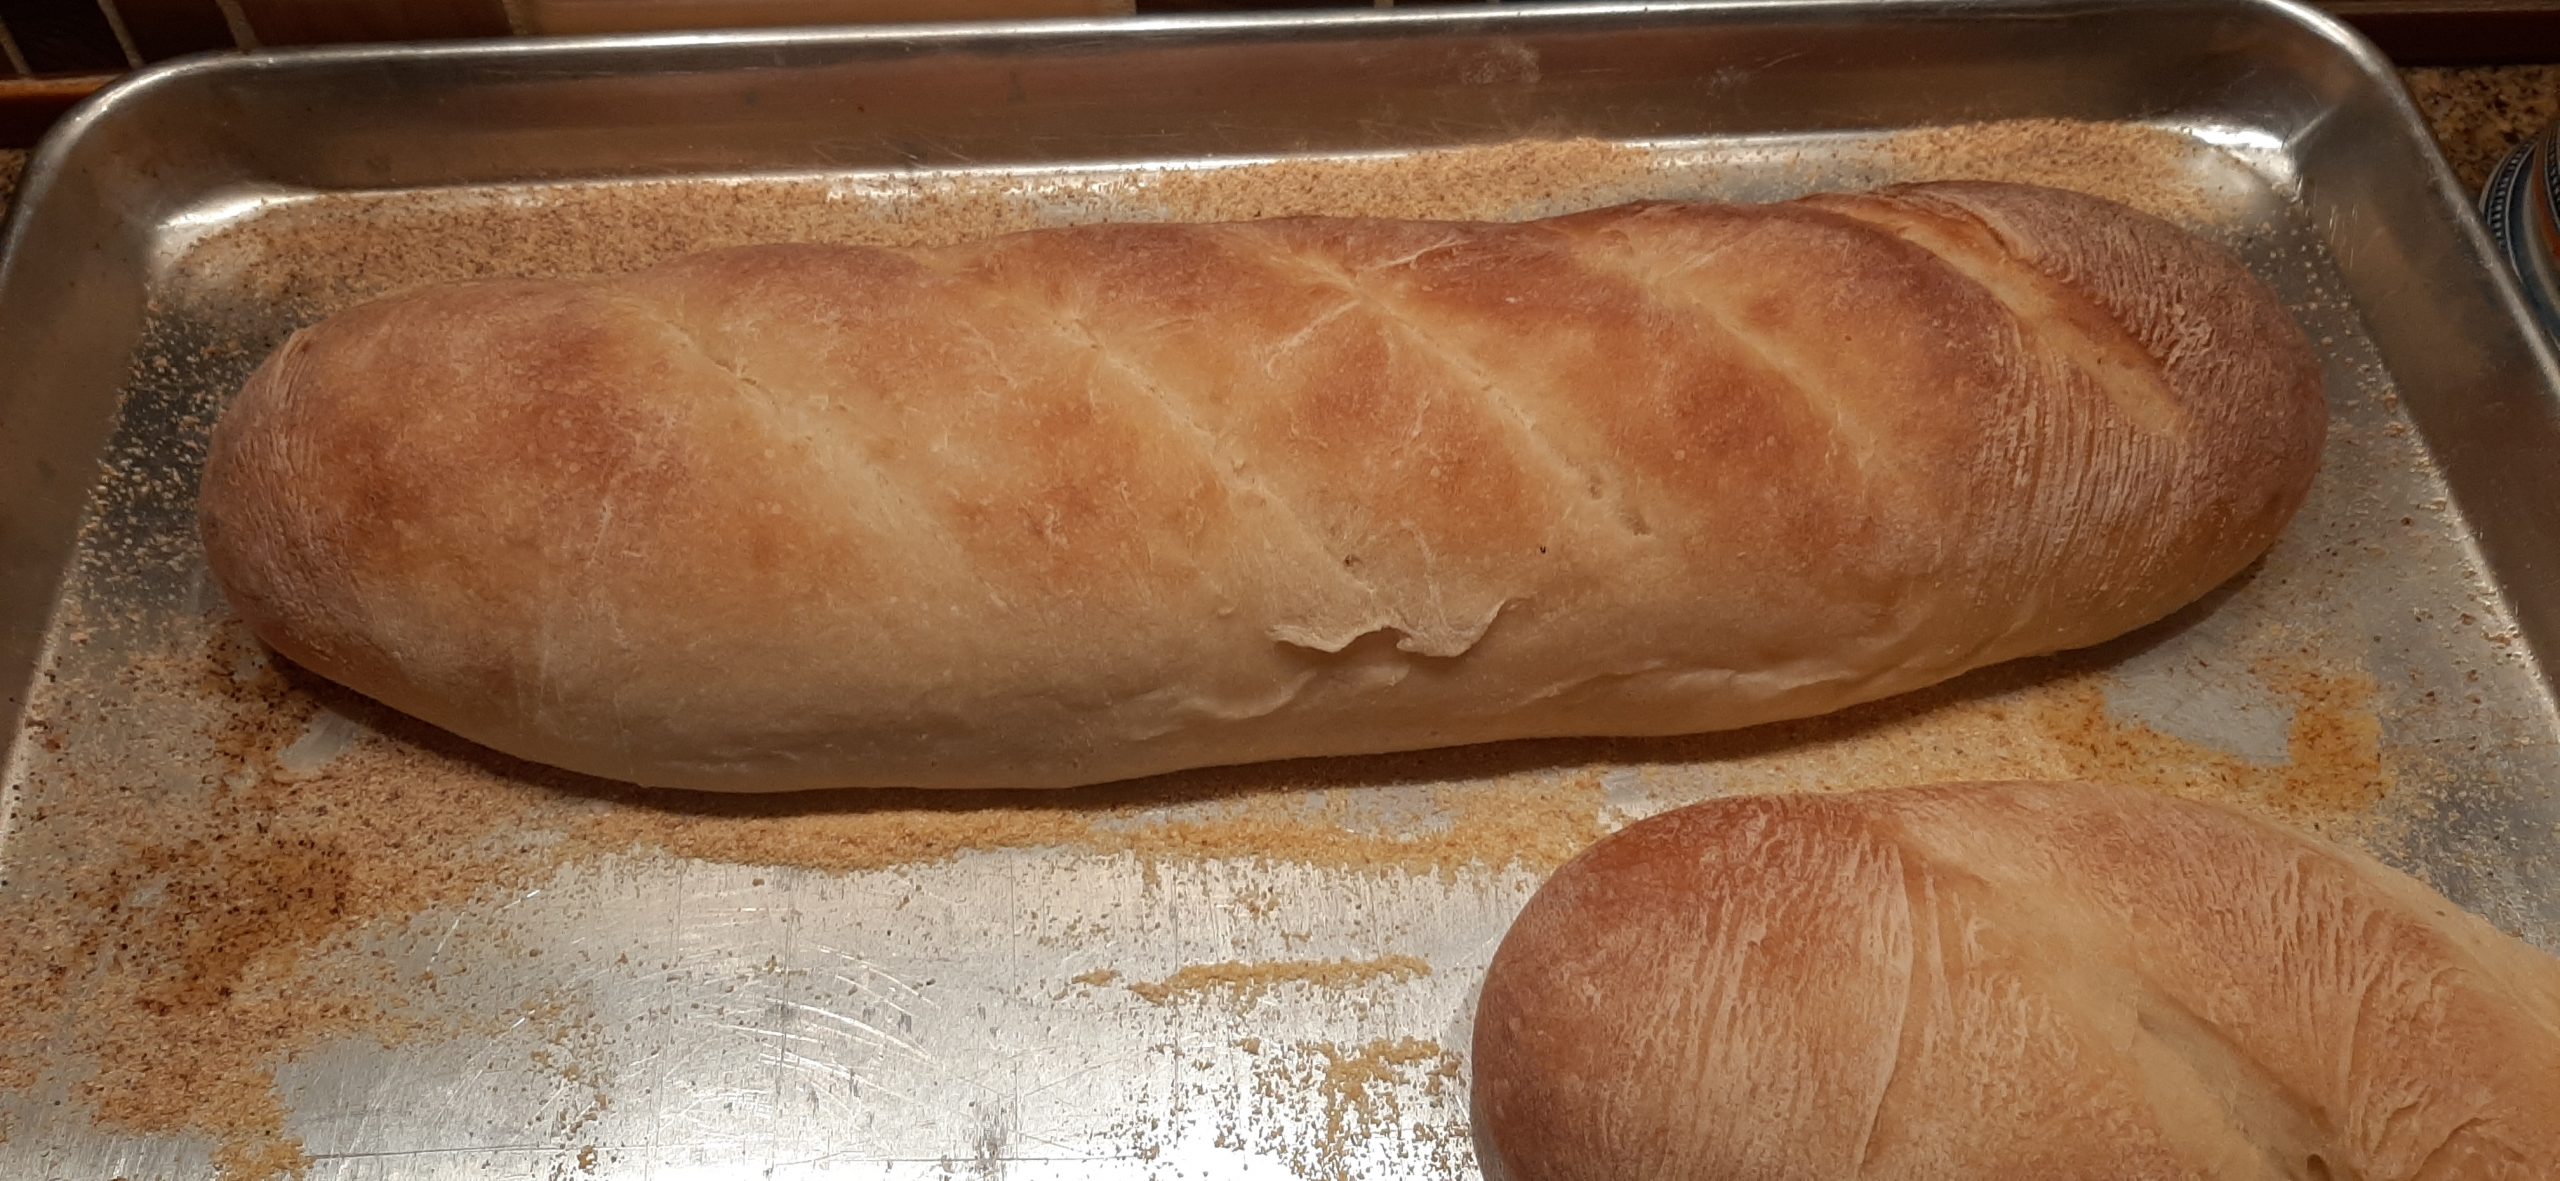
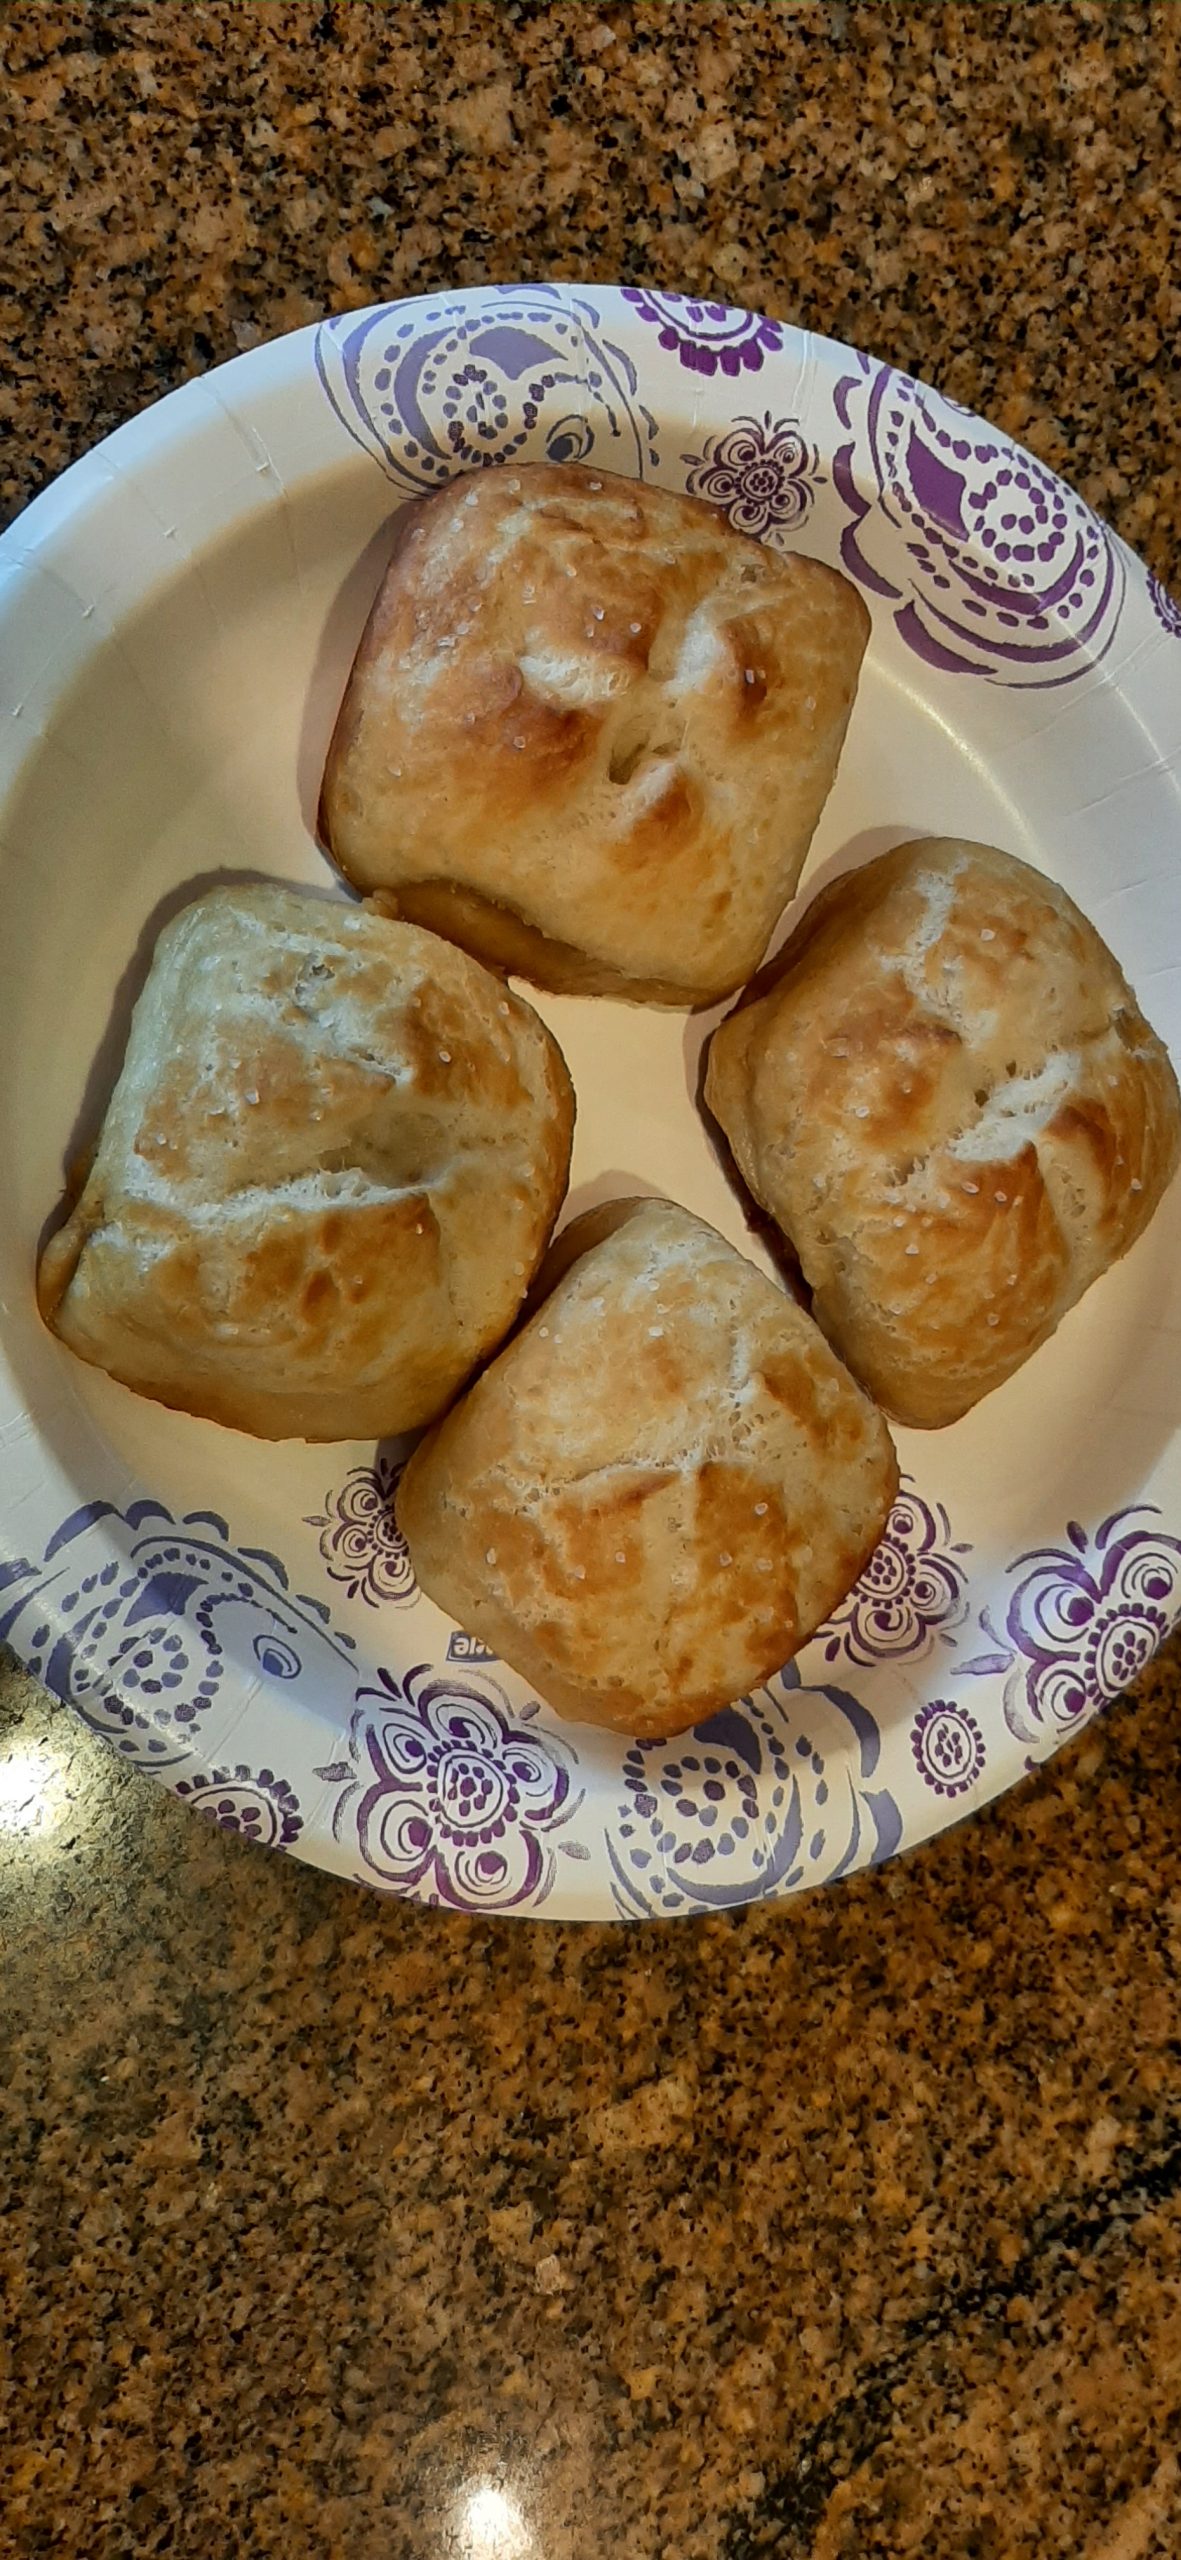
OK all you bread bakers, have I got a quick and easy bread recipe for you where the dough positively MUST SPEND THE NIGHT IN YOUR REFRIGERATOR! I know, gasp! Must be refrigerated? Well, OK, I confess I haven’t tried to let it rise the usual way – 60 to 90-minutes on the counter. But to develop the lovely flavor I obtained by refrigerating the dough, you just need to trust me and put the darn dough in your refrigerator and walk away until the next day. Which for many of us who entertain over 4 people on a regular basis, is a God send.
Because all that needs to be done on the day of the event is to take the formed dough out of the refrigerator. Then allow it sit for a while on your counter and contemplate its very existence. Then heat your oven, make a few slits on top of each loaf, and pop the loaves in the oven.
While the oven is doing the hard work of turning raw dough into a work of art, you can be preparing every other dish you plan to serve while totally stressed to the max. (No wait, that might not be your situation. You might be the kind of person who has everything under control.) (I hate you BTW if that’s the case. Just kidding!) (Well, kind of kidding!)
But for me, one less menu item to worry about (on the day guests will be in my home at any minute) is ONE LESS MENU ITEM TO WORRY ABOUT! (And yes, I am a charter member of the Department of Redundancy Department. And proud as punch to be one too!)
Anyway, I came up with this recipe the other day when in late afternoon I invited our dear friends Jim and Margo over for dinner the next evening. Without any kind of idea what I was going to serve these fine people, I figured a nice bread would surely come in handy at some point. So, to the kitchen I proceeded with nary a recipe in hand. I just kind of winged it as I proceeded, writing down the recipe as I went along. Which BTW, brings me to a very good point.
Always, always, always WRITE DOWN YOUR LIST OF INGREDIENTS AND HOW MUCH OF SAID INGREDIENT YOU USED AS YOU INVENT A NEW DISH. Because, if the dish turns out to be the best stew, soup, casserole, bread etc. etc. you ever made, you are going to hate yourself if you didn’t write down how you created this masterpiece. Believe me, when you go to replicate the dish 6 months later because your family has been begging you for months to make it again, and you don’t remember what you did, YOU ARE GOING TO FEEL QUITE THE FOOL FOR NOT LISTENING TO MY WARNING/ADVICE.
Well, I’ve taken up enough of your time today. And I have been rather snarky, which really is unusual for me. (Right, Patti!) Anyway, you know that I love you all and only want the best for each and every one of you. And sometimes tough love is what’s required. My job therefore is done for the day.
Peace and love to all.
1¾ c. warm water
1 T. granulated sugar
2½ tsp. instant yeast
2 tsp. kosher salt
2 T. extra virgin olive oil, plus more for oiling the dough
1 T. unsalted butter, room temp.
5 c. unbleached all-purpose flour
2 T. cornmeal
Combine warm water, sugar, and yeast. Allow to sit for 10 minutes until the yeast foams. Add salt, olive oil, butter, and 4 cups of flour. Knead in your stand mixer using the dough hook, adding more flour as necessary to make a smooth, silky dough.
Form into 2 rectangles and roll into long loaves. Place on a baking sheet that has been sprinkled with corn meal. Oil the tops and place plastic wrap on top. Refrigerate overnight.
Remove from refrigerator and allow to rise on your counter for 1½ to 2 hours.
Pre-heat your oven to 425-degrees with a pan of hot water on the bottom rack. Just before placing the loaves in your oven, make 4-5 slits on the top of each loaf.
Bake for about 20 minutes or until the internal temperature reaches at least 210-degrees.
Remove from oven and allow to cool completely before slicing. Serve as is or dipped in OLIVE OIL AND BALSAMIC VINEGAR BREAD DIPPING SAUCE or sliced and toasted for CROSTINI. (See how to make both below.)
OLIVE OIL AND BALSAMIC VINEGAR BREAD DIPPING SAUCE
¼ c. extra virgin olive oil
1 sm. garlic clove (finely minced)
¼ tsp. dried basil
¼ tsp. dried oregano (Mexican oregano preferably)
2-3 crushed red pepper flakes – more if you are so inclined
pinch of kosher salt
freshly ground black pepper
2-3 tsp. balsamic glaze or good balsamic vinegar
Whisk the olive oil, garlic, dried basil, dried oregano, crushed red pepper flakes, salt, and pepper together in a small serving bowl. Let the mixture sit for a bit.
When ready to serve with Italian bread, drizzle 2 -3 teaspoons of balsamic glaze or balsamic vinegar over the olive oil mixture.
CROSTINI
Italian Bread
extra-virgin olive oil
flaky or fine sea salt, to taste
Pre-heat your oven to 450-degrees. Line a rimmed baking sheet with parchment paper for easy clean-up.
Slice the bread on the diagonal into pieces no wider than ½-inch. Lightly brush both sides of each slice with olive oil.
Place the slices in a single layer on your prepared baking sheet and bake them on the middle rack for about 9 minutes, or until they are crisp and nicely golden on top. Remove from oven and sprinkle lightly with salt. Serve immediately.
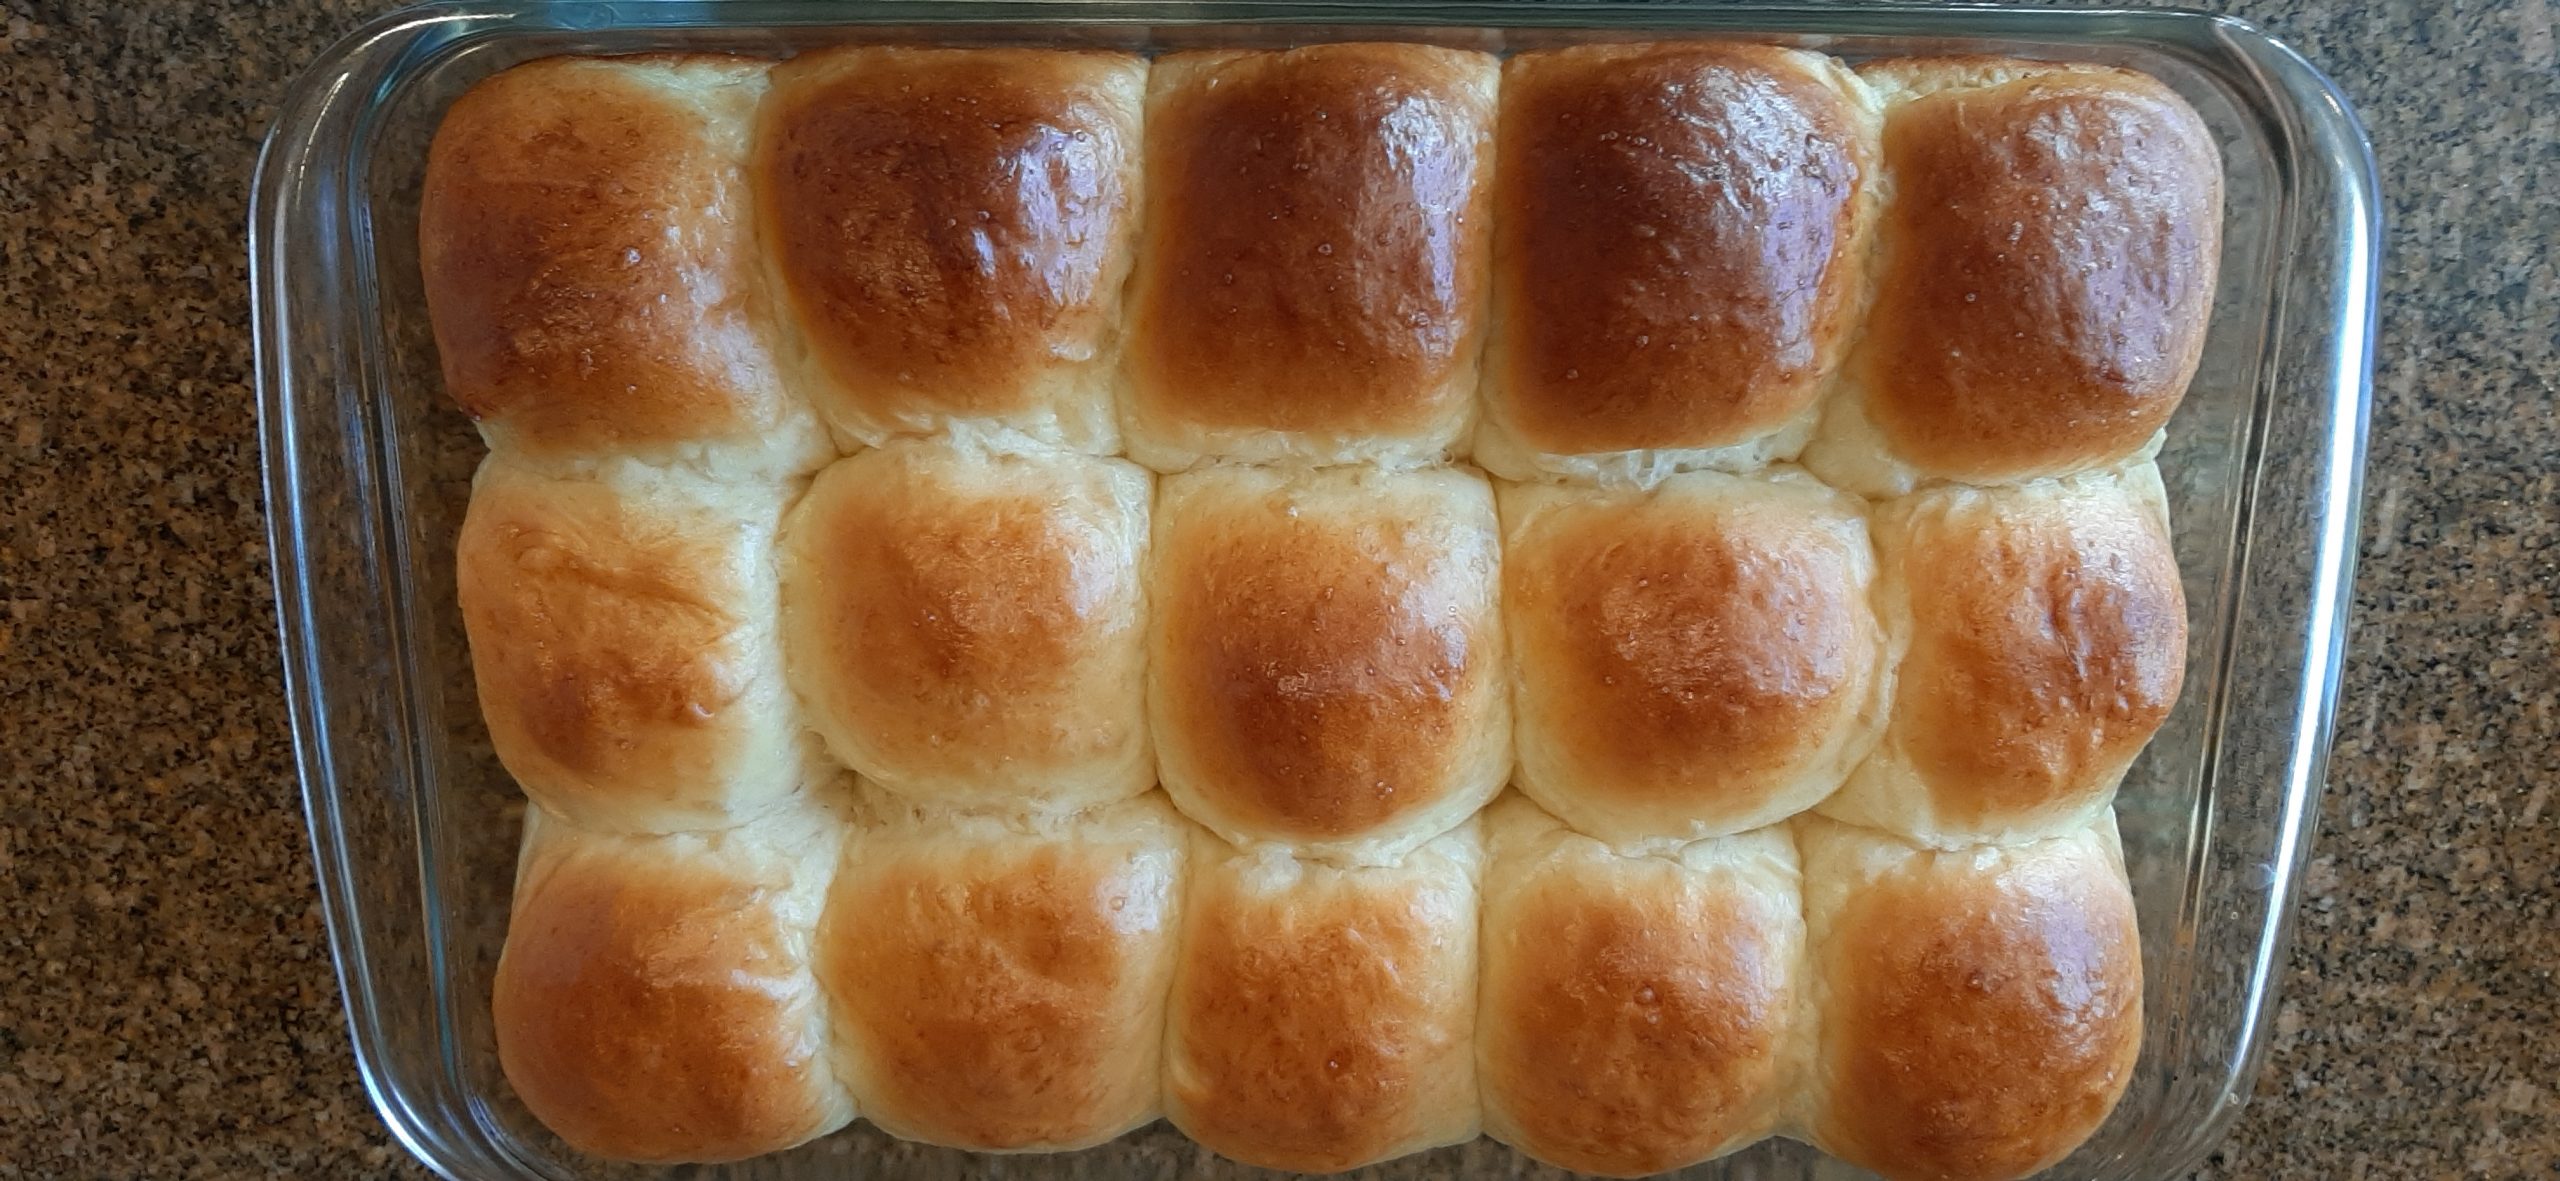
In my opinion, there is just nothing better than homemade bread. And I don’t care whether the bread comes in the form of loaves or rolls. I’m easy in that regard. So, when I was planning the menu for our last JazzVox home concert meal, I decided to make 2 kinds of bread. Why? Because bread is easy and inexpensive to make, and people love it. So, in combination with Light Rye Bread (recipe on site already), our guests gobbled up all but 1 of these rolls and a few slices of rye bread. Thank goodness there was at least a bit of bread left for us. Because dang, there is no such thing as left over bread at this household.
What wasn’t left was any of the double batch of Kräuterbutter (German Herb Butter) I had made to slather on the rye bread. Well, that didn’t go as planned. People frosted both kinds of bread with this amazing, flavored butter. (Find the recipe for Kräuterbutter below.) And frankly, given the opportunity I would have done the same thing.
Anyway, the main thing you should know about these rolls is that they are really quick and easy to build, and absolutely delicious. And you don’t even need bread flour for this recipe. Just plain old all-purpose flour. And as you can see from the picture, they are beautiful to boot.
And remember, Thanksgiving will be fast upon us. And these rolls would be perfect on your table. And because I am the kind of person I am, I’ve included directions so that you can make the dough and form the rolls one day and bake them off the next day. So, no excuses about dinner rolls being too hard to make, too time-consuming, or being too last minute. Nonsense! There is nothing easier than this recipe to build delicious dinner rolls to serve your family and friends. And boy will you be the hero of the day!
Well, it’s sunny outside. A bit of scattered cloud cover here and there. But although the sun is shining, it’s cold. So, I’ve built some soup that is happily burbling away on the stove. Along with a couple slices of leftover rye bread, we will be dining in style at the dinner table tonight.
May you too find happiness at your dinner table sharing the wonderful world of fine cuisine with your family and friends. For me, there just isn’t anything more rewarding than seeing someone smile when they bite into something I have served them. As you may gather from this comment, I live for those smiles.
As always, peace and love to all.
¾ c. whole milk, slightly warm
2 tsp. instant dry yeast
¼ c. granulated sugar
1 tsp. kosher salt
4 c. unbleached all-purpose flour, fluffed
4 lg eggs, divided
½ c. unsalted butter, room temperature and cut into chunks
veggie oil
In the bowl of your stand mixer, mix the warm milk, yeast, and sugar together. Let sit for about 10 minutes or until it becomes frothy. Add salt, flour, and 3 eggs to the bowl. Using your dough hook, mix the dough until all the flour is absorbed. Then add the butter cubes. Knead the dough until it is smooth, elastic, and only a smidge sticks to the bottom of the bowl. If needed, add a bit more flour.
Pour a small amount of oil into the bowl, and using your hands and a stiff spatula, shape the dough into a round, lightly greased ball. Cover with plastic wrap and let rise for 75-90 minutes or until doubled in size. Meanwhile, make an egg wash by whisking the remaining egg with 1 teaspoon of water.
Shape the dough into 15 rolls and place in a lightly greased 9×13-inch pan. Let rise again for about an hour, then brush with egg wash. (For building the rolls on day 1 and baking them off on day 2, see directions below.)
Bake in a pre-heated 350-degree oven for 23-25 minutes. The internal temperature should reach at least 190-degrees.
Remove from oven and serve slightly warm or at room temperature.
For making the dough ahead and baking it the next day, once the rolls are formed, cover and refrigerate them overnight. They will rise while in the fridge and be ready to bake in the morning. Make sure to let them sit out for about 20 minutes to come to room temperature before brushing with the egg wash and baking them in a pre-heated 350-degree oven for 23-25 minutes. The internal temperature should reach at least 190-degrees when they are done.
Remove from oven and serve slightly warm or at room temperature.
Mush all the ingredients together with a table fork and refrigerate covered until ready to serve at room temperature. (Best made the day ahead so the flavors have time to get to know each other.) This butter is a great spread for rye bread. (Or any other kind of bread for that matter!)
Well, here it is again – Autumn and with it – Octoberfest. Now, I don’t know about you, but I absolutely love this time of year. I love the food associated with Fall and Octoberfest. I love the leaves turning brilliant colors on deciduous trees. (Not the leaves when they hit the ground, but that’s another story.) I also love the slight chill in the air in the evening and first thing in the morning. And I especially love that it is once again open season on soup. And comfort food like casseroles and homemade bread. And I absolutely adore the coziness our fake fireplace brings to our living room while we sit happily in front of it while reading in the evening. (Our cat Miles loves the extra bit of warmth also. So much so, that his kitty bed is now permanently ensconced on the floor between our chairs.)
So, in considering the menu for this Sunday’s JazzVox pre-concert meal, I decided Central European food would be perfect.
I have used Octoberfest as the theme for other concert meals over the years and remembered that people absolutely love my Light Rye Bread (recipe on blog). So, not wanting to mess with a good thing, I decided to stick with what I know people will like. So, Light Rye Bread it is!
But for dinner the other evening, I decided to make pretzel rolls to go along with our soup. I thought the rolls might be a nice addition to the Octoberfest meal. And yes, they would be great. But this old gal can only spend so much time on her feet anymore. So, the pretzel rolls will just have to wait for another time. Even though they were quick and easy to build, they were still one dish too many for me to prepare and still remain sane! Sigh……
But I don’t have to wait to share this recipe with you! And if you are anything like me when it comes to soft pretzels and think that soft pretzels prove the existence of a higher being, then you are going to love this recipe. Easy to make, takes less time than making most other yeast breads, and tastes as good as Auntie Anne’s. Of course, they are not in the traditional pretzel shape that we all love and cherish. But as far as I’m concerned, it’s not the shape that counts. It’s how they taste. And they taste incredible!
So, I recommend you make these rolls at your earliest convenience. Or even if it’s not convenient, do it anyway. They are just that good.
But don’t forget the mustard to serve with these pretzel rolls. My favorite – plain old yellow mustard.
So, happy Octoberfest and Autumn to all. And as always – peace and love to each and everyone.
1½ c. warm water + 6 c. water, divided
1 pkg. or a scant T. instant or active dry yeast
unsalted butter, room temp.
1 T. brown sugar
1 tsp. kosher salt
3 – 4 c. unbleached all-purpose flour
veggie oil, for greasing the bowl
2 T. baking soda
coarse sea salt, for sprinkling
Mix the yeast, 1½ cups slightly warm water, 1 tablespoon butter, and brown sugar together in the bowl of your stand mixer. Allow to sit for 5 minutes or until bubbles appear.
Add salt and 3 cups of flour. Mix with the dough hook and knead for at least 3 minutes until the dough is smooth, silky, and no longer tacky. Add additional flour as necessary. (The dough should be slightly sticky, but not tacky.)
Pour a small amount of oil in the bowl. Using your hands and a sturdy spatula, form the dough into a greased ball. Cover the bowl tightly with plastic wrap and allow the dough to rise for 1 hour or until nearly doubled in size.
Meanwhile lightly butter two 8×8-inch baking pans. (Or use whatever pan or pans you have that are roughly 8×16-inches.)
Once risen, punch the dough to release any air bubbles. Divide the dough into 18 balls, approximately the same size, and place on a piece of parchment paper. (I just pinch off 18 pieces of dough. Then I take bits and pieces off larger chunks and add to smaller pieces until I have roughly even size pieces. To form the balls, I just keep tucking under each piece until I have a nicely shaped ball.)
Preheat oven to 400-degrees. Bring the baking soda and the remaining 6 cups of water to a boil in a large pot.
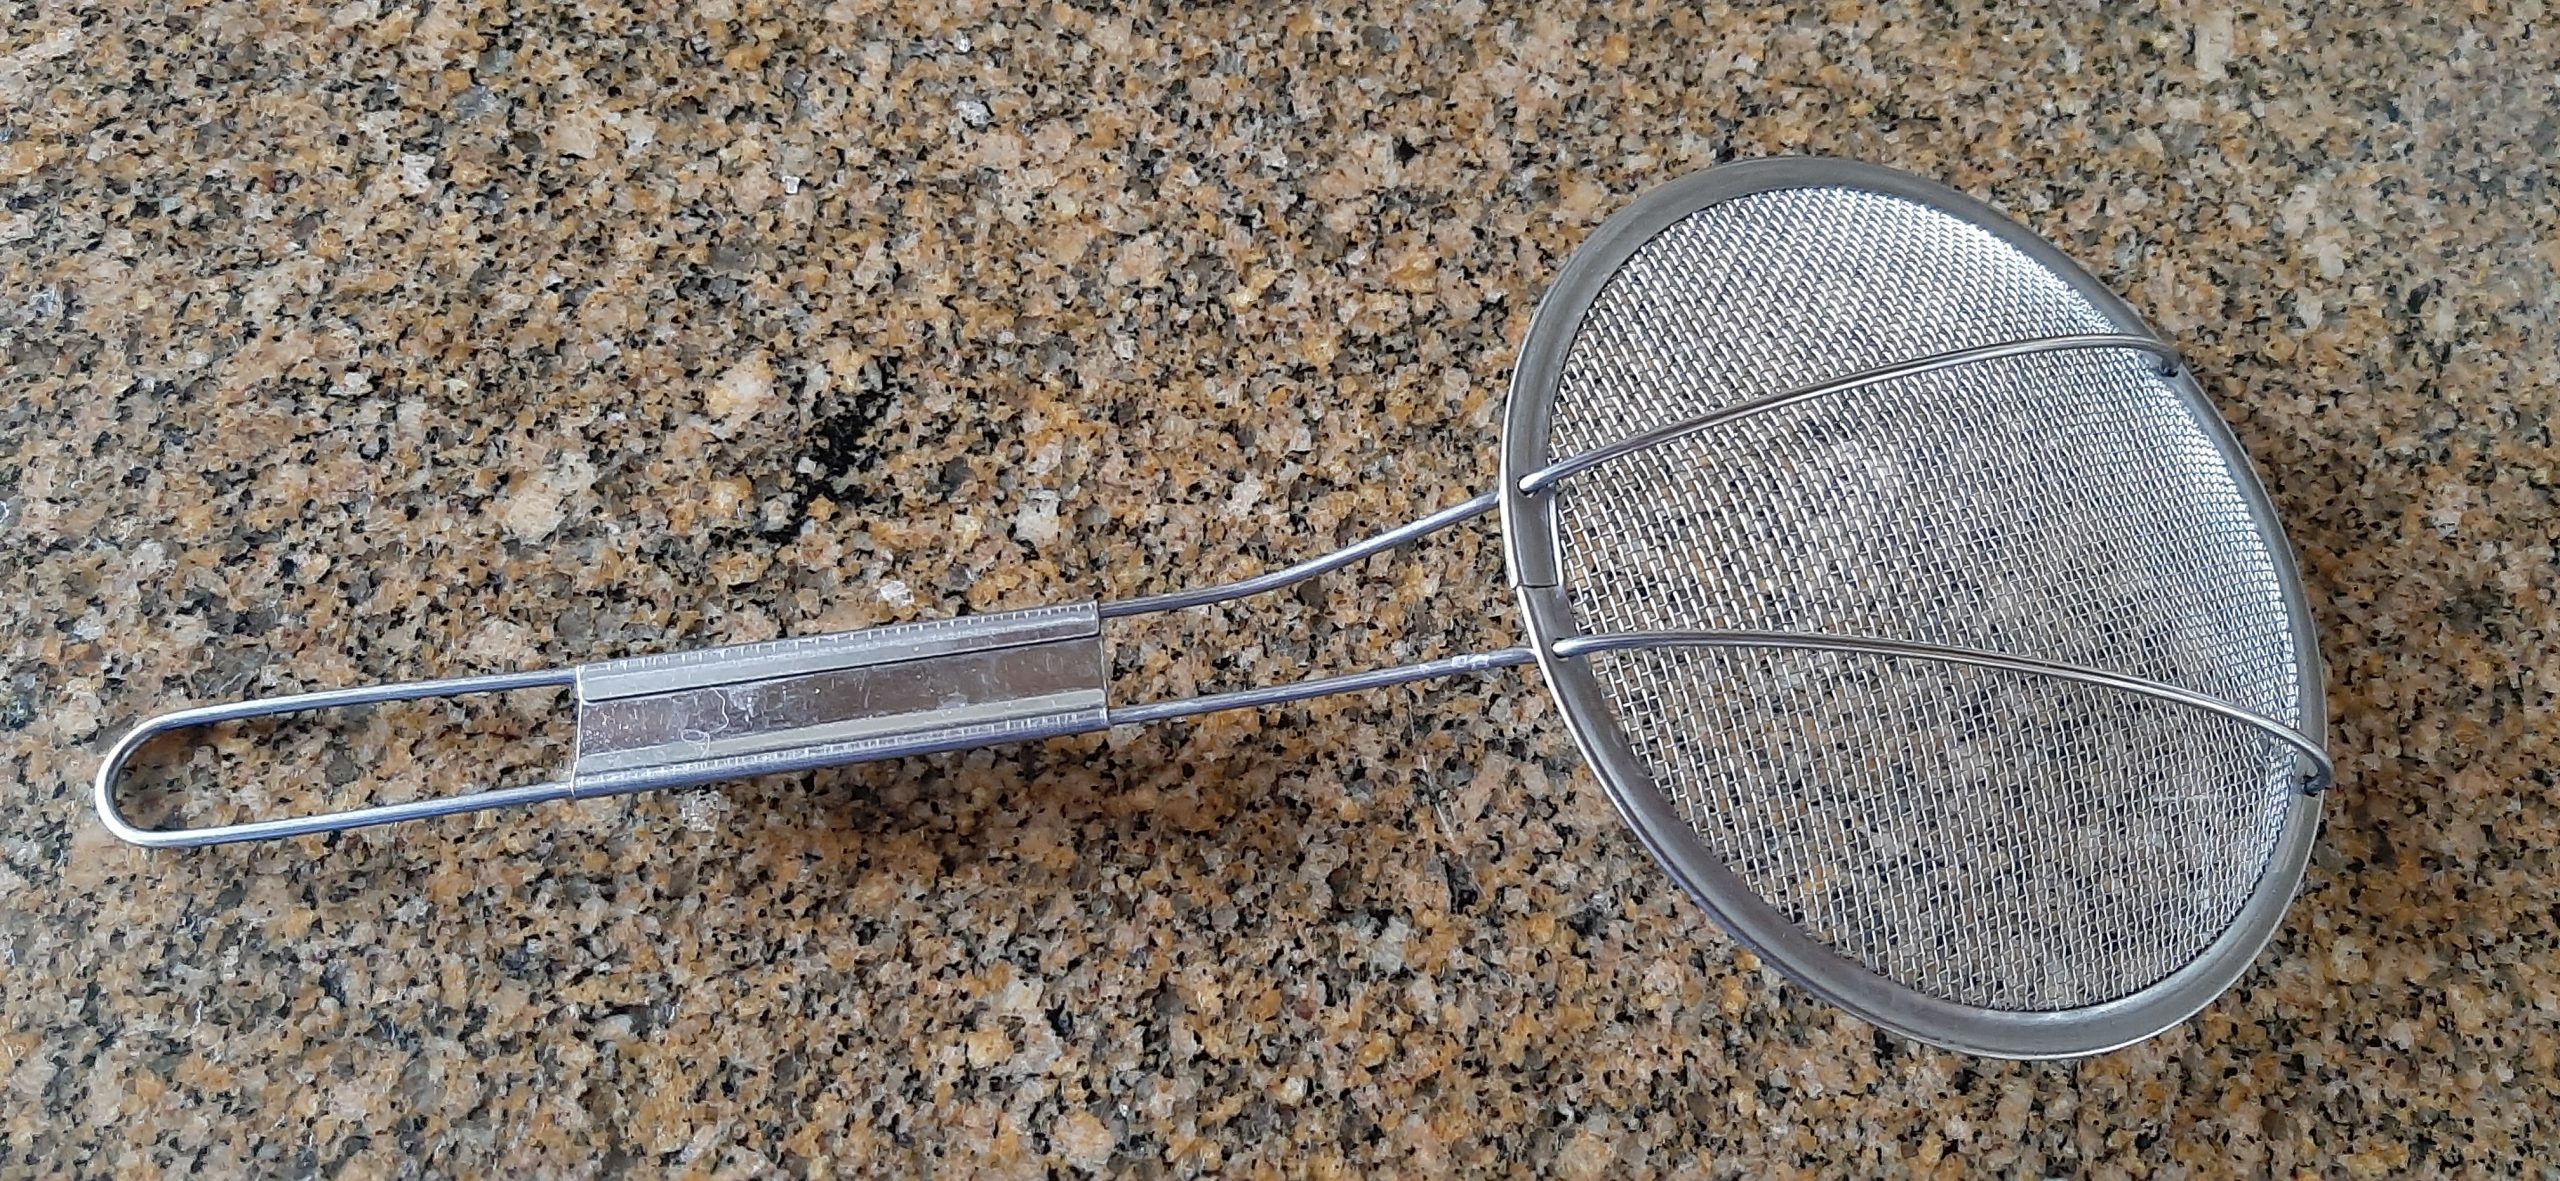
Drop 3-4 pretzel balls at a time into the boiling water for about 30 seconds. Using a slotted spatula or flat spider strainer (see picture below), lift the pretzel rolls out of the water and place back on the parchment paper. (Placing the rolls back on the parchment paper allows some of the water to drain off.) When all have had their bath, place the pretzel rolls close together in the prepared baking pans. (9 in each pan.) Using a pair of scissors, cut an “X” about ½-inch deep on each roll.
Melt a couple of tablespoons of butter and lightly brush each roll with the melted butter, then sprinkle with coarse sea salt.
Bake for 20-24 minutes or until a light golden brown and the internal temperature of the rolls reaches at least 190-degrees.
Remove from the oven and serve warm or at room temperature. With lots of mustard to dip in with each tender bite.
OK, once again I must eat a large helping of humble pie! Because I stated many years ago that I didn’t particularly like muffins. At least most store-bought or bakery made muffins, and even some homemade muffins just didn’t rock my socks. But over the years, things have changed regarding muffins. There are some homemade muffins now that I really like. These for example. And maybe I even like them a bit too much.
But for many years, I only truly liked my recipe for homemade bran muffins. And in writing up this preface I came to the realization that I had never posted that recipe. What? How could that be? I’ve been making bran muffins since my beloved sister-in-law Evelyn gave me the recipe in about 1973!
Her recipe is in my first self-published cookbook (1998), but I hadn’t written it up for my blog? Shame on me! Because the bran muffins I’ve been making now since God was a child are the tastiest and easiest bran muffins to ever come out of an oven.
The recipe used to be found under the catchy title of Six-Week Bran Muffins. Because apparently, the refrigerated batter would still be fine even if it was allowed to happily reside in your refrigerator for up to 6 weeks. Never happened in my household, so I’m not going to make that statement. But I will state unequivocally that the recipe you find below makes for absolutely wonderful bran muffins. So, if you too love bran muffins, please find the recipe below. But back to orange raisin nut muffins. (That’s really why you’re here right? I do get so carried away!)
So, in getting ready for an upcoming trailer trip, I decided muffins for breakfast would be lovely. But for years now, I have been trying to duplicate my grandmother’s orange raisin cake. With poor results I must confess. So, why not an orange raisin muffin? So based on a recipe by Wescott Sharples on the relish.com site, I came up with this version.
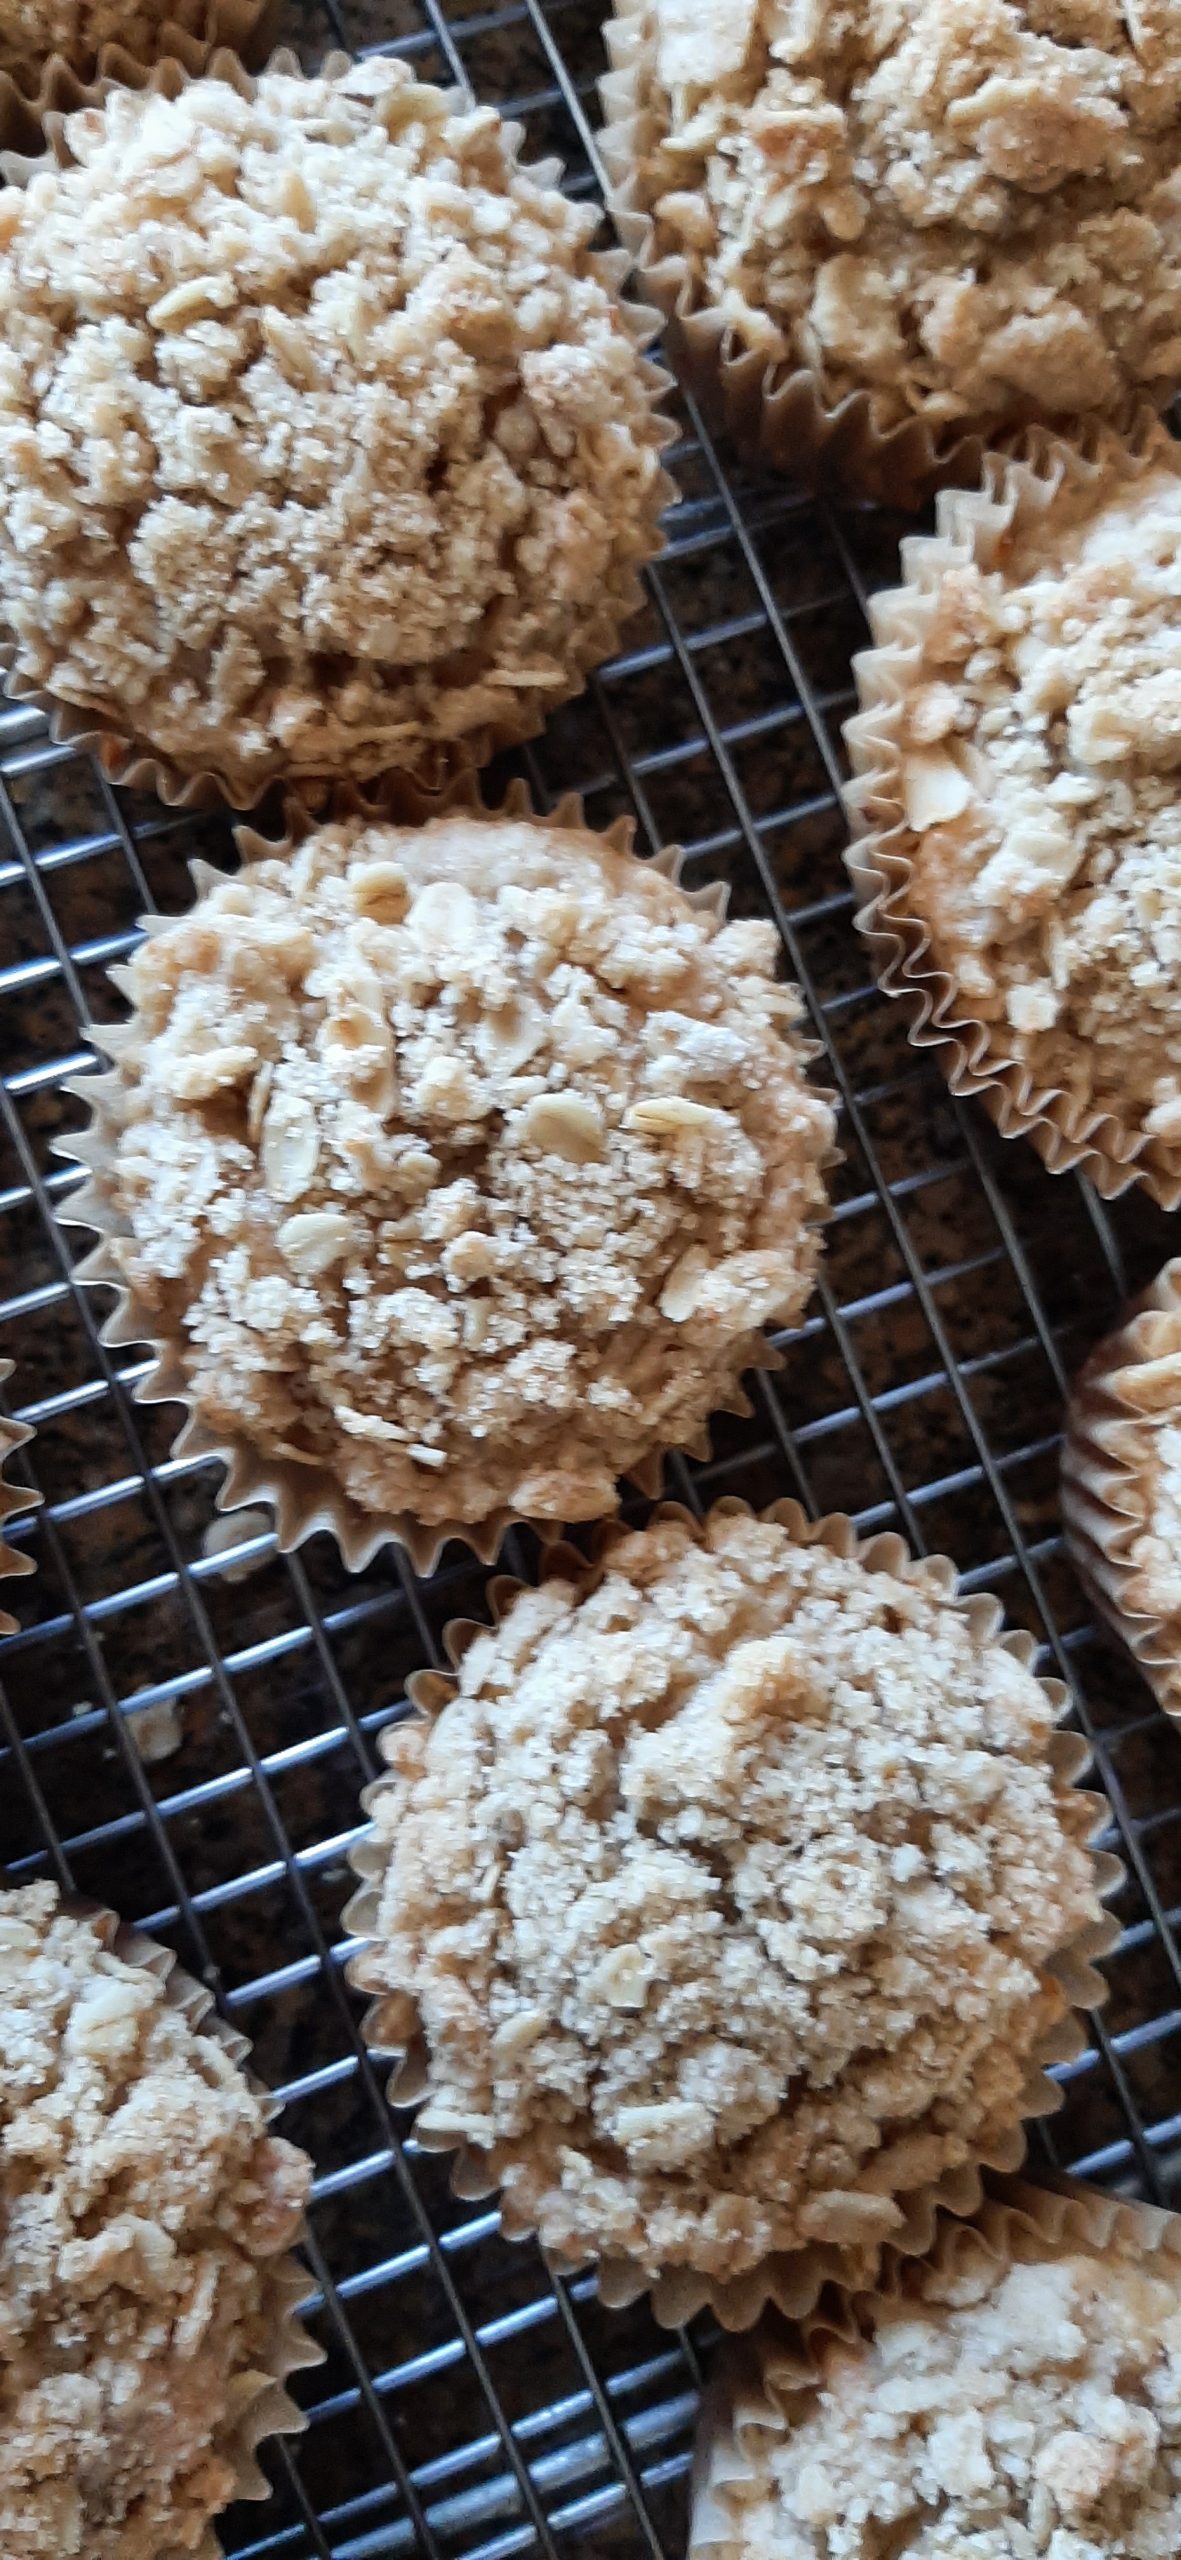
And boy oh boy are these muffins tasty. Not too sweet, and semi moist and chewy from the oats, chopped golden raisins, and walnuts. And the simple crumble topping gives these muffins just the boost of flavor and crunch that I feel is needed. All in all, a truly great muffin. And just a super breakfast treat.
Since I am getting ready for a trip with buddies, I am going to keep this preface short. Lucky you! And of course, lucky me too. (For the trip of course.)
We are so blessed to live in this beautiful part of the world. And to have a trailer and wonderful friends with whom we can share amazing adventures. As I said, we are well and truly blessed. So, here’s to Craig and Marsha – old friends, great friends, musical friends, intelligent friends, and every possible type of friend in between. Let the fun continue.
And as always, dear readers and friends, peace and love and lovely muffins to all.
Crumble Topping:
½ c. unbleached all-purpose flour
¼ c. brown sugar, packed
¼ c. old-fashioned oats
1/8 tsp. salt
4 T. (½ stick) unsalted butter, at firm room temperature
Whisk together the flour, sugar, oats, and salt. Work in the butter, mixing until coarse crumbs form. Refrigerate until needed.
Orange Raisin Walnut Muffins:
¾ c. whole wheat flour, fluffed
¾ c. whole wheat pastry flour, fluffed (or unbleached all-purpose flour if you must)
1 c. uncooked old-fashioned oats
2½ tsp. baking powder
¼ c. granulated sugar
¼ c. brown sugar
½ tsp. fine sea salt
1 T. orange zest
1 lg. egg
1 c. (8-oz.) sour cream
2 T. vegetable oil
¾ c. orange juice (does not have to be fresh squeezed orange juice)
¾ c. chopped golden raisins (I almost always use golden raisins because I like them best)
½ c. chopped walnuts (but pecans would also work)
Line 18 muffin cups with paper baking liners. Set aside.
Whisk the whole wheat flour, whole wheat pastry flour, oats, baking powder, granulated sugar, brown sugar, salt, and orange zest together in a large bowl.
Whisk the egg, sour cream, vegetable oil, and orange juice together in another bowl. Add the wet ingredients to the flour mixture mixing only until blended. Gently stir in the chopped raisins and nuts.
Using a #16 ice cream scoop (scant ¼ cup – 2-oz.) plop batter into prepared muffin cups filling until almost full.
Sprinkle the crumble topping over the muffins, dividing evenly, and patting gently.
Bake in a pre-heated 400-degree oven for about 20 minutes, or until wooden pick inserted in center comes out clean. Do not overbake.
Remove from oven and let cool completely before storing in an airtight container. Best warmed a bit before serving.
BRAN MUFFINS (½ recipe from the original) (the best bran muffins imaginable)
3 c. bran cereal (I use Kellogg’s All-Bran cereal)
1 c. boiling water
½ c. veggie or canola oil
1½ c. granulated sugar
2 eggs
2 c. buttermilk
2½ c. unbleached all-purpose flour, fluffed
2 T. wheat germ
2½ tsp. baking soda
1 tsp. fine sea salt
Line 24 (or more as needed) muffin cups with paper baking liners. Set aside.
Combine the cereal and boiling water in a large mixing bowl. Let sit for 5 minutes or more. Combine the remaining ingredients with the softened bran.
Using a #30 ice cream scoop (scant ¼ cup – 2-oz.) plop batter into prepared muffin cups filling until almost full.
Bake in a pre-heated 400-degree oven for about 20 minutes, or until wooden pick inserted in center comes out clean. Do not overbake.
Remove from oven and let cool completely before storing in an airtight container. Best warmed a bit before serving.
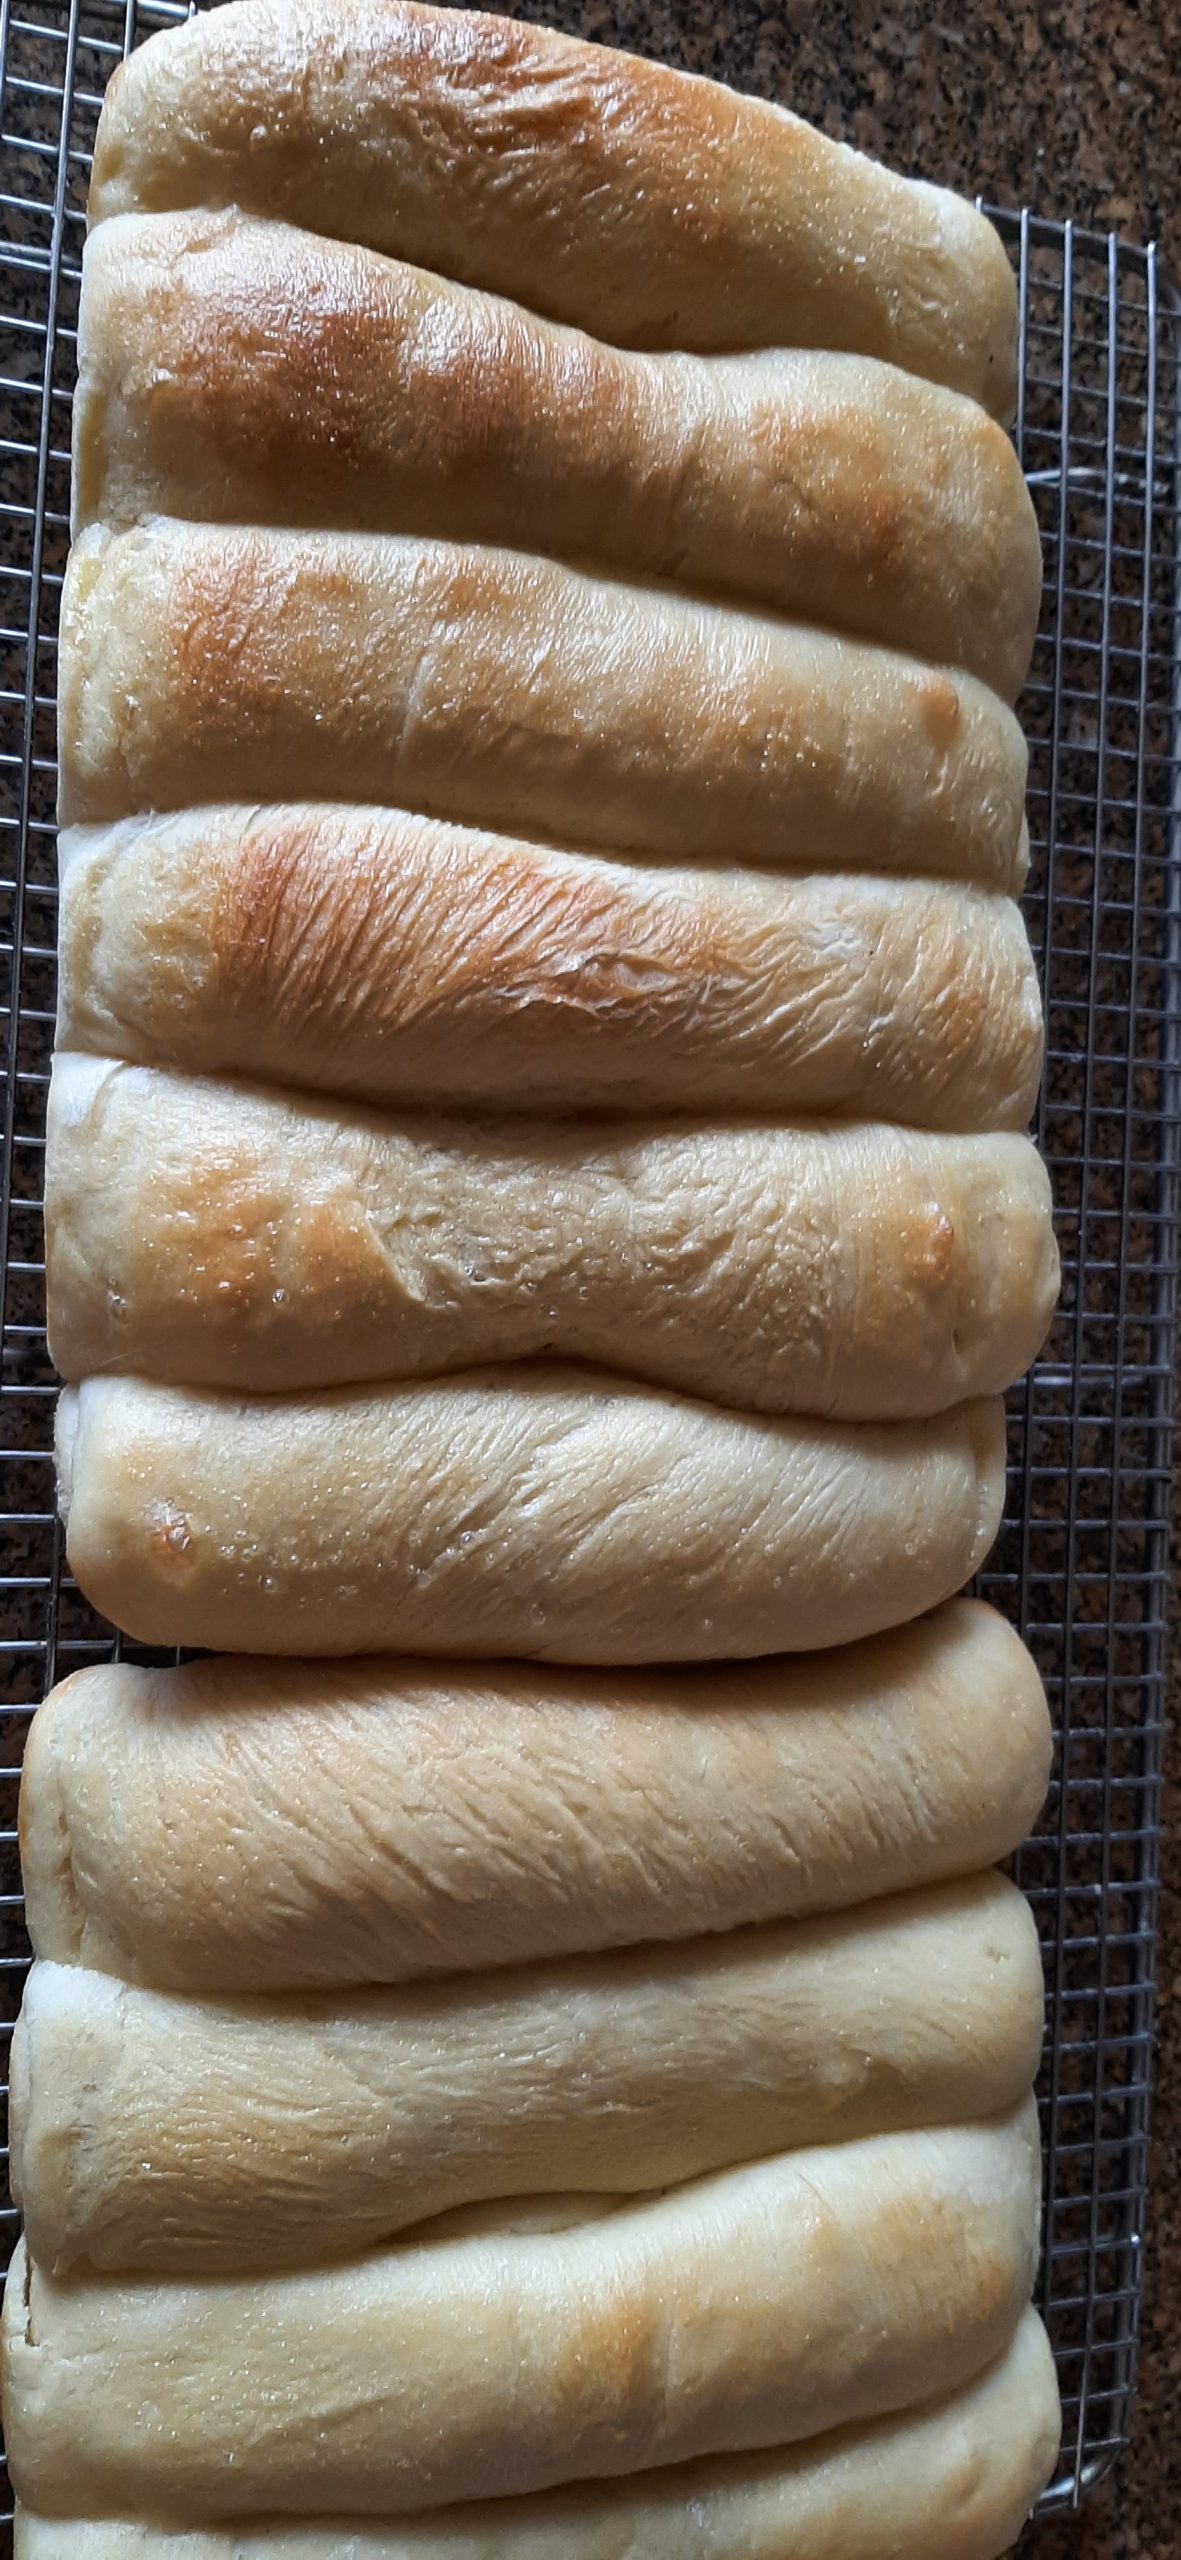
For our 4th of July dinner, I served hot dogs and a Caesar salad. I know, not a traditional combination, but hey, this is what sounded good to me and because I was doing the cooking….. Well, I’m sure you can see how this works!
Anyway, with Hebrew National all-beef hot dogs happily residing in our refrigerator, I decided that because these were especially good wieners, they deserved special treatment. And to me that meant that they should be served in a really great bun. (And coincidentally, we deserved good buns too.) And since I happen to know how to bake bread, I decided to play around and see what I could come up with. So, this recipe is kind of a mishmash of several recipes I reviewed. And as luck would have it, the buns were amazingly tasty. But a bit more about hot dog buns before I go any further.
I recently read an article about New England style buns. This unique bun predates, by several years, other hot dog buns found almost everywhere else in the United States.
Before the “invention” of the New England bun, commercial bakers would simply slice rolls all the way through. But New England style buns are different. Not only do they have a very tender crumb, but because they are baked close together, they have very soft sides. Then they are cut on top about halfway down through the bun allowing frankfurters, chicken salad, lobster filling, etc. to fit easily in the slit without the filling oozing out the sides. (Which of course makes consuming one of these babies a lot less messy!)
But to make “proper” New Englund style buns, they must be baked in a special pan. Which BTW, I do not ever plan to purchase. (I already have too many baking pans that have only been used once. And I feel guilty enough without adding possibly 1 more pan to the list!)
Anyway, I tried to duplicate the official New Englund style pan by using a 6×6-inch square pan and an 11×6-inch rectangular pan. And it worked, but I will not go to the trouble next time. Because, to my thinking, what makes these buns special is the flavor and texture, not the shape or the requirement to use a special pan. (If you are interested, you can see what the pan looks like for yourself by searching for one on Amazon. Only $31.95 each!)
Regardless of special pan or not, you can bet your bottom dollar that I will be making these buns again. Because they are delicious, tender, easy to make, and a lot smaller than the kind of hot dog buns you can buy in a grocery store.
Like the Mikado sings in Gilbert and Sullivan’s famous operetta The Mikado – “let the punishment fit the crime”. To my thinking, it’s of equal importance to “let the bun fit the hot dog”! So, I hope you will give this recipe a try when next you choose to serve gourmet hot dogs.
Now I know there are some who would argue that a gourmet hotdog qualifies as an oxymoron. All I can say is – poor deluded person. Because done right, hot dogs are magnificent! And I’d argue with anyone that a really great frankfurter, in an outstanding bun, decorated with fabulous condiments, deserves nothing less than 5 stars!
Even if you disagree, I still wish you all the peace and love you can handle.
½ c. warm whole milk
½ c. warm water
2 tsp. instant yeast
1 T. granulated sugar
1½ tsp. kosher salt
1 egg
¼ c. powdered milk
2½ c. unbleached all-purpose flour, plus more as needed
4 T. (½ stick) unsalted butter, room temp., plus more to grease the baking pans
extra virgin olive oil, to grease the mixing bowl
whole milk
In the bowl of your stand mixer, using your dough hook, combine the warm milk, warm water, instant yeast, and granulated sugar. Let sit for 5 minutes.
Then add the salt and egg. Mix until combined.
Add the powdered milk and the flour. Knead the dough for several minutes. Add more flour if the dough is too wet. The dough should come away from the sides of the mixing bowl but stick slightly to the bottom of the bowl.
Add the butter, a little at a time, and knead for a further 4-5 minutes until the dough is shiny and smooth.
Pour a little olive oil in the bowl, and using your hands and a stiff rubber spatula, form the dough into a nicely greased ball.
Overnight method:
Cover the bowl with plastic wrap and store in the fridge for up to 24 hours.
On the day you bake the buns, turn the chilled dough out onto a lightly floured surface and lightly dust the surface of the dough with flour as well.
Same day:
Cover the dough with plastic wrap and let rise for 1 hour in a warm place, or until the dough has doubled in size. Then gently punch the dough down to remove some of the air bubbles. Turn onto a floured surface and add a bit of flour to the dough ball as well.
To shape and bake the buns:
Butter a large baking sheet and set aside.
Cut the dough into 10 equal sized pieces. (Or as close as you can get!)
Roll each portion into a flattened piece of dough about 5 inches long. Then roll up the long side up tightly to form a tube shape. Place the formed buns ¾-inch apart, sealed side down, on the prepared pan.
Cover the buns with plastic wrap that has been lightly coated with cooking spray and let the dough rise for about 45 minutes in a warm place.
Just before baking, gently brush the buns with milk before placing them in a pre-heated 350-degree oven.
Bake for 17-20 minutes or until a light golden brown on top and the internal temperature reaches at least 190-degrees.
Remove from oven and place on a wire rack to cool. Best eaten the same day.
Just before serving, slit along the top and add lots of yummy condiments and a great frankfurter or any other filling that rocks your socks.
And yes, of course you can cut the bun in half lengthwise for a traditional, non-New Englund presentation. But why?
“Blues is to jazz what yeast is to bread. Without it, it’s flat.” Carmen McRae the jazz singer
“A loaf of bread, the Walrus said, is what we chiefly need: Pepper and vinegar besides are very good indeed.” Author Lewis Carroll
Having pretty much stated the obvious, there should be no doubt in your mind that I am, always have been, and will continue to be an ardent bread lover. And when the bread is as easy to make as this one, well all I can say is BRING IT ON!
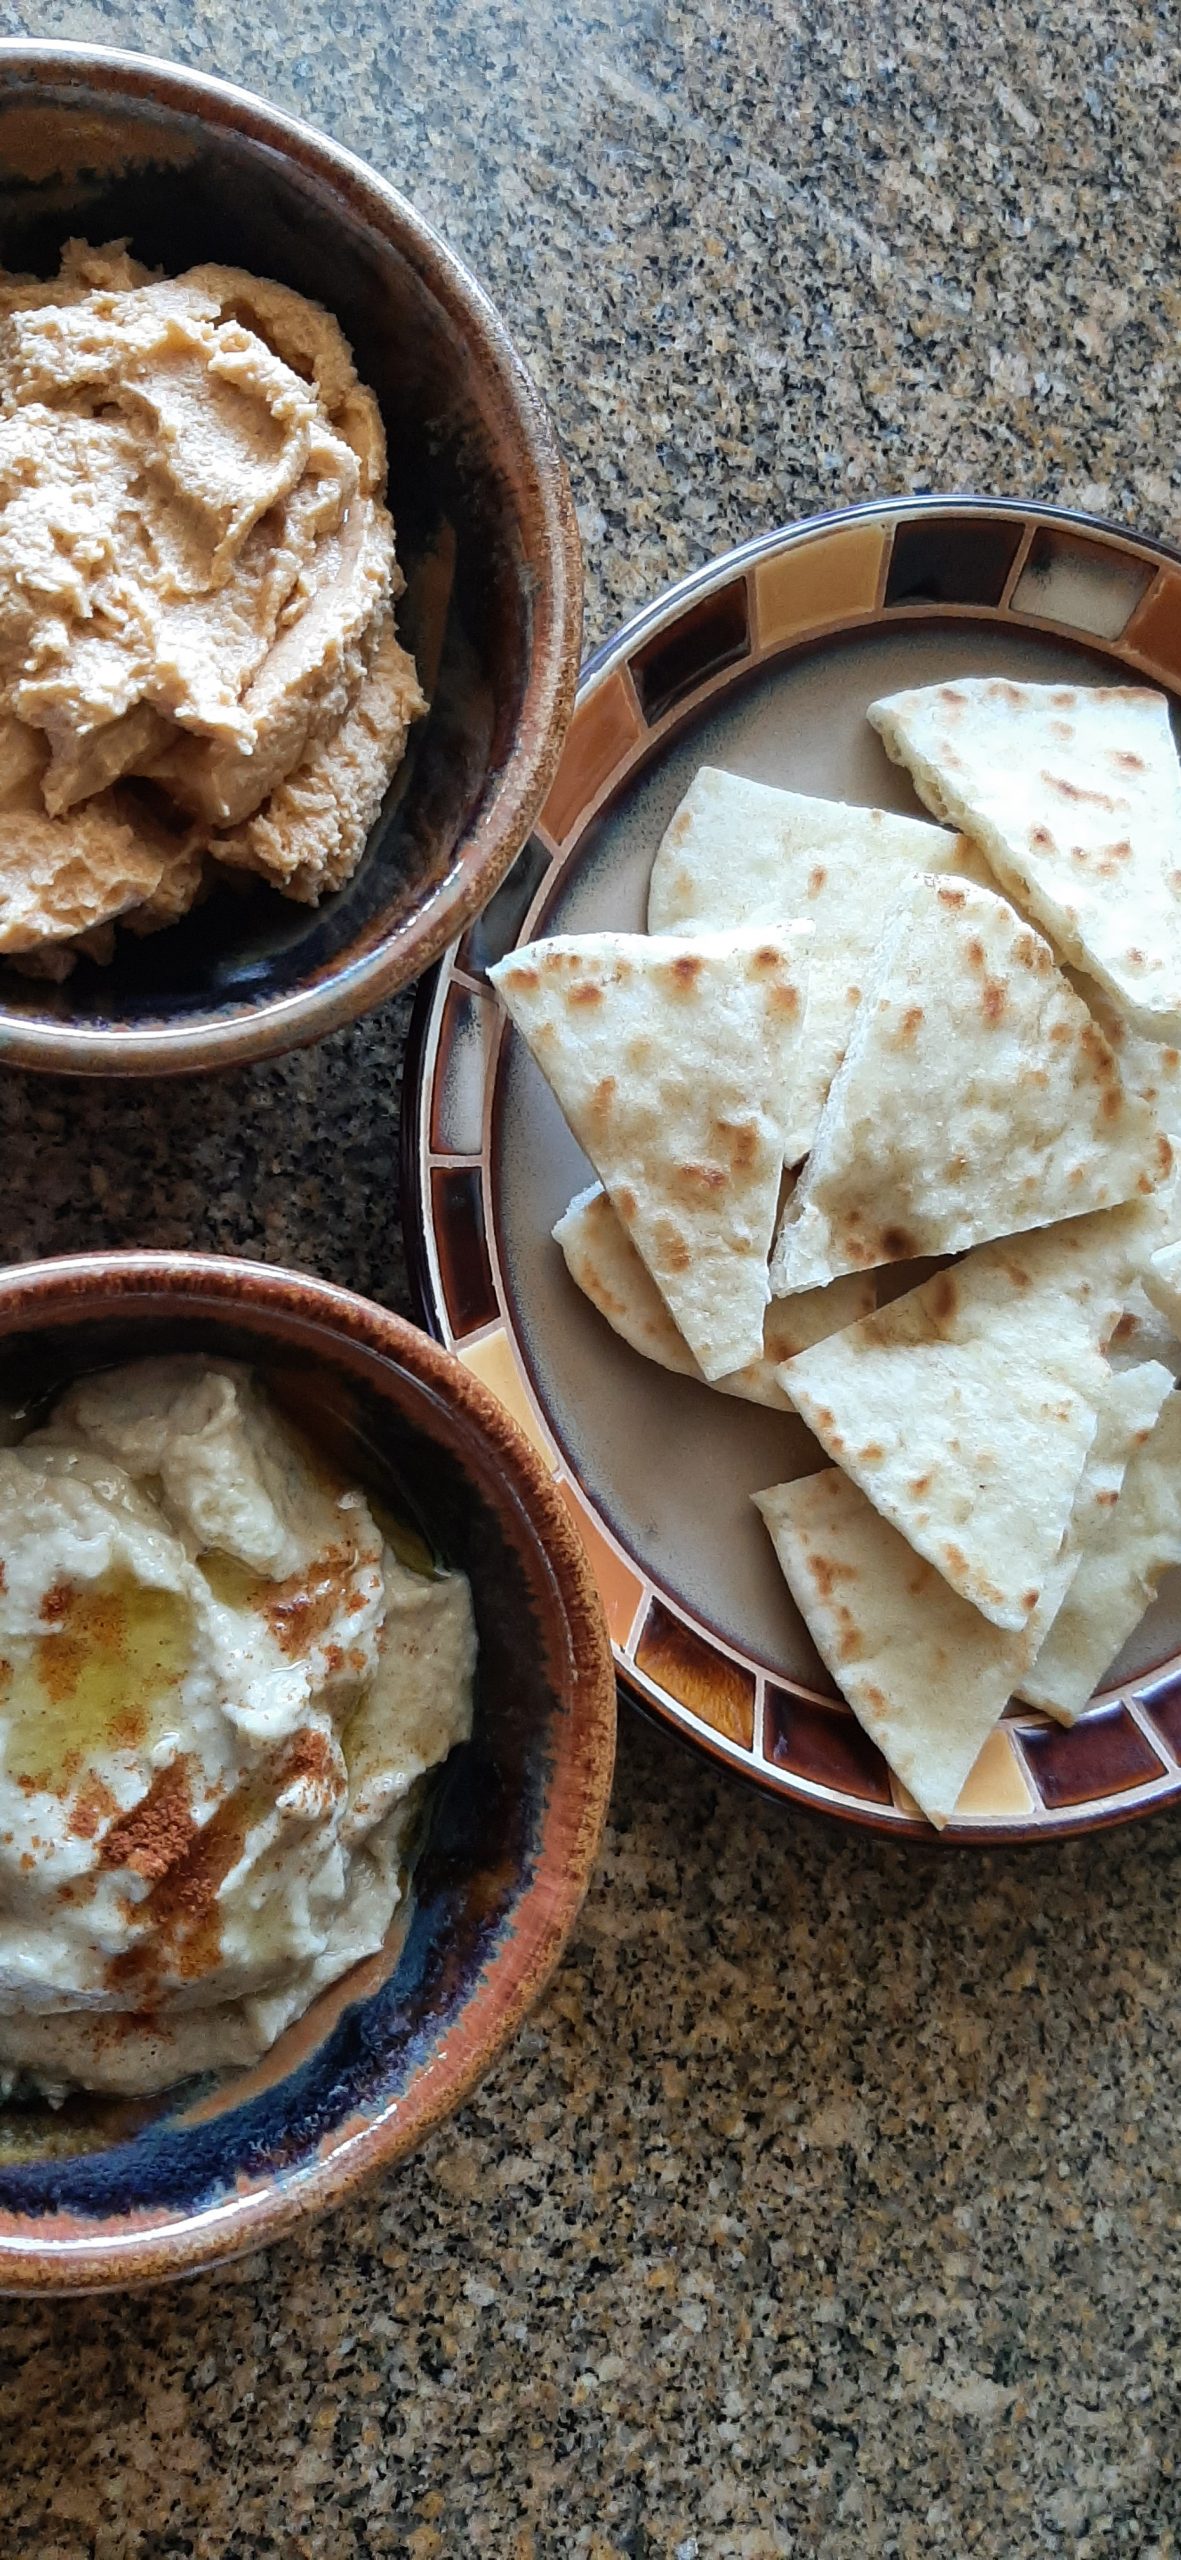
So, the other afternoon I decided to try, for the umpteenth time, making baba ganoush that was not only palatable but downright delicious. And I succeeded. (See my recipe under Oven Baked Baba Ganoush.) And just because there are certain foods that are perfect together, I made some hummus too. (Also, several recipes on site for hummus.)
But then, what to serve these two amazing dip/spreads with besides crudité? (Raw veggies are always great, but perfect flatbread or naan is not only a compliment but a foundation.) (Hard to keep baba ganoush on a carrot stick!)
So, with these three middle eastern dishes in front of us, we feasted in style.
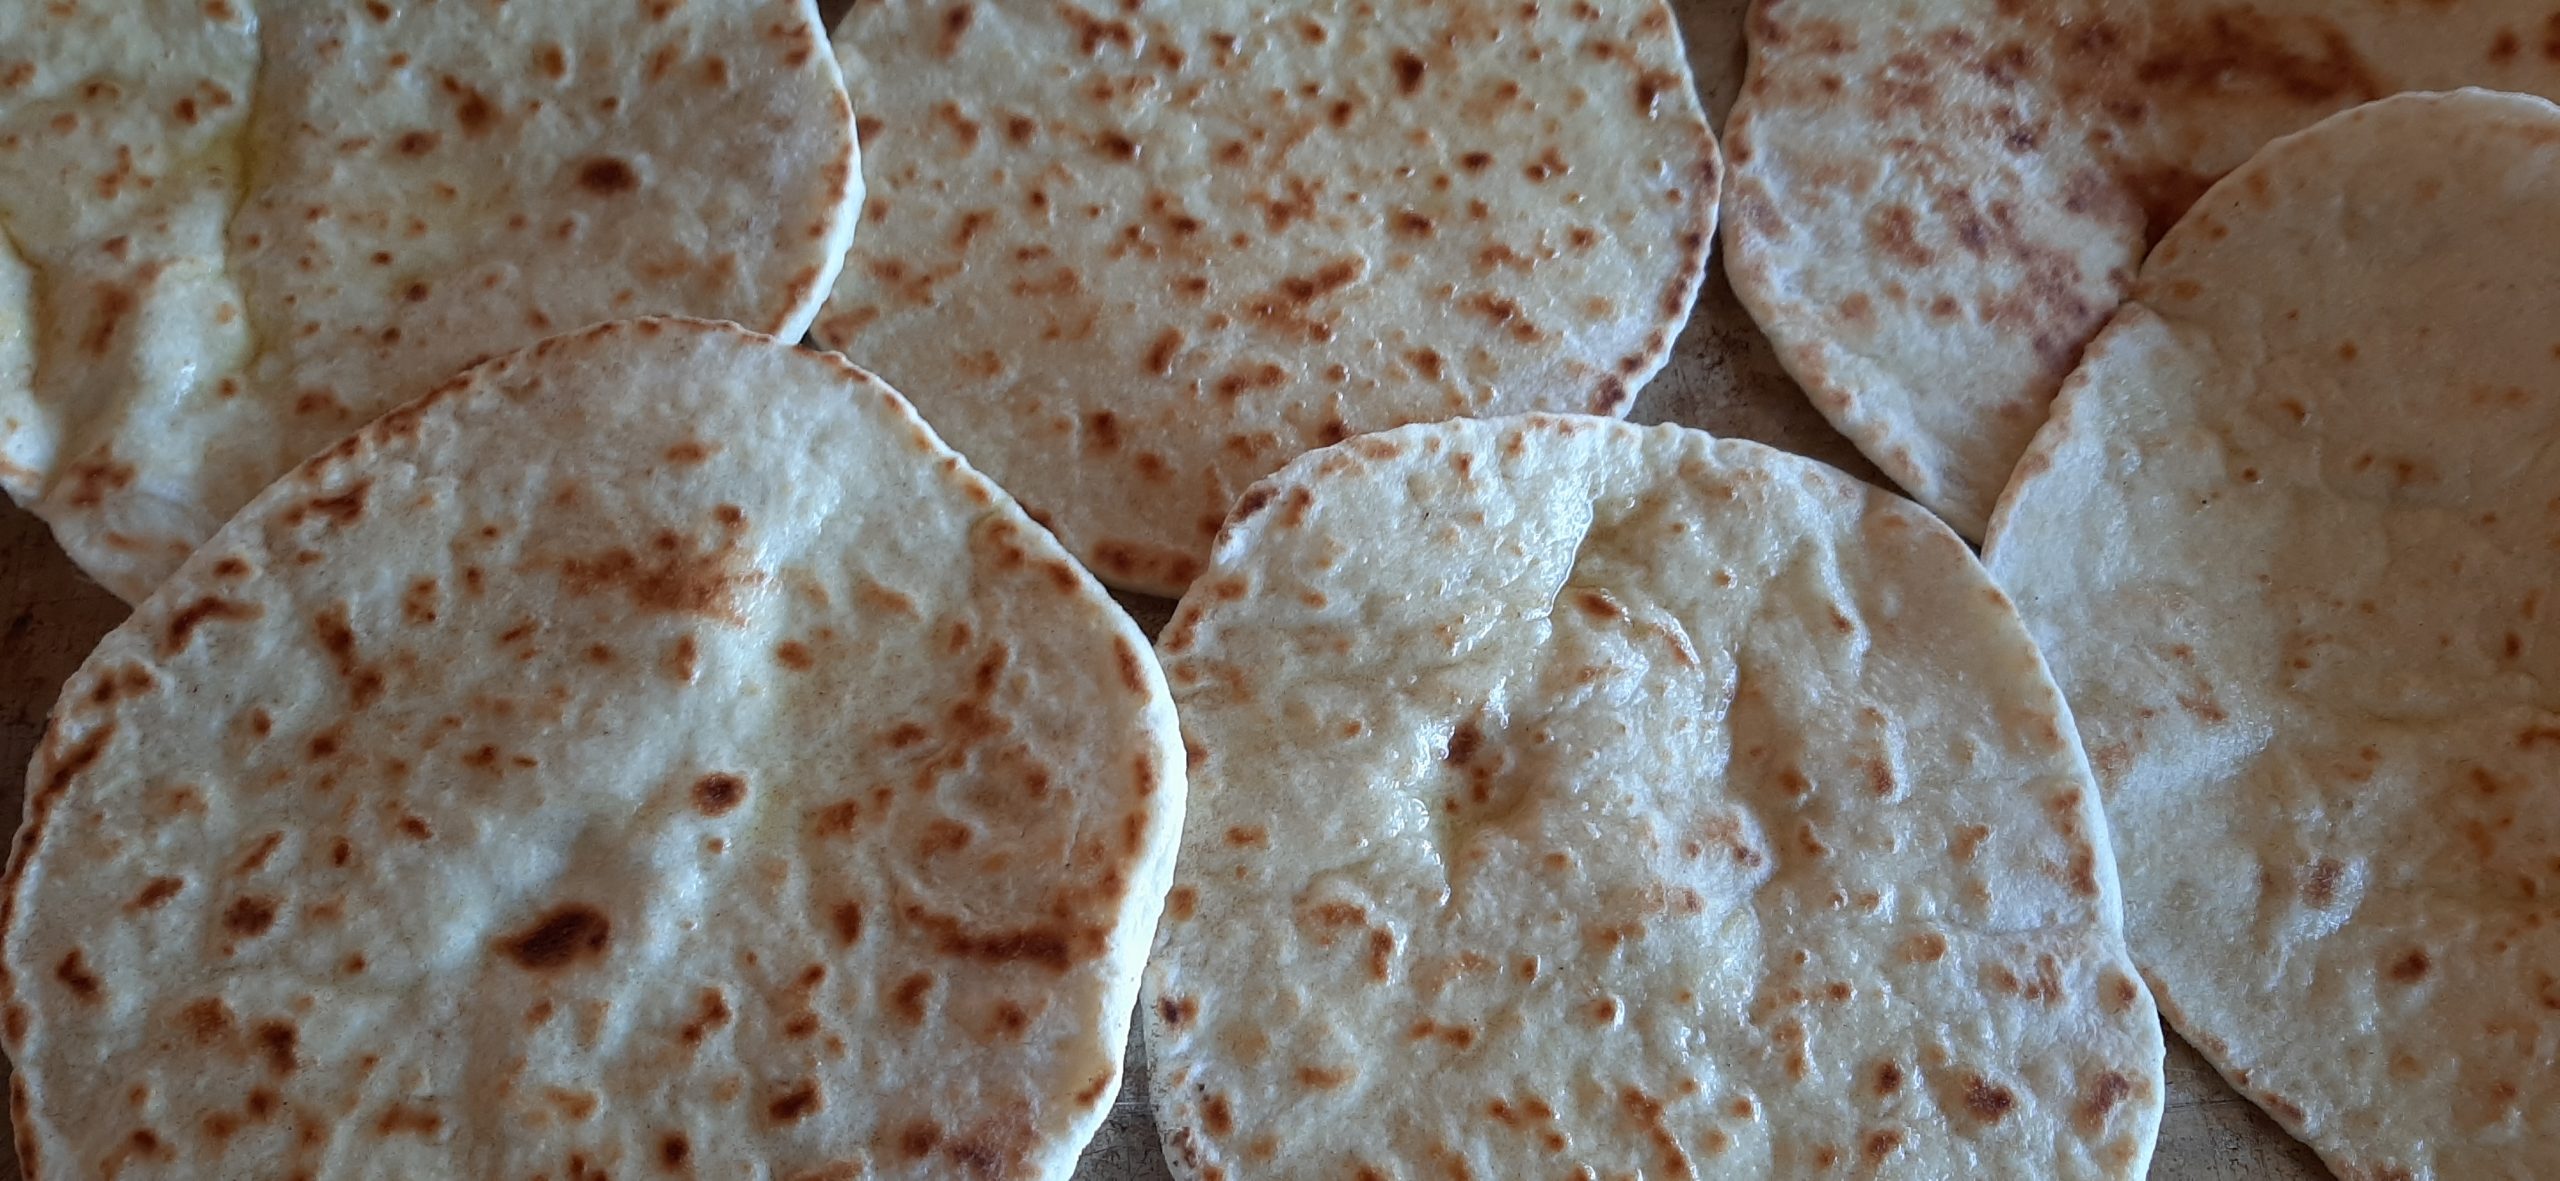
And the flatbread had been so very easy to make. In fact, the preparation really could not have been more effortless. No mixer involved, and simple straightforward ingredients. And the result – perfect base for hummus and baba ganoush. And this flatbread will be perfect next time I serve Ground Lamb Patties w/Rosemary and Thyme, Ćevapčići (Serbian Grilled Sausages), or Grilled Lamb Patties w/Tzatziki. (All 3 recipes on site.)
So, I am absolutely thrilled to be able to share this recipe with you. And I hope you like this flatbread as much as I do.
Well, it’s sunny and warm here today. While I am inside writing this post, Mr. C. is power washing our driveway. Which is both steep and long. So, while I am doing what I love, he is doing what needs to be done. Therefore, the only fair thing to happen in a situation like this is to 1) thank him for all his effort and 2) build him something he loves. And I’m thinking some kind of bar cookie would do the trick. So, on that happy note, I will bid you farewell for today, and get off my duff and into the kitchen!
Peace and love to all.
½ c. warm water
½ tsp. granulated sugar
1 tsp. instant yeast
½ tsp. kosher salt
2 c. unbleached all-purpose flour, fluffed
3 T. milk
1 T. extra virgin olive oil, plus extra for brushing on flatbread
In a small mixing bowl, combine water, sugar, and yeast. Let stand for 5 minutes.
In a large mixing bowl, combine salt, flour, milk, 1 tablespoon olive oil, and the yeast mixture. Stir to combine until dough comes together. (I use a regular table knife to stir the dough.)
Divide the dough into six equal pieces. Roll each piece in a ball with your hands. Arrange the balls on a small parchment paper lined baking sheet and cover with plastic wrap that has been lightly coated with cooking spray. Let the dough rise for 1 hour.
Heat a large griddle or skillet over medium heat.
Roll the dough balls out on a floured surface to a ¼-inch thickness and place 1 at a time on your ungreased heated skillet. Cook the flatbread until it starts to bubble. (And no, the bubbles won’t pop.) Flip the bread and brush the cooked side with olive oil. Cook the second side for another minute or two or until the bubbles are nicely browned.
Remove to a baking sheet or plate. Serve warm. (I love to serve this simple flatbread with hummus and baba ganoush.)
Store leftover bread in an airtight container at room temperature. Heat flatbread a bit before serving if not enjoying it immediately.
So, if you are like me, then you know how hard it is to make a really good baba ganoush. At least, after many tries, I had never made one that I wanted to make again, much less share with all of you. Until the day before yesterday, that is.
I think one of the mistakes I kept making was grilling the eggplant to get that lovely smokey flavor that is so important to a great baba ganoush. Which invariably resulted in the flesh semi-burning at the surface before the rest of the eggplant tenderized.
Now, I don’t know about you, but I am much better at using an oven than I am at grilling. So, based on several recipes I perused, I decided to take the advice of cooks much better and wiser than myself, and put my oven to work rather than my grill. And then cheat a little by adding a couple of smokey ingredients to offset the lack of the smokiness that comes with grilling.
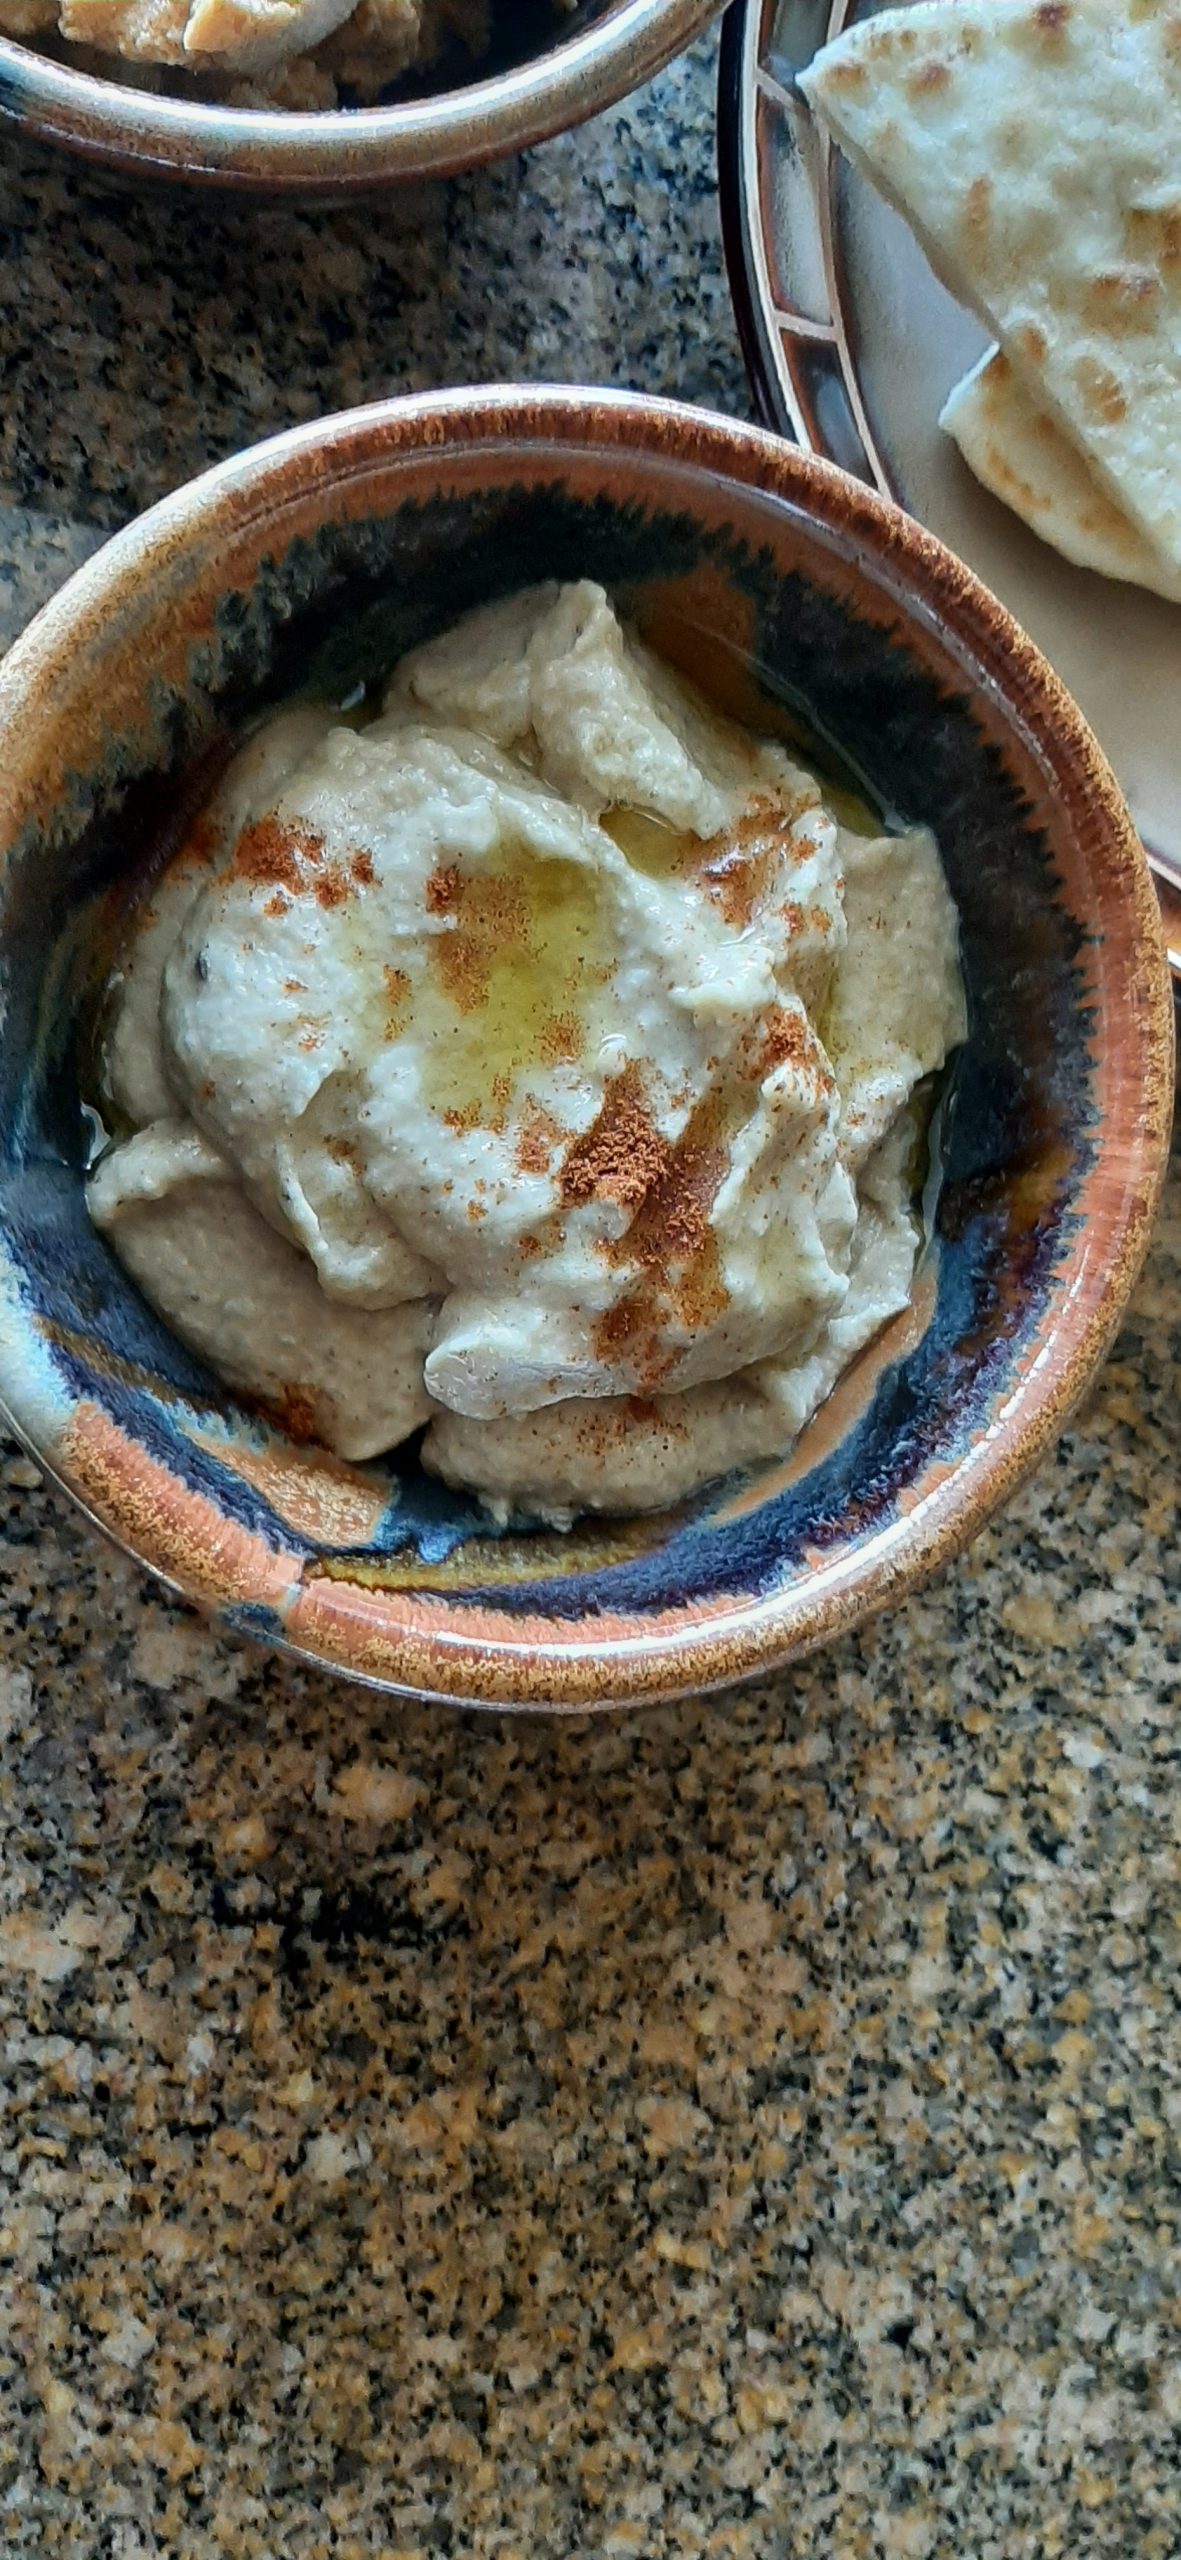
In truth, I started by leaving the baba ganoush chunky. It tasted OK, but I kept chewing on small pieces of roasted garlic that I found less than appealing. (Hard to smash up roasted garlic using a potato masher.) The rest of the mix was delicious, so I decided, what the heck, and got out my small food processor. This resulted in a lovely, smooth dip which made all the difference. The garlic was still evident, but only in a good way. And with just a drizzle of olive oil and a light sprinkling of smoked paprika on top, the baba ganoush was a winner.
I served the baba ganoush with hummus (several recipes on site under Hummus a Tune Mr. C. and my new favorite Quick and Easy Flatbread. (Find recipe below.)
So, if you too are an ardent fan of baba ganoush, I hope you give this recipe a try. It is simple to prepare, but it does take a bit of taste testing along the way to reach perfection. So, try very hard not to eat the whole batch before it is made available for others to also enjoy.
And as always, dear friends, peace and love to all.
2 med. eggplants
extra-virgin olive oil
4-5 lg. cloves of garlic
2 T. fresh lemon juice, or more to taste
3 T. tahini, or more to taste
pinch ground cumin, or to taste
¼ tsp. baking soda (if baba ganoush is bitter)
smoked paprika, for garnish
Line a large, rimmed baking sheet with parchment paper.
Halve the eggplants lengthwise. Brush the cut side very lightly with olive oil. Place the eggplant halves on the prepared pan, cut side down.
Cut off the top of the garlic cloves. Place garlic onto a square of aluminum foil. Pour a little olive oil over the exposed tops of the cloves and wrap tightly in the foil. Place the garlic packet on the baking sheet with the eggplant.
Roast the eggplant and garlic in a preheated 425-degree oven for 35 to 40 minutes or until the eggplant is tender. Remove from oven and allow to cool.
You will find that the baked eggplant has a darkened skin on the cut side from baking flesh side down on the baking sheet. I advise you to carefully cut around the edge of each eggplant half with a paring knife. Then carefully lift the burned skin off the eggplant and scrape off as much of the unburned flesh as possible into a fine mesh strainer set over a bowl. (And no, the burned part will probably not come off in one nice piece. No one is that lucky! So be patient. This step takes a bit of time. But it’s important.) Discard the burned parts. Then scoop out the remaining flesh into the strainer. Discard the skins.
Let the eggplant sit in the strainer for a few minutes to release some of the unwanted liquid. Remove any blackened parts that might remain. Then stir the eggplant a bit. This will help get rid of any residual liquid. Transfer the flesh to the bowl of your food processor and discard the liquid in the bottom of the bowl.
Gently squeeze the roasted garlic cloves out of their peels and into the food processor.
Add the lemon juice, tahini, cumin, and 2-3 tablespoons of olive oil. Process until smooth. Taste and add additional salt, lemon juice, tahini, or olive oil. (You will probably need more salt Or even some of each ingredient.) If your baba ganoush is a bit bitter, try adding just a smidge of baking soda and give the whole thing another whirl. Taste again and make further adjustments as required.
Scoop into a serving bowl, cover, and refrigerate for a couple of hours. Just before serving, garnish with a drizzle of olive oil and a light sprinkle of smoked paprika.
Great served with my Quick and Easy Flatbread, pita chips, and/or crudité.
QUICK AND EAST FLATBREAD
½ c. warm water
½ tsp. granulated sugar
1 tsp. instant yeast
½ tsp. kosher salt
2 c. unbleached all-purpose flour, fluffed
3 T. milk
½ tsp. fresh lemon juice
1 T. extra virgin olive oil, plus extra for brushing on flatbread
In a small mixing bowl, combine water, sugar, and yeast. Let stand for 5 minutes.
In a large mixing bowl, combine salt, flour, milk, lemon juice, 1 tablespoon olive oil, and the yeast mixture. Stir to combine until dough comes together. (I use a regular table knife to stir the dough.)
Divide the dough into six equal pieces. Roll each piece in a ball with your hands. Arrange the balls on a small parchment paper lined baking sheet and cover with plastic wrap that has been lightly coated with cooking spray. Let the dough rise for 1 hour.
Heat a large griddle or skillet over medium heat.
Roll the dough balls out on a floured surface to a ¼-inch thickness and place 1 at a time on your ungreased heated skillet. Cook the flatbread until it starts to bubble. (And no, the bubbles won’t pop.) Flip the bread and brush the cooked side with olive oil. Cook the second side for another minute or two or until the bubbles are nicely browned.
Remove to a baking sheet or plate. Serve warm. (I love to serve this simple flatbread with hummus and baba ganoush.
Store leftover bread in an airtight container at room temperature. Heat leftover bread a bit before serving.