And yes, I know the bones of this
cobbler recipe have gotten a lot of press lately. The recipe was even featured
in The Seattle Times, and you can’t get much more note-worthy than that! But as
you well know, I almost always feel compelled to mess with perfectly good
recipes and put my own spin on a dish. Where this compunction comes from I have
no idea. But at 75, the chances of my changing a decade’s long habit is
probably just not going to happen. And in my humble opinion, amaretto should
have been an ingredient from the onset. Plus I don’t like to eat the fuzzy skin
of peaches, even if they are cooked. And vanilla in the cakey part of a cobbler
should almost be mandatory as far as I’m concerned!
So anyway. I changed the recipe
from the Boat Street Café to what you see below. And frankly, the cobbler was
very well received by all of us who were lucky enough to be gathered around our
friends Jim & Margo’s dining room table last weekend. But the hot water and
sugar topping method was totally the inspiration of Susan Kaplan who sold the Boat
Street Café to Renee Erickson in 2003. Full disclosure folks, full disclosure.
But regardless of who put what in the recipe, or changed the instructions, or added or deleted ingredients, this is a delicious way to use those wonderful, juicy peaches that are beginning to grace our local produce stands and farmers markets. So before the season is over, make your family and friends a dessert that features peaches. They are just so delicious. And if the ones Mr. C. brought home the other day are any indication of this season’s crop, we are all in for a treat. Happy eating everyone.
4 tsp. cornstarch
1/3 c. amaretto
10 lg. peaches
½ c. (1 stick) unsalted butter, room temperature
1½ c. granulated sugar, divided
1½ c. unbleached all-purpose flour
2 tsp. baking powder
1 tsp. kosher salt
¾ tsp. ground cinnamon
¾ c. whole milk
1 tsp. vanilla extract
½ c. hot water vanilla ice cream
Whisk the cornstarch and amaretto together in a 9×13-inch casserole dish or glass Pyrex pan. (Pan can be a bit larger, but not any smaller.) Set aside.
Peel the peaches (see “how to”
below) and cut into 8 wedges, then each wedge in half. Place in a colander to
drain while you prepare the cobbler part. (If you want to save the nectar,
place the colander in a bowl.)
With an electric mixer, beat the butter
and 1 cup plus 2 tablespoons of the granulated sugar for 1 minute. In a
separate bowl, whisk together the flour, baking powder, salt, and cinnamon. Add
to butter mixture and beat for about 30 seconds. Slowly mix in the milk and vanilla
extract. Continue beating at medium speed for 2 minutes more, or until the mixture
is light and fluffy.
Gently pour the drained peaches in
with the cornstarch mixture. Stir until every surface of every peach piece is
coated with the cornstarch/amaretto mixture.
Spoon the batter in large blobs
over the peaches. Using a small offset spatula or implement of choice, spread
the batter over the fruit so that it’s evenly distributed. Sprinkle with the remaining
6 tablespoons of sugar and drizzle the hot water evenly over the sugar.
Place the baking dish in a
pre-heated 350 degree and bake for 60-70 minutes or until the top is cracked
and golden brown, and a toothpick inserted into the topping comes out clean.
Remove the pan from oven and
place on a cooling rack for at least 30 minutes before serving.
To serve, scoop into bowls and top with ice cream. Best served the same day as baked.
Peach Pealing 101:
Put a pot of water onto boil. Lightly score the bottom of each peach with an X. Working in batches of 3 or 4, add the peaches to the boiling water for 2 to 3 minutes. Using a slotted spoon, transfer the blanched peaches to an ice-water bath to stop the cooking. Remove peaches from ice water and remove skin with a paring knife.
I
love scalloped potatoes, potato gratins, and just about every which way you can
think of to calorie up cut potatoes and bake them in the oven. But after
discovering this recipe inspired by Tory Avery, I now have a way of serving a
potato casserole without as many calories as most of my regular favorites. And
why is that you might ask. Well, notice the absence of two of the most caloric
ingredients in most potato casseroles – cheese and heavy cream. And yet, even
without these ingredients, this kugel is creamy and delicious.
Now
granted, you are invited to add a bit of sour cream as a topping. But I never
said it was a low calorie dish. It just has less calories than most of its potato
casserole predecessors. (At least the ones I love the most.)
But,
boy oh boy is this kugel delicious. It’s like a big old potato latke, without having
to spend time frying large spoonful’s of potato mixture in hot oil on top of
your stove. (And if you have never done this, please take it from me. You can
spend hours frying potato latkes. Because as soon as you fry a couple three,
they’re gone. So you have to fry more. You see where I’m going with this,
right?)
Anyway, if you want a simple potato dish to add a certain je ne sais quoi to an otherwise traditional assortment of other offerings on your table, give this recipe a try. It’s really yummy, easy to fix, economical, and different from most other potato preparations. Just remember to include something crunchy in your menu. Actually that’s important regardless of whether you serve this dish or not. If you don’t already, get used to planning for at least one crunchy component in every meal you serve. It will soon become a habit, and as you well know, habits are hard to break. Happy kugel to you and yours.
Place
a 9×13 metal or ceramic baking dish or pan in the oven and preheat oven to 400
degrees, letting the dish heat up inside. (Glass does not work well for this
recipe.)
Peel
the potatoes, then use a food processor or hand grater to grate them into large
shreds. Place the potato shreds in a large mixing bowl and cover with cold
water. Let the shreds sit for a few minutes.
Meanwhile,
wash and mince the green onions. (Don’t even think about discarding the green
part. Cut that part up too.) Set aside.
In
a large mixing bowl, whisk together the eggs, potato starch, salt, and pepper
until fluffy. Drain the potato shreds in a colander, pushing down firmly on top
of the shreds with your hands to push out the excess liquid. Place the grated
potatoes in the bowl with the seasoned eggs. Stir in about ¾ of the minced
green onions and mix all together until well combined.
Take
the preheated baking dish out of the oven. Quickly pour in 3 tablespoons of the
olive oil, then use a pastry brush to carefully spread the oil around the
bottom and sides of the hot dish. (The hot dish and oil will help guarantee a
beautiful brown and crisp bottom crust for the kugel.)
Quickly
spread the potato mixture into an even layer in the baking dish, then drizzle
remaining 1 tablespoon of olive oil across the top.
Bake
uncovered in a pre-heated 400 degree oven for 60-70 minutes or until the top is
nicely browned. If the kugel seems to be browning too quickly, cover the pan with
aluminum foil to keep it from over-browning. But in order for the potatoes to
become tender, it truly takes about 70 minutes of baking time.
The
kugel tastes best hot from the oven, but do let it set up for 5-10 minutes
before slicing and serving. Pass the sour cream and remaining minced green
onion.
What is there about the combination of Kalamata olives, feta cheese, and fresh tomatoes that for me always evoke happy memories of sunshine, warm water, coastal breezes, and good times? Oh yah – I remember now. It’s the wonderful vacations we have taken along the Mediterranean Ocean and the Adriatic Sea. So for one of our most recent JazzVox pre-concert meals, I decided to serve some dishes from that part of the world. So of course, the meal had to include a Greek salad.
Now
the reason I named this salad Greek Salad (Kinda Sorta), is because I included
romaine lettuce in the mix. And everyone who is anyone knows that the number
one rule when fixing a traditional Greek salad is “thou shall not use lettuce
or any other leafy green in the making of this salad”. So up to this point, I
had never even considered making this culinary faux pas.
But
I’m older now, and frankly I don’t give a flying fig if I break established
rules or not. (That is if the rules aren’t illegal, immoral, or irreverent!) So,
I decided to add some romaine, not only for the color, but also for the crunch.
And in all honesty, I think the romaine added a lot to the salad. It was
perfect with the other ingredients, and helped create a freshness that I have often
found missing in more traditional Greek salads.
So
the moral of this story is to never fear thinking outside the box when you are
cooking. Yes you may end up flying in the face of the traditional way a dish is
prepared. But who cares? Cooks experimenting with new methods and ingredients is
the only reason we have the amazing dining choices we have today. I mean
really. Can you even imagine a world without guacamole, lemon curd, or milk
chocolate? Gives me hives even thinking about it!
So have fun in your kitchen. Break away from tradition. And try this salad. It really is yummy!
Dressing:
¼
c. extra virgin olive oil
3
T. freshly squeezed lemon juice
½
tsp. Dijon mustard
1
clove garlic, finely minced
1
T. chopped Italian parsley
1
tsp. dried oregano
¼
tsp. kosher salt
freshly
ground black pepper (or more to taste)
Whisk all the dressing ingredients together. Store in the refrigerator until needed.
Salad:
5
c. chopped romaine lettuce
1
c. halved cherry tomatoes
¼
red onion, cut into thin slices
½
English cucumber, partially peeled, cut in half, seeded, and cut into thin half
rounds
½
green pepper, diced
18
Kalamata olives, halved, or more to taste
½
c. crumbled feta cheese, or more to taste
Place
the lettuce, tomatoes, onion, cucumber, green pepper, and olives in a salad
bowl. Dress with salad dressing. Gently toss in the feta cheese. Serve immediately.
When
we were in Central Europe recently, we were offered muesli almost every morning
as one of the many offerings provided with our breakfast buffet. Not granola,
it was definitely muesli. And always with our choice of yogurt. Which of course
reminded me that my family has been calling muesli and granola “Breakfast in
Siberia” since 1978. (My former husband and I took our three youngest kids to
Europe for 5 weeks. And while we were staying with relatives in Sweden, the
combination of muesli topped with yogurt was always lovingly referred to by that
particular moniker.)
Now
you may wonder what the difference is between granola and muesli. The main difference is that while both are made of various combinations of grains,
nuts, seeds, and dried fruits, muesli is usually unbaked.
While granola is baked and is sweeter and contains more oil which
binds the ingredients together into crunchy clumps.
Now you know me. I almost always have to break the rules
somewhere along the line when it comes to food. And of course, this recipe is
no exception. But in my defense, it simply made sense to bake some of the
ingredients for the sake of texture and flavor. So this muesli spends a bit of
quality time in the oven. But there are no clumps, so there is still that
distinction.
And yes I have recipes on this site for granola too. I love
my granola recipes and still make each one of them to this day. But I so enjoy
variety. And if breakfast isn’t the meal where a bit of variety is really
appreciated, I don’t know a marshmallow from a boiled potato!
So make this recipe next time you want a healthy diversion from Cocoa Puffs. Or you are tired of paying an inordinate amount of money at the grocery store for a package of muesli that is 95% oats and 5% nuts, fruit, or seeds. I promise you that with your first bite you will know what you have been missing by not making your own breakfast cereal. Happy breakfast to you all!
scant
1 tsp. kosher salt
¾
tsp. cinnamon
2
T. vegetable oil
3
T. real maple syrup
2
tsp. vanilla extract
5 c. old-fashioned oats
1½
c. mixed nuts (almonds, pecans, walnuts, hazelnuts)
1½
c. coconut
½
c. chia seeds
1½ c. mixed dry fruit
In
a large mixing bowl whisk together the salt, cinnamon, veggie oil, maple syrup,
and vanilla. Stir in the oats, nuts, and coconut. Mix well.
Pour
the mixture onto a rimmed baking sheet. Bake in a pre-heated 350 degree oven until
the oats and coconut flakes are lightly golden and fragrant, about 15 minutes.
Stir half way through the baking time. Don’t wash the bowl. Add the chia seeds
and nuts to it.
When
the oat mixture is just out of the oven, pour it over the chia seeds and fruit.
Mix well. Allow to cool completely before storing in an airtight container.
Serve with milk or yogurt.
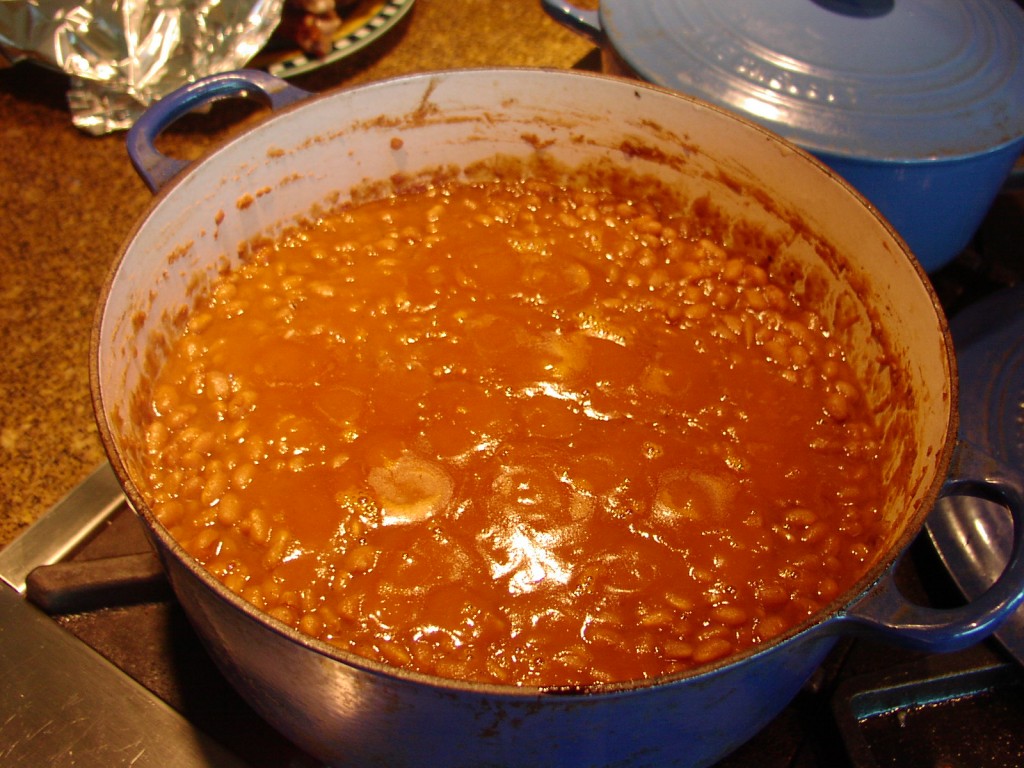
So
call me old-fashioned, but I don’t think a BBQ picnic is complete without baked
beans. And not the kind of baked beans containing fancy new ingredients like quinoa,
agave nectar, or stevia. I’m talking about the kind of baked beans I’ve been
preparing since my early 20s. Dry beans rehydrated with lots of ketchup, brown
sugar, bacon, onion, rum, Dijon mustard, etc. (OK, I didn’t use rum or Dijon
mustard when I first started making baked beans. But a few concessions for the
sake of flavor simply had to be made as I developed as a cook. And I’m sure my
father, the baked bean maker in our family would agree with each of my
respective inclusions.)
So,
because I consider myself to be am open minded person, and my daughter Paula just
happened to have gifted me with an Instant Pot a couple of Christmas’s ago, I
decided to make this recipe for baked beans a generational mash up.
First
and foremost, baked beans have to be made from scratch. (And yes I have cheated
over the years and purchased a big old can of baked beans and doctored them up
to my liking. But in my defense, that was when I was much younger, still
working, and had kidlets littered about the house. However, now that I am
retired with virtually nothing stopping me from spending hours in the kitchen,
I no longer go that route.)
Anyway,
this recipe contains all of the ingredients I used when I began preparing baked
beans decades ago, except for of course the aforementioned rum and Dijon
mustard.
So
if you too love baked beans, give this recipe a try. And yes it still takes a
good deal of time to bake beans from scratch. But most of the time you are free
to pursue other activities. Very little prep time is involved. The rest of the
time your Instant Pot and oven are doing the heavy work.
So
host a picnic before the summer is over. There is just no better way to spend quality
time with your family and friends than by getting your faces totally smeared
with BBQ sauce, or having your arms and elbows become sodden from the juices
dripping out of a luscious hamburger. Good times my friends. Good times!
And for a recipe for Vegetarian Baked Beans – check out the recipe already on this site.
2
lbs. Great Northern beans, picked over and washed (about 4½ cups dry beans)
8
c. water, plus more as needed
1
lg. yellow onion, chopped, divided
2
tsp. paprika
3
garlic cloves, chopped
2
bay leaves
¾
lb. lean thick-cut bacon, cut into small pieces
2/3
c. molasses (not blackstrap – too strong)
2
c. ketchup, or more to taste
½
dark rum, opt.
2
T. Worcestershire sauce
2
T. dried parsley
½
tsp. dried thyme leaves
½
tsp. dried savory
1-2
tsp. seasoned salt
freshly
ground black pepper
¼
c. Dijon mustard
1½ c. brown sugar
Place
half of the beans, water, half of the chopped onion, paprika, garlic, and bay
leaves in the Instant Pot. Note the water level for future reference. Set on
high and cook for 35 minutes. (See guide below if not using Great Northern dry
beans.) Once machine is done cooking, allow it to naturally release pressure
for about 20 minutes. Manually release the remaining pressure and carefully
remove the lid. Using a large slotted spoon, lift the beans into a container.
Save the water.
Add
the remaining half of the dry beans and enough water to bring the level in the
pot up to where it was for the first set of beans.
Please note: If you have a large Instant Pot, you may be able to
pressure cook all the dry beans at once. If so, lucky you! I only have a 6
quart pot so I had to cook the beans in 2 batches.
While
the beans are cooking, fry the bacon in a large fry-pan until crisp. Add the
remaining onion and sauté just until translucent. (And no, you don’t drain off
the bacon fat unless there is quite a bit. But with lean bacon you shouldn’t
have too much.) Remove pan from heat and stir in the molasses, ketchup, rum,
Worcestershire sauce, parsley, thyme, savory, salt, pepper, Dijon mustard, and
brown sugar.
When
the beans are all cooked, drain off all the water. (Save a couple cups of the
water just in case additional liquid is needed during the baking process.) After
the beans are drained, add them to the fry pan. Taste the sauce and adjust
seasoning as required.
Pour
into an oven proof covered casserole. Cover and bake in a pre-heated 275 degree
oven for about 2 hours. Remove the lid and continue baking for another hour so
that the top can brown nicely. (During the baking time, check the beans
periodically to make sure they aren’t drying out too much. Add reserved Instant
Pot water as needed.)
Remove
from oven and serve warm.
Can
be made ahead, refrigerated, and warmed just before serving.
I almost always prepare
a veggie tray when I entertain a large crowd of family and friends. Because
invariably there are those on a diet, or vegetarian, vegan, or genuinely allergic
to almost everything, but are able to eat veggies. Plus of course, there are those
people like myself that simply love raw vegetables. But I also love to dip
those darling little veggie morsels in something that tastes yummy. (My
downfall, I know!) So for a recent get-together I whipped up this tasty Once
Upon a Chef site recipe to serve along-side the veggies.
And oh my! It was
very tasty and well received by my guests. And the best thing – there was
enough left that for breakfast this morning, I was able to spread each of our toasted
half bagel with this delicacy. Oh baby – what a treat! And yes I know. A bit
decadent for a Tuesday morning, but I simply could not let it go to waste. (My
story and I’m sticking to it!)
So if you are planning a get-together and want to make sure there is at least one dish that almost everyone can enjoy – cut up a variety of fresh veggies and plop them on a plate. Then if the spirit moves you, go the extra mile and serve this dip with the veggies. And no, perhaps not everyone will be able to partake of this dip, but for those who can, you will be hearing nothing but praise. And just so you know, toasted pita bread wedges are also wonderful served with this dip. See recipe below.
8 oz. feta cheese
½ c. sour cream
½ c. mayonnaise
(I use light mayonnaise)
zest of ½ lemon
1 small clove
garlic, roughly chopped
¼ tsp. dried dill
¼ tsp. dried
oregano
¼ tsp. dried
thyme
pinch kosher salt
freshly ground
black pepper, plus a couple of grinds for garnish
1/8 tsp. crushed
red pepper flakes
crudité
Combine the feta
cheese, sour cream, mayo, lemon zest, garlic, dill, oregano, thyme, salt,
pepper, and red pepper flakes in a food processor. Process until very smooth.
Taste and adjust seasoning, if necessary. Transfer to a serving bowl, cover and
refrigerate until about an hour before you plan to serve. Sprinkle lightly with
coarse ground pepper and serve with crudité.
Can be made up to 3 days ahead and stored in a covered container in the refrigerator.
Toasted Pita Wedges: Brush pita bread on both sides with olive oil and sprinkle
with a pinch of kosher salt. Cut into wedges and place on a large baking sheet.
Bake in a pre-heated 350 degree oven for about 10 minutes or until lightly
toasted.
Sometimes steak by itself is a bit boring.
Well at least for me it can be a bit bland. While at the same time, I have
always had an appreciation for a good sauce. So on the infrequent occasions when
I desire a big old hunk of rare meat, my mind immediately turns to what I can prepare
that will enhance the flavor of the meat.
Now please know that I don’t need a lot of
sauce, but a bit is always nice. And I especially appreciate a sauce that is
easy to prepare and not too, too unhealthy. So when I found this recipe on the
Allrecipes site, I became a very excited carnivore. And as it turns out, with
very good reason.
This sauce was simply delicious. And just a delightful
accompaniment to Mr. C’s beautifully grilled tenderloin steaks. I added some
tiny potatoes roasted in olive oil and herbs, a crisp cucumber salad, and a nice
hearty red wine to the menu, and this summer dinner on the deck was perfection
personified.
So next time you want to take your grilled steaks or ground beef patties to a new level, fix this wonderful sauce and surprise your family or friends. I promise you will not regret the short amount of time it took you to make this sauce. (Or the short time it takes your family or friends to thank you for your effort!)
4 T. (½ stick) unsalted butter
1 lg. shallot, minced
2 c. sliced fresh mushrooms
1 garlic clove, finely minced
1 c. beef broth
1/3 c. dry red wine
1 T. Worcestershire sauce
¼ tsp. kosher salt
freshly ground black pepper
1 bay leaf
1/8 tsp. dried thyme, or more to taste
1 tsp. cornstarch
2 T. cold water
Melt the butter in a skillet over medium heat.
Stir in the shallot and cook until the shallot has softened and turned
translucent, about 3 minutes. Add the mushrooms and stir until they begin to brown,
about 5 minutes. Add the garlic and cook for 1 minute.
Whisk in the beef broth, wine, Worcestershire
sauce, salt, pepper, bay leaf, and thyme. Bring to a simmer over medium-high
heat. Once simmering, reduce the heat to medium-low, and continue to cook,
uncovered until the sauce reduces slightly, about 10 minutes.
Dissolve the cornstarch in the cold water, and
stir into the simmering sauce until thickened. Serve over your favorite steak
or choice of protein.
I
am always looking for summer salads that don’t contain mayonnaise. Now don’t
get me wrong. I am a true believer in the power of mayonnaise. And if truth be
told, I like almost any dish that contains this magic ingredient. But when it
comes to serving a salad that might possibly be on a picnic or summer gathering
table for a couple three hours in the summer time, I get a bit nervous. So when
I found this recipe on the foolproof living site I knew I had found a dish
that would suit my needs. Of course I had to add my own touches here and there,
but basically I took to this recipe like a duck to water.
And
I must say, it is truly a lovely combination of ingredients. The use of pickled
jalapeño is true genius. I love using
fresh jalapeño, but it can be a bit too spicy for some. So using the tamer version
in the form of pickled pepper is a wonderful compromise. And yes I always have
pickled peppers in my pantry (bet you can’t say that real fast) because I
always use them when I make Guacamole (recipe on site).
So if you are looking for an easy, make ahead salad that is perfect for a summer get-together, give this recipe a try. Or just make the salad for yourself and don’t share it with anyone else! It will taste just as delicious on day 4 as it does on day 2. If it lasts that long, that is! Happy August every one. And stay cool!
8-9
ears of yellow corn or 5 cups of frozen
yellow corn stir-fried in a bit of butter
vegetable
oil
6
T. fresh lime juice
2
garlic cloves, finely minced
¼
c. extra virgin olive oil
2
T. pickled jalapeño juice, or
more to taste
1
tsp. kosher salt
freshly
ground black pepper
1
orange bell pepper, diced
2
c. cherry or grape tomatoes, halved
1½
c. finely diced celery
½
c. finely chopped red onion
¼ c. chopped pickled jalapeño slices
2 (15 oz.) cans of black beans, drained and rinsed or 3-4 cups cooked black beans
Using a small basting brush, coat the shucked ears
of corn lightly with vegetable oil. Place on a medium-hot grill and turn as
needed until all sides are lightly browned. Remove from grill and allow to cool
completely. When cool, cut off the kernels and set aside. Note: The corn
kernels do not have to be cooked through. In fact, they taste even better if a
bit undercooked.
Meanwhile, whisk or shake together the lime juice,
minced garlic, olive oil, pickled jalapeño juice, salt, and pepper. Set aside. (Can be prepared well ahead.)
To make the salad: Place the
corn kernels, bell pepper, halved tomatoes, celery, red onion, pickled jalapeño, and black beans in a salad
bowl. Drizzle with the dressing and toss gently. Adjust seasoning. Cover and
place in your refrigerator. Best if made a day ahead. Give the salad a gentle
stir before serving, adjust seasoning again, and serve either cold or at room
temperature.
Although
this is basically a Serbian recipe, Ćevapčići – pronounced chae vap chee
chee (or something like that) is served in some form or another throughout the
Balkan States. Basically Ćevapčići is just a wonderful combination of 3 types
of ground meat, spices, and veggies. When formed into patties, or into the more
traditional shape of small sausages, grilled, then laid in a warm pita and
smothered with Tzatziki, shredded lettuce, diced tomatoes, and chopped white
onion, there is just nothing finer.
And
who told me about this wonderful dish? My PA (Randy) at my dermatologist’s
office. (You just never know when you might meet a foodie.) Life is wonderful.
Right!
Anyway.
You need a new taste sensation? You need a new way to fill a pita bread pocket?
You need an amazing new way to justify eating an inordinate amount of Tzatziki
at a single meal? Well thanks to Randy, you now have it! And while you’re at it
– make some hummus to go along with the meal. (You can never have too much “Mediterranean”
food around. In all our travels, we have never found anything that was made,
grown, or served around the Adriatic and Mediterranean oceans that we didn’t
love!)
So
go a little out of your comfort zone, and treat yourselves to some Ćevapčići. Even
if you just grill this mixture up and serve it like you would a regular all
beef hamburger, you will not be disappointed. Even go without a pita pocket or bun of any kind! Set a new
trend. Be the first on your block! So stop balking and go Balkan in the near
future. You will thank me. I know you will.
Oh, and sorry I haven’t posted any new recipes for a while. We were on vacation and posting our trip report when we got home took precedence over posting a new recipe. But I have some fun recipes to share with you, so keep tuning in.
1
lb. pork sausage
1
lb. ground beef
1
lb. ground lamb
1
egg white
1
T. Hungarian paprika
1
tsp. baking soda
1
tsp. kosher salt
¼
tsp. cayenne pepper
freshly
ground black pepper
1
c. finely chopped onion
4
cloves garlic, minced
2
T. finely chopped Italian parsley
warm
pita bread, opt.
Tzatziki
(recipe below), opt.
shredded
lettuce, opt.
chopped
tomato, opt.
chopped white onion, opt.
Combine
the pork sausage, beef, and lamb together in a large bowl. Whisk the egg white,
garlic, onion, parsley, paprika, baking soda, salt, cayenne, and black pepper
together in another bowl. Pour the egg mixture over the meat and mush together
with your hands.
Form
into fairly thick patties about 3½-inches in diameter. Place on a waxed paper
lined platter. Refrigerate for at least 4 hours and up to 24 hours.
Grill over 350 degree heat, 4-5 minutes per side, or until nicely browned and kind of spongy. Serve in warm pita bread with Tzatziki, shredded lettuce, chopped tomato, and chopped white onion.
TZATZIKI
2
T. extra virgin olive oil
2
c. plain Greek Yogurt
3
small or 2 medium garlic cloves, finely minced
½
tsp. dill weed
¼
tsp. kosher salt, or more to taste
freshly
ground black pepper
1
English cucumber, partially peeled, seeded, grated, and allowed to drain for a
few minutes in a colander
Combine
all ingredients. Adjust seasoning. Cover and refrigerate until ready to serve.
Before
starting any trip I make lots and lots of plans. Where to stay, what to do in
every given location, and even where to eat that’s close to where we are
staying. And why do I make the effort? Good question. Because as much as I
research, plot, and plan – stuff happens! Point in fact. We arrive at our first
hotel in Prague, Czech Republic (CR). (Nothing but great reviews from
Booking.com you understand.) We arrive by taxi, and…. Wait, I should start from
the beginning. I’ll get back to this hotel in a paragraph or two.
Also
before I go any further, I hope you enjoy traveling along with us on our latest
adventure. I plan to talk a bit about each of the places we visited, with short
explanations and descriptions of the amazing buildings and other architectural
wonders that we visited along the way. And of course, lots of pictures. But in
this day and age, the best way to experience what we saw is to search on the
internet for descriptions and pictures of the places and things that you find
most interesting. My words and our pictures are just a rough guide to these
amazing wonders. Do yourself a favor. Google away! Now back to our story.
We
left Camano Island as planned at 8:30 am Tuesday June 11th for a car
drop off at SeaTac at 10:30 am. Unusually bad (I think) traffic, but we arrived
at our destination on time. Met by a lovely man who took us to the airport and
check-in was a breeze. Boarded our British Air Boeing 777 (comfortable seats
BTW for flying steerage class) and after an uneventful 9 hour flight landed at
Heathrow on time. Every possible effort was made during the flight to keep us
both hydrated and satiated with beverages (including free wine and beer) and an
abundance of mediocre food. All kinds of entertainment was also provided free
of charge. So I watched 2 movies I otherwise would never have considered viewing
– Crazy Rich Asians and Frozen. (Loved Frozen BTW.) While I watched “Darkest Hour”
starring Gary Oldman as Churchill – AC.)
After an almost 3 hour layover in jolly old England, we were back in the air for the second leg of our journey. Now this British Air experience was completely different. We were on an Air Bus (not nearly as comfortable) and for 1 hour and 45 minutes, everything we wanted to put in our mouth had a price tag. Cup of tea, coffee, dry sandwich, crisps, shortbread cookies – it all cost. And how to pay for these items? Well – the stewardess had to hand write a credit card charge slip for every bloody transaction! But we all kept our cool. But those unfortunate people, like us, who received our sandwich just as the plane started its final approach to the Prague airport, were not terribly impressed. Anyway, we landed without incident, and that’s really the most important thing to consider in the grand scheme of things. Then off the plane, onto customs, retrieve our baggage, get some cash, and hire a taxi. All very smooth and with no hassle what-so-ever. (If you don’t mind waiting with a mass of humanity 45 minutes to get through Passport control – AC.)
Wednesday, June 12, 2019 – Prague, Czech
Republic
Now
back to after we arrived at our pension (Balbin) by taxi.
Most
of the time, pictures are worth a thousand words. And had I paid closer
attention to the picture of the room while I was on “booking mode” I probably would
have made a wiser choice. And having been informed that we were going to be on
the top floor of an old hotel (only three floors were serviced by an elevator)
certainly would have been nice to know up front also. Lack of air conditioning should
also have been part of my consideration since we were traveling during June and
July! Lessons learned. But we were there, having gained entrance by pushing a
buzzer to be let in. So after making our way up the concrete stairs and onto a
landing where we could access the elevator, we rode until it was time again to
climb more stairs. All the time I’m thinking. Why did I want to stay near the Old
Town and Wenceslaus Square? What’s wrong with new and modern? Will Andy ever
forgive me?
But
we were met by the nice owner and all seemed well. Then he showed us our room.
OMG. I almost panicked. It looked for all the world like the kind of room that
might have been inhabited by a starving artist or author in the 1930s. (Remember,
at this point, I’m sleep deprived, hungry, and I need a drink!) And to make
matters even worse, it’s in the 90s and very humid. (And that’s just inside our
room!) So a non-air-conditioned room with only skylight windows was not what I
had in mind! But when in Rome, etc. etc. So we got our luggage settled and
decided that for 5 nights we would just have to cope.
At
this point dinner was our prime concern. So we conferred with David the owner
about the restaurant choices I had made during the research phase of our trip.
Most were no longer in business, but a couple of them in the vicinity were open
and received David’s seal of approval. He also gave us the name and location of
a few other good restaurants close by. And, the best thing of all, he said we
could borrow a fan for our room, which was waiting for us upon our return from
dinner. Yea team!
The restaurant we chose, Hospoda Hajnovka, was really just around the corner. We walked in and there were only a couple of guys drinking in the bar, but we were politely shown to a table by a nice English speaking waiter. After perusing the menu, in English BTW, I chose a sausage appetizer and a Caesar salad. Andy was in the mood for ribs. And OMG, when our dinners arrived, it looked like enough food to feed 4 hungry adults. The food was absolutely delicious! Andy ordered a beer, and I drank water. I was really thirsty, and somehow a martini (not that I could have gotten one anyway) just didn’t sound good to me at the time. (Now I was really worried!) After dinner we walked home with only one thought in mind – sleep.
We
opened the skylight window, even though we were told that an electrical storm
was on its way, cranked the fan up to max, removed the cover from our bed, and
fell immediately into a deep sleep. About an hour later, I heard the rain
start, and quickly closed the skylight except for a crack. It was actually delightful
to hear the rain on the skylight as I drifted back to sleep.
We both awoke about 3 hours later to daylight, truly not knowing if it was 9:20 pm the same night, or 9:20 am the next morning. We realized we had only been asleep for a short time, and that it had cooled off beautifully. We both drifted back to sleep on our terribly comfortable bed, only waking once or twice to make a night call or retrieve our cover.
Thursday, June 13, 2019
We awoke at 4:00 am. Andy went for an early morning walk, and I started this trip report.
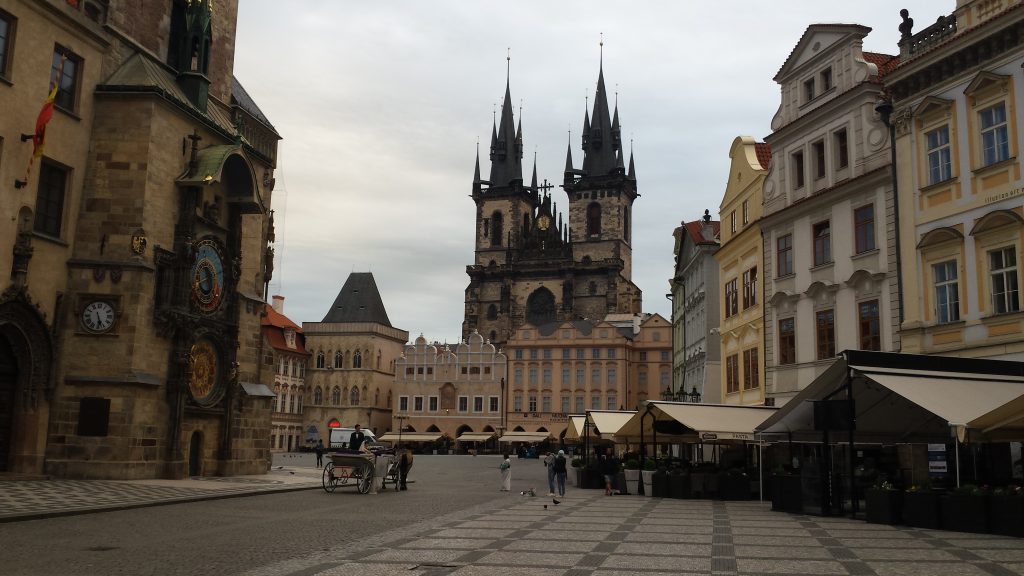
Prague at 5:00 am
Very few people out and aboutPrague still half asleeplooking across the river Vltava
When Andy returned we were both ready for breakfast at 8:00 am. I had booked a 3½ hour tour before we left home, and with no problems were picked up at our hotel at 9:30 as agreed upon.
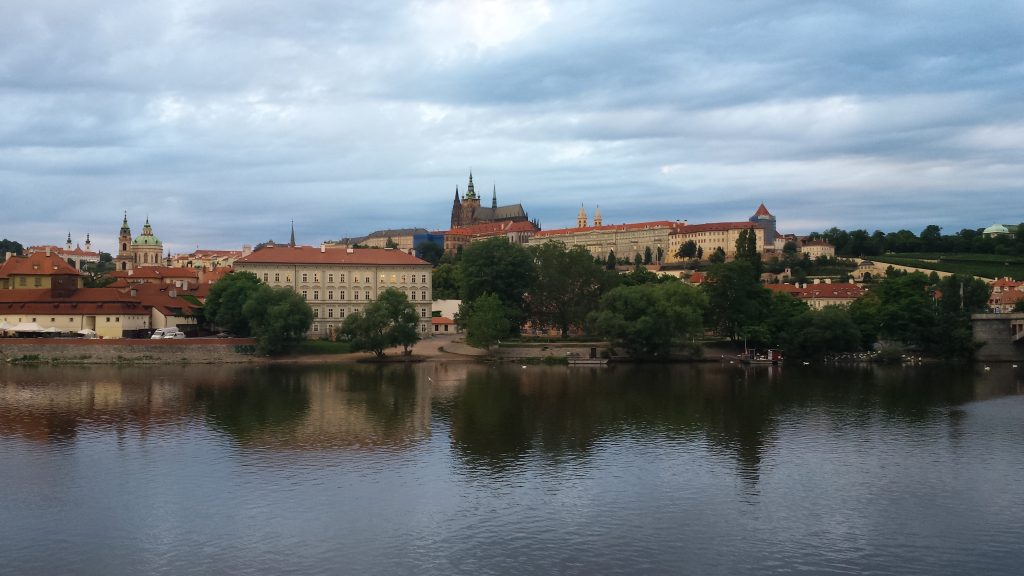
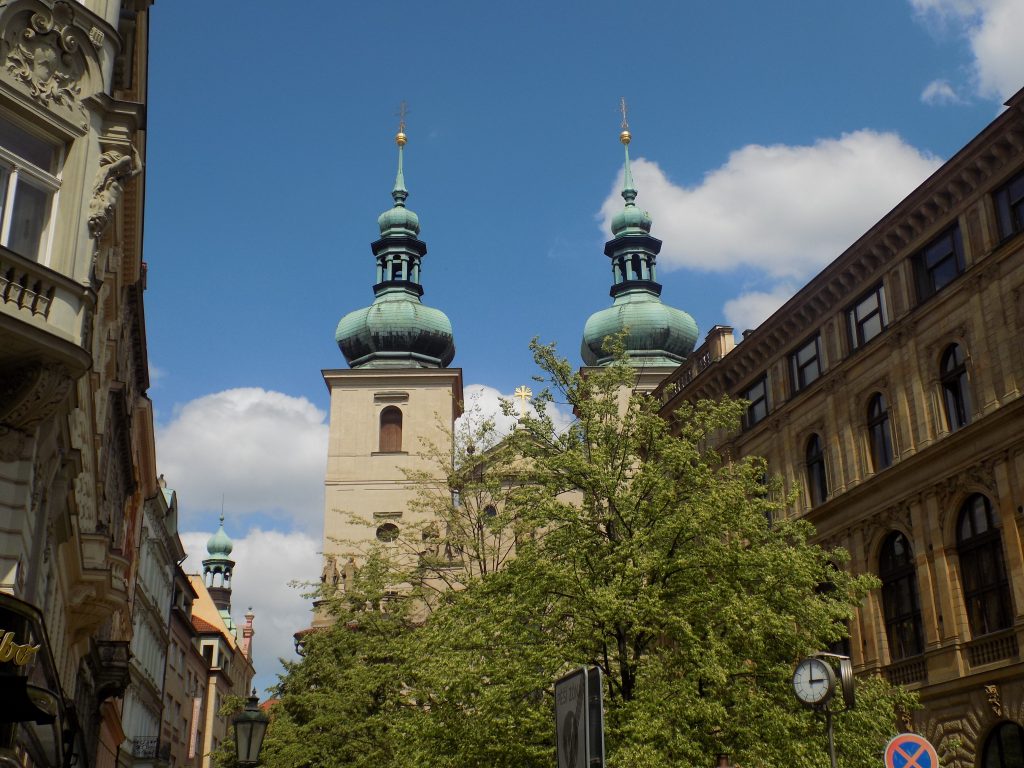
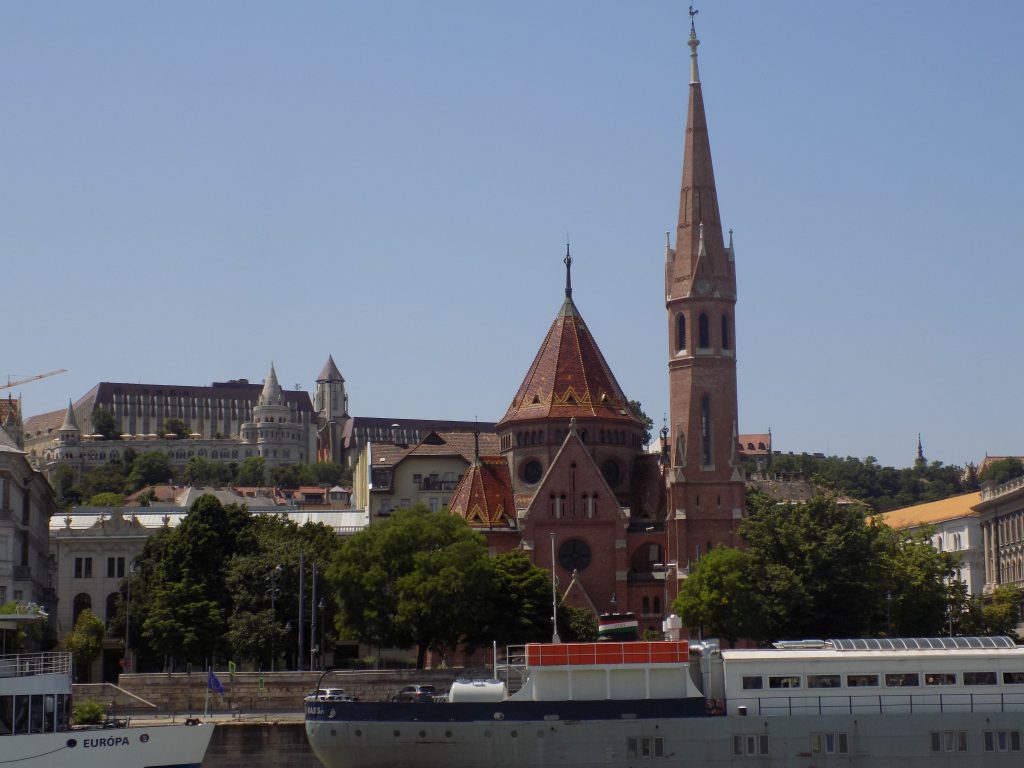
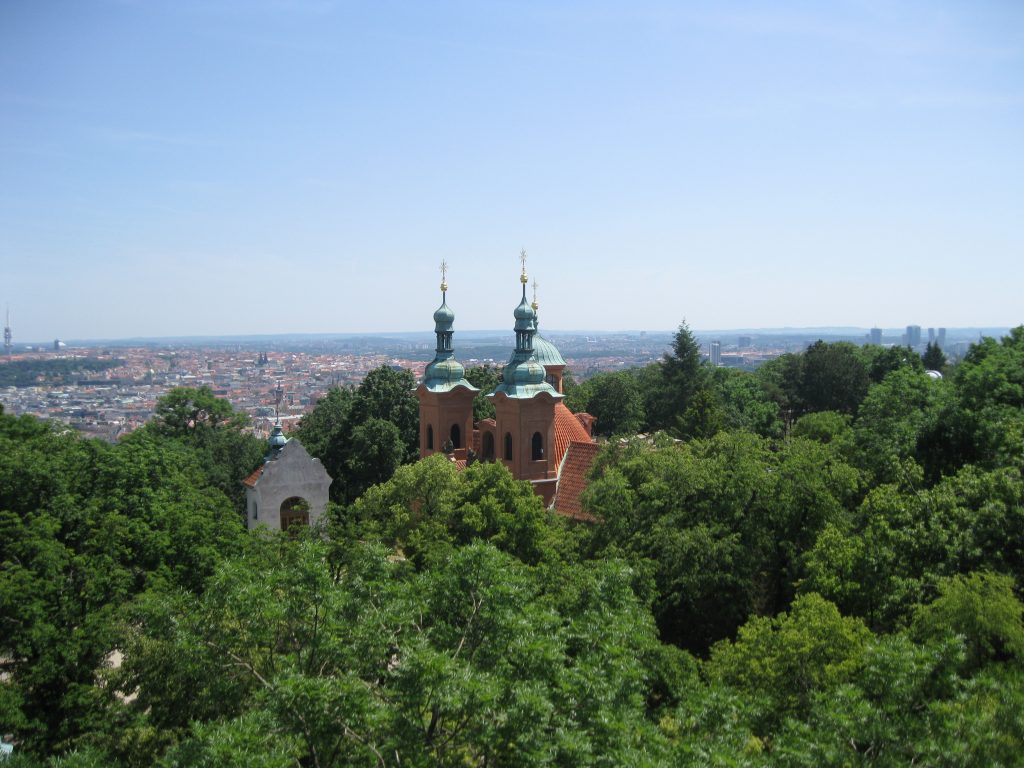
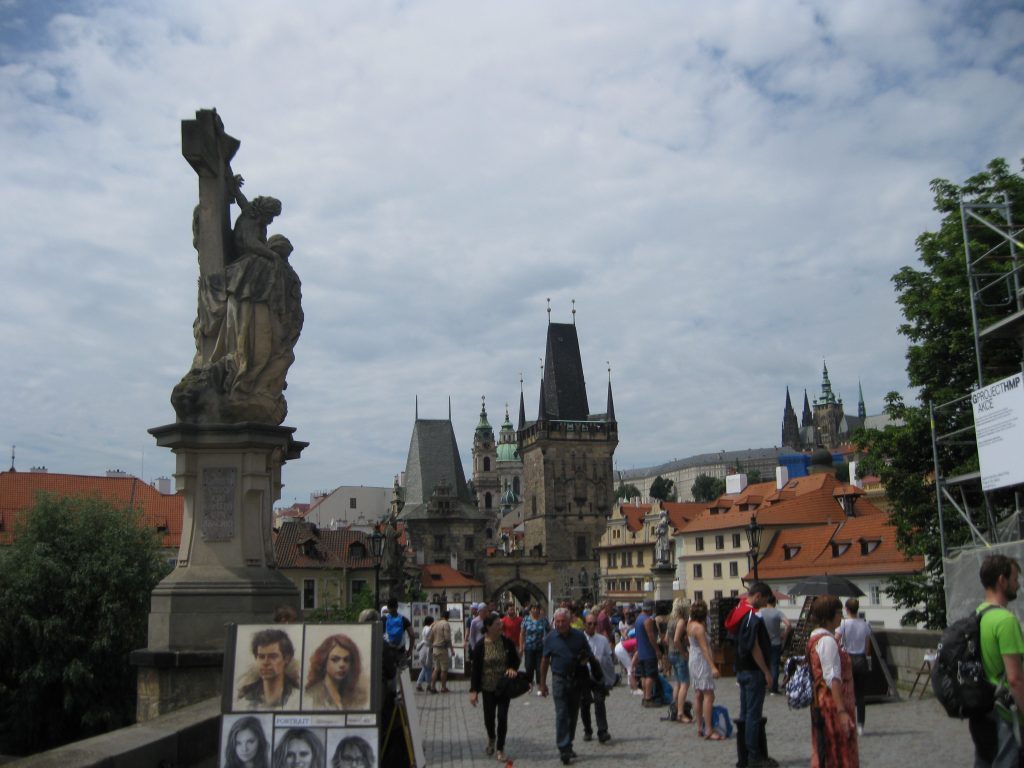
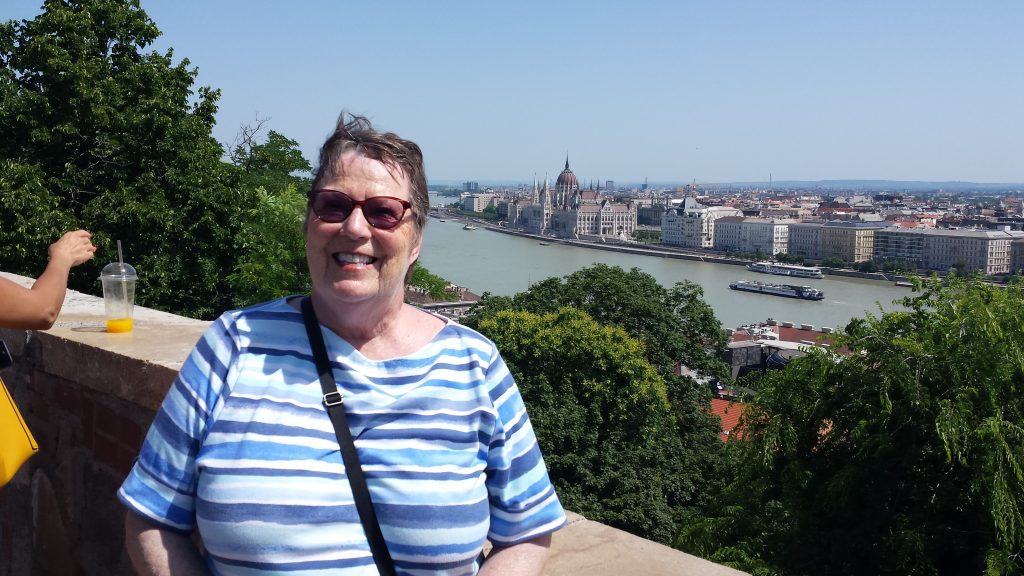
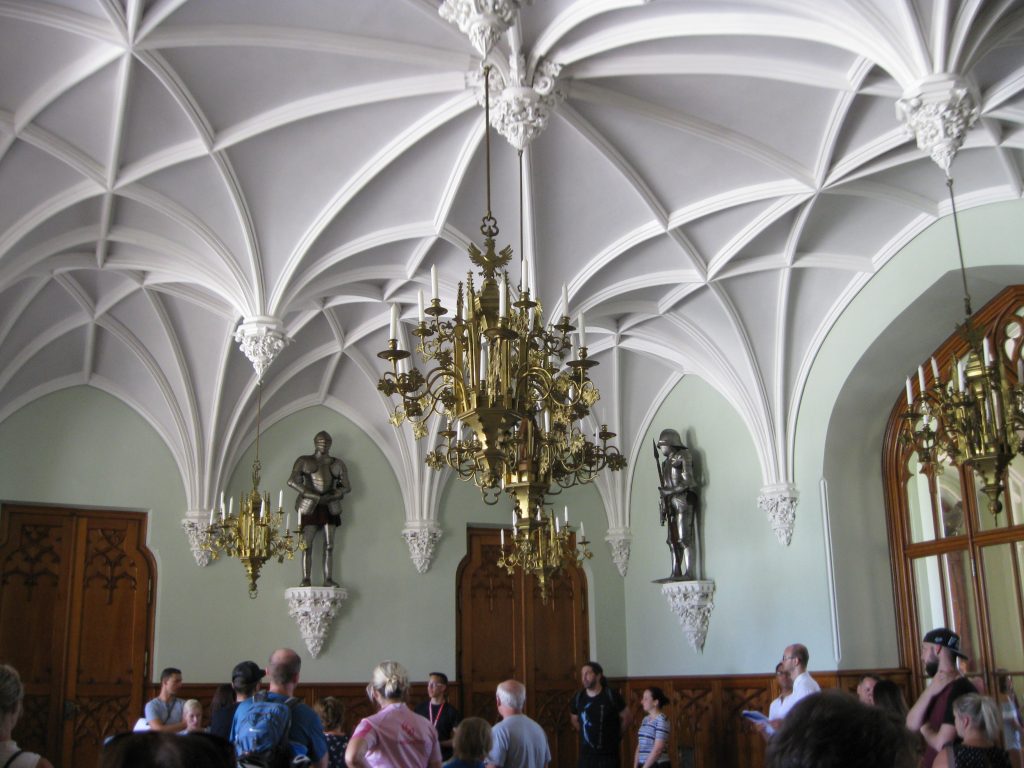
The tour began with a short trip around the center of Prague. Then we headed for the Prague Castle. A few pictures taken that day.
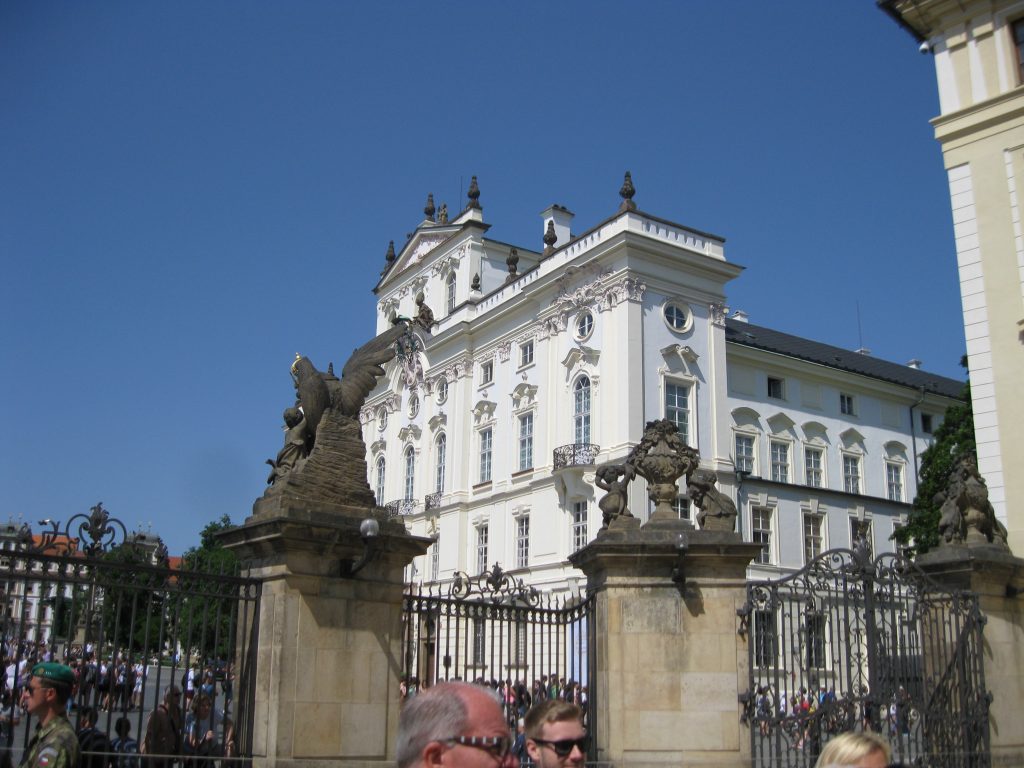
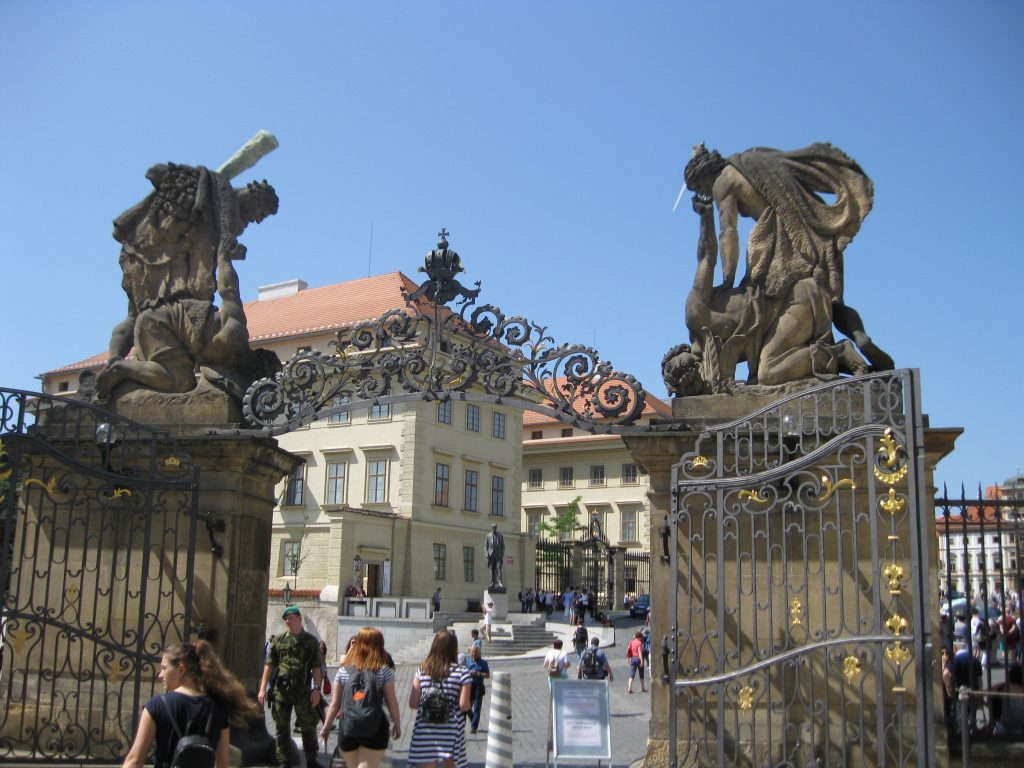
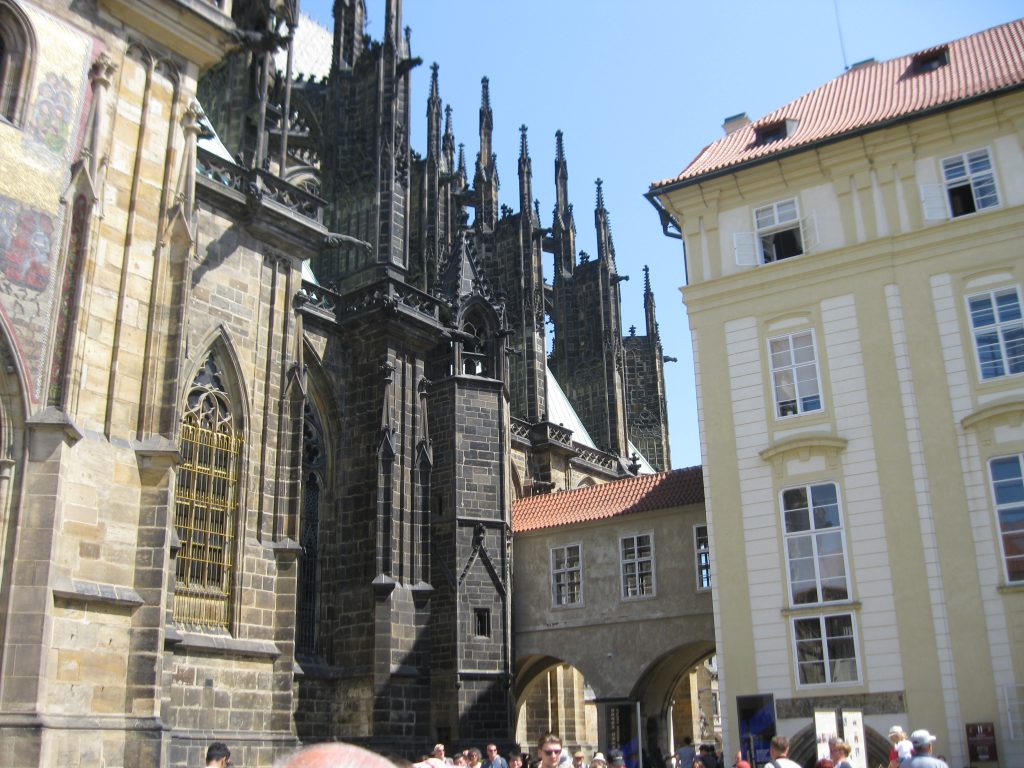
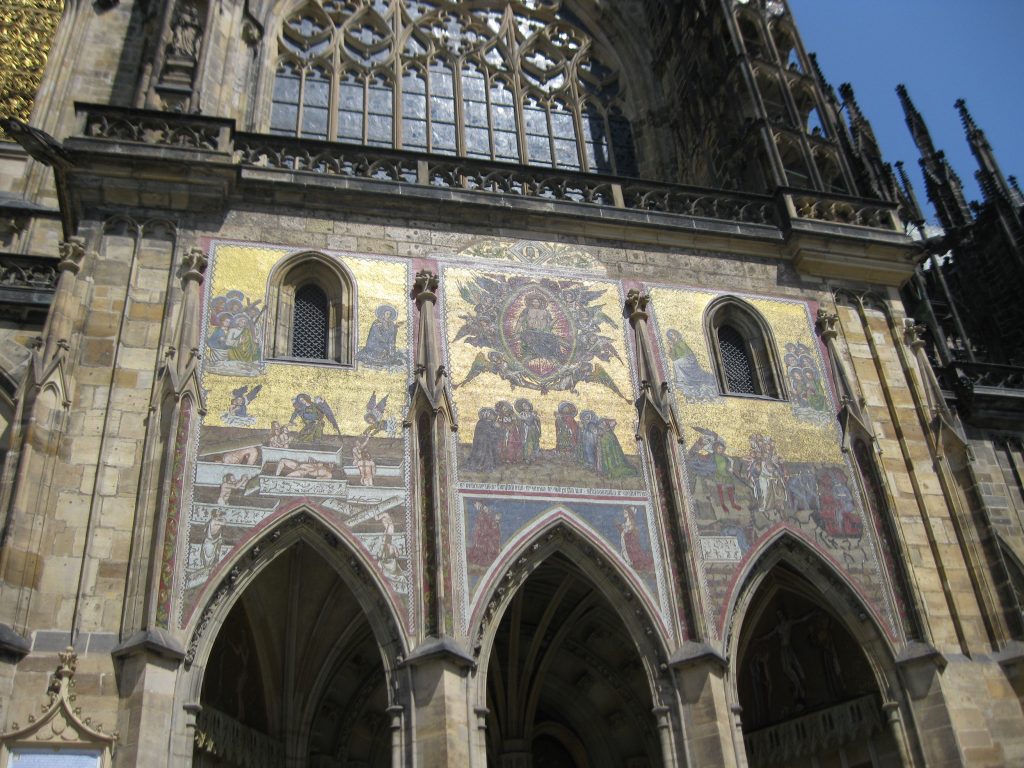
outside the castle walls
Close up of one of the gates. Notice the armed guard. You can leave by this gate, but the entrance gate is manned by armed guards searching your purse or backpack and then being run through a scanner. TSA has nothing on these guys!St. Vitus Cathedral. Notice the covered walkway used by royalty. (Connects to the Old Royal Palace. No getting wet for church goers here!)Painted glass tiles on the cathedralSt. George’s Basilicajust walking along minding our own businessa walk in the gardenlooking over the castle from one of the towers
A
brief history of the castle follows – (excerpts from the amazingczechia.com web
site)
The history of
Prague Castle dates back to the 9th century, when Duke Bořivoj I built the
Church of the Virgin Mary there. This church was destroyed in the 13th century.
In the 10th century, Duke Vratislaus I with his son Wenceslaus I,
a.k.a. St. Wenceslaus, founded the Basilica of Saint George nearby.
In the 12th
century, the settlement was re-built into a medieval stronghold. In the 14th
century, during the reign of King Charles IV, the foundations of St. Vitus
Cathedral were laid. Charles IV also strengthened the fortifications of the
castle and the royal palace was re-built in the Gothic style.
In 1382, Bohemian
kings moved out of Prague Castle. In 1483, Bohemian rulers returned to the
castle, when the dynasty of Jagellons decided to use it as their seat.
Subsequent centuries witnessed further development. Vladislav II
commissioned the magnificent Vladislav Hall and it was completed in 1502. The
hall is still used by the modern Czech state for representative and ceremonial
purposes.
The next dynasty,
the Habsburgs, remodeled sections of the castle in the Renaissance style. They
also added new buildings and the Royal Gardens. During the reign of Rudolf II,
Prague Castle became the residence of Holy Roman Emperors and the city gained importance
as the center of the Holy Roman Empire.
In 1618, the
second Prague Defenestration took place at the castle. Defenestration is a
rather violent incident in which multiple people got thrown out of a window.
The word “defenestration” is derived from the Latin word for window: fenestra.
In 1618, two Catholic counts and their scribe were defenestrated by Protestants
from the third floor of the Ludwig Wing in the Old Royal Palace. All of them
survived the incident, but the event triggered a long period of religious
conflicts, known as the Thirty Years’ War. It was a very bad period for Prague
Castle as it was repeatedly damaged and robbed.
In the second
half of the 18th century, Empress Maria Theresa ordered major rebuilding and
renovation of Prague Castle. The Holy Roman Empire was dissolved in 1806 when
the last Holy Roman Emperor, Francis II, abdicated. From 1804, he reigned as
Emperor Francis I of Austria. The imperial seat of the Austrian Empire was not
Prague, but Vienna. The importance of Prague Castle and the whole city diminished
significantly. In 1848, Emperor Ferdinand V abdicated and chose Prague Castle
as his residence.
In 1918, the
first Czechoslovak Republic was proclaimed. Prague was the capital of the new
state and Prague Castle became the seat of the Czechoslovak president Tomáš
Masaryk. Nowadays, it is also the residence of the head of state – the
president of the Czech Republic.
But Prague Castle
is much more than that. Many sections of the castle are open to the public and
millions of tourist gladly visit it. The castle is the place where the Czech
crown jewels are kept. Countless historical and artistic treasures are
displayed or stored there. It is a symbol of Czech statehood and the history of
Czechia throughout the centuries.
Main interests at
the castle complex:
St. Vitus Cathedral is a Roman Catholic cathedral and the
seat of the Archbishop of Prague. In its current form it was built in the
14th century, but the first church at that site was built in 930 and was also
dedicated to St. Vitus. The cathedral was officially re-dedicated to St. Vitus,
St. Wenceslaus and St. Adalbert in 1997. Nevertheless, it is still commonly
known as St. Vitus Cathedral.
St. George’s Basilica is the oldest surviving church
building in the castle complex, founded in 920 and expanded in 973. The Baroque
facade is from the 17th century.
Old Royal Palace is located in the southern wing of
Prague Castle. This part of the castle served as residence for Bohemian kings
from the 10th to the 16th century. The main sights in the Old Royal Palace are All Saints Church and
Vladislav Hall.
New Royal Palace is a complex of
buildings in the western part of Prague Castle. This section has served the
rulers as residential and representative space since the 16th century. During
the reign of Maria Theresa from the Habsburg dynasty (1740-1780), the facades
of the New Royal Palace complex received a consistent look. Nowadays, the
President of the Czech Republic receives his visitors there and some halls and
rooms are therefore not open to the general public. The famous Spanish Hall (Španělský
sál) is in the New Royal Palace.
The Royal Garden is a Renaissance garden created during the reign of Ferdinand I (Holy Roman Emperor) in 1540. It is located north of St. George’s Basilica. More information and pictures of the castle when we make our own (not guided) tour.
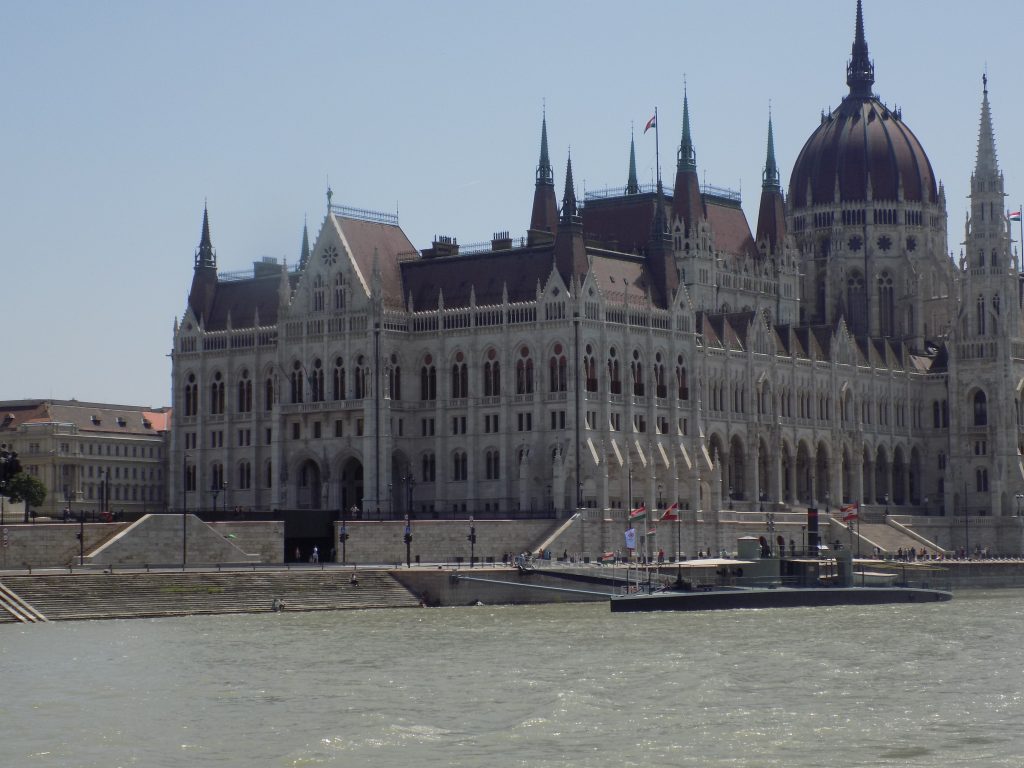
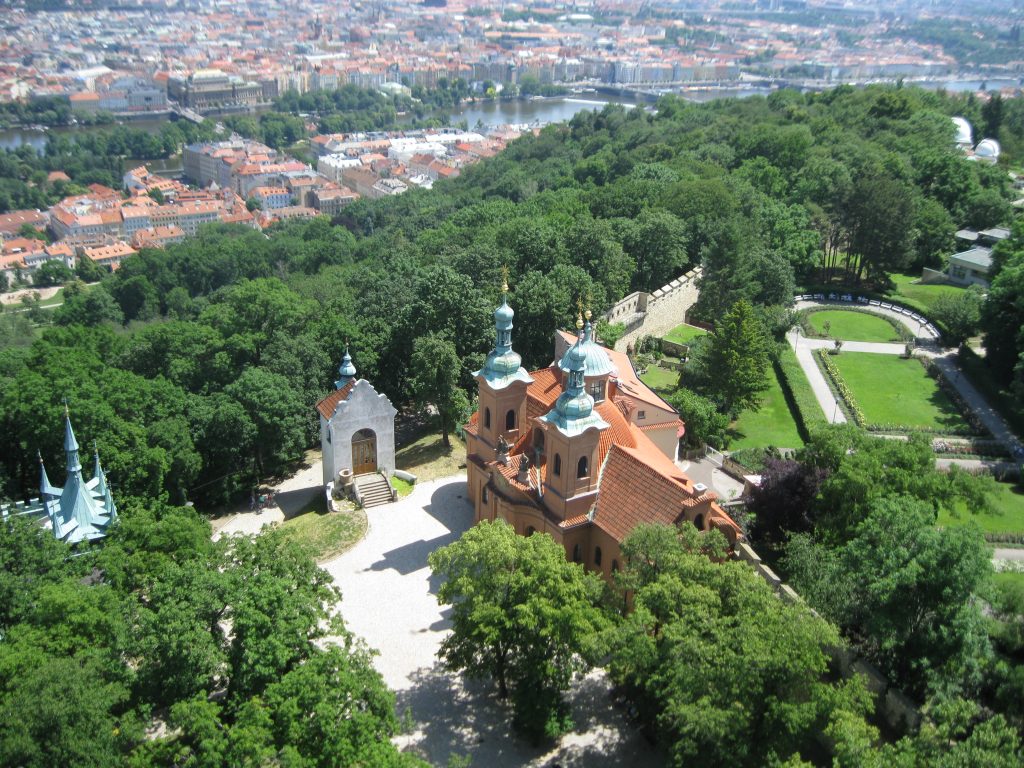
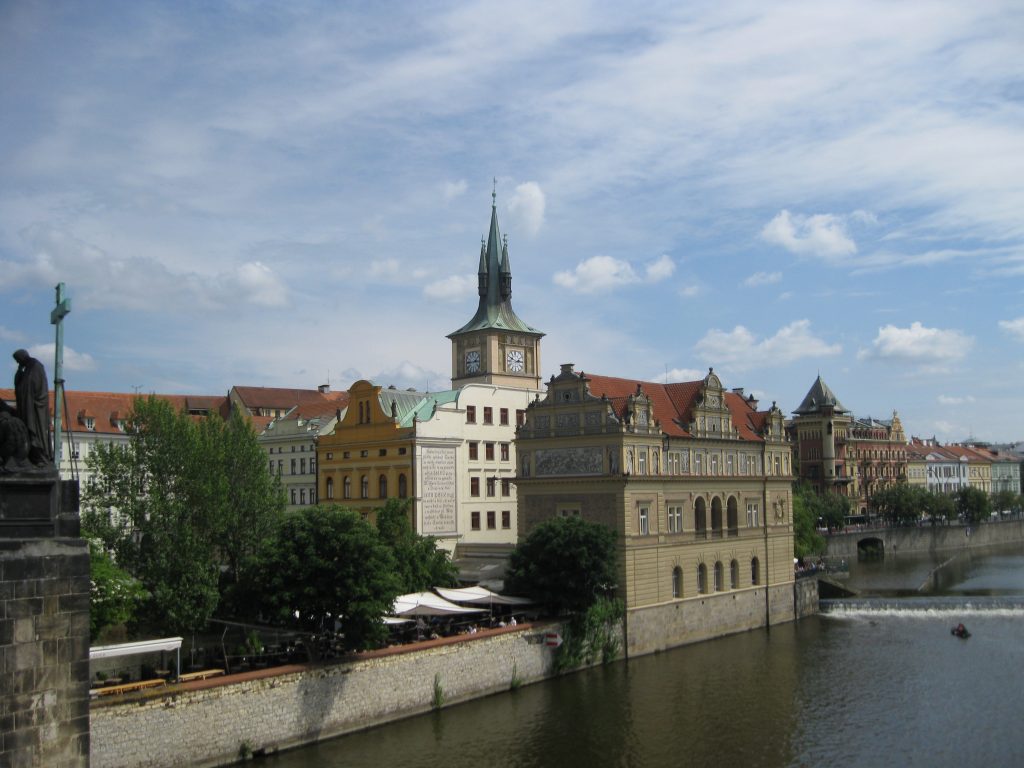
After our 1 hour
tour of the castle grounds we got back in our small shuttle bus and proceeded
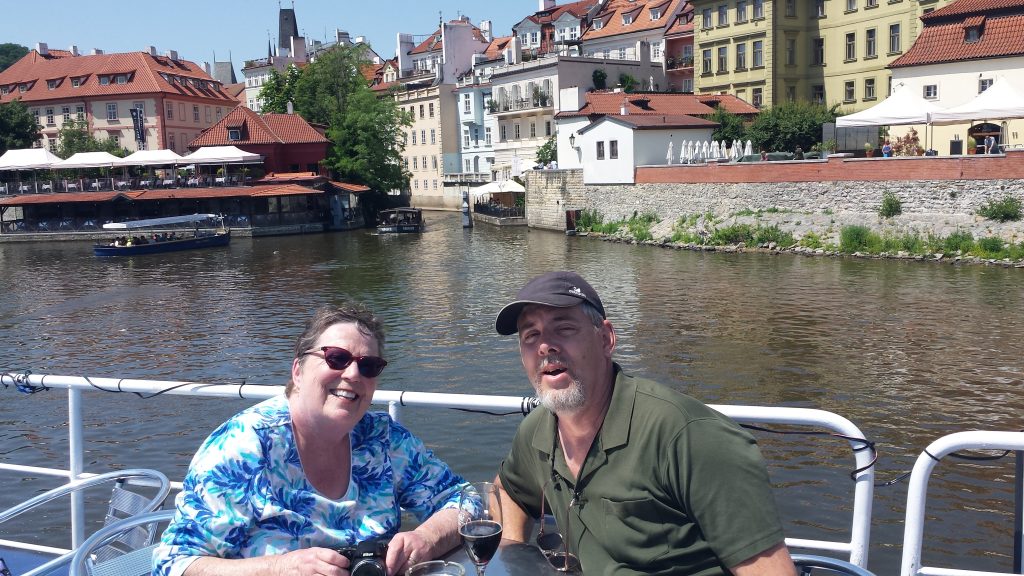
to the Vltava River. There we boarded a tour boat and proceeded directly to the
top deck where we were greeted by a waiter who took our beverage order. Then we
sailed up and down the river, under the famous Charles Bridge, and witnessed
from the river incredible sights including the amazing panorama of the Prague
Castle. Lovely way to spend an hour.
two happy touristsunder bridgesabout to go under the famous Chain Bridgeview from the riveranother view from the riverbut wait – still moreI think this is Prague – could be Budapest – does it matter?
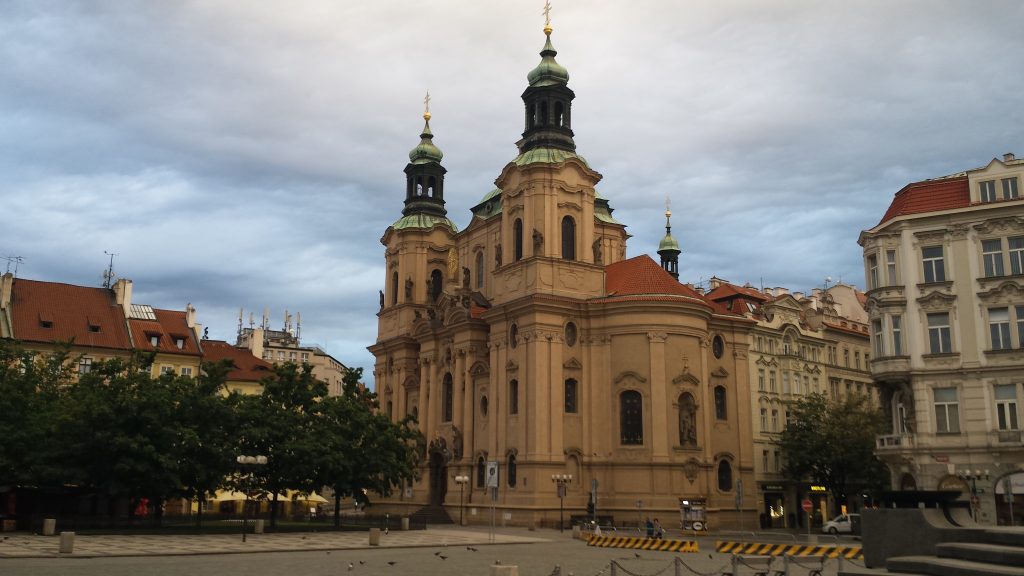
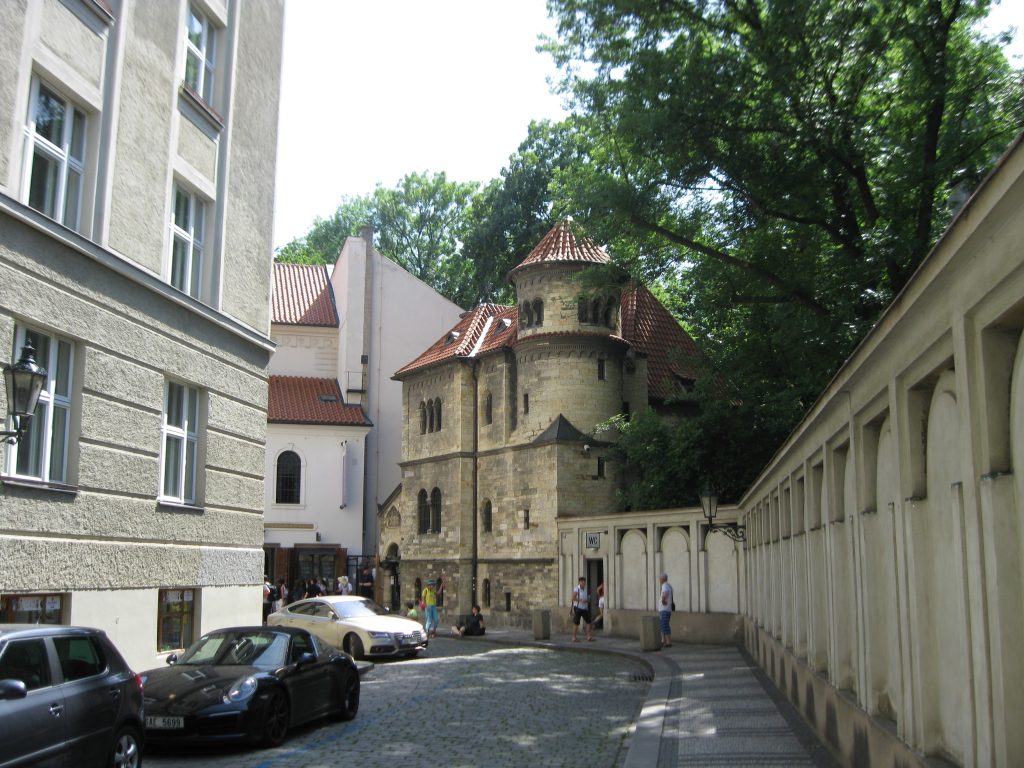
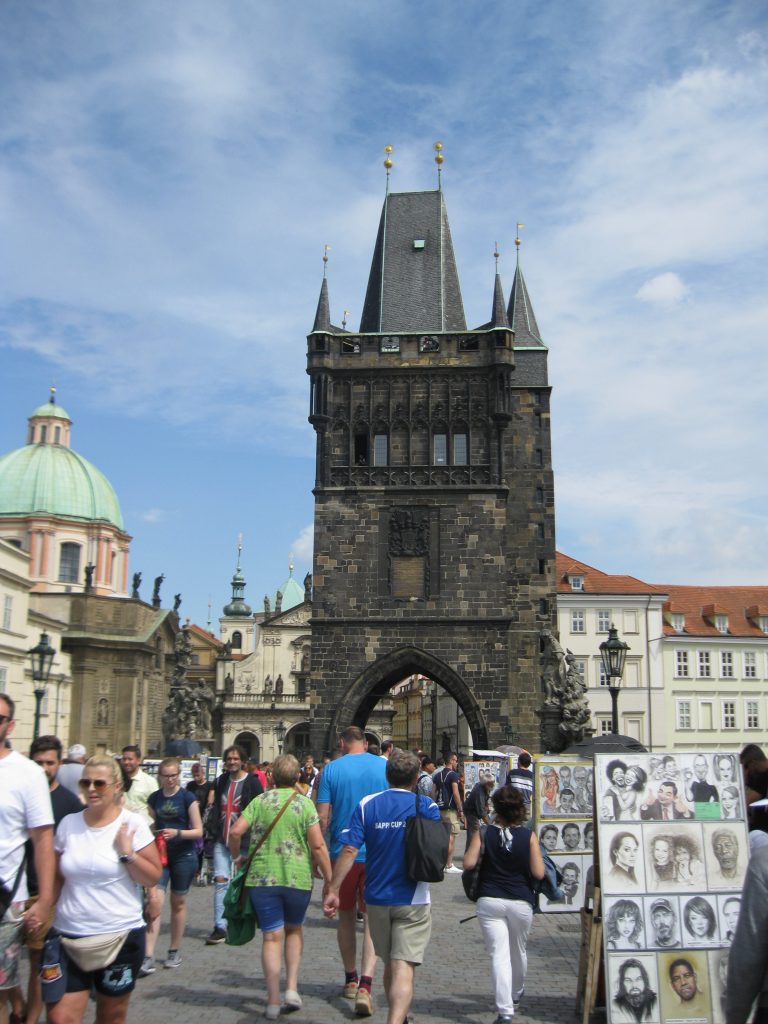
Then off the boat for a 30 minute walk to Old Town, past the Jewish Quarter, and ending our tour in the Old Town Square. After thanking our English speaking tour guide, we headed off on our own.
After stopping
for some rather dreary Italian food seated under a shade cover near the
Astronomical Clock, we headed back to our pension. Along the way we encountered
a greater number of tour groups than we have ever before experienced, anywhere!
Many of the tours were groups of children from 7 or 8 through college age.
Amazing.
By now, late
afternoon, I am hot, in need of a lay down, and damn tired of walking. But
mainly I am very thirsty. Much to our delight, right across the street from our
pension is an open establishment (Ollie’s) serving
coffee, decadent desserts, and the best lemon/lime aid I have ever tasted.
Freshly made from muddled lemons, limes, and mint. After two of these drinks, I
felt enough refreshed that I was actually able to climb the stairs to our lofty
room. (Before our stop for liquid refreshment, I wasn’t so sure about my
chances of ever reaching our room again!) But lemons must have restorative
powers. Good to know!
So with just enough
energy left to actually remove my shoes before my head hit the pillow, I
happily drifted off to sleep. (Actually we both hit our pillows at about the
same time. Lights out for about an hour. Lovely.)
Then off to dinner at about 6:30. And right in our own neighborhood. Indian food. And very, very good. Then back to our room for some quality time with our computer and books. End of a lovely day spent in this absolutely beautiful city.
Friday, June 14, 2019
Woke up early
again (6:00 am) to Andy gently shaking me to tell me he was going for an early
morning walk. Go dear go. I will shower and be ready for breakfast when you
return.
After breakfast
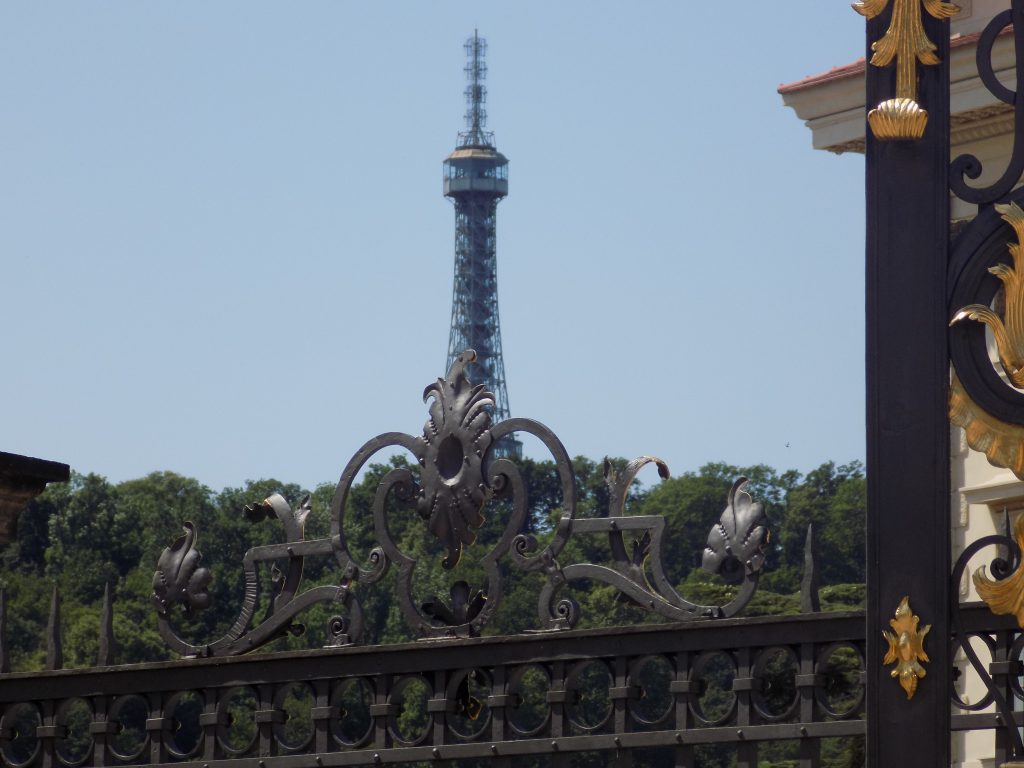
we headed out to find the closest Hop On Hop Off tour bus stop so that we could
purchase a 48 hour pass. Well we missed it by one block so hoofed it down to
the next nearest stop which was on Wenceslas Square. We paid our money and
hopped aboard. We couldn’t quite figure out where we wanted to go first, so we
just stayed aboard and went around the entire route. Finally on our second time
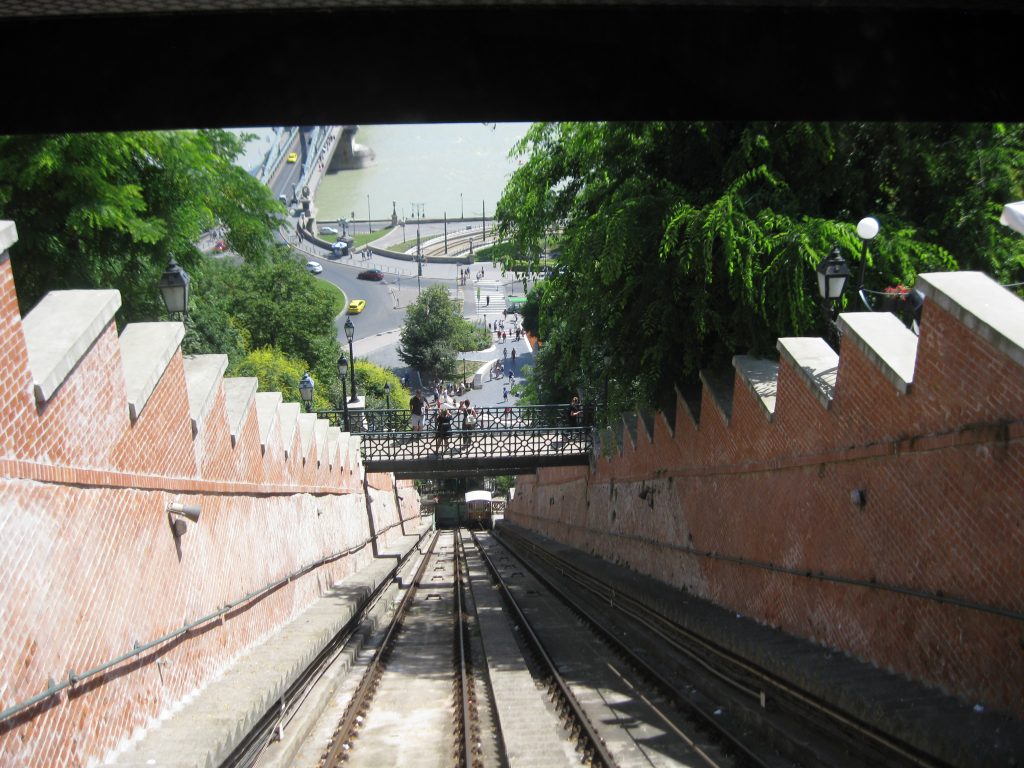
around, we disembarked the bus at Kampa Park and took the funicular up to the
Petrin Hill tower (replica of the Eiffel Tower). We walked around the lovely
grounds for a while, and then Andy climbed the tower and took some great
pictures.
Perin Hill Tower
After riding the
funicular back down again, we stopped for a late lunch at one of the many
little restaurants on the street directly below the tower. At this point, I
must give a shout out to the people of the CR. They love lemonade. And not this
stuff we have that comes in a can or carton.
They use real
lemons muddled with additional lemon slices, lots of ice, and either sparkling
or still water. And oh is it delicious. No sugar, just lemons and water.
Sometimes with mint. Fabulous. And so very refreshing. Then back on the bus and
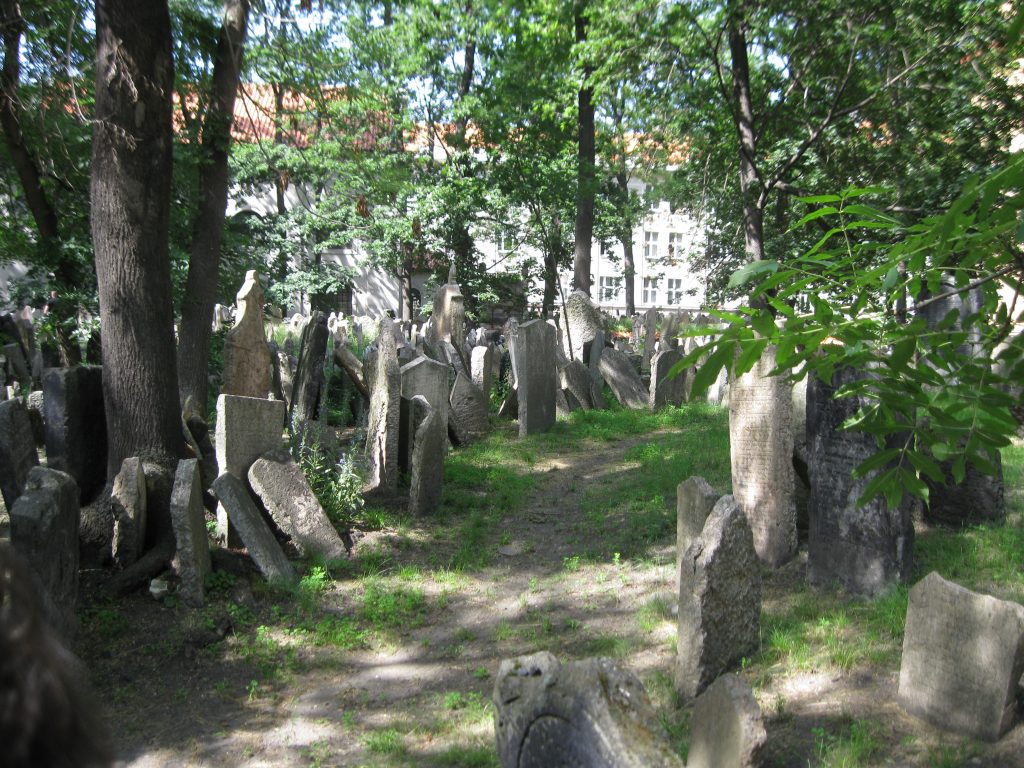
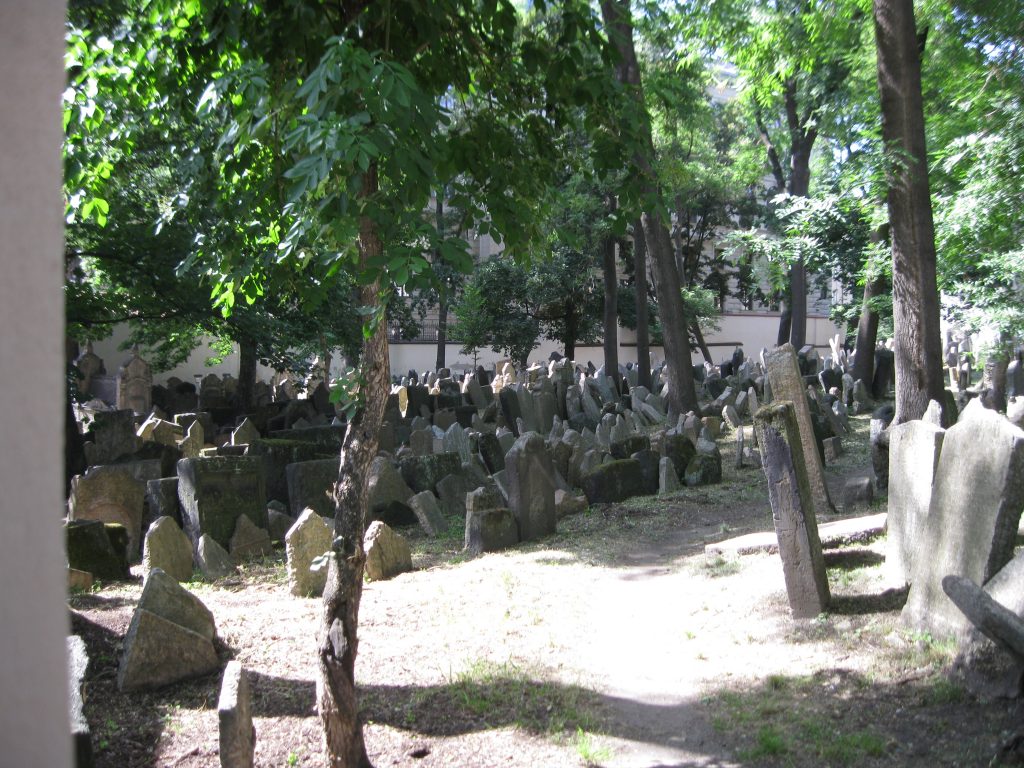
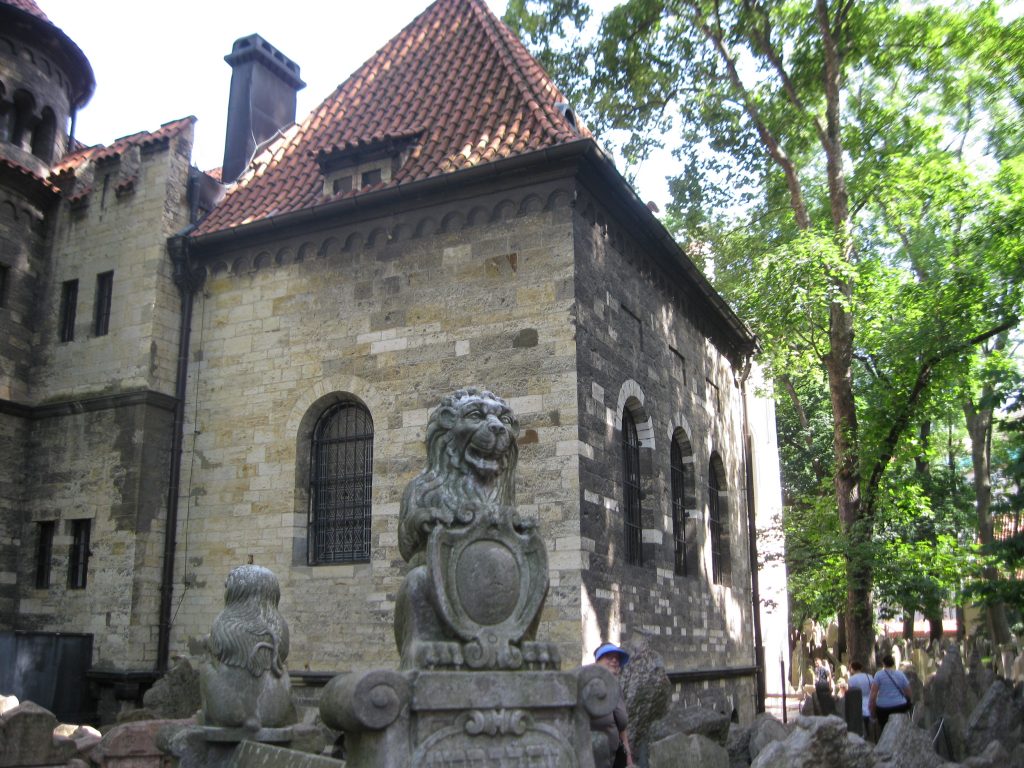
off for a tour of the Jewish Quarter, including the Old Jewish Cemetery.
The cemetery is one of the largest of its kind in Europe and
one of the most important Jewish historical monuments in Prague. It served its
purpose from the first half of the 15th century until 1786. During the more
than three centuries in which it was in active use, the cemetery continually
struggled with the lack of space. Piety and respect for the deceased ancestors
does not allow the Jews to abolish old graves. Only occasionally was the Jewish
community allowed to purchase grounds to expand the cemetery. And many times it
had to gain space in other ways.
If necessary, a new layer of soil was heaped up on the
available area. For this reason, there are places where as many as twelve
layers now exist. Thanks to this solution the older graves themselves remained
intact. However, as new levels were added it was necessary either to lay over
the gravestones associated with the older (and lower) graves to protect them,
or else to elevate the stones to the new, higher surface. This explains the
dense forest of gravestones that one sees today; many of them commemorate an
individual who is buried several layers further down. This also explains why
the surface of the cemetery is quite a bit higher than the surrounding streets
and why retaining walls are necessary to hold the soil and the graves in place.
View down the street to the Jewish Quarter. Wall on the right contains part of the cemetery.
It was a totally fascinating and thought provoking walk
through this amazing area in the Jewish Quarter. I was so glad to be able to
visit these graves and pay our respects in person.
Then back through Old Town and a stop at the Kafka Snob Food sidewalk café for liquid refreshment. I truly felt like I was about a quart low, so I drank 2 lemonades while Andy enjoyed an Aperol Spritz. (An Aperol Spritz consists of ice, 3 ounces of Aperol (a bright orange aperitif best described as tasting of zesty orange with complex herbal scents harmonized with a touch of vanilla), 3 ounces of Prosecco (Italian sparkling wine), a splash of club soda, and a slice of orange.)
Then back up on our tired feet and forward movement toward
the nearest hop on hop off stop. Because by now it
was pretty late in the afternoon, the bus refused to discharge riders at all
the hop on hop off designated stops. (Like the one we wanted!) Grrrrr. So we
had quite a long walk back to our pension. Again grrrrrr. But we made it and
celebrated by going out for dinner and drinks. We shared a duck breast, order
of fries, and a Caesar salad at the Hospoda
Hajnovka again. Very lovely meal.
Then back to our room, right to bed, and again it took me about 10 seconds of tossing and turning until I was fast asleep.
Saturday, June 16, 2019
Breakfast
at 8:00, but then back to our room and a later start to our day. (I think we were
both a bit tired today, so taking our time getting out the door. Plus we
weren’t quite sure where to start.)
So
caught the hop on hop off bus and just started riding around. Finally decided
today was the day to visit the castle. (We had been to the castle on our tour
the first full day in Prague, but this was our day to go at our own pace.) So
we transferred to the right Hop On Hop Off bus (there are 3 main lines that go
to different places with only a few stops where you can change lines) and were
whisked away towards the castle.
And
OMG the people. But I was very surprised at how quickly we got into the St.
Vitus Cathedral even though the line looked like it might take several hours. I
think we were actually inside within 20 minutes. And oh was it magnificent. Absolutely
took my breath away. Then we visited the Old Royal Palace, and finally the
Basilica of St. George. As we were sitting in a pew at the basilica, Andy asked
me what the difference was between a cathedral and a basilica. Heck if I know,
I replied. I was raised Lutheran, remember! Well when I got back to our room I
looked it up. And since I know you too have an enquiring mind, the following is
the answer.
A
cathedral is the home church for the bishop or archbishop of a Catholic
diocese. It takes its name from the bishop’s chair, called a cathedra in
Latin, which traditionally represents the seat of power and authority of the
leader of the diocese.
A
basilica is simply an important church building designated by the pope because
it carries special spiritual, historical, and/or architectural significance.
Basilica is the highest permanent designation for a church building, and once a
church is named a basilica, it cannot lose its basilica status.
So after leaving the castle grounds we climbed onto our red line bus and changed to a green line bus so that we could get back to our part of town. While we were waiting for the green line bus, we realized that there was a fun outdoor food court just where we were to wait for our ride. So since it was 2:00 and we were both hungry and thirsty, we took advantage of the opportunity to grab a bite and a couple of lemonades a piece. I had only been in Prague for 4 days, but had already lost track of the number of lemonades that had deliciously assuaged my ever present thirst!
Since it was getting late in the day, and neither of us seemed to have the strength to visit even one more site, we decided to take a brief look inside the Municipal House (deemed the pearl of Czech Art Nouveau). Also the home of the oldest bar in Prague and the second oldest bar in Europe. So of course we had to have a drink in this bar. Duh! After our drink we headed for the bus again and to the nearest stop we could find that would put us at least within walking distance of our room.
Then some reading, napping, dining, and a good nights’ sleep for both of us.
Sunday, June 16, 2019
This morning
neither of us was up at the crack of dawn, and I especially was not raring to
go anywhere. I just wanted to stay in bed and read! First of all, it was
finally cool. That’s because it was raining outside which I actually welcomed
as much as an extra dry martini at 5:00 in the afternoon! So I dozed off and on
until 8:40 and finally headed downstairs for breakfast about 9:00. After
breakfast I still wasn’t ready to start sightseeing, plus it was still raining.
So we both mellowed until the rain stopped at about 12:30.
We walked down to
the metro station and rode for 2 whole stops. We left the underground and proceeded
several blocks towards our destination – Charles Bridge.
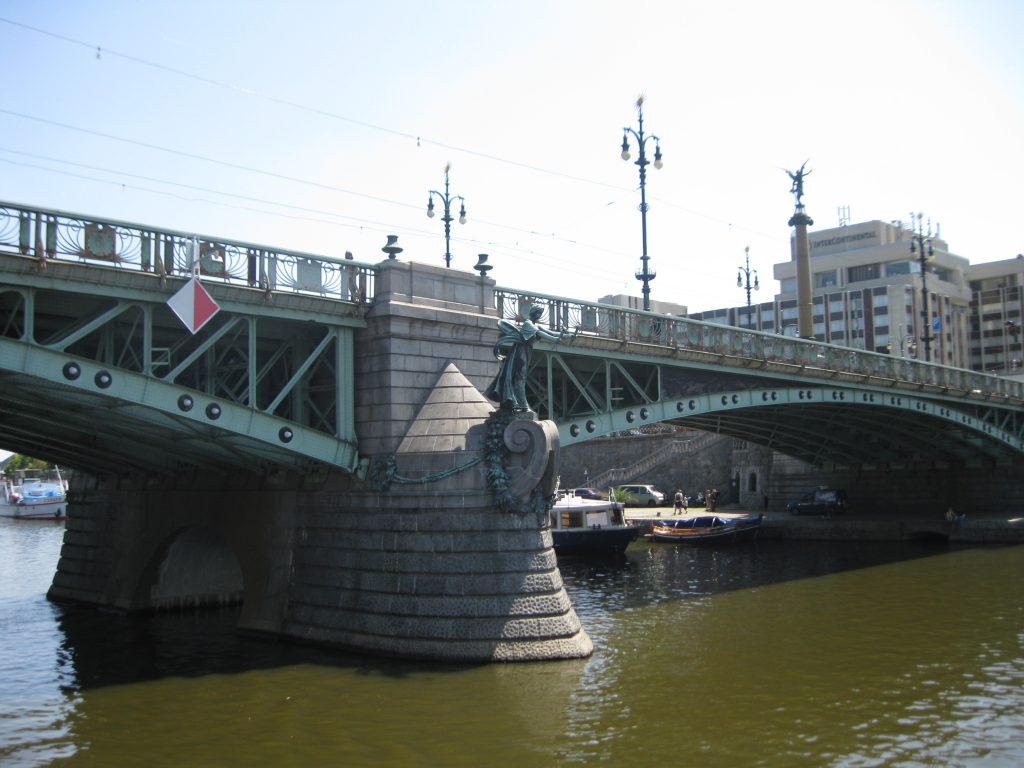
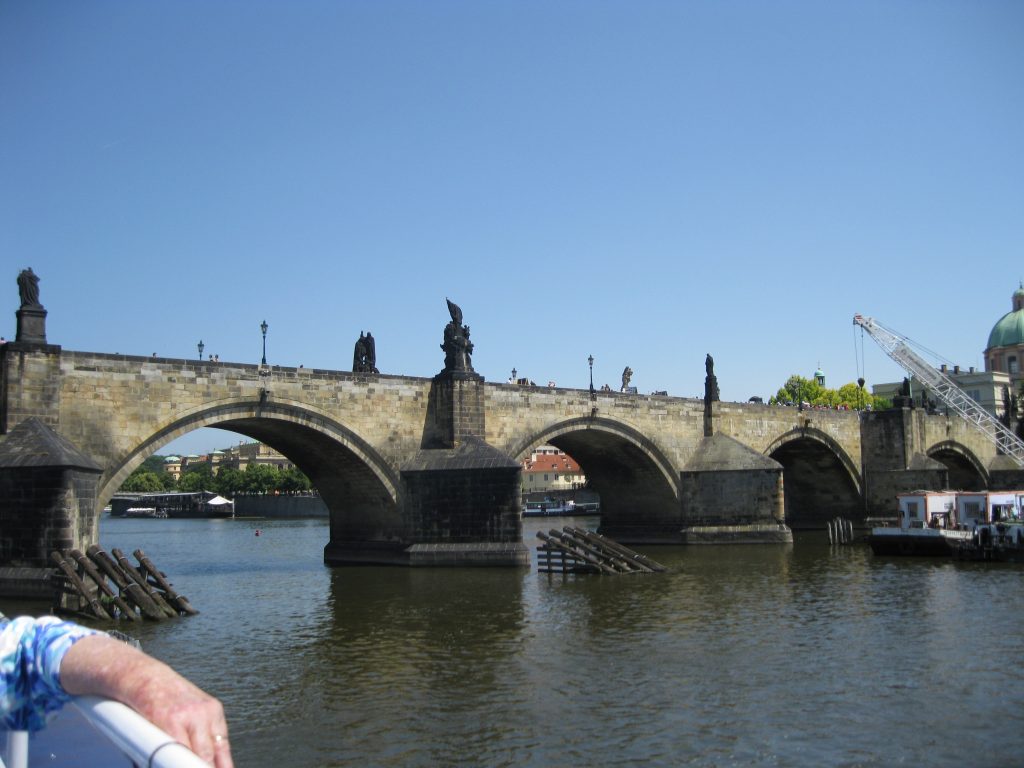
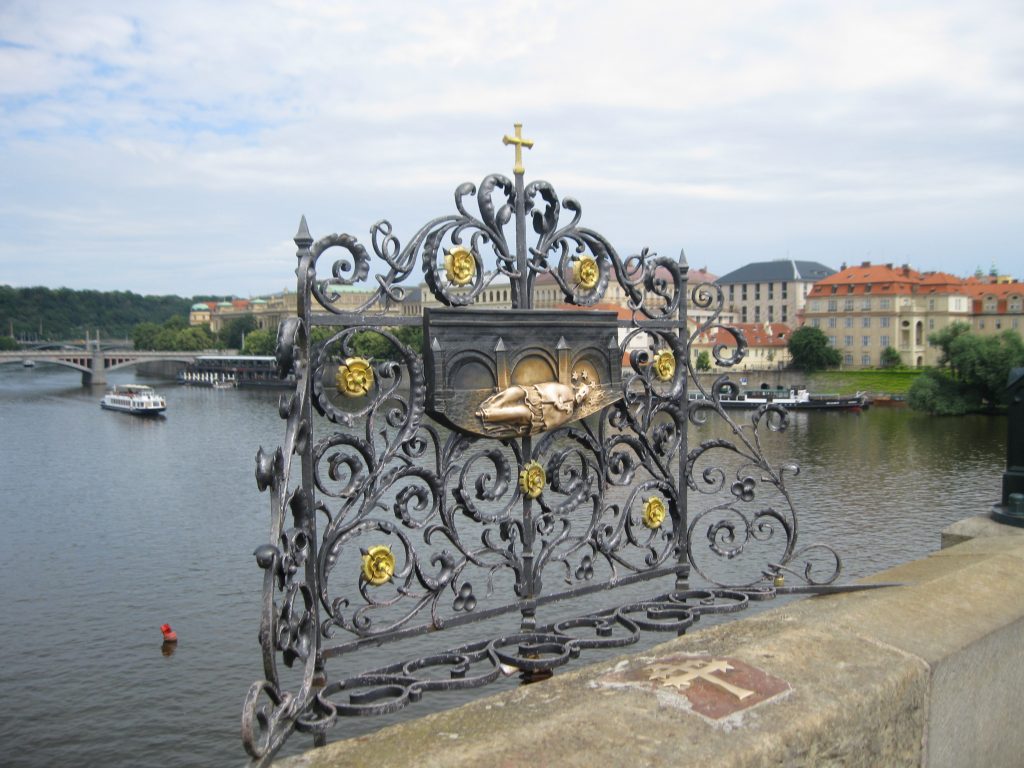
The Charles Bridge is a historic bridge in Prague that crosses the Vltava River. Its construction began in 1357 under the auspices of King Charles IV, and was finished in the beginning of the 15th century.The current bridge replaced an even older bridge that was built between 1158 and 1172 and badly damaged by a flood in 1342.
The Charles Bridge was originally called Stone or Prague Bridge but has been “Charles Bridge” since 1870. As the only means of crossing the river Vltava until 1841, Charles Bridge was the most important connection between Prague Castle and the city’s Old Town and adjacent areas. This “solid-land” connection made Prague important as a trade route between Eastern and Western Europe.
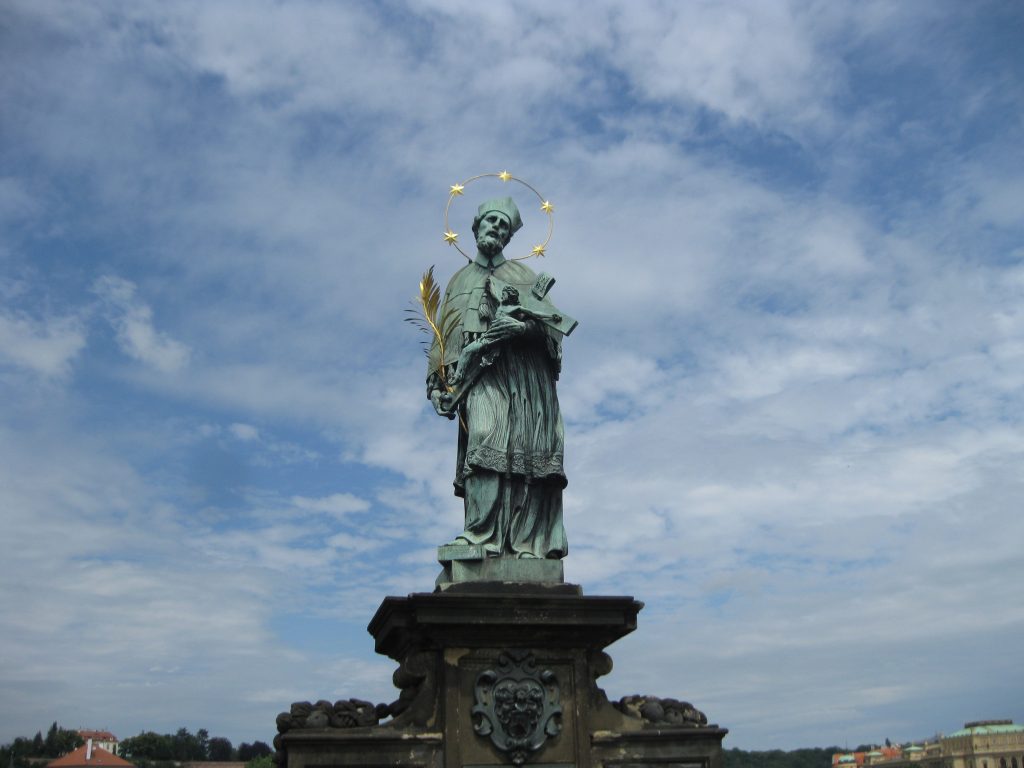
The bridge is 2,037 feet long and nearly 33 feet wide. It has 16 arches and is protected by three bridge towers, two on the Lesser Quarter side and one on the Old Town side. The bridge is decorated by a continuous alley of 30 statues and statuaries, most of them in the baroque-style. The statues were originally erected around 1700 but all have been replaced by replicas. And the greatest part – pedestrians only on this bridge. Lovely.
One
interesting note about our walk across the bridge. There was a line of people spanning
the bridge, a few feet apart and all facing downstream with their arms and
hands (palms upward) as if in prayer or meditation. I finally couldn’t stand it
any longer, so I asked a nice 50 something lady what was going on. She said
they were simply there to offer support to the bridge. Nothing more sinister or
of greater meaning than that they loved their bridge and wanted the bridge to
feel their love. I got it. I also felt love for this very old and very important
historic monument.
After
walking across the bridge we decided lunch was in order. So we sat at a charming
outdoor restaurant and I was finally willing to order a plate of goulash and
dumplings. Before today it had just been too darn hot to even consider a stew
like dish. But the goulash was wonderful and Andy and I both enjoyed my meal.
Next we went for a walk through this interesting part of Prague. The Lesser Quarter is beautiful and fairly quiet. One of the sites we visited was the Lennon Wall. Once just a normal, not very interesting wall, since the 1980s it has been filled with John Lennon-inspired graffiti including lyrics from Beatles’ songs. Located in a small and secluded square across from the French Embassy, the wall received its first such decoration following the 1980 assassination of John Lennon when an unknown artist painted a single image of the singer-songwriter and also lyrics such as “All You Need is Love” and “Imagine” on the building facade.
In 1988, the wall was such a source of irritation for the communist regime that the police would paint over the “graffiti” and every morning young Czechs would paint more grievances back on the wall. In time this led to a clash between hundreds of students and security police on the nearby Charles Bridge. The movement these students followed was described as “Lennonism” and Czech authorities described these people variously as alcoholics, mentally deranged, sociopathic, and agents of Western capitalism.
To this day the wall continuously undergoes change and the original portrait of Lennon is long lost under layers of new paint. But the wall remains as a symbol of global ideals such as love and peace.
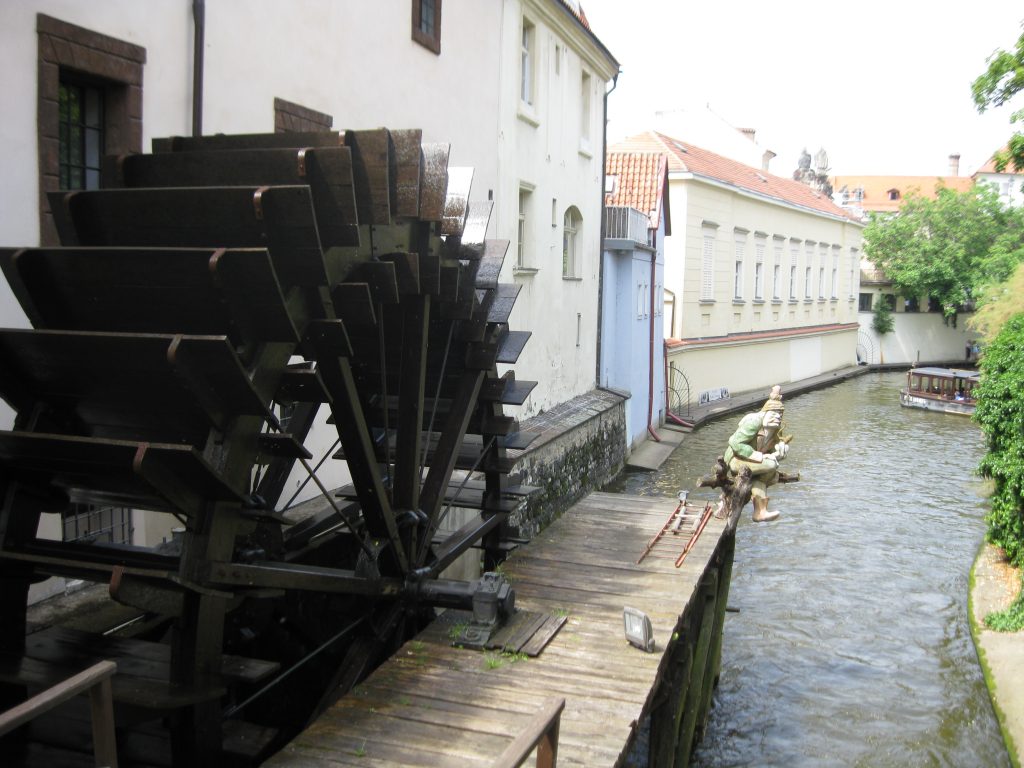
The only remaining water wheel on a tiny canal in the Lesser Quarter with it’s guardian gnome (or whatever)
After visiting the “wall” we walked
back across the Charles Bridge and hurried through Old Town, Old Town Square, and
through the Ungelt Courtyard (first stopping for liquid refreshment of course)
to beat the 4:00 closing time of the Church of St. James. We wanted to visit
this church because it was said to possess the most beautiful interior in Old
Town. And I must say – it was stunning.
By now, we are hungry and thirsty again. So time to head towards our pension. On the way we stopped at a restaurant recommended by our host and enjoyed a lovely meal. Home again about 6:00 for writing, reading, and general relaxation. Tomorrow we pick up our car and head out for more adventure. Will miss Prague, but not the heat. (Like it’s going to be cooler the rest of our trip! Right!)
Monday,
June 17, 2019 – Olomouc, Czech Republic
Up early enough to get breakfast at
8:00. And I must say – I love continental breakfasts. An assortments of fresh
breads, butter, jams, charcuterie, different types of cheese, hard boiled eggs,
cherry tomatoes, dry cereals, juice, dense cakes, fresh fruit, yogurt, along
with all the coffee and tea you can drink. Marvelous. And all I have to do is
choose what I want to eat from this marvelous selection. What a treat. I figure
over the years I must have fixed at least 16,000 breakfasts, probably more. So
to sit down to a breakfast that has been lavishly spread out before me, and I
haven’t contributed in any way, is my idea of heaven.
After breakfast we packed our bags,
checked out of our “hot box”, grabbed a taxi, and presented ourselves to the
car rental place. Their records showed that we were to pick up our car at the
airport. Wrong. I gladly provided them with my confirmation paperwork which clearly
stated that we were in the right place at the right time. It took a little bit
longer to get our car. But because of their error, we saved some money, and we
were still on the road in a rather timely manner.
Then out of Prague and onto the
freeway to Olomouc. Fabulous signage along the freeway. And gas stations and
dining establishment every few klicks.
Andy had already researched how to
reach Hotel Conti. So I drove and he navigated. (This works well for us
regardless of what country we are visiting. The man simply cannot get lost!
Thank God.) And oh what a pleasure to find ourselves in a charming residential
neighborhood and in a beautiful new hotel. Even the grounds were fabulous with
cozy intimate seating areas in a park like setting. Could not be more pleasant.
Then bags up to room, get situated
and take a little rest before heading out to dinner. The life of Riley I tell
you. But a little about this city.
Olomouc lies in the eastern province of Moravia. It’s known for its 6 baroque fountains and the 18th-century Holy Trinity Column, a monument adorned with religious sculptures. On Wenceslas Hill are the Gothic St. Wenceslas Cathedral and the Romanesque Bishop’s Palace.
Tuesday, June 18, 2019
Woke
up to a cool room because a) we weren’t on the top floor of the hotel, b) we
weren’t in a large city, but rather guests in a modern hotel on a peaceful tree
lined residential street c) the windows in our room opened wide, and d) there
was a lovely overhead fan. What a difference from our last 5 nights. I will
never book a room again without air conditioning or sure knowledge that air
conditioning will not be needed! (Like in February for example.) Well let’s
face it. I was going from past experience with Booking.com. When I used them to
book our rooms in South Africa, we had nothing but beautiful accommodations. So
I never gave it a thought that different countries might have difference
standards. Plus there were nothing but good reviews on Hotel Balbin. But what
do you expect from an attic room in a hotel built in 1887? Fool me once etc. etc. But enough about the
first 5 nights of our trip.
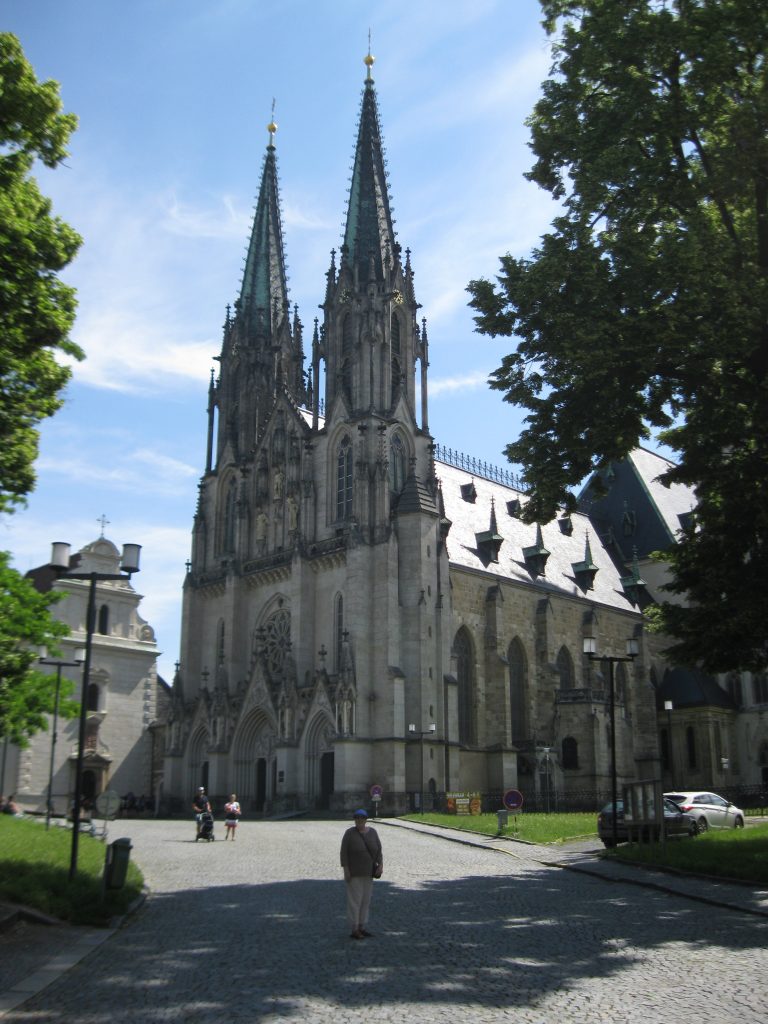
After a sumptuous breakfast in the lovely dining room of our hotel, we visited St. Wenceslas Cathedral.
This beautiful gothic cathedral was founded in 1107. The square surrounding the cathedral was named after Saint Wenceslaus I, Duke of Bohemia on the thousandth anniversary of his death in 1935. The cathedral is also named after him.
The cathedral began in the Romanesque Rstyle and was consecrated in 1131. Extensive Gothic modifications were made in the 13th and 14th century.
Changes, which included re-facing the building, rebuilding the west front and the construction of the central tower, were made during 1883–1892. The cathedral was restored beginning in February 2004 and completed in 2007.
The
cathedral is formed by three towers. The front two form the front of the
cathedral, while the third one in the back, the southern tower, is 330.2 feet
high making it the tallest church tower in Moravia, and the second tallest
church tower in the Czech Republic.
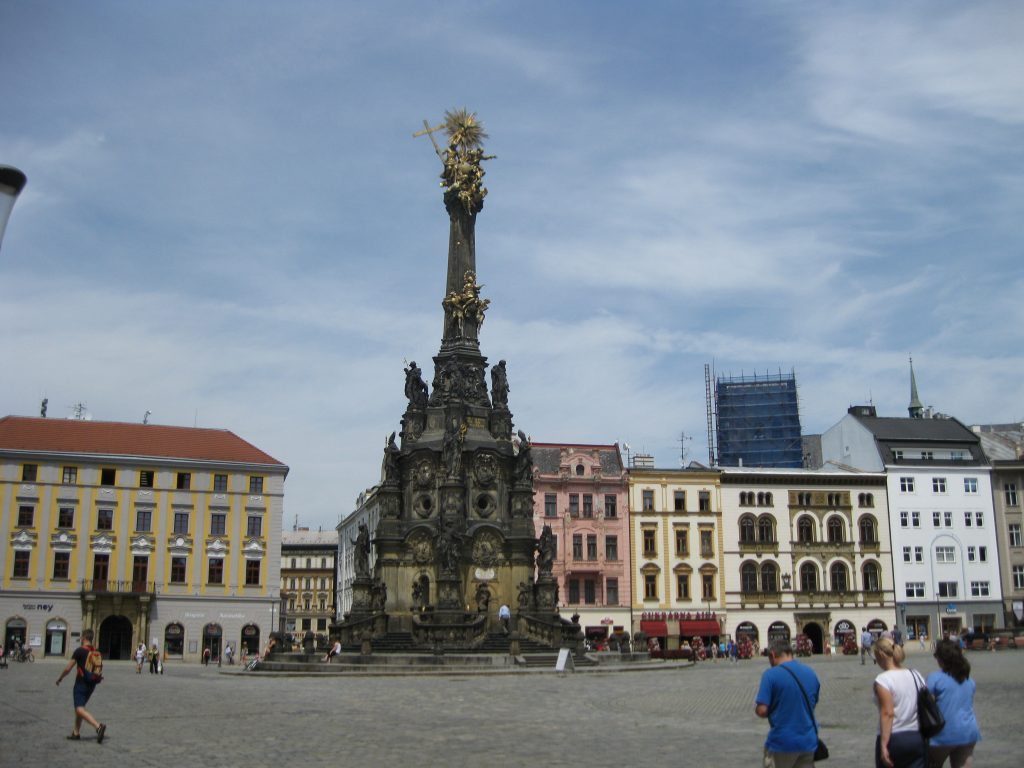
After leaving the cathedral complex we headed for Old Town and the Holy Trinity Column. Beautifully designed. After oohing and ahhing the column we decided to head for the cheese shop. Now not just every town has a cheese specifically named after it. But Olomouc holds that distinction. So of course we had to taste this unique corpse of milk varietal. Olomoucke tvaruzky is a mature cheese made of skim milk. It has a completely unique spicy flavor, with a typical cheesy smell, a surface with a golden yellow cover, and a sticky semi-soft to soft consistency. It comes in the form of circles, rings, sticks, or irregular pieces. It was first mentioned in 1452 and then subsequently in a piece in 1583. In those days the cheese was made in local villages and simply labeled as “farm cheese”.
To me it tasted a lot like a young salty Parmesan. I
liked it a lot. The lady who gave us a taste, and from whom we later bought a
small round, stated that it was best served with fresh bread spread with
butter, and a chilled beer.
During our exploration of the old town area, we found
4 of the fountains, numerous restaurants, and enough ice cream shops to make
any kid, regardless of age, a happy camper.
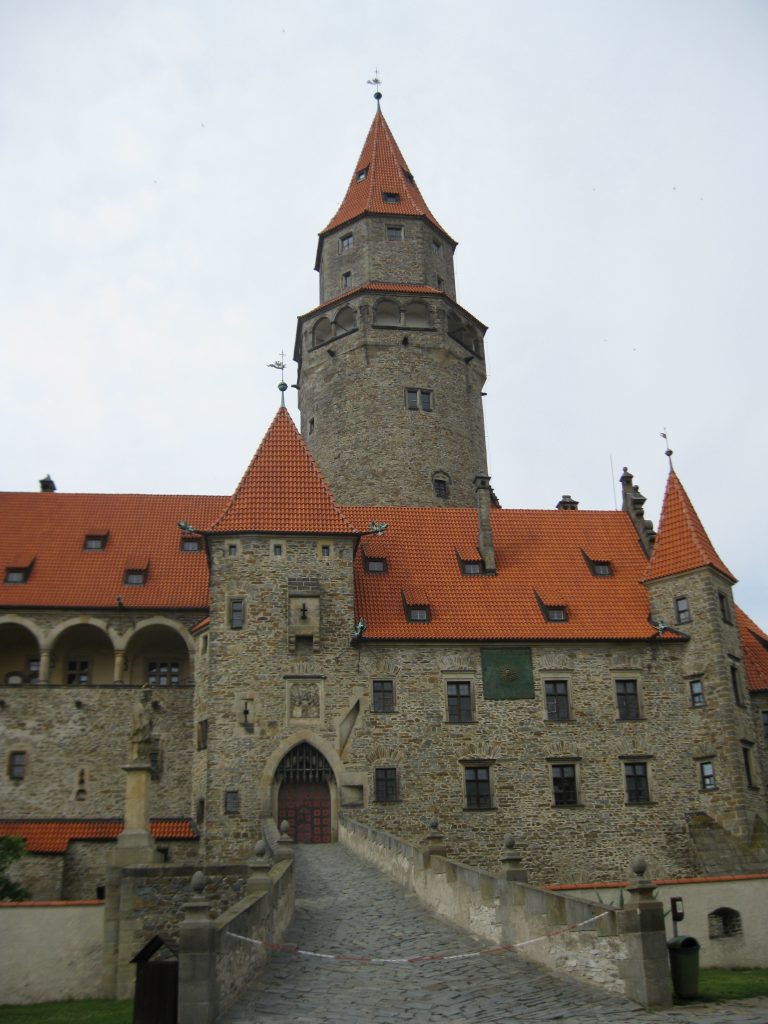
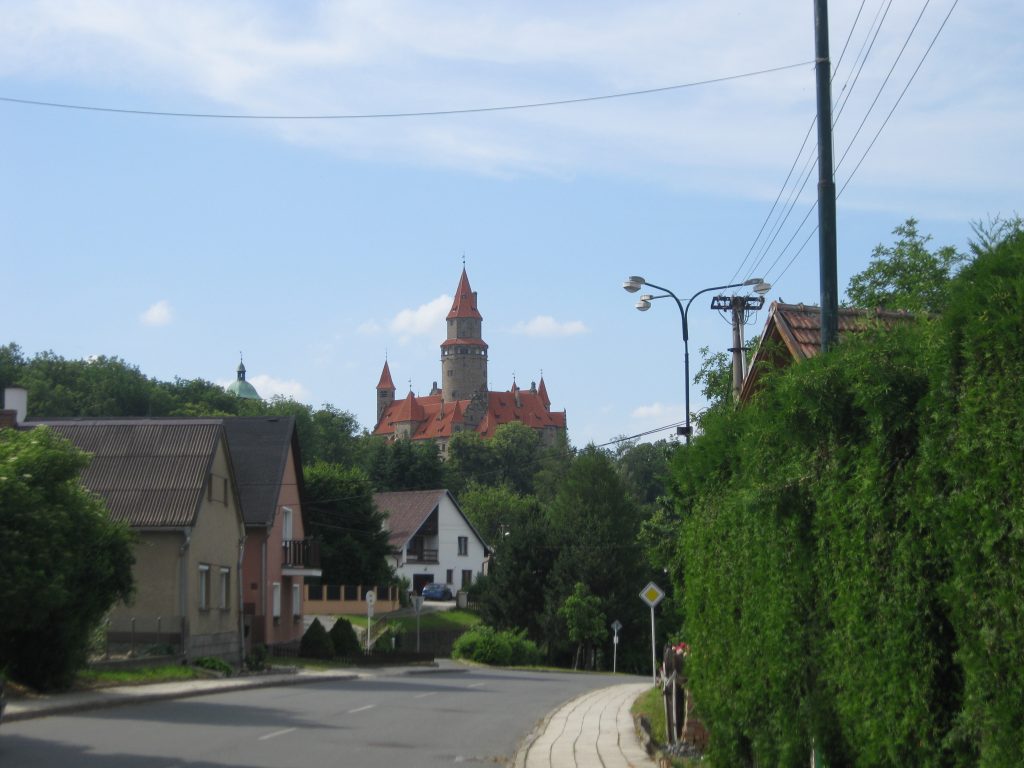
Then back to our room to retrieve our car and head out
for Bouzov Castle about 28 klicks from Olomouc.
Well, even though we have a pretty good driving atlas
for this part of the world, we found ourselves going north rather than west.
But getting lost has its own rewards. We drove through some magnificent forest
and farm land. Up and down rolling hills, through quaint little villages, and a
quick visitors glimpse of what appeared to be a peaceful and serene way of
life. Terrific. Finally Andy found the right road to take us to our
destination. Of course it was too late to take a tour of the castle, but we
still could walk into the main entrance and get a feel for the place. Which of
course we did. Then back on the road to Olomouc and some quiet time in our room
before dinner.
the castle we couldn’t visitand the reason we wanted to visit it in the first place
I have to say at this point that as good as the food is in the CR, it’s fairly boring after a bit. And I’m telling you true. We have tried both the bread and the potato dumplings so far. In both cases – gut bombs! And in full disclosure, the recipe I use from my first Betty Crocker cookbook is so much better than anything we have yet to taste. I haven’t completely given up on dumplings, but I’m going to wait until we reach Poland before I order another dish that comes with these dense little wonders. The Polish people simply must have a better handle on this simple dish. I’m keeping my fingers crossed.
Wednesday, June 19, 2019 – Dobczyce, Poland (Kraków)
Woke up early so that we could get on the road by 9:00
and we made it. Found the main road towards our destination and traveled
smoothly along as planned. And into Poland with not so much as a welcome wave.
Stopped at the first gas station we found for a vignette (toll sticker) but
were told that they are only required for commercial travel i.e. trucks, etc.
in Poland. So happily got some Polish spending money from a cash machine and
were on our way.
Saw more of the lovely rolling hills and decided that this
part of the world has it together. Lovely homes mixed in with pastures and
wooded areas. Every part feels rural while still housing thousands of people.
Got to our hotel, checked in and read or snoozed until it was time for dinner.
We were entertained during this time by a delightful thunder and lightning
storm. We felt right at home.
Dinner was underwhelming, but there sure was a lot of it on our plates. Probably the best thing we tasted was Andy’s soup. Zurek is described as “sour soup”. But there was no apparent sourness to it. It tasted like a wonderful, fairly thin mushroom soup. I may be eating a lot of this soup while we are in Poland. I ordered a chicken schnitzel like dish. Came with enough boiled potatoes for 4 hungry adults plus 3-1½ cup each portions of a carrot salad, beet salad, and coleslaw. Yikes! Andy ordered pierogi. They were OK, but I have had better homemade pierogi prepared by friends. After dinner, we came home and read for a while on the outdoor terrace. Very nice. Then lights outs with dreams of hospitals on my mind.
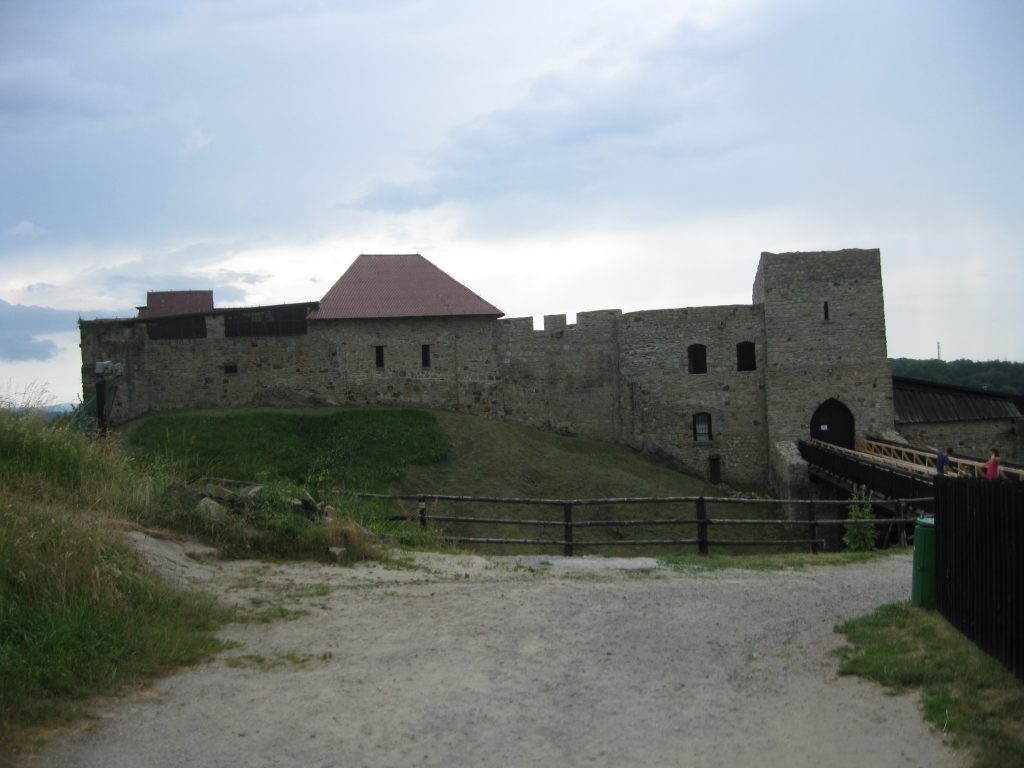
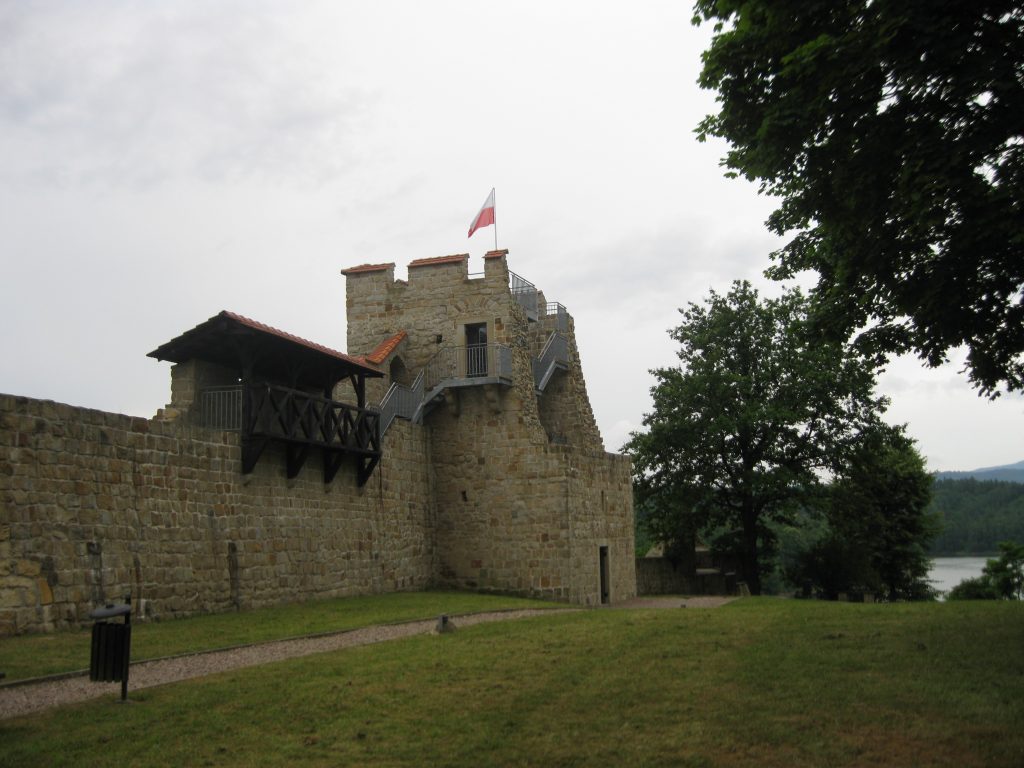
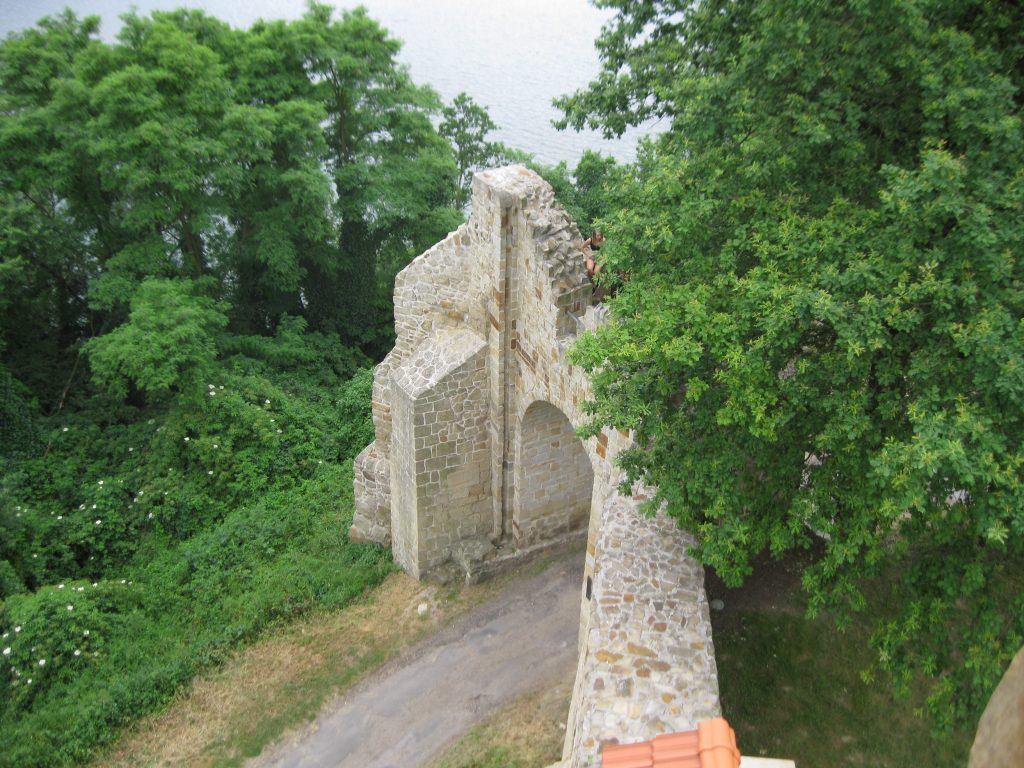
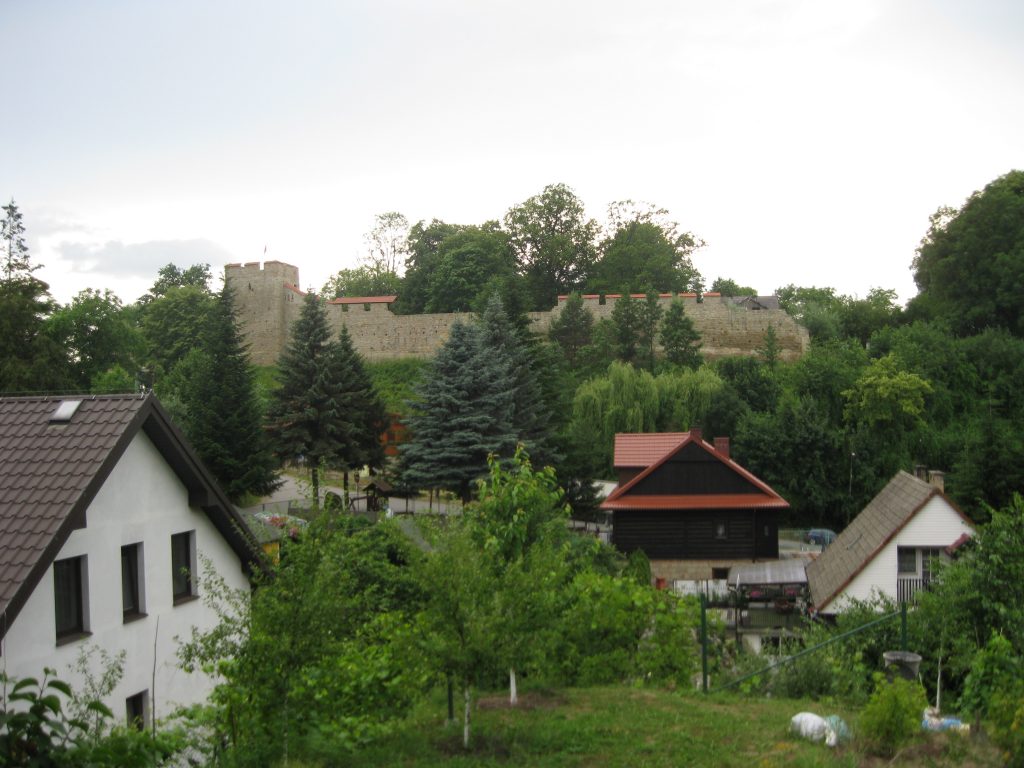
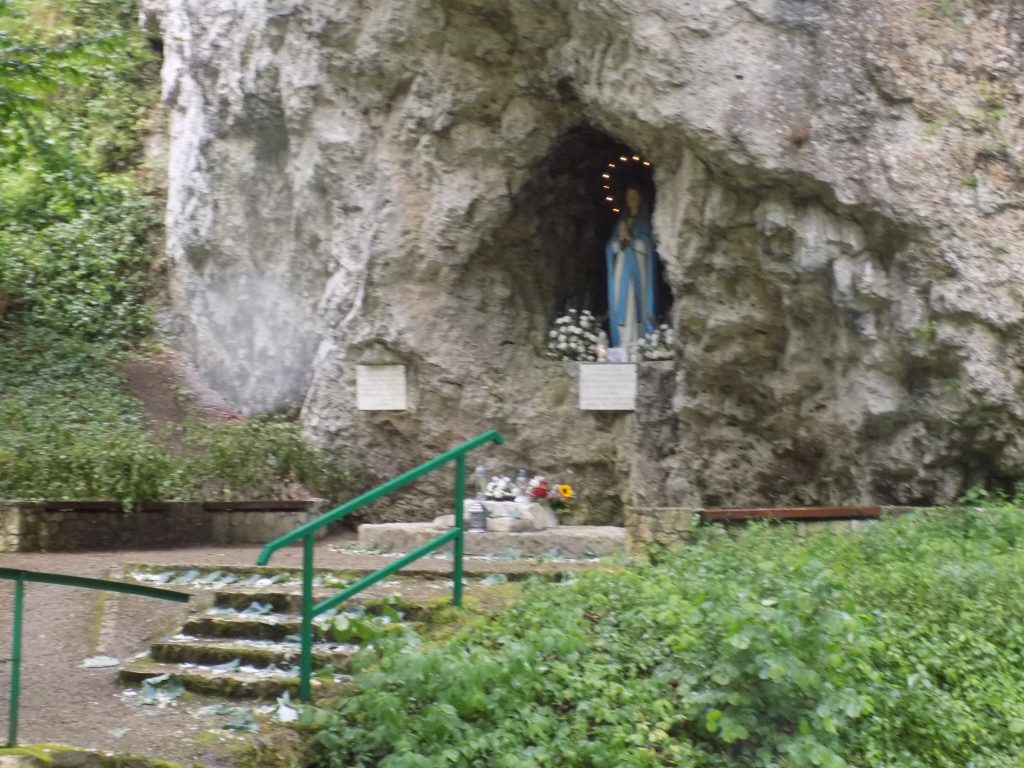
Our hotel complete with lovely gardens, a deck for reading, a parking place for our car (the tiny green one), a view to the lake, and the near-by ruins of a castle. Who could ask for anything more than that! the castleno guard on duty at this castleonce upon a time I’m sure there was a guard posted to this entryview of the castle from our hotel
Thursday,
June 20, 2019
Since my early 20s I have had a condition where I
break out in small boil like eruptions on my right hand. (About where the palm
of my hand and my wrist meet.) Well one of these episodes had started about 5
days before, and while I had tried to sleep that night, I decided I had better
do something about this problem first thing the next morning.
So after a lovely breakfast we went to the front desk
and spoke with a charming young lady who told us where to go and we went.
Except for the language barrier, this was probably the fastest visit I had ever
made to an emergency room.
After the paperwork, which only took about 5 minutes,
I was taken into a room and worked on with no delay. Now there was no deadening
of the area before they excised the wound, which would have been nice. But it
didn’t take long and I was all bandaged and ready to go in no time. Then off to
the pharmacy to get my 3 prescriptions filled. An antibiotic, a dietary
supplement containing at least 50 billion live bacterial cultures which counter
act the antibiotic which tends to kill all the good bacteria in my gut, and
some pain medicine. I also picked up some sterile bandages for when I change
the dressing. Grand total under $40.
After leaving the pharmacy we decided to drive out in
the country side and see what we could find. What we found were about a million
homes built in and around fields of corn, wheat, and whatever, small batches of
forested land, and roads that were wonderfully signed. We spent all afternoon
just driving around.
It happened that June 20th was Corpus Christi, a public holiday in Poland. Corpus Christi is a celebration of the day when the Catholic Church commemorates the practice of Holy Eucharist or Communion. It is a day off for the general population, and schools and most businesses are closed. Large groups of people take part in outdoor processions in the villages, towns and cities in Poland. The processions include children dressed in white who scatter flower petals on the streets. Some of the procession’s participants stop to pray at temporary shrines. Many homes are decorated with religious icons. But the best part for us, there was hardly any traffic. So being on the roads was a treat. But even just staying in the car took just about as much strength as I could muster after my visit to the hospital. So after our drive about, it was back to our hotel for some much needed rest (me) and a good walk-about for Andy. Dinner was at a nearby restaurant (horrible martini), but Andy’s duck leg was marvelous. I had spaghetti carbonara. Not the best I’ve ever eaten, but I ate it anyway. Then back to the lovely terrace at our hotel for some Kindle and Nook time. (Sounds a bit kinky right?)
Friday, June
21, 2019
Sat down to breakfast at about 9:00. Didn’t need to be
up early this morning because we had an official duty to perform and we had no
idea when the hospital cashier’s office would be open. Since I had visited the
hospital on a public holiday, the area that took insurance information or money
for services rendered was closed. So we had to make a special trip back to the
town of Myšlenice (me-shleh-NEET-zeh) to
fork over some cash.
The first office we visited told me that no money was
owing. Being told yesterday by the hospital staff that we needed to pay for the
emergency service, we tried someone on the 2nd floor. At this window
the lady was very pleased to take the equivalent of $175 from me, in return for
a receipt that proved I had paid my debt to this society.
After leaving the cashier we made our way out of the
building to find provisions for a picnic lunch. We were heading for the Ojcow
National Park and I thought a picnic lunch would be a lot of fun. So I picked
up 2 croissants, some sliced cheese and ham, Rainier cherries, and a candy bar.
When we got to the park and I started to make our sandwiches, I realized that
the croissants were filled with Nutella. (Since I don’t read Polish, I had no
idea that I wasn’t purchasing plain croissants.) Well we suffered through the
problem, and with the added chips that Andy had purchased at a gas station
convenience store, we managed a fine repast. Just as we were getting back in
the car, the heavens opened up and everybody and everything was drenched with
water. The roads were very difficult to drive because it appeared that the
surface water exceeded the storm drain capacity by about 3 to 1. So all the
cars and trucks were making their way through rivers of water/mud/rocks etc. We
didn’t even consider getting out of the car to visit any of the attractions the
lovely park had to offer. First of all the rain made everything soggy, and
secondly, there was nowhere to park anyway. So we just drove through a couple
of times and called it good.
a lovely covered bridge in the parka grotto built into the stone
While we were already north of Kraków, we decided to visit the ruins of Ogrodzieniec Castle. Ogrodzieniec Castle is a ruined medieval castle in the semi-mountainous highland region called the Polish Jura about an hour north of Kraków. Rebuilt several times in its history, the castle was originally built in the 14th–15th century. The castle is situated on the 515.5-metre-high Castle Mountain, the highest hill of the Krakow Czestochowa Upland.
It was great to see the castle from the car. (It would have been even nicer if we could have at least taken a picture of it.) But it would have been a real treat to walk up to it and stand on its walls. But neither of us was prepared to find a place to park or dash through the rain and the lightning strikes, just to get up close and personal. So being the wusses that we are, we stayed in the car and applauded from afar.
Then back on the road and home to our hotel. Then dinner, read and type for a while, and lights out. Another fine day in Central Europe.
Saturday,
June 22, 2019
Well,
today was the day for going into Kraków and
visiting the Old Town. Andy researched the weather forecast and learned that we
might have another thunder storm and a 60% chance of rain in the afternoon.
After
stopping at a gas station to purchase a city map, we finally located a parking
garage. Of course, it was a garage that needed a pass (not for just any old
person who needed a parking place) and since I was driving I got to back up the
ramp to obtain freedom. Now, I don’t like to back up! But I was behind the
wheel, so I was assigned the dubious pleasure. Pleasure, right!?!? Anyway, we
got turned around and in the next block found a public parking place at
a hotel. Then off we headed for Old Town.
Just
as we were setting off, it started to sprinkle. And then the sprinkle became a
downpour the likes of which we had experienced the day before. We both had our
rain jackets along, but within one block we were completely soaked. So we did
what everyone else without an umbrella was doing – we ducked into a door way.
We must have waited at least 15 minutes before we decided that the rain was not
going to stop. So we reluctantly heaved our dripping bodies back onto the
sidewalk in search of the entrance to the old city. Luckily just after passing
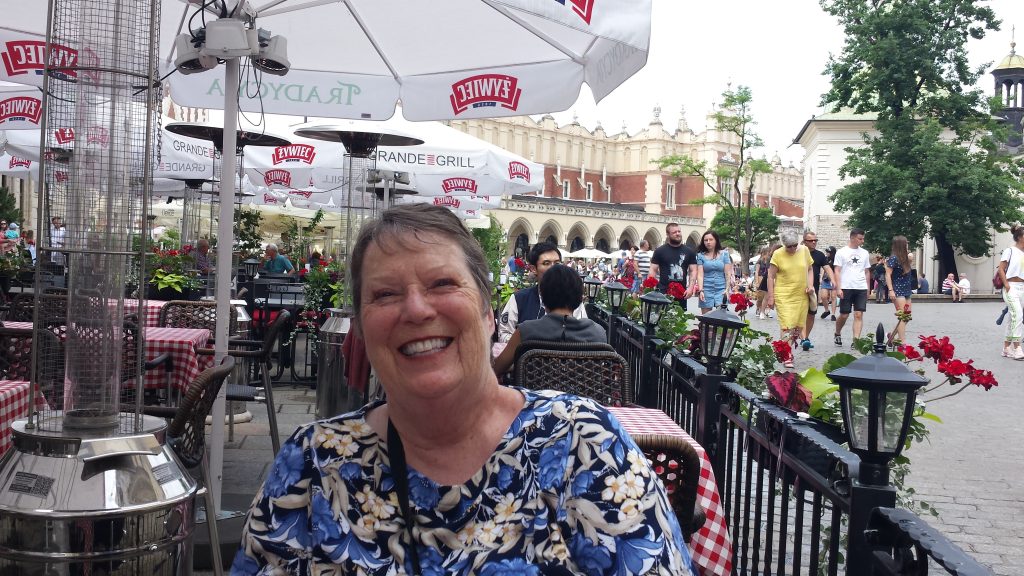
through the entrance we spotted a coffee shop. I declared myself in need of an
Americano and a retreat from the rain. While we were drinking our coffee, a
nice gentleman who overheard us speaking English, showed us where he had just
purchased an umbrella at a reasonable cost. So we hustled over to the small
souvenir shop and now both of us were equipped to handle how much ever rain
Mother Nature intended to throw at us. Therefore, it stopped raining and didn’t
start again until about 8:00 pm when we were safely back in our hotel room. I
now thought of our umbrellas as insurance. With our luck we might not have to
open them again on this trip. (We should be that lucky!)
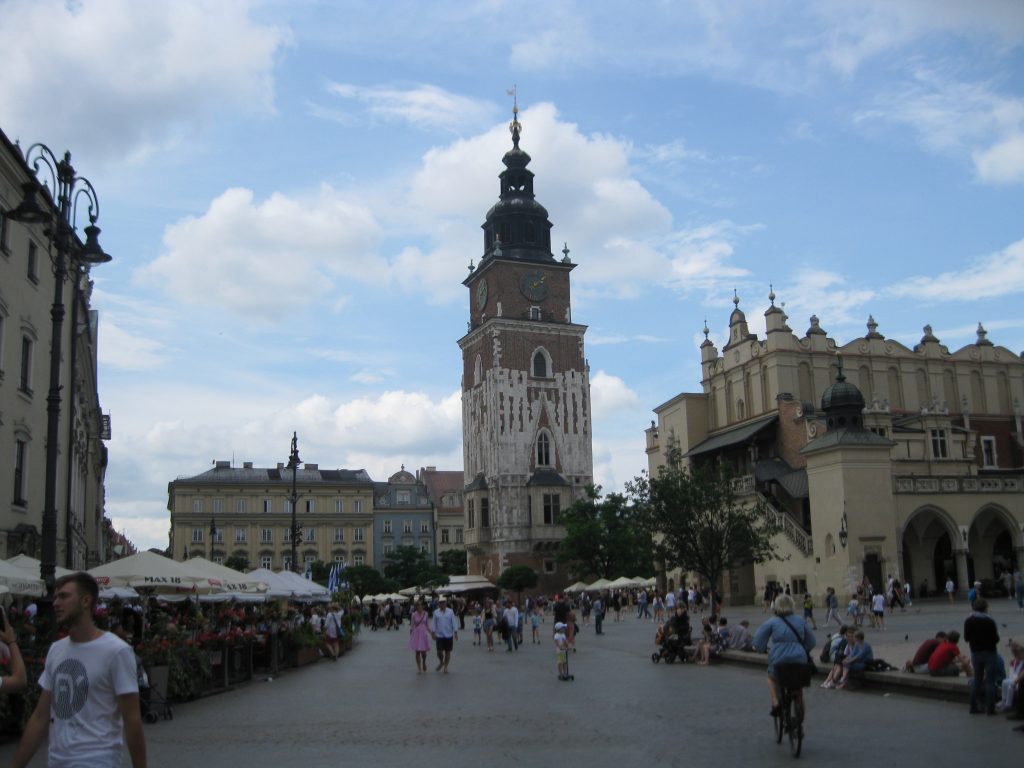
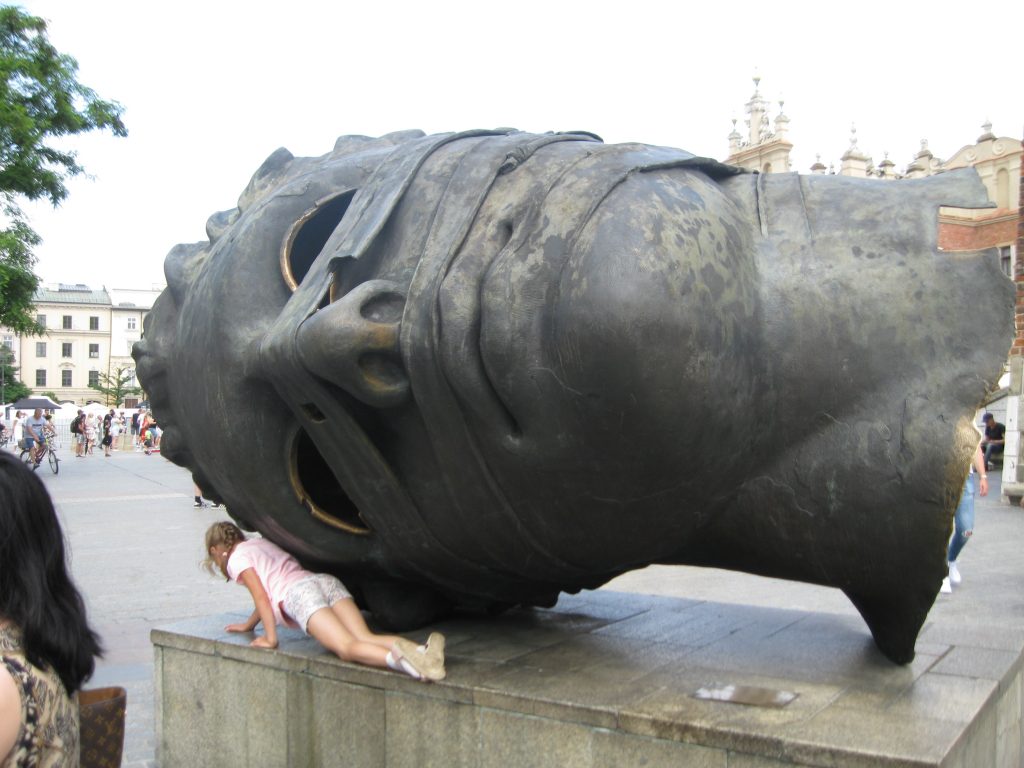
the new name of this street is “rainy street”Two handsome old guys – one on duty, one not so much!Is that not a face everyone could love?St. Mary’s church
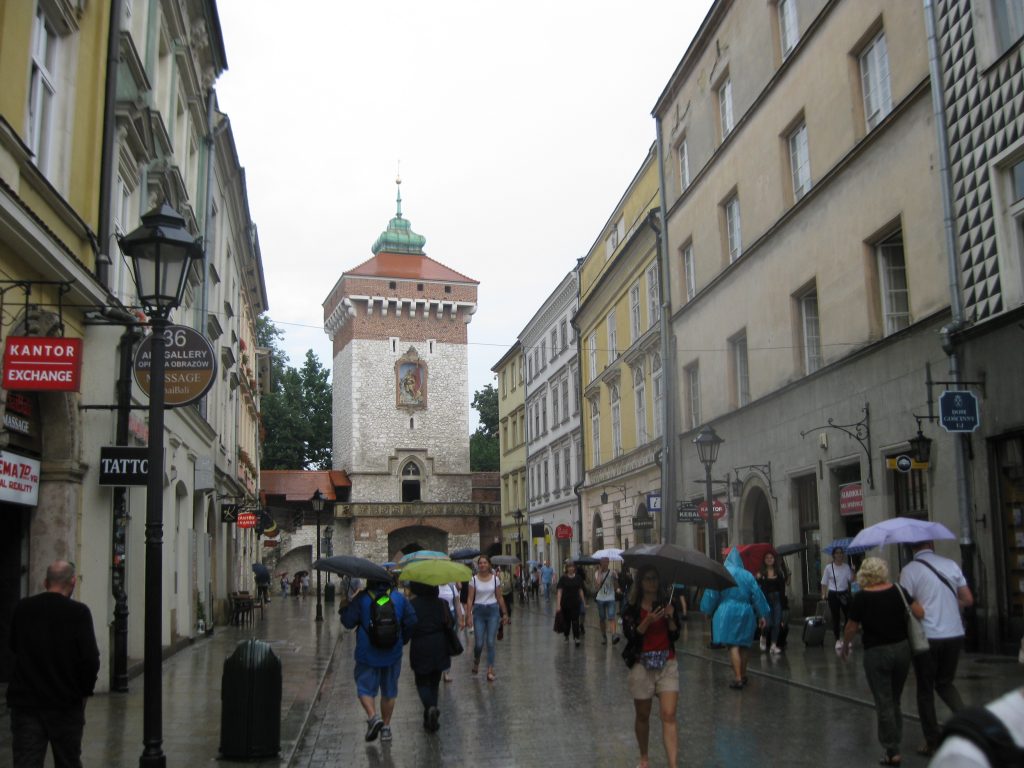
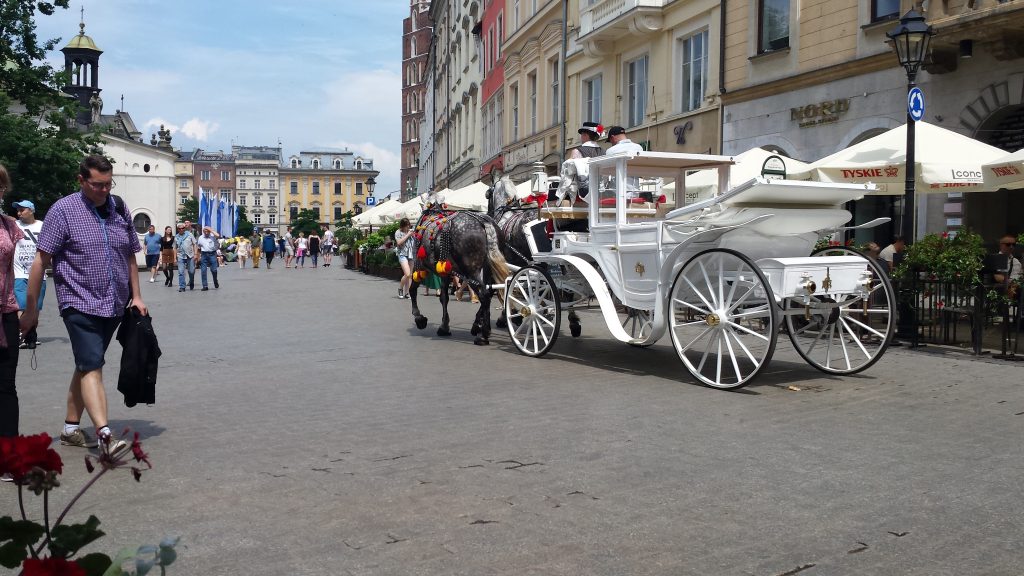
I should mention that before we even entered the Old Town we passed the very impressive Grunwald Monument. The Battle of Grunwald, fought between the joint armies of Poland and Lithuania against the Teutonic Knights on July 15, 1410, is considered to be one of the greatest battles ever to take place in medieval Europe. A defining moment in Polish history, the battle was immortalized in Kraków with the unveiling of this weighty monument in front of an estimated 160,000 people on the 500th anniversary of the event in 1910. Antoni Wiwulski’s (1877-1919) original masterpiece was, not surprisingly, destroyed by the occupying Nazis during WWII and the copy that now stands in its place dates from 1976, having been faithfully reproduced using sketches and models of the original. At the top on his horse is the King of Poland Władysław Jagiełło, his sword pointing downwards in his right hand. At the front is his cousin the Lithuanian prince Vytautas (Vitold), who is flanked on either side by victorious soldiers from the joint army. The dead man at the front is Urlich von Jungingen, the Teutonic Order’s Grand Master, who lost his life during the battle. But because it was raining so hard, we hardly spent any time looking at this magnificent monument. However, later that afternoon on our way out of the Old Town and back to our car, we were able to spend some time admiring this large historical masterpiece. Both of us were very impressed by both its size and regal appearance.
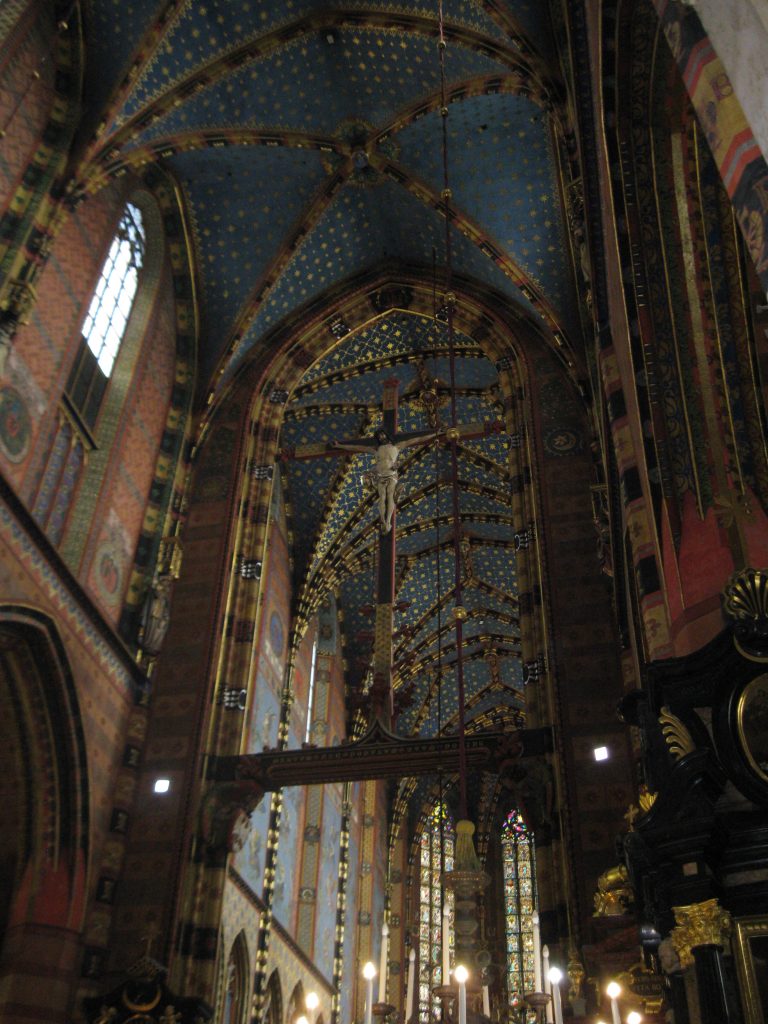
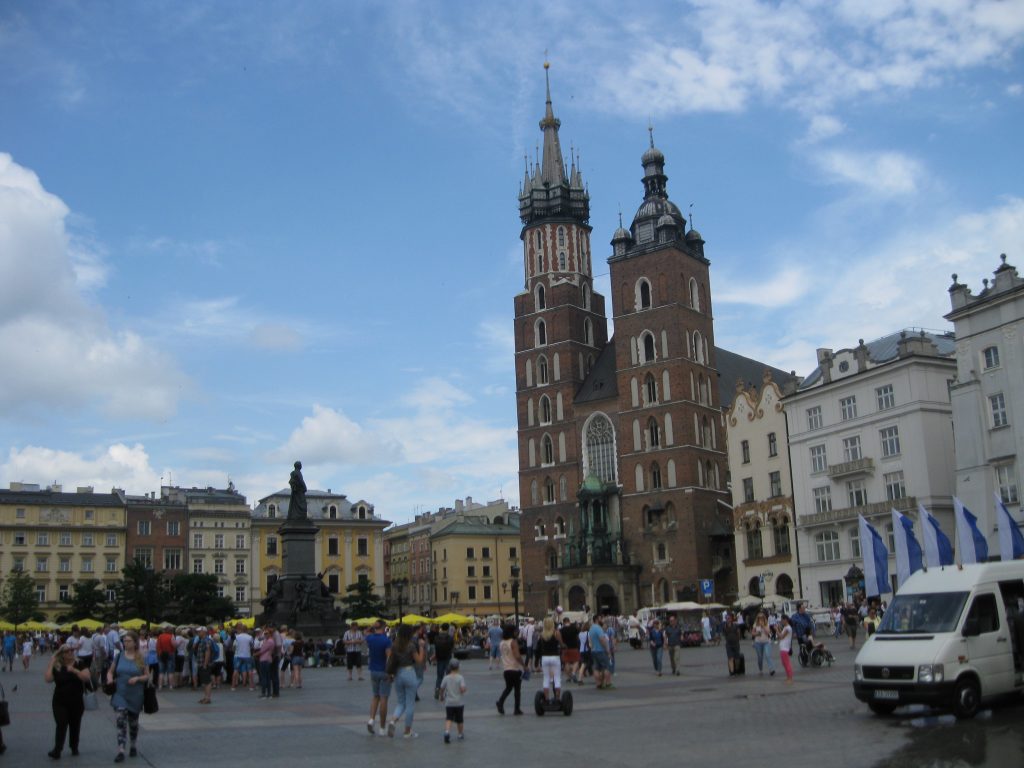
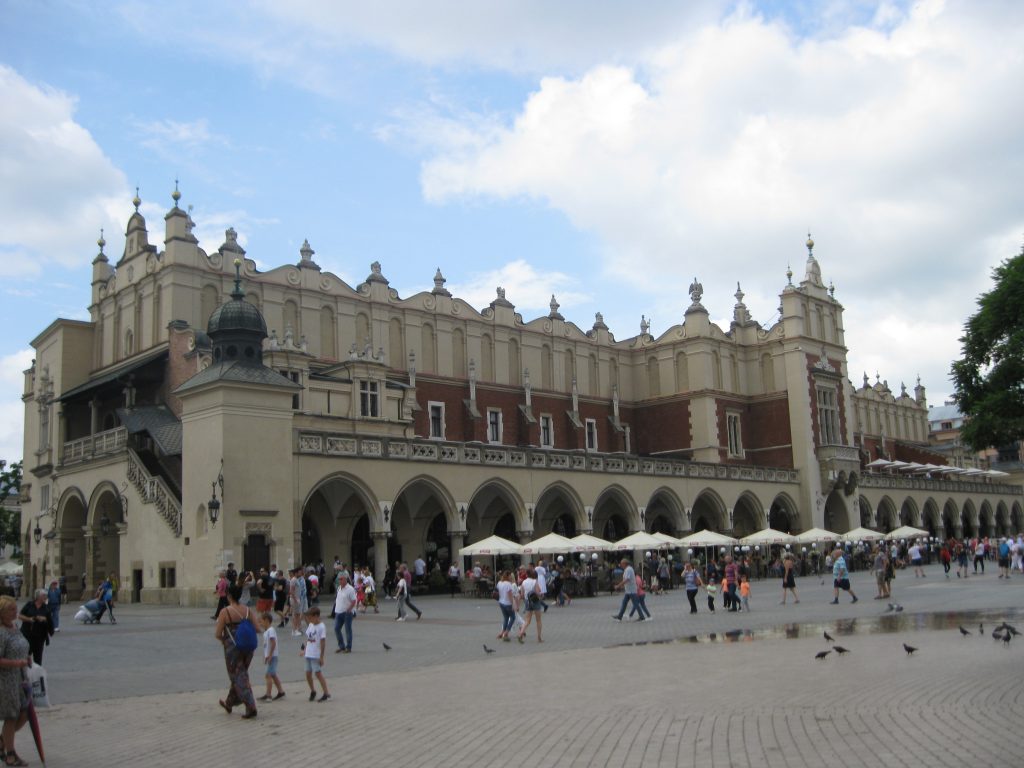
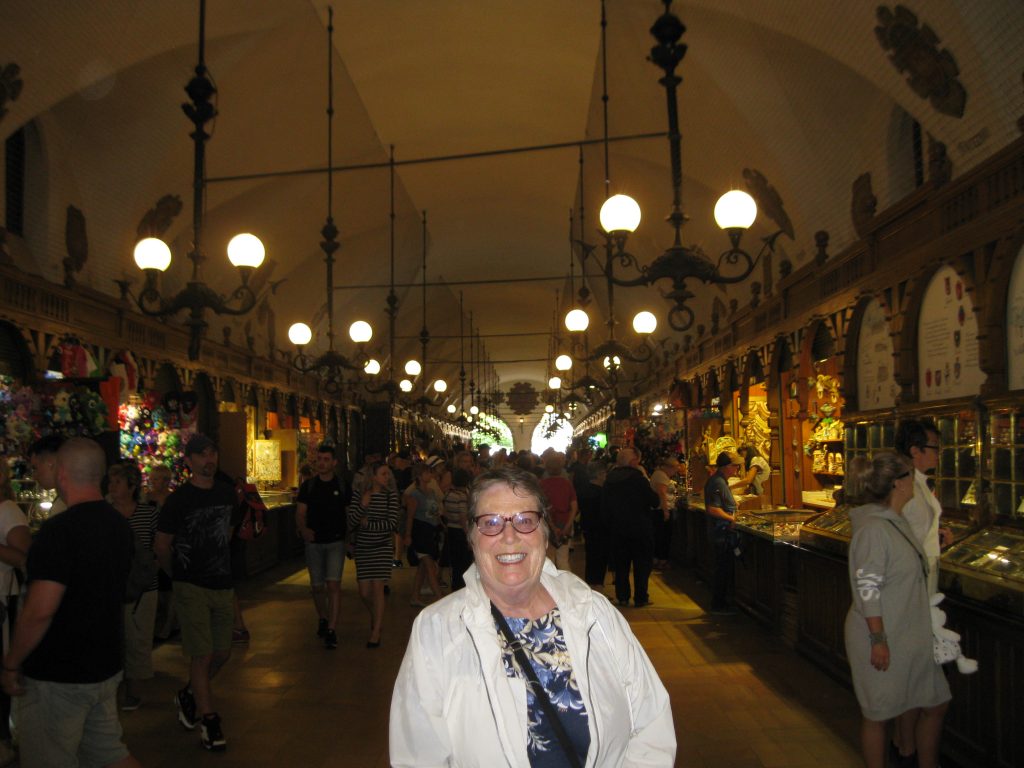
Next we walked along Floriańska Street, which is one of the main streets in Krakow’s Old Town. Then into St. Mary’s Church which is a brick gothic church adjacent to the Main Market Square. Built in the 14th century, its foundations date back to the early 13th century and serve as one of the best examples of Polish gothic architecture. Standing 262 feet tall, it is particularly famous for its carved wooden altarpiece.
On every hour, a trumpet signal is played from the top of the taller of the two Saint Mary’s towers. The plaintive tune breaks off in mid-stream, to commemorate a famous 13th century trumpeter who was shot in the throat while sounding the alarm before a Mongol attack on the city. Saint Mary’s Church (Basilica) also served as the architectural model for many of the churches that were built by Polish immigrants, particularly Saint Michael’s and Saint John Cantius in Chicago. Then through the Main Market Square and into the Cloth Hall. The Cloth Hall (which now contains shops) is the central feature of the Main Market Square which was listed as an UNESCO World Heritage site in 1978.
the main squareAnd I thought I had a big head!Cloth Hallhappy shopper in the Cloth Hall
Cloth Hall was once a major center of international trade. Traveling merchants met there to discuss business and to barter. During its golden age in the 15th century, the hall was the source of a variety of exotic imports from the east such as spices, silk, leather and wax, while Kraków itself exported textiles, lead, and salt from the nearby Wieliczka Salt Mine.
Next we visited the The Jagiellonian University, also known as the University of Kraków. Founded in 1364, the Jagiellonian University is the oldest university in Poland, the second oldest university in Central Europe, and one of the oldest surviving universities in the world. Notable alumni include, among others, mathematician and astronomer Nicolaus Copernicus.
We walked by the
beautiful Archbishop’s Palace and into the St. Francis Basilica. Built in the 13th century, St. Francis’
Basilica was the first brick building in Kraków, but its legacy was forged at the
turn of the century when Wyspiański filled the interior with colorful Art
Nouveau murals that deftly balance the organic and geometric with unique floral
patterns. Wyspiański also designed the church’s magnificent stained glass
windows, including the imposing, almost violently energetic ‘God in the Act of
Creation’ window over its rear entrance. Argued by some to be the greatest
modern stained glass window in the world, we were truly touched by its unique
beauty.
Brick Church
In another of the
wonderful old churches along our tour, we noticed that the front pews were
filled with nicely dressed people carrying bouquets of fresh and paper flowers.
We sat down in the 2nd section just to admire the pulpit area when
from one of the side chapels a bride and groom appeared. Then the organ started
playing and we were transfixed. This was one of those serendipitous moments
when all of your senses are on full alert. This was the reason we traveled
abroad. In America we would not have even been allowed in the church for such a
momentous occasion. Here, we and the others around us simply did the right
thing and left of our own accord.
Our tour of the Old Town finally brought us to the Mary Magdalene Square, where again we were rewarded with live music. This in the form of a small acapella choir singing what we believe to be centuries old madrigals. Enchanting.
Then we walked along Kanonicza Street where many of the clergy lived. (There were so many churches built in this area, and of course the clergy had to live somewhere!) Then back through the Old City, stopping for our daily fix of lemon gelato and lemonade. (But of course!)
Just after
passing through the gate 3 ladies were making beautiful music together. A
violinist, a keyboard player, and an auto harpist. And both the keyboard player
and auto harpist were singing. Lovely duets. We really should have purchased a
CD, but we were getting low on złoty.
Then back to the hotel where we had paid to park our car, made a few wrong turns getting out of the city, stopped for dinner along the way, and back to our hotel. None the worse for wear (except for my feet that is) and a quiet evening of reading, writing, and relaxation. We deserved the relaxation part. We had played hard that day!
Sunday, June
23, 2019 – Košice, Slovakia
Hit
the road at about 10:00 am and decided to take the scenic route through the
mountains to Košice. (The freeway would have been faster, but we weren’t
in a hurry and we love the mountains.)
Our
driving destination in the mountains was the alpine village of Zakopane. Before
I go any further, I should explain the road system in Central Europe to you. I
have never seen so much road work in my life! The infra-structure is totally
being updated and you can barely go 30 klicks without a new bridge being built,
a new highway being carved out of the wilderness, or storm drains (etc.) being
replaced. It is totally amazing. But the interesting part is that the
slow-downs are kept to a minimum. Except for that day, when it seemed like half
the population of Kraków were trying to get back to the city at the
same time. We figured that since the previous Thursday had been a legal
holiday, many Krakównians
(my word) had taken a 4 day long weekend in the mountains. The back-ups were
many miles long. Thank God we were traveling in the opposite direction. But
back to Zakopane.
Along our route
we passed several ski resorts and had the weather been nicer, I think we might
have even had a glimpse of snow here and there. But the skies were cloudy and
at the highest elevation, we were actually driving through fog. But the whole
drive was worth it, because in one of the many small villages, we saw a stork
in its nest. Amazing. And not that far away from us. We had seen an abundance
of stork nests when we were in Spain a few years ago, but never complete with
the resident mommy. Worth the drive for just that one sighting.
saw our first stork nestLooked just like the huge ant hills we had seen in South Africa. However, these were just plain old piles of cow food.
Eventually we
found our way to Košice and a lovely room just 2
blocks from the Old Town. After unpacking we spent an hour or so unwinding, and
then off to finds some Euros and a place to eat.
You know, some people just never learn. Here we had just purchased umbrellas and owned water shedding (yah right – or so mine said) jackets. And where were they when the storm hit? In our car back at the hotel. I’ll tell you – when the wind started to blow, the wait staff went into hyper protection mode. We had just been served our dinner when all of sudden, all the people who like ourselves were seated outside, headed inside. And the waiters and waitresses started pulling in the seat cushions, tying up the sun umbrellas, and covering (and yes they have blue tarps in this part of the world too) the wicker chairs. And then it started to rain. No, not just rain. It was another torrential downpour like we had experienced just the day before. So after we finished our meal and Andy had lingered over his espresso as long as possible, he decided something had to be done.
So
he ran back to the hotel, retrieved our jackets and umbrellas from the car,
found a cash machine so that we actually had some real money (Euros) in our
possession, and came and rescued me from the hotel/restaurant. Then it was time
to walk through the mini rivers that had filled the streets. At one point, we
actually walked through 2-3 inches of running water. Needless to say both our
pairs of shoes were completely soaked. But we made it back to the hotel, shared
a couple of laughs with other guests who like us had been surprised by the
storm, and survived to tell the story. Hopefully I have learned my lesson. Be
prepared for any eventuality. And don’t trust the weather service people. There
had been no rain predicted for that day. Maybe we should have looked closer,
because what was falling from the sky had very little in common with the rain
we know and love. It was simply buckets of water being tossed about with a few
lightning strikes thrown in for good measure. I hope to never complain about
drizzle again!
FYI: Another interesting aspect of traveling in Central Europe, is that they don’t have toll booths like ours for their major highways. For the Czech Republic, Slovakia, and Hungary you must carry a vignette (toll sticker) if you plan to travel at the speed of lightning! (The speed limit is as much as 130 klicks per hour on some of the main roads.) So trying to purchase a vignette when you don’t know which gas stations sell the bloody things, and you don’t speak the language, and they don’t speak English can be quite entertaining. (Thank God the toll sticker came with the car for the Czech Republic, and Poland doesn’t require them except for trucks.) None the less, we got our Slovakian sticker so I guess you could say we were, at least for that particular country – “street legal”. (At least for the next 3 days.)
Monday, June
24, 2019
After breakfast we headed out to visit the Slovak Paradise National Park. So out of the city, through lovely green farmland in the valley, and up into the mountains. Our first stop was the Manor House in Betliar. I stayed in the car while Andy walked around the beautiful building and the lovely grounds. North-west of Rožňava in the valley of the Slaná River, the Manor House is like a fairy tale two-storied house with four corner towers. It is surrounded by a wonderful English park with romantic structures including an artificial cave and waterfall.
the house of my dreamsmy gardenWhere I would go to hide from the kids if they were still little and I could still walk!
And if you were wondering why I stayed in the car, it’s because my arthritis had kicked up and my left foot was swollen and very painful. This had started about 4 days before, but I had chosen to ignore it. But that day, my foot simply would not be ignored! So I babied it all day. I hoped that by the next day it would have calmed down enough for me to visit the wonderful sights in Košice.
After
visiting the Manor House, we proceeded further up into the mountains. Beautiful
scenery and at one point we found a very small burg on the shores of a lake. As
it happened, there was a fine little restaurant situated right there. So of
course we stopped the car and drifted on down to the seating area. Andy made a
very good comment about this charming village and the small restaurant. He stated,
that “if this had been Austria, there wouldn’t have been a single place to park
or a table to be had”. Eastern Slovakia is simply not as filled with tourists
as some of the countries to the west. In fact, we basically stood out like sore
thumbs! But everyone was kind and tried to help us as much as possible. So far
we hadn’t gone hungry and our thirst had been quenched, so no real worries to
be had.
Looking down on the lake and village.cool old bridgejust another scene of life in the country
Basically
that entire day was spent traveling through the Slovakian countryside. And I
must say. I can’t think of a better way to spend a day.
Then
back to our room, a little rest before dinner, then great pizza not far from
our hotel (we drove anyway), and home again to read, relax, and plan for the
next day.
Forgot to mention – saw more storks in their nests that day. Complete with babies! Totally awesome.
Tuesday, June 25, 2019
Well
my foot wasn’t any better the next morning, so I decided to stay in our room
while Andy went exploring around the city. Since I hadn’t seen one hotel ice
machine yet in Central Europe, in order to ice my foot, I took 2 bottles of
canned beer out of our mini-fridge and using a pair of my underwear, I
jury-rigged a “holder” to keep the beer cans up against my foot. Worked like a
charm. So after icing a couple of times and staying off my feet, the swelling
hadn’t really gone down, but I didn’t hurt as badly.
So
when Andy returned from seeing St. Elizabeth’s Cathedral, St. Michael’s Chapel,
University Church (no pictures), The State Theatre of Košice, the Immaculate
Sculpture, and a tour through the city park, we decided it was time to head
back into the country. And not just to any part of the country. We
headed for wine country! To Tokaj wine country that is. Now before you stop
reading because Tokay wine has never been your thing, read on and learn!
St. Elizabeth’s CathedralSt. Michael’s Chapelside view from the gardencovered walk-waythe Immaculate sculpture
The following
information is based on an article from WineEnthusiast magazine and from what
we learned first-hand from one of the owners of the Tokaj Macik Winery.
Tokay is an
outdated and somewhat ambiguous term used, at one time or another, to describe
a number of distinct wine styles. Though the name is not officially used today,
it may be used unofficially and thus is worth explaining in order to provide
clarity and avoid confusion.
The term Tokay
can unofficially refer to one of three distinct wine styles: Slovakian/Hungarian
Tokaji, Alsatian Pinot Gris (previously known as “Tokay d’Alsace” or just
“Tokay”), and a sweet Australian fortified wine today called Topaque.
Tokaji wine comes from the Tokaj region which includes the area around the southeast border of Slovakia and Northern Hungary can range from bone-dry to lusciously sweet. However, it is sweet wines for which the region is best known, and the finest examples are considered some of the world’s greatest dessert wines.
The term Tokay
was at one time used to describe these wines in export markets, perhaps to make
pronunciation easier for non-Slovakian/Hungarian speakers.
There are six grape varieties permitted in Tokaji production, of which the most important is Furmint. The furmint grape is late-ripening and especially prone to botrytis (noble rot), making it ideal for the production of sweet wines. Fully dry or off-dry Tokaji wine is also made from the Furmint variety. The other grapes permitted are Hárslevelű, Sárga Muscotály (better known as Muscat Blanc à Petit Grains or Yellow Muscat), Kövérszőlő, Zéta and Kabar.
The best-known
Tokaji wine is the sweet Tokaji Aszú, produced from botrytis-infected grapes.
The grapes are harvested by hand in a time-consuming and labor-intensive
process, similar to what is done to produce Sauternes. Botrytis-infected grapes
have an incredibly high sugar concentration, and thus the wines retain a high
level of residual sugar after fermentation. Tokaji Aszú is required to have a
minimum of 60 grams of residual sugar per liter.
Other styles of
Tokaji wine include Szamorodni, Late Harvest, and Eszencia. The most
prestigious is Tokaji Eszencia, a lusciously sweet wine with low alcohol and a
huge minimum of 450 grams per liter of residual sugar. It is exceptionally rare
and very expensive.
In Alsace, Pinot Gris was long known as Tokay d’Alsace, or just Tokay. Use of the term was banned in 2007. Alsace Pinot Gris is generally richer and more full-bodied than expressions of the grape elsewhere, and is usually made in a dry style. The pinot gris grape is perhaps better known as pinot grigio, and it is under this name that it has gained huge traction in the mass market, particularly from the Veneto region of Italy.
The Australian
fortified wine known today as Topaque was formerly known as Tokay. Topaque is a
sticky fortified wine produced from the Muscadelle grape, itself once known
locally as Tokay. Hungarian objection to the use of the name Tokay has meant
that its use in the United States was and still is a thing of the past.
So here we are in
wine country, not having any idea where we are, but wanting to sample some
local wine. And as serendipity would have it, we spotted the Tokaj Macik Winery. As we were approaching one of
several buildings that were on site, a whole bus of tourists was just leaving.
In fact the entire winery staff was outside in the shade (about 91 degrees
today) eating the left-overs from the luncheon the winery had provided to its
planned guests. We asked if we could taste the wine and order some lunch. Well
yes we could taste the wine, but the facility was not a restaurant. OK, lets’
just drink some wine then. Then we were asked, would we like the 6, 9, or 15
pour? Well it was about 2:00 and we hadn’t had any lunch, so we opted for the 6
pour package. And these were not short pours. And I must say, I am not a sweet
wine person. But there was not one of these samples that I wouldn’t have gladly
enjoyed at home. OMG – wonderful wine!
So
after our tasting, we decided to take a bottle home with us. (We asked about
shipping, but they don’t ship or sell wine to the US. Mores the pity!)
As
we were leaving, one of the owners asked if we would like to see the wine
cellar. We hesitated because we felt that we had already imposed enough on
these fine people. But they told us the cellar was something that really should
be experienced, so we gladly accepted and down we went.
Now
we had been in underground dwellings before. When we were in Turkey, we
actually were in a small city carved out of tufa that went down 6 floors. And
the same kind of rock (tufa) that was carved out to make the underground and
above ground dwellings in Turkey, was used to carve out this amazing wine
cellar.
Tufa
is a highly porous, sedimentary rock (limestone) composed of calcium carbonate,
CaCO3. It is formed by biological and chemical precipitation of Calcite or
aragonite from cold, supersaturated surface or ground waters. Mostly the
metabolism of algae, bacteria and mosses is important for tufa formation due to
consumption of CO2 (causing CaCO3 supersaturation). Tufa is mostly of brown
color due to impurities (mainly iron oxides). And the amazing thing about tufa
is that before it is exposed to air for too long, it can easily be carved into
any shape you wish. Then after a time, the composition hardens, and it becomes
like concrete.
Now
this tufa cave was like nothing we saw in Turkey. First of all, every surface
was moldy. Not just kinda-sorta moldy, but oozing in the stuff! At one point I
actually touched one of the walls, and it was definitely slimy. But down we
went and what an amazing experience for us. There were different chambers,
narrow ones that contained wine banks. (They really looked like banks, because
the bottles were behind bars.) And the owner explained that some of the “banks”
were for the exclusive use of the owner’s family, but anyone who purchased wine
from them could have his or her own “bank” in which to store their wine. Really
cool. Some of the bottles were terribly old. The owner said that she and her
family had recently opened a 60 year old bottle, and that it had been amazing!
Fresh and full bodied and just delicious.
After
thanking all the staff that was around, we headed back to our car and back to
our hotel. As we were driving along, we realized that 60 years ago, this
wonderful country was in the grip of communism. But people who love wine can
always find a way to beat the system. Of course it helps if you have an
underground cellar of which the communists are not aware.
More
storks, nests, and babies today. They seem to love to build their nests in
small towns, on top of telephone poles, and as visible to the public as
possible. Hurray for that!
pretty much sums it all up
For pictures of the winery, visit Tokaj Macik Winery and spend some time looking at the incredible photographs.
Wednesday,
June 26, 2019 – Eger, Hungary
Said
goodbye to the nice folks in Košice, and headed south towards our next stop –
Eger, Hungary. But, as is our want, we decided to take the back roads. So up
and through the farmlands and forests of southern Slovakia and into northern
Hungary.
As
mentioned before, when entering Slovakia or Hungary, in order to drive on the
main roads, you needed to purchase a vignette (toll ticket). And not speaking
the language can be a bit of a challenge. But at this particular border
crossing, you would have had to be deaf, dumb, and blind not to be able to
figure it out. (Sometimes we get lucky!)
Then
on into Eger and to the Hotel Romantik. This proved to be no problem because
Eger is not a large city. It’s a large village. So once in our room, which
actually had an air-conditioning unit, we sighed with happy relief and counted
ourselves blessed. (Funny how your blessing can turn on you!) So after
unpacking and spending a bit of time at the outside table by our room, we headed
off to dinner. Lovely dinner with live music.
It
turns out the restaurant was booked for the evening, but there was one table
available behind the guitar playing singer, and a little in the alley. Fine
with us. We like music and there was some breeze from the alley, so better and
better. The musician was actually pretty darn good and we enjoyed the breeze
immensely.
After
dinner it was back to our room for some quiet time and then a cool night’
sleep. Now when I say cool, I really mean cold. The air-conditioning unit was
right over the headboard of our bed. (More about the bed later.) So at first it
was delightful to have cool air blowing our hair about. But when it came down
to actually sleeping in a cold draft, it wasn’t so pleasant. So we turned off
the air and the room immediately became stifling. So the air had to come back
on.
Earlier I had tried putting my head at the foot of the bed and that had worked for me. But Andy was too long for the bed. But finally he decided that he would make it work for him too and we both ended up with our horrible bumpy pillows where our feet would normally be found. Which coincidentally helped downplay the great mountain range that constituted the mattress. (And I use the term “mattress” with misgivings.) It was actually the first bad mattress we had experienced on this trip. But eventually after much manipulation of the air-conditioners remote control, we managed to achieve a livable temperature and both drifted off to a rather good nights’ rest. Then up and to breakfast and a new town to explore.
Thursday,
June 27, 2019
After
a nice breakfast, we sat around our cool room until about 10:30. It was just
bloody hot in Elger, and there weren’t all that many things to take in, so we
left with just enough time to get to Eger’s Basilica for the 11:30 organ
concert.
The
Basilica of Eger is also named Saint Michael and Saint John Cathedral. The
building is the offices of the archdiocese of Eger, which means the bishops and
the archbishop do their everyday tasks there. The Basilica of Eger is
considered to be the second largest religious building in Hungary. János László
Pyrker was assigned archbishop of Eger in 1827 and he asked the great architect
of the time, József Hild to make the designs of this magnificent building. The
construction lasted from 1831 to 1836 and the building was consecrated in 1837.
The
construction of the altars, painting of the ceiling frescoes took more time
than the construction of the building and the decoration of the internal space
took 120 years.
The
organ of the cathedral of Eger was built in 1864 by Ludvig Moser from Salzburg,
known to be the greatest in his profession at the time. The organ was rebuilt
and enlarged in 1912. The former mechanical structure was replaced by a
pneumatic system. And it was our great pleasure to be in the tiny (maybe 7
other people) audience for a magnificent performance. I was doing semi OK until
the organist began the toccata (of Bach’s Toccata and Fugue in D minor). At
which point the tears really started to flow. I grew up with this music. The
first concert I can remember ever attending as a very young child (under 5
years of age) was an organ concert with my dad. So it was only natural that the
beauty of the music and the memories would overcome me with emotion. It was
wonderful. I felt so lucky to be alive and able to feel the tremendous emotion
that divine music evokes. Who cares if my mascara smeared? I was in heaven.
After I composed myself, we left the basilica and headed across the street to
visit the Károly Eszterházy University Lyceum
and its beautiful library.
looking up at the organ pipesthe ceilinglooking at the church across the square from the entrance to the Károly Eszterházy University Lyceum
Perhaps
the finest of its type in Central Europe, the Archdiocesan Library is
absolutely stunning. When it
opened in 1793, it was only the second public library in Hungary, and was
planned as a University library. But Empress Maria Theresa put paid to that idea
when she decreed that there would be no University in Eger.
However,
the hard work of stocking the library had already been done. Bishop Eszterházy,
who oversaw the construction of the Lyceum, had wanted a library that would
provide for a four faculty University. To this end he had systematically
collected a large number of scholarly books and manuscripts. By the time he had
finished, the collection numbered 16,000 volumes, but his University was not to
be.
Today the Archdiocesan Library holds 150,000 books including a number of codices (manuscript pages held together by stitching: the earliest form of book, replacing the scrolls and wax tablets of earlier times), 85 incunabula (documents written before the year 1501) and, among other gems, a signed Mozart letter. Yet, it is not so much the manuscripts that demand your attention, tucked away as they are, but the surroundings in which they are kept. Although the library is beautiful to behold on all levels, it is the ceiling fresco that demands your attention. The work of Johann Lukas Kracker, a Viennese artist, and his son-in-law Zach József, depicts the Council of Trent (1545-1563). Kracker did the lion`s share of the work, while it was Zach’s task to render the architectural elements and ensure the optical illusion worked. (The ceiling appears to be domed, but in fact it is flat.)
FYI:
The Council of Trent was an ecumenical council called by Pope Paul III to
breathe life into a church under attack. By the time it closed in 1563, the
council had condemned Protestant heresies and delineated church teachings on
scripture, original sin, justification, the Sacraments, the Eucharist and the
veneration of saints.
The
books in the library are kept on shelving, not just any old shelving, but
rather shelving designed to fit harmoniously into the surroundings. A local
craftsman constructed the shelves without
using any nails, an amazing feat when you consider the weight they had
to carry. Baroque in style, with a gorgeously warm patina that just makes you
want to run up and stroke them, the
shelves stretch up to the trompe i`oeil ceiling. Inset into the shelving are 24
large gilded medallions, each with a head in relief. The depictions are of
individuals that Bishop Eszterházy believed had made important contributions to
Europe’s cultural life and influenced him in his thinking. Interesting note: The books were originally catalogued
with the aesthetic in mind. They were arranged according to size, regardless of
subject matter or content.
After we finished looking at the library, Andy decided to
climb up several flights to see the Astronomical Museum. Turns out he would
have had to buy a ticket on the main floor, which by this time was several
flights below him. And it being about 98 degrees outside, with a humidity of
about the same (or so it seemed), he chose to just come back to the library
where I had stayed patiently waiting for his return.
view from the top great view of the basilica
While I was waiting and the nice young women who was selling
entrance tickets to the library was doing nothing in particular, we started
chatting. I asked her if she attended the University. She said no, that she was
working for a year so that she could start medical school the following year.
After conversing with her, it became apparent that college is as expensive in
Hungary as it is in the USA. And her brother was already attending medical
school in Budapest. So she had to work to help finance her education. (Her
parents could only help so much!)
But what a delightful young woman. She wants to be a
Pediatrician because she loves children and really wants to help her fellow
Hungarians. The problem is, after college doctors in Hungary make less than she
is making as a staff member of the University. So although many young
Hungarians seeking medical degrees are educated in Hungary, they don’t stay in
Hungary. They are almost forced to practice in another country. Very sad
commentary.
We also talked about libraries. In Hungary you have to pay to
take a book out of the library. And the cost is higher than downloading a book
to your Kindle or Nook. But we agreed; there is just nothing like holding a real
book in your hands. But the ways of the world are changing. When Andy returned
I thanked her for the lovely conversation, wished her luck, and we headed on
our merry way.
By this time, it was time for lemonade, lunch, and our everyday treat – gelato. Then we decided to take the very short tourist bus ride and give our hot feet a rest. Then back to the hotel room for some reading, relaxing, emailing, face-booking, and cool air. Tomorrow – Budapest!
Friday, June
28, 2019 – Budapest, Hungary
After
a nice breakfast we retrieved our car from its prison (tucked behind a locked
gate) and headed into the hills again. We could have taken the major highway
into Budapest, but what fun is that! So into the hills, past a ski area, and
through many small towns and villages.
And I am so glad we chose this particular route. Great vistas down into
the valley, and in one small town, three stork nests in a row. And in one of
the nests was a very frustrated mama stork. She was actually jumping up and
down while flapping her wings. She was obviously trying to teach her fledglings
how to fly. And not succeeding very well, at least from our perspective.
Because it was quite apparent even from the ground, that the fledglings were not
going anywhere. You could almost hear them thinking – “she’s trying to kill us.
She wants us to fall to our death”. It would have been wonderful if we could
have stopped and taken a video, but on narrow streets with cars behind you, it
is impossible. But I hope the sight of that poor frustrated mommy will last in
my memory banks for a long time to come. (I also hope that poor mama was
eventually able to kick her kids out of the nest. After all, God gave them
wings for a reason!)
After
finding our way to Budapest it was time to find our way to our B&B. Andy
had Google mapped our route to the exact number of meters from turn to turn. So
after having made only one wrong turn, we ended up at our destination. Now
something you should know about hotels, B&Bs, pensions, etc. in Europe.
There are sometimes no big fancy signs to guide you to the front door of your accommodation.
Often there is just an obscure name written on the door itself. Nothing in the
American hotel or B&B experience prepares you for what you might find (if
you are lucky and very well prepared for) in Europe. The door to a really nice
hotel can (and usually does) look like the door to someone’s flat. And not a fancy
flat either. But once inside, it can be really beautifully appointed. The old
saying “don’t judge a book by its cover” absolutely applies in this situation.
After getting a wonderful orientation from the owner and our luggage etc. arranged to our liking in our room, we headed off to dinner. Then home again to relax and plan our next day.
one block uphill from our B&B
Saturday,
June 29, 2019
After
a nice breakfast on the patio overlooking the tops of close by apartments and
with several church spires in our view, we headed down hill to find the nearest
Hop On Hop Off bus stop. There we purchased a three day pass, and on we
climbed. There were 4 different routes available. A yellow, red, black, and
night time route. We only had time for the yellow and red routes our first day.
But these were the two longest routes and we were able to see most of the
important sights and decide which of the many we wished to visit during the
next three days. This was basically our orientation day. And one of the things
we were able to “catch” while we were touring the city was a very long, loud,
and colorful Hare Krishna parade. Complete with a police escort and as many
gawkers as any parade would hope to attract. Of course this semi-spontaneous
parade didn’t help with the traffic problems, but it was sure fun to watch from
the top deck of our tour bus.
The city was simply packed with pedestrians. And completely jammed with private cars, city buses, tour buses, trams, and taxis. Apparently the underground metro was closed for some reason, so surface traffic was especially bad. Thankfully our car was parked in front of our B&B, so all we had to worry about was not getting hit by one of the crazed drivers while walking about. We even managed a ride on a streetcar after we purchased a three day pass for the metro. We wanted to be completely covered so that we could see everything and go anywhere we wanted to go without burdening the fine people of Budapest with one more tourist behind the wheel of a foreign car. So after a full day of playing tourist, we stopped for a gin and tonic (I finally found a bar that served Tanqueray), a shared pizza, a visit to a very tiny shop for a chocolate bar (one always needs to have chocolate handy), and a gelato cone, we climbed the three blocks up to our street and trundled on home to the cool comfort of our B&B room. A very pleasant first day in Budapest.
Sunday, June
30, 2019 – Happy 75th birthday to me!
After another fine breakfast at the Bellevue B&B, it was time to head out for another day of adventure in Budapest. Since we had purchased a 72 hour metro pass, we began by riding the number 16 bus up to the top of Castle Hill. (Really only about 4 blocks from our residence, but uphill all the way.) After departing the bus, we walked to the edge of the bastions, where we could see for miles and miles over the better part of Pest.
We also were able to get up close and personal with the Turul statue. A Turul is a mythological bird of prey, mostly depicted as a hawk or falcon in Hungarian tradition, and a national symbol of modern Hungary and Transylvania (now part of Romania).
After spending a bit of time looking around the area we took the funicular down to the base of Castle Hill. Connecting the banks of the River Danube and the Buda Castle, the Funicular (Budavari Siklo in Hungarian) has been in service since 1870. The Buda Castle Funicular was admitted to the list of UNESCO World Heritage sites in 1987.
The bottom of Castle Hill is also one of the Hop On Hop Off
stops, so we hopped on for a ride to our next destination – a river cruise.
the Parliament from the “wet” side
After spending an hour cruising the Danube, we decided it was
time for a light lunch at a lovely little café built under an archway. Then
back on the Hop On and after a couple of hours (or so it seemed) we arrived at
the Opera House just in time for a tour.
the entrance staircase used by us common folka bit of the ceilingthe royal staircase
The main concert hall was closed for renovation, but the tour
of the rest of the facility including the stairway used only by royalty was
delightful. The tour concluded with a brief 15 minute concert in which Andy was
asked to dance with the soprano. What fun. I could not get to my camera in
time, even when Andy was asked to stand for the final bow or I would be
displaying his happy grin for all to appreciate. Lovely time.
Then we decided to go get tickets for the evening string orchestra
(small chamber group) performance at St. Stephen’s church. We had a couple of
hours to kill, so we stopped in a shaded café for drinks and an appetizer. The
appetizer was so large that we never did need dinner. So to kill time before
the concert, we had another drink in another café and a lovely birthday dessert
of fresh fruit and ice cream. Then the concert.
The concert was expensive and short. But the venue could not
have been more beautiful and the performers were 1st class. We were
only 4 rows (pews) back from the performers, so we were able to hear and view
the concert with ease. The soprano had a magnificent voice, and appeared to be
really enjoying being in front of an audience. The instrumental musicians were
a bit stoic in appearance, and although they played beautifully, except for the
cellist they all looked like they would rather have been at home watching
television. Perhaps that is how orchestral players all appear in Hungary. They
did once in a while smile at one another, but I felt like they might be holding
the audience in distain. (Wealthy tourists, you know and probably not music
lovers to boot!)
After the concert, it was getting dark and I was a bit apprehensive about finding our way home. I thought we would be the only people out and about. This could not have been further from the scene we strolled through to our bus stop. Deak Square, where we were to catch our bus was alive with families, arm in arm friends, old people, young people, laughing people, dog walkers, concessioners, and the tallest and most illuminated Ferris wheel I think I have ever seen. And because of all the activity the whole place was lit up like it was mid-day. Fantastic. And of course with Andy’s incredible planning, we had only been at the bus stop for 10 seconds when our bus magically appeared and we were whisked to the bus stop at the top of our street. Then straight to our B&B for a little evening reading time. Another wonderful day and absolutely a magnificent way to spend the 75th anniversary of my natal day.
Monday, July
1, 2019
So
the weather report predicted that today would be in the upper 90s. They lied!
It had to be at least in the low hundreds because today was the day when “I
lost my cool”. (And now I personally know from whence cometh that term.) But
let’s go back to the beginning of the day.
We
hopped on the number 16 bus that took us to the Hop On stop in Pest. After
waiting a few minutes, we hopped aboard and rode the bus to the Market Hall.
The
Great Market Hall or Central Market Hall in Budapest is the most
beautiful and largest of all the several market halls in Budapest. This market
hall is not only “Great” in size, but also “Great” in other aspects. The building was
designed and built in 1897. The market offers a large variety of stalls on
three floors.
The entrance gate has a neo-gothic touch. A distinctive architectural feature is the roof which was restored with colorful tiles. The size of the building is 10,000 square meters and is covered by a steel structure. During World War II the market was significantly damaged and remained in deteriorating condition until 1991 when a thorough renovation was undertaken to bring it back to its original splendor. The building re-opened in 1997 to much acclaim. The Great/Central Market Hall continues to be one of the most popular tourist attractions of the city.
Most of the stalls on the ground floor offer produce, meats, pastries, candies, spices, and spirits. Many of them have items that are popular with tourists such as Tokaji wine and absolutely every conceivable kind of salami. The second mezzanine floor has eateries and tourist souvenirs. The basement contains fish mongers, picked vegetables stalls, and a few specialized butcher shops.
Our IGA should have produce like this. Just sayin’fabulous
After visiting
the market and buying some paprika and pine tree honey, we had a wonderful
lunch at an Argentine restaurant. After lunch we decided to visit the Dohány Street Synagogue.This synagogue, also known as the Great Synagogue or Tabakgasse Synagogue, is a beautiful and historical building. It is the largest synagogue in Europe, capable of seating 3,000 people. The building is 246 feet long and 89 feet wide. The style of the synagogue is Moorish but its design also features a mixture of Byzantine, Romantic, and Gothic elements. Two onion domes osit on the twin octagonal towers at 141 feet high. A rose stained-glass window sits over the main entrance.
Similar to basilicas, the building consists of three spacious richly decorated aisles, two balconies and, unusually, an organ. (The first organist was Franz Liszt.) Its ark contains various Torah scrolls taken from other synagogues destroyed during the Holocaust. The Central Synagogue in Manhattan is a near-exact copy of this synagogue.
The synagogue was built between 1854 and 1859 and as stated above is in the Moorish revival style, with the decoration based chiefly on Islamic models from North Africa and medieval Spain (the Alhambra). The synagogue’s Viennese architect, believed that no distinctively Jewish architecture could be identified, and thus chose architectural forms that had been used by oriental ethnic groups that were related to the Israelite people, and in particular the Arabs.
The Dohány Street Synagogue complex consists of the Great Synagogue, the Heroes’ Temple, the graveyard, the Memorial, and the Jewish Museum. Dohány Street itself, a leafy street in the city center, carries strong Holocaust connotations as it constituted the border of the Budapest Ghetto.
in the court yard of the synagogueThis monument has metal leaves with the names of people who lost their lives during the holocaust. Had me in tears.
After our guided
tour in English ended at about 4:00, we decided we had had enough tourist
attractions for the day. And at just about that same time, I learned about
losing your cool. I was so thirsty and so hot, that riding a Hop On on the
upper level, with no protection from the blazing sun, turned me into the
likeness of a demanding, nasty 4 year old having a full blown tantrum. (OK,
maybe not that bad, but I was definitely not my usual, fairly well controlled
adult.) All I wanted was to get off the damn tour bus and find a shady spot to
sit down and drink about 2 quarts of lemonade.
So at our
transfer stop (to the good old number 16 city bus), we replenished liquids, and
I was able to maintain enough composure to catch a bus and act almost like a
normal human being. That is until the very busy bus, filled with standing room
only riders, and driven by a not very attentive bus driver, didn’t wait for
passengers to disembark before he closed the back door on 5 of us riders,
knocking my glasses off into the street during the process. After Andy picked
up my glasses and the other 4 passengers were safely off the bus, I headed up
to the front door and was prepared to rip the bus driver a new “whatever”, when
he decided maybe it was best to drive away from this obviously crazed American
woman. I was not hurt at all, but I was madder than hell. Then back to our room
for another quart or two of water, a lie down, and a brief snooze (for me)
before dinner.
For dinner we once more braved the bus, and went to the top of Castle Hill to find the pizza place I had researched while still at home. We never found the place, (turns out it had closed the previous month) but we shared a wonderful Hungarian style pizza and the best apple strudel I have ever tasted at what would have been the original restaurants close neighbor. Then back on to the “16” and home to our quiet and cool B&B.
Tuesday,
July 2, 2019
After a good
nights’ sleep, we were ready for another day of touring Budapest. The weather
man had predicted slightly lower temperatures, so with that in mind, we headed
to the bus stop. Our aim was the top of Castle Hill and the beautiful Matthias
Church.
Stairs to Castle Hill, should you choose to be so foolish!Happy tourist in her fairy tale realm.turrets and touristsThe beautiful roof of Matthias Church
Matthias Church is one of the finest churches
in Budapest, and one of the most unique churches in Europe. Located atop the
Buda Castle hill, it has been serving the citizens of the immediate area since
1015, its foundation by the first Hungarian king.
Full of surprises, mysteries and treasures,
the church has a breathtaking interior with colors inspired by orientalism and
romantic historicism. Its mystically exotic atmosphere paired with its
Neo-Gothic features differentiates it from any other church.
The church was used as a coronation church by Hungarian kings for centuries, also a mosque for over 150 years by the Ottoman Turks, once owned by Franciscans, Jesuits, now a thriving Catholic church with holy masses, concerts, plenty of weddings, and thousands of tourists. The graceful architecture and stunningly rich, all embracing wall paintings of the majestic building leave one speechless. While the outside of Matthias Church offers the historical beauty of traditional Gothic churches with delicate turrets, the colored tile roofs already give away that this church is not following the usual recipe. Entering inside the church you are welcomed by a wonderful combinations of warm lights, shadows and colors with orange, brown, and golden hewed frescos reaching from floor to ceiling. Your senses are also drawn to the beautiful stain glass windows, far reaching arches, century old wooden pews, and medieval remnants. According to historians a church called Church of Mary stood on the site of the current building founded by Saint Stephen, the first king of Hungary in 1015. The current Roman Catholic Church was founded by King Bela IV after the Mongol invaders left Hungary in 1242 in complete ruins.
After a lovely break for liquid refreshment and a shared Greek salad and warm sandwich, we took the bus down to Széll Kálmán tér (a large square that serves as one of Budapest’s main metro hubs). Here we went down the longest, scariest escalator I have ever been on. The whole time I was on this fast moving people mover I kept thinking I was falling down a rabbit hole. I now know what Alice must have felt. It was absolutely surrealistic. But at the bottom was a nice clean underground stop with fabulous directions that even I could understand. So we hoped aboard, travelled under the Danube River and came up in the closest stop to the beautiful and huge Parliament building.
Parliament Building from the land side.The building is absolutely massive!
After taking a few pictures and deciding that it was once again too hot to spend much time in the sun, we braved the line for ice cream and thus fortified we made our way back onto the underground and back to the Buda side of the Danube. Then we popped onto a streetcar that traveled along the river and after riding it to the end and then back to the “Chain Bridge” stop, where once again, and for the last time, hopped aboard our favorite bus line (16) and arrived back to the comfort of our B&B at about 3:45. Then reading, writing, and enjoying the cool until time to seek dinner. Dinner was lovely. A small café in the neighborhood. Andy had a nice red wine. I had another lemonade. (I’m hooked.) And we shared a delightful prosciutto and fresh mozzarella salad and a bowl of ratatouille. 2 yummy sausages in a paprika rich broth with onions, tomatoes, bell peppers, and cabbage. Crusty bread on the side for soaking up the broth. Perfect
Across the street from the Parliament BuildingA brief rest before leaving for our room.
Tomorrow – Back to Slovakia and a small hotel in the mountains. And a bit of a respite from the rigors of city life. But sorry to leave Budapest after viewing only a few of the many wonderful sights it has to offer and after finally becoming completely confident in the transportation system. Thanks to Andy we had mastered the Hop On Hop Off, underground, streetcar, and bus systems. It should be this easy to get around Seattle!
Wednesday, July 3, 2019 – Banska Stiavnica, Slovakia (actually about 10 klicks away in Hodruša – Hámre)
After paying for
our room in cash and another fine breakfast, Andy got us out of town as if he
had been driving this route for years. The man is amazing! Then out into the
farm lands and hundreds of acres of sunflowers in full bloom.
After crossing
into Slovakia, we purchased our vignette (toll ticket) so that we could travel
by the main highway. (Sometimes it’s really the only realistic option.) Then up
into the mountains and to our country hotel 10 klicks from the small town of Banska
Stiavnica. (We called the town “Steve” for ease of pronunciation.)
Then a relaxing late afternoon of reading on the covered patio of the hotel. Then coffee, appetizer, drinks, and dinner at the hotel’s very fine restaurant. Lights out at about 10:45.
Thursday,
July 4, 2019
After a wonderful breakfast we headed out for our day trip to Banská Štiavnica (Steve). “Steve”lies amid the forests of the Štiavnické Vrchy mountains and is included on the UNESCO World Heritage List.
The former mining
town (population 10,900) is one of the most beautiful hill towns and in
historical terms one of the most interesting towns in Slovakia.
Extraction of precious metals in this area enjoyed a very long history. This region was first mentioned in a document from 1156 as terra banensium or the land of miners. Silver ore prevailed among the mined metals and Banská Štiavnica won the title of “silver town”.
Banská Štiavnica progressively became the biggest mining center in the Habsburg Monarchy in the 18th century. In the period between 1790 and 1863 the mountains surrounding the town yielded 490 metric tons of silver and 11 tons of gold. Mining schools and science also flourished in the town. In 1735, the oldest mining school in the Kingdom of Hungary was founded here, which was promoted to the Banská Akadémia (Mining Academy) in 1762, the first university of its kind in the world. In 1846 it joined the Forest Academy founded in 1808 to form one common entity. Prosperity and fame returned to the town for some time and by the end of the 18th century Banská Štiavnica was the third biggest town of the Kingdom of Hungary with 23 thousand inhabitants.
But the
development of the town reached the deadlock at the end of the 19th
century when mining fell into decay. This trend also continued in the 20th
century. The last mine in “Steve” was closed down in 2001.
I should mention
that I was not prepared for finding the sights “Steve” had to offer this
morning. I knew what sights I wished to visit, but had no idea where they were
located. So after driving through the town, we decided to head back to our
hotel, 25 minutes away, to do some computer research.
We first thought
we would visit a local zoo/game farm. But when we got there, it looked a little
too kiddy tourist for my likes. So we proceeded in the other direction back towards
“Steve”.
Upon our 2nd
visit, we found a parking lot and proceeded downhill into the main and oldest
part of town. As with every hill town, no streets are level. You are either
proceeding up or down hill. Ugh! But when we came to the main street, we found
our first destination – the Kammerhof Mining Museum. The Kammerhof is the largest complex of buildings in the
historical center. The exhibition presents the history of Slovak mining,
particularly the technical collections, archaeological findings, moving models
of mining equipment, the history of book printing in Banská Štiavnica, the
first technical university in the world, the Mining Academy and its professors,
portraits of Chamber earls and more. An absolutely fabulous museum. After
spending some quality time in the museum, we decided to have lunch. Lovely food
and a wonderful dark beer for Andy.
On our way to visit the main square, we heard organ music coming out of a church. Fancy that! It was the Church of St. Catherine of Alexandria. Right off of the main square (St. Trinity). And there on a poster was an advertisement for an organ concert that very evening. So you bet we planned to make the concert our evening’s entertainment.
The church of St. Catherine of AlexandriaA real church with hymn numbers and everything.St. Trinity Squarea little bent, but still OKand yet another lemonade
After
the excitement of visiting the church and learning about the Bach concert, we
needed ice cream, so of course we each had to have a sorbet cone. Double scoop
for me! Yum.
Then
back in the car for another go at seeing both the old and the new castles, then
back to our room for some rest and relaxation before the concert.
All and all, we agreed that of the 4 countries we visited on this trip, Slovakia was the most beautiful and the people the most generous and seemingly satisfied with their world. Of course there are always exceptions, but we felt most at home among the Slovakians.
Friday, July
5, 2019 – Brno, Czech Republic
After saying good
bye to the fine people at Hotel Daro, we began our drive out of Slovakia and
back into the Czech Republic. Beautiful roads through the rolling hills and
plains of Slovakia. I must say again that Central Europe is absolutely beautiful.
Everything is still green. No brown hills or desert like areas. Just lush
vegetation. And like other countries we have visited, the floor of the forests
appear to be swept clean. There is very little underbrush, and deciduous trees
out-number the evergreens. So when you look into a forest from your car, you
can see the tree trunks and far back into the trees. It’s actually very lovely.
And I must say, I
am going to miss Slovakia. As I’ve stated above, there is a sort of respectful
peace about the Slovakians. They appear happy and well adjusted, even though we
have seen what might be considered huge apartment buildings (built during the
Soviet era) where it appears that the people are living at just above the
poverty level. Regardless, the adults are very attentive to their children and
appear to be making the best of a rough life.
After crossing
the border into The Czech Republic, we stopped for lunch at a ski resort
restaurant. Best pasta I’ve had in years. Small pieces of fried chicken and
prosciutto in a very creamy cheese sauce with hollow tube al dente pasta. Andy
and I shared the dish, and it was plenty. Then back in the car and to our hotel
on the outskirts of Brno.
We arrived early
for our check in and the poor woman who greeted us did not speak English. But
she had a very smart phone. She would speak into the phone and it would translate
her words into English. Then we would answer in English and translate for her
into Czech. Between the phone and hand gestures, we got situated into our room.
At 3:00 the official receptionist asked to see our passports. She was very
concerned because the stamps from our entry into the Czech Republic were so
faint as to be almost unreadable. Apparently she had been told to record some
kind of number off that stamp to prove that we had entered her country legally.
She must have been misinformed, because this was the first time anyone cared a
hoot whether or not we had arrived by airplane or horse drawn cart! Plus, we
could be touring around Europe and have arrived in Frankfurt for all it
mattered. Finally she seemed OK when we offered to pay for our 3 night stay
upfront. She happily rung up our card and seemed content that we weren’t out to
leave without paying our bill. In her defense, this was not a town visited by
most foreign tourists. But people are kind everywhere. Number one lesson
learned by traveling around the world. That even if you can’t converse
properly, you somehow just are made to feel that your hosts simply want your
stay to be a pleasant experience.
After relaxing in
our room we decided we should get some dinner. Because today was a national
holiday both in Slovakia and the Czech Republic, we had seen many businesses,
including supper markets closed. Today was St. Cyril and Methodius day*. We
found a beer garden close by with an attached, but independent grill. We shared
a gyros and souvlaky plate. Then back to our hotel to find that all the parking
places were taken. Grrrr. But the English speaking receptionist, after
consulting with the owner, informed us that we could park in the church parking
lot across the street. Then time to read and lights out.
*Saints Cyril and Methodius (826–869 & 815–885 respectively were two Greek brothers who were Byzantine Christian theologians and missionaries. Through their work they influenced the cultural development of all Slavs, for which they received the title “Apostles to the Slavs“.Both Slovakia and the Czech Republic celebrate these two brothers with a national holiday.
BTW – today’s temperature was perfect.
Saturday,
July 6, 2019
Today was also a
national holiday, at least in the Czech Republic. Jan Hus day. Jan Hus, born in Bohemia in 1369, was a priest,
reformer, and master at Charles University in Prague.
Hus
is seen as a key predecessor to the Protestant movement of the sixteenth
century. He was an advocate of church reforms, such as using Czech as the
liturgical language, aligning the church’s practices with teachings contained
in the Bible, limiting the power of the church to spiritual matters, and
stopping the sale of indulgences. His
followers became known as Hussites.
He
was excommunicated from the Catholic Church in 1412 for insubordination.
After
being promised safe passage to attend a meeting that was intended to discuss
the differences in the church, Hus was detained and put on trial. Refusing to
give up his beliefs, he was found guilty of heresy against the doctrines of the
Catholic Church and was burned at the stake on July 6, 1415.
During
his execution, it is said that the pages from the banned Wycliffe bible were
used as kindling, and one of Jan’s last acts was to proclaim that a man would
rise up in 100 years whose teachings could not be suppressed. Almost exactly a
century later in 1517, Martin Luther nailed his list of 95 issues against the
Roman Catholic Church onto the church door at Wittenburg.
Between
1420 and 1431, the Hussite forces defeated five consecutive papal crusades
against followers of Hus. Their defense and rebellion against Roman Catholics
became known as the Hussite Wars.
So
being not quite sure what businesses and tourist attractions were open today,
we decided to travel to South Moravia and the villages of Lednice and Valtice.
Our first stop was to tour the Lednice Castle. In 1996 it was inscribed on the UNESCO World Heritage list (together with the twin manor of Valtice) as “an exceptional example of the designed landscape that evolved in the Enlightenment Eand afterwards under the care of a single family.” It contains a palace and the largest park in the country, which covers 77 square miles.
Since Lednice first passed into the hands of the House of Liechtenstein in the mid-13th century, its fortunes had been tied inseparably to those of that noble family. The palace of Lednice began its life as a Renaissance villa and in the 17th century it became a summer residence of the ruling Princess of Liechtenstein. The estate house proclaimed rural luxury on the grandest scale. In 1846–58 it was extensively rebuilt in a Neo-Gothic Nstyle.
The surrounding park is laid out in an English garden style and contains a range of romantic follies including the artificial ruins of a medieval castle on the bank of the Thaya/Dyje River (1801) and a solitary sixty-meter minaret, reputedly the tallest outside the Muslim world at the time of its construction (1797–1804). After our tour of the castle we decided the only word to describe the structure both outside and inside was opulent. Absolutely beautiful works too.
Lednice castle as seen from the gardenfrom a side gardenanother view of the castle with its attached huge green houseinside the green houseand inside the castleDinners ready. Please take your seats.
Then after a
simple lunch provided by our hotel (packaged sandwich) we headed for the
Valtice Chateau some 7 klicks away. By now it’s really hot again. (mid 90s)
So before touring the chateau, we stopped for a long, tall lemonade. Which didn’t taste of lemon at all. But the waiter had said something about grapes, and because it was cold and went down just fine, we enjoyed the heck out of our drinks. The only thing that marred the whole experience was that I thought I had lost my purse. Andy graciously offered to go back to the car and see if I had left it there. Thank God that’s exactly what I had done, so disaster averted. (I tell you true. I do not do well when it is super hot outside. All I could think of was getting something cold to drink. After I calmed down and my thirst was temporarily quenched, we headed up to take a tour of the chateau/castle.
Valtice
Castle is one of the most impressive baroque residences of Central Europe.
Originally a Gothic castle founded in the 12th century, from 1530 Valtice
became the place of residence for the princely family of Liechtenstein. A
number of important architects of the 17th and 18th centuries provided its
current shape. Again after touring this amazing structure, we were blown away
by how the family Liechtenstein lived their everyday existence.
Entrance hall at the summer residence (chateau) in Valtice Amazing staircasebeautiful deskindoor plumbing – looks a little fishy to menice ceilingeven the floor is beautifuland another gorgeous stirwayI want one!And I want to go through this door!
By
now it’s time to head for the barn. But first some dinner. So we drove around
our little suburb of Brno and found an Indian restaurant with a parking place
right next to the restaurant.
Now
that may sound like the norm, but it is absolutely the farthest thing from
normal. Parking places are very hard to find. We take them for granted in
America, but in Europe only the more affluent have cars, and then most of the time
they too have to find parking somewhere other than in front of their residence.
(Something to do with horses and carriages and dwellings that were built before
motor cars came along.)
Anyway, we parked, we ate, and we drove to our hotel to happily find that there was still one available place to park. Then for me, write up todays’ adventure, and for Andy to figure out how to turn on the air conditioner and settle down with his book. Tough times I tell you!
Sunday, July
7, 2019
After a breakfast served in our room that was large enough for 4 hungry adults, we headed north of Brno for a tour of the Moravian Karst which includes the Punkva Caves and the incredible Machocha Abyss, a sinkhole which is about 400 feet deep. Macocha Abyss (named in the 17th century) was created by the collapse of the ceiling in one of the larger caves. So after happily wandering through the different “rooms” in the cave, all of a sudden we were in the open air looking up at rock walls and greenery. The experience was breathtaking and absolutely unique.
steepest tram we’ve ever been onYikes!fabulous formationslike I said…….down the stairs to the “abyss”filled with waterSunlight at last, but not for long. Back into the dark everyone!
After walking what seemed like miles, going up stairs, down
stairs, up ramps, down ramps, and everything in-between, we boarded small
shallow boats for a ride on the Punkva River.
The River Punkva runs
underground through the caves and it was quite exciting to follow its course.
While underground, it also contains two small lakes. The river itself was
formed by several local brooks which all managed to come together to form this
splendid underground waterway. BTW, Macocha Abyss is the only place where the river
sees daylight in this vast (30 kilometers of underground passages) system of
caves. All and all a splendid way to spend a day.
Even the ride from
and to our hotel through the hills north of Brno was delightful. Forested
areas, farm land, small quaint villages, and pretty good roads. We got a little
lost on our way home in one of the towns, but Andy with his built in
navigational system easily figured it out. After a dinner of passable pizza, a
really not very good Caesar salad, and beer (really good), we topped off the
day with another ice cream cone and then back to our room to read, write, and
plan for our next days’ trip back to Prague and the return of our rental car. We
will sleep well tonight!
(Per Wikipedia, the Punkva River, after leaving the caves, flows through the valley and several fish ponds (i.e. above-ground), before entering the Svitava River in Blansko township. It does indeed originate underground, and flows underground exclusively upstream of the the Caves. AC)
Monday, July
8, 2019
After another huge breakfast delivered to our
room, we packed the car and headed back to Prague. Andy had Google mapped the
route to our hotel again down to the last meter. So after having made only one
wrong turn, we found our hotel. The young man on duty was very helpful. We were
about 2½ hours early for our 2:00 check in, but he offered to keep our bags
while we returned our car. He also booked our taxi ride to the airport for the
next morning without batting an eye.
Andy had also plotted the route to our rental
car drop off site. So with directions in mind, he effortlessly found the rental
office and within 10 minutes we had turned in the car, no further charges
required, and were headed to the metro station.
Along the way we stopped for lunch and then
using transportation information found in our Rick Steves Travel guide to
Eastern Europe, we purchased a 90 minute metro/bus/streetcar ticket and headed
down the rabbit hole again to the yellow line platform. Again, when I say down
the rabbit hole, I mean down the steepest, longest escalator ride imaginable to
board the underground. How steep is the escalator you might ask. Well that I
don’t know. But I can tell you this much. When you are riding up an escalator,
the people coming down look like they are bent backwards at about a 45 degree
angle. No kidding. It’s truly weird and actually kind of spooky. But boy can
the transportation system in Prague move people around quickly and efficiently.
Again, people in Seattle should be so lucky!
It’s just like the signage along the roads.
You would have to be deaf, dumb, and blind not to be able to reach your
destination. That’s of course true if you know where you are going. Sometimes
you just have to use your directional field guide (the sun), and give it your
best effort. Because even having an Atlas, most of the tiny villages are
nowhere to be seen on any map. But with Andy’s natural ability, and my
sometimes helpful suggestions, we seem to do OK.
So I am sitting in our beautiful room in the
newer part of Prague. Andy has gone for a short walk in a nearby park, and I
have spent the last hour trying to get us checked in for our flight home.
Apparently American Airlines/Finnair does things a bit different in the “check
in/seat assignment” category. Hopefully we will be able to check in at the
airport and get seats assigned that are at least on the same wing! Tomorrow
will tell. For now, I’m going to kick back with my Ngaio Marsh book (Nook book
that is) and contemplate nothing of more relevance than where we should go on
our next overseas trip. Andy’s thinking Ireland and Iceland. I’m thinking
that’s just fine with me. Do they speak English?
Tuesday,
July 9, 2019 – Home again, home again, jiggity jig!
After our
last continental breakfast, it was time to check out of our hotel and get ready
to meet in the lobby for our taxi ride to the airport. I hadn’t slept as well
as I would have liked because I was unable to perform an airport check-in from
our hotel room. So I had a few trepidations about actually being able to have
seats together (if at all) upon check-in at the airport. Should not have
worried in the least. Seats already assigned and adjacent.
We
made the first leg of our journey home, on time and all in one piece. Our
connecting flight was on-time and so were we. So that also worked out well.
When we arrived at SeaTac we had to wait for an extra 20 minutes for our second
piece of luggage. Actually it had already arrived but was off to the side.
Luckily Andy spotted it and claimed it or we might still be at the baggage
claim carrousel. We didn’t learn until we arrived home and opened our bag that
TSA had for whatever reason had to open our bag and we think that is why it was
off to the side rather than having a good time going round and round with all
the other luggage.
Anyway,
after claiming our car we made it home in the wee small hours of the morning.
(That would be Wednesday morning the 10th.)
All
in all a most marvelous trip. And both of us were very glad for the chance to
have experienced such a grand adventure. At the same time we were equally
overjoyed to be home with our kitties, our dear friends, our new baby great
grandson, our own bathroom, and especially our own pillows. There really is no
place like home. (But I do miss the fresh lemonade and the ever present gelato,
frozen yogurt, and ice cream concessions.)