When its rhubarb season, I practically come unhinged. Because I love rhubarb. And this year is absolutely no exception. For years I contented myself with rhubarb pie. Which reminds me, I have never posted my recipe for rhubarb pie! (What planet has my mind been visiting that I have allowed this to happen?) I assure you, within a few days you will have my recipe. (Good grief Patti!)
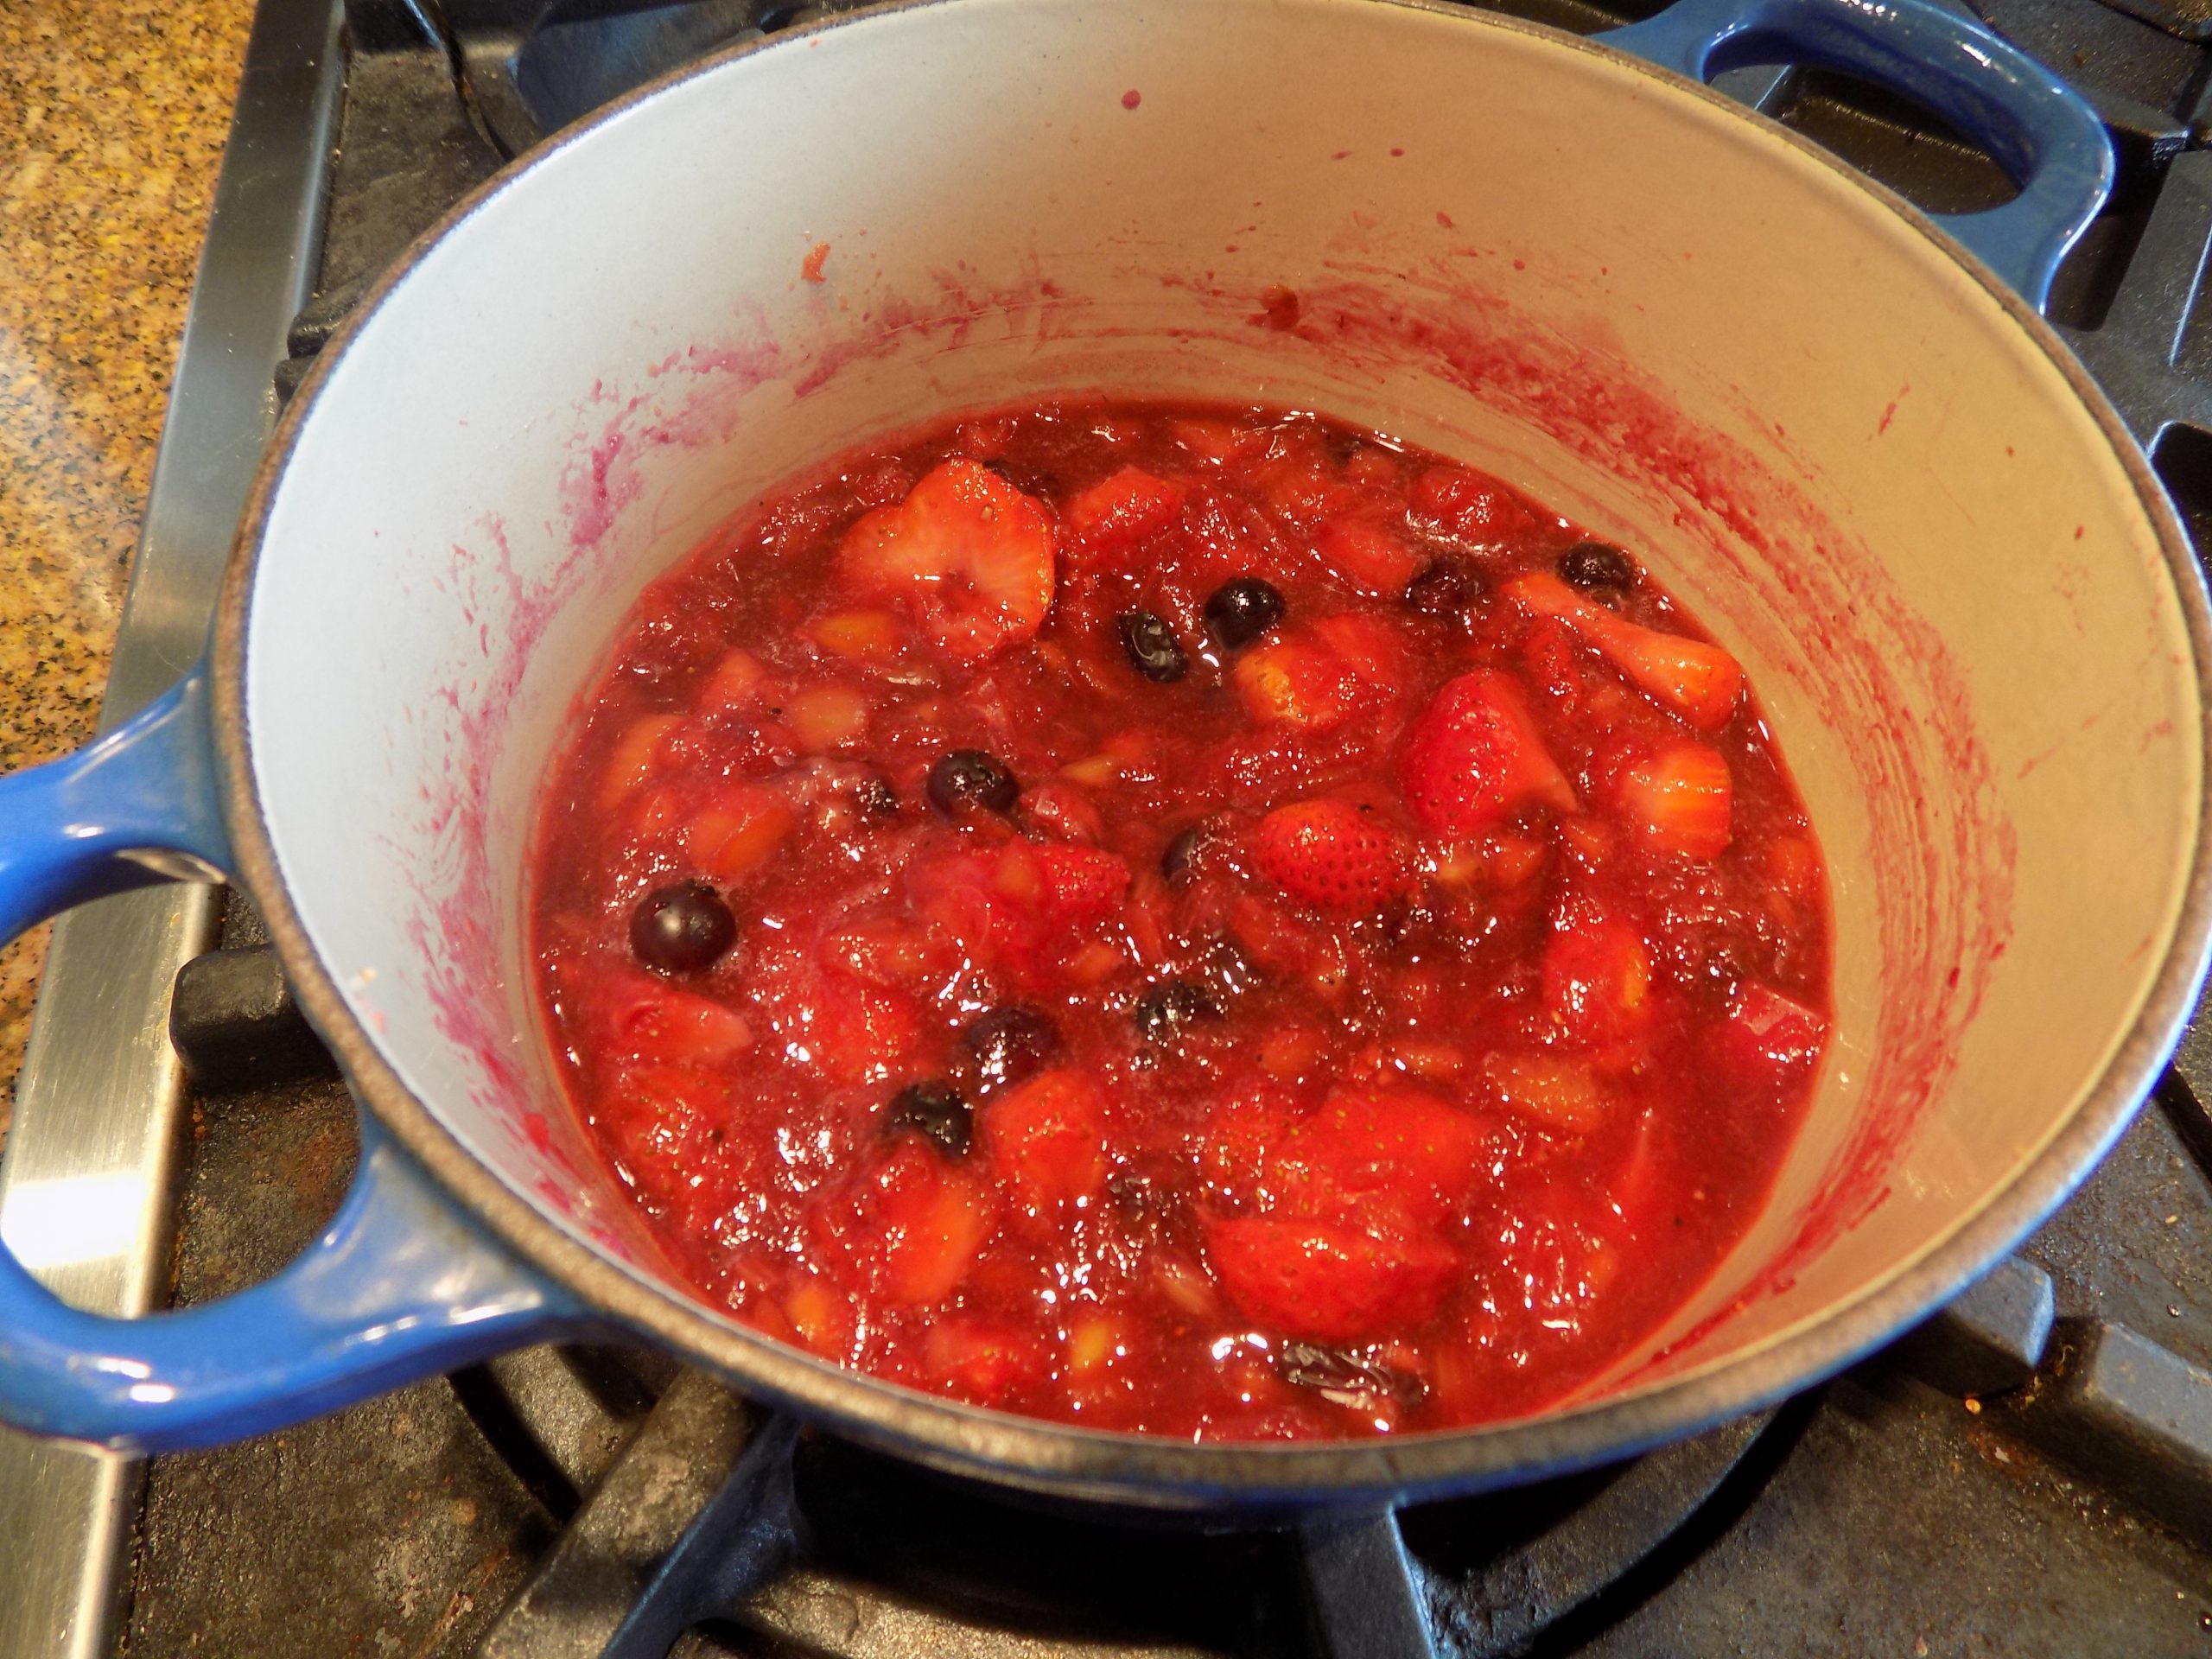
Anyway, I remembered that I had a small amount of finely chopped rhubarb leftover from another recipe as I prepared the overnight sourdough sponge for waffles. And while my stand mixer was working away, I though how nice it would be to have a fruit compote to top the waffles I was baking the next morning. Thus, this recipe was conceived. But I only had about ¾ of a cup of rhubarb. And fairly finally chopped rhubarb to boot. So, what other fruit did I have on hand to add to the mix? Well, it just so happened that I had some fresh strawberries and blueberries in the refrigerator. Perfect. Add a bit of brown sugar, a pinch of salt, and a wee dram of bourbon to add another depth of flavor, and as the old saying goes “Bob’s your uncle”!
And I must say, this compote was absolutely perfect on the waffles. Heated gently just before serving and further doctored with a small dollop of whipped cream, the combination of light as a feather sourdough waffles, tangy compote, and whipped cream was unbeatable. (Sourdough Waffle recipe to follow shortly.)
This compote would also have been perfect on shortcake, pound cake (if you need a great pound cake recipe, give my recipe for Cream Cheese Pound Cake a try), or vanilla ice cream. And yes, I will be making more of this in the near future. Crazy easy to make and super delicious.
As always, play with your food. You never know what amazing new dish you might come up with.
Peace and love to all.
¾ c. finely chopped rhubarb
½ c. chopped strawberries
¼ c. blueberries
3 T. brown sugar
pinch kosher salt
2 tsp. bourbon
Combine chopped rhubarb, strawberries, and blueberries in a heavy saucepan. Add the brown sugar and salt; stir to coat evenly. Let sit until fruit has released its juices, about 15 minutes.
Bring fruit mixture to a light boil over medium heat. Reduce heat to medium-low and simmer, stirring occasionally, until fruit is soft and mixture has started to thicken, about 5 minutes.
Remove from heat, stir in bourbon, and let cool, about 30 minutes. (Mixture should thicken a bit more as it cools.)
Place in a jar or storage container and refrigerate for up to a week. Great served on Sourdough Waffles or Pancakes. (Recipe to follow.)
I found this wonderful recipe for rhubarb freezer jam on the vanillaandbean.com web site. And oh my – this jam is truly delicious. And easy to make. Just a few simple ingredients, a bit of time, and the next thing you know, your husband is enjoying a peanut butter and jam sandwich. With a happy grin on his face, I might add! At least that’s what happened at my house the day after I made this jam.
Before I go on, I want to spend a couple of minutes talking about rhubarb. Because rhubarb is one of my favorite foods. In fact, it actually may be my favorite vegetable. But it does have its limitations. It’s not really good eaten raw. It depends on sugar to make it palatable, and it’s only on the market for a short time each year. So, perhaps what makes it so special, is its unavailability most of the time. And yes, of course, you can freeze raw chunks of rhubarb for later use. But then you must remember it is in your freezer. (A definite limiting factor for me these days. Of course, I will still have to remember that I have jam in the freezer. But somehow, that is different. I won’t have to do anything with the jam after I take it out of the freezer. Except of course, enjoy eating it! And therein lies the difference!)
So, if you too like to build your own jam, I would suggest you prepare a batch or two of this lovely concoction at your earliest convenience. And now is the time. Rhubarb is being sold at farmer’s markets and grocery stores even as I write. But only for a limited time. So, don’t wait! Hie thee out of your comfy chair, strap yourself in a vehicular contraption, mask up, and visit your favorite purveyor of fruits and vegetables. Then hurry on home and prepare a treat everyone in your home will enjoy.
As always, enjoy your time in the kitchen. Take pride in all the wonderful dishes you prepare for yourself and your family. And share the bounty. I love it when our dear friends next door drop off a few cookies or some other treat they wish to share with us. And I know they are also pleased when we take a little “something” over to them. Makes for a nice change to each of our regular routines. And it’s just plain fun to share. (Something we all should have learned in kindergarten!)
So, just as a reminder, I have taken the liberty of reminding us all of the first 7 things the author Robert Fulghum felt everyone should have learned and embraced in kindergarten:
1. Share everything
2. Play fair
3. Don’t hit people
4. Put things back where you found them
5. Clean up your own mess
6. Don’t take things that aren’t yours
7. Say you’re sorry when you hurt somebody.
Peace and love to all.
6 c. ½ – 1-inch pieces of fresh rhubarb
1 T. orange zest
⅓ c. fresh orange juice
1¾ c. cane sugar
1 tsp. vanilla paste or vanilla extract or the seeds of half a vanilla bean
2-3 freezer containers
Stir the rhubarb, orange zest, orange juice, and sugar together in a large, heavy pot. (I use a long handled wooden spoon.) Let sit for about 20 minutes or until the fruit starts to release its juices.
Bring the mixture to a simmer over medium-low heat. Once simmering, increase the heat to bring the mixture to a boil, stirring as needed to prevent sticking to the bottom of the pot. The mixture will boil vigorously at first, but as it cooks down, it will boil more slowly.
Continue cooking, stirring and adjusting the heat as needed to avoid splatters, while allowing the mixture to continue bubbling.
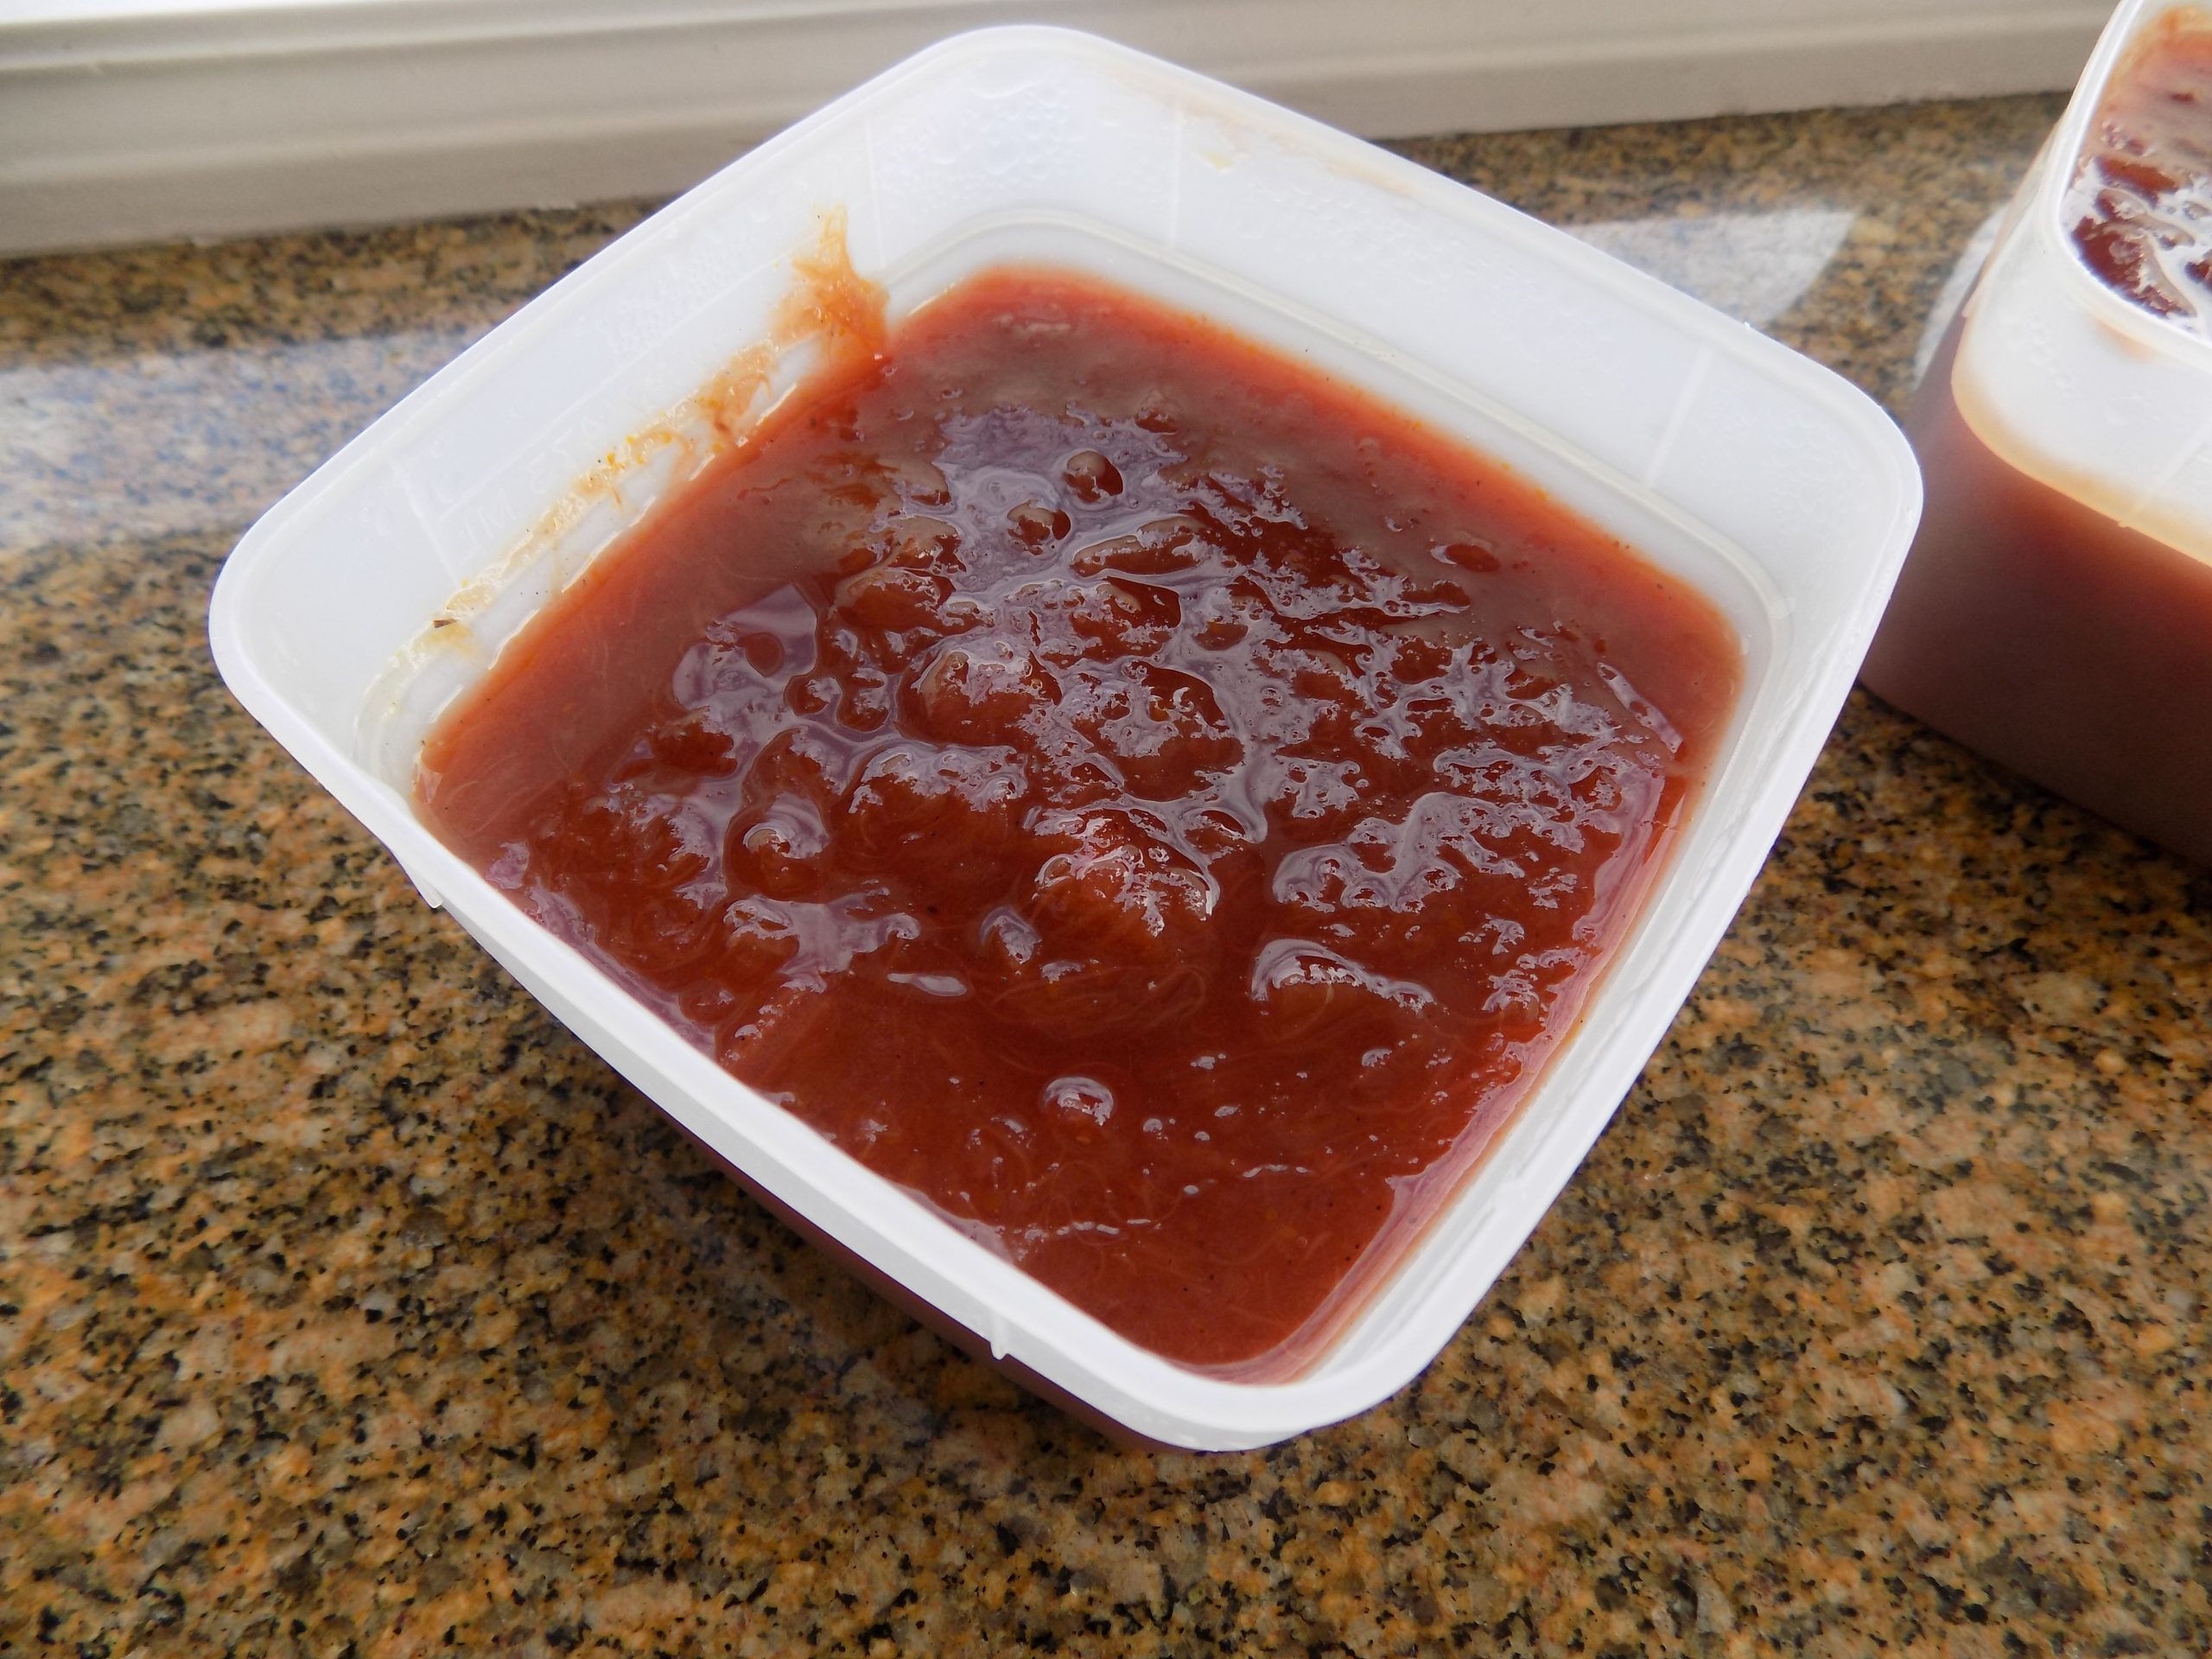
Cook until the jam reaches about 220 degrees. This will take about 18-20 minutes. (You can use either a standard candy thermometer or an instant-read thermometer to take the jams temperature. But be advised. If you use an instant read thermometer, be sure it is OK up to 220-degrees. Mine is good up to 250-degrees, but not all instant-read thermometers are the same.) When the jam reaches temperature, remove from heat and stir in the vanilla paste.
Allow the mixture to cool for about 15 minutes before transferring to containers. Do not fill the containers to the top. Leave at least a ½-inch space at the top of the containers so the jam has room to expand as it freezes. Add the lid and allow the jam to cool to room temperature. Chill in the fridge overnight to set, then transfer to the freezer for longer storage.
Once out of the freezer, store in the refrigerator.
I know, I’m lazy. And yes, the older I get, the lazier I become. So, when I have already prepared a main dish and a side, I have little patience for fussing with a vegetable. But one of the easiest and almost foolproof ways to bring out the very best qualities in most any veggie is to roast it in the oven. (Or grill it, but that takes way too much time when I am tired or in a hurry!) So, a few evenings back, I decided to roast some lovely sugar snap peas for our dinner. And they were delicious. And had been ever so easy to prepare.
During almost any veggies brief stay in a hot oven, something miraculous happens. Any inherent bitterness gets mellowed, while at the same time, the natural sugars in the vegetable caramelize. Leaving the lucky person who gets to eat these delectable morsels very much pleased with themselves for A) eating a veggie & B) enjoying a veggie with very few additional calories or carbohydrates attached. I mean really – how fantastic is that!?!? And bonus points for snow peas because they are relatively rich in fiber. And we all need lots of fiber in our diet. (Especially those of us in our “golden” years! Golden years here defined as: between retirement and the beginning of age-imposed physical, emotional, and cognitive limitations.)
So, although this is a basic and very simple recipe to prepare, it tastes like you worked very hard to produce this splendid addition to your already well thought out menu. And please know, this recipe can easily be modified. Like a little heat – add a light sprinkle of crushed red pepper flakes. Want some onion flavor too – add a bit of granulated garlic. Like lemon? Add some lemon pepper. Use your imagination.
But please remember, this recipe is meant to be quick and easy to prepare. You need not roast garlic for this dish. Or caramelize sweet onions. Or even add freshly chopped parsley. This is a slam dunk veggie dish.
As always, take time over preparing your menu. Think about what flavors compliment each other. And always plan with diversity in mind. And try to use whatever you have on hand that should be eaten before it is no longer edible. And has to be thrown away.
In my case, many delightful dishes started with an ingredient or two that yelled at me when I opened the refrigerator door. Fortunately, I usually listen because using ignored and aging ingredients not only saves us money, but almost always results in a new culinary discovery. And isn’t that grand? No waste, saves money, and a great dish to boot! My idea of culinary perfection. Well, that and a really moist and delicious chocolate cake. (BTW, my Mocha Chocolate Cake with Sour Cream Frosting fits that description.) Just saying!
Peace and love to all.
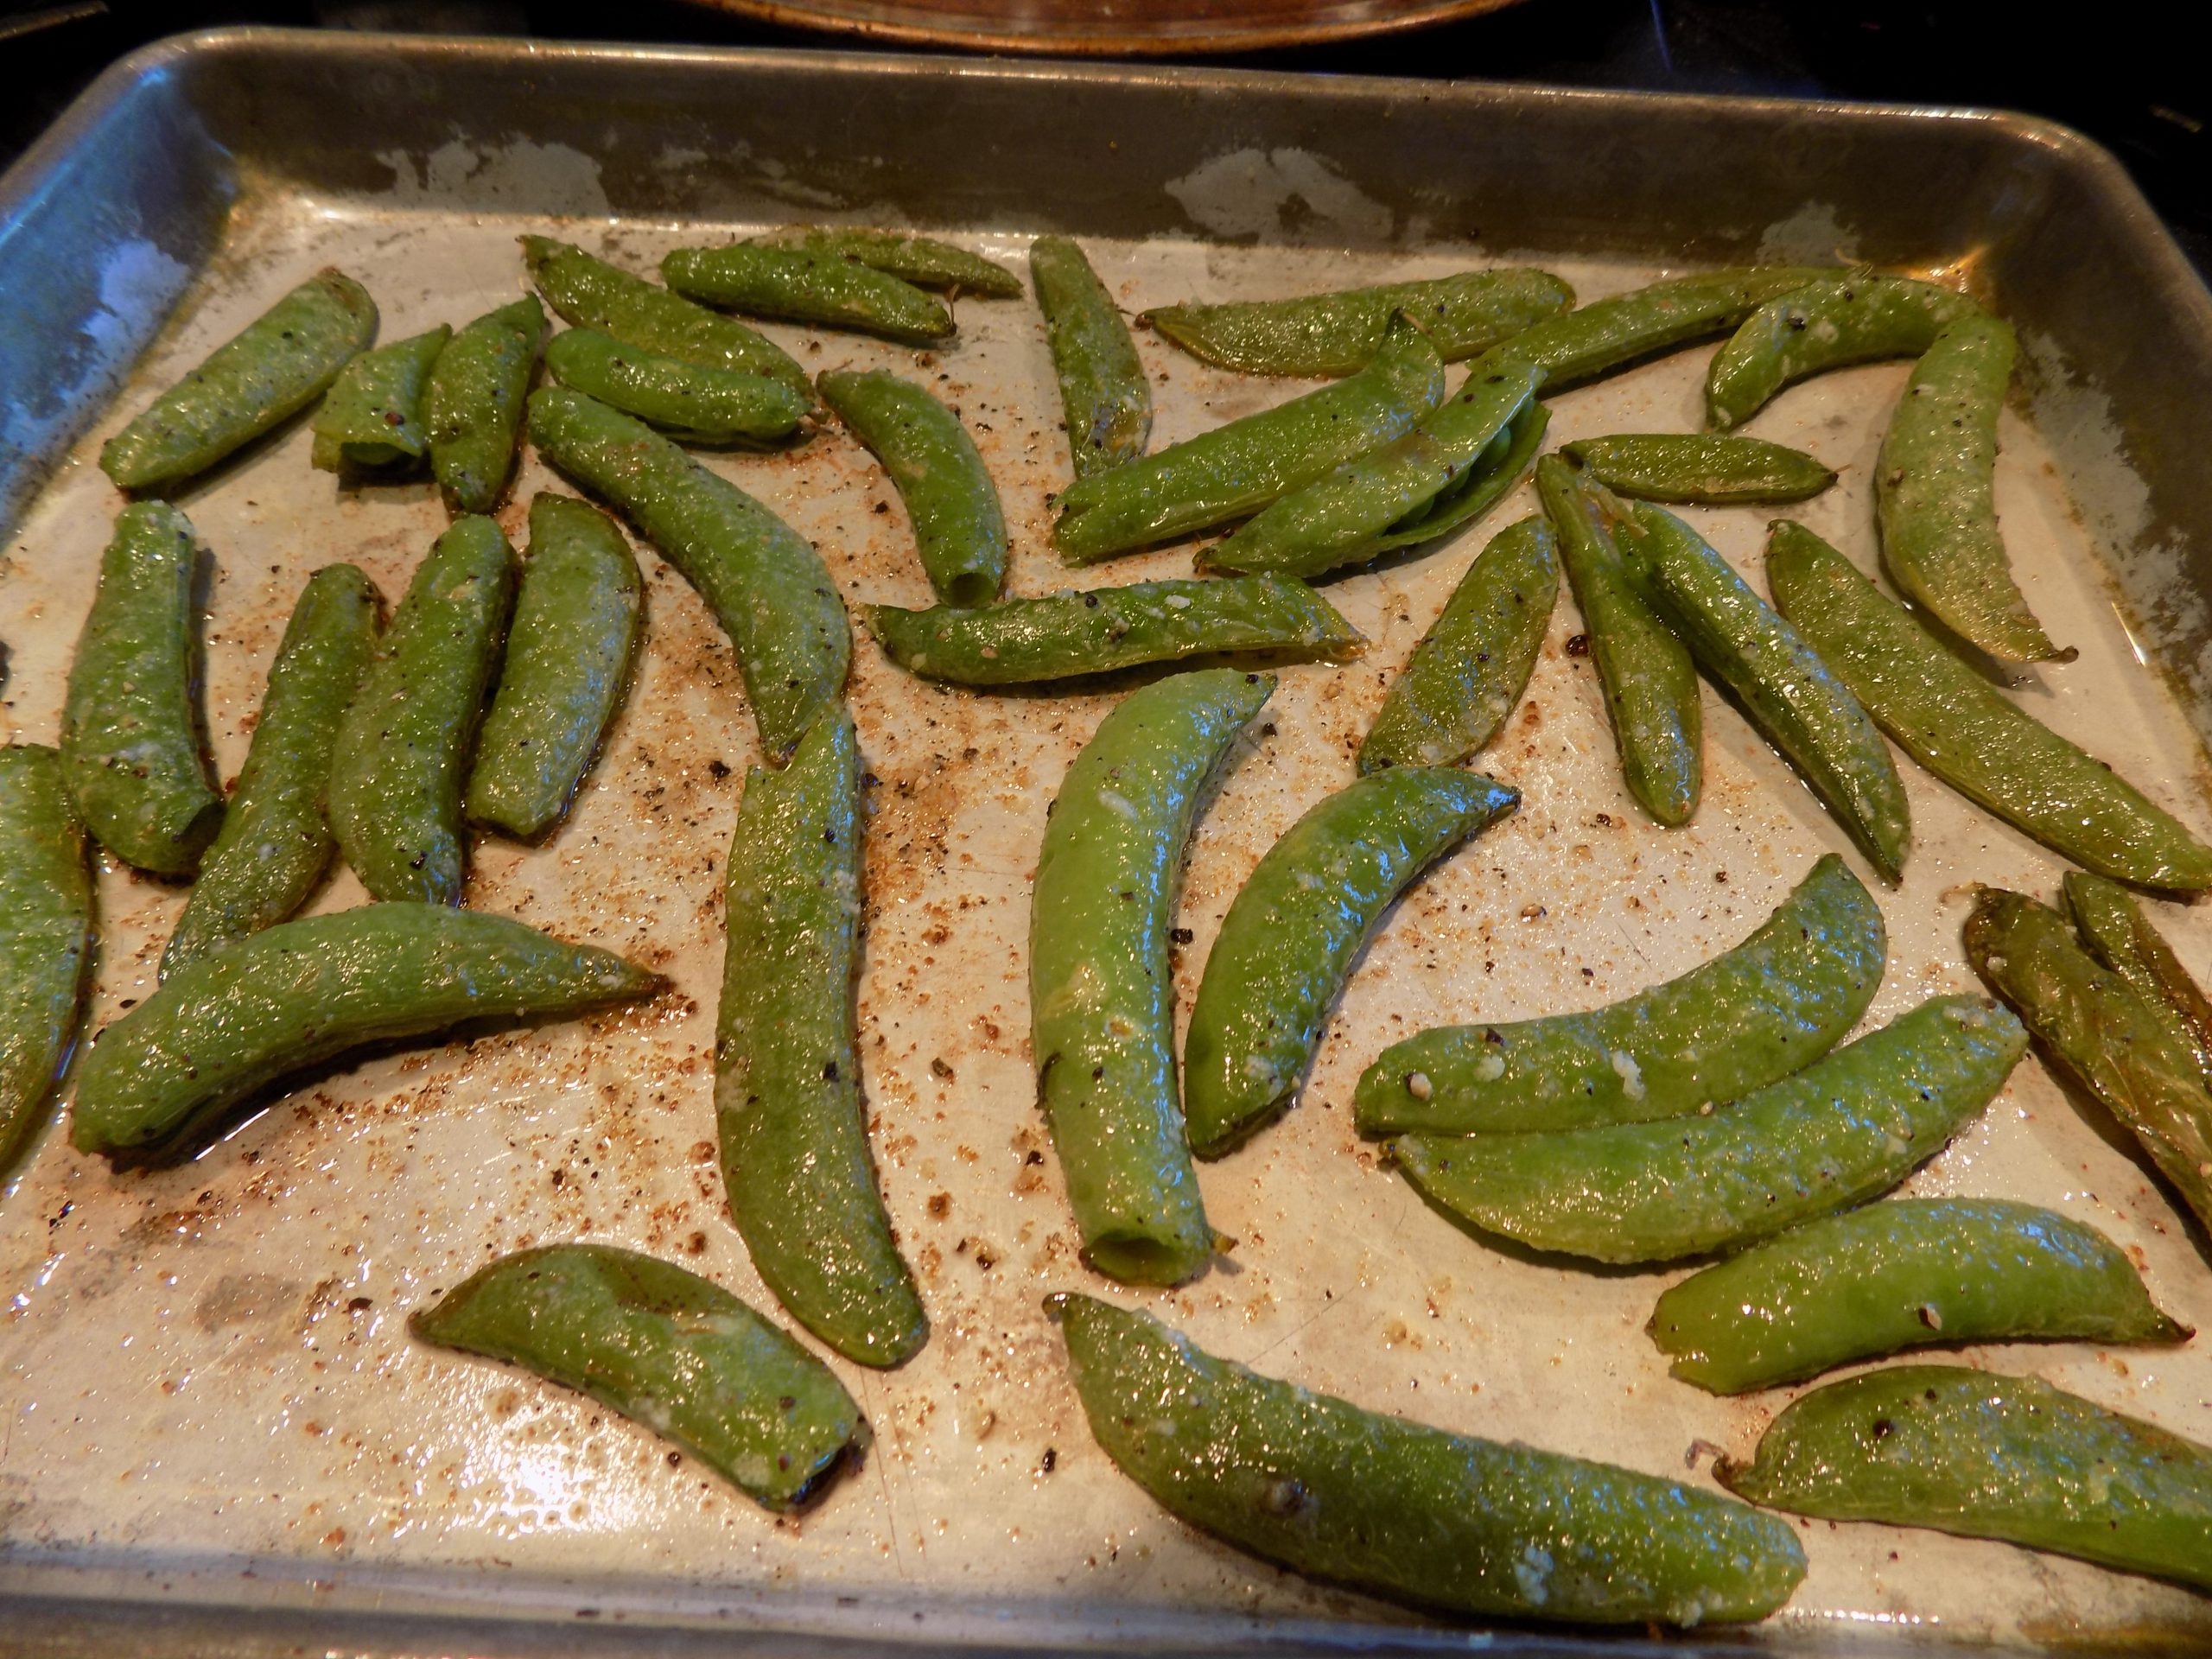
½ – 1 lb. sugar snap peas*, calyx cut off and strings removed (if necessary), and pods thoroughly dried
1 T. extra virgin olive oil
½ tsp. kosher salt
freshly ground black pepper
½ tsp. granulated garlic
Preheat oven to 450-degrees.
On a rimmed baking sheet, toss snap peas with oil, salt, pepper, and granulated garlic.
Bake for 10 to 12 minutes or until desired tenderness. Serve immediately.
*Sugar snap peas are a cross between green peas and snow peas. The pods appear quite fat, but like snow peas, you eat the entire pod. Cut off the calyx (end attached to the stalk), and remove the fibrous strings running down the center. (Note: some varieties are string-less.) You may also see these peas labeled simply as “snap peas” or “sugar peas.”
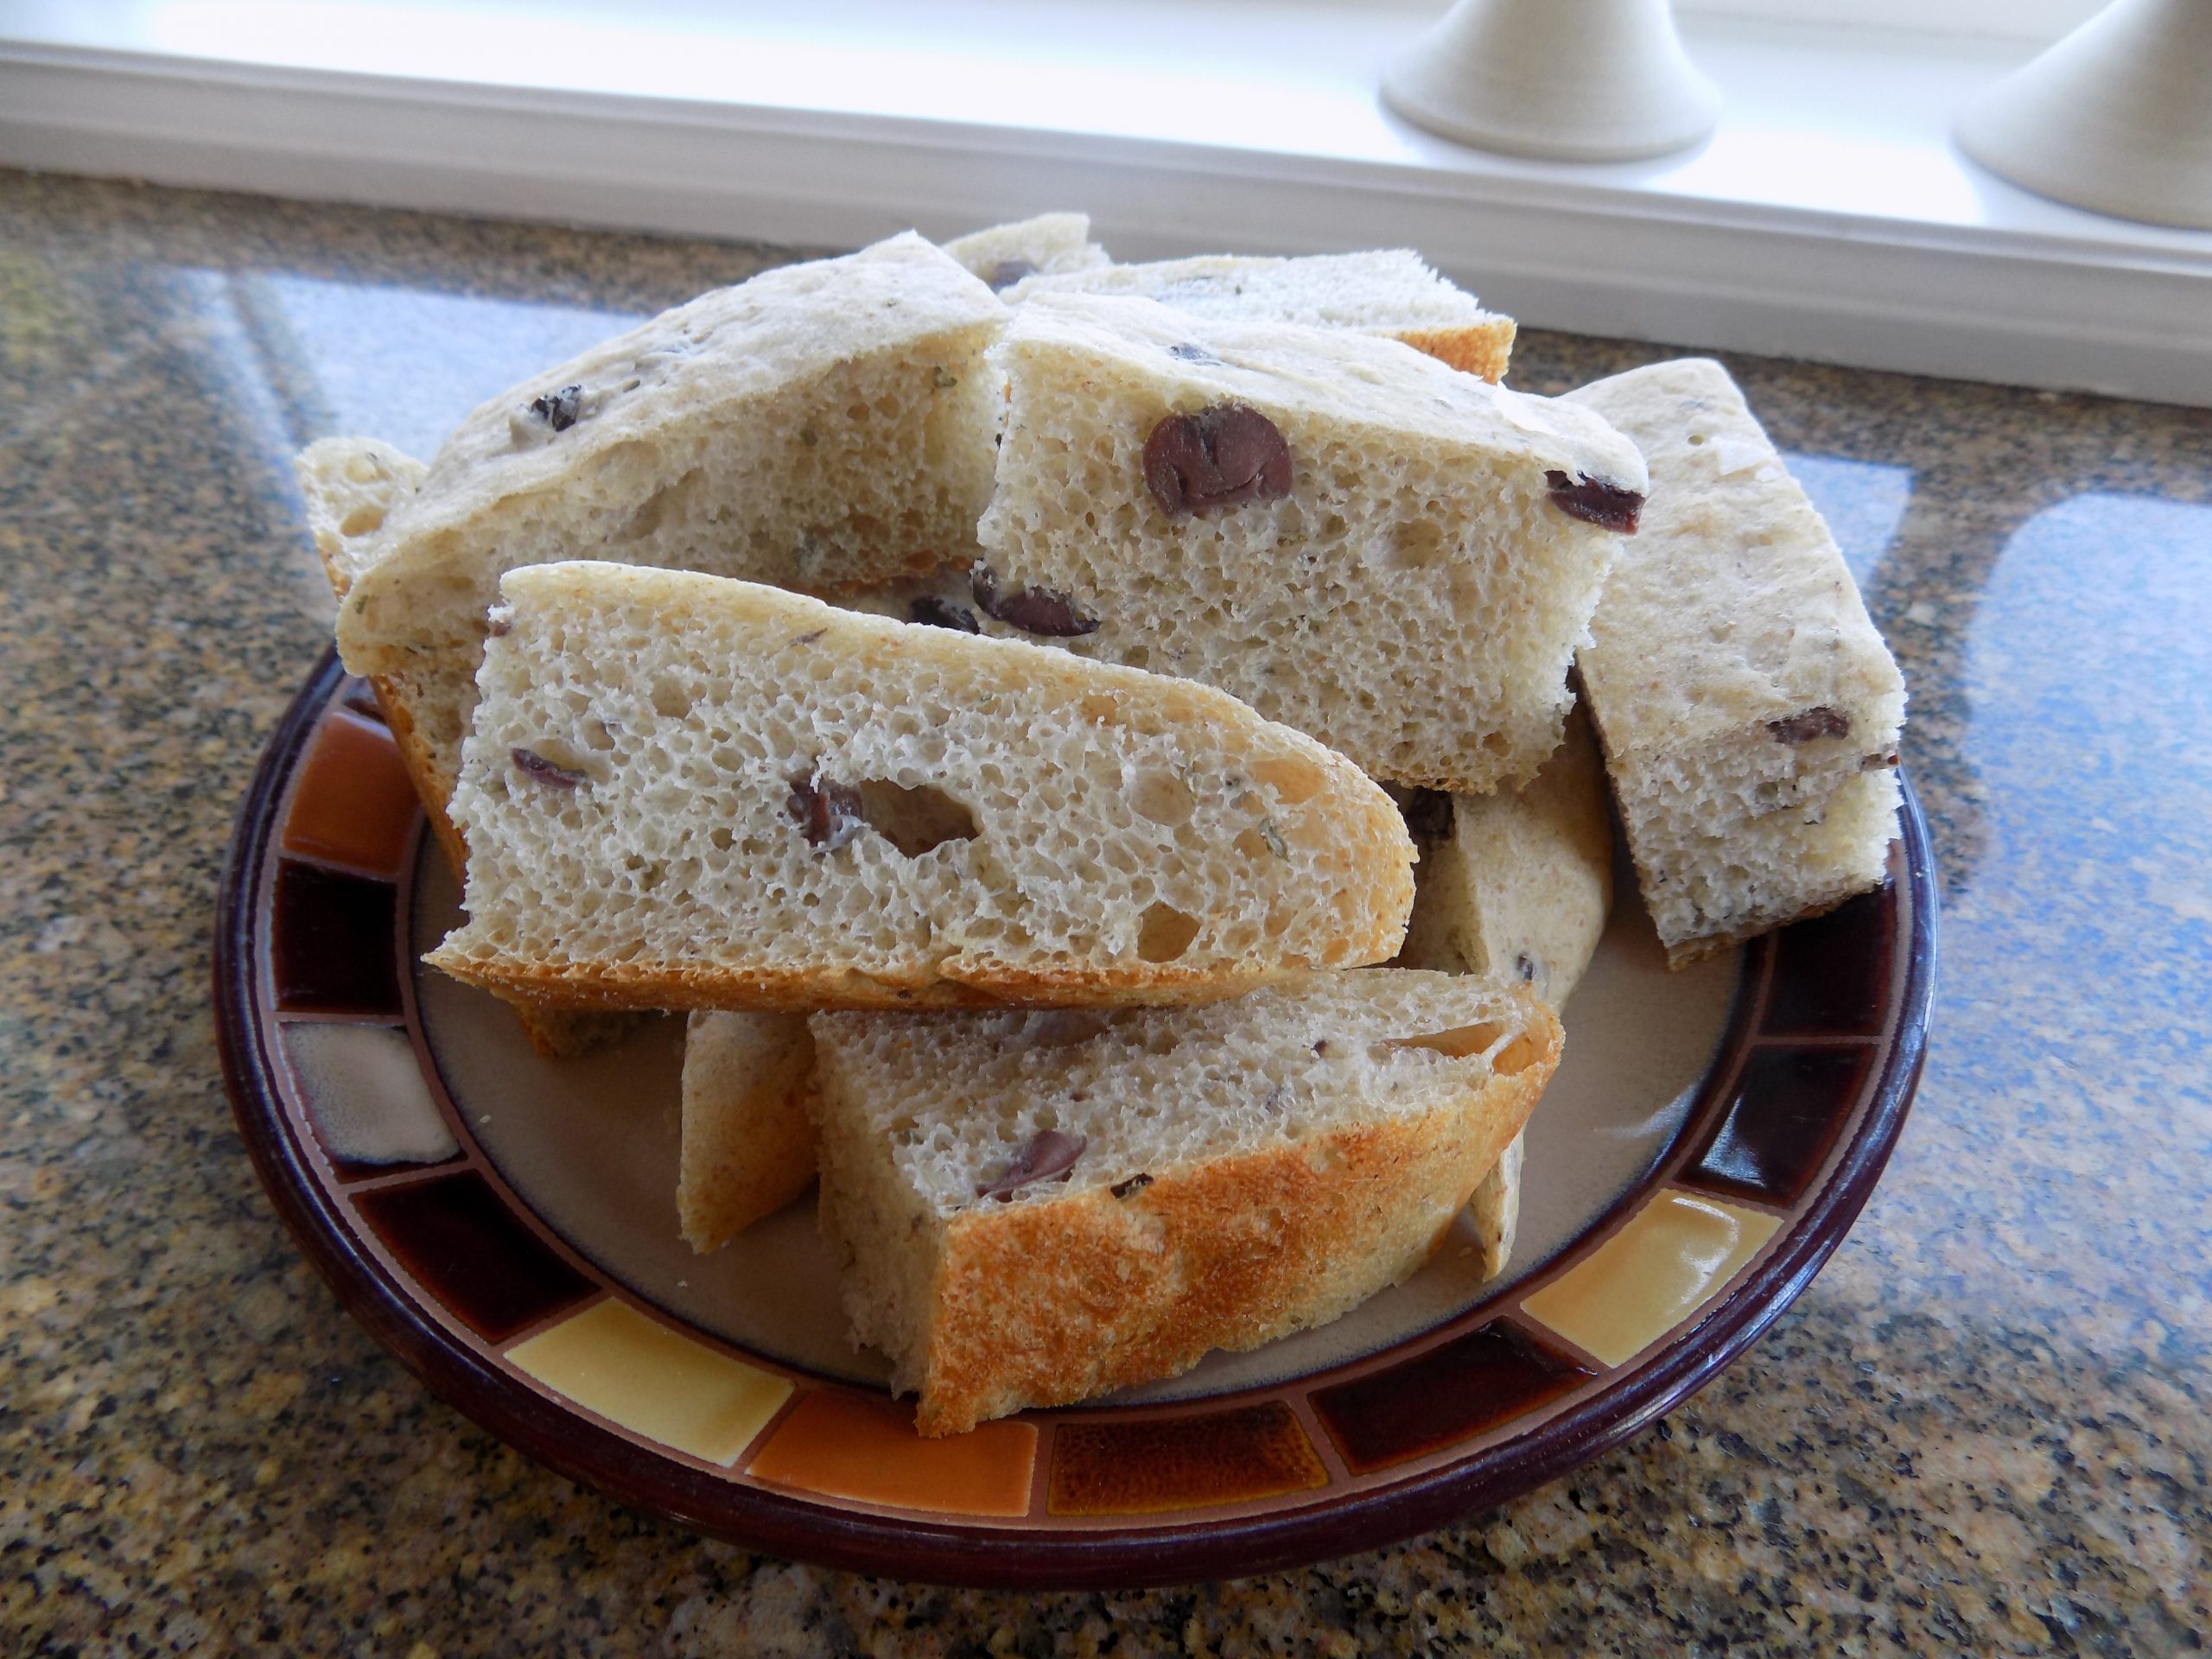
Whenever I bake bread I feel like an earth mother. Because there is just something primal about taking a few simple ingredients and turning them into something as magnificent as bread. And since baking some form of bread is as old as civilization itself, I feel connected to past generations through this simple action. It fills my soul with joy and humbles me to watch bread rise, then come out of the oven as this incredible product that I had some small part in producing. Kind of like watching my kids grow up. Talk about a humbling experience! But I digress!
If I try really, really hard, I can still recall the smell of bread baking in my grandmother’s kitchen. Pure heaven. But I’ll tell you true, I’m sure my grandmother never dreamed of putting anything like garlic, rosemary, or kalamata olives in her bread! In fact, I’m pretty sure she never even heard of rosemary or kalamata olives. Garlic, maybe, but if so, she sure as heck never used it. (Mores the pity.)
But the good news is – I know about rosemary, garlic, and kalamata olives, and I am not afraid to share my knowledge with you! First of all, if you are not using these amazing ingredients with enthusiasm, in my opinion, it is time to re-think your priorities.
Lets’ start with garlic. There are very few savory dishes that can’t be improved by the judicious use of garlic. I swear, there are weeks when not a day goes by without me finely mincing a garlic clove or 2, 3, 4, etc. This Allium sativum is simply an integral part of my cooking. And because it is so much a part of our everyday life, we have never been bothered by vampires. (Not just everyone can make that claim!)
And rosemary, how can I esteem rosemary any more than I do? This fragrant evergreen herb with its edible needle-like leaves is fabulous in so many dishes. In fact, rosemary is almost essential if you are fixing lamb. And for many other dishes, including soups, rosemary provides just that certain “something” that turns the dish from acceptable to incredible. And the fact that this perennial is ever so easy to grow, makes it even nicer. I have 3 big bushes of rosemary in my yard because I never want to find myself without rosemary. (I’d get the hives without rosemary. I’m absolutely sure I would. So, I take no chances!)
That leaves kalamata olives. Oh, how I wish kalamata olives had been around when I was younger. I have always loved olives in any form. But kalamata olives, they are just special. Perfect in pasta (think puttanesca or pasta salad), salads (think Greek salad), pizza, and of course bread. Which of course now leads me directly to why you should make this bread at your earliest convenience.
I first started making bread containing kalamata olives many years ago. And no, I did not dream up the use of kalamata olives in bread. I read about it in a cookbook I’m sure, because this was decades before I could go online and find at least a thousand recipes already posted for what I thought was an original concept. (I have since learned that there is no such thing by the way! At least when it comes to food!)
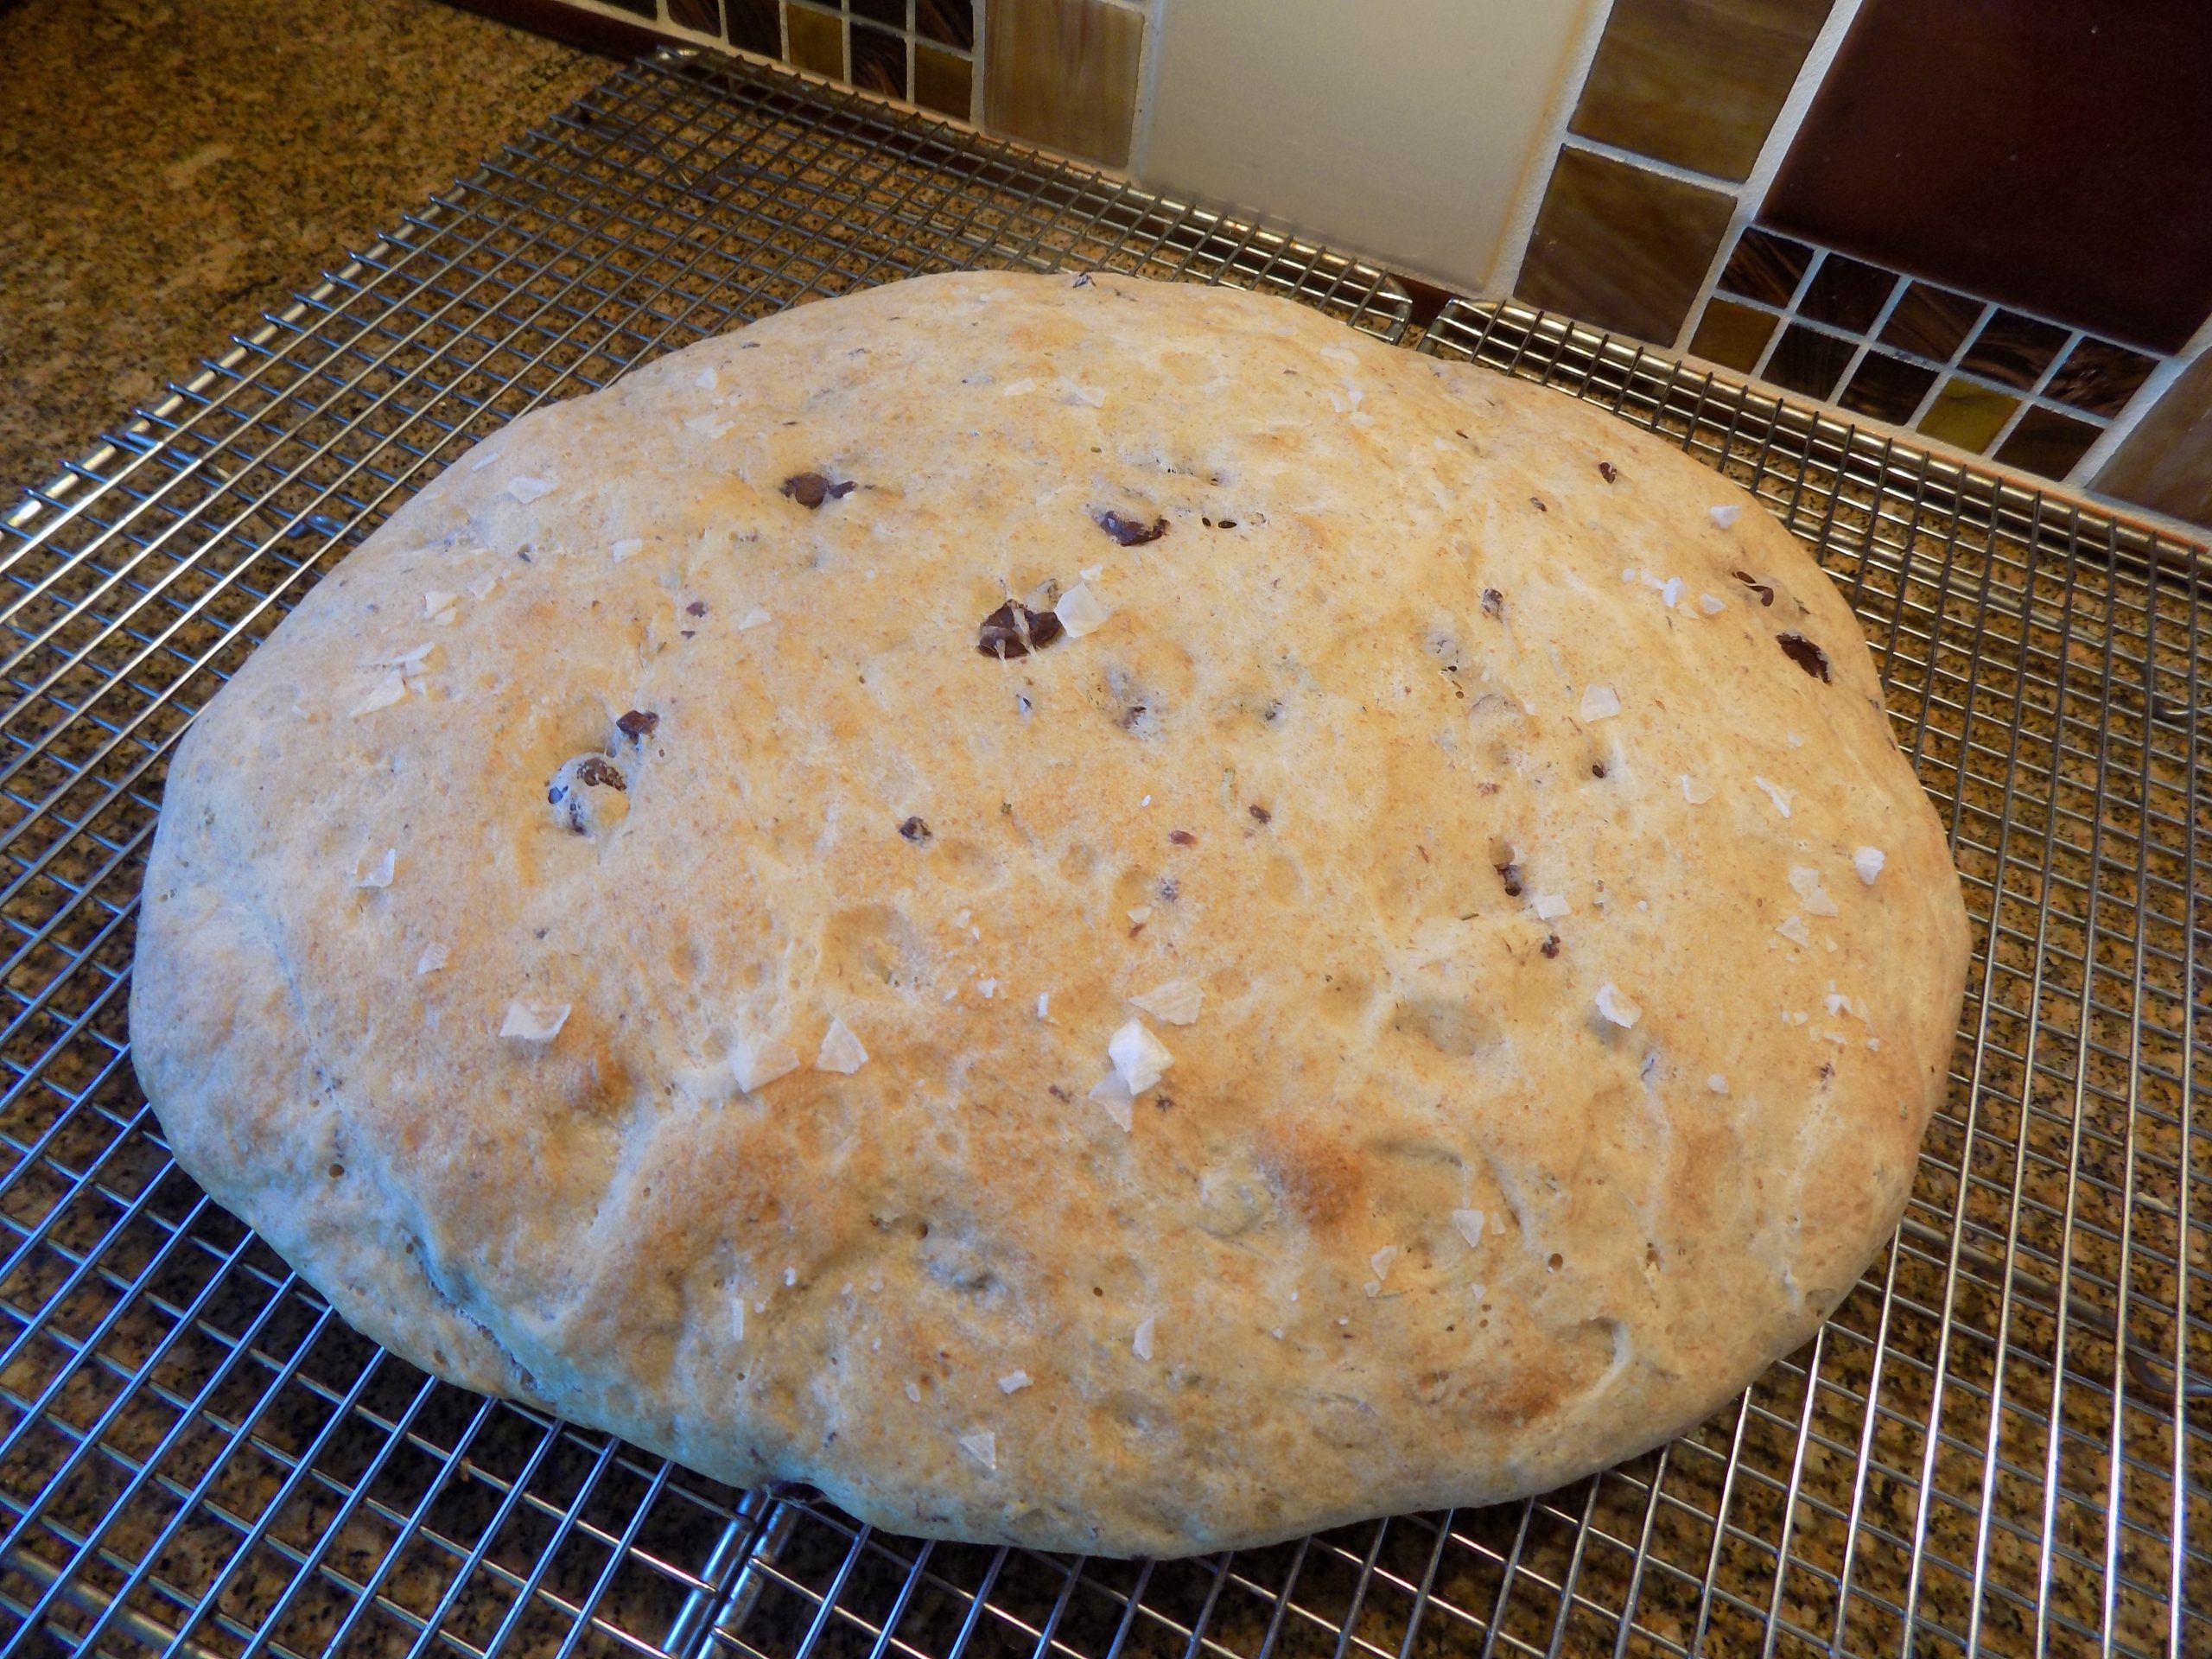
Anyway, the gist of all this rhetoric is that garlic, rosemary, and kalamata olives are wonderful ingredients, even in bread. And because this particular bread is baked flat, there is a lot of crust. And the part that isn’t crust, is nice and chewy. So, give it a try. Easy to build, and lovely to eat. Perfect with soup or as a side with a hearty main course salad.
As always, begin each day with a smile on your face. For me, that’s easy. Because I know there will be an Americano waiting for me in the living room once I stagger down the hall in my bathrobe. Freshly made coffee, and delicious. And while I sip my coffee and read the daily paper, I always take a moment to thank whichever deity may happen to be listening, for providing me with such a wonderful life. May you be as blessed.
Peace and love to all.
1 c. sourdough starter discard
2/3 c. slightly warm water
1½ tsp. active dry yeast
½ tsp. granulated sugar
1 tsp. kosher salt
½ tsp. granulated garlic
1 T. finely chopped fresh rosemary
1 c. Kalamata olives cut in thirds
2½ c. bread flour, or more as needed
extra virgin olive oil
flaky or coarse salt
Combine the sourdough starter, water, yeast, sugar, and salt in the bowl of your stand mixer. Let sit for 5 minutes. (Or as long as it takes to chop the rosemary and olives and retrieve the granulated garlic from its hiding place.)
Add the granulated garlic, rosemary, kalamata olives, and 2 cups of the bread flour to the mixing bowl. Using your dough hook, knead dough until relatively smooth, about 6 minutes using enough remaining flour to make a soft dough. (Most of the dough will form an irregular shaped ball around the bread hook. There should still be a bit that clings to the bottom of the bowl. And the dough will be very sticky.)
Cover with plastic wrap. Allow to rise at room temperature 1 hour, or until doubled in bulk.
Prepare a large, flat baking sheet by spraying with cooking spray. Pour the dough onto the prepared pan, and shape into a rough circle about ¾-inch thick. Spread the surface with olive oil. Cover with a piece of plastic wrap. Allow to rise for 1 hour at room temperature. Sprinkle lightly with flaky or coarse salt.
Bake in a pre-heated 450-degree oven for 14-15 minutes, or until a light golden brown and the internal temperature reaches 200 degrees. Remove from oven and allow to cool completely before slicing.
As I write this post, Miles is enjoying his usual spot where he can watch the birds in the courtyard. He was quite upset with me because I interrupted his nap. Shame on me!While Max couldn’t even be bothered to lift his head when I walked in the bedroom.
And yes, I know. White rice is not the best choice for a nutritious and low carb side dish. But frankly, there are just those culinary occasions when white rice is the best choice. Taste wise. And one of those times happened a few nights ago. (I won’t bother you with what I had prepared to go on the rice because it was one of those times I hate to admit that I had any hand in preparing, much less creating said dish.) But back to how this recipe came about.
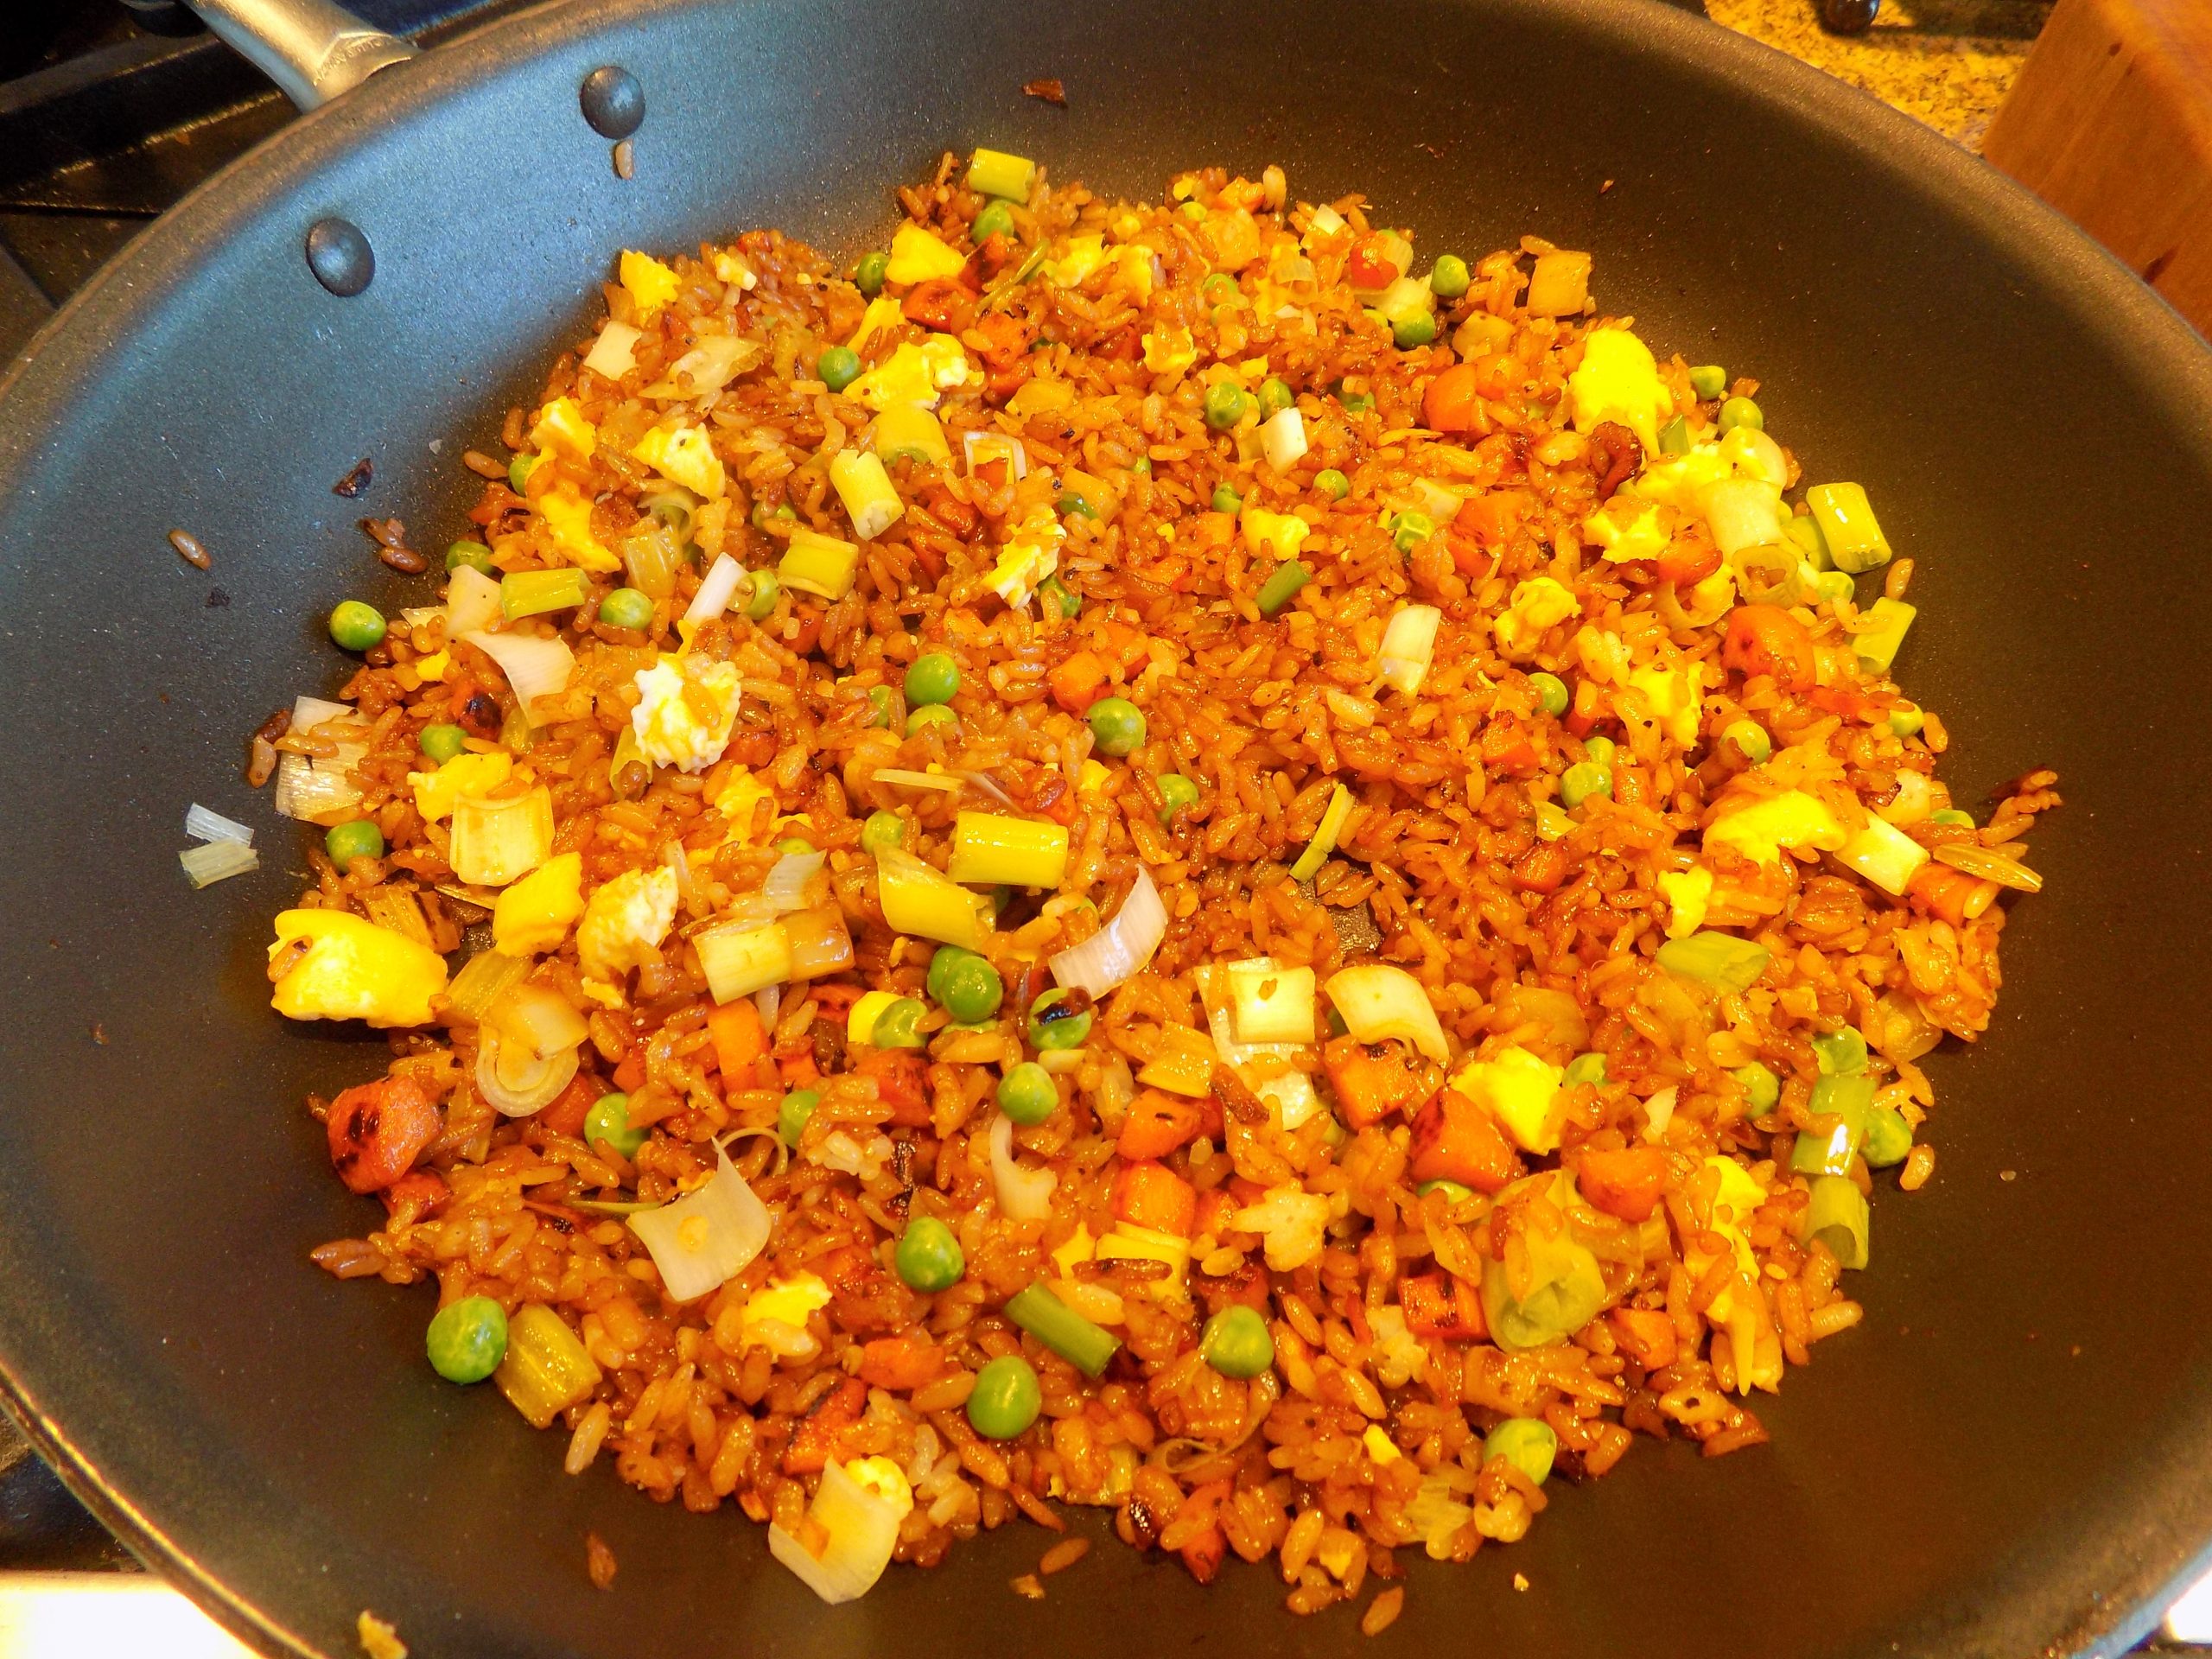
I thought we would be enjoying leftovers of the failure (grrrr) I admitted to above, so I made sure to steam plenty of rice for the next evening. (I believe the saying you are attributing to me at this point is “hoisted on my own petard”.) Anyway, I had lots of cold steamed rice and now what to do with it? Simple really. Make fried rice. So, that’s exactly what I did!
Now I already have a great recipe for fried rice on this site. But truly, can you ever have too many recipes for a good thing? I didn’t think so either. Plus, I wanted a fast and easy recipe. So, with a few very minor changes to the recipe for Fried Rice I found on gimmesomeoven.com, I had redeemed myself. At least in my own eyes. (Mr. C. actually thought my self-proclaimed failure was just fine. But then he loves me.) And of course, I am always my own worst critic. Regardless, the Salisbury steak I produced the other evening was not worthy of your high standards! But I would offer up this recipe to anyone, because it is easy to prepare, contains ingredients that are easily obtained, and it tastes better than any fried rice you can order in a restaurant. At least, better than any I have ever eaten in a restaurant.
So, next time you have leftover rice, use this basic recipe to create your own special fried rice. Have other veggies on hand, use them. Want to throw in meat or seafood, go for it. This is a very versatile and adaptable recipe. And ever so delicious.
As always, have fun playing in your kitchen. Since our kitchens are the heart of our homes, make sure every member of your household feels welcome to help with meals in some way. Even if you are met with resistance for chores such as setting the table, clearing the table or emptying the dishwasher, members of your family will still feel appreciated if you remember to thank them. Thank you is such an easy way to show love. And especially with children, it is a good life lesson. If you learn to say thank you at an early age, it becomes a habit. And a habit that leads to respect. And if you want your children to receive respect as an adult, they must first learn to give it freely.
Peace and love to all.
2 T. unsalted butter, divided
1 beaten egg
1 small carrot, finely diced
⅓ c. diced celery
⅓ c. finely diced onion
¼ tsp. kosher salt
freshly ground black pepper
1 lg. clove garlic, finely minced
2 c. cooked and chilled white rice
2 T. soy sauce, plus more to taste
1 tsp. oyster sauce
2 thin or 1 fat green onion, thinly sliced
¼ c. frozen peas
¼ – ½ tsp. toasted sesame oil
Heat 2 teaspoons of the butter in a medium-large fry pan. Cook the egg until set, stirring occasionally. Remove the cooked egg from the pan and set aside.
Add another 2 teaspoons of the butter to the pan and heat until melted. Add the diced carrot, celery, onion, salt, and pepper. Sauté gently for about 10 minutes or until the onion and carrot are soft. Add the garlic and cook for 1 minute.
Add in the remaining butter and stir until melted. Add the rice, soy sauce, and oyster sauce. Stir until combined and the rice kernels are separated. Continue sautéing for a few minutes more, stirring occasionally. (Let the rice rest for a bit between stirs so that it can crisp up on the bottom.) Then add in the cooked egg, green onion, and green peas; stir to combine.
Remove from heat and stir in the sesame oil until combined. Taste and season with extra soy sauce, if needed. Serve hot.
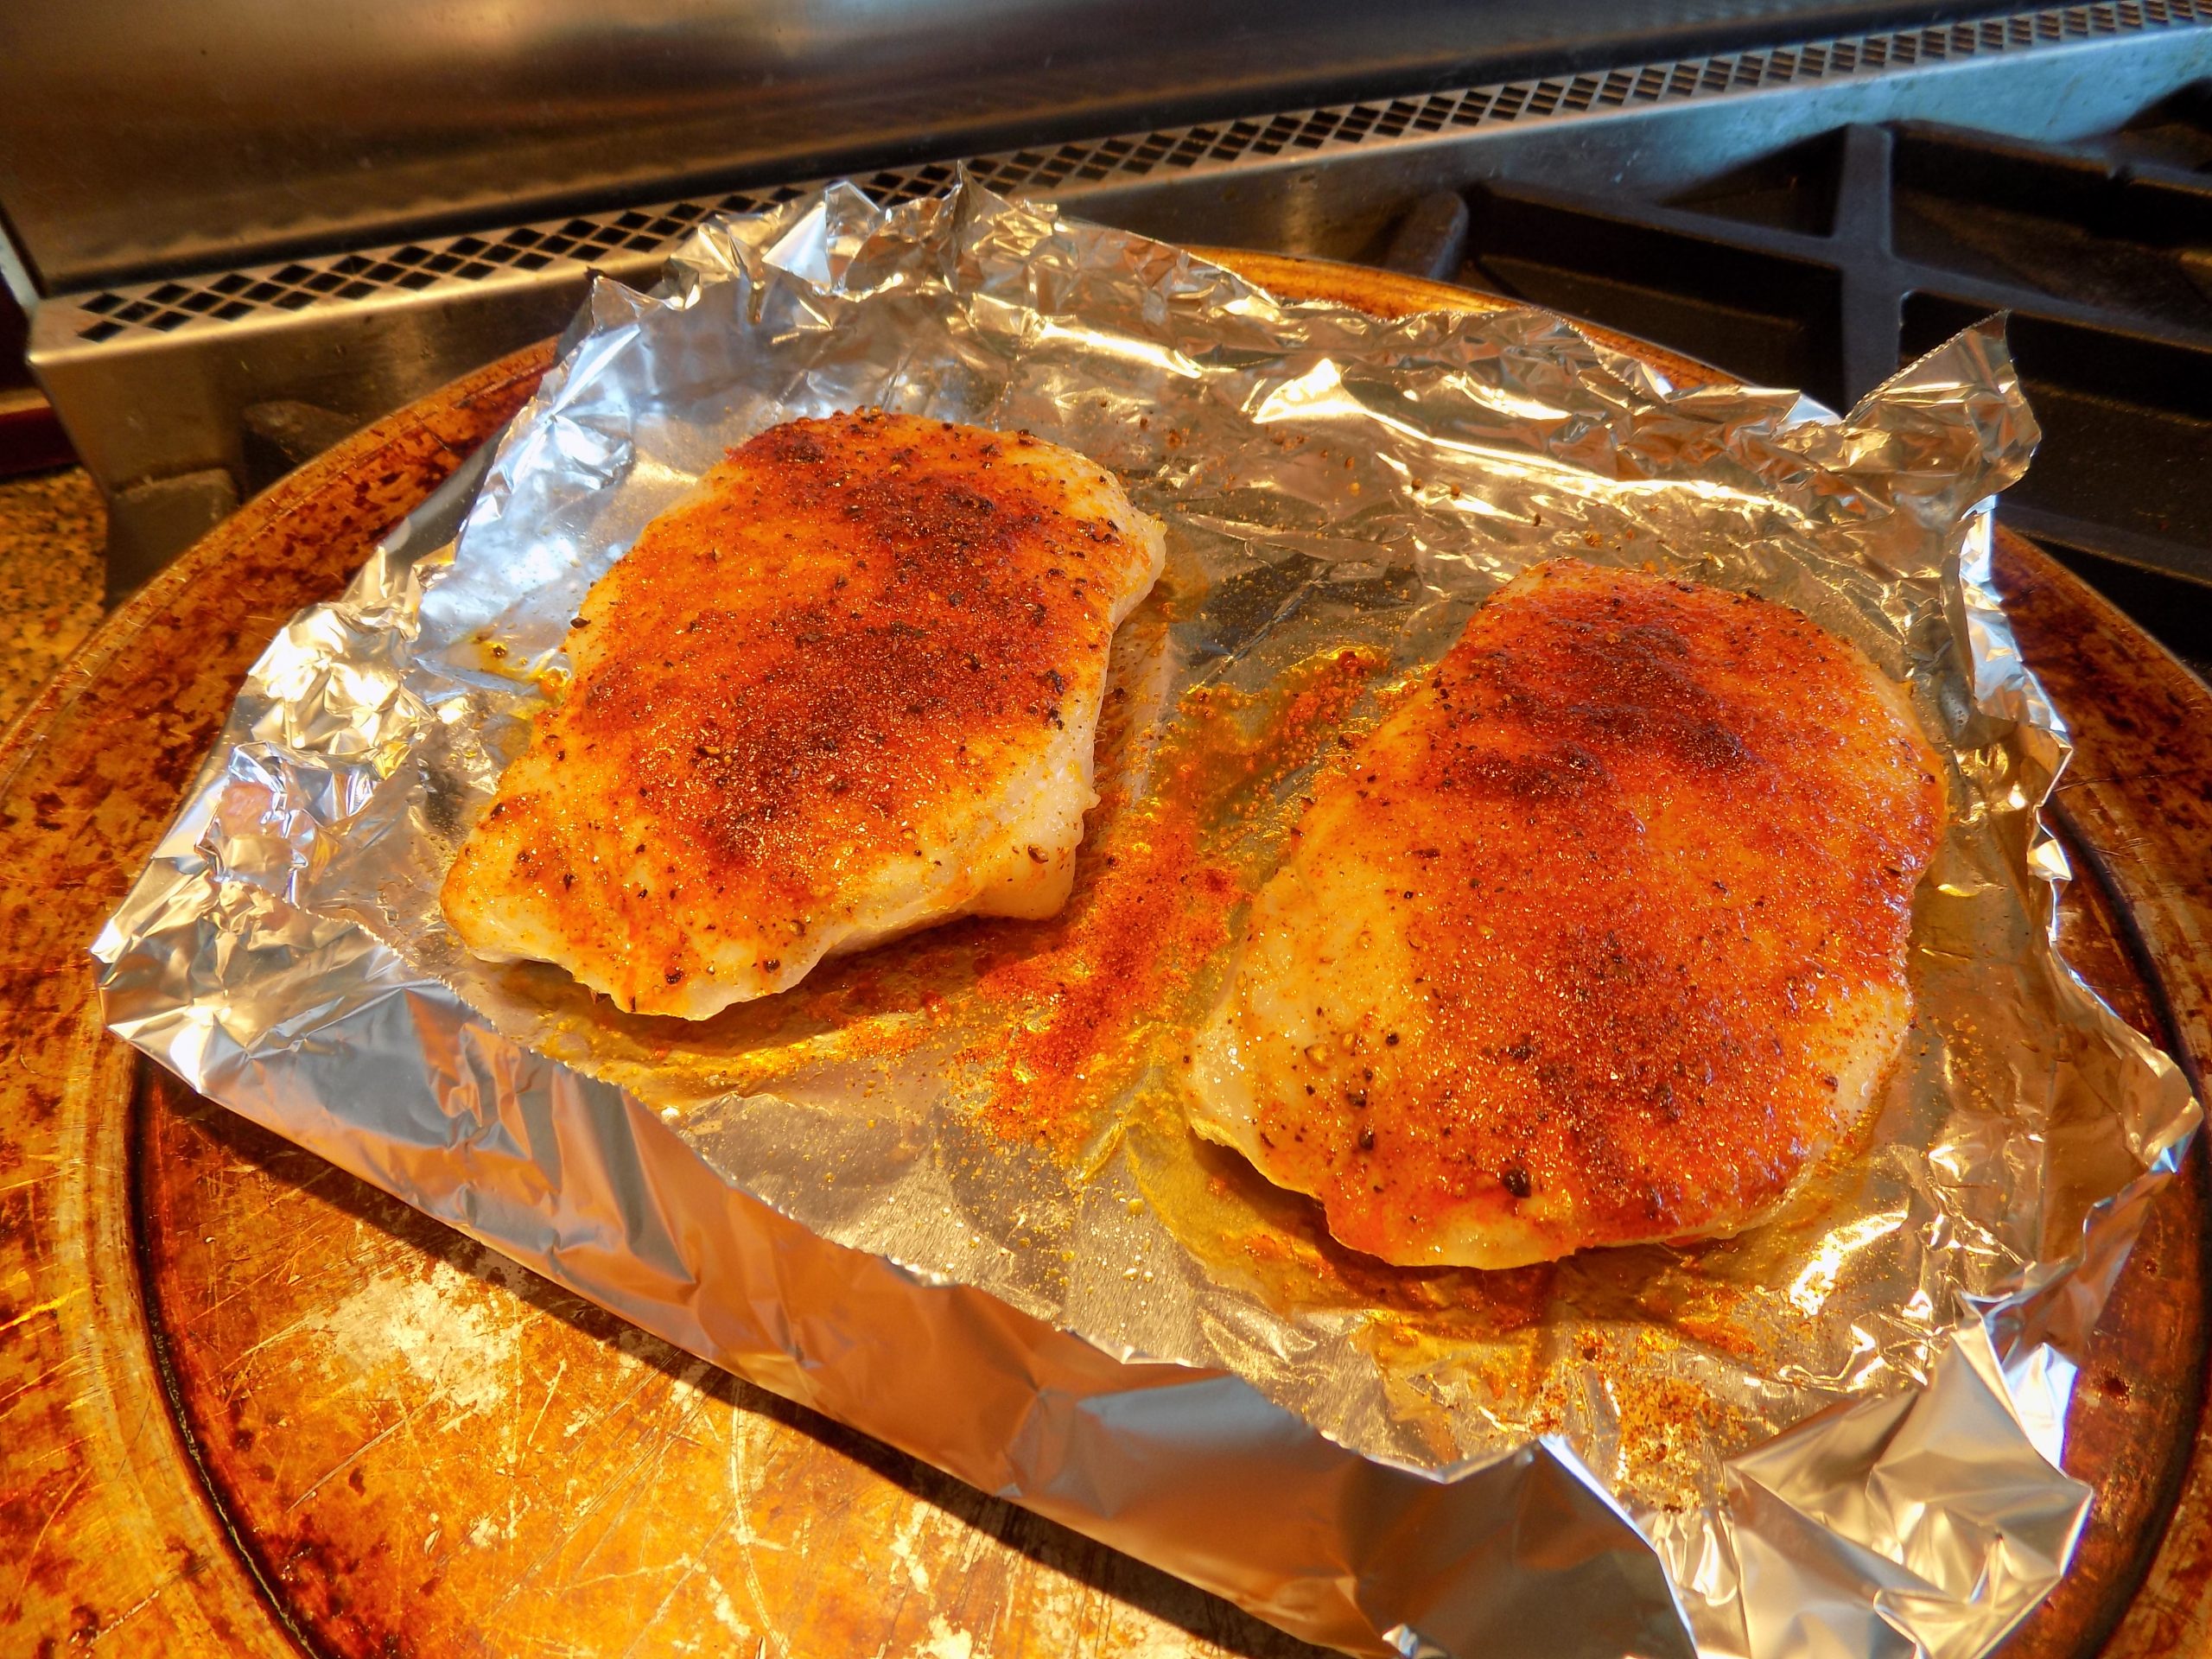
Whenever I plan a trailer camping trip, the first meat I think to bring along is the other white meat. You know – pork. And because pork products come in many forms, for this post, I am only referring to pork chops and pork tenderloin. But why only chops and tenderloin? That’s simple to explain. They are both very easy to cook. Sometimes it takes a little prep work to coach the best out of these cuts, but never very much. But cooking either cut takes a gentle hand. Pork needs to be respected and of utmost importance, it should never be over cooked. (Of course, it can be over cooked, but not if you desire a tender piece of meat.)
For years I couldn’t fix a tender pork chop to save my soul. But then I discovered brining and learned that trichinosis is not the plague it once was, and therefore we no longer need to cook pork to death! So now, every camping trip includes pork chops and pork tenderloin. And both are always very well received with very little effort expended on my part.
Happily, last evening, we feasted on tender and succulent pork chops thanks to this recipe I found on the iwashyoudry.com site. I served the chops with Easy Fried Rice and Garlic Roasted Sugar Snap Peas. (Both recipes soon to be posted.)
So, if you too are a fan of pork chops but can’t stand it when your chops turn out dry and fit only for repairing the soles of your favorite leather boots, give this recipe a try. You will be glad you did.
As always, keep smiling, keep being tolerant of others even if their views differ radically from your own, and most importantly, thank your lucky stars that you were blessed with a mind that can discern fact from fiction. Because there is a lot of fiction being touted these days around the country, and especially in Washington DC. And unfortunately, not everyone was born with a healthy intellect or was taught critical thinking. That level of intelligence or skill is simply not possessed by everyone. So, be kind. Understand that you are just luckier than some.
Peace and love to all.
2 (4 oz. each) 1-inch or thicker boneless pork chops
2 c. warm water
2 tsp. kosher salt
2 tsp. seasoned salt
extra virgin olive oil
1 tsp. granulated garlic
½ tsp. paprika
freshly ground black pepper
Bring the pork chops to room temperature before preparing the brine.
Place the warm water in a flat glass container that will allow the pork chops to not overlap. Stir in the kosher and seasoned salt until they are both dissolved. Place the pork chops in the salt water, making sure the chops are completely covered. (Add additional water if necessary). Let the pork chops sit in the water at room temperature for 30 to 45 minutes, or place in your fridge for up to 24 hours. (I brined and refrigerated our chops for 7 hours. They were perfect.)
Line a baking sheet with foil or parchment paper.
Remove pork chops from salt water and pat dry with paper towels, making sure all moisture is removed. Drizzle both sides of pork chops with a bit of olive oil, then season both sides with the granulated garlic, paprika, and black pepper.
Bake in a pre-heated 425-defree oven for about 8 minutes or until the internal temperature reaches about 143-degrees. Remove from oven and cover loosely with foil for 5 minutes before serving.
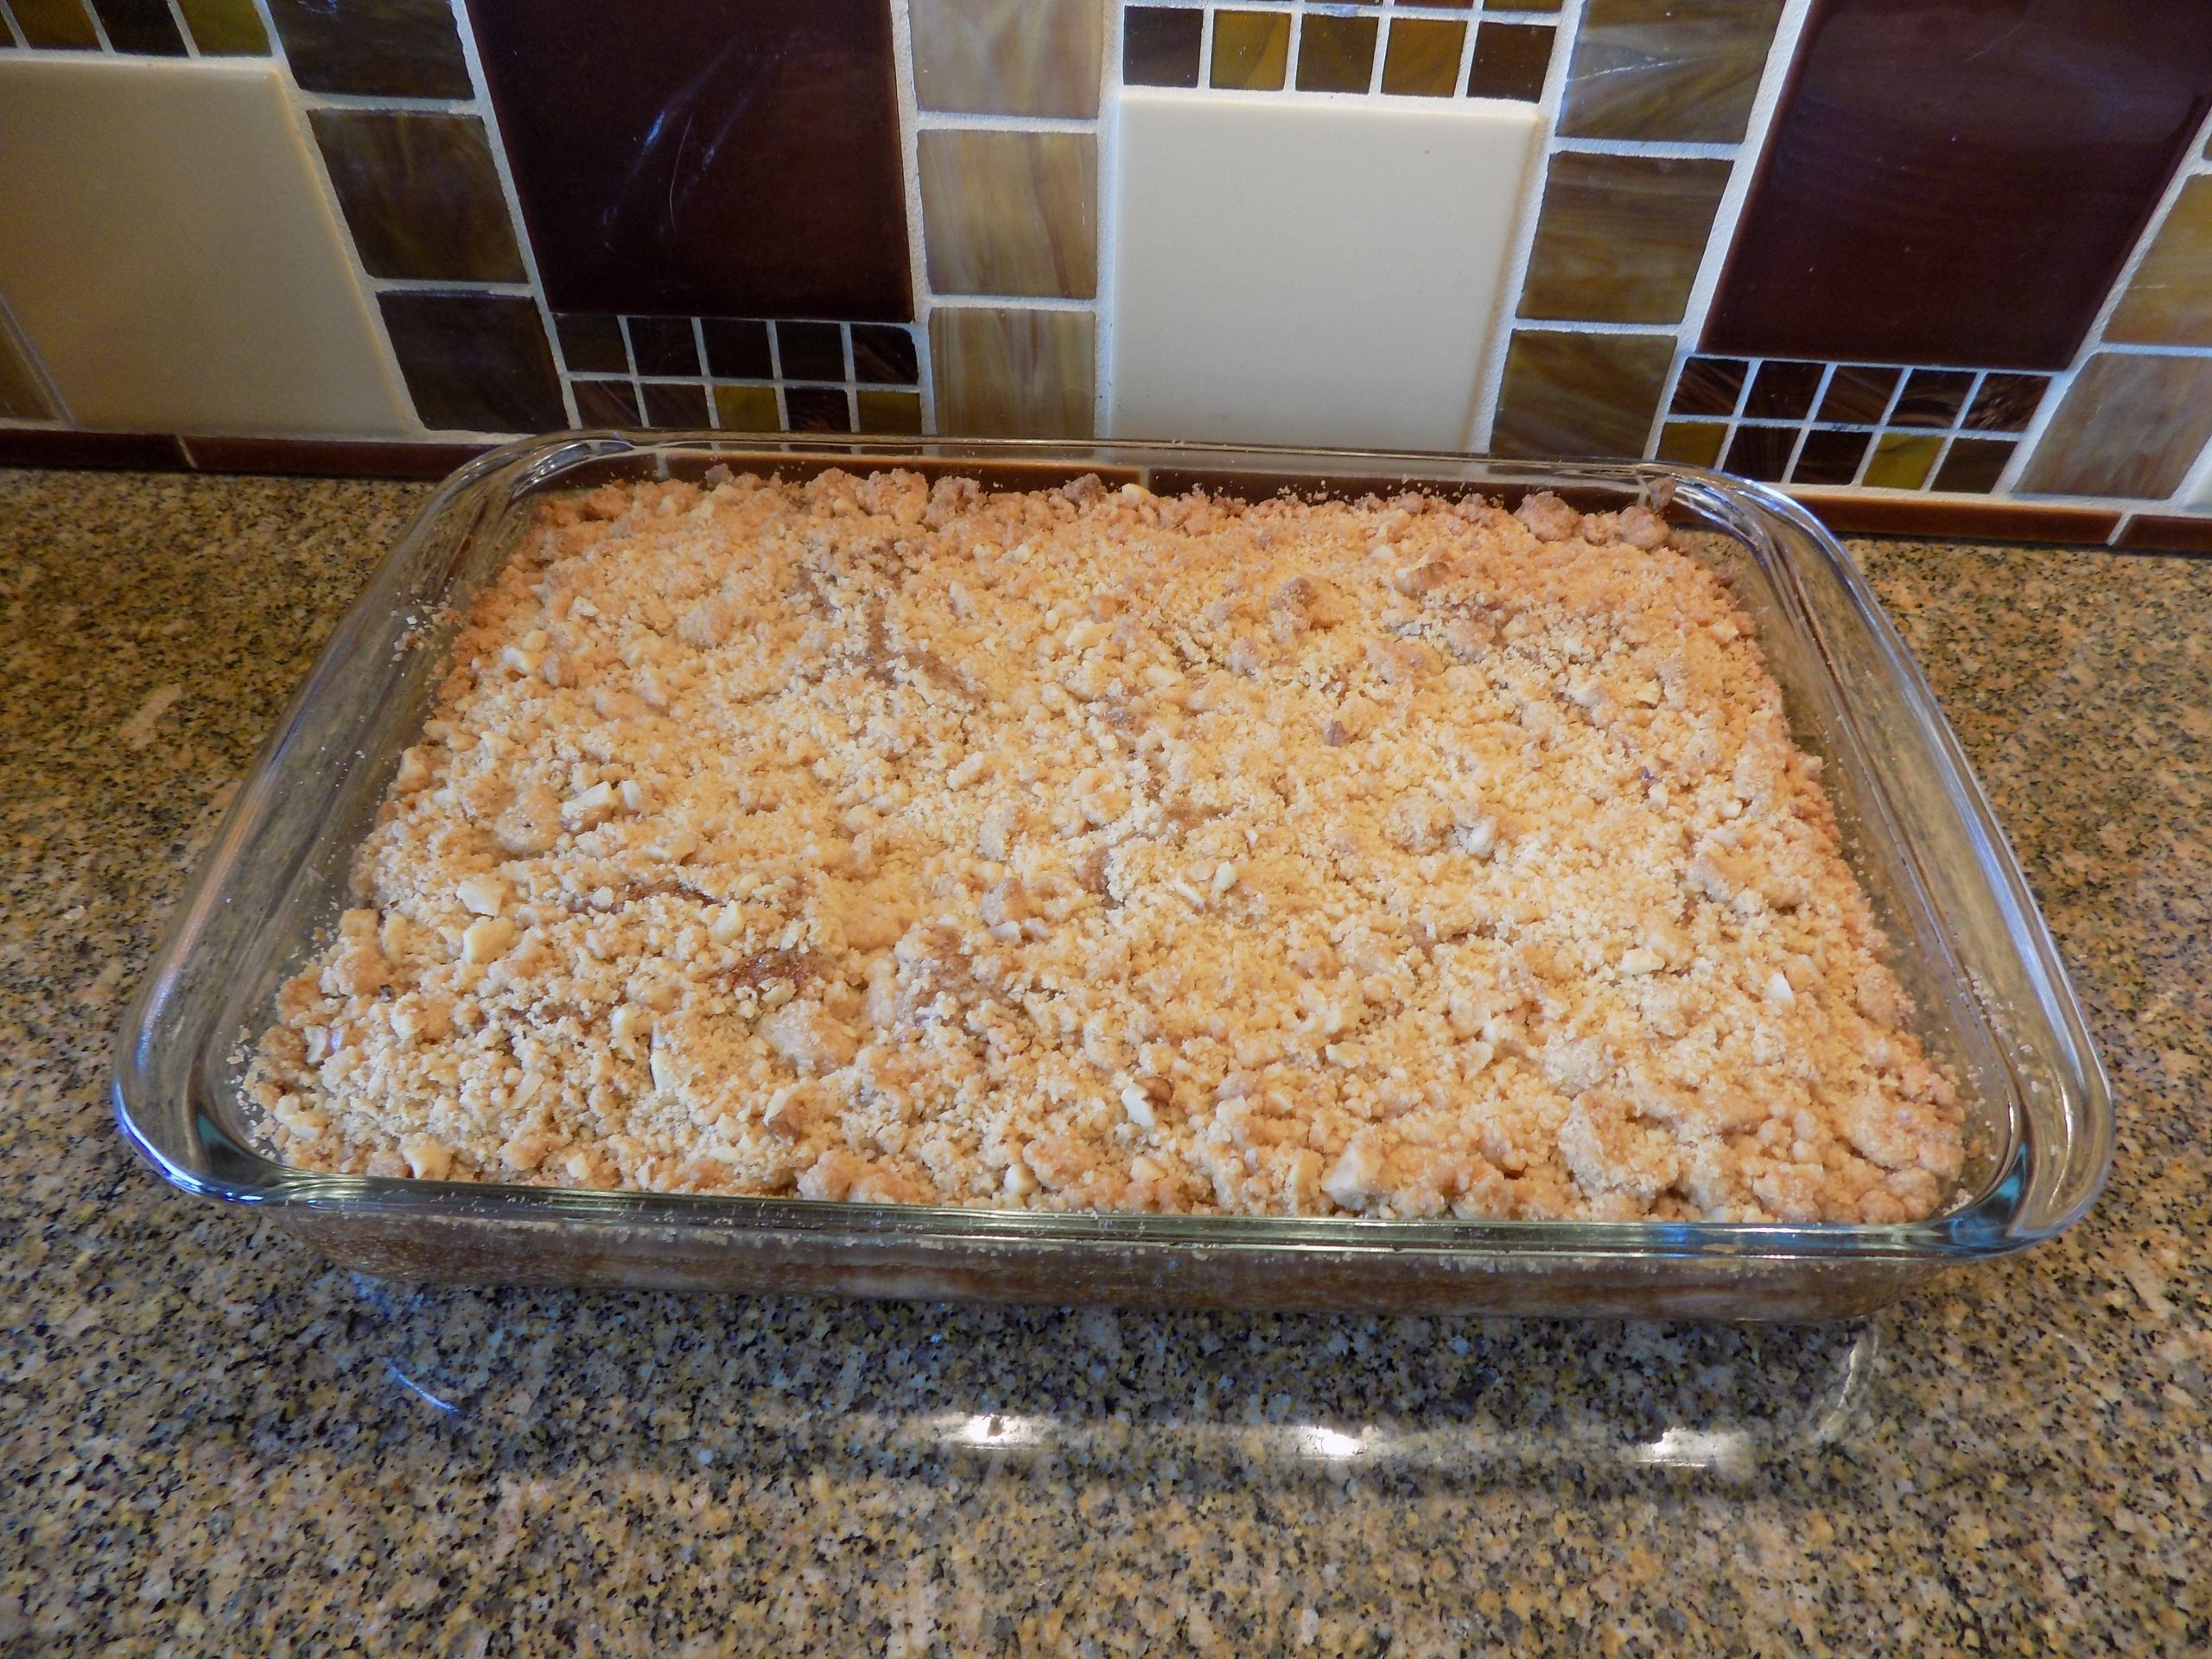
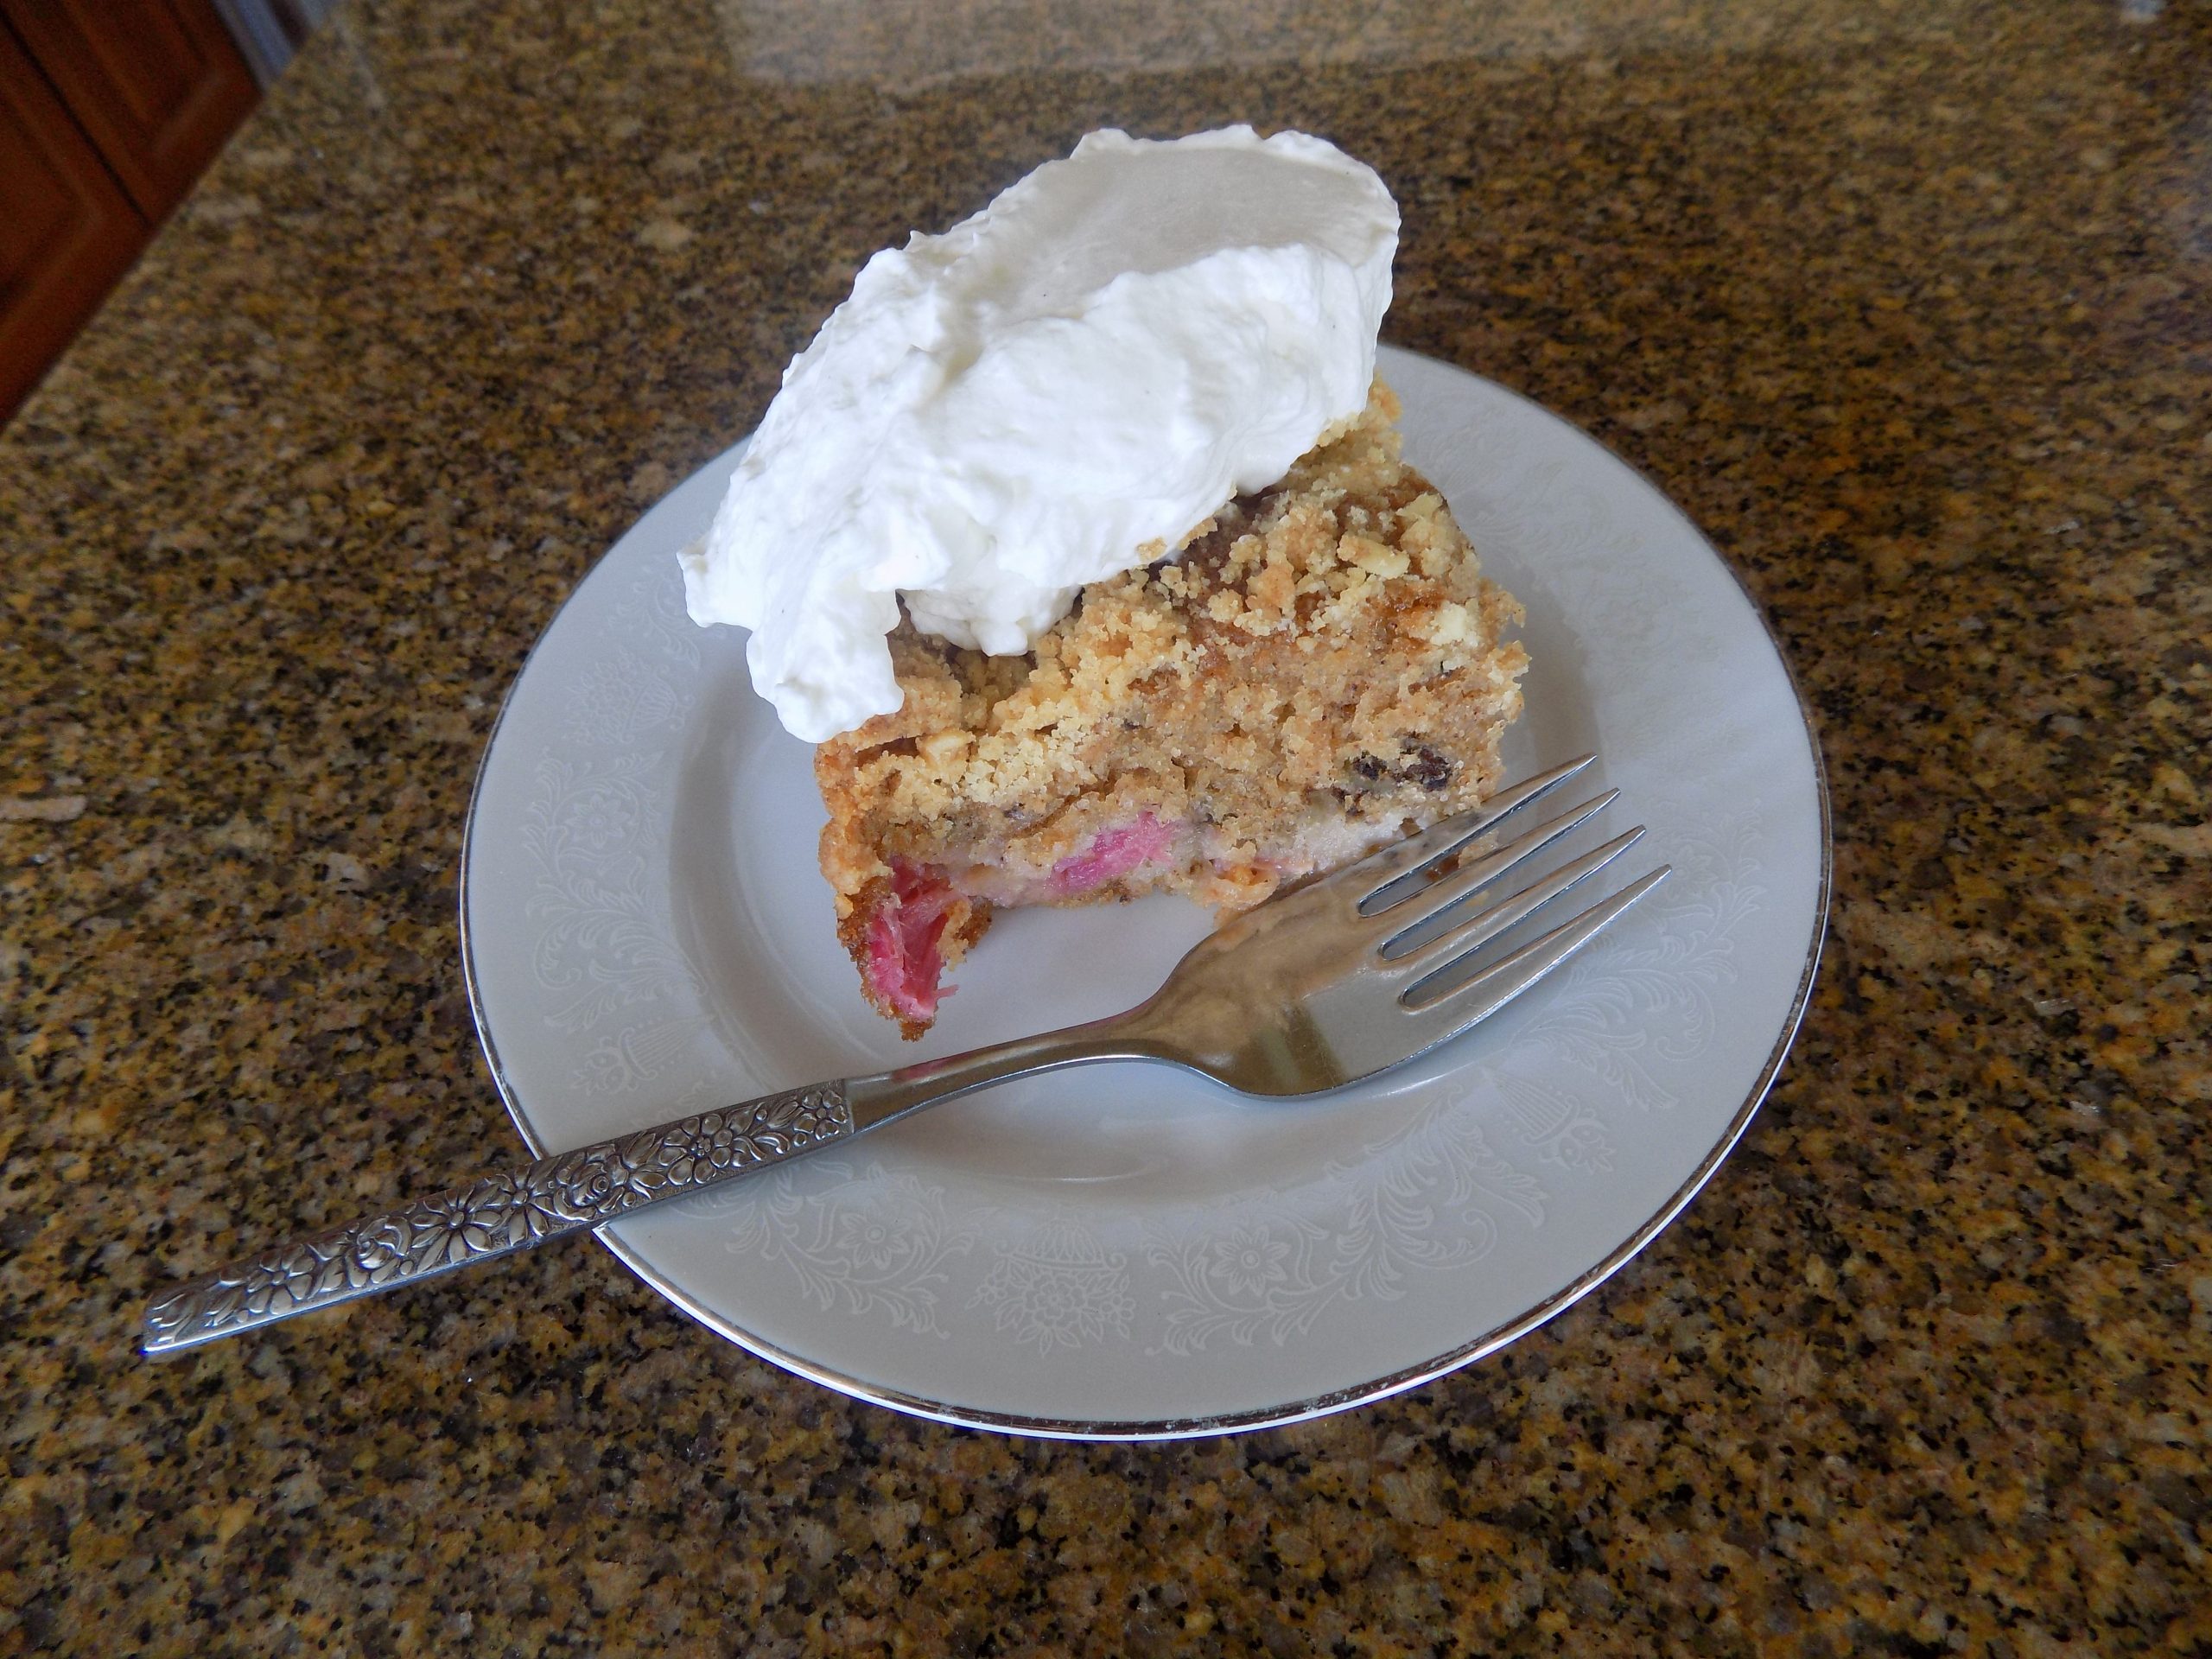
Hurray, it’s fresh rhubarb season again! And we happen to be dedicated fans of this very delicious vegetable. Yup, rhubarb is a veggie and a very undemanding perennial veggie to boot. Apparently, rhubarb originated in Asia and although the stalks resemble celery, they are wildly different from celery. Celery is part of the parsnip family and the leaves are not only edible but cherished for their intense flavor. (I actually pick celery based on the bunch that contains the most leaves. If possible, I use the leaves in every soup I build that calls for celery.) While rhubarb belongs to the buckwheat family. And you should only eat the stems of the rhubarb plant. Both the stalks and the leaves contain oxalic acids which are toxic. However, the stalks contain much less of the toxin and therefore are considered safe to eat. But, it is recommended that you harvest rhubarb stalks before the 24th of June. Apparently, after that, the stalks also contain too much oxalic acid to be considered safe to eat. (This has never been a problem for me. I harvest my rhubarb way before that time, because I can’t wait to make it into a dessert – like, for example, this rhubarb coffee cake.)
I have been making a rhubarb coffee cake very similar to this one since the late 90’s. (Before that I had never been fond of coffee cakes. Usually too bland for my taste.) But, as my baking skills have improved, I reviewed my old recipe and decided to change things up a bit to make the cake even tastier. So, this is what I came up with.
I served this cake to members of the jazz group Seabreeze, who had not met indoors since the beginning of the covid crisis. They had met three times out-of-doors, but for one reason or another, had not been allowed to complete a full rehearsal. But since all the members and Mr. C. and I are fully vaccinated, the group met in our living room yesterday. Although Mr. C. practices classical pieces most days, it was wonderful hearing jazz performed in our home again. I just sat and listened. And of course, I had to serve them a treat. They are all such wonderful and talented guys, that it was actually my treat to fix something special for them. And they loved the cake. As did I.
So, if you are lucky enough to have some rhubarb on hand, consider building this moist and delicious coffee cake. And no, you don’t have to serve it dolloped with whipped cream. But I’m telling you true, it doesn’t detract from the pleasure either.
As always, enjoy your time in the kitchen. Take pleasure in whatever you fix that makes your family or your guests happy. And even the times when you try a new recipe and it doesn’t come out as delicious as you expected, keep going. Not every recipe is going to result in perfection. But you can learn from those recipes. And at least for me, learning is half the fun.
Peace and love to all.
For the cake:
½ c. (1 stick) unsalted butter, room temp.
1 c. granulated sugar
½ c. brown sugar, packed
2 eggs
1 tsp. vanilla extract
2 c. unbleached all-purpose flour, fluffed
1 tsp. ground cinnamon
1 tsp. baking soda
½ tsp. kosher salt
1 c. buttermilk
4 slightly rounded c. diced fresh rhubarb
½ c. chopped walnuts
In a large bowl, beat the butter and sugar together until well blended. Add eggs, one at a time, beating well after each addition. Beat in vanilla.
Whisk the flour, cinnamon, baking soda, and salt together in a small bowl. Add to the creamed mixture alternately with buttermilk just until thoroughly combined. Stir in rhubarb and chopped walnuts. Pour into a lightly buttered 13×9-inch baking dish. (Glass preferred.) (Don’t bother to wash the mixing bowl. You can use it to assemble the topping.) While the cake enjoys it’s first 25 minutes in the oven, prepare the topping.
Bake in a pre-heated 350-degree oven for 25 minutes before adding the topping. After 25 minutes, remove from oven, reduce the heat to 325-degrees, evenly sprinkle on the topping, return to oven, and continue baking for another 23-25 minutes or until the topping is a nice light brown and a pick inserted into the cake comes out clean. Do not over-bake. Remove from oven and cool on a wire rack.
Serve room temperature or slightly warmed in the microwave. Cointreau Whipped Cream is perfect with this coffee cake. See recipe below.
Topping:
1 c. unbleached all-purpose flour
½ c. brown sugar, packed
1 T. baking powder
¼ tsp. kosher salt
6 T. (¾ stick) unsalted butter, room temp.
¼ c. finely chopped walnuts
In a small bowl, combine the flour, brown sugar, baking powder, and salt. Cut in butter until mixture resembles coarse crumbs. (I use my fingers for this not-so-delicate operation.) Mix in the finely chopped walnuts. Set aside until needed.
Cointreau Whipped Cream
2 c. (1 pint) heavy cream
¼ c. powdered sugar
½ tsp. vanilla paste or extract
2-3 tsp. Cointreau (or other orange flavored liqueur)
Whip the cream to stiff peaks. Whip in the powdered sugar, vanilla, and Cointreau. Dollop on pieces of cake just before serving.
The only thing Mr. C. and I disagree about regarding this dish, is that he likes his pasta lightly sprinkled with Parmesan cheese, and I like mine undecorated. Other than that, we totally agree that this is one of the best pasta dishes we have ever tasted. Now I realize this recipe is ever so close to my recipe for Spicy Lemon Shrimp with Pasta. But it is just different enough to be interesting. But either recipe will guarantee a better lemony shrimp pasta dish than you will ever taste in any restaurant. Not bragging here folks – just stating a fact.
Because most restaurants have to dumb down their recipes to please the majority of their clientele. So, instead of making recipes like this one lemony enough, they will only go so far. And of course, restaurants don’t use as much shrimp, because, well, shrimp costs money. And they are in the business of making a profit. And heaven help them if they give a dish like this a bit of a kick. But that little “kick” helps make this dish super delicious.
So, of course I am prejudiced, but I have eaten many a lemon shrimp dish where only my sense of decorum prevented me from paying a visit to the restaurant chef and demanding a lemon, a pinch of crushed red pepper flakes, and more shrimp! Now you too won’t have to be tempted to embarrass yourself or whomever you are dining with. When you get a hankering for an easy lemon pasta to prepare, that is going to make every adult in your home happy, don’t hesitate to give this recipe a try. I do feel that this much flavor might be a tad too much for a young child. But if you too are empty nesters, I say GO FOR IT!
And of course, you must be a lemon lover. Because lemon is really the star in this pasta. Of course, the shrimp doesn’t hurt either. But it’s really the intense lemon flavor that takes this dish into a whole new realm of delicious. So, please give this recipe a try.
As always, keep smiling, keep cooking, and keep trying new dishes.
Heat the butter and olive oil over medium-high heat. Add the shrimp, green onions, and garlic; cook just until the shrimp turn pink, 2-3 minutes. Remove from pan with a slotted spoon.
Add the wine to the pan and cook until the liquid is mostly evaporated. Then add the broth, lemon zest, lemon juice, salt, pepper, and crushed red pepper flakes. Bring to a boil and cook for about 1 minute. Return shrimp mixture to pan and heat through.
Remove from heat and add in the al dente pasta. If more moisture is required, add in a bit of pasta water and return pan to heat for only about a minute. Taste, adjust seasoning if necessary, then stir in the fresh parsley. Serve immediately.
I am always looking for easy ways to serve veggies. And one of the veggies we particularly favor is the lowly sweet potato. But even if our taste buds admire sweet potatoes passionately, they can become a bit boring if they are always served the same way. So, with a minimum of effort, this simple combination of ingredients can turn your basic sweet potato into a dazzling low calorie side dish that everyone in your family will enjoy. And for the cook, who undoubtedly has other dishes to prepare, this recipe produces savory, crispy on the outside, buttery on the inside, chunks of vegetable goodness! With a minimal amount of effort! Now tell me true, who doesn’t welcome that kind of dish to their dining room table?!?! (This is a no brainer folks.)
I found this recipe on the chelseasmessyapron.com site. I added granulated onion because I could, and we were both seriously happy with the result. In fact, there was a bit of fork stabbing going on at the dinner table. But that’s all in the past now and no one lost an eye! Remember, It’s all fun and games ‘til someone loses an eye. (Sorry, family joke. Right Kaspar?) Anyway……
You simply must try this recipe next time you get a hankering for sweet potatoes. But don’t be surprised if you are unable to stop yourself from eating these little darlings until you are stuffed. Which BTW, is quite alright. The ingredients are all good for you. (Isn’t it grand when something tastes fabulous and it’s healthy too.) So, stop right now and add sweet potatoes to your grocery shopping list. Because if you are anything like me, if it isn’t on the list, it will probably remain at the food emporium along with all the other items that failed to be jotted down. (Isn’t it fun getting older?!)
As always, keep playing with your food, keep trying fun ways to get your family to eat healthier, and don’t worry if you slip once in a while and serve something that you are sure would cause eyebrows to raise. Like what I’m going to serve for dinner tonight, for example. Tonight, we are going to feast on salami and cheese grinders (think hot submarine sandwiches). Complete with mayonnaise, mustard, lettuce, onion, tomato, black olives, pepperoncini, and anything else I can think of to tantalize our taste buds. And on the side – Tim’s extra thick potato chips and a big old glass of dark beer. I can hardly wait! (And yes, tomorrow I’ll be good again.) But not tonight!!
Peace and love to all.
2 lbs. sweet potatoes, peeled and cut into roughly ½-inch chunks
2 T. extra virgin olive oil
¾ tsp. fine sea salt, divided
freshly ground black pepper
½ tsp. ground chili powder
½ tsp. paprika
½ tsp. ground cumin
½ tsp. granulated garlic
¼ tsp. granulated onion
Combine the olive oil, ½ teaspoon salt, pepper, chili powder, paprika, cumin, granulated garlic, and granulated onion in a large baking pan. (I use my fingers for this delicate operation.) Then add the sweet potato chunks and toss to coat every bit of every surface. Spread the coated chunks out evenly with no overlapping. (If the potatoes touch each other the pieces will steam rather than roast. Not what you want!)
Bake in a pre-heated 425-degree oven for about 30 minutes or until fork tender. Flip once during baking time.
Remove from oven, sprinkle with the remaining sea salt, and serve immediately.
Sorry for not posting for such a long time, but because of vacation, visiting a daughter post-surgery, breaking my nose, planning a trip to southern Oregon to attend my son’s wedding, and planning and booking camping reservations for our fall trailer trip, I haven’t had the opportunity to share recipes in my usual carefree and frequent style. And yes, I have been missing sharing great recipes with you all. But as with everyone, I must prioritize my time wisely. But I think I am finally at the point where I can resume my passionate incidence that you should have access to the best possible recipes an internet search can provide. So, basically – I’m back! (Well at least until our next vacation or until I break some other part of my body.) Good grief! And I thought I was invincible! Huh! Anyway……….
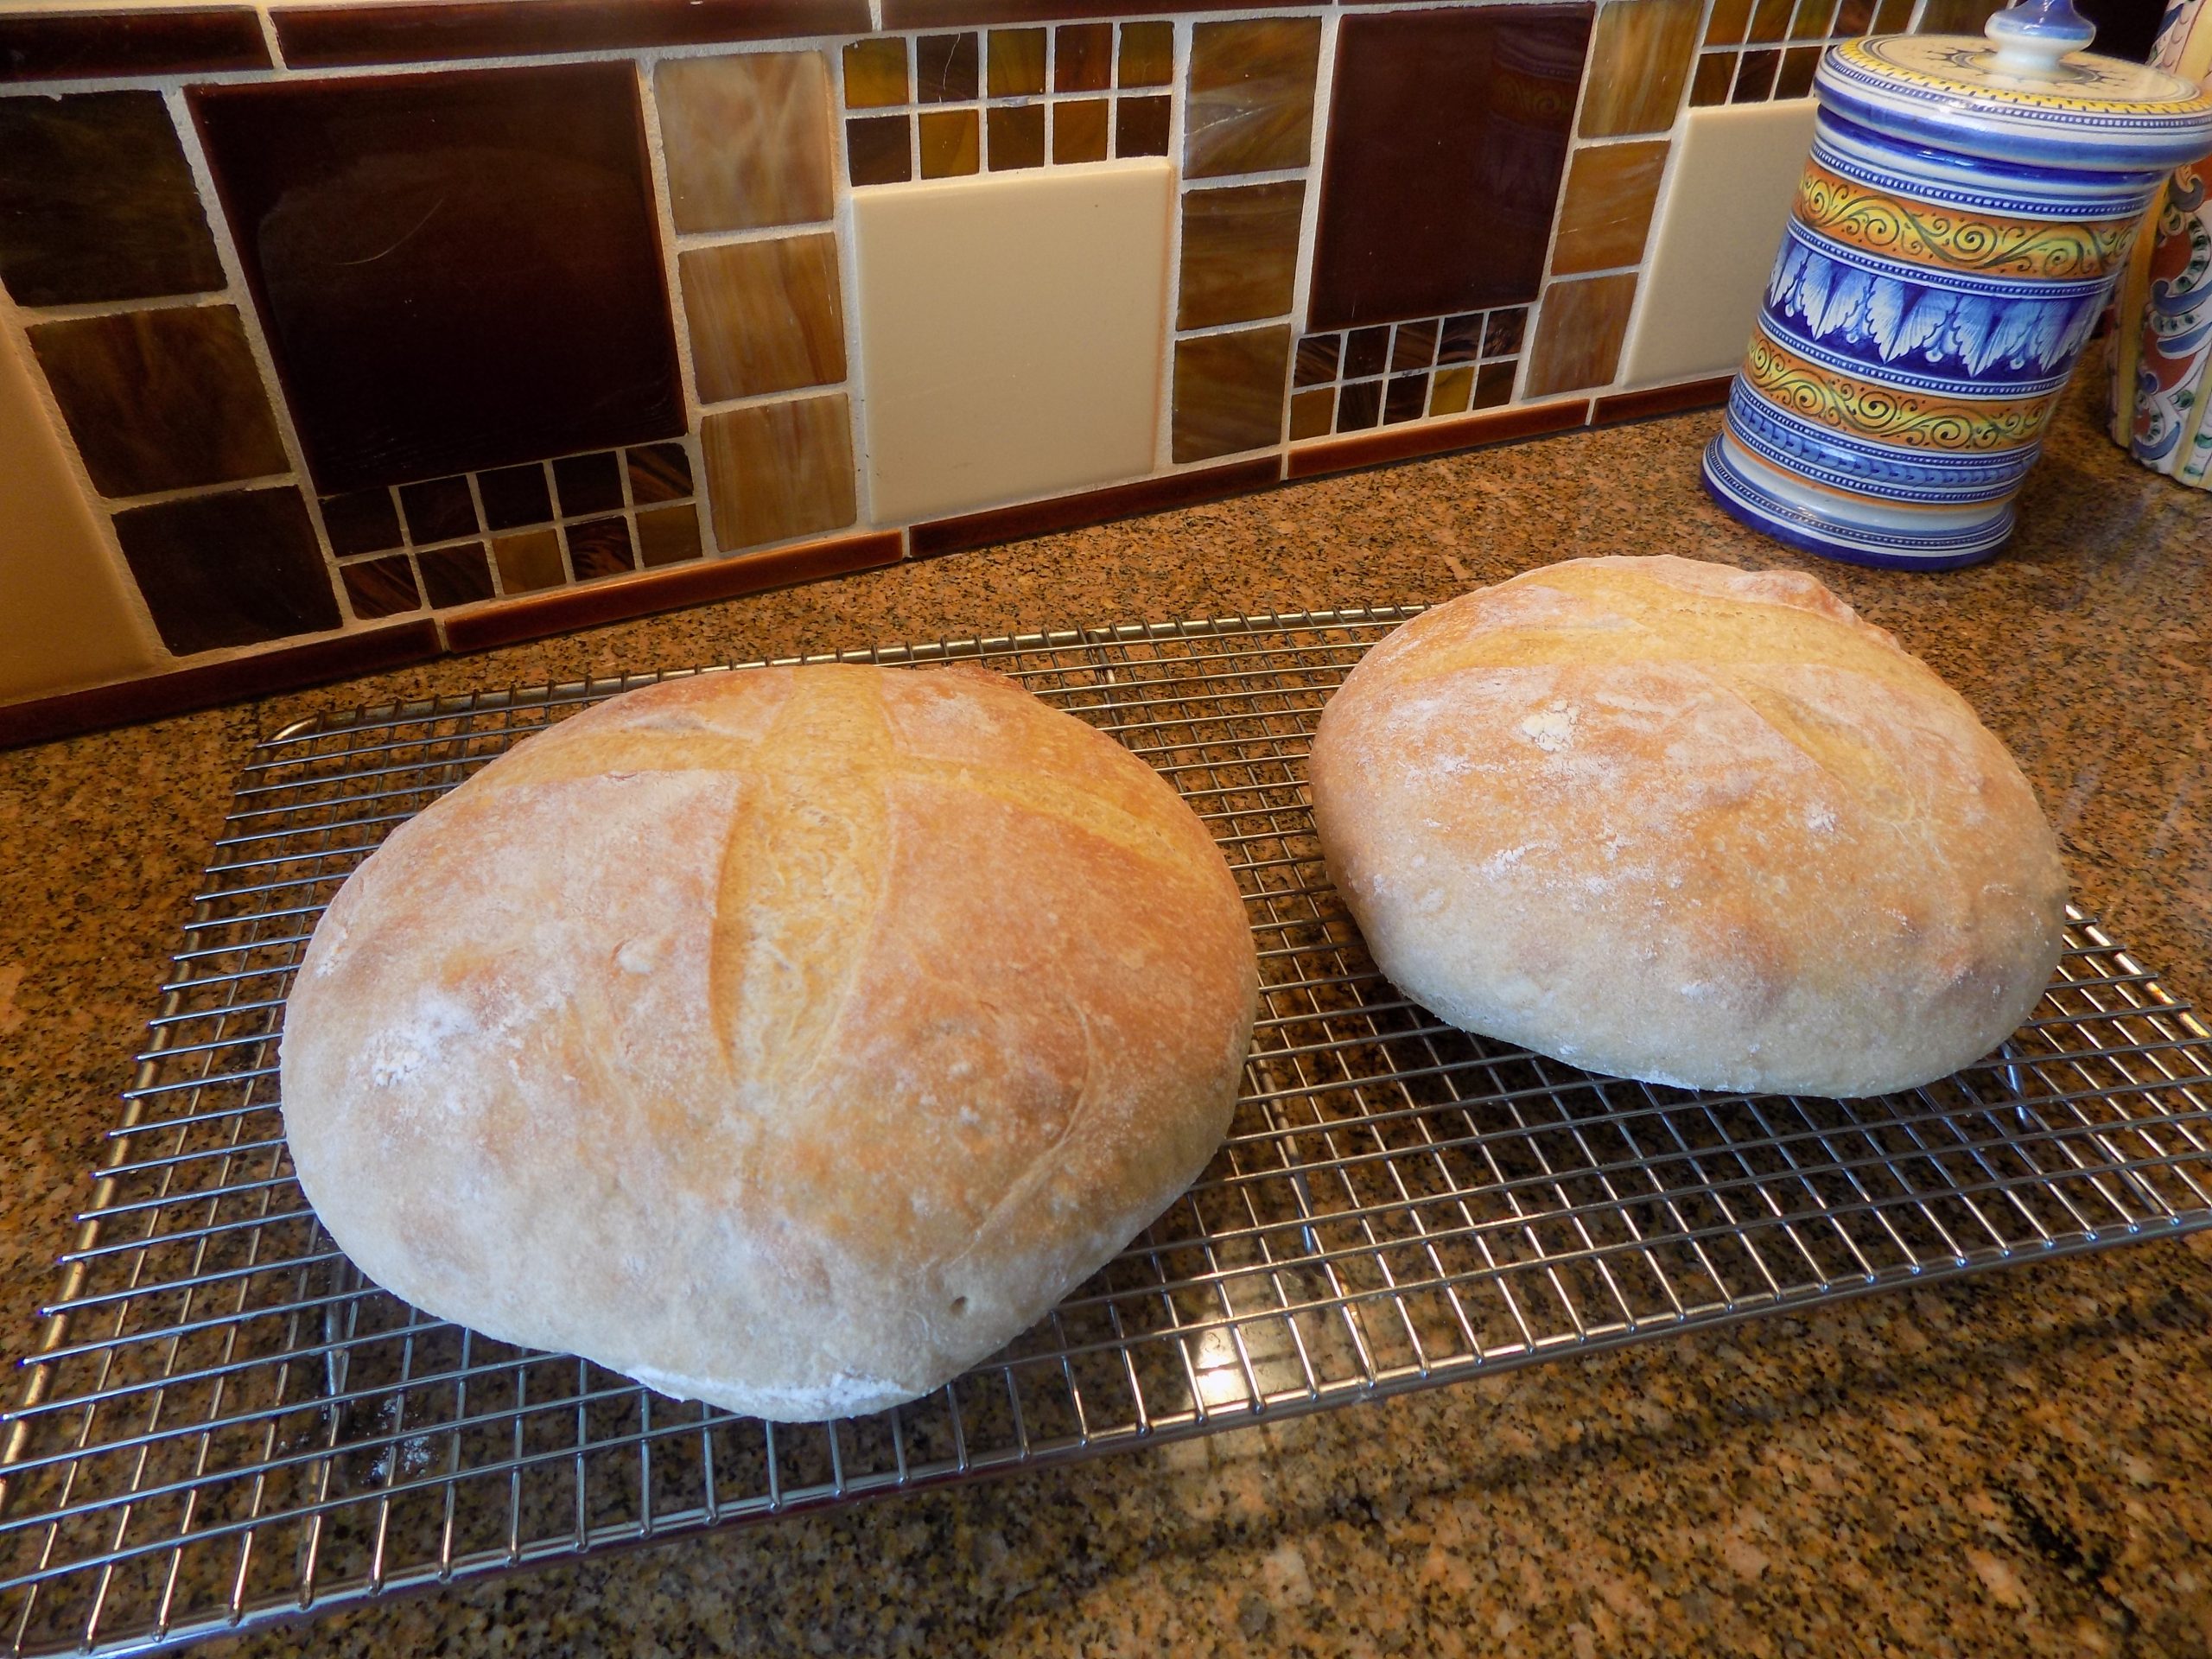
I’ve had this recipe ready to post since late March. But for all the reasons listed above, I am only getting to it today. But that doesn’t mean that it isn’t a first-rate recipe. Because it is! So, if you are a sourdough bread lover and have a sourdough starter languishing away in your fridge, you are in for a treat.
This bread is very easy to build, and it tastes like it came from a fancy bakery. When we were hosting jazz concerts in our home, and I would provide a full meal before the concert, I almost always served homemade bread to our guests. At one of the concerts one of the ladies asked me where I bought my bread. I told her I had made it myself. She stopped, looked at me for a few seconds, then said “wait – you mean people can make bread like this at home?” I quickly assured her that if I could make bread, then almost anyone who could read could do the same. That baking bread just took a little practice.
She was totally flabbergasted. She had obviously never contemplated such a thing. Where I on the other hand, I had never considered not making bread. Same planet, different world.
But, since you are reading about this recipe, you are either a friend catching up on what’s going on in my life, or you are a bread baker. If you are a maker of bread, I hope you enjoy this simple recipe. If you are a friend, I send you love from Chez Carr.
As always, have fun in your kitchen, but don’t forget to spend some time each day outdoors. Because it’s SPRING! And if you have the time, inclination, and a bit of ground or a nice large planter, plant some seeds. It is so fun and rewarding to experience the magic mother earth can perform with just a bit of tender care from you. Now please excuse me, I have some rhubarb to harvest. Rhubarb crisp – coming soon to Chez Carr.
Peace and love to all.
1½ c. warm water
¾ c. sourdough starter discard, room temperature
2 tsp. active dry yeast
1 tsp. granulated sugar
1½ tsp. kosher salt
¼ c. dark rye flour
¼ c. whole wheat flour
1 T. vital wheat gluten flour
3 c. bread flour, plus more as needed
extra virgin olive oil
Place the warm water, sourdough starter, yeast, and sugar in the bowl of your stand mixer. Let sit for 5 minutes. Add the salt, rye flour, wheat flour, vital wheat gluten flour, and 1 cup of the bread flour. Mix together with your bread hook. Let sit for 5 minutes.
Add enough remaining bread flour to make a soft, elastic dough. Dough should ball up around the bread hook, leaving just a bit stuck to the bottom of the bowl. The dough should be a bit sticky, but not tacky. Pour a bit of oil in the bowl and using your hands and a stiff rubber spatula, form the dough into a ball, completely greased with the oil.
Cover with plastic wrap and allow to rise until doubled in volume, about 90 minutes. Punch down once during this rising.
Cover a baking sheet with a rectangle of parchment paper. Gently shape the dough into two balls, using flour as needed, but avoid kneading. Place the dough balls on the parchment paper. Dust with a bit of flour and cover with a clean tea towel. Place in a warm spot for an hour. In the last half hour of rising, preheat your oven to 400-degrees.
Once the oven comes to temperature, slash an “X” on the top of each boule. (Don’t use too much force or you will deflate the bread.) Just let the weight of the knife do the work.
Bake for 24-27 minutes, or until golden brown and the internal temperature reaches at least 205 degrees. Remove from oven and cool completely before slicing.