WHISKEY SOUR

Well, as you can tell from the title and the picture, this is another recipe from Mr. C. The resident mixologist extraordinaire. (He would hate me referring to him as such, but it is what it is!) Anyway, this is a drink that I was surprised to find delicious. Because I am not usually a fan of drinks containing bourbon. Cooking with bourbon – absolutely. But with just one sip of this concoction, I was hooked.

Not only did this drink taste great, but it was also very pretty to look at. And isn’t that half the battle in the enjoyment of food or spirits. We first judge a dish or drink by how it looks. (Presentation really is important.) And part of the eye appeal of any drink is the glass or appropriate container in which it is offered. And a garnish never hurt the total effect either. So, just for grins and giggles, I decided to share a description of the 7 main types of mixed drink glassware we use in our home. Accompanied by the picture below so you can see an example of the glasses we use in each category.

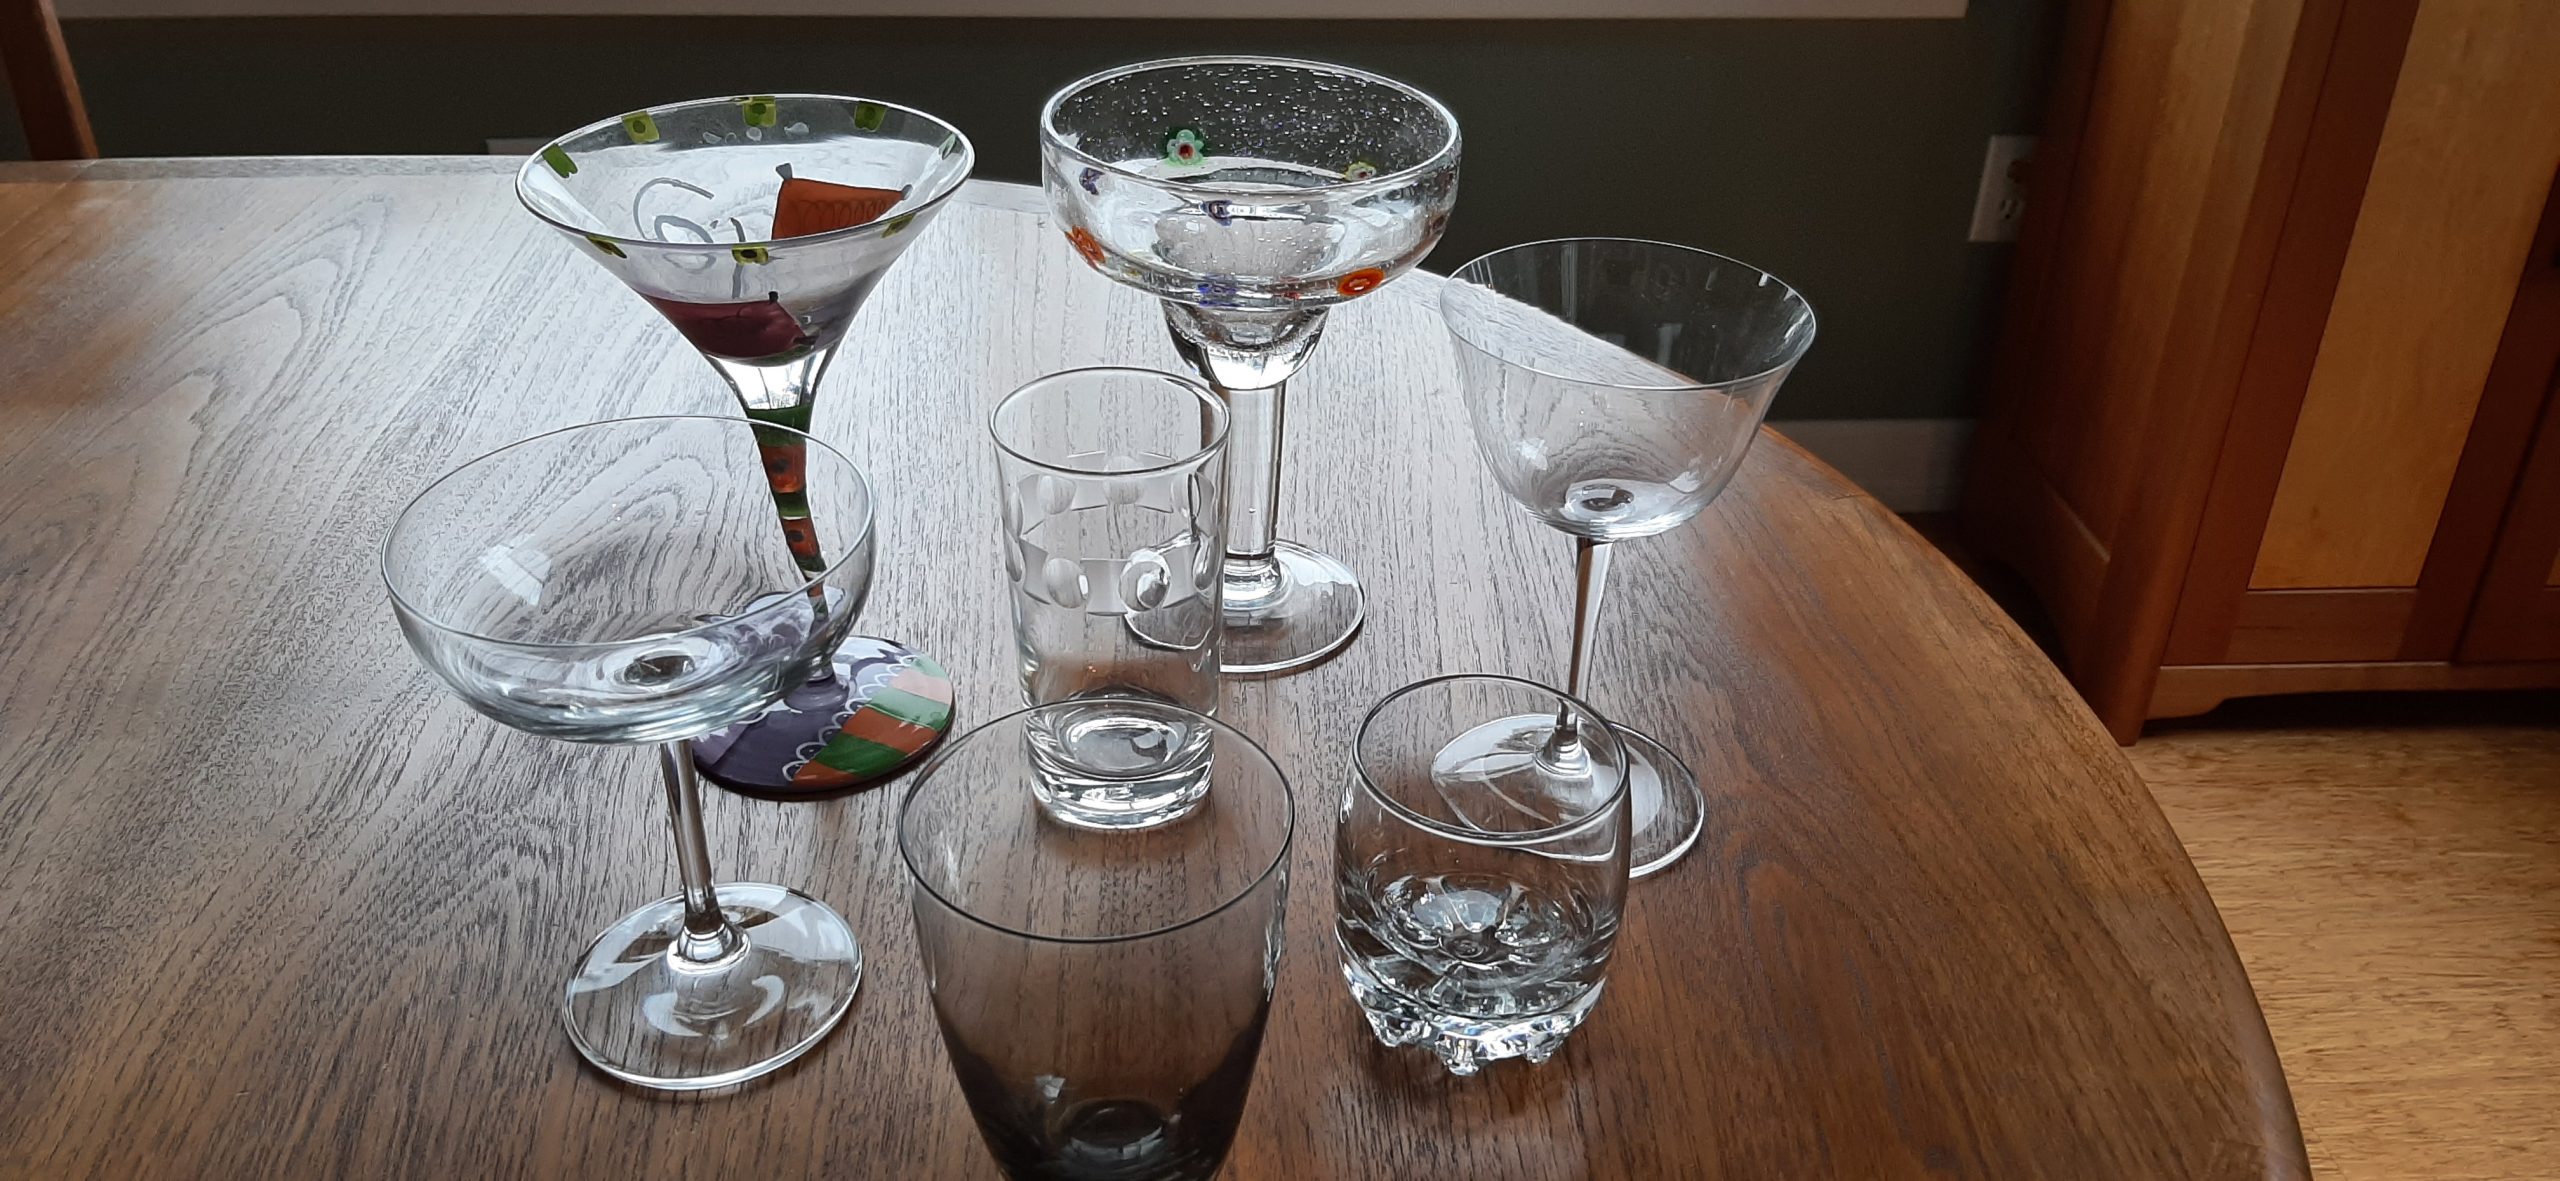
Top left – Cocktail or Martini glass. Top right – Margarita glass. Far left – Champagne Coupe glass. Middle – Collins glass. Far right – Sour glass. Bottom – Highball glass. Bottom right – Old Fashioned glass.

The main types of glassware for mixed drinks we use.

Champagne Coupe – a shallow, broad-bowled, saucer shaped stemmed glass. Often used for cocktails served “up” (like martinis) in lieu of a cocktail glass. (Less spillage from a coupe glass than a traditional cocktail or martini glass.)

Cocktail glass – a stemmed glass with an inverted cone bowl, mainly used to serve straight up cocktails. The term “cocktail glass” is often used interchangeably with “martini” glass.

Collins glass – a straight sided, rather narrow glass used for mixed drinks.

Highball glass – a glass tumbler taller than an Old-Fashioned glass and shorter and wider than a Collins glass.

Margarita glass – a variant of the classic champagne coupe glass. It looks like the bowl of a coupe glass resting on a smaller wine glass.   

Old Fashioned glass – traditionally for a simple cocktail or liquor “on the rocks” or “neat”

Sour glass – a stemmed glass equipped with an outward flared lip essential to the delivery of the silky smoothness associated with a Whiskey or Pisco Sour. As with all stemmed glasses, the stem helps keep a cold drink cold by keeping it away from the warmth of your hand.

So, with all that information for you to digest, I will leave you for today. But always remember, the final touches, be it salad served in a lovely serving bowl, or a dish sprinkled with even the lowliest of garnishes (fresh parsley or paprika for example) is a sign to everyone at your table that you have made a special effort on their behalf. It’s the little things people remember. You can talk until you are blue in the face, but your actions are what really count. So, make that last little bit of effort just for the sake of giving your family or friends the best you have to offer.

I have also included a likeness of the cover to Mr. C’s list of cocktails that are available to our guests as before or after dinner beverages. It’s just a fun way to give our guests a way to try something new or stick with a drink they love. Because for the appetizers, entrée, side dishes, and dessert, there are no choices to be made. Our guests are going to get only what I have chosen to serve. End of story!     

THE LIGHTNING LOUNGE – COCKTAIL MENU

Andy Carr – creator, keeper, and mixology enthusiast  

This beverage menu includes dozens of cocktail options, both classic and esoteric; and is organized according to the following base spirits:

Gin, Bourbon, Scotch, Rye Whiskey, Vodka, Tequila, Mescal, Brandy, and Pisco

You will find that this menu also includes Summer Coolers and Winter Warmers

CHOOSE YOUR POISON

As always, peace and love to all.

2 oz. bourbon whiskey

¾ oz. fresh lemon juice

½ oz. simple syrup

1 egg white

Ice

Angostura bitters


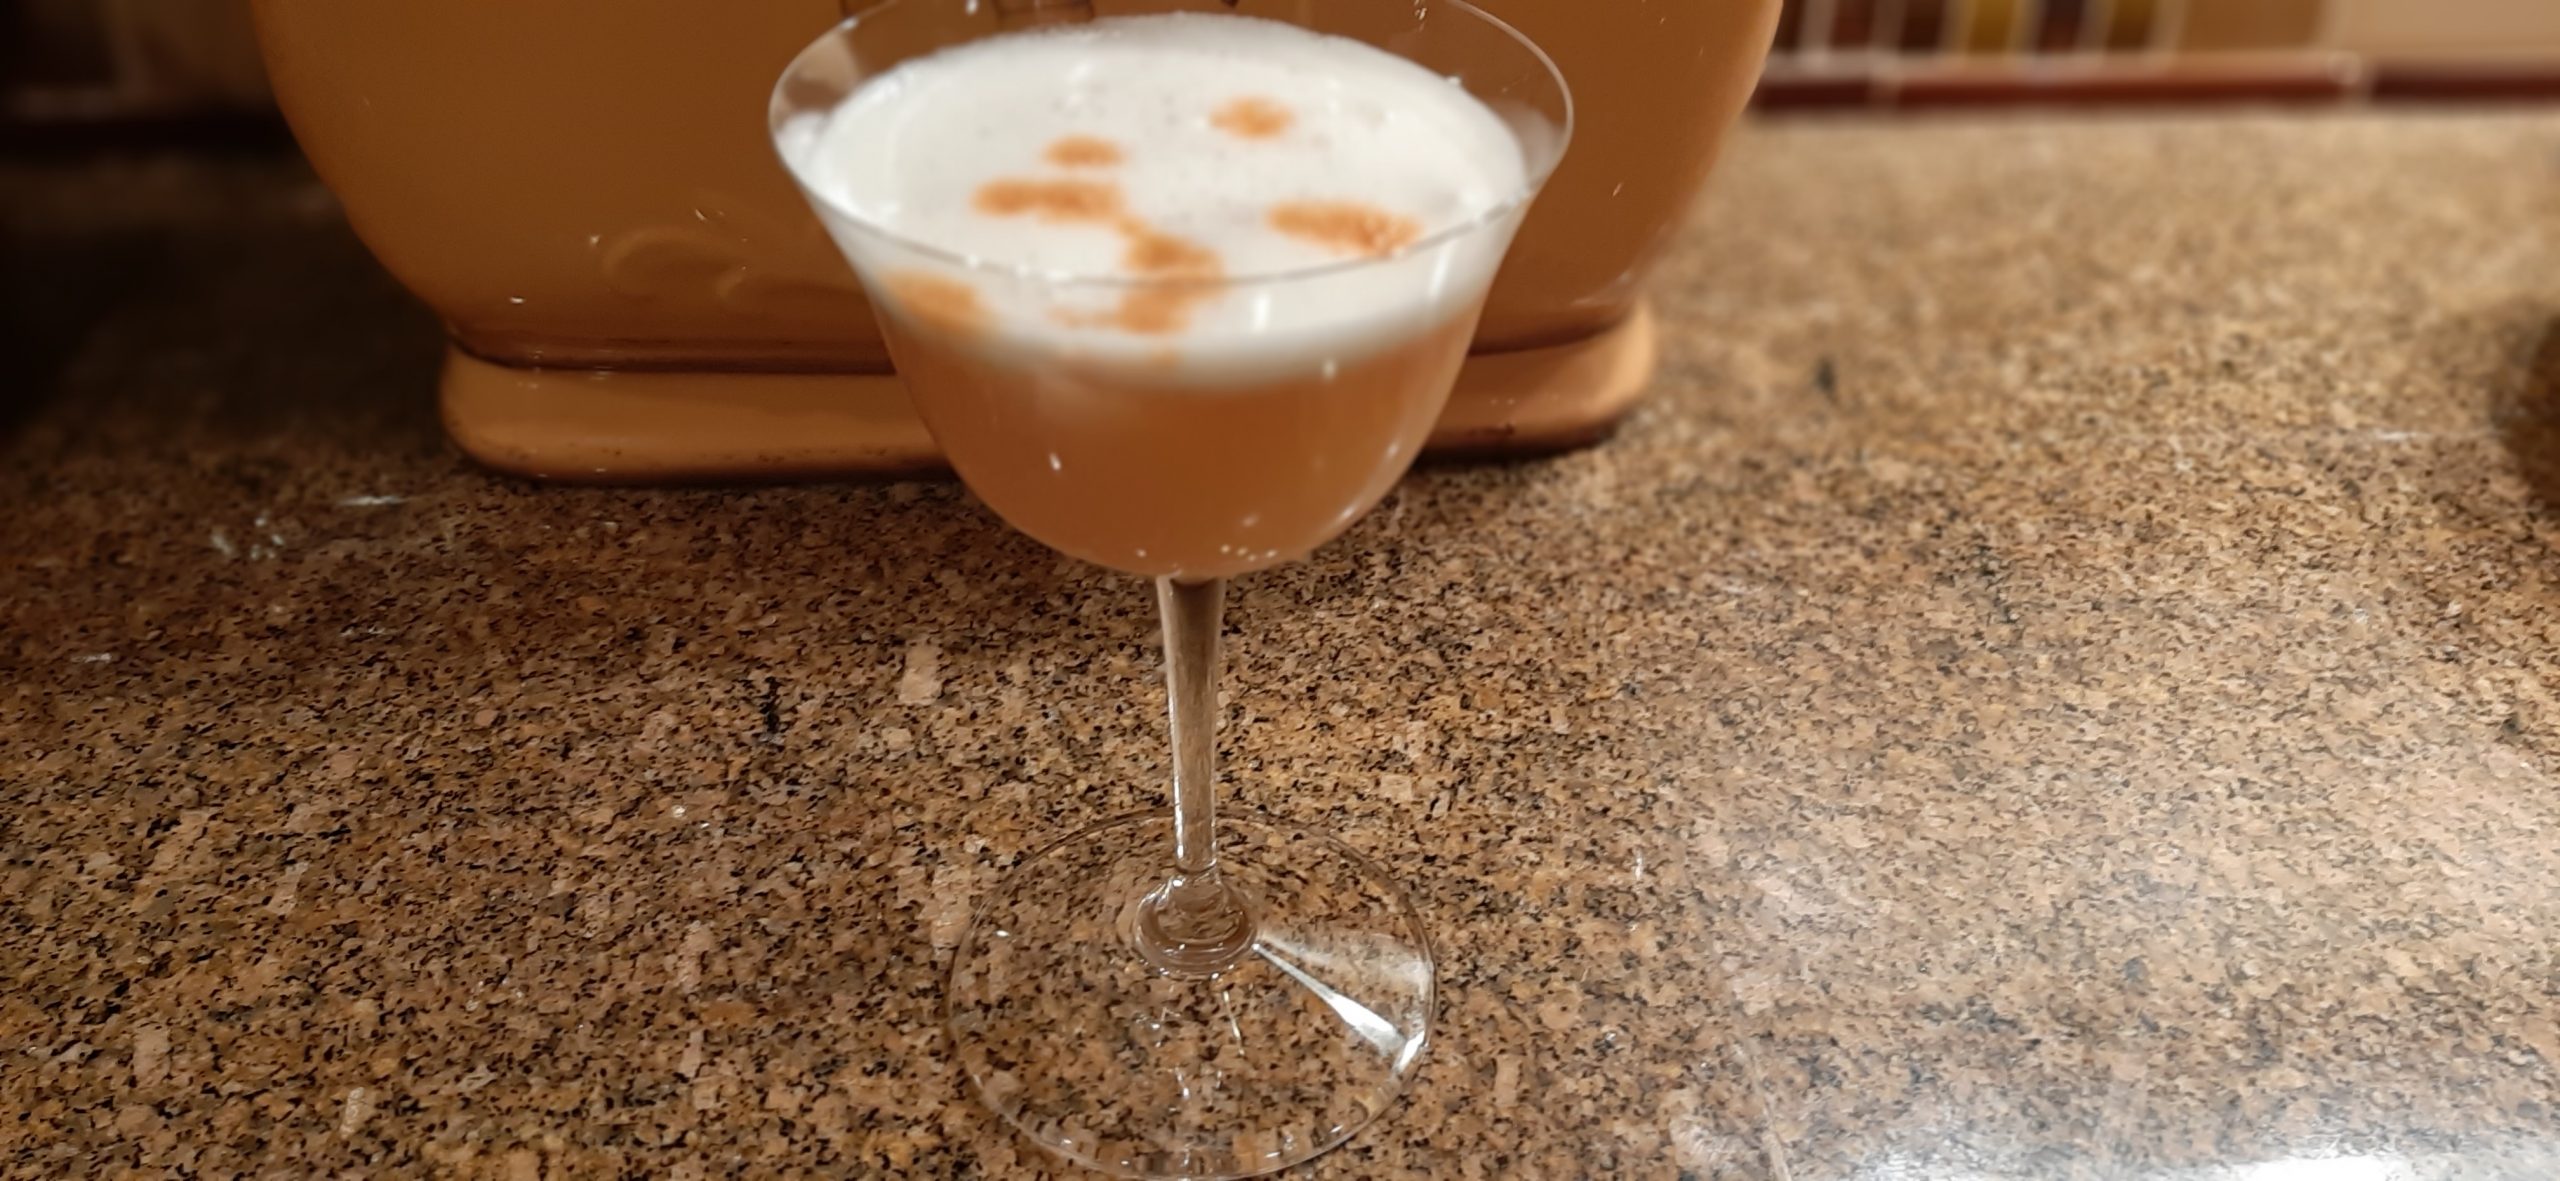
Combine the whiskey, lemon juice, simple syrup, and egg white in a cocktail shaker. Shake well to combine. (This is called a “dry shake”.) Then add ice and shake vigorously again. Strain into a chilled sour glass.  Add a few drops of Angostura bitters. 

Optionally, garnish with a half an orange slice and a maraschino cherry.  Serve on the rocks or straight up.

Please Note:

The standard IBA (International Bartenders Association) recipe does not include egg white (or as an optional ingredient, a “dash of egg white’).  With egg white included, it is sometimes called a “Boston Sour”.

If shaken properly, the egg white will form a natural froth on top of the drink.  A variant of the whiskey sour is referred to as Ward 8.  Which is often based on bourbon or rye whiskey, and includes both lemon and orange juice, and grenadine syrup as the sweetener.

SOFT ITALIAN BREAD

I know, I know! Another bread recipe. But as much as I think I have every base covered with bread types, something comes up that causes me to go online and search for exactly what I need. Then invariably, I change the recipe anyway. Which is exactly what I did with this recipe. So much so, that no one could possibly recognize this recipe as their own inspiration. Unless of course, they had the same type of bread in mind. Then all bets are off.

What I wanted was a quick and easy bread to build, that was tasty, and came with a soft crumb. And believe it or not, that’s exactly what I achieved. When the moon is in the seventh house and Jupiter aligns with Mars. Let’s just say it was a 5th Dimension “Aquarius” kind of moment. And I shall now always believe in harmony, understanding, sympathy, and trust abounding. Let the sunshine in!

So, if you too want to build a bread that is just amazingly easy to make, tastes like a million dollars, and can be used in multiple ways, may I recommend this recipe. It is so stinkin’ delicious as to be almost unbelievable. And – it’s inexpensive to make.

So, without further ado, let the baking begin. And while you hurry to your kitchen to bake this bread, I’m going to start a new book. Some people believe in eating an apple a day. While we too love apples, Mr. C. and I get more nourishment from reading a book a day. Or if we are really busy, a book every two or three days.  

So, from this, you may ascertain, and rightly so, that we spend a great deal of our time reading books. (Enough so that our TV has disowned us.) So, I was pleased to learn a new word that explains why time often slips away unnoticed when our noses are buried in a good book. It might also help you understand more about yourself if you too are an avid reader. The word is Book.clipse, pronounced boo-klips. Definition – a phenomenon in which a book is so engrossing that it completely obscures one’s perception of time. So, as you can clearly see, since there is now a word to describe our condition, we are not alone. And isn’t that nice to know.

And for those of you who aren’t into books, a few things to consider. Batteries are not required. Books don’t have to be plugged in at night. And you can borrow them from a library (free of charge). And best of all – you can learn about other cultures, places, and how people live in books. While simultaneously improving your ability to empathize, gain valuable knowledge, exercise your brain, while being entertained commercial free.    

On that happy note, peace and love to all. And happy reading.

2 tsp. instant yeast or 2½ tsp. regular dry yeast

1 tsp. granulated sugar

1 c. warm water

2½ c. bread flour

2 T. extra virgin olive oil, plus more for greasing the dough

1 tsp. kosher salt

In the bowl of your stand mixer, combine the yeast, sugar, and warm water with your dough hook. Let stand for 5 to 10 minutes or until yeast is foamy.

Add 2 cups flour, olive oil, and salt. Stir on low speed until a shaggy dough forms. Increase the speed to medium and knead the dough for about 5 minutes, adding just enough of the remaining flour to form a soft, smooth and elastic dough. (Just a bit of the dough will stick to the bottom of the bowl, but the sides will be clean.)

Pour a bit of olive oil in the bowl, and using your hands and a stiff spatula, form the dough into a greased ball. Cover bowl with plastic wrap and let dough rise 60 to 70-minutes or until doubled in size.

Line a baking sheet with parchment paper. Punch down the dough and shape it into about a 12-inch rounded ends football shape (bâtard). Place on prepared baking sheet. Cover with plastic wrap that has been lightly coated with a bit of cooking spray (greased side down) and let rise another 35-45 minutes until puffy. Gently use a serrated knife to make a few ¼-inch deep slits in the surface of the loaf just before placing in the oven.

About 20 minutes before the dough is ready to bake, place a pan of water* on the bottom rack while you pre-heat your oven to 400-degrees.

When the oven is up to heat, bake the bread for about 20 minutes or until golden brown and the internal temperature reaches at least 200-degrees.

Remove from oven and place on a wire rack until completely cool before slicing.

*When I pre-heat my oven for this bread (and many others for that matter) I place a 9-inch cake pan filled with water on the bottom rack and bake the bread on the middle rack.

Adding steam to the oven when baking bread makes a huge difference to the final product. When the dough is fully risen and ready to go in the oven, it still has some potential to rise further in the heat of the oven. This is referred to as “oven spring”. The carbon dioxide trapped within the gluten expands in the heat of the oven and causes the air bubbles to expand and the loaf to grow larger. So, to achieve maximum “oven spring”, the dough requires a steamy atmosphere. If you place the dough into a hot, dry oven, the crust will very quickly dry out and harden. And once it has hardened it won’t be able to expand as easily. Steam will also help improve the color of the crust by gelatinizing the sugars on the exterior of the loaf, resulting in better browning, and a shinier, thinner, and crispier crust. 


DARK RUM BAKED BEANS WITH BACON  

This is my second posting for these beans. The first post was published on New Year’s Eve. Then a few days later I deleted the recipe. Because I had baked the beans in a Corning Ware covered casserole dish, (for a pretty presentation), but the beans never got tender. After several hours in the oven. So, I took this recipe off my blog. Even though I had made these beans successfully for decades. Then I realized (after the fact) that the type of casserole dish I used does not hold the heat like a Dutch oven. Either the old-fashioned kind or like a Le Creuset enamel coated cast iron pot. Duh. Then my dear friend Vicki said she looked for my recipe because she liked the beans so much. So, I am re-posting this recipe. But please note: Either use a heavy cast iron pot (as shown in the picture) or cook the beans part of the time on your stove top so they can get really hot and tenderize completely.

Original post: OK, this is a recipe for old fashioned, starting from scratch, no fancy equipment required, baked beans. The kind you find in great BBQ joints – if you’re lucky. And the kind of delicious baked beans that take hours of time in your oven. I’m serious. Great baked beans need to spend several hours in a low and slow oven. But OMG is it worth the time. And patience. Because if there is anything better than baked beans, I have yet to discover what dish that could be! And all thanks go to my father – Albert Merz. Smart, educated, never said a mean word about anyone, Swiss-French musical genius. Not a perfect man, but the one who taught me to be happy and love life.

Now, my dad could build baked beans. But his baked beans did not contain dark rum. That was my addition. And a fine one if I may be so bold. And several of the other additives like Worcestershire sauce, thyme, and savory are all on me. But if he were still alive, I’m sure he would approve. But molasses and brown sugar – oh yah. He would add them in large quantities. Because really, baked beans are meant to be sweet. Or at least, in my opinion, great baked beans are sweet. Other types of bean dishes, not so much. But baked beans – go on over to the dark side and add brown sugar like it was going out of style! And bacon.

And yes, I do have a recipe for Vegetarian Baked Beans that is really very nice. But nothing beats this recipe when you want to go all out. I also have a recipe for Instant Pot and Oven old Fashioned Baked Beans that is lovely. (If you happen to have an instant pot, that is.) (I did but gave it back to daughter Paula because I never used it.) Call me old fashioned, but I like to soak beans and go from there. But the result is very much the same.

But regardless of what recipe you use, homemade baked beans are one of the reasons life is worth living. And because life is too short to eat mediocre food, go the extra mile and fix baked beans from scratch. And yes, I have doctored canned baked beans before to good result. Because once upon a time I too was a working mother and time was of the essence. But now, being a retired person with a bit more time on my hands, I wouldn’t think of paying good money for a small can of baked beans when I could build the whole mess from ingredients I almost always have on hand. So, consider this recipe next time you throw a BBQ party, or your family has requested a ribs, baked beans, and potato salad meal. But please, if you are in the area, let me know. I’ll bring dessert.

Well, that’s it for now. It’s New Years Eve and we are off to a potluck dinner at our neighbors Andy and Amy’s home. And guess what I’m bringing. Got it in one. Baked Beans.

So, to all – HAPPY NEW YEAR.

And as always, peace and love to all.

3 c. dry Navy beans (about 1½ lbs.) picked over and washed 

¾ lb. meaty bacon, cut into ½-inch pieces 

1 lg. yellow onion, chopped

3 garlic cloves, chopped

2 c. water, plus more if needed

2/3 c. molasses (not blackstrap – too strong)

1½ c. ketchup

½ dark rum, opt. (but why?)

2 T. Worcestershire sauce

2 tsp. paprika

½ tsp. seasoned salt

½ tsp. dried thyme leaves

½ tsp. dried savory

tiny pinch ground cloves

freshly ground black pepper

¼ c. Dijon mustard

1½ c. brown sugar, or more to taste

Day 1:

Place the washed dry beans in a bowl. Cover with 2 to 3-inches of cold water and set the bowl on your counter overnight. If it’s very warm in your kitchen, place the beans in your refrigerator. Drain and rinse the beans before using.

Day 2:

Fry the bacon till most of the fat has been rendered in a large covered Dutch Oven. (And no, you don’t drain off the bacon fat unless there is quite a bit. But with lean bacon you shouldn’t have too much.)  Add the onion and sauté just until translucent. Add the garlic and cook for one minute.

Stir in the drained, soaked beans, water, molasses, ketchup, rum, Worcestershire sauce, paprika, seasoned salt, thyme, savory, cloves, black pepper, Dijon mustard, and brown sugar. Taste the sauce and adjust seasoning and brown sugar as desired.

Cover and bake in a pre-heated 300-degree oven for about 7 hours. Remove the lid and continue baking for another hour so that the top can brown nicely. (During the covered baking time, check the beans periodically to make sure they aren’t drying out too much. You can even give them a stir. Add water as needed. Or salt if required.)

Remove from oven and serve warm.

Can be made ahead, refrigerated, and warmed just before serving.

JAM TARTS

Jam Tarts just out of the oven.

Jam Tarts with whipped cream and other yummies.

Leftover Jam Tarts. Yeah!

Yesterday I had this overwhelming desire to make quiche. Which happened. But after I had rolled out the crust for the quiche, I was left with a few pie crust scraps. Not enough to make another quiche or even a small pie. So, what to do with the bits that were left? I could always make Pie Crust Cookies. (See how-to below.) Then, I remembered that I owned at least 10 small tart pans. (I used to make mini quiches and tiny pecan tarts fairly frequently for parties or special events.) So, since we were having company for dinner, why not make some sweet, small, one bite tarts for dessert? But what to use as the filling that didn’t require more time in the kitchen? Plus, I didn’t have much dough to work with. So, even if I did have the time to make a filling, I would probably then have left over filling. Sometimes you just can’t win. But as it turns out, I did win. (This time!)

As I was debating what to use as a filling in these tart shells, I thought about using a bit of jam or jelly. But I had never actually used jam or jelly as a filling for small tarts. Or was there even such a thing as a jam tart?

Well, boy howdy, after searching the internet for jam tart recipes, I realized mini jam tarts were very popular. (About 16,200,000 results.) So, that’s just what I did. My only dilemma at this point was which jam to use. Since I had my own freezer rhubarb jam and gifted homemade strawberry jam already open in our fridge, I decided on the strawberry jam. And these little dessert bites turned out to be very delicious. Who knew?

I plated them along with a few other miniature sweet bites of this and that left over from Christmas. And this became a very nice way to end a meal.

So, if you too ever find yourself with leftover pie crust dough, consider making some tiny jam tarts. They are just so cute. And they taste good too.

Well, it’s sunny here on Camano Island today. But cold. Very cold. So, we are hunkering down for the day. Mr. C. is writing out band charts for a local singer (our dear friend Joan), and I am trying to decide whether to prepare Pasta with Arrabiata Sauce or Puttanesca for dinner. (Both recipes on this site.) Darn hard choice because we both adore these dishes equally.

May you too only be burdened with choices like my simple quandary described above. The world would be in such a better place if people everywhere had nothing of greater significance to contemplate than what to serve for dinner. Which gave me pause to reflect on how very lucky I am. And to give thanks to whichever deity happened to be listening for my wonderful life. I am well and truly blessed. Which is always my hope for each of you too.

Peace and love to all.  

JAM TARTS

leftover pie crust (find my favorite recipe for pie crust below)

jam, jelly, or curd

Roll out the pie crust. (Not too thin.) Using a 2½-inch round cutter, make as many circles as possible. Carefully transfer the circles to an ungreased tart pan. Place about 1 teaspoon of jelly, jam, or curd in each pastry cup. Don’t overfill, or the jam, jelly, or curd will leak out of its confines and possibly burn.

Bake in a pre-heated 350-degree oven for about 35 minutes. Remove from oven and using a small offset spatula or table knife, carefully transfer the tarts to a cooling rack.

To decorate, you can dollop with a bit of whipped cream or shake a bit of powdered sugar over each one. But really, these babies are just wonderful ungarnished.

PIE CRUST

¼ c. very cold water

2 c. unbleached all-purpose flour, fluffed

1 tsp. kosher salt

heaping 2/3 c. Crisco

Step 1 – Pour cold water into a small bowl. 

Step 2 – Measure flour and salt into a mixing bowl. 

Step 3 – Take 1/3 cup of the flour back out of the mixing bowl and stir it into the water. Make a paste. Set aside. 

Step 4 – Add the Crisco (heaping 2/3 cup) to the flour and salt mixture. Mix together. (I use my KitchenAid mixer.) 

Step 5 – Add the water/flour paste to the flour/shortening bowl and mix just until blended. Do not over-mix. Roll out dough and place on a pie plate. This recipe makes enough dough for a double crust pie, if using a regular sized pie plate, or one large bottom crust with a little left over for pie crust cookies or small tarts like the one shown below.

Helpful hint: Use a pastry cloth to roll out your pie crust. It really makes a difference. You can find pastry cloth in almost any kitchen wares shop. Well worth the $10 or so.

PIE CRUST COOKIES

leftover pie crust

cinnamon

granulated sugar

Roll out your leftover dough. Cut into fancy shapes if you must. But really, just cut into pieces large enough to handle. Transfer to a baking sheet. Sprinkle with cinnamon and sugar. (You decide how much.)

Bake in a pre-heated 350-degree oven for 9-11 minutes or just until beginning to turn a light golden brown.  

Remove from oven and cool on a wire rack. Then prepare to enjoy one of the most delicious treats you will ever put in your mouth.

MY FAVORITE DESSERTS

Oh my, even trying my very best, keeping my list of favorite desserts to a manageable number posed problems.

1) Should I put some cakes under this category or were they already included under My Favorite Cakes? (Already posted.) Because homemade cakes are also one of my favorite desserts to serve. But it seemed only proper (at the time) that cakes have their own special list. So, bottom line, when looking for a special dessert you should also look at my list of favorite cakes. (Why I didn’t just combine the two lists is something I will never understand. But at the time, it made sense). (Isn’t retrospect wonderful?) Right!!! Anyway, this list contains, except for my list of favorite cakes, cookies, and candy, (all perfectly correct to serve at the end of a meal BTW), some delicious ways to end a meal. And I know, almost all meals that end with dessert are a treat. Because, I don’t know about you, but I don’t usually serve dessert. Well, unless we are feeding company, that is. But just Mr. C, and me – heck no. We don’t need the extra calories. But with guests, all bets are off!

2) Which of all the desserts on my site would I not want to eat again? And the answer to that was – not one bloody one of them! I like them all! So, making choices was difficult. So, even though I tried really hard, I could not exclude any of the desserts you find listed below.   

So, given my logic for this long list, I hope you find this, and my other “favorite” lists helpful.

Well, snow is semi-predicted in our part of the world for later today and for the next couple of days. I say “semi-predicted” because the weather people can’t seem to make up their minds whether we should worry about the weather, or whether the weather is not going to cause us any grief at all. (Don’t you just love the English language. How did any of us ever learn to spell!)

So, on the happy thought of snow possibly falling on our beloved homeland, I’m planning quiche and spinach salad for dinner. But it won’t make itself. So, I better get to it.

As always, peace and love to all.

MY FAVORITE DESSERTS

Affogato

Almond Cake with Strawberry Sauce and Vanilla Bean Paste Whipped Cream

Amaretto Peach Cobbler

Apple Crisp with Spiced Rum and Cinnamon Whipped Cream

Bailey’s Irish Cream Cupcakes with Espresso Cream Cheese Frosting

Banana Split Trifle with French Vanilla Pudding, Pound Cake, and Chocolate Chunks

Berry Pie Bars

Bourbon Pecan Pie with Bourbon Whipped Cream

Bread Pudding with Spice Rum Sauce

Caramel Apple Bars

Chocolate Mousse with Cointreau

Chocolate Chip, Macadamia Nut, and Toasted Coconut Bars

Cherries Jubilee

Crumble Topped Raspberry Tart in an Oatmeal Crust

Flourless Orange Chocolate Cake

French Apple Pie

Fudgy Brownie, Chocolate Mousse, and Raspberry Trifle

Gooey Lemon Butter Cake

Italian Dream Cake

Lemon Meringue Pie

Lime or Lemon Curd Topped Cheesecake Bars

Mince Tarts or Pie with Bourbon Caramel Whipped Cream

Mincemeat Bars with Brandy Whipped Cream

Mixed Berry Trifle

Nantucket Cranberry Cake

Peach and Blueberry Galette in a Cinnamon Sugar Crust

Peach Kuchen

Peach Pie

Pumpkin Pie Bars with Bourbon-Caramel Whipped Cream

Pumpkin Pie with Bourbon Whipped Cream

Rhubarb Crisp with Caramel Whipped Cream

Rhubarb Pie

Salted Caramel Turtle Brownies

Salted Caramel Upside-Down Apple Cake

Salted Dark Chocolate Fudge-Walnut Brownies

Strawberry Buckle

Strawberry Rhubarb Cheesecake Bars

Strawberry Rhubarb Crumble

Strawberry Shortcake

Sweet Potato Pie with Bourbon Caramel Whipped Cream

Tart Cherry Topped Cheesecake Bars

Tiramisu

DILL PICKLES

I can’t believe I haven’t already posted this recipe. Because truly, these are the best dill pickles you will ever eat. And yes, I know, this is not the time of year to make dill pickles. I got that. But, if I had realized earlier that I had been so remiss, you would already have the recipe. You see how that works? But in making My Favorite This and That Recipes list, I discovered my omission. But it’s never too late, as the old saying goes. Plus, better late than never! And sorry about no picture. But use your imagination and conjure up a picture of a small cucumber turned a lovely shade of dark green. You got it!

As I stated above, these are the best dill pickles ever. Plus, they are easy and inexpensive to make. But best made outdoors. Allow me to explain.

Many a time dill pickles were made at an afternoon Pickle Packin’ Party at our Bellevue home on a sunny early autumn afternoon. We would invite family and friends to come and share the fun and then stay for a BBQ dinner. Because bottom line, packing pickles is most fun when done with others. And since there is a lot of water involved with pickle making (washing the cucumbers and making the brine) watching out for friends and spouses coming close to you with a hose is always a concern. Sunny days and waterpower can easily (and did) turn a normally passive spouse or friend into a crazed adult. Of course, there may have been beer involved, but who can remember that far back! All I know is that fun was had by all. And the result was everyone went home with pickles a plenty.

So, if you too are into dill pickles, give this wonderful recipe from our dear family friend Charlotte a try. I’m not kidding – these pickles are amazing.

Also, hosting a party where some type of edible to share is being prepared is worth the effort. I don’t care if it’s Glögg, pickled herring, cookies, chicken stock, beef stock, demi-glace, or dill pickles. (All edibles that have been the theme of parties we have hosted in the past). Even the folks who are only interested enough in a kitchen to be able to find the dining table, refrigerator, coffee maker, and where the booze is stored are going to enjoy themselves. I mean really, who doesn’t have fun at a party? Especially if there’s food being made and food being eaten. And perhaps a drink in hand!

So, if you haven’t yet made a New Year’s resolution, hosting a food making party might be an easy “resolution” to fulfill. And who doesn’t appreciate even one resolution marked PAID.

As always, peace and love to all.      

12-14 wide mouth qt. jars and lids

12 lbs. pickling cucumbers 3-4 inches long

1 lg. bunch fresh dill, cut into 4-inch lengths

12-14 peeled garlic cloves

2-2½ tsp. alum

12-14 sm. dried hot red peppers

2 qt. white vinegar

6 qt. water

2 c. pickling salt (you can use kosher salt if it doesn’t contain anti-caking agents)

Thoroughly scrub the cucumbers and lightly pack them in jars. To each jar add a lot of fresh dill (stems and all), 1 garlic clove, ⅛ teaspoon alum, and 1 hot red pepper.

In a large pot, bring the vinegar, water, and salt to a boil.

In another pot, place the lids in water to cover and bring to a simmer (180-degrees) for at least 10 minutes. Do not let the lids boil. Keep the lids in the simmering water until ready for use.

One at a time, pour hot brine over the cucumbers up to the neck of the jar. Quickly wipe the rim with a clean cloth and pop on one of the lids. Tighten it down with a clean ring. Seal as tightly as possible. Store for about 3 weeks before enjoying the fruits of your labor. (And yes, cucumbers are botanically a fruit.)

Please note: Even if a couple of the jars don’t seal properly, they should be just fine. The brine for pickles being high in vinegar (acid) and salt, does not support the growth of Clostridium botulinum bacteria.   

MY FAVORITE GRAVIES

My friend Jim called last night to tell me I forgot Mashed Potatoes and “Grandma” Gravy from my posting of My Favorite Side Dishes. I had a list already started for Savory Sauces and Gravies, but after talking with Jim I decided gravies needed their own list. Because if anything is more delicious and harder to achieve than a fantastic gravy, I have yet to prepare or taste it. And about the “grandma” part, well it’s because Jim always tells me I make good gravy because I’m a grandma. Ridiculous! It’s not being a grandma. The number one secret to making great gravy is time. Time spent preparing gravy (decades in my case) and actual time for the gravy to burble while the flavors develop, and the mixture thickens to glossy perfection. So, in my estimation, practice and patience are the two main ingredients in a wonderful gravy.   

So, along with providing you with my list of favorite gravies, I decided to write down my way of ensuring successful gravy results. There are just a few simple steps to follow, but they make all the difference in the world. (Or at least I think they do!)

Fat – drippings and brown bits from roasting/frying turkey, chicken, pork, or beef, unsalted butter, or fat of choice.

Flour or starch of choice – added to fat over low heat until the mixture resembles wet sand. This step takes time because you want all the fat absorbed by the starch. (And BTW, flour is my starch of choice.) If you are adding onion, garlic, or any other veggie to your gravy, slowly caramelize the onion in the fat and add the other veggies for just a minute before whisking in the flour. Let the mixture turn a nice golden brown before slowly adding liquid.

Liquid – Hot broth or stock (homemade is best), milk, or cream whisked in a small amount at a time until desired consistency is achieved. Whisking helps prevent lumps. This process takes me at least 20 minutes. Actually, when I am making turkey gravy, I start making the gravy as soon as the turkey comes out of the oven and has been transferred to a platter to rest before being sliced.

Don’t add salt until your final taste before serving, especially when using purchased broth or stock. (Even low-sodium stock or broth.) And never add salt when you make your own broth or stock. Salt can always be added. But do add a bit of freshly ground black pepper to any gravy.

Taste as you go along. If a boost of flavor is required, add a bit of base or even a gravy mix. (All’s fair when it comes to great gravy!) Better Then Bouillon makes great flavor bases. Plus, they offer a wide variety of flavors.    

For brown or white gravy, add a bit of Kitchen Bouquet. Kitchen Bouquet adds a nice rich color to your gravy. This seasoning sauce is primarily composed of caramel with vegetable flavorings. I also use KB in stews and some soups.

For any gravy, fresh herbs and spices can be really tasty. Wine or dry sherry are also fine additions.

Give it time! Gravy requires time to thicken and become silky smooth. So, never rush your gravy. And serve it super-hot.

Cognac – OK, not everyone has a small bottle of cognac in their pantry. But I would not have it any other way. Just a bit added to some gravies just before serving lifts the taste of your gravy to a new dimension. A tad bit of fresh lemon juice is also wonderful for certain gravies. 

Well, that’s it. All I have to say on the subject of gravy. Except, gravy is comfort food. Probably not a good idea to serve it every day. But on special occasions, there is simply nothing finer. I mean really, what would mashed potatoes and turkey dressing be without turkey gravy? Inconceivable! That’s what it would be. Inconceivable!   

So, with thoughts of turkey gravy happily floating through my mind, I wish you all peace and love.

MY FAVORITE GRAVIES

Bacon Flavored Red Gravy (under Grilled Meatloaf with Bacon Flavored Red Gravy)

Beef Gravy with Mushrooms and Onion

Creamy Chicken Gravy

Italian Chicken Gravy (over polenta)

Lamb Gravy (under Stuffed Boneless Leg of Lamb)

Mushroom Gravy (under Jägerschnitzel – German Pork Schnitzel with Mushroom Gravy)

Onion Gravy (under Beer Braised Bangers (Sausages) with Onion Gravy)

Pan Gravy (under Chicken Fried Steak with Pan Gravy)

Sausage Gravy (under Biscuits with Sausage Gravy)

Turkey Gravy with Cognac

CANDIED FRUIT AND NUT BRAIDED YEAST BREAD

I have been enjoying a variation of this bread since I was a child. Every Christmas, our close family friend Charlotte always made a similar bread, and I routinely made a pig of myself. It was just so amazingly delicious.

So, when I started making bread in my early twenties, I found this recipe which was very like Charlottes, but also included a small amount of candied citron and candied cherries. And I liked it even better. (Some days an angel really does land on your shoulder.) Well, as you might have guessed, I have been making this bread ever since.

One of the fun Christmas events when my kids were young was to have an open house. All kinds of goodies were served including this Christmas bread. It was a way to share Christmas with our friends. And to teach the kids the enjoyment that can come from hosting. Other years we would deliver goodies to friends and family. The picture you see below was taken I believe in 1974. Ursala on the left and Paula on the right.

I didn’t bake this bread every year because there are just so many incredible breads out there that make wonderful Christmas treats. Like cinnamon rolls (several recipes on site), Christmas Berliner Stollen, Krendl (Russian Christmas Bread), Dried Cranberry and Almond Braided Danish, Bread Pudding with Spiced Rum Sauce, Baba Au Rhum, and Cream Cheese Danish. To name a few.  

But as with other favorite recipes of mine, I just make them and assume the recipe has already been posted on this site. Silly me. So, I apologize for not getting this braided yeast bread recipe posted sooner. (Like in time for Christmas 2023.) Also, this year, I changed things up a bit. Shape wise that is. I decided to make 5 small loaves instead of three braided breads. Every year I give 4 of our neighbors a small loaf of some type of sweet bread for Christmas. This year, as you can see from the picture above, it was a loaf of this delightful bread. (And yes, the fifth loaf stayed here and was gobbled up very quickly.)

So, if you too are a bread lover, and want to make something special for Christmas (or any other day of the year for that matter), this is a bread I am sure you will enjoy as much as I do. If you aren’t a candied fruit lover, just leave it out. Or change the type of candied fruit. Or add more nuts. Whatever appeals. Just don’t forget the glaze. It is just so wonderful. Not too sweet – just perfect. And if you have never used vanilla paste, get some at your earliest convenience. It is tantamount to heaven in a jar.

Well, it’s still raining here in NW Washington. But at least we aren’t having the same terrible snowstorms that are battering the East Coast and California. But there is a small chance of snow this weekend. And I say – bring it on! I love snow. Especially when there is nothing on our calendar. And for more weeks than I care to count, our weekend is free. And to that I say – HALLELUJAH! Let it snow, let it snow, let it snow.

And as always, peace and love to all.

2 c. whole milk, scalded

½ c. (1 stick) unsalted butter, room temp.

2/3 c. granulated sugar

2 tsp. kosher salt

¼ tsp. crushed cardamon seed

1 tsp. ground cinnamon

scant 2 T. active dry yeast

¼ c. lukewarm water

2 lg. eggs

8 c. unbleached all-purpose flour

1½ c. chopped walnuts

1 c. diced citron

1 c. chopped candied red and green maraschino cherries, plus more for decoration

veggie oil

½ c. powdered sugar

1 tsp. vanilla paste or vanilla extract

milk

Combine the scalded milk, butter, salt, crushed cardamon seeds, and cinnamon in the bowl of your stand mixer. Cool to lukewarm

Add the yeast softened in water. Add eggs. Mix well. Add 4 cups of the flour and beat well. Add the nuts, citron, chopped candied cherries, and enough remaining flour to form a firm dough (dough will be sticky).

Pour a bit of veggie oil in the bowl, and using your hands and a stiff spatula, form the dough into a lightly greased ball. Cover with plastic wrap and place in a warm place until doubled in bulk, about 60 minutes. Punch down the dough.

For three braided loaves:

Turn onto a lightly floured surface; divide into thirds. Divide each portion into thirds again. Shape each into a 14-in. rope. Place 3 ropes on parchment paper or a greased baking pan and braid; pinch ends to seal and tuck under. Repeat with remaining dough. Cover and let rise for 40-50 minutes or until doubled in size. Bake in a pre-heated 350-degree oven for about 20-25 minutes or until the internal temperature reaches at least 195-degrees.

Remove from oven and place on wire racks. Make the glaze by whisking the powdered sugar and vanilla bean paste together with enough milk to make a thin consistency. Using a pastry brush, coat the braids with a thin layer of icing. Decorate with holly leaves and additional red and green candied maraschino cherries.

For 5 small loaves:

Turn onto a lightly floured surface; divide into 5 equal sized pieces. Shape into footballs and place in small, lightly greased loaf pans.

Cover and let rise for 40-50 minutes or until doubled in size. Bake in a pre-heated 350-degree oven for 25-30 minutes or until the internal temperature reaches at least 195-degrees.

Remove from oven and place on wire racks. (If you have baked the loaves in aluminum foil pans, let the bread cool in the same pans. If not, remove from pans. Make the glaze by whisking the powdered sugar and vanilla bean paste together with enough milk to make a thin consistency. Using a pastry brush, coat the braids with a thin layer of icing. Decorate with holly leaves and additional red and green candied maraschino cherries.


MY FAVORITE SIDE DISHES  

This was a hard category for me to undertake. For me, side dishes are often more important to the meal than the entrée. Wait, that’s not true. Most of the time, for me, side dishes make the meal.

As I’ve gotten older, I find meat less appealing. Yes, I still eat meat. But a lot less than when I was younger. So, keeping my list of favorite side dishes to a reasonable size was like asking me to choose which of my kids I loved the most. Almost impossible! (Not for my kids because I love them all to the moon and back.) But to choose my favorite side dishes? Holy cow. And then, what constitutes a side dish? The starch or the vegetables or a combination thereof. So, I have broken this category into two parts. MY FAVORITE SIDE DISHES (EMPHASIS ON THE STARCH) and MY FAVORITE SIDE DISHES (EMPHASIS ON THE VEGGIES).

And even then, the lists are longer than I wanted. But none of these dishes could be eliminated. So, if you were looking for a short list, just know that I tried my darndest to adhere to the KISS principle. (Keep It Simple Sister.) But this was the best I could do.

So, I hope you find these lists beneficial. I know looking at my “favorites” lists is a lot easier than looking through all the recipes on this site. But don’t limit yourself to just my favorites. Because all the recipes on this site I consider worthy of your time and effort in the kitchen.

OK, that’s it for today. It’s stormy outside so there are no mountains in evidence. It’s windy, so the birds must have hunkered down and decided to stay at ground level rather than be up in our trees. Even Port Susan Bay is disguised as a fog bank. So, our outdoor color palette for today seems to be restricted to various shades of grey and green. With more of the same predicted.

But we are cozy in our home, with nothing more important to worry about than the possibility of snow this weekend. My wish is that every person on earth was blessed with this same inconsequential level of concern. I realize this will never be the case. But if I happen upon a bottle with a genie in it, my first and only wish will be for life to become considerably easier for everyone on earth.

Peace and love to all.     

MY FAVORITE SIDE DISHES (EMPHASIS ON THE STARCH)

Asian Flavored Steamed Rice

Baked Cheddar Cheese and Fresh Chive Polenta

Brown Rice Patties

Creamy and Savory Grits

Creamy Garlic and Rosemary Polenta

Creamy Parmesan Polenta

Creamy Polenta with Cream Cheese

Easy Fried Rice

Fried Marinated Tofu with Green Onions and Sesame Seeds

Green Chilies and Rice Casserole

Gruyèr Cheese Soufflé

Israeli Couscous with Shallots, Garlic, and Shiitake Mushrooms

Lemon Pepper Rice

Lemony Quinoa with Fresh Herbs

Mushroom Risotto with Green Onions and Peas

Potato, Gruyère Cheese, and Caramelized Onion Gratin

Noodles Romanoff

Quinoa, Kale, and Shallot Pilaf

Rice Cooker Savory Brown Basmati Rice

Savory German Bread Pudding with Mushrooms

Savory Kale and Mushroom Strata (Bread Pudding)

Savory Mushroom Rice-A-Roni

Savory Wild Rice, Brown Rice, and Mushroom Pilaf

Simple Vegetarian Fried Brown Basmati Rice

Spinach and Mushroom Wild Rice Pilaf

Turmeric Rice

White Cheddar Cheese Grits

Wild Mushroom Bread Pudding

MY FAVORITE SIDE DISHES (EMPHASIS ON THE VEGGIES)  

Accordion Baked Potatoes (Hasselback) (Under Easy Friday Night Fish Fry)

Beets in a Lemon-Garlic Vinaigrette

Braised Green Cabbage

Cheezy Baked Cauliflower

Chinese Salt and Pepper oven Roasted Beans

Collard Greens with Smoked Pork Hock

Creamy Caramelized Pearl Onions and Petite Peas

Creamy Corn Pudding

Creamy Mashed Sweet Potatoes

Dried Corn Casserole

Eggplant Parmesan Light

French Mashed Potatoes with Gruyère and Mozzarella Cheese (Aligot)

Fried Cabbage with Bacon

Fried Zucchini

German Potato Salad

Grilled Corn on the Cob with Chili Garlic Sauce

Honey and Soy Sauce Glazed Green Beans

Honey, Thyme, and Balsamic Glaze Dressed Beets with Feta Cheese

Mashed Potatoes with Bacon, Cheese, Chives, and Sour Cream

Oktoberfest Sauerkraut

Oven Baked Melting Potato Slices

Oven Roasted Steak Fries with Fry Sauce

Roasted Carrots with a Honey Bourbon Glaze

Roasted Veggies with Lemon Garlic Aioli

Scalloped Potatoes

Spinach and Gruyère Cheese Gratin

Spinach with Almonds and Feta Cheese

Sweet Potato Casserole

Twice Baked Potatoes

Yukon Gold and Sweet Potato Gratin with Manchego Cheese

Yukon Gold Potato Gratin with Pepper Jack and White Cheddar Cheese

Zucchini, Caramelized Onion, and Pepper Jack Cheese Gratin

Zucchini Pancakes

KANSAS CITY STYLE BBQ SAUCE

Although I have 2 other BBQ sauces on this site, I decided last evening to look for a Kansas City style BBQ sauce recipe. Our good friends Jim and Margo swear by bottled KC Masterpiece BBQ Sauce. But it is not available at our local grocery store. So, I went online looking for a knock-off recipe. What I found was this recipe from heygrillhey.com. I changed a couple of the amounts because of personal preference, but the rest is straight off the site.

Now you may be wondering why I didn’t just make one of my regular recipes. Well, if truth be told, I was not in the mood to cook. I know. Doesn’t happen very often. But I was tired from trying to book our trailer trip in May and finding many of our favorite campgrounds already booked up solid. Grrrrr

So, I wanted a BBQ sauce where I didn’t have to chop a darn thing. Because in my current frustrated condition, I might have chopped off a finger. And not even realized it was gone! So, with this recipe, the hardest thing I had to do was get my small Le Creuset cast iron pan out of the drawer where it lives. After that it was all downhill.

And I am so glad I made this sauce. It is delicious and ever so simple to make. And it was perfect with the ribs I served. (Also stinkin’ easy to make.) (Savory Oven Baked Pork Loin Back Ribs.) I also served half a baked sweet potato to each of us along with some left-over baked beans. A fine meal if I do say so myself. (And so little time spent.)

So, if you too ever find yourself with limited energy but a desperate need for BBQ sauce, this is the recipe for you. (Even if you have all the energy in the world, this is still the recipe for you.)

Well, that’s it for today. I still have a few days to book for our May adventure, and it’s too early to start drinking. So, I better sign off and get back to work.

As always, peace and love to all.   

8 oz. can tomato sauce

½ c. ketchup

6 T. brown sugar

¼ c. apple cider vinegar

¼ c. molasses

1½ tsp. smoked paprika

1 tsp. kosher salt, or more to taste

freshly ground black pepper 

½ tsp. chili powder

½ tsp. granulated garlic  

½ tsp. granulated onion  

¼ tsp. dried mustard

⅛ tsp. crushed red pepper flakes, or more to taste

Whisk all ingredients together in a saucepan. Bring to a boil over medium heat, reduce heat, and gently simmer uncovered for 30 minutes.

Remove from heat and allow to cool completely before transferring to an airtight container. Store in your refrigerator.

This sauce can be used immediately, but best when made ahead. Can be served warm or at room temperature. Great with ribs.