AUTOMATIC EMAIL NOTIFICATION OF NEW POSTS

Hello everyone,

If you would like to receive an email whenever a new post/recipe/entry appears on my blog, just click on

“Leave a reply” in the upper left hand corner of any post just under the recipe title. The following screen will appear way down at the bottom of the recipe:

Leave a Reply

A blue box with the words “Enter your comment here…” will appear.

Just click in the box, leave a comment, and the following will appear.

Fill in your details below or click an icon to log in: (icons will appear on the right)

Then fill in your email (required) and name (required), and Website if you so choose. Please note: your email address is never made public.

Then check either or both of the boxes:

–          Notify me of new comments via email

–          Notify me of new posts via email

Then hit the Post Comment button

If you really don’t want to post a comment, but still want to receive email notifications, just write (in the comment box) – Patti. That will be sufficient to sign you up for all new comments or new posts, or both. Well that and checking the appropriate box(s) too.

But as always, if you have problems email me at chezcarrcuisine@wavecable.com

And thanks for reading my blog.

Patti


CARIBBEAN PORK STEW

OLYMPUS DIGITAL CAMERA

We recently were invited to our good friends Tim and Susie’s home for an “after gig” dinner party. And Susie fixed just an amazing Caribbean dinner for us. And the main dish she served was a pork stew. So based on the gist of the recipe Susie gave me that evening, I immediately went on line and found (I’m pretty sure) the recipe she used. (Sometimes I get tired of bugging my friends for their recipes, so I just wing it.)

Anyway, the recipe below adapted from Cooking Light magazine, Valerie’s Kitchen blog, and brought to life by Susie is so melt in your mouth good as to be worthy of a literary mention, in say, a modern romance novel. And because I have an active imagination and sometimes (sometimes?!?!) can’t help myself, the first couple of paragraphs in this fictitious novel might read something like this:

“Kathryn could not have known on that late summer afternoon how the delicious smell of her Caribbean pork stew would completely turn her life around. As the stew quietly bubbled away in the slow cooker on the counter under her open kitchen window, she was completely unaware that a change in her life was in the wind. And even though the late afternoon was hot, quiet, and heavy with languor, tiny whiffs of the stew’s delicious aroma somehow found their way through her new neighbor Jeffrey’s open den window.

Jeffrey, who had lost his wife to his best friend a couple of years before, had only lived in his new home for a month. He had moved because everything in his old neighborhood had reminded him of how he had been deceived by the two people he had trusted most in life. He had needed to put his former life far behind. He had seen Kathryn come and go from her house and of course had noticed how beautiful she was. He also knew that she had been recently widowed. His realtor had been eager to share that tidbit of information when he was showing Jeffrey the house. But Jeffrey wasn’t looking for love. In fact he had no desire to ever again become involved with a gorgeous woman. But that afternoon, as he sat at his desk putting the final touches on the article he was writing, he sensed that there was something different in the air. He couldn’t quite define what it was that had awakened his senses. But he knew for a fact, that whatever it was, it was emanating from his neighbor’s home.”

So if you too want to awaken the senses of your family and friends, prepare this dish for them. It has a bit of heat to it, but it’s not overpowering. Just delicious. And thanks again Tim and Susie for another wonderful meal at your home and of course, your friendship.

(And lest you worry, I have no intention of becoming a romance novel writer.)

  • 1 T. extra virgin olive oil
  • 2 lbs. lean pork, cut into bite sized pieces (a boneless pork roast is perfect)
  • 1 tsp. kosher salt
  • freshly ground black pepper (lots)
  • 2 garlic cloves, finely minced
  • 2 lg. red bell peppers, chopped
  • 1 bunch green onions, thinly sliced
  • 3 T. hoisin sauce
  • 2 T. lower-sodium GF Tamari or regular soy sauce
  • juice of one large, soft lime
  • 2 T. creamy peanut butter
  • 1 tsp. ground cumin
  • ¼ tsp. crushed red pepper flakes
  • 1 c. chicken broth
  • basmati rice, cooked according to package directions or follow the recipe below
  • lime wedges

Add oil to a large skillet and place over medium-high heat. Add pork, salt, and pepper and sauté until the cubes are dark brown. Add garlic and cook for 1 minute. Place browned pork and garlic, red bell pepper, and green onions in an electric slow cooker coated with cooking spray.

Combine hoisin sauce, Tamari, lime juice, peanut butter, cumin, crushed red pepper flakes, and chicken broth in a small bowl. Pour mixture over the pork and stir well to combine.

Cover and cook on HIGH for 1 hour. Reduce heat to LOW, and cook for 90 minutes or until pork is fork tender. (Check after about an hour.)

Serve over rice with lime wedges.

BASMATI RICE

  • 2 c. basmati rice
  • 1 T. unsalted butter
  • 3 1/3 c. water
  • 34/ tsp. kosher salt

Rinse rice in a fine mesh sieve under cold water until water runs clear. Drain well. Melt butter in a 4-quart heavy pot over moderate heat; add rice and cook, stirring, 2 minutes. Scoop into your rice cooker. Add water and salt. Turn rice cooker on “go”. When rice cooker turns off, rice is done. Let stand for 5 minutes, then fluff with fork.

No rice cooker?  Rinse rice in a fine mesh sieve under cold water until water runs clear. Drain well. Melt butter in a 4-quart heavy pot over moderate heat; add rice and cook, stirring, 2 minutes. Stir in water and salt and bring to a boil over high heat. Reduce heat to low and cook, covered, until rice is tender and liquid is absorbed, about 20 minutes. Remove from heat. Let stand for 5 minutes, then fluff with fork.


TOMATO SALAD (LITTLE CONDIMENT SALAD)

OLYMPUS DIGITAL CAMERA

There are really only 4 good reasons to make this salad. The first reason – it is more of a condiment than a true salad. In other words, you don’t have to make a huge bowl to fulfil the “salad or veggie requirement” in your meal. With this salad, an average serving would only be about half a cup. 2nd reason – it’s quick and easy to prepare. Number 3 – it is best made ahead of time. 4th, but absolutely not the last reason – this salad is beautiful to look at!

I started making what I refer to as “little condiment salads” probably 25 years ago. This was after my kids were out of the house and I wanted just that extra little flavor sensation to spice up an otherwise ordinary meal. (You know, the basic three course dinner – meat, starch, and veggie or salad. The holy trinity of dinner preparation.) So long ago I decided, that in some cases, a little dish of something delightful, like this tomato salad, was just the ticket. And I’ve been making this salad, or a variation (see below) ever since.

So next time you feel the meal you are planning needs a little extra touch to make it even better, give this “condiment” a try. You will love the fresh flavor and the vibrant color. Or if you know you are going to have one heck of a day, make your salad the evening before. The salad is not going to wilt or grow soggy. (That’s your job after a hard day!) In fact, it will simply be in your fridge waiting for your tired body to throw some rice in your rice cooker and cook up some pork chops. Then when the rice and chops are ready, you need merely open the fridge, take out the salad and sit down to a lovely meal. I hope you enjoy this salad as much as we do.

You know, I almost missed the most important reason you should prepare this salad. Reason number 5 – this salad is just plain delicious!

  • 3 T. extra virgin olive oil
  • scant 2 T. chopped fresh parsley
  • 2 T. finely chopped fresh chives
  • 1 T. finely chopped white or yellow onion
  • 1 garlic clove, finely minced
  • 1 tsp. coarse salt (I use half kosher and half smoked black pepper, but any coarse salt will do)
  • freshly ground black pepper
  • heaping 2 c. cherry tomatoes (red or orange) cut in half

Whisk together the olive oil, parsley, chives, onion, garlic, salt, and pepper. Gently stir in the tomatoes. Best made ahead of time to allow flavors to meld. Serve cold.

Variation: Use any of the following in place of or mixed with tomatoes: cucumber, celery, carrot, avocado, red pepper, etc. Also basil or mint can be added, along with feta cheese. A bit of fresh lemon juice is also a lovely addition. Basically any combination that appeals. The point is to keep the salad small and more of a condiment than a bowl of salad.


PORK AND GREENS WITH NOODLES

OLYMPUS DIGITAL CAMERA

This is one of those quick and easy recipes that is perfect for weeknights. (Of course you can also serve it on the weekend, but because of its ease of preparation, I tend to think of it as an “I’m too tired to really cook” kind of weeknight dish.) I mean really, when you analyze the ingredients, you have all the essential elements associated with dinner. You’ve got your meat, your starch, and your veggies. The only difference is that they are all combined in one neat little package. So while your family might feel slighted by only one item present on the dinner table, you can relax knowing you have covered all the bases. And truly, aren’t some nights just all about you! I mean – you’ve fed them right? And something really tasty too. So I say “get over it family and cut the poor cook some slack”!

Of course, if the gilt really becomes too much for you – throw a couple of cookies and a bowl of ice cream at them after dinner. (And no, they don’t have to be a home baked cookies. I am not the food Nazi, and I promise not to report you to Betty Crocker.)

So next time you get the urge to just go home and lock yourself in your room and to heck with feeding your hungry masses, stop at the store on your way home from work. (You know the little darlings have to be fed, so this is your way of feeding the troops, and still getting to bed early.) Pick up a couple thick, lean pork chops, a package of pre-washed greens, and any other ingredients for this dish that you don’t already have on hand. Then beat feet home, change your clothes, pour yourself a libation, and prepare my version of Martha Rose Shulman’s recipe for Stir-Fried Pork and Green with Noodles. Then relax and enjoy your meal. You’ve fulfilled your “food” obligation and in fine style too.  

One thing more – don’t forget the cookies and ice cream while you’re at the store.     

  • 2 T. vegetable oil, divided 
  • ½ lb. lean pork, cut in very thin strips
  • 1 tsp. sesame oil
  • 2 large garlic cloves, finely minced
  • 1 T. minced fresh ginger
  • pinch crushed red pepper flakes
  • about 1 lb. Swiss chard, beet greens, turnip greens, spinach, or kale stemmed and washed very well  
  • 2 T. low sodium Tamari or soy sauce
  • ¼ c. chicken stock or water  
  • 8 oz. Japanese somen noodles, wide rice vermicelli, or Chinese egg noodles cooked al dente
  • ¼ c. thinly sliced green onions, garnish

Heat a large, heavy skillet or wok over medium-high heat until hot enough to evaporate a drop of water on contact. Add 1 tablespoon of the vegetable oil and add the pork; stir fry for about 2 minutes or until the pork is just barely cooked through. Remove from pan and set aside.  

Add the remaining 1 tablespoon vegetable oil, sesame oil, garlic, ginger, and crushed red pepper flakes to the pan. Cook for about one minute or until the garlic releases its aroma. Stir in the greens and stir fry until mostly wilted. Add the Tamari and chicken stock. Cook for about a minute. Add the cooked noodles and reserved pork; stir together until heated through. Adjust seasoning, sprinkle with green onions, and serve immediately.


CHOPPED SALAD WITH SALAMI AND CHEESE

OLYMPUS DIGITAL CAMERA

Remember when chopped salads were all the rage? Well in our home, chopped salads are STILL very much in fashion. In fact, more so than ever! And with this heatwave we are experiencing, I have practically no desire to cook, much less spend any time over a hot stove! Thus – salad for dinner. Please note, Mr. C. and I lovingly refer to this time of year as “the salad days” of summer. (Not to be confused with the Shakespearean idiomatic expression “Salad Days” referring to a youthful time, accompanied by the inexperience, enthusiasm, idealism, innocence, or indiscretion that one associates with a young person. A more modern use, especially in the United States, refers to a heyday, a period when somebody was at the peak of their abilities—not necessarily in that person’s youth.) Thank you Wikipedia!

Anyway – I can’t really remember which restaurant in Seattle featured this salad oh so long ago. But since the recipe appeared in my first cookbook (1998) without any reference to the contributor, it must be a recipe I copy-catted at home. Sounds like something I would do, right??

So if you too are still fond of eating, but not of cooking at this time of year when the temperature is way hotter than we Western Washington wimps can tolerate, give this recipe a try. It takes very little time to throw together, and we’re talking only one bowl dirtied in the preparation of this dish. And that of course translates to less time in the kitchen after dinner too. (I’ve always told you I’m on your side. And in this case, I’m on Mr. C’s side too since he is the meal cleanup crew in our household.)

So stay cool my friends, drink lots of liquids, and enjoy the warm weather while you can. It will all too soon be “soup season”.

  • ½ c. light mayonnaise
  • 1 tsp. Dijon mustard
  • 1 tsp. ketchup
  • 2 tsp. fresh lemon juice
  • ½ tsp. Worcestershire
  • ¼ tsp. sugar
  • pinch of kosher salt
  • freshly ground black pepper
  • 1 T. chopped fresh parsley
  • 1 clove garlic, minced
  • 4 c. chopped romaine lettuce
  • ½ c. thinly sliced fresh basil
  • ¼ c. chopped red onion
  • 1 roasted red pepper, thinly sliced
  • ½ – ¾ c. diced salami
  • ½ – ¾ c. diced mozzarella cheese
  • ½ – ¾ c. diced provolone cheese

Whisk the mayonnaise, mustard, ketchup, lemon juice, Worcestershire sauce, sugar, salt, pepper, parsley, and garlic together in a medium sized salad bowl. Add the romaine, basil, red onion, red pepper, salami, and cheeses. Stir until all the ingredients are covered with the dressing. Serve immediately.

Note: I usually don’t serve this salad with bread. But if you are being fancy, a nice crusty Italian loaf on the side would taste wonderful with this salad.  A nice red wine wouldn’t hurt either. (And no, wine does not count as drinking lots of liquids!)


CREAMY SMOKED SALMON PASTA

OLYMPUS DIGITAL CAMERA

As I have grown older, my stomach has started to rebel against certain foods such as those high in fat. And my lower GI tract, which until a few years ago was able to accommodate almost anything I sent its way, has now seemingly turned against me. So, contrary to the popular belief I once held, my brain is no longer in charge of my body. That happy distinction has now shifted to (you guessed it) my lower GI tract!  And just to confirm my long held belief that God has an ironic sense of humor, my taste buds remain unimpaired. So, my mouth still craves a buttery and creamy pasta sauce, while other parts of my body are praying that I can withstand temptation. Sometimes I feel like a royal battle is being staged in my body with no consideration being paid to what I still desire and need. (Perhaps that’s the true definition of growing old!)

Regardless, I have decided that I am going to fight for my rights. I still want to enjoy creamy pasta sauces, but I must respect the fact that my brain GI tract probably knows what’s best for me in the long run. Hence, this recipe.

So if you too love pasta, but are trying to reduce the amount of fat in your diet, may I suggest this recipe the next time a creamy and rich tasting pasta sauce calls your name. With this recipe, you can actually listen next time it happens!

  • 1 T. olive oil
  • 2 lg. finely chopped shallots (about ½ cup)
  • 1 c. dry white wine
  • ¾ c. light sour cream (Tillamook “light” sour cream is really very good)
  • scant 2 T. fresh lemon juice
  • ½ tsp. dill weed, or more to taste
  • ¼ tsp. kosher salt  
  • freshly ground black pepper
  • ¾ c. frozen petite peas brought to room temperature
  • 4 oz. smoked salmon, cut into small chunks
  • ½ c. grated Parmesan cheese + more for passing  
  • 12 oz. pasta*, cooked al dente (reserve about a ½ cup of the pasta water)

Heat oil in medium saucepan over medium-low heat. Add shallots; cook 5 minutes, stirring frequently. Add wine and simmer until reduced to about ½ cup, about 6 minutes. Whisk in the sour cream, lemon juice, dill weed, salt, and pepper. Cook for about 1 minute or until the sauce is hot. Stir in the peas, salmon, and Parmesan cheese. Remove from heat and add the hot al dente pasta and about ¼ cup of the hot pasta water. (Add more pasta water as required.) Adjust seasoning and serve immediately. 

*penne, farfalle, orecchiette, conchiglioni (seashell shaped), farfalloni (bow tie shaped), etc.

And remember, you never want your cooked pasta to wait for your sauce to be done. If anything has to wait, be sure it’s the sauce.

CEDAR PLANKED SALMON

OLYMPUS DIGITAL CAMERA

When it comes to BBQing, I am so far behind most of my friends that it is really quite embarrassing. But I have vowed to catch up, or at least become semi-proficient with a long handled spatula and welding gloves! (Actually I would consider myself blessed if I could just became less intimidated by that scary black covered appliance that lives on my deck.) But I’ll tell you, with this recipe now in my repertoire, I am well on my way to becoming at least a passable griller. (It also doesn’t hurt that Mr. C. bought me a beautiful new Webber for my birthday. At least now I have a BBQ with automatic starters for the burners and internal workings that aren’t half rusted away! Ah the joys of living near salt water.)

So if you too are even slightly intimidated by your BBQ, this recipe is ideal. First of all the salmon tastes amazing. And by using a cedar plank, you don’t even have to set the fish directly on the grate. Is that great or what?

No mess to clean up, unless of course you forget to soak your cedar plank before placing it on the BBQ. Then you and the fire department might have a huge mess to clean up. But forewarned is forearmed as the saying goes.

So get that BBQ out of mothballs, shoo any resident critters out and away, and get ready for one of the best ways to enjoy salmon ever invented by someone other than me. (I got this recipe from my dear friend Linda, who got it from her cousin (I think) Lynn, who found it somewhere…………) I modified the recipe slightly, but to whomever it was who gave birth to this recipe originally, I salute you. It is the best grilled salmon recipe I have ever found.

  • 2 T. extra virgin olive oil
  • 1 T. unsalted butter
  • 3 garlic cloves, finely minced
  • 1½ T. fresh lemon juice
  • 1 T. Dijon mustard
  • 2 tsp. capers or rough chopped green olives
  • ¼ tsp. kosher salt
  • freshly ground black pepper
  • 1 tsp. dried basil
  • 1 tsp. dried dill weed
  • 1/8 tsp. cayenne
  • 3 lb. salmon fillet
  • cedar plank(s) – soaked for 1-2 hours 

Sauté the olive oil, butter, garlic, lemon juice, mustard, capers, salt, pepper, basil, dill, and cayenne together for 5 minutes over medium-low heat. Set aside. 

Heat grill to 350 degrees. Set salmon skin side down on soaked cedar plank. Slather the olive oil mixture all over the top of the salmon.

OLYMPUS DIGITAL CAMERA

Place plank(s) on BBQ. Shut lid and depending on thickness, BBQ for 20-30 minutes or until the internal temperature in the thickest part of the fish reaches 135 degrees. Serve hot, warm, or at room temperature. No sauce or aioli required.   

Please Note: Do not use cedar from Home Depot, Lowes, or any lumber yard. The cedar sold for building purposes is treated. Use cedar planks that you either cut yourself or buy from a grocery or kitchen store specifically packaged for the purpose of using with food. Thanks Jim for this very valuable bit of information.


PARMESAN CRACKERS

20160730_135228

While staying with Mr. C’s sister Katie and her husband Rick to attend the Methow Valley Chamber Music Festival this year, Katie made these amazing crackers for a function at a local art gallery. But of course, we all had to make certain that the crackers were worthy of such an auspicious gathering, especially since the event was in conjunction with the festival. And oh my goodness. All four of us were absolutely blown away by how delicious they were. (It truly was a miracle that any of the crackers made it to the gallery. But we are all adults and have been known, upon occasion, to show a modicum of restraint when necessary! And this was one of those times when it was necessary. Darn!)

Anyway, this recipe comes from chef Marc Murphy. But instead of calling them crackers, he calls them “My Mother’s Parmesan Cookies”. We all concluded that they were really more of a savory cracker than a cookie, so thus the name change. Katie also thought a bit of black pepper would be a nice additional. Therefore I included the pepper in the recipe, because I wholeheartedly agreed with her conclusion. (Actually, a tiny touch of pepper is wonderful with almost any savory, and a wide array of sweets. I mean really, can you imagine pfeffernusse or strawberries without a dash of pepper in the ingredient list? Not on my watch, I’ll tell you that!)

So whatever you ultimately choose to call these little bites of heaven, cookies or crackers, they are sure to please anyone lucky enough to be in their proximity. But warn your family and friends. Once tried, no one can stop at just one! So he/she who hesitates is lost. Or more aptly put – delay or vacillation could result in unfortunate or disastrous consequences.

For more cracker recipes, search under “Crackers” in the category section.

  • 16 T. (2 sticks) unsalted butter, room temperature
  • 2 c. finely grated Parmigiano-Reggiano (Don’t even think about using that stuff that comes in a can!)
  • a couple twists of finely ground black pepper, opt.
  • 1¾ c. unbleached all-purpose flour

In the bowl of your stand mixer, beat the butter, cheese, pepper, and flour together until stiff dough forms. (If your butter is really soft, this should take no time at all.) Roll dough into logs about 1½ inch in diameter, cover with plastic wrap, and refrigerate for at least an hour. When ready to bake, slice dough into thin slices (about 1/3rd inch thick) and place on lightly buttered, Silpat, or parchment paper lined baking sheet(s)*. (If hard to cut, allow rolls to sit at room temperature for about 15 minutes, then try again.)

Bake in a pre-heated 350 degree oven for about 20 minutes or until edges and bottoms are a nice golden brown. Remove crackers from oven and allow to cool for about 10 minutes on baking sheet(s) before transferring to a wire rack. When completely cooled store in an airtight container.

*If using more than one sheet, shift and rotate the pans half way through the baking process.

Please note: These crackers will stay fresh for a few days, but don’t count on any making it past day 2. At least at our house, homemade crackers have the same chance of longevity, as say, a pint of Ben and Jerry’s Cherry Garcia ice cream!)

Dough can be prepared and rolled into logs the day before and refrigerated until needed.

REMOLACHA (ARGENTINE BEET SALAD)

OLYMPUS DIGITAL CAMERA

We first tasted remolacha when we visited Argentina a few years ago. Before that time I had never tasted roasted beets in a salad. Now it’s quite common, thank goodness. Of course, several decades ago, you couldn’t order any item in a restaurant without the plate appearing with the requisite slice of pickled beet garnish. (I still can’t eat pickled beets from a can.) But give me a salad made from beets like my sister-in laws Beets in a Lemon-Garlic Vinaigrette (on this site), and we are talking a completely different story!

And truly, there is nothing better than a fresh from the ground beet roasted with a little olive oil, salt, and pepper. A perfect side vegetable. Or mixed with greens, a simple dressing, chèvre or feta, and some nuts for additional flavor and crunch, and you have this salad which is truly fit for a king!

So especially now when beets are literally popping out of the ground and being sold in every farmer’s market in America, give this delicious salad a try. And while you’re at the farmer’s market, you might pick up a container of locally made chèvre to go in your salad. We especially love to use flavored chèvre in this recipe. Our favorite is garlic and basil.

So do yourself a favor. Support your community by buying local, and your own health by choosing organic whenever possible. If this salad doesn’t convince you that beets are a treat, then I don’t know when I’m beat and will retreat from making any further comments on the subject!

  • 2 medium sized beets
  • 2 tsp. + ¾ c. extra virgin olive oil, divided
  • kosher salt and freshly ground black pepper
  • ¼ c. red wine vinegar
  • 1 tsp. Dijon mustard
  • 2 tsp. honey
  • 1 T. finely chopped shallots
  • 1 clove garlic, minced
  • ½ tsp. kosher salt or more to taste
  • freshly ground black pepper
  • 8 c. salad greens (I use a combination of romaine, arugula, and spring greens)
  • 3 oz. chèvre (goat’s milk) cheese, room temperature (you can use feta if you prefer)
  • ½ c. toasted walnut or almond pieces

Remove the tops and the roots of the beets and peel with a vegetable peeler. Cut the beets in bite sized pieces. Place on a baking sheet and toss with the 2 teaspoons olive oil and sprinkle with kosher salt and pepper. Roast in a pre-heated 400 degree oven for 30 to 40 minutes, turning once or twice with a spatula, until the beets are just tender. Remove from oven and allow to cool. Set aside.

OLYMPUS DIGITAL CAMERA

Meanwhile place the red wine vinegar, Dijon mustard, honey, shallots, garlic, ½ teaspoon salt, pepper to taste, and remaining ¾ cup olive oil in a jar. Cover with lid, and shake vigorously to blend. Taste and adjust seasoning, if required.

When ready to serve, place salad greens in a medium sized salad bowl. Add the roasted beets, and enough salad dressing to lightly moisten all of the greens. Gently crumble the chèvre into the bowl along with the nuts. Toss lightly and serve immediately.

BISCOTTI – 6 WAYS FROM SUNDAY

OLYMPUS DIGITAL CAMERA

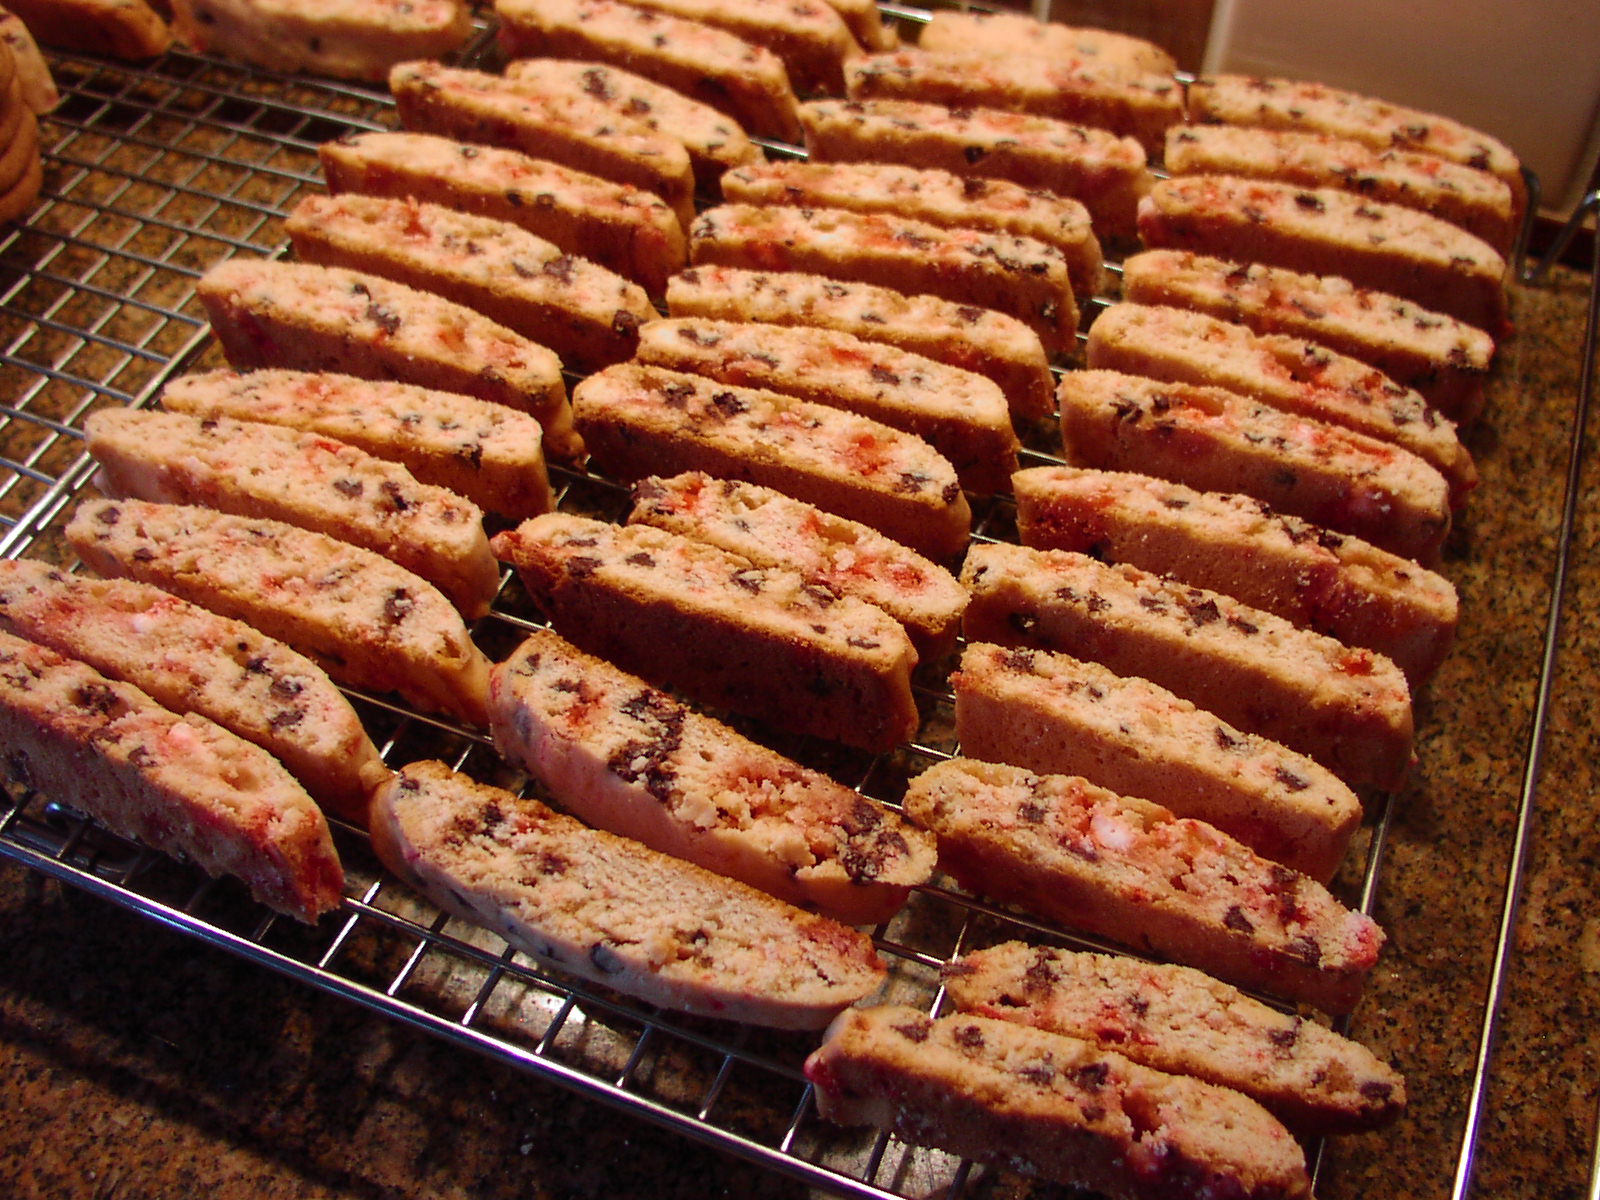
Peppermint Candy and Chocolate Chip Biscotti

I recently decided that you all deserved to know more about biscotti. Because if there ever was a versatile cookie (Italian biscuit), the lovely biscotti is it. Perfect with coffee in the morning or dunked in wine after dinner. Not too sweet, but packed with flavor. Almost perfect in every way. (They would be perfect, but for whatever reason, they seem to disappear from our biscotti jar. I’ve asked Mr. C. about this phenomenon, but he too remains as puzzled as I am! Sure he is!)

And since I have several favorites, but remain totally unable to determine which I prefer, I’ve decided to leave that onerous task of making a decision to you. Thus 6 biscotti recipes from which to choose. “Gee baby, ain’t I good to you!”

The root words “bis” and “cotto” literally mean “twice” and “baked.” (Kind of like twice baked potatoes, but not.) But please do not be intimidated by the fact that you have to bake them for a while, take them out of the oven, cool for a few minutes, slice them, and put them back in the oven to finish baking. It really is an easy process and truly not that time consuming.

And the results? Well let me just say – you haven’t lived until you’ve stumbled into the kitchen in the morning, prepared yourself a nice, hot cup of coffee, and sat down with the morning paper and a couple homemade biscotti. To my thinking, life simply does not get any better. Bon appetito!

ALMOND CHOCOLATE CHIP BISCOTTI

  • 7 T. + 2 T. unsalted butter
  • ½ c. + 2 T. sugar
  • 2 eggs
  • ½ tsp. almond extract
  • 2 c. flour
  • 1 tsp. baking powder
  • ¼ tsp. salt
  • 1 c. coarsely chopped almonds
  • 1¼ c. chocolate chips, divided
  • 2 tsp. unsalted butter

Cream butter and sugar together. Add the eggs and almond extract. In a separate bowl, whisk together the flour, baking powder, and salt. Combine with butter mixture. Stir in 1 cup of the chocolate chips.

Using your hands liberally greased with butter, divide the dough in half. On a parchment paper lined baking sheet, pat each half into a 12 x 3-inch rectangle. Bake in a pre-heated 350 degree oven for 25 to 30 minutes, or until a light golden brown. Remove from oven. Cool for 10 minutes. Then cut each roll diagonally into ½ inch thick slices. Turn the slices cut-side down on the baking sheet. Bake for 10 minutes more or until firm. Remove pan from oven, but do not transfer to cooling rack.

Melt the 2 teaspoons butter and remaining ¼ cup chocolate chips together. Slowly drizzle chocolate mixture over biscotti. Let cool completely and store in an airtight container.

Note: I suggest baking biscotti with straight oven heat. Convection baking browns them too quickly. These are soft biscotti.

ANISE BISCOTTI WITH ALMONDS (traditional Italian favorite)

  • ½ c. unsalted butter, room temperature
  • 1 c. sugar
  • 3 eggs
  • 1 tsp. anise extract
  • 3 c. flour
  • 1 T. baking powder
  • ½ tsp. salt
  • 1 c. chopped almonds

Cream butter and sugar together. Add the eggs and anise extract. In a separate bowl, whisk together the flour, baking powder, and salt. Combine with butter mixture. Stir in the chopped almonds.

Using your hands liberally greased with butter, divide the dough in half. On a parchment paper lined baking sheet, pat each half into a 12 x 3-inch rectangle. Bake in a pre-heated 350 degree oven for 25 to 30 minutes, or until a light golden brown. Remove from oven. Cool for 15 minutes. Then cut each roll diagonally into ½ inch thick slices. Turn the slices cut-side down on the baking sheet. Bake for 10 minutes or until firm. Remove from oven and cool on wire racks. Store in an airtight container.

Note: I suggest baking biscotti with straight oven heat. Convection baking browns them too quickly. These are delicious, but they are jaw breakers! Best for dunking.

CANDIED ORANGE, DRIED CRANBERRY, AND CHOCOLATE CHUNK BISCOTTI

  • ½ c. unsalted butter, room temperature
  • ¾ c. sugar
  • 2 eggs, room temperature
  • 1½ tsp. vanilla
  • 2 c. flour
  • 1½ tsp. baking powder
  • ¼ tsp. salt
  • 4 oz. candied orange peel
  • 1/3 c. dried cranberries (can use dried cherries)
  • 1 c. semi-sweet chocolate chunks or chocolate chips

Cream butter and sugar together. Add the eggs and vanilla. In a separate bowl, whisk together the flour, baking powder, and salt. Add the candied orange peel and dried cranberries to the flour mix and stir (I use my fingers) until orange pieces and cranberries are coated with flour. Combine with butter mixture. Mix in chocolate chunks.

Using your hands liberally greased with butter, divide the dough in half. On a parchment paper lined baking sheet, pat each half into long logs, and flatten to 1-inch. Bake in a pre-heated 350 degree oven for 25 to 30 minutes, or until a light golden brown. Remove from oven. Cool for 10 minutes. Then cut each roll diagonally into ½ inch thick slices.

Turn the slices cut-side down on the baking sheet. Bake for 10 minutes or until firm. Remove from oven and cool on wire racks. Store in an airtight container.

Note: I suggest baking biscotti with straight oven heat. Convection baking browns them too quickly. These are soft biscotti.

CRANBERRY-ORANGE ANISE BISCOTTI WITH WHITE CHOCOLATE CHIPS

  • ½ c. unsalted butter, room temperature
  • ¾ c. sugar
  • 2 eggs, room temperature
  • 1¼ tsp. vanilla
  • ¼ tsp. anise extract
  • 2 c. flour
  • 1½ tsp. baking powder
  • ¼ tsp. salt
  • 2 T. grated orange peel
  • ¾ c. dried cranberries, chopped
  • 1 c. white chocolate chips

Cream butter and sugar together. Add the eggs, vanilla, and anise extract. In a separate bowl, whisk together the flour, baking powder, and salt. Add the orange peel and dried cranberries to the flour mix and stir (I use my fingers) until orange peel and cranberries are coated with flour. Combine with butter mixture. Mix in white chocolate chips.

Using your hands liberally greased with butter, divide the dough in half. On a parchment paper lined baking sheet, pat each half into a 2 x 10-inch rectangle. Bake in a pre-heated 350 degree oven for 25 to 30 minutes, or until a light golden brown. Remove from oven. Cool for 10 minutes. Then cut each roll diagonally into ½ inch thick slices.

Turn the slices cut-side down on the baking sheet. Bake for 12-15 minutes to toast. Remove from oven and cool on wire racks. Store in an airtight container.

Note: I suggest baking biscotti with straight oven heat. Convection baking browns them too quickly. These are soft biscotti. This is my niece Mya’s recipe. Thanks again darling girl.

DRIED CHERRIES, ALMONDS, AND WHITE CHOCOLATE BISCOTTI

  • ½ c. unsalted butter, room temperature
  • ¾ c. sugar
  • 2 eggs, room temperature
  • 1 tsp. vanilla
  • ½ tsp. almond extract
  • 2 c. flour
  • 1½ tsp. baking powder
  • ¼ tsp. salt
  • ½ c. dried cherries, chopped
  • ½ c. lightly toasted slivered almonds
  • 1 c. white chocolate chips

Cream butter and sugar together. Add the eggs, vanilla, and almond extract. In a separate bowl, whisk together the flour, baking powder, and salt. Add the dried cherries to the flour mix and stir (I use my fingers) until cherries are coated with flour. Combine with butter mixture. Mix in the toasted almonds and white chocolate chips.

Using your hands liberally greased with butter, divide the dough in half. On a parchment paper lined baking sheet, pat each half into long log, and flatten to 1-inch thickness. Bake in a pre-heated 350 degree oven for 25 to 30 minutes, or until golden brown. Remove from oven.  Cool for 10 minutes. Then cut each roll diagonally into ½-inch thick slices. Turn the slices cut-side down on the baking sheet. Bake for 10 minutes or until firm. Remove from oven and cool on wire racks. Store in an airtight container.

Note: I suggest baking biscotti with straight oven heat. Convection baking browns them too quickly. These are soft biscotti.

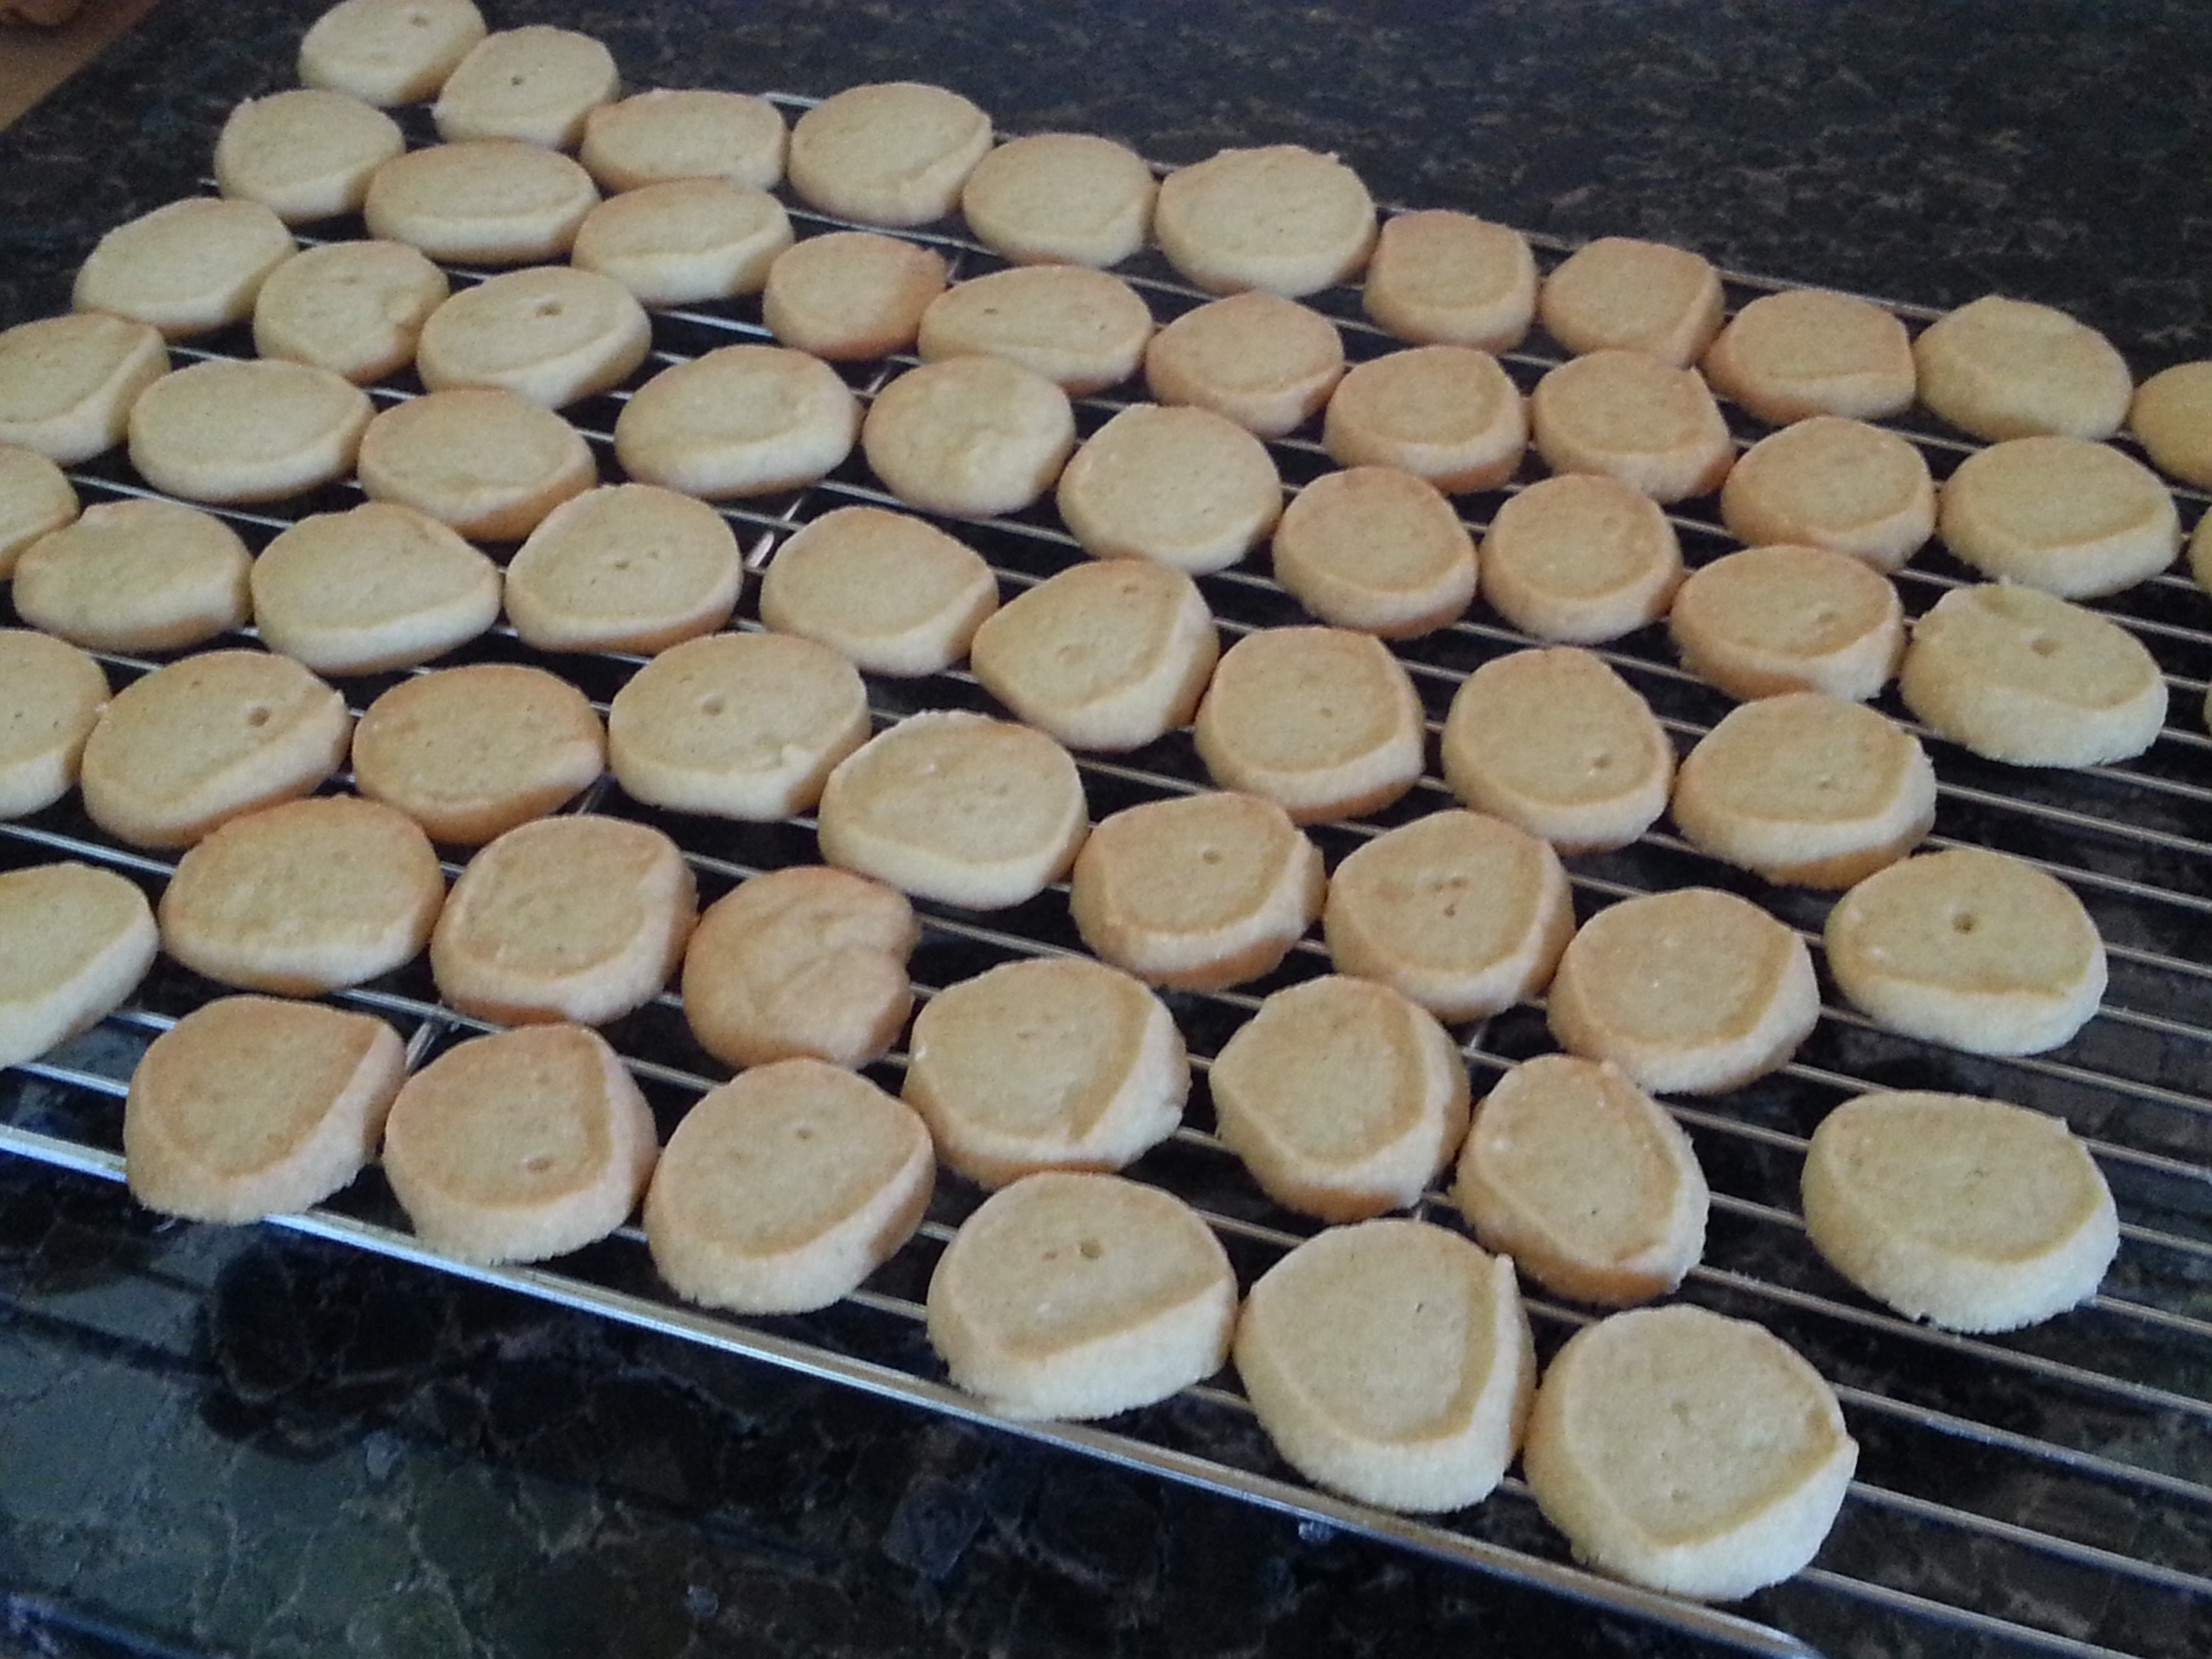
PEPPERMINT CANDY AND CHOCOLATE CHIP BISCOTTI

  • ¾ c. (1½ sticks) unsalted butter, room temperature
  • ¾ c. granulated sugar
  • 3 eggs, room temperature
  • 2 tsp. good peppermint extract
  • 3¼ c. unbleached all-purpose flour
  • 1 tsp. baking powder
  • ¼ tsp. salt
  • 1 c. crushed peppermint soft mint candy, like Sees, King Leo, or Bob’s Sweet Stripes
  • ½ c. mini semi-sweet chocolate chips or ½ cup chopped regular chocolate chips
  • melted white chocolate, milk chocolate, or semi-sweet chocolate for drizzle, opt.

In your mixer bowl, cream together the butter and sugar until light and fluffy. Add the eggs, one at a time, beating well after each addition. Beat in the peppermint extract. In a separate bowl, whisk together the flour, baking powder, and salt. Stir in the crushed peppermint candy and the chocolate chips. Gradually add the flour mixture to the creamed mixture, beating only until blended. Using your hands liberally greased with butter, divide the dough in half. On a parchment paper lined baking sheet, pat each half into a 12 x 2½-inch rectangle. Bake in a pre-heated 350 degree oven for 25 to 30 minutes, or until golden brown. Remove from oven. Cool for 10 minutes. Then cut each roll diagonally into ½ inch thick slices. Turn the slices cut-side down on the baking sheet. Bake for 10 minutes or until firm. Remove from oven and cool on wire racks. Store in an airtight container.

Note: Drizzle with melted chocolate if desired. (I usually don’t decorate them because I’m lazy, and frankly they are sweet enough already. But if you are making them as a gift, a chocolate drizzle is a lovely touch.)

I suggest baking biscotti with straight oven heat. Convection baking browns them too quickly. These are soft biscotti.