EASY CHINESE DUMPLINGS/POTSTICKERS ANYONE?

I love good Chinese food. (I know, I’ve said it before!) But in all honesty, what I enjoy the most is Dim Sum (點心). According to Wikipedia, dim sum is described as “a style of Chinese cuisine (particularly Cantonese but also other varieties) prepared as small bite-sized portions of food served in small steamer baskets or on small plates. Dim sum dishes are usually served with tea, and together form a full tea brunch. Dim sum traditionally are served as fully cooked, ready-to-serve dishes. In Cantonese teahouses, carts with dim sum will be served around the restaurant for diners to order from without leaving their seats.”

When we lived in Bellevue, going to a Chinese restaurant that served dim sum was easy. Just a short 20 minute ride from our house to the International District and we were in dim sum heaven. But now that we live (on a good traffic day) 75 minutes away from the district, we are not so prone to jump in the car for a lunch time excursion.

But that doesn’t mean that I don’t still love dim sum. It just means that if I want dim sum, I pretty much have to make it myself. And believe it or not, as frightening as that sounds, it’s doable! All you need is a little time, confidence, and a few readily available ingredients. (Well, at least in the 3 recipes I’m sharing with you today!)

So go ahead. Be brave. Put on your big kid pants and get out to your kitchen and prepare a treat that everyone will love. Just make enough while you’re at it. They freeze beautifully. Just don’t cook them before you freeze them. Simply lay them out on a lightly greased baking sheet. Allow them to freeze solid individually, then bag them up. Then any time you want dim sum for lunch or have a yen for appetizers before dinner, take a few out, steam as directed below, and enjoy. (No need to defrost before placing in the steamer.)

And please know that if you live close by, I am always available as a taste tester. I take great pride in being considered approachable and I’m always more than eager to assist in the quest for fine cuisine.

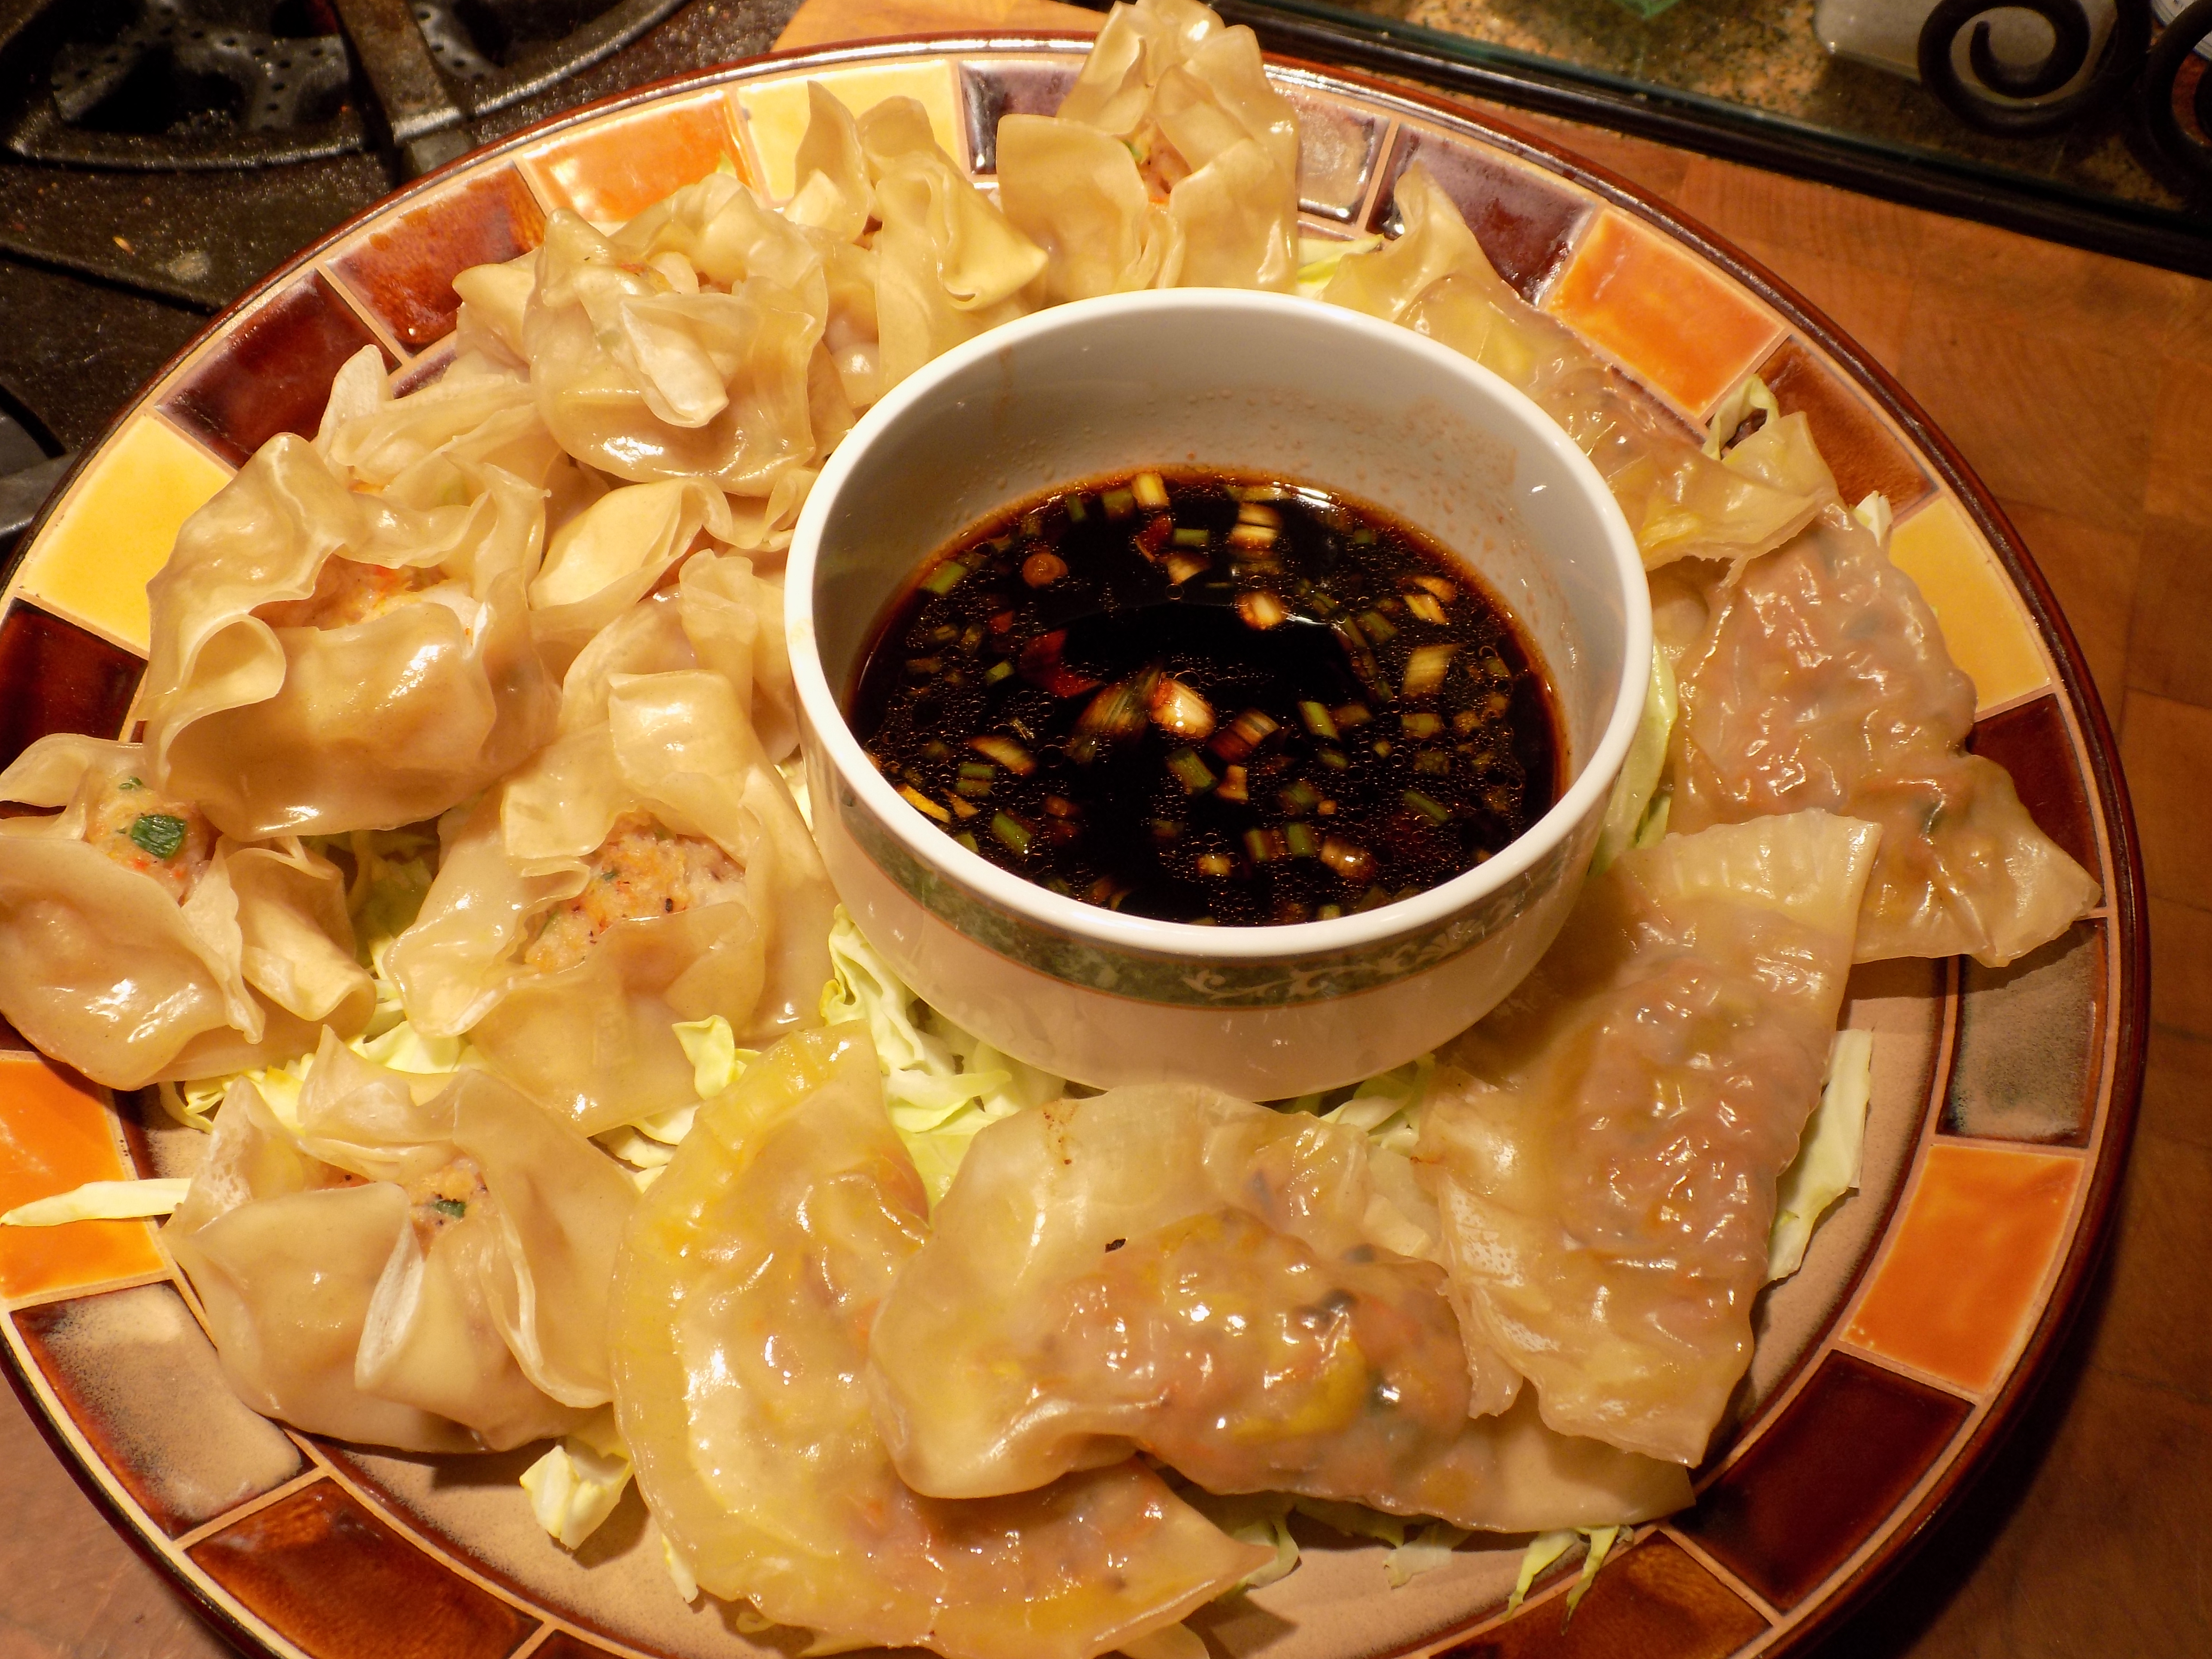
CHINESE PORK AND SHRIMP SHU MAI (DUMPLINGS) WITH GINGER-SOY DIPPING SAUCE 

  • ½ lb. ground pork
  • ½ lb. chopped fresh shrimp
  • 4 diced water chestnuts
  • 2 green onions, very finely minced
  • 3 fresh shiitaki mushrooms, minced
  • 3 dried shiitake mushrooms, soaked in hot water for 30 minutes, then drained and minced
  • 1 T. rice wine or dry sherry
  • 1½ T. cornstarch
  • ½ tsp. sugar
  • 2 tsp. low sodium tamari or soy sauce
  • 2 tsp. sesame oil
  • ½ tsp. kosher salt
  • freshly ground black pepper (not too much)
  • 24-30 round won ton wrappers 

Combine pork, shrimp, water chestnuts, green onions, and mushrooms together in a bowl. In a separate bowl, whisk together the rice wine, cornstarch, sugar, tamari, sesame oil, salt, and pepper. Add to the pork mixture. Place a tablespoon of the mixture in the center of each won ton wrapper. Gather the sides up around the filling so that it looks like a tiny purse. Allow some of the filling to show at the top. If you have trouble, dab a little water on the skin so that it sticks together better.

Place onto a lightly greased baking sheet. Repeat until all the filling and wrappers have been used. Place shu mai in the refrigerator or freezer for 1 hour. Lightly coat your steamer rack(s) with cooking spray. Place the cold shu mai onto the prepared steamer racks, 1-inch apart. Cover steamer, and cook dumplings for 15-20 minutes or until the wrapper is tender and the filling is cooked completely. Serve with Ginger-Soy Dipping Sauce.  (See recipe below)

VEGETABLE POTSTICKERS WITH GINGER-SOY DIPPING SAUCE (Vegetarian)  

  • 3 T. vegetable oil
  • 2 tsp. minced ginger
  • ½ lg. onion, finely chopped
  • 1 lg. garlic clove, finely minced
  • 1 c. shiitake mushrooms, chopped (you can use part re-hydrated dried mushrooms)
  • ¾ c. finely shredded green cabbage
  • ¼ c. finely shredded carrot
  • 2 green onions, finely minced
  • ¼ tsp. white pepper
  • 1 tsp. sesame oil
  • 5 tsp. Shaoxing wine or dry sherry
  • 1 T. GF tamari or soy sauce
  • ½ tsp. sugar
  • 1 pkg. round won ton wrappers

In a wok or large skillet over medium heat, add the oil and ginger. Cook for 30 seconds, until fragrant. Add the onions and stir-fry until translucent. Add the garlic and cook for one minute. Add the chopped mushrooms and stir-fry for another 3-5 minutes, or until the mushrooms are tender and any liquid released by the mushrooms has cooked off.

Add the cabbage and carrot and stir-fry for another 2 minutes, or until the veggies are tender and all the liquid released has been cooked off. Remove from heat and allow to cool.

When cool add the minced green onion, white pepper, sesame oil, Shaoxing wine, tamari, and sugar. Taste and adjust seasoning.

To assemble, scoop 1 scant tablespoon of filling onto the center of the wrapper. Fold the wrapper in half to form a half circle. Using a fork, crimp the edges together. (Make sure to seal as tightly as possible.)

Place onto a lightly greased baking sheet. Repeat until all the filling and wrappers have been used. Place potstickers in the refrigerator or freezer for 1 hour.

Lightly coat your steamer rack(s) with cooking spray. Place the cold potstickers onto the prepared steamer racks, 1-inch apart. Cover steamer, and cook dumplings for 12-14 minutes. Serve with Ginger-Soy Dipping Sauce. (See recipe below)

Thanks to the Woks of Life website for the main gist of this recipe.

SHRIMP SHU MAI (CHINESE SHRIMP DUMPLINGS) WITH GINGER-SOY DIPPING SAUCE

  • 1 garlic clove, minced
  • ½-inch piece fresh ginger, peeled and minced
  • ¼ tsp. lime zest
  • ½ lb. lg. uncooked shrimp, peeled, deveined, and coarsely chopped
  • 1 tsp. low sodium tamari or soy sauce
  • ½ tsp. rice wine vinegar
  • ½ tsp. sesame oil
  • ¼ teaspoon salt
  • 1/8 tsp. white pepper
  • 1 green onion, very finely minced
  • 20-24 round wonton wrappers

Place garlic, ginger, and zest in a food processor and pulse 6 to 8 times or until finely ground and well combined. Scrape down sides of bowl.


Add half of the shrimp, Tamari, vinegar, sesame oil, salt, and pepper to the food processor and process until a smooth paste just comes together. Pour mixture into a mixing bowl and fold in the minced green onion and remaining shrimp.


Place scant tablespoon of the mixture into the center of a wonton wrapper. Gather the sides of the wonton skin up around the filling so that it looks like a tiny purse. Allow some of the filling to show at the top. If you have trouble, dab a little water on the skin so that it sticks together better.

Place onto a lightly greased baking sheet. Repeat until all the filling and wrappers have been used. Place shu mai in the refrigerator or freezer for 1 hour. Lightly coat your steamer rack(s) with cooking spray. Place the cold shu mai onto the prepared steamer racks, 1-inch apart. Cover steamer, and cook dumplings for about 20 minutes. Serve with Ginger-Soy Dipping Sauce. (Recipe below.)

GINGER-SOY DIPPING SAUCE

  • ½ c. low sodium tamari or soy sauce (use GF tamari or soy sauce for vegetarian)
  • 2 T. rice vinegar
  • 1 T. sesame oil
  • pinch crushed red pepper flakes
  • 2 finely minced green onions
  • 2 garlic cloves, finely minced
  • 1 T. finely minced fresh ginger

Combine all ingredients.


CHEWY GINGER MOLASSES COOKIES

One of my favorite cookies in the whole wide world is a big old thick and chewy molasses cookie. And if my 72 year old body was kinder to me regarding the intake of sugar and my weight was still (like in college) regularly hovering around the 130 mark, I would eat one of these babies every day! But alas, neither of these 2 conditions are ever going to grace my (rhetorically speaking) doorstep again. (In fact, they’re never even going to get close to the state of Washington!) So needless to say, my being able to enjoy a ginger cookie with sheer abandon is no longer advisable or recommended. (Of course I can still eat broccoli any old time I please, but for some reason, it’s just not the same!)

But for Christmas this past year – 2016, I decided I wanted to update my regular ginger cookie recipe to incorporate an even more pronounced spice flavor. So I took my basic ginger cookie recipe, changed it up a bit, and the result is this cookie.

Now I must admit that you really need to like the taste of ginger to appreciate this cookie. But if you are not afraid of a cookie that slaps you in the face with flavor, and has an incredible texture that remains chewy for weeks, then this is the cookie for you.

And should someone ask you if these cookies are good for you, tell them unequivocally – YES! Blackstrap molasses contains the highest vitamin and mineral content of all types of molasses. Dr. Cari Case, D.C., reports that “a 2 teaspoon serving contains 2.39 milligrams of iron and 117.6 milligrams of calcium. This serving provides 13.3 and 11.8 percent, respectively, of the daily recommended values for these minerals. Iron is critical for the proper transport of oxygen to body tissues, and calcium is integral to numerous physiological processes that occur daily. Blackstrap molasses also makes a good option for individuals wanting to increase iron stores. Compared to red meat, another source of iron, blackstrap molasses is lower in calories and does not contain any fat. Other minerals found in blackstrap molasses are manganese, copper and potassium. Two teaspoons provides 18 percent of the daily requirements of manganese, 14 percent of the daily requirements of copper, and roughly 10 percent of the daily requirements for potassium. Other minerals and vitamins present are magnesium, selenium, vitamin B-6 and niacin”. Of course, what you tell them about all the butter and sugar – well – you’re on your own!

  • 1½ c. unsalted butter, room temperature
  • 1 c. granulated sugar
  • 1 c. brown sugar
  • 2 lg. eggs
  • ½ c. blackstrap molasses
  • 4½ c. all-purpose flour
  • 2 tsp. baking soda
  • ¼ tsp. salt  
  • 4 tsp. ground ginger
  • 1½ tsp. ground cinnamon
  • 1 tsp. ground cloves
  • sparkling sugar, opt.

In a large bowl, cream butter and sugars until light and fluffy. Beat in eggs and molasses. Whisk together the flour, soda, salt, ginger, cinnamon, and cloves.  Add to the creamed mixture; mix well. Using an ice cream scoop (your choice for size), form balls and dip top into sparkling sugar before placing on ungreased baking sheets sugar side up. Bake in a pre-heated 350 degree oven for 10-12 minutes or until the cookies are just set. Do not overbake.

Cool completely on a wire rack. Store in an airtight container.

BLOODY GOOD MARY

I recently realized that I hadn’t posted any recipes for adult beverages since December of 2015. That’s just sick and wrong! Because mixed drinks, when done correctly, rank right up there with any other truly great recipe. So I plan to immediately remedy my deplorable lack of good judgement in this regard.

The first recipe I am going to post is my rendition of a Bloody Mary.

To begin with, I don’t start with V-8 or any other already doctored tomato juice. I like to control the flavor completely by just the ingredients I add to the mix. Plus, V-8 tends to be more expensive than plain tomato juice, and contain more sodium.

Now one thing you should know about this recipe. It’s not for sissies! It possesses a goodly amount of pucker power from the lemon juice and a lively kick from the hot sauce and horseradish. But what it does for simple vodka is nothing short of amazing.

So next time you feel like greeting the morning with a new taste sensation, build a batch of this seasoned tomato juice. Then simply add a bit of vodka (or none at all for that matter) and watch the sun rise with new found enthusiasm. Good morning, America!

  • 1 c. tomato juice
  • juice of 1 lemon (save the juiced lemon carcass in a plastic bag in the refrigerator for when you serve the drink) 
  • 1 tsp. Worcestershire sauce
  • 5-6 drops hot sauce (I use Frank’s Red Hot)
  • freshly ground black pepper
  • ½ tsp. celery salt
  • 1 tsp. prepared horseradish, or more to taste
  • 3 oz. cold vodka
  • kosher or other coarse salt
  • celery stalks, pickled beans or asparagus, etc., garnishCombine the tomato juice, lemon juice, W. sauce, hot sauce, pepper, celery salt, and horseradish in a pitcher. Refrigerate overnight. Just before serving add the vodka. Adjust seasoning. When ready to serve, rub the reserved lemon carcass around the rim of the glass and dip in coarse salt. Add ice to 2 glasses and pour in tomato juice mixture. Garnish with celery stalks, leaves side up.


MEXICAN BLACK BEAN AND RICE CASSEROLE

Basically, I don’t like Mexican rice. Of course, as with almost everything, there are exceptions. One exception is my recipe for Mexican Rice (on this site) because it contains no tomatoes. (I don’t particularly like the taste of rice and tomatoes together.) So mainly when I place my order in a Mexican restaurant, I request no rice. But I do dearly love the combination of rice and beans. So recently I decided to work up a rice and black bean dish (sans tomato) with a decidedly Mexican flavor. And this recipe is the result.

Of course I have known for decades that rice and beans form a complete protein, so obviously this dish is perfect for vegetarians. But for those of us who are omnivores but appreciate a break from meat periodically, this dish is so filling and delicious, the lack of meat is not even noticed. And as a replacement for the mandatory Mexican rice and blob of refried beans served on every gigantic “be careful the plate is hot” entrée platter in America, there are very few rivals. (Well maybe in the Southwest, but sure as shootin’ not here in the Pacific NW!)

So next time you get a hankerin’ for Mexican food, give this dish a try. It is creamy and full of flavor. Absolutely perfect for children and adults alike. And please feel free to add your own spin to this dish. Just don’t add tomatoes. That would defeat all the hard work I put into researching and refining this dish, and that would make me sad.

  • 2 tsp. butter
  • 1 c. uncooked long grain white rice, washed thoroughly and drained  
  • 1½ c. vegetable broth
  • 3 garlic cloves, minced
  • 1/3 c. finely chopped onion
  • ¼ tsp. kosher salt
  • freshly ground black pepper (small amount)
  • juice of 1 lime
  • 1 can black beans – rinsed and drained
  • ½ c. sour cream
  • 1 (4-oz.) can diced green chiles  
  • 1 c. shredded cheese, divided (I use a combination of mozzarella and sharp cheddar)
  • ½ tsp. dried oregano (Mexican oregano is the best)
  • 2 tsp. chili powder

Heat butter in a medium sized covered saucepan. Add rice and sauté until all the rice is covered with butter and starting to brown. Add broth, garlic, onion, salt, and pepper. Bring to a boil. Reduce heat, cover, and simmer over low heat for 20 minutes or until liquid is almost absorbed. Add lime juice to rice, re-cover pan and continue to simmer for 2 additional minutes. Lightly fluff rice with fork and stir in black beans. Cover and heat additional 3 minutes or until beans are heated through. Remove from heat.

Meanwhile, whisk together the sour cream, green chiles, ¾ cup of the cheese, oregano, and chile powder. Gently stir into the rice mixture. Adjust seasoning. Scoop into a buttered casserole dish and sprinkle with the remaining ¼ cup cheese. Bake in a pre-heated 350 oven for 30 minutes or until the cheese on top is melted.

(And yes I know brown rice is better for us than white rice. But under the circumstances, I believe you should cut me some slack because of all the nutritional value contained in the black beans. Thank you.)


CHINESE ALMOND COOKIES

When planning the menu for a dinner party featuring Chinese food, I was stumped when it came to the dessert portion of the meal. I could make my own fortune cookies, but then I would have to come up with clever fortunes to go in the cookies. Then there’s the ever present problem of how you get paper fortunes baked into the cookies without starting a fire in an open flame (propane) oven? Too much thought and skill involved. So I dropped that idea. And from my days working in the International District I remembered seeing egg tarts and a type of gelatinous almond concoction being delivered to other people’s tables. The gelatinous dish (Almond Float) especially looked just too scary for me. (I have an irrational dislike for all thing “Jello”, so of course I haven’t tried this Chinese delicacy. It must be delicious because I have witnessed people swooning over it, but like I said – gelatinous substances – eww!)

So I did what I always do when faced with a possible cuisine related disaster; I searched the web for inspiration. And what I found were several recipes for Chinese almond cookies. Perfect. Of course, I had to design the cookies to meet my specifications. I didn’t want to include an egg, which seemed to be in every recipe. I wanted a cookie closer to the flavor and crunch of shortbread. But I wanted to use granulated sugar rather than powdered sugar. I wanted a Chinese cookie, not a Scotch shortbread.

So the result was this cookie which incorporates the granulated sugar taste of a traditional Chinese almond cookie, but possesses the crunch of shortbread. Of course my version retains the almond flavor and look (whole almond on top) associated with the traditional version. It’s just that mine are crunchy, not soft like most sugar cookies, including traditional Chinese Almond Cookies.

So if you are planning a Chinese meal and want a dessert that is semi-traditional, easy to prepare, inexpensive, and sure to be loved by young and old – bake up a batch of these little darlings. They are light and absolutely perfect with a lovely cup of coffee or tea.

And even if you don’t like Chinese food, you are sure to love these almond flavored treats. Now if you don’t like Chinese food or almond flavoring, I can offer you no help. There are just some culinary circumstances that even this overly Pollyanna prone person can alleviate!

  • 1 c. unsalted butter, room temperature
  • ½ c. granulated sugar + more for sprinkling
  • pinch salt
  • 1½ tsp. almond extract
  • 2½ c. unbleached all-purpose flour
  • whole almonds

Beat butter, sugar, and salt together until light and fluffy. Add extract. Add flour and work just until combined. Place dough on a long piece of plastic wrap. Using your hands, wrap the dough into the plastic wrap gently shaping it into a round log with about a 1-inch diameter. Refrigerate for 2 hours.

Cut into ½-inch thick rounds. Place on an ungreased cookie sheet about 1½-inches apart. Flatten each cookie slightly with the bottom of a glass. Sprinkle a small amount of sugar on each cookie. Place an almond in the center and gently press down to make sure the almond stays where it belongs!

Bake in a pre-heated 300 oven for 25-30 minutes or until the bottom of each cookie is a nice golden brown. Transfer to a wire rack to cool. Store in an airtight container.


CHAR SIU PORK (CHINESE BBQ PORK)

When I worked in the International District of Seattle during the 70s, I used to treat myself periodically to a quarter pound of BBQ pork for lunch. It was absolutely delicious. And there was one particular shop I always patronized. And to this day I can still conjure up the wonderful smell that emanated from that shop. I can also visualize the shop itself, with its uneven floor, bathroom straight out of the 1600s, and the wizened old owner/chef who always smiled at me despite the fact that he was missing at least 2/3rds of his teeth. But he was so nice and boy howdy could this guy BBQ meat. If I could have afforded to buy from him all the time, I would have taken home BBQ duck and pork (叉燒) on a weekly basis. But 40 some years ago, these items were way outside my budget. Unfortunately!

But ever since those 10 years working in the International district, I have loved BBQ pork. So for a recent dinner party, I decided to try replacing the recipe I had been using for many years with one that would more accurately reflect the exquisite flavor of the BBQ pork of long ago. I knew the secret was in the combination of ingredients for the marinade. (No duh!) And I was pretty sure the ingredient list should include Chinese Five Spice. But I didn’t have any Chinese Five Spice on hand or star anise for that matter, so I used regular anise seed in my own Chinese Five Spice blend. I have no idea how this pork would taste with a Chinese Five Spice blend that included star anise, but I can’t imagine it could be any tastier. Thanks to the Recipe Tin Eats web site (great site BTW) for this wonderful recipe. And sorry I changed a few things here and there.

So if you love Chinese BBQ pork as much as I do, give this recipe a try. And if you happen to visit the International District in whatever large city is closest to your home, look for the seediest shop you can find with ducks and strips of BBQ pork hanging in the window. Then go inside and buy anything that is hanging from a hook. Because it is bound to be incredible. Tell them Patti sent you!  

  • 2 tsp. sugar
  • 5 tsp. honey
  • 5 tsp. hoisin sauce
  • 1 tsp. oyster sauce  
  • 2 T. low sodium tamari or soy sauce
  • ½ tsp. Chinese Five Spice powder, either purchased or my preference – homemade (recipe below)
  • 1 tsp. sesame oil  
  • 1 T. vegetable oil  
  • 1 pork tenderloin, trimmed of fat and silver skin and cut in half lengthwise

Make the marinade by placing the sugar, honey, hoisin sauce, oyster sauce, soy sauce, Chinese five spice, sesame oil, and vegetable oil in a small saucepan and bring to simmer for just 30 seconds, then set aside to cool.

Place the pork and cooled marinade in a Ziplock bag. Remove as much air as possible, then massage the pork so the marinade is all over the pork. Place in the fridge and marinate for at least 3 hours, preferably overnight or up to 24 hours.

Take the pork out of the fridge and bring to room temperature. Line a baking tray with foil and place a rack on top. Remove pork from the marinade (save the marinade) and place on the rack. Tuck the thin end of the tenderloin halves underneath so the whole piece of meat is roughly the same thickness.

Roast in a pre-heated 375 degrees for 45-60 minutes or until the internal temperature is 160 degrees. After 20 minutes, baste generously with the reserved marinade. After another 20 minutes, baste with remaining marinade. Remove from oven and allow the pork to rest for 15 minutes before slicing.

Please note: For a more authentic BBQ taste, remove the pork from the oven when it reaches about 150 degrees. Then place on a low temperature BBQ grill to help caramelize the sugars in the marinade. Watch very carefully because you don’t want to burn the marinade. I have to admit I haven’t tried the grilling part myself, because when I fixed this recipe, I was preparing a full Chinese dinner, and neither Mr. C. or I had time to breath much less spend any time at the BBQ. But rest assured, the next time I make this recipe there will be some real grilling involved!  


KRENDL (RUSSIAN CHRISTMAS BREAD)

I dearly love being invited to a dinner party where everyone is asked to bring a dish to compliment a theme, be it ethnic or as a side to a particular main dish, or to include a particular ingredient, etc. I love this type of invitation because it often forces me to search the web. (Like I need a dinner party invitation to search out new and exciting dishes to share with you!)

Anyway, I was recently invited as a guest of a guest (my dear friend Vicky) to be her date. (Her husband and mine were gigging together during the dinner hour. So I was basically Mark’s replacement at table.)

The dinner was being hosted by Eric and Eliza and labeled as “Goose Fest”. But in reality, it was to celebrate Russian Christmas. Eliza is of Russian decent and apparently many Russians celebrate Christmas Day on January 7 in the Gregorian calendar, which corresponds to December 25 in the Julian calendar. The dinner party was actually on the 14th, but what’s a few days here and there among friends?

Anyway, one of the suggestions Vicki offered me for my contribution was Krendl. Never heard of it, but when has that ever stopped me. So off to web recipe land I ventured. And this incredible bread is the result.

I changed Barbara Rolek’s recipe just a bit, but not enough to hardly notice. So thank you Barbara for what is now one of my favorite sweet breads. (And no, I am not going to wait until next Christmas to make this bread again. In fact, I am going to make it for our next JazzVox pre-concert meal.)

This bread fulfills all of the basic desires I have when it comes to sweet breads. The dough is pleasantly sweet, the filling is full of fruit (think raisins in cinnamon rolls, for example), and the glaze is perfect. There is even a slight crunch to this bread from the sliced almonds. What more could you ask??

So if you love rich and tender bread, a filling resembling a fruit compote, and thin sweet almond flavored glaze, this is the bread for you. But please don’t wait until next Christmas to make this fabulous delicacy. It would be perfect served at an Easter brunch, to accompany coffee and tea at a book club meeting, or as a special treat to leave in your break room at work, to mention just a few examples.

And to make things a little different than what you usually experience when building a filled sweet bread, the filling is made before the dough is even started. Fun, eh?

Wonder why? I leave that for you to figure out my friends.

So get out your yeast and give this recipe a try. Just be advised that this bread is going to serve about 2 dozen people. The good news is that it feeds a lot of people and also freezes well. The bad news is that you are not going to be able to stop eating it. You’re just going to have to trust me on this. I speak from way too much experience.

Filling:

  • 1 c. sweet white wine (I use Muscato) or apple juice
  • 1 lg. apple, peeled and chopped
  • 2/3 c. finely chopped dried apples
  • ½ c. finely chopped dried apricots
  • ½ c. chopped pitted dried prunes
  • 1/3 c. golden raisins
  • 2 T. butter
  • 1 T. sugar
  • ¼ tsp. almond extract

In a large saucepan, combine wine, apple, dried fruits, butter, and sugar. Bring to a boil. Reduce heat and simmer uncovered for 25-30 minutes or until a jam-like consistency is obtained. Stir periodically. When desired thickness is reached, remove from heat and stir in almond extract. Cool to room temperature while you make the dough. Spread on dough as explained below.

Bread Dough:

  • 1 pkg. or 1 scant T. active dry yeast
  • 5 T. granulated sugar, divided
  • ¾ c. warm whole milk
  • ¼ c. (½ stick) unsalted butter + 3 T., room temperature
  • 2 lg. egg yolks
  • 1½ tsp. vanilla extract
  • 3 c. unbleached all-purpose flour
  • ½ tsp. kosher salt
  • vegetable oil
  • ½ tsp. ground cinnamon

In the bowl of your stand mixer, dissolve the yeast and 3 tablespoons of the granulated sugar in warm milk. Let proof for about 10 minutes. After allowing the mixture to proof, add the ¼ cup butter, egg yolks, vanilla, 1½ cups of the flour, and salt; mix with your dough hook on medium speed until smooth. Stir in enough remaining flour to form a soft dough (dough will be slightly tacky). Knead until smooth and elastic, about 4-6 minutes. Pour a tiny bit of oil over dough and form into a ball. Cover with plastic wrap and let rise in a warm place until doubled, about 75 minutes.

Punch down dough. Turn onto a lightly floured surface; roll into a 32×10-in. rectangle. Melt remaining 3 tablespoons of butter; brush over dough to within 1-inch of edges. Mix cinnamon and remaining 2 tablespoons of sugar; sprinkle over top. Spread with cooled fruit mixture. Roll up jelly-roll style, starting with a long side; pinch seam and ends to seal.

Place on a parchment paper lined baking sheet, seam side down. Form into a pretzel shape. (Forming the dough may make the parchment paper go all wonky, but persevere. Remember, you are dealing with paper and a piece of dough and you are the boss. Now’s the time to allow the latent bully side of your personality come to full fruition!) Cover the dough with plastic wrap or a tea towel; let rise in a warm place for 30-40 minutes or until almost doubled.

Bake in a pre-heated 350 degree oven for 40-45 minutes or until golden brown. Remove from pan to a wire rack. Spoon glaze over surface while the bread is still slightly warm. Quickly decorate with sliced almonds. (The glaze will start to harden as soon as it is spooned onto the bread.) Allow glaze to set before serving.

Glaze:

  • 1 c. powdered sugar, or more as needed
  • 2 tsp. milk
  • 1/8 tsp. almond extract
  • 2-3 tsp. warm water, or more as needed
  • ¼ c. sliced almonds

Whisk the powdered sugar, milk, almond extract, and warm water together. Add additional powdered sugar or warm water to reach desired consistency. (Glaze should be fairly thick, but not so thick that it doesn’t flow slowly and evenly when spooned onto the warm bread.)


CHINESE SALT AND PEPPER OVEN ROASTED BEANS

So OK, olive oil is not usually used in Chinese cooking.  But what the heck, it’s my kitchen, my olive oil, my family and friends who will be eating the beans, and no one but me to blame for this gross misconduct and offence against all foods Chinese.

But in my own defense, olive oil is better for us then many oils that could be used, plus it tastes good. So to those who might suggest that I haven’t the right to change things up so drastically I say – sorry, but all things are fair in striving to provide great taste sensations for my family and friends. And frankly, what olive oil does for beans is almost remarkable. And I adore remarkable food. And yes, I know that most Chinese green bean recipes are heavy on the soy sauce, chili sauce, sesame oil thing. (And God bless them for it.) But what I wanted was a veggie side dish that didn’t include the mirepoix of Chinese food – garlic, ginger, and green onions.

I wanted a dish that simply featured the flavor of the vegetable. Especially because the evening I first served these beans, I served other dishes that all had that “Chinese food” flavor thing going. And as wonderful as that is, a flavor change is always welcome.

So that’s my story about these beans. And the best part, aside of course from the marvelous flavor of the beans, is the versatility of this simple dish. These beans can be served with almost any type of meat or seafood. And talk about quick and easy – nothing could be simpler.

So next time green beans catch your eye at the grocery store, bring some home and give this recipe a try. You are going to thank me. And speaking of thanks, I would like to thank Stacey from There’s a cook in my kitchen website who posted this recipe just for me. (Well not just for me, but I was the only one in my den/office when I found this recipe on the internet!)  

  • 1 lb. fresh green beans, cut into 2-inch pieces
  • 2 T. extra virgin olive oil
  • kosher salt
  • freshly ground black pepper

Spread the beans onto a rimmed baking sheet in a single layer. Pour on the olive oil and mix until all the beans are covered in oil. Sprinkle on a fair amount of salt and a generous amount of pepper.

Bake in a pre-heated 400 degree oven for 20 minutes or until the edges of the beans start to brown and the beans are not quite tender. Remove from oven and adjust seasoning. Serve immediately.


CHINESE SPICY ORANGE SHRIMP

I think I have previously mentioned that I love Cooking Light – the magazine that is! (I like cooking light too, but I don’t always succeed in that arena.) So for a dinner party I hosted recently, I decided to cook Chinese food. OK, American Chinese food. Although I know traditional ingredients like tripe, chicken feet, and bitter melon are available in Seattle’s International District, it’s too far to drive just to obtain a few authentic products. (Oh who am I trying to kid. I wouldn’t cook with tripe, chicken feet, or bitter melon if they were personally delivered to my front door by Ming Tsai himself!)

So what’s left – BBQ Pork, steamed dumplings, fried rice, etc. Basically the usual suspects found in every Chinese restaurant around the world. (Except China, of course.)

So call me plebian if you must, but I do dearly love American Chinese food. Well, maybe I better qualify that statement. I love good Chinese food. Defined by me as containing no MSG and just a modicum of oil, the exclusive use of low sodium tamari or soy sauce, super fresh veggies and meat, and a whole lot of restraint shown when adding salt.

So when I came across this recipe from the August 2007 issue of Cooking Light while setting my menu, I knew from just reading the ingredient list that this dish would be a winner. And it sure enough was! I changed/added a couple of ingredients, but basically it remains yet another example of the wonderful recipes that can be found in Cooking Light. (And no, I am not on the Cooking Light payroll, nor do I receive a free subscription. My words are unsolicited, which by definition make them 100% accurate. Right???) But back to the issue at hand.

As you know, citrus works very well with seafood. And something about the orange zest and juice along with the other ingredients work well to enhance the flavor of the shrimp rather than detract from it. And we’re talking only 2 teaspoons of oil in this recipe. Hurray for that!

So if you too love Chinese food, I suggest you try this delicious shrimp recipe. It is definitely a quick and easy dish to prepare, making it perfect for any night of the week. Served with Chinese Salt and Pepper Beans and steamed brown rice, you have a dinner that will please your entire family. Just remember to start your brown rice first. It will take longer to cook then both of the other recipes.

And if you haven’t learned to love brown rice yet, try using low sodium broth in place of the water when you cook the rice. Also, and I can’t believe I am going to put this in writing after railing above about too much salt, but a tiny pinch of salt and some freshly ground pepper will also add to the overall flavor of the brown rice. (Sorry to go all pettifogging on you when it comes to the issue of salt, but rest easy. I’m working on the problem!) Enjoy the shrimp. Thanks again Cooking Light for this delightful recipe.

  • 1 lb. peeled and deveined uncooked large shrimp
  • 1 T. cornstarch, or more as needed to coat the shrimp
  • 1-2 tsp. orange zest
  • ½ c. orange juice
  • pinch kosher salt (unless using regular soy sauce)
  • 2 T. low sodium tamari or soy sauce
  • 1 T. honey
  • 1 T. rice wine vinegar
  • ½ tsp. Sriracha or chili sauce, or more to taste
  • 2 tsp. vegetable oil
  • 1 T. minced fresh ginger
  • 2 garlic cloves, minced
  • ¼ c. chopped green onions

Place shrimp in a medium bowl. Sprinkle with cornstarch; toss well to coat. Set aside.

Whisk together the orange zest, juice, salt, tamari, honey, vinegar, and Sriracha. Set aside.

Heat oil in a large nonstick skillet over medium-high heat. Add minced ginger and garlic to pan; stir-fry for 20 seconds or until fragrant. Add shrimp; stir-fry for 3 minutes or until almost done. Add juice mixture and green onions; cook 2 minutes or until sauce thickens and shrimp are done, stirring frequently. Serve immediately.


MASSAGED KALE AND APPLE SALAD

DSCN0223

I first had this wonderful salad several years ago at our friend Sylvia’s 60th birthday party. Our mutual friend Shelley had prepared the salad, and the first words out of her mouth to me that evening were “Patti, you have just got to try this salad”! And ever the one to comply with a friend’s request, especially if it involves food, I gladly gave in to her summons. You know how you feel when you are experiencing a life changing moment and are wise enough to realize it, that’s what happened to me at Sylvia’s party. I knew instantly that I had met an ingredient that would forever become a part of my life. And it has. I use kale in casseroles, side dishes, soups, and of course salads. (I have yet to use kale in any desserts, but give me time. It could happen yet!)

And whoever thought to massage kale to remove the bitterness is nothing less than a genius. When Shelley told me how she had massaged the kale, I was thunder struck. First of all, I had never seen kale for sale in the grocery store. It was simply something green that lined the dishes and bowls in the deli case. You didn’t eat that stuff; it was just for presentation. (In much the same way parsley was used as a garnish until people discovered not only its health benefits, but how a last minute sprinkle of parsley freshens the flavor of almost any kind of savory.)

Thus it was for me with kale. I started exploring recipes that contained kale. I quickly found that kale had taken the place of spinach in many recipes previously featuring vitamin C rich Amaranthaceae.   I personally love spinach with a passion. But I certainly understand substituting massaged kale for spinach because children especially don’t like the oxalic acid taste of spinach. I simply started using kale in addition to spinach and chard because I just love me my greens!

So consider making this salad for your family or friends in the near future. It’s easy to prepare, has tons of healthy ingredients in it, and the flavor is extraordinary.

And thank you again Shelley for introducing me to kale. And if I remember correctly, the recipe originated at PCC. So thanks to PCC too! (Oh, and sorry for the couple of changes I made.)

For more kale recipes, search under “Kale” on the home page of this site. Also search under “soup”, because many of my favorite recipes containing kale are in the soup section.

  • 1 bunch curly kale, de-stemmed, cut into bite sized pieces, washed, and spun dry in a salad spinner
  • ½ tsp. kosher salt
  • 1 c. finely diced red cabbage
  • ¼ c. diced red onion, opt.
  • ½ c. currants or finely chopped raisins
  • 1 apple, finely diced (I use Honey Crisp or Opal, if available)
  • ½ c. sunflower seeds, toasted
  • ¼ c. extra virgin olive oil
  • 2 T. apple cider vinegar
  • 1/3 c. gorgonzola, blue, or feta cheese, crumbled

Place kale in a large mixing bowl. Add salt and rub the kale pieces together with your fingers for about 2 minutes or until the leaves turn a darker color as the tough cellulose structure breaks down. (Massaging kale actually eliminates the bitter taste making it a perfect green for almost any salad.) Add the cabbage, onion, currants, apple, and sunflower seeds. In a small container whisk the olive oil and vinegar together. Gently stir into the kale mixture. Adjust salt and vinegar. Just before serving, toss in the crumbled cheese.