NEUFCHÂTEL CHEESE AND OLIVE SPREAD
Sometimes I go off on a wild tangent about something that will never bring about world peace, a higher literacy rate in the United States, or a magic formula for lowering stress when driving in Seattle traffic! But then, more often, my tangents are on a more attainable level and actually result in something over which I have some control. In this case I’m talking about reduced calories in an ingredient that is always, and I do mean always in my refrigerator. And that delicious ingredient ladies and gentlemen is cream cheese. Yep – cream cheese (or more accurately now Neufchâtel cheese).
Since deciding that my weight is way out of control, I have been paying greater attention to what I put in my mouth. Now for years I have been buying Neufchâtel cheese as frequently as I purchase cream cheese. I just assumed (my bad) that they were pretty much identical dairy products. And whichever happened to be on sale, or my fingers touched first, swiftly landed in my shopping cart. But in reading the packages, I soon found out that 1 tablespoon (1-oz.) of cream cheese has 100 calories, 84% fat, 8% carbs, and 8% protein. Whereas Neufchâtel cheese has only 70 calories, 1/3rd less fat (83%), 5% carbs, and 12% protein. So, why not cream cheese instead of Neufchâtel cheese? Well I think I just answered that question, but if you need me to break it down in another way – well it’s simple really!
Cream cheese by law must contain at least 33% milk fat and not more than 55% moisture. American Neufchâtel cheese contains only about 23% milk fat and has a slightly higher moisture content. This means that you need less other moisture rich ingredients to come up with a creamy, spreadable consistency. (Think less mayonnaise and sour cream, for example.)
Then I considered the taste of both. I found that for me, the flavor of Neufchâtel cheese is just as wonderful as cream cheese and just as perfect as the base for almost any type of spreadable. (I’m not sure I would use Neufchâtel cheese in a cheese cake, unless specifically listed in the recipe, but for dips and spreads it’s perfect.)
So, not requiring a baseball bat to hit me in the head before I pay attention to something – I have switched exclusively to Neufchâtel cheese for almost all of my cream cheese needs. And because I am so excited about my new found knowledge, I am going to share some of my favorite spread recipes with you in hopes that each and every one of you too will accept Neufchâtel cheese into your lives. (If that makes me a crusader, so be it!)
So I hope you enjoy the recipes and BTW – Happy Valentine’s Day. (It’s tomorrow, you know!)
And remember: Hunks or slices of cheese and dips or spreads that contain cheese (including cream cheese and Neufchâtel cheese), should always be served at room temperature. The wonderful creamy texture and complex taste of cheese cannot be fully appreciated if the cheese is still cold.
And you will note that all the recipes below call for “light” mayonnaise (I use Best Foods) and “lowfat” sour cream (I use Tillamook). Both are excellent products and all of the spread recipes on this post are just delightful (thank you very much) and happy as Puget Sound clams to find themselves lightened up!
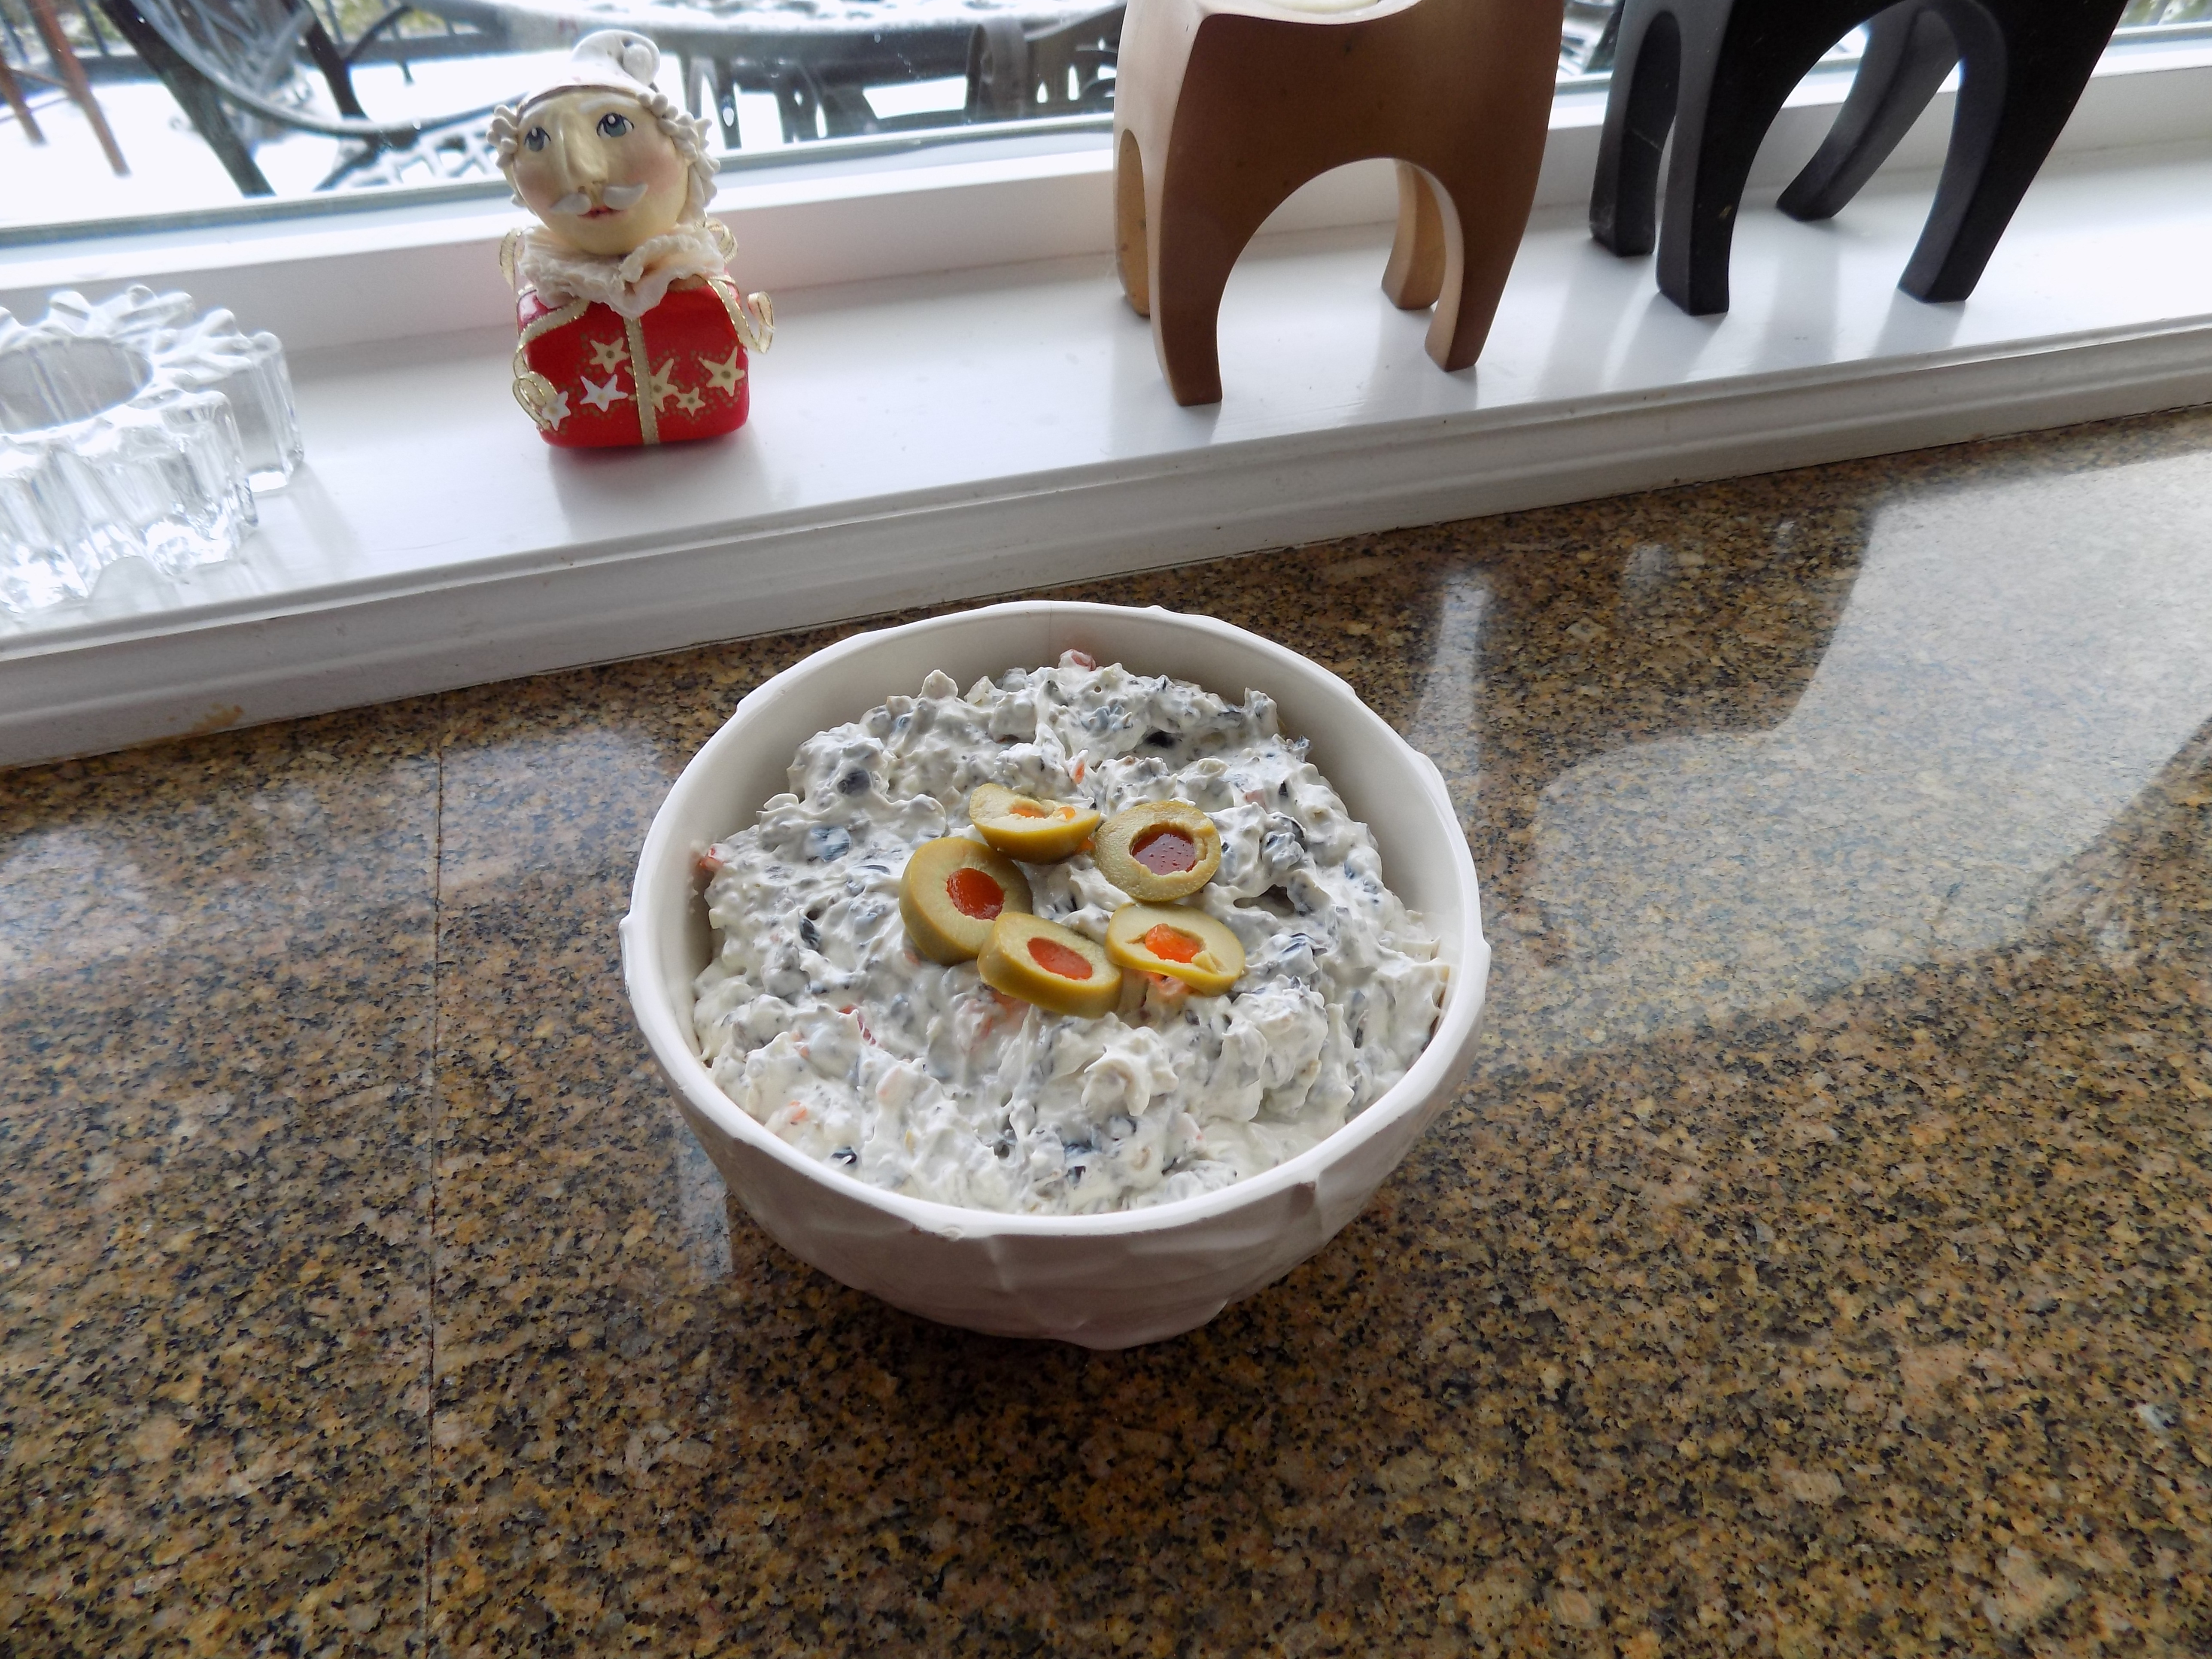
NEUFCHÂTEL CHEESE AND OLIVE SPREAD
- 1 (8-oz.) pkg. Neufchâtel cheese, room temperature
- 1-2 T. low fat sour cream
- ½ tsp. Worcestershire sauce
- 1/8 tsp. granulated garlic
- freshly ground black pepper (not too much)
- 1 small can chopped black olives
- 3 T. finely chopped green olives
Combine all ingredients. Refrigerate for several hours to combine flavors. Serve with fresh vegetables or crackers. Also wonderful served as a canapé.
NEUFCHÂTEL CHEESE AND VEGETABLE SPREAD
- 1 (8-oz.) pkg. Neufchâtel cheese, room temperature
- ¼ tsp. seasoned salt
- freshly ground black pepper (not too much)
- 1 T. finely minced carrot
- 1 T. finely minced green pepper
- 2 T. finely minced red pepper
- 2 tsp. finely minced fresh parsley
- 2 tsp. finely minced shallot
- 1 small garlic clove, finely minced
Combine all ingredients. Refrigerate for several hours to combine flavors. Serve with fresh vegetables or crackers. Also wonderful served as a canapé.
VIENNESE LIPTAUER (NEUFCHÂTEL CHEESE, ANCHOVY, AND CAPER SPREAD)
- 1 (8-oz.) pkg. Neufchâtel cheese, room temperature
- ½ c. unsalted butter, room temperature
- 3 T. low fat sour cream
- 1 T. Dijon mustard
- 2-3 tsp. anchovy paste
- 1½ tsp. paprika
- ¼ tsp. kosher salt
- 1 tsp. caraway seeds
- 1 tsp. capers, drained and finely minced
- 1 T. grated or finely chopped onion
Whirl the Neufchâtel cheese, butter, sour cream, mustard, anchovy paste, paprika, and salt together in a food processor until very smooth. Taste and adjust the seasoning. Add the caraway seeds, capers, and onion. Pulse a couple of times just to incorporate the new additions. (You do not want them pulverized!) Scoop into serving dish. Cover with plastic wrap and refrigerate for at least an hour before serving. Serve at room temperature with rye bread or Finn Crisp, a thin rye crisp bread with caraway. Finn Crisp comes in a small, mostly red package and can be found at most grocery stores.
SHARP CHEDDAR CHEESE AND CREAMY HORSERADISH SPREAD
- 8 oz. grated sharp cheddar cheese
- 6 oz. Neufchâtel cheese, room temperature
- 1 tsp. distilled white vinegar
- 6 T. heavy cream
- 1 T. creamy horseradish (I use Beaver Brand Hot Creamy Horseradish)
- pinch of kosher salt
- freshly ground black pepper
Whirl all the ingredients together in a food processor until creamy and smooth. Refrigerate for at least 2 days before serving at room temperature with crackers. Cornichons (crisp, sour pickles made from really tiny cucumbers) are a wonderful accompaniment to this cheese spread.
BACON, DATE, AND NEUFCHÂTEL CHEESE SPREAD
- 8-oz. Neufchâtel cheese, room temperature
- 2 T. milk
- ½ c. crumbled cooked bacon
- ½ c. chopped dates
- 2 green onions finely minced
- pinch kosher salt
- freshly ground black pepper
- balsamic glaze, opt.
Whip the Neufchâtel cheese and milk together. Stir in the bacon, dates, green onions, salt, and pepper. Serve in a small bowl or on a small plate drizzled with balsamic glaze.
SMOKED SALMON SPREAD
- 8-oz. Neufchâtel cheese, room temperature
- ½ c. low fat sour cream
- 2 tsp. finely minced green onion
- 2 tsp. minced fresh parsley
- 2-3 tsp. fresh lemon juice, or more to taste
- ¼ tsp. kosher salt
- freshly ground black pepper
- ½ lb. smoked salmon
- milk
Beat Neufchâtel cheese and sour cream together. Add green onions, parsley, lemon, salt, pepper, and smoked salmon. Stir until salmon is broken down and mixture is creamy. Add milk until you reach desired consistency. Refrigerate at least 4 hours before serving.
Beat Neufchâtel cheese and sour cream together. Add green onions, parsley, lemon, salt, pepper, and smoked salmon. Stir until salmon is broken down and mixture is creamy. Add milk until you reach desired consistency. Refrigerate at least 4 hours before serving.
CREAMY ANCHOVY GARLIC SPREAD
- 2 small cloves garlic, rough chopped
- 7-8 anchovy fillets
- 6 T. unsalted butter, room temperature
- 1 (8-oz.) pkg. Neufchâtel cheese, room temperature
- ¼ c. low fat sour cream
- 2 dashes hot pepper sauce (I use Frank’s Red Hot Original)
- freshly ground black pepper
- 1 T. finely chopped fresh chives
Combine the garlic, anchovies, butter, Neufchâtel cheese, sour cream, hot pepper sauce, and pepper in the container of a food processor. Process until smooth. Stir in the chives. Transfer to a serving bowl, and refrigerate for at least 6 hours or better yet, overnight. Serve at room temperature with plain crackers (not quite as plain as saltines) or toasted baguette slices.
JALAPEÑO POPPER DIP/SPREAD
- 1 (8-oz.) pkg. Neufchâtel cheese, room temperature
- ½ c. light mayonnaise
- ¼ c. grated Monterey Jack cheese
- ¼ c. grated sharp cheddar cheese
- ¼ c. grated Parmesan cheese
- ¼ c. sliced pickled jalapeños (I use Mrs. Renfro’s) + a couple slices for garnish
- ½ fresh jalapeño, seeded, de-veined, and finely chopped, or more to taste
Whirl the Neufchâtel cheese, mayonnaise, Monterey Jack cheese, cheddar cheese, and Parmesan cheese together in a food processor until smooth. Add the pickled jalapeños and the finely chopped fresh jalapeño and whirl until only small bits of the fresh jalapeño remain visible. Do not over process. You want those little bits of green to remain. Spread the mixture into a lightly buttered casserole. Bake in a pre-heated 375 degree oven for about 20 minutes. You should be able to see the mixture gently bubbling around the edges and the top should be turning a light golden brown when the dip is hot. Allow to rest for about 5 minutes. Serve with tortilla chips.
ROASTED RED PEPPER CHEESE SPREAD
- 8-oz. Neufchâtel cheese, room temperature
- ½ c. light mayonnaise
- scant 1/3 c. rough chopped roasted red pepper
- 1 tsp. finely minced onion
- 1/8 tsp. granulated garlic
- pinch kosher salt
- freshly ground black pepper
- 1 c. grated sharp cheddar cheese
- 1 c. grated Monterey Jack cheese
Combine all ingredients in a food processor and whirl until smooth. Spoon into a serving bowl, cover with plastic wrap, and refrigerate at least 24 hours before serving at room temperature. Great spread on multi-grain crackers.
CHEDDAR AND PORT WINE SPREAD
- 8 oz. Neufchâtel cheese, room temperature
- 2 c. (scant) shredded sharp cheddar cheese
- 3 T. tawny port (I use Benjamin Australia Tawny Port)
- ½ c. dried cranberries, roughly chopped
- ½ c. toasted chopped pecans
Combine Neufchâtel cheese, cheddar cheese, and port in a food processor. Whirl until creamy and smooth. Stir in chopped dried cranberries. Scoop into a small serving bowl. Cover with plastic wrap and refrigerate until about an hour before ready to serve. Sprinkle with pecans just before serving. Great with crackers and thin apple slices.
LOX AND PARTY RYE BREAD WITH CAPER AND RED ONION SPREAD
- 8 oz. Neufchâtel cheese, room temperature
- 1/3 c. capers, roughly chopped
- ¼ c. finely chopped red onion
- 2 tsp. fresh lemon juice
- pinch kosher salt
- freshly ground black pepper
- party rye bread
- 6 oz. thinly sliced lox
Combine Neufchâtel cheese, capers, red onion, lemon juice, salt, and pepper. Spread on party rye; top with lox.
GARLIC AND HERB CHEESE SPREAD (MOCK BOURSIN CHEESE)
- 8 oz. Neufchâtel cheese, room temperature
- ½ c. (1 stick) unsalted butter, room temperature
- ¼ tsp. dried thyme leaves
- ¼ tsp. dried marjoram leaves
- ¼ tsp. dried dill weed
- ¼ tsp. dried basil
- ¼ tsp. freeze dried chives
- ½ tsp. granulated garlic
- freshly ground black pepper
- 1 T. finely minced fresh parsley
- 2 T. finely grated Parmesan cheese
Cream all ingredients together or whirl in a food processor. Refrigerate at least 4 hours. Bring to room temperature before serving with a variety of crackers. Also wonderful spread on a grilled steak. It melts beautifully on the cooked steak and leaves a lovely puddle into which you can dip your pieces of steak.
SUN DRIED TOMATO AND FRESH BASIL SPREAD
- 1 (8-oz.) pkg. Neufchâtel cheese, room temperature
- 2 T. sun dried tomato bits (not oil packed is the best, but if all you have are sun dried tomatoes packed in oil, just drain slightly and chop finely)
- 5-6 large basil leaves, finely chopped
- 1 T. chopped fresh parsley**
- 2 small cloves of garlic, finely minced**
- ½ c. finely grated Parmesan cheese
- freshly ground black pepper
- 2 heaping tablespoons light mayonnaise or low fat sour cream
Combine all ingredients; refrigerate at least 24 hours before serving at room temperature with crackers, toasted baguette slices, or even bagels.
**Hint: When you have both parsley and garlic to mince, and they are going into a recipe at the same time, mince them together. The parsley helps keep the garlic from “skipping” around your cutting board. In the case of this recipe, I add the basil to the garlic and parsley too. I’m lazy – what can I say?