Category Archives: THIS & THAT RECIPES

CHOCOLATE KAHLUA ICE CREAM SAUCE

OLYMPUS DIGITAL CAMERA

Now I realize that really good vanilla ice cream doesn’t require a topping, but what the heck – why not? If you are considering ice cream in the first place, you might as well indulge yourself or your family or friends, and go all the way. And if this ice cream sauce doesn’t make a believer out of you, then I don’t know what could! (Unless of course, it’s one of my other sauces (see Caribbean Rum-Raisin Ice Cream Sauce for 3 other delicious sauces.) But back to this recipe.

I made this recently for one of the desserts for a JazzVox pre-concert meal. People loved it. Then I also served it, along with my Caribbean Rum-Raisin Ice Cream Sauce to good friends at our small “open trailer” get together in Anacortes. Again our friends thought it was definitely worthy of posting on this blog.

So you, my dear readers, are getting the benefit of my friend’s unsolicited approval. And don’t you deserve it too! It’s been a rough year. If the presidential race isn’t enough to put you off your feed, there’s always the drought in California, hurricanes all over the world, and the melting ice cap! I tell you, if there ever was a time we all needed (and I mean needed) a little pampering, it’s now. So don’t deny yourself. Eat ice cream and of course vote in the upcoming presidential election.

Pardon the unpaid political proclamation, but if ever there was a time to stand up for what I believe, this is it. And I believe strongly in America and am proud of the humanitarian nation it has always been. But unless we all vote for a reasonable candidate, it could so easily dissolve into a non-respected, joke of a country. Please don’t let that happen. Don’t let hearsay or unverified accusations sway your thinking. Don’t be faithful to a party just because you have always voted their agenda. Now is the time to really think about the lasting effect your vote could make. Take time to read each party’s platform. I want my children and grandchildren to enjoy the same freedom and ability to succeed as I have enjoyed all my life. I want them to be able to go camping in our national parks, and know that the politicians in command care about each and every citizen, not just the people that look and think exactly as they do. And if I’m not mistaken, you probably want the same for your descendants too.

So get out there and vote. Spread the word, and don’t let anyone tell you that by not voting you are making a difference, because they might actually be correct! Your abstinence might just help the one candidate you don’t want in office, to actually win this election. The future of our country is just as much in your hands regardless if you go to the poles or not. But taking the high road and saying that you are not voting because you don’t like any of the candidates is the equivalent to indulging in a  political game of Russian roulette. Remember, no one is perfect. And our candidates are just like everyone else in that regard.  

So please accept my apology if I have offended you or you feel I have over-stepped my position as a food blogger. But I am also a real person who feels deeply about the welfare of our country. I strongly believe, that if we don’t take a firm stand, and vote to retain the integrity and intelligence our leaders have displayed in the past, our country as we know and love it, is going to change dramatically. And I don’t believe it will be for the better!

Again, I know a food blog is not the best place to voice my opinion on something other than the relative merits of dark chocolate over milk chocolate. But being a passionate person, I have interests that far outreach the confines of my kitchen. I do promise however, not to write any more about the upcoming election, at least on my blog.

If you would like to read more about my feelings on the upcoming presidential race, you can follow the steps listed below to a guest editorial I wrote for our local newspaper:

          Search under Stanwood/Camano news

          Choose e-Edition

          Click on Stanwood/Camano News – Updated Aug 29, 2016

          Click on the right arrow in the white circle at the upper right hand corner of the page

          Keep clicking until you get to page A4–the Opinion section (3 clicks, I think)

          My editorial is entitled “Fate of world on the line in U.S. election” (I did not write the title – the newspaper did!)

  • 1½ c. semi-sweet chocolate chips
  • 3 T. unsalted butter
  • tiny pinch salt
  • ½ c. heavy whipping cream
  • 2 T. Kahlua or other coffee-flavored liqueur

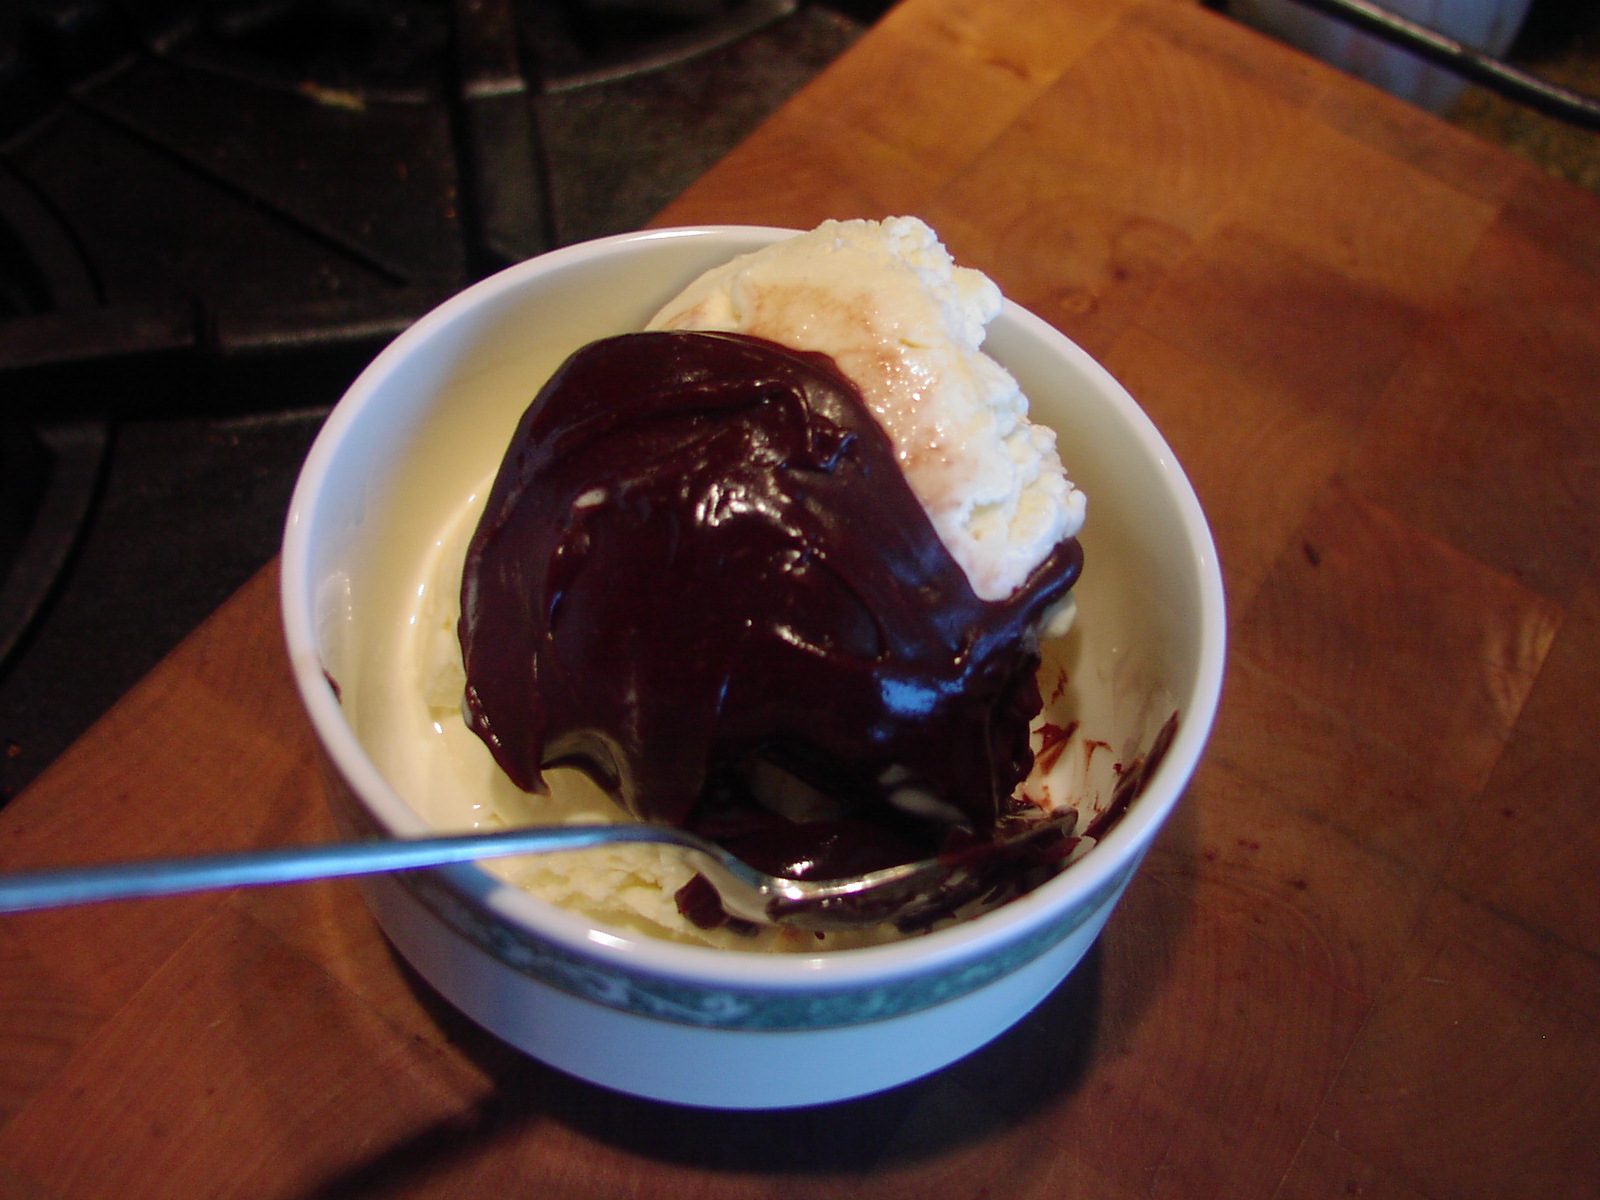
Melt the chocolate chips, butter, salt, and whipping cream together in the microwave, being especially careful not to burn the chocolate chips. Remove from microwave and whisk in the Kahlua. Serve warm or at room temperature over vanilla ice cream. And please enjoy the two other ice cream sauce recipes to follow.

DARK CHOCOLATE AND ORANGE ICE CREAM SAUCE

  • ¾ c. Dutch processed cocoa
  • 6 T. sugar
  • 2/3 c. water
  • 4 T. (1/2 stick) unsalted butter
  • 2 tsp. vanilla
  • 2 T. Cointreau or other orange flavored liqueur

Whisk cocoa and sugar together in a medium-sized saucepan. Gently whisk in the water. Slowly bring to a boil and cook for 1 minute. Remove from heat and stir in butter, vanilla, and Cointreau. Serve warm or allow to cool completely and store in the refrigerator. Warm before pouring on ice cream.

FRESH STRAWBERRY ICE CREAM SAUCE

  • 1 qt. fresh strawberries, divided (raspberries, blueberries, Marionberries, blackberries, etc. can also be used)
  • ¼ c. sugar or more to taste
  • ½ tsp. vanilla

Wash strawberries and remove the stems; cut each berry into 4 or 6 pieces, depending on the size of the berry. Combine half the strawberries, sugar, and vanilla in a saucepan. Cook over medium-high heat, stirring occasionally. The mixture will appear too dry for a while, but then the juice will begin to appear and produce the syrup. Cook until sauce thickens, about 15 minutes.

Remove from heat. When the sauce is completely cool, add the remaining strawberries. Store covered in the refrigerator. Also great over shortcake or pound cake with sweetened whipped cream.


CARIBBEAN RUM-RAISIN ICE CREAM SAUCE

OLYMPUS DIGITAL CAMERA

When it comes down to it, there really are no bad ice cream sauces. Well at least not if they are homemade. But once in a while a really amazing sauce comes along, and your taste buds go into overdrive. That’s what happened when I played with a basic caramel sauce recipe to serve with vanilla ice cream for the pre-concert JazzVox meal I served last weekend featuring Caribbean food. I knew that plain rum, both dark and light, were essential to Caribbean cuisine. But I like spice rum for desserts, so I used a combination of rums plus a bit of cinnamon to enhance the spice flavor. What I turned out was pretty darn good if I say so myself. Which of course I am saying. (Believe me, when I try new recipes and they are not worthy of your discerning palate, the paper they are printed on goes straight to the circular file and the “delete” button gets pushed sending the word document to “who knows where or cares”!)  

This recipe however, should find you running to your local emporium for all the ingredients you don’t already own and the largest container of really good vanilla ice cream you can carry. It is just that delicious and so different from other ice cream sauces. I also made a Kahlua Ice Cream Sauce (next recipe to be posted) that turned out great, but it’s more of a standard ice cream sauce. But it’s equally delicious, if you happen to like chocolate and Kahlua that is!               

And just because I care so much about all of you, I’ve included a couple other really delicious ice cream sauces for your edification – Spiced Rum Sauce and Bourbon Caramel Sauce. Both too are easy to prepare, economical, and far above any product sold on the market. (OK, there are some really good ice cream sauces available commercially. But they are really expensive, and you don’t get that happy feeling of a job well done when someone else builds a product you know you can do better, or at least equally as well.)

So enjoy the recipes and have fun with them. Believe me, there is nothing like this sauce out there. But beware. Once you have served this to family and friends, there will be no going back. If I weren’t so lazy, I would start a business selling this to local stores. But doing such a bizarre thing at my age a) sounds like way too much work, b) sounds like way too much of a monetary investment, and c) sounds like way too much work! So if you want rum-raisin sauce for your ice cream, you’re just going to have to make it yourself! At least now you have a recipe! Enjoy

  • ½ c. dark rum
  • ½ c. spice rum
  • ½ tsp. cinnamon
  • ¼ c. golden raisins
  • ¼ c. dark raisins
  • 1 c. brown sugar
  • ¼ lb. (1 stick) unsalted butter
  • pinch salt

Pour the rum into a bowl. Add the cinnamon and raisins, cover, and place in the refrigerator overnight. Just before making the sauce, drain the raisins reserving both the liquid and the raisins.

Whisk the brown sugar, butter, and salt together in a heavy sauce pan until the butter is melted and the mixture starts to go a darker color and develops big frothy bubbles. Usually takes 4-6 minutes.  

Remove from heat and gently pour in the reserved rum. Whisk for about 2 minutes and return the pan to the stove. (The alcohol should have all dissipated by now.) Stir or whisk continuously over low heat about 10 minutes while the mixture gently simmers to a slightly thicker consistency. (The sauce should display tiny bubbles on the surface the entire time the sauce is cooking.) Remove from heat and stir in the raisins.  Serve warm over vanilla ice cream, apple pie, bread pudding, gingerbread, crêpes, pound cake, pumpkin pie, or any other dessert item that takes your fancy. It would also be wonderful served over baked ham or pork tenderloin. And don’t get me started on what this sauce would add to a simple baked sweet potato!

Note: This is a very potent sauce. Use sparingly.

SPICED RUM SAUCE

  • 1 c. packed brown sugar
  • ½ c. unsalted butter
  • ½ c. heavy cream
  • 2 T. spiced rum
  • ¼ tsp. cinnamon

Combine brown sugar and butter in a medium sized heavy saucepan. Cook over medium heat for about 2 minutes or until butter completely melted and mixture is smooth. Add heavy cream, spiced rum, and cinnamon. Bring to a simmer and cook for approximately 5 minutes or until mixture thickens and is reduced to about 1½ cups. Serve warm. Can be made ahead and refrigerated. Bring to a simmer again before serving or gently warm in your microwave.

BOURBON CARAMEL SAUCE

  • ¼ c. unsalted butter
  • ½ c. brown sugar
  • ¼ c. heavy cream
  • 2 T. good bourbon
  • pinch freshly ground nutmeg, opt.

Whisk butter and brown sugar together over medium heat in a small heavy saucepan until brown sugar is dissolved completely. (This happens after the mixture comes to a boil and is allowed to burble for a couple of minutes or until it turns kind of shiny.) Continue whisking the whole time the mixture is on the heat. Remove from heat and gently whisk in the heavy cream, bourbon, and ground nutmeg. Serve warm, or allow to come to room temperature and refrigerate.


REFRIGERATOR DILL PICKLES

OLYMPUS DIGITAL CAMERA

OLYMPUS DIGITAL CAMERA

I love dill pickles with a passion. No wait – let me re-state that. I love truly good dill pickles with a passion. And for decades, come cucumber time I would make my mother’s dearest friend Charlotte’s dill pickles. They are simply beyond belief good. So for all you purists out there, I have included Charlotte’s recipe at the end of this post.

But for all of you who happen to be like me – too lazy or too busy to get your canning act together, I offer this recipe for quick and easy dill pickles that I found on the “Once upon a Chef” website. (Great site BTW)

And talk about instant (well almost instant) gratification! No more waiting for several months to finally be able to open a jar. These babies are ready in about 48 hours. (The original recipe states that they are ready in 24 hours, but I found that they needed another day to reach their full potential.)

And guess what? You can make these pickles year round. No waiting for that 2 or 3 week window when pickling cucumbers are at their peak and you have vacation plans. Now, whenever the mood hits you, you can make up a batch and within 48 hours be crunching on a slender spear of heavenliness. (I’m not sure that’s a word, but I’m going to use it anyway!)

Of course if you don’t like super crunchy dill pickles, with a nice vinegary, garlicky, and slightly hot (from the crushed red pepper flakes) bite, you are not going to like these pickles in the least. You might as well leave this post right now and not waste your time reading any further. (It’s only going to be more pickle information and effusive plaudits for my recipe find of the decade!) But for those of you who, like me, worship the ground that cucumbers are raised on, please continue reading.

The only problem you might find with this recipe is locating the right cucumbers for these pickles. You really can’t use regular American slicing or English cucumbers. They won’t stay crisp. You need to use Kirby, Persian, or small pickling cucumbers for this recipe. During late summer your best bet for finding pickling cucumbers is your local farmer’s market or fruit stand. During the rest of the year, Trader Joe’s, Whole Foods, and Central Market (here in the Seattle area) usually carry at least the Persian variety.

So have fun with this recipe. If you also enjoy Bread and Butter Pickles, check out my quick and easy recipe also on this site.

  • 1¼ c. white vinegar
  • 3 T. kosher salt
  • 2 T. granulated sugar
  • 2 c. cold water
  • 2 lbs. Kirby, Persian, or mini cucumbers, blossom/stem end cut off, then cut into spears
  • 2 T. coriander seeds
  • 6 large garlic cloves, peeled and halved
  • 1 tsp. mustard seeds
  • 1 tsp. dill seeds, opt.
  • ¼ tsp. crushed red pepper flakes
  • 16 dill sprigs (2-oz. pkg.)

Combine the vinegar, salt, and sugar in a small non-reactive saucepan over high heat. Whisk until the salt and sugar are dissolved. Transfer the liquid into a bowl and whisk in the cold water. Refrigerate brine until ready to use.

Stuff the cucumber spears into two clean 1-quart jars. Add the coriander seeds, garlic cloves, mustard seeds, dill seeds, red pepper flakes, dill sprigs, and chilled brine into jars, dividing evenly. If necessary, add a bit of cold water to the jars until the brine covers the cucumbers. Cover and refrigerate for at least 48 hours, then serve. Pickles will keep in the refrigerator for a month or more. (But good luck keeping them that long!)

DILL PICKLES (CHARLOTTE’S)

  • 12-14 sterilized wide mouth qt. jars and lids (I sterilize the jars in the dishwasher. I boil the lids on the stove.)
  • 12 lbs. pickling cucumbers, 3-4 inches long
  • 2 to 2½ tsp. alum
  • 12-14 garlic cloves
  • 12-14 small dried hot red pepper pods
  • 1 bunch fresh dill, cut in 4-inch lengths
  • 2 qt. white vinegar
  • 6 qt. water
  • 2 c. pickling or kosher salt

Thoroughly scrub the cucumbers. Lightly pack in jars. To each jar add 1/8 teaspoon alum, 1 clove garlic, 1 small dry red pepper, and a lot of dill, stems and all. Meanwhile bring vinegar, water, and salt to a boil. Pour hot brine over pickles. Gently tap the jars against the counter a few times to remove all the air bubbles. Top off with more pickling brine if necessary. Seal as quickly and as tightly as possible. Store for at least 3 months before eating.

Please Note: If any of the lids don’t seal properly, store the jars in your refrigerator.


GRANOLA WITH OATS, NUTS, SEEDS, DRIED FRUIT, AND COCONUT

OLYMPUS DIGITAL CAMERA

There is just nothing better than waking up to a lovely Americana handed to you by your husband along with the morning paper. This is how I start every morning. (Not a bad gig, right?) Well, to make it up to him, I usually fix him a breakfast that is both nourishing and delicious. And one of the ways I do this is by making my own granola. Now granted, I don’t serve granola every morning because that would get too monotonous. (And as you well know, breakfast can be a bit tedious if you don’t change things up every day.) So when our dear friend Peggy offered me her granola recipe, plus a sample, I jumped at the chance to taste another person’s homemade version of this very expensive (off the grocery shelf) breakfast staple. And oh was it good! So of course I had to make some for us, and share her basic recipe with you. (And yes I changed a couple of things, but I simply can’t help myself!)

At this point, I really should explain what constitutes a typical breakfast at Chez Carr. I basically like to serve a variety of items for breakfast in much the same way I would serve several small tapas at a dinner party. Small portions, but a nice variety. So breakfast at our home usually consists of a piece of whole wheat toast, a small piece of breakfast meat (one slice of very lean bacon or 2-oz. of chicken breakfast sausage), an easy over or scrambled egg, a half piece of fruit, and a small bowl of granola with either a dollop of Greek yogurt and blueberries (for example), or a small amount of milk. And when I say a small amount of granola, I mean about 3 tablespoons. And the dollop of yogurt is about 2 tablespoons. Just enough granola to add crunch to our meal, and just enough yogurt to give us that delightful creamy mouth feel we so dearly love. So all in all, really not a heavy breakfast. Once in a while I go nuts and fix us pancakes. But they’re made with whole grain or oat flour, so they really do have some protein and therefore some redeeming nutritional value! Oh, and Mr. C always has a small glass of juice every morning with breakfast. (Can’t leave that out!)

So if you too would like to add a bit of excitement to your morning meal, make up a batch of this healthy granola. Your whole family will appreciate the delicious flavor and crunch. And even though they might not equate their newfound energy with eating this protein rich cereal for breakfast, they should be able to make it to lunch now with energy to spare. This is simply not Captain Crunch my friends! This is the real deal. And no preservatives with names only a biology professor can pronounce. Just healthy ingredients that are easy to assemble and ever so easy to get everyone in your family to eat. Word of warning to you parents with school age children: Don’t be surprised if your children start wanting this granola for an afternoon snack. This grandma advises – let them! Granola is sure a lot better for your kids than candy, cookies, chips, or any form of frozen after school snack.

Thanks again Peggy for this wonderful recipe. And for my recipe for granola, search under Granola, and mine will magically appear.

  • 3 c. rolled oats
  • 2 c. nuts & seeds (almonds, cashews, pecans, hazelnuts, pepitas, sunflower seeds, etc.)
  • 1 c. shredded unsweetened coconut or whatever coconut happens to be in your pantry at the time 
  • ¼ c. vegetable oil
  • ½ c. honey
  • ½ tsp. kosher salt
  • 1-2 tsp. ground cinnamon
  • 1 tsp. ground ginger
  • ¼ tsp. nutmeg
  • 1/8 tsp. ground cardamom
  • ¼ c. roughly chopped candied ginger
  • 1 c. dried fruit (golden raisins, chopped dates, dried blueberries, cranberries, strawberries, apricots, etc.)

In a large bowl mix together the oats, nuts, seeds, and coconut. In a small bowl whisk together the oil, honey, salt, cinnamon, ginger, nutmeg, and cardamom; pour over the dry ingredients and stir until well combined. Spread evenly on 2 large baking sheets. Bake in a pre-heated 250 degree oven for 30 minutes, stirring after 15 minutes. Remove from oven and stir in the candied ginger and mixed dried fruit. Return to the oven and bake for another 15 minutes. (Total baking time – 45 minutes.) Remove from oven and place baking sheets on wire racks. Let cool completely before storing in an airtight container. Serve with yogurt and fresh berries or simply with milk.


SPICY PLUM FREEZER JAM

OLYMPUS DIGITAL CAMERA

OK, call me lazy, but I like freezer jam because there’s no cooking involved, no boiling jars, boiling water baths, pressure cooker action, or botulism concern. (Temperatures below freezing render botulism inactive, which is why it isn’t a concern with frozen jams or jellies.) Plus, the un-cooked fruit in freezer jam simply tastes fresher than if it had been subjected to a baptism of fire. But of course, there is always the exception that proves the rule. And if anyone can find one (exception that is) it’s yours truly.

So you guessed it; this “freezer” jam is cooked. But I have to tell you, in this case the cooking works to advantage. The cooking process helps to blend the flavors (plums and spices) resulting in a final product that is incomparable.

So if you too are crazy about freezer jam, I would highly recommend that you put your prejudices aside (fresh rather than cooked fruit) and give this recipe a try. It is simply delicious, plus you get to break the rules. (This is in essence the encapsulation of the idea that although technically this recipe is a breach of standard freezer jam procedure, there is no need for punishment, apology, or retribution since no actual damage has occurred.) In other words, no harm, no foul! Just good eating.

  • 8 c. pitted and chopped plums (about 4 lbs.)
  • 3 c. granulated sugar
  • ½ c. brown sugar, packed
  • zest and juice of 1 large lemon
  • 2 tsp. ground cinnamon
  • ½ tsp. ground nutmeg
  • ¼ tsp. ground cloves
  • 2 3-oz. packets liquid pectin (6-oz. total)

Combine the plums and sugars together in a large heavy pan. Bring to a boil, stir in the lemon zest, lemon juice, cinnamon, nutmeg, and cloves. Continue to gently boil for 30-40 minutes or until the jam thickens and the liquid resembles syrup. Stir in the pectin and bring to a rolling boil for 5 minutes. Remove from heat and let cool to room temperature. Spoon into freezer containers and let sit on your counter for 8 hours or overnight.  Makes about 6-7 cups of jam. Store in the refrigerator if using immediately, or freeze until ready to us. Wonderful on fresh Buttermilk Biscuits. (See recipe on site.)

FRESH PLUM AND DRIED FIG CHUTNEY

OLYMPUS DIGITAL CAMERA

Yesterday I posted my recipe for Spicy Plum Crunch, and tomorrow I plan on posting my recipe for Spicy Plum Freezer Jam. I’m calling this 3 recipe mini-series starring fresh plums “Plum Crazy”.

This is actually the first recipe I made using the plums we received from our dear friends Mark and Vicki. Their plum tree limbs were literally dripping with plums and Vicki had already used as many as she could. So when they offered to send us home with a bunch, we jumped at the chance. Especially since all morning we had been scarfing down Vicki’s delicious Prune Relish and savoring every bite. So of course I had to have the recipe and then of course I had to change it a wee bit. With her approval of course! I thought just a small amount of dried fig would be a nice addition and that the resulting concoction would be more like a chutney than a relish. And in creating a “chutney”, I could achieve one of my own culinary goals.

I think in one of my earlier posts I mentioned that I had never been able to produce a decent chutney. And even though the recipe Vicki gave me calls itself a “relish”, I theorized that by adding just a little bit of fig, it would not only add an additional depth of flavor, I could then allow myself to label it a ”chutney”. And truly, I can’t think of a better condiment to go with a spicy curry than this exceptional combination of ingredients. And of course there was the added benefit that now I could legitimately cross “chutney” off my “culinary no can do” list. (Remember: It’s really just all about me!)

So if you too are a chutney lover, this is the recipe for you. It’s very easy to prepare and costs a fraction of what those small 9-ounce bottles of good chutney cost in the grocery store. And truly, if you don’t give this recipe a try, you’re plum crazy! (And I don’t mean that in a good way!)

  • 4 c. chopped fresh plums or prunes
  • ½ c. chopped dried figs
  • 2 sweet onions, rough chopped
  • 2 c. apple cider vinegar (I use organic unfiltered cider vinegar)
  • 1 T. kosher salt
  • 2 tsp. freshly ground black pepper
  • 1 T. ground cloves
  • 1 T. ground cinnamon
  • 1 T. dry mustard
  • 4 c. sugar

Place the plums, figs, and onion in the bowl of your food processor. Whirl until everything is smooth or to your own desired consistency. Pour into a heavy pan. Add the vinegar, salt, pepper, cloves, cinnamon, dry mustard, and sugar. Bring to a rapid boil, reduce heat, and simmer for an hour. Stir periodically. Remove from heat and allow to cool before placing in 5-6 pint size freezer containers*. Attach lids and let sit overnight before placing in your freezer. (Don’t even think of trying the chutney for at least 2 weeks.)

Wonderful as a topping on mild creamy cheese frosted crackers. (Think chèvre.) Lovely on baked Brie lightly garnished with toasted pecans or walnuts. (See my recipe for Baked Brie with Curry Powder, Chutney, and Toasted Pecans under the title “Two Brie, or Not Two Brie: That is the Question”. And of course, great as an accompaniment to any curry dish. (See my recipes for Chicken, Shrimp, or Roasted Vegetables in a Curry Masala Sauce and Curry Sauce for Chicken, Shrimp, Beef, or Lamb.)

*If you prefer, the hot chutney can be stored in prepared canning jars.

RÉMOULADE SAUCE

OLYMPUS DIGITAL CAMERA

If I were to describe myself culinarily in just one word, it would have to be “saucy”. Now please don’t misunderstand the term “saucy” as it relates to my personality! (Granted I can be a bit cheeky, irreverent, disrespectful, bold, and even brazen – all synonyms for saucy BTW.) But in this case, I mean “saucy” as it relates to my love for all thick liquids or accompaniments served with food to add moistness and flavor, i.e. sauces, gravies, aiolis, relishes, salsas, condiments, dips, dressings, etc. etc.

As proof, after our last JazzVox home concert featuring the fabulous vocalist Cindy Scott and the amazing jazz guitarist Brian Seeger, Mr. C., Nich (Mr. JazzVox himself), Cindy, Brian , and I were sitting around eating leftovers, drinking wine, beer, and other adult beverages, the conversation turned to all of our shared love of food. (Well of course it did!) And since both Cindy and Brian live in New Orleans, and I just happen to love Creole and Cajun food as much as they do, we discussed restaurants, favorite dishes, cookbooks that I absolutely needed to own, and other things related to the culinary wonder that is New Orleans. And Brian happened to mention rémoulade as one of his favorite things to serve on anything seafood. I guess my eyes must have glazed over from just the thought of a new sauce for seafood, because a couple of days later when Brian and Cindy were safely back in the Big Easy, Brian sent me his favorite rémoulade recipe. The recipe was the brainchild of John Folse, a famous Louisiana chef, restaurateur, and leading authority on Cajun and Creole cuisine.

Now I have to tell you, John’s recipe produced one of the best sauces I have ever tasted. I served it along with boiled shrimp last Saturday night to our cooking club and they agreed it was amazing.

So if you want to make a sauce to serve with boiled shrimp, crab cakes, grilled scallops, fried oysters, or any fried fish, do not hesitate to give this recipe a try. It is simply over-the-top delicious.

And if you want to think of me in the more traditional way “saucy” ladies are thought of, that’s OK too! This 71 year old lady can handle it. Of course I can’t fulfill the expectations associated with “saucy” any longer, but I have my memories. Love and happy cooking to all.

  • ¾ c. mayonnaise
  • ¼ c. Creole whole grain mustard (Zatarain’s is perfect)
  • ¼ c. ketchup
  • 1½ tsp. Worcestershire sauce
  • ½ tsp. hot pepper sauce
  • ¼ c. finely diced green onions
  • 2 T. finely diced celery
  • 1 T. finely minced garlic
  • 2 T. finely chopped parsley
  • ¾ tsp. fresh lemon juice
  • ¼ tsp. kosher salt
  • freshly ground black pepper

In a mixing bowl, combine all of the above ingredients. Cover and place in the refrigerator, preferably overnight or at the least four hours. When ready to serve, remove from refrigerator and adjust seasonings to taste.

GARLIC TOAST

OLYMPUS DIGITAL CAMERA

OK, I know, almost everyone knows how to make garlic toast. But if you happen to be in the .04% of the population who doesn’t know how to make a truly wonderful garlic toast, I am going to help you out right now!

There are actually few things better than a crunchy, chewy, and totally butter infused with garlic piece of bread to accompany an entrée. Granted, garlic toast wouldn’t go well with Mexican or Chinese dishes, but Italian or French food – c’est magnifique! And even for breakfast with a side of eggs and bacon, garlic toast is a winner.

So next time you prepare an Italian or French feast, or just want to make your family and friends totally happy at dinner time, bake up a batch of this toast. It’s ever so easy and ever so much better than the prepared garlic bread loaves that you can buy at your local grocery store. There simply is no substitute for the real thing. And this is the real thing! Vampires beware!

  • 4 T. unsalted butter (½ stick), room temperature
  • 2 medium garlic cloves, minced
  • 2 tsp. finely chopped fresh Italian parsley leaves
  • ½ tsp. kosher salt
  • ½ of a crusty Italian or French baguette, cut in half lengthwise, and then cut into serving size pieces

Place the butter, garlic, parsley, and salt in a small bowl and mix with a table fork until well blended. Place the bread on a baking sheet, crust side down. Spread the butter mixture evenly over all of the pieces. Bake the bread in a pre-heated 425 degree oven for about 10 minutes or until the top is a nice golden brown. And of course, doubling or tripling, etc. is easy peasy.

TAPENADE

OLYMPUS DIGITAL CAMERA

Tapenade is a spread consisting of very finely chopped olives, anchovies, and capers in olive oil. The name “tapenade” comes from the Provençal word for capers, tapenas. It is a very popular dish in the south of France and is most often eaten as an hors d’œuvre, spread on toasted crusty bread or baguette slices.

I first started making tapenade when I was in my early forties because it was easy to prepare and totally different from anything else I served. (And no, I have no idea where I learned about tapenade. The recipe wasn’t in my Betty Crocker cookbook, that’s for darn sure!) I just knew that it was delicious and everyone who tried it loved it! I also had no idea until I began researching for this post that some form of this amazing spread had been around since before the time of Christ.

According to Clifford A. Wright, award winning writer on all foods Italian and Mediterranean, “although capers are native to the Mediterranean, it is likely they were brought to Provence from Crete by the Phocaeans, Greeks from Asia Minor, who settled near Marseilles in the sixth century B.C. The caper plant was known as tapeneï in Provençal, and the flower bud, the part of the caper used for culinary purposes, was the tapeno, which were preserved in amphora (ancient vessels used for storage) filled with olive oil since vinegar was not used at that time. The capers became mushed together in the amphoras to form a kind of pâté of crushed tapeno, the ancestor of the modern tapenade. This is why it is today known by the word for caper rather than olives, which is actually, in volume, the greater constituent ingredient.”

So next time you want an absolutely delicious and different topping to serve with toast as an appetizer, get out your food processor and whip, or should I say pulse up a batch. And you are right! There are lovely little jars of this concoction in the fancy food deli section of almost every grocery store. But just for grins, look at the price before you just plop a jar in your cart. (You might want to have someone with you to help break the fall if you begin to faint.) Then consider how much it would cost to make your own. (And again, I know. Not everyone has capers, kalamata olives, and anchovies just lying around.) But they should! All three of these ingredients are wonderful in all kinds of dishes. Just do a Google search on any of these items and see what amazing new culinary delights are out there for you to try.

Now, for your final French history lesson today: According to Smithsonian Magazine, historians are now convinced that Marie Antoinette never said “let them eat cake”. That darling little statement was attributed to Maria Theresa, the Spanish princess who married Louis XIV more than a century before Marie Antoinette ever set foot in France. (And you thought you were only going to learn about food on my blog. Surprise!)

  • ¼ c. extra virgin olive oil
  • 6-8 anchovy fillets
  • 2 garlic cloves, roughly chopped
  • ½ tsp. dried rosemary
  • ½ tsp. dried oregano
  • freshly ground black pepper
  • 1½ c. pitted kalamata olives
  • 3 T. capers, washed and drained

Combine olive oil, anchovy fillets, garlic, rosemary, oregano, and pepper in a blender or food processor. Process until thoroughly pulverized. Add olives and capers and pulse until they are coarsely ground. (Do not over process. You do not want a paste.) Serve with toasted baguette slices.

NOT QUITE PERFECT CRISPY KALE “CHIPS”

OLYMPUS DIGITAL CAMERA

OK, I know every good cook wants to be able to prepare the perfect kale chips because not only are they delicious, they are such a healthy alternative to potato chips. But I’m not going to lie to you. This recipe is not perfect, but it is pretty darn close. So why did you post it if it’s not perfect I hear you asking? Well, because it’s as good as I can get it.

I have actually been trying to perfect this recipe for about 3 years now. And frankly, during this testing time I must have gone through 12-14 batches in an effort to make the kale chips of my dreams. So give me as much grief as you’d like, but I’m tired of trying to make this recipe any better. There are just too many variables when you make kale chips. The leaf thickness is never the same in any 2 bunches of kale. Then of course, there are different kinds of kale. But the main problem I kept experiencing was getting the saltiness of the chips just right. It was just darn near impossible!

But I was very happy with the last batch I made. So much so, that my experiments with baked kale are over. This last try had just the right amount of olive oil and seasoned salt, with a little extra flavor boost from the tamari and granulated garlic.

And I know there was absolutely no need for me to pursue kale chips with such a vengeance since there were already so many recipes out there. But it had become a personal exasperation for me. I just could not get it right! And when that happens, it’s like someone waving a red cape in front of a bull! And you know what bulls do when they see red? Well actually, bulls don’t see red. They are dichromates, which means, they only see blue and yellow. And bulls only chase the matador’s cape because of the movement, not the color. But regardless, the analogy still works. Like any self respecting bull, I simply couldn’t stand a moving target that I couldn’t conquer. In this case, my target was a “not quite perfect” kale chip recipe! My job here is done.

  • 10-12 c. loosely packed kale (1-2 bunches) – ribs removed, washed, torn into about 2-inch pieces, and spun dry
  • 2 T. extra virgin olive oil
  • 1 tsp. low sodium tamari or soy sauce
  • ½ tsp. granulated garlic
  • ½ tsp. seasoned salt

Place the kale in a large bowl. In a small bowl, combine the olive oil, tamari, granulated garlic, and seasoned salt. Pour on top of the kale and gently massage the kale leaves (yes with your fingers) until every leaf is coated with a very thin layer of the mixture. Lay leaves in a single layer on 2 large baking sheets.

OLYMPUS DIGITAL CAMERA

Bake for about 9-10 minutes in a pre-heated 275 degree oven. (Use convection heat if possible.) Keep a close eye on the kale. The kale leaves should be completely dry to the touch when they are ready. (They will however still look a bit shiny from the olive oil.) Take them out of the oven and gently lift them with a thin metal spatula. Allow them to cool completely and store in an airtight container.