Category Archives: VEGETARIAN RECIPES

ROASTED VEGGIE LASAGNA WITH CHEESE BÉCHAMEL SAUCE

OLYMPUS DIGITAL CAMERA

I have wanted to work up a “white” veggie lasagna recipe for several years now, but somehow I never seemed to get around to it. So when Mr. C. casually mentioned one evening that he was hungry for lasagna, I took his words to heart and decided to serve 2 types of lasagna at our upcoming JazzVox concert. (Kills 2 birds with one stone; Mr. C gets his lasagna fix and I have a food theme for the next concert.) And because I know not everyone eats meat, I usually try to serve 2 main dishes, one with meat, one without. And because I knew that the lasagna with meat was going to have a tomato base, I decided now was the time to work up a “white” veggie lasagna recipe. Thus the recipe you see before you.

And since I know you’re interested, the whole “veggie lasagna” idea stemmed from a wonderful meal we enjoyed at the home of our good friends Alan and Sandy. Sandy and Alan host classical concerts in their home in Chimacum, WA. With Alan on violin and Sandy on piano, they offer amazing concerts specializing in Romantic and early twentieth-century works. For information about upcoming concerts visit them at www.rawsonduo.com.  So, whenever we have the time, we attend our friend’s concerts in Chimacum. The music is always wonderful, but there’s another reason we try and visit our friends as much as possible. Along with being a fabulous musician, Sandy is a trained chef. So not only do we have the pleasure of listening to our friends perform, we get to eat the nibbles that Sandy prepares for after the concert. Then, to really seal the deal, we stay and have dinner and hopefully help decompress the worn out performers. (Wine is usually a big part of the decompression process!)

So one of the evenings after everyone else had left, Sandy served us an amazing veggie lasagna. (I would have prepared her recipe for the concert, but it has a tomato base.) Her veggie lasagna was just so wonderful, and after much praise, she shared with me the secret of great veggie lasagna. “It’s all about the veggies!” Such a simple concept, but it really started me thinking not only about veggie lasagna, but every dish that I prepare. So, while I was concocting this recipe for “white” lasagna, I took Sandy’s words to heart. I tried to make sure that every ingredient in the béchamel sauce had but one mission to perform. And that was to compliment the wonderful flavor of the roasted vegetables.

So dear friends, I hope you enjoy the recipe. And since I know that many of you would also like to have Sandy’s Veggie Lasagna recipe, I will be sharing her recipe, along with my Lasagna Bolognese recipe with you in the near future.

  • 1 medium eggplant, partially peeled, sliced and cut into 1-inch cubes
  • 1 red onion, coarsely chopped
  • 2 small zucchini, cut lengthwise and then into 1/3-inch half moons
  • 1 red pepper, diced
  • 1 yellow pepper, diced
  • 10-12 crimini or button mushrooms, sliced
  • ¼ c. extra virgin olive oil
  • 1 tsp. kosher salt
  • freshly ground black pepper
  • 6 T. butter
  • 2 garlic cloves, finely minced
  • ½ c. flour
  • 6 c. milk (whole milk is best)
  • 1/8 tsp. freshly grated or ground nutmeg
  • ¼ tsp. kosher salt
  • ¼ tsp. white pepper or black pepper to taste (white pepper actually has a sharper flavor than black)
  • 2 c. loosely packed fresh baby spinach chiffonade* (see below to learn how to chiffonade)
  • ½ c. fresh basil chiffonade*
  • 1 lb. lasagna noodles** (I like Culinary Circle Authentic Bronze-cut Lasagna noodles)
  • 2 c. grated Pecorino Romano cheese, divided
  • 1½ c. grated mozzarella cheese
  • ½ c. grated Parmesan cheese

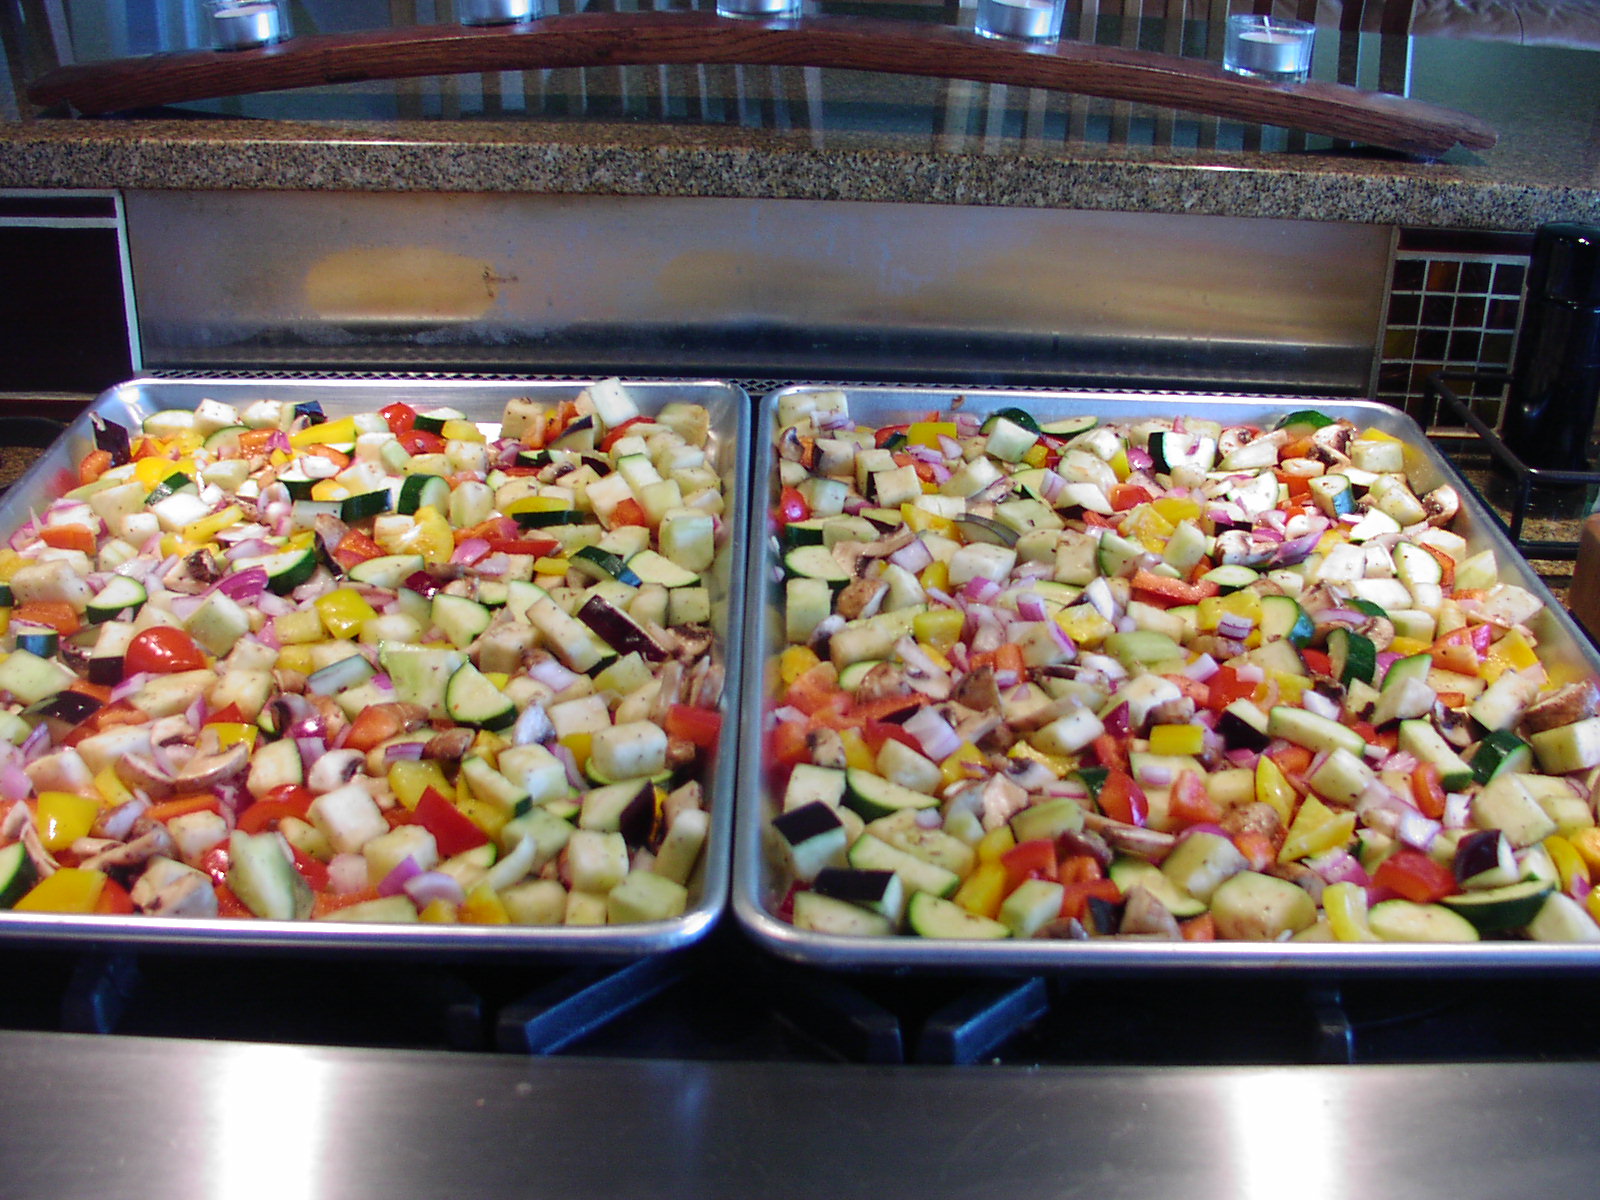
Place the eggplant, onion, zucchini, red pepper, yellow pepper, and mushrooms on a large low sided baking sheet.  Drizzle with olive oil. Sprinkle lightly with salt and pepper. Using your hands, toss the vegetables together until they are evenly coated with the oil and seasonings. (The picture shows veggies for a double recipe.)

OLYMPUS DIGITAL CAMERA

Place in a pre-heated 400 degree oven for 20 minutes or until the vegetables are tender and browned. (Turn a couple of times during the baking process to ensure even browning.)  Remove from oven. Set aside.

Meanwhile, melt the butter in a heavy saucepan over low heat. Add the garlic and cook for about 1 minute of until the garlic gives off its aroma. Whisk in the flour and cook for a couple of minutes or until the roux starts to turn a delicate golden brown. Slowly whisk in the milk and bring to a slow boil, stirring the entire time. Boil for one minute as the sauce continues to thicken. Remove from heat and whisk in the nutmeg, salt, and pepper. Set aside. (Reserve 1 cup of the béchamel sauce. This will be spread on the lasagna half way through the baking process.)

Before cooking the noodles, have all the other ingredients prepped and ready to go. Cook the noodles in boiling salted water until al dente (firm to the bite). Remove pan from heat. Don’t drain. Leave the noodles in the water as you assemble the lasagna. (But don’t dilly daddle during the lasagna assembly process or your noodles will quickly take on the proportion of a football field!)

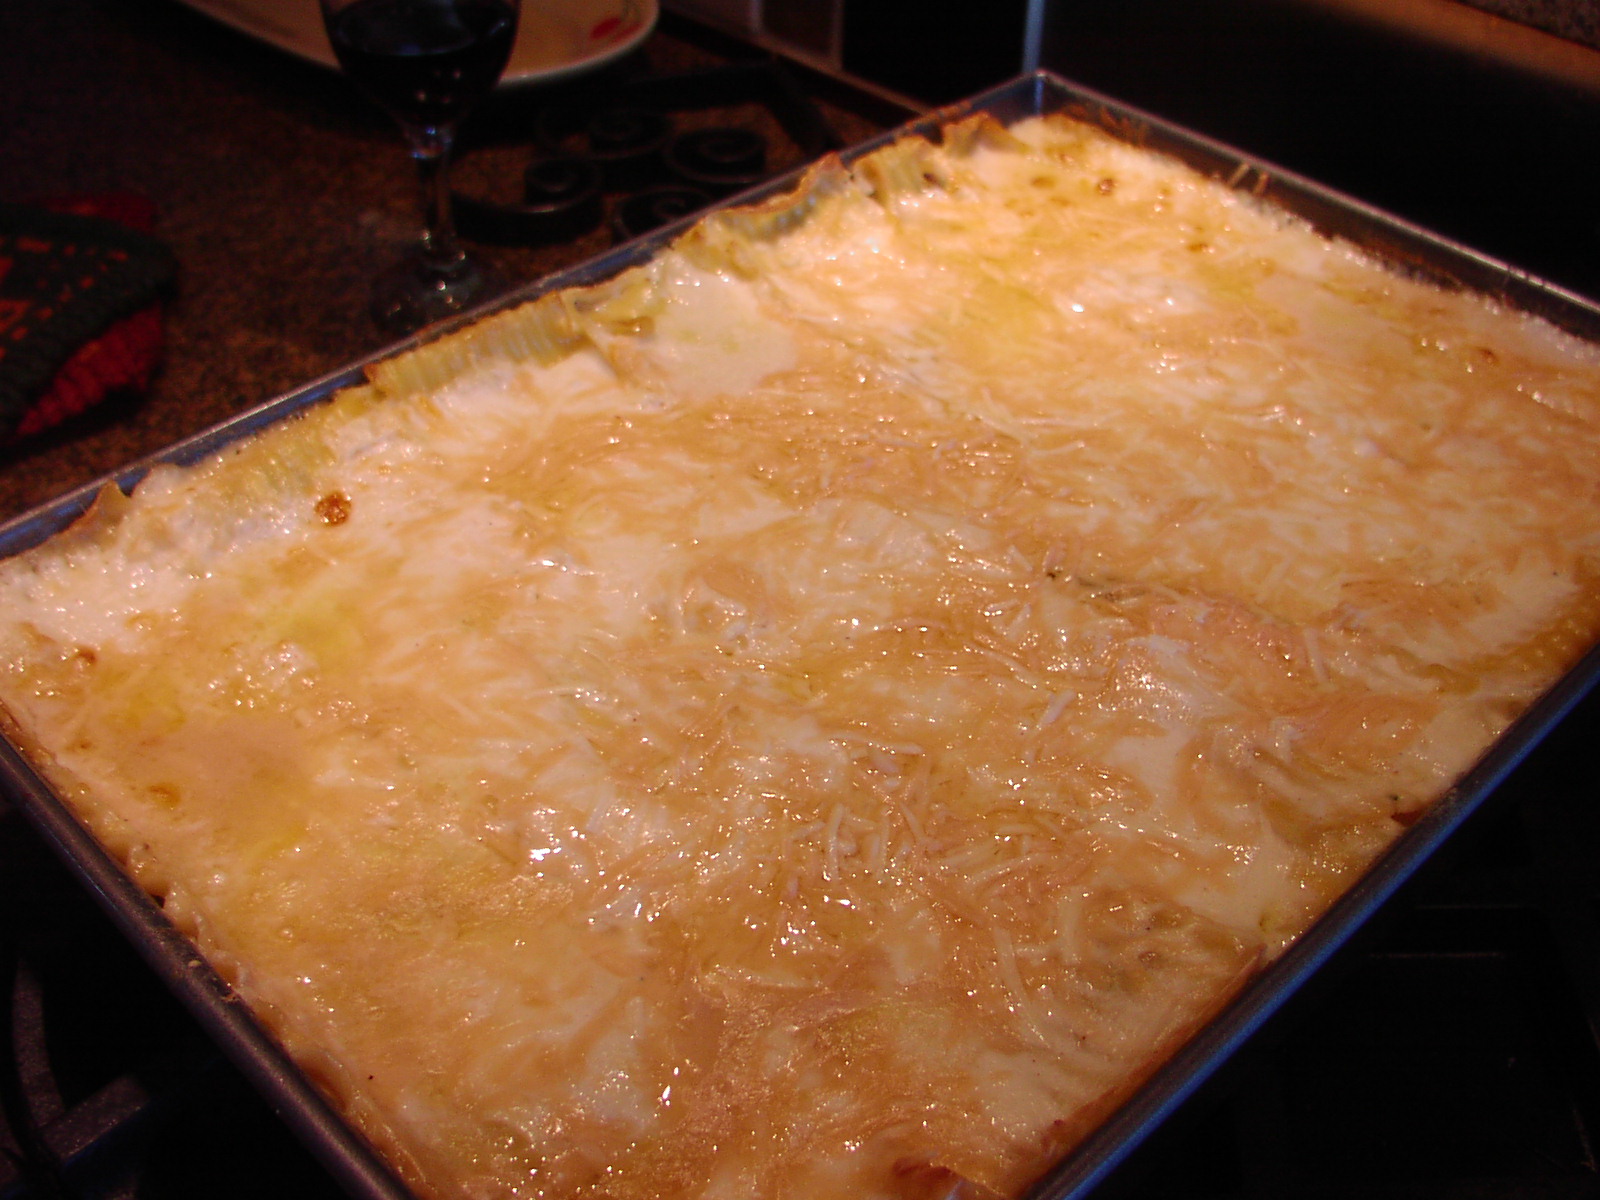
To assemble:  Spread ½ cup béchamel sauce in a buttered 10×16-inch baking pan.  Arrange 1/3rd of the lasagna noodles over the sauce. Spread half of the roasted vegetable over the noodles, followed by half of both the spinach and the basil. Top the basil with ¾ cup of the Pecorino and ¾ cup of the mozzarella cheeses, then half of the béchamel sauce. Repeat, beginning with another third of the noodles, roasted veggies, spinach and basil, ¾ cup of Romano and ¾ cup mozzarella, and the remaining béchamel sauce. Layer on the remaining noodles. Carefully cover the pan with foil that has been sprayed with non-stick cooking spray and bake in a pre-heated 375 degree oven for 35-40 minutes. Remove the foil; spread the reserved 1 cup béchamel over the top and sprinkle with the remaining ½ cup Romano and ½ cup Parmesan cheeses. Bake uncovered for an additional 15-20 minutes or until the lasagna is bubbly and lightly browned on top.  Allow to cool for about 15 minutes before serving.

*Chiffonade (pronounced “shif-oh-nod”) is a knife technique used for cutting herbs and leaf vegetables such as lettuce into thin strips or ribbons. To chiffonade leaves of basil, stack the basil leaves and roll them into a tube. Then carefully cut across the ends of the tube with your knife to produce fine strips.

**Hint: when deciding how many noodles to cook, spread the bottom of your pan with a single layer of uncooked noodles. Triple that number and you have just the right amount. (Seems too easy, doesn’t it?)


FRIED MARINATED TOFU WITH GREEN ONIONS AND SESAME SEEDS

OLYMPUS DIGITAL CAMERA

So I know what you are thinking. Where in the world has Patti been that she hasn’t written a post in almost a month? First of all – sorry about that, but Mr. C. and I have been on the road with our ginormous 19 foot trailer taking in the sites and visiting family from here to Colorado and back. Touring with a trailer is a lovely way to experience our country and believe me, our country is worth seeing. For example, staying in a fairly primitive campground at the Black Canyon of the Gunnison National Park in Colorado, with snow still on the ground and deer grazing around the trailer is a fantastic experience. Never heard of the Black Canyon of the Gunnison National Park? Well neither had we until I discovered it on line while I was planning our itinerary. Now I can hardly wait to return. Just for grins, visit the park’s website at www.nps.gov/blca/index.htm. I’m sure you will instantly become as fascinated with this amazing and little known area of Colorado as we were.

And speaking of amazing areas that are not as well known as say Yellowstone and coincidentally not as far away, Steens Mountain and the Malheur National Wildlife Refuge in SE Oregon are tops on our list of places to be visited with regularity. But enough with the travel guide prose. Let’s get on with the dish of the day.

This marinated tofu dish is absolutely delicious and ever so “in”. With all the press about eating organic, sustainable, local, slow, vegan, vegetarian, etc. etc., this dish comes as close to “realistic” healthy food as I can muster. And I do try to cook healthy, really I do. So give this fried tofu recipe a try. Mr. C tells me for him this tofu dish is analogous with “crack” (crack-cocaine), not that he has ever tried crack you understand, but you get the gist. He LOVES it.

  • ¼ c. soy sauce
  • ¼ c. rice wine vinegar
  • 1 T. chili-garlic sauce or Sambal Oelek and 1 small clove finely minced garlic
  • 1 tsp. sesame oil
  • pinch kosher salt
  • 1 lb. firm tofu
  • 3 T. corn or peanut oil
  • ¼ c. cornstarch or more + 1 tsp., divided
  • ¼ c. thinly sliced green onions
  • 1 tsp. sesame seeds

Combine the soy sauce, vinegar, chili-garlic sauce, sesame oil, and salt in a small container. Remove the tofu from the container and press gently between several sheets of paper towel to remove some of the liquid. Cut into 12 same size pieces and add to the marinade. Let tofu marinate for about 2 hours. When ready to fry add oil to medium sized frying pan and hot over medium high heat. When oil is hot, take each piece of tofu out of the marinade (reserving marinade), blot on a paper towel, dip in the ¼ cup cornstarch (or more as needed) and place in hot oil.  Fry the pieces until they are crispy brown on both sides.

OLYMPUS DIGITAL CAMERA

Meanwhile pour the remaining marinade and 1 teaspoon of cornstarch into a small pan. Whisking the entire time, bring the mixture to a boil and stir until thickened. Remove from heat.

When tofu is crisp and golden brown, remove to a serving plate. Pour sauce over the tofu and sprinkle with green onions and sesame seeds. Serve immediately.

Please note: Play around with the sauce. If you are a ginger lover, add some ginger. I know I am going to the next time I make this dish.


BROCCOLI CHEDDAR CHEESE SOUP

OLYMPUS DIGITAL CAMERA

OK, I know summer is just right around the corner. So why, I can hear you asking, are you giving us a recipe for soup? Well, the answer is very simple. I was really busy the other day, and I knew I was not going to have time to prepare an elaborate dinner. I remembered that I had a container of this soup in the freezer. So I took it out of the freezer about mid day and let it defrost on my counter. Then when it came time to eat, I slowly re-heated the soup on top of the stove (and yes, I did use a pan) and served the soup with some left over oyster crackers that had been patiently waiting for me to re-discover them in the pantry.

Well the re-heated soup was just so delicious, especially with the oyster crackers, that I felt duty bound to share this recipe with you as quickly as possible.

Usually I serve this soup with homemade croutons, recipe below, but since I was short on time as well as homemade croutons, the oyster crackers were brought in as pinch hitters. (Or more correctly spelled “pitch” hitters when it refers to baseball!) And yes, it’s baseball season again!!!

So, regardless of what time of year you choose to serve this easy to prepare soup, your family and friends are going to love it. Even your veggie-phobic children might forgive you the “green stuff” in the soup if you let them sprinkle on their own oyster crackers.

And for all of you, who are Mariner lovers, sorry about the baseball season “again” jab. But I’m afraid I am stuck in the 50s and 60s when it comes to enjoying baseball. Sick’s Stadium on Rainier Avenue; the sun is shining warm on my face, I’ve got a big old hot dog in my little hands, and I’m sitting next to my dad and little brothers. I can actually see the faces of the players up close and personal without the aid of huge screens judiciously placed around the field. Those were the days! Go Rainiers!

And “go” Broccoli Cheddar Cheese soup. It’s fast and easy to prepare and tastes like a million dollars. Yeah team!

  • 3 c. chopped broccoli
  • 3/4 c. unsalted butter
  • 3/4 c. chopped onion
  • 3/4 c. flour
  • 3 c. chicken stock or vegetable stock
  • 4 c. milk
  • 3 c. grated sharp cheddar cheese
  • kosher salt
  • freshly ground black pepper
  • pinch nutmeg

Steam chopped broccoli until crisp tender. Set aside. Melt butter in heavy medium sized sauce pan. Add onion and sauté until onion just begins to show a little brown around the edges. Add flour and cook until mixture turns the color of coffee with cream, stirring continuously. Slowly whisk in chicken broth and milk. Cook until mixture boils and thickens. (If too thick, add a little more milk.) Add broccoli. When heated through, remove from heat and stir in grated cheese. Add salt if necessary, fresh ground pepper, and nutmeg. Serve with Garlic Croutons or oyster crackers.

Garlic Croutons:

  • 1 T. butter or olive oil (or combination)
  • 2 c. cubed crusty, chewy bread
  • granulated garlic

Melt butter in a large sauté pan. Add bread cubes and slowly sauté until crunchy and browned. (This takes upwards of 45 minutes, so plan to make croutons when you are working on other dishes and are close at hand.) Stir frequently. When the bread cubes are dry, a nice golden brown and crunchy, lightly sprinkle with granulated garlic. Remove from heat, cool, and store in an airtight container. Use on soups or salads.

Note: And yes, there is a huge difference between store-bought croutons and crusty baguette bread cubes toasted at home. Home prepared croutons are ever so much tastier, with half the salt and none of those unpronounceable ingredients that we are told might lead to all kinds of unspeakable health issues latter in life. (If we even live long enough to have a later life that is!)


SPLIT EMMER FARRO AND WILD RICE WITH MUSHROOMS AND PECANS

OLYMPUS DIGITAL CAMERA

As Mr. C. is fond of saying – “hail, oh mighty pharaoh (or as we like to spell it) farro”! And why you might ask? Well – because farro (an ancient strain of hard wheat) is said to have been found in Egyptian tombs. (Sounds like a pharaoh to me!) But enough frivolity!

Emmer (farro) has been cultivated in the Fertile Crescent (the region in the Middle East which curves like a quarter-moon shape, from the Persian Gulf, through modern-day southern Iraq, Syria, Lebanon, Jordan, Israel, and northern Egypt) and in Italy for over 10,000 years. Farro, which is just the Italian name for emmer wheat, has a delicate roasted nutty flavor and a distinctive chewy texture. It has a higher fiber and protein content than common wheat, is rich in magnesium, niacin, zinc, and B vitamins, and holds the distinct honor of containing the lowest glycemic index of all cereal grains. In addition, emmer farro just happens to be delicious. Ta-da!

So last time we were visiting Rick and Katie (Katie is Mr. Cs sister) in Winthrop, Washington, Katie served a side dish made with Bluebird Grain Farms Emmer Farro. We both absolutely loved the dish. So much so, that I had to go out the next day and buy a couple of packages to bring home with us. For information about retail locations in your area, visit www.bluebirdgrainfarms.com

So if you want to add some variety and nutrition to your side dishes, give emmer farro a try. And this recipe, which is my take on the recipe provided on the Potlatch Pilaf package is just amazingly delightful.

  • 2 T. extra virgin olive oil
  • 1 c. chopped yellow onion (I like Copra yellow onions the best)
  • 10 large mushrooms, sliced
  • 2 tsp. kosher salt
  • freshly ground black pepper
  • 1 tsp. herbes de Provence (try to use one without lavender)
  • 1 c. Potlach Pilaf* – from Bluebird Grain Farms in Winthrop, Washington – for more information on this wonderful product go to their website noted above
  • ¼ c. dry sherry
  • 2 c. vegetable broth (I use 2 cups water and 2 teaspoons Better Than Bouillon Vegetable Base)
  • 1/3 c. chopped toasted pecans, opt.

*or you can use ¾ cup split farro and ¼ cup wild rice

Heat the olive oil in a medium covered saucepan over medium heat. Add the onion and cook for about 3 minutes. Add the mushrooms and cook for another couple of minutes. Stir in the salt, pepper, herbes de Provence, and emmer and wild rice blend. Cook, stirring frequently for 3 minutes. Add the sherry and stir until all of the liquid is absorbed. Add the vegetable broth, bring to a boil, reduce heat to low, cover, and cook for 45 minutes, stirring periodically. Remove cover and stir in pecans. Adjust seasoning. Let stand for 10 minutes before serving.


LEMONY QUINOA WITH FRESH HERBS

OLYMPUS DIGITAL CAMERA

It isn’t just every side dish I prepare that inspires Mr. C. to regress to bachelor behavior. But last evening this quinoa* recipe brought out the “waste not/want not, eat every last bit of it right out of the pan” in him most often associated with people (especially men) who live alone and do their own cooking. (And I’m not talking about all you guys out there who know how to cook. I’m talking about those for whom cooking ramen is or was a major undertaking!)

So last night as we were starting to package up the leftovers and do the dishes, Mr. C. grabbed the quinoa pan out of my hand, and standing in front of the sink finished every last seed (yes quinoa is a seed rather than a grain) before I could say “like it, do you”? His answer was a big old happy grin and a hearty verbal “oh yah”. (I think he was actually shaking his head yes at the same time too.)

So next time you need a delicious, easy and healthy side dish (Andy’s wonderful sister Katie and her dear husband Rick refer to quinoa as the “side dish of the ancients”), give this recipe a try. Believe me there are times when Mr. C. is all thumbs. And if last night had been one of those times, I’m confident that he would have given this recipe, 10 thumbs up! Thanks Giada for this delightful recipe. (Sorry for the changes I made.)

*Interesting facts and health benefits associated with Quinoa: Quinoa originated in the Andean region of Ecuador, Bolivia, Columbia, and Peru where it was successfully domesticated about 5,000 years ago. According to the Huffington Post web site, quinoa is high in protein (its protein balance is similar to milk and has more protein than rice, millet, or wheat), is a good source of riboflavin (riboflavin helps reduce frequency of migraine attacks by improving the energy metabolism within the brain and muscle cells), is alkaline-forming (helps balance the bloods pH level), has only 172 calories per ¼ cup of dry quinoa, is gluten free, and is a complex carbohydrate that helps our bodies maintain a lower glycemic index. (In other words, it’s good for us!)

Quinoa Caution: Quinoa is coated with a naturally occurring toxic substance called saponin.  So always rinse quinoa before cooking. Place the quinoa in a strainer and run cold water over it until the entire soapy residue has been washed away. You can taste test a few seeds; if they still have a bitter taste, run more cold water over them.

  • 3 c. chicken stock
  • 1½ c. quinoa
  • ¼ c. extra-virgin olive oil
  • 1 tsp. lemon zest
  • 2 T. fresh lemon juice
  • ¾ c. chopped fresh basil leaves
  • 2 T. chopped fresh parsley leaves
  • 1 T. chopped fresh thyme leaves
  • ¼ tsp. kosher salt
  • freshly ground black pepper

Rinse and drain quinoa thoroughly in cold water. In a medium saucepan, add the chicken stock and quinoa. Bring to a boil over medium-high heat. Reduce the heat to a simmer, cover the pan and cook until all the liquid is absorbed, about 12 to 15 minutes. (When done, the seed appears soft and translucent and the germ ring will be visible along the outside edge.)

Meanwhile combine the olive oil, lemon zest, lemon juice, basil, parsley, thyme, salt, and pepper. When the quinoa is done, pour the olive oil mixture over the quinoa and toss until all the ingredients are coated. Adjust seasoning and serve while still warm.


BAKED CHEESE OMELET WITH SPICY TOMATO SAUCE

OLYMPUS DIGITAL CAMERA

OLYMPUS DIGITAL CAMERA

Breakfasts have always been my bugaboo. What to serve that takes literally minutes to prepare, offers variety, while at the same time supplying enough protein and complex carbohydrates to jump start our day? (I know, many of you maintain that coffee fulfills that need, but some of us truly need more than caffeine to get our engine running!) So for me, preparing a breakfast that is both interesting and nutritious is a mighty big challenge; mainly because I don’t really start functioning productively until about 11:00am. (You guessed it – I am not a morning person!) So anytime I can prepare something as tasty as this omelet, I am in happy breakfast heaven.

This recipe is as close to a dish my mother used to serve, all too infrequently unfortunately, for Sunday dinners. We lived on a farm, and as many families did in the 40s, 50s, and 60s, we had our main meal after church and then a small repast in the evening. My mother was not a very good or inventive cook, but boy could she prepare a good omelet. And every time she would serve this dish, I would gobble it up like there was no tomorrow.

So the other day I decided to try and replicate her recipe. (I know – why did I wait so long?) So first I tried using Ro*Tel in my sauce, the second picture at the top, but it wasn’t the flavor I wanted. So this morning I made the sauce using plain old tomato sauce. Viola! Just as good as moms! So although the first picture shows the right sauce, I served it over simple scrambled eggs. Confused, let me paraphrase what I just said. The sauce in the first picture should be served with the omelet in the second picture. And yes, I am lazy and should have made the omelet again, but this is a really busy week for me. (Concert in two days and I’m still working on memorizing all the words.) Besides I know that only intelligent, busy, productive people follow my blog. No doubt in my mind that my efficiency measures would make complete sense to one and all!

So next time you want to serve a wonderful dish perfect for breakfast, lunch or dinner, whip up this easy omelet and the yummy sauce. Serve it with toast or warm tortillas and fresh fruit, and you will have a meal your entire family will enjoy.

  • 2 tsp. + 3 T. butter, divided
  • ¼ c. diced green bell pepper
  • ¼ c. minced onion
  • 1 lg. garlic clove, minced
  • 1 (8-oz.) can tomato sauce
  • 7-8 crushed red pepper flakes
  • pinch dried oregano (Mexican preferably)
  • freshly ground black pepper
  • 8 lg. eggs
  • ½ c. 2% milk
  • ½ tsp. kosher salt
  • 8-oz. grated cheddar cheese, Monterey Jack, or mozzarella cheese (or combination), divided
  • Mexican sour cream, opt.

In a small sauce pan, melt the 2 teaspoons butter over medium heat. Add green pepper and onion; sauté for about 3 minutes. Add garlic and cook for one minute or until garlic releases its aroma.  Stir in the tomato sauce, red pepper flakes, oregano, and black pepper.  Simmer until the sauce is thick, about 7-8 minutes.

Meanwhile, beat the eggs, milk, and salt together. Stir in about 2/3rd of the grated cheese. Melt the remaining 3 tablespoons butter in a heavy 10 to 11-inch ovenproof pan and pour in the egg mixture. Bake in a pre-heated 400 degree oven for 15 to 20 minutes. When the egg is set, the omelet is done.

OLYMPUS DIGITAL CAMERA

Serve generously slathered with Spicy Tomato Sauce and garnished with remaining cheese and sour cream. I like to serve freshly baked flour tortillas and fresh fruit on the side. Serves 4 adults very nicely.


REFRIED BEANS

OLYMPUS DIGITAL CAMERA

OK, so you know the old doggerel – beans, beans the musical fruit, the more you eat the more you, etc. etc. – well for all the bad press associated with eating dried beans, they are none-the-less extremely good for us. According to the WebMD site, and I paraphrase, “Dried beans or legumes are an inexpensive and healthy addition to your diet. A serving (1/3 cup of cooked beans) contains around 80 calories, no cholesterol, lots of complex carbohydrates, and little fat. In addition, beans are a good source of B vitamins, potassium, and fiber, which help promote digestive health and relieve constipation. Eating beans may help prevent colon cancer, and reduce blood cholesterol (a leading cause of heart disease). Beans, often thought of as a side dish, make excellent meat free entrees.”

Add to this the fact that when properly prepared they are just darn right tasty. (My words, not WebMD’s.) And this recipe is just about as simple and pure as any bean recipe could be. No added fat, no meat, just a really nice combination of subtle flavors. It is actually the culmination of years of trying to make tasty, low fat, and meatless refried beans. I mean really, there is enough fat in the form of cheese in the other dishes I usually serve with refried beans to make up for any necessity to include it in the refried beans themselves. And then if truth be told, I usually serve grated cheese on the beans, so fat in the recipe is totally unnecessary. Whew – that was probably more information than you ever wanted to know about a simple dish featuring a dried bean.

So do yourself a favor, give these beans a try. They are really tasty and terribly good for you. And vegetarian and I think vegan, although I am not an expert on veganism. (A lack of knowledge I pride myself on, by-the-way. And yes, I know for some of you that firmly categorizes me as “slightly depraved”. I’m actually OK with that, if we only extend the definition of depraved as far as it applies to veganism!)

  • 2 c. dried pinto beans
  • 2 garlic cloves, rough chopped
  • ½ jalapeno, rough chopped (no seeds or veins)
  • 1 tsp. chili powder, divided
  • 11 c. water (yes, eleven!) – will probably need even more
  • 2 tsp. kosher salt
  • freshly ground black pepper

Rinse the beans thoroughly; place in a large pan with the garlic cloves, jalapeno, and ½ teaspoon of the chili powder. Add water. Bring to a boil; reduce heat to low and simmer uncovered for 1 hour. Stir the beans often as they cook and add water as needed. After the first hour, add the remaining ½ teaspoon chili powder, salt, and pepper. Continue to simmer for another 1½ hours or until the beans are very tender and the water has reduced to the consistency of thin gravy.

OLYMPUS DIGITAL CAMERAWhen the beans are finished cooking either whirl until smooth in a food processor and return to the pan to keep warm, or use a hand blender to break down the beans to the desired consistency. (Some people like some lumps in their refries, some want their beans as smooth and lump free as possible, other want the beans left whole; merely a personal preference.)  Use as a bean dip with tortilla chips or as a side dish. Great served with freshly baked flour tortillas (you can get them unbaked at Costco) and as a side with Carne Adovada (Mexican Red Chili and Pork Stew)


GREEN CHILIES AND RICE CASSEROLE

Some days it just doesn’t seem like there are enough hours to go around. I long ago realized that I was simply born on the wrong planet. No one’s fault really; just a mistake any over worked and underpaid stork could have made. But it still doesn’t negate the fact that I truly would have been happier if the original 36 hour a day plan for me (based solely on my own observations) would have been followed. And I know I am not alone. There are many of you out there for whom fate destined your misfortune too.  But alas, there is absolutely nothing we can do about our situation. (I’m quite sure in the future biologists will be able to work in cooperation with the Union of Stork Deliverers to make certain this type of error never again occurs.) But for those of us already on planet earth, we must persevere and make the most of the piddling 24 hours a day we were given. Hopefully this quick and easy recipe will help.

  • 3 c. cooked rice (1 c. raw)
  • 16-oz. (pint) sour cream
  • 1 can cream of mushroom soup
  • 1 small can (4-oz.) chopped green chilies
  • 1 lb. Monterey Jack or Pepper Jack cheese, grated
  • paprika

Combine the cooked rice, sour cream, soup, and green chilies. Spoon half of the mixture in a lightly buttered casserole dish. Sprinkle with half of the grated cheese. Repeat. Sprinkle lightly with paprika. Bake uncovered in a 350 degree oven for 30 minutes. Serve hot.

Can be prepared ahead of time and stored in the refrigerator. Just allow a little more baking time if you are starting with a cold casserole. And no, this is not a low calorie dish. But oh my goodness is it good and definitely a child pleaser. My kids used to woof this down. Great served with roast pork and a green salad.

POTATO, GRUYÈRE CHEESE, AND CARAMELIZED ONION GRATIN

There just doesn’t seem to be any food more comforting than some kind of starch lovingly paired with cheese. And potatoes and cheese are no exception. Then when you throw in some caramelized onions and heavy cream infused with garlic and fresh thyme, you have a combination only an uncivilized barbarian wouldn’t appreciate.

And since I don’t happen to associate with any of the aforementioned, my friends tend to be as crazy about comfort food as I am. And this recipe is as perfect an example of comfort food as I can imagine. (I served it at our New Year’s Eve party this year to rave reviews. So of course I had to share it with all of you!)

Speaking of parties, I also served up what I now call the “career game” at our News Year’s Eve. Everyone seemed to enjoy the new “game” very much. Since no one else at the party (except for Mr. C. of course) knew everyone else who was invited, I threw out the professions of a few of the people in the room. It was then everyone’s mission to figure out who did what for a living or passion. I had intended it to kind of get people talking to each other. As it turned out, my group of friends needed no prompting in that regard, but never-the-less, it was fun to witness them further getting to know each other by ferreting out each others chosen profession or passion. And when the group is as eclectic, intelligent and amazing as our guests were that evening, it was really fun to watch the discovery process enfold. For example, and this is just a sample of the professions or passions of the people at the party: there were among our guests someone who worked for FEMA, a retired art teacher, 2 senior managers at Boeing, the head of marketing for BECU (Boeing Employees Credit Union for those of you who aren’t locals), a ferry boat captain, a retired editor of the U of W Daily paper, 2 outstanding artists who happen to live in our vicinity, a person who was once a vaudevillian, and the person who edits the user manuals for Microsoft (think Excel, for example).

And of course, during the various interchanges, we learned about other fascinating aspects of each others’ lives, or like in my case, accomplishments over which I had no previous knowledge. (I learned that my friend Laurie had danced in the Nutcracker as a child! How cool is that?)

When I started this blog, I promised that I would share the secret to throwing a successful holiday party. And since I attended a fabulous party before Christmas that our friends John and Deanne hosted and then gave a New Years Eve party that seems to have been a success, I thought now was the time to honor my promise. So, here goes! (For those of you who already have the “throw a great party” down pat, disregard the following paragraph.) For those who want to know more, please read on.

Patti’s recipe for throwing a good party:

1 – Invite an interesting and eclectic group of people (the most important ingredient)

2 – Feed them well and often (exciting and interesting people love to eat)

3 – Provide alcoholic as well as non-alcoholic beverages (most people these days are responsible drinkers and interesting non-alcoholic beverages help them stay on track)

4 – Throw in a white elephant or bottle exchange or an ice-breaker diversion like the one I described above (breaks the monotony of eating wonderful food, drinking, and talking to friends, old or new)

5 – Relax and have fun yourself (the second most important ingredient)

That’s it!  And of course, if you are as lucky as I am, invite your musical guests to come and make music together. There is just nothing more fun than a room full of live music.

So dear readers, next time you plan a soiree think about following my recipe for making the event memorable. Just don’t forget to invite me. (Maybe I should have made that rule number 6!)

  • 2 lbs. russet potatoes
  • kosher salt
  • 5 sweet onions
  • 3 T. butter
  • olive oil
  • 2 c. heavy cream
  • 3 cloves garlic
  • 5-6 sprigs fresh thyme
  • 8-10 oz. grated Gruyère cheese
  • kosher salt
  • freshly ground black pepper
  • ½ c. grated Parmesan cheese
  • milk

Scrub the potatoes and cut in half lengthwise. Then slice each section into 1/8-inch thick half moons. Place in a pan with just enough cold water to cover the top layer of potatoes. Add about 2 teaspoons of kosher salt. Bring to just under a boil, reduce heat and simmer potatoes until almost tender. Do not overcook. Strain in a colander and cool to room temperature. Meanwhile, thinly slice onions. Heat butter in a large skillet over medium heat. Add the onions and cook for about 45–60 minutes or until they turn a lovely shade of brown and are almost mushy. (That’s a technical cooking term, by the way!) You will want to stir the onions frequently during the caramelization process. If the onions start to burn or get too dry, add a little olive oil and reduce the heat. This process takes time, but is well worth the effort.

While your potatoes are cooking and your onions are slowly taking on the color of brown sugar, pour the heavy cream into a small pan along with the peeled garlic cloves and thyme sprigs. Bring to a light simmer and cook for about 10 minutes. Remove from heat and set aside.

When ready to assemble gratin, lightly butter a shallow casserole dish. Place a single layer of potato slices in the bottom of dish, slightly overlapping. Top with 1/3rd of the Gruyère, 1/3rd of the onions, 1/3rd of the herb and garlic infused cream and a light sprinkle of salt and pepper. Repeat with 2 more layers. Sprinkle with the grated Parmesan. Now comes the hard part. Gently tip the pan. If you don’t see the heavy cream along the sides of the pan almost up to the level of the last layer of potatoes, add enough milk so that it is just visible around the edges. The last thing you want are dry potatoes.  And I would strongly advise against adding additional cream instead of milk. This dish is already crazy rich. The milk just ensures that the potatoes will be creamy, not dry.

Cover with aluminum foil or the casserole lid and bake in a pre-heated 375 degree oven for 40-45 minutes with the lid on. Remove the lid and bake another 30-40 minutes or until the potatoes are super tender and the top is a lovely light brow. Remove from oven and let sit for about 10 minutes before serving. If you want to make the dish ahead of time, cover and place in the refrigerator until about an hour before you want the dish to go in the oven.

WILD MUSHROOM BREAD PUDDING

OLYMPUS DIGITAL CAMERA

I found this recipe in the Seattle Times several years ago and have been making it ever since. It is a perfect dish to serve with a holiday meal. It’s basically like eating a very rich and savory stuffing or dressing, but in my opinion is easier to prepare. The wild mushrooms are just delicious, but if you can’t find any, use crimini over button mushrooms. This recipe also has the advantage that it can be prepared the day before and simply refrigerated until about an hour before you plan to bake it in your oven. Better and better, wouldn’t you say?

So give it a try. Instead of stuffing your bird this Thanksgiving or Christmas, place this bread pudding on your holiday table. It will be a huge success.

  • 1 c. milk
  • 1 c. whipping cream
  • 2 large eggs, room temp.
  • ½ tsp. kosher salt
  • freshly ground black pepper
  • ½ tsp. dried rosemary, crumbled
  • 2 T. chopped fresh parsley
  • ½ c. finely grated Parmesan cheese
  • 4 c. packed cubed sour dough bread (1 or 2 day old chewy sourdough bread is best for this recipe)
  • 2 T. butter
  • 1 medium onion, finely chopped
  • 2 garlic cloves, minced
  • 8-oz. coarsely chopped wild mushrooms

Combine milk, cream, eggs, salt, pepper, rosemary, and parsley in a medium sized bowl. Gently fold in bread cubes and set aside. Melt butter in a medium sized sauté pan. Add onion and garlic and sauté until onion is soft. Add mushrooms and cook until golden brown. Allow to cool and scoop into the bowl with softened bread cubes. Stir gently and pour mixture into a lightly buttered casserole dish. Bake in a pre-heated 350 degree oven for 45 minutes or until a knife inserted into the middle comes out clean. Serve immediately.