Category Archives: VEGETARIAN RECIPES

EASY LEMON AND BASIL SPAGHETTI

OLYMPUS DIGITAL CAMERA

If there is an easier pasta dish to prepare than this slightly adapted version of a Giada de Laurentiis classic, I’d appreciate it if you would send me the recipe at your earliest convenience! (And BTW, your recipe has to be as delicious.) Because, frankly, this is the tastiest quick and easy pasta I have ever had the pleasure of putting in my mouth. Now granted, I love fresh lemon, basil, Parmesan, and pasta more than just about any other ingredients. So for me, this simple dish is just about as good as it gets. And the fact that I only have to make one pot dirty is not only a bonus for me, but the resident dish washer (Mr. C) also appreciates that benefit.

So about this recipe, I have very little more to say either about the dish or about life in general. (I know – no caustic remarks directed at politicians, no firm instructions not to mess with the ingredients, not even a comment about myself or my friends that you don’t care to read about anyway!)

So, just one more little tidbit for the record. Make this dish and you will know what summer tastes like. And thank you Linder for sending me the recipe, and Giada, for sharing yet another incredibly divine recipe with all of us.

  • 1/3 c. extra virgin olive oil
  • 1½ tsp. lemon zest
  • scant ¼ c. fresh lemon juice
  • 1/3 c. finely grated Parmesan cheese
  • ¼ c. chopped fresh basil + more for garnish
  • ¼ tsp. kosher salt
  • freshly ground black pepper
  • 8 oz. spaghetti, cooked al dente

Whisk together the olive oil, lemon zest & juice, Parmesan, basil, salt, and pepper in a large bowl. Add the cooked pasta, adjust seasoning, garnish with basil, and serve immediately. (If you need additional liquid for your sauce, use a small amount of the pasta water.)


CHICKEN, SHRIMP, OR ROASTED VEGETABLES IN A CURRY MASALA SAUCE

OLYMPUS DIGITAL CAMERA

There really isn’t anything about Indian curry that I don’t like. And this curry dish, slightly altered from a recipe provided when I recently purchased a package of Aromatic Curry Masala at the Methow Masala shop in Winthrop, WA, is just about as good as an Indian style curry can get. It’s so delicious, that if I had been served this curry dish in a restaurant, I would have wanted to go back for more at my earliest convenience. The only changes I made to the original recipe were to replace tomato paste for diced tomatoes, use my own curry masala blend (the second time I made it), and add sour cream or yogurt right at the end. (Just makes the sauce a little creamier.)

Now if you happen to live near Winthrop, you can buy the curry blend any old time you want. But for those of us who would have to make a special trip, I went to all the trouble of working out what I believe to be an adequate Aromatic Curry Masala substitute. (BTW, Mr. C. loved both curries I made before writing this post. But he did admit that he liked the curry made with chicken better (curry number 1) than the curry I made with shrimp (curry number 2). No mention of the sauce flavor being any different when I used my own curry blend (curry number 2). Just that he preferred chicken curry over shrimp curry.

Now of course, many of you are not going to go to the bother of making your own curry masala powder. And believe me, if I still had 4 kids at home and worked full time, I wouldn’t be making my own curry powder either! But since my kids are grown and I am retired, I take no greater pleasure than trying my hand at what I call “seasoning blend mixology”. (I have kind of a spice and herb obsession if truth be known!) And if I do say so myself, my recipe below for Curry Masala Powder is darned good. But dear friends, even if you don’t have the time, energy, or interest in making your own curry powder, make this delicious dish anyway. Just use purchased curry powder. (There will be no points subtracted or shame attached to using a commercially produced curry powder. The only shame would be if you didn’t give this recipe a try when next you got a hankering for Indian food!)

So grind yourself up some curry powder (or start with purchased curry powder), steam up some rice (remember, brown rice is healthier for you than white rice), and prepare a chicken, shrimp, or roasted vegetable curry for your family in the near future. They will be delighted to have something new and exciting to eat for dinner. And you will have had a new adventure in the kitchen. And isn’t that the real reason many of us love to cook??

  • 1 tsp. cumin seed
  • 1 tsp. brown mustard seed
  • ¼ c. (½ stick) butter
  • 2 large onions, finely chopped
  • 5 lg. garlic cloves, finely minced
  • 1-inch piece of fresh ginger, finely minced
  • 3-4 T. Aromatic Curry Masala spice blend from Methow Masala or my version of Curry Masala Powder (see recipe below)
  • 1 tsp. kosher salt
  • ¼ c. tomato paste
  • 2-3 med. jalapeño chili peppers, seeds and veins removed, and finely minced
  • 4 c. (1 qt.) chicken or vegetable broth (or use 4 tsp. chicken or vegetable base and 4 c. water)
  • 6-8 boneless, skinless chicken thighs cut in bite sized pieces or 2 lb. large uncooked shrimp, peeled and deveined or 3 cups assorted roasted vegetables
  • ½-¾ c. sour cream or plain yogurt

Toast the cumin seeds and mustard seeds in a dry pan over medium heat until the aroma of the two spices is released. Set aside.

Melt the butter in a heavy covered pan. Add the onions and cook until they start to brown. Add the garlic and ginger and cook for one minute. Add the curry masala powder, salt, toasted cumin and mustard seeds, and the tomato paste. Let the mixture cook for about a minute. Whisk in the jalapeños and chicken broth and simmer uncovered for about 15 minutes. Add the chicken pieces and cook just until the chicken is no longer pink in the middle. If you are using shrimp, cook only until the shrimp turn light pink. If you are using roasted vegetables, add just long enough to heat through. Whisk in the sour cream or yogurt, adjust seasonings, cover, remove from heat, and let sit for 15 minutes. Serve over brown rice. And yes I know brown rice is not usually served with most curry dishes, but it’s healthy and we love it! If you must, you can serve the curry over basmati rice.

Also, since I know many of you are wondering – no this is not a recipe for a really spicy hot curry. The jalapeños truly add more flavor than heat, especially if you carefully remove the seeds and veins. Of course, there is a bit of heat, but I pride myself in not hurting anyone. So if you are super sensitive, you might want to use less jalapeños or none at all.

CURRY MASALA POWDER RECIPE

  • scant ½ c. coriander seeds
  • 2 T. fennel seeds
  • 2 T. cumin seeds
  • 1 T. black or brown mustard seeds
  • 1 tsp. black peppercorns
  • ½ tsp. fenugreek seeds
  • 2 tsp. crushed red pepper flakes
  • 2 tsp. ground cinnamon
  • 2 tsp. turmeric powder
  • 1 tsp. ground ginger
  • 1 tsp. ground cloves
  • 1/8 tsp. ground cardamom

In a small pan over low heat, individually dry roast the coriander seeds, fennel seeds, cumin seeds, mustard seeds, peppercorns, fenugreek seeds, and crushed red pepper until aromatic. Don’t hurry the process.

When each is toasted, remove to a bowl to cool. (And yes, it can be the same bowl.) When all of the spices are room temperature, whirl in a grinder until powdered. (It’s OK if there are still tiny chunks. If the chunks bother you, sieve the mixture before proceeding.) Add the ground cinnamon, turmeric, ginger, cloves, and cardamom. Store in an airtight container. Use in any of your favorite recipes calling for curry powder.

FYI: Internet source for dried herbs and spices www.myspicesage.com

I have always been more than satisfied with the price, delivery method (most of the time free delivery) and products I have received from this company.

VEGETARIAN BAKED BEANS

OLYMPUS DIGITAL CAMERA

So, I have to tell you, starting a pot of baked beans without first frying up about a half pound of bacon just felt sick and wrong. I mean really, how could baked beans taste right without this quintessential ingredient? But I wanted a vegetarian side dish that could, if need be, stand in as the compulsory protein if one of my guests didn’t eat meat. So I took my standard recipe and simply left out the first ingredient.  

So if you too would like to step over to the dark side, I suggest you give this recipe a try as written. It produces absolutely lovely baked beans and I promise you will not miss the bacon in the slightest. Even Mr. C, whose middle name actually should have been “bacon” loved the beans and didn’t miss it in the least.

So next time you invite the gang over for a backyard BBQ, include these beans in your menu planning. They are perfectly delicious and the best part – they are truly at their finest when they have had a day or two to mellow out in the refrigerator. So, for you, that means one less dish to prepare on the day of the event. (As you know, I am just crazy about dishes that can and really should be prepared ahead of time.)

For additional recipes that are fun to serve at a picnic/BBQ, search under the heading BBQ & PICNIC RECIPES. Cheers to the lazy, hazy, crazy days of summer!

And for a sad story about baked beans, see my story below. Sigh…… 

  • 1 lb. small navy beans
  • water
  • ¼ c. maple syrup (the real stuff!)
  • 1 c. brown sugar
  • ½ c. molasses, or more to taste (regular or part black strap)
  • 1 small can tomato paste
  • 1 24-oz. bottle of ketchup
  • ¼ c. yellow mustard
  • ¼ c. Worcestershire sauce
  • 1 T. kosher salt, or more to taste
  • freshly ground black pepper
  • 1 yellow onion, chopped

Carefully wash the beans removing any matter that doesn’t look like a healthy, fat dried bean. Place in a large bowl and cover with water by about 3 inches.  Place in refrigerator overnight. Next day, rinse and drain the beans.

Place in a covered pot with enough water to cover the beans by about 3 inches. Bring to a boil, reduce heat, and simmer gently until the beans are tender, about 40-45 minutes. (Do not worry that the beans will become mush while they are spending their time in a low oven. They will be just fine!)

Drain the cooked beans and place in a Dutch oven. (The main thing here is that the beans must be covered as they bake. If you don’t have a Dutch oven, you can bake them in any kind of pan, as long as the pan is covered, even if it’s covered with aluminum foil. However, it may take a longer baking time if you use aluminum foil rather than a tight cover. Sad story to follow.)

In a medium sized bowl whisk together the maple syrup, brown sugar, tomato paste, ketchup, yellow mustard, Worcestershire sauce, salt, and pepper. Add the mixture to the beans along with the chopped onion. (I usually rinse out the ketchup bottle with a little water and then throw the liquid in with the other ingredients.)

Bring to a boil, cover, and bake in a pre-heated 225 degree oven for 3-4 hours. (Check the beans periodically to make certain they are not getting too dry. While you have the lid off, give them a little stir. Add water as needed.) Uncover the beans the last hour to brown them up a bit. Best made the day ahead and either re-warmed or served at room temperature.

Sad story:

So here it is, 3 days before I plan to serve baked beans to our home concert (JazzVox) guests, and I place 4 pounds of beans to soak. (quadruple recipe) Next day I cook the beans in water for a short time, but not long enough. Then I throw the rest of the recipe together in a large pan and cover the whole mess with aluminum foil. Seven (7) flippin’ hours later the beans are still in the oven and they are still crunchy! There is obviously no hope for these beans. So I did what any self-respecting cook would do. I tossed the whole shebang into the yard waste barrel, sent a little invocation to the Gods of yard waste asking for their help with the next batch, and started all over again. Sad, right?

And just to prove that this girl obviously can’t learn from her mistakes or that the Gods were watching the World Cup while I was requesting assistance, the second batch of beans still didn’t have that wonderful creamy mouth feel that should be the hallmark of really good baked beans. Once again, I simply didn’t cook the beans long enough on the stove top before adding the other ingredients. So once again, the beans were in the oven about 7 hours. OK, this time they weren’t crunchy. They tasted fine, but I knew they could be better.

So the moral of my sad story is to cook your beans until they are tender. Not over cooked, but perfect. And when you figure out how to do that, would you please let me know!


NEW MEXICO STYLE WHOLE PINTO BEANS

(Sorry about no picture, but in accordance with the theme of this post, I decided a picture was unnecessary.)

One of the mistakes I feel many good cooks make when they are planning even a simple meal for family and friends, is to believe that every dish served has to sparkle with its own star quality flavor. And until recently I was just as guilty as the next cook in thinking this way. It wasn’t until I was on our latest trip to New Mexico that I got to thinking about what constitutes a truly memorable meal. And the lunch I ordered at the High Country Restaurant & Saloon in Chama, New Mexico will remain as memorable as any I have experienced because it was this delicious meal that started me thinking. (Well actually it was these beans that started the thought process that changed my entire way of thinking about meal planning, at least at a conscious level!)

Until then, I guess I never fully grasped the idea that even taste buds need a break. (And yes, I had read and understood about palate cleansing and serving small portions of many foods rather than large portions of a couple of dishes, etc., but I never categorized these concepts in relationship to every day meals.)

When I reflect on the average dinner I prepare for us, I think main dish, side, and veggie/salad. And until recently, I felt that all three needed to scream “I’m the star; I’m the star!!!” What I was forgetting was that our taste buds are also included in these little dinner parties. And like the rest of our body, need a periodic rest.

So after analyzing this amazing, 3 item lunch I ate in New Mexico, I concluded that what I enjoyed the most was the simple preparation used on the pinto beans. Not only did the flavor of the bean shine through, they were not laden with lard or smothered in sauce, cheese, or salsa. They were perfectly plain. And in combination with the fantastic cheese enchilada and the rich pozole, they were the “time out” place my taste buds craved.

So then I started thinking about other dishes that possess the same qualities as these beans. And I realized that sides like potatoes (mashed, baked, boiled or roasted), rice, pasta and the like are all “time out” places for our taste buds. And even though these dishes might be topped with some kind of gravy, sauce, condiment, or dressings, they still possessed the underlying bland flavor that is necessary for our taste buds to appreciate the more exotic flavors featured in other dishes.

And yes I know what some of you are thinking. It took you until age 71 to figure this out? Well yes, I guess it did! I think I knew at a sub-conscious level that I was slightly off track in some of my thinking. But until New Mexico, I hadn’t had a lesson in perfect meal planning presented to me in such a clear and precise manner.

Now what this all means for me, is that I have been over achieving when it wasn’t necessary. That always striving to find a new and exciting way to feature a potato, for example, is not always the best choice. Or when I do serve a fancy main and side dish, my veggie or salad should be very simply prepared. I think this will not only free up some of my time, it will also make for more enjoyable meals.

In much the same way you can’t tell a bed by its covers, you are not going to know if this spin on meal planning works for you, until you give it a try. And speaking of trying things, I hope you enjoy this recipe for delicious pinto beans. The flavor is not going to scream “I’m a star” at you when you bite into them. But rather the flavor will seduce you into enjoying the more predominant flavors featured in the other dishes being served. But never fear; your taste buds will lead you back to the beans over and over again throughout the meal. It’s as inevitable as rain in the spring.

  • 2 c. dried pinto beans
  • water
  • 1 tsp. kosher salt
  • a few grinds of freshly ground black pepper
  • pinch white pepper
  • 1 tsp. sugar
  • 1 tsp. granulated garlic
  • 1 T. vegetable oil

Spread the beans out in a baking pan. Discard any foreign matter such as small rocks, bits of dirt, or shriveled beans. Rinse the beans under cold water. Place in a bowl and cover with water by about 4 inches. Soak at room temperature or in your refrigerator for at least 8 hours or overnight. Thoroughly rinse the beans before proceeding. (If pressed for time, place the beans and water in a sauce pan, bring to a boil, remove from heat, cover, and let stand for 1-2 hours. Thoroughly rinse the beans before proceeding.)

Place in a large covered sauce pan. Add enough water to cover by about 2 inches. Bring to a boil; reduce heat to low, cover, and simmer for 1 hour. Stir the beans often as they cook and add water as needed. After the first hour, add the salt, black pepper, white pepper, sugar, granulated garlic, and oil. Continue to simmer for another hour or until the beans are very tender and the water has reduced to the consistency of thick gravy. (If the beans are too runny, remove the lid and let simmer until they reach the desired consistency.) Adjust seasonings and serve whole. (None of that mashed action for these beans!)


CAPONATA ALLA SICILIANA (SICILIAN EGGPLANT RELISH)

OLYMPUS DIGITAL CAMERA

People often ask me if I have ever had a failure in the kitchen. That’s like asking if a bear goes number 2 in the woods! Well, of course I have and of course they do! In fact, I don’t know a single cook who hasn’t had a few colossal defeats along the way. It’s just part of the whole cooking experience.

I also have never known a cook who doesn’t have a favorite dish or two that they wish they could perfect, but just can’t seem to come up with the right combination of ingredients or technique to make it happen. I am just as guilty as the next cook in that regard too.

Now granted, I don’t have as many complete failures as I did when I was just learning to cook, but there are still some dishes that I simply can’t duplicate, no matter how hard I try. For example, I still haven’t mastered a truly good version of a Major Grey type chutney. And really, it can’t be that difficult. Never-the-less, I’ve never found a recipe or invented a combination of ingredients that comes close to the real thing.

But then, there also used to be a dish with eggplant, onion, green olives, capers, and tomatoes that I enjoyed in Italy and wanted to re-create at home. I had all but given up on creating the perfect caponata after several failed attempts over a number of years. But thanks to Saveur and old fashioned persistence, I can now serve up a caponata that will knock your socks off! (I made a couple of changes to the recipe in Saveur, but then, of course I did!) But truly, this combination of ingredients is just amazingly delicious. Served on fresh baguette slices, there is darn near nothing that compares with this quintessential Sicilian appetizer for absolute culinary bliss. (How’s that for a description of a simple veggie dish made with easily obtainable ingredients?!)

So if you too happen to adore caponata, or even if you have never tasted this Sicilian comfort food, give this recipe a try. Caponata makes a wonderful appetizer to serve at a dinner party, especially when served with other Italian dishes. And easy! It’s at its best when made a couple days ahead, brought to room temperature or slightly warmed, scooped into a pretty bowl, then surrounded with fresh chewy baguette slices. Your guests will think you are the next best thing to Lidia Bastianich, Marcella Hazan or my personal favorite, Ettore Boiardi (Chef Boy-Ar-Dee). Just kidding! (Actually Ettore Boiardi was a real chef. In fact his restaurant Il Giardino d’Italia which opened in 1924 in Cleveland, Ohio was so well regarded that Boiardi started his canned Italian food business because his restaurant patrons kept asking him for his recipes.) Lidia and Marcella of course are also real chefs, but to the best of my knowledge, neither of them have ever forced pasta into a can!

  • 3 medium-large eggplants, partially peeled, and cut into 1/3-inch cubes
  • ½ c. extra virgin olive oil, divided (or more as needed)
  • 1 large yellow onion, chopped
  • 1 celery stalk, thinly sliced
  • ¼ tsp. kosher salt
  • freshly ground black pepper
  • 2 T. tomato paste
  • 1 (15-oz.) can tomato sauce, preferably made with Italian tomatoes
  • 6 oz. pimento stuffed green olives, roughly chopped (about 1 1/3 cups)
  • ½ c. white wine vinegar or if you can find it, Ponti Italian Wine Vinegar – kind of a yellow color – sold at PFI (Pacific Food Importers) – basically my favorite vinegar
  • ½ c. golden raisins
  • ¼ c. capers, drained
  • 3 T. sugar
  • 2 tsp. unsweetened cocoa
  • ½ c. finely shredded basil, or more to taste

Coat the eggplant pieces with 6 tablespoons of the olive oil on a rimmed baking sheet. (If the pieces seem dry, add a little more olive oil. A little more olive oil never hurts.) Roast in a pre-heated 375 degree oven until just browned, about 30 minutes. Turn every 10 minutes.

Meanwhile, add the remaining 2 tablespoons olive oil to a large fry pan. Add the onion, celery, salt, and pepper; slowly cook until the onion starts to caramelize. Add the tomato paste and sauce; let gently burble for 10 minutes. Stir in olives, vinegar, raisins, capers, sugar, and cocoa; cook, stirring occasionally, until thickened, about 5 minutes. Add the roasted eggplant and let burble for another couple of minutes. Remove from heat and stir in the basil. Adjust seasoning. Let cool to room temperature before serving or storing covered in your refrigerator for up to one week. Best made a couple days ahead and served on chewy Italian baguette slices.

OLYMPUS DIGITAL CAMERA


GRUYÈRE CHEESE SOUFFLÉ

OLYMPUS DIGITAL CAMERA

OK, I don’t care what anyone says, soufflés are really cool. But for some unknown reason, they have kind of gone out of fashion. And I don’t have the foggiest idea why that is. They are fairly inexpensive to make and could not be easier to prepare. The kind of cheese you use can be whatever you happen to have on hand, so there’s no reason anyone need even make a special trip to their local cheesery. And eggs, who doesn’t have eggs on hand? So what is preventing cooks from making this light and fluffy delicacy? Well I don’t know about anyone else, but I sure as heck know why I stopped making soufflés for about 10 years! I truly doubt anyone else out there has a similar excuse, but please allow me to tell you my true story about soufflés, a couple of cans of shrimp, my 4 kids, and why I disdained soufflés for such a long time.

When my kids were young, and their father and I were both working at good jobs, but paying a mortgage ($210 a month) that at the time seemed outrageous (remember I’m almost 71, so this was a long time ago), I made dishes like soufflés on a regular basis. Of course I didn’t use imported Gruyère cheese, but even with sharp cheddar cheese or inexpensive Swiss cheese, soufflés were delicious and actually quite inexpensive to prepare. Plus, everyone in my family loved them. So to kind of fancy up my soufflés, I would often make a shrimp sauce to go on top. Well, like I said, we weren’t rich, not technically poor by any means, but with 4 kids, baby sitter expenses, car payments, etc. we kept close tabs on our grocery dollars. And in those days, (the early to mid 70’s) canned shrimp was readily available and cheap, plus you couldn’t just go to your local grocery store and buy fresh shrimp and cook it yourself. Canned shrimp was just about the only way to go. And usually there was no problem with the quality.

But this one time, I made my usual basic sauce, opened a couple cans of shrimp, drained them off, and added them to the pot. We sat down to dinner, and the soufflé was perfect. But the sauce, OMG, there must have been more shell in the cans than there was shrimp. It was absolutely crunchy and absolutely inedible. I was so mad. Here I had made this perfect soufflé, and because of the sauce, the entire meal had to be thrown away. I don’t remember where we went to eat that evening, but it sure wasn’t our dining room! And I truly don’t think I made another soufflé for at least 10 years!

But as I got older and wiser, a) I stopped buying canned shrimp, b) I refrained from covering a perfect soufflé with a sauce, (what was I thinking?) and c) I forgave the soufflé, even though it wasn’t its fault in the first place!

So unless you have a reason as irrefutable as mine for not fixing a soufflé, give this recipe a try at your earliest convenience. You just won’t believe how lovely and creamy this soufflé feels in your mouth. It’s like eating a puffy bite of warm cheese. Just don’t try and dress it up with a fancy sauce. But if you must, just don’t use canned shrimp. Sometimes lessons can be learned at someone else’s expense. And I paid the piper already, so you have a free pass!

  • 5 T. unsalted butter, room temperature, divided
  • 3 T. finely grated Parmesan cheese
  • 4½ T. flour
  • 1½ c. milk (whole milk is best)
  • ¼ tsp. kosher salt
  • freshly ground black pepper (not too much)
  • ¼ tsp. paprika
  • pinch of freshly grated or bottled nutmeg
  • 7 large eggs, room temperature, separated
  • 2 c. grated imported Gruyère cheese (5-6 oz.) or cheese of choice

Grease the inside of a 2 quart casserole dish with 1 tablespoon of the butter. Sprinkle the finely grated Parmesan cheese along the bottom and sides of the dish. Set aside.

Melt the remaining 4 tablespoons of butter in a heavy saucepan. Whisk in the flour. Cook for a couple of minutes. Remove from heat and slowly whisk in the milk. Return pan to heat and bring to a boil. Reduce heat and allow to burble until very thick, stirring constantly. Remove from heat and add the salt, pepper, paprika, and nutmeg. Whisk in the egg yolks one at a time.

Place the egg whites in a mixing bowl and beat to stiff peaks. (Be sure not to get any of the yolk in with the whites when you are separating the eggs or the whites won’t whip up as light and fluffy.)

Fold a third of the yolk sauce and a third of the Gruyère into the egg whites. Do not over-blend. Add the next third of the sauce and cheese into the whites and again fold gently. Add the final third of sauce and cheese into the whites. Scoop the mixture into the prepared casserole. Bake the soufflé in a pre-heated 350 degree oven for 45 minutes or until it has puffed and the top is nicely browned and firm to the touch. (A long skewer inserted into the soufflé should come out fairly clean.) Serve immediately.


SPINACH AND MUSHROOM WILD RICE PILAF

OLYMPUS DIGITAL CAMERA

Recently I have become totally obsessed with finding healthy side dish recipes. So I can’t begin to tell you how delighted I am to share this recipe with you today. And who better to share my obsession with, than a captive audience sitting in front of a computer screen? (I figure you wouldn’t be visiting my site unless you too weren’t hungry (so to speak) for new and exciting ways to prepare healthy and delicious dishes.)

So, a couple of days ago I was at our local Bartells. (For those of you who live outside the Seattle area, Bartells is a local drug store chain.) And whenever I go to Bartells for legitimate drug store items, such as makeup, I always peruse the middle isle for packaged foods that are featured at a discounted price.

This last visit I found great prices on flavored almonds and Lundberg rice products. So I bought two packages of their wild rice blend.

When I got home I immediately went on line and visited the Lundberg site for recipe ideas. And this recipe literally jumped off the screen and onto a word document before I even knew what hit me. It is gluten free (if you use GF tamari), vegetarian, and full of nutritious ingredients. What can be better than that? Well the fact that it’s absolutely delicious sure doesn’t hurt either!

So however you want to approach this recipe, as a delicious side dish or as a healthy side dish, you’re 100% covered.

So hurry up and read the recipe and get thee to the grocery store if you need ingredients, or straight to the kitchen if you don’t, and build your family a side dish that comes with its own PhD. (P-painless to prepare, h-healthy, D-delicious) And thank you Lundberg for both the lovely wild rice blend and the recipe. (Sorry for the slight modification.)

  • ¾ c. dried mushrooms* (shiitake, chanterelle, porcini) cut or broken into small pieces
  • 1 c. very hot water
  • 1 c. combination wild and whole grain brown rice (or Lundberg Wild Blend)
  • 1¾ c. vegetable broth (I use Better Than Bouillon Vegetable Base)
  • 1 T. olive oil
  • 1 med. onion, finely chopped
  • 2 c. fresh button mushrooms, halved and thinly sliced (about 8 medium mushrooms)
  • 6 garlic cloves, minced
  • 6 oz. spinach, stems removed and rough chopped
  • 1 T. gluten-free tamari soy sauce
  • 1/8 tsp. crushed red pepper flakes
  • ½ tsp. kosher salt
  • freshly ground black pepper
  • ¼ c. sliced green onions or chives, garnish

*if you don’t have dried mushrooms, use another 2 cups of fresh button mushrooms

Place dried mushrooms in a bowl. Add the hot water and set aside. Meanwhile, in a medium sauce pan, bring the broth and rice to a boil. Cover with a tight fitting lid, reduce heat to a low simmer, and cook for 45 minutes. Remove from heat (with lid on) and let steam for 10 minutes.

Meanwhile, heat the olive oil in a large skillet over medium-high heat and sauté the onion until translucent. Add the fresh mushrooms and cook until softened; stir in garlic and cook 1 minute more. Drain the re-hydrated mushrooms and add to the pan along with the spinach; cook until spinach just starting to wilt. Stir in the tamari, red pepper flakes, salt, and pepper.

OLYMPUS DIGITAL CAMERA

Gently fold mushroom-spinach mixture into cooked rice and garnish with green onions or chives.

THE BREAKFAST SCRAMBLE

OLYMPUS DIGITAL CAMERA

So what I really need to ask myself is – why am I writing up a recipe, a version of which half the population already prepares on a regular basis? Well, that’s an easy question to answer, even for me! If only half the population knows about scrambles; that leaves the other half that doesn’t have a clue. And believe me, I was part of the clueless masses ‘til a couple of years ago when my sister-in-law Katie fixed a wonderful and quick vegetarian scramble for us one morning.

I had just made an appearance and was sitting at the counter drinking my first cup of coffee, when she started the unbelievably quick process that led to absolutely delicious scrambled eggs. So here I am, half awake (have I mentioned before that I am NOT a morning person) watching Katie prepare this masterpiece. What, she wasn’t setting the sautéed vegetables aside while she washed the pan? She wasn’t then adding more butter and carefully cooking the egg mixture to a certain point, then tenderly placing the cooked veggies and a smidge of cheese on half of the eggs, folding the other half ever so gently over the veggies and cheese, then placing the pan in a pre-heated oven to finish cooking? What had just happened here? She had created a mock omelet without the time involved and bother necessary to create the “real thing”. I was not only dumbfounded; I was hooked!

So of course, the first morning we were home, I fixed us a wonderful scramble and have been dishing up scrambles ever since. FYI: scrambles take about a quarter of the time to prepare as an omelet, but still include all the same ingredients and flavor. Now granted, scrambles aren’t as pretty or as showy as an omelet, but its breakfast y’all. Who the heck cares if the eggs are beautiful? Scrambles are both delicious and nutritious, on the table in no time flat, and they aren’t cold cereal!

And just so you don’t think I’m a complete culinary moron, I had previously added cooked ham or bacon to my scrambled eggs, but never thought to add veggies such as spinach, mushrooms, or basil. And yes, I had been going through all the steps of making the perfect omelet as referenced above, but I must admit, not very often. A wonderful omelet is a joy and a delight, but it takes time to prepare. And frankly, more time then I normally want to spend fixing food to break our fast.

Below is the recipe for the scramble I prepared yesterday morning. The eggs, milk, salt, and pepper mixture is simply the base for many, many variations you can make using ingredients that your family loves and/or you happen to have on hand. Feel free to sauté bacon or sausage, or add veggies such as onion or red bell pepper, greens such as baby kale, herbs such as fresh thyme or parsley, or your favorite cheese. Almost any combination will work beautifully. And frankly, my scrambles are never the same twice. However, the one I made yesterday morning was particularly delicious, and all the better because it was meatless. So, I may even look up this recipe next time I scramble to get breakfast on the table. Good morning! Breakfast’s ready!

  • 4 eggs
  • 2 T. milk or half & half
  • ¼ tsp. seasoned salt
  • freshly ground black pepper
  • 1 T. butter
  • 4 mushrooms, halved then thinly sliced
  • 3 slices zucchini or other summer squash, chopped
  • 3 sliced green onions
  • 1/3 c. chopped fresh spinach
  • ¼ c. grated sharp cheddar cheese
  • 7-8 fresh basil leaves, thinly sliced (chiffonade)

Whisk together the eggs, milk, salt, and pepper. (The start to any scramble.) Set aside. Melt the butter in a small non-stick frying pan. Add the mushrooms and fry until browned. Add the zucchini, cook for about a minute and add the green onions and spinach. Stir fry until the spinach starts to wilt. Reduce heat to low. (Never cook eggs over high heat!) Add the egg mixture and cook until the eggs are almost set, lifting the cooked egg mixture from the bottom of the pan to the top. This step allows the uncooked egg to gravitate to the bottom of the pan and also get cooked. (If there is any sign of brown, your heat is too high.) Stir in the cheese and basil. Finish cooking and serve immediately.


SPLIT EMMER FARRO AND WILD RICE PILAF


OLYMPUS DIGITAL CAMERAI found this recipe on the Bluebird Grains Potlatch Pilaf package. (Say that three times in a row for your daily tongue twister teaser!) Anyway, like I started to say, I found and prepared this dish (made a few minor changes here and there), loved it, and I am very excited to share the recipe with you.

Now I know that some of you are not in the habit of buying packages of grain and grass seed* except for the ones found in the bird-food section of your grocery store. But I’m going to ask you to put on your big kid pants, conquer your fear of growing feathers and wanting to fly south for the winter, and give this organic, healthy, protein rich, and GMO-free product a try. Plus, for all you locavores**, the farro is grown in the upper Methow Valley of Eastern Washington. (That’s local enough for this locavore!) The organic wild rice unfortunately is not grown locally. But I’m sure that doesn’t surprise you one little bit since Washington isn’t known for its wild rice production. (We leave that distinction to Minnesota, the land of 15,000 lakes.)

So, regardless of where the grains were raised, and despite the fact that we don’t really know whether the grains were lovingly tended and exposed to classical music as they were growing up***, all of us could profit from a few more healthy grains like farro and wild rice in our diet. So, fly to your local grocery store (and I mean “fly” figuratively rather than literally), and bring home a grain or two with which you are completely unacquainted. Then give it or them a try. You are going to find that the likes of quinoa, red rice, farro, and wild rice are just delicious. And I can’t overemphasize their nutritional value. Oh I could, but I think I have already nagged said enough on that subject!

For more recipes that feature farro, type “farro” in the search field at the top of the “home” screen.

*wild rice is a highly nutritious annual water-grass seed “zizania aquatica” naturally abundant in the cold rivers and lakes of Minnesota and Canada

**the practice of eating food that is locally grown

***my not too subtle dig directed at the kind of people who carry their need for information on food ingredients and growing conditions to the ridiculous

  • 2 T. extra virgin olive oil
  • 10 button mushrooms, halved and then thinly sliced
  • ¼ c. chopped shallot or onion
  • 1 lg. garlic clove, minced
  • ¼ tsp. kosher salt
  • freshly ground black pepper
  • 1 tsp. Herbs de Provence (preferably without lavender)
  • 1 c. Bluebird Grains Farm’s Potlatch Pilaf (or ¾ cup farro and ¼ c. wild rice)
  • ¼ c. dry sherry or dry white wine
  • 2 c. vegetable or chicken broth
  • 1/3 c. toasted slivered almonds

In a medium sized covered saucepan, heat the olive oil. Add mushrooms, stirring occasionally until the mushrooms start to brown. Add the chopped shallot and cook for about 3 minutes. Add the garlic and cook for about a minute or until the garlic releases its aroma. Stir in salt, pepper, Herbs de Provence, and the Potlatch Pilaf mix. Stir frequently for about 3 minutes. Add the sherry and cook for about a minute, or until the sherry is evaporated. Pour in the broth, bring to a vigorous simmer, reduce heat, cover, and simmer for 40 minutes. Remove from heat and let stand for about 10 minutes. Fluff with a fork and stir in the toasted almonds just before serving.


PASTA WITH BUTTON MUSHROOM SAUCE

OLYMPUS DIGITAL CAMERA

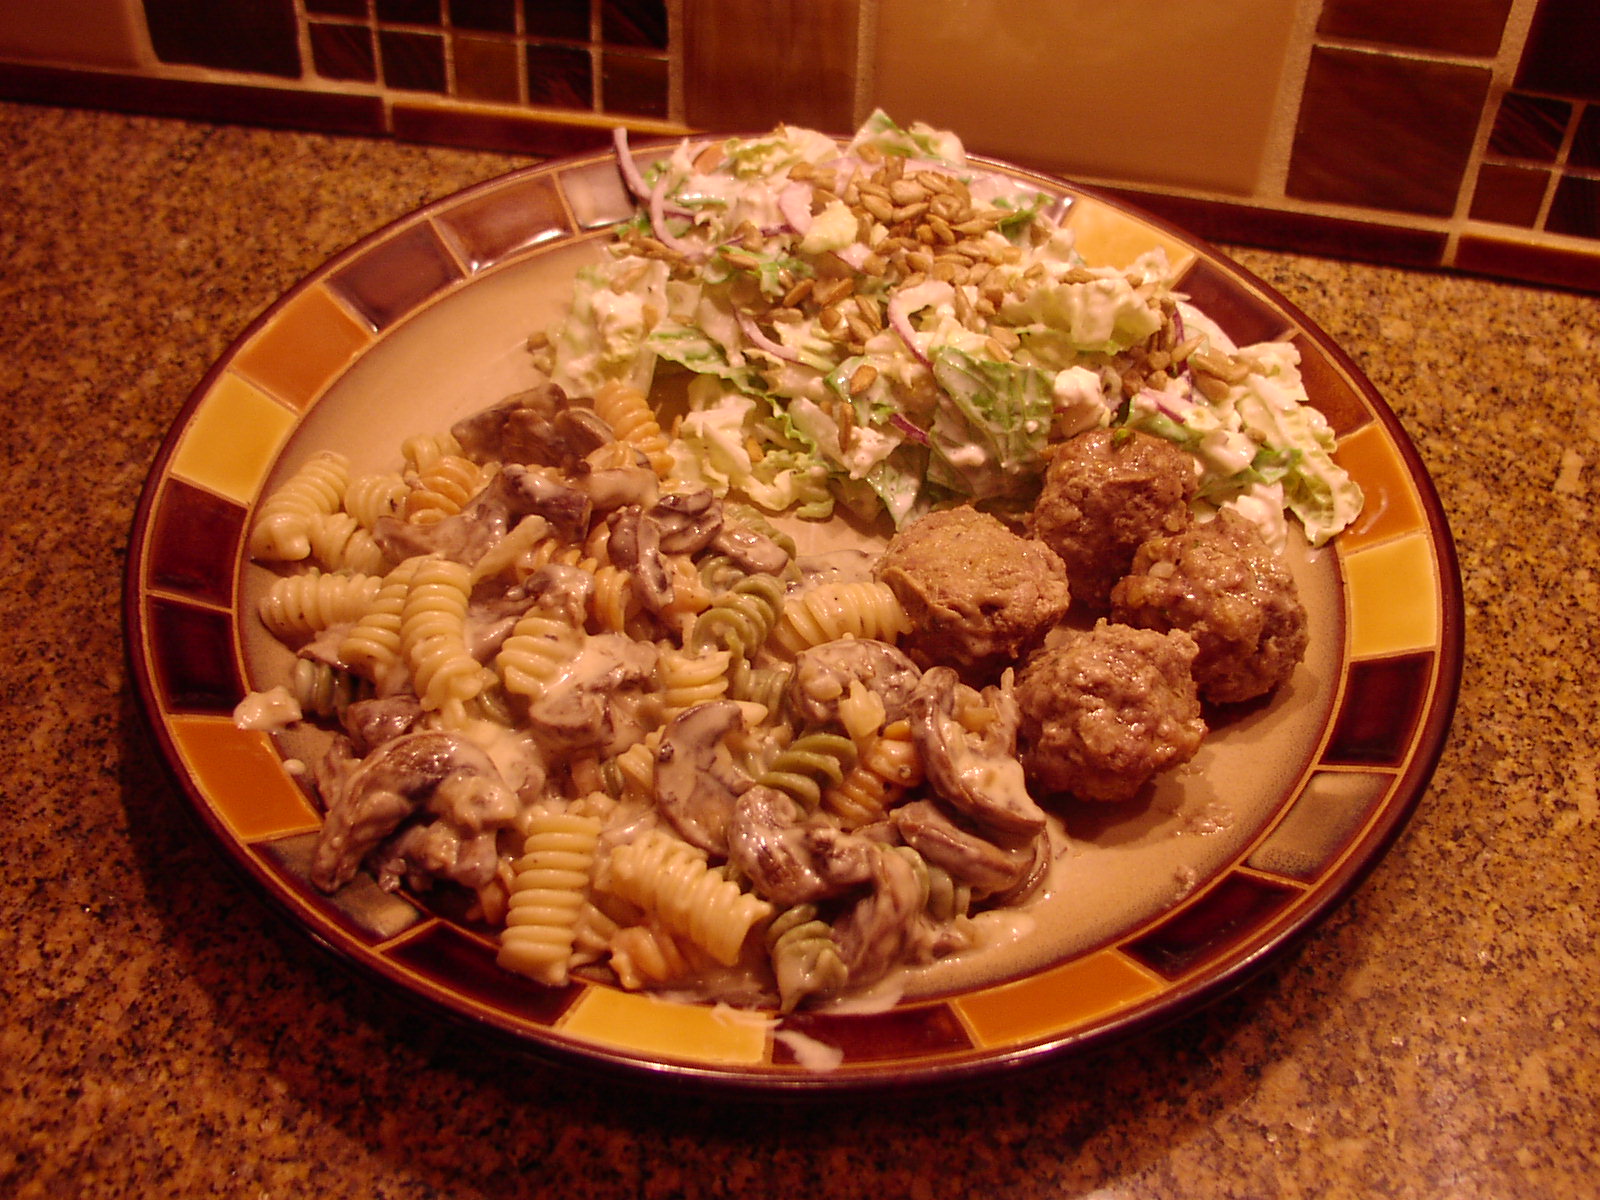
I know I have told you before, but sometimes a food item, particularly a veggie, can get kind of forgotten in my refrigerator. I think it’s because I am always trying new recipes and I focus on the new ingredients to the shameful neglect of what came before. And that’s exactly what happened when I recently discovered 4 very large button mushrooms lurking at the bottom of my vegetable bin. Poor things; they looked absolutely pathetic just lying there, stem side up in their very own blue polystyrene container from Costco. So what to do with these mushrooms? The frugal cook in me just could not throw them to the Gods of yard-waste. They simply did not deserve that fate! And although I know that mushrooms lose their potency over time, they weren’t slimy, so I considered that good enough.

But then, what to do with them? Well, the same thing I almost always do with an ingredient that needs to be surrounded by compatible flavors to make it more enjoyable. I make a pasta dish.

So that’s exactly what I did, and the recipe below is the result. And all hubris aside, this recipe is very, very good. Easy too! And vegetarian, if you use vegetable stock, which is my first choice for this pasta. (The dish actually tastes a lot like a meatless beef stroganoff.)

So if you need an easy recipe for a weeknight pasta dish your entire family will enjoy, pick yourself up some button mushrooms and put some pasta water on to boil. But remember: don’t cook your pasta ahead of time. If need be, make the sauce wait for your freshly cooked al dente pasta.

You know, now that I mention cooked pasta, I should provide you with my own guidelines for what I consider to be perfectly cooked pasta.

So for those of you who were not born knowing the fine nuances surrounding perfection in pasta cooking, I have listed the steps below. For those of you who already know how to cook perfect pasta, or were born with the knowledge, (like that could ever happen), just ignore my well thought out, well written, and helpful instructions!

  • 1 T. extra virgin olive oil
  • 1 small shallot, minced
  • 1 clove garlic, minced
  • kosher Salt
  • freshly ground black pepper
  • 8 lg. or 4 very lg. button mushrooms, cut in half and thinly sliced
  • ¼ c. dry white wine
  • ¼ c. vegetable, beef, or chicken stock
  • ½ c. sour cream
  • ¼ c. grated Parmesan cheese
  • 4 oz. pasta, cooked al dente

Heat the oil in a large skillet over medium heat. Add the shallot, season with salt and pepper and cook until soft. Add the garlic and cook for one minute. Add the mushrooms and cook until the mushrooms are tender and starting to brown, stirring occasionally, about 5 to 7 minutes. Add the wine and cook until all the liquid evaporates. Add the stock and simmer for one minute. Remove the pan from the heat. Whisk in the sour cream. Drain the pasta, reserving about 1 cup of the pasta water, and add the drained pasta to the sauce. Add the Parmesan. Adjust seasoning. (If the pasta seems too dry, add a small amount of the reserved pasta water.) Serve immediately.

Note: This is the perfect amount for 2 hungry adults. The recipe can be doubled or tripled as needed.

Perfect Pasta:

1)      Use pasta which contains at least some semolina flour

2)      Use a large cooking pot

3)      Add cold water (1 lb. pasta = 5-6 quarts of water) to the pot

4)      Cover the pot and bring the water to a rolling boil.

5)      Add kosher salt (about 1-2 tablespoons per pound of pasta)

6)      Add the pasta all at once

7)      Stir immediately with a wooden spoon to prevent the pasta from sticking together and to the bottom of the pan

8)      Bring the water back to a boil as quickly as possible. Then reduce the heat only enough to prevent the water from boiling over on to your stove top. Do not cover the pan.

9)      Continue to periodically stir the pasta so that it cooks evenly

10)   DO NOT RELY ON THE PACKAGE INSTRUCTIONS FOR ACCURATE COOKING TIME. Taste testing is the only way to know when the pasta is al dente. (Al dente means “to the tooth” in Italian and refers to the fact that the pasta has a slight resistance when you bite into it. The pasta doesn’t have a hard center, nor is it soft.)

11)   If you are using the pasta for a hot dish with a sauce (like this recipe), save about a cup of the cooking water, drain the pasta (don’t rinse) and add it to the sauce and serve immediately. (Or you can place the hot pasta on a plate or in a serving bowl or platter and immediately cover with sauce.)

12)   If you are using the pasta for a cold dish (like my recipe for Shrimp and Macaroni Salad or Tuna Macaroni Salad), drain the pasta and immediately rinse with cold water. (Rinsing the pasta serves to both stop the cooking process and remove the thin coating of starch that can cause it to be sticky when cold. This method also works well for lasagna noodles.)