Category Archives: MAIN DISH RECIPES

CHICKEN AND VEGETABLE LO MEIN STIR-FRY

OLYMPUS DIGITAL CAMERA

So, for 10 years (1970-1979) I worked at the International Branch of Seafirst Bank. (Way back before Seafirst became part of The Bank of America (the California based bank that is), which was then subsequently devoured (they called it a “merger”) by what is today known as Bank of America, I had the very great pleasure of working in what was then known as “China Town”.  And along with working in the International District, I got to eat there! (Those were the days my friends!) And that meant that often on a Friday night my husband and kids would drive into town and join me for dinner after work at Tai Tung, our favorite Chinese restaurant.

Now for those unfamiliar with Tai Tung, established in 1935, and I swear, no changes have been made to either the décor or the menu since inception, it was the perfect place to take a family. The food was inexpensive, relatively good, and the atmosphere was perfect for a family with 2 tired parents and 4 hungry children. We all loved going there. So I feel a lot of nostalgia for both the restaurant and Asian food in general.

These days however, I have a slightly higher standard when it comes to the flavor and amount of fat and salt contained in an individual dish. And I find that my new standards can mostly only be attained when I cook the dish at home. (Don’t get me wrong, I still go out for dim sum every chance I get).

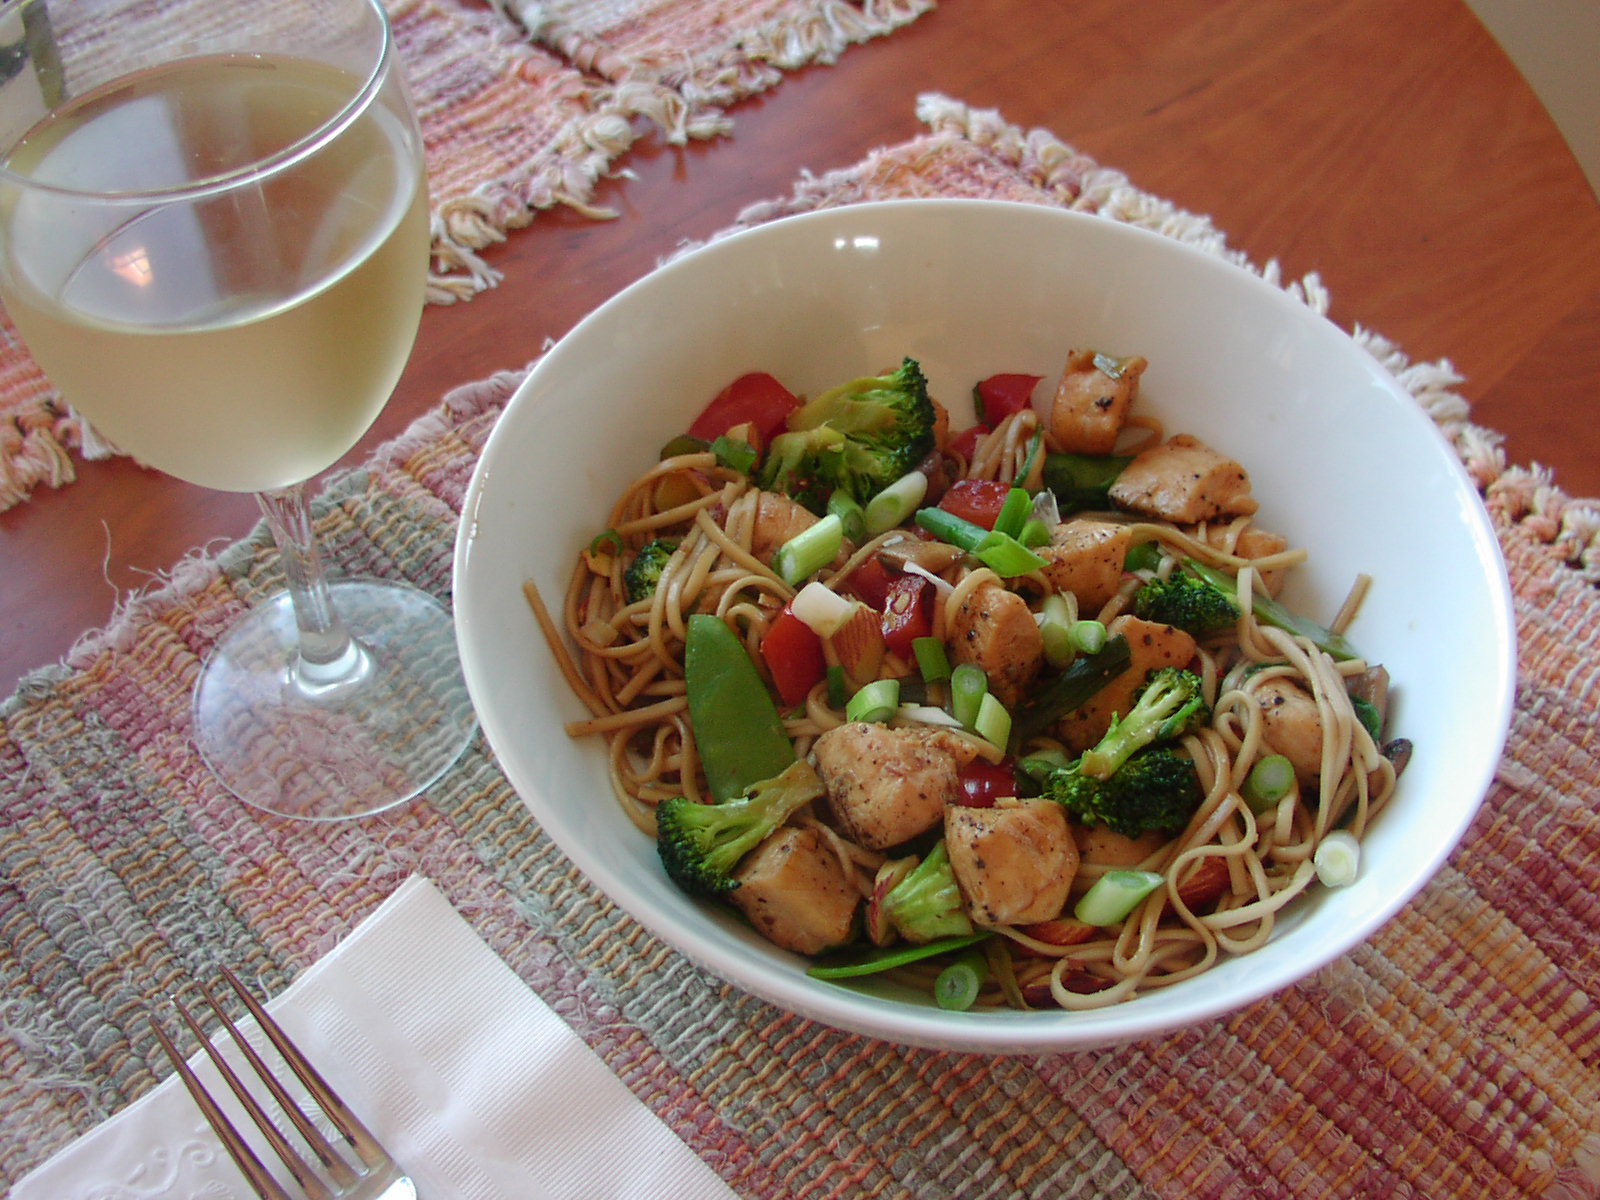
So this recipe is my answer to a meat and vegetable chow mein. Of course, it’s not nearly as greasy, is packed with more flavor and vegetables, less meat and sodium, and no MSG. Other than that, it’s just like the chow mein with soft noodles we used to get at Tai Tung. Anyone want to go out for Chinese?

  • 1 boneless, skinless chicken breast cut into small bite sized pieces (or you can use pork, beef, or shrimp)
  • kosher salt
  • freshly ground black pepper
  • 3 T. butter, divided
  • 1 T. sesame oil
  • 3 c. bite sized pieces of fresh broccoli
  • ½ red pepper, diced
  • 10-12 button mushrooms, thinly sliced
  • 1 bunch or 8 green onions cut on the bias (white and green parts)
  • 1 c. snow peas cut in two on the bias
  • 2 tsp. finely minced fresh ginger
  • 3 garlic cloves, finely minced
  • pinch red pepper flakes
  • 1 can sliced water chestnuts, opt.
  • 1/3 c. good soy sauce (I use GF Tamari)
  • ½ c. dry sherry
  • 2 c. packed fresh spinach or napa cabbage, opt.
  • 8-oz. lo mein noodles, cooked according to package directions (I use Roland brand Organic Lo Mein Noodles)
  • ½ c. toasted slivered or chopped almonds

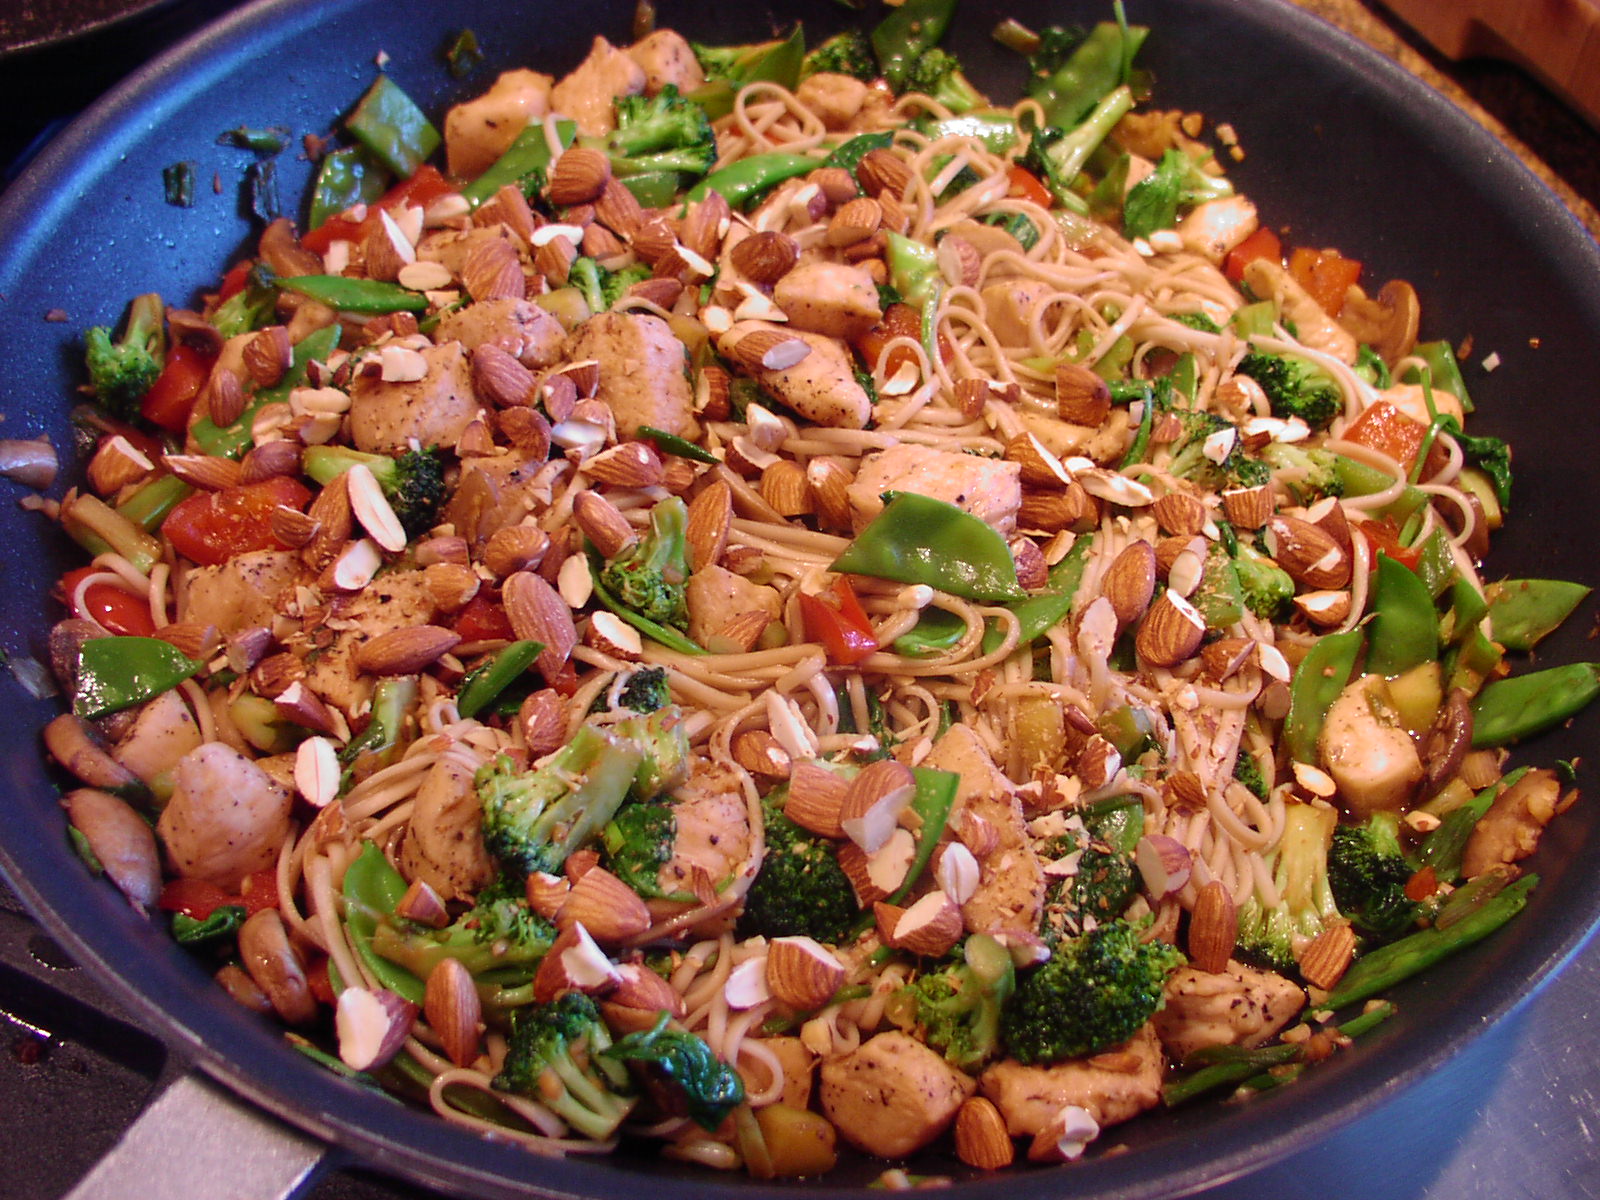
Lightly sprinkle chicken with salt and pepper. In a large fry pan, melt 1 tablespoon of the butter and the sesame oil over medium heat. Add the chicken and brown on all sides. Make sure chicken is cooked through, but do not over-cook. Remove from pan and set aside. Add the broccoli, red pepper, and mushrooms. Sauté for about 2 minutes. Add the green onions, snow peas, ginger, garlic, red pepper flakes, and water chestnuts. Cook for another minute or two. Add the remaining 2 tablespoons of butter, soy sauce, and sherry. Simmer one minute. Add the spinach, reserved chicken, and using a pair of tongs, lift the cooked lo mein noodles directly into the pan with the chicken, noodles and sauce. Toss all together with the tongs.  Sprinkle with the toasted almonds and serve immediately.

OLYMPUS DIGITAL CAMERA

General rule of thumb when preparing a pasta dish that incorporates cooked noodles into a sauce: Never cook pasta ahead of time and let it sit around while the sauce finishes cooking. If anything, have your sauce ready before the pasta has completed cooking. Pasta is always best when cooked just before adding to a sauce and then eaten immediately.


SLOPPY JOES

OLYMPUS DIGITAL CAMERA

Sometimes I truly miss having young children around. I get over it quickly, believe me, but when the urge to eat “kid food” pops up in my brain, I think about my own children growing up and Sloppy Joes! Not that I ever fed Sloppy Joes to my children; only because I was totally unaware of this culinary delight. Even though what appears to be a “Sloppy Joe” recipe (Barbecued Hamburger Mix) is right there on page 292 of my 1961 edition of Betty Crocker’s New Picture Cook Book, I never gave the recipe more than a cursory glance. And seriously, I must have looked at the recipe hundreds of times since I perused my cookbook on an almost daily basis. I’m still trying to fathom how I could possibly have missed the delicious combination of flavors described right there in front of me? Boggles the mind, I’ll tell you that! (BTW – this is not Betty’s recipe.)

And unfortunately, to the best of my knowledge, none of my close friends were turned on to Sloppy Joes either. Or if they were, they sure as heck never served this culinary wonder to my family or I would have snatched up the recipe faster than it takes to say “do you kids want chili, spaghetti, or Sloppy Joes for dinner”?

So next time you are at a loss as to what to fix for dinner, give this recipe a try.  It is economical, fairly nutritious, easy to prepare and truthfully, really delicious – basically a perfect dinner solution after a long day of work.

After all, what parent doesn’t want to serve a dish that takes hardly any kitchen time and is loved by the entire family? For that matter, what retiree on a fixed income doesn’t want the same dish for the very same reasons? Although in our case, we the retired that is, don’t tend to be exhausted from too much work. If we are tired, it’s usually from too much play! (Did I mention that being retired is one of the best things about growing older? That and not really giving a flying fig what others think about who and what you are.)

And for that very reason, the one about not giving a flying fig, I totally enjoyed eating Sloppy Joes in our TV room last night with Mr. C. We watched the first episode in the Granada television series of Sherlock Holmes starring Jeremy Brett. I’m telling you, there is hardly a better combination to celebrate self indulgence than a toasted ciabatta roll loaded with BBQ flavored meat and watching the scintillating plot unfold in an Arthur Conan Doyle mystery. If you doubt my word, try this magnificent combination for yourself. It’s simply elementary my dear reader!

  • 1 T. extra virgin olive oil
  • 1 lb. lean ground beef
  • 1 large onion, diced
  • 1 large red pepper, diced
  • 2 large cloves garlic, minced
  • 1 tsp. dried marjoram
  •  ½ tsp. chili powder
  • 1 tsp. kosher salt
  • freshly ground black pepper
  • 15-oz. tomato sauce
  • ¼ c. ketchup
  • 2 T. packed brown sugar
  • 3 T. Worcestershire sauce
  • 2 T. red wine vinegar
  • 1 T. yellow mustard (don’t even think about using a fancy mustard)
  • 1 tsp. beef base (I use Better Than Bouillon Beef Base)
  • 3 ciabatta, Kaiser, or hamburger rolls, sliced and toasted

In a large covered sauté pan, heat the oil over medium-low heat; add ground beef and sauté until browned. Add onion, pepper, and garlic and continue cooking until onion translucent. Add marjoram, chili powder, salt, pepper, tomato sauce, ketchup, brown sugar, Worcestershire sauce, vinegar, mustard, and beef base. Bring to a boil, reduce heat, partially cover and let simmer until sauce is thick, about 30 minutes. When ready to serve, ladle on top of your buns of choice. Serve immediately. Great accompanied by your favorite coleslaw, thick potato chips (if you have kids) and of course, a nice cold beer (not for the kids).

CHICKEN ALA ROCK

OLYMPUS DIGITAL CAMERA

Since July of 2008, Mr. C. and I have been hosting vocal jazz artists from around the world in our home. Often the artists stay the night with us, as was the case with Chris McNulty in May of 2009.  And the next morning over coffee and a lingering breakfast, Chris and I started talking food. (Well, of course we did!) She shared with me her amazing and truly unique recipe for just about the best chicken you could ever hope to taste.

She and her husband Paul Bollenback, the fabulous jazz guitarist, had to leave shortly after breakfast so that left me plenty of time that afternoon to gather the recipe ingredients for this dish including one perfect garden variety rock. (Excuse the pun.) Yep, you heard right! A plain old fashioned, just the right size, good and heavy rock.

So that very evening I prepared this incredible dish for the first time. I must say, I was a bit skeptical about the peperoncini, and I worried about the chicken burning, but my fears turned out to be completely unfounded. (Notice the use of a big old rock from the yard didn’t worry me at all!) The chicken came out ultra tender and moist, and the flavor from the mustard, peperoncini, and roasted red peppers was divine.

So go on out in your yard or take a walk in the woods and find yourself a rock. (I suggest you measure the pot you are going to use to contain the rock before you go a gathering.) And then give this recipe a try. I guarantee you will not be disappointed. Oh, and wash your rock before you use it. You just never know where that rock has been during the last several million years!

  • 1 whole fryer, cut into 8 pieces or 8 bone-in, skin-on chicken thighs*
  • 2 T. grainy mustard
  • 2 T. extra virgin olive oil
  • ¼ tsp. red pepper flakes
  • 1½ tsp. kosher salt
  • freshly ground black pepper
  • 1 frying pan large enough for chicken (single layer)
  • ¼ c. peperoncini rings, with a little juice
  • 2 roasted red peppers cut into large pieces
  • aluminum foil
  • 1 very heavy pan that fits in frying pan
  • 1 very large rock (yes the kind you find in your yard) that fits in heavy pan
  • chopped fresh parsley, opt.

*if you use bone-in, skin-on chicken thighs, I suggest you do what I do. Using a pair of kitchen shears cut away most of the skin and fat. I leave just enough skin to barely cover the chicken with just a little of the meat showing around the edges. There will still be plenty of skin to brown nicely and you will have eliminated a great deal of calories totally unnecessary to the enjoyment of this dish. (Actually I cut away most of the skin anytime I use chicken thighs.)

Combine mustard, olive oil, red pepper flakes, salt, and pepper in a small bowl. Slather all over the chicken pieces and place them skin side down in cold frying pan. Sprinkle the chicken with the peperoncini rings and the roasted red pepper pieces.

OLYMPUS DIGITAL CAMERACover with a piece of aluminum foil large enough to fit down over the chicken and extend over the sides of the frying pan.

OLYMPUS DIGITAL CAMERAPlace frying pan on stove. Place the very heavy pan on top of the aluminum foil. Place the rock in the pan. (Actually you can place the rock in the pan before putting it on the chicken.)

OLYMPUS DIGITAL CAMERATurn the heat on medium low and walk away for 30-35 minutes. Remove the pan and rock. Carefully remove the aluminum foil (as the steam first escapes it is very hot) and gently turn the chicken. (If there is liquid, remove 98% of it before browning the second side of the chicken.) Turn up the heat and cook chicken for an additional 5-10 minutes. (Don’t turn the chicken at this point and don’t worry that the second side is not the amazing brown of the first side.) Just sprinkle it with fresh parsley and serve it to anyone you truly love.

For more information on home concerts in the Seattle area, visit our website www.jazzvox.com


STEAK AU POIVRE (PEPPERCORN STEAK)

The steaks – medium rare
The cognac sauce

So, we don’t eat steak very often but when we do we go all out. And this is one of our favorite ways to enjoy this rare treat. And I do mean rare! I actually used to order or cook my steak very, very rare, in fact almost so rare that you could hear an echo of mooing in the background! But over the years I have learned that the best way to cook or order a steak is medium rare. (Mr. Cs more refined palate preferred medium rare steaks all along. It just took me longer to realize that medium rare was the perfect way to appreciate steak.)

Cooked to an internal temperature of about 125-130 degrees, a good steak is tender, juicy, and full of flavor. Cook it past 160 degrees or higher, and your beautiful cut of meat will become tough, dry, and flavorless, basically fit only for Fido, who might actually reject it, or your compost heap (most likely won’t reject it)!

And I know there are those who prefer their steak well done. If you happen to know someone like that and you are doing the shopping and cooking for this person, order lovely cuts of well marbled steak for anyone else. For the person who likes his/her steak well done, buy a cheaper cut of meat. Believe me, they will be none the wiser. Regardless of what you start with, past 160 degrees any superior qualities that were in the meat to begin with are now relegated to history.

Of course, even if you or one of your family members or guests likes massacred meat, the Steak au Poivre sauce will still be a delicious accompaniment. The sauce is easy to prepare and a perfect complement to the peppery crust on the steak.

So however you like your steak cooked, give this recipe a try. And if I have offended you in any way by my opinionated comments regarding your or a loved one’s idea of how a steak should be prepared, please forgive my culinary fervor! It’s just my opinion after all. Well, to be truthful, it’s how most connoisseurs feel about over cooked steak. Oh, never mind!

  • 2 New York, filet mignon, or rib eye steaks, cut 1¼-inch thick
  • kosher salt
  • 1 – 2 T. coarsely ground black pepper (depending on size of steaks)
  • 2 T. butter, divided
  • 1 T. extra virgin olive oil
  • ¼ c. finely chopped shallots
  • ½ c. beef broth
  • ¼ c. Cognac or brandy
  • 1 T. heavy cream

Pat the steaks dry with paper towels. Sprinkle liberally with salt and then press the black pepper evenly on both sides. (If your steaks are quite large, you will probably need 2 tablespoons of cracked pepper. You want a nice “pepper crust” on the steaks.) Heat 1 tablespoon of the butter and the oil in a large sauté pan over medium-high heat until the butter almost smokes. Place the steaks in the pan and lower the heat to medium. Cook the steaks for 3-4 minutes on 1 side and then for about 3 minutes on the other side, or until the internal temperature is about 125-130 degrees depending on how “rare” you like your medium rare. (See meat temperature chart below.)

Remove the steaks to a serving plate and cover tightly with aluminum foil. Meanwhile, add the shallots and cook over medium heat for 2 minutes. Add the beef broth and cook over high heat for 4 to 6 minutes, until reduced by half, scraping the brown bits from the bottom of the pan. Add the Cognac and cream; cook for 2 more minutes. Off heat, swirl in the remaining tablespoon of butter and adjust seasoning. Serve the steaks with the sauce poured on top.

Meat (Beef)Temperature Chart in Degrees F

  1. Rare                    120-125
  2. Medium-Rare    130-135
  3. Medium             140-145
  4. Medium-Well    150-155
  5. Well done          160 and above


CHICKEN PICCATA

OLYMPUS DIGITAL CAMERA

And yes, I know I post a lot of recipes for chicken! But we eat a lot of chicken, so continue reading as I explain why that is so.

Besides being a delicious and versatile culinary ingredient, according to the fitday website, “chicken is a great source of protein. One 6 oz. serving of chicken contains 48 g of protein. It is also rich in potassium, calcium, and contains no carbohydrates. The nutritional makeup of chicken makes it a healthy, filling food option. By eating healthy cuts of chicken, you’ll consume only a small amount of calories and your stomach will stay full for hours. This decreases your likelihood of snacking on unhealthy foods later in the day”.

Also, according to fitday (and I paraphrase) “dark meat, which sometimes gets a bad rap because it contains more calories than white meat, isn’t quite as unhealthy as you may have been led to believe. Dark chicken meat is rich in myoglobin, a compound packed with iron found in muscle cells. The dark meat parts of the chicken, like the chicken’s legs, are rich in myoglobin, whereas white meat chicken contains no myoglobin at all. Dark chicken meat also contains more zinc and B vitamins than white meat.” Bottom line:   dark chicken meat contains more calories and fat than white meat, but packs greater nutritional value. White meat is less caloric and to my mind, a more adaptable ingredient.

So if you are like me and trying to cook with healthier ingredients, start adding more chicken to your diet. And for a couple of recipes that feature dark chicken meat, try my recipes for Green Pozole with Chicken and Oven Chicken Fricassee.

So give this quick and easy recipe for the indomitable Gallus domesticus a try. The sauce is a snap to prepare and tastes absolutely lovely. Serve with a side dish like Lemony Guinoa with Fresh Herbs or simple mashed or boiled potatoes and a green salad or green veggie, and you will make everyone in your household happy campers.

And if you wonder why I mostly write my recipes as if I am only serving 2 people with perhaps a planned over or two, it’s because I mainly cook for just Mr. C. and myself. And remember – it’s just really all about me! But fear not; in most cases my recipes can be doubled or tripled with absolutely no problem. And if in doubling or tripling a recipe there should be a problem, I am a decent enough person to tell you so in advance! If I remember to do so, that is!

  • 2 boneless, skinless chicken breasts
  • ½ tsp. kosher salt
  • freshly ground black pepper
  • 2 T. flour
  • 1 T. vegetable oil
  • ¼ c. dry white wine (I use Pinot Grigio)
  • 1 garlic clove, minced
  • ½ c. chicken broth
  • 2 T. fresh lemon juice
  • 1 T. capers
  • 2 T. butter
  • 3-4 thin Lemon slices
  • 1 T. chopped fresh Italian parsley

Cut each chicken breast into three pieces. First cut off the thinner end. Then slice the thicker end in half horizontally. Dry off the chicken pieces with paper towels and sprinkle lightly with salt and pepper. Place the flour in a bag, add the chicken pieces and shake well to coat. When the chicken pieces are evenly coated, place them in a medium sized frying pan that has been heated and the bottom coated with the vegetable oil. Add the chicken pieces and cook for about 2 minutes on each side or until light brown and done. Do not overcook. Remove to a plate. Tent the chicken with aluminum foil to help retain heat. Deglaze the pan with wine and add minced garlic. Cook until garlic is slightly brown and liquid is nearly evaporated, about 2 minutes. Add broth, lemon juice, and capers. Reduce to about 1/4 cup. Add butter and sliced lemons. Once butter melts, pour sauce over cutlets and garnish with parsley.


BAKED CHEESE OMELET WITH SPICY TOMATO SAUCE

OLYMPUS DIGITAL CAMERA

OLYMPUS DIGITAL CAMERA

Breakfasts have always been my bugaboo. What to serve that takes literally minutes to prepare, offers variety, while at the same time supplying enough protein and complex carbohydrates to jump start our day? (I know, many of you maintain that coffee fulfills that need, but some of us truly need more than caffeine to get our engine running!) So for me, preparing a breakfast that is both interesting and nutritious is a mighty big challenge; mainly because I don’t really start functioning productively until about 11:00am. (You guessed it – I am not a morning person!) So anytime I can prepare something as tasty as this omelet, I am in happy breakfast heaven.

This recipe is as close to a dish my mother used to serve, all too infrequently unfortunately, for Sunday dinners. We lived on a farm, and as many families did in the 40s, 50s, and 60s, we had our main meal after church and then a small repast in the evening. My mother was not a very good or inventive cook, but boy could she prepare a good omelet. And every time she would serve this dish, I would gobble it up like there was no tomorrow.

So the other day I decided to try and replicate her recipe. (I know – why did I wait so long?) So first I tried using Ro*Tel in my sauce, the second picture at the top, but it wasn’t the flavor I wanted. So this morning I made the sauce using plain old tomato sauce. Viola! Just as good as moms! So although the first picture shows the right sauce, I served it over simple scrambled eggs. Confused, let me paraphrase what I just said. The sauce in the first picture should be served with the omelet in the second picture. And yes, I am lazy and should have made the omelet again, but this is a really busy week for me. (Concert in two days and I’m still working on memorizing all the words.) Besides I know that only intelligent, busy, productive people follow my blog. No doubt in my mind that my efficiency measures would make complete sense to one and all!

So next time you want to serve a wonderful dish perfect for breakfast, lunch or dinner, whip up this easy omelet and the yummy sauce. Serve it with toast or warm tortillas and fresh fruit, and you will have a meal your entire family will enjoy.

  • 2 tsp. + 3 T. butter, divided
  • ¼ c. diced green bell pepper
  • ¼ c. minced onion
  • 1 lg. garlic clove, minced
  • 1 (8-oz.) can tomato sauce
  • 7-8 crushed red pepper flakes
  • pinch dried oregano (Mexican preferably)
  • freshly ground black pepper
  • 8 lg. eggs
  • ½ c. 2% milk
  • ½ tsp. kosher salt
  • 8-oz. grated cheddar cheese, Monterey Jack, or mozzarella cheese (or combination), divided
  • Mexican sour cream, opt.

In a small sauce pan, melt the 2 teaspoons butter over medium heat. Add green pepper and onion; sauté for about 3 minutes. Add garlic and cook for one minute or until garlic releases its aroma.  Stir in the tomato sauce, red pepper flakes, oregano, and black pepper.  Simmer until the sauce is thick, about 7-8 minutes.

Meanwhile, beat the eggs, milk, and salt together. Stir in about 2/3rd of the grated cheese. Melt the remaining 3 tablespoons butter in a heavy 10 to 11-inch ovenproof pan and pour in the egg mixture. Bake in a pre-heated 400 degree oven for 15 to 20 minutes. When the egg is set, the omelet is done.

OLYMPUS DIGITAL CAMERA

Serve generously slathered with Spicy Tomato Sauce and garnished with remaining cheese and sour cream. I like to serve freshly baked flour tortillas and fresh fruit on the side. Serves 4 adults very nicely.


CARNE ADOVADA (MEXICAN PORK AND RED CHILI STEW)

OLYMPUS DIGITAL CAMERA

When I started my latest mini-series on stews, the rain was beating down and snow was imminent. Today however, the sun is shining, the water in Port Susan Bay is a light dusky blue, and Mt. Baker*, Three Fingers, and Glacier Peak are out in all their glory. (I love the term “out” in connection with a mountain being visible. As if when it’s not visible it’s “in” or “gone”? Yet another example of the vagary consistent within the English language.) But back to the recipe. (Sometimes it’s almost impossible for me to stay on track.) Now, where was I? Ah yes – stew.

I came across this recipe (or my take on a combination of adovada recipes) while I was researching stews from around the world. What interested me the most about this dish was the use of different and totally unfamiliar chilies. So I went on line and ordered the chilies I needed from a specialty site. I patiently waited until they arrived, and taking the advice of several people who had made comments on the recipes I lifted, I began my journey into adovada land. It was wonderful, but I had used all the guajillo chilies I had ordered in just my first batch of this stew. So just for grins and giggles I decided to see if I could purchase more at one of my local grocery stores. Low and behold, I had no trouble finding them in Stanwood. Yeah team! Needless to say I was delighted.

Now something you should know. This is a very rich stew, and a small portion goes a long way. In fact, the next time I serve it, I am going to think of it as a side dish. Actually, a small serving would be just perfect, not to mention economical served with Refried Beans, Classic Coleslaw, warm flour or corn tortillas, and a Margarita or cold beer.

So next time you are hungry for traditional Mexican food and don’t want to make a trip to your local Mexican restaurant where pretty much everything tastes the same regardless of what you order (oh oops, did I say that out loud), give this dish a try. I promise you that it will have the authentic Mexican taste we all crave and typically can’t find at a restaurant. OK, if you live in Denver, New Mexico, or Texas you can probably find great Mexican food on every corner. But not so much in many parts of the US.

So take the time some rainy Saturday to create a Mexican fiesta for your family and friends. Good Mexican food takes time to build, but it is well worth the effort. Buen provecho!

*For those of you not familiar with the glorious northwestern part of Washington State, Mt. Baker is in the most northern part of the Cascade Range or North Cascades. Mt. Baker is the mountain shown at the top of my home page (using the zoom feature on my camera) as it appears from my kitchen sink. And yes, I do know how lucky I am!

  • 9 dried guajillo chili peppers* (about 2-oz.)
  • 4 dried chile de árbol **
  • 4 c. chicken broth
  • 1 tsp. ground cumin
  • 1/8 tsp. ground cloves
  • 2 lb. pork shoulder, cut into 1-inch cubes (extra fat and silver skin removed)
  • kosher salt
  • freshly ground black pepper
  • 2 T. corn or vegetable oil
  • 1 large yellow onion, chopped
  • 6 garlic cloves, minced
  • 1 T. dried oregano, preferably Mexican oregano

In a dry skillet, toast the chili peppers over medium high heat until they are slightly puffed and fragrant. (Be careful not to burn the pods or they will become bitter.) Let cool. Rip off the stems of the dried chili peppers and empty out all of the seeds. (Feel free to cut a slit into each chili if it helps to remove the seeds.) Pour 3 cups of the chicken broth into a pot; add the cumin, cloves, and the toasted chilies. Bring the mixture to a boil, reduce the heat and simmer for about 30 minutes or until both types of chili pods are fully rehydrated. Remove from heat and cool. When cool, carefully pour the liquid and re-hydrated chilies into a blender or food processor and process until smooth. Set chili sauce aside.

Meanwhile pat the meat dry with paper towels and season with salt and pepper. Heat oil in a heavy covered Dutch oven. Add the meat in single layers and brown thoroughly on all sides. Remove meat to a bowl. (Add more corn oil during the browning process if required.) When all the pork is browned and removed from the pan, add the onion and cook until soft. Next add the garlic and oregano and cook for about a minute or until the garlic releases its aroma. Add the browned meat back into the pot along with the chili sauce. Use the last cup of chicken stock to “wash out” the blender or food processor bowl and add liquid to the Dutch oven. Stir well to bring up all the browned bits from the bottom of the pan. Bring stew to a boil, remove from heat, cover, and place in a pre-heated 325 degree oven for 2 hours or until the meat is very tender. Stir after one hour, taste and adjust seasonings; add a small amount of water if necessary. (You want the stew to be moist but not so soupy that it can’t be served on a regular plate. See picture above.)  When the meat is fork tender, remove the pan from the oven and serve.

Note: Carne Adovada is also wonderful when used as a filling for burritos, enchiladas, or tacos.

*The Guajillo Chili Pepper is the most common chili in Mexico after the Ancho. The flavor is distinct, slightly fruity with a strong piney, berry under taste. The chili measures 3 to 5 inches in length and is about an inch wide. The color is a brick red with deep burgundy tones with a smooth, shiny skin. Dried Guajillo Chili peppers can be located in the ethnic food section of most grocery stores.

**The Chile de árbol is a small and potent Mexican chili pepper also known as bird’s beak chili and rat’s tail chili. These chilies are about 2 to 3 inches long, and ¼ to 3/8-inch in diameter. They can be purchased in most good sized grocery stores.


CREAMY CREOLE SHRIMP WITH CHEESE GRITS

OLYMPUS DIGITAL CAMERA

If there is anything better than cheesy grits covered with a savory sauce and perfectly cooked shrimp, will someone please tell me what it is? I mean really! I truly believe grits are manna from heaven.  And then when you doctor them with some butter and a wee bit of sharp cheddar cheese, well who in their right mind can resist? And Creole seasoning? Whoever invented this combination of herbs and spices should be canonized. And I’m not even catholic! But I would vote to make this person a saint in the time it takes roux to go from caramel colored to burnt! And believe me, that’s only a matter of seconds!

I have actually been trying to perfect a saucy, semi-spicy shrimp over grits dish for quite some time now. I have pages of recipes copied off the internet and have made several attempts to make the perfect sauce (poor Mr. C.).  Some sauces call for the addition of andouille sausage, which by itself I love. But I don’t particularly care for the combination, so I checked that duo off my list. Finally, last evening, I prepared a sauce I can truly say is delicious. It includes simple ingredients, but I must confess it will never be featured on 30 Minute Meals. It does take time to prepare, but I am telling you, it is worth the time and effort. Actually next time I make it, I am going to double the recipe and put half in the freezer. And I know, it looks like there will be a lot of sauce, but not the case. The amount of sauce is perfect for 3 healthy adult servings.

So if you like Cajun or Creole food, give this recipe a try. And in case you are worried about the spice level, don’t. The sauce is not overly spicy nor does the flavor overwhelm the delicate flavor of the shrimp. And for those who like their food spicier, there is always hot sauce!

  • 1 lb. unpeeled, medium-size raw shrimp (26/30 count)
  • 3 c. water
  • 5 T. vegetable oil, divided
  • 1/3 c. flour
  • 1 medium onion, finely chopped
  • 2 stalks celery plus leaves, chopped
  • 1 medium-size green bell pepper, chopped
  • 2 cloves garlic, minced
  • ¾ tsp. chopped fresh thyme
  • 3 T. tomato paste
  • 1 tsp. lobster base – Better Than Bouillon or Knorr (more expensive, but worth it)
  • 1 bay leaf
  • 1 T. Creole seasoning, divided (I use Emeril’s Essence – see recipe below)
  • ¼ tsp. kosher salt
  • freshly ground black pepper
  • 1½ tsp. Worcestershire sauce
  • 2 T. heavy cream
  • 2 green onions, thinly sliced on the diagonal, opt.
  • 2 T. chopped fresh Italian parsley, opt.
  • hot sauce, opt.

Peel shrimp, reserving shells; devein shrimp. Set aside. Bring shells and water to a boil in a medium saucepan over medium-high heat; reduce heat to low, and cook 20 minutes. Pour shrimp broth through a colander over a large bowl, pressing shells with back of a spoon; discard shells. Reserve the shrimp broth.

Heat 4 tablespoons of the vegetable oil in a Dutch oven over medium heat; stir in flour, and cook, stirring constantly, until flour is caramel colored (about 15 minutes). Add onion, celery, green pepper and cook, stirring often, 5 to 7 minutes or until vegetables are tender. Add the garlic and thyme; cook until you can smell the garlic, about 1 minute. Stir in the shrimp broth, tomato paste, bay leaf, 2 teaspoons of the Creole seasoning, salt, couple grinds of pepper, and Worcestershire sauce. Reduce heat to low, and cook, stirring occasionally, for 45 minutes. Meanwhile pour the remaining 1 tablespoon vegetable oil in a medium size fry pan. Season the shrimp lightly with salt, pepper, and the remaining 1 teaspoon of Creole seasoning. Add shrimp to hot oil and cook only until done. Do not over-cook. Set aside. After the sauce has burbled away for 45 minutes or so, stir in the heavy cream. If sauce is too thick add a bit of water. Add the cooked shrimp and adjust seasoning. When ready to serve, spoon Cheese Grits (see recipe below) into the bottom of a shallow soup bowl. Ladle the shrimp and sauce on top. Serve with green onions, chopped parsley, and hot sauce available on the table. Cornbread and a nice hearty beer or merlot are great accompaniments.

Cheese Grits:

  • 1½ c. milk
  • 1½ c. water
  • ½ tsp. kosher salt
  • ¾ c. quick-cooking grits
  • 1 T. butter
  • ¾ c. sharp cheddar, grated

Bring milk, water, and salt to a boil in a saucepan over high heat. Gradually whisk in grits. Reduce heat to low, and simmer, stirring occasionally, 10 to 12 minutes or until thickened. Remove from heat and stir in the butter and cheese. Adjust seasoning. If you like thinner grits, add a little more milk before adding the butter and cheese.

Emeril’s Essence Creole Seasoning:

  • 2½ T. paprika
  • 2 T. salt
  • 2 T. garlic powder or granulated garlic
  • 1 T. freshly ground black pepper
  • 1 T. onion powder
  • 1 T. cayenne
  • 1 T. dried oregano
  • 1 T. dried thyme

Combine all ingredients and store in an airtight container.


SAVORY CHICKEN BREASTS WITH MUSHROOMS AND PEARL ONIONS

OLYMPUS DIGITAL CAMERA

OK, you all know I love to mess with recipes and then foist them off, I mean share them with all of you. But there are just those evenings when I really don’t want to think, much less be inventive. I just want to cook something that’s new and easy to prepare. That’s the reason I subscribe to Cooking Light. I know I can almost always find several recipes in each issue that I know, just by looking at the list of ingredients, are going to be delicious and right up my alley. I guess if truth be known, I have a relatively narrow scope on the food I cook. I’m not usually prone to use exotic ingredients (except I must confess some of the stew recipes I’m working on include some new and exciting herbs and spices). And frankly there are even some veggies available on the market today that I have no desire to even try, much less incorporate into my recipes. (Dandelion greens (I hate dandelions), salsify and kohlrabi quickly come to mind.) And because I’m getting older and more aware of what I put in my mouth, I now tend to cook with less beef and pork and more fish, chicken and veggies (“normal” veggies that is).

So as I was perusing the latest issue of Cooking Light one afternoon, I came upon this recipe for chicken breasts. I had all the ingredients on hand (well actually I had to steal the pearl onions out of a frozen package of petite peas and pearl onions I had in my freezer), but everything else was in its original and pristine form. So I decided to put my brain on cruise control, cook dinner while enjoying one of Mr. C’s fabulous martinis, and prepare this new recipe, courtesy of Cooking Light, as written!

And truly, I wish I could say I stayed with my original plan. But it is almost impossible for me to leave a recipe alone! But I didn’t change much. I just used half the chicken called for, a few less onions and mushrooms, but prepared the amount of sauce as written. (I love sauce more than life itself, I swear!)

So for all of you out there who love a simple but glorious chicken cutlet, this is the recipe for you. It’s quick and easy to prepare and the delicate sauce is simply delicious.

We enjoyed this dish with simple boiled red potatoes and buttered petite peas. (Well we had to have the peas, didn’t we? After all, I had stolen their buddies (those darling little pearl onions), so I felt almost obliged to use the peas too! Actually, they were the ideal veggie to serve with the chicken. I love it when inspiration comes from the simplest of tasks – like stealing pearl onions from a package of peas. Who’d have guessed?)

  • 2 boneless skinless chicken breasts
  • kosher salt
  • freshly ground black pepper
  • 3 T. flour
  • 2 T. olive oil, divided
  • ½ c. frozen pearl onions, thawed and drained
  • 8 button mushrooms, quartered
  • 2/3 c. brandy
  • 1 c. chicken stock
  • 2 tsp. cornstarch
  • 1 T. butter
  • 1 tsp. fresh thyme leaves

Cut each chicken breast into three pieces. First cut off the thinner end. Then slice the thicker end in half horizontally. Between the 2 breasts you will come out with 6 fairly same size pieces. (I’ve always loved math!) Dry off the chicken pieces with paper towels and sprinkle lightly with salt and pepper. Place the flour in a bag, add the chicken pieces and shake it up baby! When the chicken pieces are evenly coated, place them in a medium sized frying pan that has been heated and the bottom coated with one tablespoon of the olive oil. Add the chicken pieces and cook for about 2 minutes on each side or until light brown and done. Do not overcook. Remove to a plate. Tent the chicken with aluminum foil to help retain heat. Add the remaining 1 tablespoon oil to the pan and add the pearl onions and mushrooms; season lightly with salt and pepper and sauté until browned, about 6 minutes. Remove pan from heat. Add the brandy to pan and bring mixture to a boil. (Helps if you remember to turn the heat back on under the pan.) Cook until liquid mostly evaporated. Whisk together the chicken stock and cornstarch and add to the pan. Stir until sauce is thick and hot. Remove from heat and whisk in the butter and fresh thyme. Adjust seasoning. Add the chicken and serve immediately.

GREEN POZOLE WITH CHICKEN

OLYMPUS DIGITAL CAMERA

Since winter is going to be with us for a while longer (it’s actually snowing as I write), I thought I might add a few more stew recipes to my blog for your culinary edification. And since most countries have their own take on “stew”, I thought I would bring you along on my quest for beloved stew recipes from around the world.

I have already posted Carbonnade (Germany), Beef Bourguignonne (France), Poulet Au Vin Blanc (France), Irish Lamb Stew (Ireland), and from the good old USA, Chicken and Dumpling Stew, Beef Stew, and Creamy Oyster Stew.  Today I am going to share with you my take on a classic Mexican stew –pozole.

I actually got this recipe from Mr. C. He had just come home from a tango rehearsal at one of the other musician’s homes, and she (Ruthie) had served this wonderful stew after rehearsal. Well needless to say, Mr. C. was so impressed with the dish that he requested a copy of the recipe. (I have him very well trained!) As it turns out, the recipe was posted on the Epicurious site in 2003. Of course I made a few changes based on ingredients that I knew I could purchase at my local grocery store. I also ramped up the flavor a bit by starting with chicken stock rather than plain water. I also tried to stick to as few pots as possible. (The first time I made this stew I had every pot I owned dirty by the time the stew was done! Not the best use of my time or energy. So the changes I made were both efficiency measures and time reduction methods. I love to cook, but I don’t appreciate performing steps that make no difference to the final result.)

So below is my recipe for Green Pozole with Chicken. Now something you should know before you follow me into Mexican food heaven. I have never tasted another pozole stew, so all I really know is that whatever it is that I made tastes really, really good.

So, if you happen to be a pozole connoisseur, I would appreciate your comments. (And yes, before you jump all over me for not including green pumpkin seeds in my recipe, I know they should be included. But if you can find hulled green unroasted pumpkins seeds on Camano Island or even in the burgeoning metropolis of Stanwood, then you are a better shopper than I. And don’t even go there with me about using dried epazote as a first choice over oregano!) Comments/questions?   chezcarrcuisine@wavecable.com

  • ½ c. dried white corn posole (hominy)*
  • 5 c. water
  • 5 tsp. Knorr Caldo de Pollo (chicken flavor bouillon- located in the ethnic food section of most grocery stores – yellow label, green lid) or regular chicken stock
  • 1 celery stalk, rough chopped
  • 1 carrot, rough chopped
  • ¾ large onion, chopped, divided
  • 3 garlic cloves, minced, divided
  • 1 small Turkish or ½ California bay leaf
  • couple grinds of black pepper
  • 1 tsp. kosher salt, divided
  • 1½ lb. boneless skinless chicken thighs
  • ½ lb. tomatillos, husked
  • 1 jalapeño chile pepper, quartered (including seeds)
  • 6 T. chopped fresh cilantro, divided
  • ½ tsp. oregano (preferably Mexican), crumbled
  • 2 T. cornstarch
  • cubed avocado tossed with lime juice, opt.
  • lime wedges, opt.

*Use 15-oz. of canned hominy if in a hurry, but taste and texture are just not as good as when you start with dried pozole.
Place dried hominy in a non-reactive container and cover with water; soak overnight. Next day, boil posole in salted water for approximately 2-2½ hours or until tender. Drain.  Meanwhile bring the 5 cups of water, chicken bouillon, celery, carrot, half of the chopped onion, half of the minced garlic, bay leaf, black pepper, and ½ teaspoon salt to a boil, covered, in a large heavy pot; reduce heat and simmer 10 minutes. Add chicken and poach at a bare simmer, uncovered, until chicken is just cooked through, about 20 minutes. Transfer chicken to a cutting board to cool. Pour broth through a fine-mesh sieve into a large bowl, discarding solids, and reserve stock. When chicken is cool enough to handle, coarsely shred with your fingers.

Using the same pot, simmer tomatillos, remaining onion (except for about a quarter cup reserved for garnish), and 1 cup of the reserved chicken stock together, covered, until vegetables are tender, about 10 minutes. Gently pour the soft vegetables into a blender or food processor along with the jalapeño, 2 tablespoons of the chopped cilantro, oregano, remaining garlic, and remaining ½ teaspoons salt. Whirl until well blended. Pour back into the pot and cook uncovered, stirring frequently, until thickened, about 10 minutes. Combine corn starch and 1 cup reserved broth, add to purée and simmer for 5 minutes. Stir in shredded chicken, hominy, and remaining reserved broth and simmer, partially covered for 20 minutes. Stir in remaining 4 tablespoons cilantro and adjust seasonings. Serve pozole in bowls garnished with reserved onion (really a must), avocado, and lime wedges. Lovely with cornbread on the side; a nice cold beer too!