Category Archives: MAIN DISH RECIPES

ASIAN MARINATED SEARED TUNA

OLYMPUS DIGITAL CAMERA

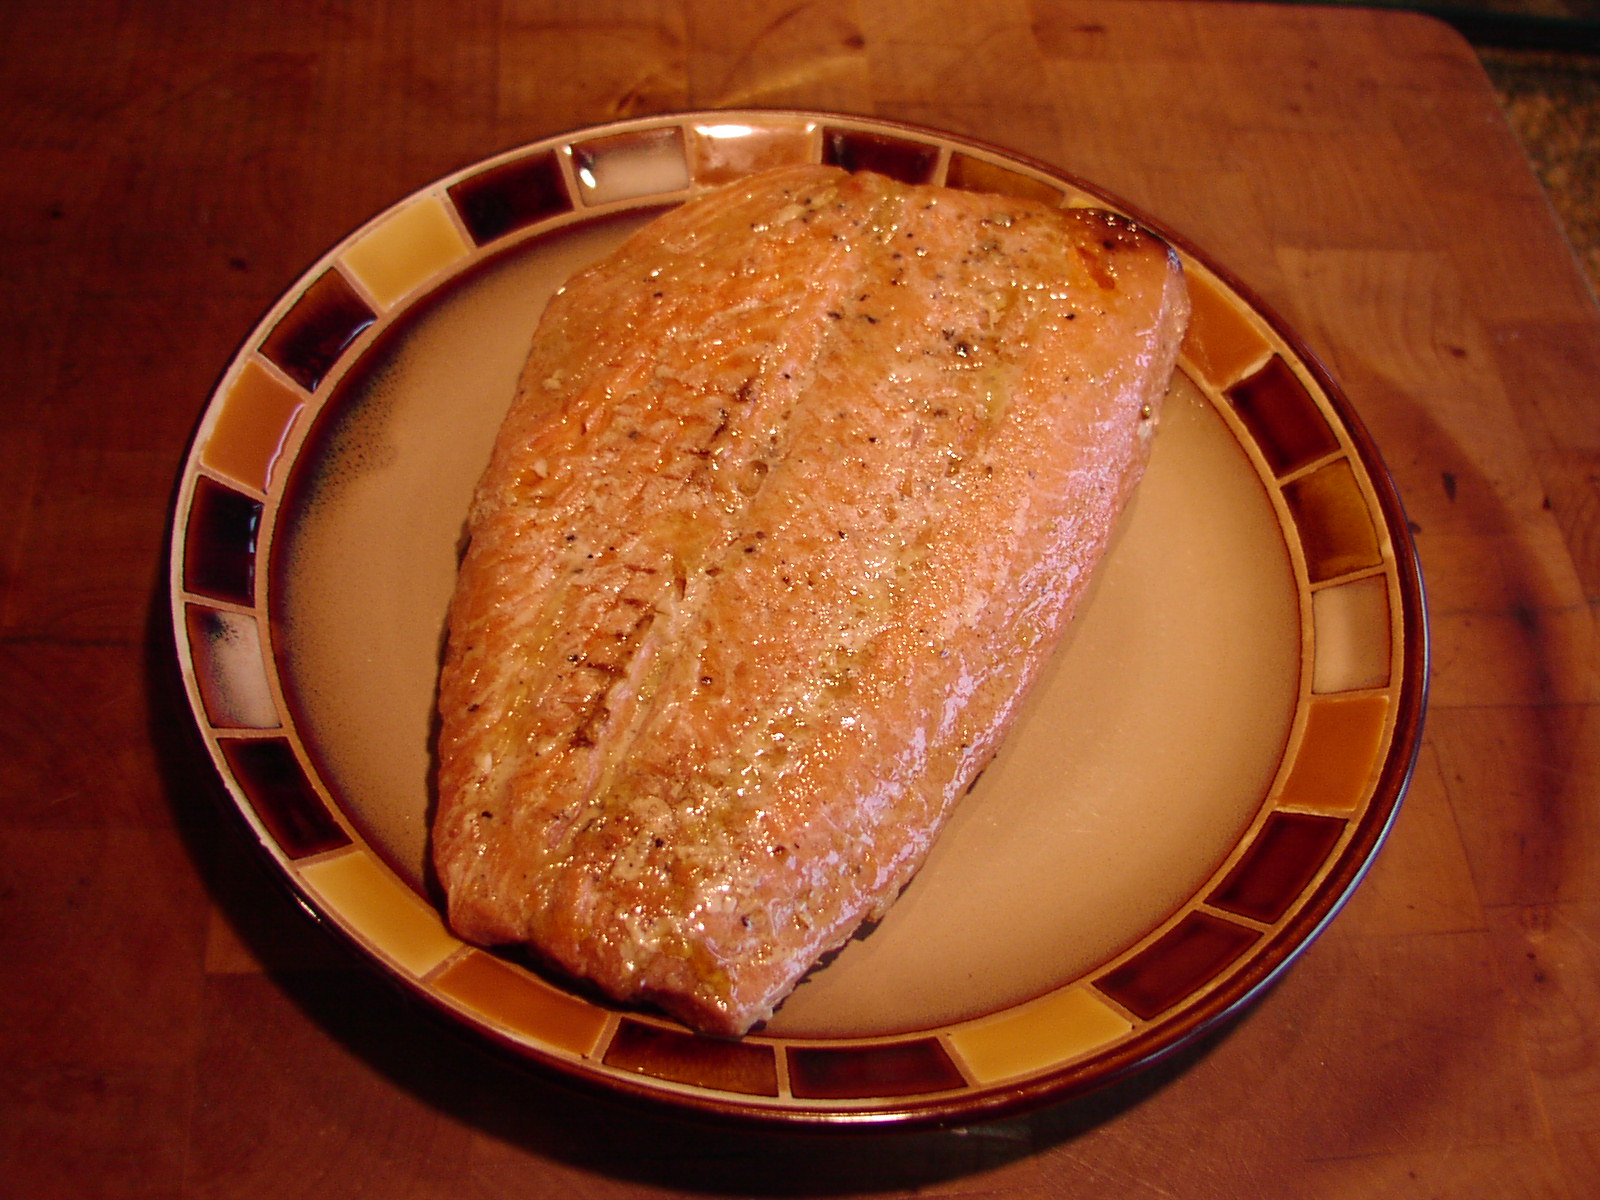
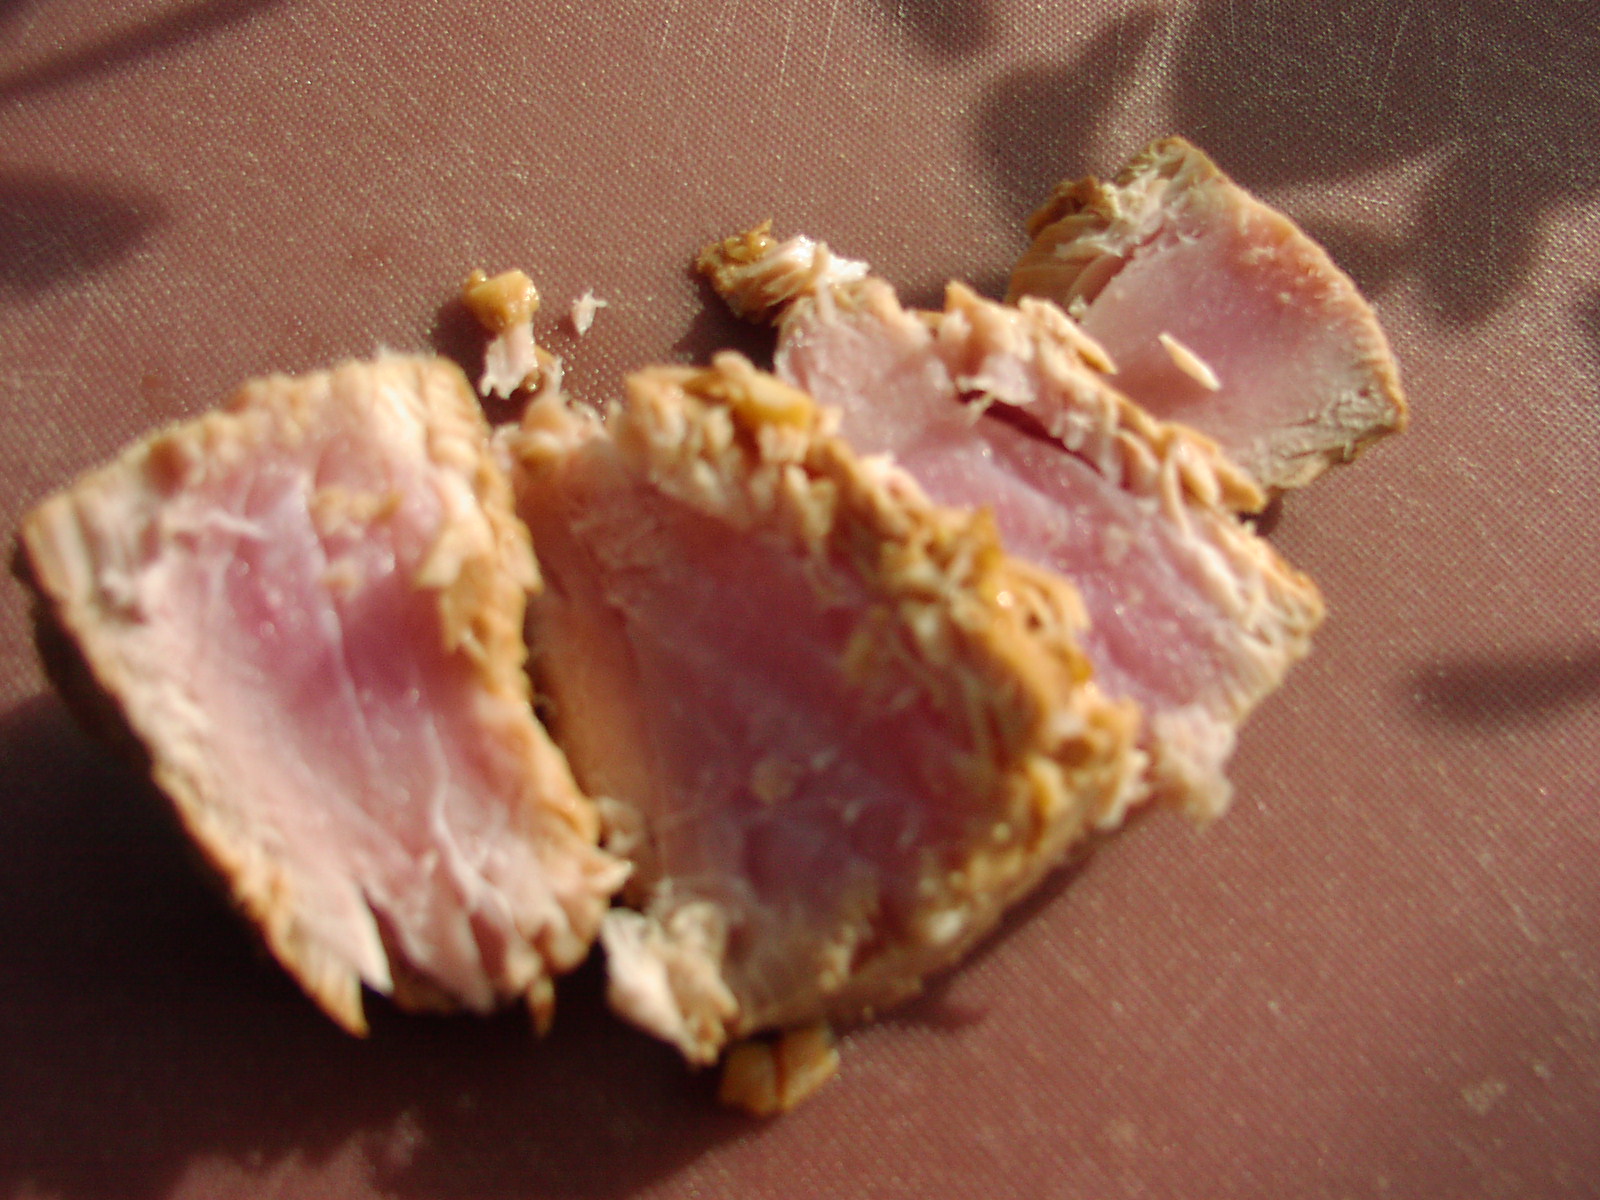
(Sorry about the fuzzy picture, but before I could take a picture, the tuna was all but consumed. Then before I could actually check to see if I had taken a decent enough picture, it was all gone!)

If there is anything better than having wonderful neighbors, I can’t think what it could possibly be? Except of course if said neighbors are also good friends AND bring you fresh tuna. Now that is what I call a winning combination.

So when Jerry and Jeanie got back from their fishing trip and asked if we would like some fresh tuna, we jumped at the chance. It isn’t just every day that we get to sink our teeth into such a delicacy. Plus this is a delicacy that takes very little effort or time to prepare. (Another winning combination!)

With such an amazing piece of fish (about 2 pounds), the last thing I wanted to do was prepare it in such a way as to spoil either the delicate flavor or moistness of the fish. So off to the internet in search of both elucidation and inspiration. I knew I wanted to either grill or sear the tuna, but did I want to marinate the fish or serve it with something like a wasabi aioli? After remembering that I wanted to cut down on the amount of sauces and aiolis I served, I decided that a marinade was the answer.

I was lucky enough to stumble on a Youtube by Chris Henry, a personal chef. The tuna she prepared on her video looked so delicious, I just knew it would be outstanding. And take it from me, this was the best tuna preparation I ever tasted, much less prepared myself. And like I mentioned; simple as can be.

So next time you want to treat your family and friends, I suggest you find yourself a lovely hunk of tuna and use this recipe. So thank you Chris for sharing your recipe. And thank you again Jerry and Jeanie for your lovely gift of tuna. But mainly, we both want to thank you for your friendship. It means more to us than even the sushi grade tuna you gave us. And that my dear friends, is saying a lot!

  • 2 T. GF, low sodium Tamari
  • 2 T. regular soy sauce
  • juice of ½ of a lime
  • 2 tsp. finely minced fresh ginger root
  • 2 garlic cloves, finely minced
  • 1 – 1½ lbs. fresh tuna fillets or steaks
  • extra virgin olive oil

Combine the Tamari, soy sauce, lime juice, ginger, and garlic in a covered bowl or airtight freezer bag. Add the tuna and place in refrigerator for an hour or up to 4 hours (if the steaks are really thick). Remove from refrigerator about 30 minutes before you plan to cook the steaks. (I marinated 1½-inch steaks for 2 hours the other evening and they were perfect!)

Remove the steaks from marinade. Discard marinade.

Coat a medium sized fry pan with olive oil. Heat the oil until just before it starts to smoke. Fry the steak(s) for about 1½ – 2 minutes on each side or until the internal temperature reaches between 115 and 120 degrees.* (You never want to overcook tuna. So this is one of those times when an instant read thermometer is worth its weight in gold!) Remove tuna from pan, let sit for 3-4 minutes, then slice thinly against the grain. Serve immediately.

Please note: the marinade gives the tuna a wonderful flavor. In my estimation no other condiment or sauce is necessary, in fact it might detract from the glorious flavor of the fish.

*To cook and serve rare tuna, the tuna must be free of parasites. In order to do that, the just caught tuna must either be frozen at -4° F for 7 days or frozen at -31° F (“flash frozen”) for 15 hours. Even if the tuna in your store is marked “sushi or sashimi grade” (considered safe to be eaten raw) you can’t always be sure you are receiving a safe product.

According to Marc Matsumoto, “The term “sushi-grade” is often tossed around to imply some level of freshness, but in the US, there’s no regulation around the use of the phrase, so it can be used to describe anything. That said, most stores aren’t in the business of getting their customers sick, so they usually reserve the label for their freshest fish.” (Which I have discovered in my research doesn’t mean the fish is free of parasites. It just means it’s “fresher” than the fish that isn’t labeled “sashimi or sushi grade”!)

So moral of the story: Trust your fishmonger and buy tuna from a reliable source or buy commercially frozen fish.


SALMON CAKES

OLYMPUS DIGITAL CAMERA

There is just something about a homemade cake. And I don’t really care if it’s chocolate, carrot, apple, etc. as long as it’s moist and delicious. And that goes for the savory varieties of cakes also.

To my mind, there is nothing worse than a crab or salmon cake that has the consistency and look of particle board that has gotten wet! Now granted, I have never tasted wet particle board, but I have an active imagination. And what my imagination tells me is that wet particle board tastes a lot like a poorly prepared crab or salmon cake! (If any of you have firsthand knowledge on this subject, please don’t hesitate to correct me if I’m wrong.)

Anyway, what I am trying to say in my own indomitable way, is that these salmon cakes are not dry. They are delightfully tender, moist, and juicy. They are also very easy to build, especially if you use planned over salmon, which it what I usually use when I make these cakes. I look for salmon on sale, then buy 2 pounds rather than just one. Then I cook both pounds setting one pound aside to use within the next couple of days. Then with my planned over salmon I either prepare this dish or one of a handful of other dishes like Salmon Caesar Salad or Salmon, Bacon, and Corn Chowder. (Both recipes can be found on this site.)

One additional detail I should really mention before I shut up so that you can go to the store and buy the ingredients to make these little darlings for dinner. These salmon cakes are absolutely delicious. (I know, you probably already ascertained that little detail since I posted the recipe in the first place.) But I still felt it was obligatory to state the obvious. (A little compulsion left over from my days in human resources. “Miss Smith, you were applying for “work” when you came to us for employment. So now, please just sit down and do the job for which you were hired.”) I loved my job! But back to salmon.

So keeping in mind that salmon is a good source of niacin, omega-3 fatty acids, protein, phosphorus, vitamin B6, choline, pantothenic acid, biotin, and potassium, make up a batch of these tender and delicious salmon cakes at your earliest convenience. They truly are a salmon lover’s delight. You might even be surprised if one of your family members, who professes to hate salmon, suddenly becomes a huge fan. It has happened before and it can happen again. Enjoy

  • 2 T. unsalted butter, divided
  • 2 T. extra virgin olive oil, divided
  • 2 T. finely chopped red bell pepper
  • ¼ c. finely diced celery
  • 2 T. finely minced shallot or green onion
  • 1 egg
  • ½ c. mayonnaise
  • 1 tsp. Dijon mustard
  • 1 tsp. Worcestershire sauce
  • ¼ tsp. hot sauce (I use Frank’s RedHot Sauce)
  • 1½ tsp. Old Bay Seasoning
  • freshly ground black pepper
  • 1 T. finely minced fresh parsley
  • 1 T. capers, drained
  • 10 finely crushed unsalted or low salt saltine crackers (I use the kind with no additional salt on the top)
  • 1 lb. cooked salmon, flaked
  • ¾ c. Panko bread crumbs, or more as needed

In a large frying pan, bring 1 tablespoon of the butter and 1 tablespoon of the olive oil to medium-high heat. Add the red pepper, celery, and shallot; sauté for about 4 minutes or just until the veggies are starting to soften. Take pan off heat, remove the veggies with a slotted spoon, and set veggies aside to cool. (Don’t wash the pan. You are going to be frying the salmon cakes in this same pan.)

Meanwhile lightly beat the egg in a medium sized bowl. Whisk in the mayonnaise, Dijon mustard, Worcestershire sauce, hot sauce, Old Bay Seasoning, black pepper, parsley, and capers. Stir in the finely crushed saltines, the cooled vegetables, and the salmon. Form the mixture into 8-10 small flat cakes. (Will be messy!)  Coat each cake with Panko and place on a wax paper lined plate*. Cover and  refrigerate for at least 2 hours before frying. When ready to cook, heat the remaining butter and olive oil in the reserved fry pan. Fry cakes over medium heat until golden brown on both sides. (About 4 minutes per side.)

OLYMPUS DIGITAL CAMERA

If you enjoy a sauce with your salmon cakes, may I recommend Old Bay Aioli. (See recipe below.)

*I use my 2-inch diameter ice cream scoop, drop the balls in a small bowl filled with the Panko crumbs, roll the balls around in the Panko, and then place the coated balls on a wax paper lined platter. Flatten each ball slightly with your hand.

OLD BAY AIOLI

  • ½ c. light mayonnaise (I use Best Foods Light Mayonnaise)
  • 2 tsp. Dijon mustard
  • ½ tsp. granulated garlic
  • ¼ tsp. sriracha
  • 4 tsp. fresh lemon juice
  • ½ tsp. Old Bay Seasoning
  • freshly ground black pepper to taste
  • kosher salt to taste

In a small bowl, whisk together the mayonnaise, mustard, granulated garlic, sriracha, lemon juice, Old Bay Seasoning, and pepper. Add salt if needed.


GRILLED MARINATED SALMON

OLYMPUS DIGITAL CAMERA

I found this recipe on the allrecipes web site. I was researching seafood dishes because we need to add more seafood to our diet. And since salmon is one of our favorites, I jumped all over this recipe when I read the ingredients list. Now granted I did change out olive oil for vegetable oil, and low-sodium, GF Tamari for regular soy sauce. But the bones of the recipe are straight off the site. (And thank you allrecipes for that!)

What appealed to me most when I first read this recipe was the fact that I could probably get away without serving a sauce of some kind with this marinated and grilled preparation. (And believe me, my dear husband loves tartar sauce or aioli with his seafood!) So finding a fish dish that wouldn’t require a sauce is exactly what I was looking for when I went searching. After all, if you are going to go to the trouble of adding more foods to your diet that were designed by Mother Nature to help lower cholesterol, like salmon, then adding a sauce made with mayonnaise isn’t the wisest choice as an accompaniment! (Kind of bad karma trying to mess with Mother Nature that way!) Plus, did you ever hear the term “defeating the purpose”? Well that’s exactly what I would have been doing if I had served this salmon with Mr. Cs favorite aioli or tartar sauce! Not to mention; any sauce I could have prepared would have detracted from the subtle and delectable flavor the salmon derived from its short bath in the Asian inspired marinade. So, as they say – mission impossible (serving fish without a sauce) became mission accomplished (he didn’t miss a sauce in the least)!

So please give this recipe a try if you too are trying to add more seafood to your diet. It’s really an outstanding seafood dish. And as a personal favor, since he rarely reads my blog, please don’t mention this post to Mr. C. I am slowly and surely reducing the amount of fat in our diet to try and bring both of our cholesterol levels down. But I don’t want him to feel deprived, so the less Mr. C. knows of my master plan, the better off he’ll be! (In more ways than one!) Thanks

  • 1½ – 2 lbs. salmon fillet or fillets*
  • granulated garlic
  • sea salt
  • lemon pepper
  • 1/3 c. brown sugar
  • 1/3 c. low sodium GF Tamari or soy sauce
  • 1/3 c. chicken stock or water
  • ¼ c. extra virgin olive oil

Moderately season the salmon with granulated garlic, salt, and lemon pepper. (Flesh side only. No need to season the skin.) In a shallow pan, whisk together the brown sugar, Tamari, chicken stock, and olive oil. Place the seasoned salmon fillet or fillets flesh side down in the pan. Cover with plastic wrap and place in the refrigerator for at least 2 hours.

When ready to cook, preheat the grill to medium. If you have a basket or other grilling container, lightly coat with cooking spray. If not, lightly coat the grill grate itself with cooking spray. Place the salmon in the basket or on the grate skin side down, lower lid and let cook for about 4-8 minutes, depending on thickness of the fish. Discard marinade. When time to turn, carefully lift the salmon and turn it over. (Usually the skin stays in the basket or on the grill.) Cook covered for another few minutes just until done**. Do not overcook or the salmon will be dry. Serve immediately or cool and serve at room temperature. No tartar sauce or aioli required.

*If I purchase one large fillet, I usually cut it in half. That way it’s easier to marinate and also to flip when grilling.

**The USDA recommends cooking salmon to an internal temperature of 145 degrees. Push the tip of the meat thermometer gently into the middle of the salmon fillet at its thickest part to get an accurate reading.

Please note: Another method of grilling salmon or any fish with skin on one side, is to place the fillet skin side down on aluminum foil that has been pierced in several places with a table fork. Place the aluminum foil on the grill, lower lid, and cook for 4-6 minutes over medium heat. When it’s time to turn, grab the closest edge of the foil with both hands and slide it off the fire. Flip the fish gently onto the hot part of the grill. Gently remove the foil and the skin should lift right off. Lower the lid again and cook just until done.


CHICKEN AND BROCCOLI FETTUCCINE (HAVE IT BOTH WAYS!)

OLYMPUS DIGITAL CAMERA

So here’s the skinny! A regular Alfredo sauce is considered by many to be one of the top ten forbidden foods. (Or at the very least, a dish that should only be consumed once in a blue moon, which for those who don’t remember, is about once every 2½ years!)

Now I am here to tell you, that is just not often enough for yours truly and Mr. C! We love us our pasta Alfredo. So in an effort to keep our desire for Alfredo commensurate with our need to keep our cholesterol at a level that is appropriate for people in their “golden years”, and not coincidentally keep our doctors from jumping up and down and yelling at us, I have modified one of our favorite “Alfredo” style dishes. Now granted, without the cream it’s certainly never ever going to replace the real deal. But, truly, it ain’t half bad! But since I know that some of you are purists, I decided to also provide you with the original recipe that won my grandchildren (Derek and Rebecca) over to the belief that broccoli is the best green vegetable ever invented!

So give my modified version a try. It still has the creamy sauce that is so important to a delicious “Alfredo”. But I have to tell you. When you warm up leftovers, no puddle of butter is left in the bottom of the bowl. (If you happen to be one of the people who has never reheated an Alfredo sauce, please believe me when I tell you that looking in the bowl after the pasta has been reheated is enough to immediately change your thinking on Alfredo Sauce. Does the term “swimming in liquid fat” mean anything to you? Well that’s exactly what your noodles will be doing if you reheat a true Alfredo sauce.)

But like I said, if you are a purist, under the age of 30, have the metabolism of a pigmy shrew, are 6’2’’, and weigh about 102 pounds, please give my original recipe a try. It is really fabulous. Just don’t tell me about it. I might start crying, and no one likes to see tears on their computer screen.

Reduced fat CHICKEN AND BROCCOLI FETTUCCINE:

  • 2 T. unsalted butter, divided
  • 1 c. bite sized pieces of fresh broccoli
  • 3 cloves garlic, finely minced
  • 1 boneless, skinless chicken breast half, cubed
  • ¼ tsp. kosher salt
  • freshly ground black pepper
  • 2 T. dry white wine
  • 2 T. flour
  • pinch ground nutmeg
  • ¾ c. chicken broth
  • 1 c. milk (I use 2%)
  • 8-oz. fettuccine pasta, cooked al dente (keep some of the cooking water*)
  • ¾ c. finely grated Parmesan cheese + more for passing (or use part Parmesan and part Pecorino Romano)

Melt 1 tablespoon of the butter in a large fry pan. Add the broccoli and sauté for 2-3 minutes. (Broccoli should still be crisp.) Add the garlic and cook for 1 minute. Remove broccoli and garlic from pan with a slotted spoon and place in a bowl. Add the chicken, salt, and pepper; cook until the chicken is barely cooked through. Remove from pan and add to the reserved broccoli and garlic.

Pour wine into the pan and cook until very little liquid remains. Add the remaining 1 tablespoon butter and the flour. Whisk together and cook for about 2 minutes.  Add the nutmeg, chicken broth, and milk; stirring until the sauce boils and thickens. Remove from heat and add the cooked pasta, reserved broccoli, garlic, and chicken, and ¾ cup Parmesan. Add some of the pasta cooking water if the sauce seems too thick. Adjust seasoning and serve immediately with additional Parmesan cheese.

Please note: If doubling this recipe, use only 3 tablespoons of flour, but double all the remaining ingredients. FYI: many of my recipes feed just 2-3 people. Unless otherwise stated, my recipes can easily be doubles or tripled.

* You really don’t need to use seemingly gallons of water when you cook pasta. In fact, you only need to use enough so that the pasta has room to expand and not stick together. This not only saves water and energy, but the resulting cooking water has a higher percentage of residual starch, which makes it perfect for adding to the sauce if more liquid and/or thickening is required. For more information, search Serious Eats; The Food Lab; A new way to cook pasta?

Good old fashioned CHICKEN AND BROCCOLI FETTUCCINE:

  • ¼ c. (½ stick) unsalted butter, divided
  • 1 c. bite sized pieces of fresh broccoli
  • 1 large garlic clove, finely minced
  • 1 boneless, skinless chicken breast half, cubed
  • ¼ tsp. kosher salt
  • freshly ground black pepper
  • 1 c. whipping cream
  • 8-oz. fettuccine pasta, cooked al dente (keep some of the cooking water)
  • ¾ c. finely grated Parmesan cheese + more for passing (or use part Parmesan and part Pecorino Romano)

Melt 1 tablespoon of the butter in a large fry pan. Add the broccoli and sauté for 2-3 minutes. (Broccoli should still be crisp.) Add the garlic and cook for 1 minute. Remove broccoli and garlic from pan with a slotted spoon and place in a bowl. Add the chicken, salt, and pepper; cook until the chicken is barely cooked through. Remove from pan and add to the reserved broccoli and garlic.

Add the remaining 3 tablespoon butter and cook until butter is lightly browned. Add 1/3 cup of the cream and boil rapidly over high heat until large shiny bubbles form; stir occasionally. Reduce heat to medium and add cooked noodles to sauce. Toss vigorously and add the chicken mixture, Parmesan cheese and the remaining cream, in about 3 additions. Adjust seasonings and serve immediately with additional Parmesan cheese.


CREAMY PASTA WITH PANCETTA AND PEAS

OLYMPUS DIGITAL CAMERA

Usually when I make a creamy sauce, I use cream. Sounds reasonable, right? But in an effort to reduce the number of calories and amount of fat in the dishes I prepare, I decided to use chicken stock and 2% milk instead of cream when I prepared this dish last evening. (OK, I did use 2 tablespoons of butter, but that’s just a fraction of the amount I normally would use!) So of course the resulting product was not as rich as a regular Alfredo sauce. (How could it be without a half cup of butter and 2 cups of heavy cream?) But regardless, it was still quite delicious. And without all the fat, it just had a fresher taste to it. Perhaps it was because the other ingredients were forced to shine on their own without relying on the cream to carry the day.

Whatever the reason, we were very happy to chomp away on this pasta sans the guilty feeling we usually experience when we are eating a creamy pasta dish. Not to say, we won’t ever eat a true Alfredo again. But I think I will be adapting my other standard Alfredo type dishes too, so that we can enjoy them more often without our cholesterol numbers shooting into the stratosphere!

And the first one I am going to adapt is one of our favorite pasta recipes – Chicken and Broccoli Fettuccine. So look for this recipe in the near future. And for those of you who have no cholesterol worries or don’t ever have to concern yourself with putting on weight, I will also post the “real” recipe. Which just happens to be Derek and Rebecca’s (two of my grandchildren) favorite food. (Poor kids. They unfortunately inherited their grandmother’s love of sauces.)

So if you too love pasta with a creamy sauce, give this dish a try. It takes no time to whip up. And I’m sure your whole family will love it. And miss all those calories in a traditional Alfredo sauce? I think not!

  • 2 T. unsalted butter, divided
  • ½ c. diced pancetta
  • 3 garlic cloves, finely minced
  • 2 T. dry white wine
  • 2 T. flour
  • ¼ tsp. kosher salt
  • freshly ground black pepper
  • pinch crushed red pepper flakes
  • pinch ground nutmeg
  • ¾ c. chicken broth
  • ¾ c. milk (I use 2%)
  • 8-oz. penne pasta, cooked al dente (keep some of the cooking water*)
  • ½ c. uncooked frozen petite peas, thawed
  • ½ c. finely grated parmesan cheese + more for passing (or use part Parmesan and part Pecorino Romano)
  • 2 tsp. chopped fresh parsley

Melt 1 tablespoon of the butter in a large fry pan. Add the pancetta and fry until crisp. Remove the pancetta from pan with a slotted spoon and set aside. Add the garlic to the pan. Cook for 1 minute. Add the wine and cook until no liquid remains. Add the remaining 1 tablespoon butter and the flour. Whisk together and cook for about 2 minutes.  Add the salt, pepper, crushed red pepper flakes, nutmeg, chicken broth, and milk; stirring until the sauce boils and thickens. Remove from heat and add the cooked pasta, peas, cooked pancetta, ½ cup Parmesan, and parsley. Add some of the pasta cooking water if the sauce seems too thick. Adjust seasoning and serve immediately with additional Parmesan cheese.

Please note: If doubling the recipe, use only 3 tablespoons of flour, but double all the remaining ingredients.

*Something I had thought for a long time just came out as being accurate. You really don’t need to use seemingly gallons of water when you cook pasta. In fact, you only need to use enough so that the pasta has room to expand and not stick together. This not only saves water and energy, but the resulting cooking water has a higher percentage of residual starch, which makes it perfect for adding to the sauce if more liquid and/or thickening is required. For more information, search Serious Eats; The Food Lab; A new way to cook pasta?


VEGETARIAN MUSHROOM STROGANOFF

(Sorry, no picture. I lost it when my computer and my camera were not speaking. They have resolved their differences now, but the picture is still missing in action. Will add a picture in the near future.)

Of course you know what most savvy people are saying about vegetarians or people who eat at least one or more meatless meals a week. And yes you are right there with me if you too believe the word is “smart”. But another word immediately jumps into my brain also. And that word is “yummy”. Because there are just an abundance of wonderful recipes out there that don’t contain as much as a quarter cup of meat broth or a tablespoon of bacon fat to make them both delicious and nutritious.

So when I hear someone say they hate vegetarian food, I almost always look at them as if they just stepped out of a brand spanking new Studebaker. And just for your information, the last Studebaker was manufactured in 1967!

Because in my opinion, what these folks have done is limit themselves to food choices that are often expensive, include more protein than is necessary for continued good health, and lack the vegetables, herbs, spices, and whole grains needed to supply our bodies with the necessary vitamins and minerals to support good health. (And no, I don’t believe taking a daily multi-vitamin replaces the lack of fresh vegetables, herbs, spices, and fruits in our diet!) And don’t even get me started on fiber!

So when I decided the other evening to serve “Beef Stroganoff”, I thought about my pledge to serve more meatless dishes. And I concluded that the meat in a stroganoff was not the part I cherished the most. What I loved were the mushrooms, noodles, and the savory sour cream gravy. So I basically made my standard recipe without the meat. And truly, I didn’t miss the meat one little bit.

So in essence you might say that this new spin on my old recipe was “fashioned by an impulsive epicure”.

(Sorry Leah Worth for changing out the words “for” and “ingénue” with “by” and “epicure” from the Bobby Troup classic song “The Meaning of the Blues”.) But it really was Mr. Cs idea to change the lyric. He changed the word “ingénue” to “epicure” while we were listening to the song and talking about food. (Nothing new, believe me!) And I loved the new words, because like Mr. C, I too feel that the word epicure has fallen into disuse. So while I was writing up this recipe, our conversation while listening to Janis Mann’s version of this beautiful blues song came to mind. And I totally felt that Mr. Cs new lyric applied to what I had just done to my original Beef Stroganoff recipe. Hence the musical reference.

(For those of you haven’t the foggiest idea what I’m talking about, I have included the words to one of the loveliest and saddest songs ever written. I’m sure after reading the lyrics you will perfectly understand how the entire chain of events came about. Or not!) But regardless, give this recipe a try. I truly believe the epicure in you won’t miss the meat in the least.

The Meaning of the Blues

Blue was just the color of the sea,

Til my lover left me;

Blue was just a bluebird in a tree,

Til he said “Forget me.”

Blue always made me think of summer,

Cloudless summer skies so fresh and warm;

But now the blue I see is more like winter

Winter skies with clouds about to storm.

Blue was just the color of his eyes

Til he said “Goodbye, love.”

Blue was just a ribbon for first prize

Til he said, “Don’t cry, love.”

And blues were only torch songs

Fashioned for impulsive ingénues;

But now I know, too well I know,

Too well I know the meaning of the blues.

(To hear this song performed, search on “Julie London meaning of the blues”.)

  • 1 T. extra virgin olive oil
  • 2 T. butter, divided
  • 1 lb. cremini mushrooms, sliced (or any combination of fresh mushrooms)
  • scant ½ c. chopped onion
  • 2 garlic cloves, minced
  • ¼ c. dry white wine
  • 2 tsp. fresh thyme leaves or ¾ tsp. dried thyme leaves
  • 2 tsp. paprika
  • ½ tsp. kosher salt
  • freshly ground black pepper
  • 2 T. flour
  • 1½ c. vegetable or mushroom broth
  • 1 c. sour cream
  • 8-oz. wide egg noodles, cooked al dente
  • 2 T. chopped Italian parsley

Heat the olive oil and 1 tablespoon of the butter in a large skillet over medium-high heat. Add the mushrooms and onion; cook until the onion is translucent and the mushrooms slices are starting to brown. Stir in garlic and cook for one minute. Deglaze the pan with the white wine. When the wine is all but evaporated, add the thyme, paprika, salt, and pepper. Cook, stirring occasionally for 3 minutes. Stir in the flour and remaining 1 tablespoon of butter, and cook, stirring constantly for 2 minutes.

Whisk in broth, bring to a boil, reduce heat, and cook for 5 minutes. Remove from heat and stir in the sour cream and noodles. Sprinkle with fresh parsley and serve immediately.

Tip: Never cook noodles ahead of time and let them sit until you’re ready for them. If any part of the dish needs to wait, it should be the sauce. And no, I don’t care what any given recipe says. If it instructs you to cook the noodles and just keep them warm, just say no! You know better!


GRILLADES (CAJUN MEAT STEW) AND CHEESE GRITS

OLYMPUS DIGITAL CAMERA

Until I read the latest issue of Southern Living, I had never heard of Grillades. (Remember, I live in the Northwest corner of the US, so dishes like Grillades are not indigenous to our area.) But through the years I have learned to absolutely adore many of the dishes that have their roots in the South. (Thus my subscription to Southern Living!) So when I read the ingredients in the Grillades recipe, I was hooked immediately.

Grillades (pronounced ɡree-yahds) is a kind of meat stew typical of French regional and Cajun cooking. And at least in Cajun country, Grillades is most often served with grits. And since I am a true believer in the merits of grits, you can bet your best Squirrel Perlo recipe that if grits are even mentioned in conjunction with any given dish, I will be fixing them too!

So yesterday I decided it was the perfect day to tackle Grillades. But as some of you know, I almost never try a recipe until I have researched other recipes for the same dish. Especially if the dish is one that I have not previously tasted. I simply like to read what other cooks have included or excluded in their recipes so that I can better judge what might work best for our tastes. As a result, I didn’t change a thing in the Southern Living seasoning mix recipe. (Well that’s not entirely true. I did reduce the amount of cayenne from 1½ teaspoons to ½ teaspoon because I thought the original amount might be just too spicy for me. And I’m glad I did. The amount of cayenne I used was perfect for both of us.)

I did however change a couple of amounts and cooking methods from the magazine recipe based on other recipes I perused. For example, I changed thinly sliced pork to pork cubes. (Much easier to deal with.) But all in all, the recipe is basically as reported in the September 2015 edition of Southern Living.

Now comes the best part. When we sat down to dinner last evening, and each of us took our first bite, almost simultaneously we looked at each other and uttered the same three little words. OMG! We both exclaimed that this dish was one of the best things we had ever tasted.

So if you too are fans of Cajun cuisine, you have simply got to try this recipe. It is an all time winner at Chez Carr.

  • 7 tsp. Creole Seasoning Mix for Grillades, divided (see recipe below)
  • 2 lbs. boneless pork roast, cut into 1-inch pieces
  • 1 c. unbleached all-purpose flour, divided
  • 7 T. vegetable oil
  • 1 med. yellow onion, chopped
  • 1 c. chopped celery
  • 1 lg. green bell pepper, chopped
  • 2 lg. garlic cloves, finely minced
  • 4 bay leaves
  • 3 c. beef or chicken broth
  • ½ c. dry red wine
  • 1 (14.5-oz.) can diced tomatoes
  • 1 T. Worcestershire sauce
  • 1 tsp. dried thyme
  • 1 tsp. kosher salt
  • hot cooked Cheese Grits (see recipe below)

Sprinkle about 2 teaspoons of the seasoning mix on all sides of the pork cubes in a large bowl. In a gallon size freezer bag combine ½ cup of the flour and another 1 teaspoon of the seasoning mix together. Add pork to bag (don’t wash the bowl) and shake until all the cubes are coated.

Heat oil in a large heavy covered Dutch oven over medium-high heat. Add the pork, and fry for about 4 minutes on each side or until golden brown. (You will probably need to fry the pork in 2 batches.) Using a pair of tongs, transfer the browned pork back to the bowl where you coated the meat originally and reserve the drippings in the Dutch oven.

Sprinkle remaining ½ cup flour over drippings. Cook over high heat, whisking constantly, about 4 minutes or until mixture is medium brown. Immediately add the onion, celery, bell pepper, and garlic, and stir with a wooden spoon until well blended. Add bay leaves and the remaining 4 teaspoons of seasoning mix. Reduce heat slightly and continue cooking, stirring constantly, about 2 minutes.

Add the broth to vegetable mixture, stirring until well incorporated. Add wine, diced tomatoes, Worcestershire sauce, thyme, salt, and browned pork; bring to a boil over high heat. Reduce heat to low, cover, and cook, stirring often, about 90 minutes or until the meat is tender. Midway through, taste to check seasoning. Add additional salt and/or seasoning mix to taste. (I had to add more salt to mine.) Just before serving, remove bay leaves.

OLYMPUS DIGITAL CAMERA

To serve, ladle a large serving of Grillades into a shallow bowl. Add a heaping spoonful of Cheese Grits on top and to the side. Serve immediately. (At our home, this is a meal unto itself. Nothing else to eat required. Of course a nice glass of wine to go with the Grillades is always welcome. Mr. C. recommends a hearty Cabernet-Sauvignon.)

CREOLE SEASONING MIX FOR GRILLADES

  • 1½ tsp. onion powder
  • 1½ tsp. granulated garlic
  • 1 tsp. kosher salt
  • 1 tsp. white pepper
  • 1 tsp. freshly ground black pepper
  • 1 tsp. paprika
  • ½ tsp. dry mustard
  • ½ tsp. dried thyme
  • ½-1½ tsp. cayenne (depends on how much heat you like or can tolerate)
  • ½ tsp. gumbo file

Combine all the ingredients and store in an airtight container.

CHEESE GRITS

  • 1 tsp. kosher salt
  • 5 c. water
  • 1 c. hominy grits (I use Quaker brand Quick cooking grits)
  • 3 T. unsalted butter
  • 2 T. cream cheese
  • ¼ c. grated Gruyère, Swiss, or Edam cheese

In a large saucepan over high heat, bring salt and water to a boil. Slowly whisk in the grits. Reduce the heat to low; cover and cook for 25 to 30 minutes, stirring occasionally to make sure the grits don’t stick to the bottom of the pan. (Grits are done when they have the consistency of smooth cream of wheat.) Remove from the heat and stir in the butter, cream cheese, and grated Gruyère. Season with salt to taste and serve warm.

OLYMPUS DIGITAL CAMERA

HAM, FARRO, CANNELLINI BEAN, AND SWISS CHARD SOUP


OLYMPUS DIGITAL CAMERAWe have experienced a really strange summer this year in the Pacific NW. No rain for weeks on end, hot temperatures, and more aggressive winds than normal. Then suddenly about 2 weeks ago, the skies clouded over, the winds whipped up to a mighty force, and we received our first rain in months. And believe me, there was rejoicing heard all around our glorious state. The farmers were happy, the hardy folks fighting our numerous wild fires were ecstatic, and those of us who were trying to keep our yards and gardens alive could be found dancing in the showers while sending grateful thanks up to whichever benevolent deity would listen.

So now, after several decent rain storms our yards are looking better, the webs are starting to come back between our toes, and at least to this native Washingtonian, it appears that fall is on its way. Now don’t get me wrong. I’m not wishing for the gray days of winter to get here any sooner than they must. But when I wake up thinking about making soup, I know that it’s my own internal precursor to the onset of fall.   (Some people get aches and pains in their joints when fall weather approaches; I suddenly get a desire to build soup.)

So yesterday morning I decided to build a version of Deborah Madison’s Smokey Farro and Chickpea Soup. I changed a couple of ingredients to suit my taste, and added some ham to add a depth of flavor and additional protein. The result was an absolutely divine new addition to my fall and winter soup recipe collection. I hope you too will add this to your soup recipe repertoire. It is delightfully easy to prepare, healthy to the max, and absolutely delicious.

  • 4 c. water
  • 1 c. emmer farro (I use Bluebird Grain Farms organic Emmer Farro)
  • ¼ tsp. kosher salt
  • 2 T. extra virgin olive oil
  • 1 lg. onion, finely chopped
  • 2 stalks celery, finely chopped
  • ½ c. chopped fresh parsley
  • 2 garlic cloves, minced
  • 1 bay leaf
  • 1 heaping cup diced ham (for vegetarian soup, leave out ham)
  • 3 c. vegetable broth
  • 2 c. water
  • 1½ tsp. Spanish smoked paprika
  • freshly ground black pepper
  • 1 (14.5-oz.) can fire-roasted diced tomatoes, undrained
  • 1 (15-oz.) can cannellini beans, rinsed and drained
  • 4 c. chopped Swiss chard
  • 4 good sized green onions, thinly sliced
  • ¾ c. finely grated Parmesan cheese, garnish
  • garlic croutons (see recipe attached) or toasted baguette slices, opt.

Place the 4 cups of water, emmer farro, and salt in a covered pan. Place on high heat and bring to a boil. Boil for 5 minutes, stirring frequently. Reduce heat, cover, and simmer for about 45 minutes or until berries are plump and chewy. When the farro is done, drain, reserving the excess liquid, and set both the farro and reserved liquid aside. (You may need the liquid to thin out the soup at the end of the cooking time.)

Meanwhile, heat the olive oil in a large heavy covered soup pot and fry the onion, celery, and parsley for a few minutes until onion is tender, stirring frequently. Add the garlic, bay leaf, and ham; cook for 2 minutes. Add the broth, 2 cups water, smoked paprika, pepper, cannellini beans, and canned tomatoes. Bring to a boil. Reduce heat, cover pan, and simmer gently for about 20 minutes. (If the farro isn’t done after the soup is finished simmering, remove the soup from heat and set aside until the farro is drained and ready to be added to the soup.)  When the farro is drained and ready, place pot back on heat, and stir in the Swiss chard and farro. Simmer for about 3 minutes or until the chard wilts. Adjust seasoning. If the soup seems too thick, add some of the reserved farro cooking water. (You want a nice brothy soup.) Stir in the green onions just before ready to serve.

OLYMPUS DIGITAL CAMERA

Serve with Garlic Croutons or toasted baguette slices, and grated Parmesan cheese.

GARLIC CROUTONS

Chop up some small bite sized pieces of a chewy, artisan baguette. Place in a frying pan with butter or olive oil (or a combination) and sauté until each crouton is crunchy. (This takes about 45 minutes because you need to go low (heat) and slow.) Add more butter or oil as needed. When desired crunchiness is attained, sprinkle with granulated garlic. Allow to cool completely before placing in an airtight container.


GRILLED LAMB PATTIES WITH TZATZIKI (GREEK CUCUMBER SAUCE)


OLYMPUS DIGITAL CAMERAIn my estimation lamb is under-utilized. And I believe one of the reasons is that a lot of parents with young children think their children won’t like the taste. Well, I beg to differ. When my children were growing up, a leg of lamb was one protein source I knew would be devoured right down to the bone. And I mean this literally. (I’m pretty sure they would have gnawed on the bone if I would have let them!) They truly loved it. And really, what’s not to love? A nice bone-in piece of meat with slits all over the surface stuffed with slivered garlic and fresh rosemary. Then liberally slathered with oil, sprinkled with salt and pepper, and baked to a medium rare. What person of any age could resist this delicacy?

Now granted, lamb isn’t cheap. But because it’s so lean, it doesn’t shrink as much as beef either.

So attached is a recipe for ground lamb that has tons of flavor and is a good way to introduce your family to the joy that is lamb. (Of course, even if your family are already lamby pie lovers, you can fix this recipe. The flavor just won’t be as much of a pleasant surprise.) I take that back. Because of all the herbs and spices, the flavor is still going to be a pleasant surprise! So regardless of your families’ level of culinary acquaintance with baby sheep, fix this quick and easy recipe while it is still BBQing season. You won’t be sorry.

And for all you parents out there introducing your children to lamb for the first time, at least you won’t have to explain that the lamb on the table absolutely did not come from Shari Lewis’s puppet Lambchop! True story! Thanks for the memories kids. Love you mucho!

  • 1 clove garlic, finely minced
  • 1 T. finely chopped red onion
  • 1 T. chopped fresh cilantro
  • 1 T. dry sherry
  • ½ tsp. kosher salt
  • freshly ground black pepper
  • ½ tsp. ground cumin
  • ¼ tsp. dried oregano
  • 1/8 tsp. ground allspice
  • pinch crushed red pepper flakes
  • 1 lb. ground lamb, room temperature

Combine the garlic, onion, cilantro, dry sherry, salt, pepper, cumin, oregano, allspice, and red pepper flakes in a bowl. Add the ground lamb and gently combine with the other ingredients. Don’t overwork the meat. Divide into 3 or 4 patties. While you are forming the patties don’t over press the meat together; just work enough so that the meat retains its shape and doesn’t fall through the grill while it is cooking. (Not good form and you will lose points if the patties fall apart on the grill!)

Place the patties on a medium hot grill and do not overcook. A little red in the middle is perfect. Let rest for 3-4 minutes before serving. Serve with Tzatziki (recipe below). Also great with Cucumbers with a Yogurt, Feta, and Dill Dressing.

TZATZIKI  

  • 2 T. extra virgin olive oil
  • 2 c. plain Greek Yogurt
  • 3 small or 2 medium garlic cloves, finely minced
  • ½ tsp. dill weed
  • ¼ tsp. kosher salt, or more to taste
  • freshly ground black pepper
  • 1 English cucumber, partially peeled, seeded, and grated

Combine all ingredients. Adjust seasoning. Cover and refrigerate until ready to serve.

SAUTÉED CHICKEN WITH GRUYÈRE CHEESE, MUSHROOMS, AND WHITE WINE

OLYMPUS DIGITAL CAMERA

This is yet another chicken recipe that is quick and easy to prepare, making it a perfect dinner entrée after a hectic work or play day. And of course, it’s delicious. (Like I would post anything but a delicious recipe!)

But this is one of those recipes that works best when all the chopping, slicing, mincing, and assembling has been done in advance. In other words, get your act together and have all your ingredients prepped and in place before you start sautéing the chicken. (Hey, why not? You have to do it anyway. So why not get it over with before you actually fire up the burners and curse yourself for not heeding my warning to begin with?) Anyway……

The bones of this recipe come from the Food.com web site. And while I’m giving that site credit, I would like to get on my high horse (with a little help from a tall self-righteous attitude), and say what I really think about all the cooking sites out there in internet land. Thank you, thank you, THANK YOU! (Bet you didn’t see that one coming, did you?) There isn’t a recipe under the sun that can’t be found either by title or ingredient combination. There isn’t a cooking technique, gadget, or unique ingredient that can’t be ordered on-line and delivered directly to your home. There isn’t an excuse in the world for someone to rely on fast food or packaged, processed products to feed their family when every resource imaginable to provide a healthy and delicious meal is at their fingertips! (That’s the high horse part in case you were wondering!)

So to all of those wonderful sites out in internet land that provide great recipes, cooking techniques, and commentary on every aspect related to culinary endeavor, I salute you. And to the Food network (I’m now back on my high horse again), please bring back more love (good cooks/chefs and their sterling recipes) and less war (cupcake, chopped, etc). I personally want recipes, not entertainment. If I wanted to occupy my time watching and listening to suspense, drama, and a staged production, I would watch the news and read every word written about the candidates and their race to be in next years’ presidential election!

  • 2 boneless, skinless chicken breasts, halved lengthwise, then cut in two (8 pieces in all)
  • kosher salt
  • freshly ground black pepper
  • nutmeg
  • 3 T. butter
  • 8 medium sized button mushrooms, halved and thinly sliced
  • 2 small or 1 large shallot, finely minced
  • ½ c. dry white wine (I use Pinot Grigio)
  • ½ c. heavy cream
  • ¾ c. finely grated Gruyère cheese (you can use plain Swiss cheese, but a premium Swiss cheese is best)
  • dash paprika

Season one side of each piece of chicken with salt, pepper, and a light sprinkling of nutmeg. Melt the butter in a large, covered fry pan over medium-high heat. Add the chicken and sauté until both sides are slightly browned and the chicken is cooked through. (Do not overcook the chicken.) Remove from pan, tent with aluminum foil, and set aside. Add the mushrooms and shallot to the pan, reduce the heat, and sauté until the mushrooms are starting to brown and the shallot pieces have all but disappeared from sight. Stir in the white wine and simmer until the wine has all but evaporated. Whisk in the cream, Gruyère cheese, and the paprika. Cook for one minute. Adjust seasoning. Stir in the reserved chicken along with any pan juices; remove from heat, cover, and let sit for about 3 minutes.

OLYMPUS DIGITAL CAMERA

Great served over mashed potatoes with a side green veggie or a nice crisp green salad. And of course, some more of that wonderful Pinot Grigio you used in the dish itself!