Category Archives: MAIN DISH RECIPES

CHINESE SPICY ORANGE SHRIMP

I think I have previously mentioned that I love Cooking Light – the magazine that is! (I like cooking light too, but I don’t always succeed in that arena.) So for a dinner party I hosted recently, I decided to cook Chinese food. OK, American Chinese food. Although I know traditional ingredients like tripe, chicken feet, and bitter melon are available in Seattle’s International District, it’s too far to drive just to obtain a few authentic products. (Oh who am I trying to kid. I wouldn’t cook with tripe, chicken feet, or bitter melon if they were personally delivered to my front door by Ming Tsai himself!)

So what’s left – BBQ Pork, steamed dumplings, fried rice, etc. Basically the usual suspects found in every Chinese restaurant around the world. (Except China, of course.)

So call me plebian if you must, but I do dearly love American Chinese food. Well, maybe I better qualify that statement. I love good Chinese food. Defined by me as containing no MSG and just a modicum of oil, the exclusive use of low sodium tamari or soy sauce, super fresh veggies and meat, and a whole lot of restraint shown when adding salt.

So when I came across this recipe from the August 2007 issue of Cooking Light while setting my menu, I knew from just reading the ingredient list that this dish would be a winner. And it sure enough was! I changed/added a couple of ingredients, but basically it remains yet another example of the wonderful recipes that can be found in Cooking Light. (And no, I am not on the Cooking Light payroll, nor do I receive a free subscription. My words are unsolicited, which by definition make them 100% accurate. Right???) But back to the issue at hand.

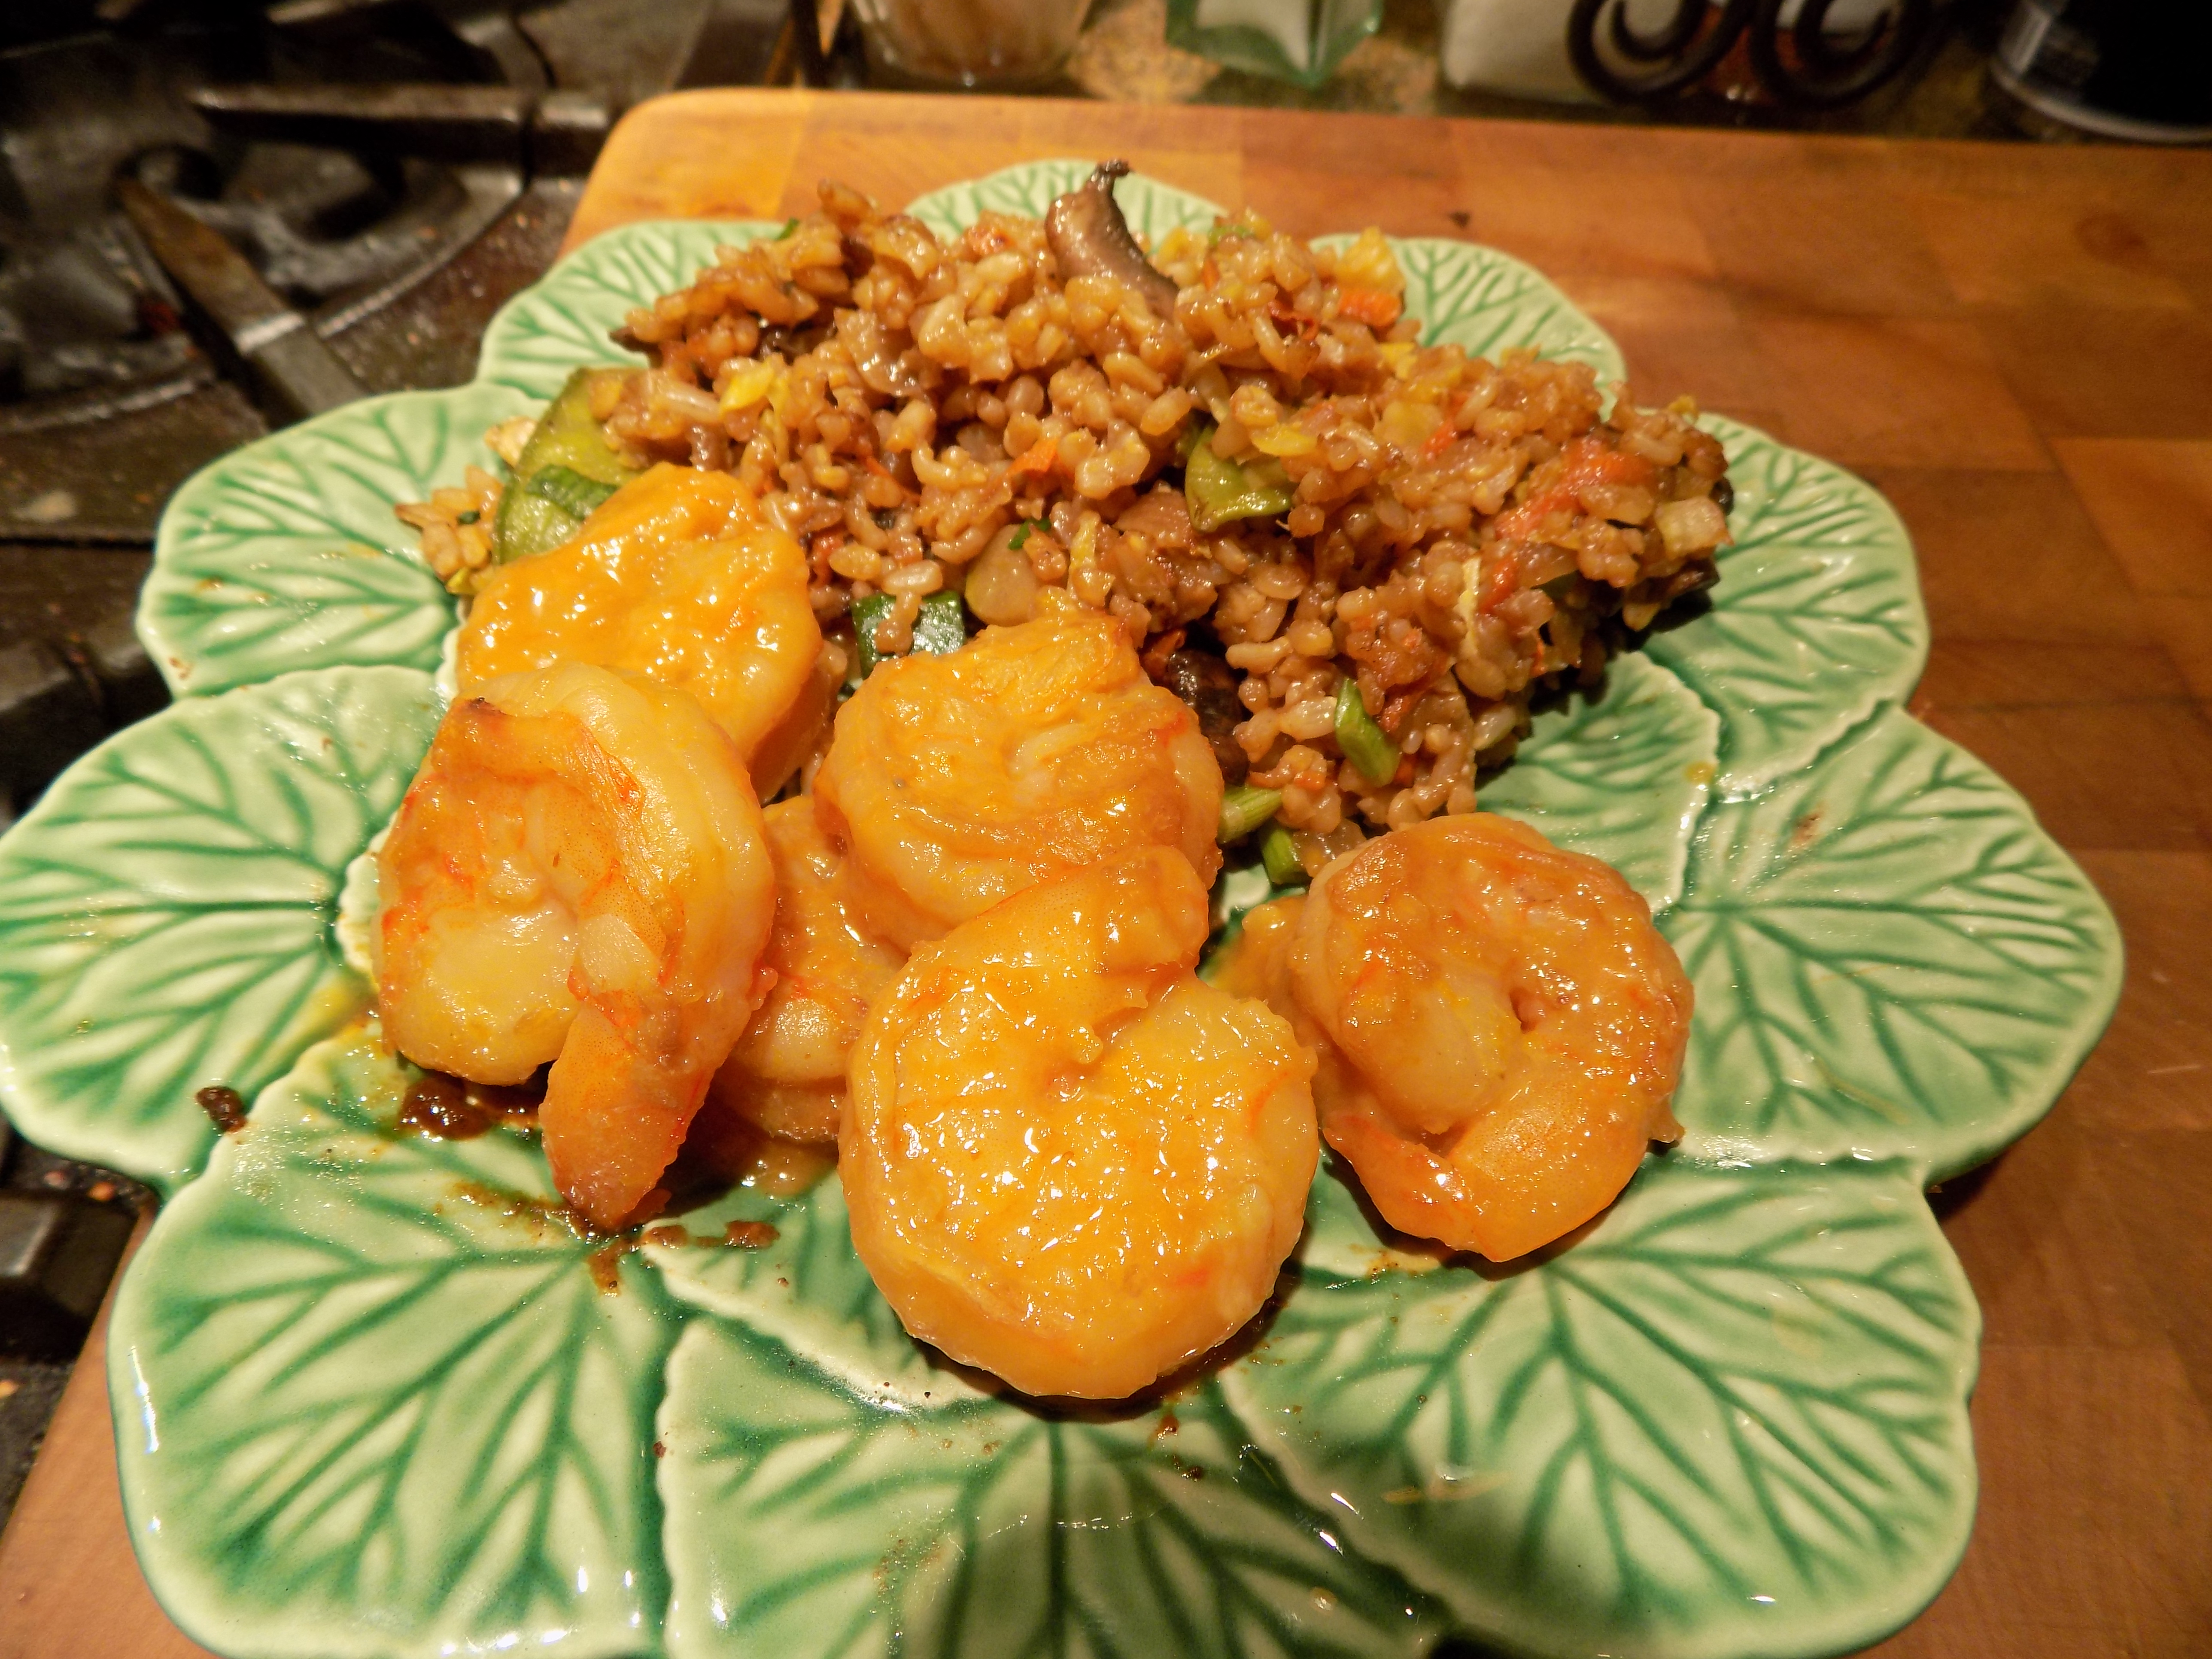
As you know, citrus works very well with seafood. And something about the orange zest and juice along with the other ingredients work well to enhance the flavor of the shrimp rather than detract from it. And we’re talking only 2 teaspoons of oil in this recipe. Hurray for that!

So if you too love Chinese food, I suggest you try this delicious shrimp recipe. It is definitely a quick and easy dish to prepare, making it perfect for any night of the week. Served with Chinese Salt and Pepper Beans and steamed brown rice, you have a dinner that will please your entire family. Just remember to start your brown rice first. It will take longer to cook then both of the other recipes.

And if you haven’t learned to love brown rice yet, try using low sodium broth in place of the water when you cook the rice. Also, and I can’t believe I am going to put this in writing after railing above about too much salt, but a tiny pinch of salt and some freshly ground pepper will also add to the overall flavor of the brown rice. (Sorry to go all pettifogging on you when it comes to the issue of salt, but rest easy. I’m working on the problem!) Enjoy the shrimp. Thanks again Cooking Light for this delightful recipe.

  • 1 lb. peeled and deveined uncooked large shrimp
  • 1 T. cornstarch, or more as needed to coat the shrimp
  • 1-2 tsp. orange zest
  • ½ c. orange juice
  • pinch kosher salt (unless using regular soy sauce)
  • 2 T. low sodium tamari or soy sauce
  • 1 T. honey
  • 1 T. rice wine vinegar
  • ½ tsp. Sriracha or chili sauce, or more to taste
  • 2 tsp. vegetable oil
  • 1 T. minced fresh ginger
  • 2 garlic cloves, minced
  • ¼ c. chopped green onions

Place shrimp in a medium bowl. Sprinkle with cornstarch; toss well to coat. Set aside.

Whisk together the orange zest, juice, salt, tamari, honey, vinegar, and Sriracha. Set aside.

Heat oil in a large nonstick skillet over medium-high heat. Add minced ginger and garlic to pan; stir-fry for 20 seconds or until fragrant. Add shrimp; stir-fry for 3 minutes or until almost done. Add juice mixture and green onions; cook 2 minutes or until sauce thickens and shrimp are done, stirring frequently. Serve immediately.


ITALIAN SAUSAGE, SPINACH, AND MUSHROOM CASSEROLE

dscn0108

Of course you already know that I am a pasta fanatic. And in all honesty, this casserole is one of the reasons why I can’t seem to stay away from any type of dish that consists of a sauce and various other accoutrements that surround shaped and boiled semolina flour and water. This casserole has everything I find necessary to fulfill my “must have pasta” need. It has meat, veggies, cheese, and a killer cream sauce. When combined, it is just a fantastic amalgamation of flavors. And it’s pretty too!

So next time you’re in the mood for pasta, and especially when you have a small army to feed, make this dish. Now, I’m not going to tell you that it‘s a quick dish to prepare. Because it does take some dedicated kitchen time. But I will say that it’s an easy recipe to follow, and not too expensive compared to a lot of lasagna type recipes that call for vast amounts of expensive cheese. Plus it’s a lovely change from a tomato sauce based pasta dish. And, this pasta can be made well ahead and kept in your refrigerator until needed.

So everything considered, it’s a great dish to have in your special treat and company repertoire.

So give it a try. What’s to lose? Well for sure it’s not weight! Because this definitely is not a low calorie casserole. But then, I’ve never enjoyed a low calorie casserole in my life, so what would I know about how to create one? Never mind – just enjoy!

  • 1 T. extra virgin olive oil
  • 1 lb. bulk Italian sausage
  • 1 onion, chopped
  • 2 cloves garlic, minced
  • 1 lb. fresh button mushrooms, sliced
  • ¼ tsp. oregano
  • pinch crushed red pepper flakes
  • ½ tsp. kosher salt
  • freshly ground black pepper
  • 2 T. minced fresh parsley
  • 10 oz. fresh baby spinach, chopped
  • ½ c. unsalted butter
  • 6 T. flour
  • 2 c. milk
  • ¼ c. dry white wine
  • 1 c. sour cream
  • 1 tsp. Worcestershire sauce
  • 2 tsp. beef base
  •  c. dry penne pasta, cooked al dente
  • 2 c. grated Mozzarella cheese
  • paprika

Heat olive oil in a large fry pan. Add the Italian sausage and cook until browned. Add onion and mushrooms. Fry until the onion starts to soften, about 4 minutes. Add the garlic and cook for one minute. Stir in the oregano, red pepper flakes, salt, pepper, parsley, and spinach. Remove pan from heat. In a medium sized saucepan melt the butter and whisk in the flour. Let cook for a couple of minutes, then gradually add the milk. Cook over low heat until thickened. Remove from heat and whisk in the white wine, sour cream, Worcestershire sauce, and beef base. Add to the sausage mixture, along with the cooked pasta. Adjust seasoning. Scoop into a lightly greased 9×13-inch pan or casserole dish. Top with Mozzarella cheese and sprinkle with paprika. Bake uncovered in a pre-heated 350 degree oven for 35-45 minutes, or until the casserole is bubbly and the cheese topping has melted and started to brown. Let sit for 10 minutes before serving.

Note: This recipe can be doubled or tripled easily. It can also be made ahead and kept in the refrigerator until about 2 hours before you need to pop it in the oven. Letting the casserole come to room temperature before heating allows all the ingredients to warm more evenly.


BEEF STROGANOFF

dscn0016

I am a strong believer in the power of positive thinking. That’s the only way I have found to be successful at anything I have ever attempted. Well positive thinking and a Betty Crocker cookbook given to me when I was 20 years old! You see, Betty taught me to cook. And one of my early culinary successes was Beef Stroganoff. And through becoming confident in the kitchen, I became confident in other areas as well. Or at least confidence enough to try other endeavors that interested me. And believe me, through the years I have taken on many projects and adventures that had I been told as a teenager I would be doing, would have caused me to laugh out loud or bury my head under a pillow!

Now don’t get your hopes up too much. This is not the recipe that was in my 1961 First Edition Betty Crocker’s New Picture Cook Book. This is my version that has been manipulated, adjusted, and massaged for over 50 years. But even with all the revisions I have made, this is still one of the easiest and quickest dishes to prepare. Also one of the most delicious. So, absolutely perfect for a weeknight meal. Serve with a green salad or a nice steamed green veggie, and dinners ready.

And as far as using your cooking skills to translate into the power of positive thinking, it really only makes sense. Good food on the table makes your family and friends happy. Which means they will always want to be at your table which only makes you feel better about yourself and want to continue feeling that way. So I say, cheers to good food and to those who provide it! Of course you still have to use your head while reeling from the afterglow of a meal well prepared. You still can’t fly or jump off roofs or any of the other skills attributed to super heroes. You are still human, even if you are a marvelous cook! But if you drift off to sleep dreaming of your face on the cover of Time magazine, that’s OK. It means you have the confidence to believe that anything is possible. And confidence in confidence alone is a great thing. Just ask Julie Andrews!  

  • 1 T. extra virgin olive oil
  • 1 T. unsalted butter
  • 1 small onion, cut in half then thinly sliced
  • ½-¾ lb. button mushrooms, sliced
  • ¼ tsp. kosher salt
  • freshly ground black pepper
  • ¾ lb. high quality lean beef, cut in very, very thin strips against the grain, then into bite sized pieces
  • ¼ c. brandy
  • 1 c. beef stock
  • 1 bay leaf
  • 1 tsp. whole grain mustard
  • 1 c. sour cream
  • 1 T. chopped fresh Italian parsley or 2 tsp. dried parsley
  • 1½ c. uncooked thick egg noodles, cooked al dente

dscn0018

(I buy my thick noodles at Costco. They are every bit as good as homemade – and a lot less work!)

Heat the oil and butter in a large heavy skillet. Fry the onion and mushrooms over medium heat until the mushrooms are dry and browned. While they are cooking add salt and pepper. Remove to a medium sized bowl and set aside.

Add cut steak to the same skillet and quickly fry over high heat for 30 seconds to a minute. (The meat should still be semi-rare.) Remove from pan and add to the bowl with the cooked onion and mushrooms; set aside. Remove pan from heat and add the brandy, beef stock, and bay leaf to the pan. Return pan to stove and reduce the liquid by half. (If there are brown bits on the bottom of the pan, be sure to scrape them up into the liquid.) Stir in the mustard and add the cooked onion, mushrooms and meat, sour cream, parsley, and cooked noodles. Adjust seasoning and discard the bay leaf. Cook just until hot, then serve immediately. 

And remember: if any part of this dish has to wait, make your sauce wait for your noodles, not the other way around.   

FRIED RICE

dscn0010

Yesterday while trying to decide what to fix for dinner, I remembered that I had some cooked white rice in the fridge. When I serve rice, it’s usually brown rice or some kind of pilaf. But the night before I had served a chicken curry, and I like curry best over white rice. (FYI – For my curry recipe, go to Curry Sauce for Chicken, Shrimp, Beef, or Lamb.) So with about 2 cups of cooked rice literally staring me in the face, I decided to make fried rice.

I have been making this recipe for decades. It is so tasty and the best part is that you can use as many or as few veggies as you happen to have on hand. I didn’t have any fresh mushrooms for example, so I used dry mushrooms. (Actually I prefer dried mushrooms in fried rice anyway. So no problem there.) Then I simply used the combination of veggies listed below, because they were what was in my veggie drawer. But you could add celery, bean sprouts, Fried Tofu (see recipe below), edamame, broccoli, or any other vegetable your little heart desires or you simply need to use up. (Soup and fried rice have a lot in common when it comes to using up fresh vegetables that scream at you every time you open the veggie crisper drawer!)

And the amounts listed below are merely a guideline. If you are crazy nuts about peas for example, add as many as you like. Hate mushrooms, leave them out. This recipe should be used as a simple road map to preparing a delicious side dish that is simple to make, inexpensive, and pretty to boot. And it goes well with just about any type of meat.

So do yourself and your family a favor. Get your wok out of storage, or your largest fry pan from its resting place, and build a treat for your family. Fried rice is simply an amazing dish. Kids don’t even realize they are eating veggies when they are gulping down this rice with its subtle Asian flavor. And what parent doesn’t like a little harmless subterfuge when it comes to providing their offspring with nutritious food? Or wife for that matter trying to get cruciferous veggies down her husband’s throat. (Not mentioning any names here, but I’m pretty sure you can figure out to which husband and wife team I am alluding!)

  • 2 eggs
  • ½ tsp. kosher salt, divided
  • 3 T. vegetable oil, divided
  • 3 tsp. sesame oil, divided
  • ½ c. chopped yellow onion
  • ¾ c. chopped button mushrooms or ½ c. chopped dry mushrooms, rehydrated and squeezed semi-dry
  • 2 c. cold cooked rice
  • 1/3 c. shredded carrot
  • ½ c. diced zucchini
  • ¾ c. finely sliced green cabbage
  • 2 T. vegetable, chicken, or beef broth
  • freshly ground black pepper
  • 3 T. Tamari, or more to taste (use GF Tamari to make this a GF dish)
  • ¼ c. frozen petite peas or fresh peapods, sliced
  • ½ c. sliced green onions

Beat eggs with ¼ teaspoon of the salt. Heat 1 tablespoons of the vegetable oil over medium heat in a wok or large fry pan. Pour in beaten eggs. Stir eggs continuously until cooked dry and separated into small pieces. Remove from pan and set aside.

Add the remaining 2 tablespoons vegetable oil and 1 teaspoon of the sesame oil to the pan. Turn burner to medium heat. Add the yellow onion, mushrooms, and rice to the pan. Stir fry for 5 minutes. Add the carrot, zucchini, and cabbage; stir fry for an additional 4 minutes. Add the broth, remaining ¼ teaspoon salt, pepper, and Tamari. Stir to mix well. Add the peas, green onion, cooked eggs, and remaining 2 teaspoons sesame oil. Bring up to heat. Adjust seasoning and serve immediately.

Please note: If you want to include meat in your fried rice, add as much cooked meat or cooked shrimp as you would like along with the peas, green onions, etc.

FRIED TOFU

  • ½ block extra firm tofu
  • 2 T. cornstarch, or more as needed
  • 2 tsp. vegetable oil
  • 1 tsp. sesame oil

Wrap tofu in a clean, absorbent towel and set something heavy on top, such as a cast iron skillet, to press out the liquid. Let sit for a few minutes. Cut tofu into ¼-inch slices and coat with cornstarch.  Combine the vegetable oil and sesame oil in a medium frying pan. Bring oil to medium heat and fry the tofu until both sides are a nice golden brown. Remove from pan and drain on a paper towel. When cool cut into bite size pieces. Set aside. Add to the fried rice along with the peas, green onions, etc. Stir gentle so the tofu doesn’t break up.


OVEN ROASTED WHOLE CHICKEN WITH DRESSING AND PAN GRAVY

dscn0004

I call baked chicken my “Sunday night special” because there is just nothing better than a lovely roast chicken to close out a weekend. And since this chicken is best when it has had some time in the refrigerator to become acquainted with the lovely herbs and spices that have been sprinkled in its cavity and on its skin, preparation takes place in the morning. That leaves me free to spend the rest of my Sunday, or any other day for that matter, working around the house, shopping, reading, or just sitting around contemplating the inside of my eyelids – aka, taking a nap. And just to make life even easier, I also prepare the dressing in the morning, so the only significant task left for me to do in the evening is clean a green veggie or make a simple salad to accompany the chicken.

And what better way for me to start my week than with leftover chicken in the refrigerator. I can use the chicken to make a simple soup, or a nice curry, or chicken salad, or…..well, you get the point. My Monday night meal is already half done, even if I don’t just warm up the leftovers and serve the meal just the way I did the night before. Of course, if truth be known, I don’t particularly enjoy left-overs. (I know – crazy!) I would rather take a simple ingredient liked baked chicken and repurpose it into a totally different dish. Now I realize something like chicken noodle soup is going to remain chicken noodle soup, and that’s fine. But baked chicken? Well that’s a different story. So tonight, my leftover chicken from Sunday evening is going to be featured in a lovely chicken curry.

So don’t hesitate to bake a chicken in the near future. And no you don’t have to make the dressing or even the gravy. But should you choose to do so, the recipes below are easy to prepare, full of flavor, and help turn a simple chicken dinner into a feast.

So welcome to autumn my friends. The season of homemade soup, pot roast, beef stew, chili, and all manner of dishes that evoke home, happiness, and comfort. 

  • 3½ to 4½ lb. whole chicken, washed, excess fat removed, then dried very well with paper towels
  • 2 tsp. kosher salt
  • freshly ground black pepper
  • zest of one lemon
  • 2 tsp. finely chopped fresh rosemary
  • 2 tsp. finely chopped fresh sage
  • 2 tsp. finely chopped fresh thyme
  • 1 tsp. granulated garlic
  • 1 tsp. onion powder
  • 2 T. butter
  • 2 c. chicken stock, plus more as needed
  • 1 bay leaf
  • cooking spray

Combine the salt, pepper, lemon zest, rosemary, sage, thyme, granulated garlic, and onion powder together. Sprinkle half of the mixture in the cavity of the bird. Add the butter. Truss the bird by tying the legs together. Place the bird, breast side up on a roasting rack, tucking the wings in as you go. Sprinkle the remaining spice mixture evenly over the skin. (And no it won’t really stick to the skin. That’s OK.) Place the chicken uncovered in the refrigerator for at least 1 hour, or up to 24 hours before roasting.

Remove from refrigerator and pour the chicken stock in the bottom of the roasting pan along with the bay leaf. Just before placing the bird in the oven, spray liberally with cooking spray.

Bake in a pre-heated 425 degree oven for 90 minutes or until the juices run clear and the internal temperature reads 180 on an instant-read thermometer. Add more chicken stock to the bottom of the pan half way through baking if the pan is dry. When done, remove from oven and set the bird on a platter loosely tented with aluminum foil. Let chicken rest for at least 20 minutes before slicing.

GRAVY

  • flour
  • chicken stock
  • 1 tsp. Kitchen Bouquet
  • freshly ground black pepper
  • 1 chicken gravy mix (just in case)
  • 1 tsp. cognac, opt.

Place the roasting pan on the stove after the chicken has been removed. Turn the heat to very low and begin making your gravy immediately. (Good gravy flavor and consistency require time to develop.)    Do not remove any fat from the pan, do not strain the liquid, do not do any of the things most cook book writers tell you to do to make good gravy. (Oh OK, you can remove the bay leaf!)

Whisk in enough flour to absorb the fat. Let cook for a couple of minutes. (This process takes time, so be patient.) Slowly whisk in chicken stock until you reach the desired thickness you like. Add the Kitchen Bouquet (gives the gravy great color) and some freshly ground black pepper. No salt! Taste the gravy. If you think it needs more depth of flavor, begin by whisking in part of the gravy mix and a small amount of chicken stock. Let the gravy simmer for a couple of minutes and taste again. Repeat if needed.

Turn heat as low as possible and let the gravy simmer away while the chicken rests. Whisk periodically.  (You will probably need to add more stock during this time.) Also, after the chicken is sliced and plated, don’t forget to add the juices to the gravy that have accumulated on the platter while the chicken was resting. Just before serving, taste the gravy again and make any final adjustments to the seasoning. Stir in the cognac and serve piping hot.

Note: if the gravy seems a little salty, you might try adding a teaspoon or two of fresh lemon juice.

DRESSING

  • 2 T. unsalted butter
  • ½ c. chopped celery (stalks and leaves)
  • ½ c. chopped onion
  • 5 button mushrooms, chopped
  • 1 clove garlic, finely minced
  • 2 T. chopped fresh Italian parsley
  • 2 tsp. poultry seasoning
  • 2 tsp. minced fresh sage
  • 1 tsp. finely chopped fresh rosemary
  • 1 tsp. fresh thyme leaves
  • ½ tsp. savory, either powdered or dried leaves
  • ½ tsp. kosher salt
  • freshly ground black pepper
  • 4-5 c. dry bread cubes (I use inexpensive sliced sourdough bread cut into cubes and toasted)
  • 1 egg
  • 1 c. chicken stock, or more as needed

In a large sauté pan, melt butter and add celery, onion, and mushrooms. Cook for about 5 minutes. Add the garlic, parsley, poultry seasoning, sage, rosemary, thyme (sound familiar?), savory, salt, and pepper. Remove from heat. Place dried bread cubes in a large mixing bowl. Add the sautéed vegetables; mix thoroughly. Whisk together the egg and stock in a separate medium sized bowl. Pour the liquid over the bread cubes and gently stir. Add more stock if the dressing is dry. (Remember, this is dressing, not stuffing, and therefore is not going into the cavity of the chicken. So any moisture needs to be added while it is being prepared.) Taste the dressing and add additional poultry seasoning and/or salt if needed.

Place dressing in a buttered casserole dish, cover and refrigerate until ready to bake in a pre-heated 350 degree oven for about 30-45 minutes or until hot. 


GROUND BEEF PATTIES WITH COGNAC SAUCE

OLYMPUS DIGITAL CAMERA

As much as I love to cook, there are just those evenings when the last thing I want to do is spend time or more time in the kitchen. What happens more often than I would care to admit, is that I have already spent my entire day in the kitchen preparing for an event. So the last thing I want to do is even think about what to do about dinner. Sometimes the answer is obvious. I grab my dear husband and drag him out the door to a local food purveyor. But that never seems quite fair. After all, the poor guy has been smelling food all day. And I’m quite sure expecting that at least some morsel of whatever I have been preparing is going to reach the dining room table. (Not usually going to happen.) So the good wife in me hates to deprive him of a home cooked dinner.

For those evenings, and for times when all I want is a simple meal fit for the most dedicated carnivore (I resemble that remark), I fix this simple recipe, along with a baked sweet or Yukon Gold potato and a steamed green veggie. Mr. C. is happy, I’m happy, the cats are happy. All is right with the world.

So if you too have extenuating circumstances that result in you not jumping for joy at spending another or even 30 minutes preparing dinner, I suggest you use the excuse I often use under this most trying of situations. I DON’T WANT TO! YOU CAN’T MAKE ME! I QUIT! (I don’t actually say those things. But you can bet your favorite Dr. Seuss book my inner child is jumping up and down screaming them in my head!)

Actually what I usually do is negotiate. You know, the art of getting your own way but in a decent, respectful manner. I play to Mr. Cs always agreeable side. I merely tell him, “I’m old, I’m tired, and if I have to make dinner I might accidentally burn down the house”. No, I don’t do that either. I just tell him the truth – “I truly don’t have the desire or strength to cook dinner tonight”. That’s all it takes. Just a simple statement told in an adult and civilized manner. Sometimes it results in us going out. Sometimes Mr. C. cooks, and sometimes the best of all possible worlds happen. We cook dinner together. I can almost always garner enough strength to cook when I have Mr. C. helping me. And of course, a dish as easy as this makes our joint adventure even more enjoyable. That and one of Mr. Cs martinis! (You just have to get a little extra boost of energy wherever you can. A nice glass of wine works too.)

So enjoy how easy this ground beef recipe is to prepare, how economical it is, and how darn delicious it is for containing such a short list of ingredients. You can thank me later by replying at the top left corner of this post.

  • 1 lb. lean ground beef
  • 2 T. minced onion
  • 2 tsp. Montreal Seasoning
  • 1 T. unsalted butter
  • ½ c. beef stock
  • 1 T. Cognac

Combine the ground beef, onion, and Montreal Seasoning. Form into 2 or 3 torpedo shaped patties. Heat the butter in a small fry pan. Add the patties and fry the first side until dark brown and about half cooked. Flip the patties and cook an additional couple of minutes or until desired doneness.

OLYMPUS DIGITAL CAMERA

Remove pan from heat and transfer the patties to a small plate; cover with aluminum foil to keep warm.

Add the beef stock and Cognac to the pan. Return pan to medium high heat and cook until liquid is reduced by about half. Remove from heat and pour over the patties.   

CREOLE MEATLOAF WITH MASHED BUTTERMILK POTATOES AND TRINITY GRAVY

OLYMPUS DIGITAL CAMERA

I love Creole food and I love meatloaf. So I decided that a recipe for Creole meatloaf would be next on my list of “how in the heck am I going to use up more of the ground beef in my freezer?!?!”

Having decided on the flavor theme, I went about looking for Creole recipes I could adapt. And one of the first recipes to pop up on my search was a recipe from Rachael Ray. But I couldn’t stop with just looking at one recipe, so I brought up a few more and the recipe below is the result of combining several recipes and my own ideas on the subject.

Now, unless you have done a lot of Creole cooking, you might be wondering about “trinity” gravy. If you are like me, my “trinity” in cooking is a combination of onion, carrot, and celery. I start almost every stew, soup, or red sauce with this combination of base ingredients. In French cooking it’s called mirepoix, and consists of 2 parts onion, 1 part carrot, and 1 part celery. But the Creole and Cajun cuisine considers onion, celery, and green pepper to be the holy trinity of flavor. 3 parts onion, 2 parts celery, and 1 part green bell pepper. Cajun/Creole dishes such as étouffée, gumbo, and jambalaya almost always start with this base. And since I love all three of these dishes, I decided maybe a trinity gravy was right up my alley too.

I am happy to report that both the meatloaf and the gravy are a wonderful combination of flavors, very simple to prepare, and economical to build. In fact, I would classify this dish as perfect for company. It does take time to prepare, but all can be made ahead of time, and then reheated just before serving. And although the ingredients aren’t expensive, the presentation looks like a million dollars.

Now I’ve heard, that half the enjoyment one gets from food is in the presentation. Frankly, I think that’s a load of rutabaga skins! I’ve tasted many a dish that looked terrific, but the flavor – less than satisfactory. But this delicious dish is not just beautiful on the outside. Remember – “external attractiveness has no relation to goodness or essential quality.” I know this maxim first stated by Sir Thomas Overbury in his poem “A Wife”, was meant to imply that beauty (in a wife) should not be just skin deep. But, as far as I’m concerned, his reflection speaks equally to culinary presentations! And if this dish doesn’t yell “good wife” I don’t know what dish does!! (And yes, I can make any quote or maxim have something to do with food. It’s a DNA abnormality handed down through my father’s side of the family!)  

For a small family or a senior couple like Mr. C and me, this wonderful meatloaf and gravy is a three meal delight. First night – eat until you can’t walk. Second night, eat until you remember how bad you felt after dinner the night before! Third day, argue over who’s going to get the last couple of slices of meatloaf for lunch! Enjoy, and no fighting kids!     

Meatloaf:

  • 1 T. extra virgin olive oil, plus more for smearing on meat loaves before baking
  • 1 lg. onion, finely chopped, divided
  • 5 garlic cloves, finely minced, divided
  • 2 tsp. paprika
  • 2 T. fresh thyme leaves
  • 2 T. Creole Seasoning, divided (to make your own, see two very good recipes below)
  • 1 tsp. kosher salt, divided
  • freshly ground black pepper
  • 2 T. grainy Dijon mustard
  • ½ c. bread crumbs
  • 1 egg
  • ¼ c. milk
  • 1 lb. ground beef
  • 1 lb. ground pork

Heat the olive oil in a medium skillet over medium heat. Add 1/4th of the onion to the skillet, and cook to soften, 5-6 minutes.  (The rest of the onion is used in the gravy.) Add half of the minced garlic and cook for one minute. (The rest of the garlic goes in the gravy.) Transfer the mixture to a bowl and cool.  To the cooled onion mixture add the paprika, thyme, 1 tablespoon of the Creole seasoning (the rest of the Creole seasoning will be used in the gravy), ½ teaspoon of the salt (the rest in the gravy), black pepper, mustard, breadcrumbs, egg, and milk.  Mix to combine. Add the ground beef and the ground pork, stirring gently just until well combined. (I use my hands for this part.) Form into 2 loaves, each about 10 inches long and 4 inches wide.

OLYMPUS DIGITAL CAMERA

Place on a parchment-lined rimmed baking sheet. Smear the entire surface lightly with olive oil. Bake in a pre-heated 375 degree oven for 30-35 minutes or until the internal temperature reaches 160 degrees.

To serve: Slice the meat loaves. Arrange the slices over Buttermilk Mashed Potatoes and pour the Trinity Gravy over both.  Garnish with sliced scallions and serve.

Trinity Gravy:

  • 2 T. butter
  • 2 celery stalks, finely chopped
  • 1 green bell pepper, seeded and finely chopped
  • 1/8 tsp. white pepper
  • 2 T. tomato paste
  • small bay leaf
  • 2 T. all-purpose flour
  • 1½ c. beef stock (I use beef base and water)
  • 1 tsp. hot sauce or more to taste (I use Frank’s Red Hot Sauce)
  • 1 T. Worcestershire sauce
  • mashed sweet or russet potatoes (see recipe below)
  • 2-3 scallions, sliced on the bias, for garnish

Meanwhile, in the same skillet you used for the meatloaf mixture, melt the butter and add the remaining onion. Cook for about 7 minutes, then add the celery, bell pepper, remaining ½ teaspoon salt, and white pepper.  Cook the mixture long enough to soften, about 30 minutes. (I usually cover the pan after about 10 minutes and let the veggies gently steam/fry.) The veggies should be kinda brown and kinda mushy. That’s what you want. None of this crisp tender for this recipe!

OLYMPUS DIGITAL CAMERA

Add the remaining garlic and cook for one minute.  Add the tomato paste and bay leaf; stir for 1 minute.  Sprinkle the flour and remaining Creole seasoning over the mixture and stir for another minute.  Whisk in the stock, hot sauce, and Worcestershire sauce; cook to thicken over medium-low heat for a couple of minutes. Adjust the seasoning. Turn the heat to the lowest setting to keep the gravy warm. Stir periodically.

If you are not going to be serving in the next little while, remove from heat and re-warm when ready. Remove bay leaf before serving.

Buttermilk Mashed Potatoes:

  • 2 lbs. sweet potatoes or russet potatoes, peeled and cut into chunks
  • kosher salt
  • freshly ground black pepper
  • ¾ to 1 c. buttermilk

Cover the potatoes with water in a medium pot and bring to a boil, then season with salt, reduce heat, and cook for 12-15 minutes until tender.  When the potatoes are done, drain and return to the hot pot and mash with black pepper and buttermilk to desired consistency. Add salt if necessary.

EMERIL’S ESSENCE CREOLE SEASONING

  • 2½ T. paprika
  • 2 T. salt
  • 2 T. garlic powder or granulated garlic
  • 1 T. freshly ground black pepper
  • 1 T. onion powder
  • 1 T. cayenne
  • 1 T. dried oregano
  • 1 T. dried thyme

Combine all the ingredients and store in an airtight container.

CREOLE SEASONING MIX (my recipe) 

  • 1½ tsp. onion powder
  • 1½ tsp. granulated garlic
  • 1 tsp. kosher salt
  • 1 tsp. white pepper
  • 1 tsp. freshly ground black pepper
  • 1 tsp. paprika
  • ½ tsp. dry mustard
  • ½ tsp. dried thyme
  • ½-1½ tsp. cayenne (depends on how much heat you like or can tolerate)
  • ½ tsp. gumbo file

Combine all the ingredients and store in an airtight container.


GROUND BEEF AND PORTOBELLO MUSHROOM BURGERS

As I’m sure you already know if you have read any of my previous posts, I am the number one fan of ground beef. I actually much prefer it to steak, and as a breakfast meat, in my mind there is no comparison. And now, after having purchased a quarter of a Highland cow and had a good portion of it ground, I am even more convinced that ground beast is indeed a food from the Gods. (And yes I meant to write “beast”, because that was a common mispronunciation when my kids were young, and I still often lapse into “kiddie language world”.)

Anyway, I decided I wanted to serve a tasty barbequed burger to my friends who would be helping us celebrate our new trailer on our shakedown cruise. When I am trailer camping, I still like to serve great food, but I really don’t want to spend my entire day in the kitchen. (Our trailer kitchen is very nice, but never-the-less, one of the reasons I go camping is to get away from my usual routine, and treat myself to some quality outside time!) So I planned the menu around quick and easy recipes like this one.

This recipe is based on a recipe I found on the Food Network Kitchen site. Their recipe called for ground turkey, but I thought using ground beef (since I had 24 pounds in my freezer) would be perfect too. So I changed a couple of ingredients, and the following recipe is the result.

And I am telling you, all the ingredients work perfectly together to make just a delicious, succulent burger. And using grilled English muffins instead of regular hamburger buns is genius. English muffins toast beautifully on the grill and are not as filling as those puffy things you usually associate with a hamburger. I will never again buy a package of squishy buns. My heart now belongs to English muffins, or homemade rolls of course!

So do yourself a favor and mix up a batch of this ground beef mixture, form it into patties, and throw the burgers on the grill. Your family won’t even suspect that they are eating vegetables when they bite into one of these burgers. But they will notice that the burgers taste just wonderful. But do it soon. Fall is fast upon us. And even though you can still BBQ in the winter, burgers always taste better when you eat them al fresco! Plus it saves cleanup under your kitchen table. After all, any burger worth its gooey additives is going to be messy. So when you eat outside, the juices running off your elbows aren’t a problem. Plus your hose is probably nearby. (So much easier than throwing your kids in the shower after they have eaten!) Happy end of summer.

(Sorry about no picture, but we were all hungry and the burgers disappeared before I could get my camera out of its case.)

  • 1 lg. portobello mushroom cap, stem and gills removed, finely chopped
  • 1 small finely chopped shallot
  • 1 T. chopped fresh parsley
  • 2 T. extra-virgin olive oil, plus more for brushing on the grill
  • 1 tsp. Worcestershire sauce
  • 1 tsp. Monterey Steak Seasoning
  • 1 tsp. seasoned salt
  • freshly ground black pepper
  • 1 lb. lean ground beef
  • thin slices manchego or sharp cheddar cheese
  • English muffins, split
  • mayonnaise
  • Dijon mustard
  • sliced avocado

Mix the mushroom, shallot, parsley, olive oil, Worcestershire sauce, Montreal Steak Seasoning, seasoned salt, and pepper together. Add the ground beef and mix together with your hands until just combined. Divide the mixture into 4-5 balls, then lightly press into 1-inch-thick patties. Place on a plate, cover, and refrigerate until firm, about 30 minutes.

Preheat your grill to medium heat. Brush the grate with olive oil. Grill the patties, undisturbed, until marked on the bottom, 4 to 5 minutes. Give the patties a quarter turn and cook until marked again, 2-3 more minutes. Flip the patties, top with cheese, and grill until cooked to your liking. Remove from grill to a platter and cover with aluminum foil to stay warm.

Toast the English muffins on the grill, then spread one half with mayonnaise, the other half with mustard. Add a hamburger patty, a couple slices of avocado and take a bite. Heaven I’m telling you, heaven! Or if you like a more traditional burger, add any of your favorite condiments. It’s all good!


BAKED COD WITH CAPERS, KALAMATA OLIVES, AND GARLIC

OLYMPUS DIGITAL CAMERA

It’s a beautiful warm and sunny day here on Camano Island. As I am typing away, Max, one of my orange kitties is dozing on a towel on my desk, Mt. Baker is out in all its glory (I can see it from my den window), Mr. C is off golfing with a friend, and I have the day to myself. I don’t even have to cook dinner, because I have leftovers from last evening.

OLYMPUS DIGITAL CAMERA

Mommies little helper Max (16 months) – sound asleep

OLYMPUS DIGITAL CAMERA

Time to add his 2 cents worth

Usually I look forward to cooking our evening meal. But when what I have to look forward to, like some more of this delicious cod, I can easily forgo the pleasure of cooking for the taste treat I know is in store for me. And frankly folks, I can hardly wait for dinner and its only 9:58 am!

I am always looking for ways to cook fish that are not only tasty but good for us. And what I mean by “good for us” is that the fish isn’t fried or needs a caloric tartar or aioli sauce to provide additional flavor.

So when I went searching for another way to bake cod, I found 3 recipes that I found interesting. Two featured capers and Kalamata olives; the third lemon, garlic, and either fresh thyme or rosemary. So I took what I thought was a good combination of all three recipes and the following baked cod dish is the result.

And oh-my-gosh the cod was good. You could still taste the fish, but the topping was just a perfect augment. Of course, it didn’t hurt that I started with fresh cod. And baking it at 475 degrees (which was recommended in one of the recipes) was genius. The fish was firm but still very moist.

So if you too want to add more fish to your diet, but don’t want to feel like in doing so you are adding a ton of unnecessary calories from frying, coating, or dipping your fish in tartar sauce, give this recipe a try. Obviously there are a few calories in the caper-Kalamata spread, but nothing compared to a breaded and deep fried piece of fish accompanied with tartar sauce.

Now don’t get me wrong. One of my favorite meals is fish and chips. But my stomach sometimes rebels when I feed it all that grease. With this recipe, there is no after dinner upset or guilt. And although you can’t measure the calories in guilt, it can still weigh you down. And not as in helping your scale show lower numbers, but as in a mind suffering from regret! So don’t let that happen to you. Try this recipe and relax. You are going to love serving this dish to your family. It’s quick and easy to prepare. And you are going to feel so good providing a healthy and delicious alternative to fried fish. A little happy dance before serving the fish would not be inappropriate! Neither would a nice glass of white wine!

  • 1 lb. cod fillet, bones removed and cut in portion sized pieces
  • 1½ T. lemon juice
  • 1 T. extra virgin olive oil
  • ½ tsp. kosher salt
  • freshly ground black pepper
  • ¼ tsp. paprika
  • 2 cloves garlic, finely minced
  • 1 tsp. fresh thyme or rosemary, lightly chopped
  • 2 tsp. capers, drained and coarsely chopped
  • 2 T. chopped Kalamata olives

Place the cod in a lightly buttered 8×8 or 9×9 glass baking dish. Combine the lemon juice, olive oil, salt, pepper, paprika, garlic, thyme, capers, and olives together in a small bowl. Spread evenly over the cod.

Bake in a pre-heated 475 degree oven for 10-12 minutes or until the flesh is opaque in color. I serve the cod with plain rice, spooning the juices from the pan over the fish and the rice. Add a salad or veggie, and dinner is ready!

Note: Would be great with any firm, white fleshed fish.

RICE AND PASTA PILAF

OLYMPUS DIGITAL CAMERA

OK, it’s time to fess up. When I am trailer camping, I almost always buy packaged rice mixes as a side dish for dinners. They are easy to store, simple to prepare, and usually make enough for 2 dinners. And one of my favorites is Rice-a-Roni. (Remember, I never said I was a gourmet!) And truly, there are some pretty good rice/risotto mixes on the market today. But even though they are perfect for camping, they are expensive (for what you get), and have that subtle background taste that I really don’t enjoy. I call that flavor – “packaged”. You find it in lots of products, from pancake mix to cake mix and beyond. (And yes, I still use cake mixes occasionally. In fact, some of my favorite dessert recipes start with a cake mix. But I digress…..)

So I have determined, after performing my own very unscientific analysis on the subject, that the unpleasant background flavor I don’t appreciate comes from the ingredients that I can’t pronounce and were never a part of my grandmother’s era. (My usual guideline for what I want to put in my mouth!)

So while looking for a fairly tame side dish to go with a simple ground beef pattie and steamed green beans dinner I was planning for last evening, I went on line for inspiration. And what I found was a recipe on Allrecipes by Sarah Billings for a homemade Rice-a-Roni. Oh the joy of finding one of my favorite guilty pleasures that I could duplicate at home. Of course I added/changed a couple of ingredients from the source recipe, and what I prepared was not quite like what comes in the little red boxes. It was much better! No “packaged” flavor. No ingredients that only a mad scientist could pronounce, and the right price since I had all the ingredients on hand. (Always a bonus!)

So if you too love a simple rice side dish, this is the recipe for you. And to change it up a bit, or even make it into a main dish, just add some cooked meat or seafood, additional veggies (mushrooms come to mind), a bit of whatever kind of cheese you happen to have, and you have a wonderful dish that is easy, fast, and economical to prepare. And bottom line, your kids are going to love it. It has that creamy mouth feel that makes macaroni and cheese such a favorite with children.

And just for the record, I am still going to buy packaged rice mixes when on trailer trips. But when I am at home, you can bet your last Golden Grain $1.00 off coupon that I am going to continue making all of my rice side dishes from scratch. And this recipe is now on the top of my list!   

  • 2 T. unsalted butter
  • ½ c. orzo pasta
  • ½ c. uncooked white rice  
  • ½ c. diced onion
  • 2 cloves garlic, minced
  • 2 c. chicken, beef, or vegetable broth
  • 1 tsp. seasoned salt
  • freshly ground black pepper
  • 2 sliced green onions
  • ¼ c. toasted slivered almonds

Melt the butter in a lidded pan over medium-low heat. Add the orzo pasta and rice and fry until just starting to turn golden brown. Stir in onion and cook for a couple of minutes. Add the garlic and cook for 1 minute. Stir in the broth, seasoned salt, and pepper. Increase heat to high and bring to a boil. Reduce heat to medium-low, cover, and simmer until the rice is tender, and the liquid has been absorbed, 20 to 25 minutes. Remove from heat and stir in the green onions and slivered almonds. Adjust seasoning. Let stand for 5 minutes, then fluff with a fork.