Category Archives: MAIN DISH RECIPES

BACON CHEESEBURGER PATTIES

OK, I like a good old fashioned bacon cheeseburger as well as the next guy. Maybe even more than the next guy. Add a slice or two of avocado and you have the recipe for my favorite burger.

Now either I’m getting sloppier or restaurant burgers are getting bigger and therefore more unwieldy. Whichever, I seem to always make a horrible mess when I eat a hamburger. Even if I try really, really hard, I usually manage to get hamburger detritus all over the front of me, the table, and whomever I am dining with! (Not a pretty sight!)

So the other day when I wanted to serve a ground beef pattie for dinner, I went on line and found the bones of this recipe on the allrecipes.com site. Of course I had to make a couple of changes, like adding an egg. The organic, open range, loved and pampered cow from whence our ground beef had cometh, was so lean, that if I didn’t know better, I’d swear the cow had been anorexic when butchered. But not to fret. This cow had been loved and well taken care of throughout its short but happy life. (Thank God no vegetarians will be reading this recipe. My reputation as a fairly decent person would dissolve in the time it takes to pop the lid on a container of hummus!) But fellow carnivores, back to this burger.

When I saw this recipe, or the bones for this recipe, I knew that I would love the outcome. And oh my, the burger patties were even better than anticipated. Next time I make them, I am going to serve them on really nice toasted buns (maybe brioche buns), with slices of avocado, red onion, tomato, and lettuce. And dressed with Thousand Island dressing. Yum. I figure if I’m lucky, with the bacon and cheese contained in the burger itself, I have about a 50/50 chance of making less of a mess. Wish me luck.

  • 1 lb. lean ground beef
  • ¼ tsp. seasoned salt
  • freshly ground black pepper
  • ½ tsp. granulated garlic
  • 1 tsp. dehydrated onion
  • 1 T. prepared horseradish
  • 1 egg
  • 4 slices cooked lean bacon, chopped  
  • ½ c. shredded sharp cheddar, pepper Jack, or blue cheese

In a large bowl, mix together the ground beef, salt, pepper, granulated garlic, onion, horseradish, and egg.   When well combined, stir in the bacon and cheese. Shape into 3-4 patties. Preheat your grill. When ready to cook the burgers, lightly oil the grill grate. Place patties on the grill, and cook for 4 minutes per side, or until done to liking. Or fry in a pan. That works too!


CHICKEN, PROSCIUTTO, AND PARMESAN CHEESE SALAD

While we were on our last RV camping trip to Eastern Oregon and Eastern Washington (remind me to tell you someday about watching a rattlesnake being killed on the site across from ours) I decided that upon our return I would start working on summer salads perfect for taking on picnics. (And no, none of them include baked rattlesnake even though I’ve heard it tastes a lot like chicken.)

So last evening I prepared this salad. (Unfortunately we couldn’t get away for an actual picnic because of time restrictions and uncooperative weather, but none the less we persevered.)

Anyway, this salad was just plain delicious. Mr. C. really loved it. (I think it’s probably the crispy prosciutto that really won him over.) Regardless, he said he could eat it any old time I wanted to fix it. (Always a good indication that he really likes something.) And truly, what’s not to like? The salad in and of itself is wonderful. But when topped with moist and tender chicken, crisp prosciutto, shaved Parmesan, and croutons, well it’s just a flavor burst with every bite. And, a meal unto itself. (I’m getting fonder and fonder of one dish meals. Part of getting older I’m sure!)

So while it’s still summer, whip up one of these salads and dine al fresco. Doesn’t need to be up in the mountains or next to water. Can be on your deck, patio, or lanai. Anywhere that reminds you that summer is the bomb. (Of course, if you live in a South Western state and the air temperature is 118F, you might want to stay inside cuddled up to your air conditioner.) But for those of us that live for long days, no rain, and temperatures in the 70s, it’s outside dining as much as possible.

So enjoy the rest of your summer. Stay cool. Go on picnics. Eat salads. (That’s my bonus recipe for a wonderful way to stay both healthy and happy.)

  • 1 T. fresh lemon juice
  • 1 tsp. Dijon mustard
  • ¼ tsp. kosher salt
  • freshly ground black pepper
  • 1 T. minced shallots
  • ¼ c. extra virgin olive oil
  • cooking spray
  • 4 thin slices prosciutto
  • 4 c. baby arugula
  • 1 romaine heart, chopped
  • ½ c. grape or cherry tomatoes, halved
  • 1 cooked boneless, skinless chicken breast, cubed or shredded (I use my recipe for Baked Boneless, Skinless Chicken Breasts (see recipe below) or when I’m feeling lazy, one of the chicken breasts from a Costco rotisserie chicken)
  • 1/3 c. shaved Parmesan, Asiago, or Pecorino Romano cheese
  • 1 c. croutons (see recipe below if you want to make your own croutons)

Whisk together the lemon juice, mustard, salt, pepper, and shallots. Slowly add the olive oil and whisk until emulsified and thickened. Adjust seasoning. Set aside.

Spray a small amount of cooking spray on a medium sized fry pan or griddle. Add prosciutto; sauté over medium heat for about 4 minutes or until the prosciutto is crisp. Remove from pan and drain on paper towels. When cool break into bite sized pieces.

When ready to serve, toss together the arugula, romaine, tomatoes, and chicken in a medium sized salad bowl. Add enough dressing to moisten the ingredients, but not drown them. (You may have extra dressing. All the better to use on another salad later in the week.) Scoop onto 2 dinner plates. Sprinkle on the cooked chicken, crispy prosciutto, shaved cheese, and croutons. Serve immediately.

This dish is loosely based on a recipe in the Cooking Light magazine.

BAKED BONELESS, SKINLESS CHICKEN BREASTS

  • 1 qt. warm water
  • ¼ c. kosher salt
  • 8 whole black peppercorns
  • 1 T. brown sugar
  • 2 garlic cloves, sliced
  • 4 boneless skinless chicken breasts, halved
  • 1 T. extra virgin olive oil
  • 1 tsp. seasoned salt
  • freshly grated black pepper
  • 1 tsp. granulated garlic
  • 1 tsp. paprika

Combine the warm water, kosher salt, peppercorns, brown sugar, and garlic cloves in a 9×13-inch glass baking dish. Whisk the mixture until it looks like most of the salt is dissolved.  Add the 8 pieces of chicken breast and let them sit in the mixture for 30 minutes. Remove from the brine, rinse with cold water, and pat as dry as possible with paper towels. 

Using the same pan, washed and dried of course, place the chicken breasts in a single layer. Pour on the olive oil. Using your hands, best tool in the kitchen BTW, massage the oil all over the chicken. Wash your hands and mix together the seasoned salt, pepper, granulated garlic, and paprika. Sprinkle the mixture evenly over both sides of the chicken.

Bake in a pre-heated 450 degree oven for 15-18 minutes or until the chicken is cooked through and no longer pink.  If you use an instant read thermometer to measure the temperature at the thickest part of the breast, it should read about 170 degrees. Remove from oven, loosely tent with aluminum foil, and let rest for at least 5-10 minutes before serving.

GARLIC CROUTONS

Chop up some small bite sized pieces of a chewy, artisan baguette. Place in a frying pan with butter or olive oil (or a combination) and sauté until each crouton is crunchy. (This takes about 45 minutes because you need to go low (heat) and slow.) Add more butter or oil as needed. When desired crunchiness is attained, sprinkle with granulated garlic. Allow to cool completely before placing in an airtight container.


BAKED BONELESS, SKINLESS CHICKEN BREASTS

Yah, yah, yah! I know at this time of year I should be posting a recipe for grilled chicken breasts, but hey – I’m lazy. It’s just so much easier to pop chicken breasts in the oven than heat the grill, go back and forth to the grill, and then clean the grill. Like I said, I’m lazy. And truthfully, heating up our grill for 4 chicken breasts just seems kind of wasteful. Well not so much of propane, because both grilling and firing up our oven require propane, but of Mr. Cs time and energy to clean the grill.  

So, if you will forgive me this crime against summer grilling, I will share with you one of the best ways to ensure a flavorful and moist piece of meat. The chicken is wonderful all by itself, but also perfect used in your favorite recipes that call for cooked chicken.

So give this recipe a try. And yes I know this recipe is not as easy as just slapping the chicken breasts on a sheet pan, sprinkling them with a little salt and pepper, and throwing the whole mess in the oven. This recipe takes a little time and planning. But please believe me, the time your chicken breasts spend in a warm soothing bath is well worth the effort. When prepared this way, the meat will practically melt in your mouth. And isn’t that so much better than trying to swallow a piece of meat that really should be classified as “chicken jerky”. (Believe me, I have made more than my share of chicken “jerky” in my time. I’m just sad it took me this long to figure out what I was doing wrong!)

Anyway, I hope you profit from my quest for a better cooked chicken breast. And don’t hesitate to share your new found knowledge with everyone you know. After all, brining isn’t just for turkeys anymore. It’s also absolutely wonderful with pork.

And should you wonder if it would work to grill the chicken rather than baking it, please give it a try. If it turns out just great, just let me know so I can feel even guiltier about being such a lazy daisy.

  • 1 qt. warm water
  • ¼ c. kosher salt
  • 8 whole black peppercorns
  • 1 T. brown sugar
  • 2 garlic cloves, sliced
  • 4 boneless skinless chicken breasts, halved
  • 1 T. extra virgin olive oil
  • 1 tsp. seasoned salt
  • freshly grated black pepper
  • 1 tsp. granulated garlic
  • 1 tsp. paprika

Combine the warm water, kosher salt, peppercorns, brown sugar, and garlic cloves in a 9×13-inch glass baking dish. Whisk the mixture until it looks like most of the salt is dissolved.  Add the 8 pieces of chicken breast and let them sit in the mixture for 30 minutes. Remove from the brine, rinse with cold water, and pat as dry as possible with paper towels. 

Using the same pan, washed and dried of course, place the chicken breasts in a single layer. Pour on the olive oil. Using your hands, best tool in the kitchen BTW, massage the oil all over the chicken. Wash your hands and mix together the seasoned salt, pepper, granulated garlic, and paprika. Sprinkle the mixture evenly over both sides of the chicken.

Bake in a pre-heated 450 degree oven for 15-18 minutes or until the chicken is cooked through and no longer pink.  If you use an instant read thermometer to measure the temperature at the thickest part of the breast, it should read about 170 degrees. Remove from oven, loosely tent with aluminum foil, and let rest for at least 5-10 minutes before serving.

Please note: This recipe can be halved, doubled, tripled etc. with no ill effect. In fact, the picture shown is of only 2 chicken breasts.


GREEK GROUND CHICKEN MEATBALLS WITH TZAZIKI SAUCE

Sometimes dishes get served before I have a chance to take a picture. That’s exactly what happened at a recent pre-concert JazzVox meal. Before I could take a picture of these meatballs based on a recipe from the Juicy Bites website and the tzatziki sauce (my recipe from about 25 years ago), they were history.

So the next time I serve this delicious combination, I will take a picture. But for now you will just have to content yourself with a mental image of light colored baked meatballs, smothered with a white sauce with green things in it, aka – tzatziki.

Now most of you know that I love chicken and serve it a lot. But chicken can be a bit boring. Well I’m here to tell you, there is nothing boring about these meatballs. The mint and the dill give the dish a unique flavor, and when slathered with tzatziki, well frankly, there is just nothing finer. (Actually, I think dog kibbles would taste good if they were slathered in tzatziki. But I’m not going to stand behind those words; just offer them up as a lazy summer afternoon rumination.)

So next time you want to serve ground chicken or turkey (I use ground turkey as much as I use ground chicken), give this recipe a try. Serve the meatballs and tzatziki with a savory pilaf, a crunchy Greek Salad, and a beautifully chilled bottle of white wine, and you will have captured the wonderful flavors and essence of Greek dining. Huh? Maybe Greece should be our next overseas adventure. Time to buy a couple travel books and see if Greece meets our criteria as a perfect travel destination. We love to visit countries with an ancient culture, beautiful art and architecture, interesting museums, pleasing climate, fun and friendly people, and of course – fantastic food. Wait! I don’t need a travel guide to tell me that Greece would be perfect for us. I already know all of our travel desires would be met in Greece. So, time to make a plan and present it to Mr. C. I know, I’ll serve up my idea along with a meal as described above, and I’ll bet you he’ll be searching our calendar for dates within an hour. Wish me luck! And enjoy the meatballs.

At the bottom of the post you will find 2 pictures of our orange cat Miles. The first picture shows Miles sound asleep on our catwalk. No problem, right? Wrong! The second picture shows why his sleeping at the end of the catwalk is of concern. It’s 9 feet down if our little darling were to fall. And since that part of the catwalk is above the bottom of the stairway, there is no way for either of us to fetch him. And no, when I designed our home Max and Miles were not even a glimmer in their papa’s eyes. We had another pair of orange brothers who were very coordinated and we never worried about them falling.

A little background. Miles and his brother Max are two of the least coordinated and skittish cats we have ever had the pleasure of owning. They can fall off the back of a couch and land on their backs at the slightest movement that might be threatening, like Mr. C. turning a page in his book, or me walking by with a glass in my hand. So the thought of either one of the brothers being startled awake while on the catwalk and reacting quickly to a perceived threat always scares the pickles out of me. And since I’m sure you want to know, Miles survived his nap and my heartrate is back to normal.

  • ½ c. panko bread crumbs
  • 1/3 c. whole milk
  • 1 small onion, finely minced
  • 2 garlic cloves, finely minced
  • ¼ c. finely chopped Italian parsley
  • ¼ c. finely chopped mint leaves
  • 3 T. finely chopped fresh dill
  • 2 tsp. dried oregano (Mexican preferably)
  • 2 tsp. kosher salt
  • freshly ground black pepper (not too much)
  • 2 eggs
  • 1 T. extra virgin olive oil
  • zest and juice of 1 small lemon
  • 2 lbs. ground chicken or turkey

Pour the milk over the panko bread crumbs in a large bowl and stir until liquid is absorbed. Add the onion, garlic, parsley, mint, dill, oregano, salt, pepper, eggs, olive oil, and lemon zest and juice. Mix together with a fork until well blended. (I use the large serving fork that came with my silverware set. Works great!) Add the ground chicken and stir with the same fork until just blended. (Do not overwork the meat.)

Using a small ice cream scoop, shape the balls and place on a baking sheet lined with foil and coated with non-stick cooking spray.  Bake in a pre-heated 400 degree oven for about 20-25 minutes until just done. (Do not overbake or the meatballs will be dry.) Serve with tzatziki sauce. Recipe below.

TZATZIKI  

  • 2 T. extra virgin olive oil
  • 2 c. plain Greek Yogurt
  • 3 small or 2 medium garlic cloves, finely minced
  • 1½ tsp. chopped fresh dill or ½ tsp. dill weed
  • ¼ tsp. kosher salt, or more to taste
  • freshly ground black pepper
  • 1 English cucumber, partially peeled, seeded, and grated

Combine all ingredients. Adjust seasoning. Cover and refrigerate until ready to serve.

Garlic trick:

If you are using fresh garlic in a recipe, but would like to reduce a bit of the “garlic bite”, place the peeled garlic cloves in a small bowl and cover with milk. Warm the cloves in your microwave, but do not cook them. Then remove the cloves from the milk and slice or mince according to your recipe. You will find that the flavor is still there, but the bite has mysteriously disappeared.


MEXICAN STYLE STUFFED GREEN PEPPERS

I love stuffed green peppers. I always have. Even as a small child I favored them over a simple meat and potatoes dinner. There was just something delightful about each of us having our own delectable container filled with seasoned meat. I liked the tidiness of the presentation. And along with the stuffed pepper would always come our very own baked potato. Again a tidy package on which to heap all kinds of lovely ingredients like butter, salt, and pepper. No sour cream, bacon, or sliced green onions in those days. But as much butter as we wanted. (We had our own cows and my grandmother churned our butter. So butter was not a luxury, it was simply taken for granted and eaten enthusiastically.) Sigh……..

So yesterday while we were at the grocery store, I noticed that green peppers were on sale. I looked at Mr. C, he looked at me, we nodded yes simultaneously, and the making of our dinner menu was hatched right there in the produce section of our local IGA. (It’s OK, we’re married! Hatching dinner plans in public is still considered acceptable behavior for married couples!)

Anyway, when we arrived home I decided to work up a recipe for stuffed peppers featuring Mexican ingredients and seasonings. So I began my task and came up with this recipe. I hope you enjoy it. And don’t hesitate to serve it to your children. They might balk at the pepper part, but I bet they will love the filling. And to its credit, the filling is high in protein and some other really-good-for-growing-children ingredients. Including, and this is the fun part, you can sneak wheat germ into the filling and your kids won’t even notice. Hah – is that great or what?!?! For this recipe, I would suggest about a quarter cup of wheat germ. At least, that’s the amount I used per pound of meat while I still had kidlets at home.

For more information about the health benefits of wheat germ for children, visit www.parentinghealthybabies.com, then search under Health Benefits of Wheat Germ for Children.

Please note: For my recipe for a delicious, unmistakably Italian stuffed green pepper, search under Stuffed Green Peppers on this site.

  • 4 green peppers, tops sliced off and seeds and membranes removed and discarded (save the top to finely dice and add to the filling)
  • 2 tsp. extra-virgin olive oil
  • 1 lb. lean ground beef
  • ½ small onion, finely chopped
  • 1 jalapeño, minced (first carefully remove the seeds and membranes)
  • 2 cloves garlic, minced
  • ½ tsp. kosher salt
  • freshly ground black pepper
  • ¼ tsp. smoked paprika
  • ½ tsp. ground cumin
  • ½ tsp. dried oregano (Mexican preferably)
  • 2 tsp. chili powder
  • 1 (8-oz.) can tomato sauce 
  • 2 tsp. Worcestershire sauce
  • ½ c. cooked brown rice
  • ½ c. low-fat sour cream
  • ½ c. grated shredded sharp cheddar or cheese of choice, plus more to sprinkle on top for presentation

Heat oil in a large skillet over medium-high heat. Add beef and fry until cooked through and browned. Add onion, jalapeño, and the finely diced flesh from the top. Cook until the veggies are slightly softened, about 4 minutes. Stir in garlic and cook for 1 minute. Add salt, pepper, smoked paprika, cumin, oregano, chili powder, tomato sauce, and Worcestershire sauce. Cook for about 2 minutes to blend flavors. Remove from heat and add the cooked rice, sour cream, and cheese; mix well. Adjust seasoning.  

Lightly grease an 8×8-inch baking pan. Place the peppers, cut side up in the pan and fill with the meat mixture. (If you have extra filling, bake it in another small baking dish.)

Bake the peppers in a pre-heated 350 degree oven for 75-90 minutes or until the pepper is very soft and starting to brown. (If the filling gets too brown during the baking process, cover with aluminum foil.)

Remove from oven and sprinkle with a small amount of grated cheese. Serve immediately.

[contact-form][contact-field label=’Name’ type=’name’ required=’1’/][contact-field label=’Email’ type=’email’ required=’1’/][contact-field label=’Website’ type=’url’/][contact-field label=’Comment’ type=’textarea’ required=’1’/][/contact-form]


CURRIED CHICKEN CASSEROLE WITH BROWN RICE AND BROCCOLI

In my opinion, people who think casseroles are uninteresting, too fattening, and a thing of the past, simply don’t have enough empirical study on the subject. And I mean to help with that problem by offering up one of my favorite casserole recipes to assist with said research.

Now I know broccoli, chicken, and curry casserole (Chicken Divan) has been around for decades. But my version is healthier, less caloric, and if I may be so bold, tastier than most. (If I didn’t believe that, I wouldn’t be posting this recipe in the first place! Duh!)

So what makes my spin on this classic different?

  • no cream of mushroom or chicken soup
  • no sharp cheddar cheese
  • no bread crumbs
  • no butter
  • no sherry or white wine
  • the addition of a small amount of cooked brown rice
  • broccoli and chicken cut into really small pieces so that each bite contains a small bit of each ingredient
  • the addition of a small amount of onion
  • the addition of Dijon mustard to give the sauce a bit of a kick

So as you can see, this recipe has just a few ingredients either lacking or added to make this casserole just a tad bit unique. It’s still really Chicken Divan. But I think my execution of this dish better reflects the current taste for more sophisticated yet wholesome preparations. But as they say – vive la différence! If you have a favorite recipe for Chicken Divan, I say, stick with what you know and like. But if you are a novice to casserole preparation, and feel up to the task of researching casseroles to enhance your culinary expertise, I would recommend this recipe. You have to start somewhere after all, so you might as well start with a casserole that is easy and relatively inexpensive to prepare, and just plain delicious. In Mr. Cs words, “this is really wonderful”. (I love it when those words pop unsolicited from his mouth. Makes me feel all warm and fuzzy. Of course the pre-dinner martini helps with that feeling too. But it’s healthier mentally to believe that Mr. Cs comments are the real reason for my elation!)

  • ½ c. uncooked brown rice*
  • 1 c. water
  • ½ tsp. seasoned salt
  • 3 c. very small pieces of broccoli flowerets and peeled stems  
  • 1 T. extra virgin olive oil
    2 boneless, skinless chicken breasts, cut into small bite sized pieces
  • kosher salt
  • freshly ground black pepper
  • ¼ c. finely minced onion
  • 2 tsp. flour
  • 2 tsp. curry powder
  • 1 c. chicken stock
  • 1 tsp. Dijon mustard
  • 1 c. low-fat sour cream
  • 1/3 c. light mayonnaise    
  • 1 T. fresh-squeezed lemon juice
  • 1/3 c. coarsely grated Parmesan cheese
  • 2 T. minced fresh parsley, opt. garnish*or 1 cup leftover cooked rice

    Combine rice, water, and seasoned salt. Cook while you are assembling other ingredients. (I use my rice cooker.)  While the rice cooks, steam or blanch the broccoli until crisp tender. (You don’t want the broccoli tender at this point. It will continue to cook while it cools and during its tenure in the oven.) Set aside.

    Heat the olive oil in a large fry pan. Add the diced chicken and sprinkle with salt and pepper. Fry the chicken cubes just until done. (They should have some brown on them.) Remove from pan and set aside.

    Add the onion to the pan and cook until translucent, about 2 minutes. Do not let the onion get brown. When the onion is done, whisk in the flour and curry powder. (The flour will be quite dry.) Cook for about 2 minutes. Slowly whisk in the chicken stock, mustard, sour cream, mayonnaise, and lemon juice. Adjust seasoning. Bring to just under a boil, reduce heat and cook for about 1 minute. Remove from heat and gently stir in the cooked rice, broccoli, and chicken.

    Scoop into a buttered casserole dish. Sprinkle with Parmesan cheese and bake in a pre-heated 350 degree oven for 30-35 minutes, or until the casserole is hot. Remove from oven and sprinkle with fresh parsley. Serve immediately.


ASIAN FLAVORED GROUND BEEF PATTIES WITH WILTED GREENS

Ever on a quest for ground beef recipes, I decided an Asian spin on ground beef would be nice for our dinner last evening. I had some left-over fried rice and an English cucumber lying recumbent in my refrigerator, so why not make an Asian influenced night of it? So on to the wonderful world of internet I proceeded to do some research on the subject.

Now I know what you’re thinking. “You get lots of your recipes from other people, don’t you Mrs. Carr?” And to a certain extent, that is absolutely true. But in my defense, I usually have the main idea of what I am after already in my head. But being the lazy resourceful cook that I am, I often start with someone else’s recipe, or a combination of several people’s recipes. Then of course, I mess with it or them until I have a recipe that appears adequate to the task of pleasing my discerning palate. And, of course, I always try to reconstruct the recipe(s) to reduce the fat and salt content, as well as changing the cooking instructions in ways that allow the recipe to be more accessible to cooks who may still have limited culinary experience. (Lofty goals, right??) Then I present the recipe to you.

So, that’s exactly what I did yesterday when I changed a recipe from the Eating Well magazine site. The recipe provided me with the “bones” of this dish. But through judicious application of my experience with food, I added a few ingredients that I felt would make the dish even healthier. I added garlic, an egg (binder), and Tamari. I substituted kale and other dark greens for watercress*, and cooking spray for canola oil.

And again, I know what you’re thinking. “So Patti, if you change everyone else’s recipes, why shouldn’t I change yours?” My answer – you should, you should! All I am offering is an idea for a healthy and delicious dish to serve to your family and friends. A dish that is good for you, fairly inexpensive, easy and fast to prepare, and above all free of all the unnecessary, unpronounceable ingredients found in processed food. In other words – homemade! And even if your dish ends up nothing like mine, who the heck cares!?!? You will have served a dish to your family that is not only fun to eat, but a little different and therefore more fun for you to prepare. (The reason I never wanted to work in a restaurant kitchen is because I would have had to prepare the same dish night after night after night ad nauseam!! I get bored too easy for that. And I know a lot of really outstanding home cooks who feel the same way! They love to cook, but bring on the adventure of new and exciting food challenges. Thank you.)

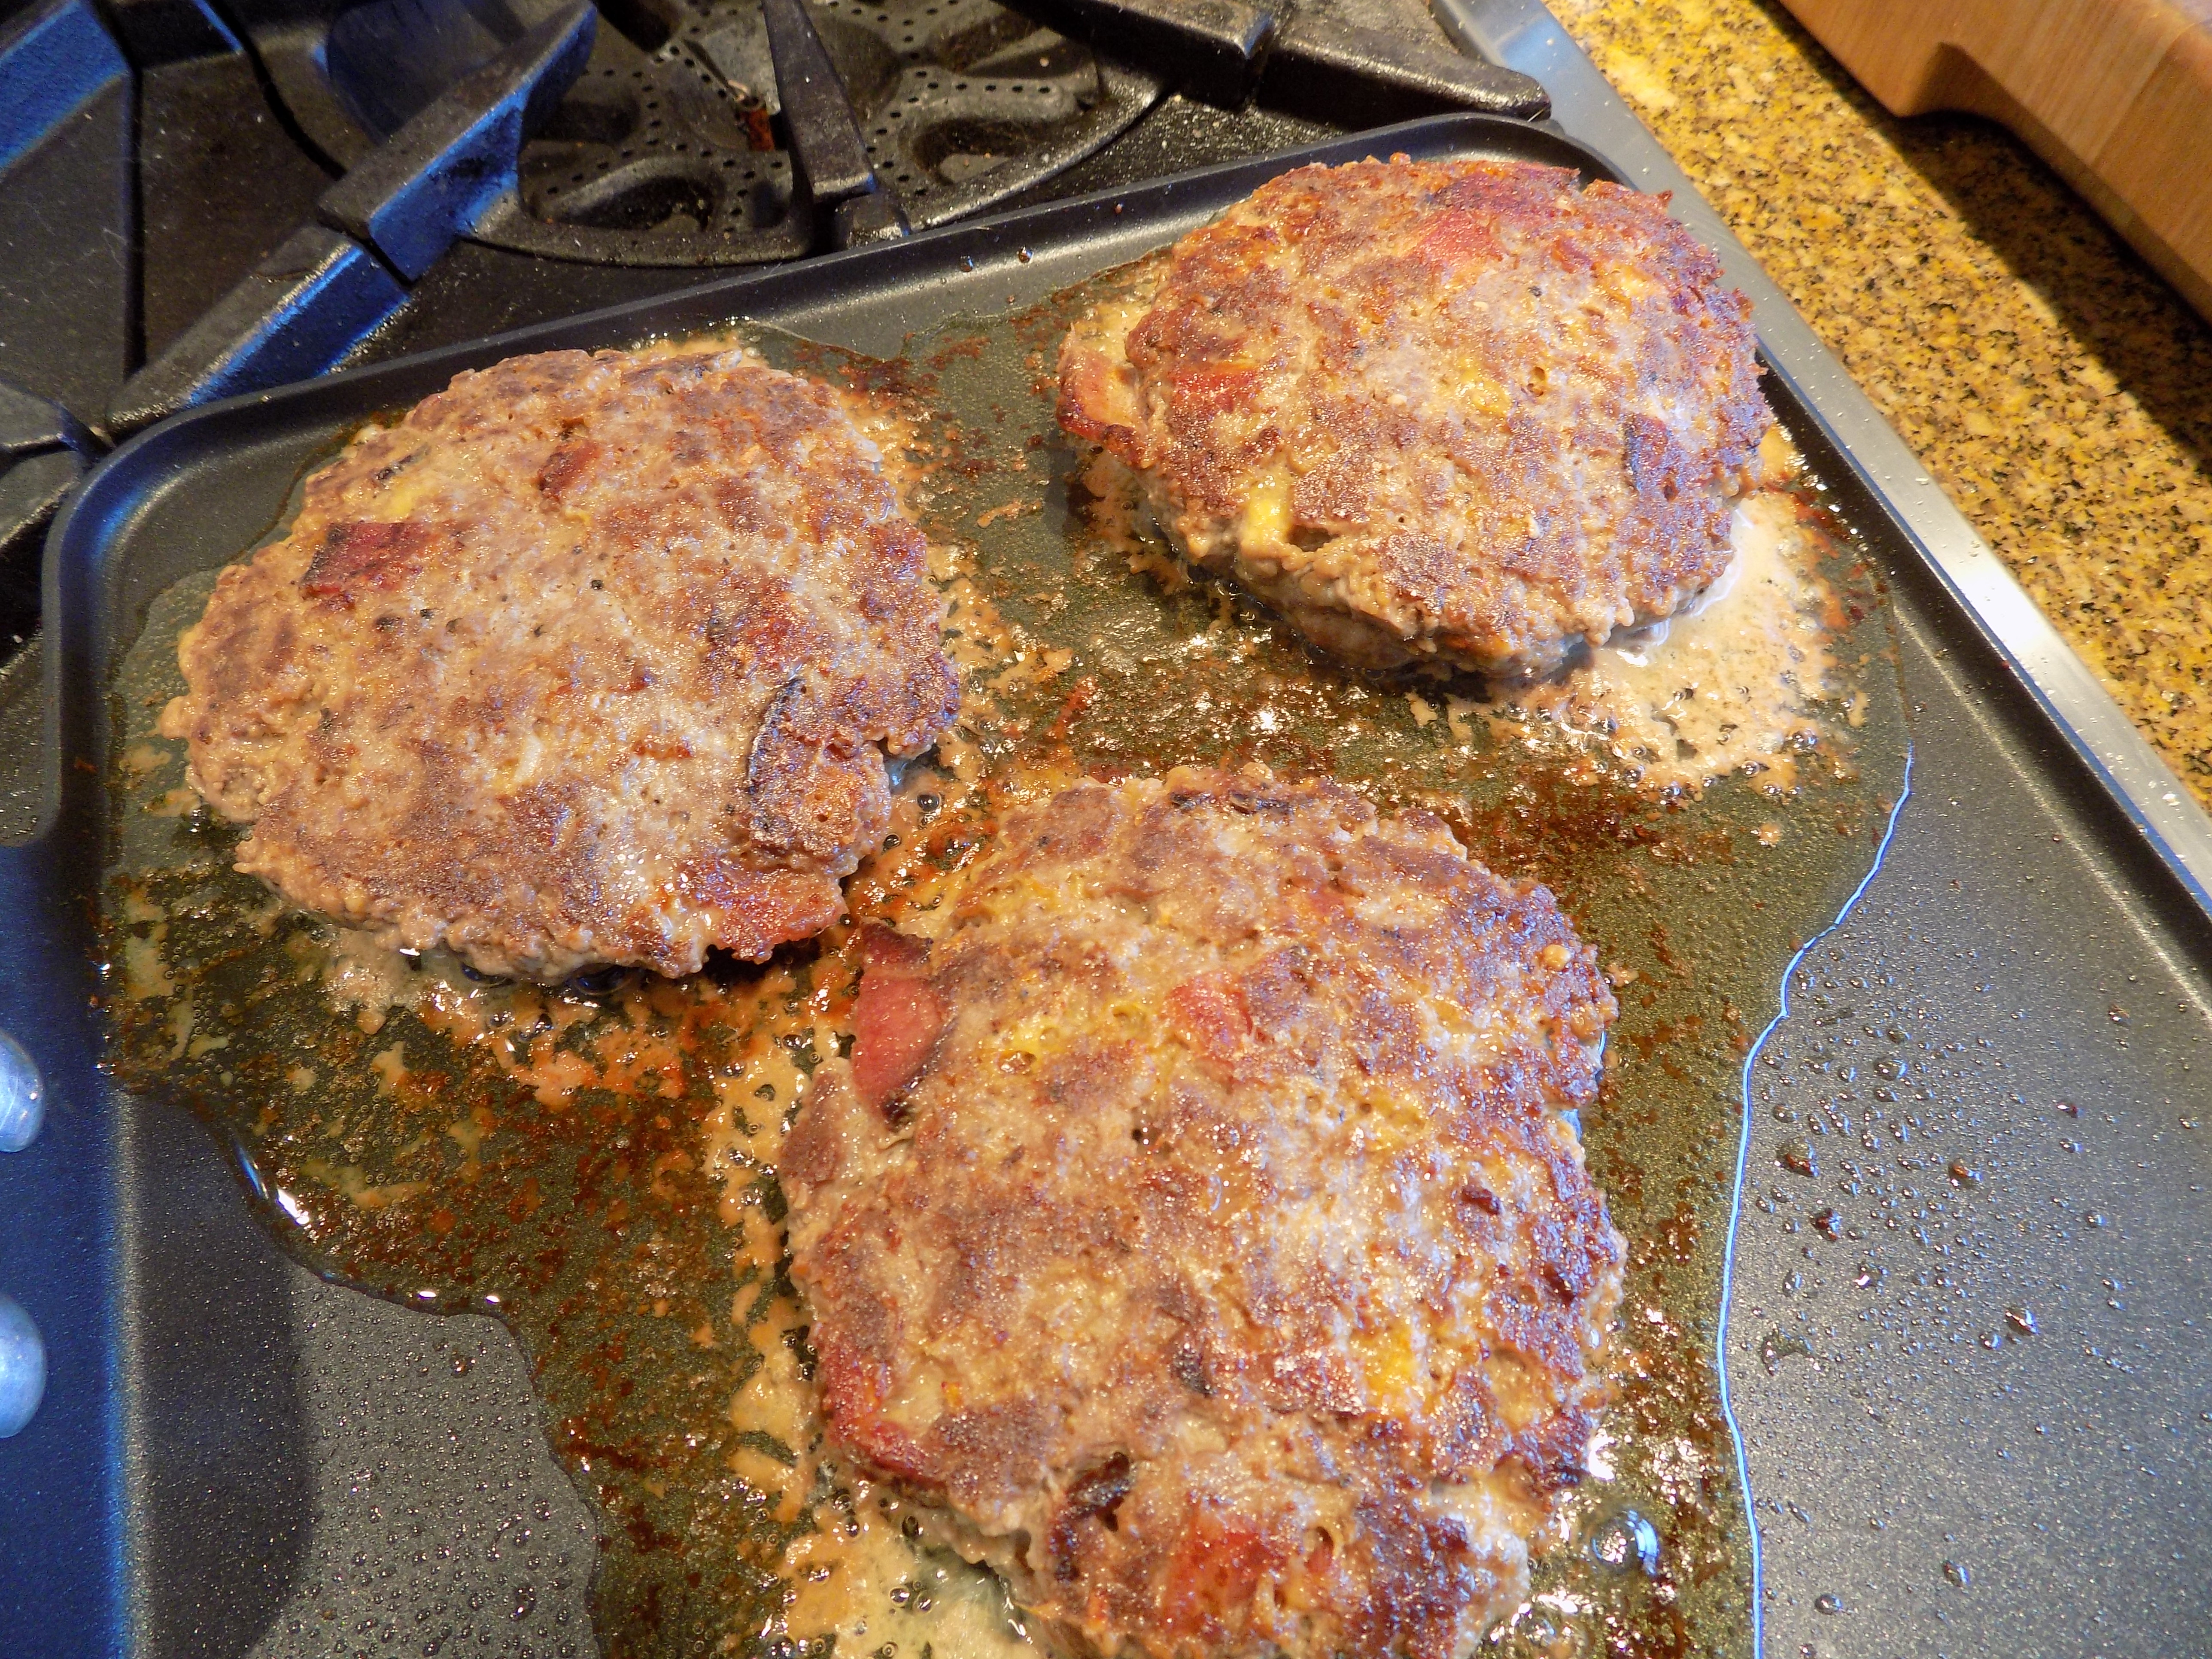
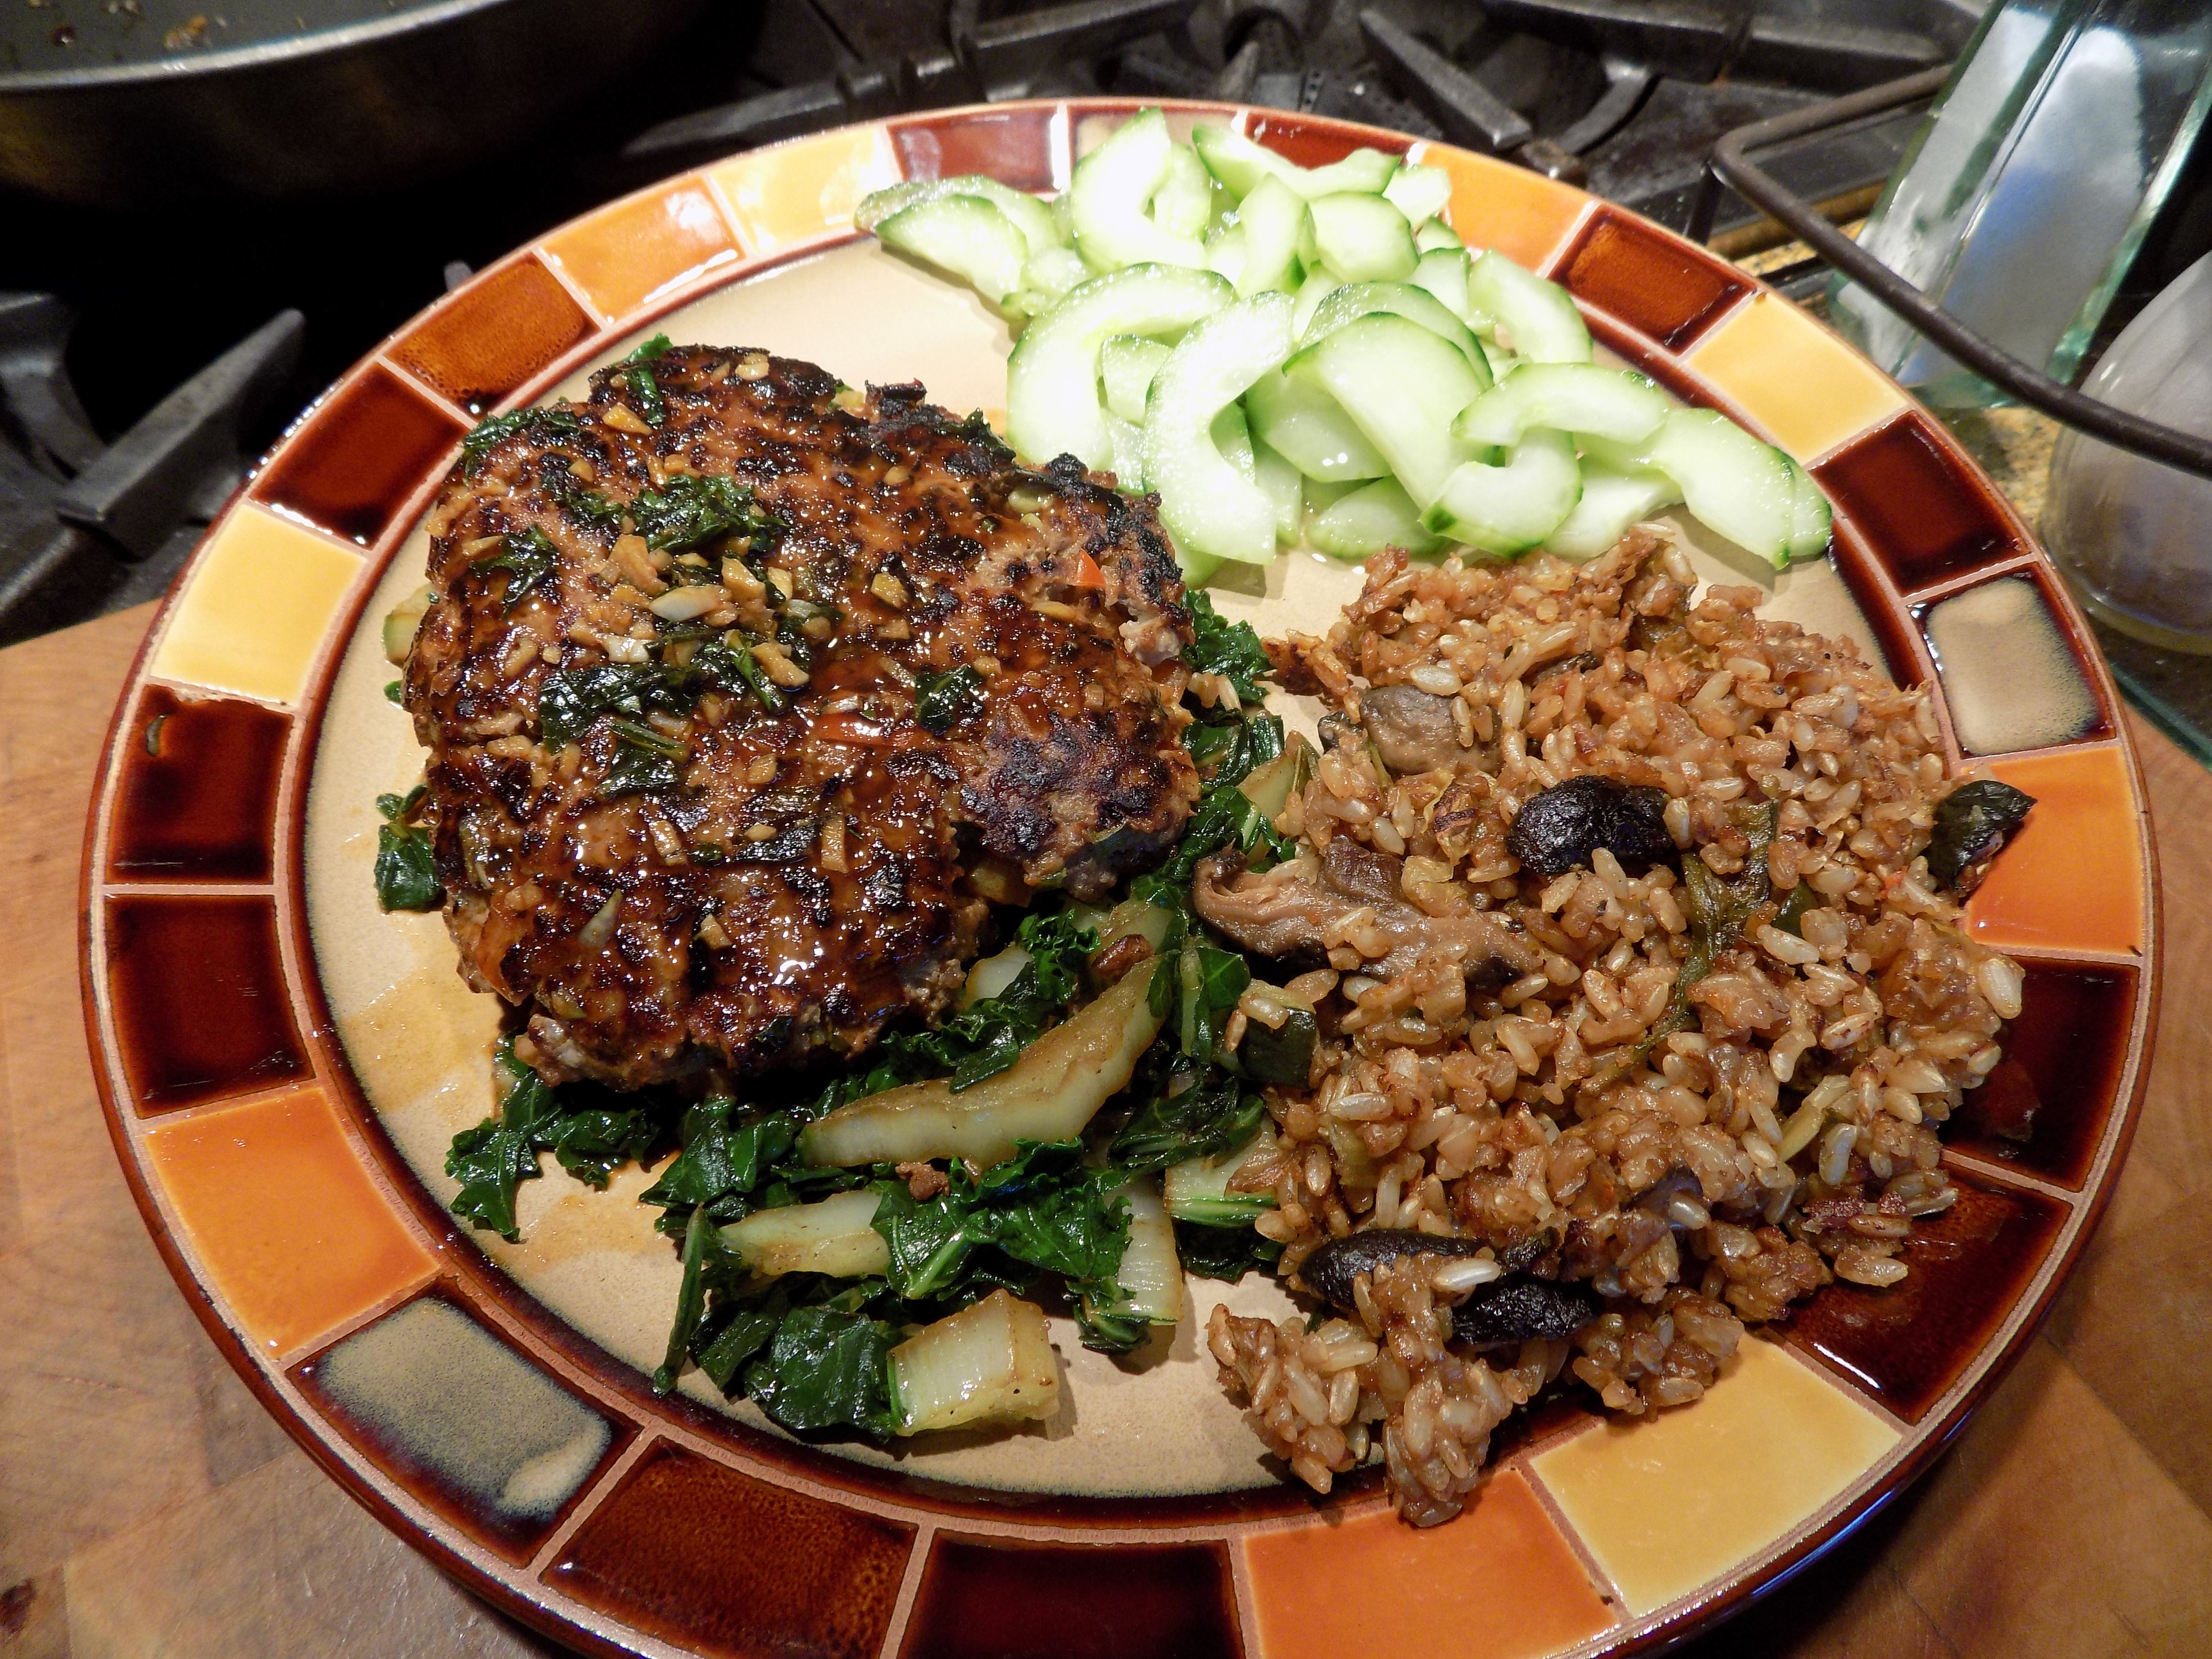
So treat your family some evening to a fun and delicious Asian inspired meal. These ground beef patties are perfect served with brown or fried rice and Sunomono (Japanese Cucumber Salad). Sunomono recipe on site.

*Analysis of the vitamin content difference between kale, spinach, and watercress as found on the www.healthyeatingsfgate.com site. “Kale has the highest vitamin content of these three greens, with a cup serving providing 684 percent of the daily value, or DV, for vitamin K, 206 percent of vitamin A and 133 percent for vitamin C. Spinach contains the most folate, with 15 percent of the DV, compared to 5 percent for kale and 1 percent in watercress. While watercress has the least vitamins overall, a cup serving still provides 106 percent of DV for vitamin K, 22 percent for vitamin A and 24 percent for vitamin C. Your body needs Vitamin K for blood clotting, vitamin A for immune function and vision, vitamin C for healing wounds and forming collagen and folate for creating new cells and, in pregnant women, preventing neural tube birth defects.”

  • 6-8 c. chopped and massaged curly kale
  • 6-8 c. thinly sliced greens*
  • 2 tsp. Tamari or soy sauce   
  • ½ c. Shaoxing rice wine or dry sherry
  • 4 T. hoisin sauce, divided
  • 2 garlic cloves, finely minced, divided
  • ½ red bell pepper, finely diced   
  • 8-9 finely chopped scallions
  • ¼ c. plain dry breadcrumbs or Panko
  • 1 egg
  • 2 T. minced fresh ginger
  • 1 lb. lean ground beef
  • cooking spray

Combine the kale and greens in a bowl. Set aside. Whisk together the Tamari, rice wine, 1 tablespoon of the hoisin sauce, and ½ of the minced garlic in another bowl. Set aside.

In a medium sized bowl, combine the bell pepper, scallions, breadcrumbs, egg, remaining 3 tablespoons of the hoisin sauce, ginger, and remaining ½ of the minced garlic.  Gently mix in the ground beef. Form the mixture into 4 patties. (The less you mess with the ground beef, the more tender the finished product.)

Lightly coat a large non-stick fry pan with cooking spray. Heat the pan and fry the patties until done to your liking. (Flip only once as the patties have a tendency to fall apart.) When done, remove from pan and cover with aluminum foil.

Add kale and greens of choice to the pan; stir-fry for about 4 minutes or until wilted. Divide the cooked greens among 4 plates. Return the skillet to medium-high heat and add the Tamari mixture. Whisk until smooth, bubbling, and slightly reduced, about 1 minute. Top the greens with the ground beef patties and drizzle with the pan sauce.

*use any greens, i.e. napa cabbage, bok choy, spinach, chard, watercress, etc.


MEATLOAF WITH STROGANOFF SAUCE

I think I mentioned in one of my recent posts that we had purchased some grass fed beef. (Lovely, BTW.) Because I don’t particularly enjoy cooking or eating cuts of meat that are terribly fatty, like chuck steak or chuck roast for example, I asked the butcher to grind most of these types of cuts into – you guessed it – ground beef. So when you look in my freezer you will find lots of 1 lb. packages of this amazing ingredient. So featuring ground beef for dinner has become quite frequent in the Carr household. And since I almost always like to gussy things up a bit, I thought a nice meatloaf topped with a sumptuous gravy would be perfect to serve on a cold winter night. (Plus I knew there would be leftover meatloaf.  And we absolutely adore meatloaf sandwiches when made with multi grain wheat bread, a tiny smear of mayonnaise, a good dollop of ketchup, a modicum of mustard, a very thin slice of onion, some lettuce, a tomato slice or two, and sliced dill pickle. If feeling extravagant, a thin slice of sharp cheddar cheese is always welcome too.) But back to this recipe. (But do try my idea of a perfect sandwich if you ever find yourself with leftover meatloaf in the refrigerator.)

As I was considering how I could change the meatloaf up a bit, I thought about stroganoff. We both love stroganoff. And ground beef is not much more than steak that has been previously tenderized. So why wouldn’t a stroganoff sauce be perfect? And indeed, why not? So I prepared one of my usual meatloaf recipes, and while it and a potato were happily baking away in the oven, I went to work on the sauce.

Now I’ve been making stroganoff for well over 40 years. So creating the sauce recipe was easy. What was difficult was realizing that I should have been serving this combination for well over 40 years too! Where was my head when I was trying to come up with wonderful, economical, reasonably quick dinners for my children after a full day of work? And then realizing how much money I could have saved by making a meatloaf rather than purchasing a pricey cut of beef for the stroganoff. Plus with meatloaf, I could have hidden veggies and a scoop of my ever present secret ingredient – wheat germ! Like I said, where was my head?

Well in my defense, I was a little busy during those years. Plus, if a recipe didn’t appear in one of my cookbooks, I certainly didn’t have the time for inventive cooking. But I do now. So my hope is that this recipe will help you if you are facing time or budget restraints but still desire the wonderful taste of a delectable stroganoff.

And please do me a favor. If you have beef recipes that you cherish, but don’t have the time or financial resources to prepare them per your recipe, let me know. I will see if I can figure out how they can be prepared using ground beef. Please – I need your help. I’m drowning in the stuff and I’m running out of ideas. Thank you.

Meatloaf:

  • 2 T. chopped dehydrated onion
  • 1 T. dried parsley
  • 1 tsp. granulated garlic
  • 1 tsp. Montreal Steak Seasoning (comes in bulk in the dried herbs and spices section)
  • 1 tsp. seasoned salt
  • freshly ground black pepper
  • ¼ tsp. dried savory
  • ½ c. dry bread crumbs (I use the Italian bread crumbs – also comes in bulk at many grocery stores)
  • 2 eggs
  • ¼ c. milk
  • 1 lb. bulk sausage
  • 1 lb. not so lean ground beef
  • paprika

In a large mixing bowl combine the onion, parsley, garlic, Montreal Seasoning, salt, pepper, savory, bread crumbs, eggs, and milk. Stir in the sausage and then the ground beef. (I use a table knife for this purpose.) Form into 2 rectangular loaves. Place on a rimmed baking pan and bake for 1 hour in a pre-heated 350 degree oven. Remove from oven and let sit for at least 10 minutes. Slice and serve topped with Stroganoff Gravy and lightly sprinkled with paprika.

Stroganoff Sauce:

  • 1 tsp. extra virgin olive oil
  • ½ c. chopped onion
  • 10-12 button mushrooms, sliced
  • ½ tsp. dried thyme
  • pinch kosher salt
  • freshly ground black pepper
  • 2 tsp. Worcestershire sauce
  • 1 tsp. Dijon mustard
  • 1 tsp. beef base
  • 1 c. sour cream

Heat the olive oil. Add the onion and mushrooms; cook until the onion is translucent and the mushrooms slices are starting to brown. Whisk in the thyme, salt, pepper, Worcestershire sauce, mustard, and beef base. Bring just to a boil. Add the sour cream and once again, bring just to a boil. Remove from heat and serve over slices of the meatloaf.


OLD FASHIONED SPAGHETTI AND MEATBALLS

Every once in a while, all I want for dinner is a big old plate of spaghetti and meatballs. And when the urge hits me, I fix this recipe.

I have been making this sauce and these meatballs for decades. This was one of my standby recipes when my children were young, because they all loved it, spaghetti was fairly economical to make, nutritious, and I enjoyed preparing it. (And yes, even after work!) So not only is this spaghetti delicious, it brings back wonderful memories.

It was also one of the recipes I fixed when after a long weekend morning of cleaning the house, doing 43 (or so it seemed) loads of laundry, and working in the yard, I would get a wild hair about 2:00 pm to have company for dinner! (Dear God, what was I thinking?) So I would pick up the phone and call our dear friends and invite them over. Then off to the store, back home, start some bread, make this dish, cut up greens for a salad, throw some brownies together, put the box of wine in the refrigerator along with some Miller beer, and Bob’s your uncle! Where I ever got the energy for those kind of days I will never know! My only excuse is that I was young and didn’t know any better.

Now that I’m a wee bit older and definitely a whole lot smarter, I have to plan company dinners down to a gnat’s eyelash. I go so far as to prepare comprehensive excel spreadsheets, complete with time tables that reflect any and all tasks that can be done ahead of time. (Many would call it being anal-retentive; I call it being prepared!) Some would even go so far as to blame it on my age! And they would be right! I simply can’t work as fast or as long as I did in my thirties. Regardless – I can still do it, and that’s what matters.

So if you too love spaghetti and it’s a nostalgic part of your past, call, text, email, twitter, or whatever!?!? your friends and invite them over for dinner. And no, you don’t have to go so far as to serve them box wine, although I’ve been told they are making some really good box wines these days. (There are just some food and drink items from our past that should stay relegated to the very back recesses of our brains. For example: I have my memory of boxed white wine safely filed away between Annie Green Springs and Ripple in the back part of my brain. And I can’t even remember where I stashed my memory of Singapore Slings, but I sincerely hope that wherever it is, it stays hidden for the rest of my life!)

Oh, BTW, it’s OK if you don’t have wonderful memories of spaghetti and meatballs. It’s never too late to begin making your own nostalgic memories. Have fun!

Meatballs:

  • ½ c. finely chopped onion
  • 2 garlic cloves, finely minced
  • 2 T. chopped fresh parsley
  • ½ tsp. ground savory
  • ½ tsp. dried thyme leaves
  • ½ tsp. seasoned salt
  • ¼ tsp. paprika
  • ¼ tsp. dried rosemary
  • freshly ground black pepper
  • pinch ground nutmeg
  • 2 eggs
  • 2 T. milk
  • ¾ c. oats
  • 1 lb. lean ground beef
  • 1 lb. seasoned pork sausage

Combine the onion, granulated garlic, parsley, savory, thyme, salt, paprika, rosemary, pepper, nutmeg, eggs, and milk together in a medium bowl. Add the oats, ground beef, and ground pork and stir just until combined. Using an ice cream scoop, form balls and place on a lightly greased rimmed baking pan.

Bake in a pre-heated 400 degree oven for 20-25 minutes or until the balls are baked through. Remove from oven and set aside.

Sauce:

  • 2 T. extra-virgin olive oil
  • ½ c. chopped onion
  • 2 cloves garlic, chopped
  • 1 (28-oz.) can chopped or diced tomatoes (Italian tomatoes preferably)
  • 1 bay leaf
  • pinch crushed red pepper flakes
  • 1 tsp. dried oregano (I use Mexican oregano)
  • ½ tsp. kosher salt
  • freshly ground black pepper
  • 3 T. chopped fresh basil leaves
  • 1-2 T. butter, optional
  • ½ lb. spaghetti, cooked al dente
  • grated Parmesan, garnish

In a large covered sauce pan, heat the oil over medium high heat. Add the onion and sauté until soft and translucent, about 6 minutes. Stir in the garlic and cook for an additional minute. Add the tomatoes, bay leaf, red pepper flakes, oregano, salt, and pepper. Stir to combine ingredients. Bring to a boil, reduce heat, cover, and simmer for about 30 minutes. (Take the lid off part way if the sauce is too thin or allow to gently burble away until the sauce reaches your desired thickness.) Remove from heat, discard bay leaf, add the basil, and adjust seasoning. If the sauce tastes acidic, add butter 1 tablespoon at a time to round out the flavor.

Just before serving, add the meatballs and cook for a couple of minutes. Add the al dente spaghetti, and serve immediately. Pass Parmesan.


CHAR SIU PORK (CHINESE BBQ PORK)

When I worked in the International District of Seattle during the 70s, I used to treat myself periodically to a quarter pound of BBQ pork for lunch. It was absolutely delicious. And there was one particular shop I always patronized. And to this day I can still conjure up the wonderful smell that emanated from that shop. I can also visualize the shop itself, with its uneven floor, bathroom straight out of the 1600s, and the wizened old owner/chef who always smiled at me despite the fact that he was missing at least 2/3rds of his teeth. But he was so nice and boy howdy could this guy BBQ meat. If I could have afforded to buy from him all the time, I would have taken home BBQ duck and pork (叉燒) on a weekly basis. But 40 some years ago, these items were way outside my budget. Unfortunately!

But ever since those 10 years working in the International district, I have loved BBQ pork. So for a recent dinner party, I decided to try replacing the recipe I had been using for many years with one that would more accurately reflect the exquisite flavor of the BBQ pork of long ago. I knew the secret was in the combination of ingredients for the marinade. (No duh!) And I was pretty sure the ingredient list should include Chinese Five Spice. But I didn’t have any Chinese Five Spice on hand or star anise for that matter, so I used regular anise seed in my own Chinese Five Spice blend. I have no idea how this pork would taste with a Chinese Five Spice blend that included star anise, but I can’t imagine it could be any tastier. Thanks to the Recipe Tin Eats web site (great site BTW) for this wonderful recipe. And sorry I changed a few things here and there.

So if you love Chinese BBQ pork as much as I do, give this recipe a try. And if you happen to visit the International District in whatever large city is closest to your home, look for the seediest shop you can find with ducks and strips of BBQ pork hanging in the window. Then go inside and buy anything that is hanging from a hook. Because it is bound to be incredible. Tell them Patti sent you!  

  • 2 tsp. sugar
  • 5 tsp. honey
  • 5 tsp. hoisin sauce
  • 1 tsp. oyster sauce  
  • 2 T. low sodium tamari or soy sauce
  • ½ tsp. Chinese Five Spice powder, either purchased or my preference – homemade (recipe below)
  • 1 tsp. sesame oil  
  • 1 T. vegetable oil  
  • 1 pork tenderloin, trimmed of fat and silver skin and cut in half lengthwise

Make the marinade by placing the sugar, honey, hoisin sauce, oyster sauce, soy sauce, Chinese five spice, sesame oil, and vegetable oil in a small saucepan and bring to simmer for just 30 seconds, then set aside to cool.

Place the pork and cooled marinade in a Ziplock bag. Remove as much air as possible, then massage the pork so the marinade is all over the pork. Place in the fridge and marinate for at least 3 hours, preferably overnight or up to 24 hours.

Take the pork out of the fridge and bring to room temperature. Line a baking tray with foil and place a rack on top. Remove pork from the marinade (save the marinade) and place on the rack. Tuck the thin end of the tenderloin halves underneath so the whole piece of meat is roughly the same thickness.

Roast in a pre-heated 375 degrees for 45-60 minutes or until the internal temperature is 160 degrees. After 20 minutes, baste generously with the reserved marinade. After another 20 minutes, baste with remaining marinade. Remove from oven and allow the pork to rest for 15 minutes before slicing.

Please note: For a more authentic BBQ taste, remove the pork from the oven when it reaches about 150 degrees. Then place on a low temperature BBQ grill to help caramelize the sugars in the marinade. Watch very carefully because you don’t want to burn the marinade. I have to admit I haven’t tried the grilling part myself, because when I fixed this recipe, I was preparing a full Chinese dinner, and neither Mr. C. or I had time to breath much less spend any time at the BBQ. But rest assured, the next time I make this recipe there will be some real grilling involved!