Category Archives: MAIN DISH RECIPES

FRIED CHICKEN BREASTS WITH A KALE, BLACK GARLIC, PRESERVED LEMON, AND PROVOLONE CHEESE TOPPING

I am having so much fun trying out recipes that contain black garlic and preserved lemons. These new to me ingredients just seem to be a match made in heaven. Their individual flavors absolutely complement each other. (If either or both of these ingredients are new to you, please read about them at the bottom of this post.)

So when I was hungry for chicken last evening, I decided to play around and see what kind of concoction I could create to enhance the flavor of a simple pan fried chicken breast. I not only wanted the chicken dish to be terribly tasty (of course), but I insisted to my sauce loving self, that any topping I produced would not only be delicious, but healthy! (Not easy for me, because I love me my cream sauces!)

So with the knowledge that the half wine barrels behind my house had beautiful stems of kale at the absolute peek of their deliciousness, I started my chicken topping with just picked, washed and roughly cut kale. To the kale I added a few other ingredients, and the recipe you find below is the result.

This recipe is easy to prepare, and fairly inexpensive if you already have the black garlic and preserved lemons that is. If you don’t happen to have these 2 ingredients in your refrigerator, you can always substitute with regular garlic and fresh lemon juice.

But please don’t hesitate to purchase both of these innovative products and experience for yourself the wonder of these two culinary delights. Each can be used in almost any of your favorite savory recipes calling for garlic or lemon juice.

FYI: I am, as I write, trying out recipes for both preserved lemons and black garlic. Both take time. So I have lemon pieces brining away in my refrigerator and on the counter of my outdoor kitchen, heads of garlic heating away on the warm only option in my rice cooker.

Spoiler warning! I know already that my preserved lemon pieces are going to be divine. (I cheated and used some last evening, even though my preserved lemon recipe calls for at least 10 more days of refrigerated incarceration for the lemons to be completely “preserved”.) And the garlic heads need at least 2 more weeks before they have turned a stunning shade of black, and therefore ready to be classified as “black garlic”. I shall endeavor to keep you posted.

In the meantime, have fun in your kitchen and don’t forget to try new recipes that include newfangled ingredients. New dishes are fabulous for our taste buds and serve to help us retain our cognitive skills. And for those of us who are senior citizens, any help in that arena is much appreciated.  

  • 2 T. extra virgin olive oil
  • 2 boneless, skinless chicken breast, cut in half lengthwise and dried with paper towels
  • kosher salt
  • freshly ground black pepper
  • 4 c. roughly chopped kale, dried (I use my salad spinner)
  • 2 cloves black garlic, finely chopped
  • 1 fresh garlic clove, finely minced (or more if you don’t use black garlic)
  • tiny pinch crushed red pepper flakes
  • ½ c. chicken stock
  • 2 tsp. minced preserved lemon or 1 T. fresh lemon juice
  • 1 c. shredded provolone cheese

Heat the olive oil in a large fry pan. Add the chicken to the pan and sprinkle with salt and pepper. Fry until the first side is just starting to brown. Flip to the second side, sprinkle with salt and pepper, and cook until the interior temperature reaches at least 165 degrees. (Best way to check is with an instant read thermometer poked into the thickest part of the meat.) Remove from pan when done, cover with aluminum foil, and set aside.

Meanwhile, using the same pan, sauté the kale until it starts to soften, about 6-7 minutes. Add the black and fresh garlic, red pepper flakes, and chicken stock. Cook until most of the liquid has evaporated. Stir in the preserved lemon and adjust seasoning.

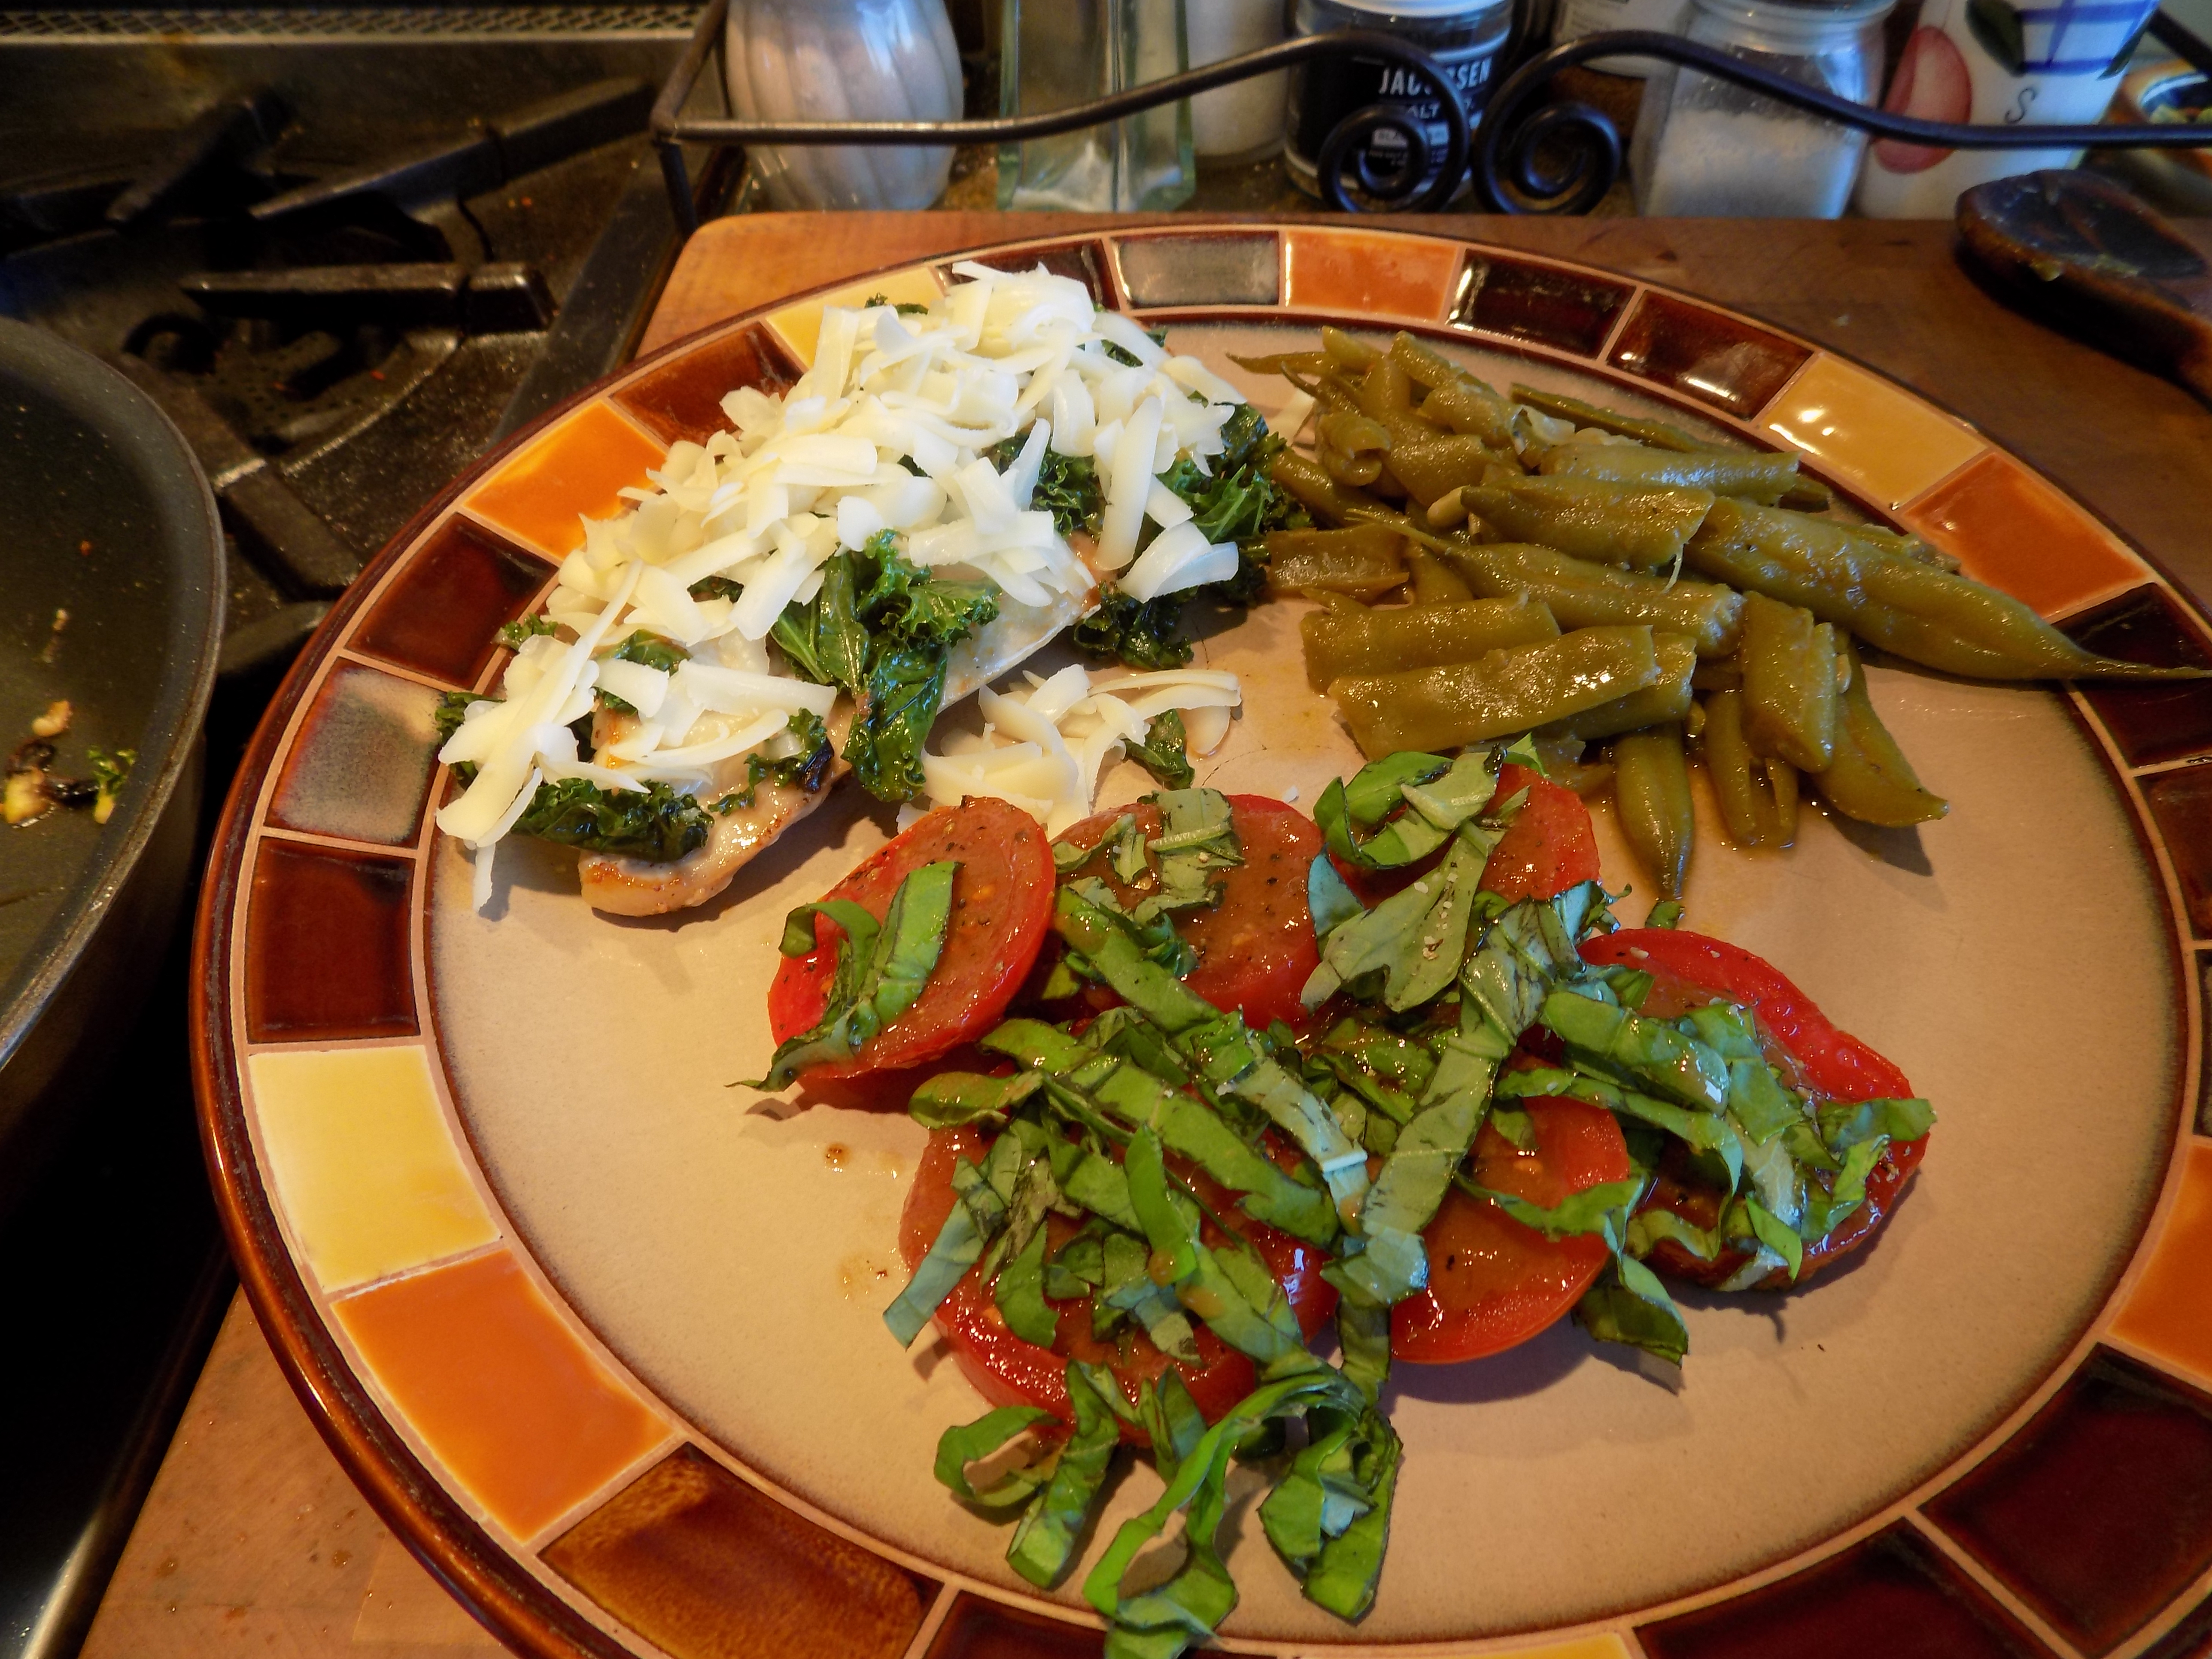
To serve, place a piece of chicken on each person’s plate, add a quarter of the kale topping, and sprinkle with a fourth of the shredded cheese. Serve immediately.

Black Garlic is a type of aged garlic often used in Asian cuisine. It is made by heating whole heads of regular old fashioned store bought garlic slowly over the course of 2-3 weeks. The taste is earthy and somewhat similar to roasted garlic, but with sweet and syrupy hints of balsamic vinegar and molasses. Much more mellow than raw or cooked garlic. The texture is kind of sticky and spongy like you would imagine if it were a clove of garlic disguised as a black gummy bear. (At least that’s what it reminds me of. Not the flavor of course, but the texture and appearance.) Black garlic is perfect in salads, pastas, sauces for various meats, and any other dish that would benefit from a mellow touch of garlic.

Preserved Lemons are fresh lemons preserved in salt and lemon juice. (Or in the case of my made-up recipe, a couple of additional ingredients.) Great in Moroccan dishes and any savory recipe calling for lemon zest/rind or lemon juice. Perfect in sauces, salads, salad dressings, pasta dishes, main dishes, you name it! Recipe for homemade preserved lemons soon to follow.


CHUNKY ANDOUILLE SAUSAGE, SHRIMP, AND CHICKEN SOUP

So what do you do with half a pound of andouille sausage, 1 chicken breast, and 8 ounces of frozen, uncooked shrimp? You make soup, of course. And that’s just what I did the other evening. I made soup. Middle of summer and all. With garlic toast on the side, it turned out to be a perfect mid-summer meal! And yummy, oh my goodness yes!

Based on a recipe I found on the Genius Kitchen site, I added some ingredients, changed the amounts here and there, and adjusted and simplified the preparation instructions. But the bones of the soup are basically from that site. (Great site BTW.)

My only regret after dinner was that I hadn’t had enough of the main ingredients to prepare a full recipe. But by all means, you can halve the recipe very easily. Just don’t blame me if you halve the recipe and wish you hadn’t. But enough about blame. Let’s get back to the “soup in the middle of summer” part.

It just came to me while I was writing this recipe preface, that I have displayed terribly misguided thinking in the past. And frankly, I should have realized my archaic opinion of serving hot soup in the summer was just that. Archaic! After all, what’s just about the first thing I discuss with our waiter, after I order my martini of course, when we go out for dinner? “What’s the soup of the day?” Winter and summer, I ask that same question. And I don’t let the temperature outside have any part of my decision. (You can just about make bet on my saying yes to any type of seafood bisque, regardless of the time of year.) So to date, why have I not served more hot soup in the summer? Because I’m a total idiot, that’s why!  

Of course there are many wonderful cold soups, but I’m going to start serving hot soup in the summer too. And yes I get the whole thing about cooking over a hot stove. But not all soups take hours to simmer, and many soups are a one dish meal. And let’s not forget about the abundance of fresh veggies in the summer. That and the fact that many soups are low in calories and easily warm up the next day in the microwave.

So my friends, don’t make the same mistake I’ve made the last 54 years of my life. Don’t wait until fall to serve hot soup. After the other evenings meal, sitting on our east facing deck, enjoying this delicious soup and garlic toast, I’ve become an advocate of hot soup in the summer. Well that, and one dish meals. (I’m not counting the garlic toast as another “dish”, because I dunk it in the soup, which clearly indicates that it’s just another aspect of the soup. Right!?!?)

Enjoy the rest of your summer. And one more thing. Please don’t leave out the green and red peppers. The soup would simply not be the same without these two key ingredients. And yes, this dish has definite Cajun influences. But there-in lies its basic appeal. I need say no more!

  • 2 T. extra virgin olive oil, divided
  • 1 lb. andouille sausage, sliced into 1/3-inch pieces (I use Johnsonville Andouille Smoked Sausage – not too spicy)
  • 2 boneless, skinless chicken breasts, cut into bite sized pieces  
  • 2 tsp. kosher salt
  • freshly ground black pepper
  • 1 lb. uncooked lg. shrimp, peeled and deveined
  • 1 lg. yellow onion, chopped 
  • 2 green bell peppers, chopped  
  • 2 red bell peppers, chopped   
  • 4 stalks celery, thinly sliced
  • 6 cloves garlic, finely minced
  • 1 (28-oz.) can diced tomatoes (Italian canned tomatoes are best)
  • 3 c. chicken broth
  • 1 c. dry white wine
  • 2 tsp. Worcestershire sauce
  • 1 T. dried oregano 
  • 2 tsp. dried thyme 
  • 4 tsp. sweet paprika (preferably Hungarian paprika)
  • ¼ tsp. crushed red pepper flakes  
  • Garlic Toast, opt. (see recipe below)

Pour 1 tablespoon of the olive oil into a large covered soup pot. Sauté sausage until browned on both sides. Remove from pan and transfer to a small bowl.

Sprinkle chicken pieces with salt and pepper. Add chicken to the pan and sauté until completely cooked. (Don’t over-cook.) Transfer chicken to another small bowl and set aside.

Add shrimp to the pot, and sauté just until fully cooked. Remove from pan and add to the bowl with the cooked chicken. Set aside to cool. Once cool place in refrigerator until needed.

Meanwhile, add the remaining 1 tablespoon olive oil, onions, peppers, and celery to pot; sauté for 10 minutes or until the veggies are soft and beginning to brown. Stir in the garlic and cook for 1 minute.

Return half of the cooked sausage to pot. Stir in the canned tomatoes with juice, chicken broth, wine, Worcestershire sauce, oregano, thyme, paprika, and crushed red pepper flakes.

Bring mixture to a boil. Reduce heat; cover, and simmer for 60 minutes.

After 60 minutes, add the remaining cooked sausage, chicken, and shrimp to the pot and simmer about 3-4 minutes or until the soup has come again to a hearty simmer. Adjust seasoning, and serve with garlic toast.

GARLIC TOAST   

  • 4 T. unsalted butter (½ stick), room temperature
  • 2 medium garlic cloves, minced
  • 2 tsp. finely chopped fresh Italian parsley leaves
  • ½ tsp. kosher salt
  • ½ of a crusty Italian or French baguette, cut in half lengthwise, and then cut into serving size pieces

Place the butter, garlic, parsley, and salt in a small bowl and mix with a table fork until well blended. Place the bread on a baking sheet, crust side down. Spread the butter mixture evenly over all of the pieces. Bake the bread in a pre-heated 425 degree oven for about 10 minutes or until the top is a very light golden brown.


ASIAN SALAD WITH GRILLED PORK TENDERLOIN SLICES

As promised, this is another recipe to help you feature leftover pork tenderloin. In this case, the pork tenderloin I used was from my recipe for Grilled Soy Sauce Marinated Pork Tenderloin on this site. And it all came together beautifully.

First of all I should tell you once again that I love main course dinner salads. And if the meat or protein is already cooked, all the better! One less step for me. Of course the hacking and slashing of the veggies (my friend Vicki’s term for cutting vegetables) still has to occur, and the dressing still has to be prepared, but what the heck, there’s still one less step to construct. (I’ll take all the help I can get on this one, because I do get tired of chopping veggies and building salad dressings!) But I love salads, so I guess it’s a small price to pay to eat a dish that’s healthy from all the veggies and dressed with a vinaigrette that’s not only tasty, but doesn’t contain ingredients I can’t pronounce! Like I said, all the better.

So next time you have leftover meat of any kind, use it in a salad. Have leftover roasted veggies, they are wonderful in salad too. Dried fruit, nuts, and seeds can also add a wonderful touch to an otherwise boring combination of lettuce and dressing. Let your imagination be your guide.

And please do make your own salad dressings. Homemade dressings save money, and help insure that only quality ingredients reach the lips of the ones you love. Of course, the shelf life on homemade dressing is very short in comparison to that bottle of dressing you purchased how many months ago? I rest my case!

  • 2 T. vegetable oil
  • 2 T. sesame oil
  • 1 T. finely minced fresh ginger
  • 1 garlic clove, finely minced
  • 2 T. white vinegar (not white wine vinegar; the old fashioned inexpensive vinegar)
  • 1 T. fresh lemon juice
  • ½ tsp. sugar
  • 1 tsp. kosher salt
  • freshly ground black pepper
  • 4 c. chopped romaine lettuce
  • 1 c. thinly sliced red cabbage
  • ½ c. finely diced celery
  • ½ c. sliced green onions
  • 1 med. carrot, grated
  • ½ c. frozen edamame, thawed
  • 2 T. toasted sesame seeds
  • ½ c. toasted slivered almonds
  • thinly sliced grilled pork tenderloin (I use leftover Grilled Soy Sauce Marinated Pork Tenderloin on this site.)

Whisk or shake together the vegetable oil, sesame oil, ginger, garlic, vinegar, lemon juice, sugar, salt, and pepper.

Combine the romaine, cabbage, celery, green onions, carrot, edamame, sesame seeds, and almonds in a salad bowl. Pour on enough salad dressing to moisten. Avoid adding too much dressing or the salad will taste heavy or over-dressed. (It is meant to be a light and refreshing salad and just perfect for a warm summer evening.)

Scoop salad onto individual plates and top with pork. 


GRILLED PORK TENDERLOIN AND NOODLE CASSEROLE

OK, yesterday I promised to post a couple of recipes to help you use up some of your leftover grilled pork tenderloin from my 2 recent posts starring this fabulous cut of pork.

Now I realize, having leftover meat is not a bad thing, in fact it’s a great thing. But what to do with it can sometimes be daunting. So this is what I did to utilize the leftover pork tenderloin from my recipe for Grilled Pork Tenderloin with Bourbon BBQ Sauce. I made a casserole. And oh boy was it good. And no, I didn’t use the leftover BBQ sauce. But the pork itself was seasoned perfectly for the other ingredients in this casserole. (You’d think I actually planned it that way. But boy would you be wrong. Just a lucky coincidence!)

For the rest of the casserole, I only used ingredients I happened to have on hand, so no trip to my local grocer was necessary. So if you decide to try this recipe, you too can use what you happen to have on hand. No red bell pepper, no problem. Swiss cheese, but no cheddar – knock yourself out. Hate peas – who cares! It’s a casserole using leftover meat – make it your own. This recipe is just a suggestion for what to do when staring at leftover pork tenderloin in your refrigerator and not wanting to serve it exactly like you did the previous evening.

Of course, you could always just thinly slice the meat, then gently warm it in the leftover BBQ sauce, and slather it between two halves of a lovely, crispy bun. But what fun would that be, when instead you could empty out your refrigerator veggie bin and have leftover casserole for your next days’ lunch? Your welcome!

  • 5 T. butter, divided
  • 2 T. flour
  • 1½ c. milk (I use whole milk)
  • ¼ tsp. kosher salt
  • freshly ground black pepper
  • 1 tsp. dried parsley
  • pinch crushed red pepper flakes, opt.
  • 1 tsp. Dijon mustard
  • 2 tsp. Worcestershire sauce
  • ½ c. diced onion
  • ½ c. finely diced celery
  • ¼ c. red bell pepper, finely diced
  • 6-8 sliced fresh mushrooms
  • 2 garlic cloves, finely minced
  • ½ c. sour cream, or more to taste
  • 1½ c. grated sharp cheddar cheese
  • ½ c. frozen petite peas
  • 2 c. egg noodles, cooked al dente and drained 
  • 2 c. thinly sliced cooked pork tenderloin, cut into narrow strips  
  • ¾ c. Panko breadcrumbs

Melt 2 tablespoon of the butter in a small saucepan. Whisk in the flour and stir for about a minute. Gradually whisk in the milk and cook until the sauce is thick and creamy. Take off heat and stir in the salt, pepper, parsley, crushed red pepper, Dijon mustard, and Worcestershire sauce. Set aside.

Melt 2 tablespoons of the butter in a large skillet over medium heat. Stir in the onion, celery, red pepper, and mushrooms; sauté until the onion turns translucent. Don’t allow the veggies to brown. Stir in the garlic and cook for one minute.     

Remove pan from heat and stir in the prepared sauce and sour cream until well combined. Then add the cheese, peas, cooked noodles, and cut pork. Adjust seasoning.

Dollop mixture into a lightly greased 9×13-inch baking dish (preferable glass) or ceramic casserole dish.

Melt the final 1 tablespoon butter in a small pan. Stir in the Panko. Sprinkle topping evenly over the casserole.

Bake in a preheated 325 degree oven for 35-40 minutes, or until bubbly and the topping is a nice golden brown.


GRILLED SOY SAUCE MARINATED PORK TENDERLOIN

When we were in Salt Lake City recently to visit my son and his family, I came up with this recipe for our father’s day celebration meal. Everyone liked it, so when we returned home I made it again for just Mr. C. and me. Still tasted good, so here goes with yet another recipe for pork tenderloin. (In the next couple of days I will publish my recipes for Grilled Pork Tenderloin and Noodle Casserole and Asian Salad with Grilled Pork Tenderloin Slices to help you figure out what to do with all the pork tenderloin you have left-over from the many pork tenderloin recipes on this site!)

Anyway, this is my take on a soy sauce based marinated tenderloin. It’s ever so flavorful without beating you over the head with its Asian goodness. One might even say it produces a subtle Asian inspired flavor. But anyone who has ever met me knows that I am absolutely unable to do anything with subtlety, so you’ll have to be the judge on this one.

So give it a try while it’s still officially grilling season. It’s easy to prepare and feeds several people, unless of course you are feeding teenagers, then my advice to you is to double the recipe. Happy grilling!

And don’t forget to garnish the sliced pork with sliced green onions. Right kids!?!?

  • ¼ c. extra virgin olive oil
  • 1/3 c. soy sauce (if you use low sodium soy sauce, add an additional ½ teaspoon sea salt)
  • 6 garlic cloves, finely chopped
  • 2-3 T. finely minced fresh ginger
  • ¼ tsp. crushed red pepper flakes
  • ½ tsp. sea salt (sea salt contains minerals that add to the marinade flavor)
  • freshly ground black pepper (not too much)
  • 2 pork tenderloin, trimmed of silver skin and excess fat
  • 2-4 thinly sliced green onions, opt.

Combine the olive oil, soy sauce, garlic, ginger, red pepper flakes, sea salt, and pepper in a shallow dish or zipped plastic freezer bag. Add the tenderloin and turn in the marinade until all surfaces are introduced to the liquid.

Place in a cool place for at least 5-6 hours. If marinating longer, like overnight, place in the refrigerator. Bring meat to room temperature before placing on the grill.

Heat your grill to about 300 degrees. (And yes I know, every other recipe you read will say to grill pork tenderloin at about 500 degrees. I totally disagree. I find 300 on my Weber gas grill to be perfect for this recipe.)

Place room temperature marinated tenderloins on grill surface. (Do not rinse off the marinade. Just hold it out of the marinade for 5 seconds or so before placing on the grill.) Close lid, and walk away for 7 minutes. Flip the meat, close the lid again, and walk away for another 10 minutes or so. Using a thermometer (instant is the easiest), grill until the internal temperature reaches 140 degrees.

Remove from grill and tent with aluminum foil for at least 8 minutes. Then thinly slice on the diagonal and place on a serving dish. Garnish with green onions and serve immediately.    


GRILLED PORK TENDERLOIN WITH BOURBON BBQ SAUCE

So – let’s talk pork tenderloin. I know I have said it before, but for the greatest bang for your buck, you really can’t beat pork tenderloin. And I’m sure most of you already know that it is no longer necessary to cook the pickles out of pork to insure against contracting trichinosis. So pork tenderloin prepared carefully, need no longer resemble and taste like dried shoe leather. The secret – don’t over-cook the meat! And then, regardless if you brine, marinate, rub, sauce, etc. the pork, it will turn out tender and juicy. And seriously, don’t hesitate to cook your pork with a little pink still showing.  

So, about this recipe. The pork preparation part is from the Dr. Dan 101 cooking for two site (The best grilled pork tenderloin – Memphis style). And yes, I made a few deviations from the original recipe, but I don’t feel anything was lost in the translation. The BBQ sauce – well let’s just say I’ve been making a version of this recipe for about 40 years.

This recipe for pork tenderloin takes advantage of both a simple brine and a dry rub. Sounds onerous, but really both the brine and rub are easy and fast to throw together. And the result is nothing less than delicious. And exceedingly tender and juicy. Pretty much perfect in every regard.

So do yourself a huge favor, and serve this pork and BBQ sauce to your family and friends while the true grilling season is upon us. (And yes I know you can grill any time of year. But who likes to don a parka just to cook a piece of meat when it’s cold and possibly raining or snowing outside. Not this girl, that’s for sure.)

An interesting note about terminology: Our dear friend Jim enlightened us last evening on the proper usage of the terms “grilling” and “barbecuing”. Simply put, and if I understand correctly, when you barbecue meat, you cook it low and slow using slowly circumvented hot air or smoke from wood chips, with the grill lid closed. When you grill, the lid is mostly up, with direct, fairly high heat coming from under the meat/veggies/fruit, etc. For example you would probably grill chicken breasts, but you would most likely barbecue a pork butt. Actually, most large grills are equipped to both grill and barbecue. And as is the case with many foods cooked on a grill, a little bit of “grilling” and “barbecuing” actually occurs in the quest for a delicious finished product. To prove my point, this recipe includes both grilling and barbecuing techniques. Happy summer and happy outdoor cooking.

  • 4 c. water
  • 4 T. kosher salt
  • 5 T. brown sugar, divided
  • 2 pork tenderloin, trimmed of excess fat and silver skin
  • 2 T. paprika
  • freshly ground black pepper
  • ½ tsp. chili powder
  • ½ tsp. dry mustard
  • ½ tsp. granulated garlic
  • ½ tsp. onion powder
  • lg. pinch cayenne pepper
  • vegetable oil
  • thinly sliced green onions, garnish, opt.

Combine water, salt, and 3 tablespoons of the brown sugar together in a one-gallon food storage bag or a shallow glass container. Add the tenderloin to the brine and refrigerate for 2 to 4 hours.

Meanwhile combine the paprika, remaining 2 tablespoons brown sugar, black pepper, chili powder, cayenne, dry mustard, granulated garlic, and onion powder.

When the tenderloins have finished their time in the salt water bath, rinse well under running water and pat dry with paper towels.  

Place the tenderloins on a small shallow baking pan. Sprinkle all over with the rub. Cover with plastic wrap and set in a cool place (not the refrigerator) for a couple of hours. 

Meanwhile, heat your grill. If you have a large enough grill, heat 1 section to 450-500 degrees. Heat another section to about 300 degrees.  Oil both parts of the grill with the vegetable oil.  

Grill each tenderloin for about 3 minutes per side on the hotter part of the grill with the lid up. Immediately transfer to the cooler section, close the lid, and grill/barbecue each side again until the internal temperature reaches 140 degrees at the thickest point. (I use my instant read thermometer.)  Remove from grill and tent with aluminum foil for at least 15 minutes before thinly slicing on the diagonal. Garnish with sliced green onions and pass the Bourbon BBQ Sauce.

BOURBON BBQ SAUCE

  • ¼ c. unsalted butter
  • ¼ c. minced onion
  • 3 cloves garlic, minced
  • ¼ c. brown sugar
  • 2 tsp. whole grain mustard
  • 1 c. ketchup
  • 1/3 c. Worcestershire sauce
  • ¼ c. fresh lemon juice
  • ¼ tsp. hot sauce, or to taste
  • ¼ tsp. cayenne
  • 2 T. bourbon

Melt butter in a medium sized covered saucepan. Sauté onion until translucent; add garlic and cook until garlic releases its aroma, about 1 minute. Add remaining ingredients, bring to a boil, reduce heat, cover pan, and simmer gently for 30 to 60 minutes, stirring occasionally. Basically cook the sauce until you reach desired thickness. (Sauce will thicken as it simmers. If the sauce is still too thin after 60 minutes, remove the lid. But be warned – simmer at a low temperature or you will have BBQ sauce all over you and your kitchen!) Serve sauce warm or at room temperature.


SHRIMP ÉTOUFFÉE

So, how to enjoy étouffée without causing stomach distress, especially if you are over 60? Well the first thing to do is not add too much cayenne pepper to the Creole Seasoning mix. Seems like this should be fairly simple to understand, but I can’t tell you how many times I have been fooled by someone saying “really, it’s not that spicy”! I have even said the same thing to guests, without thinking that “too spicy” is really a relative thing. What is perfect for me, can well be far beyond what another person can tolerate. So the sauce for this étouffée can be as spicy or non-spicy as you want it to be. You get to dictate how much cayenne you want to use when you make Creole Seasoning yourself. For us, I use 2 teaspoons of cayenne. (The recipe makes about a cup of seasoning, so a teaspoon or two of cayenne is not that much. At least for us.) You may wish to use much less or even more if your stomach lining is cast iron. Regardless of how much cayenne you use, you are going to be delighted with how wonderfully flavorful the sauce is.

Now, not being from Louisiana, I get very confused by what to call some of the regions finest dishes. I love them all, but there are differences, subtle in some cases, but distinctive in other ways.

In order to understand that when eating this dish you are enjoying an étouffée, not a jambalaya or a gumbo, I have provided you with a very simple explanation of the differences.

Étouffée is a main course, made using one type of shellfish smothered in a thick sauce served over rice. It can be prepared with a lot of heat, or with little to none.

Jambalaya is more like a paella. It contains meat (often andouille sausage, chicken, smoked ham, and shrimp), often tomatoes, all simmered together with rice and stock.

Gumbo is served as a soup. It is a mix of vegetables and meat or shellfish with a semi-thickened stock and served alongside rice that has been cooked separately.

There is however, one thing consistent in all three dishes. That is the use of the “holy trinity”. In Creole and Cajun cooking, many recipes, including this one, contain the combination of onion, green bell pepper, and celery (revered threesome) that has been gently sautéed to form a flavor base for the rest of the ingredients.  Much the same way in which French cooking has its mirepoix (carrot, onion, and celery) and Italy its soffritto (onion, celery, carrots or fennel bulb) as a base for many of their traditional recipes.

Regardless of what this dish is called, it’s just plain delicious. And it’s reasonably easy to prepare. And it’s a one dish meal. Protein, veggies, and starch are all served together in a bowl, making any other dish superfluous. I like that! Less work for me and fewer dishes for Mr. C. to wash after dinner. I call that a win/win! (Of course, you could always serve garlic bread as a side, but it’s really not necessary. You know, not necessary the way air and water aren’t necessary to life itself!)

Creole Seasoning:

  • 1/3 c. paprika (I use sweet Hungarian paprika)
  • 3 T. dried oregano (I use Mexican oregano)
  • 2 T. kosher salt
  • 2 T. dried basil
  • 1 T. freshly ground black pepper
  • 1 T. onion powder
  • 4 tsp. dried thyme
  • 4 tsp. granulated garlic
  • 1-3 tsp. cayenne pepper

Mash all ingredients together with a mortar and pestle. (The back of a soup spoon works too.) Store in an airtight container. Makes more than you’ll need for this recipe. But it’s a great all-purpose creole seasoning recipe. Great in soups, stews, and yes, even other Creole and Cajun recipes.

Étouffée:

  • 1 lb. peeled and deveined large shrimp (save the shells)
  • ½ c. water
  • 2 T. vegetable oil
  • 6 T. unsalted butter, divided
  • 3-6 tsp. Creole Seasoning (recipe above), divided
  • 1 medium sized yellow onion, diced
  • 1 green bell pepper, diced
  • 4-5 celery stalks, thinly sliced
  • 4 garlic cloves, finely minced
  • ¼ c. all-purpose flour
  • 1 tsp. minced fresh thyme
  • 2 bay leaves
  • 1 c. diced tomatoes (either fresh or canned)
  • 3 c. chicken stock, or more if needed
  • 1 tsp. Worcestershire sauce, or more to taste
  • cooked rice (I use brown rice cooked in my rice cooker.) See recipe below.
  • 1 bunch green onions, sliced
  • hot sauce, opt.

Place peeled shrimp in a colander. Place shells in a small saucepan along with the ½ cup water. Bring water to a boil, remove from heat, cover, and let the shells steep until the shrimp stock is needed. (Before adding the stock to the sauce, strain the shells and discard.)

Heat the vegetable oil and 2 tablespoons of the butter in a medium large saucepan over medium heat. Pat the shrimp dry with paper towels and sprinkle with about 1 teaspoon of the seasoning mix. Fry until just cooked through. Do not over-cook. Remove shrimp to a small bowl. Set aside.

Melt the remaining 4 tablespoons butter in the same pan over medium heat until the butter just starts to brown. Sauté the onion, green pepper, and celery in the hot butter until softened, about 5 minutes. Don’t let the veggies get brown. Add the fresh garlic and cook for 1 minute. Stir in 4 teaspoons of the seasoning mix, the fresh thyme, and the bay leaves. (You may want to add more of the seasoning later, but for now, 4 teaspoons is perfect.)

Sprinkle the flour onto the vegetable mixture and stir until everything is well combined, 3 to 4 minutes. Stir in the diced tomatoes. Let cook for a minute or two. Whisk the chicken stock and shrimp stock into the vegetable mixture, stirring until smooth. Bring to a simmer and cook until the sauce is slightly thickened and reduced to a gravy consistency, 3 to 5 minutes, or for however long it takes to bring sauce to your desired consistency. Stir in the Worcestershire sauce and adjust seasoning.

Add the cooked shrimp and any accumulated juices. Cook only until the shrimp are hot. 

Serve the étouffée over rice in large, shallow bowls. Garnish with green onions. Pass the hot sauce.

BROWN RICE

  • 2 c. uncooked brown rice
  • 3½ c. water
  • 1 tsp. seasoned salt
  • freshly ground black pepper

Place all ingredients in rice cooker. Push the button. Walk away for an hour.

CHEF SALAD WITH THOUSAND ISLAND DRESSING

I love salad for dinner. Especially if it’s a salad that contains some of my favorite ingredients. I just can’t begin to tell you how many times I order a chef salad when we go out for dinner. Well actually, either a Chef Salad or a Shrimp/Crab Louie. I love them both equally. (Which reminds me. I haven’t posted my recipe for a truly tasty Louie on this site yet. I shall endeavor to correct this glaring omission in the very near future!) But back to the recipe at hand.

Another thing I love – going out to dinner. But, and that’s a capitalized “but”, not too often. I like to go out about every 7-10 days. That gives me just enough of a break from cooking to not feel tethered to my stove! Because, as I’m sure you all know by now – I truly love to cook. But as with everything else, a wee bit of “time-off”, is always appreciated.

But the other night, I didn’t want to go out. Not out for dinner, or even to the grocery store for ingredients I might be lacking. So I opened the refrigerator door and found almost everything I needed for this salad. (I didn’t have cherry tomatoes or an English cucumber, but we managed to eat the salad regardless.)

So next time you get a hankering for a big old dinner salad, give this recipe a try. And don’t worry if one or two items are missing, or you want to replace them with something else. That’s the beauty of this salad. You can adapt it to whatever you have on hand. Well, the lettuce part is pretty much a necessity, but it doesn’t have to be romaine and arugula. It can be a spring mix, or iceberg or “whatever” lettuce, if that is your preference. Don’t like Thousand Island dressing, use ranch or another dressing you happen to have on hand. The main thing is to use healthy and delicious ingredients that you and your family enjoy. This is a salad filled with love. Just because it happens to be fairly healthy, should not be held against it.

A toast to summer, to salads, and to all of you out there who provide delicious and nutritious food for your family and friends. Salud!

THOUSAND ISLAND SALAD DRESSING

  • 1 c. mayonnaise (I use Best Foods/Hellmann’s Light mayonnaise)
  • ¼ c. ketchup, or more to taste
  • 1-2 tsp. Dijon mustard
  • ½ tsp. prepared horseradish, or more to taste
  • dash hot sauce (I use Frank’s RedHot)
  • 2 T. dill pickle relish or 2 T. finely diced dill pickle (I usually use dill pickle relish)
  • pinch kosher salt
  • freshly ground black pepper
  • ¼ c. minced green onion
  • 3 T. finely minced black olive
  • 1 T. minced fresh parsley

Combine all ingredients. Store in a covered container in your refrigerator. Can be made ahead. BTW – great on Rueben Sandwiches. (See recipe on site.)

CHEF SALAD

  • 4 slices thick, meaty bacon cut into small pieces and fried until crisp
  • ½ c. small chunks of deli Black Forrest ham
  • ½ c. small chunks of deli roasted turkey or chicken
  • 1/3 c. sharp cheddar cheese cubes  
  • ½ c. Swiss, Gouda, Manchego, Emmental, or Gruyère cubes (or cheese of choice)
  • ½ c. black olive slices
  • 1 c. thinly sliced English cucumber (I partially peel and seed the cucumber before cutting into chunks)
  • 2 hardboiled eggs, peeled and cut into wedges or slices
  • 6-8 c. chopped romaine 
  • 1 c. baby arugula leaves, opt. (I love the fresh peppery taste)
  • ¼ c. thinly sliced green onion
  • ½ c. halved cherry or grape tomatoes
  • 1 avocado, cut into thin slices
  • 1 c. croutons
  • Thousand Island Salad Dressing, or dressing of choice  

Prepare the salad dressing and keep in fridge until needed. (Can be made ahead.)

Prep the bacon, ham, turkey or chicken, cheeses, black olives, cucumber, and hardboiled eggs. Set aside.

When ready to serve, combine the romaine, arugula, sliced green onion, and tomatoes in a salad bowl.

Spread the lettuce mixture on 2-3 dinner plates. Divide the bacon, ham, turkey or chicken, cheeses, black olives, cucumber, and egg slices onto each plate in individual sections. Garnish with the avocado and croutons. Serve the dressing on the side. This recipe makes 2-3 good sized dinner salads.


BAKED CHICKEN SHAWARMA WITH GREEK YOGURT SAUCE AND BAKED RICE

When we lived in Bellevue, we used to eat at the Mediterranean Kitchen on Bellevue Way. It was renowned for being partially subsidized by the garlic growers of America (just kidding). But they did use an exceedingly huge amount of garlic in their dishes. And their Chicken Shawarma was no exception. OMG. We would come home from dinner and both of us would reek of garlic. Leftovers, and there were always leftovers, would cause the entire refrigerator to smell like the kitchen of the restaurant.

But, it was worth it! Because the shawarma was wonderful. Marinated strips of chicken breast in red wine vinegar, spices, and garlic. Grilled with onions, green onions, red cabbage, and tomatoes, served with a tahini sauce. Oh my. Lovely.

So let’s leap forward 10 years.  

As much as I love garlic, my golden years’ stomach will no longer tolerate that much garlic! But I still love shawarma. So I went on line to see if I could make a shawarma a little tamer than Med Kitchens version.

And I located this recipe (at least the one for the chicken) on Tory Aveys’ site. (Wonderful recipes on her site as I’ve stated several times before!)

The yogurt sauce and rice recipe were compilations based on recipes from several wonderful cooking blogs.

So next time you get a hankering for middle-eastern food but either don’t have a Mediterranean restaurant close by, or the strength to leave home to find one, this is the meal for you. Chicken prepared with warm, savory spices and herbs, a sauce that has all the flavors you associate with middle-eastern cuisine, and a delicious and simple rice dish as the base for all this goodness.

Καλή όρεξη! (Good appetite in Greek.)

  • 1 lb. boneless skinless chicken breasts  
  • 2 T. extra virgin olive oil, plus more as needed
  • 1 tsp. cumin
  • 1 tsp. paprika
  • ½ tsp. allspice
  • ½ tsp. turmeric
  • ¼ tsp. granulated garlic
  • 1/8 tsp. cinnamon
  • pinch cayenne
  • ½ tsp. kosher salt
  • freshly ground black pepper
  • nonstick cooking oil spray
  • Greek Yogurt Sauce (see recipe below)
  • Baked Rice (see recipe below)

Cut each chicken breast into bite sized pieces. Place in a glass or plastic bowl. Whisk the olive oil, cumin, paprika, allspice, turmeric, granulated garlic, cinnamon, cayenne, salt, and pepper together in a small bowl.

Pour the spice marinade over the chicken pieces. Stir with a spoon till all the chicken pieces are evenly coated in the marinade.

Cover and place in the refrigerator for at least 3 hours. (Overnight is fine.)

Spray a rimmed baking sheet with nonstick cooking oil. Place the chicken pieces in a single layer on the sheet.

Bake in a pre-heated 400 degree oven for 12-15 minutes or until cooked through (no pink).

Take the chicken out of the oven and transfer, complete with pan juices, to a large skillet. (If there are no pan juices, use about a tablespoon of olive oil to grease the pan.) Over medium-high heat, sauté the chicken for 3-4 minutes till the smallest pieces of chicken start to turn brown and crisp. Taste and adjust seasoning. Can be made ahead.

Serve warm over Baked Rice and dolloped with Greek Yogurt Sauce.

GREEK YOGURT SAUCE:

  • 1 c. plain Greek yogurt
  • 2 tsp. fresh lemon juice
  • 1 clove garlic, very finely minced
  • ¼ tsp. kosher salt
  • freshly ground black pepper

Whisk all ingredients together. Store covered in the refrigerator until needed. Can be made ahead.

Note: If you are a tahini lover, try adding a tablespoon or two to this sauce. You might need to add a bit of water to the sauce to thin it out.

BAKED RICE

  • 1 T. extra virgin olive oil
  • ½ c. chopped yellow onion
  • 2 garlic cloves, finely minced
  • 1 c. long-grain white rice
  • 2 c. chicken stock
  • 2 tsp. fresh lemon juice
  • ½ tsp. kosher salt
  • freshly ground black pepper

In a heavy covered pan, heat the olive oil over medium heat. Add the chopped onion and cook for 3 to 5 minutes or until softened. Add the garlic and cook for 1 minute. Add the rice and stir until each grain of rice is well coated. Add the chicken stock, lemon juice, salt, and pepper. Bring to a boil.

Cover with lid or aluminum foil, if your pan does not have a lid. Bake in a pre-heated 350 degree oven until the rice is tender and the stock is absorbed, about 20 to 25 minutes. Remove from oven and let stand, covered for 5 minutes before fluffing and serving. Can be made ahead and refrigerated. Reheat before serving.

CREAMY CHICKEN, GARLIC, MUSHROOM, AND PARMESAN CHEESE PASTA

Well, sometimes the stars appear to be in proper alignment and events happen that turn out to be delightful. Mr. C. and several other wonderful musicians in the area were on the faculty of a jazz camp being held at nearby Warm Beach Camp and Conference Center.

And the day before yesterday, Mr. C. happened to be free from about 4:00 in the afternoon until 9:00 pm when he was to accompany 2 of the 3 student (average age 70+) ensembles. Happened our good friend Todd was playing the same gigs and free at the same time. So Mr. C. called me and asked if he could bring a friend home for dinner? Of course! Then I found out it was Todd. That made it even better!

I warned both guys that I was testing a new recipe, but they both agreed that being guinea pigs was just fine with them. (What good sports!)

Anyway, I lucked out. The pasta turned out to be very tasty. And even using 4 cloves of garlic, the over all flavor was subtle, delicate, and delicious. 

I got the idea and bones for this recipe from the Recipe Critic site. I changed a few amounts, added a couple of ingredients, and the results were acclaimed by both guys.

So if you need a very simple, but guest-worthy dish to serve some evening when you don’t have a lot of time, I would offer this recipe as a happy solution. All you need to accompany this dish is a green veggie or a simple green salad. Although, garlic bread would always be a delectable  addition. That, and a bottle of chilled dry white wine.  

  • 2 T. extra virgin olive oil
  • 2 boneless, skinless chicken breasts, cut into bite sized pieces
  • ½ tsp. kosher salt
  • freshly ground black pepper
  • 10-12 sliced button mushrooms
  • 2 T. cognac or brandy, opt.
  • ¼ c. unsalted butter
  • 1 med. shallot, finely minced
  • 4 garlic cloves, finely minced
  • 1 T. all-purpose flour
  • ½ c. chicken broth
  • 1 c. heavy cream or half & half
  • ¾ c. grated Parmesan cheese, plus more for passing at table
  • 1 c. chopped baby spinach, or more to taste
  • 6 oz. angel hair pasta, cooked al dente

Heat the olive oil in a large heavy frying pan. Add the chicken pieces, sprinkle with salt and pepper, and cook just until done (no longer pink). Remove to a bowl. Set aside. Add the sliced mushrooms to the fry pan and cook for a few minutes until tender and slightly browned. Take off heat and add the cognac. Remove the mushrooms to the same bowl with the chicken. Set aside.

Melt the butter in the same pan in which you cooked the chicken and mushrooms. Add the shallot and cook over medium-low heat for 2 minutes. Add the garlic and cook for 1 minute. Whisk in the flour and keep stirring for 2 minutes.

Whisk in the chicken broth, heavy cream, and Parmesan cheese. Taste and adjust seasonings. Add the reserved chicken and mushrooms, including any juices at the bottom of the bowl.

Stir in the spinach and let the sauce simmer until the spinach wilts and all the ingredients are hot.

Add the freshly cooked al dente pasta. Serve immediately. Pass additional Parmesan cheese.  

Note: This is one of those recipes where it is advisable to prep all your ingredients ahead of time. The actual cooking of this dish takes very little time. So being all prepped is the wise choice.