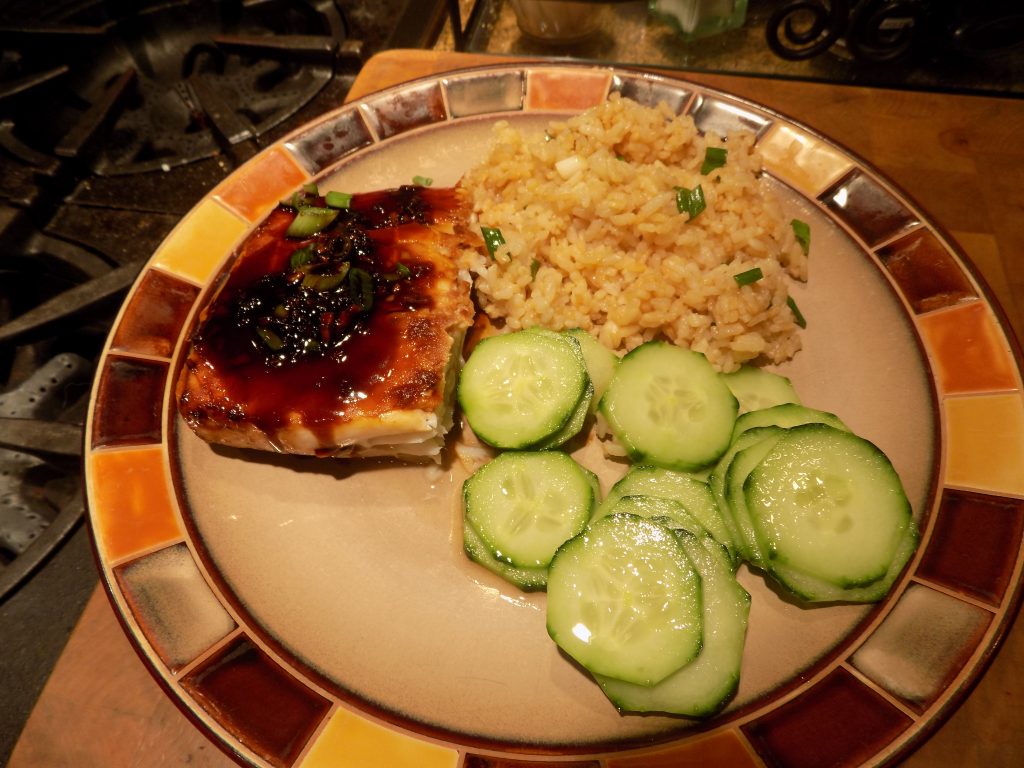
Once in a while I
get an idea that won’t stop nagging at me. And the inspiration for this recipe
came as one of those thoughts that just would not go away!
And I’m glad it didn’t. Because the result was this recipe that is ever so much
easier not only to prepare, but to eat than a regular chicken cordon bleu.
Now the first
time I prepared this dish, I made the mistake of not making enough sauce. The
casserole came out too dry. (My own fault since I glommed this recipe together
from several I looked at on the internet.) But having eliminated that problem
by doubling the sauce part, this is now a dish fit to serve company. Very
tasty, and can be prepared ahead of time. I love that in a casserole.
So if you too
love chicken cordon blue, but don’t appreciate the mess associated with the
real thing, give this dish a try. It’s lovely. Great flavor and even a nice
presentation.
And a general apology to our guests Tim & Susie, Todd & Cindy for having to eat my first attempt at this recipe. This version is much better. Honest it is!
And sorry about no photo of the casserole. Must have been brain dead. Just imagine a Pyrex dish with browned crumbs on the top and you have the whole picture. So to speak.
Chicken:
2 T. unsalted
butter
4 boneless,
skinless chicken breasts, cut into ¾-inch cubes
kosher salt
freshly ground
black pepper
Heat the butter in a large skillet. Add the chicken cubes lightly sprinkled with salt and pepper. Fry just until cooked through. Do not over-cook. Remove pan from heat. Using a large slotted spoon, transfer the cooked chicken to a roughly 9×13-inch casserole or glass Pyrex dish. Set aside. Pour the remaining liquid from the fry pan into a 4 cup measuring implement. Set aside.
Sauce:
6
T. unsalted butter
3
cloves garlic, finely minced
6
T. all-purpose flour
3
c. whole milk (approximately)
1
tsp. chicken bouillon
3-4
T. Dijon mustard, or to taste
1½
c. grated Parmesan cheese
kosher
salt
freshly
ground black pepper
Melt the butter in a heavy pan. Add the garlic and cook for 1 minute. Whisk in the flour, and cook for 1-2 minutes. Add enough milk to the reserved chicken frying liquid to make 4 cups. Slowly pour in the milk mixture while whisking quickly to avoid lumps. Add the chicken bouillon. Whisk constantly over medium heat until the mixture begins to simmer and thicken, about 3-5 minutes. Once the sauce has bubbled and thickened, remove from heat and stir in the mustard and Parmesan cheese. Stir until the cheese is melted. Season to taste with salt and pepper.
Casserole Assembly:
12 slices deli
ham (about ½ lb.), cut into small pieces (I use Black Forrest ham)
12 oz. shredded Swiss
cheese, or more to taste
2 T. unsalted
butter
2 c. Panko bread
crumbs
Scatter
about half the cut ham over the cooked chicken pieces. Evenly place the grated
Swiss cheese over the first bit of ham. Scatter the remaining ham over the
cheese. Spread the sauce evenly over the top.
Melt
the remaining 2 tablespoons of butter in a skillet over medium heat. Remove pan
from heat and stir in the panko. Sprinkle over the top of the casserole. Note: If you are making this dish ahead
of time, don’t add the Panko topping until just before you pop the casserole in
the oven.
Bake
in a pre-heated 350 degree oven for 30-40 minutes or until the top is browned
and the casserole is bubbling. The last half of the baking time can be
convection. (This will help brown the top.) Remove from oven and let sit for
about 5 minutes before serving.
OK, I know I am probably
alone here, but I actually like homemade pizza better than 90% of the pizza
found in restaurants. The 10% that I like better is baked in Italy but I simply
can’t afford to fly to Rome every time I get a pizza craving! No duh!!!! And I
have to admit; the part about actually being in Italy probably has something to
do with my feeling that the best pizza is made there. I do so love Italy!
Now of course, intrinsic
to my preference for homemade pizza I include the fact that I have friends who
make incredible pizza in and outside of their own homes. Our dear friends Chip
and Linda who own the Quillayute River Resort* in Forks, WA have an Italian
pizza oven in their home. And Chip is a master bread baker. So between the
amazing crust that he prepares from scratch and the oven that is designed for
the purpose, Chip’s pizzas are amazing. And our great friend Tim in Anacortes
also prepares fantastic pizzas. He actually bakes his creations on his grill.
Fabulous.
But I do neither.
I use my oven. I crank the sucker up to 475 degrees, bake the pizza on the
bottom rack, and use the convection setting. That’s as far as I am willing to
go to insure tasty pizza. I simply can’t foresee a real pizza oven in my
future. And if I tried baking pizza on our grill, I would either burn myself or
worse yet, burn down the house. (I am not a grill queen. And I don’t want to
task Mr. C. with a grill assignment I am unwilling to try myself. We have our
positive attributes, but mechanical aptitude is not one of them! Two spatulas,
hot flames. Not going to happen!) So we are stuck with pizza ala Chez Carr.
In my opinion, the
first thing about any good pizza is the crust. And I happen to like thin crust.
I want it to have flavor, but not so much that it detracts from the rest of the
ingredients. The second thing I think is essential to the overall appeal of a
pizza is the sauce. For years I would make a tiny bit of sauce and spread it on
very lightly. Wrong! The sauce is important. It should be very flavorful and should
not be used sparingly.
The next
ingredient that is super important – cheese. Gotta have plenty of cheese or why
bother?
And then
pepperoni, Italian sausage, chopped onion, black olives, mushrooms, and bell
pepper. What is not to like in this combination? For me it is the very definition
of pizza. But I live with a guy who likes pesto sauce or a white pizza sauce,
so I am going to be trying out recipes with more contemporary ingredients in
the next few months. If you have a favorite I would love to hear from you.
But in the meantime, give this recipe a try. Your kids will love it. They won’t even notice the whole grain flour in the crust. They might not like the extra onions or bell pepper pieces. But the great thing about pizza is that you can add ingredients to one part of the pizza, and leave them off the other side. Everyone gets what they want and everyone is happy. Now how often does that happen with any other dish? Bon appetito!
Whole Wheat Pizza Crust:
¾ c. + 1 T.
lukewarm water
1 pkg. or
1 scant T. active dry yeast
1 tsp. sugar
1 c. whole-wheat
pastry flour
1 c. bread flour
½ tsp. kosher
salt
extra virgin
olive oil
Place water,
yeast, and sugar in the bowl of your stand mixer. Stir with your bread hook. Let
stand until the yeast has dissolved and starts to look bubbly, about 5 minutes.
Stir in whole-wheat flour, most of the 1 cup of the bread flour, and the salt
until the dough begins to come together. Add enough remaining flour to make a smooth,
elastic ball of dough that pulls away from the sides and bottom of the bowl, about
4 to 5 minutes.
Pour a small
amount of olive oil over the dough and turn to coat. Cover with a clean kitchen
tea towel or plastic wrap. Let sit for about an hour or until doubled in size.
Punch down. While the dough rises, prepare the pizza sauce and get the topping
ingredients ready.
When the dough is ready, punch it down. Spread it out on a lightly greased large pizza pan or baking sheet. Spread the dough as thin as possible. Form a small rim by pinching edge of dough.
Stir all ingredients together until thick and smooth.
Pizza Toppings: (my favorite)
sliced
or shredded mozzarella cheese (about ¾ lb.)
1
lb. crumbled cooked bulk Italian sausage
1
lb. pepperoni slices
½
c. chopped onion
¾
c. halved black olives
1
c. sliced mushrooms
½
of a bell pepper, chopped
½ c. grated Parmesan cheese
Pizza Assembly:
Spread
the pizza crust with a nice thick layer of pizza sauce. (Lots of sauce is best!
If you don’t use it all, put the rest in the freezer for the next time you get
a pizza craving or make marinara sauce.)
Spread
about a third of the mozzarella over the sauce, then add the other topping
ingredients. Finish with the rest of the mozzarella and the grated Parmesan.
Bake
in a pre-heated 475 degree oven on the lowest rack for 12-14 minutes or until
the cheese is bubbly and the crust is browned. Let sit for 3-4 minutes before
slicing.
And of course you can change topping amounts, add or delete toppings, do whatever you want to your hearts content. Other topping ingredients we enjoy – sun-dried tomatoes, artichoke hearts, and anchovy fillets (when we are feeling worthy).
*Quillayute River Resort
Nestled in a secluded forest by the Quillayute River, this relaxed, all-suite resort is 7 miles from La Push Beach and 16 miles from Bogachiel State Park.
The cozy 1-bedroom suites feature full kitchens with vintage-style appliances, as well as living areas with fireplaces and pull-out sofas. All have satellite TV, free Wi-Fi and heated bathroom floors, plus covered porches with river views and BBQ grills.
Each of the five riverside housekeeping suites have a comprehensively-equipped kitchen with charming, completely refurbished 1950s era appliances, and new pots, pans, dishes, and utensils – everything you need. Kitchens also come equipped with toasters, blenders, electric hand mixers, microwaves, coffee makers, coffee, salt, and pepper.
Bedrooms have either 2 double beds or 1 King size bed, DISH TV with ESPN, and DVD/CD players. Other amenities in all the suites include DSL Internet connections, clock radios, telephones, and a collection of books for the non-electronically inclined.
Relax in the comfort of your living room while you watch the river flow and cozy up next to the fireplace.
Bathrooms are equipped with heated tile floors, hair dryers, full-size bathtubs, and EO Products – Organic Skin and Hair Care Products soaps, bath gels, and lotions.
Each suite has its own set of deck chairs and a charcoal barbeque on the covered porch overlooking the river. Each suite is also separated from the next by an enclosed garage.
I
want you to know just how brave I have become. I have actually used my Instant
Pot 3 times in the last few weeks. Amazing right? And I must say in all honesty
– what in the heck was I worried about? My Instant Pot is so easy to use, and
so far the results have been terrific. OK, I still don’t sauté in my Instant
Pot because I like to control that step on my stove top. But cook dried beans,
or in this case meat that would normally have to simmer for hours, well I am
now so on board the Instant Pot train! And the pot is even easy to clean!
Better and better.
So
the other day I got a wild hair to make a shredded beef enchilada. I love
Mexican food, and already had a great recipe for Cheese Enchiladas with Red Chili Sauce (the best red sauce you
could ever hope to create at home BTW), but my mouth was craving shredded beef.
So I went on line and glommed together this recipe. And I must say it filled my
expectations and then some. And easy? Oh yah!
So
if you too have been the least bit hesitant to use your Instant Pot, get over
your fears and give this recipe a try. I topped the enchiladas with homemade Pico de Gallo (on site) and sour cream.
And served Mexican Cabbage Salad (see recipe below) and Instant Pot refried
pinto beans on the side. (Beans recipe to be posted in the next few days.)
And if you love shredded beef enchiladas as much as I do, make this recipe at your earliest convenience. It is just plain yummy. And if you have extra meat, don’t hesitate to freeze it for the next time you experience an enchilada craving.
2
T. extra virgin olive oil
3
lb. boneless chuck roast, all visible fat and gristle removed, and cut into
3-inch pieces
1
c. beef broth
juice
of 1 lime
1
sm. can (8 oz.) tomato sauce
2
tsp. chili powder
2
tsp. dried oregano, preferably Mexican oregano
2
tsp. ground cumin
1
tsp. paprika
1
tsp. kosher salt
¼
tsp. crushed red pepper flakes
¼
tsp. ground cloves
freshly
cracked black pepper
1
can (lg. or sm.) chopped green chilies
1
sm. yellow onion, rough chopped
4
cloves garlic, rough chopped
2
bay leaves
flour tortillas, warmed on a dry griddle
Heat
olive oil in a large frying pan. Brown all the pieces of meat and place them in
your Instant Pot. Add more olive oil if necessary. (The beef chunks should be
very well browned on all sides.) Don’t wash the fry pan. Pour off any fat, but
leave the brown bits for later.
In
a medium sized bowl, whisk the broth, lime juice, tomato sauce, chili powder,
oregano, cumin, paprika, salt, crushed red pepper flakes, ground cloves, and
black pepper together. Stir in the canned green chilies, chopped onion, chopped
garlic, and bay leaves.
Pour
over the meat and give the whole mess a good stir.
Place
the lid on the instant pot and lock. Steam release knob should be set on
“sealing”. Cook on manual setting (high pressure) for 60 minutes.
Allow pressure to release naturally.
Remove
beef from pressure cooker and shred with 2 forks, discarding any fat.
Pour
the remaining liquid from the Instant Pot into the fry pan. Discard the bay
leaves. Heat and stir up the brown bits on the bottom of the pan. If the sauce
is not thick enough, make a simple water and cornstarch slurry (1 to 1 water
and cornstarch mixture) and add to the meat juices. Bring to a boil, and whisk
until smooth and sauce reaches desired consistency. Add shredded beef to pan. Adjust
seasoning. Cook until warm.
Fill
warmed tortillas with meat, roll, and top with Pico de Gallo and sour cream. Or
whatever your heart desires. Meat can also be used as a filling for tacos or on
a taco salad. Let your imagination be your guide.
Note: I have not tried making this shredded beef the more traditional way. That is on either my cook top or in the oven, but I see no reason why it wouldn’t turn out just fine. Just check it every hour or so to make sure the beef is not getting too dry. Add water or beef broth as required.
MEXICAN CABBAGE SALAD
½ small head
cabbage, chopped
1 jalapeno
pepper, seeded and minced
½ small red
onion, minced
1 carrot, shredded
1 T. chopped
fresh cilantro
juice of 1 lime
pinch kosher salt
freshly ground
black pepper
In
a bowl, mix together the cabbage, jalapeno pepper, red onion, carrot, cilantro,
lime juice, salt, and pepper. Store in refrigerator until ready to use.
This
salad would also make a great accompaniment to fish tacos. Just sayin’!
I’m
always looking for delicious ways to prepare fish. And we love cod. But cod is
not a strong flavored fish, so that means it needs a little flavor boost from
either the method of preparation or from the sauce it is served with. But Mr.
C. is a strong believer that not only should the fish itself be flavorful,
there simply must be a sauce or aioli to create perfection.
So yesterday I went on line and found yet another combination of spices that sounded appealing. I messed with the amounts, but the spice combination itself comes from the Kitchen Stewardship site and calls itself “St. Peter’s Seasoning”. It’s really a wonderful spice blend. (I’ve only been looking for the perfect fried fish recipe for 50 some years now. And this comes as close as any that I have tried. I added the flour, cornmeal, and milk part, and that worked very well with the spice combination. This is now my go-to recipe when I want a really tasty fried fish. And just in case you were worried. This coating is spicy, but not crazy spicy. And of course, you can always cut down or totally eliminate the cayenne pepper from the recipe.)
So please give this recipe a try. Although I used cod last evening, I think it would work just as well with halibut or any other firm fleshed fin critter. Happy dining.
1
T. granulated garlic
1 T. kosher salt
1 T. paprika
1½ tsp. onion powder
1½ tsp. freshly ground black pepper
1½ tsp. dried oregano leaves (ground in a mortar & pestle)
1 tsp. dried thyme leaves (ground in a mortar & pestle)
¼ tsp. cayenne pepper, or to taste
½
c. unbleached all-purpose flour
1/3
c. finely ground cornmeal
½
c. milk
2
lb. fresh cod (the thicker the fillets the better), cut into portion size
pieces
veggie oil
Blend
the granulated garlic, salt, paprika, onion powder, pepper, oregano, thyme, and
cayenne pepper together in a shallow pan. Whisk in the flour and cornmeal. Set
aside.
Pour
the milk in another shallow pan. Place the cod in the milk, turn the fillets so
that all sides have been exposed to the milk, and refrigerate for 20-25
minutes.
Pour enough oil in a fry pan to coat the bottom. Heat to medium-high. When the oil is hot, remove the fish from the milk and coat with the flour/corn meal/spices mixture. Fry the fish until it is nicely browned. Carefully flip and cook the second side of the fish until it too is nicely browned. Remove the fish to a wire rack and serve immediately. I like to serve this fish with a simple tartar sauce. (See recipe below)
Simple Tartar Sauce:
¾
c. light mayonnaise
2
small garlic cloves, finely minced
1
tsp. finely grated lemon peel
4
tsp. fresh lemon juice
1-2
T. finely chopped dill pickle
1
T. finely minced onion
¼
tsp. kosher salt
freshly
ground black pepper
Combine
all ingredients. Refrigerate until needed.
Yesterday was a
swell day. I made a few more reservations for our upcoming trip to Eastern
Europe, got caught up on my “to do” list, and tried a new recipe featuring
flank steak. (How could a day be more perfect than that?) Well – the only thing
that would have made it even better is if I’d remembered to take a picture of
the flank steak before we gobbled it down! But hey! I’m kind of out of the
habit since I haven’t been posting recipes as regularly as usual. (Four weeks on
a trailer trip and then two weeks of planning our next trip, is my only
excuse!)
But I’m back now
and eager to share exciting new recipes with you like this one I modified from the
Skinny Taste site.
As I mentioned a
few weeks ago, I have been on an Asian food kick for months now. So when it
came time to think about last evenings’ dinner, I went searching for an Asian
inspired marinade for the flank steak that was thawing in my sink. And I found
this marvelous and simple recipe.
Mr. C. grilled the steak to perfection, and along with purchased frozen pot stickers “fried” in my air fryer and Sunomono Salad (on this site), we supped royally last evening.
So next time you
want a simple and delicious flank steak for dinner, give this recipe a try. And
if you have never cooked a flank steak, you are in for even more of a treat. So
easy to prepare and the taste is simply marvelous. Just don’t cook the pickles
out of it! If you don’t like your beef steak on the rare side, walk away from
this recipe. Flank steak will get tough if you cook it too long. It will also
loose flavor.
But, I would encourage you not to go to the other extreme either. Not with flank steak. Flank steak is at its best when medium rare. If you like your steak truly rare or even blue rare, then grill a flatiron or top sirloin steak instead. (And yes, I love rare steak as much as the next gal. Moo….) But different cuts of steak are simply tastier when cooked properly. And flank steak is no exception. Medium rare. Repeat after me – medium rare! Thank you. (And enjoy!)
¼ c. reduced sodium soy sauce or Tamari
1 T. vegetable oil
2 T. honey
1 tsp. sesame oil
2 cloves garlic, minced
2 tsp. minced fresh ginger
freshly ground black pepper
pinch crushed red pepper flakes
4 thinly minced green onions, divided
1 tsp. seasoned or regular rice vinegar
1 lb. flank steak, trimmed of all fat and silver skin
In
a medium-size bowl, combine the soy sauce, vegetable oil, honey, sesame oil, garlic,
ginger, black pepper, crushed red pepper flakes, and half of the minced green
onions. Remove 3 tablespoons of the marinade and combine it with the rice
vinegar in a small bowl. Cover and refrigerate.
Place
remaining marinade and steak in a 1-gallon re-sealable bag (remove as much air
as possible) or in the bottom of a small shallow container (cover the pan with
plastic wrap). Refrigerate for at least 6
hours or for up to 12 hours. Turn the steak every hour or so during this time. Remove
from refrigerator about 45 minutes before you plan to grill the meat.
Remove
the steak from the bag or pan and discard the marinade.
Set
the grill to high heat. Carefully grease the grill with some oil. Once the
grill is hot, add the steak.
Cover
and cook the steak until well browned, about 3 to 4 minutes, then flip and
cook until desired doneness, about 3 to 4 minutes. Use a thermometer to make
certain the temperature doesn’t surpass 122 degrees for a perfect medium rare steak.
(If you cook flank steak until no pink is showing, it will be tough.)
Remove
from grill, and tent with aluminum foil for about 10 minutes before slicing
very thinly against the grain and on a diagonal. Garnish with the remaining
green onions. Serve immediately. Pass the reserved marinade as a sauce.
OK,
I am never going to buy bottled teriyaki sauce again. (Of course I might have
to if I’m traveling, but if I’m at home, there is no reason to spend the money
or to settle for a product that is less than perfect.) Because in making this
dish the other evening, I was blown away by the complex flavor in this simple
recipe for teriyaki sauce.
Now
one thing you should know. This is an Emeril Lagasse recipe. And if I had the
opportunity, I would kiss his toes. He really understands food. So after saying
that, I need to give full disclosure. I changed his recipe to fit my way of
preparing food. (Now there’s a new concept, right?!?!)
But truly, any way you look at it, this is a dish fit for the Gods. It’s simple. It’s delicious. It’s NW cuisine at its finest. (Well NW with an inspired Asian (via New Orleans) influence.) Just make it soon. It is over the top amazing. Thank you dear Emeril.
1/3
c. mirin or rice wine
½
c. soy sauce
1
T. sugar
2
tsp. minced gingerroot
1
garlic clove, minced
pinch
cayenne
2
(6-7-oz.) halibut fillets
minced green onions, as garnish
Combine
the mirin, soy sauce, sugar, ginger, garlic, and cayenne in a small saucepan
and bring to a boil. Lower heat and simmer until reduced to a syrup like
consistency, 5 to 6 minutes. Remove from heat. (Don’t reduce too much.)
Pour
a thin layer of the sauce/syrup in the bottom of a lightly greased baking pan.
Place the halibut fillets skin side up in the sauce. Marinate for 1 hour.
After
an hour bake the halibut in a pre-heated 400 degree oven for 12-15 minutes or
until the flesh is opaque and the internal temperature has reached 140 degrees.
Remove from oven and serve flesh side up garnished with green onions. Pass the
remaining teriyaki sauce. Great with Asian
Flavored Steamed Rice (on this site) and a steamed green veggie.
All
I can say is – don’t be daft! Make the sauce, but at least double the recipe.
This is truly the teriyaki sauce you have always dreamed of. But if you are
like me, never quite achieved!
So
Emeril, you Asian (not) darling – thank you. I shall forever be in your debt. And
if you ever desire a Camano Island experience, we (Mr. C. and I) are here for
you! Mi casa es tu casa!
Yesterday morning when I asked Mr. C. what he would like for dinner his immediate response was pasta. Big surprise! And since it was Valentine’s Day and I was receptive to the idea, I decided to honor my dear husbands request and a pasta dish would be on our dinner table that evening. But what kind of pasta? Then I remembered that I had a package of smoked salmon in the refrigerator. So then – smoked salmon pasta seemed the likely choice with some grilled or baked asparagus on the side. But wait! How about adding asparagus to the pasta and serving a nice green salad on the side? So to the internet I proceeded.
And
what do you know! I was not the first person to think of adding asparagus to a
pasta dish. So taking hints from several posted recipes, and borrowing
ingredient ideas from a smoked salmon tortellini recipe I had on file, I came
up with this dish.
Now, the first thing I liked about this dish when I dug into it last evening was the creaminess. Then the little bit of tang from the lemon zest, lemon juice, white wine, and capers hit my palate. And finally, the smoky and savory flavor of the salmon caught up. The result was a quite complex and satisfying blend of yumminess.
So if you too love smoked salmon and like to feature it as an ingredient, I recommend that you give this recipe a try. It’s very easy to prepare and can easily be assembled even on a work night. And good enough for company? You bet. Serve it with a crunchy green salad and Garlic Toast (recipe on site) and your guests will forever thank you for all the effort you went to on their behalf. (You need not tell them the ease of preparation on this dish. That can just be our little secret.) Cheers!
2
T. olive oil
1
lg. shallot, finely chopped
10
asparagus spears, bottom ends trimmed off; top ends cut on the diagonal into
1-inch pieces
2
lg. cloves garlic, minced
¼
c. dry white wine
1
small lemon, zested and juiced
¼
tsp. kosher salt
freshly
ground black pepper
1
c. whole milk
8
oz. (lg. pkg.) cream cheese, room temp., cut into large chunks
2
T. drained capers
2
T. minced fresh parsley
8
oz. smoked salmon, roughly chopped or torn into bite sized pieces
8 oz. linguini, fettucine, or spaghetti cooked al dente (save some of the cooking water)
2 T. chopped fresh chives, opt.
Heat the olive oil in a large frying pan over medium heat. Add the
shallot and asparagus; sauté until tender, about 5-7 minutes. Add the garlic
and cook for 1 minute. Pour in the wine and cook until all the moisture is
evaporated. Add the lemon zest and juice, salt, and pepper.
Stir in the milk and bring to a simmer. Add the cream cheese and stir until melted. Add the capers, parsley, and salmon. Bring to just under a boil. Add the cooked pasta and some of the pasta water if needed to reach desired consistency. (I used about a cup last evening.) Serve sprinkled with chives.
It has been quite the winter, at least the past week or so. With unprecedented low temperatures and heavy precipitation, we have had several snow storms the last few days resulting in 10-12 inches of snow here on Camano Island.
For us that means – we ain’t goin’ nowhere! We live on a hill, with a steep drive way, and even though Mr. C. shovels the snow off the driveway daily, there is no way we are going to risk life and limb just to fishtail to the grocery store, or wherever, even for the sake of a vast amount of bragging rights!
So what to do
with the time? Of course we could have done some deep cleaning on our house.
Right, like that’s going to happen! (We didn’t want to set some kind of snowy
weather precedent, after all!) Or we could spend our time recovering from
surgery (me), recovering from the horrible cold/flu that’s going around (both
of us), reading books (both of us), researching recipes (that would be me) or
working on Beethoven, Mozart, and Schubert piano sonatas (Mr. C. for sure). So
that’s what we did.
For me, it was
re-reading for the umpteenth time, many of the Rex Stout books featuring my
favorite detective Nero Wolfe. I love Nero. And I know. I shouldn’t presume to
call him by his first name. But since I feel that I know him better than most,
thanks to Archie Goodwin, and share a couple of his most characteristic traits
(being round and worshipping excellent food), that he would forgive me this tiny
indiscretion. All of which brings me to this recipe.
I have known for a long time that there are really no subjects that haven’t in some way been covered on the internet. But even so, I was quite surprised when I decided that I would like to try preparing a couple of Nero’s favorite dishes. (Like a fictional character is going to be the author of gourmet recipes!) But on my first search, right there in print, was an invitation to purchase the Nero Wolfe cookbook. Holy cow. And I must say, I was sorely tempted.
But
then the practical side of me took over (pfui) and I realized that as much as I
admire haute cuisine and love hearing Nero and Fritz (his cook/chef) discuss dishes
like Bacalhau (Portugese Salt Cod), the chances of me ever preparing most of
the dishes in the cookbook was somewhere between slim and nil! So
I tucked my credit card back where it belonged, and searched other posts for simpler
and more modest recipes from the cookbook. Which of course I found. And this is
one of them. Hopefully, more to follow.
Since it’s
Valentine’s Day, and both of us long ago decided we would not celebrate
Hallmark holidays (no gifts or cards exchanged), I never-the-less fixed this
recipe for breakfast this morning. (OK, I still have a bit of romance in my
soul.) But you can bet your bottom dollar, I’m not going to wait for a special
occasion to serve it again.
So next time you
feel like a little something fancy would brighten your otherwise normal first
meal of the day, give this recipe a try. It truly is delicious and very easy to
prepare.
And just for Mr. C. because he asked, shirred eggs, also known as baked eggs, are eggs that have traditionally been baked in a flat-bottomed dish (shirrer) which is another name for a ceramic or porcelain ramekin.
unsalted butter
4 breakfast link sausages, fully cooked
2 T. half & half
4 tsp. dry sherry
4 lg. eggs
kosher salt
freshly ground black pepper
paprika
1 tsp. chopped fresh chives
Generously
butter 2 shallow baking dishes. (I use small oblong Corningware French White dishes.)
Place
2 cooked sausages in each dish. Add 1 tablespoons half & half and 2
teaspoons dry sherry to each dish. Carefully add 2 eggs to each dish (don’t let
the yolks break), then sprinkle lightly with salt, pepper, paprika, and chives.
Bake in a pre-heated 325 degree oven for 14 to 17 minutes or until the egg white is set and the yolk is still runny (or cooked to desired firmness). (I used convection the last 3 minutes.) Remove from oven and serve immediately with toast.
I
am always looking for new ways to cut carbs in the dishes I prepare without
sacrificing flavor, texture, or nutritional value. So while it was snowing like
crazy a couple of days ago, I was inside happily working on this new recipe for
an old favorite. And I know what you’re thinking. With 2 perfectly good stuffed
green pepper recipes already on this site, why another one? Well the answer is
simple. I didn’t want a filling that included rice or any other grain.
So
I decided to think a little out of the box. I knew that using rice was a
standard ingredient because not only was it inexpensive, it acted as the binder
that held the filling together. But when I gave the problem a bit of thought, I
realized that who cares if the filling hangs together! Where’s it going anyway?
Could it really escape the confines of a green pepper shell?
And when served, does it matter if the filling spills onto your plate. After all, God gave us forks and spoons for a reason! So with no concern for appearance or points for presentation expected, I offer you this wholesome recipe for stuffed green peppers. And if I weren’t far too modest to pat myself on the back, I’d tell you that these peppers are pretty darn delicious. But like I said – I’m far too modest! You will just have to judge for yourself.
4
lg. green bell peppers
1
T. extra virgin olive oil
1
lb. lean ground beef
½
small onion, diced
1
stalk celery, thinly sliced
3
cloves garlic, minced
2
heaping T. tomato paste
¼
c. water
1½
tsp. Montreal Steak Seasoning by McCormick
¼
tsp. kosher salt
freshly
ground black pepper
1
T. Worcestershire sauce
1
c. frozen corn
½
c. sliced black olives
1
generous c. grated sharp cheddar cheese, divided
1 generous c. shredded mozzarella cheese, divided
Cut
the tops off each bell pepper and remove seeds and membrane from inside. Set cleaned
peppers aside. Chop the tops and set aside. (You may through away the seeds and
membranes.)
In
a large skillet over medium high heat, heat the olive oil and add the ground
beef, onion, celery, and chopped green pepper tops; cook until the meat is
browned. Add the garlic and cook for 1 minute.
Remove
from heat and stir in the tomato paste, water, Montreal seasoning, salt,
pepper, Worcestershire sauce, corn, olives, and ¾ cup of each of the cheeses.
Meanwhile, bring
a pan of water to a boil. Add the green peppers and cook for 6 minutes. Remove
from water and drain upside down. Place in a lightly greased baking dish. Spoon meat mixture into bell peppers.
Bake in a preheated 375 degree oven for 30 minutes. Sprinkle remaining cheese over the top and continue baking another 10-15 minutes or until the cheese topping is melted and starting to brown.
Yesterday
was a very pleasant day for us. We began our adventures by attending a Met
opera broadcast at the Lincoln Theater in Mount Vernon. Starting time: 9:55 am.
(We attend as many of these live movie theater opera transmissions as possible.
We also enjoy the broadcasts from the National Theatre in London.)
After
leaving the theater we decided to have a small lunch, then hit the French
bakery at Terry’s Corner. (I draw the line at baking my own croissants). After
that, the grocery store. But before going home, we decided we still had the
strength to take a short walk along a couple of the new trails on Barnum Point.
(And no, for those of you who don’t have the privilege of living in beautiful
NW Washington, it was not raining! It was a beautiful, balmy winter day.) Which
leads me, in kind of a roundabout way, to this soup.
All
day I had been vaguely thinking about building soup for dinner. But while walking
along the trails (very enjoyable I might add) I decided to definitely make soup
when I got home. But by the time we actually walked in the door, 4:30 or so, it
was a little too late to start a soup that would take 2-3 hours to burble. (Yes
I know, I could have used my Instant Pot, but that thing actually still terrifies
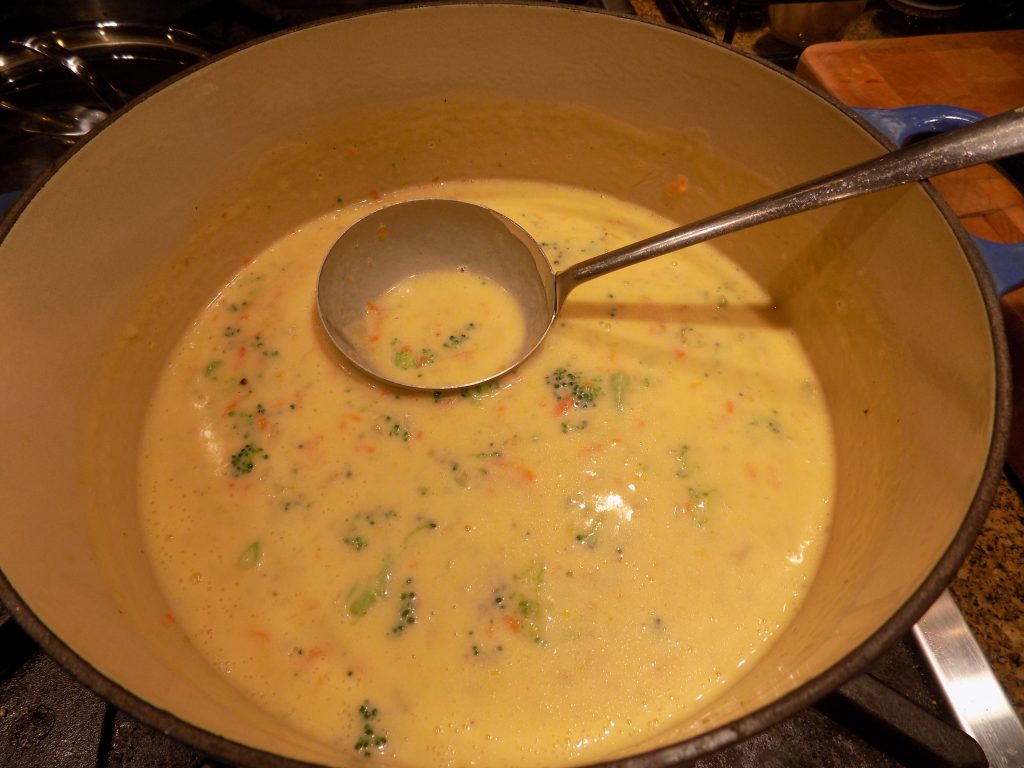
me!) So I looked in my fridge and pantry and made up my mind. Broccoli cheddar
soup would fit the bill nicely!
I
went on line and searched my blog for the recipe. (And yes I actually use and
follow my own recipes!) Well usually that is. This time I just about gasped out
loud when I read the ingredients. Three fourths cup butter. Yikes! (No wonder
it was so good!)
So
in trying to become a reformed butter over user, I decided to work out a new recipe
using less butter, while at the same time keeping the wonderful mouth feel of a
truly rich, delicious, and thick soup base.
Thus
this recipe. We both proclaimed it not just edible, but very yummy. (And yes, I
do realize that cheddar cheese is hardly a low fat ingredient. But if you can
show me how to make a wonderful cheddar cheese soup with some type of low-fat
replacement product, then please use your super powers to also bring about
world peace!)
Just
give this recipe a try next time you are in the mood for a creamy soup. Or use
my original recipe (Broccoli Cheddar
Cheese Soup) if you have no fat restrictions or are under 17 years of age.
BTW, I will learn to use my Instant Pot. I just need a little more time to get used to the idea that this is a newfangled pressure cooker that is not likely to explode! (Or so they say!)
3
c. small chunks of broccoli flowerets and peeled stems
¼ c. (½ stick) unsalted butter
½
med. onion, chopped
½
c. grated carrot
1
garlic clove, finely minced
¼
tsp. seasoned salt
freshly
ground black pepper
¼
c. flour
2
c. milk
2 c. chicken stock (or veggie stock for vegetarian)
pinch
paprika
pinch
ground nutmeg
3
c. grated sharp cheddar cheese
Garlic Croutons, opt. (see recipe below)
Steam
the broccoli until crisp tender. Remove from heat. Set aside.
Melt
the butter in a medium sized heavy sauce pan. Add the onion and carrot; cook slowly
until tender, about 10 minutes. Don’t let the onion brown. Add the garlic,
seasoned salt, and pepper; cook for about a minute.
Whisk
in the flour and cook for a short time. Gradually whisk in the milk and chicken
stock. Let simmer for about 20 minutes.
Stir in the cooked broccoli, paprika, and nutmeg. Adjust seasoning. Remove from heat and stir in the cheese. Serve immediately garnished with a few croutons.
Garlic Croutons:
1 T. butter or extra virgin olive oil
2-3 c. cubed crusty, chewy bread
granulated
garlic
Melt butter or olive oil in a large sauté pan. Add bread cubes and slowly sauté until crunchy and browned. (This takes upward of 45 minutes, so plan to make croutons when you are working on other dishes and are close at hand.) Stir frequently. When the bread cubes are golden brown and crunchy, lightly sprinkle with granulated garlic. Cool and store in an airtight container.