OK, I hate to boast, but I truly believe that cauliflower was invented mainly for this soup recipe. Because, regardless of the other good recipes I have for this simple cruciferous vegetable, this preparation is now my favorite. And I’ll bet a years-worth of broccolini, that it’s going to become your favorite way to eat cauliflower too. And never mind that you probably already have a recipe for cauliflower cheddar soup. You simply must give this recipe a try. Roasting the cauliflower imparts such a goodly amount of richness, that in combination with all the other ingredients, there is no way this soup could be anything but delicious.
I served it last evening with just baked Chewy Sourdough Baguette slices, and it made the perfect Sunday evening meal. And it had been ever so quick and easy to build. So, another point in its favor. The only mistake I made was in not making a double batch. Because for lunch today, we are going to have to fight over the leftovers. Good thing Mr. C. is always such a gracious loser.
As always, keep having fun in your kitchen and keep on preparing healthy and delicious food for yourself and your family. I’m flat out of advice on matters I have no business mentioning on a cooking blog in the first place. So, I will simply leave you with my standard hope and prayer for each and everyone of you. Peace and love to all.
Oh, and if you were concerned about me offering to give up broccolini for a full year, please do not worry. I can’t stand the stuff, so I wouldn’t be eating it anyway. But thanks for any unease my words may have caused you.
1 med. head cauliflower, cut into very small pieces (use the stems and florets)
1 T. extra virgin olive oil
kosher salt
freshly ground black pepper
4 T. unsalted butter, divided
1 shallot, finely minced
2 lg. garlic cloves, finely minced
1 med. carrot, grated
1 lg. stalk celery, finely chopped
2 c. water
2 tsp. Better Than Bouillon Chicken or Vegetable flavored base
3 T. unbleached all-purpose flour
2 c. whole milk
2 c. grated sharp cheddar cheese, loosely packed
½ tsp. hot sauce, or more to taste (I use Frank’s Red Hot)
chopped chives, opt. (you can substitute green onion in a pinch)
garlic croutons, opt. (see recipe below)
Place cauliflower on a rimmed baking sheet. Drizzle with olive oil and lightly sprinkle with salt and pepper. Bake in a pre-heated 425-degree oven for about 20 minutes or until the cauliflower pieces start to get brown around the edges. Remove from oven and set aside.
Meanwhile, in a covered Dutch oven or soup pot, melt 1 tablespoon of the butter and add the shallot and garlic. Cook for about 1 minute, then add the carrot, celery, water, and bouillon base. Bring to a boil. Reduce heat, cover, and simmer for 20-25 minutes or until the vegetables are completely tender. Add the roasted cauliflower.
While the veggies are cooking, melt the remaining 3 tablespoons of butter in a large saucepan. Whisk in the flour until smooth. Gradually add the milk. Bring to a boil over medium heat; cook and stir for 2 minutes or until thickened. Remove from heat. Stir in the cheese and hot sauce. Transfer to the Dutch oven and stir until well blended. (If the soup feels too thick, add a bit more water or milk.) Taste, and adjust seasoning. Serve immediately topped with croutons and chopped chives.
Garlic Croutons:
1-2 T. butter or extra virgin olive oil (or a combination)
2-3 c. cubed crusty, chewy bread (really any kind of bread you want)
granulated garlic
Melt butter or olive oil in a large sauté pan. Add bread cubes and slowly sauté until crunchy and browned. (This takes upward of 45 minutes, so plan to make croutons when you are working on other dishes and are close at hand.) Stir frequently.
When the bread cubes are golden brown and crunchy, lightly sprinkle with granulated garlic. Remove from heat. Cool and store in an airtight container.
And yes, another easy chicken recipe that I firmly believe everyone in your family will enjoy. Of course, if you have young children you might want to forego the crushed red pepper flakes. But all the other ingredients should be fine. I say this as if I had perfect knowledge and insight into feeding a family. Which of course, I do not. So, as I began writing this post, it brought to mind Mr. C’s comment this morning regarding knots. That’s right. The kind of knots made with rope or twine or shoelaces, or whatever.
Anyway, it all started this morning with the Daily Quiz in the Seattle Times. Monday through Saturday we attempt to answer the quiz questions while we eat our breakfast. And this morning’s topic was hobbies. And question 11 read as follows: Practitioners of this hobby make loops, hitches, splices, and coils. And we guessed the answer correctly. Knot tying. Then we took it a step further and tried to name all of the different knots we knew about. And it was actually quite a few. But the one thing that stopped us right in our tracks was that, yes, we knew the name of several kinds of knots, even knew how to actually tie a few knots, but couldn’t feel with any certainty that we knew the correct name for any of the knots we could produce, some of which we use every day! (And we think we’re so smart! Wrong!)
Anyway, as Mr. C. was walking away from the breakfast table, he turned to me and uttered this humble truism, “the depths of my ignorance have yet to be fully plumbed”. And I thought to myself, don’t we all fall into that category. Especially me when I try to impart cooking tips when I’ve never received any professional culinary training.
Most of my knowledge comes from spending a great deal of time in my kitchen. And listening to or reading what great culinary experts have to say on many different subjects. So, after this morning’s lesson in humility, I thought maybe it was time for a general apology. And I have a request. When I make a bold statement that you know to be absolutely incorrect, first of all, please forgive my ignorance. Then please let me know the error in my statement. I can then edit the post or at least offer an alternate possibility. Thank you. Now back to this recipe.
I made this easy to prepare dish the other evening and served it over steamed brown rice. And you know, the thing is, I didn’t begin to like brown rice until recently. Before I just thought it was like eating kernels of cardboard. But I have learned to prepare the rice in such a way, that both of us can really enjoy both its flavor and texture. I use 1 cup of brown rice, 1¾ cup water, some seasoned salt, a bit of freshly ground black pepper, and a couple of teaspoons of either veggie or olive oil, depending on what I’m serving with or on the rice. Then I walk away from the rice cooker for about an hour. Perfect brown rice, every time.
I hope you enjoy this lovely recipe from Sara at dinneratthezoo.com. If you haven’t visited Sara’s site, then I highly recommend you do so at your earliest convenience. She is great!
And as always, keep having fun in your kitchen. Keep finding the joy in life. And don’t be afraid of not knowing everything. No one knows all there is to know, even about any one subject, be it great or small. So, just for the fun of it, I am delighted to share with you the technical description of a function most of us perform on almost a daily basis. It’s called the shoelace knot.
(From Wikipedia) “The shoelace knot, or bow knot, is commonly used for tying shoelaces and bow ties. The shoelace knot is a doubly slipped reef knot formed by joining the ends of whatever is being tied with a half hitch, folding each of the exposed ends into a loop (bight) and joining the loops with a second half hitch.”
Peace and love to all. (And good luck tying your shoes next time!)
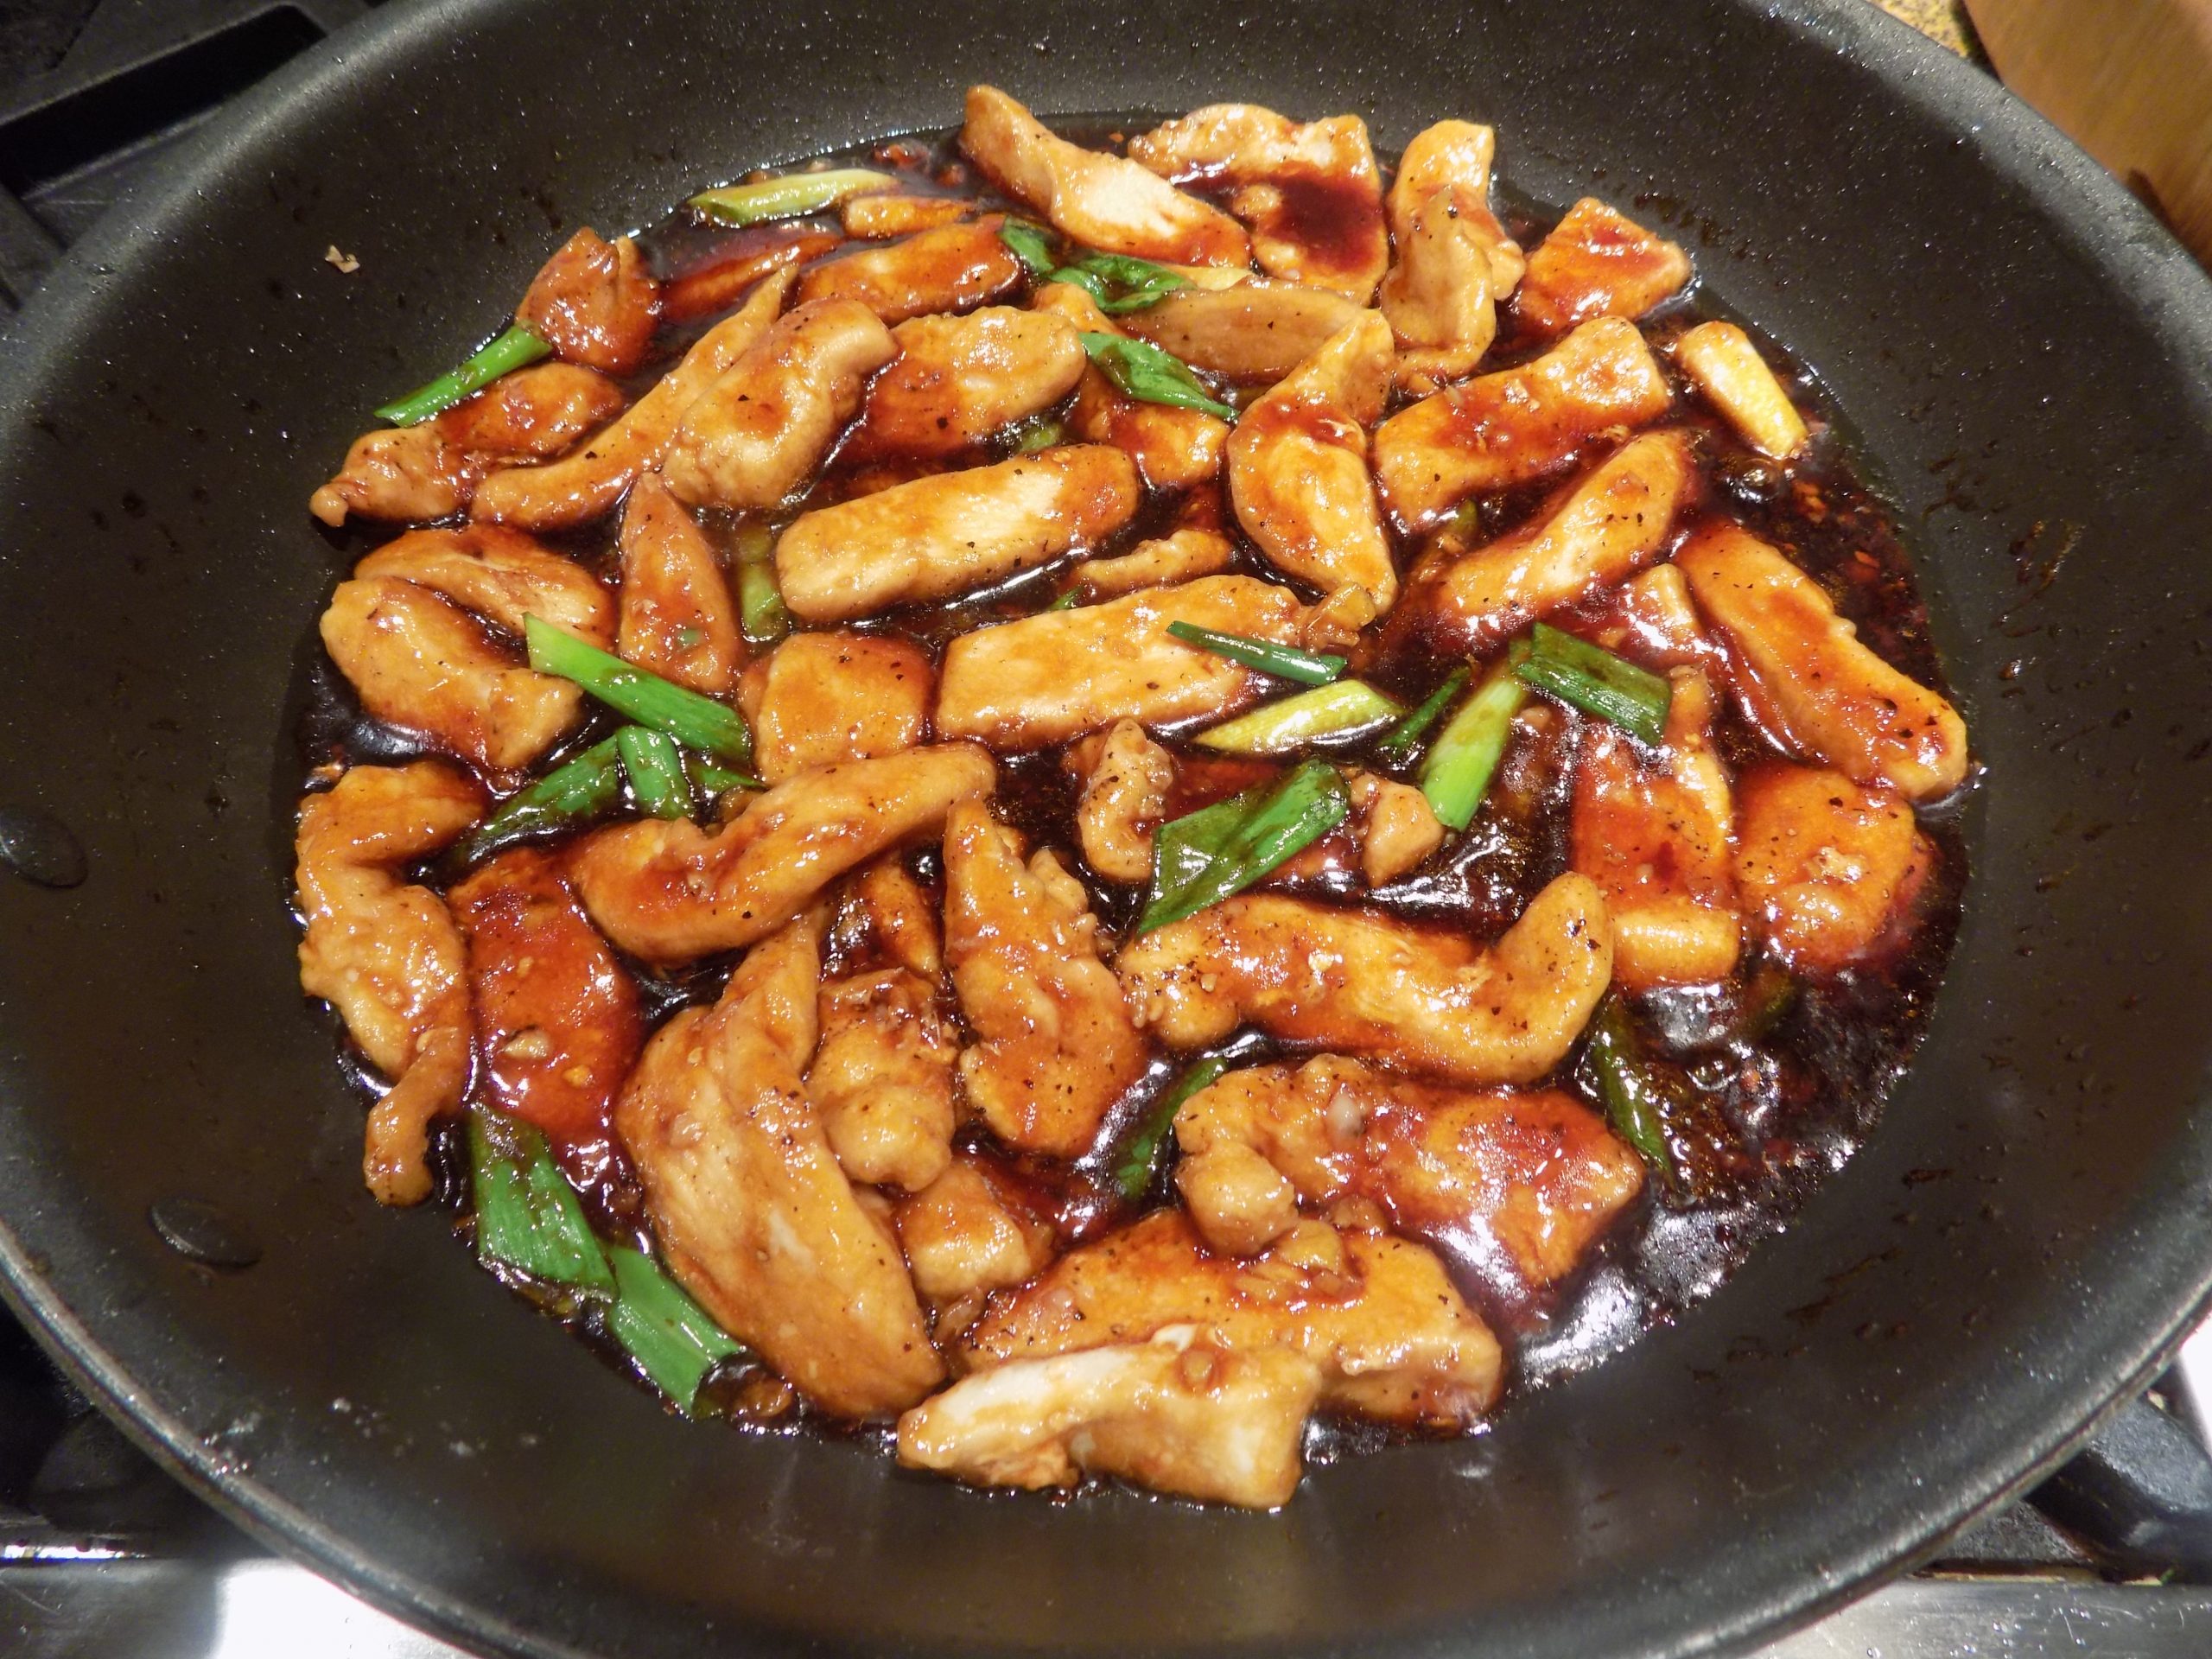
2 tsp. toasted sesame oil
½ c. low sodium soy sauce
⅓ c. water
⅓ c. dark brown sugar
¼ tsp. crushed red pepper flakes, or more to taste
2 tsp. + ¼ c. cornstarch, divided
3 T. vegetable oil
1 lb. boneless, skinless chicken breast, cut into thin strips
kosher salt
freshly ground black pepper
2 garlic cloves, finely minced
1 tsp. minced fresh ginger
5-6 green onions, cut into 1-inch pieces on the diagonal
Whisk the sesame oil, soy sauce, water, brown sugar, crushed red pepper flakes, and 2 teaspoons cornstarch together in a small bowl. Set aside.
Place the chicken and remaining quarter cup cornstarch in a resealable plastic bag, shake to coat evenly. Heat the vegetable oil in a large frying pan over medium heat.
Add the chicken to the pan in a single layer and season lightly with salt and pepper.
Cook for 3-4 minutes per side or until browned. Remove the chicken to a paper towel lined plate.
Add the garlic and ginger to the pan and cook for 30 seconds. Add the sesame oil mixture to the pan and bring to a boil. Boil for 30-60 seconds or until just thickened.
Add the cooked chicken and green onions to the pan and toss to coat with the sauce. Great served over steamed rice.
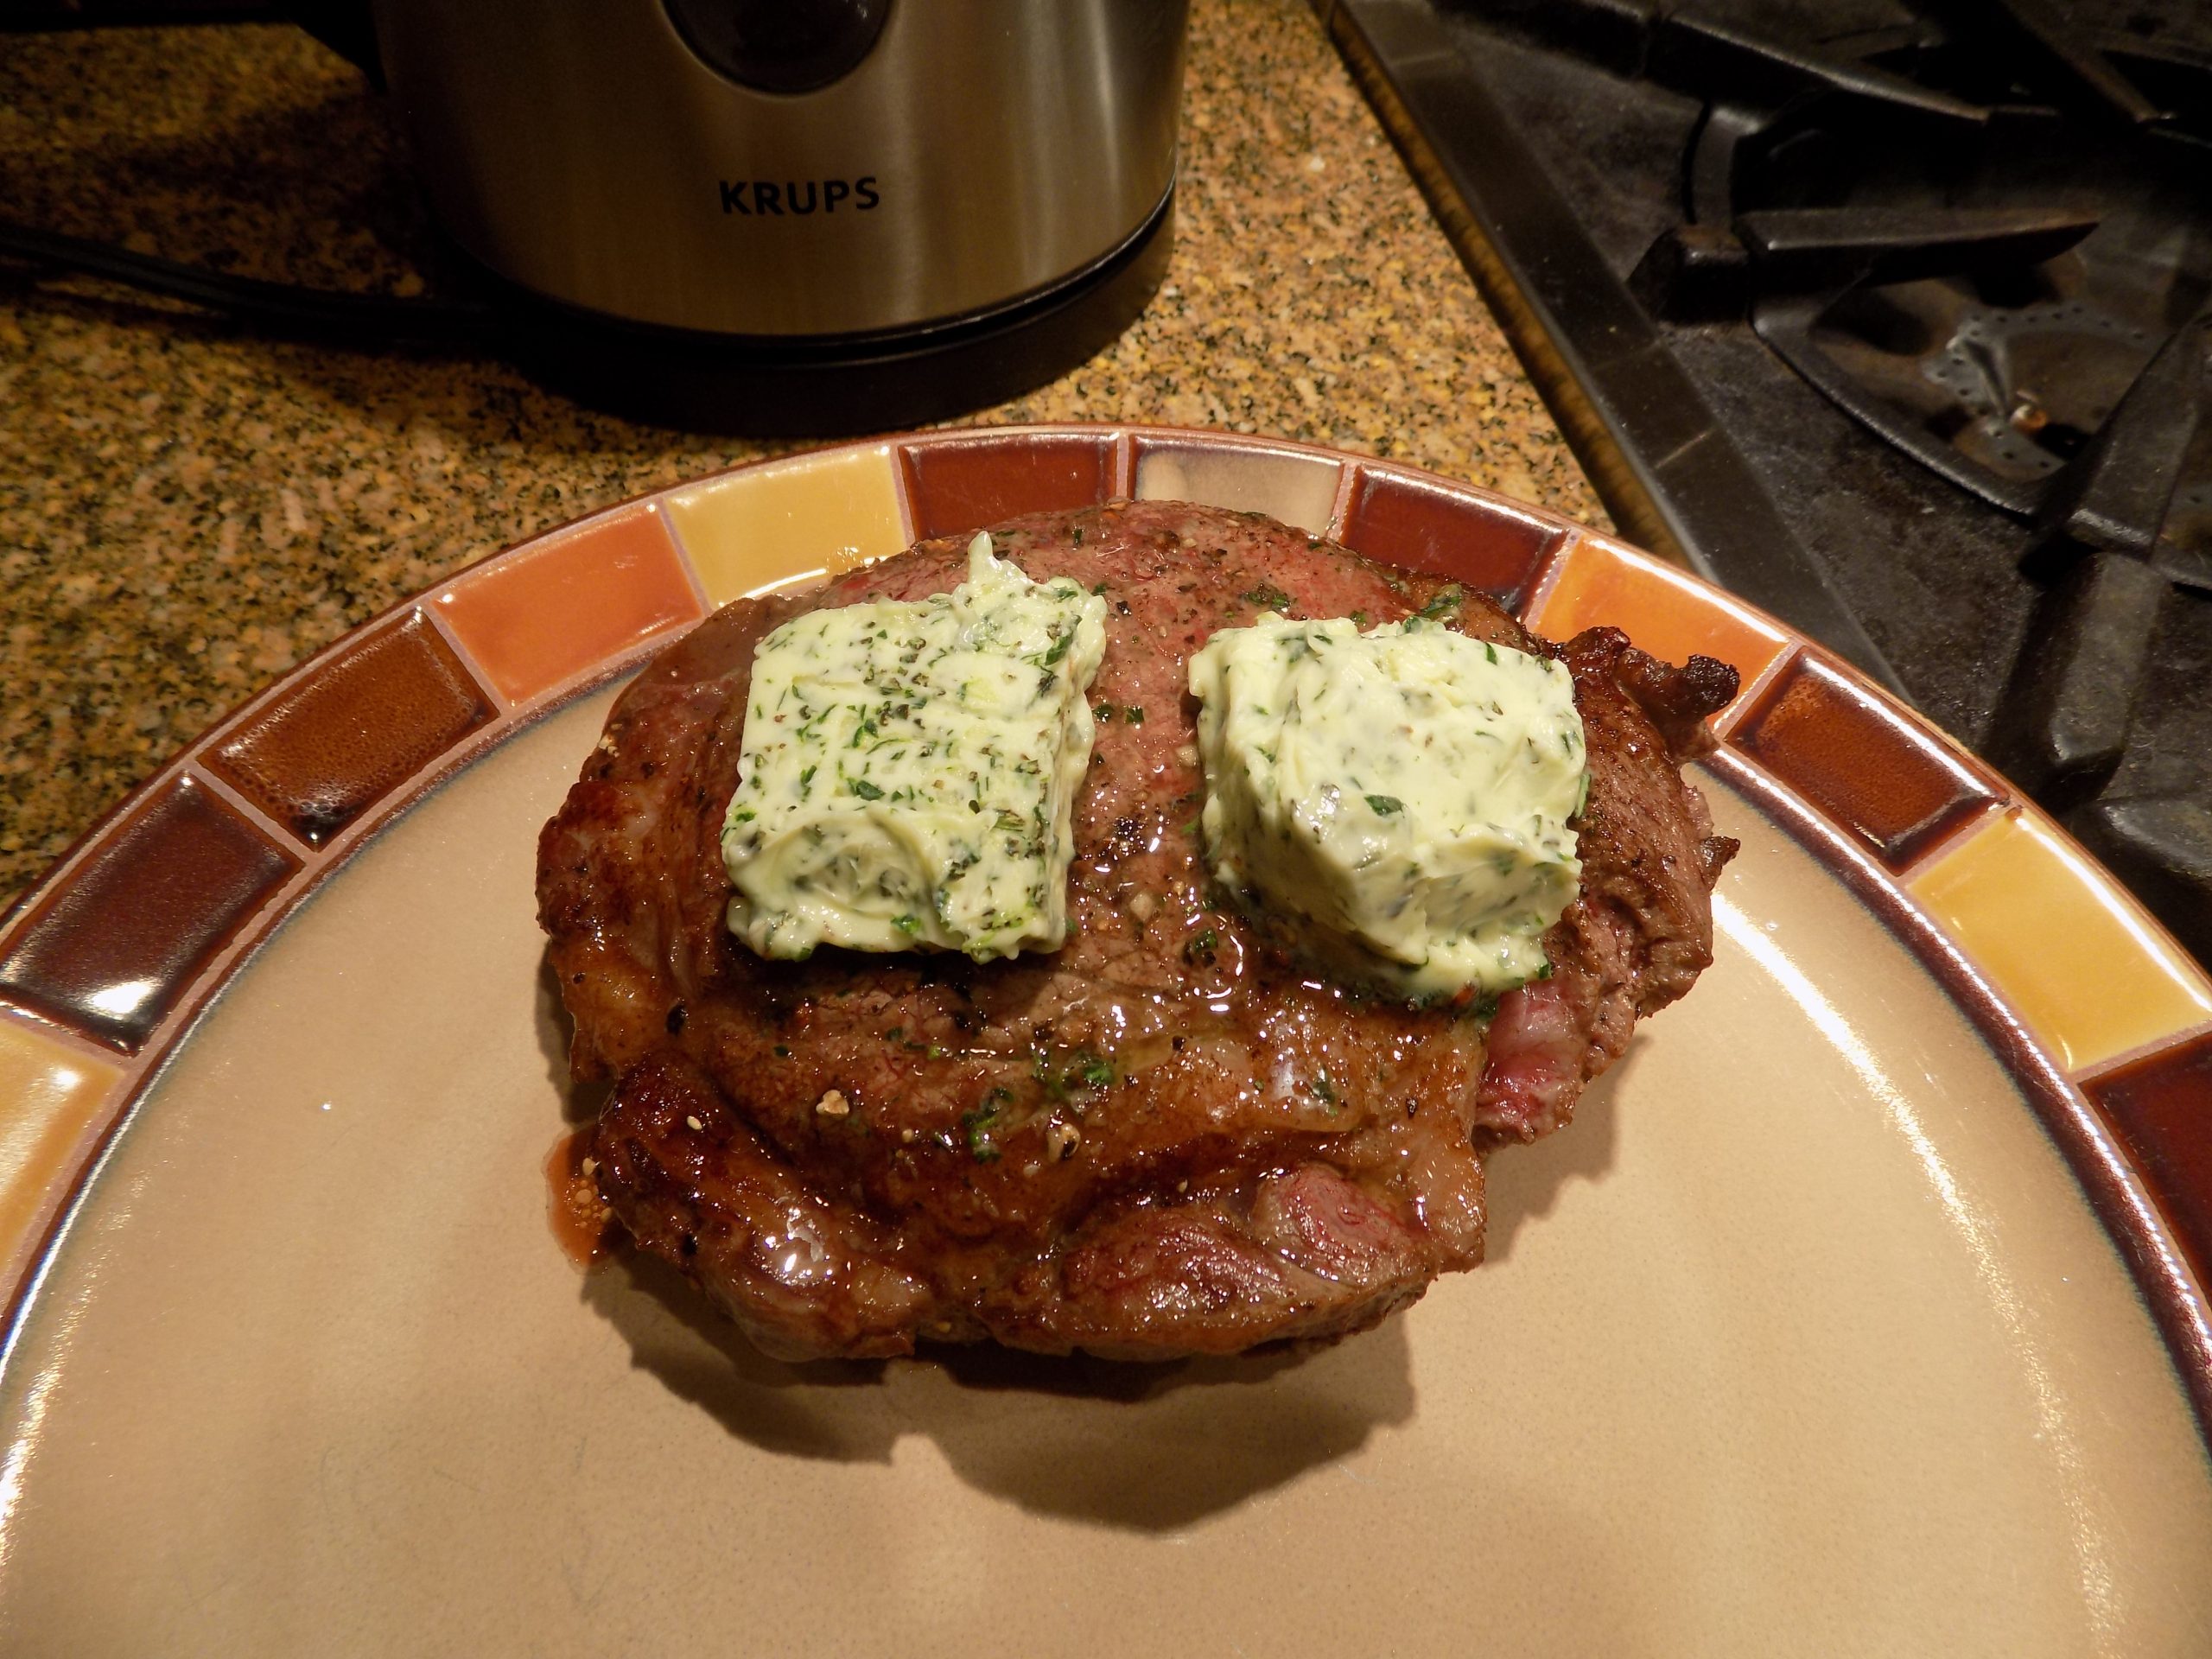
You know what they say about butter. That “butter makes everything better”. And in the case of a beautifully cooked tenderloin or filet mignon, they are 100% correct.
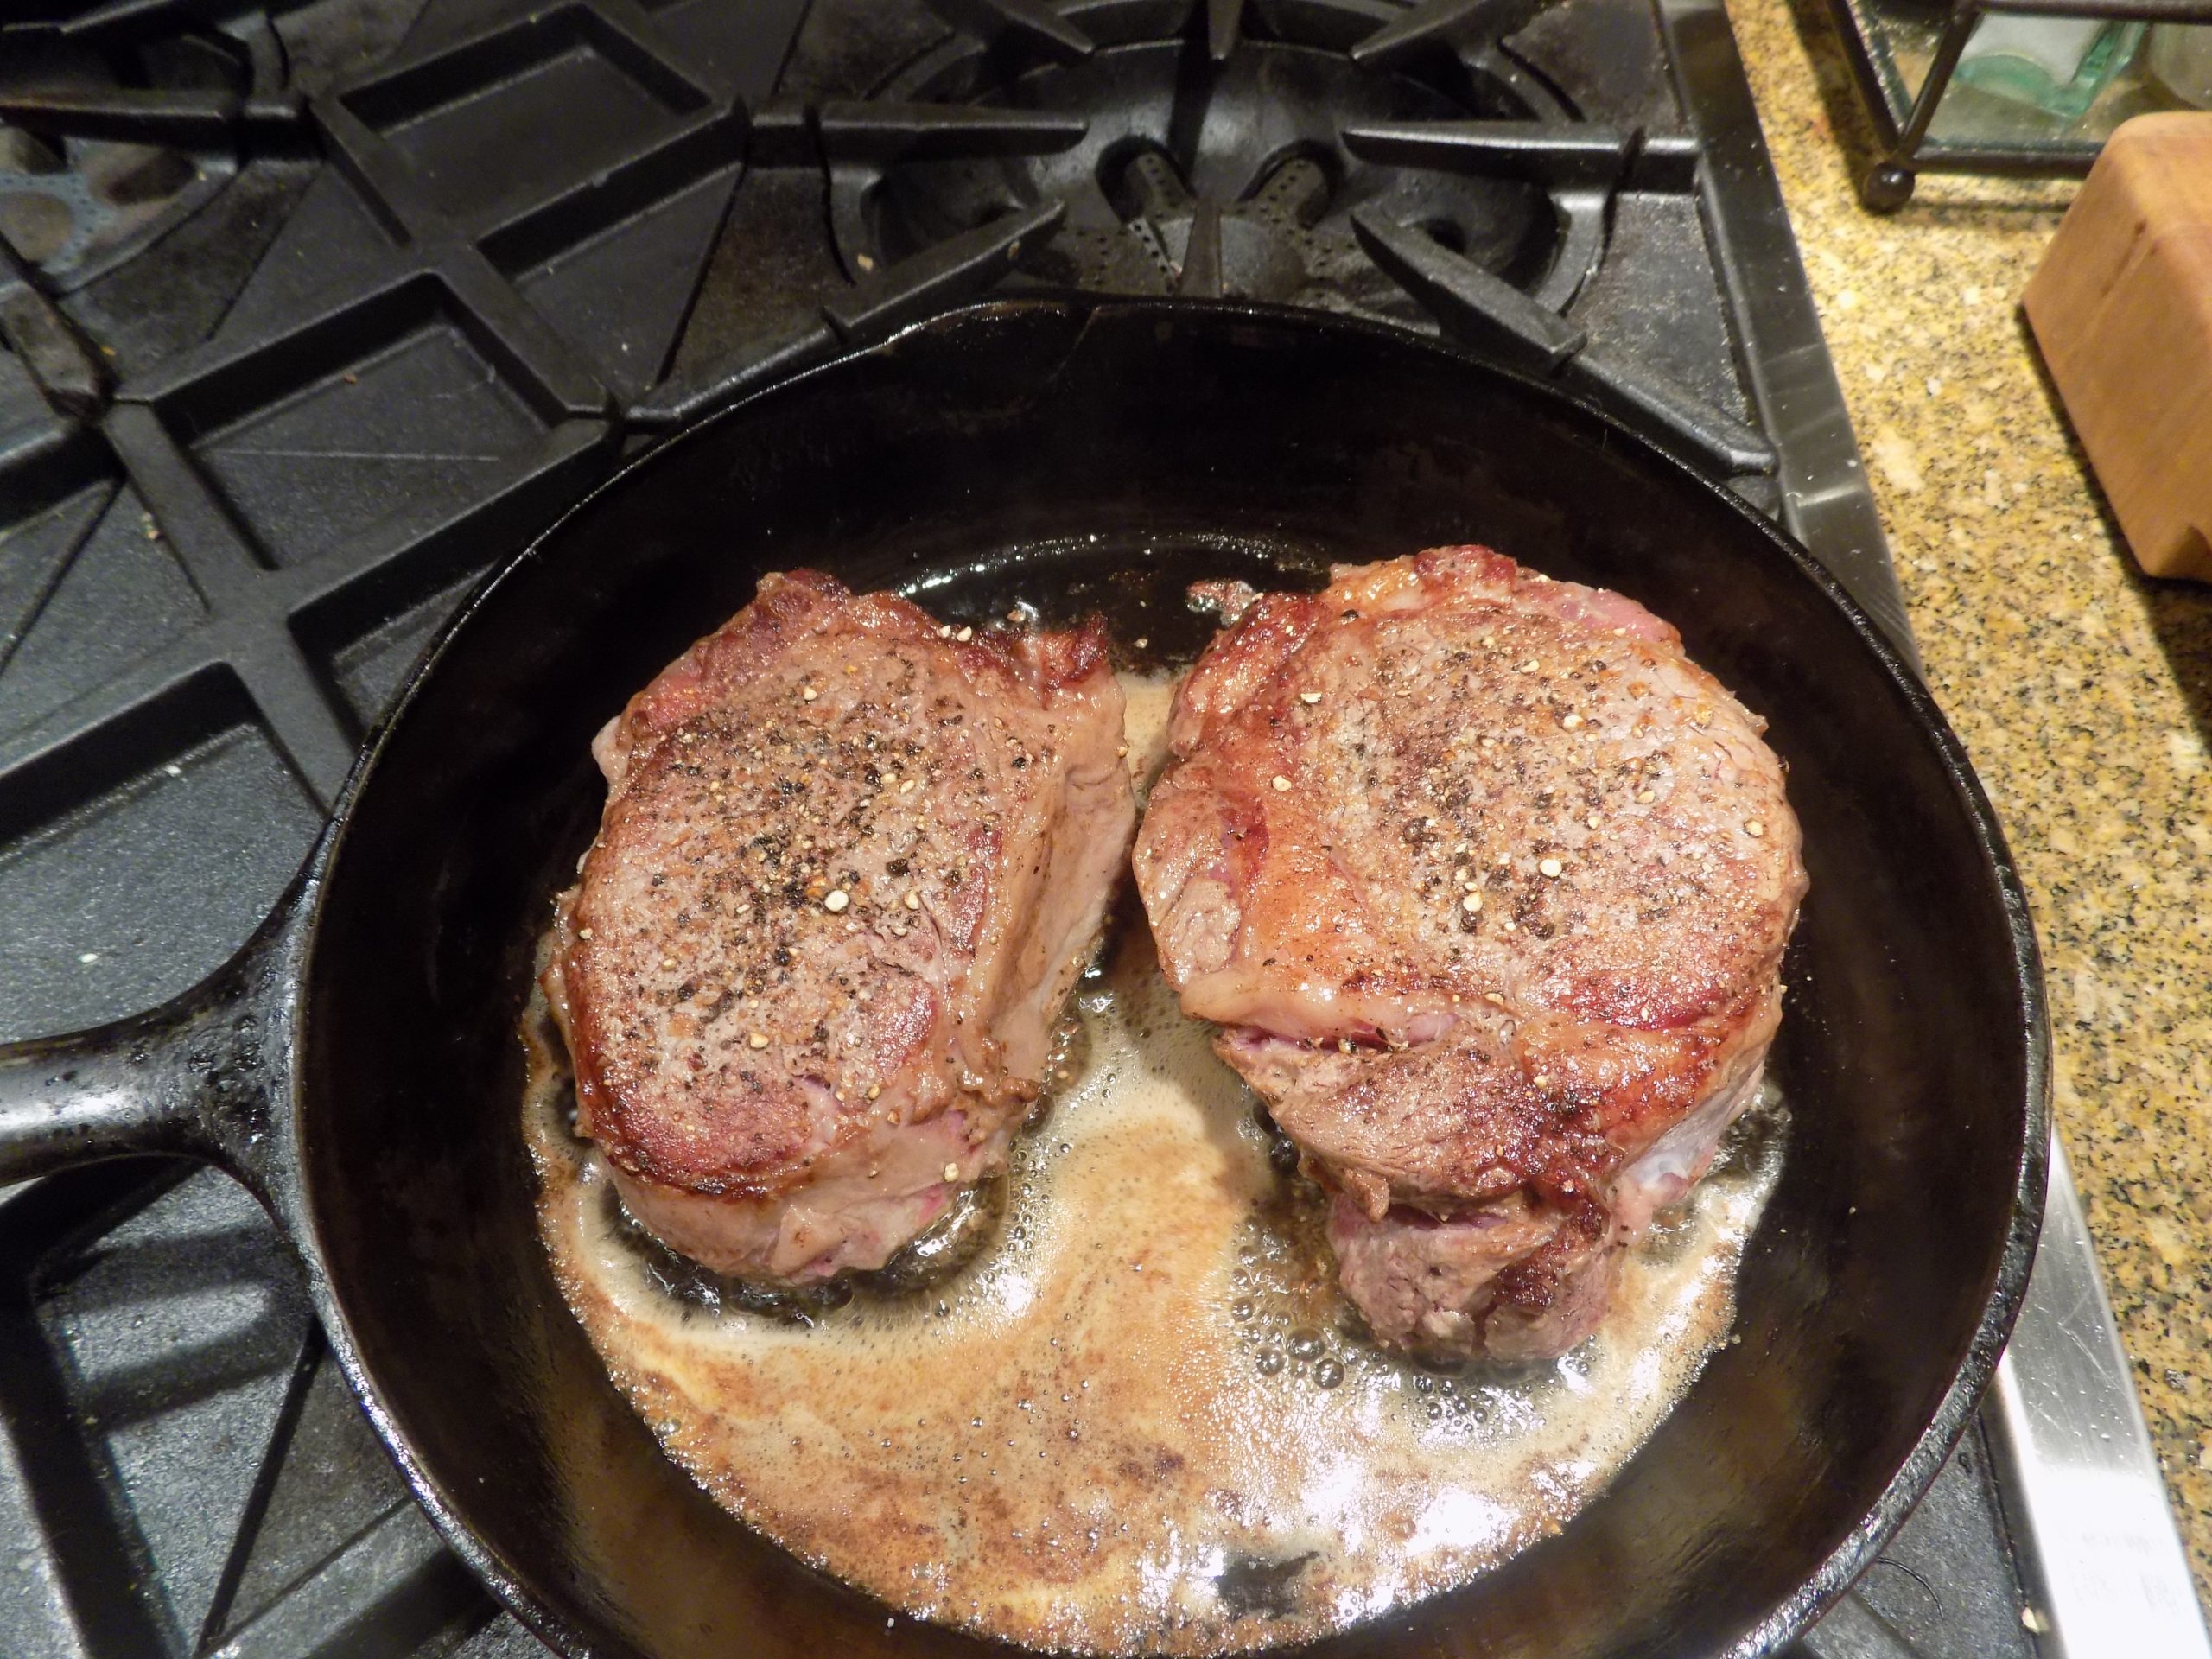
Now some would argue that the meat alone is perfect and should be enjoyed au naturale. To this I say – phooey! If they truly want their meat “naked”, then try cooking it without as much as a sprinkle of salt and pepper. Now, that’s “natural”. But I’d bet my last pound of unsalted butter that no one would admit to enjoying a good steak without the requisite liberal sprinkling of salt and pepper just before cooking begins. Especially salt. Because salt stays on the surface of meat without dissolving. This helps the meat juices stay within the muscle fibers thus helping ensure a juicy steak. Of course, along with the salt, it is important to cook the steak at a very high temperature. The high heat helps form an evenly distributed and crispy brown crust. And in the case of meat cooked using this recipe, a lovely buttery crisp crust.
FYI: Our good friend Jim, who is truly a meat expert, prepares his steaks a bit differently. He brings the meat to room temperature, then at least an hour before he cooks the meat, he liberally sprinkles it with salt and presses it into the meat. Then he sets it aside. Salting ahead of time like this ensures the entire cut gets evenly flavored. When salt is applied to raw meat, juices inside the meat are drawn to the surface. The salt then dissolves in the exuded liquid, forming a brine that is eventually reabsorbed by the meat.
Anyway, my point is, au naturale meat can be over-rated. Of course, I’m a lover of creamy and savory. So, for me, a lovely, flavored butter melting on a perfectly cooked steak is pure heaven. I could eat a great steak prepared this way weekly except for the obvious reasons. A) too much red meat is not good for me. B) Too much butter is not good for me. C) Expensive meat is not good for our budget! So, I prepare this kind of an entrée only for very special occasions.
So, if you too have a special occasion coming up, I would recommend serving this steak. And I know. For special occasions we love to go out for dinner too. But with Covid, dining in one of our favorite restaurants has not been possible. So, I have made sure that any special occasions are still celebrated with as much fanfare and fine dining as possible. But, like you, I am really looking forward to having someone else do the cooking, table clearing, and dishes. But even as write that sentence, I’m reminded that the slight annoyance of not being able to dine out is only a problem to people for whom poverty is not a reality. And then I sit back, say a thank you prayer to every deity imaginable, and then lift my butt out of my comfortable chair and walk into my well-stocked kitchen and fix us something good to eat. We are the lucky ones. We have food in our freezer, clean water, a warm home, and enough of everything necessary to live happy and productive lives. I hope and pray the same for you.
Peace and love to all.
2 beef tenderloin or filet mignon steaks (at least 1½-inches thick)
kosher salt
freshly cracked black pepper
2 T. unsalted butter
Remove the steak from the fridge at least 30 minutes before cooking. (Having the steak at room temperature helps ensure that your cooking times are more accurate and the meat cooks more evenly.) Season both sides generously with salt and pepper. Cook immediately.
Or use Jim’s method: salt the steak at least an hour before cooking. Then proceed to either cook as described below, or grill over high heat. Either way produces a really good product.
Using a cast iron pan if possible, add the 2 tablespoons of butter to the pan and allow the skillet to become scorching hot before placing the steaks in the pan. Sear the first side undisturbed for 2 minutes. Carefully flip the steaks and sear the second side for 2 minutes. (This will give your steaks a lovely and tasty crust.)
Transfer the skillet directly to your pre-heated 425-degree oven. (The skillet handle may be hot, so work carefully.) For rare, bake for 3½ minutes. The internal temperature should reach 120 – 125-degrees. Medium rare, roughly 4-5 minutes to an internal temperature of 125-130-degrees. After that, don’t bother spending your hard-earned money on tenderloin or filet mignon. Might just as well buy a cheaper cut of beef and make stew!
When your steaks reach the desired internal temperature, remove from the oven, transfer to a platter, and lightly cover with aluminum foil. Leave alone for about 5 minutes.
To serve, plate the steaks topped with slices of your choice of flavored butter. (See choices below.)
Garlic Rosemary Butter
4 T. (½ stick) unsalted butter
1½ tsp. chopped fresh rosemary
1½ tsp. chopped fresh parsley
1 lg. garlic clove, finely minced
pinch sea salt
freshly ground black pepper
Soften the butter in a microwave safe bowl until malleable, 10-15 seconds. (Don’t melt the butter.) Using a regulate table fork, mash in the rosemary, parsley, garlic, salt, and pepper. Scoop onto a piece of plastic wrap forming it as much as possible into a half stick of butter. Place in refrigerator until the steak comes out of the oven and is resting. (If you make the flavored butter way ahead of time, take it out of the refrigerator a good 30 minutes before you plan to use it.)
Garlic Lemon Butter
4 T. (½ stick) unsalted butter
2 garlic cloves, finely minced
2 T. minced fresh Italian parsley
1 tsp. lemon zest
pinch sea salt
freshly ground black pepper
Soften the butter in a microwave safe bowl until malleable, 10-15 seconds. (Don’t melt the butter.) Using a regulate table fork, mash in the garlic, parsley, lemon zest, salt, and pepper. Scoop onto a piece of plastic wrap forming it as much as possible into a half stick of butter. Place in refrigerator until the steak comes out of the oven and is resting. (If you make the flavored butter way ahead of time, take it out of the refrigerator a good 30 minutes before you plan to use it.)
Blue Cheese and Fresh Thyme Butter
4 T. (½ stick) unsalted butter
2 T. crumbled blue cheese, or more to taste
1 tsp. finely chopped fresh thyme
pinch sea salt
freshly ground black pepper
Soften the butter in a microwave safe bowl until malleable, 10-15 seconds. (Don’t melt the butter.) Using a regulate table fork, mash in the blue cheese, fresh thyme, salt, and pepper. Scoop onto a piece of plastic wrap forming it as much as possible into a half stick of butter. Place in refrigerator until the steak comes out of the oven and is resting. (If you make the flavored butter way ahead of time, take it out of the refrigerator a good 30 minutes before you plan to use it.)
Dried Porcini Mushroom, Garlic, and Fresh Chive Butter
4 T. (½ stick) unsalted butter
1 sm. garlic clove, finely minced
4 tsp. chopped fresh chives
1 T. dried porcini mushroom powder*
pinch sea salt
Soften the butter in a microwave safe bowl until malleable, 10-15 seconds. (Don’t melt the butter.) Using a regulate table fork, mash in the garlic, chives, mushroom powder, and salt. Scoop onto a piece of plastic wrap forming it as much as possible into a half stick of butter. Place in refrigerator until the steak comes out of the oven and is resting. (If you make the flavored butter way ahead of time, take it out of the refrigerator a good 30 minutes before you plan to use it.)
*Porcini mushroom powder can be purchased online or you can make it at home. Place dried mushrooms in your blender or spice grinder and let it whirl. (My spice grinder is an inexpensive coffee grinder dedicated just for the purpose of grinding herbs, spices, and anything other than coffee!)
Store mushroom powder in an airtight container. Great for adding depth of flavor to almost any dish that calls for mushrooms. And of course, any dried mushroom can be ground into powder.
Horseradish and Fresh Chive Butter
4 T. (½ stick) unsalted butter
2 tsp. horseradish, or more to taste
4 tsp. chopped fresh chives
pinch sea salt
freshly ground black pepper Soften the butter in a microwave safe bowl until malleable, 10-15 seconds. (Don’t melt the butter.) Using a regulate table fork, mash in the horseradish, chives, salt, and pepper. Scoop onto a piece of plastic wrap forming it as much as possible into a half stick of butter. Place in refrigerator until the steak comes out of the oven and is resting. (If you make the flavored butter way ahead of time, take it out of the refrigerator a good 30 minutes before you plan to use it.)
I’ve never been a great lover of sweet and sour pork because I basically hate pineapple. And invariably when sweet and sour pork is offered at a Chinese restaurant, there are big honkin’ pieces of pineapple cluttering up the dish. Now for most people, like my dear husband, that’s just fine. But I just have to say, “no thank you”. But I was hungry for Chinese food the other day. So, while searching for a Chinese pork recipe, I found this recipe on the dinneratthezoo.com site. The recipe didn’t actually label itself as sweet and sour, but that’s exactly what it tastes like to me. So, that’s how I’m going to title it.
But regardless of what this lovely dish is called, it is an absolutely marvelous way to make 2 boneless pork chops expand to feed at least 5 people. And in such a delicious and easy to prepare manner. Steam up some rice, add a veggie dish like my recipe for Asian Green Beans, and a glorious Chinese dinner is on your table in no time.
This being Valentines Day, and me feeling a bit lazy, I’m going to make this preface short. Plus, it’s still snowing and sure as shootin’, tonight’s forecast for rain will wipe away all vestiges of this white, fluffy ground covering by tomorrow afternoon. So, I’m going to kick back and spend some quality time just looking out the window.
As always, enjoy life to the fullest. Relax when you have the chance. And given the opportunity, spend a couple of hours just watching nature take its course. We live in such a beautiful world. Take advantage of that as much as possible. Peace and love to all. And Happy Valentine’s Day! Oh, and I hope you enjoy this fabulous dish!
For the sauce:
¼ c. honey
⅓ c. soy sauce (reduced sodium if possible)
½ c. ketchup
3 T. brown sugar, packed
2 T. rice vinegar
1 T. toasted sesame oil
2 tsp. cornstarch
2 tsp. vegetable oil
2 lg. garlic cloves, finely minced
Combine the honey, soy sauce, ketchup, brown sugar, rice vinegar, sesame oil, and cornstarch in a bowl.
Heat the oil in a pan over medium heat. Add the garlic and cook for 30 seconds. Add the honey mixture and bring to a simmer. Cook for 3-4 minutes or just until thickened. Set aside.
For the pork:
1 lb. thick boneless pork chops, cut into ½-inch pieces or 1 lb. boneless skinless chicken breasts cut into small pieces
1 egg
¼ tsp. kosher salt
freshly ground black pepper
¼ c. all-purpose flour
¼ c. cornstarch
vegetable oil for frying
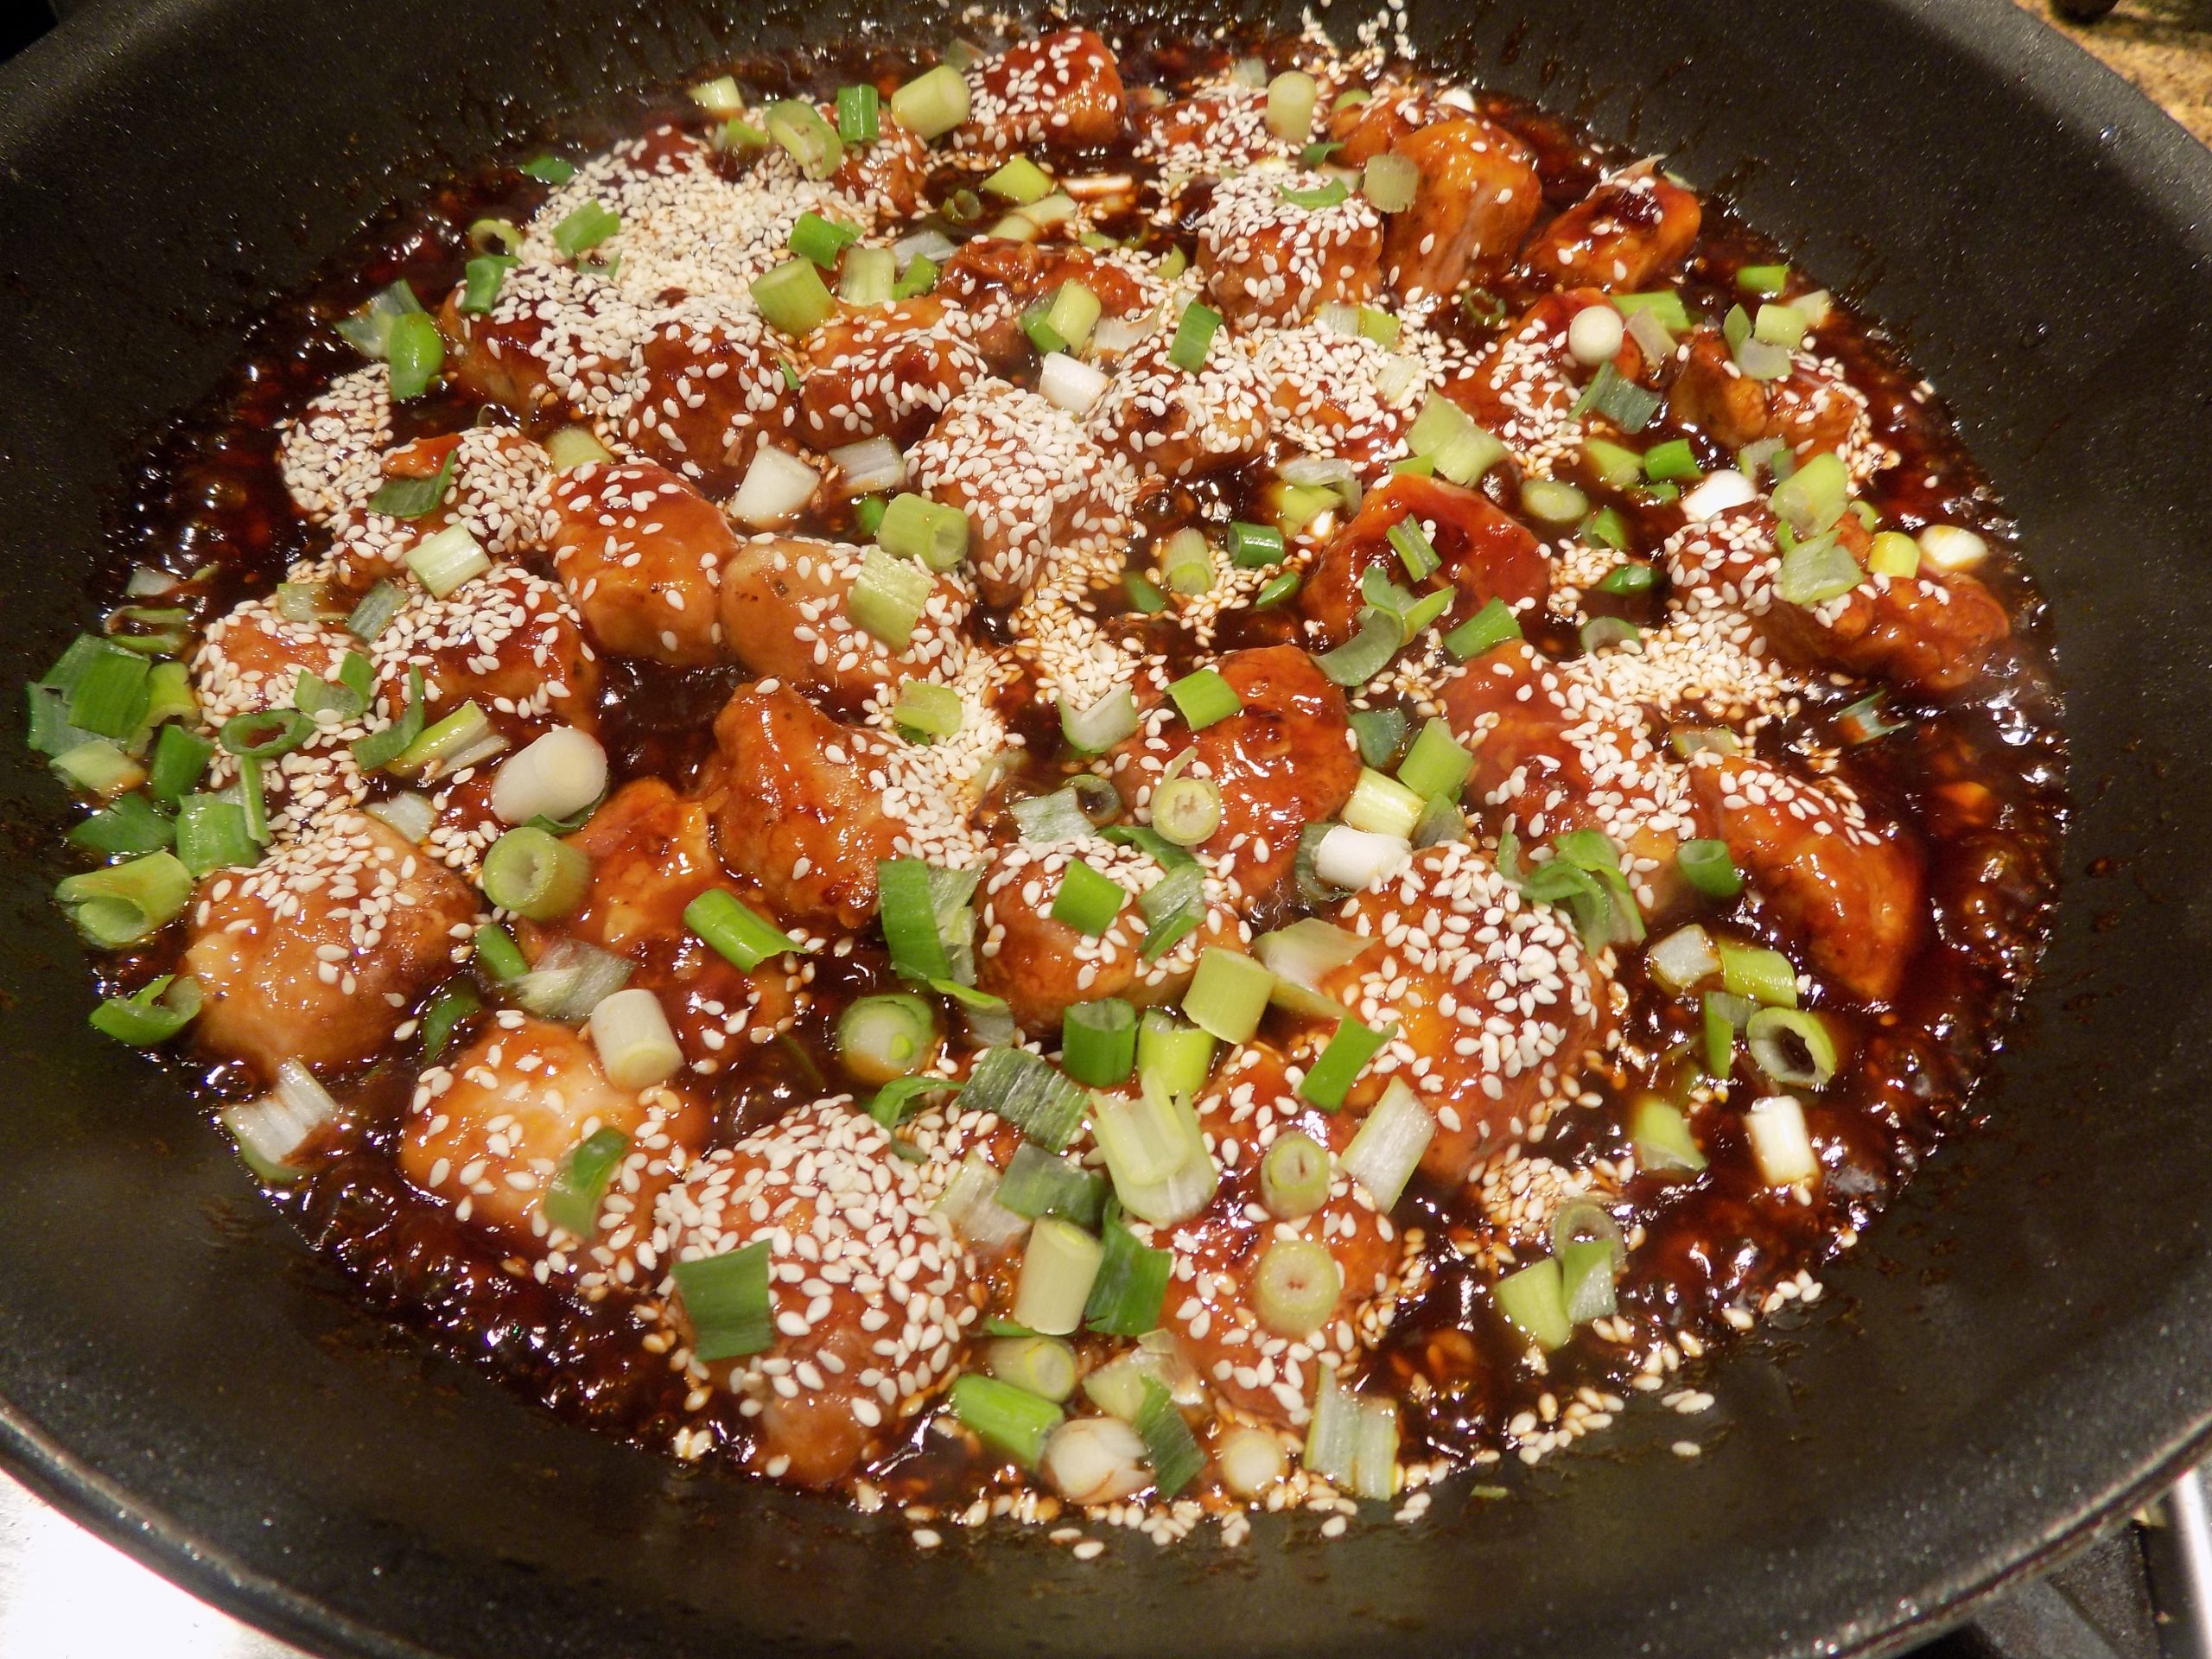
2 T. sesame seeds
3-4 green onions, thinly sliced
Beat the eggs, salt, and pepper together in a bowl. Stir in the pork pieces. Place the flour and cornstarch in a gallon sized zip-lock bag. Pinch the bag for a few seconds until the flour and cornstarch are well blended. Just before ready to fry the pork, drain off any excess egg and pour the coated pork cubes into the flour mixture. Carefully zip the bag shut and toss the pork cubes until evenly coated.
In a frying pan large enough to accommodate all of the pork pieces in a single layer, heat enough oil to cover the bottom of the pan.
Add the coated pork. Over medium heat, fry the first side until crispy and golden brown. Carefully flip the pieces and again, fry until golden brown.
Pour the sauce over the cooked pork and gently toss. Sprinkle with the sesame seeds and green onions. Serve immediately. Great over steamed rice.
For the last several days, weather predictors have been threatening Northwestern Washington with snow. (Like that’s a big threat for people like me!) Because those of us for whom snow is the coolest thing ever, would be overjoyed to see big old fluffy flakes of precipitation fall from the sky. Even though, in our case, almost any amount of snow will render us house bound. (Our driveway and road leading out of our neighborhood are anything but level.)
Lots of snow on Mt. Baker, but so far, none on the deck from which I am taking this picture. That’s Barnum Point in the foreground surrounded on three sides by Port Susan Bay.
But for retired folks like Mr. C. and me, who are already basically tethered to our house because of covid-19, so what? And snow is so pretty. And so much fun to play in. (OK, it used to be fun to play in when I was still skiing. Now however, I stick to admiring it from the comfort of my well heated and comfortable home.) But you understand what I mean. And besides all of which, even though I fervently wish for snow, I have as much say in the matter as my fellow thinking Americans who would like to see one of our former presidents (no name given to avoid a lawsuit) airlifted to a tiny island in the middle of a vast sea of sharks, never to be heard of again! But for reasons unknown to me, I was not handed the responsibility for weather in our region, or for mandating punishment even if said punishment is richly deserved! So, I do the next best thing.
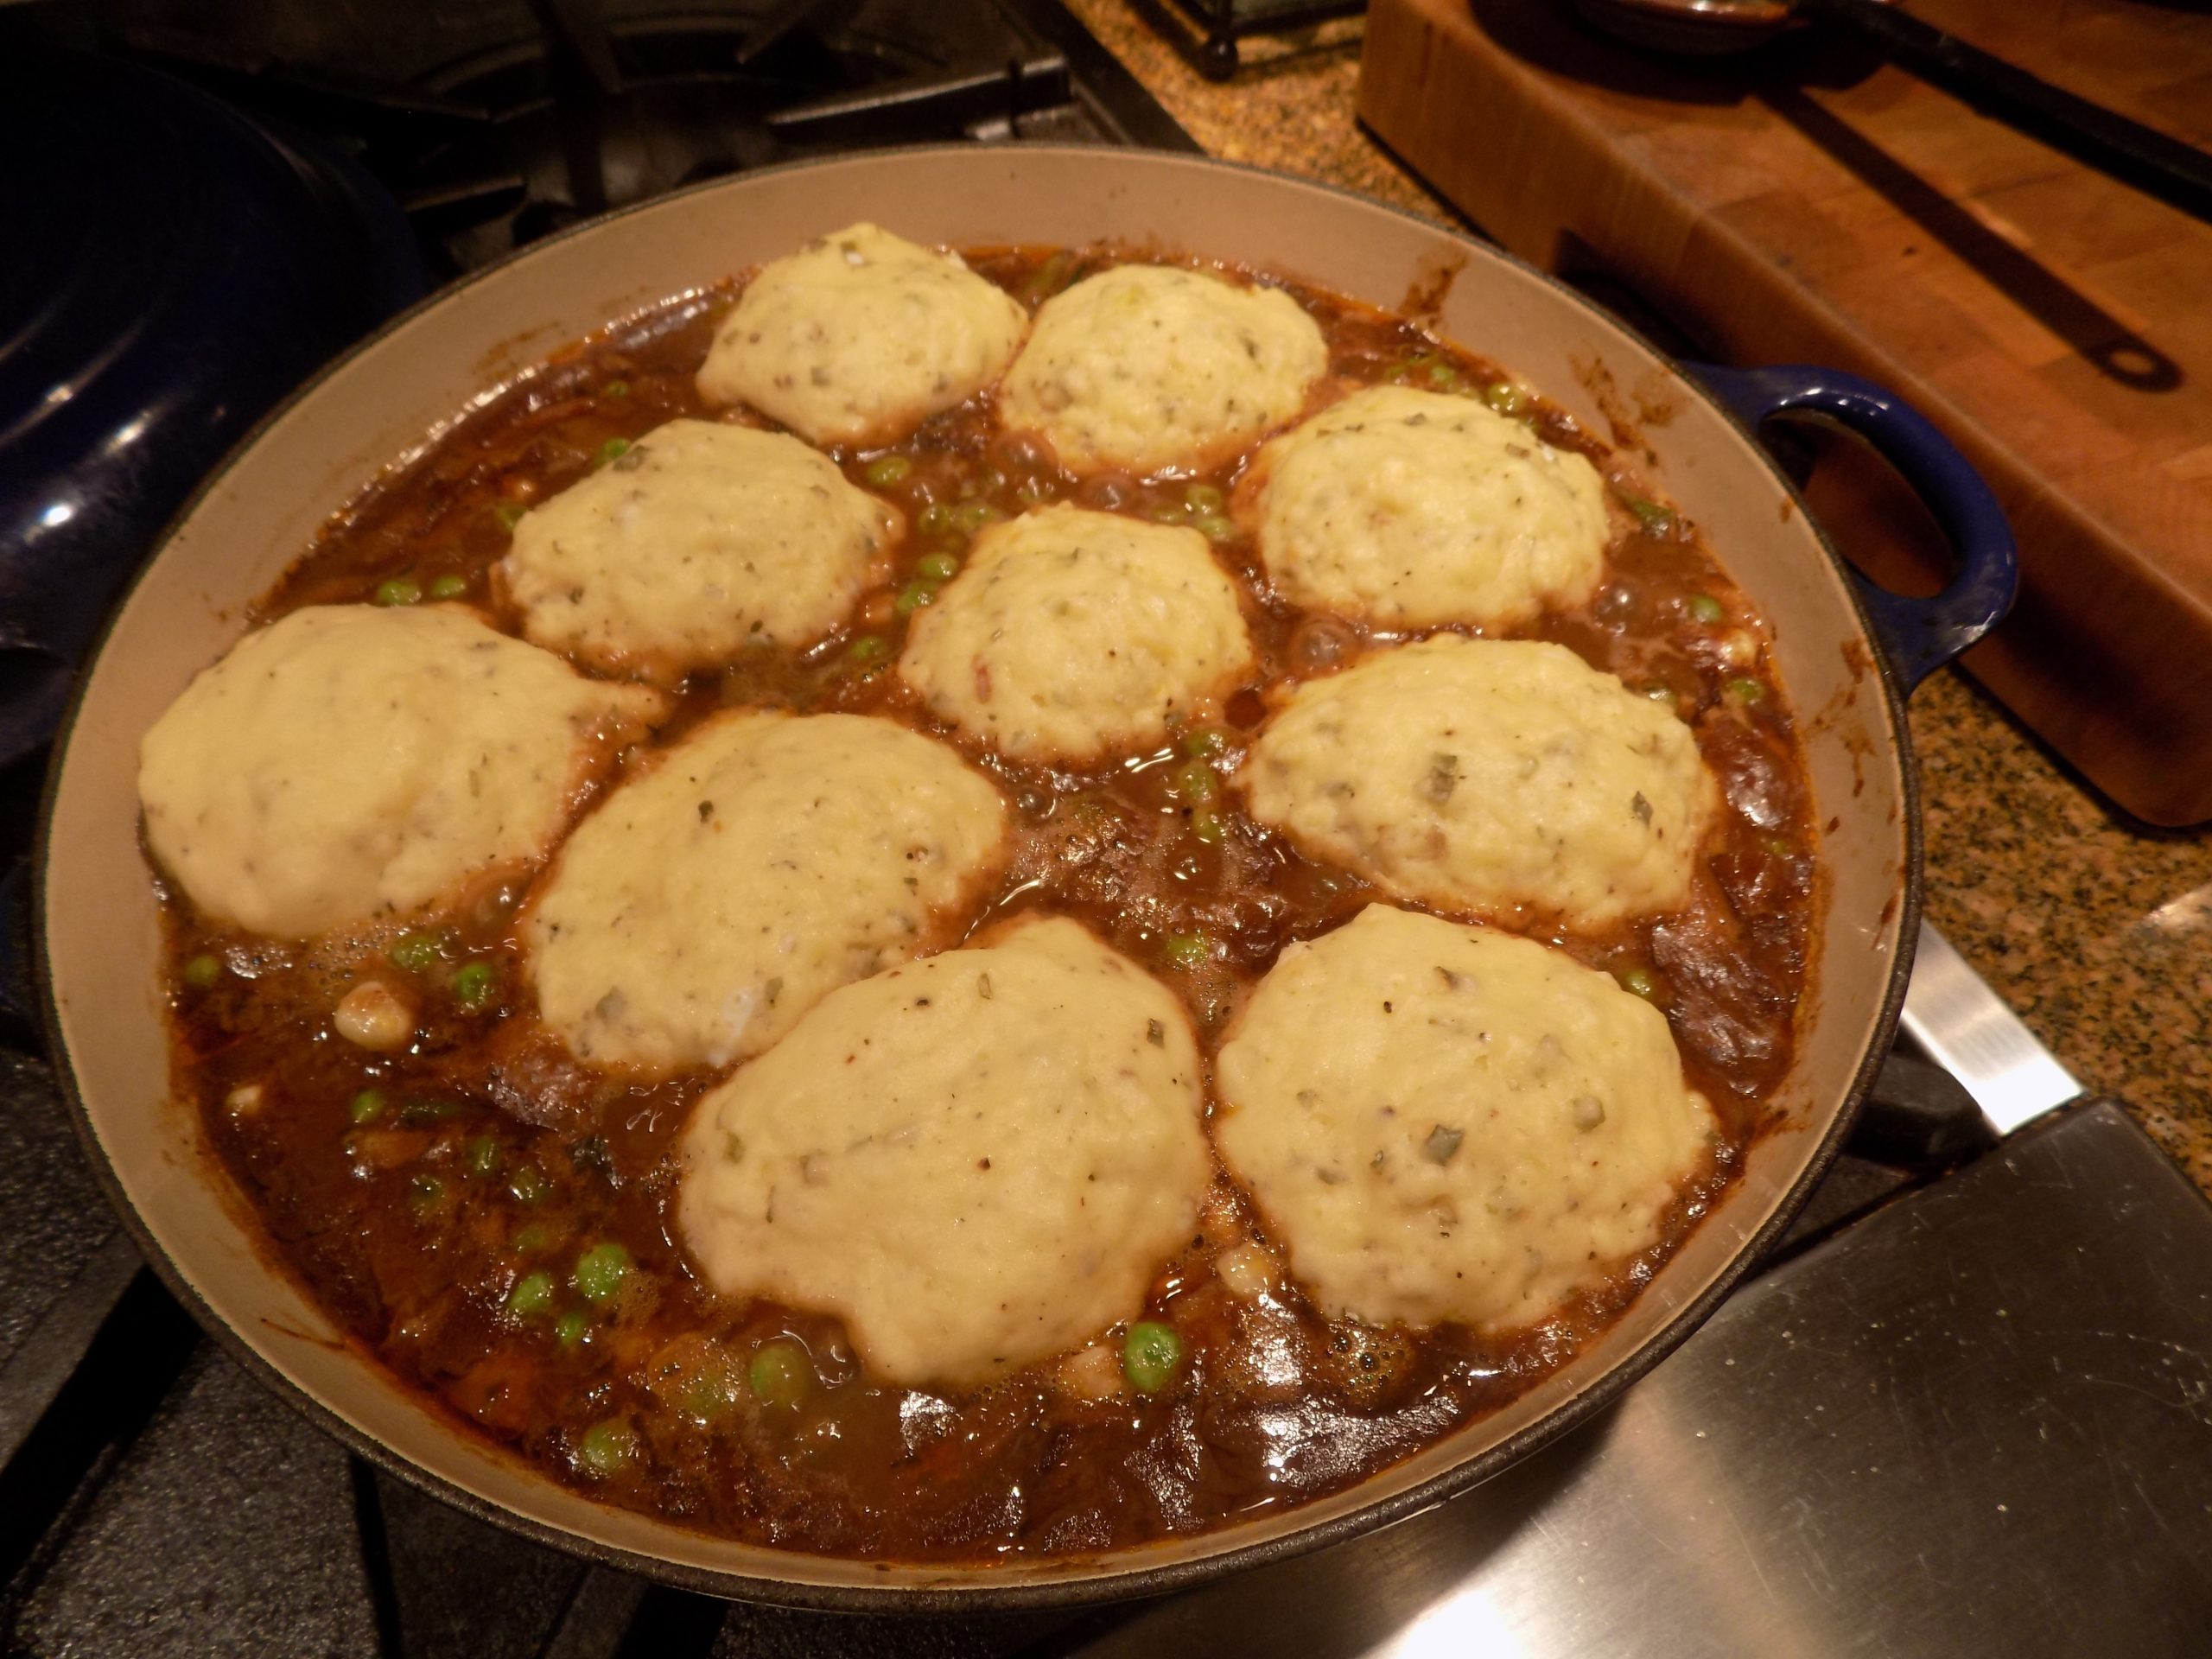
I prepare hearty comfort food that makes us feel like there must be snow on the ground. Which, of course there is. Somewhere. And beef stew, with light as feather dumplings nestled on top, is perfect “snow weather” food. So, of course I hope you give this recipe a try. The stew is delicious. And when topped with dumplings, your entire family will feel like it must be a special occasion. (Snow, or no snow.)
So as always, make each meal a special occasion. And don’t hate snow. None of us can either stop it from falling or hasten its appearance. It simply is what it is. So, stock up on hot chocolate mix and marshmallows. Whip up a batch of chocolate chip cookies or brownies. And graciously accept the inevitable. And after all that effort, and if you still have a modicum of energy left, prepare a hearty and tasty meal to top off another great day of just being alive.
Peace and love to all.
For the Stew:
4-6 slices thick lean bacon, diced
1 lb. lean beef (round steak or top sirloin is great)
2 tsp. seasoned salt
freshly ground black pepper
1½ tsp. paprika
½ c. flour
1 lg. onion, chopped
3 garlic cloves, minced
1 c. chopped celery
2 carrots, sliced ¼-inch thick
3 c. beef stock
1 c. red wine (I use Gallo Hearty Burgundy)
1 T. tomato paste
1 bay leaf
2 tsp. dried thyme leaves
½ tsp. dried rosemary, crushed
1 T. dried parsley
2 medium potatoes, diced
4-6 c. fresh or frozen vegetables (corn, beans, peas, broccoli, mushrooms, zucchini, etc.)
Fry bacon until crisp in a large, covered soup pot. Remove bacon to medium sized bowl. Don’t discard bacon fat. Meanwhile, remove any fat or grizzle from meat and cut into bite size pieces. Sprinkle meat with seasoned salt, pepper, and paprika. Place flour in a bag and add meat cubes. Shake until well coated. Brown meat in bacon fat. As pieces brown, remove to the same bowl as bacon. If more fat is needed to brown all the meat cubes, add a teaspoon or so of vegetable oil.
After all the meat has been browned, add onion, garlic, celery, and carrot slices to the pot. Stir fry for about 5 minutes, lifting brown bits off the bottom. Add beef stock, red wine, tomato paste, bay leaf, thyme, rosemary, and parsley. Bring to boil and add cooked bacon, meat cubes and any accumulated meat juices. Reduce heat to low, cover, and simmer for about 90 minutes or until the meat is almost tender. Stir periodically.
Add potatoes and simmer until they are almost done, about 30 minutes. Add fresh vegetables and cook until crisp tender. Add frozen vegetables and continue cooking until the stew is simmering gently.
Using a spoon or ice cream scoop, drop dumpling balls into the stew. (The dumplings will double in size while they cook, so make them as big or small as you wish.)
Cook dumplings at a slow simmer for 10 minutes with pan uncovered. Then cover the pot and simmer for about 10 more minutes or until the dumplings are cooked through. (Make sure you don’t peek while the dumplings are cooking for the last 10 minutes. They need to steam in order to be nice and fluffy and lifting the lid will release the steam.) To check if the dumplings are ready, use a toothpick to test if the dumplings are cooked through. The toothpick will be clean if the dumplings are cooked enough. Then serve the stew immediately.
For the Garlic, Onion, and Chive Dumplings:
1 egg
6 T. whole milk
2 T. veggie oil
1 c. all-purpose flour, fluffed
1½ tsp. baking powder
½ tsp. kosher salt
freshly ground black pepper
1 garlic clove, finely minced
1 T. chopped dried onion
2 T. finely chopped fresh or 1 T. dried chives
In a bowl whisk the egg, milk, and oil together. In another bowl, whisk the flour, baking powder, salt, pepper, garlic, dried onion, and chives together. Stir the dry ingredients into the egg mixture just until combined. Do not over-mix.
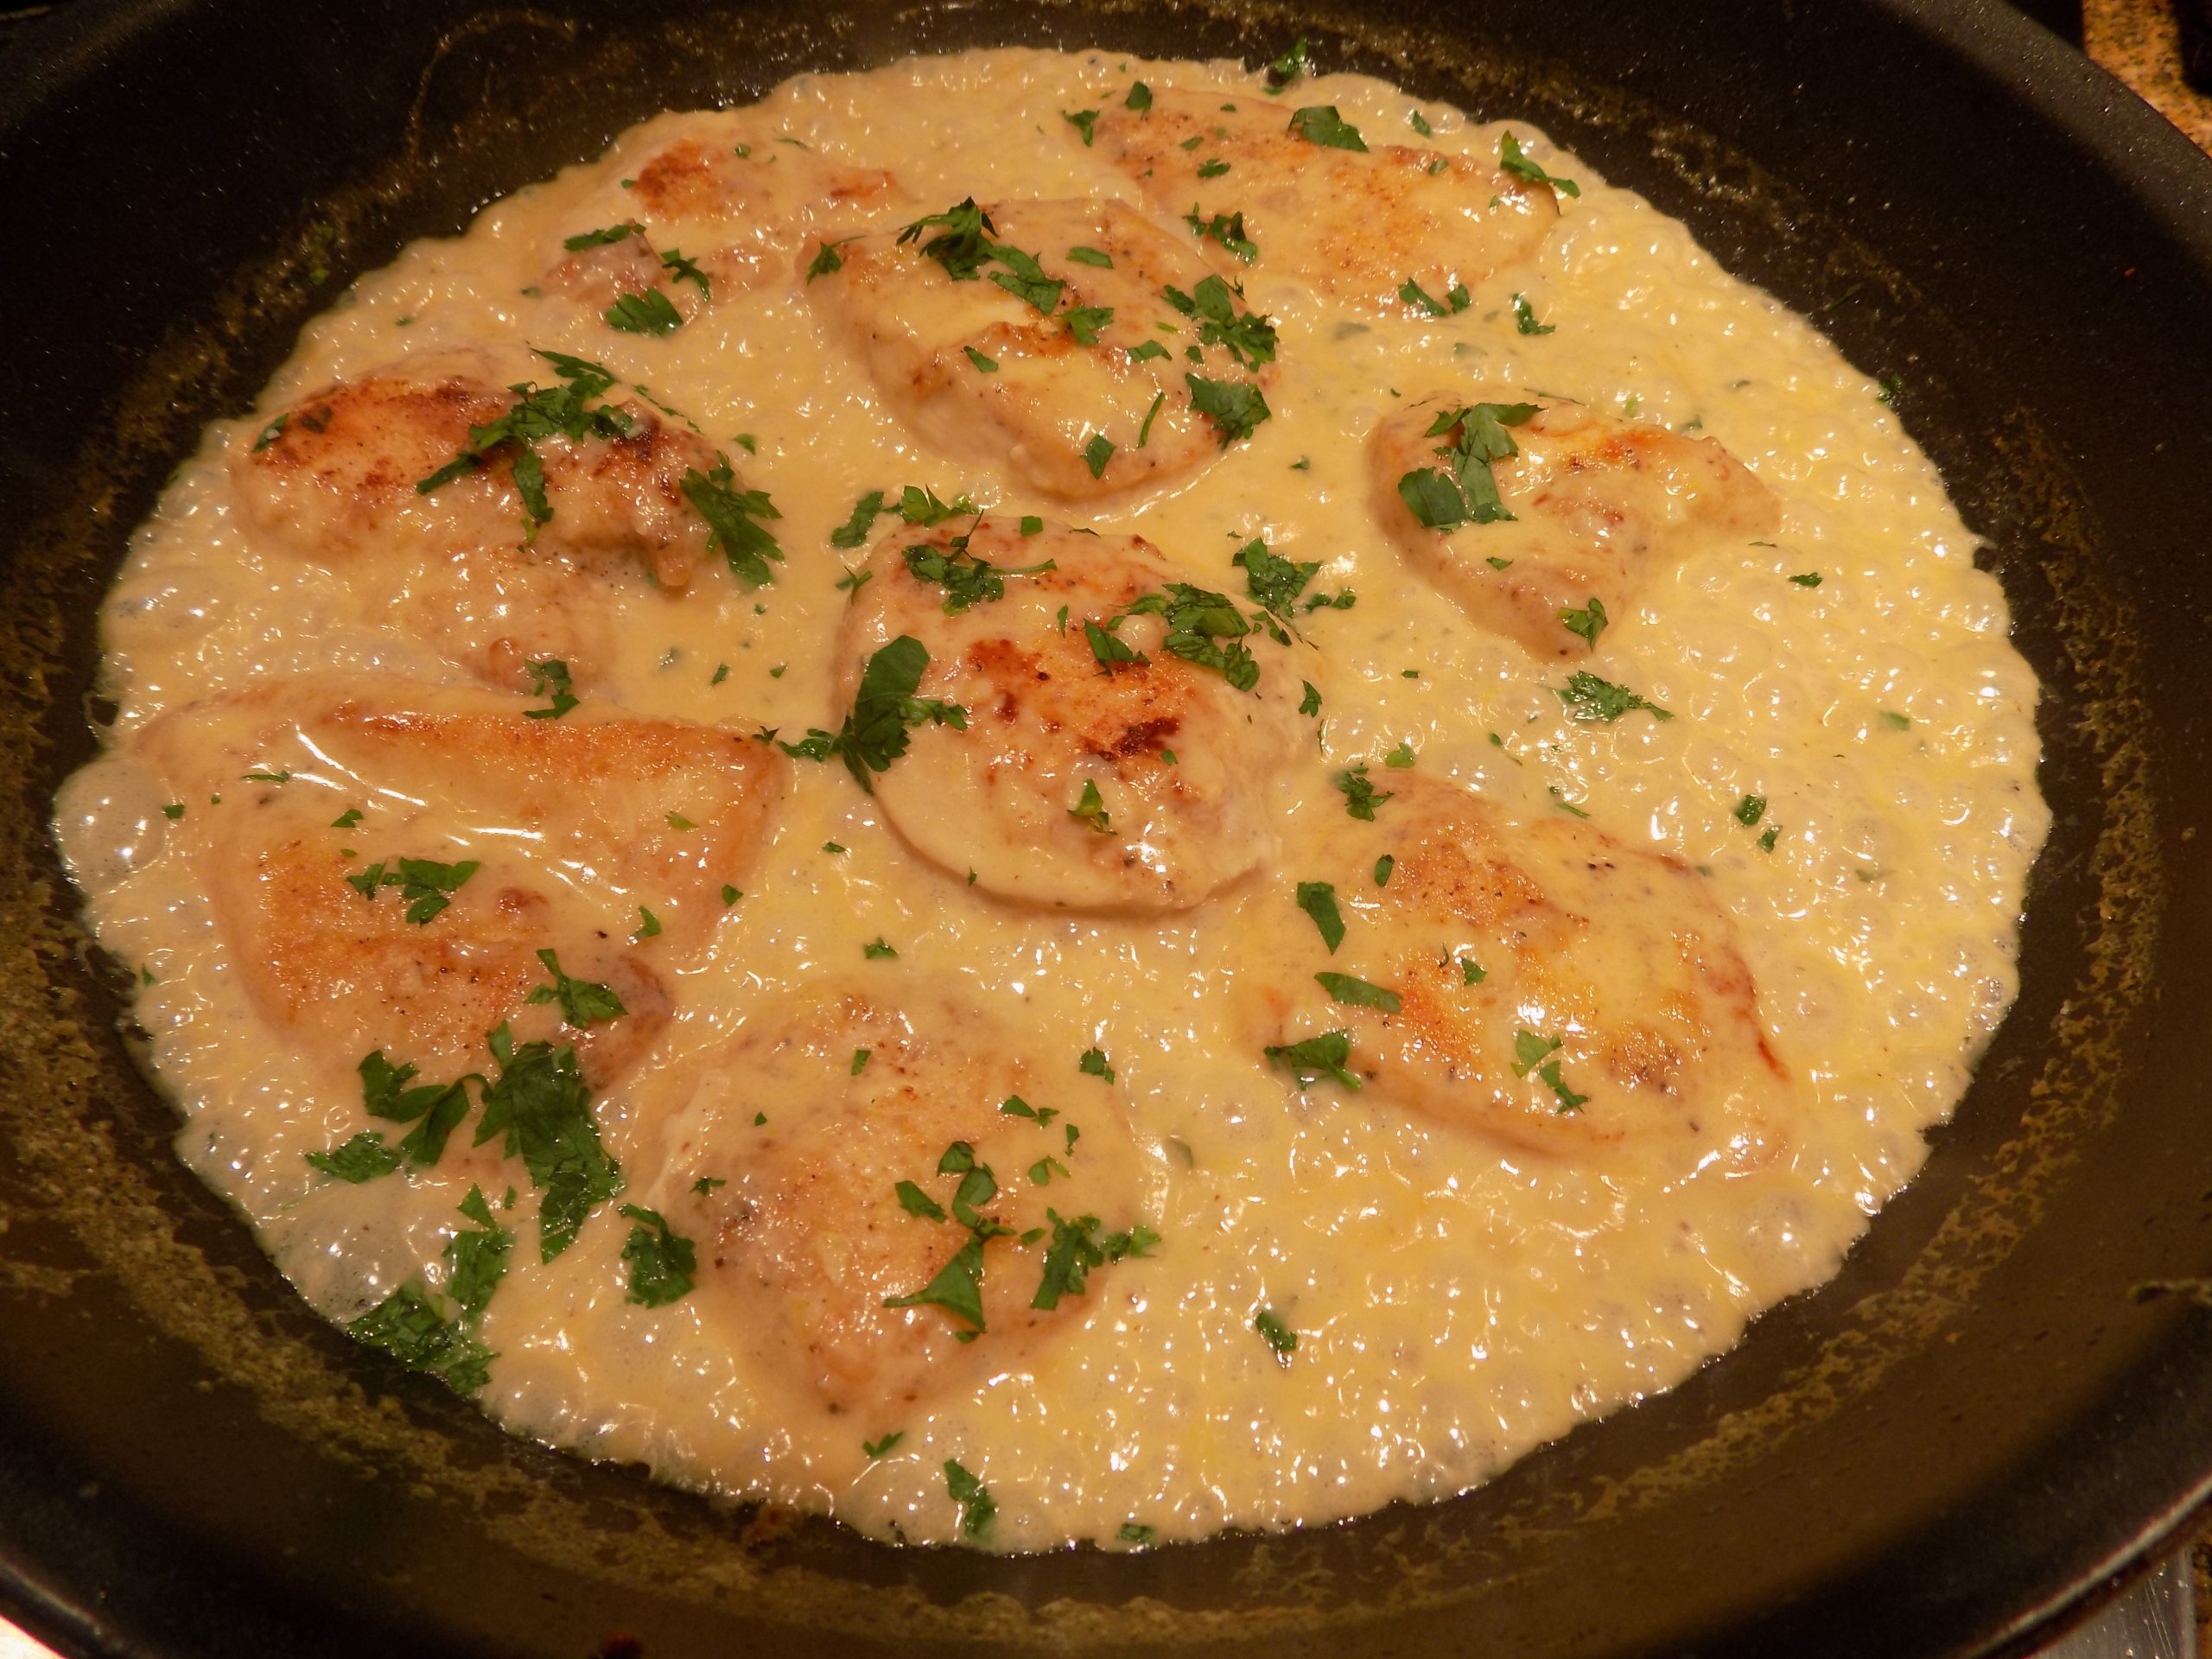
OK, this is another one of those chicken dishes prompted by my desire for a dish that is not only quick and easy to build, but creamy and rich tasting. Because more often than I would prefer, no dish sounds quite as enticing as heavy cream and starch in combination. I haven’t figured out exactly what has triggered this change, but never-the-less, it has become a reality. I vacillate between thinking the problem stems from my desire for comfort food brought on by current world events or my mind reminding me to just “go for it, because after all, you’re not getting any younger!” Either way, creamy dishes seem to be winning.
So, to offset some of the health risks associated with my current unhealthy tendency towards heavy cream, I have tried, in most part unsuccessfully, to cut down on high cholesterol saturated fats. And this recipe including heavy cream, is an example of me failing miserably. But boy of boy is this slightly changed chicken recipe from recipetineats.com. delicious. The only saving grace is that I couldn’t eat very much of this rich and satisfying dish. Plus, I served it over steamed brown rice. So, I deserve a few “good girl” points for not serving it over pasta! (And it was excellent over brown rice BTW.)
Now for those of you with no cholesterol issues or diminished, age related, physical abilities, this recipe shouldn’t cause you even a minute’s consideration. And even if you are on that slippery slope of advancing age, like me, we all deserve a treat periodically. And this definitely falls into the treat category. And truly, this dish could not be easier or quicker to prepare.
Of course, you do realize that I like to poke fun at myself and perhaps even exaggerate every so often to make my writing more interesting. So, I hope you also understand that I do take our over-all health very seriously. There is nothing I care more about than keeping us able to live productive and enthusiastic lives well into our 90s. So, I do take some liberties occasionally. But my love of cream is not one of those times. I love cream and am not afraid to admit it!
As always, stay happy, stay healthy, and keep having fun. Life is a ball. And exactly what you make of it!
Peace and love to all.
2 chicken breasts, sliced in half lengthwise, then into smaller pieces
kosher salt
freshly ground black pepper
¼ c. flour
3 T. unsalted butter, or more as needed
2 garlic cloves, finely minced
1 c. chicken broth
½ c. heavy cream
1 tsp. lemon zest
2-3 T. fresh lemon juice (start with 2 tablespoons)
2 tsp. Dijon mustard
½ c. finely grated Parmesan cheese
1 T. finely chopped fresh parsley
Dry the chicken pieces with paper towels. Sprinkle each side with salt and pepper. Coat with the flour, shaking off excess before placing in the pan.
Melt the butter in a large skillet over medium high heat. Cook the chicken until done, hopefully achieving a light golden brown on both sides. Remove to a plate.
Add a touch more butter if your pan is dry. Add the garlic and cook for 1 minute.
Add the chicken broth, cream, lemon zest, lemon juice, and Dijon mustard. Bring to a simmer and whisk to clean the bottom of the pan and incorporate the mustard.
Add the Parmesan cheese and simmer rapidly for 3 minutes or until the sauce thickens slightly. Adjust seasoning and add more lemon juice if needed.
Return the chicken to the pan (pour in any juices on the plate too), turn to coat.
Spoon chicken and sauce over freshly cooked al dente pasta or rice. Sprinkle with parsley and serve immediately.
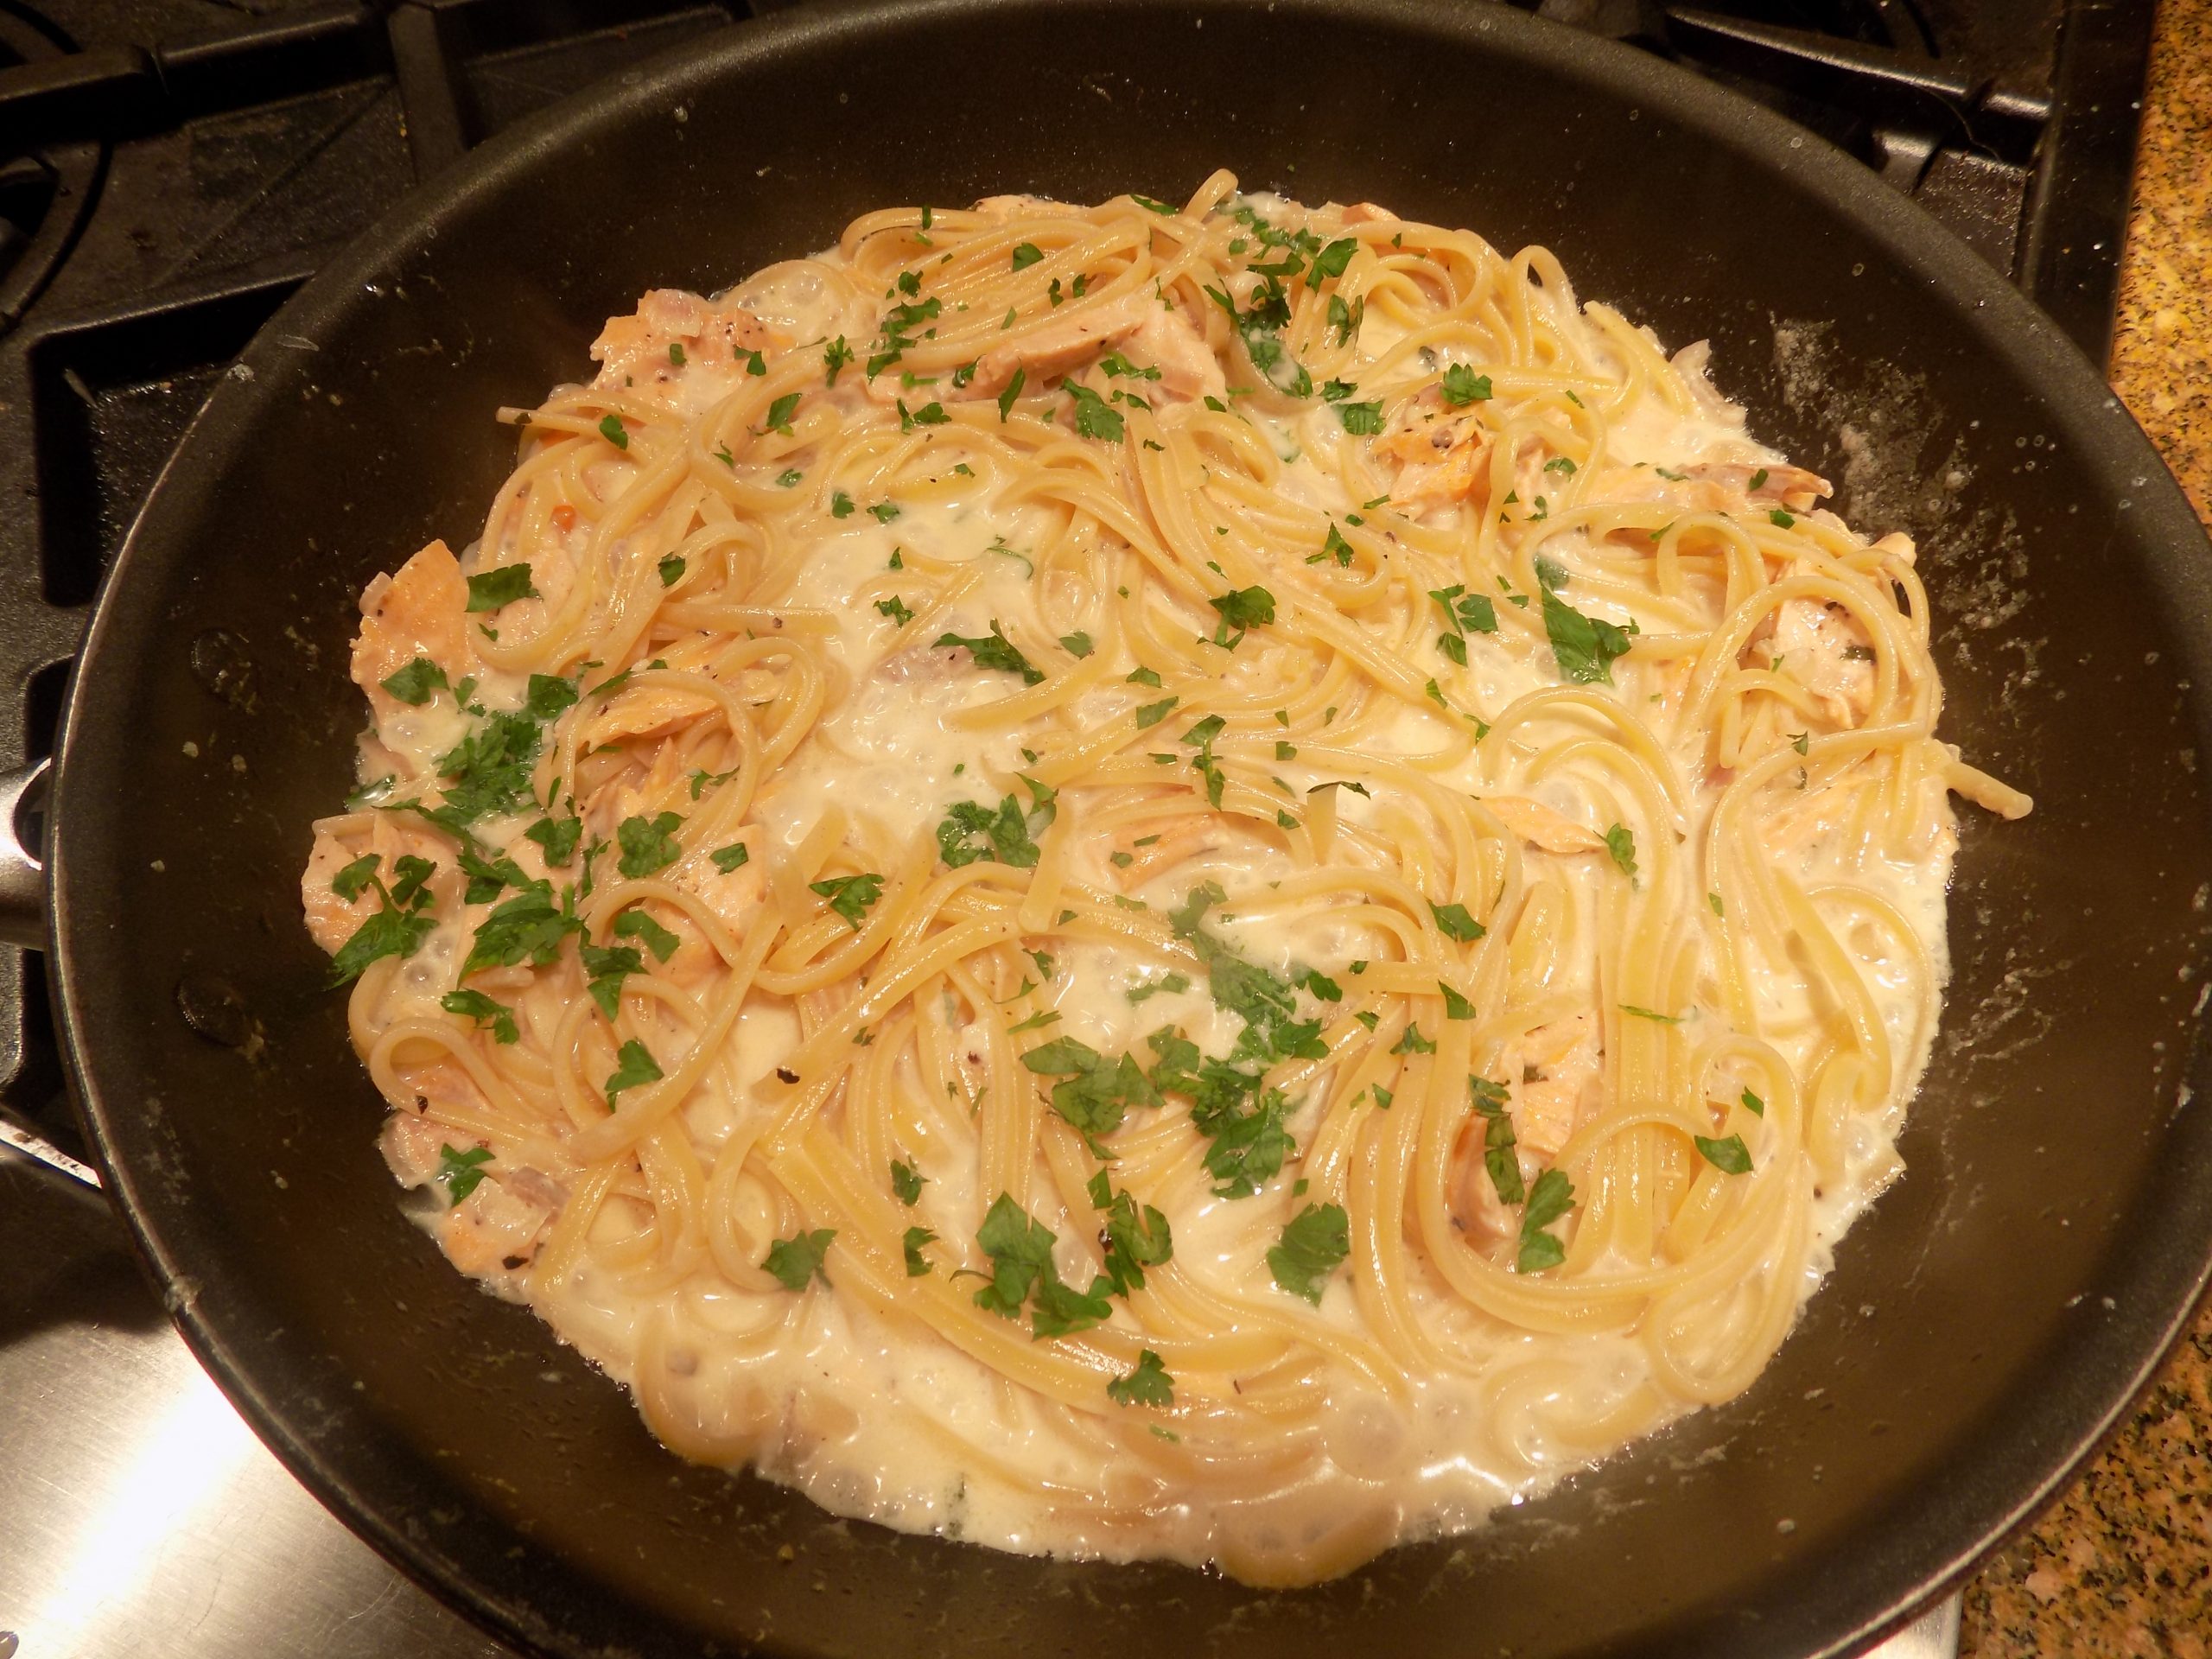
Yesterday I posted a recipe for Herb and Garlic Baked Lightly Smoked Steelhead Trout or Salmon. Darn good recipe BTW. That same evening, I used the planned over baked salmon in this lovely pasta dish from recipetineats.com.
Now I know what you’re thinking. And I get it. Like everyone else, you are probably trying hard to step away from highly caloric and heavily cholesterol laden dishes. And Alfredo is one of the most caloric pasta dishes imaginable. All that butter, heavy cream, and cheese. And I totally understand your concern. But please know, I am right there with you. So, in this recipe, the amount of butter called for has been cut way back. The amount of heavy cream has been dramatically reduced. And there isn’t even as much cheese as is usually suggested in most Alfredo recipes.
So, of course the next question you probably have is, “does it taste like a “real” Alfredo”? And I can happily and truthfully answer – yes, indeed it does. In fact, perhaps even better because it isn’t so cloyingly rich. The sauce just perfectly coats the pasta and doesn’t in any way detract from the delicious light flavor of the fish. So, am I pleased to pass this recipe along to you? You can bet your last pound of Parmigiano Reggiano on it!
Plus, this is probably one of the easiest and quickest pasta recipes to prepare. Not a lot of chopping of veggies or hours of simmering. Of course, having planned over salmon cuts down on the prep time. But even if you don’t start with planned overs, a quick bake of some fresh salmon doesn’t take that much time.
So, let me recommend this delicious fish dish next time you want to celebrate life, an anniversary, the fact you have survived another week of work, or you haven’t sent one of your kids to their room until they are 18. (Even though the kid may have richly deserved it!) (You know I’m just kidding. But if you’re a parent, and that thought hasn’t flashed into your mind at least once, you simply haven’t been paying enough attention or your children have yet to enter the “terrible teens”!)
As always, keep laughing at all the interesting situations life throws your way. Keep loving your teenagers even if they drive you crazy. Believe me, someday you will remember those days with longing. So, while they are still at home, fill them up with good food, good memories, and help them learn to make good choices. And above all else, be a good example. They are learning to be an adult from you. Peace and love to all.
3 T. unsalted butter
1 sm. shallot, very finely minced
½ c. heavy cream
¼ tsp. kosher salt
freshly ground black pepper
¾ c. finely grated Parmigiano Reggiano, plus more for table
8 oz. fettuccine, cooked al dente
½ – 1 c. pasta cooking water
6-8 oz. cooked salmon, flaked
1 T. chopped fresh parsley
Melt the butter in a large fry pan over medium high heat. Add the shallot and sauté for 2 minutes or until tender. Add the cream, salt, and pepper and bring to boil. Turn heat down to medium low and simmer for 3 minutes.
Remove from heat and stir in the Parmigiano Reggiano until the sauce is smooth and creamy.
Transfer the just cooked al dente pasta and ½ cup of the pasta water to the fry pan with the sauce. Add the salmon. Return the fry pan to the stove over medium heat. Toss very gently to coat the pasta in the sauce and allow the sauce to thicken and completely coat the pasta. If needed, add a bit more pasta water.
Remove from heat and adjust seasoning if required. Serve immediately, garnished with parsley. Pass additional Parmigiano Reggiano at table.
I love fish and chips with a big old tub of tartar sauce on the side and lots of French fries to dip in ranch dressing. Oh, and a couple of extra lemon wedges to squeeze over the fish. But fish and chips are not what I should be eating routinely. Unfortunately! Even if “the experts” recommend eating fish a couple times a week. Especially Alaskan salmon and cod. So, the cod part of fish and chips isn’t the problem. It’s the preparation and dipping components that are the culprits. So, I refrain as much as possible from partaking of this heavenly combination.
Instead, I have tasked myself with finding other tasty ways to incorporate seafood, especially fish containing omega-3 fatty acids (salmon, trout, sardines) and some shellfish (oysters, crab, mussels, and squid), into our diet. Shouldn’t be a problem really, because Mr. C. and I love most of the fresh and salt-water offerings found in the seafood display case of upscale markets. It’s just figuring out how to serve them in a healthy and imaginative way that causes any hesitancy.
So, when Mr. C. brought home 1½ pounds of steelhead trout the other day, and stated that he planned to lightly smoke it, I decided to look for another lovely way to serve this delicacy. I could have simply fixed Lightly Smoked Baked Steelhead Trout or Salmon (recipe on site), but I thought another preparation would make for a pleasant change. But I must say, either way you choose to prepare your salmon or trout, you are going to be happy with the results.
Either way, the fish is so darn tasty that you won’t miss tartar sauce or aioli in the least. And the preparation could not be easier.
And lest you think a pound and a half of fish is too much for just the two of us at one seating, you’re absolutely correct. We usually buy extra so that I can be creative with the planned overs. So, look for my recipe for Creamy Leftover Salmon Fettuccine coming to your very own computer in the near future. (And no, not a low calorie dish. But not as bad as you would expect!)
As always, find the joy in whatever you do. And keep creating delicious and wholesome dishes for yourself and your family to enjoy.
Peace and love to all.
1½ lb. steelhead or salmon filet, cut into serving sized pieces and lightly smoked*
2 T. unsalted butter
2 T. fresh lemon juice
1½ tsp. Dijon mustard
2 T. finely chopped fresh parsley
2 garlic cloves, finely minced
½ tsp. fine sea salt
freshly ground black pepper
Melt the butter in a small microwave safe bowl. Stir in the lemon juice, Dijon mustard, parsley, garlic, salt, and pepper. Lay the filets, skin side down, on a foil lined rimmed baking pan.
Slather the butter mixture over the top and down the sides of the salmon.
Bake in a pre-heated 325-degree oven for 12-15 min or until just cooked through and flaky. Don’t over-cook. (When the fish is done, it should register no more than 125 degrees on an instant-read thermometer. Or you can check for doneness by using a fork to pull back on a section of the thickest part of the filet. If the salmon is done, the flesh will look opaque and a knife will slide easily through the flesh.)
Remove from oven and let rest for about 2 minutes before serving.
*Mr. C. lightly smokes the steelhead or salmon for 30-45 minutes using alder chips. Then he takes the salmon out of the smoker and it’s up to me to do my magic.
For another wonderful recipe starring lightly smoked steelhead or salmon, see my sister-in-law Katie’s recipe for Lightly Smoked Steelhead Trout or Salmon on this site.
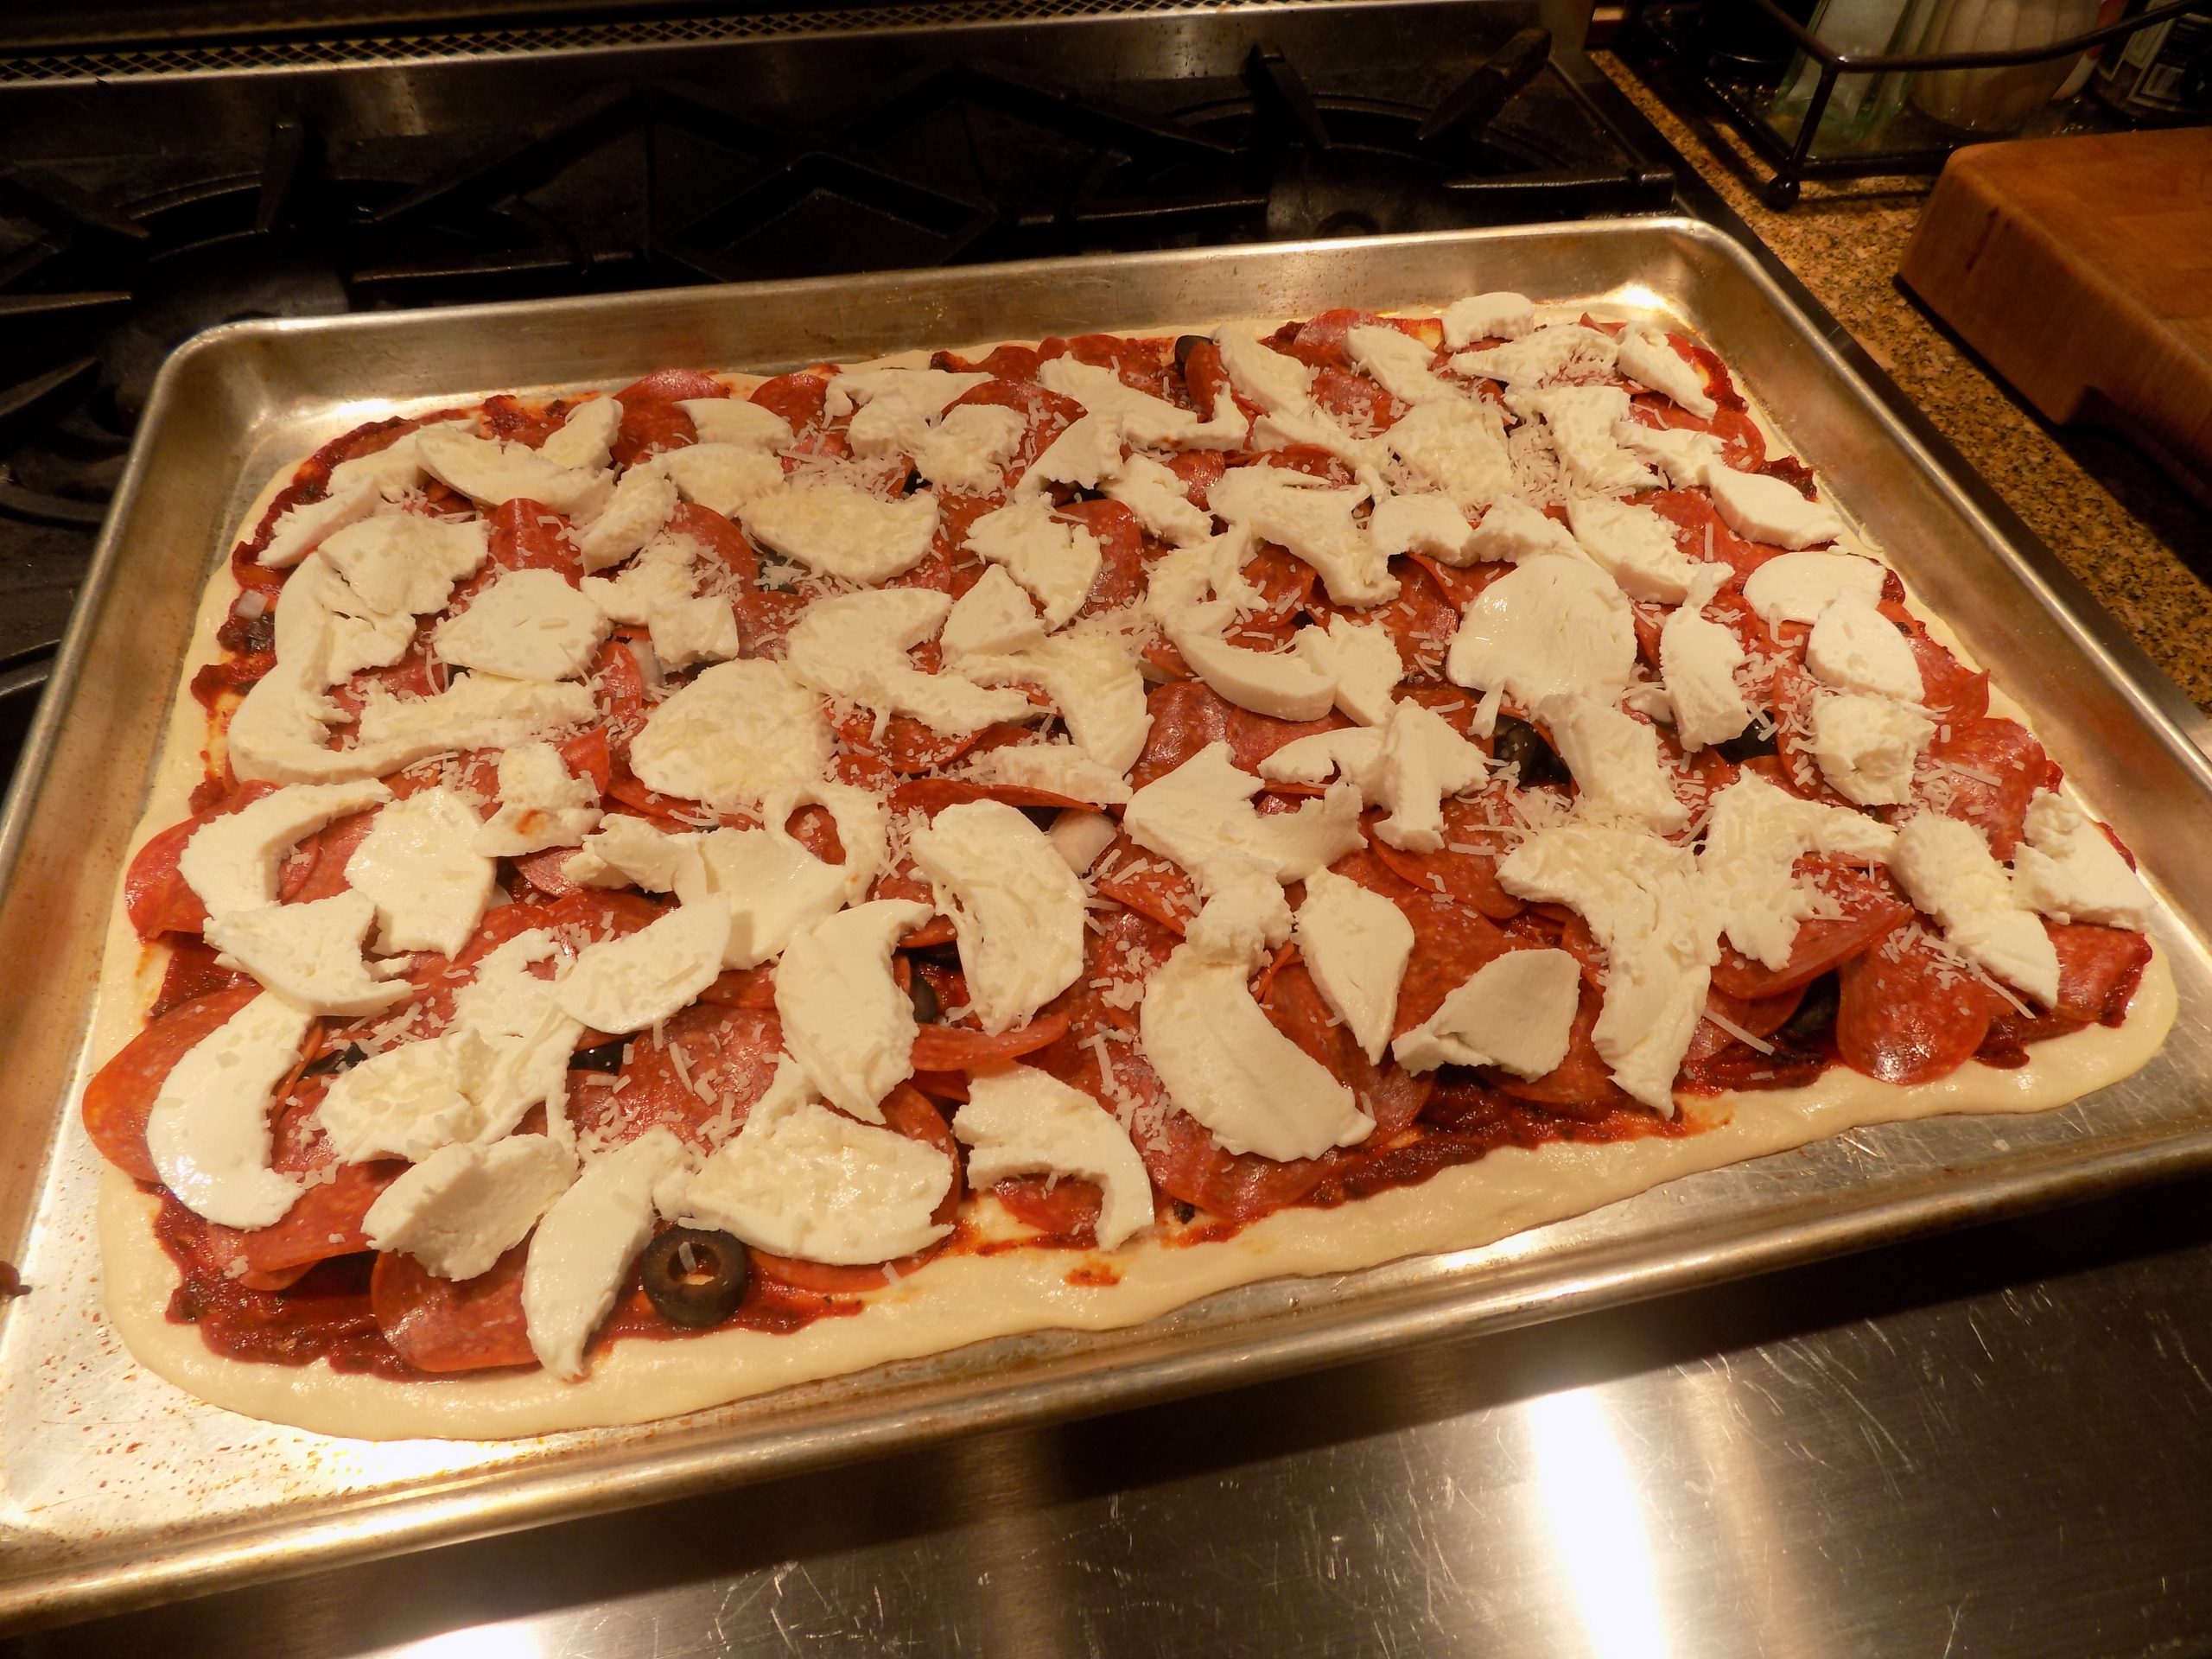
This time I topped our pizza with the pizza sauce recipe found below, 6-oz. pepperoni, 1 pound fresh mozzarella, 1/4 cup chopped onion, 3/4 can of sliced black olives, and a sprinkling of Parmesan cheese. Before the pizza was baked.
In my never-ending quest to develop the best homemade pizza crust imaginable, I once again succumbed to the siren call of the internet and found this basic recipe on the bobsredmill.com site. OK, I changed things up a bit by adding vital wheat gluten and made a huge change to the preparation instructions. So, I know what you’re thinking. “Patti, if you’re going to basically change a recipe, even not radically, why bother giving the original post any credit at all?” There are two reasons in this case. First, the bones of this recipe are not mine. And because I basically have a great deal of respect for this employee-owned American company. I purchase their products whenever possible. So, I would not cheat them out of any credit they so richly deserve, even if I have, in all good conscience, improved their original recipe! (Which I believe I have in this case.) Of course, they might object to my assessment. But all I can say to that is – tough noogies! (I’ve always wanted to write that!) But no disrespect for Bob’s Red Mill intended!
Anyway, this turned out to be a perfect pizza crust. Tender, chewy, tasty, easily worked – in all, everything you want in a pizza crust. OK, if you are a lover of thick crust, this probably isn’t the crust for you. But I am firmly in the thin crust camp. So be off with you if you like a thick, gooey, starchy, incredibly caloric base for your delicious sauce and toppings. This recipe is simply not the right one for you! But see you next time. I’m sure I have lots of other recipes on which we can establish common ground.
But back to this recipe. And, speaking of sauce, please check out my new (thanks to the simplyscratch.com site), Sun Dried Tomato Pizza Sauce recipe. (See recipe below.) This sauce is so incredibly delicious. But be warned. This is not a wimpy pizza sauce. This is a sauce with authority! So, spread lightly. The rest of course can happily reside in your freezer until the net time you get a hankering for homemade pizza. Just give it a try. Easy to prepare and the taste is unapparelled.
So, as always – keep preparing nutritious and delicious food for yourself and your family. And if you are a parent with children still at home, and not already doing so, find ways to engage your kids with cooking and baking projects. Most kids jump at the chance to help make cookies, for example. I know that’s how I first started becoming interested in culinary endeavors. And no, setting the table, clearing the table, loading and unloading the dish washer, that type of thing, is not going to pique their interest! Quite to the contrary, unfortunately. Kids need to help measure or stir something, or at the very least, lick the spoon. Whatever it takes to get them excited about being in the kitchen with you. Plus, it’s a great way to stay well connected with your kids. You never know what they might reveal as they are helping you build a cake. It’s such an unthreatening and intimate time together, that most of their kiddie defenses are down. Of course, you might learn something that you would rather not know. But you’re an adult. You can take it. And it’s always better to know, than not to know! (I think.) So, stay strong.
I’ve always told everyone that being a mother was the hardest job I ever held. But the job for which I will always feel the most pride. And even now, after decades of not being “mommy”, I still cherish the time I spent with my kids as they were evolving into wonderful adult human beings. (Sometimes my blessings overwhelm me. Today is one of those days.) Peace and love to all.
¾ c. warm water
1 tsp. active dry yeast
1½ tsp. kosher salt
1 tsp. vital wheat gluten flour
2 c. bread flour
extra virgin olive oil
Combine the water and yeast in the bowl of your stand mixer. Let sit for 5 minutes. Add the salt, gluten flour, and most of the bread flour.
Using your dough hook, mix/knead until the dough is smooth and elastic using as much flour as required. Pour a bit of oil in the bowl. Using your fingers and a stiff rubber spatula, form the dough into a ball. Make sure the entire ball is coated in oil. Cover and let rise until doubled in size, about 1 hour. Dough can be used immediately or refrigerated for up to 3 days.
Oil two 10-inch pizza pans or 1 large baking sheet. (I use my roughly 17½ x 13-inch half sheet pan.) Press the dough gently to stretch it into ¼-inch thick rounds or the 1 large, prepared pan. Top with favorite sauce and toppings. (See my recipe for Sun Dried Tomato Pizza Sauce below.)
Bake for 14-15 minutes in a pre-heated 500-degree oven or until the crust is golden-brown. Remove from oven and cool for 5 minutes.
SUN DRIED TOMATO PIZZA SAUCE
1 T. extra virgin olive oil
½ c. finely chopped onion
¼ tsp. kosher salt
freshly ground black pepper
pinch crushed red pepper flakes
2 cloves garlic, finely minced
2 T. finely chopped dried sun-dried tomatoes
2 tsp. dried oregano
1½ tsp. dried basil
2 T. dry white wine (like Pinot Grigio or Sauvignon Blanc)
1 (6-oz.) can tomato paste (preferably Italian)
¼ tsp. sugar
1 c. water
Heat a 10-inch skillet over moderate heat. When hot, add the olive oil, minced onion, salt, black pepper, and crushed red pepper flakes. Sauté until the onion is soft. Add the garlic, cook for 1 minute.
Stir in the sun-dried tomatoes, dried oregano, and dried basil. Cook for 1 minute. Add the white wine and simmer until absorbed. Whisk in the tomato paste, sugar, and the water. Reduce heat to medium-low and simmer the sauce for 10 to 15 minutes. Taste and adjust seasoning.
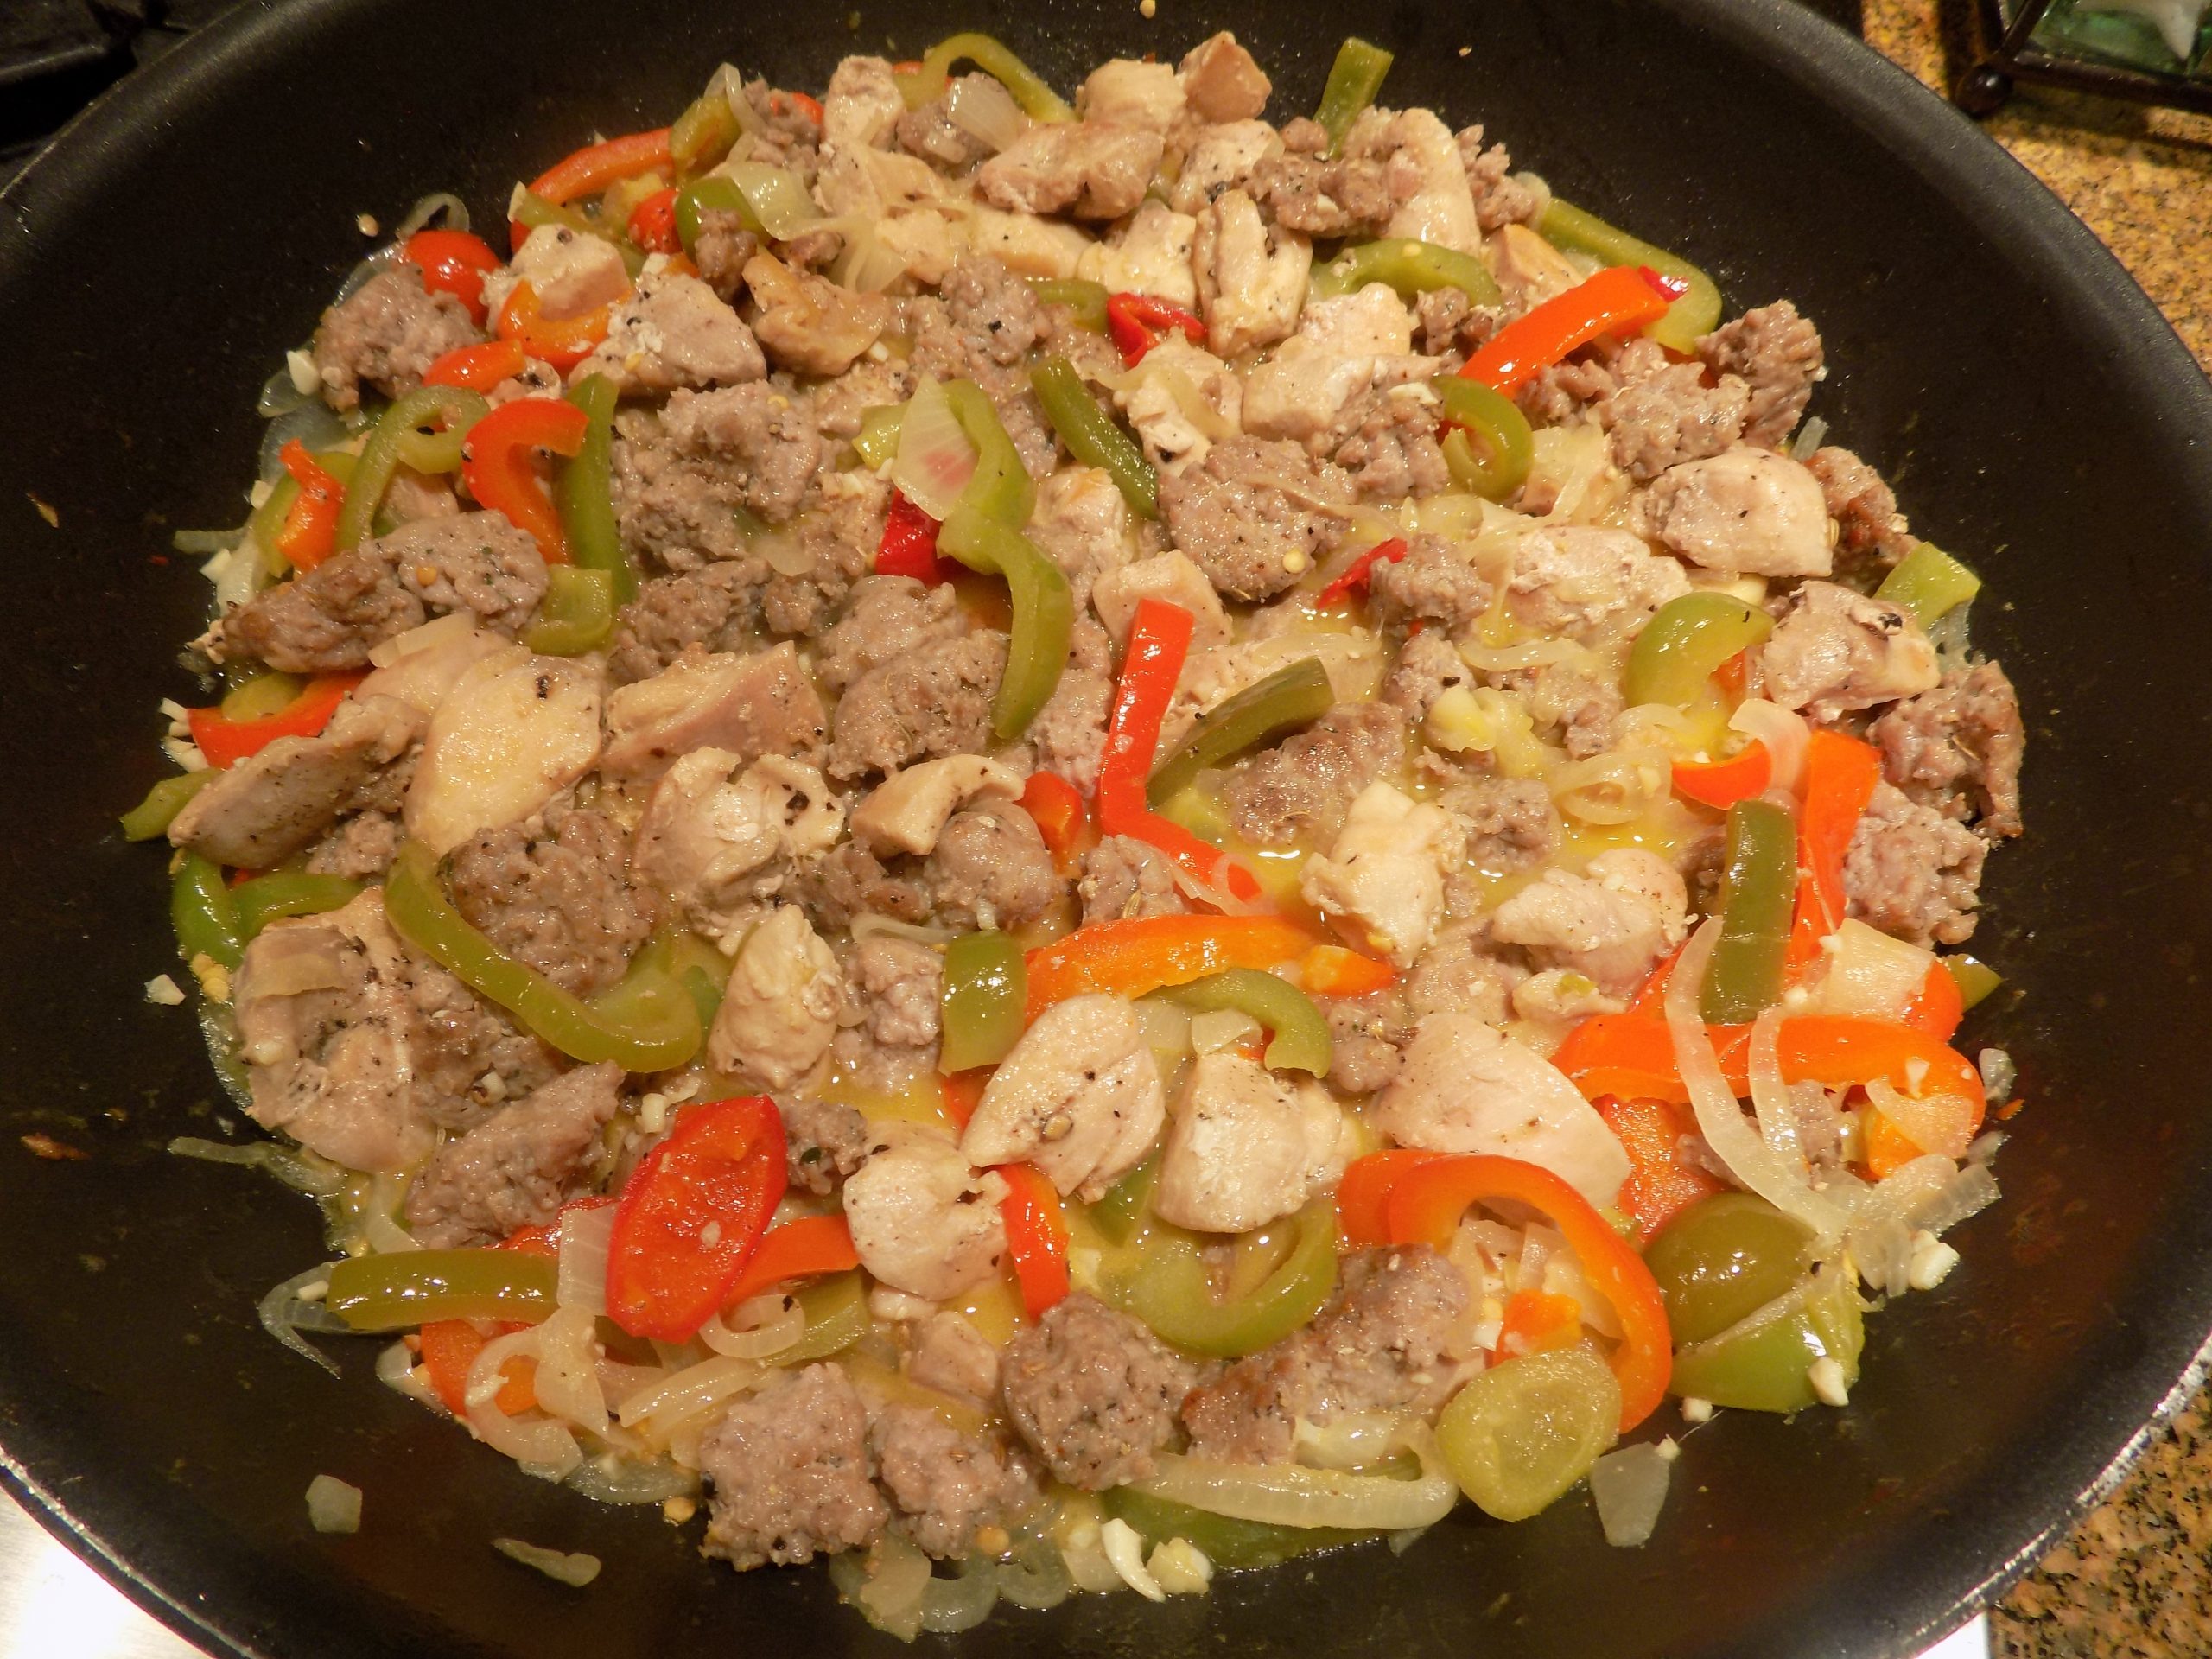
Chicken Scarpariello is a classic Italian-American dish featuring chicken thighs and sweet Italian sausage in a vinegary, sweet-sour pan sauce. In Italian “scarpariello” means shoemaker or shoe fixer. So, basically, chicken shoemaker-style. Kind of branded in the same way puttanesca was as “lady of the night” (roughly translated) but without the same cachet! Anyway, I made this dish last evening because everything I had read about it piqued my interest. Plus, I had never seen this dish listed on a menu. (At least to my best recollection, which isn’t saying much the older I get!). The description simply fascinated me. It screamed interesting and different. And I must say, my glommed together recipe was just that. Interesting and different. Oh, and also quite flavorful.
It took my taste buds a few bites before they fully accepted the new flavors. They had tasted a light vinegary broth before, but never quite like this. And especially in an Italian dish. But after a few more bites, they seemed to settle down and welcome the new flavors. As did Mr. C’s taste buds. His even more than mine!
So, I really debated whether I should post this recipe. (This dish being quite different after all!) But, after much deliberation and remembering that Mr. C. had seconds and was looking forward to leftovers, I decided in favor of sharing this recipe with you. But with full disclosure. This is probably not a dish your whole family would enjoy. Especially not young children. Mac and cheese, it is not. Spaghetti and meatballs, again no relationship. But, for anyone with a quest for new and different ways to use chicken or Italian sausage, and a sense of culinary adventure, please be my guest.
Would I make it again? Absolutely. Would it be something I could eat once a week? Nope! Is it a fast and easy dish to prepare? Not really. Would I serve it to guests? Yes, but I would have to know their tastes before making such a decision. (Kind of like serving oysters, lamb, or liver and onions. You must know your guests tastes pretty darn well before springing any of the above on them!)
Now, I hope I haven’t scared anyone away from trying this dish. I generally love surprises myself. But not at the expense of my pocketbook or use of my time. This is not a terribly expensive dish to prepare. But it ain’t cheap either. And it does take some time to prepare. But I truly would not have posted this recipe if I didn’t think it was worthy of both your time and your money. But it is different. So be prepared.
As always, keep thinking of cooking as an adventure. Because that’s exactly what it is. Sometimes you discover a new flavor sensation. Good or bad. Sometimes you unearth a fact like the genetic reason cilantro tastes like soap. (I’m in that group.) But most of the time you are simply keeping yourself and your family healthy by providing nourishing, delicious, and hopefully interesting meals. Bravo to you. And keep up the good work.
1 lb. bulk Italian sausage (I use sweet Italian sausage, but hot would work too)
1 sweet onion, halved then thinly sliced
2 bell peppers, sliced – your choice of color (I used 1 green, 1 red)
4 cloves garlic, finely minced
pinch crushed red pepper flakes
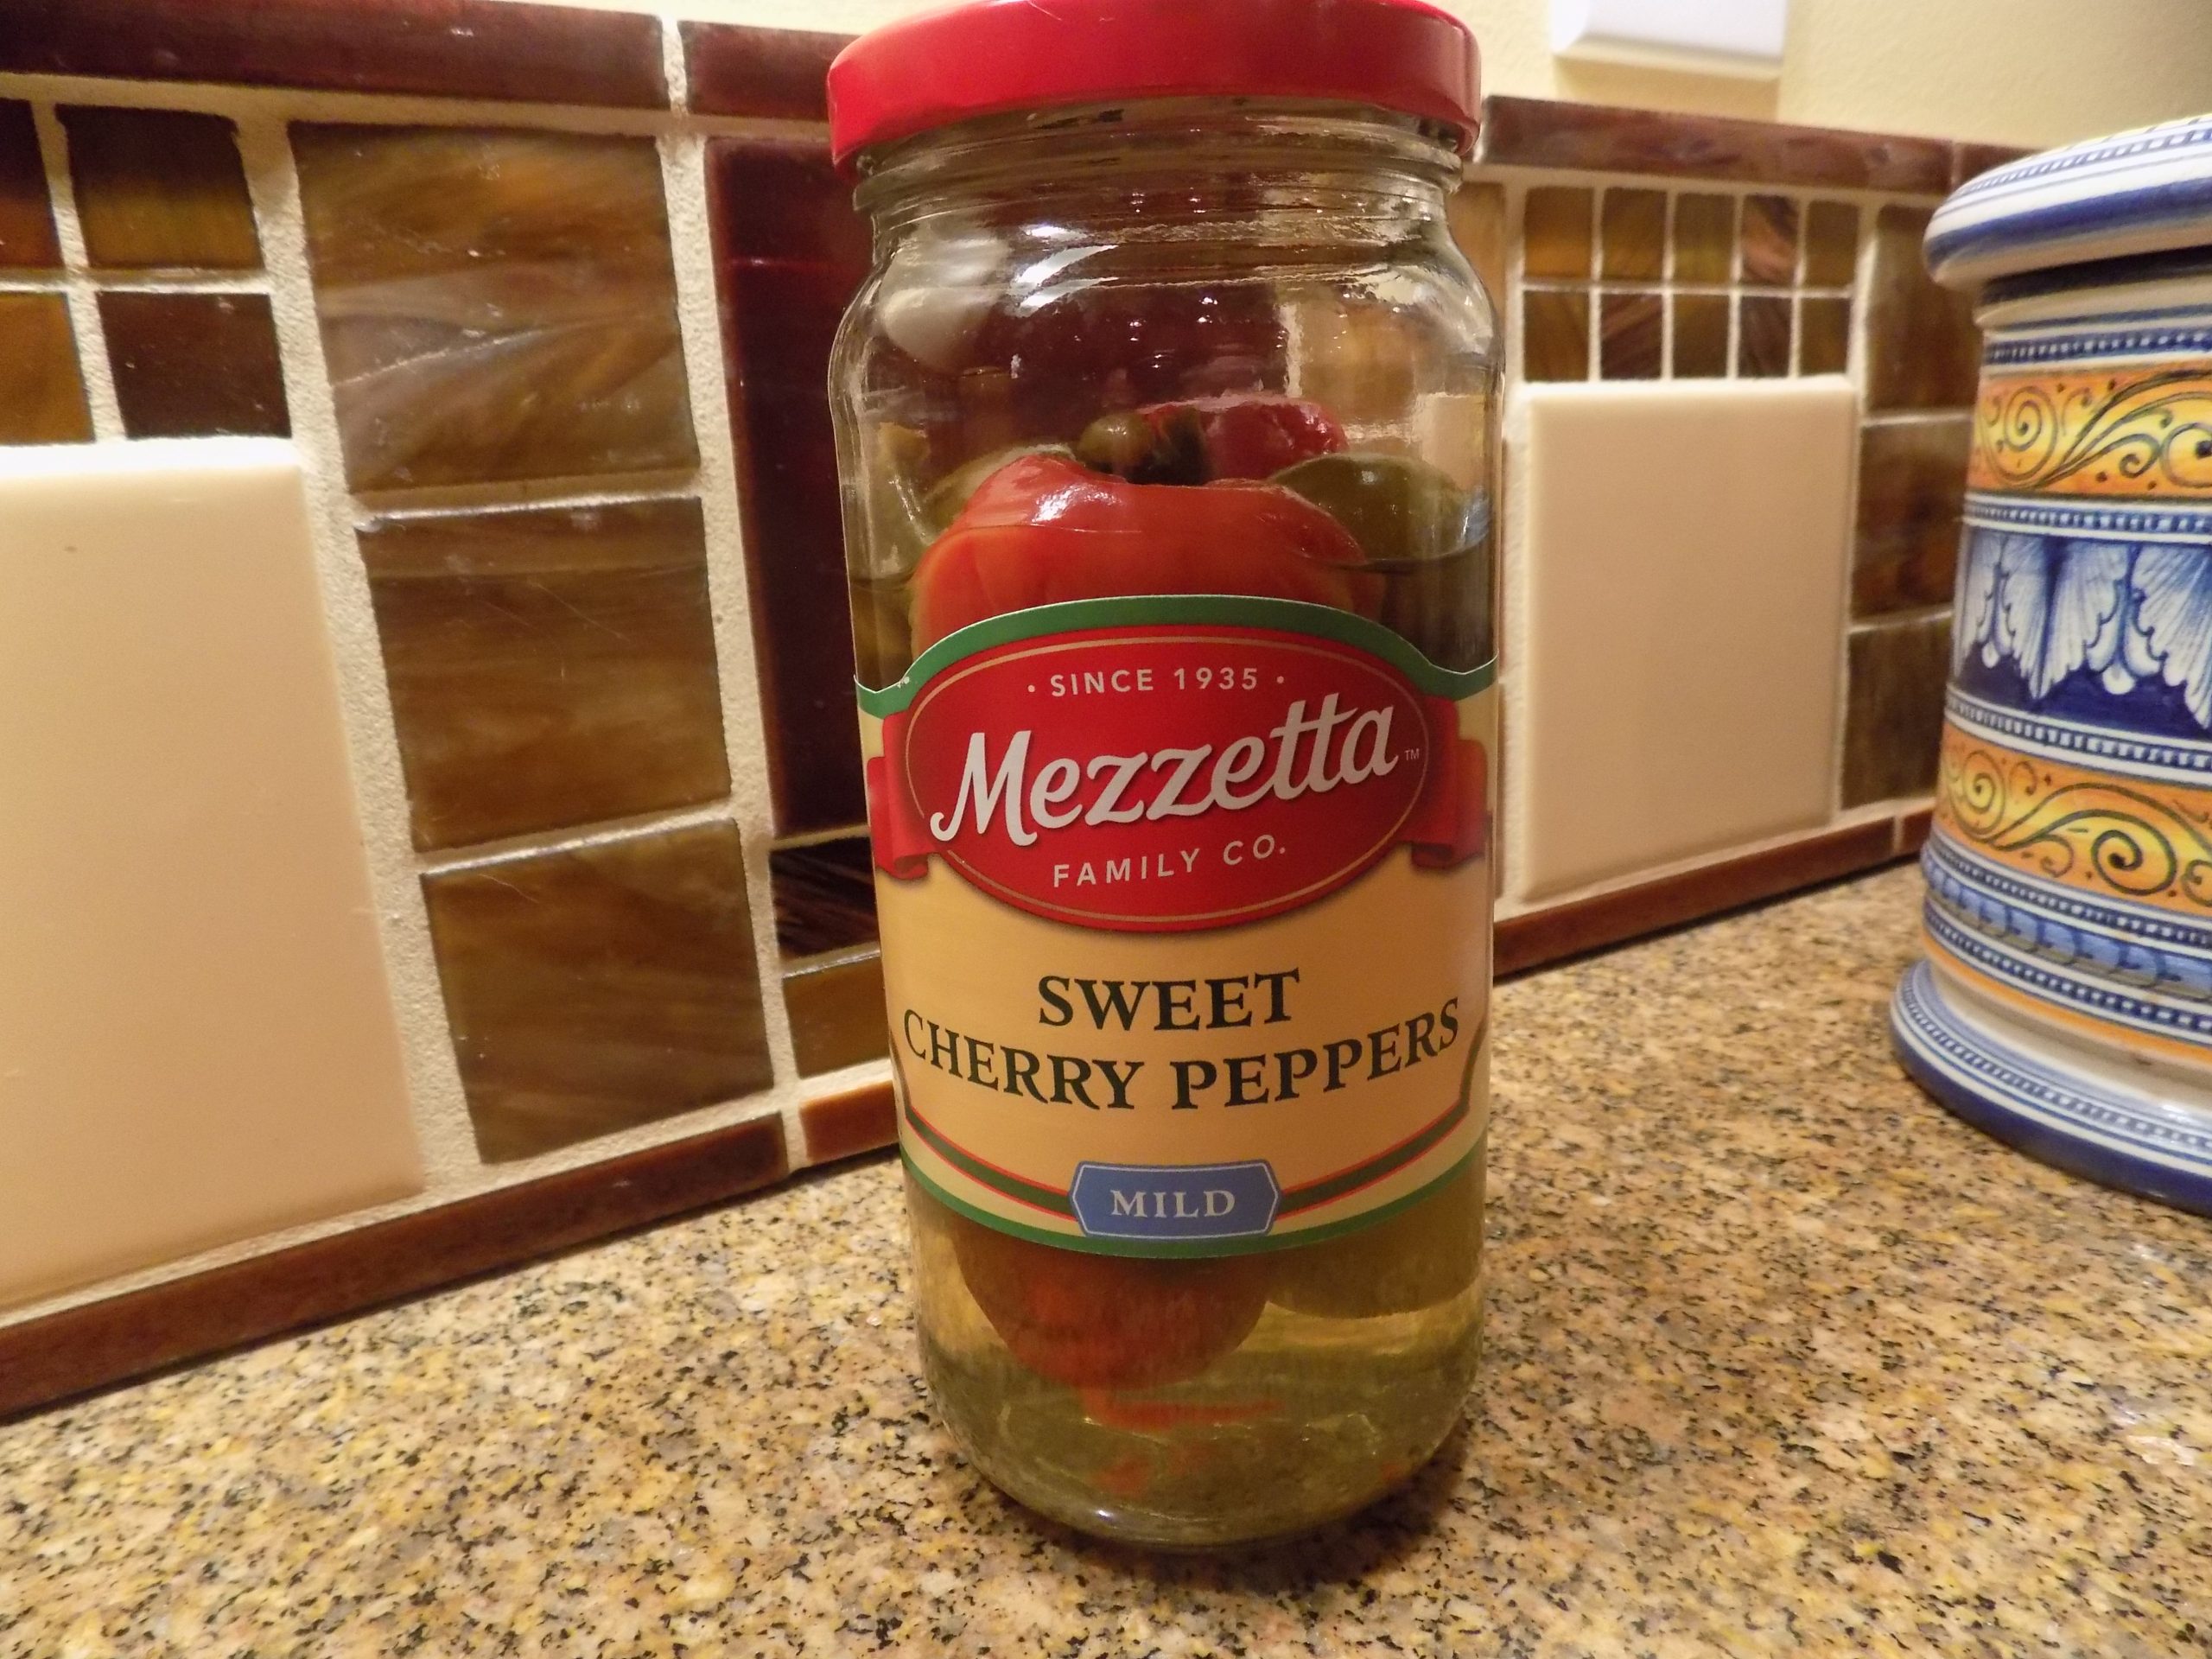
4 sweet cherry peppers*, sliced, plus 1 tablespoon brine (see picture below)
½ c. dry white wine
2 8-inch sprigs fresh rosemary, broken into 2-inch pieces
1½ c. chicken broth
2 T. fresh lemon juice
2 T. unsalted butter
Add olive oil to a very large sauté pan over medium high heat. Season the chicken liberally with salt and pepper. When the oil is hot, fry the chicken until browned on the outside and cooked through, about 5 minutes per side. Remove to a bowl.
Add the sausage to pan and brown. Don’t break the sausage up too much. You want nice big bite sized pieces of sausage in the final product. When cooked through, remove to bowl with the cooked chicken.
Add the chopped onion and bell peppers to the pan. Sauté over medium-low heat until the onion is just softened. Add the garlic, crushed red pepper flakes, sweet cherry peppers, brine, and rosemary. Cook for about 1 minute or until the garlic is fragrant. Add the white wine and cook until every bit of the liquid has evaporated.
Add the chicken broth to the skillet and cook over high heat, scraping up any browned bits, until reduced by half, about 5 minutes. Add the lemon juice and butter and stir until well combined.
Return the cooked sausage and chicken to the pan, cook for 2-3 more minutes or until the meat is hot.
Serve in shallow soup bowls with toasted baguette slices or Garlic Toast (recipe on site of course) to sop up the lovely juices.
Please note: Many of the recipes I perused contained potato. One recipe suggested oven roasted potatoes on the side. So that’s what I served with the dish last evening along with steamed green beans. See recipe below for Oven Roasted Potatoes.
*I used Mezzetta Sweet Cherry Peppers. I can actually find them at my local IGA!
On a rimmed baking sheet, toss potatoes with the olive oil. Then arrange in a single layer. Sprinkle the top side only with seasoned salt and plenty of black pepper.
Bake in a pre-heated 450-degree oven until tender and both sides are lightly browned, 20–30 minutes. Turn once during the baking time.