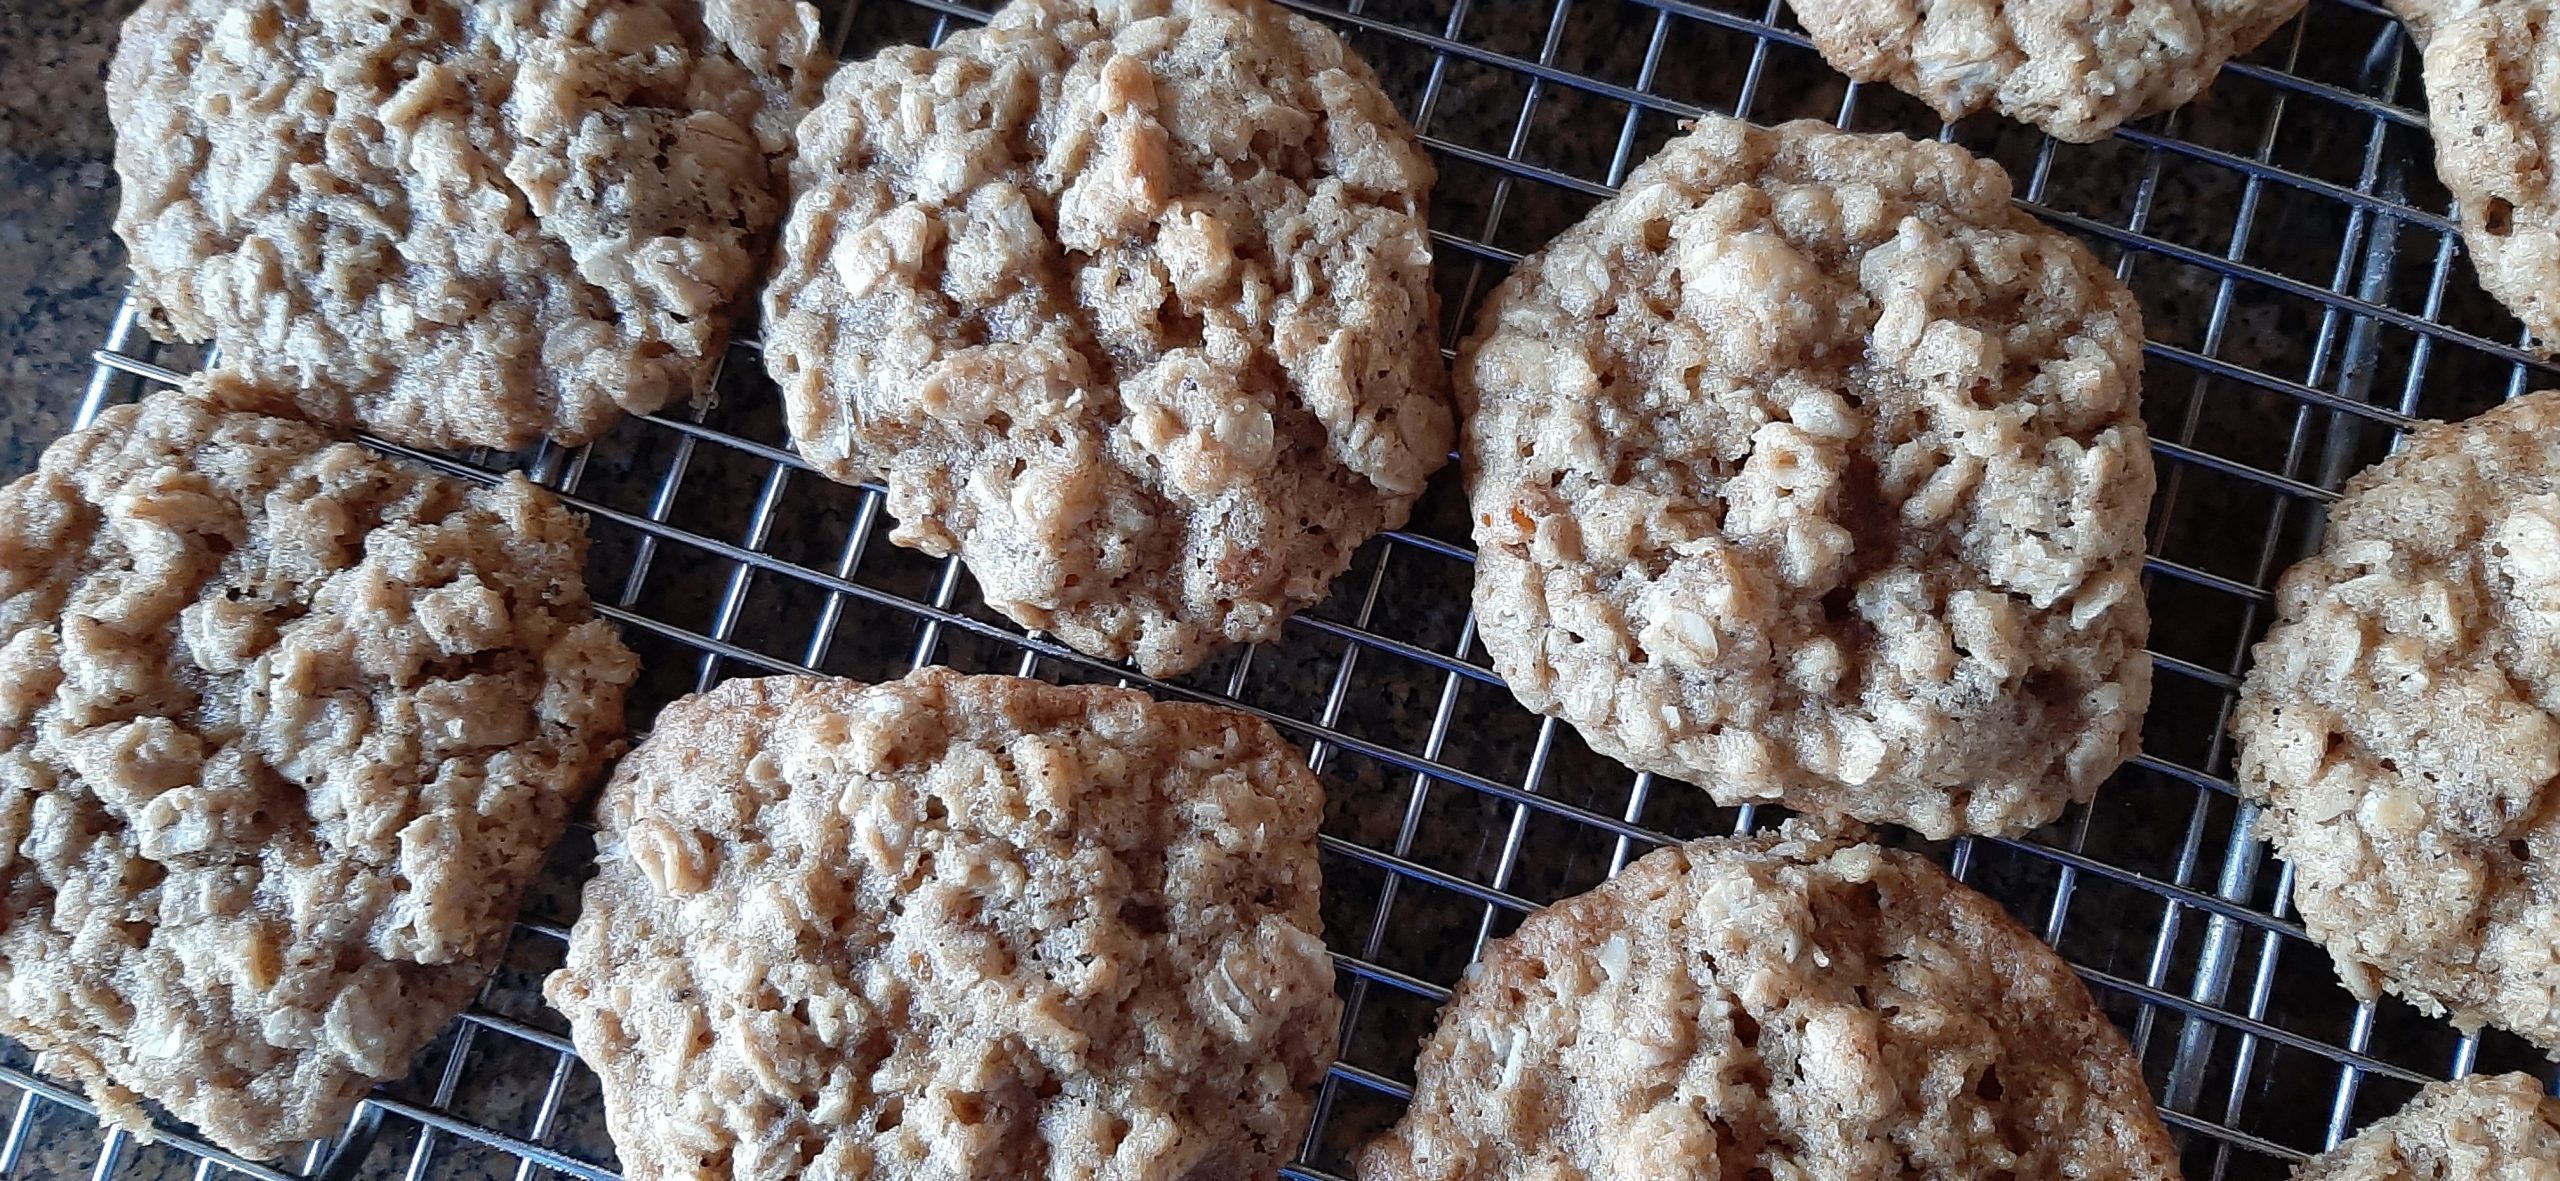
OK, I already have several recipes for oatmeal cookies on my blog including gluten free and a healthier version using monk fruit sweetener. Plus, a number of recipes that feature everything from chocolate chips, dried apples, to toasted coconut. But I had yet to make a simple, chewy oatmeal raisin walnut cookie including 3 of my favorite aromatic spices, cinnamon, nutmeg, and ginger.
So, when our good friend Todd explained to Andy that oatmeal cookies had healing qualities, I jumped at the chance to build Mr. C. a batch of these cookies along with a big old pot of chicken soup with dumplings when a few days ago he tested positive for Covid. (It had to happen sooner or later since we don’t live in a bubble.) (And yes, we are both fully vaccinated and take reasonable precautions against contracting the disease. But still it can happen and did. To both of us.)
Now, some might argue that oatmeal cookies do not actually help in restoring a person to good health. But surely no one can reason that eating a truly great oatmeal cookie doesn’t contribute to a person’s sense of well-being. At least anyone who has had the distinct pleasure of munching on a homemade oatmeal cookie straight out of the oven. And Mr. C. never got terribly sick. So, I will always believe that these cookies helped considerably in his speedy return to robust good health.
But please don’t think that you must wait for an illness to bake these cookies for yourself or your loved ones. You can simply think of them as preventive medicine!
But regardless of how you categorize these delectable treats, I suggest you make them at your earlies opportunity. They are truly lovely cookies and very easy to make.
Peace, love, and good health to all.
1 c. (2 sticks) unsalted butter, room temp.
1 c. brown sugar, packed
⅓ c. granulated sugar
2 lg. eggs
1 T. vanilla extract
1½ c. unbleached all-purpose flour, fluffed
¾ tsp. fine grain sea salt
1 tsp. baking soda
1 tsp. ground cinnamon
¼ tsp. ground nutmeg
¼ tsp. ground ginger
3 c. rolled oats (not instant)
2/3 c. golden raisins (if large, cut into smaller pieces)
2/3 c. chopped walnuts
Beat the butter in the bowl of your stand mixer until creamy. Add the brown and granulated sugars, then beat until fluffy, about 2 minutes. Beat in eggs until fully incorporated. Then, beat in the vanilla extract.
In a separate bowl, whisk the flour, salt, baking soda, cinnamon, nutmeg, and ginger together. Then stir in the oats. Add the flour mixture into the butter mixture until well combined. Then stir in the raisins and walnuts.
Using a #40 (1½ tablespoons, orchid tipped handle) ice cream scoop, drop balls of dough close together on a parchment paper lined baking sheet that can fir in your refrigerator. Refrigerate the dough balls for at least 2 hours. (But overnight is even better.)
When ready to bake, place the cold dough balls on parchment paper lined baking sheets 2-inches apart.
Bake in a pre-heated 350-degree oven until cookie edges turn a light golden brown, about 13-15 minutes. Centers will still be a bit soft, but they will firm up as the cookies cool. Leave on baking pan for about 3 minutes before transferring to finish cooling completely on a wire rack before storing in an airtight container at room temperature.
I guess I must be on a high calorie kick, because yesterday I published our dear friend Jim’s recipe for the most decadent and caloric way to serve spaghetti ever conceived. OK, undoubtedly not the most caloric and decadent recipe at one’s fingertips. But Perfectly Seasoned Spaghetti could certainly be a contender for that dubious honor. But boy oh boy is pasta tasty when prepared as directed in Jim’s recipe.
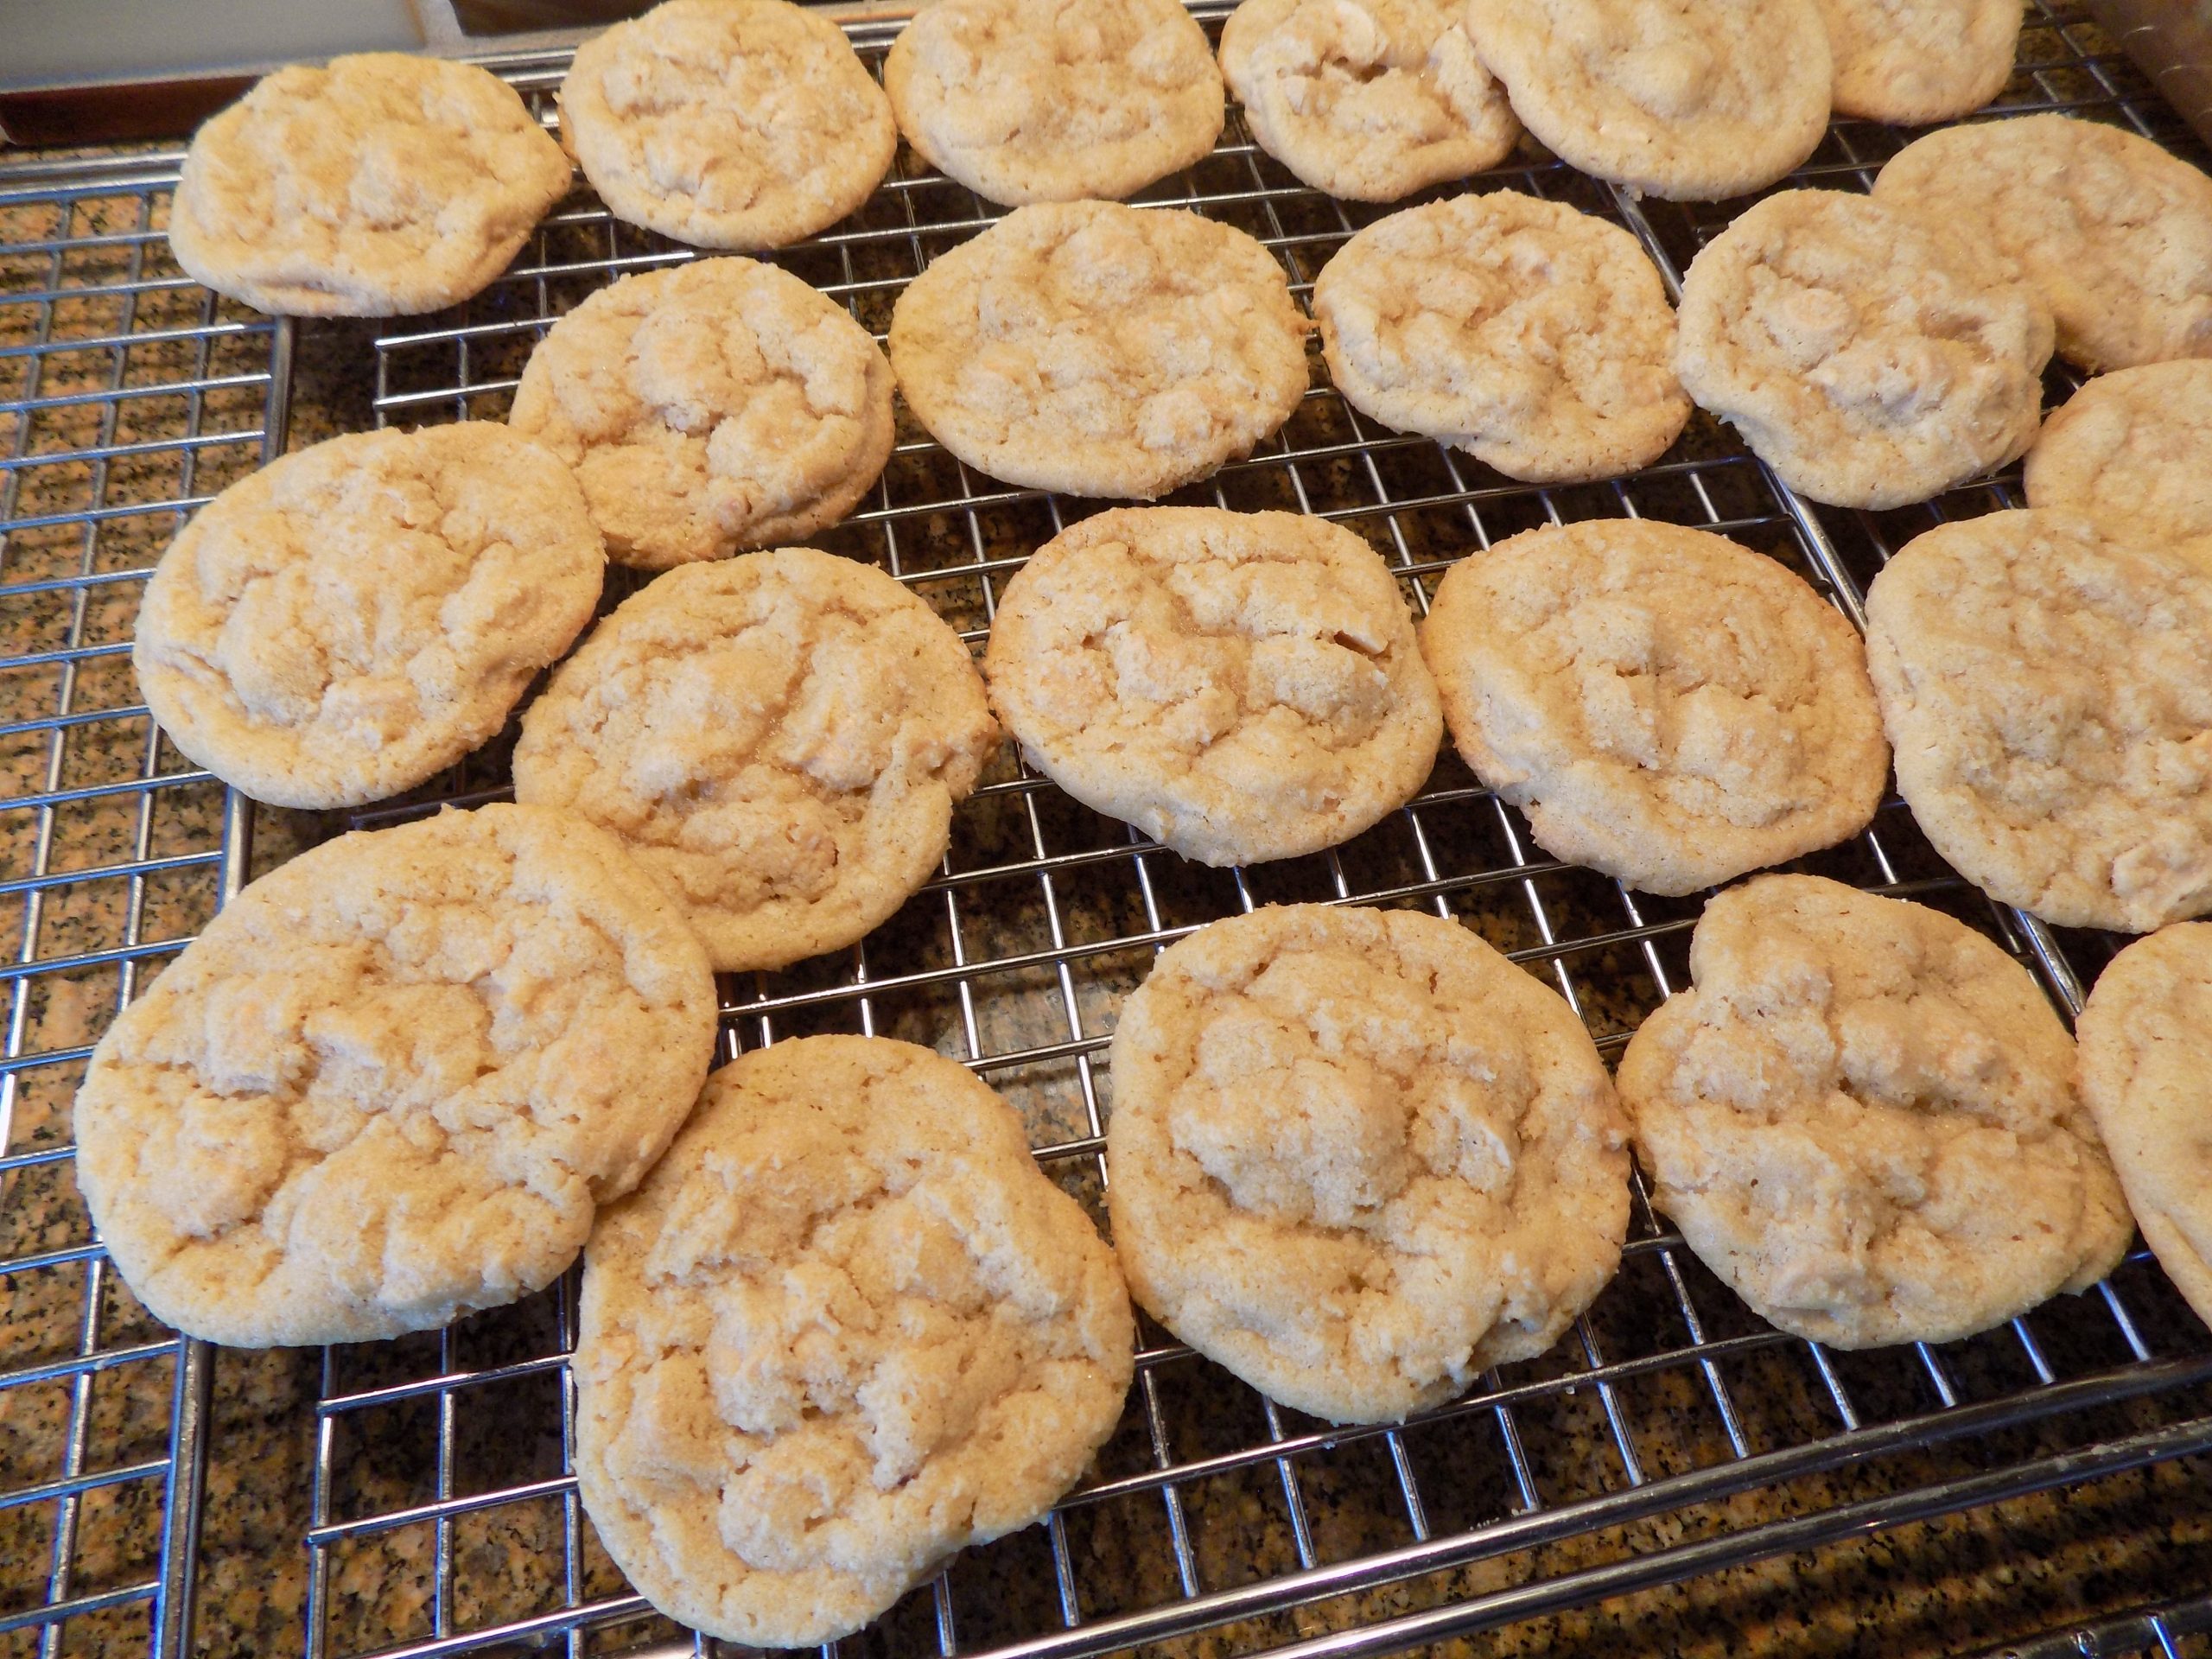
Speaking of caloric, decadent, and easy to prepare, I came up with this recipe for a different take on peanut butter cookies. I wanted to include peanut butter cookies in the goodie packages that I send to my kids every Christmas. But not the usual peanut butter cookies. I wanted soft cookies which also included a bit of crunch. What I didn’t take into consideration was the fact that some soft cookies do not stay fresh as long as hard cookies. (Think shortbread and biscotti.) Soft cookies pack well, but when kept for several days some can start to harden a bit, which to me is not a desirable attribute in a cookie.
Now I don’t want to scare you off making these cookies. Because these cookies are yummy when fresh. I just feel duty bound to tell you that if longevity in a cookie is what you are after, this is probably not the peanut butter cookie recipe for you. But if you want a really lovely peanut butter cookie to serve for afternoon tea or as a light dessert, these cookies would be perfect. Or if you have a family that can work their way through a batch of cookies in no time at all, by all means give this recipe a try. They really are delicious cookies.
Well, it’s semi-sunny outside. Mr. C. is happily reading his book. Miles is sleeping in the cat bed on Mr. C’s desk. His brother Max is sleeping at the foot of our bed, and I am finishing up this post. In other words, all’s right in our world.
Now if I could only come up with what to serve for dinner………
Peace and love to all.
1 c. (2 sticks) unsalted butter, room temperature
1 c. granulated sugar
1 c. brown sugar, packed
2 lg. eggs
2 tsp. vanilla
3 c. unbleached all-purpose flour, fluffed
1 tsp. baking soda
½ tsp. baking powder
1 tsp. kosher salt
1 c. peanuts
1 (10-oz.) pkg. peanut butter chips
Cream the butter and sugars together until soft. Add the eggs and vanilla; beat until fluffy.
In a separate bowl whisk the flour, baking soda, baking powder, and salt together. Add to the butter mixture and beat just until combined. Add the peanuts and peanut butter chips; mix well.
Using a #40 (1½ tablespoons – orchid colored end) ice cream scoop, plop cookies on a parchment paper lined baking sheet. (They can be close together at this point because they should spend several hours in the fridge.*) When you bake them place them 2-inches apart.
Bake in a pre-heated 375-degree oven for approximately 13-15 minutes. Take them out when they are just barely starting to turn color and let sit on the baking pan for 2 minutes before removing to a cooling rack. Store in an airtight container.
Note: DO NOT OVERBAKE THESE COOKIES. They will not look done when you remove them from the oven. That is exactly how they should look!
And these cookies are best eaten within a couple of days. And believe me, that will not be a problem. The problem will be not devouring them within 24 hours!
* The colder and more solid the butter is, the less the cookie will spread. Plus, flour contains naturally occurring enzymes, which break down as the dough chills, leading to increased browning. The sugar in the dough absorbs the moisture from the flour, causing the cookie to brown and caramelize. Refrigerating the dough allows the flour to fully hydrate and also helps to make the cookie dough firmer.
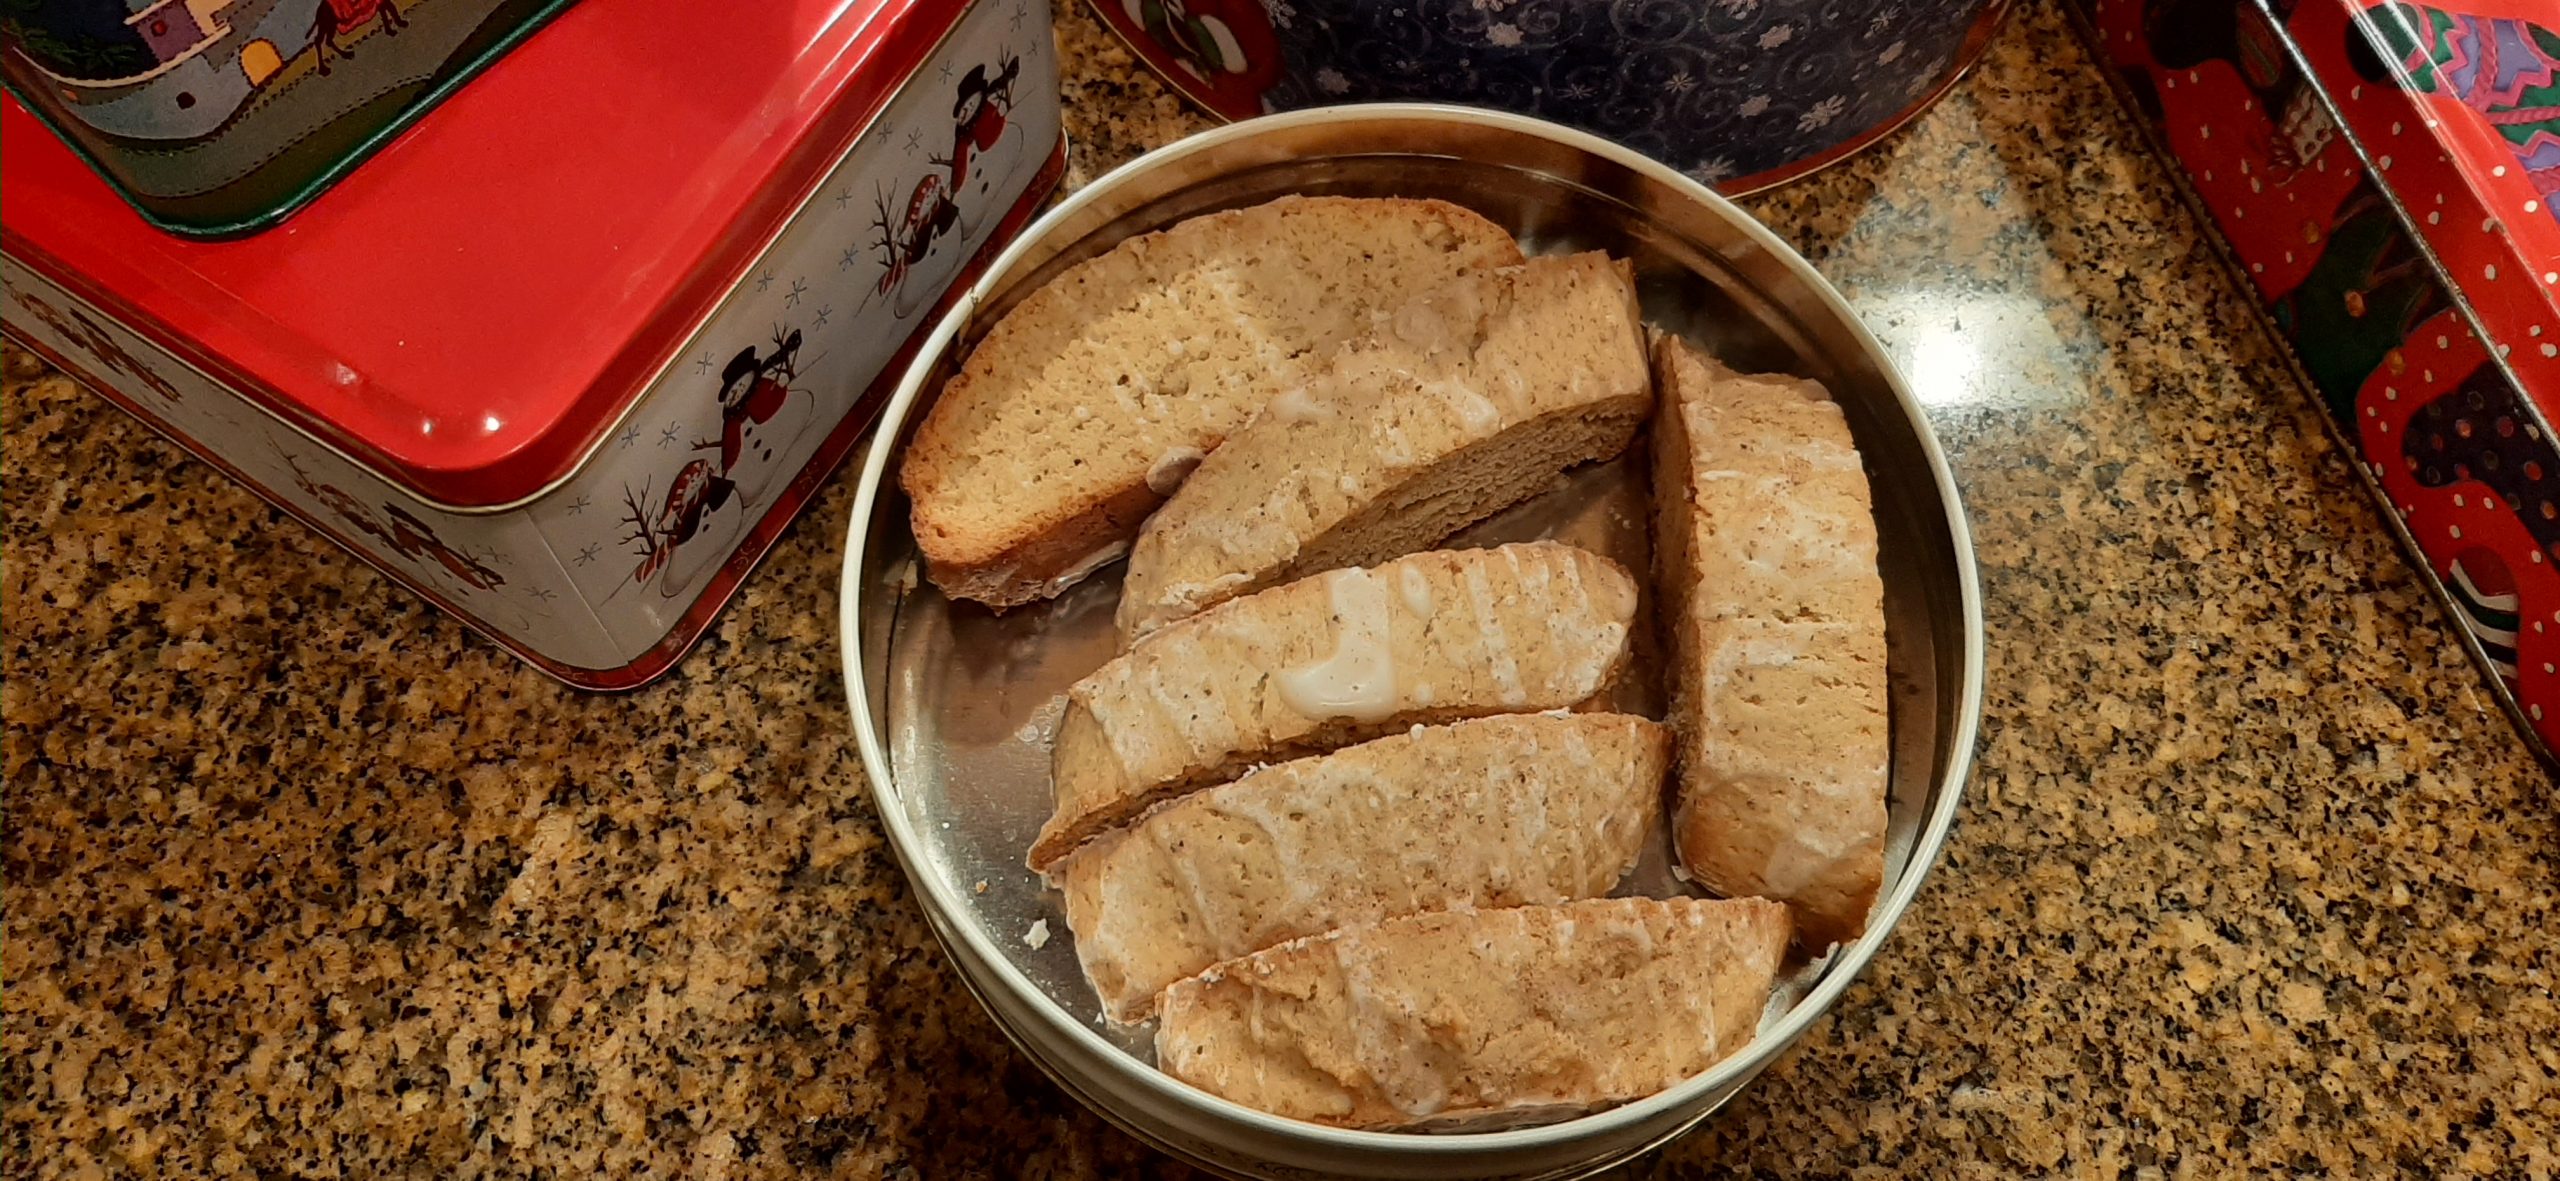
Since eggnog is a favorite of my husbands, and for him Christmas just isn’t the same without a bottle of the stuff in our refrigerator starting around Thanksgiving, I thought an eggnog flavored biscotti might just be a perfect treat for him. So, I went online to find a recipe. What I found were recipes that contained eggnog as an ingredient. And I thought to myself, what a waste of good eggnog when all the flavors of eggnog can so easily be duplicated by ingredients I always have on hand. Plus, then if he wanted eggnog biscotti in July for example, I wouldn’t have to build some homemade eggnog just for this recipe. I could basically make these delightful biscotti any old time I chose. (Or Mr. C. ever so nicely requested.)
So, the recipe below is what I came up with. And if I do say so myself, the biscotti were (they’re all gone now) delicious. And quite different from all the other biscotti I make. And yes, we love biscotti, so you will find several recipes on this site. They are all fabulous, and very easy to make.
Well, that’s all for today. Mr. C. has a rehearsal this evening, so dinner needs to be on the table by 5:30, which is much earlier than when he doesn’t have a rehearsal or gig. Usually, we get around to eating dinner around 7:00 pm. Then it’s reading time for me and reading and/or practicing the piano for Andy. In other words, very sedentary after dinner pursuits, which are not only consistent with our ages but also our inclinations. And doesn’t that make us lucky people.
May you also be able to follow your inclinations and enjoy some quality down time each and every day.
And as always, peace and love to all.
For the biscotti:
½ c. (1 stick) unsalted butter, room temp.
1 c. granulated sugar
2 eggs
½ c. whole milk
1 tsp. dark rum
1 tsp. cognac
1 tsp. vanilla paste or extract
3½ c. unbleached all-purpose flour, fluffed
2 tsp. baking powder
2 tsp. ground nutmeg
½ tsp. ground cinnamon
½ tsp. kosher salt
Line a large baking sheet with parchment paper.
In the bowl of your stand mixer, combine butter, sugar, and eggs until well blended. Mix in milk, rum, cognac, and vanilla bean paste.
In a separate bowl, whisk the flour, baking powder, nutmeg, cinnamon, and salt together. Mix the flour mixture into the butter mixture until well blended.
Roughly divide dough in half. Using buttered hands, shape each dough half into a long roll, approximately 14″ long. Carefully place rolls on prepared baking sheet, about 3-inches apart. With your fingers, lightly flatten each roll so that they are approximately ¾-inch thick.
Bake in a pre-heated 350-degree oven for 25 minutes or until golden brown. Remove from oven and place pan on wire rack for about 15 minutes. Carefully move the logs to a cutting board and cut diagonal slices (approximately ¾-inch thick).
Place slices, cut side down, back on original baking sheet. Bake for 10 minutes. Turn slices over and return to oven to bake for another 10 minutes or until firm to the touch and lightly browned. Remove from oven and transfer to wire racks to cool completely before glazing.
For the glaze:
1 c. powdered sugar
1 tsp. rum
tiny pinch cinnamon
tiny pinch nutmeg
2–3 T. whole milk
In a small bowl, whisk the powdered sugar, rum, cinnamon, nutmeg, and 2 tablespoons milk together. If needed, add more milk to achieve desired consistency.
Place completely cooled biscotti pieces, top side up, about a half inch apart on your large baking sheet. Drizzle the glaze over the biscotti. (You may not use it all. That’s OK.) Allow glaze to harden before storing biscotti in an airtight container.
I had so much fun this past December making biscotti to give to relatives and friends for Christmas. And if truth be known, biscotti is so darned easy to make, I felt a bit guilty not spending more time on these edible gifts. I quickly got over any remorse. Because dunking a biscotti in your morning coffee or tea or softening one of these Italian cookies in Vin Santo* as an after dinner or late evening treat, is just about as close to actually being in Italy as you can get. And isn’t even a temporary reminder of the joy associated with visiting Italy one of the greatest feelings on earth. At least it is for us.
So, being able to share these twice baked treasures with our friends and family helped make the holidays extra special for me.
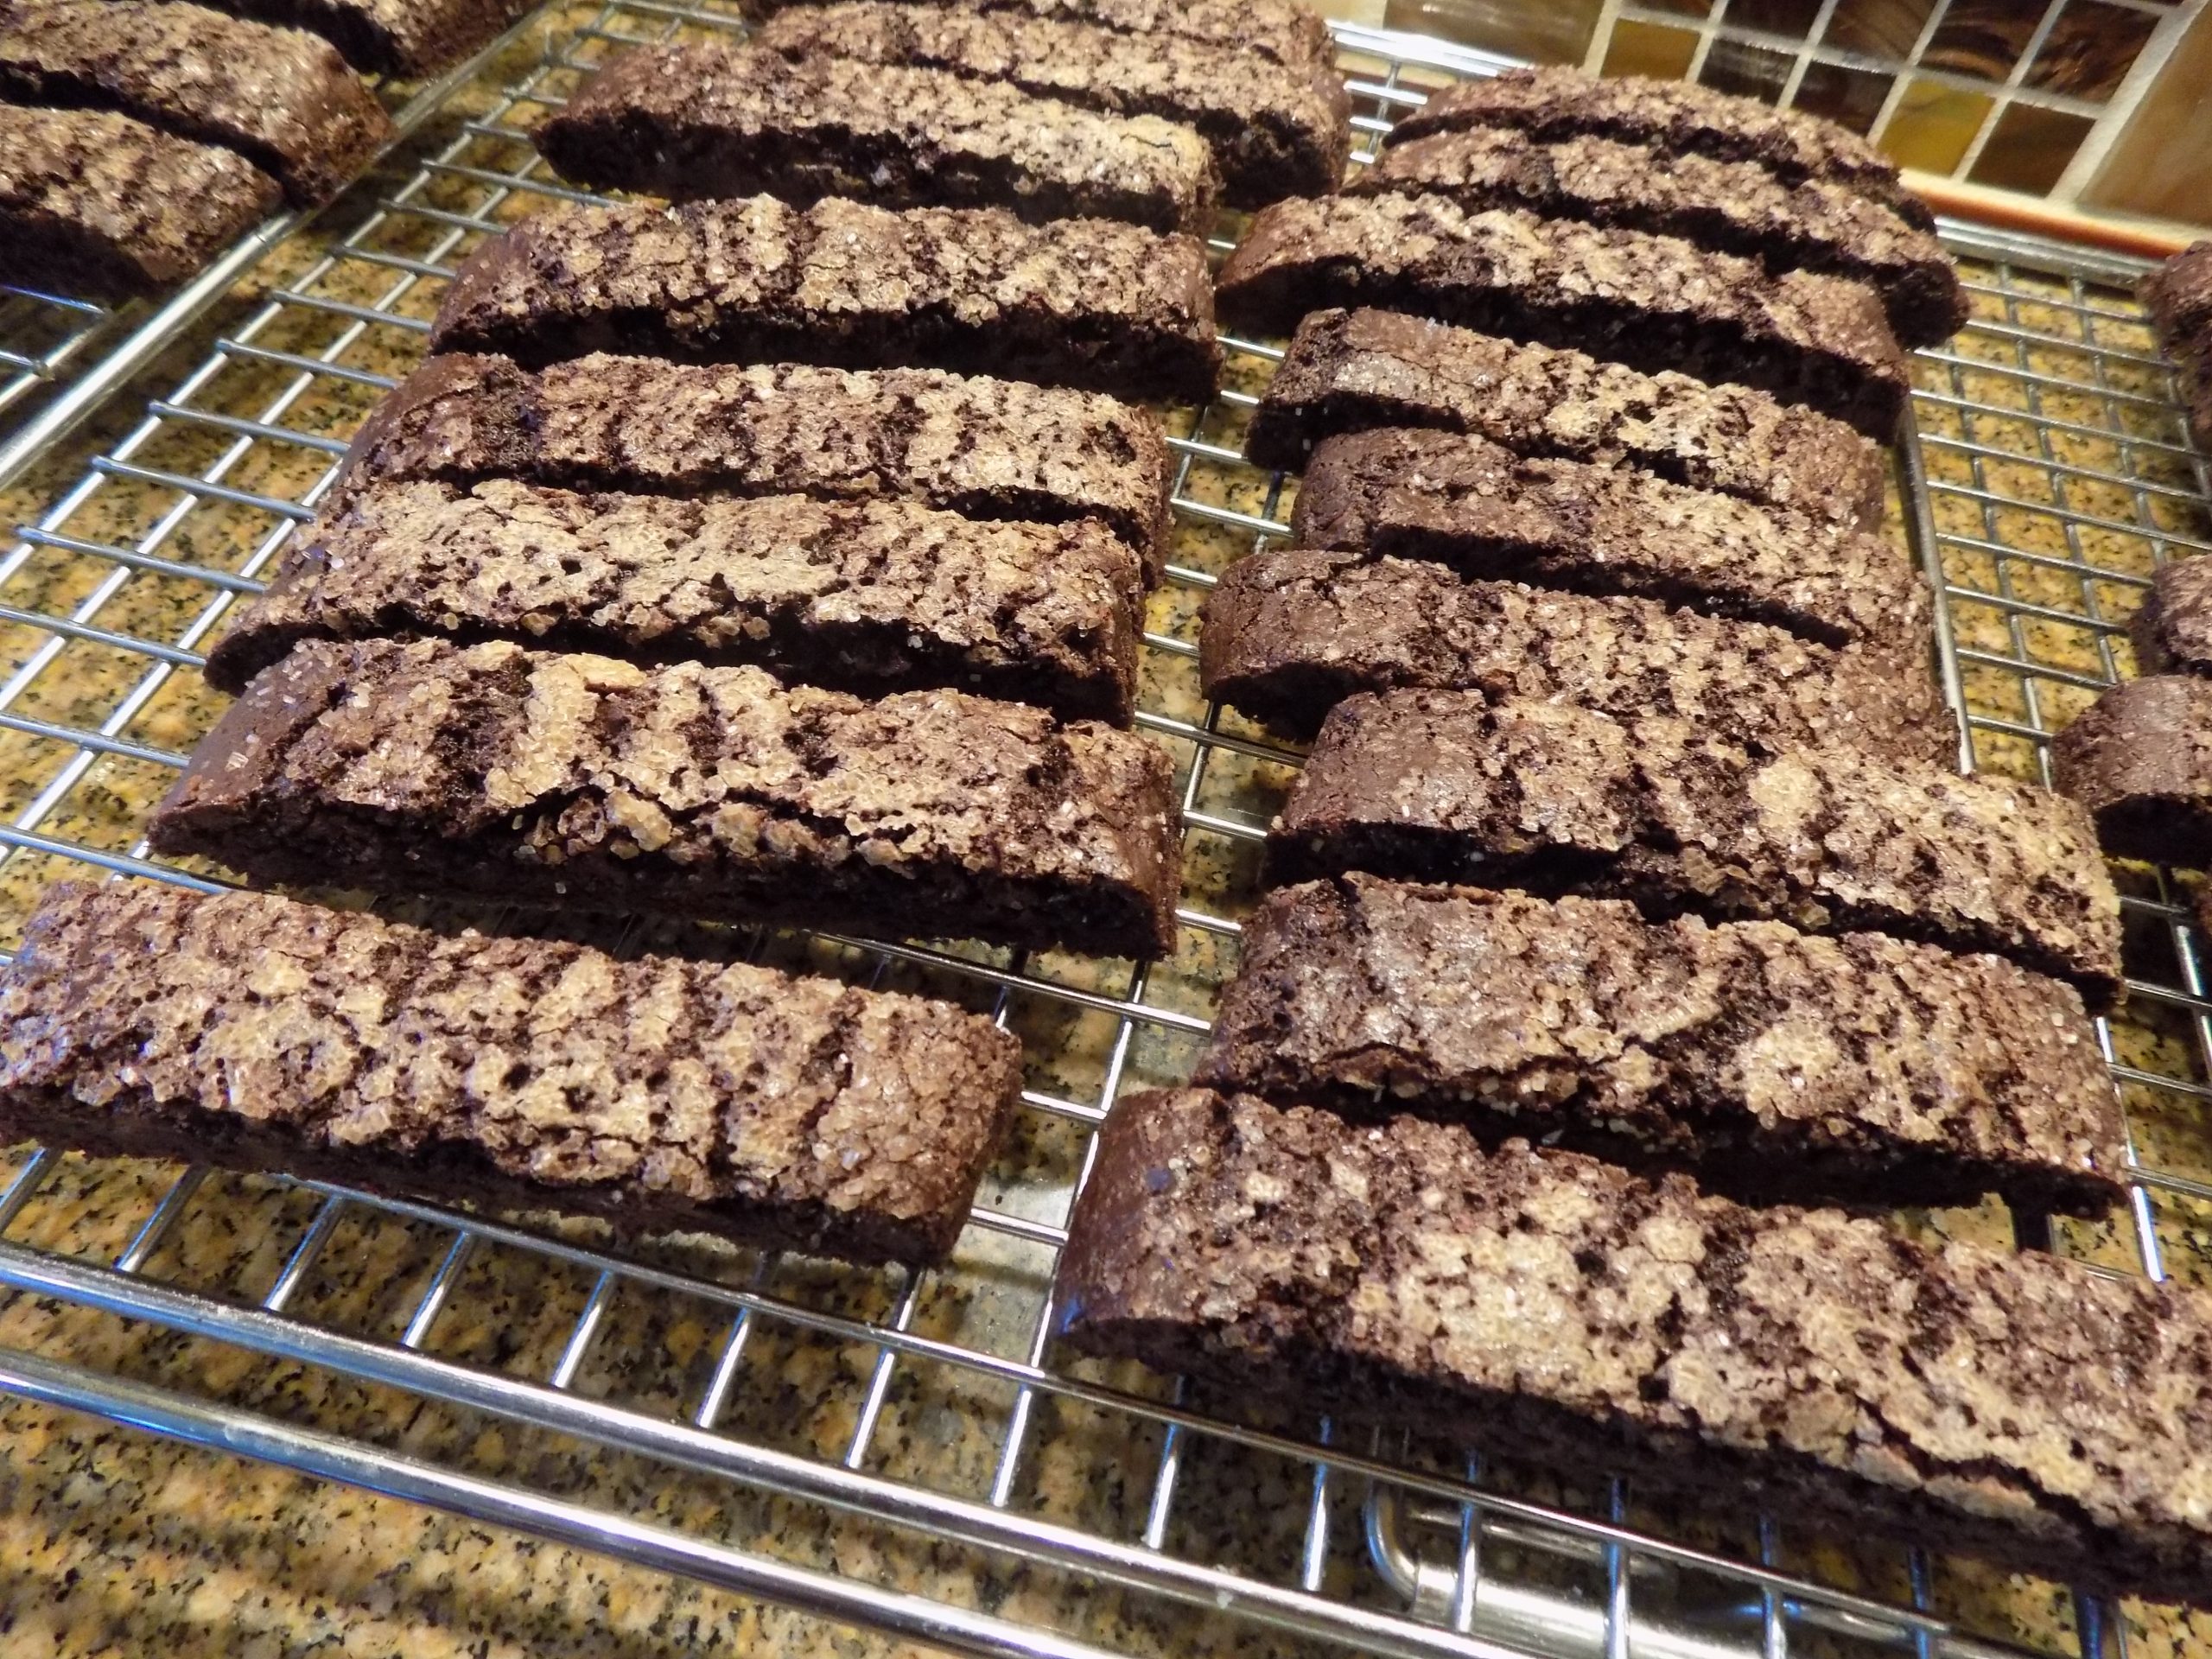
Now, something you should know. These are very flavorful cookies. Nothing bland or quiet about their flavor. And probably a cookie your children would not appreciate. But for a chocolate lover, these are perfect.
So, next time you need an easy to prepare cookie that will make you shout yum, this is the recipe for you. I found the recipe on the cooking.nytimes.com site. I did make a couple of changes, but the inspiration was all on the Union Square Café’s Chocolate Biscotti via Alex Witchel.
Well, it’s rainy here in NW Washington. But we really have nothing to complain about. California is being hit with horrendous weather, as are other parts of the country. So, a bit of inconvenient rain is just an accepted consequence of living in this natural paradise. I can still see Barnum Point (here on the island), Port Susan Bay, and the low foothills as I write. But the snowcapped mountains are hidden under low hanging clouds. Hopefully the cloud covering is dumping snow all over the Cascades. Our state can use all the water reserves we can get.
As always, peace and love to all.
2 c. unbleached all-purpose flour, fluffed
¾ c. plus 2 T. good cocoa powder
1 tsp. fine sea salt
1 tsp. baking soda
1 tsp. espresso powder (I use Medaglia D’oro instant espresso)
4 T. (½ stick) unsalted butter, room temperature
1¾ c. lightly packed brown sugar
⅓ c. granulated sugar
1 T. vanilla extract
4 lg. eggs, divided
1 rounded c. mini chocolate chips
1 T. water, for egg wash
2 T. raw sugar
Line a large baking sheet with parchment paper.
In a mixing bowl, whisk the flour, cocoa powder, salt, baking soda, and espresso powder together; set aside.
Using a heavy-duty electric mixer, cream the butter, brown sugar, and granulated sugar together for 3 to 5 minutes at medium speed. Add the vanilla extract. Mix for 10 seconds. Add 3 of the eggs, one at a time, mixing well after each addition. Add the flour mixture and mix at low speed until dough comes together, 1 to 2 minutes. Add the mini chocolate chips and mix just until chips are evenly incorporated.
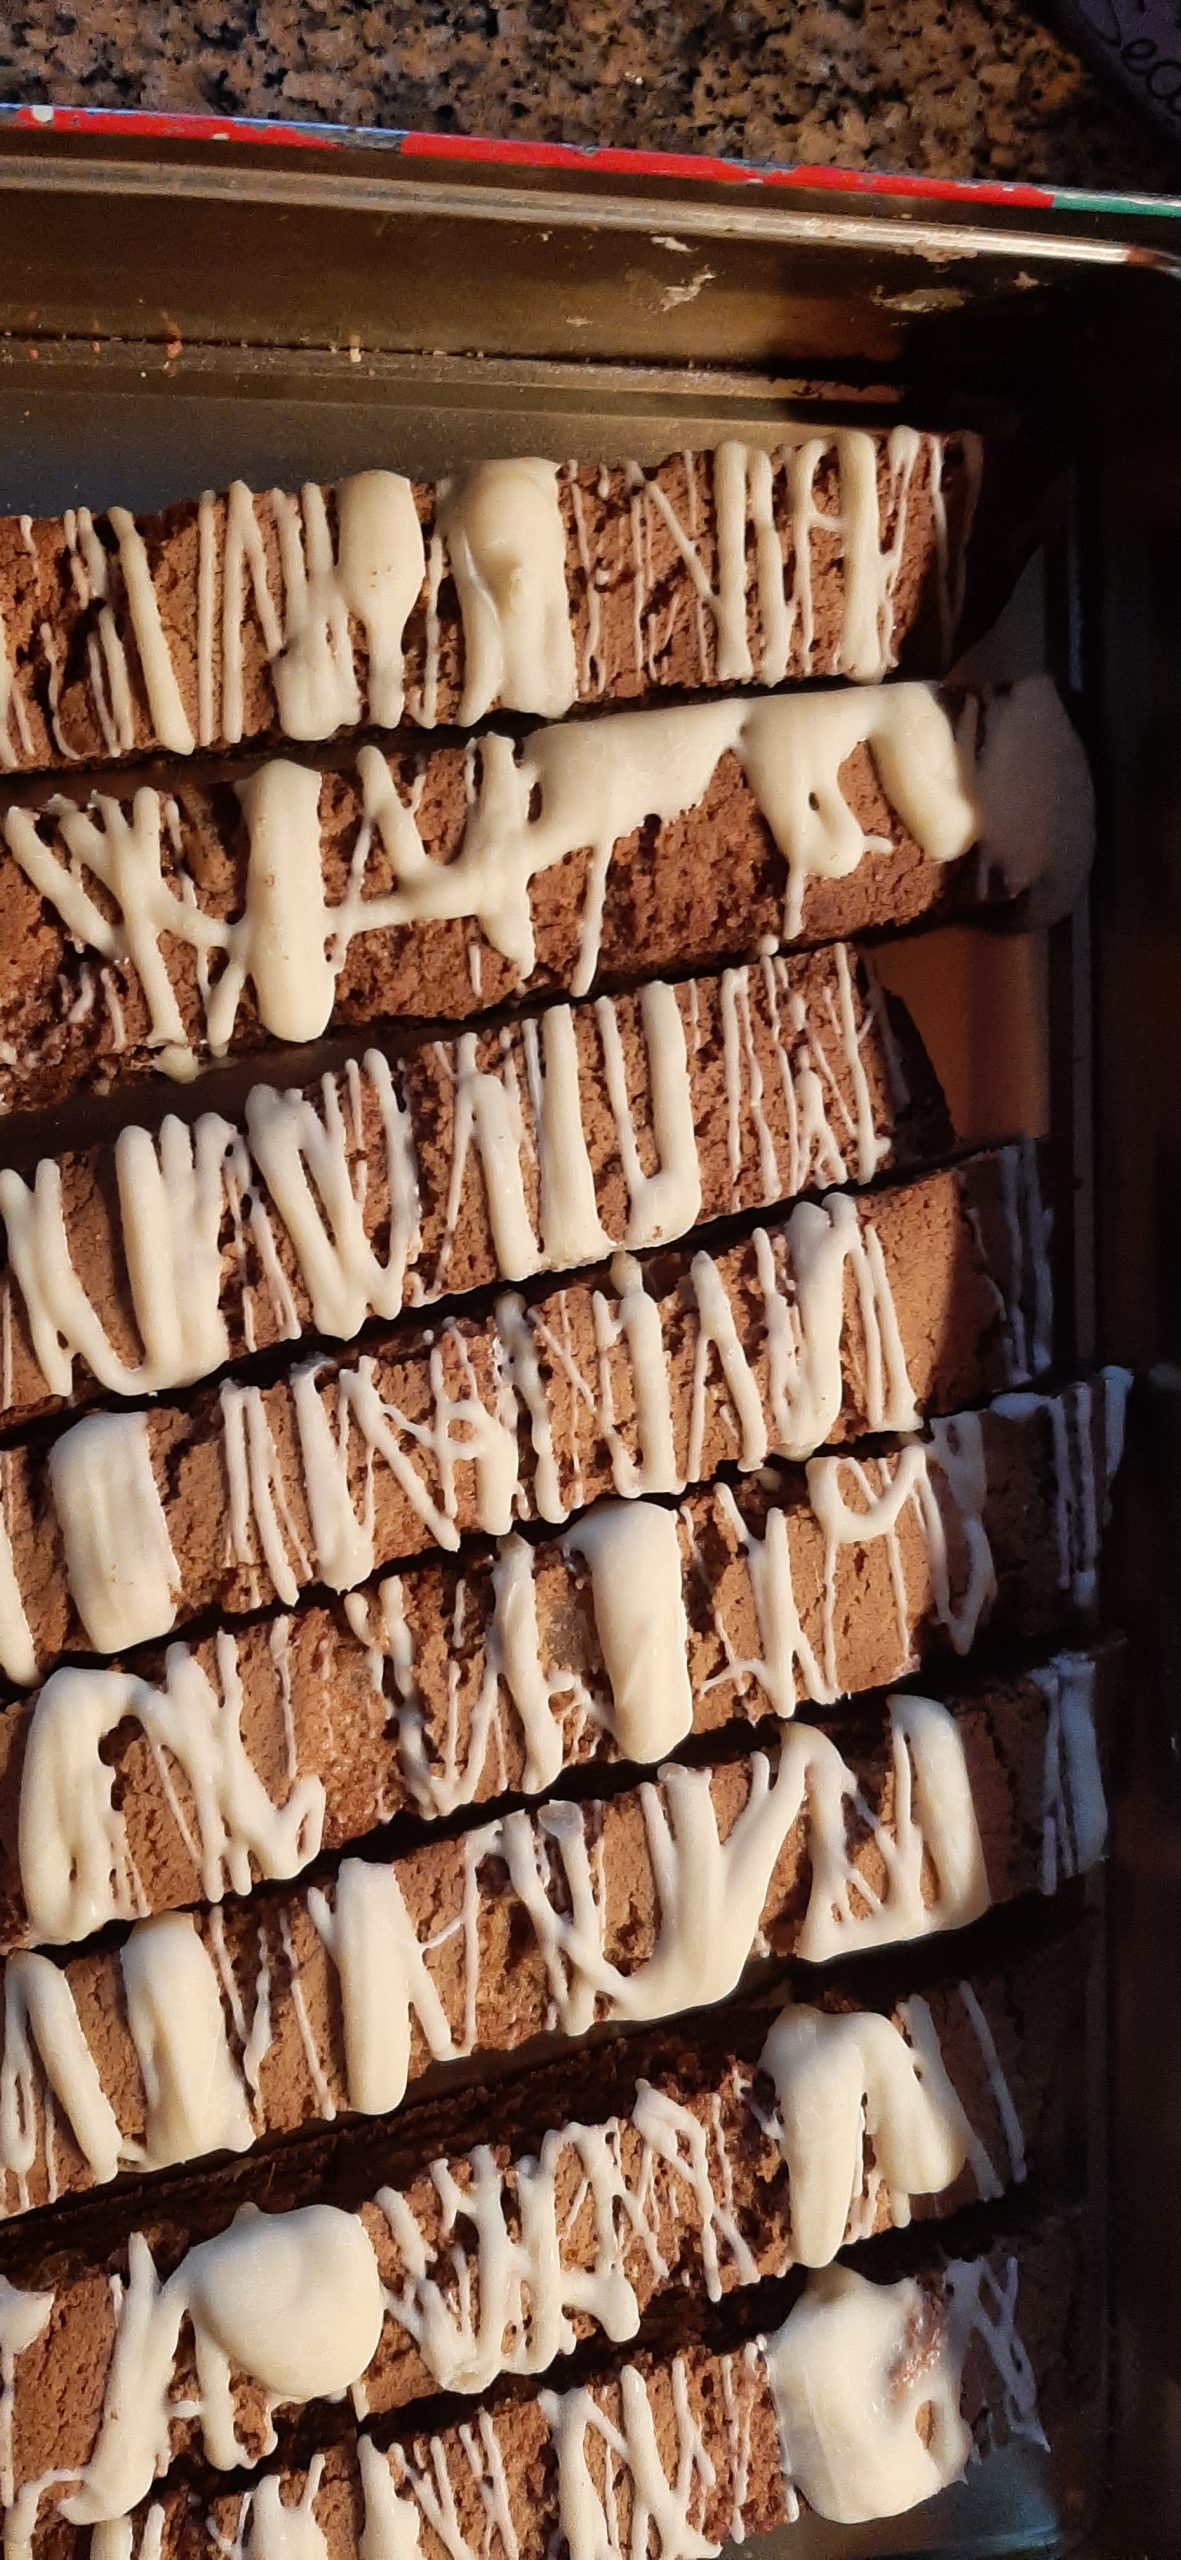
Using buttered hands, shape half of the dough into a log roughly 1½ to 2 inches wide. Place log on prepared baking sheet and flatten slightly. Form the second half of the dough the same way and place on the baking sheet about 3-inches away from the first log. Brush tops of logs with egg wash made from whisking the remaining egg with the water. Then, sprinkle each log with 1 tablespoon raw sugar.
Bake in a pre-heated 350-degree oven until the biscotti have spread and bounce back slightly when pressed with fingertips, about 30 minutes. Remove from oven and let cool completely, about 1½ hours.
Preheat oven to 325-degrees. Using a sharp serrated knife, cut logs into ½-inch diagonal slices. Place each slice, cut side down on the same parchment paper lined baking sheet. Bake until firm, crisp and slightly dry, about 15 minutes.
Remove from oven and allow to cool completely before storing in an airtight container at room temperature or in your freezer for up to three months.
*According to winefolly.com “Vin Santo (or Vino Santo) is a viscous, typically sweet dessert wine made in Italy, predominantly in Tuscany. The wine is loved for its intense flavors of hazelnut and caramel. When paired with biscotti, Vin Santo becomes “Cantucci e Vin Santo” which is inarguably Italy’s most famous welcoming tradition. What makes Vin Santo truly special is the natural winemaking process which gives it a unique taste.”
I thought covid and all its social restrictions was a bummer. And it was a bummer for a myriad of reasons. But at least we could still get together with dear friends and relatives at Christmas. Even if it was only for a short time in someone’s garage, responsibly spaced around a portable propane camping fire. (And yes, we actually did enjoy a bit of Christmas together exactly as described!)
But this Christmas was the pits. Both Andy and I were ill. We think we had RSV. But it could have been the flu. (And yes, we had this year’s flu vaccination!) But hey, we could have had both of these darling infirmities at the same time! Now wouldn’t that be special! Because we had symptoms from both at various times during our illnesses. And we still aren’t 100%! Almost 3 weeks for Andy and about 10 days for me. Humbug! (That’s what we’ve chosen to call what we had/have. The 2022 HUMBUG!)
So, we missed Christmas Eve with our dear friends Jim and Margo and Christmas day with relatives and close friends because of what’s “going around”.
But you know, while I was sitting in my favorite reading chair on Christmas day feeling ever so sorry for myself, I realized how exceedingly lucky I was to have Andy to spend the day with. And how blessed we both were to have close friends and family that were able to be together. Even if this Christmas we couldn’t be there with them. I realized all of us were the lucky ones. We had a home. We weren’t being bombed by some power-hungry Russian maniac. We weren’t out in the cold with no way to get warm, stay warm, or feed either our loved ones or ourselves. We were lucky. Just plain lucky!
So what if Mr. C. and I couldn’t spend Christmas as planned. We had fresh running water. A nice cozy bed to climb into when we felt chilled. Food to eat when we got hungry. We had everything we needed to get healthy. We were safe. Whereas so many of the world’s population could not say those three little words. I am safe. And I realized how horrible that must feel to not be safe. I couldn’t even begin to imagine what that would mean.
So, did I have a great Christmas? Yes, I did. I was given the opportunity to realize how truly blessed I am. Sometimes it takes something like a brief illness to remind us of our blessings and to put our wonderful lives in perspective. Thankfully I was able to learn a valuable lesson as I was recovering. And thankfully, I had been able to finish most of my baking before my body was invaded by germs. (I’ll take my luck wherever I can find it!)
And one of the best cookies I made this year was this recipe for gingerbread biscotti. I found the recipe on theoliveblogger.com site. Delicious. I made a small change, of course I did, but the main recipe is all Melissa. So, if you too love gingerbread and biscotti, then this is the recipe for you.
As we all approach the new year, I hope we can keep the spirit of Christmas alive throughout 2023. Wouldn’t it be refreshing to find ourselves wishing each other a merry “whatever” every time we met. I’ll start. Merry 2023.
And as always, peace and love to all.
⅓ c. unsalted butter, room temp.
1¼ c. brown sugar, lightly packed
2 lg. eggs
2 T. molasses
1 tsp. vanilla
2¼ c. unbleached all-purpose flour, fluffed
2 tsp. ground ginger
1 tsp. ground cinnamon
½ tsp. ground cloves
¼ tsp. ground allspice
¼ tsp. ground nutmeg
2 tsp. baking powder
½ tsp. baking soda
scant ½ tsp. fine sea salt
½ c. finely chopped candied ginger
white chocolate, for drizzle
Line a large baking sheet with parchment paper.
In the bowl of your stand mixer, mix the butter and brown sugar together until creamy. Add the egg, molasses, and vanilla and mix until well combined.
In a medium bowl, whisk the flour, ginger, cinnamon, cloves, allspice, nutmeg, baking powder, baking soda, and salt together. Stir in the candied ginger making sure each tiny piece is coated with flour.
Slowly add the dry ingredients to the butter mixture, just until well combined. (The dough will be very thick).
Using your hands liberally greased with butter, divide the dough in half. On the parchment paper lined baking sheet, pat each half into a 10×2-inch rectangle.
Bake in a pre-heated 350-degree oven for 20 to 23 minutes, or until a light golden brown and slightly firm to the touch but NOT hard. Remove from oven.
Cool for 10 minutes. Leave the oven on. After 10 minutes, cut each log diagonally into 1-inch-thick slices.
Turn cut side down on the baking sheet and bake for 14-16 minutes. (They should be slightly golden on both sides.)
Remove from oven and place on a wire rack to cool completely before drizzling with melted white chocolate. Allow white chocolate to harden before storing the biscotti in an airtight container.
Before I write anything about this recipe, I need to apologize for not posting a recipe since December 5th. But I have some very good reasons. My grown children’s goodie packages take precedence over any other use of my time once the calendar reflects that December has once again rolled around. And the older I get, the more Christmas seems to take me by surprise. And really, I have been cognizant of Christmas since I was about 3 years old. By 78 years old, you would think that there should be no shocker value associated with the fact that Christmas is about to descend on us, with what seems to me, at an ever-increasing rate of speed. But every darn year, I am unprepared for the fact of Christmas, even though there have been Christmas decorations in stores since before Halloween! And BTW, what’s with that? Can’t stores just finish one holiday before they start touting products for two holidays hence?
Anyway, the bottom line is that I have been madly wearing my Mrs. Santa hat, and basically loving every minute of it. Nothing makes me happier than making cookies and candy for my kidlets, other family members, and close friends. And of course, figuring out what gift would be most appreciated by my kids and other family members and friends. (Thank God for Amazon prime is all I have to say!) But back to the real reason for this post.
Every year, our dear neighbor Joanna leaves a Christmas tin full of cookies and peanut brittle on our front porch. And every year she includes these incredible bar cookies in the mix. I always know that it’s time for me to get going with my baking when our Christmas tin from Joanna arrives. So, this year I decided my kids needed some of these delicious bar cookies in their goodie package too. And since you all have been so good this year (Santa told me so), I am going to pass along this wonderful recipe via epicurious.com and Joanna.
I plan to serve these bars in lieu of pecan pie this year because after eating all the other offerings on the Christmas dinner table, most people only need a small bite or two of dessert. So, I am also making apple pie bars instead of apple pie, for just that very reason.
May you too have a full to the brim Christmas and a great 2023. We have all had a rough time the past 3 years, but to my eyes, things appear to be looking up a bit. I continue to have hope that the earth’s citizens can all pull through the various messes we have gotten ourselves into. And can learn from our mistakes.
In the meantime, let your holidays and years to come be full of laughter, love, family, friendship, and joy.
And as always, peace and love to all.
Crust:
1¾ c. unbleached all-purpose flour, fluffed
⅓ c. powdered sugar
¼ c. cornstarch
½ tsp. kosher salt
¾ c. (1½ sticks) cold unsalted butter, cut into ½-inch pieces
Line a 13×9-inch baking pan with parchment paper, leaving 1 inch overhang on all sides. Lightly butter the parchment paper. (Glass pan is best for this recipe.)
Blend flour, powdered sugar, cornstarch, and salt in food processor. Add butter and process until mixture begins to clump together. Press dough evenly onto bottom of prepared pan.
Bake crust in a pre-heated 350-degree oven until set and light golden, about 25 minutes. Remove from oven. Let stand while preparing topping. Reduce oven temperature to 325-degrees.
Topping:
1¼ c. brown sugar (packed)
½ c. light corn syrup
¼ c. (½ stick) unsalted butter
4 c. coarsely chopped pecans
½ c. heavy cream
2 tsp. vanilla extract
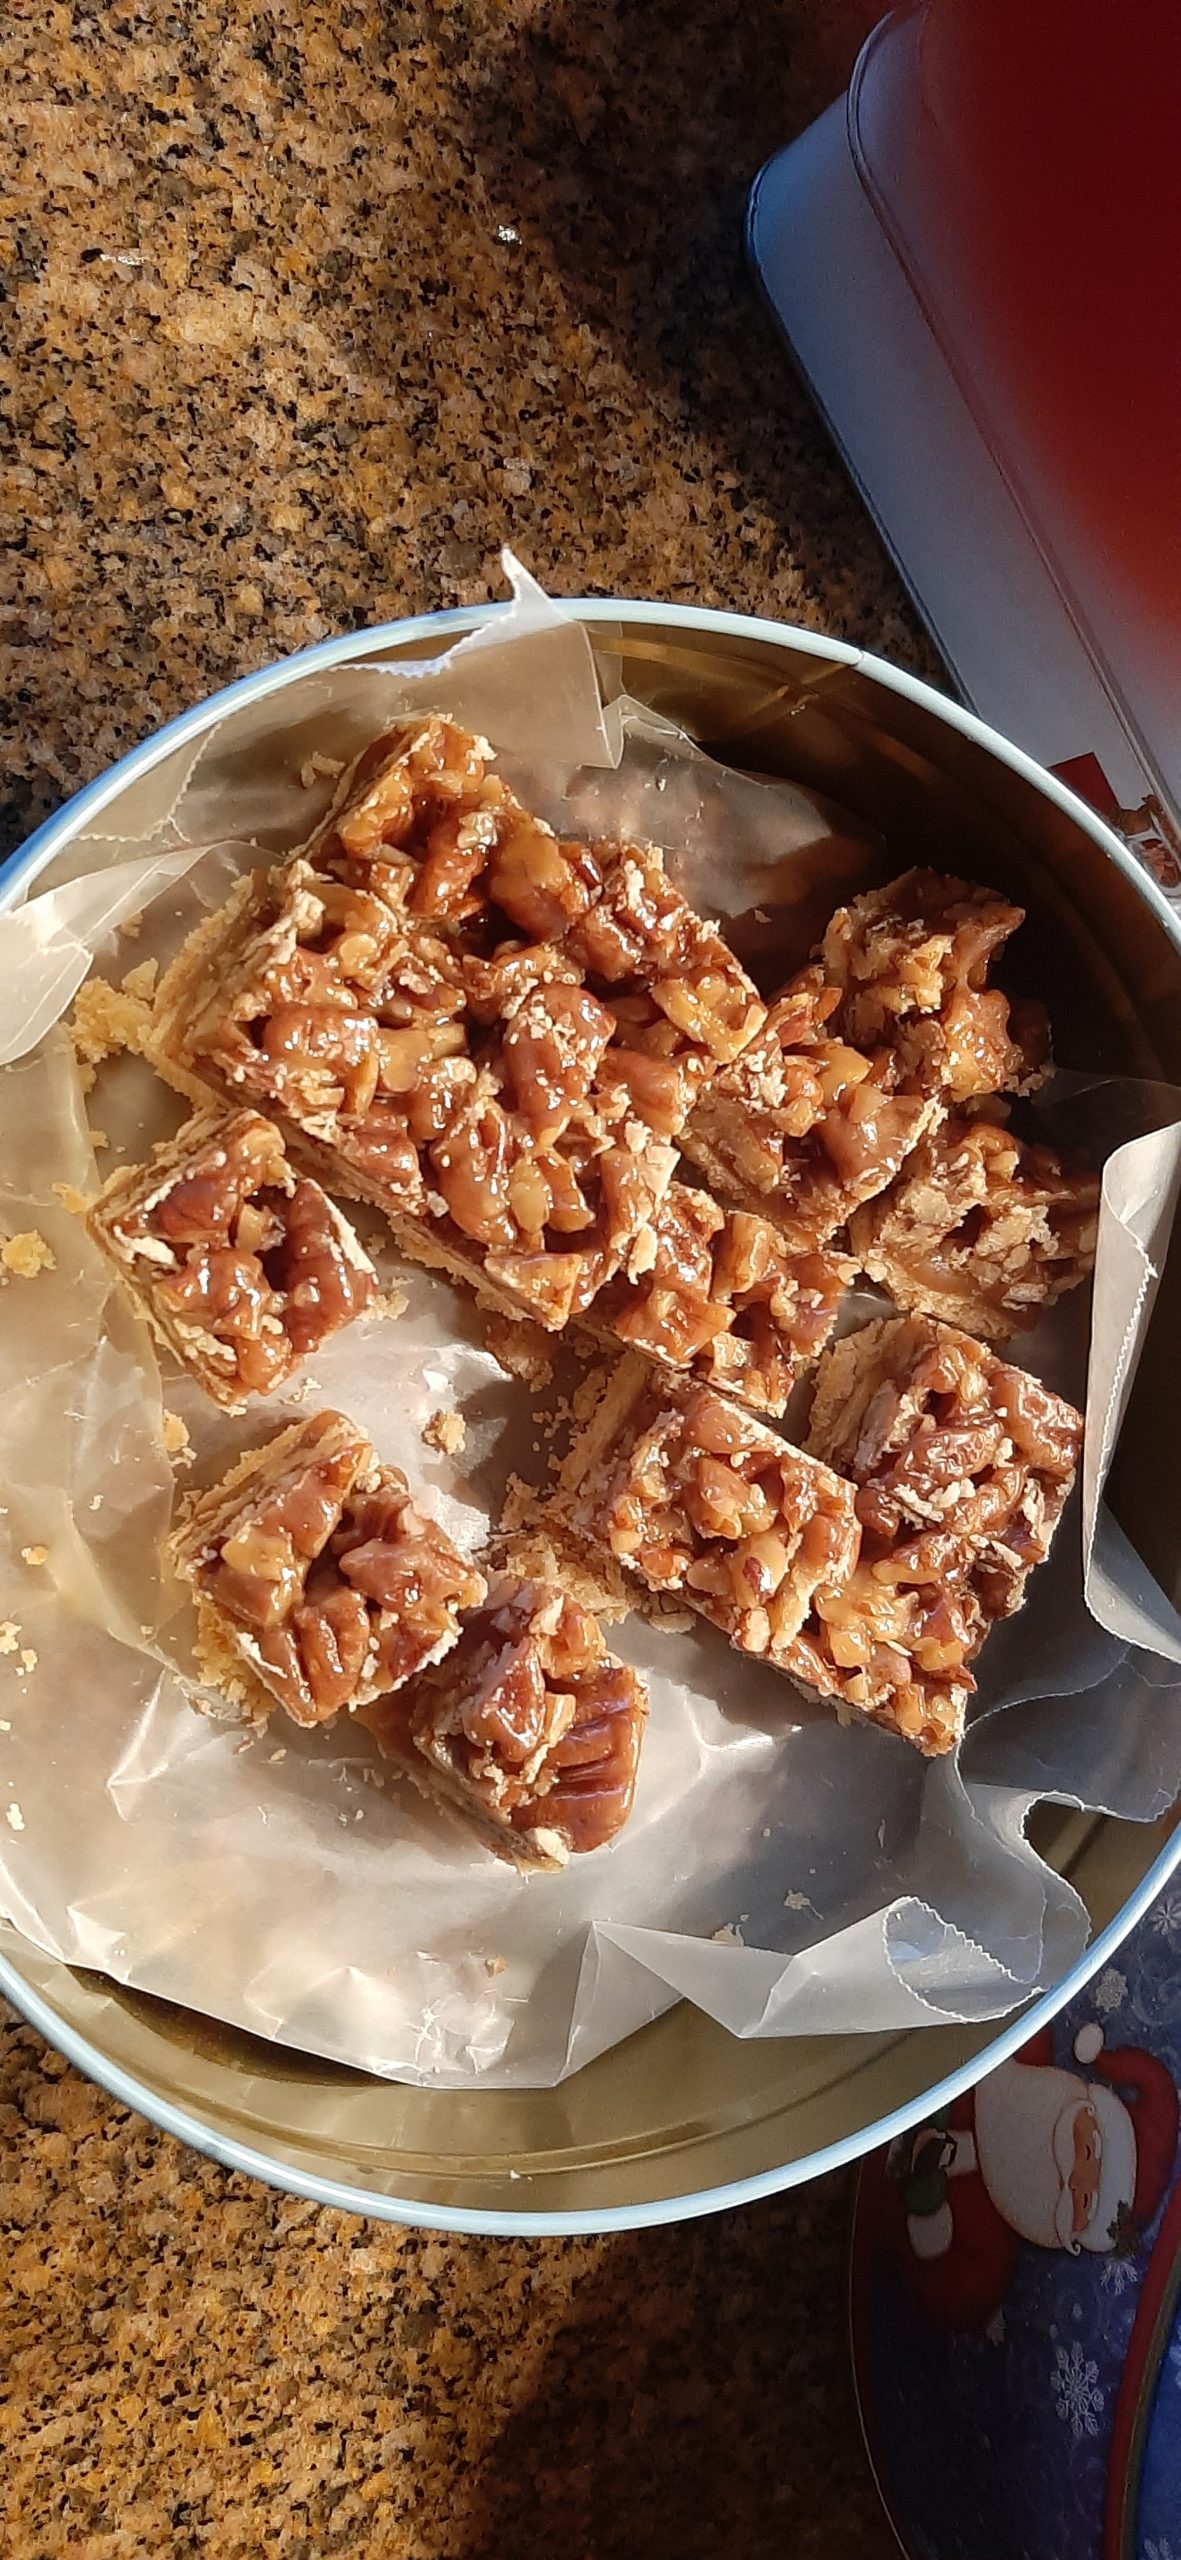
Stir brown sugar, corn syrup, and butter together in a heavy medium sized saucepan over medium-high heat until sugar dissolves and mixture boils; boil 1 minute. Add pecans and cream; boil until mixture thickens slightly, about 3 minutes. Stir in vanilla. Pour hot topping over warm crust.
Bake nut-topped crust until caramel is slightly darker and bubbles thickly, about 20 minutes. Transfer pan to rack. Cool completely in pan (topping will harden).
Lift parchment paper out of pan onto cutting board. Using a heavy sharp knife, cut cookies into 1-inch squares. (These cookies are very rich.) Store between sheets of waxed paper in an airtight container at room temperature.
This is the extract I used. Very strong, so go lightly.
Mr. C. and I had the very great pleasure of spending Thanksgiving with his 2 sisters (Nancy and Katie), their spouses (Paul and Rick), and Paul and Nancy’s two daughters Erin and Dana and their husbands (Gideon and Jason) and Gideon and Erin’s delightful daughter Clara (almost 8). The event was held in Pullman, Washington at Dana and Jason’s home. Both Jason and Dana are on the WSU faculty.
Dana, with Veterinary Microbiology & Pathology, is a PhD scientist with cross disciplinary training in microbiology, immunology, and entomology. While Jason is a PhD research assistant professor in the College of Veterinary Medicine, investigating Anaplasma – a pathogen spread by ticks that infects humans and large mammals. As Jason so aptly put it “Dana and I will tell a brick wall about our research if it stands still for 15 minutes, and we are definitely each other’s constant advisors and critics. Our shared interests in microbiology was definitely something we connected over and continues to be a part of our shared life.”
So, as you can imagine, we had a wonderful time. And, we didn’t even have to pet any ticks! What we did get to do was converse, cook and eat together, laugh a great deal, and do all the normal things that families who get along very well do to entertain themselves. So, a most pleasant 5 day get-away for us. Of course, the first day’s travel over Snoqualmie pass was not at all enjoyable. But I won’t go into that because I am still a bit terrorized by the whole ordeal!
In preparation for leaving to spend Thanksgiving away from home, I decided to make this cake, and a couple other food items to take along. Especially for the first evening since I wouldn’t be around during the day to contribute to any of the meal preparation. I figured bringing some goodies was the least I could do. So, along with this cake I took along some breakfast bread, candied ginger shortbread cookies, and 2 appetizer spreads. But I must say, this cake was my star contribution.
I started with my favorite yellow cake recipe, swapped out a bit of granulated sugar with brown sugar, and added a wee bit of caramel extract. Then I prepared a simple buttercream frosting containing some of Mr. Cs caramel sauce that he always has on hand for caramel lattes to give the frosting a light caramel flavor. Yum! It worked. And the cake had been very easy to make, and the frosting was a piece of cake. You know what I mean! The frosting was also easy to build. And the best part. The cake did not have to be refrigerated. Which is a darn good thing since there was absolutely no refrigerator space available by the time we arrived on the scene. (Can you ever really have enough refrigerator space? I don’t think so either!)
Well, that’s it for today. Sorry I haven’t posted for a few days, but I have a very good excuse. I was having way too much fun! May you too be blessed with having way too much fun with family and friends during this holiday season.
Peace and love to all.
For the cake:
1 c. (2 sticks) unsalted butter, room temperature
⅓ c. vegetable oil
2 c. granulated sugar
½ c. light brown sugar, packed
6 lg. eggs, room temperature
2 lg. egg yolks, room temperature
5 tsp. pure vanilla extract
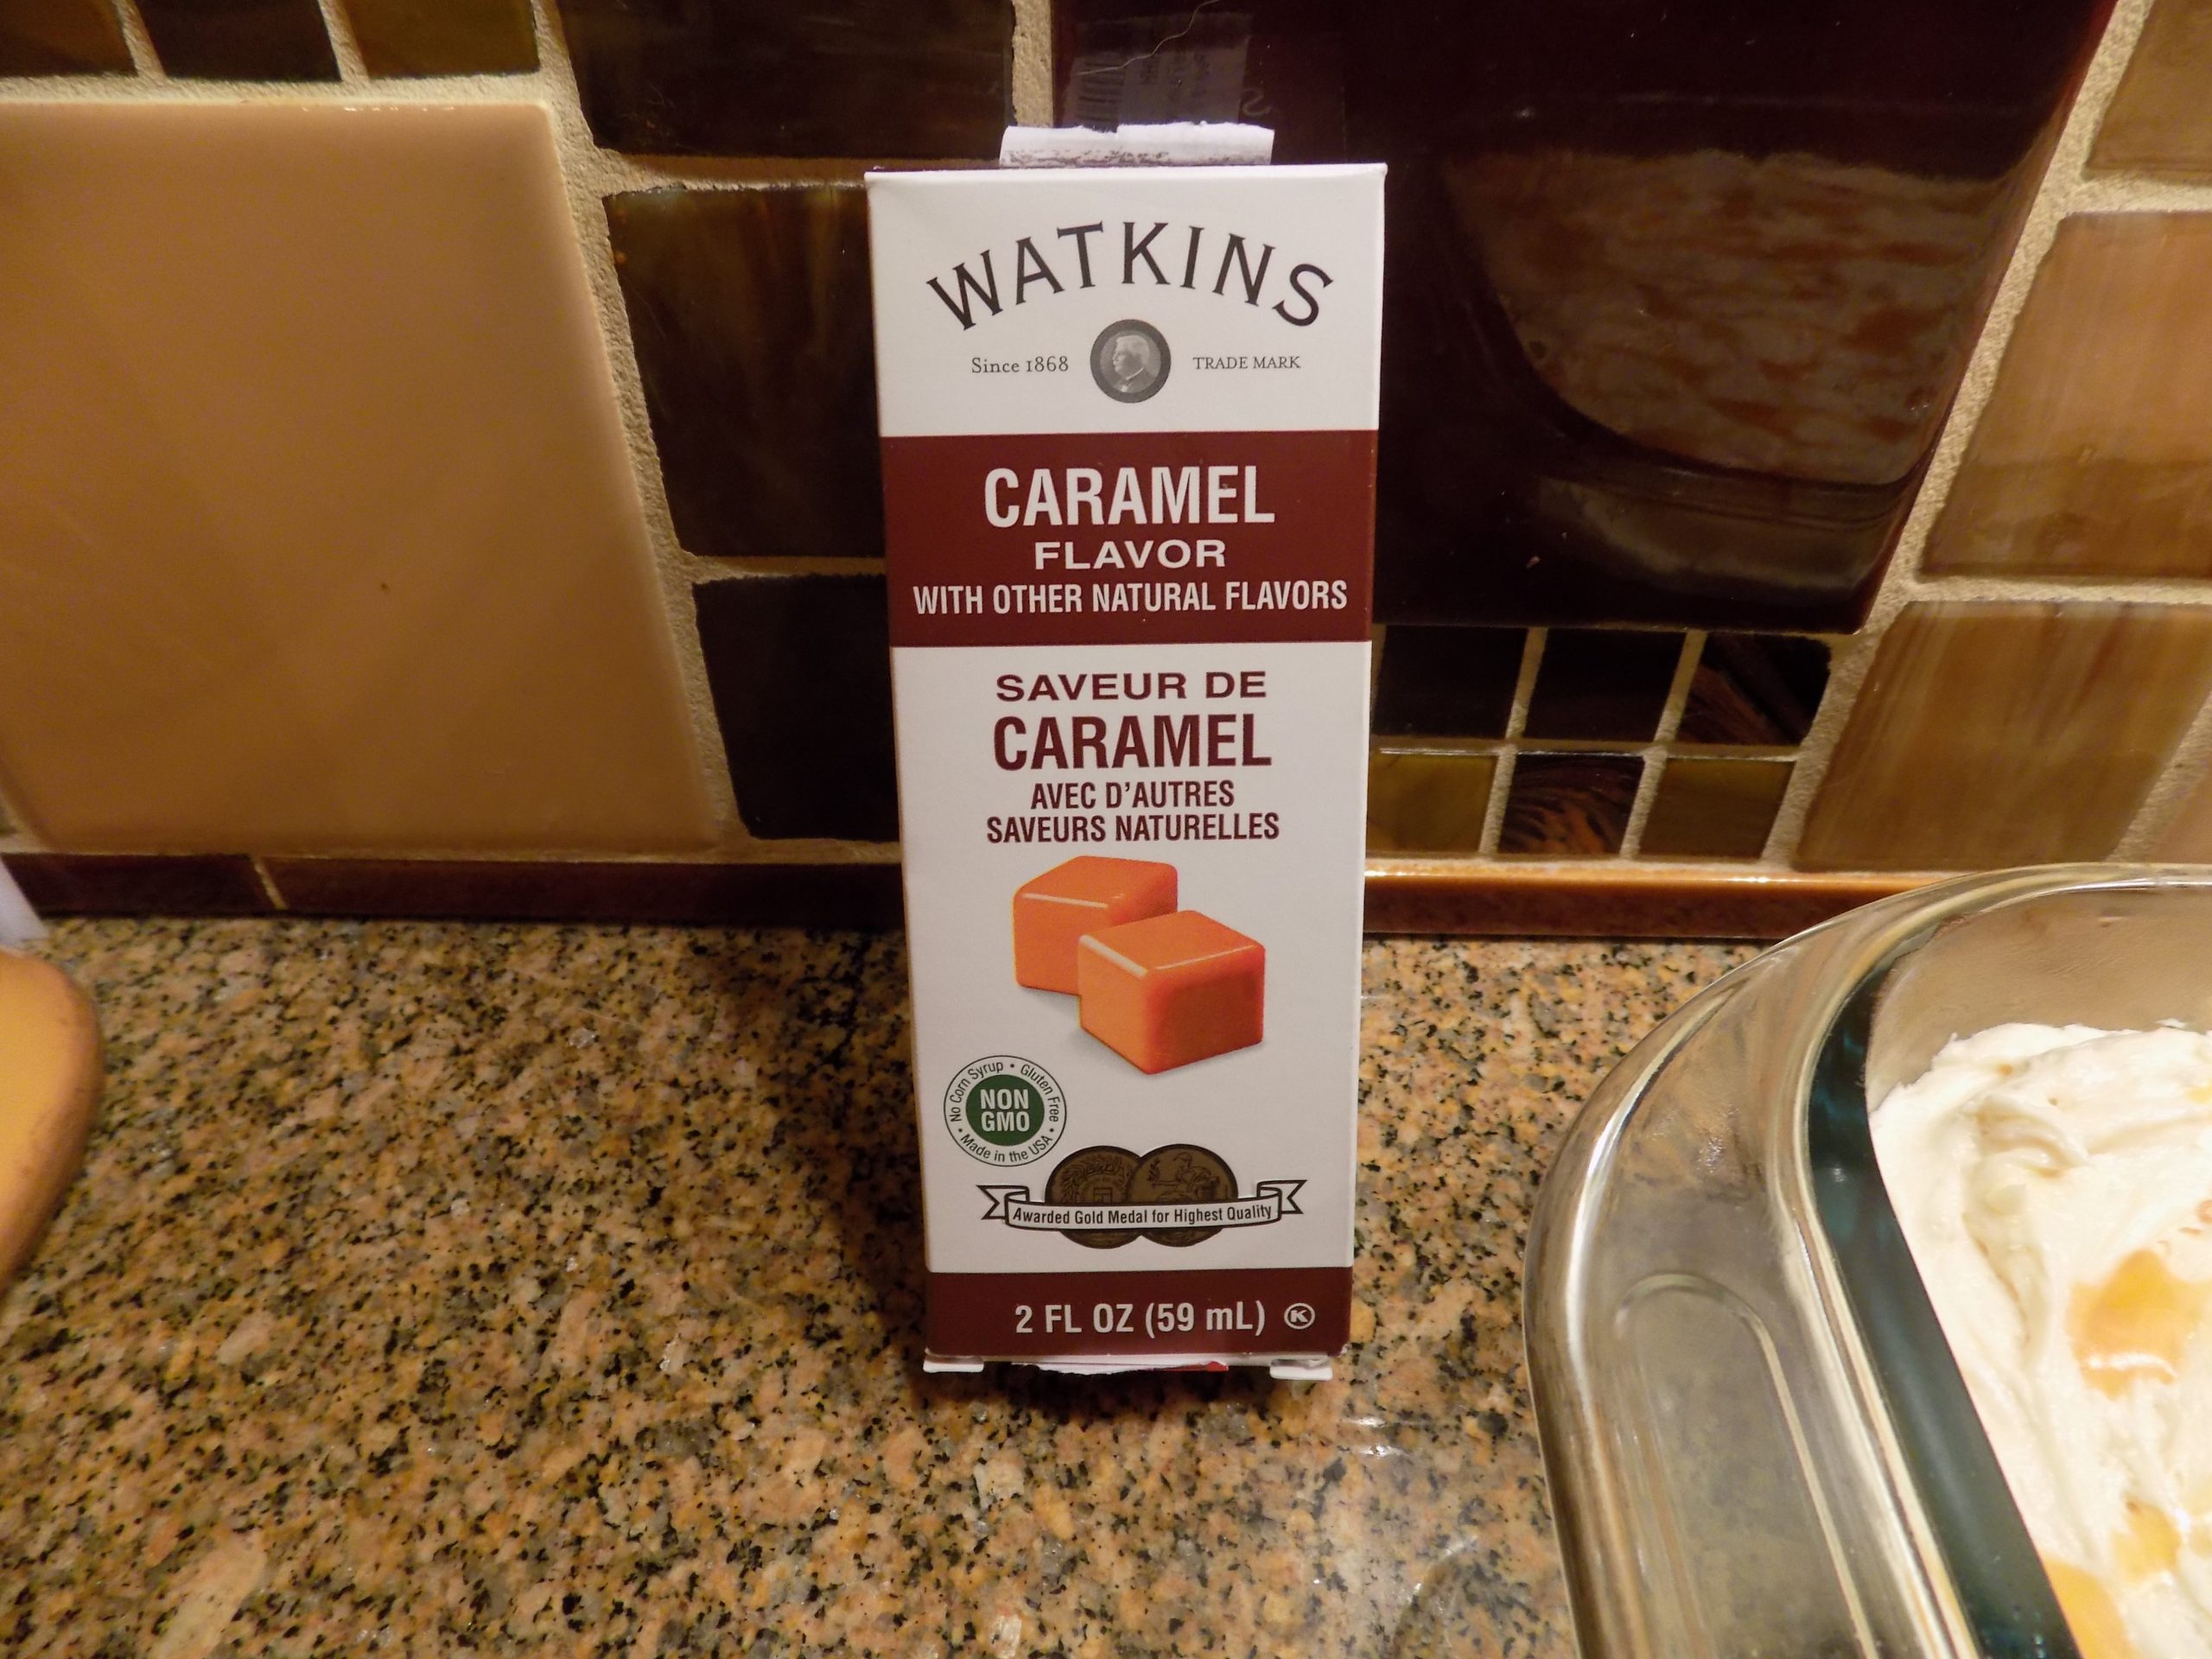
¼ tsp. caramel extract, opt. (I use Watkins brand)
3 c. fluffed or sifted cake flour
1 tsp. baking powder
½ tsp. salt
1 c. sour cream
In the bowl of your stand mixer, cream the butter, oil, and sugars on high until light and fluffy, about 5-6 minutes. (Do not skip this step. Very important.)
Add eggs and egg yolks one at a time until well incorporated. Scrape the bowl as needed. Add in the vanilla and caramel extracts and mix until well combined.
In a medium sized bowl whisk the cake flour, baking powder, and salt together.
At low speed, alternate adding in the flour mixture and sour cream just until combined. Do not over mix.
Grease and flour 1 9×13-inch cake pan (glass is best) and 1 8-inch round cake pan or 3 8 or 9-inch round cake pans. (If you plan to remove the cakes from the pans before frosting them, then grease and flour the pans as directed above and line the pans with parchment paper sprayed very lightly with cooking spray.)
Scoop the batter evenly into the prepared pans. Even off the batter with an offset spatula. (See directions for frosting a three-layer cake below.)
Bake the 9×13-inch pan in a pre-heated 350-degree oven for 33-35 minutes or until a toothpick stuck into the middle of the pan comes out clean. Do not overbake.
Bake the 8 or 9-inch round pan or pans for 28-30 minutes or until a toothpick stuck into the middle of the pan comes out clean. Again, do not over bake.
Allow cakes that you plan to remove from the baking pan or pans to cool for 10 minutes on a wire rack before gently removing the cake from the pan. If using parchment paper, gently peel it off and allow the cake to cool completely on a pretty cake plate before frosting.
For the 9×13-inch cake, just remove from oven and allow to cool completely on a rack before frosting. After frosting, keep covered at room temperature.
For the frosting:
1 c. unsalted butter, room temperature
1 tsp. vanilla extract
⅓ c. + 3 T. caramel topping, plus more to drizzle over cakes
pinch of kosher salt
4 c. powdered sugar
whole milk or heavy cream, if needed
flaky sea salt, for garnish
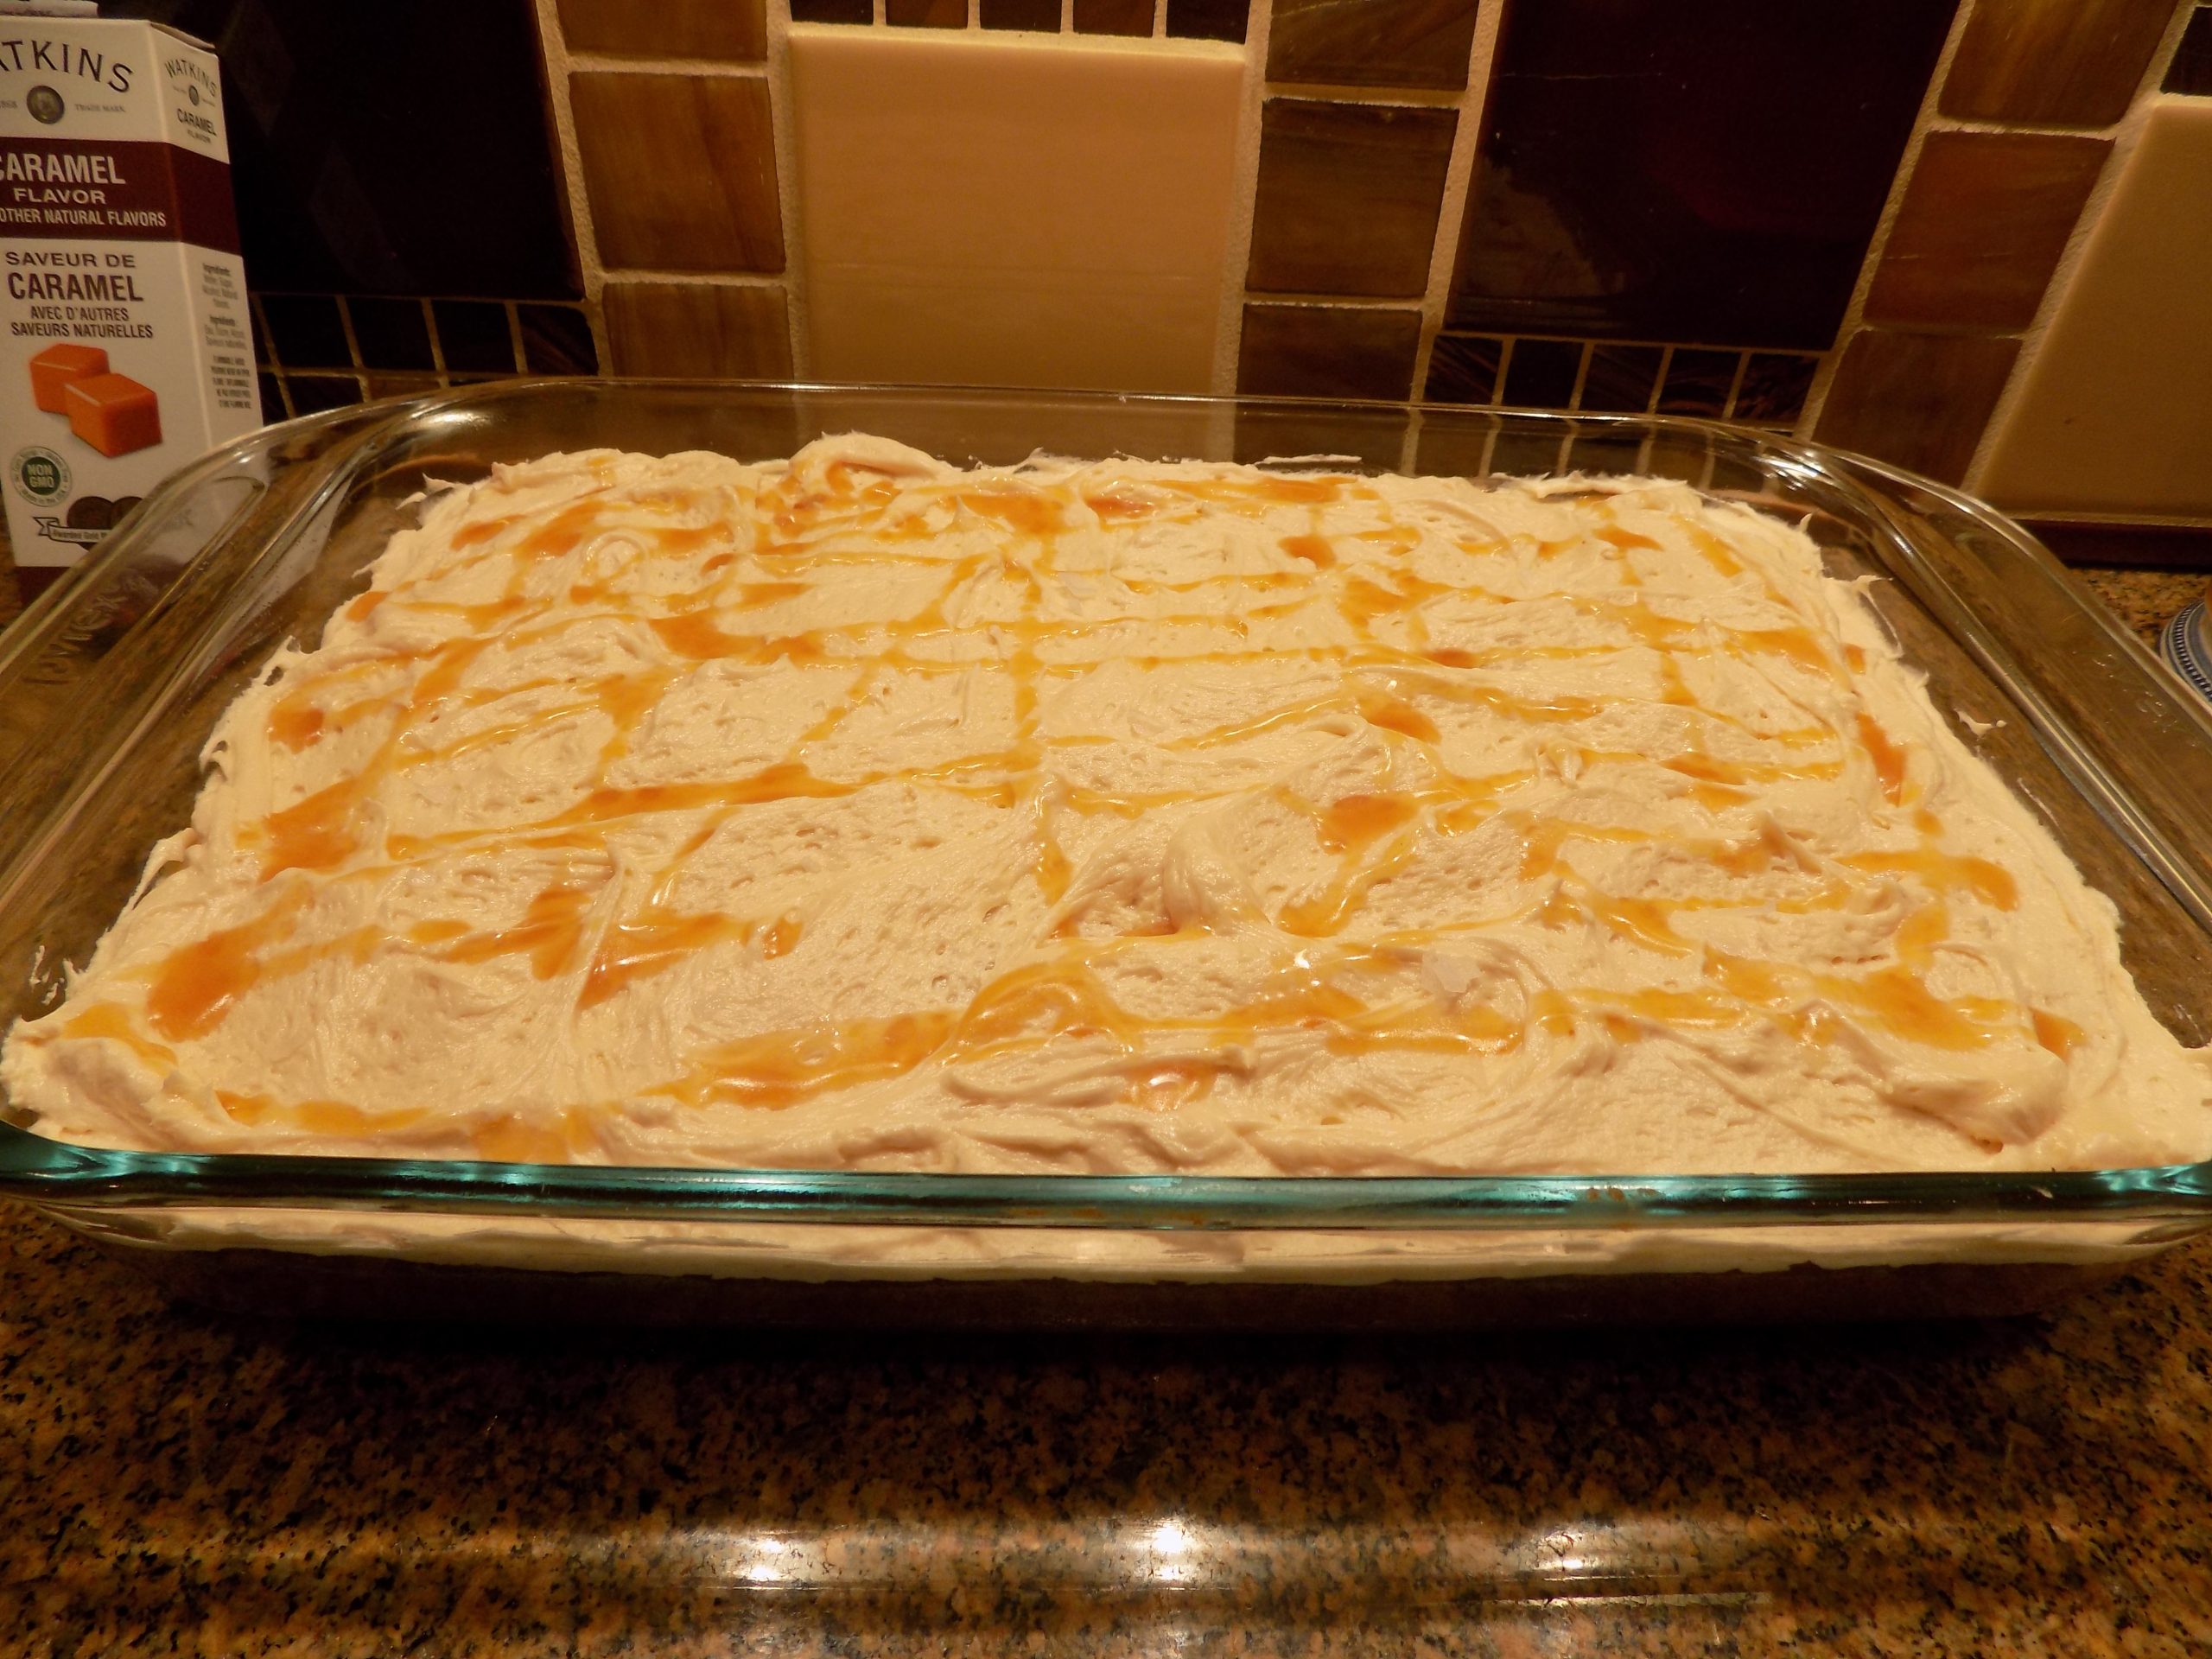
Beat the room temperature butter using a hand mixer or stand mixer with paddle attachment until soft and fluffy. Add the vanilla, caramel topping, and kosher salt, mixing until thoroughly combined.
Add the powdered sugar on low speed. Add milk or cream a few drops at a time until the frosting is light and fluffy and to your desired consistency.
Frost the cakes. When the frosted cake looks perfect to you, drizzle on as much caramel topping as you want. (If the caramel topping doesn’t drizzle easily, warm it up a bit in your microwave.) After the drizzle is in place, lightly sprinkle on a bit of flaky salt.
How to create a beautiful 3-layer cake:
Remove pans from oven and place on cooling racks for 10 minutes. Then gently remove cakes from pans and allow the cake to cool completely before icing.
Place one of the cakes upside down on your cake plate. Spread frosting over layer. (Not too much.) Place the second layer on the first layer and spread frosting. (Again, not too much. Add the top layer and frost the top and if you would like, the sides of the cake too. Then drizzle on some caramel sauce and sprinkle with flaky salt.
Please note: if your cakes are rounded at the top, slice off a bit of the cake to make the top flat before frosting. If the cake layers start sliding around, stick a couple of long picks through the layers to keep the cake together. Store at room temperature.
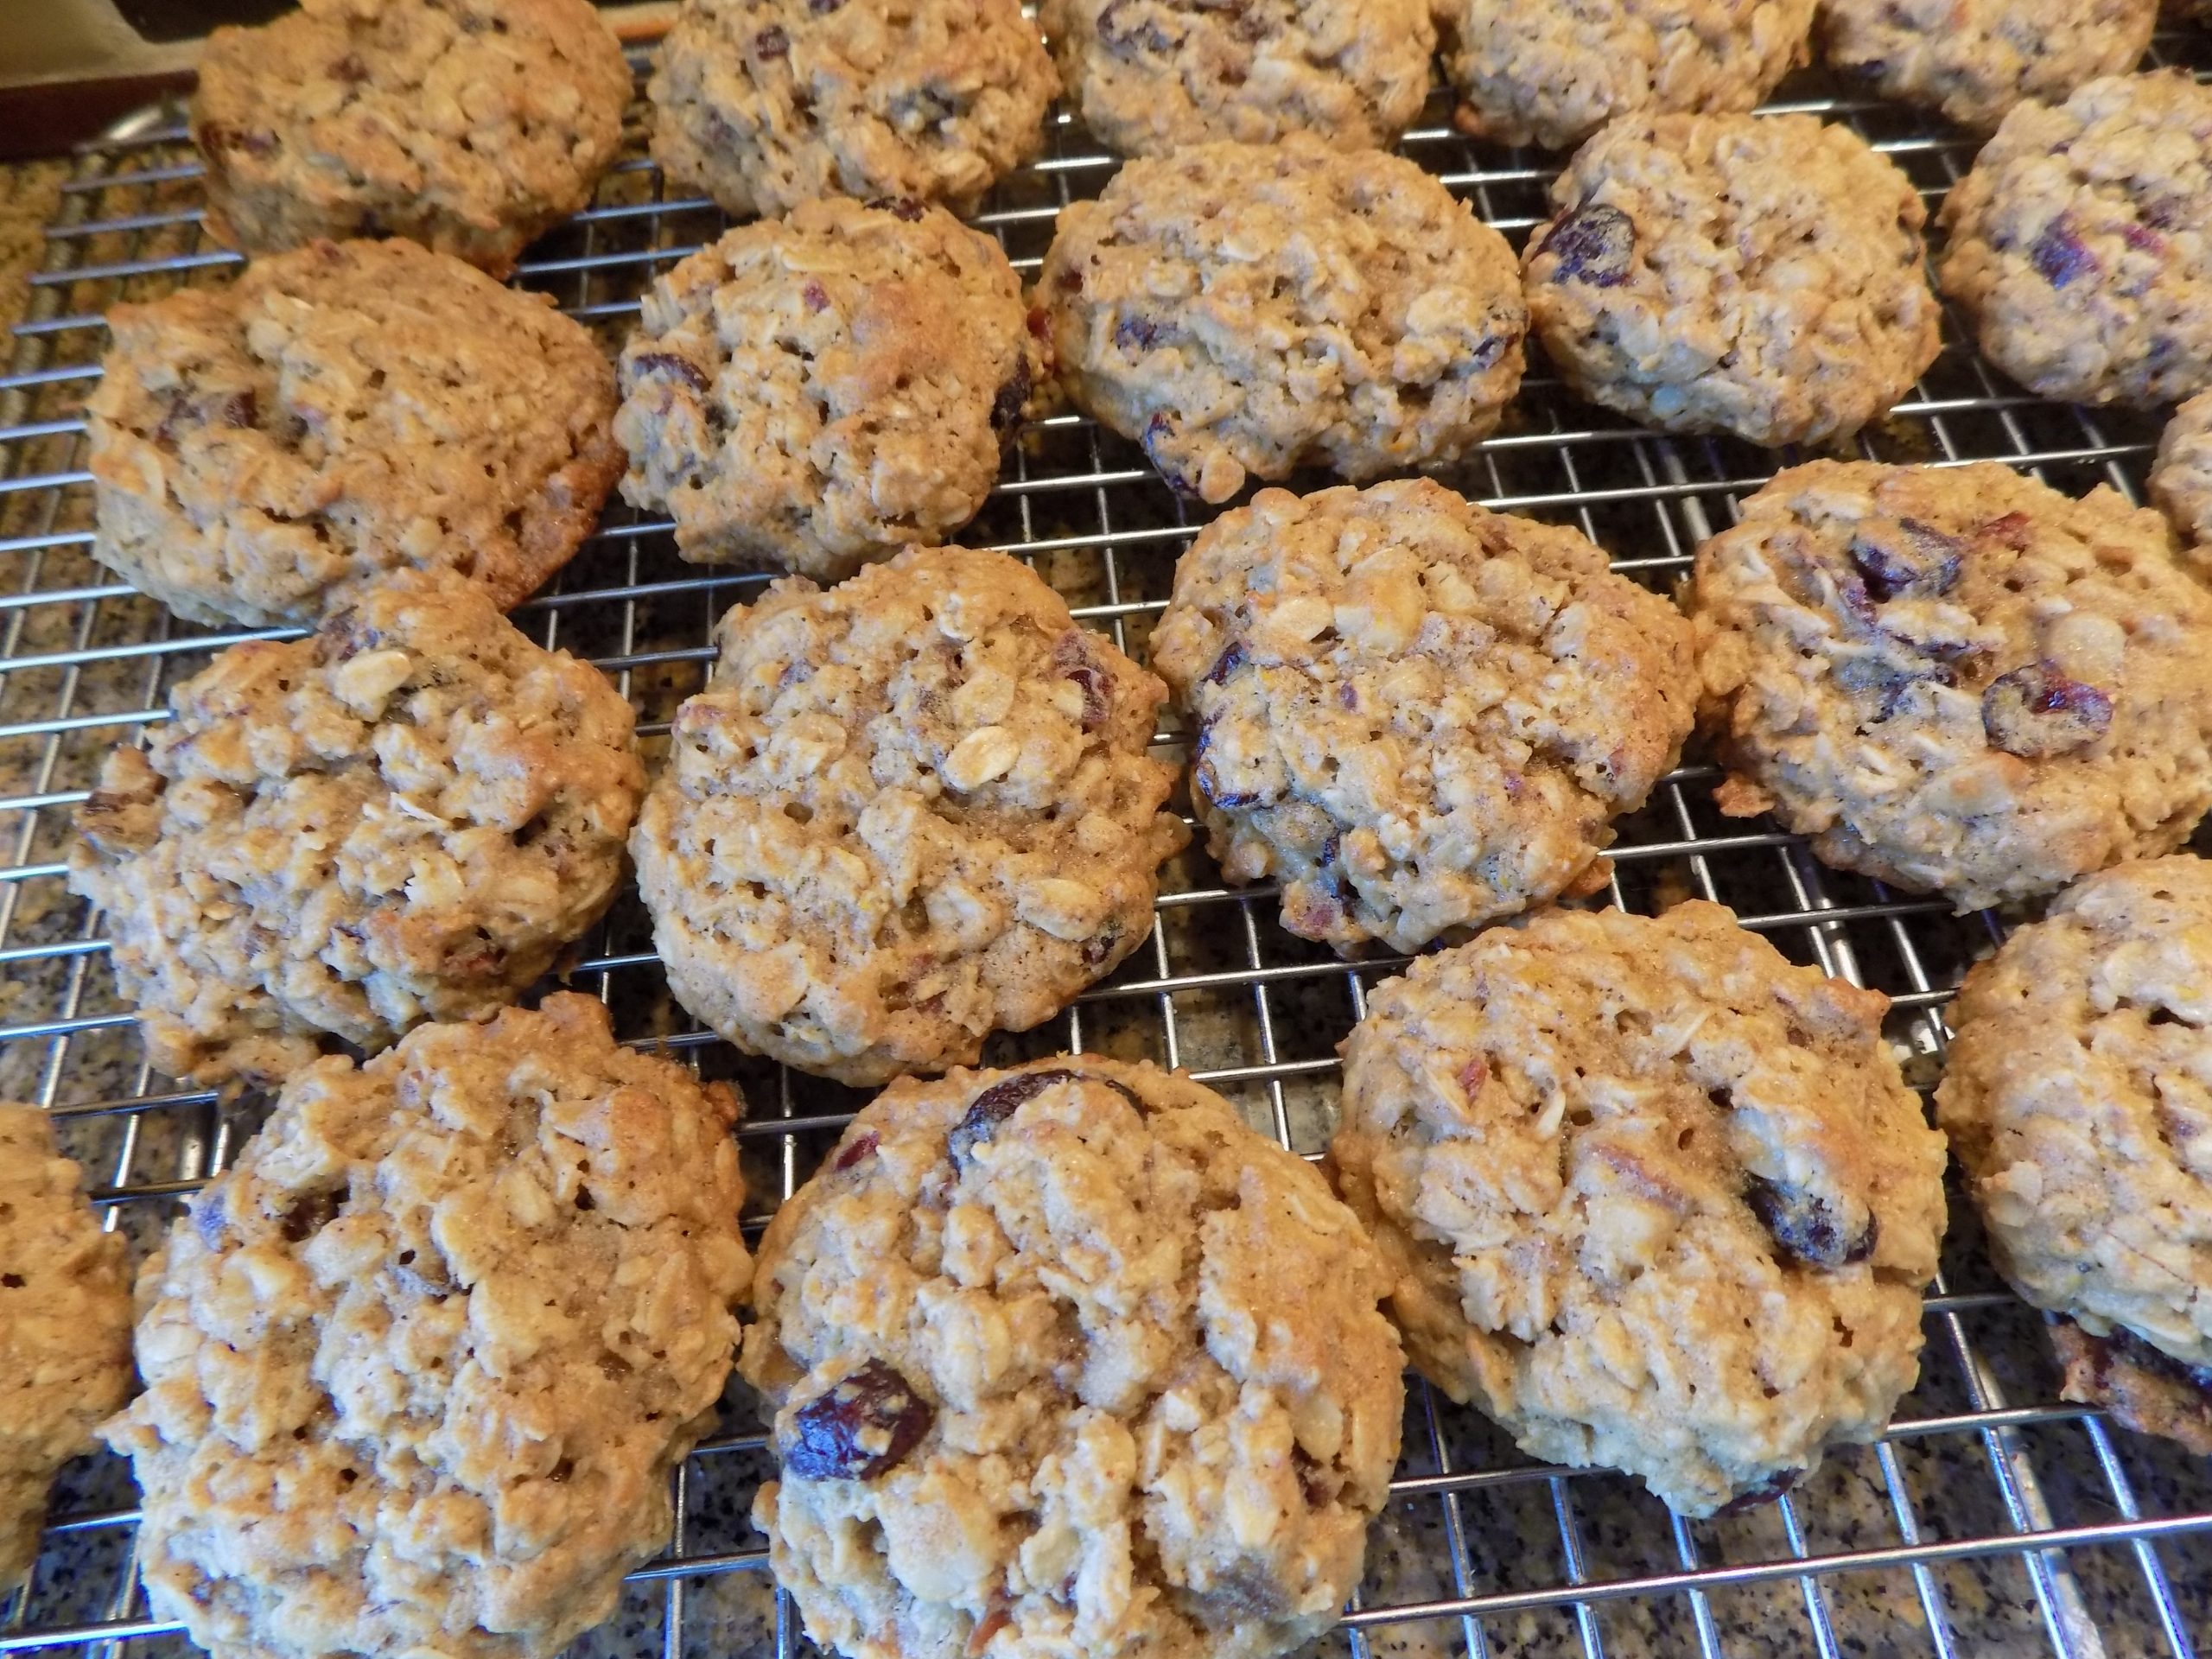
Now that it’s almost fall, I decided to develop a recipe for a fall/winter cookie. And I know what you’re thinking, what the heck is a “fall/winter” cookie? Well, it’s the equivalent of serving stew in autumn and throughout the winter. Stew just tastes better when it’s raining cats and dogs outside and there’s even a hint of snow in the air than when the temperatures are in the upper 80’s. So, a cookie that featured dried cranberries sounded like it would be perfect as the days start getting shorter, temperatures gradually decrease, and holiday decorations in every store front are just around the corner.
And what flavor goes better with dried cranberries than orange? And then there have to be nuts to give the cookies a bit of crunch. And because we are trying to eat healthier, lots of oats in the mix and the exclusive use of whole wheat flour. And what do you get? You get a really good cookie that is easy to make and would be a perfect addition to any holiday dessert selection. Like I said – a fall/winter yummy.
So, if you too would like to serve an oatmeal cookie that is just a bit different than your standard oatmeal cookie but is sure to be loved by one and all, this is the cookie for you.
Well, this is a special day at our house. Whistle Lake Jazz Quartet is recording in our living room. So, my only job is to feed the guys when they take a break. And you know my favorite things to do are listen to really good live music and feed people. So, I am one happy gal today. (See pictures of the guys below.)
Of course, I am usually a happy person. I was blessed with parents that taught me to be happy by both word and deed. My father especially stressed that I should be happy with what I had. Not that I shouldn’t strive to improve my situation if warranted. But not to be a “grass is always greener” kind of person. If I wanted greener grass, then I should work to make it happen! Therefore, metaphorically speaking, I have always had green grass.
May you too also be happy with what you have and treasure the world you live in.
Peace and love to all.
2 T. Cointreau (or your favorite orange liqueur or just plain orange juice)
1 c. dried cranberries
¾ c. (1½ sticks) unsalted butter, room temp.
1 c. brown sugar , packed
2 eggs
1½ tsp. vanilla extract
½ tsp. orange oil or 1 tsp. orange extract or 1 tsp. frozen orange juice concentrate
zest from 1 lg. orange
1½ c. whole wheat pastry flour
½ tsp. coarse sea salt
1 tsp. baking soda
½ tsp. ground cinnamon
3 c. rolled oats
¾ c. roughly chopped walnuts
Place the Cointreau and the dried cranberries in a small saucepan. Bring to a boil, stir, then remove from heat, cover, and let sit until cool.
In the bowl of your stand mixer, cream the butter and brown sugar together until smooth. Beat in the eggs one at a time, then add the vanilla, orange oil, and orange zest.
Whisk the flour, salt, baking soda, and cinnamon together in a mixing bowl; add to the butter mixture. Then mix in the oats, dried cranberries (plus any remaining liquid), and chopped walnuts.
Using a #40 (1½ T.) ice cream scoop, drop dough onto a parchment paper lined baking sheet as close together as possible. (Use a baking sheet that will fit in your refrigerator.) Gently pat each dough ball down just a bit. Refrigerate the dough balls for at least 4 hours or overnight. (Overnight preferred.)
Just before placing in the oven, transfer some of the dough balls to another parchment paper lined baking sheet and allow about 2-inches between each cookie. (I needed two pans to bake these cookies.)
Bake in a pre-heated 350-degree oven for about 14 minutes or until lightly golden brown and just set. Do not overbake. Remove from oven and allow cookies to cool on baking sheet for 7-8 minutes before removing to a wire rack to cool completely. Store in an airtight container.
Tim on bassTodd on drumsJamie on guitar and Andy on piano
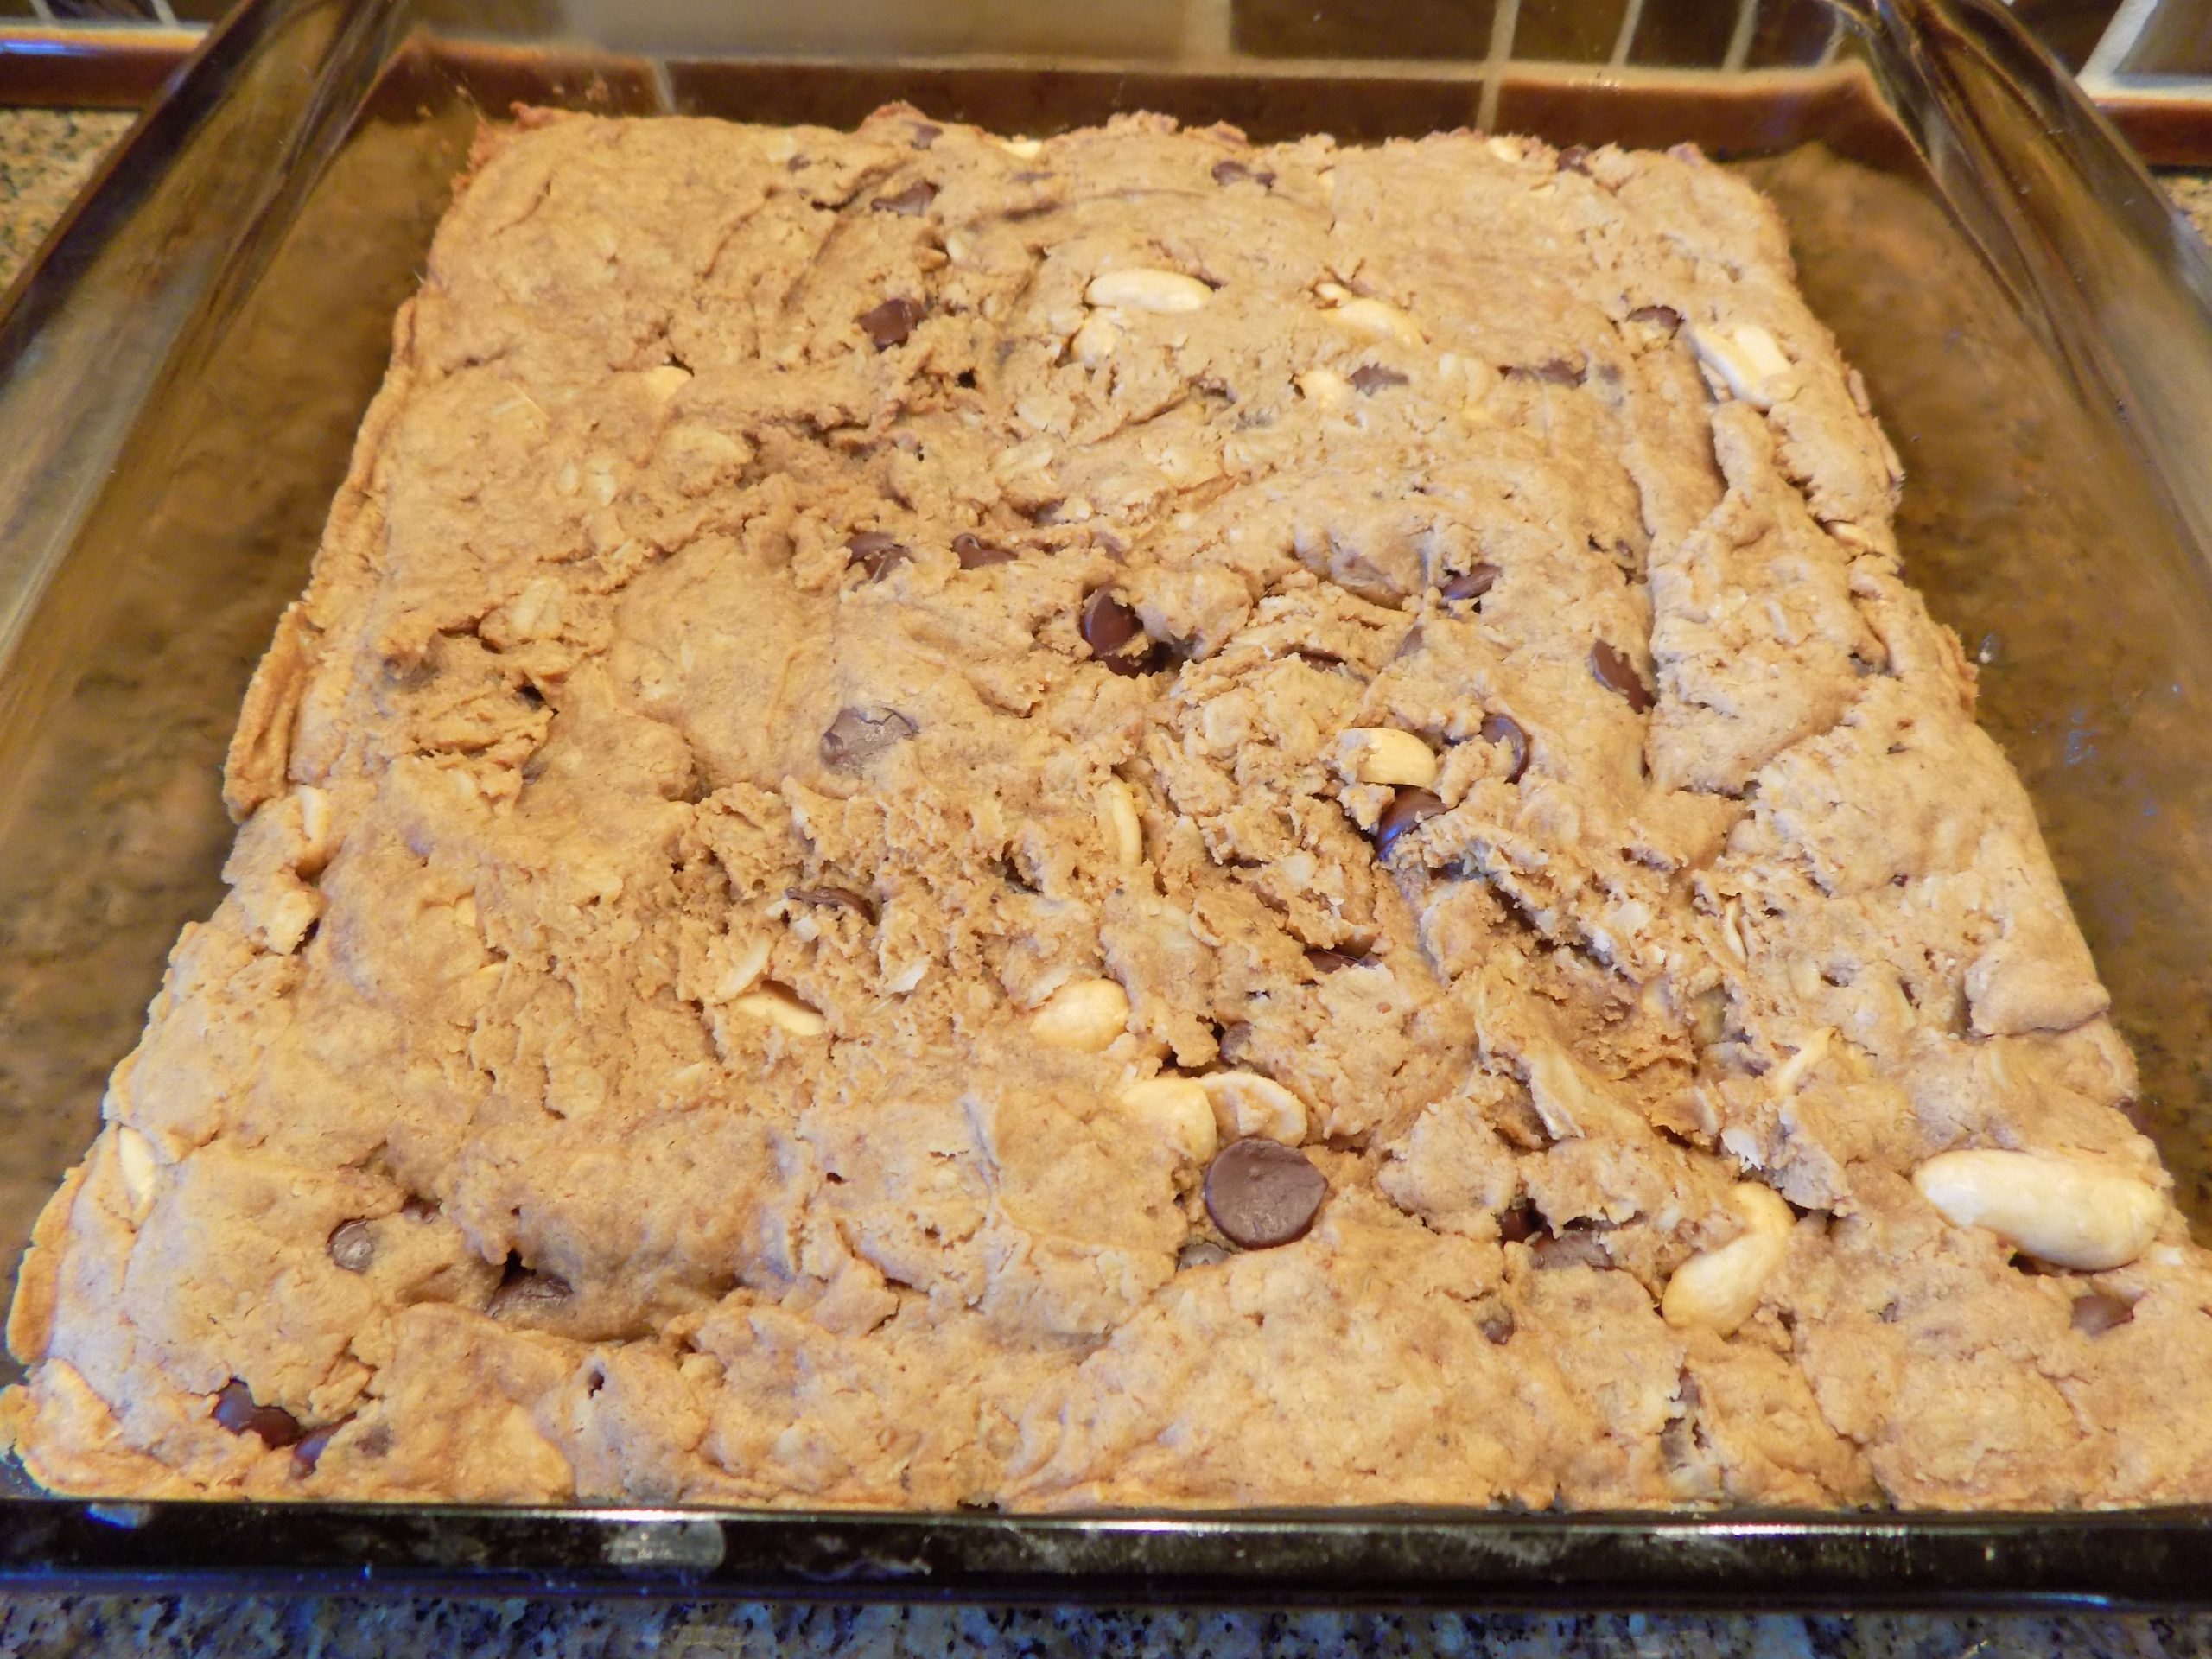
And yes, another natural peanut butter based, oat, and chocolate chip cookie recipe. (I recently published my recipe for GF Peanut Butter Oat chocolate chip coconut Cookies on this site.) And these cookies are not that much different except that this recipe is not gluten free and it’s a bar cookie. I love bar cookies. The older I get, the easier I want to make life for myself. And I thought you might find that to also be true for yourself.
So, when I looked for a healthy bar cookie recipe, this delightful ingredient assembly from the heynutritianlady.com site jumped out at me. I did add salted peanuts to the mix and changed up the prep instructions a bit, but other than that the recipe remains true to the original. And the fact that this recipe is very quick and easy to prepare didn’t hurt either.
So, enough said. The bar cookies are very good. And I can eat one without feeling guilty, which for anyone who is trying to bring their A1C numbers down, is a wonderful thing.
I am fortunate. My numbers are almost normal again since I stopped taking prednisone. But even so, I am going to continue eating like I have diabetes because, well, I’m no longer a spring chicken. I have advanced to the plucky old bird category. And as such, I need to continue paying close attention to what I put in my mouth. And for a foodie like myself, it ain’t easy. But nothing worthwhile has ever been easy. So, why should growing old be any different!
I have had such a wonderful life. I’ve never experienced hunger or had to worry about a roof over my head or how I was going to pay the electric bill. Of course, times were lean when I was younger, but there were opportunities galore when I was in my twenties. I can’t say the same for young adults who are starting out today. Things are different now. And the way our democracy is headed, I’m actually glad I’m old. I don’t like the direction in which our country is headed. Or the complete disregard some of our government leaders show for ethical behavior or empathy for one’s fellow man. Who allowed these spoiled toddlers, in the guise of men and women old enough to know better, to ever attain enough significance as to be able to display such hateful and narcissistic behavior as we are witnessing in our country today? And why aren’t more people incensed by this caustic and erratic behavior? I know if any one of these people were my kid, they’d be hearing from me on a daily basis. And it wouldn’t be to tell them they were doing a great job! I would be letting them know I was mortified by what they were doing, saying, and exemplifying! And that there would be no more Christmas goodie packages until they cleaned up their act! Period! And BTW, GO TO YOUR ROOM!!
How did we ever get to this place? Were most of us just too busy living our wonderful lives to notice what was happening to our world? If that is the case, then I have no one to blame but myself. Because I sure didn’t see it coming. I was simply content to happily drift along and assume that all was perfectly fine because I lived in this wonderful democratic country. Well, that may not always be the case.
So, if you too are bothered by what is happening in our country, please vote in every election that comes along. For most of us, the only way we can truly make a difference, is by casting our ballot for individuals who have the greater good for everyone uppermost in their political agenda.
Peace and love to all.
1 c. natural creamy peanut butter
½ c. coconut palm sugar
2 tsp. vanilla extract
½ c. whole milk
1 c. whole wheat pastry flour
1 tsp. baking soda
¼ tsp. kosher salt
1 c. rolled oats
¾ c. dark chocolate chips
½ c. salted peanuts
Butter a 9×9-inch baking dish. (Glass is best.)
Mix the peanut butter, coconut sugar, vanilla, and milk together in the bowl of your stand mixer.
In a separate bowl, whisk the flour, baking soda, and salt together. Add the rolled oats, chocolate chips, and peanuts.
Pour over the peanut butter mixture and mix all together just until thoroughly combined.
Scoop and press the dough into the prepared baking dish.
Bake in a pre-heated 350-degree oven for about 15 minutes or until the bars are lightly golden on top and set. Don’t over-bake.
Remove from oven and allow to cool completely before cutting into squares.
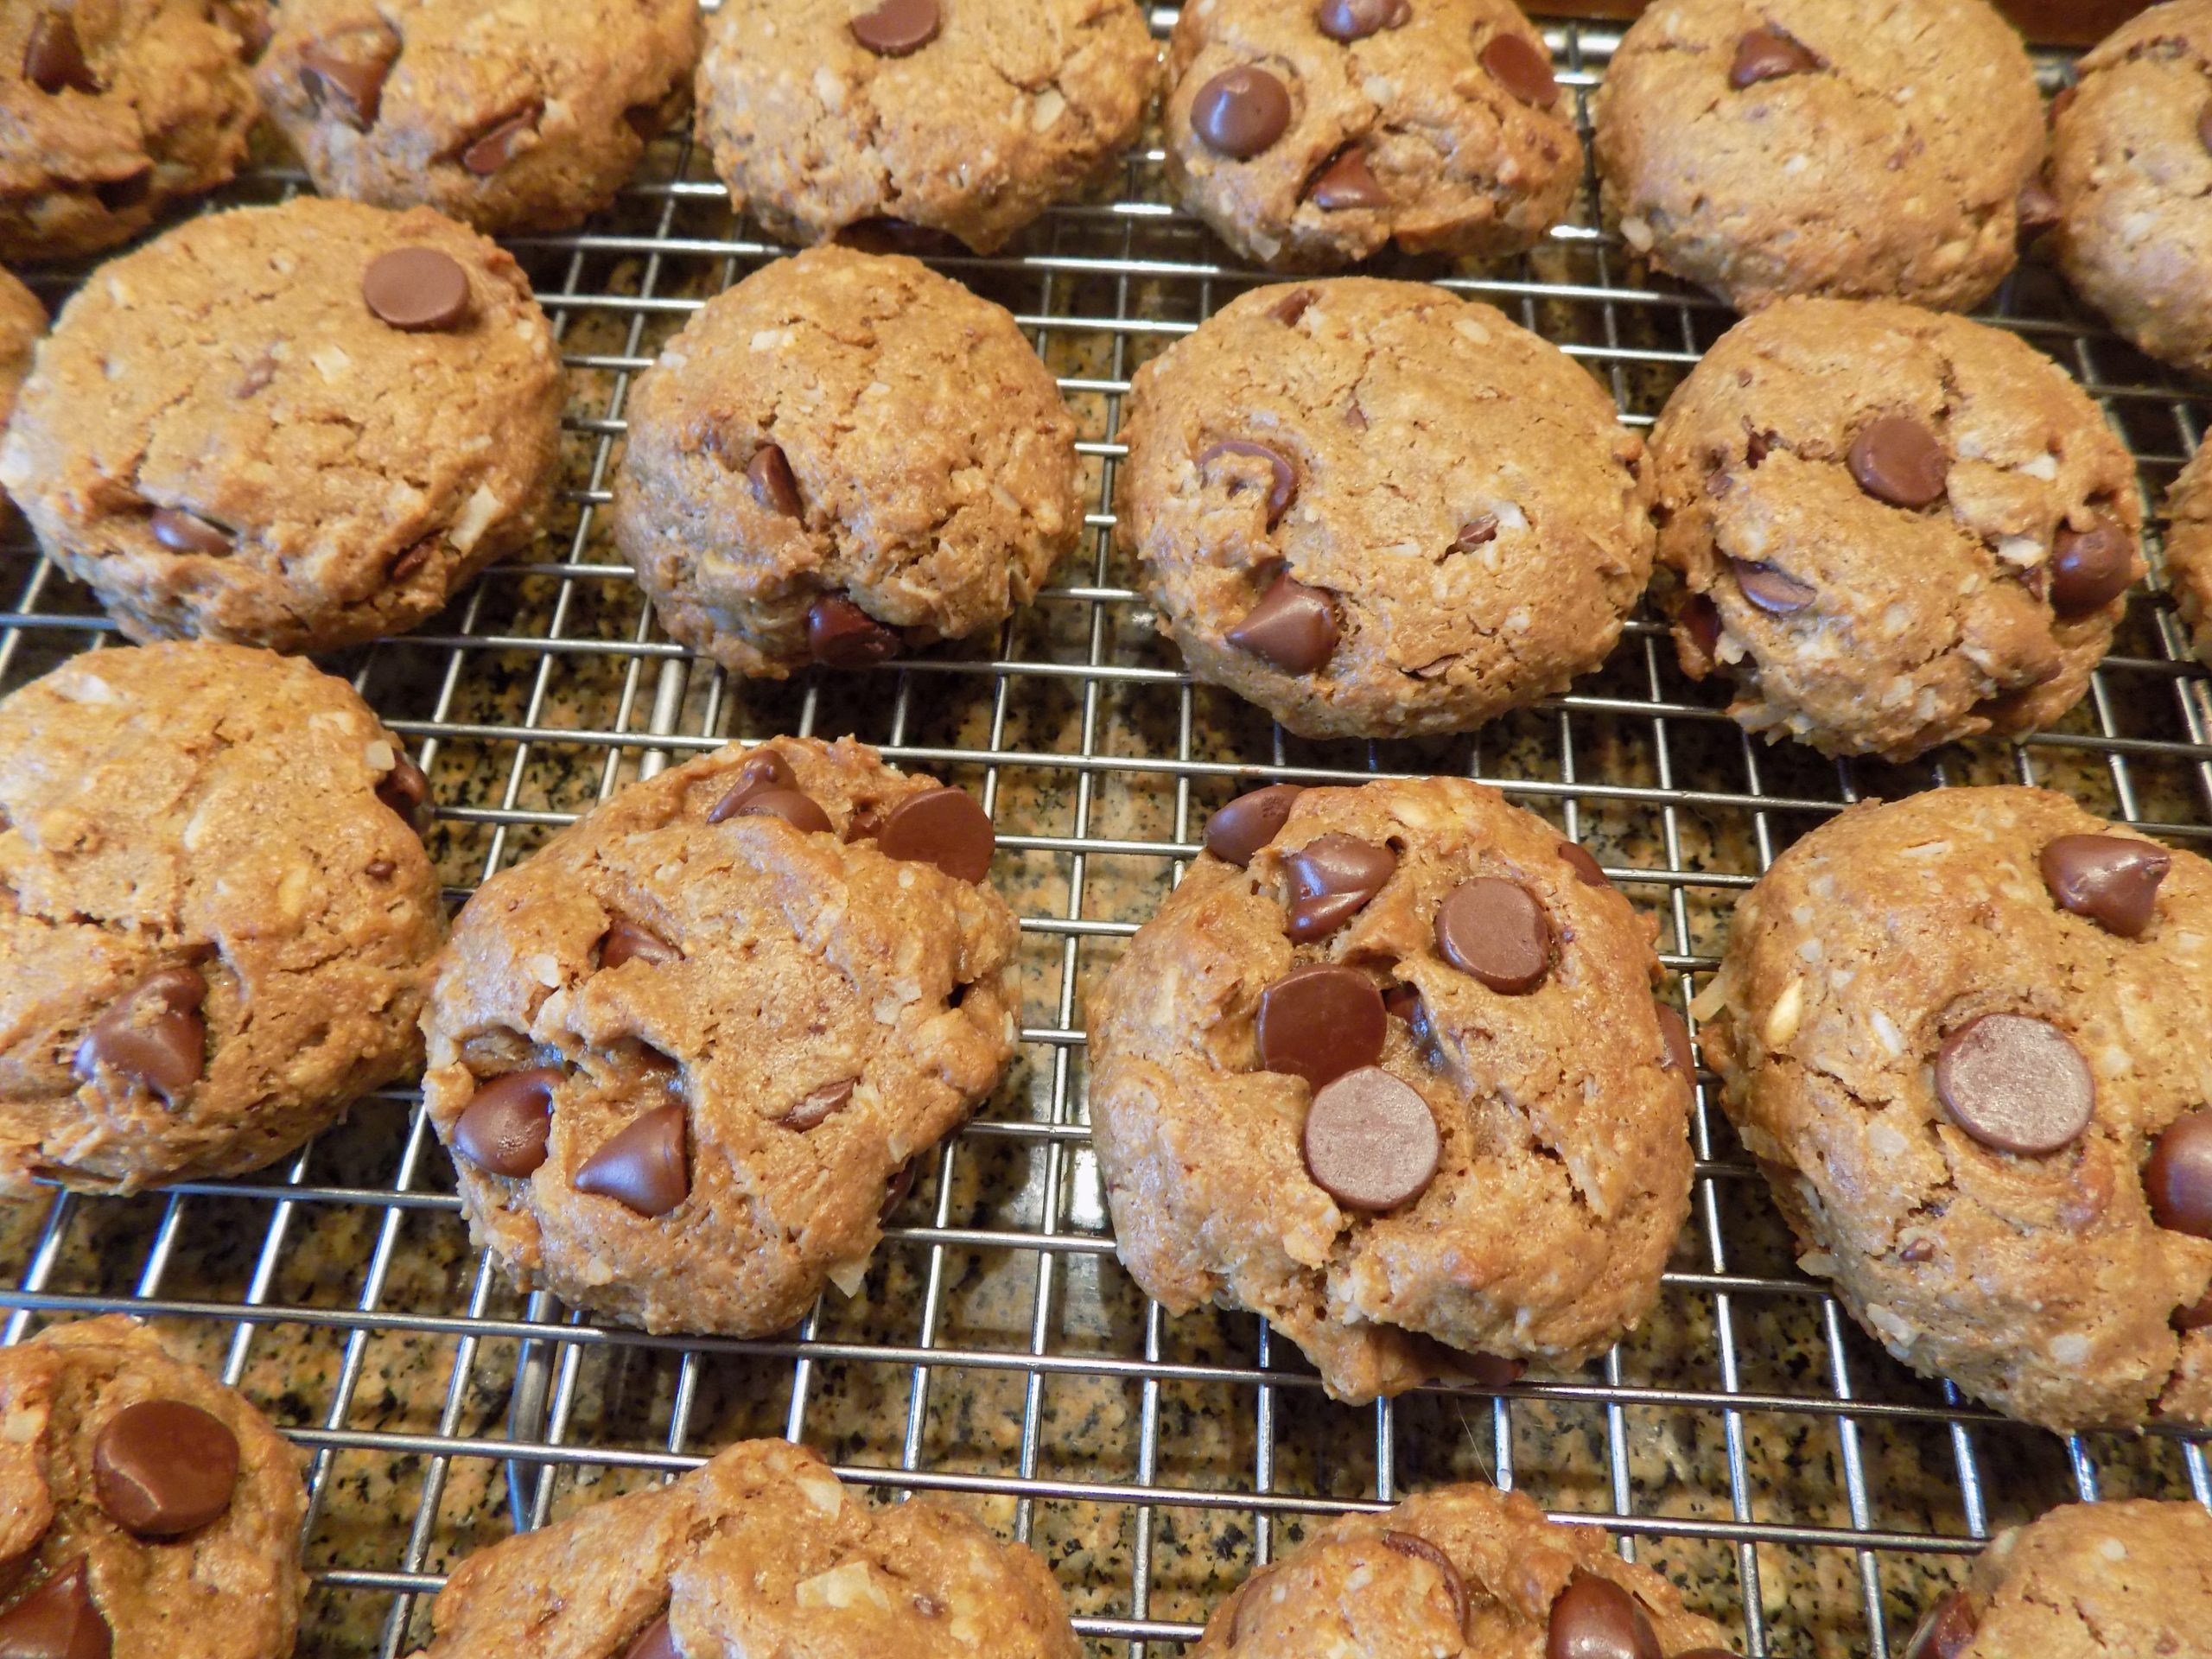
There is just something about a peanut butter cookie. Of course, I am a peanut butter lover, so I’m sure that has something to do with why I gravitate to cookies that contain this amazing ingredient. But in my quest to eat healthier, it’s great when I don’t have to add extra fat in the form of butter or oil to a cookie dough. So, in full disclosure, I don’t normally eat natural peanut butter. All that oil that tends to separate just doesn’t appeal to me when spreading it on a piece of toast. But for cookies, that very same oil helps make cookies more tender. And usually, when I use natural peanut butter in a recipe, no other fat is required. Plus, natural peanut butter is better for us because its main ingredient is peanuts, and it doesn’t contain unhealthy additives. Natural peanut butter is basically protein and unsaturated fats which are known to be beneficial for heart health and to help lower LDL cholesterol levels.
So, when you consider the benefits of using natural peanut butter, you will understand why this recipe that I found on the eatingbirdfood.com site appealed to me so much. Natural peanut butter, with the addition of coconut palm sugar, oats, chocolate chips, and coconut – fantastic. What more could a gal ask for in a cookie recipe? Well, that and the cookie contained no gluten. For me not so much of an issue, but for some, a deal breaker. So, I am always on the lookout for great recipes that are made without a spec of gluten.
So, if you too would appreciate a healthier version of a peanut butter chocolate chip cookie, I recommend you give this recipe a try. The cookies are really tasty, easy to make, and don’t make me feel as guilty as other delightful cookies that shall remain nameless.
As always, have fun in your kitchen. Make every mealtime memorable by cooking from scratch. And don’t be afraid to try dishes from different ethnic cuisines. There is nothing more rewarding than trying a dish that contains an ingredient that you don’t normally appreciate and finding that you love it in the new dish. In other words, keep an open mind when trying new recipes. You really can teach an old dog new tricks. (Or an old eater, new ingredients!)
Peace and love to all.
1 c. natural peanut butter
2/3 c. coconut palm sugar
2 lg. eggs
2 tsp. vanilla extract
½ c. rolled oats (certified GF if required)
2 T. oat flour (certified GF if required)
1½ tsp. baking soda
½ tsp. fine sea salt
1 c. chocolate chips
½ c. shredded coconut
Mix the peanut butter, coconut sugar, and eggs together in the bowl of your stand mixer. (You can mix these cookies by hand, but it’s a workout!) Add the vanilla, oats, oat flour, baking soda, and salt. Beat to combine and then stir in the chocolate chips and shredded coconut. (It will appear that you have used too many chocolate chips. But never fear, you can stick them into the dough balls even after they have been formed.)
Using a #40, 1½ tablespoon ice cream scoop (mine has an orchid handle), drop balls of dough on a parchment lined baking sheet. (They can be quite close together because the cookies are not going to spread very much as they bake.) Press each cookie down lightly. Refrigerate at least 2 hours, but over-night is best.
Bake in a pre-heated 375-degree oven for about 13 minutes or until the tops are cracked.
Remove from oven and let cool on baking sheet for 4-5 minutes, then transfer to a wire rack to cool completely before storing in an airtight container.