Category Archives: DESSERT RECIPES

FROSTED PUMPKIN PECAN MUFFINS

OLYMPUS DIGITAL CAMERA

Something you should know about me.  Unlike most people, I truly don’t like donuts and I don’t much care for muffins either. However, there are a few exceptions. (Aren’t there always?) I absolutely adore maple bars (really just a donut in rectangular form with maple icing) and have learned to really like a few kinds of muffins. Like this muffin for example. It has substance and flavor. It has a lovely dense yet moist consistency. In other words, it has something to offer besides airiness and idle calories. Any muffin I find myself drawn to usually contains bran or dried fruit or has some other redeeming ingredient that sets it apart from the average offering in any coffee shop display case. And truly I don’t understand why I love most cakes and dislike most muffins. They are very similar when it comes right down to the ingredients list. But I guess there is just no explaining an individual’s taste in food. And in that regard I am no different than anyone else. (Just proves what I have always said – “humans are nothing if not inconsistent!”)

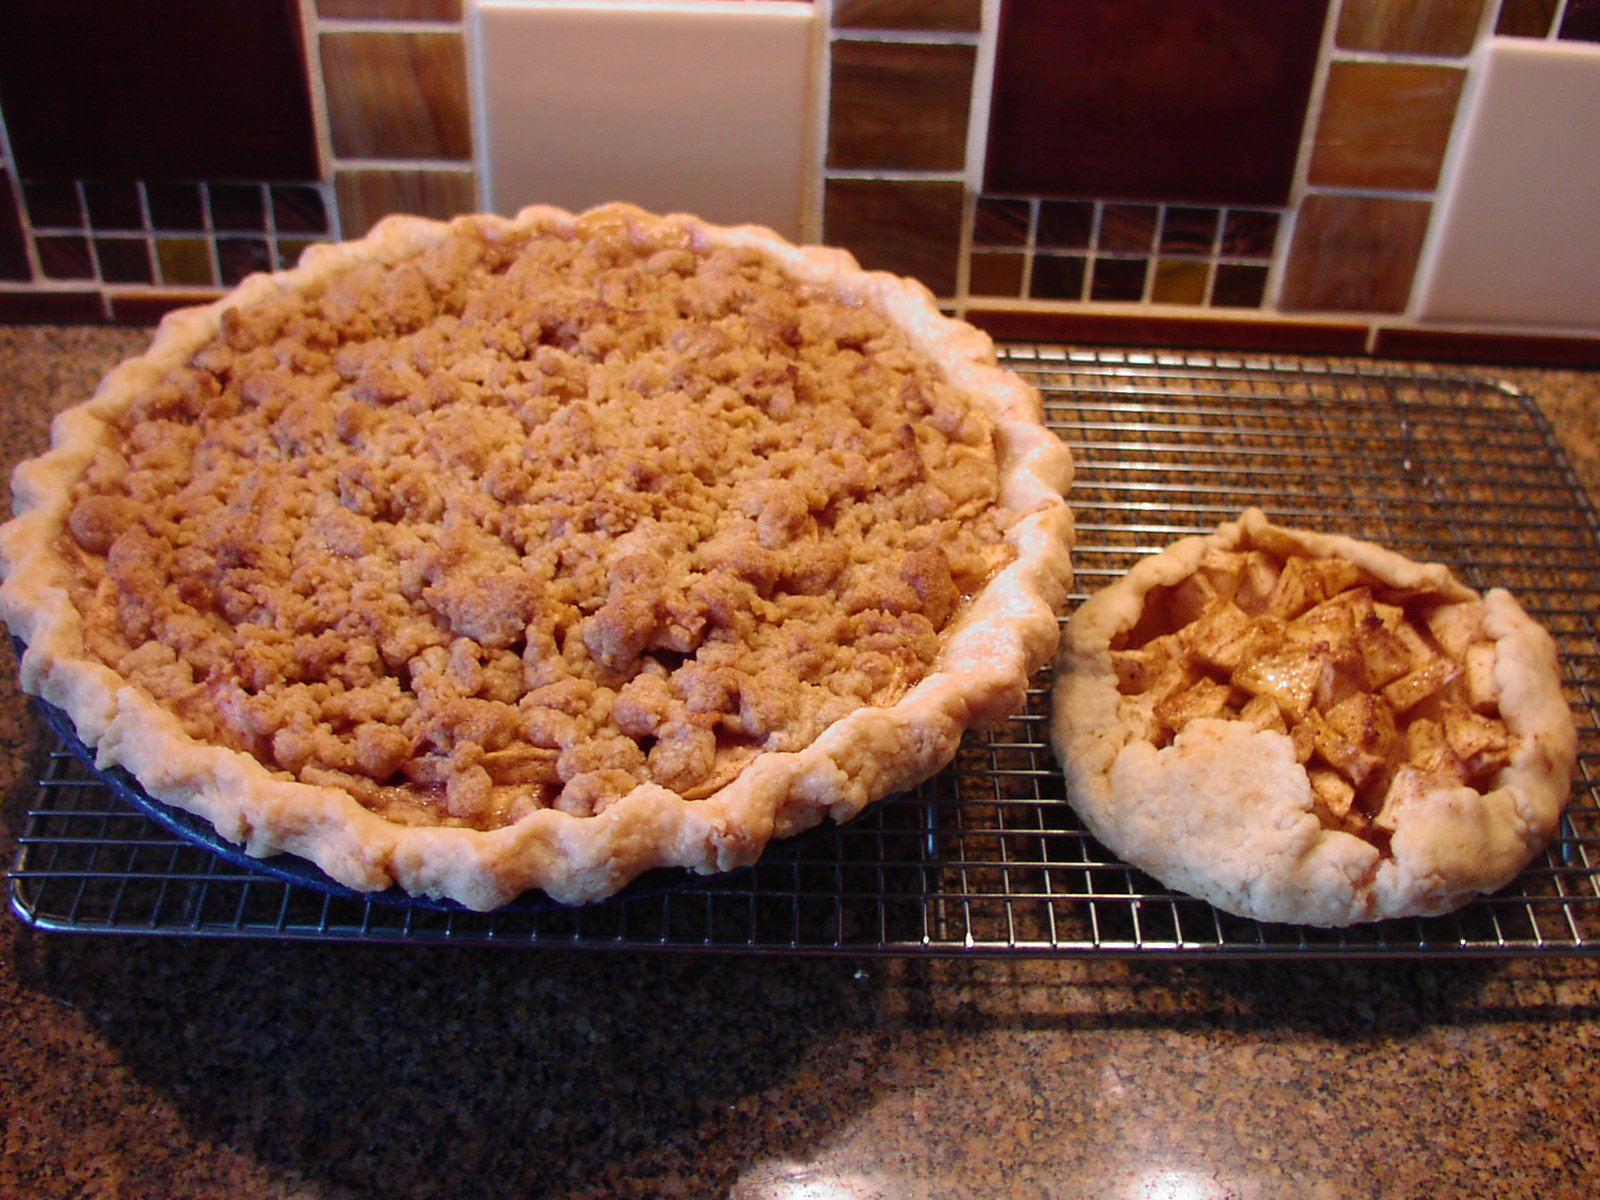
So just in case there are any readers who share my eccentricity about muffins, I’m going to post a few really outstanding muffin recipes I have learned to make over the years. I’m not going to post them in any kind of sequence or series. Even though I have learned to really like them, they will simply never hit my every day or even every week “must have, absolutely crave” list. None-the-less, they are very good and in some cases, fairly nutritious too. And muffins are easy to make, keep very well, and most normal people think are just a delightful treat. And at this busy time of year, almost indispensible as a tasty sweet to serve friends and neighbors who drop by with holiday greetings.

Because I have been so frank about my general dislike of muffins, I feel compelled to say I’m sorry to any muffin lovers out there if I have in any way offended you. Also, if your meaning of life comes from jelly donuts, I offer my heartfelt apologies for casting aspersions on something so near and dear to your heart. In fact, I’m feeling so contrite I’d be willing to make it up to you. Let’s meet for a maple bar!

Muffin Ingredients:

  • 2 c. whole wheat flour
  • 1½ c. all purpose flour
  • ¾ c. granulated sugar
  • 2 tsp. baking soda
  • 1 tsp. baking powder
  • 1 teaspoon each cloves, cinnamon, and nutmeg
  • ½ tsp. salt
  • ½ c. chopped toasted pecans
  • 1 (15-oz.) can pure pumpkin (or 2 cups puree)
  • ½ c. olive oil
  • ¼ c. real maple syrup
  • 3 T. milk
  • 3 eggs, room temperature

Frosting Ingredients:

  • 2 T. butter
  • 1¼ c. powdered sugar
  • 1 tsp. vanilla
  • 1 T. maple syrup
  • 1-2 tsp. water

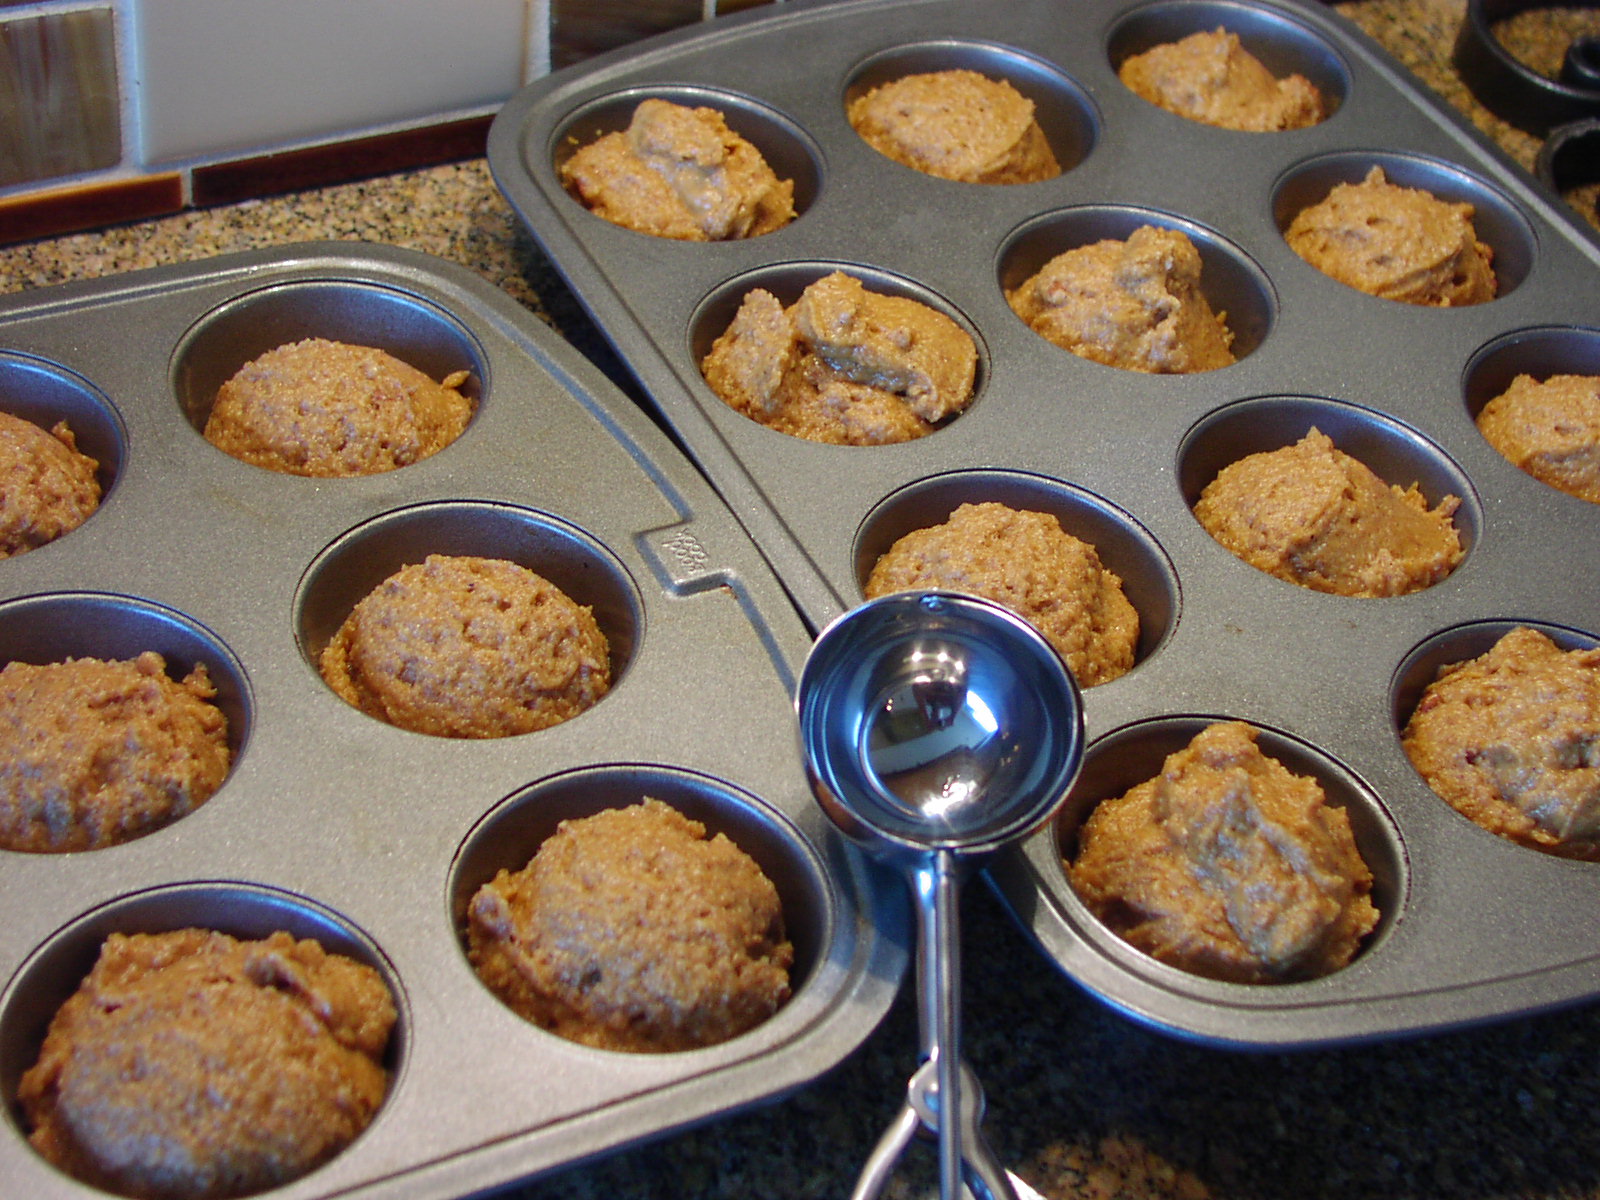
Muffins: Combine the flours, baking soda, baking powder, cloves, cinnamon, nutmeg, salt, sugar, and nuts in a large mixing bowl. In a separate bowl, whisk together the pumpkin, oil, maple syrup, milk, and eggs. Add the wet ingredients to the dry ingredients in the large mixing bowl and stir only until combined. Do not over-mix.

Lightly grease each muffin cup with cooking spray. Using an ice cream scoop, fill each muffin tin almost to the top with a scoop of batter. (If you don’t have a large ice-cream scoop, just fill using a large spoon.)

OLYMPUS DIGITAL CAMERA
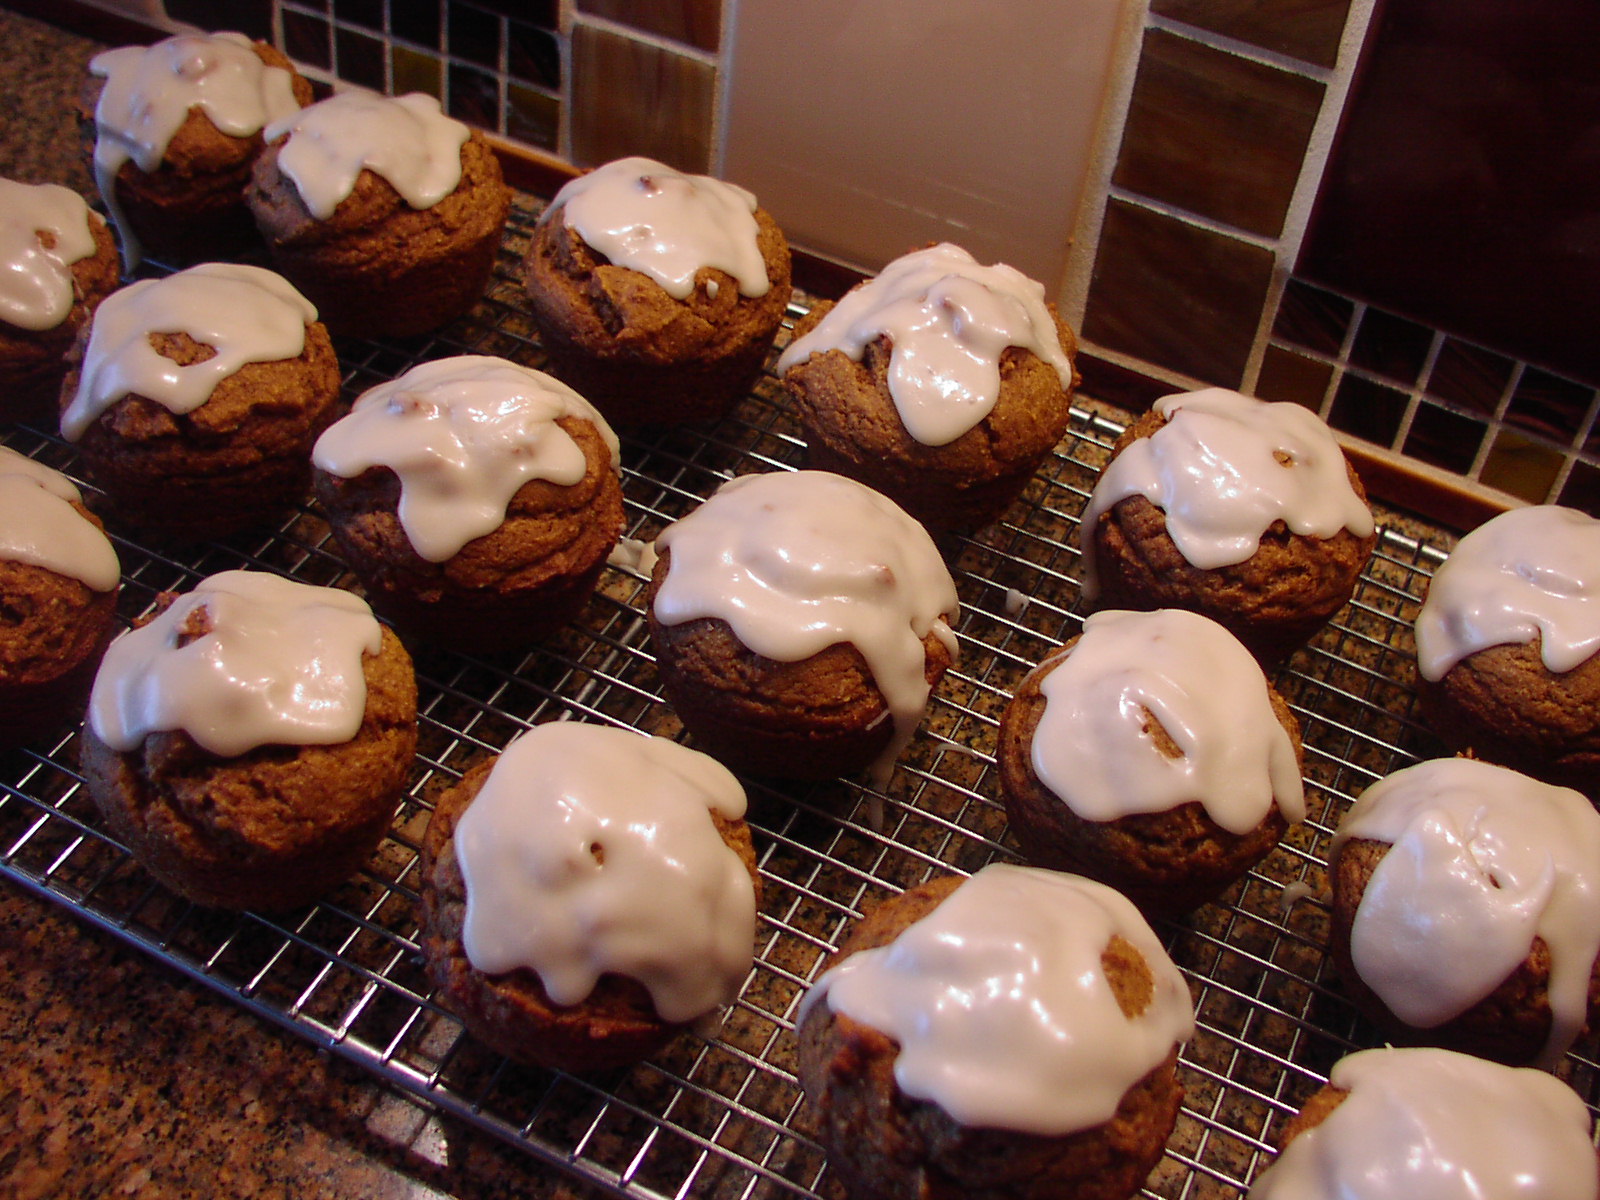
Bake in a pre-heated 350 degree oven for 25 minutes or until a toothpick inserted into the middle of one of the muffins comes out dry. Remove the muffins from pan and let cool before frosting. (If you have time, bake the muffins ahead and let them take a cold vacation for a few days in your freezer. Baked goods that contain fruit or vegetables are almost always more moist and flavorful after being frozen. However, if you do freeze them, don’t frost them until just before serving.

Frosting: Melt butter in a small saucepan. Add powdered sugar and vanilla. Stir in the maple syrup. Add water until desired consistency is reached. Drizzle over cooled muffins. Allow the frosting to harden and store in an airtight container.

PIE CRUST

OLYMPUS DIGITAL CAMERA

I learned to make this pie crust when I was 21 years old. My neighbor in student housing was the local home economics teacher. (Her husband was a graduate student, that’s why they too could live in student housing.) Anyway, I was so in the very early stages of learning to cook. I had a Betty Crocker cookbook and a Better Homes and Gardens cookbook, and I absolutely poured over them every evening.

So one day I was complaining to my friend that I really wanted to learn how to bake pies, but that they looked like they would be way over my head too hard. She said pshaw or words to that effect and dragged me into her kitchen. She gave me a one-on-one lesson on how to make the perfect pie crust and I have never looked back.

Now the last thing I want to do is try and convince you to try this recipe if you already have a great pie crust recipe. Good pie crust is tricky business. I swear 2 people making the same recipe can come up with dramatically different results. My pie crust recipe might turn out like cardboard for you and drive you to start drinking. And vice versa, I might try your recipe, find that it does not work for me at all, and end up giving up drinking! I just can’t take that chance.

But, if by some slim chance you don’t have a good pie crust recipe, I would like to offer up this proven winner. The ingredients are much the same as any other pie crust. It’s the way they are assembled that makes this recipe so different. My dear mentor, and for the life of me I can’t remember her name, explained that what makes pie crust tough is adding the water straight in with the shortening. She said that adding a little of the flour to the water first, prevented that problem. And I have to tell you, that in the 48 years I have been making pies, (48 years!?!?) I haven’t had to throw out even one pie. I’ve felt like throwing a few in my day, but never because the pie tasted awful!

  • ¼ c. very cold water
  • 2 c. flour
  • 1 tsp. salt
  • heaping 2/3 c. Crisco

Step 1 – Pour cold water into a small bowl. Step 2 – Measure flour and salt into a mixing bowl. Step 3 – Take 1/3 cup of the flour back out of the mixing bowl and stir it into the water. Make a paste. Set aside. Step 4 – Add the Crisco (heaping 2/3 cup) to the flour and salt mixture. Mix together. (I use my KitchenAid mixer.) Step 5 – Add the water/flour paste to the flour/shortening bowl and mix just until blended. Do not over-mix. Roll out dough and place in pie plate. This recipe makes enough dough for a double crust pie, if using a regular sized pie plate, or one large bottom crust with a little left over for pastry cookies or small tart like the one shown below.

Helpful hint: Use a pastry cloth to roll out your pie crust. It really makes a difference. You can find pastry cloths in almost any kitchen wares shop. Well worth the $10 or so.

OLYMPUS DIGITAL CAMERA

FRENCH APPLE PIE

OLYMPUS DIGITAL CAMERA

This recipe came to me from my mother-in-law Betty. It was her mother’s recipe and now it is the only apple pie recipe served at our extended family holiday get-togethers. Doesn’t matter whether it’s Auntie Evelyn, my daughter Paula or me making the pies, grandma Freund’s apple pie has got to be one of the offerings. And there is a very good reason for that. French apple pie is fabulous. And it’s easy. Working with just one crust is always easier than trying to fit a top crust over the filling, crimping the edges so they look beautiful, and actually getting the whole thing in and out of the oven without incident.

So next time you want to bake an apple pie, give this recipe a try. The crunchy topping reminiscent of crumbled shortbread makes just a lovely contrast to the tender apple slices. I know you and your family and friends will become devoted fans at first bite. I know that’s all it took for me!

  • ½ to 2/3 c. sugar (depends on the tartness of your apples)
  • 1 tsp. cinnamon
  • 2 T. + 1 c. flour
  • 6-8 apples, peeled and thinly sliced
  • pie crust for 9-inch one crust pie
  • ½ c. butter, room temperature
  • ½ c. packed brown sugar

In a medium mixing bowl, whisk together the sugar, cinnamon, and 2 tablespoons flour. Add apple slices and combine thoroughly. Pour into a pastry lined pie pan. It should look like there are way too many apples. That’s exactly what you want. See picture below.

OLYMPUS DIGITAL CAMERA

Cream butter and sugar together; add the remaining 1 cup flour. Crumble over apples. Cover edges of pie crust with 1 ½-inch strips of aluminum foil to prevent excessive browning. Remove foil last 5 minutes of baking.

OLYMPUS DIGITAL CAMERA

Bake in a pre-heated 375 degree oven for 60 minutes or until top is nicely browned and the apples are tender. Serve slightly warm with a side of vanilla ice cream or for an extra special treat, topped with Bourbon Caramel Whipped Cream. (Recipe under This & That)

BONUS RECIPE – PIE CRUST (my secret recipe)

  • ¼ c. very cold water
  • 2 c. flour
  • 1 tsp. salt
  • heaping 2/3 c. Crisco

Step 1 – Pour cold water into a small bowl. Step 2 – Measure flour and salt into a mixing bowl. Step 3 – Take 1/3 cup of the flour back out of the mixing bowl and stir it into the water. Make a paste. Set aside. Step 4 – Add the Crisco (heaping 2/3 cup) to the flour and salt mixture. Mix together. (I use my KitchenAid mixer.) Step 5 – Add the water/flour paste to the flour/shortening bowl and mix just until blended. Do not over-mix. Roll out dough and place in pie plate. This recipe makes enough dough for a double crust pie if using a regular sized pie plate, or one large bottom or top crust with a little left over for pastry cookies* or a small tart like the one shown below.

OLYMPUS DIGITAL CAMERA

OLYMPUS DIGITAL CAMERA

*To make pie crust cookies, roll out the left over dough, cut into whatever size or shape you like, place on a cookie sheet, and sprinkle with sugar and cinnamon. Bake along with your pie, but not for as long. Check after 20 minutes. The “cookies” should be nicely browned on the bottom when they are done. Note: pastry cookies need not be shared with anyone else.  They are meant to be eaten only by the baker!


BOURBON CARAMEL WHIPPED CREAM

OLYMPUS DIGITAL CAMERA

There are few things as wonderful as pie with a dollop of whipped cream on top. But when you add a whipped cream that has been enhanced with a bourbon flavored caramel sauce, well howdy, heaven is just a fork full away.

  • ¼ c. butter
  • ½ c. brown sugar
  • ¼ c. + 2 c. heavy whipping cream
  • 2 T. good bourbon
  • freshly ground nutmeg, opt.

Whisk butter and brown sugar together over medium heat in a small heavy saucepan until brown sugar has dissolved completely. (This happens after the mixture comes to a boil and is allowed to burble for a couple of minutes or until it turns kind of shiny. Continue whisking the whole time the mixture is on the heat.) Remove from heat and gently whisk in the quarter cup heavy cream and bourbon. Allow caramel to come to room temperature and then refrigerate. Beat the remaining 2 cups of whipping cream to stiff peaks. Add the cold caramel sauce and whip just until well blended. (The caramel sauce and whipped cream can be combined up to a few hours before serving.)

Lovely served on bread pudding and pumpkin, pecan, or apple pie with just a sprinkle of fresh nutmeg on top to provide color and a tough of spice, so to speak. Of course, straight out of the bowl is pretty marvelous too! Oh, and Mr. C. loves this on his morning latte.

PUMPKIN PIE BARS WITH BOURBON-CARAMEL WHIPPED CREAM

OLYMPUS DIGITAL CAMERA

Because I am lazy and want to spend my time doing something besides working in the kitchen on Thanksgiving (I know that surprises some of you), I devised this recipe for a make ahead and easy to prepare dessert. No pie crust to roll out and best made a day or two ahead. Even the bourbon caramel for the whipped cream can be made several days ahead. (Just don’t tell your family it’s in the refrigerator or there will be none left. I speak from experience.)

Crust:

  • 2 c. flour
  • 1 c. butter, room temperature
  • ½ c. powdered sugar

Mix flour, butter, and powdered sugar together and pat into a 10×15-inch pan. Bake in a pre-heated 350 degree oven for about 16 minutes or until light brown. Remove from oven. Meanwhile prepare filling.

Filling:

  • ¾ tsp. salt
  • ¾ c. sugar
  • 2 tsp. cinnamon
  • ¼ rounded tsp. ground ginger
  • ¼ rounded tsp. nutmeg
  • 1/8 tsp. ground cloves
  • 2 eggs, room temperature
  • 12 oz. evaporated milk
  • 1 T. melted butter
  • 2 c. solid pack pumpkin

Whisk together all of the filling ingredients and pour into prepared crust. Return pan to oven and bake for 20-25 minutes or until the filling has just set. Filling is set when you can insert a table knife into the middle of the filling and it comes out clean. Remove from oven and allow to cool completely.

Bourbon Caramel Whipped Cream:

  • ¼ c. butter
  • ½ c. brown sugar
  • ¼ c. + 2 c. heavy whipping cream
  • 2 T. good bourbon
  • ground nutmeg, opt.

Whisk butter and brown sugar constantly over medium heat in a small heavy saucepan until brown sugar has dissolved completely. (This happens after the mixture comes to a boil and is allowed to burble for a couple of minutes or until it turns kind of shiny. Continue whisking the whole time the mixture is on the heat.) Remove from heat and gently whisk in the quarter cup heavy cream and bourbon. Allow caramel to come to room temperature and then refrigerate. Beat the remaining 2 cups of whipping cream to stiff peaks. Add the cold caramel sauce and whip just until well blended. (This can be made ahead of time.) To serve Pumpkin Bars, cut to desired size, place on dessert plate and dollop with whipped cream. For an extra special touch, lightly sprinkle with nutmeg.

STRAWBERRY RHUBARB CRISP

OLYMPUS DIGITAL CAMERA

I love late spring, early summer for many reasons. Two of the top reasons are fresh local strawberries and rhubarb. And in combination, I mean really, what is not to love about this dynamic duo? And then when I think of strawberries and rhubarb in a crisp, I practically start to drool just thinking about this fabulous fruit dessert. But alas dear friends, there is actually not a speck of true fruit in a Strawberry Rhubarb Crisp. Strawberries are members of the rose family. Botanists refer to them as “false fruit,” or pseudocarp. A strawberry is a multiple fruit which consists of many tiny individual fruits embedded in a fleshy receptacle. The brownish or whitish specks, which are commonly considered seeds, are the true fruits, called achenes, and each of them surrounds a tiny seed.  And then, to make our beloved strawberries even more difficult to fathom, they aren’t even true berries! But eggplants, tomatoes, and avocados are! (I am so confused!) Then there’s rhubarb.

Rhubarb is a perennial that forms large fleshy rhizomes and large leaves with long, thick (and tasty) petioles (stalks). Rhubarb originated in Asia over 2,000 years ago. It was initially cultivated for medicinal purposes. It was not until the 18th century that rhubarb was grown for culinary purposes. Rhubarb is often commonly mistaken to be a fruit but rhubarb is actually a close relative of garden sorrel, and is therefore a member of the vegetable family. Rhubarb is rich in vitamin C and dietary fiber, as are strawberries. With strawberries, it’s the achenes that cause strawberries to be relatively high in fiber. According to the Wellness Encyclopedia of Food and Nutrition, “one-half cup of strawberries supplies more fiber than a slice of whole wheat bread, and more than 70 percent of the recommended daily allowance of vitamin C”.

So ladies and gentlemen, regardless of what strawberries (Frugaria) or rhubarb (Rheum) are or aren’t, they remain at the top of my list of yummy “whatevers” to eat at this time of year. And a truly great way to prepare both of these “whatevers” is this luscious crisp based on an Ina Garten recipe. Just don’t forget to top with a scoop of vanilla ice cream. (And no, I’m not even going to attempt to explain vanilla, except to say that vanilla beans are the dried fruit of the vanilla orchid which can only grow in areas where Melipona, a genus of stingless bees spend their summer vacation!)

  • 1 c. flour
  • 1/2 c. brown sugar
  • 1 1/4 c. granulated sugar, divided
  • 1/2 tsp. kosher salt (unless using salted butter)
  • 1 c. rolled oats
  • 12 T. cold butter, diced
  • 4 c. fresh rhubarb, diced
  • 4 c. fresh strawberries, hulled and cut into same size pieces as the rhubarb
  • 1 1/2 tsp. grated orange zest
  • 1 T. cornstarch
  • 1/4 c. freshly squeezed orange juice
  • vanilla ice cream, opt.

Combine the flour, 1/2 cup granulated sugar, brown sugar, salt, and oatmeal in the bowl of an electric mixer fitted with the paddle attachment. Add the butter and mix until the ingredients form large crumbles. Set aside.  Toss the rhubarb, strawberries, remaining 3/4 cup of the granulated sugar, and orange zest together in a large bowl. Dissolve the cornstarch in the orange juice; mix into the fruit. Scoop into a 9×13-inch baking dish. Sprinkle the topping over the fruit and bake in a pre-heated 350 degree oven for 1 hour, or until the fruit is bubbling and the topping is a light golden brown. Allow to cool for about an hour and serve warm with vanilla ice cream.

AMARETTO BUNDT CAKE

I just realized that there isn’t a commonly used word for a person like myself who loves all things Italian!  Francophile is universally used to describe people who love all things French.  And Anglophile is the name associated with people who love all things English. So why in the name of al dente fettuccine isn’t everyone using Italophile to describe a person like myself? (I know some of you already have a name for people like me, but that name doesn’t relate to a passion for Italy.)  But really, think how unfair it is that “Italophile” is not in the common vernacular! I mean come on, who doesn’t think, (at least those who have visited France, England and Italy) that Tuscany isn’t just about as perfect as any place in either France or England? Or who wouldn’t want to spend 6 months living in a small pensione in any one of the 5 tiny villages that constitute the Cinque Terra in Italy as much as they would want to spend time on the English coast or on the French Riviera? And who doesn’t think that Italian food is certainly the equal of, if not even more delicious than French cuisine? (I’m not even going to mention English food in this discussion!) I mean truly, if you want to consider food in this equation at all, Italian food would win hands down. All anyone has to do is go to the yellow pages under Italian, French, or English restaurants to determine that Italian restaurants are far and away the most popular of the three.

So back to my original supposition – I truly believe that the word “Italophile” should become a part of our common vocabulary and trip easily and frequently off of our tongues. I know I am going to start using it in conversation. People will think me strange at first, but every person who uses an unfamiliar term has to be prepared to suffer a few slings and arrows to get their point across. Of course after it catches on, and everyone is using Italophile in every other sentence, someone else will take the credit for its popularity. But you will know who it was that really started the craze. You can even tell your friends you were there at the very beginning. After all, if someone can make “dude” a household word, then a word as sophisticated and trendy as “Italophile” should be easy. Spread the word my friends, spread the word!

Oh and by the way, the recipe attached is really wonderful. It is every Italophiles dream of how a cake should taste. Buon Appetito!

  • 1 pkg. yellow cake mix
  • 4 eggs, room temperature
  • 1 (3 ½-oz.) pkg. instant vanilla pudding mix
  • 3 T. + ½ c. Amaretto liqueur, divided
  • ½ c. water
  • ½ c. vegetable oil
  • ¼ tsp. almond extract
  • 1 c. sifted powdered sugar

Combine cake mix, eggs, pudding mix, 3 T. Amaretto, water, oil, and almond extract in a mixer bowl. Beat on medium low speed for 5 minutes. Spoon batter into a buttered and floured 10-inch Bundt pan. Bake in a pre-heated 350 degree oven for 40-45 minutes. Do not over-bake. Meanwhile whisk together the remaining ½ cup Amaretto and powdered sugar. Set aside. After cake has been removed from the oven and is still hot and still in the pan, poke holes all over with a toothpick. Pour the Amaretto icing into the holes and all over what will become the bottom of the cake. Allow to cool for 2 hours before gently removing from pan to a cake plate.


CINNAMON NUT COFFEE CAKE

OLYMPUS DIGITAL CAMERA

I never really liked coffee cake as a kid or as a young adult because I found the cake part way too dry and the topping way too sweet. So for many years I never even attempted to make one myself because I assumed (you know what that makes me!) mine would turn out the same. (During all that time I had watched other people buy coffee cake with their morning coffee, but I just thought they were folks who were clueless.)

Well I was in a hurry last Friday but still wanted to bring a little treat for our BlueStreet Jazz Voices Saturday morning rehearsal. So I thought about coffee cake. I went on line searching under “coffee cake made with cake mix”. I found a veritable plethora (love that word) of recipes from which to choose. They all looked easy, so I picked one and made a few changes. As it turns out, I’m the only one who was clueless! The coffee cake turned out to be moist and delicious and the filling/topping delightful and not overly sweet. And it could not have been easier to prepare.

So if I were still gainfully employed, this would definitely be a treat I would bring my fellow staff members to brighten their day. I can just picture the smiles on their faces when I showed up some dreary winter Monday morning with one of these babies in hand. You know, working for a large financial institution (or any large corporation, for that matter) can have its rather dull moments. I know that shocks you, but it’s true. But something as simple as a homemade coffee cake sitting on the counter near the coffee pot can truly lift people’s spirits. It’s just a nice way of bringing a little of the comfort of home to the sterile environment of the office. In the immortal words of the now middle aged Pillsbury Dough Boy – “nothin’ says lovin’ like somethin’ from the oven”. (You know, it’s pretty darn scary when you find yourself quoting a man shaped marshmallow wearing a chef’s hat! But basically, that’s exactly how I feel!)

Enjoy the recipe.

  • 1 (18.25-oz.) pkg. yellow cake mix
  • 1 (5.1-oz.) pkg. instant vanilla pudding mix (that’s the large package of instant pudding)
  • ½ tsp. instant espresso, opt. (I use Medaglia D’oro)
  • 4 eggs, room temperature
  • 1 c. water
  • 1 c. vegetable oil
  • 1 c. packed brown sugar
  • 2 tsp. cinnamon
  • 1 c. chopped pecans or walnuts

In the bowl of your mixer, combine the cake mix, vanilla pudding mix, and espresso powder. Add the eggs, oil, and water; beat for about 5 minutes. Meanwhile, in another bowl stir together the brown sugar, cinnamon, and nuts. Pour just under half of the batter into a buttered 10×16-inch pan (glass is best). Spread evenly. Sprinkle with half of the brown sugar mixture. Carefully spread the rest of the batter evenly over the filling.  Sprinkle with the remaining nut mixture. Bake in a pre-heated 325 degree oven (glass) or 350 degree oven (metal) for 35-40 minutes or until a toothpick stuck in the cake comes out clean. Do not over-bake. Allow to cool completely before serving. Best made the day before.


ITALIAN DREAM CAKE

OLYMPUS DIGITAL CAMERA

So for years I have been seeing recipes for Italian Dream Cake. Years! (And yes I know it’s actually Italian Cream Cake, but once you have eaten a piece of this fabulous creation, I bet you won’t argue with my new name for this Italian classis dessert!) So like I said, I’ve been looking at recipes for this cake for years. And yet I never gave any of them a try until our last JazzVox concert. (I was planning an Italian food theme and needed more than one dessert. So in addition to one of my favorite Italian inspired cakes, Amaretto Bundt Cake (recipe to be posted in the near future), I decided to serve this cake using a recipe I found who knows how long ago. I made a few minor variations of course, but the basic easy to prepare bones of the recipe remain. All I can say is – WHY IN THE NAME OF ALL THINGS TUSCAN DID I WAIT SO BLOODY LONG TO MAKE THIS CAKE? It is incredibly delicious and almost embarrassingly easy to prepare. So do yourself a favor and don’t wait like I did. Make this cake for your next gathering and impress the pickles out of your family and friends. Or take it to work one day. Just don’t be surprised if your co-workers start begging you to “bring THAT cake” again and again. Some recipes should just plain come with warning labels. This is one of those recipes.

Warning: Will trigger adoration! Will inspire devotion! Will lead to more baking! Be prepared!

  • 1 white cake mix
  • 1 (3½-oz.) pkg. instant vanilla pudding
  • ¾ c. half & half
  • ¾ c. water
  • 4 lg. eggs, room temperature
  • ½ c. vegetable oil
  • 1¼ c. chopped pecans, lightly toasted, divided
  • 3½ c. flaked coconut, divided
  • 3 T. unsalted butter, room temp.
  • 6 oz. cream cheese, room temperature
  • ¼ tsp. vanilla
  • 1 T. heavy cream or more
  • 2½ c. powdered sugar or more

In the bowl of your mixer, combine the cake mix, vanilla pudding, half & half, water, eggs and oil. Beat for 3 minutes at medium speed. Fold in 1 cup of the pecans and 2 cups of the coconut. Pour the batter into a lightly buttered 9 x 13-inch pan (glass is best). Bake in a pre-heated 325 degree oven (glass pan) or 350 degree oven (metal pan) for 30-35 minutes or until toothpick inserted into the center of the cake comes out clean. Do not over-bake. Allow to cool completely before frosting. While cake cools, toast the remaining 1 ½ cups of coconut. Set aside.

In a medium sized mixer bowl, thoroughly cream the butter and cream cheese. Add the vanilla and powdered sugar and enough cream to make a smooth spreading consistency. (You may need to add more cream or powdered sugar to get the right consistency for you.) Frost the cake and sprinkle with toasted coconut and remaining ¼ cup pecans. Refrigerate until about an hour or two before you plan to serve. Don’t even think of serving with ice cream or whipped cream. Absolutely not necessary and would detract from the cake itself. You simply don’t want to do that!


FLOURLESS ORANGE CHOCOLATE CAKE (GÂTEAU AU CHOCOLAT)

As promised, this is another one of my favorite gluten free recipes. I make this cake every time I want an easy and absolutely decadent dessert. And I have yet to make it without someone (usually one of the guys) following me around like a puppy begging for more. They’ll usually even clean the bottom of the pan and the cake plate for me just to be able to scrape off the last few morsels. (I love it when someone else does the cleanup.) So if you want an easy and gluten free dessert, give this little darling a try. You will not be disappointed.

Speaking of disappointed, I know there are those of you out there that begin or end each day by reading my blog. (Don’t be ashamed, we all have our guilty little secrets.) So it is with mixed feelings that I tell you that this is the time of year I begin enjoying outdoor adventures and travel time with Mr. C. (Mixed feelings because I love to travel and spend quality time with Mr. C. and family, and I love to write on a daily basis. Sometimes they are just mutually exclusive.)

In other words, during late spring, summer and early fall, I won’t be writing up sparkling introductions and fantastic recipes for your edification as frequently as I have been these past 4 months. But don’t panic! Sit down, take a deep breath and get yourself under control! (And by-the-way, the old paper bag trick to stop simple hyperventilation actually does work!) Instead of almost daily, I will be posting entries when time and WiFi permit. (Sometimes we take our trailer way off grid. And when we go to Italy this fall, you can bet your best bottle of Chianti that I won’t be thinking about the blog at all!)

But come late fall and winter, when you too are back from vacations and have more time to read and digest (literally and figuratively) more recipes, we will once again begin our daily double routine. Me behind the computer, you in front!

But for now, I wish each and every one of you a happy late spring and a fantastic summer. And special thanks for taking the time to read my blog. I love writing it and hope it brings you cooking inspiration and every once in awhile a little chuckle to brighten your day. Now, where did I leave the keys to the trailer?

  • 1 lb. semi-sweet chocolate chips
  • 1 c. butter
  • ¼ c. + 2 tsp. Cointreau or other orange flavored liqueur
  • 1 tsp. vanilla
  • 7 lg. eggs, room temperature
  • 1 c. sugar
  • 1 pint whipping cream
  • ¼ c. powdered sugar
  • zest of 1 orange

Combine chocolate chips and butter in a heavy saucepan and heat until chocolate melted. Remove from heat and add the ¼ cup Cointreau and vanilla. Set aside and cool to lukewarm. Using an electric mixer, beat eggs and sugar together for about 6 minutes or until mixture is thick and pale yellow. Ribbons should form when beaters are lifted. Slowly pour the melted chocolate mixture into the beaten eggs and pour into a buttered 9-inch spring-form pan that has been fitted with an aluminum foil leakage guard bottom. (I usually cut a circle of aluminum foil about an inch in circumference larger than my pan. Then I place the pan on the foil and fold the foil up the sides to prevent batter leakage. As further protection from run away melted butter escaping to the floor of my oven, I place the whole thing on a rimmed baking sheet.) Place in a pre-heated 350 degree oven for about 40 minutes (don’t use convection if at all possible) or until a toothpick inserted into the center comes out with moist crumbs attached. Cool for 5 minutes. Gently press down edges of cake with your fingers. Cool completely in pan. Then, run knife down edges to loosen cake. Remove sides of pan and set cake, bottom of pan and all, on cake plate. When ready to serve, whip cream to stiff peaks. Whip in powdered sugar and remaining 2 teaspoons of Cointreau. Dollop whipped cream on each thin slice serving and sprinkle with a tad bit of orange zest.