Category Archives: FRENCH CUISINE

FRENCH APPLE PIE

OLYMPUS DIGITAL CAMERA

This recipe came to me from my mother-in-law Betty. It was her mother’s recipe and now it is the only apple pie recipe served at our extended family holiday get-togethers. Doesn’t matter whether it’s Auntie Evelyn, my daughter Paula or me making the pies, grandma Freund’s apple pie has got to be one of the offerings. And there is a very good reason for that. French apple pie is fabulous. And it’s easy. Working with just one crust is always easier than trying to fit a top crust over the filling, crimping the edges so they look beautiful, and actually getting the whole thing in and out of the oven without incident.

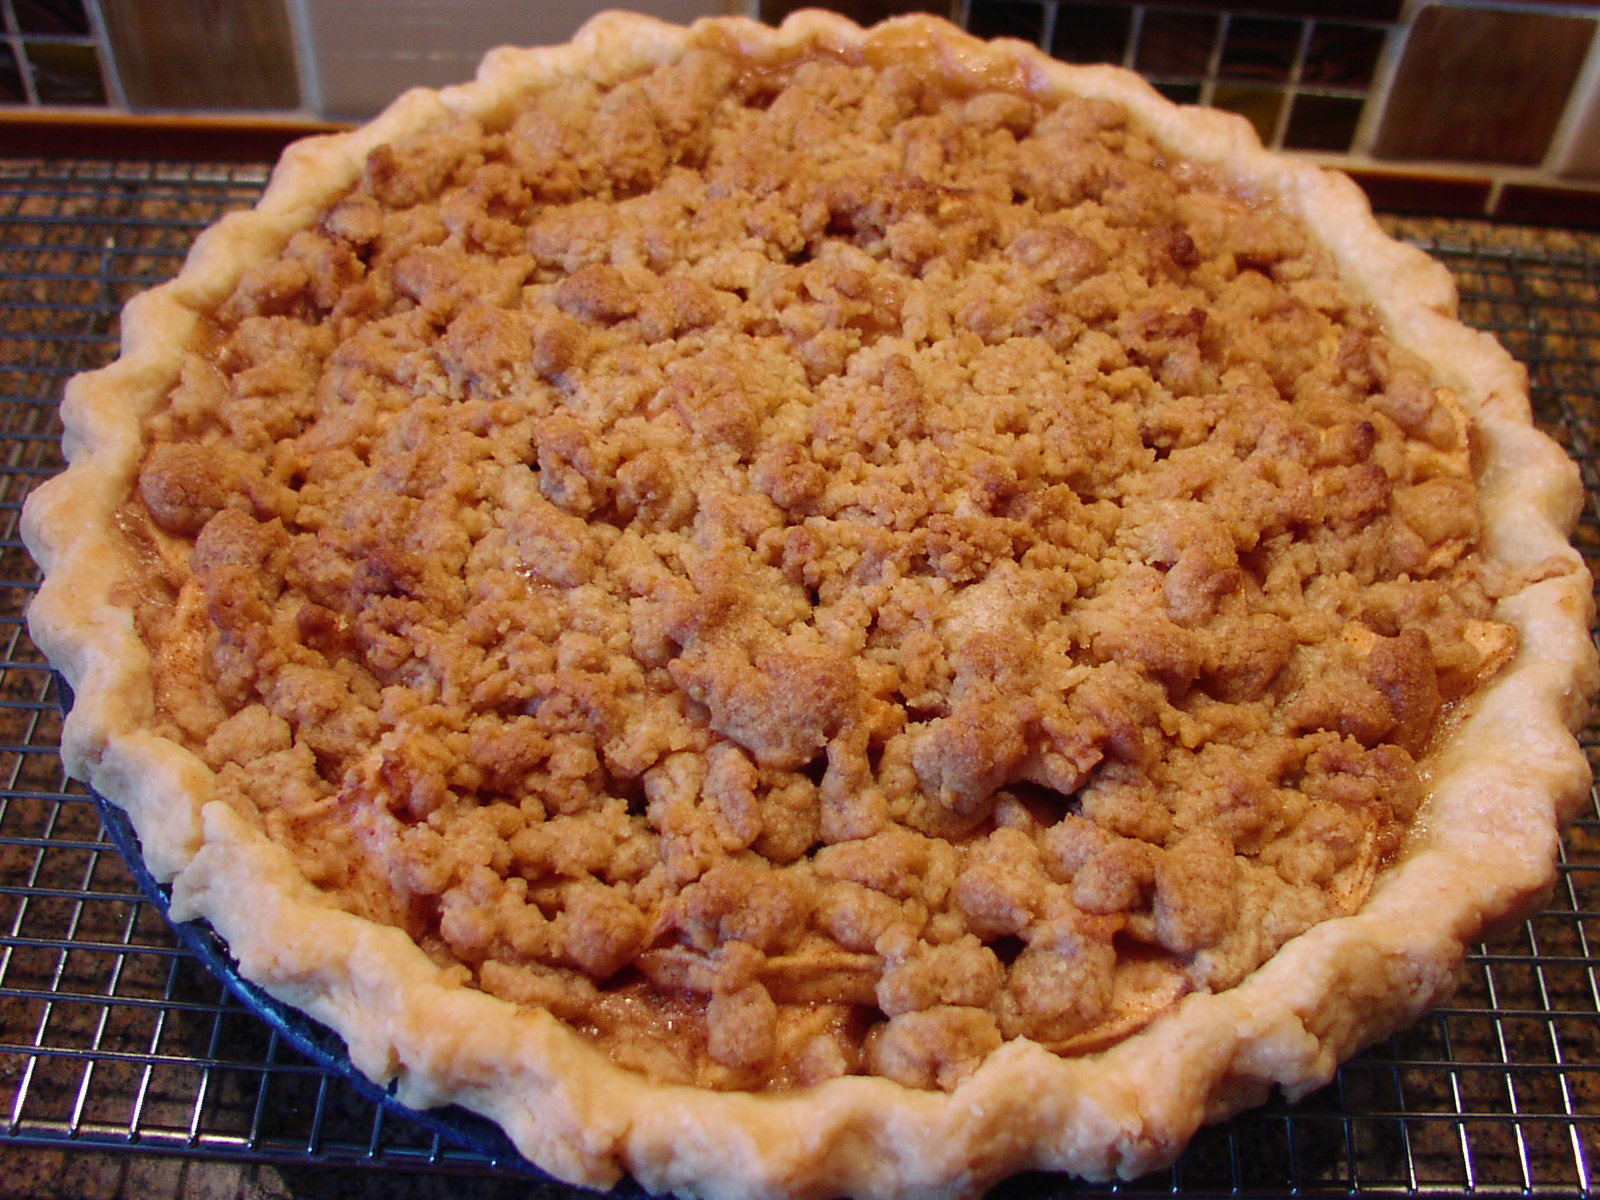
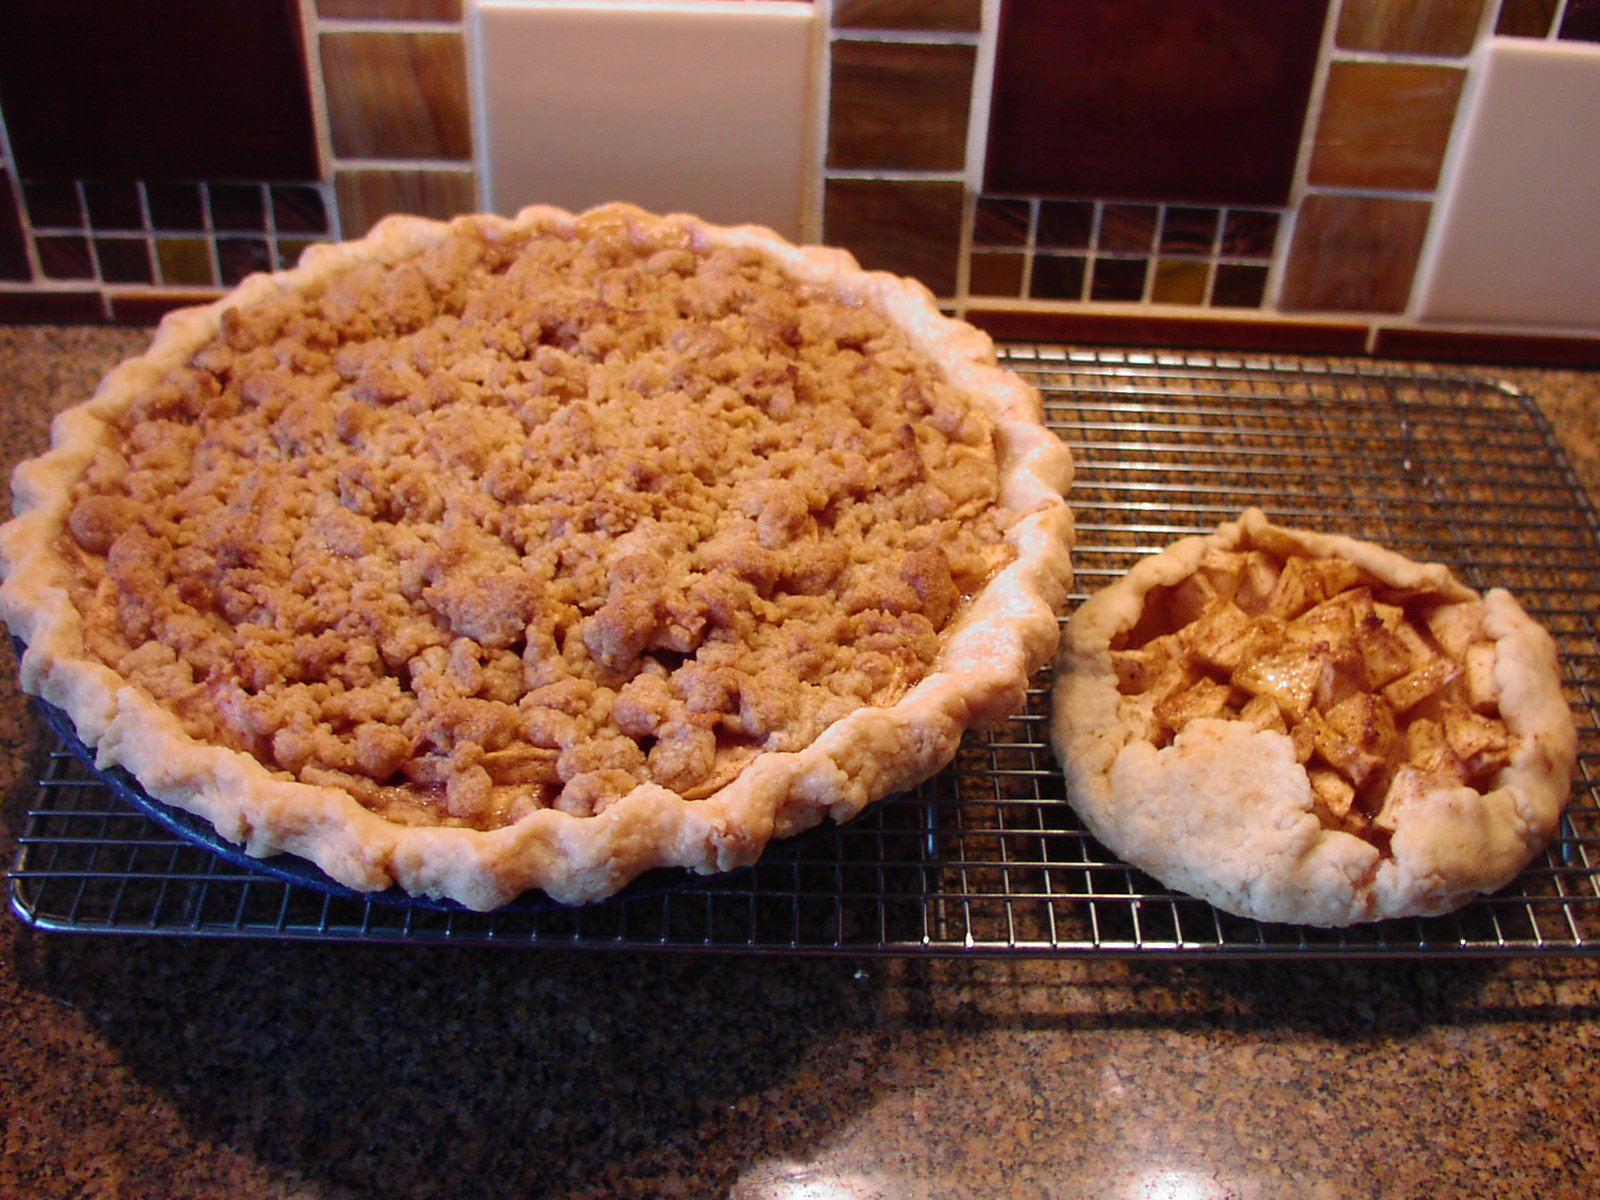
So next time you want to bake an apple pie, give this recipe a try. The crunchy topping reminiscent of crumbled shortbread makes just a lovely contrast to the tender apple slices. I know you and your family and friends will become devoted fans at first bite. I know that’s all it took for me!

  • ½ to 2/3 c. sugar (depends on the tartness of your apples)
  • 1 tsp. cinnamon
  • 2 T. + 1 c. flour
  • 6-8 apples, peeled and thinly sliced
  • pie crust for 9-inch one crust pie
  • ½ c. butter, room temperature
  • ½ c. packed brown sugar

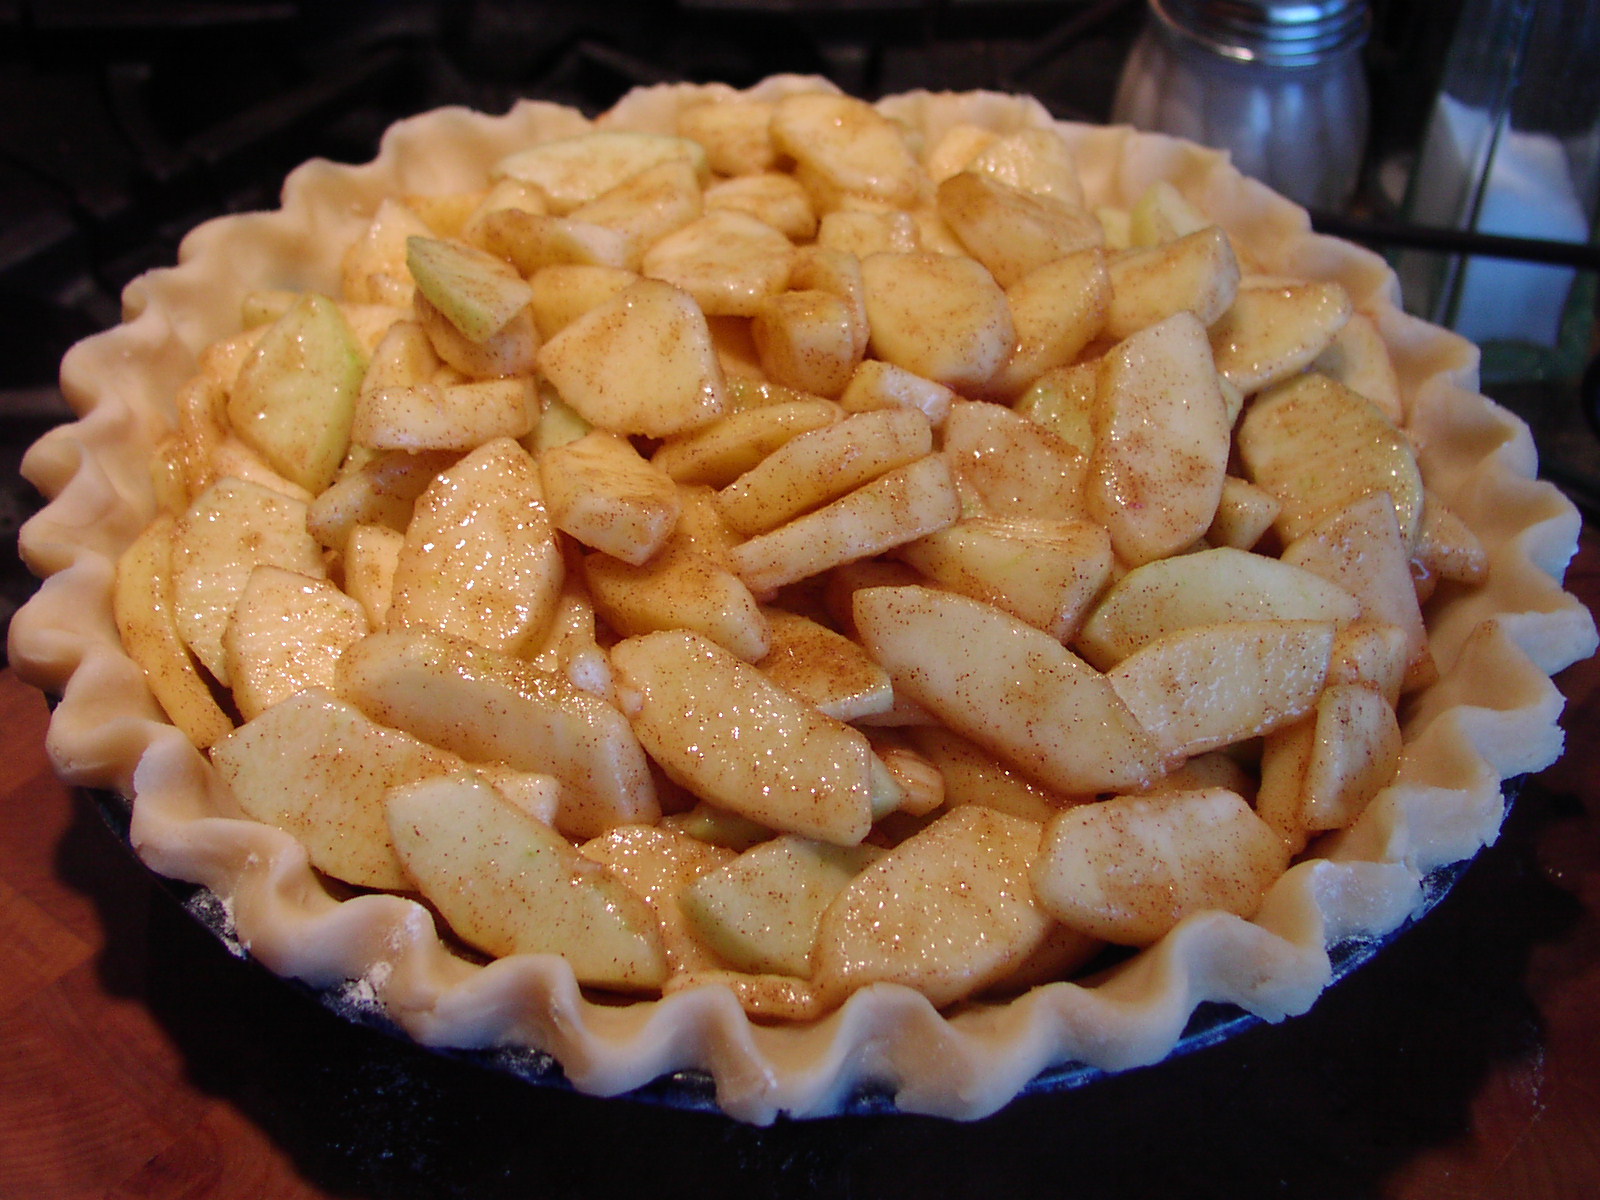
In a medium mixing bowl, whisk together the sugar, cinnamon, and 2 tablespoons flour. Add apple slices and combine thoroughly. Pour into a pastry lined pie pan. It should look like there are way too many apples. That’s exactly what you want. See picture below.

OLYMPUS DIGITAL CAMERA

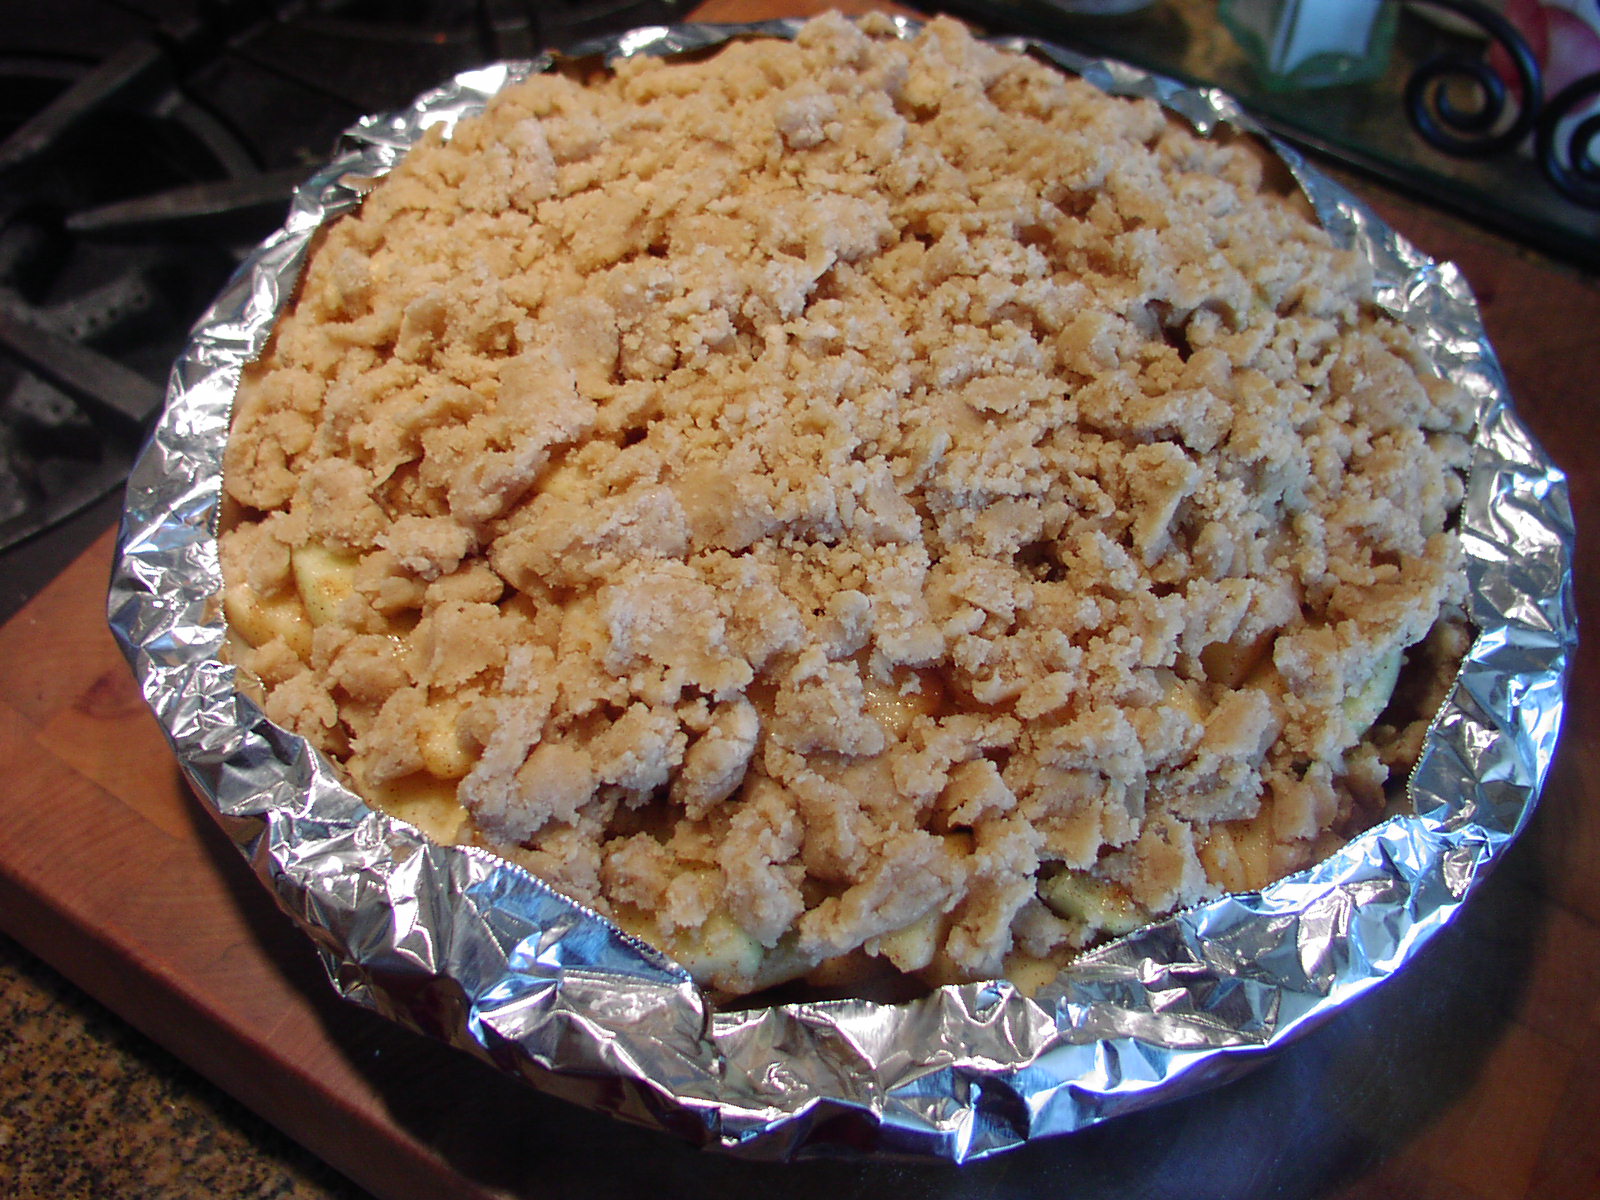
Cream butter and sugar together; add the remaining 1 cup flour. Crumble over apples. Cover edges of pie crust with 1 ½-inch strips of aluminum foil to prevent excessive browning. Remove foil last 5 minutes of baking.

OLYMPUS DIGITAL CAMERA

Bake in a pre-heated 375 degree oven for 60 minutes or until top is nicely browned and the apples are tender. Serve slightly warm with a side of vanilla ice cream or for an extra special treat, topped with Bourbon Caramel Whipped Cream. (Recipe under This & That)

BONUS RECIPE – PIE CRUST (my secret recipe)

  • ¼ c. very cold water
  • 2 c. flour
  • 1 tsp. salt
  • heaping 2/3 c. Crisco

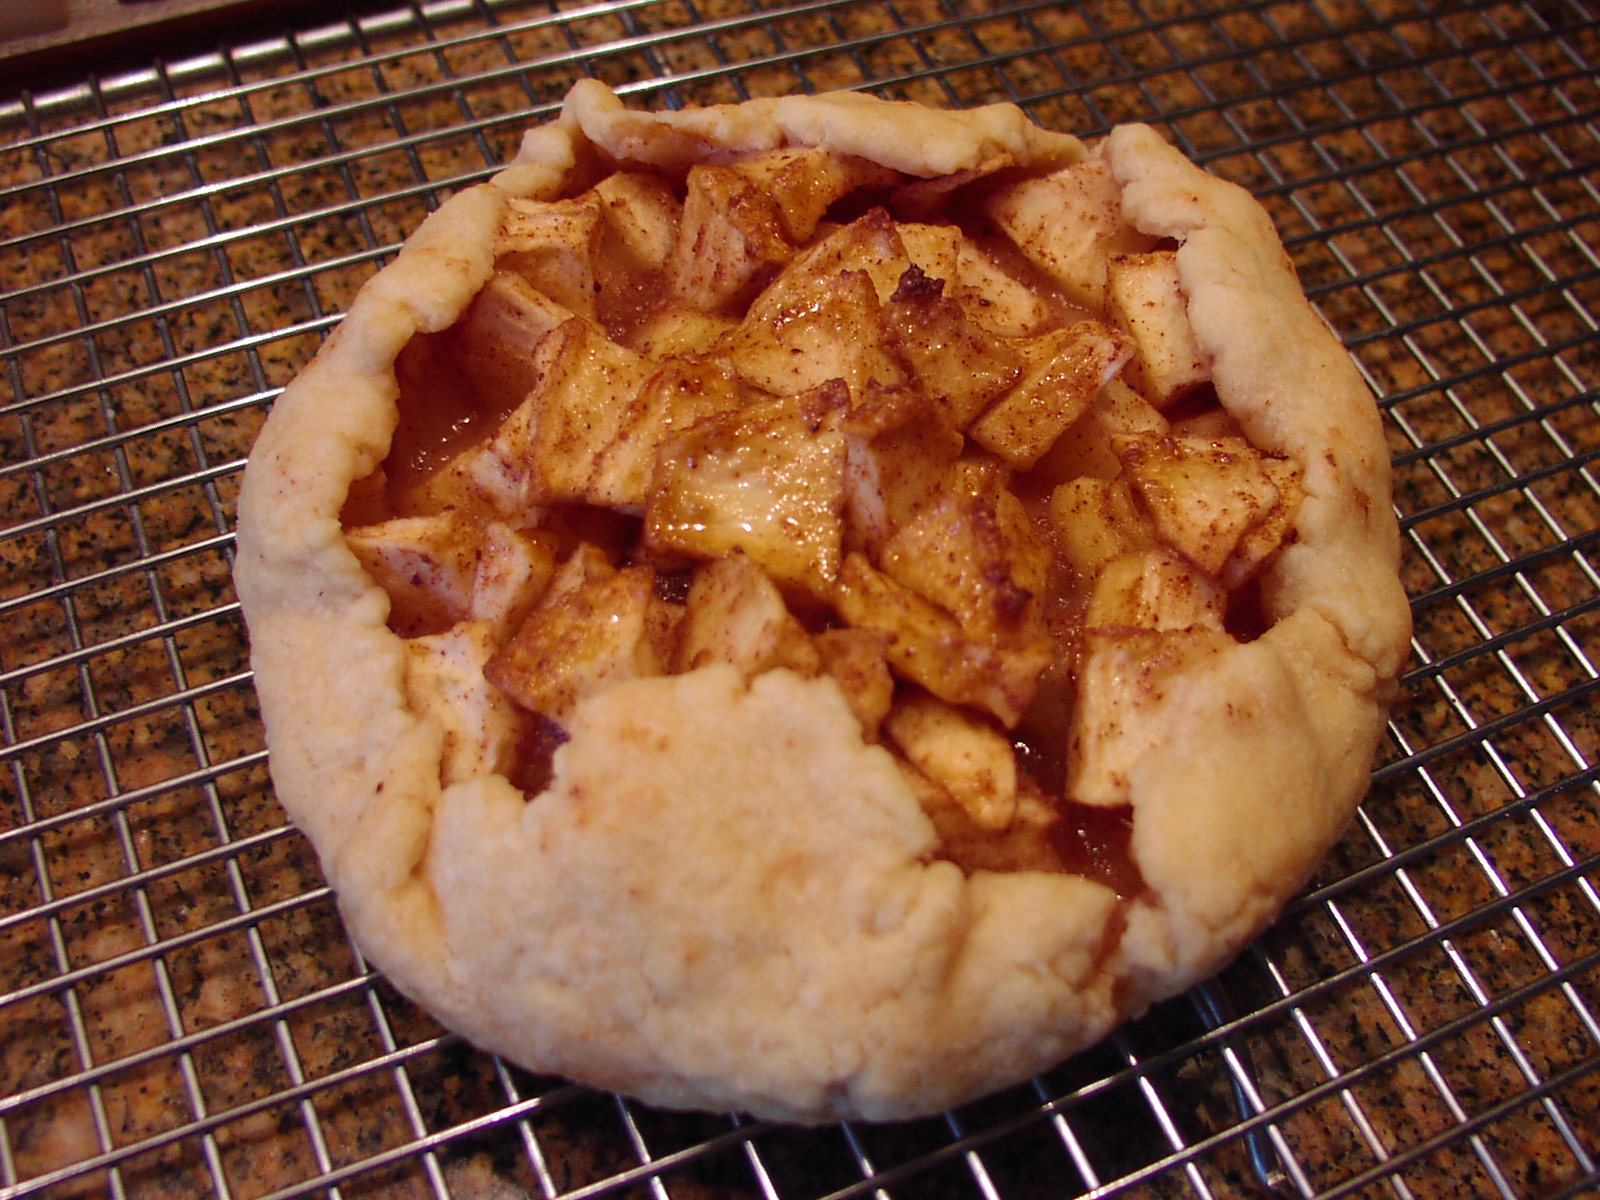
Step 1 – Pour cold water into a small bowl. Step 2 – Measure flour and salt into a mixing bowl. Step 3 – Take 1/3 cup of the flour back out of the mixing bowl and stir it into the water. Make a paste. Set aside. Step 4 – Add the Crisco (heaping 2/3 cup) to the flour and salt mixture. Mix together. (I use my KitchenAid mixer.) Step 5 – Add the water/flour paste to the flour/shortening bowl and mix just until blended. Do not over-mix. Roll out dough and place in pie plate. This recipe makes enough dough for a double crust pie if using a regular sized pie plate, or one large bottom or top crust with a little left over for pastry cookies* or a small tart like the one shown below.

OLYMPUS DIGITAL CAMERA

OLYMPUS DIGITAL CAMERA

*To make pie crust cookies, roll out the left over dough, cut into whatever size or shape you like, place on a cookie sheet, and sprinkle with sugar and cinnamon. Bake along with your pie, but not for as long. Check after 20 minutes. The “cookies” should be nicely browned on the bottom when they are done. Note: pastry cookies need not be shared with anyone else.  They are meant to be eaten only by the baker!


DUCK BREASTS WITH ORANGE MARMALADE SAUCE

I do believe summer has come early to the Pacific NW. Usually the month of June is wet or in the case of the last few years, very wet. But so far this June the weather has been splendid. Which means – I am outside and not turning my attention to the kitchen (or this blog for that matter). And then when I do come inside, I’m not much inclined to spend a great deal of time on my computer or fussing over a meal. A small piece of meat, a salad, and a veggie is just about all the effort I am willing to make after a day of activity. That and of course a nice adult beverage of some kind to sip on while I slog away at preparing our evening repast. (Must keep the cook happy, at least that’s what I tell Mr. C!)

With relatively little effort in mind, one of my favorite quick and easy meats to prepare is duck. (And I know what you are thinking. Patti, has the sun fried a few too many of your ever diminishing brain cells? Duck is neither quick nor easy to prepare!) To which I reply – nonsense! Now granted some recipes for duck are elaborate and take culinary expertise. (You will not be finding those recipes on this site.) But this recipe and my previously posted recipe for Duck Ragu with Fettuccine are both easy and quick enough for me to usually garner enough energy to prepare even after spending a grueling couple of hours harvesting weeds to donate to our local yard waste sub-station.

So don’t be afraid of cooking duck, especially duck breasts. Give this simple recipe a try. And while you’re at it, cook up a couple extra breasts. (I usually find frozen duck breasts in packages of 4 anyway, which is the perfect amount for two meals for the two of us.) Then freeze the extra cooked breasts or save them for a couple of days in your refrigerator and prepare the Duck Ragu with Fettuccine recipe. It is truly one of the best and easiest pasta dishes you will ever taste. Quack!

  • boneless Muskovy or Moulard duck breasts (1 duck breast per person)
  • kosher salt
  • freshly ground black pepper
  • zest of half a large orange
  • 3/4 c. fresh orange juice or 1 tablespoon orange juice concentrate & 3/4 cup water)
  • 3/4 c. chicken broth or stock
  • 1 c. orange marmalade
  • pinch kosher salt
  • 1 T. water
  • 1 T. cornstarch

Trim some of the skin from around the edges of each duck breast. (You want some skin, but not too much. I usually cut enough off so that when I lay the breast flat, skin side up, I can see some meat around the edge of the breast.) Using a very sharp thin bladed knife, score the skin in a crisscross pattern (just through the top of skin) at ¼-inch intervals. Pat the meat dry and lightly season both sides of the meat with salt and pepper.  Place duck breasts skin side down in a pre-heated pan heated to medium low. Fry for about 10 minutes or until fat is a deep golden brown. Turn and cook for  another couple of minutes. Transfer to a pre-heated 400 degree oven for 4-6 minutes or until interior temperature reaches 160 degrees. Remove from oven, tent with aluminum foil, and allow meat to rest for 5 minutes before cutting into thin slices. Serve immediately with Orange Marmalade Sauce.

To prepare the sauce combine the orange zest, orange juice, chicken broth, and marmalade in a small saucepan. Bring to a boil over medium heat. Combine the water and cornstarch. Add mixture to the sauce and return sauce to a boil. If using the sauce within a few minutes, cover the pan and remove from heat. If making ahead, remove sauce from heat and cool completely before placing in refrigerator. Warm before serving. (Extra sauce freezes beautifully!)

Side Dish Suggestion: oven roasted veggies including potatoes, simple green salad

Wine Suggestion: Pinot Noir


FLOURLESS ORANGE CHOCOLATE CAKE (GÂTEAU AU CHOCOLAT)

As promised, this is another one of my favorite gluten free recipes. I make this cake every time I want an easy and absolutely decadent dessert. And I have yet to make it without someone (usually one of the guys) following me around like a puppy begging for more. They’ll usually even clean the bottom of the pan and the cake plate for me just to be able to scrape off the last few morsels. (I love it when someone else does the cleanup.) So if you want an easy and gluten free dessert, give this little darling a try. You will not be disappointed.

Speaking of disappointed, I know there are those of you out there that begin or end each day by reading my blog. (Don’t be ashamed, we all have our guilty little secrets.) So it is with mixed feelings that I tell you that this is the time of year I begin enjoying outdoor adventures and travel time with Mr. C. (Mixed feelings because I love to travel and spend quality time with Mr. C. and family, and I love to write on a daily basis. Sometimes they are just mutually exclusive.)

In other words, during late spring, summer and early fall, I won’t be writing up sparkling introductions and fantastic recipes for your edification as frequently as I have been these past 4 months. But don’t panic! Sit down, take a deep breath and get yourself under control! (And by-the-way, the old paper bag trick to stop simple hyperventilation actually does work!) Instead of almost daily, I will be posting entries when time and WiFi permit. (Sometimes we take our trailer way off grid. And when we go to Italy this fall, you can bet your best bottle of Chianti that I won’t be thinking about the blog at all!)

But come late fall and winter, when you too are back from vacations and have more time to read and digest (literally and figuratively) more recipes, we will once again begin our daily double routine. Me behind the computer, you in front!

But for now, I wish each and every one of you a happy late spring and a fantastic summer. And special thanks for taking the time to read my blog. I love writing it and hope it brings you cooking inspiration and every once in awhile a little chuckle to brighten your day. Now, where did I leave the keys to the trailer?

  • 1 lb. semi-sweet chocolate chips
  • 1 c. butter
  • ¼ c. + 2 tsp. Cointreau or other orange flavored liqueur
  • 1 tsp. vanilla
  • 7 lg. eggs, room temperature
  • 1 c. sugar
  • 1 pint whipping cream
  • ¼ c. powdered sugar
  • zest of 1 orange

Combine chocolate chips and butter in a heavy saucepan and heat until chocolate melted. Remove from heat and add the ¼ cup Cointreau and vanilla. Set aside and cool to lukewarm. Using an electric mixer, beat eggs and sugar together for about 6 minutes or until mixture is thick and pale yellow. Ribbons should form when beaters are lifted. Slowly pour the melted chocolate mixture into the beaten eggs and pour into a buttered 9-inch spring-form pan that has been fitted with an aluminum foil leakage guard bottom. (I usually cut a circle of aluminum foil about an inch in circumference larger than my pan. Then I place the pan on the foil and fold the foil up the sides to prevent batter leakage. As further protection from run away melted butter escaping to the floor of my oven, I place the whole thing on a rimmed baking sheet.) Place in a pre-heated 350 degree oven for about 40 minutes (don’t use convection if at all possible) or until a toothpick inserted into the center comes out with moist crumbs attached. Cool for 5 minutes. Gently press down edges of cake with your fingers. Cool completely in pan. Then, run knife down edges to loosen cake. Remove sides of pan and set cake, bottom of pan and all, on cake plate. When ready to serve, whip cream to stiff peaks. Whip in powdered sugar and remaining 2 teaspoons of Cointreau. Dollop whipped cream on each thin slice serving and sprinkle with a tad bit of orange zest.


DEMI-GLACE

This recipe is dedicated to all you gourmets out there who want to create over the top dishes. And tomorrow’s recipe for Stuffed Boneless Leg of Lamb using demi-glace as one of its key ingredients, definitely falls into that category. While I know there are lots of recipes for demi-glace more complicated than this one, trust me, this is bad enough! Oh, it’s not hard. It just takes time. And for some of you, a few hours dedicated to watching water boil might not be the way you would choose to spend your time.  So for those of you who are too busy to see straight or are parents of small children (often one and the same), I would suggest you walk away from this recipe or stick to the version mentioned under “note” in the instructions section. Mind you, I’m not trying to discourage you from making this incredibly rich, highly concentrated French brown sauce.  But please note, demi-glace is mainly used as a base for other sauces. You still need to prepare the dish into which this delicious elixir will be merely another ingredient. So again, I’m not trying to scare you, but sometimes a little shot of reality is appreciated. I am nothing if not practical. And I can practically promise you that even if you have time to spare and the kitchen is the favorite room in your home, you are going to be a little sick of boiling liquid by the time you are finished. So why did I even bother to post this recipe? Because ladies and gentlemen, demi-glace is amazing! It can lift a dish from ho hum to extraordinary faster than Super Man can lift Lois Lane from the arms of a villain. And that’s fast!

  • 12-14 lbs. of bones and scraps of raw or cooked chicken, turkey, beef, pork, and a small amount of lamb
  • 4 onions, chunked
  • 5 carrots, chunked
  • 10 sprigs parsley
  • 12 black peppercorns
  • 2 bay leaves
  • 5 qt. water

Spread meat and bones out in 2 large rimmed baking pans. (I use turkey or chicken wings and drumsticks, beef bones, a couple pork steaks and the cheapest cut of lamb I can find. I also freeze any scraps I cut off meat for a couple of months before I make demi-glace to make sure I have lots of flavorful ingredients available.) DO NOT SEASON MEAT. Bake at 400 degrees for about 75 minutes or until bones and scraps are well browned. Remove from oven and allow to cool for a few minutes. Transfer bones and all drippings to a large covered stock pot. With a small amount of water, lift all the browned bits off the bottom of the pans and add to stock pot. Add onions, carrots, parsley, pepper corns, bay leaves, and water. DO NOT ADD ANY SALT. Bring liquid to a boil, cover, reduce heat and simmer for 4 hours. Remove from heat. Let cool for about 30 minutes, then slowly strain into another container. Discard bones and vegetables. Chill broth. (I usually refrigerate overnight.) Lift off as much of the fat as possible from the top of the now thin jelly like broth. Pour or scoop chilled broth back into a heavy pan. Rapidly boil uncovered* until there is only about 4 cups liquid remaining. Divide into 4 containers and freeze until ready to use.

*A helpful hint: your stove top will stay cleaner if you “cover” your boiling pan with a wire mesh splatter guard (they are shaped like a lid). The wire mesh allows the steam to escape, but keeps the mess to a minimum. They also work well when frying fish, chicken, and especially oysters. (Oysters tend to spit at you when they are being fried. I think it’s their way of getting even!)

Note: if you really don’t want to go through all this bother, you can simply reduce about 6 cups of beef broth down to one cup. But start with low sodium broth. It’s still going to be quite salty, and it certainly won’t taste as good as my homemade version, but it will work in a pinch.

Another note: I’m sure you noticed the lack of any type of alcohol in my demi-glace recipe. That’s because my 2 favorite recipes that call for demi-glace have wine as a primary ingredient. So in my opinion, it was best not to use any wine in the demi-glace itself. Watch for my other favorite demi-glace recipe Rack of Lamb with Kalamata Rosemary Crust to be posted in the next couple of weeks.


TWO BRIE, OR NOT TWO BRIE: THAT IS THE QUESTION

OLYMPUS DIGITAL CAMERA

Whether ‘tis nobler to offer two types of topping when serving brie or suffer the slings and arrows of someone who doesn’t like the one you chose………  (I knew when I decided to start writing on a daily basis, something amazing would happen, but I never dreamed that it would result in me channeling Shakespeare!) Please allow me to begin again using my own voice.

In my opinion, brie is one of the greatest tasting and versatile soft cheeses that is readily available in our super markets today. It can be served very simply by placing it on a plate surrounded by apple slices and buttery crackers. (The brie first being allowed to come to room temperature of course! Cheese is always more flavorful when not straight out of the refrigerator.) Or, and this is how I best like to serve brie, topped with some type of sweet or savory and heated until the cheese is warm and almost runny. Note: Not trying to sound like a cheese snob, I prefer to use French brie or brie made by an artisan cheese maker over some of the brie offered by large domestic cheese producers. Thankfully, Costco and Trader Joe’s often carry French brie. Most of the time it is in round cardboard containers, but often a very large round has been cut into large wedges. Rounds or wedges, it matters not. If it is French, it will be magnifique!

As you can see from the picture above, I prefer to cut my brie into small wedges and lay them ever so lovingly in an oven proof casserole. Then I add whatever topping I have prepared, along with toasted chopped pecans. I know that the presentation would be more traditional if I left the cheese in one piece, but I have found that pre-cutting the brie is much easier for my guests to handle. There is of course the convenience aspect to consider, but there is also the practical reason. Some guests, if left to their own devices, will help themselves to slices of cheese the size of small pieces of cake! So in order to spare my overly zealous guests the indignity of being called to task for their gluttonous behavior, I make sure there are enough servings for everyone by cutting the pieces myself. Ever the thoughtful hostess! Regardless of whether you cut the brie ahead of time, or top the intact round or wedge with the delicious topping ingredients listed below, you are going to love serving baked brie to your guests. It’s easy to prepare, and tastes like a million dollars. And by-the-way, sorry I don’t have a picture to show you of how the brie looked when it came out of the oven. But at the time, I was too busy plating other food to even think about my camera. By the time I remembered that I hadn’t taken a “this is how it looks when it’s ready to serve” picture, the lights were down and my feet were up!

Baked Brie with Curry Powder, Chutney, and Toasted Pecans

  • French brie
  • curry powder (like McCormick’s)
  • chutney (I like Major Grey’s Mango Chutney)
  • toasted chopped pecans

I purposely have not provided ingredient amounts because everything depends on how much baked brie you are building. Basically you want to cut your brie, place it in an oven-proof container, sprinkle liberally with curry powder, slather with chutney, and decorate with pecans. If you have more than one layer of cheese, decorate the first layer before adding more cheese. Bake in a pre-heated 350 degree oven until cheese is very soft and just starting to melt, about 20-25 minutes. Serve warm with toasted baguette slices or crackers. 

Baked Brie with Marmalade, Brown Sugar, and Toasted Pecans

  • French brie
  • orange marmalade
  • brown sugar
  • toasted chopped pecans

Cut the brie and lay it in an oven-proof dish. In a small bowl, stir together the *marmalade and *brown sugar and slather all over the cheese. Sprinkle with toasted pecans. Bake in a pre-heated 350 degree oven until cheese is very soft and the topping is bubbly, about 15-20 minutes. Serve warm with apple slices, toasted baguette slices and/or crackers.

*Again, as with the recipe for Baked Brie with Curry Powder, Chutney, and Toasted Pecans, the amount, in this case of marmalade, brown sugar, and pecans, depends on how much cheese you are preparing. If for example, you were to purchase about 19 or 20 ounces of brie, you would combine ¾ cup (12 tablespoons) marmalade with 3 tablespoons of brown sugar (a ratio of 4 to 1). If you stick with this ratio, you can prepare as much or as little topping as you need. Top with a sprinkling of as many or as few nuts as you prefer. Or none, for that matter.


OVEN CHICKEN FRICASSEE

OLYMPUS DIGITAL CAMERA

There are just those days when it feels like the culinary spirits are conspiring against me. I know I’m headed for one of “those days” when for example, I break the yokes on our morning easy-over eggs, which not coincidentally I have over seasoned, and the toast is 2 shades darker than I would like. Those are the times when I know I’m going to have to be extra careful with anything I touch in the kitchen. So when I begin my day with less than confidence in my culinary aptitude, I prepare this easy chicken dish. I know for a fact that no matter which poltergeist is trying to mess with my kitchen karma that day, it can’t mess up this recipe. This dish is just too unsophisticated for even the lowest in the poltergeist hierarchy to consider it worthy of their efforts. So If you too ever feel like you’re in for a day like I described above, or you know that work is going to be horrendous, and dinner needs to be as simple to prepare as possible, try fixing this ever so easy and foolproof comfort food.  While the chicken is baking, throw some rice in your rice cooker (a must by the way for busy cooks) and open a package of frozen petite peas. (I pour the peas in a small covered casserole, add a dab of butter and a sprinkle of seasoned salt and nuke them for about 2 minutes. You aren’t really cooking the peas; you’re just hotting them up.) Serve the chicken over the rice with the peas on the side, and relax. You might even want to have a glass of wine with dinner. Or, if you really want to make life better, you might have a glass while you prepare dinner and then enjoy another one with dinner. After all, if it was good enough for Julia, it should be good enough for us mere mortals! Oh, and one other little helpful hint. Don’t forget to take the chicken out of the freezer before you leave for work or get otherwise distracted. Having to stop at the store before you get home, or after a hard day of gardening, for example, is just not going to make life better. That’s the wines job!

Oh, and just for the record, this is not a true French fricassée; this is really just an all American fricasee. And yes, there is a difference!

  • 3 T. butter, melted
  • 3 T. flour
  • 1 tsp. kosher salt
  • freshly ground black pepper
  • 1 ½ tsp. poultry seasoning or more to taste
  • ½ tsp. paprika + more for sprinkling
  • 6-8 pieces of chicken (I use boneless skinless chicken thighs or breasts)
  • 1 (12-oz.) can evaporated milk
  • 1 can cream of mushroom soup

Blend melted butter, flour, salt, pepper, poultry seasoning, and ½ teaspoon paprika together. Place chicken in a shallow buttered baking dish. Spread one half of the butter mixture on top of each piece. Flip over, and spread the rest on top of each piece. Bake uncovered, in a pre-heated 375 degree oven for 20 minutes. Meanwhile whisk the evaporated milk and soup together. Pour over chicken, sprinkle with paprika, and continue baking for 30 minutes or until chicken is very tender.

Side Dish Suggestions: steamed rice or mashed potatoes, simple green veggie or salad

Wine Pairing: a not too oaky Chardonnay or a crisp Sauvignon Blanc


MUSHROOM ONION SOUP

OLYMPUS DIGITAL CAMERA

I used to work in the International district of Seattle during the 70s. I loved it! Our customers were wonderful, the business owners were our buddies, and the restaurant food and grocery selections were unparalleled in the region. My fellow employees taught me a lot about Asian cooking too. (We actually had a full kitchen in our break room, complete with a 4 burner stove, refrigerator and microwave.) Most days I would either bring a leftover from home, or build something on the spot. But sometimes, a group of us would head off to one of the local eateries. Of course we had fabulous Asian restaurants from which to choose, but we also had an incredible hole-in-the-wall Creole restaurant across the alley from us and a short lived sandwich and soup place in the great hall of the old Union Station. (Union Station is a former train station constructed between 1910 and 1911 to serve the Union Pacific Railroad and the Milwaukee Road. It now serves as the headquarters of Sound Transit and its grand hall is rented out to the public for weddings and other events.) But back to that soup and sandwich place. One of the soups they offered was an onion soup with mushrooms. It was the best soup I had ever tasted. I begged and pleaded for that recipe, but they never would share it with me, even when they were closing! How rude, don’t you think? Anyway, I played around with the ingredients and finally determined that the subtle background flavor that made my taste buds sing was caraway. So give this recipe a try, but please, do not leave out the caraway. Your taste buds will thank you!

  • ¼ c. butter
  • 2 T. extra virgin olive oil
  • 8 onions, sliced
  • 1 lb. mushrooms, quartered
  • 1 tsp. sugar
  • 2 T. flour
  • ½ c. hearty red wine (I use “Gallo Hearty Burgundy”)
  • 6 c. beef broth (I use 6 teaspoons of  Superior Touch brand “Better Than Bouillon” – beef base and 6 cups of water)
  • 2 T. chopped fresh parsley
  • ½ tsp. caraway seeds (not optional)
  • 1 bay leaf
  • 1 T. paprika
  • ½ tsp. dried marjoram
  • ½ tsp. dried thyme
  • lightly toasted baguette slices
  • Swiss or Gruyère cheese, grated
  • Parmesan cheese, grated

Melt butter in a large covered soup pot. Add olive oil and sliced onions. Cook onions for about 45 minutes or until they are caramel colored and very, very soft. Add mushrooms and sugar; cook for 10 minutes. Stir in flour and let cook for about 5 minutes over low heat, stirring often. Add wine, beef broth, parsley, caraway, bay leaf, paprika, marjoram, and thyme. Cover and simmer for at least an hour. Meanwhile, place a combination of   cheeses on baguette slices. Just before ready to serve, pop the bread and cheese in a 450 degree oven and bake until cheese is melted. Ladle soup into oven proof soup bowls and place a couple baguette slices on top. Sprinkle with more cheese and place in hot oven or under broiler until cheese is melted and starting to brown. Serve immediately.


ONION DIP


Call me old fashioned, but I love onion dip. I used to make myself sick before parties by tasting the onion dip every few minutes to make sure the flavor had not changed. (What can change in 20 minutes?) But along with advancing age came my body’s inability to tolerate too much salt. (Come now Patti, be truthful, and mention your little issue with high blood pressure!) Anyway, I can’t eat the old dry onion soup mix added to a pint of sour cream version. Truth be told (again with the truth thing), because the dry soup mix is so salty, I don’t even enjoy the original version. Serve this dip with thick, lower sodium (sigh) potato chips and the lowly onion will prove once again that it is a super star in the vegetable realm.

  • 3 T. extra virgin olive oil
  • 2 large white or yellow onions, finely diced
  • 1 tsp. kosher salt
  • ¼ tsp. white pepper
  • 2-3 tsp. beef base*
  • 1 tsp. Worcestershire sauce
  • ¼ tsp. granulated garlic
  • 16-oz. container (2 cups) sour cream
  • thick plain potato chips (like Tim’s lightly salted potato chips)

Pour olive oil into a large sauté pan. Add onions, salt, and pepper and cook until onions are caramelized (golden brown), but not to the point where they are becoming a mushy mess. It usually takes at least 20-30 minutes to caramelize white onions. (I use white or yellow onions because they are not too sweet. You do not want a sweet onion for this recipe.) Meanwhile combine the beef base, Worcestershire sauce, garlic, and sour cream in a small bowl. When the onions are caramelized, remove from heat and stir in the sour cream mixture. Refrigerate at least 24 hours before serving.