Category Archives: EASTER DINNER RECIPES

BEER BREAD


OLYMPUS DIGITAL CAMERA

Every time I make this bread I am transported back to when my children were young and weekend dinners with our extended family were very common. None of us had very sophisticated tastes in those days, mainly because things were quite different in the 70s and early 80s, than they are today. There were no micro breweries, or wine tasting rooms (“good” wine came in boxes), or fresh herbs in every grocery store, or the Food Network……the list goes on and on. We felt lucky if we had a good meat market or seafood store in our vicinity! Times and food were just simpler then. It was very common in those days for one of the couples to call, even as late as a Saturday morning, for an impromptu dinner that evening. The hostess would usually prepare something like spaghetti or chili and the rest of us would bring beer or wine. There were no fancy appetizers or drinks, just lots of good food that we knew everyone would enjoy. There were always at least 2 generations at every meal, and never less than three dogs.  The kids would join in the adult conversations or play games or watch TV, while the parents and often grandparents shared stories about their week, the state of the union, sporting events, etc. I often spearheaded these get-togethers, and when I did I would usually bake bread to go with the meal. And when I made this bread recipe, my son Sven would fill up on bread and ignore most of the rest of the meal. (Oh, he always saved room for dessert however, being the intelligent lad that he was.)  What fun we had at those dinner parties. All the noise, confusion, and mess with never one argument or shedding of tears (among the adults that is). Just evenings spent with the best and dearest of friends eating, drinking and enjoying each other’s company.

  • 12-oz. bottle of beer (I like Alaskan Amber)
  • ¼ c. water
  • 2 tsp. kosher salt
  • 2 T. sugar
  • 2 T. butter
  • 2 T. yeast (or 2 pkgs.)
  • 5 c. flour
  • cornmeal

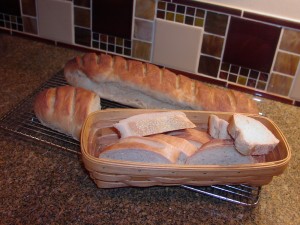
Heat beer, water, salt, sugar, and butter until very warm. Pour into the bowl of your stand mixer. Allow to cool to proper temperature for yeast to be added, about 105 degrees F. Add yeast; allow liquid mixture to sit (proof) for about 5 minutes. Add enough flour to make a stiff dough. Knead for about 5 minutes. Cover and allow dough to rise until doubled, about 45 minutes; punch down. Let rest 15 minutes. Shape in 2 long rolls on cornmeal covered pan. Let rest another 15 minutes.  Meanwhile, preheat the oven to 425 degrees. Place a rimmed baking sheet on the bottom rack in your oven. When the oven is hot and the bread is risen and ready to be baked, being very careful not to burn yourself, pour two cups of very hot water in the pan in the oven. Quickly close the oven door to capture the steam. Next, place bread in oven on a rack above the pan containing the steaming water. Bake for about 25 minutes or until loaves are golden brown and sound hollow when lightly tapped. Remove from oven and let cool to room temperature.


CREAMED SWISS CHARD

Although I have creamed other veggies using this recipe (i.e. spinach, beet greens, and pearl onions), Swiss chard is still my favorite. (Of course it is! It’s the most expensive. Duh!) But regardless of what veggie I use, this preparation turns it into a dish fit for a king, or even one step higher – Mr. C. (It’s incredibly lucky for me that Mr. C. does not read my blog, because if he ever read all the things I tell you about him, he might never speak to me again. He truly does not like being the center of attention.) But putting his feelings aside, I truly do take pleasure in fixing food that I know he is going to enjoy. It’s one of the many joys of being married to such a wonderful man. (This is where you start feeling nauseous or go ahhhhhhh, isn’t that sweet?) Regardless, you are all going to be glad I shared this recipe with you. And no it’s not a new recipe (I’ve been making it for over 30 years), or apt to win me a place in the Julia Child hall of fame (although that would be nice), it’s just one of those recipes that I feel every good cook should have in their repertoire.

  • 2 T. butter
  • 1 large or 2 small shallots, very thinly sliced
  • 1 T. flour
  • ½ tsp. ground nutmeg (dried or freshly grated)
  • ½ tsp. kosher salt or to taste
  • freshly ground black pepper
  • 1 c. milk (preferably whole milk)
  • 1 large or 2 small bunches Swiss chard, ribs removed, leaves roughly chopped

Melt the butter in a large saucepan. Add shallots and cook only until translucent. There should be no brown on the shallots. Whisk in the flour, nutmeg, salt, and pepper and cook for about 1 minute. Whisk in the milk and simmer gently until the mixture is thick. Meanwhile, steam the Swiss chard until tender. When the sauce has thickened nicely, add chard and serve immediately.

Note: If you are using spinach or beet greens, use the same amount as the Swiss chard. If you are creaming pearl onions, use 2 small bags from the freezer case.


REFRIGERATOR MASHED POTATOES

So, you might be asking yourself, what the lowly potato, and one made into such a non-gourmet dish as “mashed potatoes” could possibly be doing on the Chez Carr Cuisine blog? After all, isn’t this a blog about fine food, entertaining and “the good life”? Well first of all, let me begin to address your concerns by stating unequivocally, that I love potatoes! And without the ever so comfortable and delectable potato, especially when it is mashed, I’m not so sure my life would be half so good. Now don’t get me wrong. We don’t eat potatoes every day. In fact, they are not Mr. Cs favorite starch. But when I do serve them, especially mashed up with yummy additives, he enjoys them and I totally resemble that cartoon dog that floats in the air whenever he is given a dog bone (I think it was a dog bone). Whatever, you get the picture. I believe the term is rapture. And I guess while I am at it, I should go into full disclosure mode and clear up a misconception some of you might have about me. You may think I am a gourmet, but I am not. I was disqualified years ago when I went public about my passion for cheeseburgers. Not any cheeseburger you realize, but a really good cheeseburger with all the trimmings and a sauce that pulls all the wonderful flavors together. (If the saucy stuff isn’t dripping off my elbows by the time I am half way through the burger, then demerits are given and the maker is out of the will.) I take my cheeseburgers that seriously!  So am I the stuff from which gourmets are made, I think not. Are you going to find more recipes like this one on my blog, I think so!

  • 2-1/2 lbs. potatoes, cubed
  • 2 garlic cloves
  • kosher salt
  • 3-oz. cream cheese, room temperature
  • 1/2 c. sour cream
  • ¼ c. butter, room temperature, divided
  • 2 T. freeze-dried chives, plus more for garnish
  • freshly ground black pepper
  • milk

Place cubed potatoes, garlic, and about a tablespoon of salt in a saucepan and cover with water. Bring to a boil, reduce heat, and simmer until potatoes are tender, about 20 minutes. Drain. Mash potatoes and garlic cloves together with cream cheese, sour cream, 2 tablespoons of the butter, chives, pepper, and enough milk to bring to desired consistency. Taste and add salt if required. Spoon potatoes into a buttered baking dish, dot with remaining 2 tablespoons butter, cover and refrigerate until ready to bake. Remove dish from refrigerator 30 minutes or so before you place, uncovered,  in a pre-heated 350 degree oven for 30-45 minutes,  or until heated through. Sprinkle with additional chives and serve immediately.

Note: I like to use a combination of red and yellow potatoes in this dish, and depending on how formal the occasion, I decide whether or not to peel the potatoes. (Actually, most of the time I leave the skins on). I like to get as many nutrients in my old body as I can. And potato skins are fairly replete with the same little devils as in the potatoes themselves.

Another Note: This is a great buffet dinner or holiday dish. It can be made well ahead of time, even the day before, and heated just before serving.

GREEN BEANS

IMG_5549

Ok, I know what most of you are thinking. What in the name of all things healthy is Patti doing posting a recipe for simple steamed green beans? Hasn’t she got better recipes to offer? Doesn’t she know my time is valuable? But wait, ye of little faith, this is more about procedure than ingredient content.  It’s all about making life easier for the person preparing and serving a buffet dinner and as such the first recipe in my DINNER PARTY MENUS series.

Most buffet dinners include, at a minimum, appetizers, a main dish, starchy side, veggie of some sort, salad, perhaps bread, and a tasty dessert. This formula provides plenty of variety and seemingly an easy menu to plan. But if you are like me, the choice of the veggie component can be most vexing. And there is the general appeal of the flavor combinations to be considered.  If, for example, you are serving a creamy main dish such as Swedish Meatballs or pasta, the last type of veggie dish anyone would enjoy eating would be one smothered in yet another rich sauce. In fact, most of the time, any main dish or starchy side dish you plan to serve is going to be fairly rich. So, over the years I have learned to serve plain veggie dishes with buffet dinners. And preferably a veggie that can be prepared ahead of time and just heated up at the last minute as in this green bean recipe. So give this recipe a try for your next dinner party. And of course you can use this same method with other veggies such as broccoli or carrots. Just don’t overcook your veggies. Nothing shows off your cooking skills better than a perfectly prepared vegetable. And another little hint. Don’t try to be too precious when serving a buffet dinner. If not all of your guests will be seated at a table, don’t leave the green beans in their original long and lovely state. Do your guests a favor and cut those stunning beauties into bite size pieces. Believe me, it will not change the flavor of the beans, and your guests trying to balance a plate of food, a fork, a napkin and a beverage on their lap, will be eternally grateful that a knife was not required.

  • 2 lbs. green beans, cut into bite sized pieces
  • butter
  • kosher salt
  • juice of one lemon, opt. (don’t even think about using bottled juice – it’s fresh lemon juice or nothin’)


Steam or cook the beans in boiling water until crisp tender. Do not overcook. Immediately pour beans into a colander and spray with cold water until beans are no longer even warm. Allow to drain for a few minutes. Pour into a microwave safe serving bowl and dot with butter. Cover and place in refrigerator until just ready to serve. When ready to serve, warm beans in the microwave (remember, you don’t want them to really cook any more, just get warm). Remove from microwave, sprinkle lightly with kosher salt and drizzle with lemon. Stir and serve. 2 lbs. of beans serves about 20 people nicely.

Note: I love the 2 pound packages of green beans from Costco for a dinner party. They are of uniform length and just the perfect bite size when cut in half.


COCONUT LIME BUNDT CAKE

OLYMPUS DIGITAL CAMERA

As is so often the case, I could envision a dish, in this case a coconut lime cake, but I didn’t want to take the time or trouble to invent one (I’m basically lazy you see). So being the little plagiarist that I am (thank you Tom Lehrer for teaching me this valuable life skill), I started with Lady Bird Johnson’s Lemon Bundt Cake recipe and made it my own! (Please note: If you are young or just never had the exceedingly good luck to stumble upon this incredible man/professor/musician, you can learn more about Tom Lehrer on the internet. And if you really want to know more about plagiarism, click on the “tom lehrer plagiarize youtube”. You won’t be sorry.) Let’s see, where was I? Oh yes – cake. Anyway, I tried a couple other versions before stumbling on this “piece de resistance”. The other two tries had the flavor I was after, but not the right consistency. When I saw this recipe I just knew it was going to be the right one for me. And if I do say so myself, and I do, the final product is absolutely wonderful. The addition of the toasted coconut and the substitution of lime for the lemon was nothing less than genius. (Have I mentioned my fears of being too modest?) And as for the drizzle, well, all I can say is that it is just the “frosting on the cake”! I know – boooooo!

A little history lesson: Lady Bird Johnson was a genius in her own right. Notably well educated for her time, she proved a capable manager and a shrewd investor. After marrying LBJ in 1934, when he was a political hopeful in Austin, Texas, she used a modest inheritance to bankroll his congressional campaign, and then ran his office while he was serving in the navy. Next, she bought a radio station and then a TV station, which would soon make them millionaires. As First Lady, she broke new ground by interacting directly with Congress, employing her own press secretary, and making a solo electioneering tour.

  • 1 c. butter, room temperature
  • 1 2/3 c. sugar
    10 egg yolks, room temperature, lightly beaten
    3 1/4 c. flour
    4 tsp. baking powder
    1/2 tsp. salt
    1 c. milk
    1 ½ tsp. vanilla extract, divided
    3 tsp. lime zest, divided (about 3 limes)
    7 tsp. lime juice, divided
  • 1 c. toasted coconut, divided
  • 1 c. powdered sugar
    3 T. heavy cream   

In a large mixing bowl, cream the butter and sugar until light and fluffy. Add the beaten egg yolks until incorporated. Sift together the flour, baking powder, and salt.  Alternating with the milk, add the dry ingredients to the butter mixture. Mix until incorporated. Add 1 teaspoon of the vanilla, 2 teaspoons of the lime zest, 6 tablespoons of the lime juice, and ½ cup of the toasted coconut; beat for about 2 minutes. Spoon the batter into a lightly buttered and floured Bundt pan. Bake in a pre-heated 325 degree oven for 1 hour, or until a cake tester comes out clean. Allow the cake to cool in the pan for about 15 minutes. Invert onto a serving plate and let cool completely before drizzling cake with frosting and sprinkling with remaining toasted coconut. Meanwhile whisk together the powdered sugar, cream, remaining ½ teaspoon vanilla, 1 teaspoon lime zest, and 1 teaspoon lime juice. Add more powdered sugar or cream if you prefer your frosting/drizzle thicker or thinner. Sprinkle with remaining toasted coconut. Allow frosting to harden before serving.


BROCCOLI SALAD

OLYMPUS DIGITAL CAMERA

Broccoli has never been and will never be Mr. C’s favorite vegetable. I serve it to him quite often however because it’s one of my favorite veggies. (It’s really all about me, remember?) So try as I may to find new and fabulous ways to serve the lowly Brassica oleracea Botrytis cymosa, about 90% of the time my tries are less than amazing. (That’s putting it nicely!) But this salad (slightly modified from a recipe that came from a friend of a friend), is just so delicious that Mr. C. will actually go back for seconds! I do realize that he might only like this salad because of the bacon, but I’m choosing to think not. I’m going to live in my own little “world of denial” on this one and give him the benefit of the doubt. Ain’t love grand!

  • 5-6 c. bite sized pieces of fresh broccoli
    ½ lb. bacon cooked and chopped
    1 small red onion, diced
    ½ c. golden raisins
    1 c. light mayonnaise
    1 T. sugar
    2 T. white wine vinegar
  • freshly ground black pepper
  • 1 c. sunflower seeds

Combine broccoli, bacon, onion, and raisins in a salad bowl. Whisk together the mayonnaise, sugar, vinegar, and pepper. When ready to serve, toss broccoli with dressing and sunflower seeds. Serve immediately.

ROASTED SUGAR SNAP PEAS

OLYMPUS DIGITAL CAMERA

I got this quick, easy, incredibly flavorful and healthy recipe from the Love Farm Organics site one day when I was searching the web for a local organic farm that delivered weekly produce boxes. Well they are local if you happen to live in Portland, Oregon, but from the Seattle area, Forest Grove, Oregon (40 miles west of Portland) isn’t exactly “local”. Too bad, I would love to support these farmers. And I would love to have their produce delivered to my home once a week. But alas, great customer service only goes so far – and delivering to my home would certainly qualify as “going too far”. But if you are lucky enough to live near Forest Grove or in the metropolitan Portland area, I would advise you to check out Love Farm Organics. If their produce is as good as their recipes, you are in for a treat.

  • ½ lb. sugar snap peas*, calyx cut off and strings removed, if necessary
  • 2-3 tsp. olive oil
  • 1 T. thinly sliced shallots, rings separated
  • 1 tsp. chopped fresh thyme
  • kosher salt

Place sugar snap peas on a medium sized baking sheet. Pour about 2 teaspoons of olive oil over the peas and mix well until every pod is well coated. (Only use more oil if the pods still seem dry or are not evenly coated.) Spread pods in a single layer on the pan. Sprinkle with shallot slices, thyme, and a moderate amount of kosher salt.  (It’s easy to over salt this recipe, so go easy.) Bake for 8 to 10 minutes in a pre-heated 425 degree oven until crisp tender. Serve hot or at room temperature.

*Sugar snap peas are a cross between green peas and snow peas. The pods appear quite fat, like they’re ready to burst with large peas, but inside, they’re mostly air, and the kernels are miniscule. Like snow peas, you eat the entire pod. Cut off the calyx (end attached to the stalk), and remove the fibrous strings running down the center.  (Note: some varieties are string-less.) You may also see these peas labeled simply as “snap peas” or “sugar peas.”

VIENNESE LIPTAUER


OLYMPUS DIGITAL CAMERA

Ok, here’s the deal! If you like wimpy spreads with hardly any flavor or personality – do not try this recipe! In fact, I absolutely forbid you to try this recipe! However, if you like a spread that screams sophistication, European tradition (check out the name again), and good breeding, not to mention tastes like nothing you have ever had before (and I mean that in a good way), then work up your courage (don’t let the anchovy paste and caraway scare you) and make this for your next get-together. It is absolutely addicting.  And I know, some of you may be saying to yourself “I had Viennese Liptauer in Vienna and it was just ho-hum.” And you would be right if you ordered it in the same restaurants we did. But I promise you that once you have tasted this version your memories of ho-hum will disappear forever.

Note: Liptauer is also found throughout Hungary.

  • 1 (8-oz.) pkg. cream cheese, room temperature
  • ½ c. unsalted butter, room temperature
  • 3 T. sour cream
  • 2-3 tsp. anchovy paste
  • 1 tsp. capers, drained and finely minced
  • 1 T. grated or finely chopped onion
  • 1 T. Dijon mustard
  • 1 ½ tsp. paprika
  • 1 tsp. caraway seeds
  • 1/4 tsp. kosher salt

Thoroughly blend all ingredients together. Refrigerate at least an hour before serving. Serve at room temperature with Finn Crisp, a thin rye crisp bread with caraway. Finn Crisp comes in a small, mostly red package and can be found at most grocery stores.


CREAMY CURRY DIP

OLYMPUS DIGITAL CAMERAOLYMPUS DIGITAL CAMERA

Almost everyone loves this dip. It not only possesses inner warmth and character, it is beautiful on the outside. (If only people would refer to me the same way!) So when you want to serve a veggie plate that looks like a million dollars, spoon this dip into a “bowl” made from the bottom half of a red pepper. Place the “bowl” in the middle of a good sized plate surrounded by your favorite crudités (fancy French word for raw veggies) and sprinkle everybody with chopped fresh parsley or a sprinkle of paprika.

  • 4 oz. cream cheese, room temperature
  • ½ c. low fat sour cream
  • ¼ c. low fat mayonnaise
  • 2 tsp. fresh lemon juice
  • 1 tsp. curry powder
  • ½ tsp. ground cumin
  • ¼ tsp. turmeric
  • ½ tsp. kosher salt
  • 2 tsp. chopped onion

Combine all ingredients in a food processor; whirl until onion all but disappears. Refrigerate at least a day before serving with your favorite veggies.

PEA SALAD

OLYMPUS DIGITAL CAMERA

I usually try to be lighthearted when I post a recipe, but reading or preparing this recipe always brings back memories. In the days before life became so complicated and our local health department became so rigid, I used to join a group of women (including my dear friend Linda) with whom I worked who prepared special holiday meals for the homeless women’s shelter at our local YWCA. We would all prepare homemade food and serve it to the ladies. The main thing these women liked was the variety of food offered. (They so rarely were given choices outside of what we brought in for these holiday luncheons.) After a few meals, I learned that there were two dishes the ladies really liked. One was this pea salad, the other was deviled eggs. For whatever reason these two foods must have reminded them of better days. So you can bet your bottom dollar, we tried our best to give them what they wanted. This recipe never ceases to remind me how blessed and fortunate I am.

  • ½ c. light mayonnaise
  • 1 T. Dijon mustard
  • freshly ground black pepper
  • 1/8 tsp. dill weed
  • ½ tsp. seasoned salt
  • ½ c. finely chopped celery
  • 1 lg. shallot, finely minced
  • ½ c. thinly sliced green onion
  • 1 lb. frozen petite peas, uncooked
  • ½ c. chopped bacon, fried crisp, opt.
  • ½ c. grated sharp cheddar cheese, opt.
  • 1 c. salad shrimp, opt.

Whisk the mayonnaise, mustard, pepper, dill weed, and seasoned salt together in a salad bowl. Add the celery, shallot, and green onions. Pour the package of frozen peas into a colander*. Run enough water over the peas to melt the ice crystals that may have formed around the peas. Let sit a couple of minutes to drain. Gently fold peas in with other salad ingredients. Refrigerate for at least 30 minutes before serving. For variety, add bacon, cheese, or shrimp to the basic recipe.

*or if you are taking this salad to a potluck, for example, and won’t be eating it for several hours, just add the peas straight out of the freezer and they will thaw as you travel. Lovely way to make sure the salad is as fresh and crisp as possible.

OLYMPUS DIGITAL CAMERA