Author Archives: Patti

KANTO STYLE SUKIYAKI

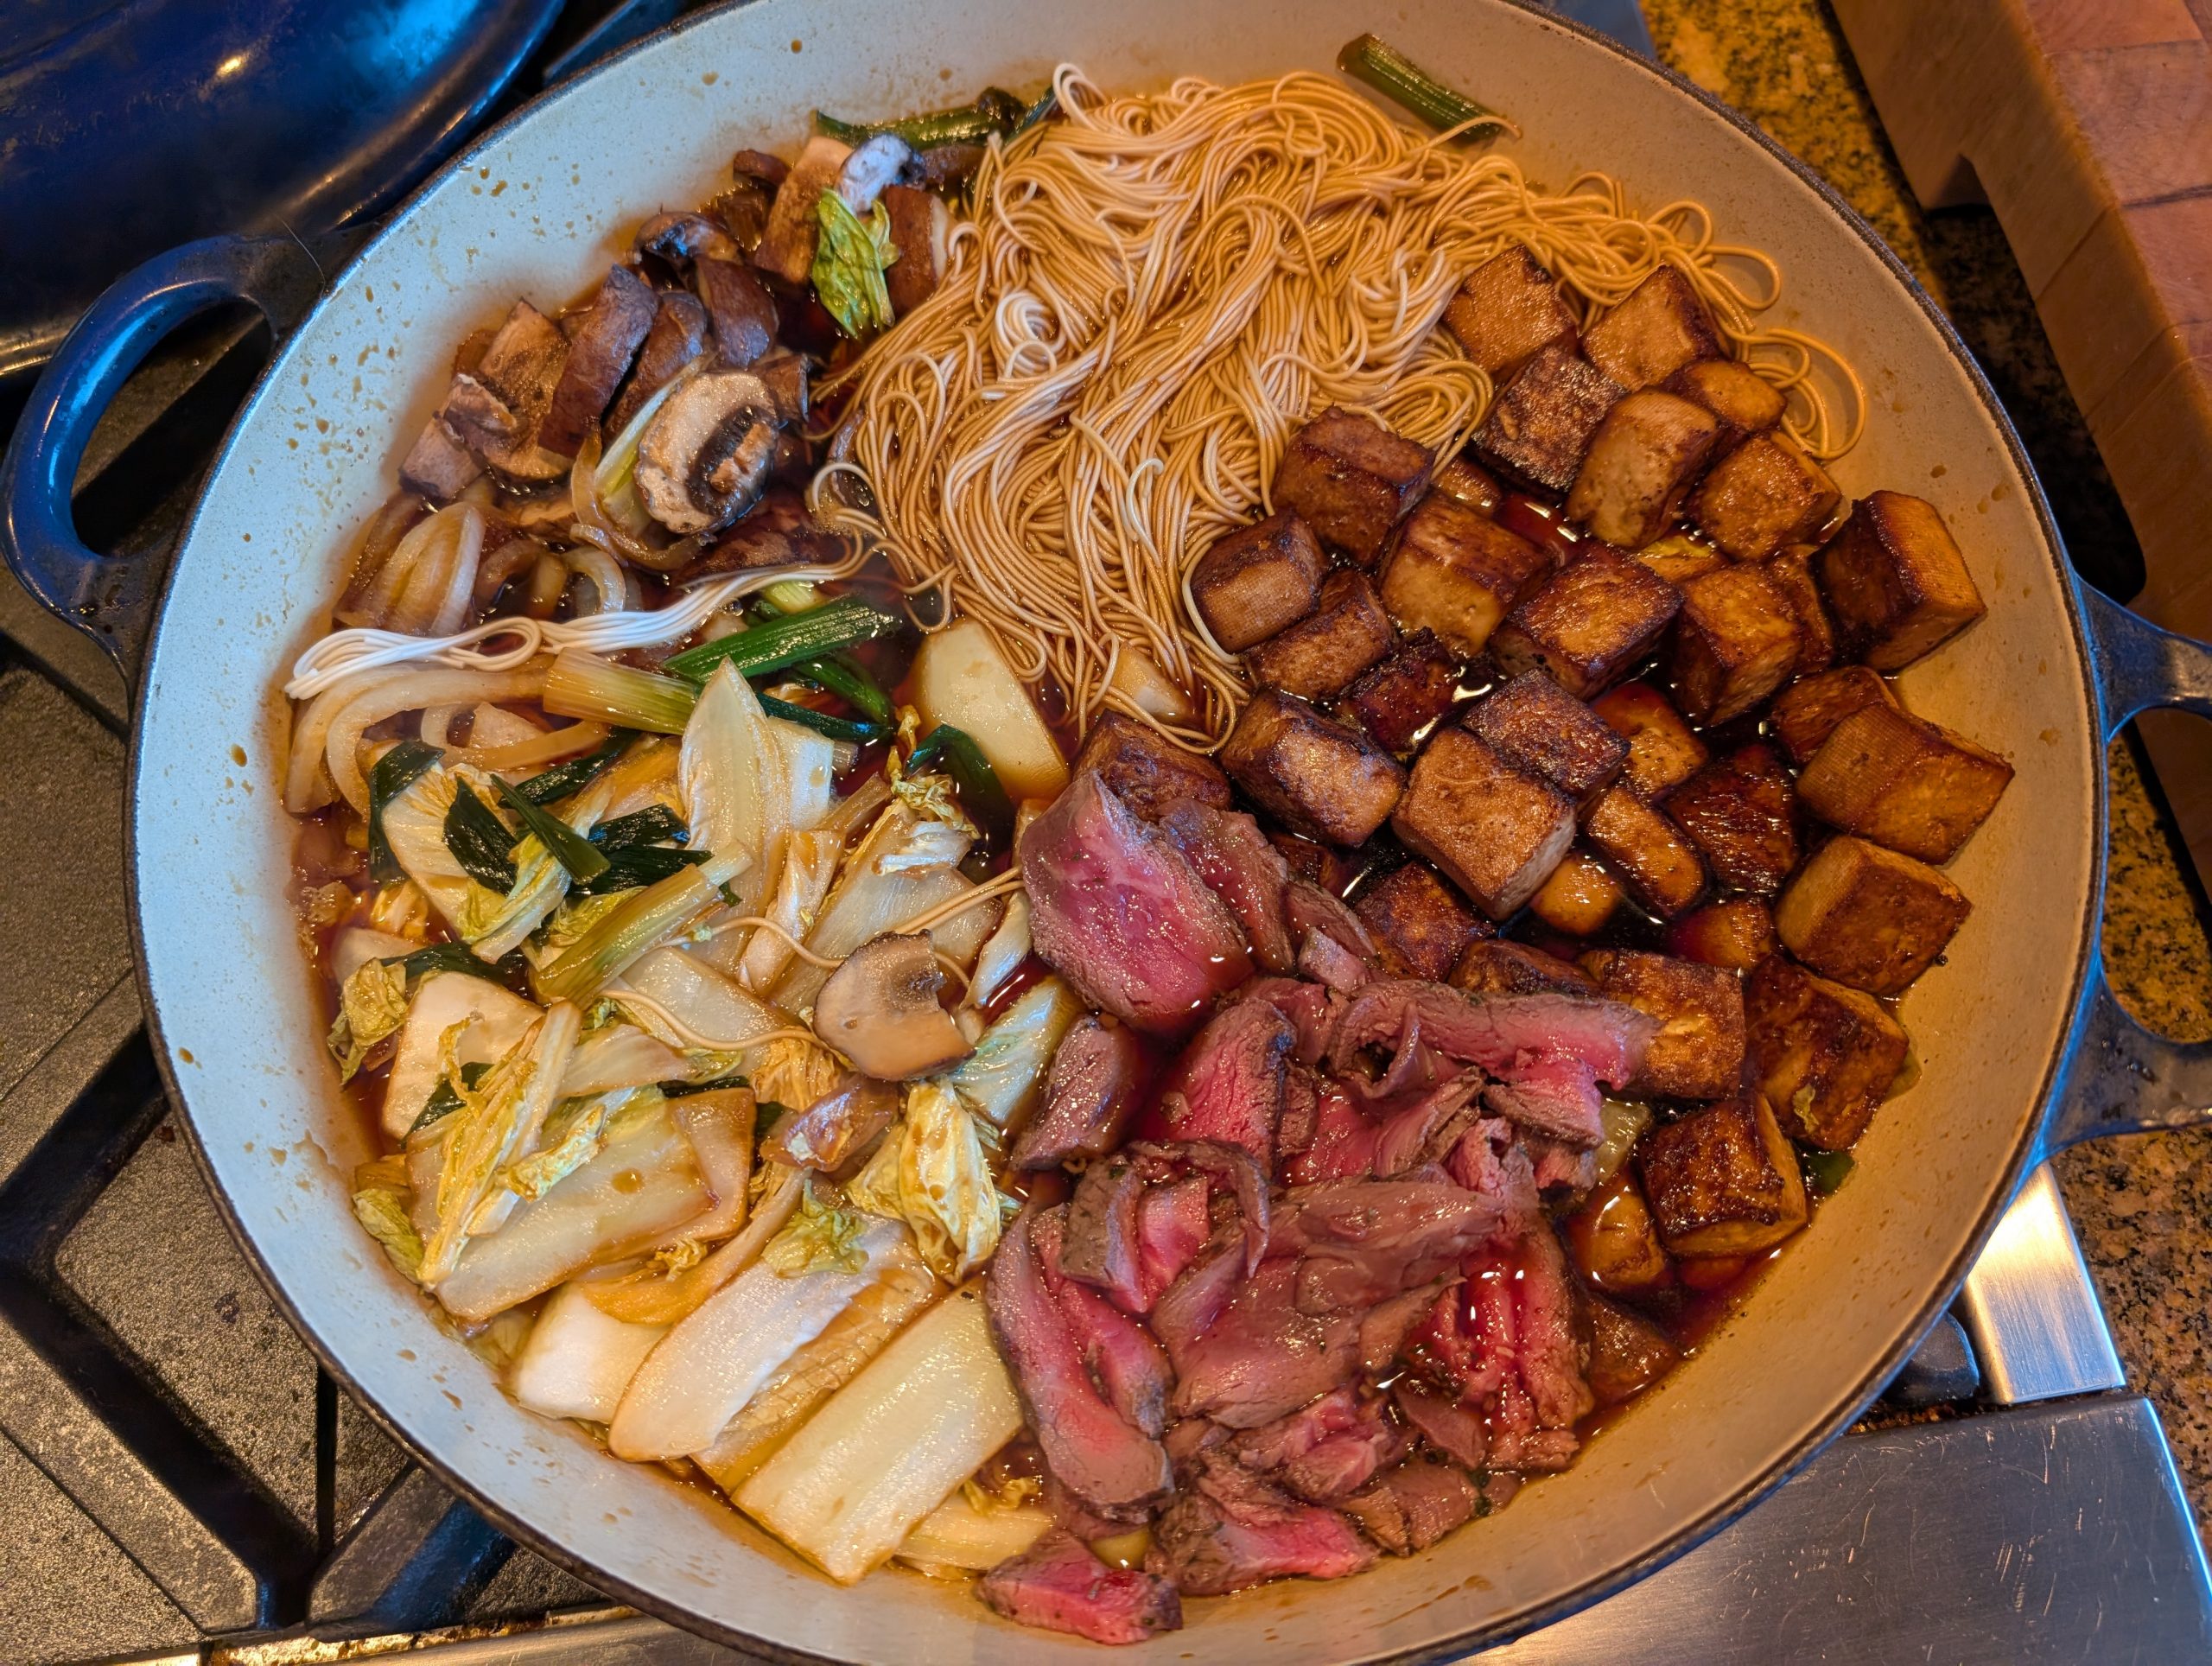
How do I love thee? (Sukiyaki) Let me count the ways! I love the veggies, the mushrooms, the tofu, the noodles, the beef, and of course the broth. In fact, I love every ingredient in this Japanese hot pot dish. Everything! But before I go any further, I should explain the difference between the two main ways Sukiyaki is prepared and presented in Japan.

In Japan there are two main styles of sukiyaki preparation. Kanto (Tokyo) style of Eastern Japan and Kansai (Osaka) style of Western Japan. Kanto style sukiyaki is prepared by heating sukiyaki sauce (warishita) in a pot before pouring the sauce over the veggies and meat and cooking them all together. Kansai style sukiyaki is eaten in stages. The beef is first seared in the pot and then sprinkled with sugar. Then the warishita is added to the pot along with the other ingredients. Since I prefer my sukiyaki Kanto style, that’s what you get today.   

When I was first learning to cook in 1964, my beloved Betty Crocker cookbook (1961 First Edition, Third Printing) was given to me by my Aunt Ruth (mom’s sister).

As a new bride I faithfully perused Betty’s recipes almost every day. But until I started working at the International Branch of Seafirst Bank in January of 1970, I paid no attention to the Sukiyaki recipe in my cherished BC cookbook.

But at work, surrounded by Chinese, Japanese, Filipino, Hawaiian, black, one woman from England, a Brooklynite, and a few of us white folks thrown in for diversity’s sake, I learned to love all kinds of ethnic food, including of course, Asian cuisine. In fact, I went for Asian food like a moth to a candle. I was instantly smitten, and even after decades of making food from all over the world (American style), I never lost my love for Asian Inspired Dishes. Which BTW, you can find all my Asian inspired recipes under Categories, right hand column on this site.  

And never mind I’m 68% more Neanderthal than the average Neanderthal. And almost every gene in my body was lovingly inherited from my ancestors centered around Strasbourg (now part of France, but part of Germany at times). Mother French/German, father Swiss French. Last names like Amann, Kléber, and Merz.

But ethnicity apparently had nothing to do with my taste buds. Because culinarily speaking, I am half Italian and half American Chinese/Japanese. I can’t help this. Italian food rocks me to sleep, while Asian food wakes me up.

That is what is so exciting about living and being a cook in an immigrant nation. All the diversity of dishes that include unique and different ingredients create new and exciting flavors and textures for all of us to enjoy. We are so lucky. And this circumstance is never clearer to me than when I travel overseas.

As much as I adore Italian food, when I’m in Italy, by about the second week, I begin to crave Chinese or Mexican or Greek food. My mouth yearns for a change because it has become accustomed to the variety of flavors only a melting-pot nation can provide.

So, although I promised myself, I would stop writing about politics, I can’t help but remind all of us, me included, how lucky we are to live in a country that until recently, took pride in our diversity. We are, and have always been, an immigrant nation. Unless of course, you are a native American or your ancestors were brought here as slaves. (But I can’t go in that direction, or I will totally come unglued.)

And of course, many of you are as upset as I am about what is happening to our country. All we can do is be kind to each other and hope and pray that our elected officials, both democrats and republicans, can get their collective act together and stop the crazy.

So, stay positive, stay informed, take care of yourself and your loved ones, and don’t give up. We are well and truly all in this together.

Peace and love to all.

1 c. mirin

¼ c. water

¾ c. low sodium tamari or low sodium soy sauce   

½ sm. onion, halved and thinly sliced

½-¾ lb. fresh mushrooms (your choice), sliced

4 c. roughly chopped napa cabbage

6 green onions, cut into 1-inch lengths diagonally

1 bunch (5-6 oz.) Japanese noodles (udon, somen, or rice vermicelli), cooked and drained

1 pkg. extra firm tofu, baked (see recipe for Baked Marinated Tofu below)  

½ lb. marbled beef, cut into very thin slices (see how below)

steamed rice, opt.

Bring the mirin, water, and tamari or soy sauce to a boil in a small saucepan. Reduce heat and simmer for about 5 minutes.

Place the onion, mushrooms, cabbage, and green onions in a large, covered skillet (keep the veggies separated) and pour the mirin sauce over the veggies. Add the cooked noodles and baked tofu.

Cover, bring to boil, and cook for 2 minutes. Remove the lid and simmer until all ingredients are softened. Add the meat and cook only until it starts turning from red to partially brown.

Place a bit of rice in individual soup bowls. Add a bit of each veggie, cooked meat, and noodles to the bowl. Add broth.

Serve hot.

For the Baked Marinated Tofu:

2 T. tamari or soy sauce  

1 T. toasted sesame oil

¼ tsp. granulated garlic

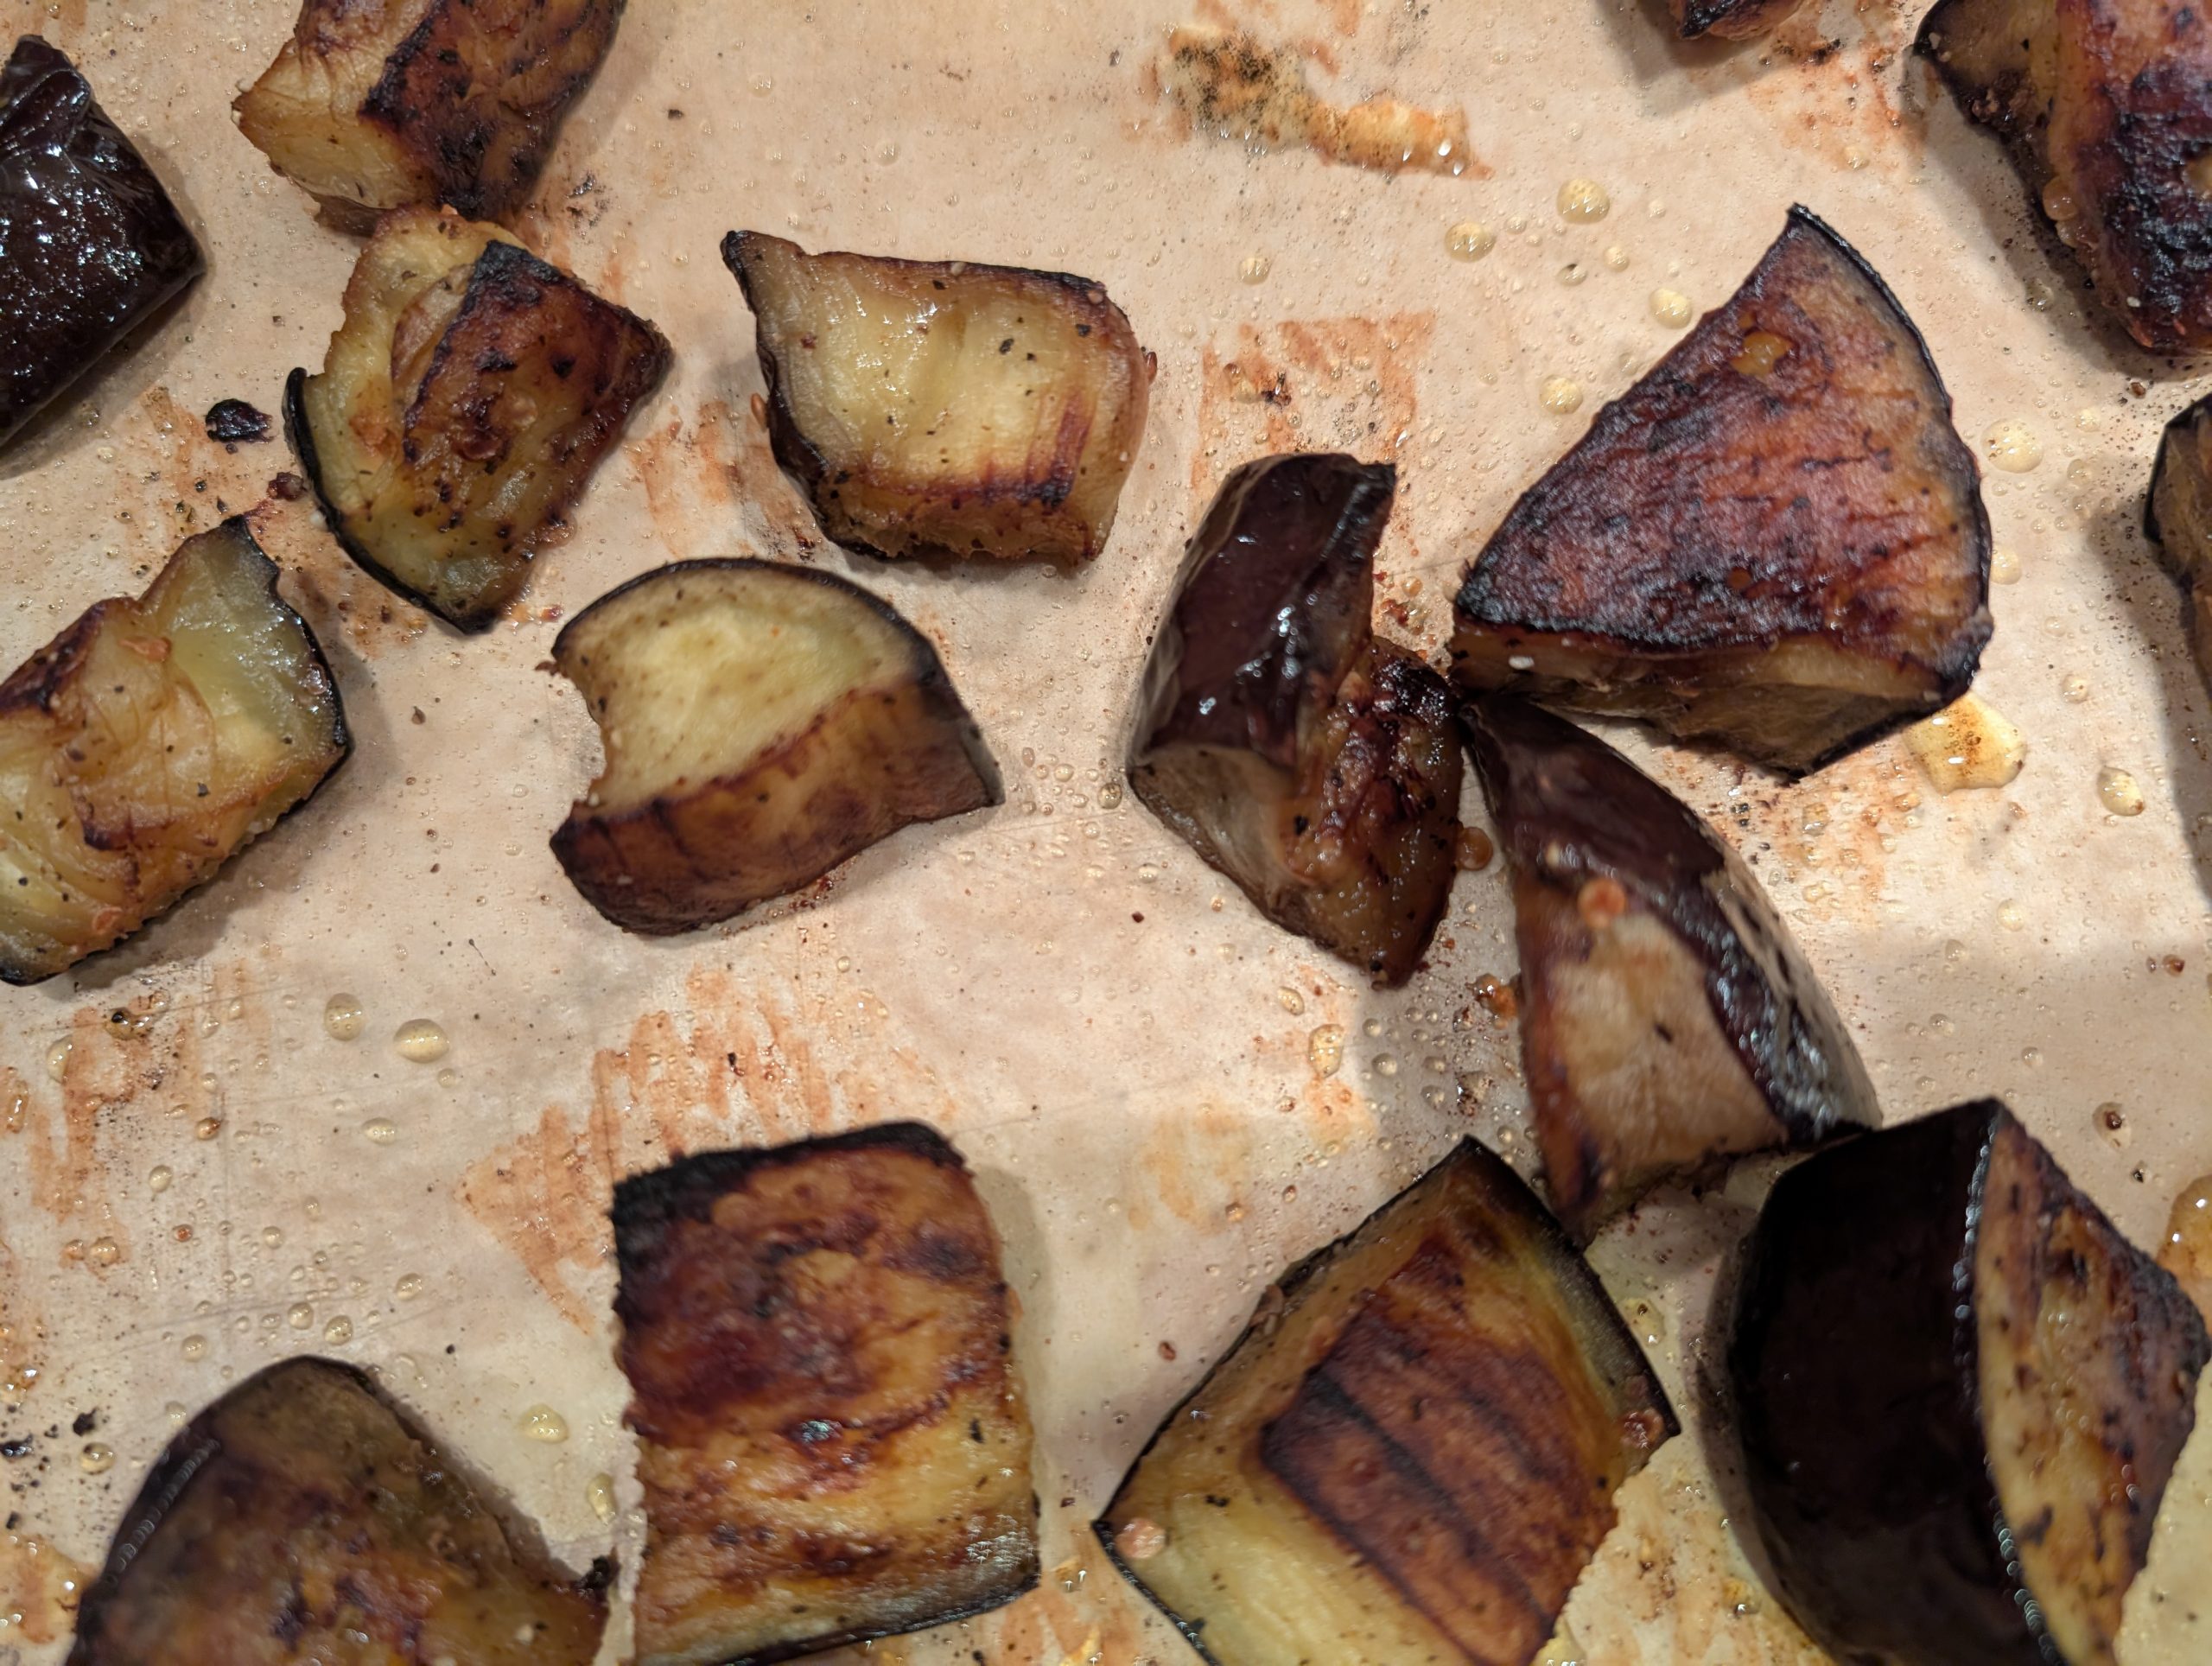
1 pkg. (10.5 oz.) extra firm tofu, cut into ¾-inch cubes  

Combine the tamari, sesame oil, and granulated garlic in a large, flat-bottomed dish. Place the cut tofu in the dish, and using your fingers, turn the cubes until all sides of the tofu cubes have been introduced to the liquid. Allow the cubes to marinate covered in your refrigerator for at least 1 hour, turning the cubes periodically.

Line a baking pan with parchment paper. Pick the tofu out of the marinade and place the cubes on the baking pan. (Any leftover marinade can be added to the mirin mixture.)

Bake the marinated tofu cubes in a pre-heated 425-degree oven for about 25 minutes, turning after 15 minutes.

Remove from the oven and set aside until needed.

How: Place the meat in freezer just until it starts to get hard. Then remove from freezer and slice the meat as thinly as possible.

ITALIAN SALAD WITH HOMEMADE CROUTONS   

I never cease to be amazed at how many ways there are to build a green salad. And how many different ingredients can be used to entice every member of a family to look forward to the salad portion of their meal. I personally love good salads. Especially if someone else builds them. But alas, that is not the story of my life. I am the salad maker unless of course I am dining at a relative or friend’s home, or at a restaurant.

So, periodically I go online to see what other cooks are inventing. Well, I found this recipe on the gimmesomeoven.com site. And this recipe makes for one absolutely marvelous salad. I made a few very small changes, but the hard work was all Ali’s inspiration. BTW – gimmesomeoven.com is a great cooking site. Check it out!

It all started because I plan to feature Italian food at our next JazzVox concert. And because I don’t want our guests to get bored with my food, I try to mix things up as much as possible.

Unlike many times when my unsuspecting guests are forced to eat food that has not previously been prepared and tested in my kitchen, I couldn’t wait. So, I made this salad for dinner the other evening and Mr. C. and I were both thrilled with the result. As I’m sure you will be too when you prepare this salad for your family and friends.

So, if you too love a fabulous green salad, this is the recipe for you. And for all of you out there who love main course salads, I think adding any kind of cooked meat or seafood would work very well with all the other ingredients.  

Now, would young children like this salad? Probably not. Would teenagers go for this salad? I believe they would. Because I’m sure my kids would have enjoyed eating this salad when they were in their teens. But then they had been exposed to curries, exotic soups, Chinese and Japanese dishes, etc. from a fairly young age.

By the time they were teenagers, they were conditioned to eat, or at least try, whatever was set in front of them. It was either that or starve! Just kidding. I was not one of those parents who forced their children to eat everything on their plate. They had to try everything. But they were not required to eat something they didn’t like. I mean really. Who do you know that loves every dish put in front of them? My kids were encouraged to develop a discerning palate. To know and recognize that some food preparations are just tastier than others. Or if a certain flavor just didn’t work for them, they didn’t have to partake. Like with me and cilantro. Yikes! Who washed this stuff in soap? And as with most of us, our tastes evolve over time. Why would I have expected my children to be any different than I was when I was young? Liver when I was young – yuck. Liver now – yum!  

And I must say, my three daughters all learned on their own how to prepare great tasting food. My son too! But each in their own way. And not because I forced them to cook while they were still living at home. Or learn from me. I knew that at some point as adults they would get hungry. And figure out, as I did, that if I wanted to eat good food, I better jolly well learn how to make it myself! So, thank you again “Betty Crocker” and the people at Better Homes and Gardens for teaching me how to cook. I could not have done it without you!

Well, that’s it for today. And just because I need a break from politics as much as you do, I’m going to keep my very personal and private thoughts to myself. I’m simply not going to bore you with my daydreams about certain people in the public eye getting the comeuppance they so richly deserve.

But, for all the rest of you, peace and love from our home to yours.     

Italian Salad:

4 c. chopped romaine lettuce

4 c. mixed Spring greens

¼ red onion, thinly sliced, covered with ice water, and then drained after 10 minutes (this helps reduce the strong, pungent flavor of the onion)

2 c. cherry or grape tomatoes, halved

2 c. croutons, store-bought or homemade (see recipe below)

½ c. grated Parmesan cheese, plus extra for sprinkling

⅓ c. sliced pepperoncini peppers

½ c. sliced kalamata olives

Combine all ingredients in a large salad bowl, drizzle evenly with the Italian vinaigrette, add some croutons, and toss until evenly combined.  Serve sprinkled with extra Parmesan cheese.

Italian Vinaigrette:

3 T. extra virgin olive oil

1 T. red wine vinegar

1 tsp. Dijon mustard

½ tsp. dried oregano

½ tsp. fine sea salt

freshly ground black pepper

1 sm. clove garlic, finely minced 

Whisk all ingredients together in a bowl (or shake together in a jar) until combined.  Taste and adjust seasoning if desired.  Use immediately or refrigerate for up to 3 days.

Homemade croutons:

12 oz. crusty bread, cut into ¾-inch cubes (see my bread recipe below)

¼ c. extra virgin olive oil

1½ tsp. Italian seasoning

1 tsp. granulated garlic

¼ tsp. granulated onion

¼ tsp. fine sea salt, or more to taste

freshly ground black pepper

Line a large baking sheet with parchment paper; set aside.

In a large bowl, drizzle the olive oil over the bread chunks.  Then sprinkle the Italian seasoning, granulated garlic, granulated onion, salt, and pepper over the bread.  Toss gently until well-combined.

Spread the bread cubes out in a single layer on the prepared baking sheet.

Bake in a pre-heated 375-degree oven for 15 to 20 minutes or until golden brown, turning once halfway through.  

Remove from oven and let cool completely.  

Use immediately, or store in an air-tight container.

Note: And if you want to take the “homemade” one step further and bake your own bread for the croutons, allow me to recommend my recipe for Easy Same Day French Baguettes.  

RED CHILI SAUCE FOR TAMALES, ENCHILADAS, BURRITOES, ETC.  

Do not be tempted to halve this recipe. Trust me on this. This red chili sauce from the tastesbetterfromscratch.com site is better than anything you can get in a Mexican restaurant. And it’s easy to prepare. I’m serious! Between this sauce and my red sauce for cheese enchiladas (find the recipe under Cheese Enchiladas with Red Chili Sauce) you are in for two very easy ways to prepare gourmet Mexican food at home. But do not be deceived. Wonderful Mexican food takes time to prepare.

It’s not like flinging a beautifully marbled steak on your grill. (No offence to beautifully marbled steaks everywhere.) Because there is serious time involved in getting a restaurant quality Mexican meal on the table. Is it worth the effort? You bet your sweet bippy! Anytime you make any kind of dish from scratch using mostly fresh or what I call “scratch cooking staples” like flour, you are eliminating a great many chemicals used in keeping prepackaged, processed foods fresh. Now, to be clear, I am not advocating that you begin making your own Worcestershire sauce, Dijon mustard, or the like. I’m just saying that the more you eliminate processed foods from your diet, the better-off you are nutritionally.

And of course, I’m not telling you I make everything from scratch. I use meat and veggie bases (like Better Than Bouillon) regularly. And big surprise! I don’t make homemade mayonnaise or ketchup. And there is always a can of cream of mushroom soup and a box of “Jiffy” corn muffin mix in my pantry for those times when even making a simple sauce or building cornbread from scratch requires more strength than I have at the time. We all have those moments. We are after all – human.

But I will always push for as many ways to stay away from packaged or processed foods as possible. And this recipe for red chili sauce is a perfect example.

Well, that’s it for now. But before I leave you to run for your kitchen to make this sauce, I need to tell you about the book I just finished. The Covenant of Water by Abraham Verghese. Wow! As I stated in one of my previous posts, Verghese had me after only 4 pages. But I was unprepared for this story of love, death, leprosy, and the historic reality that took place over three-quarters of a century (1900 to 1977) on India’s Malabar Coast. Because I absolutely fell in love with some of the characters, and was therefore devastated by how hard their lives were. And when each of these beloved characters died, it felt like I had lost a dear friend. That, my friends, is what happens when a book is written by a truly great author. And to my mind, Verghese fits that category perfectly.  

And even if parts of this book were very hard for me to read, I recommend you read it. I learned more about India and how true compassion can manifest itself from this book, than any other book I have ever read. And don’t we all need a lesson on compassion as we read about what is currently happening to our country.

If what I read and learn daily about how our democracy is being deliberately destroyed was simply a work of fiction, I would think this could never happen. But it is happening. All I can hope and pray, is that regardless of political preference, our elected representatives in congress get their collective act together to save our country from just a few rich men who want democracy destroyed. Think I’m exaggerating, do your homework. And I don’t mean simply listening to Fox News!

I mean reading what experts are predicting. Scientists, doctors, experienced politicians, historians, etc. Our constitution is under attack. And if you think it won’t affect you personally, you are sorely mistaken. For example: Your foreign built clothes washer dies. It requires a new part. Good luck. The United States is not importing from this country any longer or if they are still supplying parts, there is a huge tariff associated with the part you need. Who do you think will be charged with the difference? That $100 part that is needed to make your washer work again is now in the $750 range. You want a new Subaru this summer? Would you like to make a bet that you will be able to drive that car off the lot for about the same price as last summer? Think again.

So, what can we all do? We can write, text, email, etc. our elected officials demanding that first and foremost they protect and preserve democracy. They all, republican or democrat took the same oath of office. And in case you don’t remember what they swore to uphold, let me refresh your memory.

“I do solemnly swear (or affirm) that I will support and defend the Constitution of the United States against all enemies, foreign and domestic; that I will bear true faith and allegiance to the same; that I take this obligation freely, without any mental reservation or purpose of evasion; and that I will well and faithfully discharge the duties of the office on which I am about to enter. So help me God.”

This means, not just some of the time or when it might not serve them well personally. It means EVERY DECISION THEY MAKE SHOULD HAVE THE BEST INTERESTES OF OUR NATION AND THEIR CONSTIUENTS IN MIND BEFORE ANYTHING OR ANYONE ELSE!  They are not allowed to just turn their heads and ignore what is happening to our country. We as citizens have every right to demand that our elected officials do the job they were hired to do. And respect the oath they made freely before taking or continuing the office for which they were elected. And that they work for the good of all citizens, regardless of color, religious preference, etc. and definitely NOT FOR SOME DESPOT WANT-A-BE OR HIS RICH BUDDIES!  

Peace and love to all.              

8 dried California chili pods (you can find them in any grocery store) 

4 c. pork, beef, or chicken stock

2 T. veggie oil

2 T. unbleached all-purpose flour

2 tsp. dried oregano

2 tsp. ground cumin

2 tsp. chili powder

2 tsp. granulated onion

½ tsp. salt

freshly ground black pepper

4 cloves garlic, finely minced

Using disposable gloves, remove the stem and seeds from the dried chiles while rinsing them under cold water. 

Place chiles in a saucepan with broth. Bring to a boil, reduce heat and simmer, uncovered, for 20 minutes. Remove from heat.

Drain the broth into a container. Discard the chili skins.

In the same saucepan you used to cook the chiles, heat the veggie oil. Whisk in the flour and cook for 1 minute. Then whisk in the oregano, cumin, chili powder, granulated onion, salt, black pepper, and garlic. Gradually whisk in the chili liquid. 

Cook, stirring occasionally until the sauce is slightly thickened.

Use for tamales, enchiladas, burritos, or any Mexican dish that would profit from a bit of red sauce.

Please note: Even if this sauce is made with chilies, it is not spicy hot. It offers mild to medium heat. And the flavor is marvelous!

ITALIAN PISTACHIO ORANGE POLENTA CAKE (GF) 

“And now for something completely different.” And thank you again John Cleese for speaking this immortal line as the Announcer in the 1971 British sketch comedy film based on the television comedy series Monty Python’s Flying Circus. What a hoot!   

Anyway, my point is, this cake is different from any other cake I have ever built. And I have baked a great many cakes since I started baking at the ripe old age of 12. (That is, if you don’t count the mud pies, cakes, and cookies I assembled when I was 3.) (But that’s a story for another time!) So, you do the math! That’s a lot of years and a lot of cakes that have come out of my ovens.

So, what makes this cake so different? Well, just about everything! First and foremost, there is no gluten in this recipe. And no liquid like milk or buttermilk. And the recipe calls for olive oil. And uncooked polenta. You with me now? The recipe simply calls for many out-of-the-ordinary cake ingredients.

But what it does contain is a lot of tenderness and crunch at the same time. And a combination of flavors that are unique and delicious.  

I found this recipe on the mangiabedda.com site when I was looking for a new Italian dessert to serve at an upcoming JazzVox concert at our home. I used the polenta I had on hand that was probably grainier than fine cornmeal, but I loved the bit of crunch it provided. Next time I will make the cake with fine cornmeal just to change things up a bit. And yes, there will be a next time!

Mr. C. hosted a rehearsal at our home yesterday that began just when the cake was coming out of the oven. And of course, I had to offer the guys a piece of cake after their rehearsal ended. Both Mike and Brian asked for seconds. That pretty much says it all!

So, if you too are looking for a simple to prepare, gluten free dessert to make for family or friends, I suggest you make this pistachio cake. It truly is delicious. And refreshingly different.

Well, snow is predicted, and I could not be happier. I love snow. And even if I didn’t love snow, I have yet to learn how to make the weather conform to what I want. So, my only choice is to make the most out of whatever weather presents itself. If only I could feel as complacent about what is happening in our country as I do about the weather. Weather, I understand. What is happening in our country is beyond my comprehension. I never imagined the level of inhumanity that is currently on display.

All I can do is try to make the lives of the people around me as pleasant as possible.

Peace and love to all.  

4 extra large eggs, yolks and whites separated

1 c. + 2 T. granulated sugar, divided

⅔ c. extra virgin olive oil, plus more for greasing the pan

1 tsp. pure vanilla extract

1 lg. orange, zested (about 1½ tsp. lightly packed zest)

1½ c. finely ground raw unsalted pistachios (do not over grind), divided  

¾ c. uncooked fine cornmeal

1½ tsps. baking powder

¼ tsp. fine sea salt

2 T. freshly squeezed orange juice   

powdered sugar (for dusting the greased baking pan)

Prepare a 9-inch or equivalent sized baking pan by greasing it generously with olive oil. Lightly dust the bottom and sides of the pan with powdered sugar. Set aside.

In the bowl of your stand mixer, whip the egg whites to stiff peaks using the whisk attachment. Transfer the stiff egg whites to a small mixing bowl and place in your refrigerator.

Using the same bowl and the unwashed whisk attachment, whisk the egg yolks and 1 cup of granulated sugar together until pale and frothy. Stir in the olive oil, vanilla extract, and orange zest.

Combine 1¼ cups of ground pistachios, polenta, baking powder, and salt in a bowl. Add the dry ingredients to the wet ingredients in three additions. Stir together until just combined. (At this point the batter will be quite thick and stiff. That is exactly what you want.)  

Use a rubber spatula to fold in half the egg whites. Gently fold in the remaining egg whites until there are no traces of egg whites visible. Do not over stir! Pour the batter into the prepared pan. 

Bake in a pre-heated 350-degree oven for about 40 minutes or until the top is brown, the sides of the cake pull a bit away from the pan and the cake bounces back when you gently press it with your fingertip.

Remove from oven and place on a wire rack to cool for 15 minutes. Meanwhile, make the sugar and orange juice syrup.  

Place the juice in a small saucepan along with the remaining 2 tablespoons of granulated sugar. Bring the mixture to a boil, lower to a simmer and cook for 2-3 minutes until thick and syrupy.

Brush the surface of the cake with orange syrup. Sprinkle with the remaining quarter cup of chopped pistachios. Let cool completely before serving.

The cake can be stored in your fridge for up to 2 days. Bring it to room temperature before serving.  

EAST INDIAN SPICY ROASTED ZUCCHINI  

OK, here I go again with another quick and easy veggie side dish.

First of all, if you are new to this site, you need to know that I love veggies. Not all veggies. But most of them. However, if you put a fried parsnip, mashed rutabaga, or turnip gratin in front of me, even if the gratin is smothered in a beautiful Gruyère sauce, there would be no way on God’s green earth I would partake. Sorry, but the truth must be told! And I believe it all goes back to my childhood.

I grew up on a 2½ acre plot of land in Kenmore, Washington. There were two houses on this site. My family (2 parents, 1 exceptional girl, and 2 rather dull boys) lived in the larger farmhouse. My maternal grandparents lived in a small house on the same property. And while my dad worked at Boeing and my mom as a secretary at various local schools, my grandfather raised chickens for the eggs he sold to a local feed and seed store. My grandmother grew veggies in a huge garden, every kind of berry imaginable, and tended to all of our fruit trees. Then she preserved every veggie, fruit, or berry that could be contained in a glass jar. Grandma also made all our bread. She also fed and raised a cow or two periodically for milk, for home churned butter, and then to provide us with various cuts of meat that we stored in an individual freezer locker in a big building in Lake City. This was just how it was for many families during the 40’s before home freezers or even refrigerators were common.

Heck, those were the days when an ice man delivered ice for the ice box that lived in our screened in back porch! (And you thought I was a spring chicken. Hardly! I even remember the Watkins man that appeared every so often to peddle a variety of household products, including liniment (a muscle pain relief product), which was the original product of the J.R. Watkins company, along with other items like spices, extracts, cleaning supplies, and personal care products. All sold door-to-door through direct sales.) 

But what I remember most were my loving parents and my grandparents. All 4, devoted Christians that were way ahead of their time. Never a harsh word. Never a condemnation about race, creed, or skin color. Just good people.

Both my grandparents and parents were products of the depression era. So, bottom line, nothing went to waste. And in those days, whatever grew quickly and well in grandma’s garden was served often. And included in this trio of veggies cooked to death and presented often were parsnips, rutabagas, and turnips. And I hated them with all the passion any child would exhibit when forced to eat something as loathsome as a root vegetable. (Except potatoes, of course. They were always welcome!)  

Now to my credit, these three root veggies are the only ones I still do not tolerate. All the rest I consider mana from God. But back to the reason for this post.

One of my favorite veggies (actually a fruit) is the humble zucchini. And last night when I planned to serve shrimp curry for dinner, I decided some kind of East Indian spicy roasted zucchini would make a great side dish. So, I went online and found this recipe on the cookwithmanali.com site. And it was the perfect accompaniment. Not too spicy. Just spicy enough to provide a new and interesting way to flavor roast zucchini.

So, if you also love a bit of spice on your food, I recommend this recipe.

Well, that’s it for today. Snow is predicted and frankly, I could care less. I love snow.

So, regardless of whether or not you love snow, I suspect you have no more control over the weather than I do. So, don’t fight it. Go outside. Make a snowman. Make soup. Make homemade bread. Bake cookies. Make it fun for your whole family.

And on that happy, possibly snow-filled, enforced time at home with ecstatic children and pets who refuse to go outside and freeze their lower reaches, I wish you and yours, as always, peace and love from our home to yours.   

2 garlic cloves, finely minced

½ tsp. fine sea salt

freshly ground black pepper

¼ tsp. ground cumin

¼ tsp. ground coriander

¼ tsp. smoked paprika

pinch cayenne pepper

2 tsp. extra virgin olive oil

2 med. zucchini, sliced into ⅓-inch rounds

Panko breadcrumbs

Line a baking pan with parchment paper.

Stir the garlic, salt, black pepper, ground cumin, ground coriander, smoked paprika, cayenne pepper, and olive oil together in a mixing bowl.

Add the sliced zucchini and toss together till combined.

Dip both sides lightly in Panko.

Place on the prepared baking sheet in a single layer. Roast in a pre-heated 425-degree oven for 23-25 minutes or until tender and the Panko is crisp.

Serve hot out of the oven.

FRUITY SPICED HOT TEA MIX

OK, you all, just because Christmas 2024 is in our rear-view mirror doesn’t mean Old Man Winter isn’t up to his usual shenanigans. For the last few days, it has been just beautiful here on the western side of the Cascade Mountains. Cold, but clear skies and amazing vistas. But if the weather service is to be believed, we are in for a bit of snow this weekend. And for us, with our steep driveway, it means either risking life and limbs attempting to leave home, or staying home by our fake but warming fireplace, reading books until our eyes start to cross, while sipping a little something warm to cheer us up.

And even though most of you were not even a gleam in your father’s eyes in the years following World War II, and therefore not old enough to remember “Russian Tea”, it was very popular. The basic formula for instant hot black tea with citrus flavorings became a showcase for the convenience foods of the Space Age: Tang, powdered lemonade, and instant tea. 

So, for whatever reason, I decided to find a recipe and make some to gift unsuspecting friends as part of their Christmas package. And of course, saving some of the mix for us to enjoy also. Well, I don’t like hot tea. Never have. But this mixture of tea, citrus flavoring, and warm spices I love. A cup of this just plain warms the cockles of my heart. It simply makes me happy and filled with contentment.

Of course I can’t drink this lovely concoction every day. And neither should you. Too much sugar, caffeine, and unpronounceable ingredients. But as a treat while you watch snowflakes accumulate and inhibit your ability to leave the confines of your home, it can make a homestay acceptable. And what more could you ask of a non-alcoholic beverage?

So, if you want to try a retro hot drink, give this recipe a try. And while you’re at it, have a cookie too. Between all that sugar, you will probably get everything on your to-do list done, and in record time!

Peace and love to all.         

1 container Tang (26.2 oz.)

1 c. unsweetened instant tea  

1¾ c. instant lemonade (such as Country Time)

2 tsp. ground cinnamon

2 tsp. ground clove

Mix all the ingredients in an airtight container.

To make the hot tea, fill a mug with hot water (about 195-degrees) and stir in 2-3 teaspoons of the tea mix. Sip carefully. It’s a hot liquid after all.  

SIMPLE OVEN ROASTED EGGPLANT CHUNKS  

OK, I am obviously on a “simple to prepare, make it easy on myself, use up what I have on hand, and try to make it healthy” vegetable side dish kick! And boy oh boy do I have a treat for you! And we all have Nagi of recipetineats.com fame to thank. Of course, I did make a small adjustment to Nagi’s recipe by adding a bit of seasoned salt to the mix. But I add seasoned salt to all kinds of savory dishes because, well, it’s seasoned salt! Anyway, I made this dish last evening because I had one lone eggplant in my refrigerator veggie drawer that really needed to be used. And frankly, I didn’t want to spend any time at all on this portion of the meal. I wanted quick and easy to the max!

When I first looked at this recipe, I thought it couldn’t possibly work. Not enough flavor additives. But I have learned to trust Nagi’s recipes. So, with the addition of just a quarter teaspoon of seasoned salt, I have now found the perfect way to eat this delectable fruit. And yes, eggplant is a fruit. Although eggplants, like tomatoes, are often referred to as vegetables, they are both technically fruit, as they grow from a flowering plant and contain seeds. Cucumbers, avocados, zucchini, pumpkins, pea pods, bell peppers, and squash are also technically fruit.  

And just so you know, eggplant is considered good for us, as it is a low-calorie, high-fiber fruit packed with nutrients like vitamins C and K, potassium, and antioxidants, which are known to reduce the risk of heart disease and help with blood sugar control and weight loss.

Of course, roasting the eggplant in extra virgin olive oil doesn’t hurt the overall appeal. I mean really, who do you know that can resist any veggie (or fruit) roasted in olive oil?  

So, next time you want a simple to prepare and reasonably healthy side dish, please consider this recipe. But be warned. I ate all but about 6 chunks of the entire eggplant because I just couldn’t stop putting chunk after chunk in my mouth. In fact, Mr. C. was lucky to get the small amount that he did! Granted, I love eggplant, but a whole eggplant in one sitting? Inconceivable!

Well, that’s it for today. The sun is shining, the sky is cloudless, and the mountains are showing off their beautiful winter mantles of snow. But snow is predicted for this Sunday. And of course, the only reason snow is likely, is because we have tickets to a ballet performance at Seattle Center that day. So, Seattle and environs residents, we apologize in advance for any inconvenience a snowstorm on Sunday causes you from our thoughtless ticket purchase.

And as always from our currently snow free home to yours, peace and love to all.        

1 med. eggplant

2 T. extra virgin olive oil, plus more as needed

¼ tsp. seasoned salt (see my favorite recipe below)

¼ tsp. kosher salt

freshly ground black pepper

Line a small baking pan with parchment paper.

Do not peel the eggplant. Cut it into 1½-inch thick slices, then into 1½-inch chunks.

Stir the olive oil, seasoned salt, kosher salt, and pepper together in a mixing bowl. Add the eggplant and stir until all the chunks are covered with oil. (If you need a bit more olive oil, go for it. But don’t overdo it. You want the chunks to be coated but not smothered.)

Bake in a pre-heated 450-degree oven for 20 minutes. Then turn and roast for another 5 minutes or until the edges are caramelized and the flesh is soft but not shriveled.

Serve hot out of the oven.

SEASONED SEA SALT (my favorite)

1 c. fine sea salt

3 T. finely ground black pepper (I cheat and use canned black pepper)

3 T. paprika

3 T. granulated garlic

3 T. granulated onion

2 tsp. celery salt

1 tsp. chili powder

pinch cayenne

Whisk or shake altogether and store in an airtight container.  

DRY BRINED SPATCHCOCKED CORNISH GAME HENS

OK, I know, I know! I already have spatchcocked game hen recipes on this site. But I just can’t stop myself from trying new recipes with which to thrill and delight all my wonderful readers (if they turn out that is), while coincidently keeping myself reasonably sane. Because really, how much fun is it to fix the same darn dishes over and over again? Especially for someone like me, who unfortunately possesses the attention span of a gnat! I’d simply have gone crazy if I had chosen to become a line cook. I probably would have wound up in jail for locking the chef in the restaurant’s walk-in freezer while I put my own spin on his or her signature sauce. It simply would not have worked out for me! (Not too well for the chef either!)

Anyway, I’m not in jail, I haven’t permanently traumatized an unsuspecting chef somewhere in the greater Seattle area, and you and I both have a new recipe for game hens. All’s well, that ends well. But on to why I posted this recipe.

First of all, I am a fan of brines, herb salts, and rubs. Be it a dry rub like I use on Smoked Dry-Rubbed Ribs, a wet brine and dry rub used on my recipe Brined, Rubbed, and Grilled Boneless Pork Chops, or an herb salt used on my recipe for Herb Salted Turkey with Cognac Gravy. There is just something magical about what a little brining or dry rub can add to the enjoyment of meat. And Billy Parisi’s Chicken Seasoning (recipe below) is the best seasoning for poultry I have ever tasted. I plan to use it on all kinds of chicken preparations. It is just that delicious! Plus, this is Mr. Parisi’s recipe for game hens too.

And although I over-roasted the two game hens I prepared last evening, they still tasted marvelous. We enjoyed one last night with rice pilaf and half an artichoke each. Tonight, I’m serving the second hen with pasta, liberally smothered in a new gorgonzola sauce recipe I’m attempting, and oven roasted eggplant chunks. Also a new recipe.    

And speaking of ending well, I finished yet another Carl Hiassen book (Sick Puppy). Such a fun way to learn about the great state of Florida.

But, as the old saying goes – and now for something completely different – I just started The Covenant of Water, a novel by Abraham Verghese. I’ve only read the first 4 pages, but I’m already hooked. I’ll keep you posted.

And on that happy “new book” high, I wish peace and love to all.

2 Cornish game hens, spatchcocked (see how below)

3 T. Chicken Seasoning (see recipe below)  

Wash and pat the hens down with paper towels on both sides.

Transfer them to a rack over a sheet tray and generously season them on all sides with the Chicken Seasoning.

Place the hens in the fridge uncovered for 12 to 48 hours. (This is the dry-brining part.) (My hens were in the fridge for 24 hours. Perfect!)

When you’re ready to bake them, preheat the oven to 425-degrees.   

Bake the game hens on the middle rack for 40-50 minutes or until the deepest part of the breast reaches 165-degrees internally. (Check after 40 minutes.)

Remove them from the oven and rest them at room temperature for 5 to 10 minutes before serving.

To spatchcock a game hen: (or a chicken or turkey for that matter)

Wash and dry the critter and place on a cutting board, breast side down. Using sharp kitchen shears, cut down each side of the backbone, starting from the neck end down to the tail. Remove the backbone, pull open the game hen, chicken, or turkey and flip it over, then press down on the breast to open it out flat.

CHICKEN SEASONING

3 T. coarse sea salt

1½ tsp. freshly ground black pepper

5 tsp. granulated garlic

5 tsp. granulated onion  

1 tsp. dry mustard

1 tsp. ground cumin

1 tsp. paprika

2 T. dried parsley

2 tsp. dry rosemary (I broke my dried rosemary leaves down a bit for this mixture using my small mortar and pestle)   

2 tsp. dry thyme

Using a fork, spoon, or whisk, mix all the seasoning ingredients together until combined. Store in an airtight container.

LEFTOVER ROAST BEEF BURRITOS

And no, I will never be able to wrap a burrito correctly. And yes, I have tried. It would take greater skill than I happen to possess!

So, after eating pot roast fresh from the oven the first night, and the second night eating leftover pot roast and assorted veggies and still having quite a bit of meat left, I knew we needed a change. But what to do with cooked lean meat that was rather dry at this point. Well, why not turn it into some kind of Mexican dish? Great! Why not indeed?

The first thing I thought of was tacos. Add some taco seasoning and Bob’s your uncle. But I like my tacos in crispy corn shells. And I have yet to figure out how to make crispy corn tortillas. But I do know how to make flour tortillas. There you go. So, then the next decision. Enchiladas or burritos. After researching the difference between an enchilada and a burrito, I learned that an enchilada is typically made with a small corn tortilla and is covered in a sauce. While a burrito is made with a larger flour tortilla and is usually wrapped without a heavy sauce covering. So, both tacos and enchiladas were out. That left burritos. OK by me, I love burritos. But now, how to make a burrito filling?

So, I went online to find the perfect recipe. And luckily, I found this recipe on the allrecipes.com site. However, I did make a few minor changes. But not enough to make a never mind. (I love that expression.) Anyway, the burritos turned out great. And they were fast and easy to make. (Well, they were fast and easy to put together after I made the flour tortillas and guacamole. Which as you might suspect, making homemade tortillas takes a fair amount of time. Guacamole, not so much. But it all adds up.)

And yes, I do realize, not everyone is as crazy as I am about making their own bread products. But I will always remind you that homemade bread and in this case, tortillas are tastier, cheaper, and contain only unbleached all-purpose flour, salt, baking powder, veggie oil, and water. Whereas, for example, Mission Large Flour Burrito Tortillas – 16 count ($6.99 at Fred Meyer) are made from Enriched Bleached Wheat Flour (Wheat Flour, Niacin, Reduced Iron, Thiamine, Mononitrate, Riboflavin, Folic Acid), Water, Vegetable Shortening (Interesterified Soybean Oil, Hydrogenated Soybean Oil and/or Palm Oil), Contains 2% or Less of: Salt, Sugar, Baking Soda, Sodium Acid Pyrophosphate, Distilled Monoglycerides, Fumaric Acid, and Calcium Propionate and Sorbic Acid (To Maintain Freshness).

OK, I’ve climbed down off my soapbox. So, back to this recipe.

If you ever find yourself with leftover cooked meat (beef, pork, chicken, ostrich, etc.), consider disguising it in the form of a filling for burritos. Not only will your family heave a sigh of relief for not having to eat the same meal yet another time, but you can also take pride in serving a relatively healthy lean meat reinvention.

Well, that’s it for today. The sun is shining and Mt. Baker, in all its gender-neutral glory, is gracing my view as I type up this post. (See photo below.)

But before I leave you in peace, I must mention the name of the last book I finished. Stormy Weather by Carl Hiaasen. And I must say, if you have not read any books by Carl Hiaasen, then you are missing out.

Carl Hiaasen does not write conventional mysteries. His characters run from bat —- crazy (but lovable) to the most corrupt politicians and bureaucrats imaginable. And in many of his books, people who don’t respect nature or are only interested in obtaining more wealth or power get theirs in an unconventional way. And since I can’t find any mention of the good guys winning in real life, I find reading about outlandish ways to punish those for whom I wouldn’t offer a glass of water if they were dying of thirst, these works of fiction make me laugh. And to tell you the truth, I need to laugh. It’s a crazy world right now. And given a choice, I would rather laugh than cry.

And as always, peace and love to all.     

1 T. vegetable oil

½ onion, chopped

1 clove garlic, minced

½ c. diced tomato

2 c. chopped cooked roast beef

1 (8 oz.) can or jar Mexican salsa (mild to hot) (your choice)

1 (4 oz.) can diced green chiles

1 tsp. toco seasoning 

tiny pinch crushed red pepper flakes, opt.

5-6 flour tortillas (see recipe for homemade flour tortillas below)

2 c. grated sharp cheddar cheese, divided

shredded lettuce, opt.

sour cream, opt.

guacamole, opt.

Heat the oil in a skillet over medium-high heat. Stir in the onion and cook until tender and transparent, about 5 minutes. Add the garlic and cook for 1 minute. Mix in the diced tomato, roast beef, Mexican salsa, chiles, taco seasoning, and crushed red pepper flakes.

Bring the mixture to a boil. Reduce heat to low, and simmer, uncovered, for 25 minutes, or until thickened.

Arrange tortillas on a clean, flat work surface. Spread an equal amount of the beef mixture in the center of each tortilla. Sprinkle evenly with half of the cheese. Fold over ends and sides to make a package.

Place the burritos in a lightly greased 9×13-inch pan. Sprinkle the burritos with the remaining cheese and bake in a pre-heated 400-degree oven for about 15 minutes, or until the cheese melts. Serve with lettuce, sour cream, and guacamole. Or any other condiment that takes your fancy!

FLOUR TORTILLAS

3 c. unbleached all-purpose flour, fluffed

1 tsp. kosher salt

1 tsp. baking powder

⅓ c. vegetable oil  

1 c. warm water

Combine flour, salt, and baking powder in the bowl of your stand mixer. Using the dough hook, mix dry ingredients until well combined.

Add oil and water with mixer running at a low speed. After about 1 minute, or when mixture comes together and begins to form a ball, continue to mix for 1 minute more or until the dough is smooth.

Transfer dough to a lightly floured work surface. Divide into 8 equal portions. Turn each piece to coat with flour. Form each piece into a ball and flatten with the palm of your hand. Cover flattened balls of dough with a clean kitchen towel and allow them to rest for at least 30 minutes (or as much as 2 hours) before proceeding.

After the rest period, heat a large non-stick pan or griddle over medium heat. Roll a dough piece into a very thin, rough circle, about 7-8 inches in diameter, while keeping the work surface and rolling pin lightly floured.

When the pan is hot, place the dough circle into or onto the pan and allow it to cook about a minute or until the bottom surface has a few light brown spots and the uncooked surface is bubbly. If it is browning too fast, reduce the heat a bit. If it’s taking longer than a minute to see a few golden-brown spots on the underside of tortillas, increase the heat a bit.

Using a spatula, flip to the other side and cook for 15-20 seconds.

The tortillas should be nice and soft but have a few small brown spots on the surface. While the first tortilla is baked, roll out the second so it is ready to bake when the first one is off the griddle. Then proceed the same way until all the tortillas are baked.

Note: Don’t be tempted to roll out all the tortillas before starting to bake them. Or if you do, stack the uncooked tortillas separated by parchment paper or you will never get them apart. 

Remove the baked tortilla from pan and stack to help keep the tortillas soft. 

Serve the tortillas warm or allow them to cool for later use. When ready to use, place a slightly damp paper towel in the bottom of a microwave-safe container (with a cover) that will hold the stacked tortillas. Microwave uncovered for 15-30 seconds (start with 15) or until warm, then keep covered to hold heat while serving.

Or, for this recipe, fill the tortilla as instructed above.

Store extra tortillas in an airtight container or Ziplock bag at room temperature for 24 hours or refrigerate for up to 1 week.

To freeze, separate tortillas with waxed paper and place them in a Ziplock bag before placing them in your freezer.

Mt. Baker with Camano Island’s very own Barnum Point in the foreground. The water is Port Susan Bay.

TWO QUICK AND EASY VEGGIE DISHES

Well, apparently, I thought these two simple veggie dishes were “too insignificant” to even bother to take a photo.  “Too Insignificant” meaning something so unimportant or small that it was not worth considering or paying attention to; essentially completely negligible or irrelevant. Well, that may have been the case when I prepared both of these recipes as almost an afterthought to accompany the more exciting and note-worthy entrée. That is until I sat down to dinner and thoroughly enjoyed the first bite and every bite thereafter of these simply prepared veggies. So, I thought you might profit from my disdain. And believe me, I’ll try hard not to let this happen again. Starting today, I plan to take a picture of every item I bake, boil, steam, fry, etc. etc.

So, if you too like simple recipes that are quick and easy to fix, these recipes definitely fit the bill. And no, they aren’t fancy. But they are doable even if you are a harried working mom or dad that just got home from work and instead of being greeted with “welcome home” or “how was your day”, you are greeted with “I’m hungry”, “what’s for dinner”, or my personal favorites – “I need 2 pieces of poster board and some colored pens for class tomorrow” and “I need a white shirt for the band concert tomorrow night”. Yes, ladies and gentlemen, I have been there too!

So, if these two recipes help you get dinner on the table, my work here is done!

And for you parents who wonder “will this ever end”, believe me when I say – yes it will. And one day when you are older, you will realize that you would give almost anything for 1 more day of your kids asking you “what’s for dinner”?

Peace and love to all.   

OVEN ROASTED SWEET POTATO CHUNKS

2 T. extra virgin olive oil, plus more to coat the baking dish or pan

2 lg. sweet potatoes, peeled and cut into ¾-inch chunks

¼ tsp. dried oregano

¼ tsp. kosher salt

freshly ground black pepper

Coat the bottom of a baking pan or dish with just a thin coating of olive oil.

Place the cut sweet potatoes in the baking dish, along with the oregano, salt, and pepper. Stir to combine.

Bake in a pre-heated 350-degree oven until the sweet potato chunks are soft and fork-tender, for about 45 minutes to 1 hour, turning them halfway through the baking process.

Remove from the oven and serve immediately.   

BUTTER LEMON BROCCOLI

1 head broccoli, cut into florets and peeled stems 

2 T. unsalted butter

1 T. fresh lemon juice

1 tsp. lemon zest 

½ tsp. kosher salt

freshly ground black pepper

Steam* the broccoli until crisp tender; remove from pan.

Melt the butter in a non-stick fry pan over medium heat. When the butter melts and starts to foam, add the lemon juice and cook for 30 seconds.

Add the steamed broccoli, lemon zest, salt, and pepper. Toss until the broccoli is well-coated.

Serve immediately.

*Because I have an inquiring mind, I decided to research whether it is nutritionally wiser to steam broccoli (and other veggies) or to cook them in a microwave. And from everything I have read, the best way to retain vitamins and nutrients while they are being cooked is to use short cooking times that limit the exposure to heat and a cooking method that uses as little liquid as possible. This can be achieved with a microwave, although most studies show that the very best way to retain nutrients in vegetables is to steam them.

And even more interesting and enlightening – if your primary goal is to preserve the most nutrients in your vegetables, then steaming is generally considered better than roasting, as steaming retains more vitamins and minerals, especially water-soluble vitamins like vitamin C.

And finally, boiling vegetables is generally considered the least healthy way to cook vegetables because it causes the greatest loss of nutrients.

Now, to be honest, steaming does not retain the color of veggies the way nuking them does. And the fantastic flavor of veggies that have been roasted is incomparable. But for pure nutritional value, steaming is the recommended method.