On the rare occasions when I consider my kitchen “private enemy number one”, I become fixated on producing the easiest dish possible. And of course, because I know the Gods are probably having a field day watching my conundrum, they seem to take delight in instilling me with a burning desire for a savory meat dish. Which invariably takes a lot of prep time. Well, when this occurred a few days ago, I nixed their fun! I fixed this recipe!
I happened to have all the ingredients on hand. And this dish is super easy to prepare. And you could not ask for a more delicious and savory meat dish. (And I know. It’s not nice to fool Mother Nature or the Gods of “whatever”. And in all truth, I wasn’t trying to be duplicitous. But dang, when an old gal like me doesn’t feel like spending hours in the kitchen, she shouldn’t be needlessly tortured with a hankering for the type of dish that usually takes hours to prepare! That’s simply not fair! Anyway, that’s my story and I’m sticking to it!) But back to this recipe.
After the few minutes it took me to get the game hen in the oven, it occurred to me that maybe I should serve a little something with the game hen. But again, I wasn’t in the mood to go to any trouble. So, I whipped together a simple salad and baked a sweet potato. Done!
So, the next time you are feeling less than inclined to spend a hunk of time in your kitchen, but still want to give the illusion of having spent quality time slaving away on someone else’s behalf, give this recipe a try. And to make things even easier on myself next time I make this dish, I plan to cut up some regular potatoes and a sweet potato, coat all the pieces with a bit of olive oil, and place the potato chunks right on the pan with the game hen. Then if I still have a tad bit of energy, I might slice up a couple of tomatoes, slather them with olive oil, splatter them with a bit of kosher salt and freshly ground pepper, and decorate the whole mess with basil chiffonade. (That will complete the illusion of time and effort spent.) At which point, I will probably go sit down and read my book while the oven does the hard work. And no, you don’t have to wait to make this recipe until you are tired of your kitchen. Do make it any old time you want. You will be glad you did.
As always, live your life to the fullest. And if some days the “fullest” you feel you can tolerate is several hours spent reading a good book or listening to your favorite concertos or binge watching several seasons of Schitt’s Creek, then that is just fine. Everyone gets to define “fullest” their own way.
Peace and love to all.
1 T. unsalted butter, room temp.
1 T. extra virgin olive oil
1 tsp. dried parsley
2 garlic cloves, minced
¼ tsp. lemon zest
2 tsp. lemon juice
½ tsp. seasoned salt, plus more for sprinkling
freshly ground black pepper
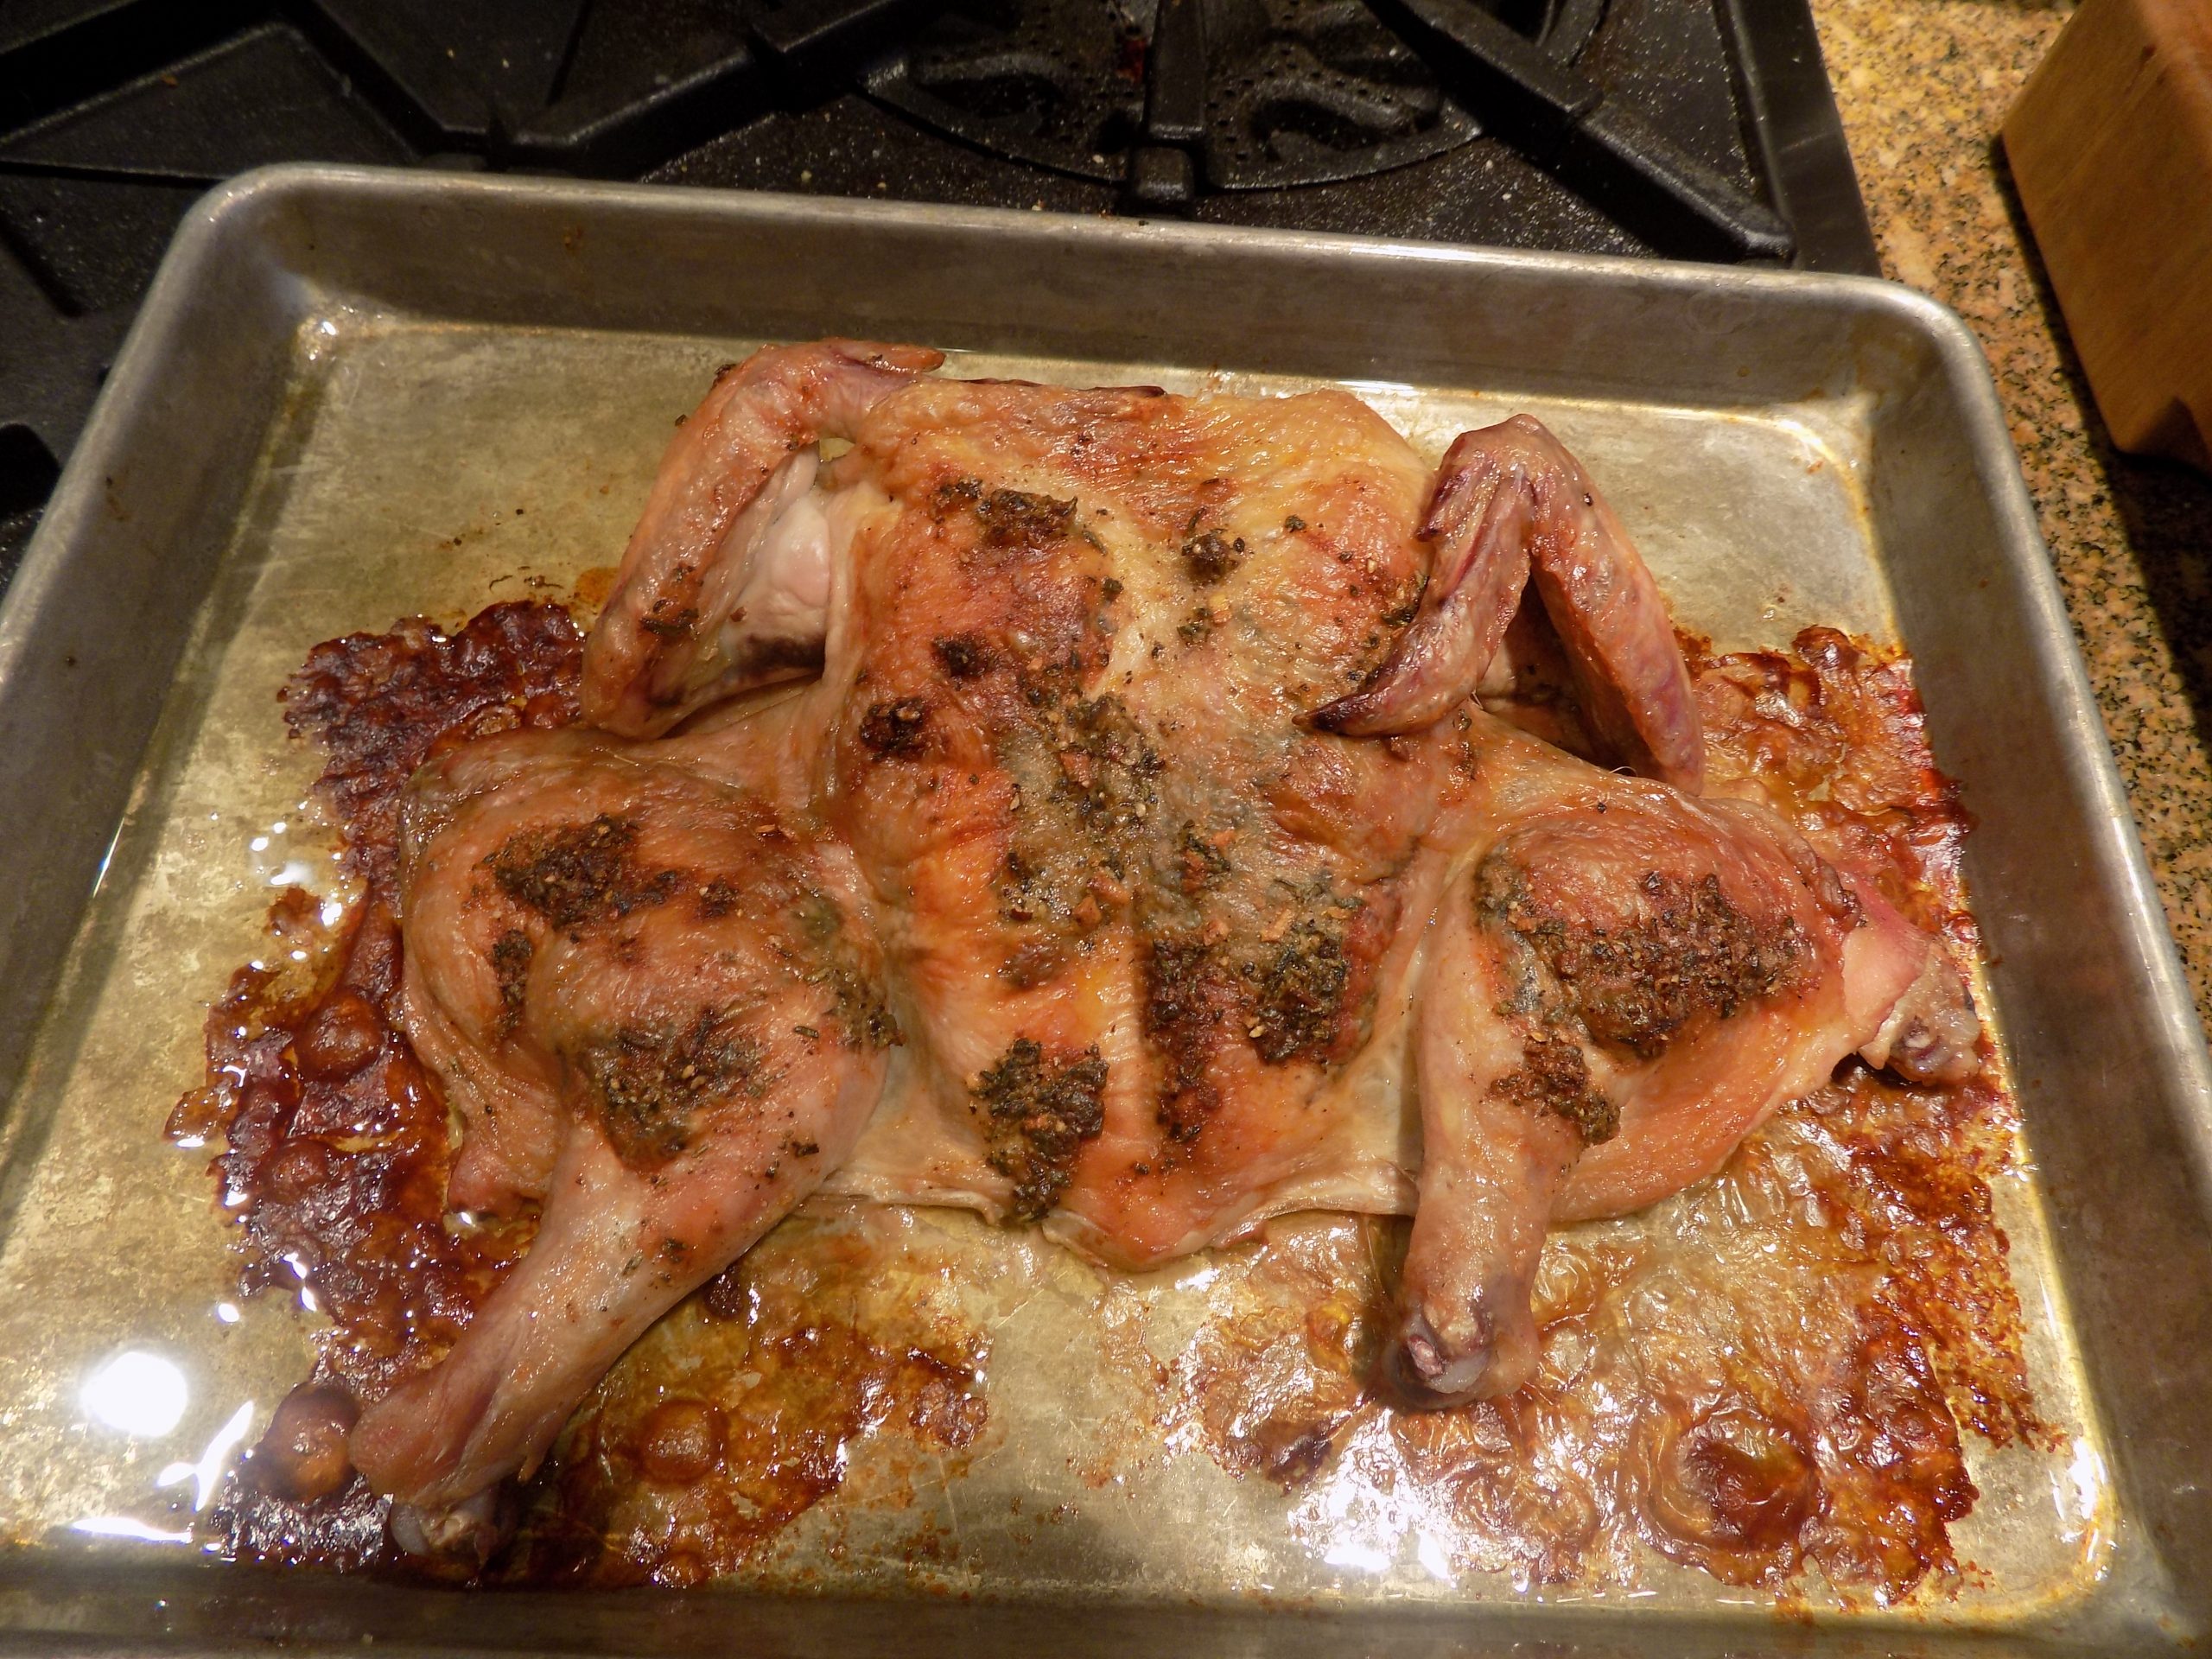
1 (24-oz.) Cornish game hen
In a small bowl, mix the butter, olive oil, parsley, garlic, lemon zest, lemon juice, seasoned salt, and black pepper together. Place the spatchcocked hen on a small, rimmed baking sheet.
Using your fingers, loosen the skin from the breast and legs/thighs and stuff all but 1 tablespoon of the lemon-herb butter under the skin. Rub the remaining butter over the top of the hen. Lightly sprinkle with seasoned salt.
Bake in a pre-heated 375-degree oven for 1 hour or until the skin is golden brown and the internal temperature in the thigh reaches 160-degrees.
Remove from oven and let rest for 10 minutes before serving.
To spatchcock a game hen:
Wash and dry the hen and place on a cutting board, breast side down. Using sharp kitchen shears, cut down each side of the backbone, starting from the neck end down to the tail. Remove the backbone, pull open the hen, flip it over, then press down on the breast to open it out flat.
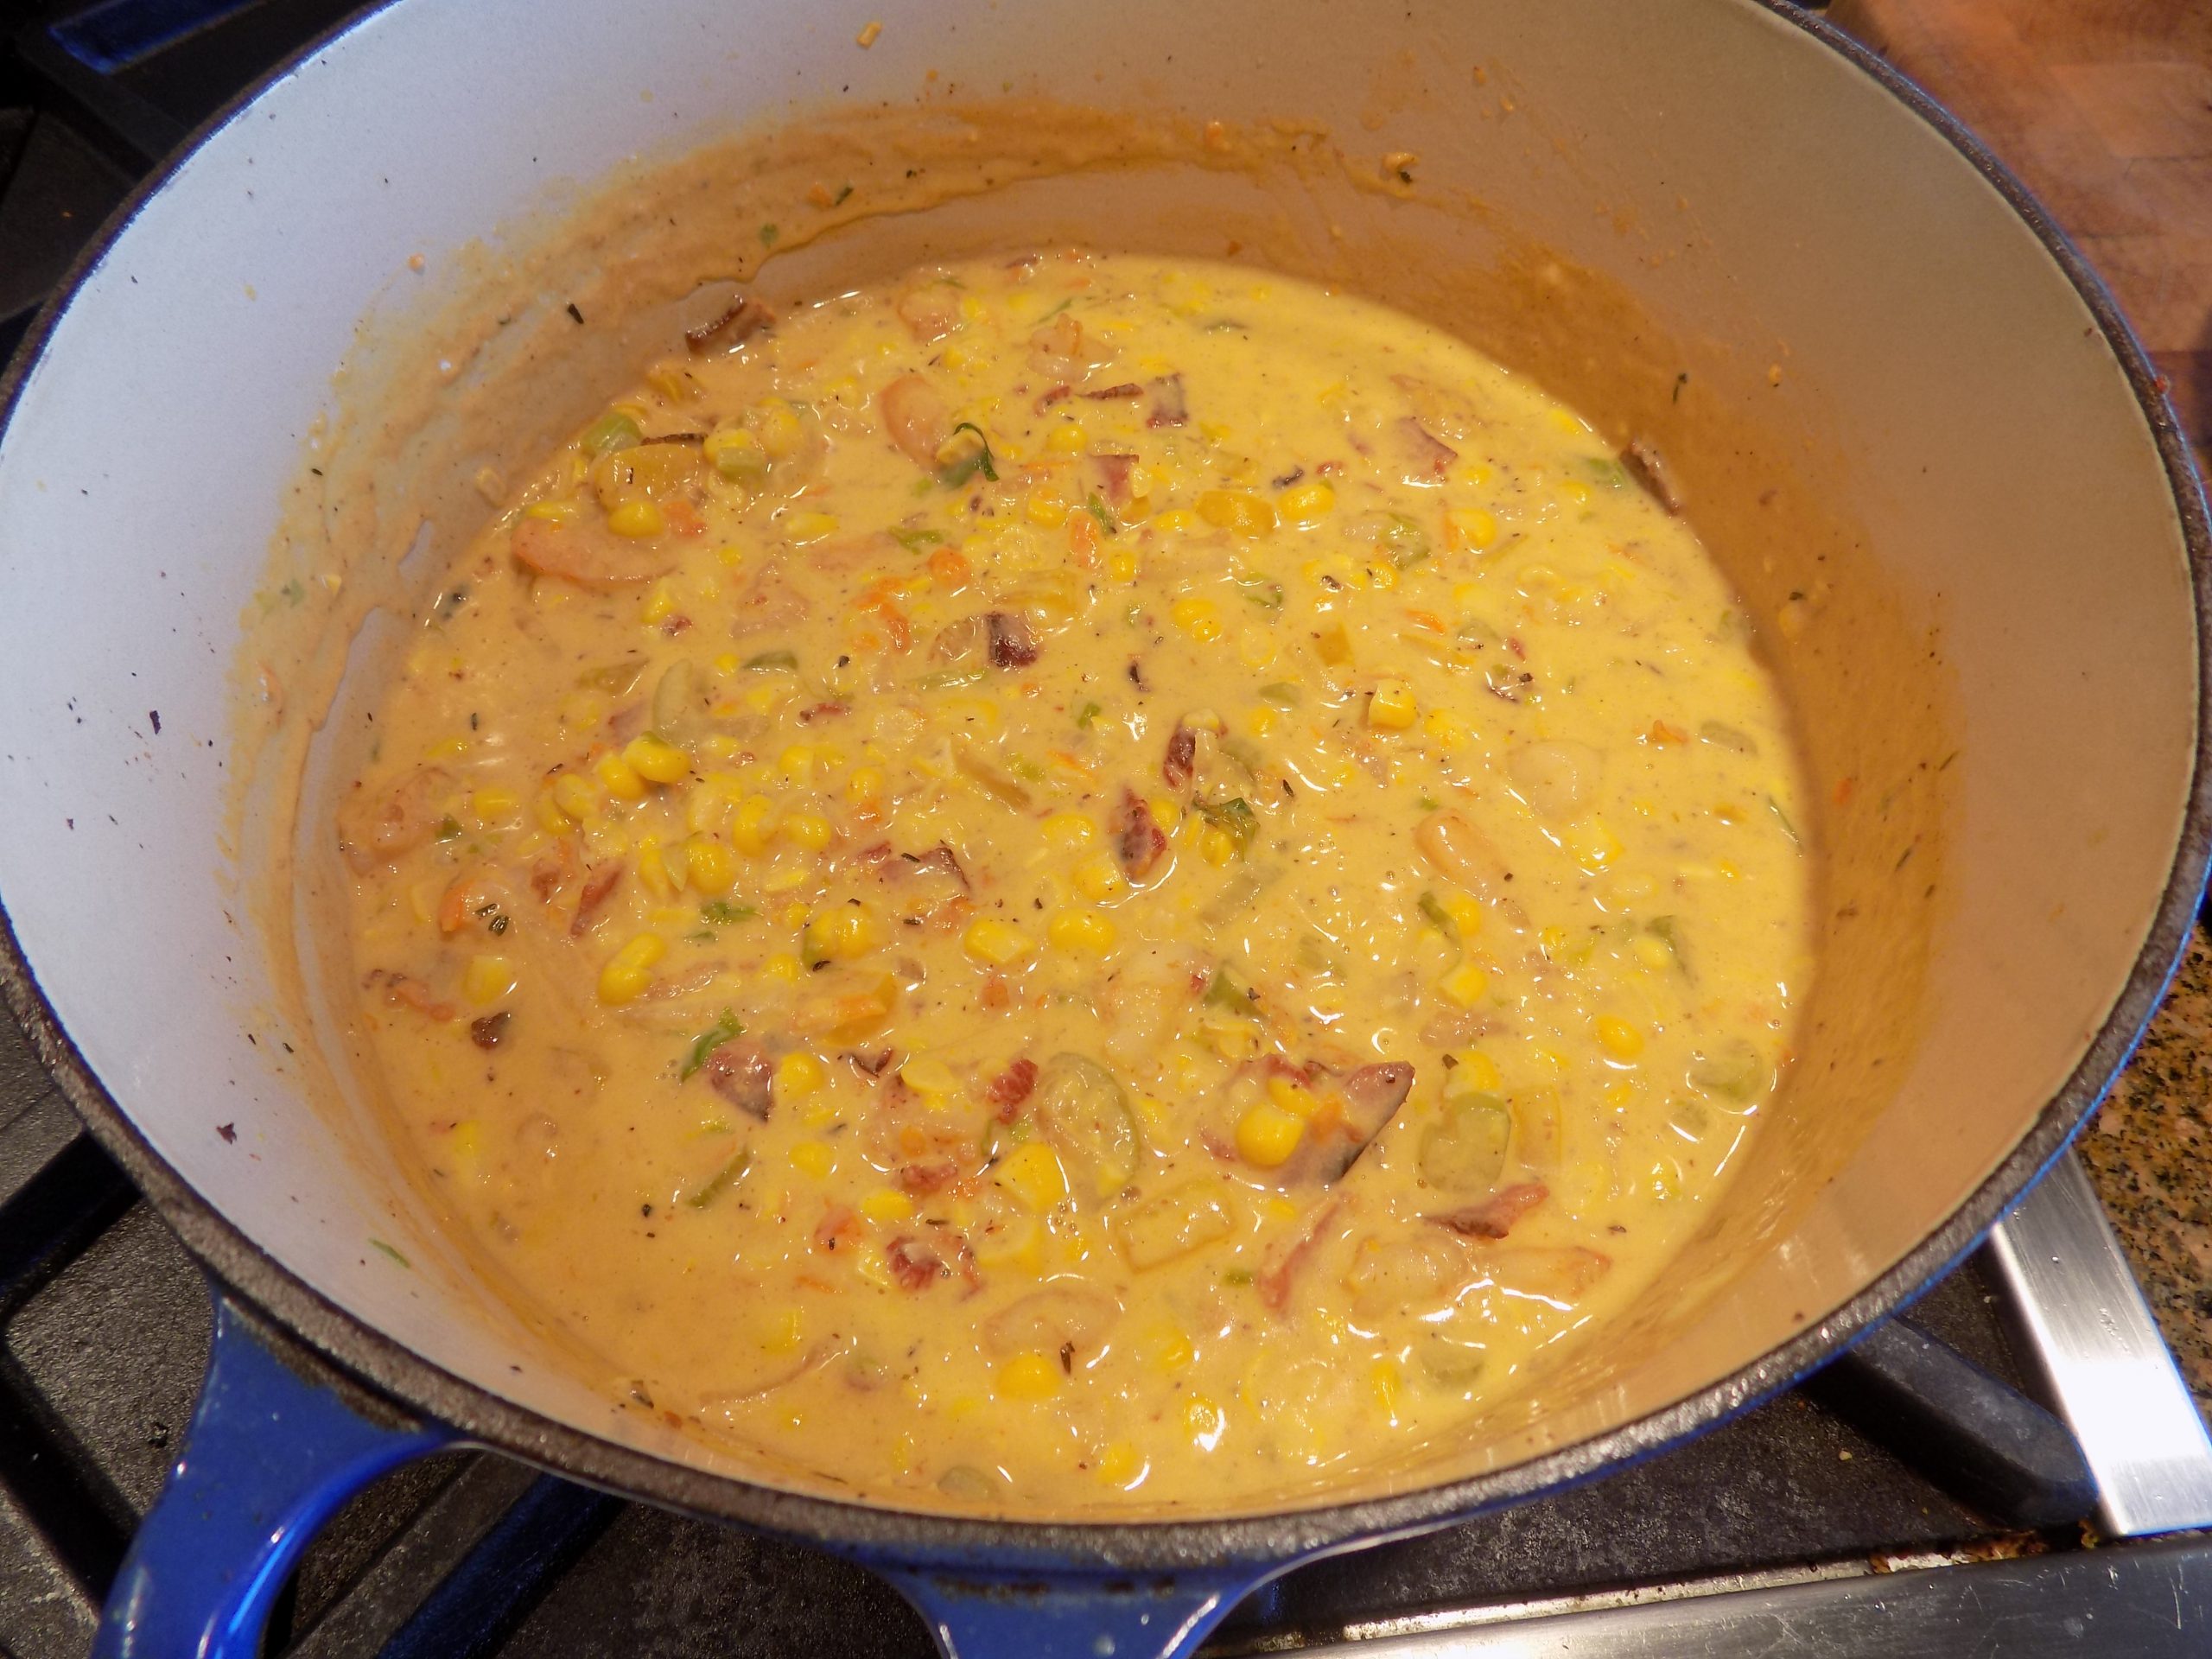
The first thing you might notice after a cursory glance at the ingredients for this recipe, is that there are no potato chunks in this chowder. And I know, many of you don’t consider chowder to be chowder if it doesn’t contain potatoes. And don’t get me wrong, I love potatoes too. But I have eaten far too many chowders (seafood chowders especially) that were half potatoes to the exclusion of other veggies that might actually have given the chowder a lovely flavor base. So, frankly, I’m done with potatoes in my chowders. (That sound you hear is Mr. C. applauding in the background?) In fact, until the other evening when I ordered a cup of crab and corn chowder at the Brown Lantern Ale House in Anacortes, I hadn’t had a taste of chowder in years. But this crab chowder was so delicious, and to my delight, nary a cheap filler like potato in the entire mixture. Just a lovely creamy chowder filled with real crab and corn. So, my faith in chowders renewed, the next day I glommed together a recipe for (you guessed it) crab and corn chowder.
So, why is this recipe for a shrimp chowder you might be asking yourself? Simple answer. I didn’t have any crab on hand. But I did have bacon, shrimp, and 2 ears of corn. So, the crab and corn recipe is pending. In the meantime, you’ll just have to settle for this recipe. Which by-the-way is delectable. Easy to prepare, and a lot lower in fat than many chowder recipes.
As always, be creative in your kitchen. Trust your instincts, especially if you’ve been cooking for a long time. You know what spices go together. You know what to put in a good spaghetti sauce. And what to throw into meat loaf. And that bacon is it’s own food group! So, yes, of course, if you can’t imagine a chowder without potatoes, serve it up! I won’t know, and even if I did, I’d be the one you heard in the background clapping my hands together in celebration of your knowledge of your families preferences. Because, more than anything, I want you to love cooking. And to feel pride when you feed not only yourself but your family and friends with fantastic food. And if that means potatoes in the chowder you serve, good on you! You’re doing it right!
Peace and love to all.
5-6 slices thick-cut lean bacon, cut into small pieces
½ lb. lg. shrimp, peeled, de-veined, tails removed and cut into small pieces
2 T. unsalted butter
½ c. finely chopped onion
⅓ c. shredded carrot
1 c. thinly sliced celery, plus chopped leaves, if possible
½ red, orange, or yellow bell pepper, finely chopped
3 cloves garlic, finely minced
¼ tsp. seasoned salt
freshly ground black pepper
pinch crushed red pepper flakes
¼ tsp. dried thyme
¼ tsp. paprika
2 T. unbleached all-purpose flour
1½ c. chicken stock or 1½ c. water and 1½ tsp. chicken base
1 c. whole milk
½ c. half and half
cooked kernels from 2 ears of corn (or 1½ cups frozen)
2-3 green onions, thinly sliced, for garnish
hot sauce, for table
Fry the bacon in a Dutch oven or large, deep saucepan over medium heat until crisp, about 6 minutes. With a slotted spoon, remove the bacon to a small bowl. Set aside.
Add the shrimp and cook just until done. With a slotted spoon, remove to the same bowl with the cooked bacon.
Add the butter to the pot and let it melt. Stir in the onion, carrot, celery, and bell pepper. Cook, stirring occasionally, until the veggies are tender, about 5 minutes. Next stir in the garlic, seasoned salt, black pepper, crushed red pepper flakes, dried thyme, and paprika. Cook until the garlic is fragrant, about 30 seconds.
Sprinkle the flour over the top of the onion mixture, then cook, stirring constantly, for 1 minute. Slowly stir in the chicken stock, milk, and half and half until no flour lumps remain. Stir in the corn kernels and bring to a gentle boil. Let bubble until thickened, about 5 minutes. (If the chowder is not as thick as you like, make a beurre manié (paste made with equal partsflour and soft butter mashed together) and stir into the soup. (I would suggest starting with 1 tablespoon each of soft butter and flour. Then if the soup is still not thick enough, repeat the process.) Taste and adjust seasoning.
When ready to serve, stir in the cooked bacon and shrimp and continue cooking just until the shrimp is hot.
Serve the chowder hot, sprinkled with sliced green onions. Pass hot sauce at table. Great served with Soft Sourdough Rolls. (Recipe to follow in the near future.)
And yes, the recipe makes more than the little bit you see at the bottom. Once again, I failed to take a picture until after I had made 2 (count them 2) salads already.
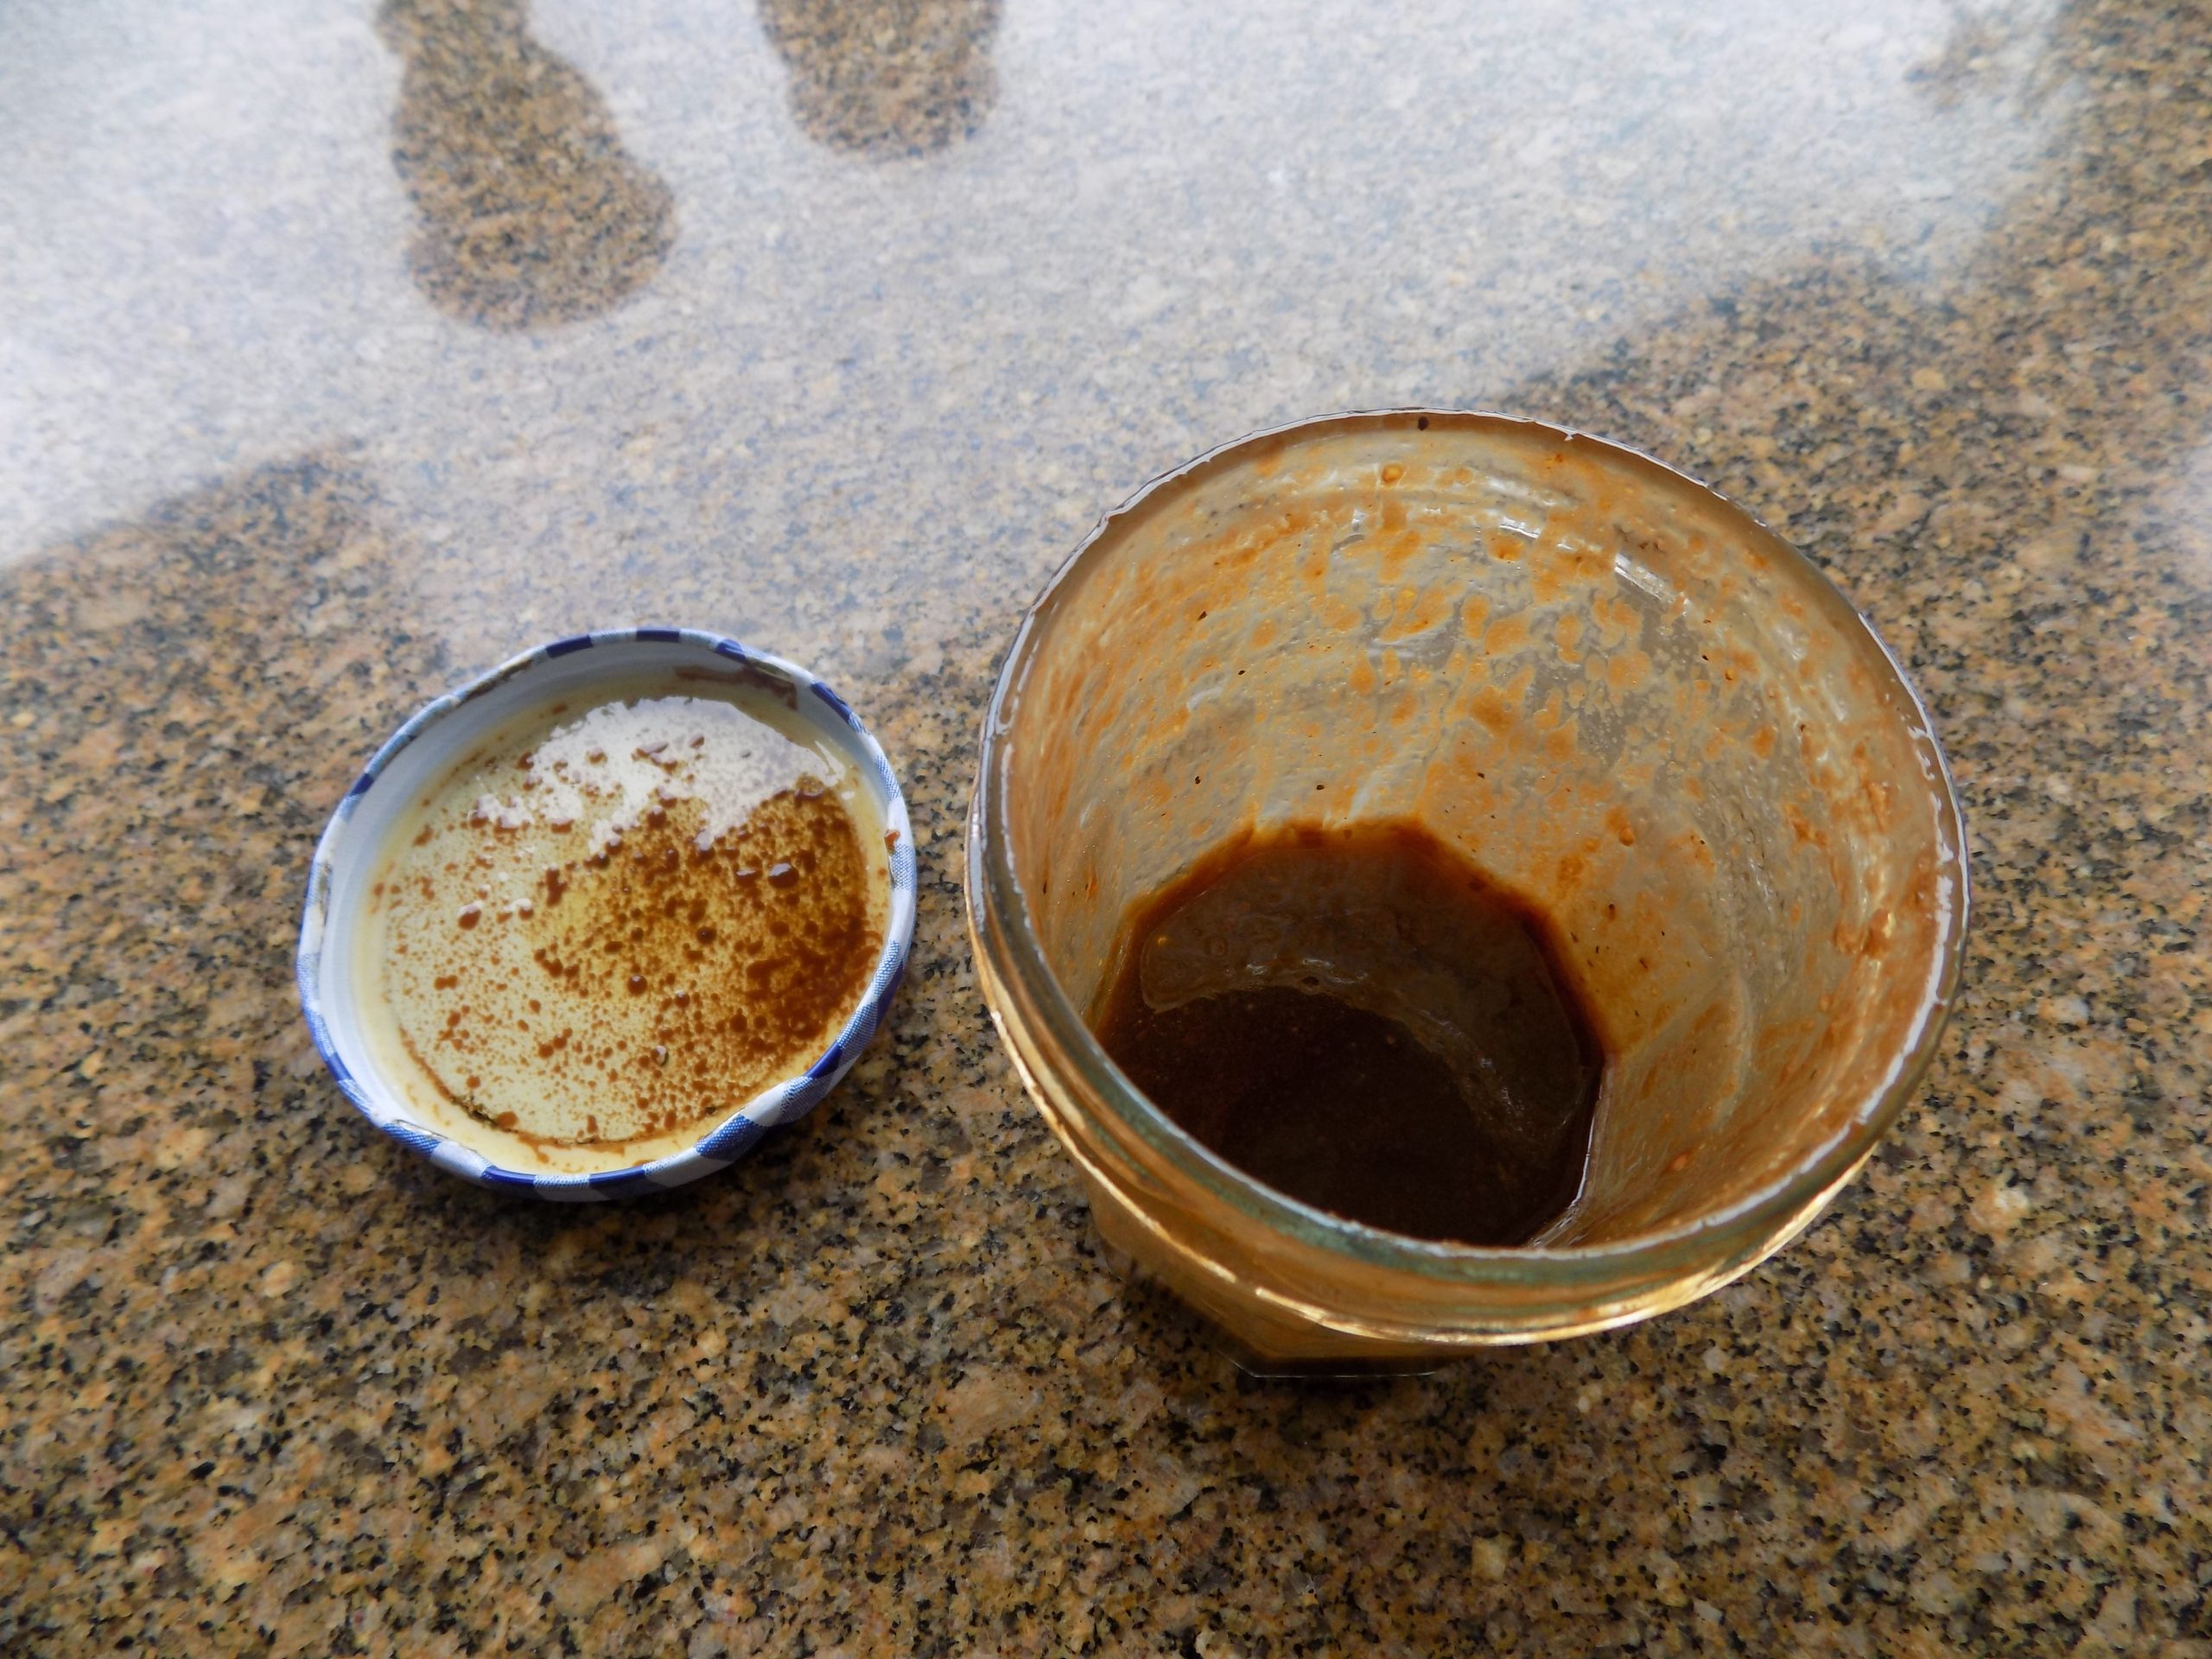
So, while in Brookings, Oregon for my son Sven’s wedding, a few of us had dinner the first night at the Black Trumpet Bistro. Daughter Paula ordered the Cobb salad. And after the first bite, she proclaimed the dressing to be the best balsamic dressing she had ever tasted. She offered me a bite, which of course I gladly accepted. And by golly, she was right. The dressing was amazing. So, the next thing out of her mouth was, “mom, would you please work up a recipe for this dressing”? Well, she’s my daughter, so, how could I refuse! (Plus, of course, I wanted more of that dressing in my life too!) So, what I came up with was my spin on Katy’s recipe from her aforkstale.com. site. Basically, the same ingredients but the proportions a bit different. Plus, I used granulated garlic rather than a clove of garlic because I wanted a softer garlic presence. And kosher salt rather than just “salt”. And extra virgin olive oil, because, well, I always use extra virgin olive oil! I don’t even bother with any other kind. But back to this dressing.
All you really need to know is that 1) The dressing is Paula approved. 2) The dressing is Mr. C. approved. 3) The dressing obviously has my seal of approval, or it wouldn’t be on this site to begin with! 4) The dressing is terribly easy to prepare. 5) The dressing will last several days in your refrigerator. 6) If you can name a better tasting purchased balsamic dressing that doesn’t contain any preservatives, too much salt, or unpronounceable ingredients, I will send you a crisp dollar bill! The ball’s in your court!
As always, keep building your own salad dressings. And I know, it’s just so darned easy to buy salad dressing. But think of the money you’ll save by concocting your own. And how much more room you’ll have in your refrigerator by not filling the shelves with 8 to 10 almost empty bottles of dressing that are never going to get eaten. (I’ve tried not to look when I’m in other people’s kitchens and they open their fridge door. But I’m human, and invariably what catches my eye are the salad dressing bottles with a half-inch of dressing glued to the bottom.) (BTW, I’m not proud of this particular brand of voyeurism, but never-the-less I am cursed with this affliction, and I don’t count on any miraculous recovery happening anytime in the near future!) Of course, I welcome any prayers for my rehabilitation. But frankly, I don’t think your lovely thoughts would make a flying fig bit of difference. I’m pretty set in my ways by now. But if you still feel compelled to offer up prayers, I think the poor Afghanistan citizens and Americans trying to leave Afghanistan could use your help.
Peace and love to all.
6 T. extra virgin olive oil
2 T. balsamic glaze or vinegar (I use Ponti Glassa Gastronomica)
2 T. mayonnaise
1 T. honey
1½ tsp. Dijon mustard
¼ tsp. kosher salt, or more to taste
freshly ground black pepper
¼ tsp. granulated garlic
In a covered jar, shake all the ingredients together. Store in refrigerator. Shake well before serving.
Perfect tossed with a combination of greens such as romaine, arugula, and baby spinach. For garnishes, any one or combination of the following would be delicious: crumbled bacon, Honey Roasted Walnuts (see recipe below), crumbled bleu or feta cheese, thin slices of apple or pear, dried cranberries, roasted beets, thin slices of red onion. (To name a few. )
Honey Roasted Walnuts
4 c. walnut halves
2 T. granulated sugar
1½ tsp. kosher salt
1½ tsp. brown sugar, packed
1½ tsp. water
1 T. honey
1 T. canola oil
Preheat the oven to 375-degrees. Spread the walnuts out on a rimmed baking pan. Toast in the oven for about 8 minutes or until they begin to smell toasted.
Meanwhile, stir the sugar and salt together in a large bowl; set aside.
When the nuts are toasted, remove them from the oven and make the glaze.
In a large frying pan over high heat, combine the brown sugar, water, honey, and oil. Stir until the mixture is boiling. Reduce heat and immediately stir in the warm, toasted nuts and cook, stirring just until the glaze is stuck to the nuts and the pan is almost dry, about 2 minutes.
Remove from heat and toss the hot, glazed nuts in the sugar and salt mixture. Gently stir the nuts until every single one is evenly coated. Return them to the baking sheet and spread them out in a single layer. Pop them back in the oven for one minute to set the glaze and the sugar coating.
Remove from oven and allow the nuts to cool completely on the pan before you move them around. (Tossing or packaging them before they are completely cool could cause the coating to come off.) When the nuts are completely cooled, store in an airtight container.
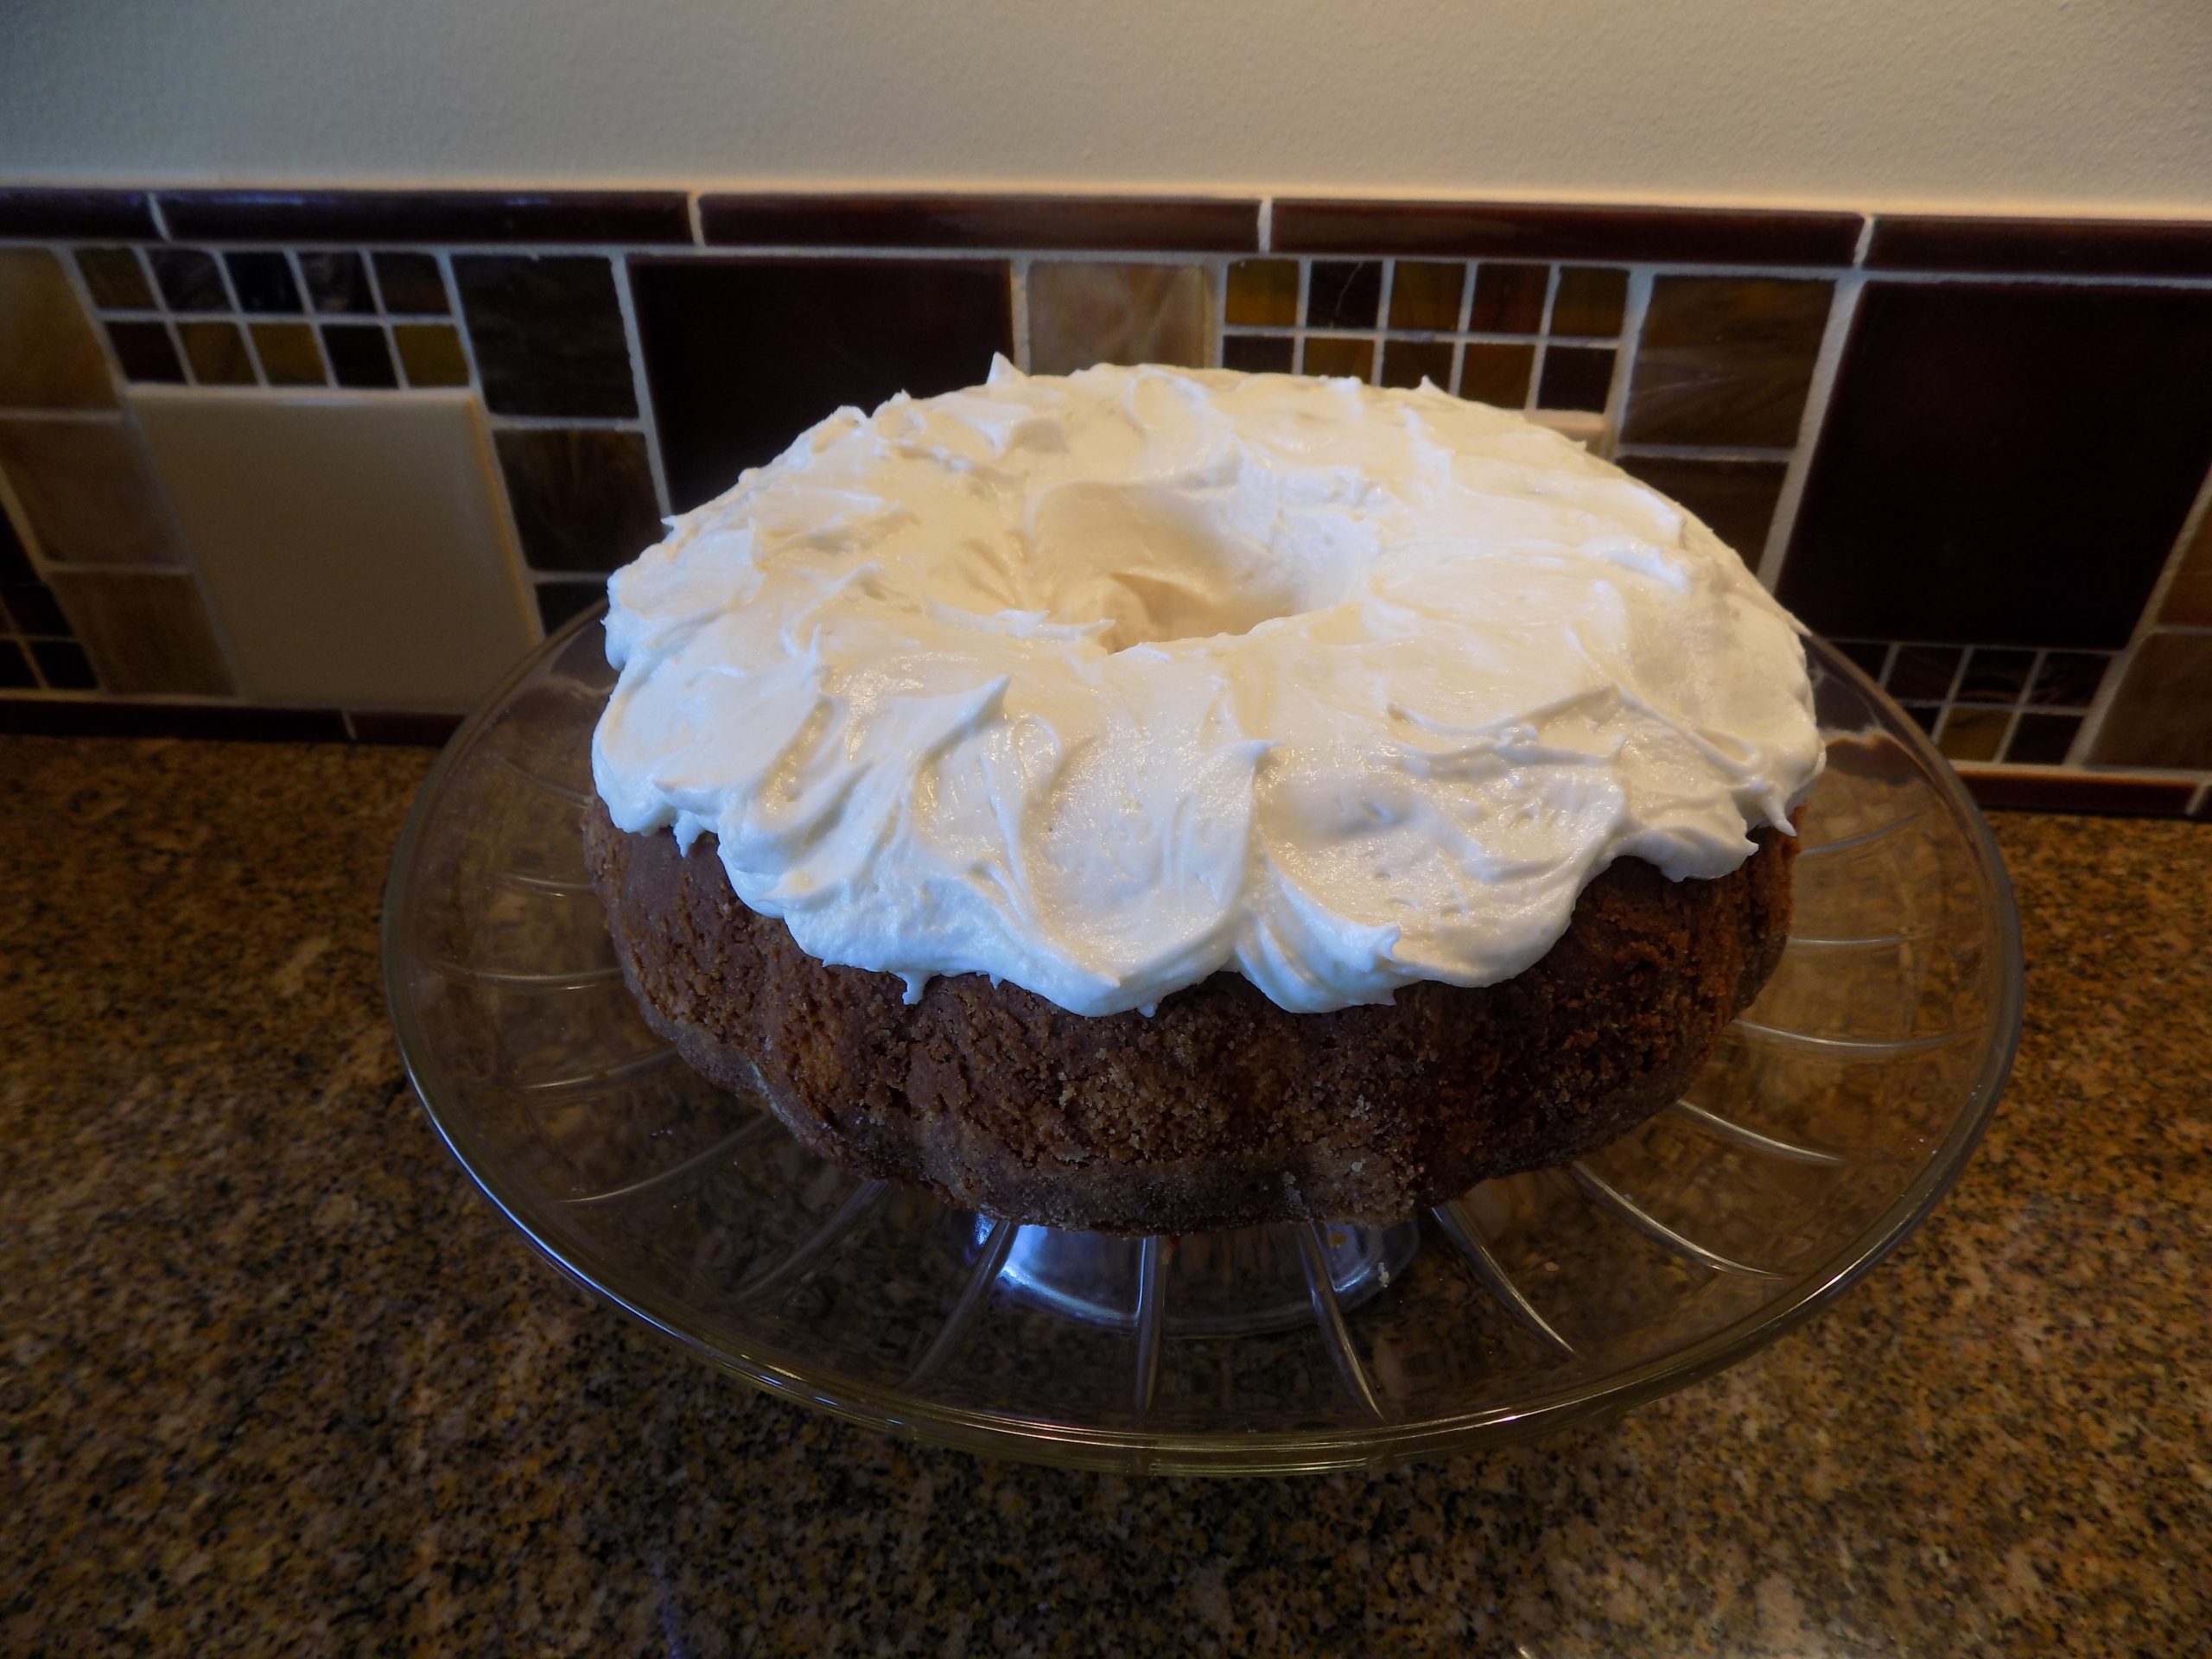
OK, confession time. You see that picture above, that was my attempt at making a lemon Bundt cake with a lemon drizzle. And as experienced as I am at baking Bundt cakes, this one came apart on me.
My first thought was that the cake must have fallen in love with the Bundt pan while they were in the warm, intimate environment of my oven. Because a good 1/8th of the cake was still clinging to the bottom of the pan as the rest of the cake lay topless on my cake dish. And even then, as I went after the recalcitrant bits, I almost destroyed the pan in the process! But I got even. I drowned the remaining bits and sent them down to visit Gritsner (the name I have given to our garbage disposal), and by now they are drowning in (never mind)!
My more reasonable second thought about why my cake refused to cooperate was because I floured the pan with 7 or 8-year-old Wondra flour. I have subsequently learned that instead of using flour of any kind, I should have used finely ground nuts or granulated sugar. (You learn something new every day.) But I’m not taking any chances the next time I build this cake. (And believe me, there will be a lot more times I build this cake.) The batter is going into a 9×13-inch glass pan that I know I can use a heavy spatula if necessary to release pieces from their rectangular enclosure!
So, back to yesterday’s fiasco. You know what they always say about lemons: If life gives you lemons, make lemonade. Well, my version now goes like this: If a lemon glaze won’t cover up your Bundt cake disaster, make a thick creamy frosting instead. So, of course, that’s exactly what I did.
But even with all the trials and tribulations, the cake turned out to be very delicious. And with a perfect moist and tender crumb. And oh, so easy to prepare. And the frosting, well, I’d give myself 6 stars for this one.
As always, just when I started feeling a bit over pleased with myself, the God’s decided I needed a lesson in humility. And you know what? They must keep their eyes peeled on me all the time, because I get these lessons frequently. And for that I am extremely thankful. Because the last thing this world needs is another conceited (your word) taking up space. There are far too many (your word) already.
Peace and love to all. And please make this cake. It is really, really tasty.
Lemon Cake:
1 c. (2 sticks) unsalted butter, room temp.
2 c. granulated sugar
3 lg. eggs
2 c. unbleached all-purpose flour , fluffed
2 tsp. baking powder
1 tsp. fine sea salt
zest of 2 lg. lemons
1 c. sour cream
Preheat the oven to 325-degrees. Grease and flour a 9X13-inch baking pan. (Glass is best.) Set aside.
Beat the butter and sugar together with an electric mixer until smooth and creamy, about 7 minutes. Add eggs, 1 at a time, beating well after each addition.
In a separate bowl, whisk the flour, baking powder, salt, and lemon zest together. Add the flour mixture to the butter mixture in 3 batches, alternating with sour cream, beating batter briefly after each addition. Don’t over-mix. Scoop batter into the prepared pan.
Bake for 25 to 35 minutes or until a toothpick inserted into the center comes out clean. (Check after 23 minutes to be sure.) Don’t over-bake.
Remove from oven and allow to cool on a wire rack before frosting.
Lemon Cream Cheese Frosting:
4 oz. (½ 8-oz. pkg.) cream cheese, softened
½ stick unsalted butter, softened
1 T. freshly squeezed lemon juice
½ – 1 tsp. lemon zest
½ tsp. vanilla extract
pinch kosher salt
2 c. powdered sugar, or more to achieve desired thickness
Using a stand mixer fitted with a paddle attachment or a hand mixer, beat the cream cheese and butter together on medium speed until smooth and no lumps remain, about 3 full minutes. Add the lemon juice, lemon zest, vanilla, and salt.
Reduce the mixer speed to low, then add the powdered sugar. Once the sugar begins to incorporate, increase the mixer to high speed and beat until soft and creamy. Add additional powdered sugar as needed. Frost the cake as soon as it’s completely cooled.
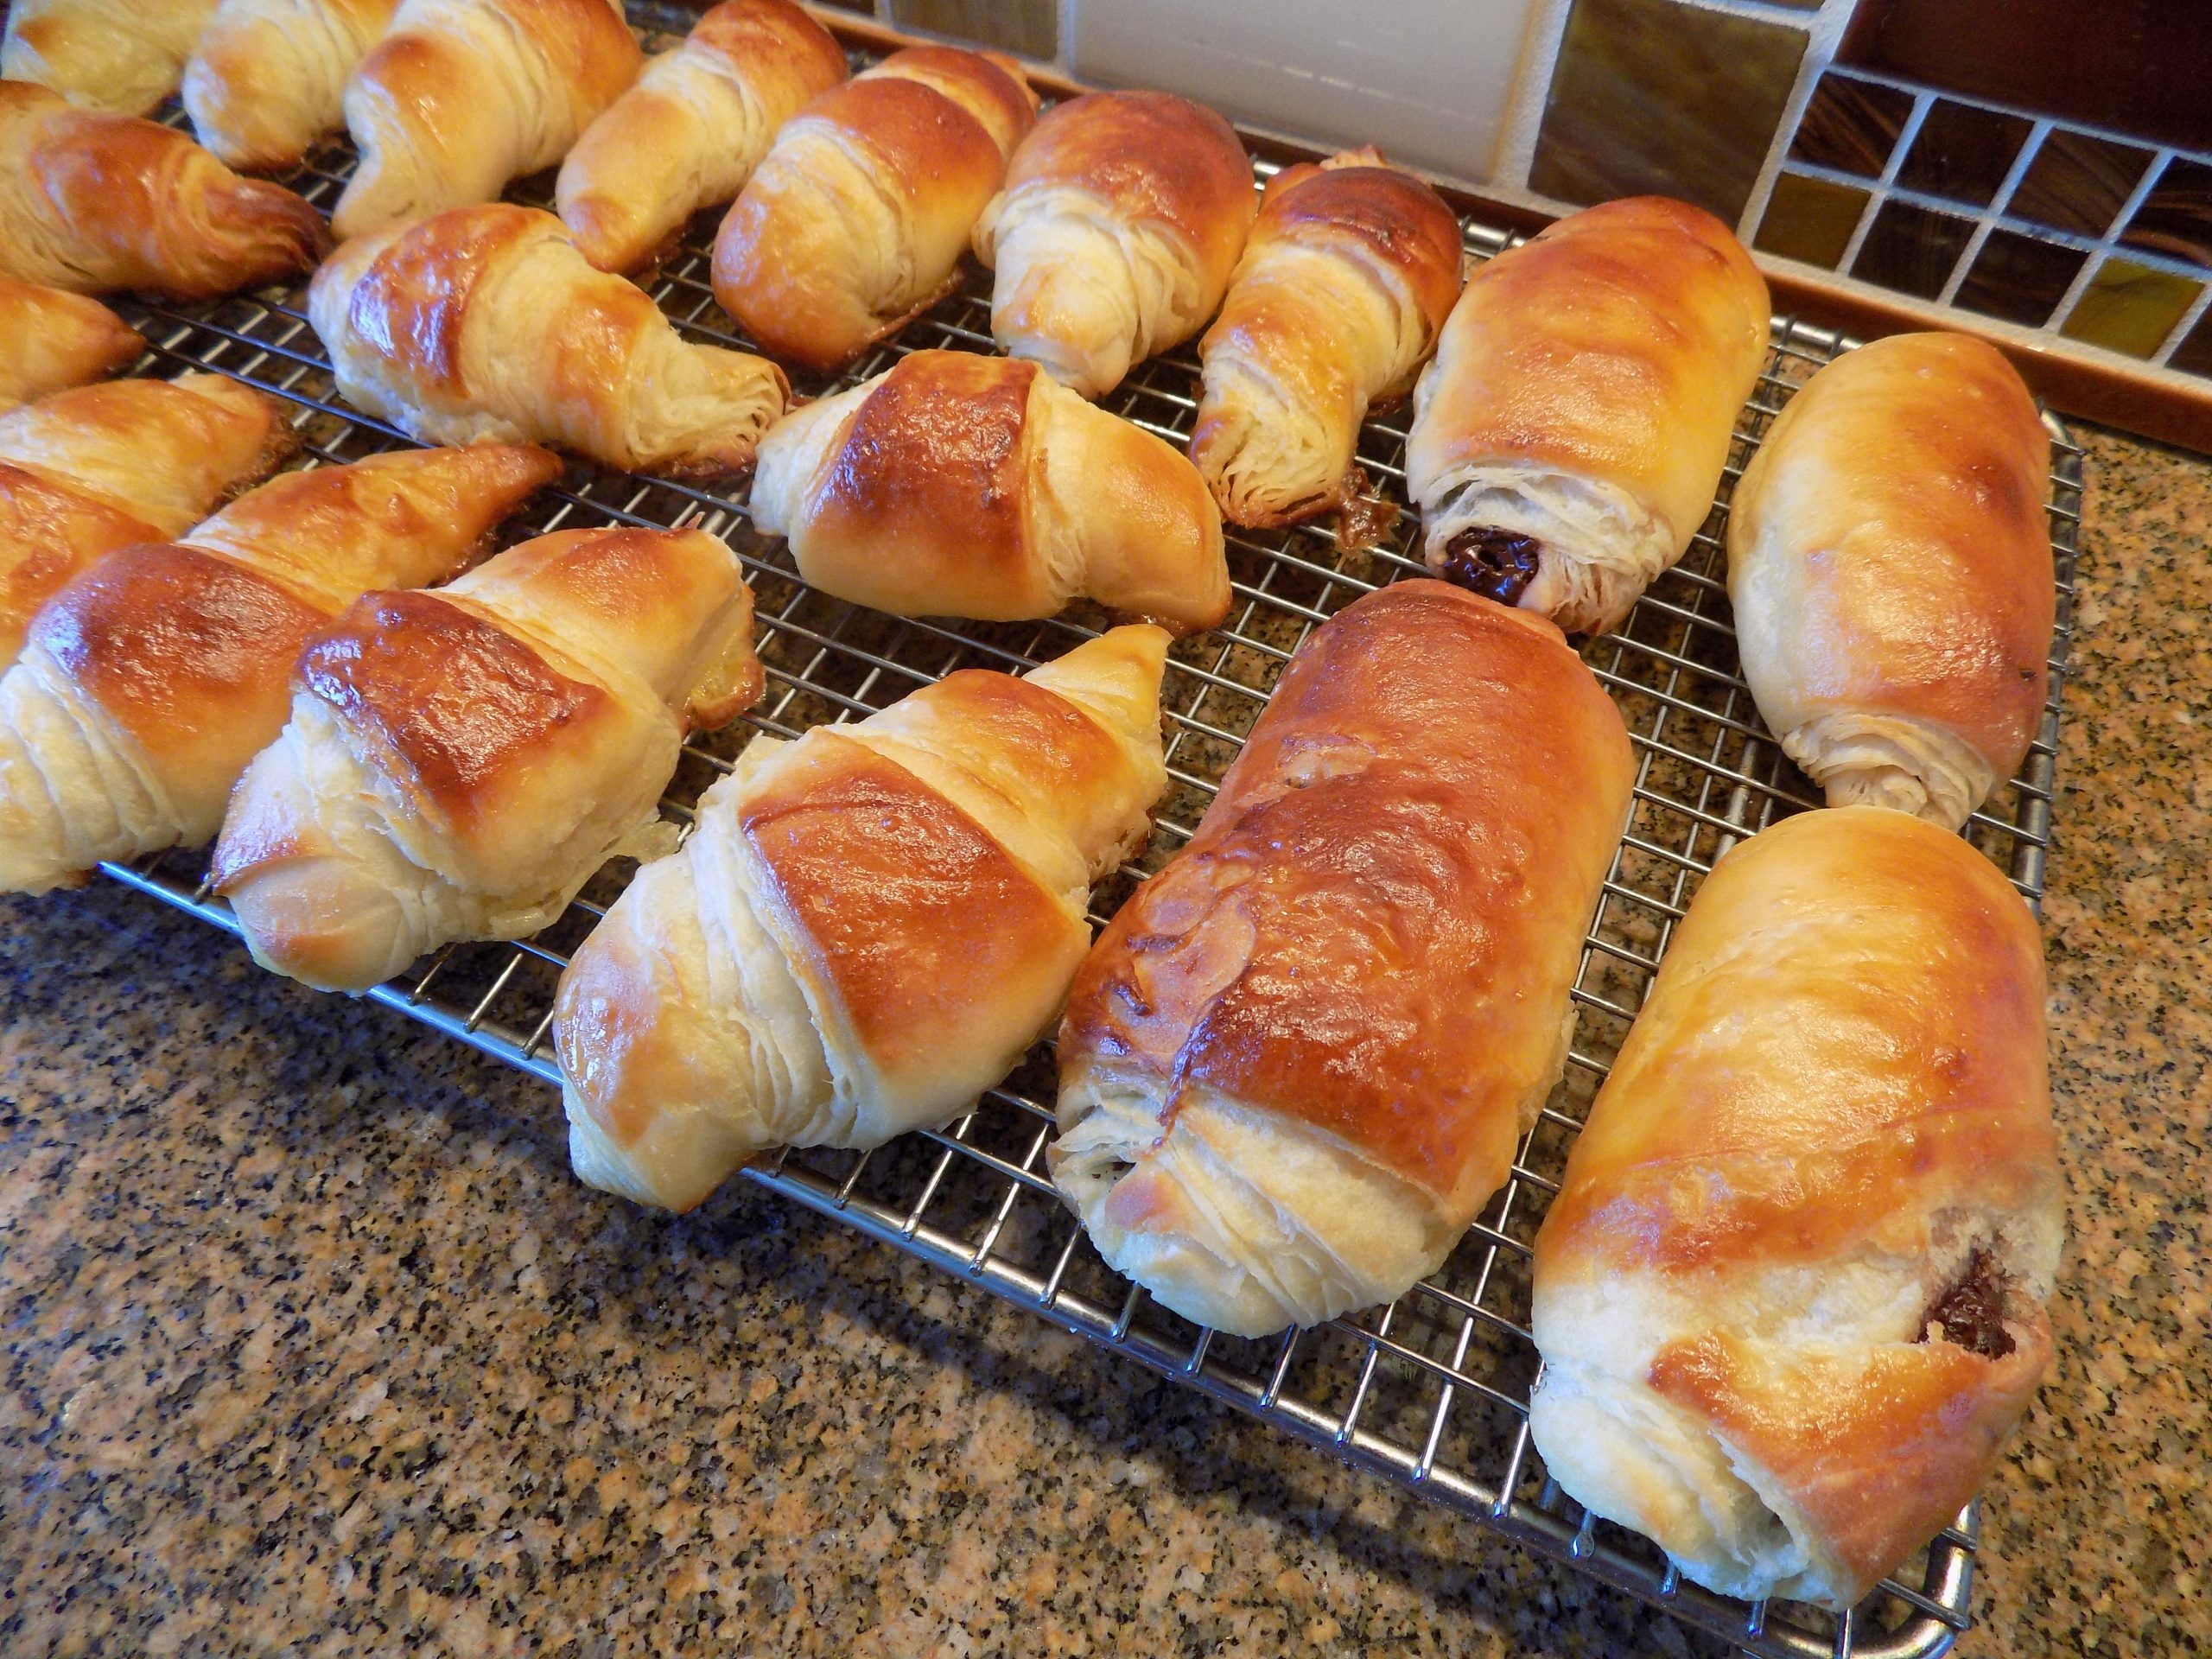
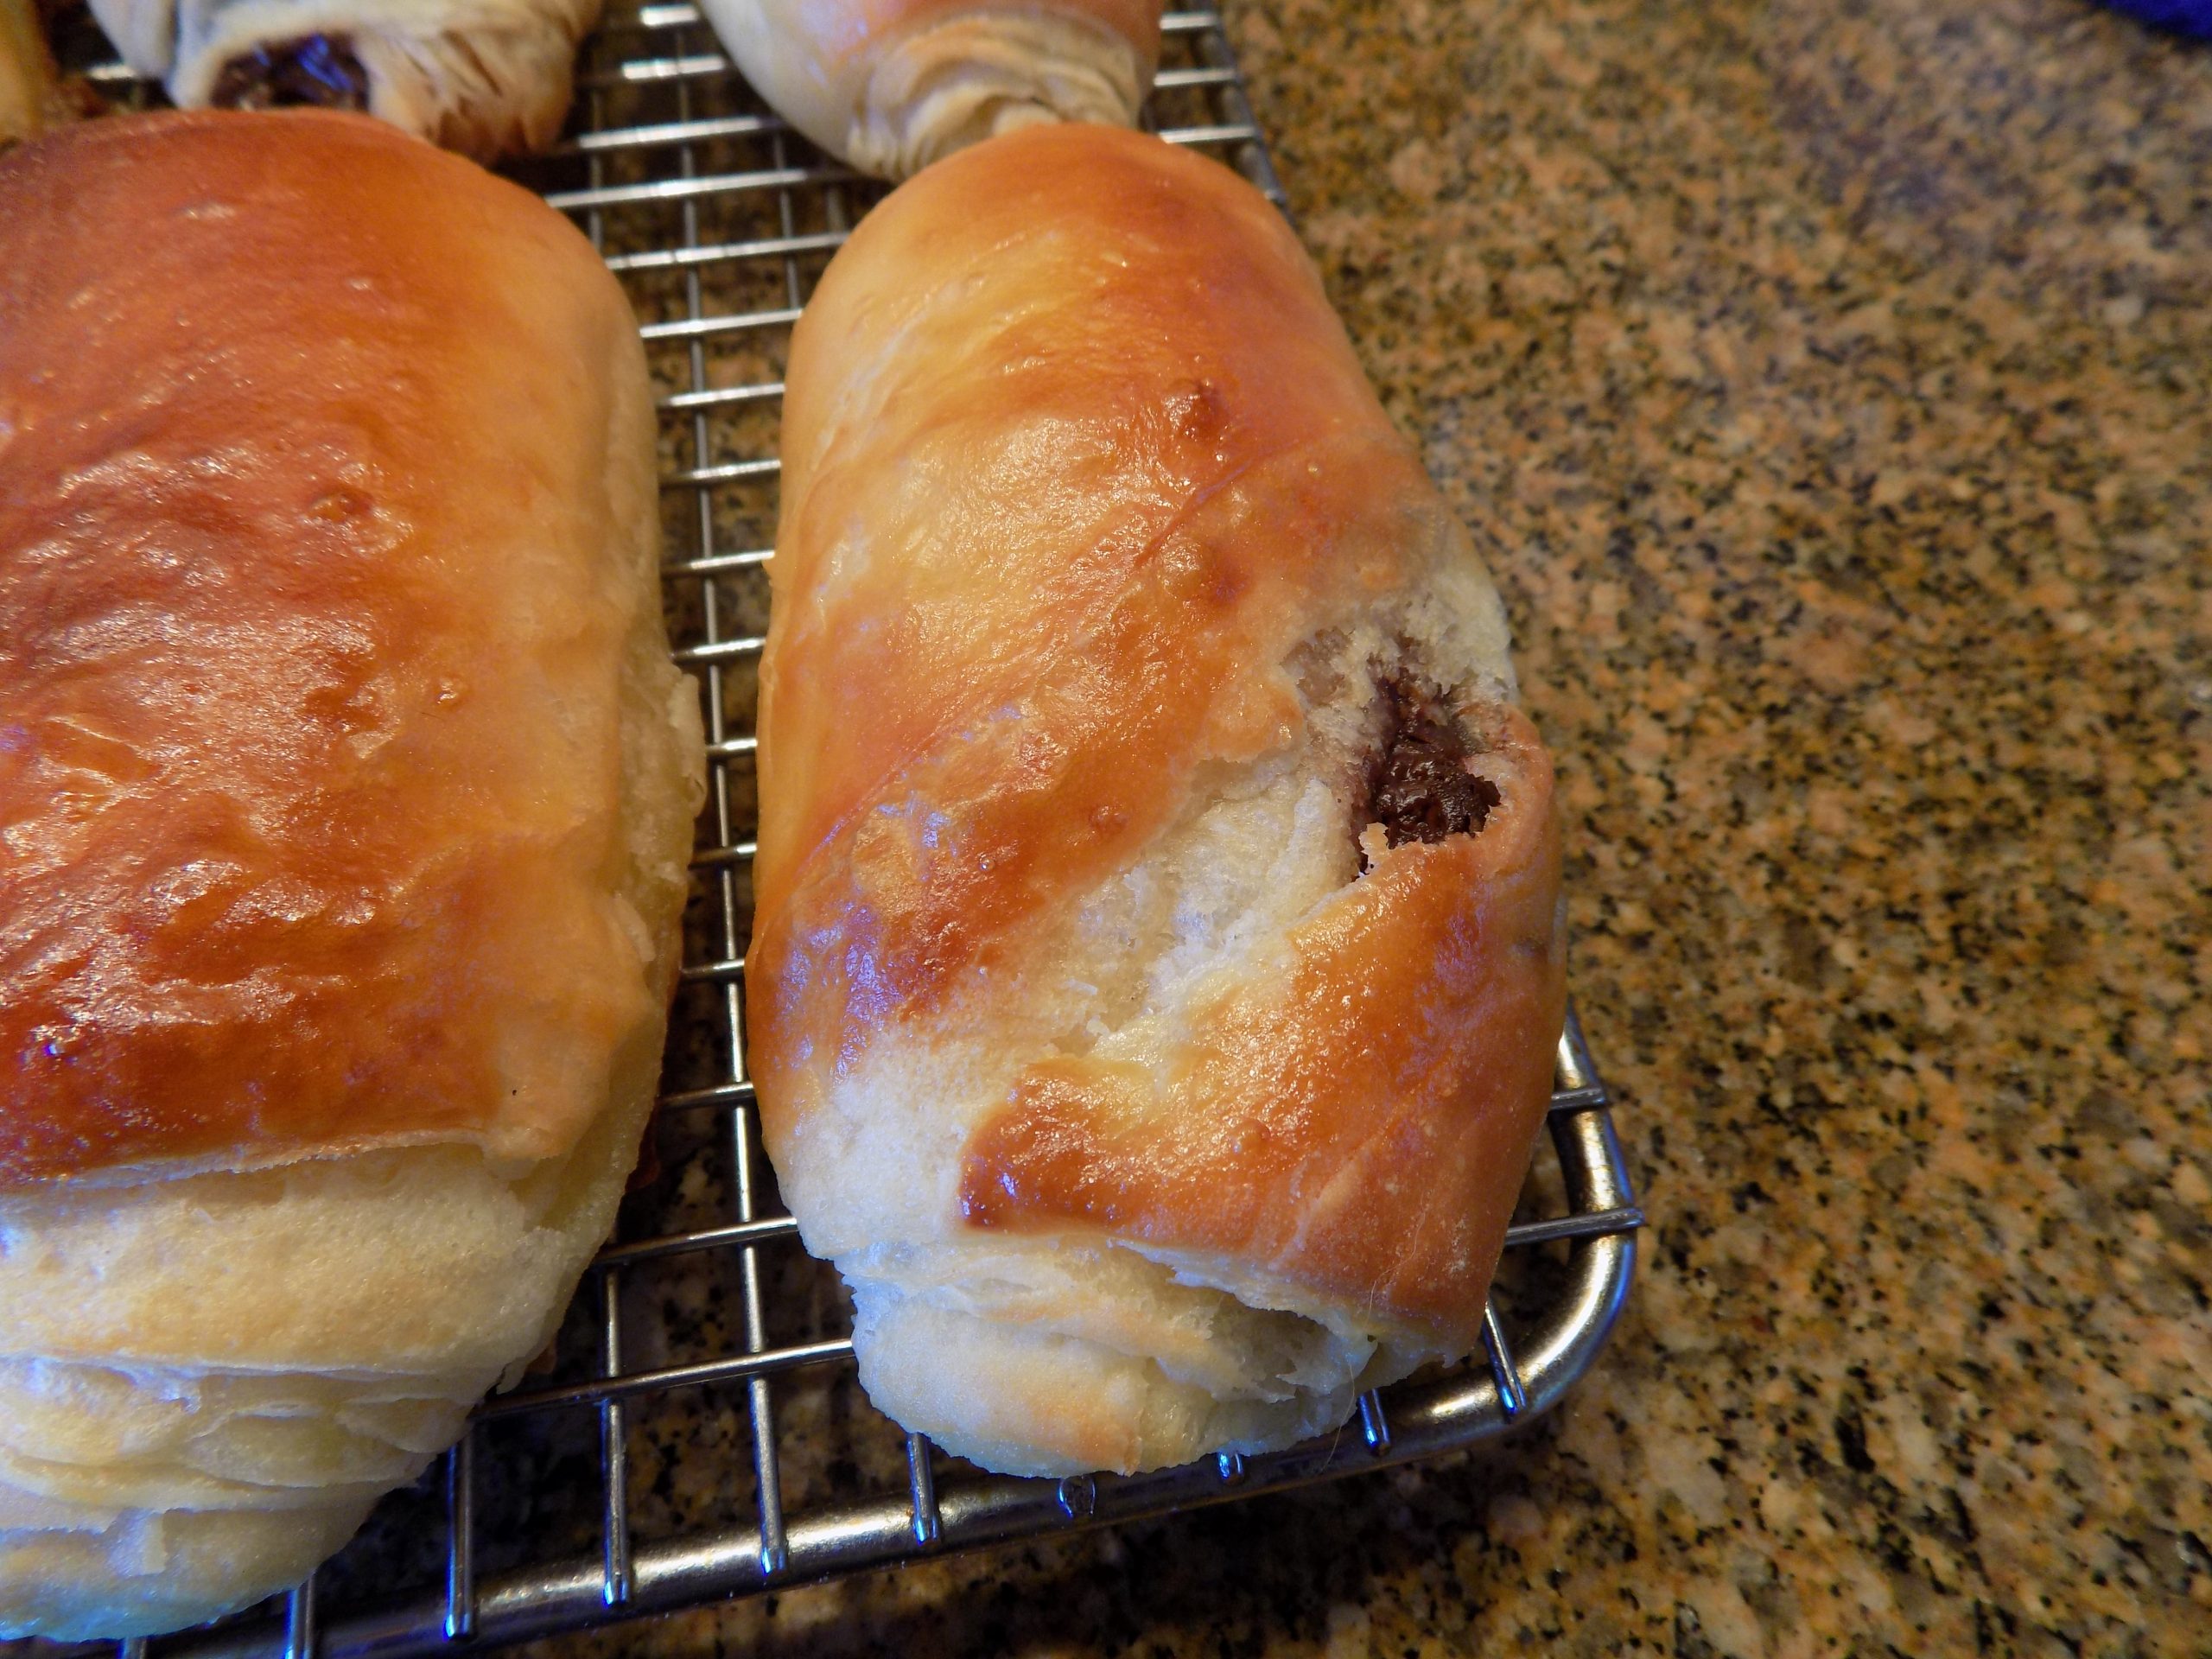
Croissants and pain au chocolatCroissantsView of the flaky interior of a croissantUp close look at pain au chocolat
Well, once again I stepped out of my comfort zone and made THE BEST croissants I have ever tasted. Of course, it didn’t hurt that the croissants were still warm when I bit into my first one. (And yes, I had two. OK, three. But in my defense, they were small croissants, by plan, I might add.) So, thanks to Bincy at merryboosters.com, I no longer have any reason to pay excruciating prices for my all-time favorite accompaniment to bacon and eggs. And the best part – the darn things were easy to prepare. Really!
First of all, you don’t need a mixer to make the dough. And no kneading required. But granted, it did take most of the day to prepare these delicacies because there is a lot of time the dough is busy rising. But so what?! I had nothing else planned yesterday. And during the time I wasn’t actively involved in the process, I dusted the house and cleaned the bathrooms, posted a recipe, and did research for another recipe I plan to present in the future. So, basically, no time wasted.
But patience required, I will certainly admit to that! Mainly because I could hardly wait to chomp into the final product. And of course, terribly concerned that the final product would not meet my expectations. Because little old me, unschooled baker that I am, actually trying my hand at building croissants and pain au chocolat (for Mr. C.)! How extraordinarily presumptuous of me! But still game enough to at least give it a try. And not only making croissants but pain au chocolat as well. (Frankly I don’t see what all the fuss is about when it comes to pain au chocolat. But Mr. C. is a devoted fan. And when it comes right down to it, I like making him happy.) So, 4 pain au chocolat were made along with 12 regular croissants. And since you are concerned with the disparity in my 12 to his 4, forget it! He loves regular croissants too.
And another thing we both really love, is that all 12 of the croissants and 4 pain au chocolat I made cost less than 2 croissants from our local French bakery. Because really, the only expensive ingredients are the European butter (which I buy at Grocery Outlet for $1.99 for 8-ounces), and the really good dark chocolate (about a third of a 3.5 oz. dark chocolate bar from Libeert (Belgian Chocolate Creators). (Probably about a dollars-worth of chocolate.) The rest of the ingredients, not appreciable.
So, for those of you who have been afraid of making homemade croissants – let it go! These are so easy to build. And so delicious. Yes, they take time. But boy are they worth the effort.
As always, have fun in your kitchen. Try new recipes because you may never know what amazing new discoveries you might make. And please don’t wait until you’re 77 (like me) to make homemade croissants and pain au chocolat. All I can think right now, is, why in the world did I wait so long? And should I make some more tomorrow, or wait a couple of days?
So, thank you again Bincy for this fabulous recipe. And for helping me keep my reputation as a “well-rounded” cook. (Define well-rounded any way you like!)
Peace and love to all.
1 c. + 1 tsp. slightly warm whole milk, divided
1 tsp. active dry yeast
¼ c. granulated sugar
2½ c. unbleached all-purpose flour, fluffed
¼ tsp. fine grained sea salt
¾ c. (1½ sticks) unsalted butter, room temperature (European butter* is best for this recipe or any other laminated** pastry for that matter)
1 tsp. vegetable oil (for coating the dough)
1 egg
semi-sweet chocolate, coarsely chopped (if making pain au chocolat)
Whisk 1 cup of the warm milk, yeast, and sugar together in a large mixing bowl. Let sit for 5 minutes to activate the yeast.
Add the salt and flour, and mix by hand until you have a smooth, evenly hydrated dough. Pour the veggie oil on the dough, and using your hands and a stiff rubber spatula, form the dough into a ball thoroughly coated with oil. Cover with plastic wrap and let the dough sit and rise for 1½ to 2 hours or until the dough doubles in size. (Mine took 2 hours.)
After the dough has doubled in size, punch it down, place it on a lightly floured surface and flatten it into a rectangle. Then roll it into a long log (like you were preparing cinnamon rolls) and divide the dough into 12 equal sized pieces.
Using a rolling pin, shape each piece of dough into a circle approximately 6½ to 7-inches in diameter. Spread the first dough circle liberally with butter, then place on a piece of plastic wrap, butter side up.
Then flatten the next piece of dough and slather with butter and stack, butter side up, directly on top of the first piece. Continue until all the dough circles have been buttered until the last piece. Place dough circle number 12 unbuttered on the top of the pile. Wrap securely with as much plastic wrap as it takes, and place in your freezer for about 35-40 minutes. (The time spent in the freezer will allow the butter to harden a bit, but still be pliable enough to roll the dough into a rectangle, 12×16-inches.)
Place the rectangle with one of the longer sides furthest away from you. Using a pizza cutter*** or knife, cut the long sides into 4 top-to-bottom rectangles, then the short sides into thirds, right to left. This will give you 12 (4×4-inch) equal size squares.
For Regular Croissants:
Cut each square into two triangles. With your hands, shape the triangle into a long pie shaped piece of dough. Cut a small incision into the triangle in the middle of the larger end. (This small incision helps keep the center of the croissant from becoming too thick.) Then starting at the larger end, gently force the cut apart while you roll the dough towards the thin pointed end, making sure you are rolling the croissant tightly, but without squeezing the dough. Place on a parchment paper lined baking sheet pointed ends down and about 2-inches apart.
Whisk the egg with the remaining 1 teaspoon milk and brush on each croissant. Cover with plastic wrap and allow to rise for 2 hours or until they puff up a little. (And yes, the plastic wrap will stick a bit to the croissants.) Then, gently but liberally brush each croissant again with a bit of the egg wash being careful not to deflate the dough.
Bake in a pre-heated 400-degree oven for 10 minutes, then reduce the temperature to 375-degress and bake for another 7-8 minutes or until the croissants are a deep golden brown and the internal temperature reaches 210-degrees. Don’t under-bake the croissants.
Remove from oven and cool on a wire rack. Store in an air-tight container at room temperature. Re-heat in a 350-degree oven for a few minutes.
For Pain Au Chocolate Croissants:
Do not cut the 4-inch squares. Place about 3 teaspoons of the chopped chocolate about half an inch up from one of the sides. Fold the dough up over the chocolate and continue rolling until you have created a cylindrical shape. Place on a parchment paper lined baking sheet, seam side down about 2-inches apart.
Whisk the egg with the remaining 1 teaspoon milk and brush on each croissant. Cover with plastic wrap and allow to rise for 2 hours or until they puff up a little. Then gently brush each croissant again with the egg wash being careful not to deflate the dough.
Bake in a pre-heated 400-degree oven for 10 minutes, then reduce the temperature to 375-degress and bake for another 7-8 minutes or until the pain au chocolat croissants are a deep golden brown and the internal temperature reaches 210-degrees. Don’t under-bake.
Remove from oven and cool on a wire rack. Store in an air-tight container at room temperature. Re-heat in a 350-degree oven for a few minutes.
*European-style butter: Excerptfrom an article on thekitchen.com. site “Overall, European-style butters are favored for their rich taste — a direct result of the higher butterfat content. More butterfat also means a softer texture, faster melt, and often, a saturated yellow hue. With less water, European-style butters are often the preferred butter for baking — especially when the flavor of butter is just as important as its function.”
And according to our good friend Keith, who spent many years as a professional baker (and I paraphrase) – “The best butter for the home baker making croissants, or any pastries, is slow-churned European style butter that contains at least 82% butterfat. This type of butter contains less air and water which makes it more pliable and resistant to being absorbed in dough during lamination**.”
**Lamination: Lamination is the process of folding and rolling butter into dough over and over again, or in the case of this recipe, spreading soft butter over layers of thin dough, to create super-thin layers. These layers, which alternate between butter and dough, are what give croissants their signature honeycomb interior structure and their fabulously flaky texture.
***Pizza cutter: My dear friend Vicki explained to me why she preferred using a pizza cutter rather than a knife when cutting dough. Cutting dough with a pizza cutter makes a nice, thin cut. And unlike using a knife, a pizza cutter doesn’t flatten the dough next to the cut. Plus, it doesn’t stretch the dough as it’s being cut. Thanks Vicki for sharing your experience with all of us.
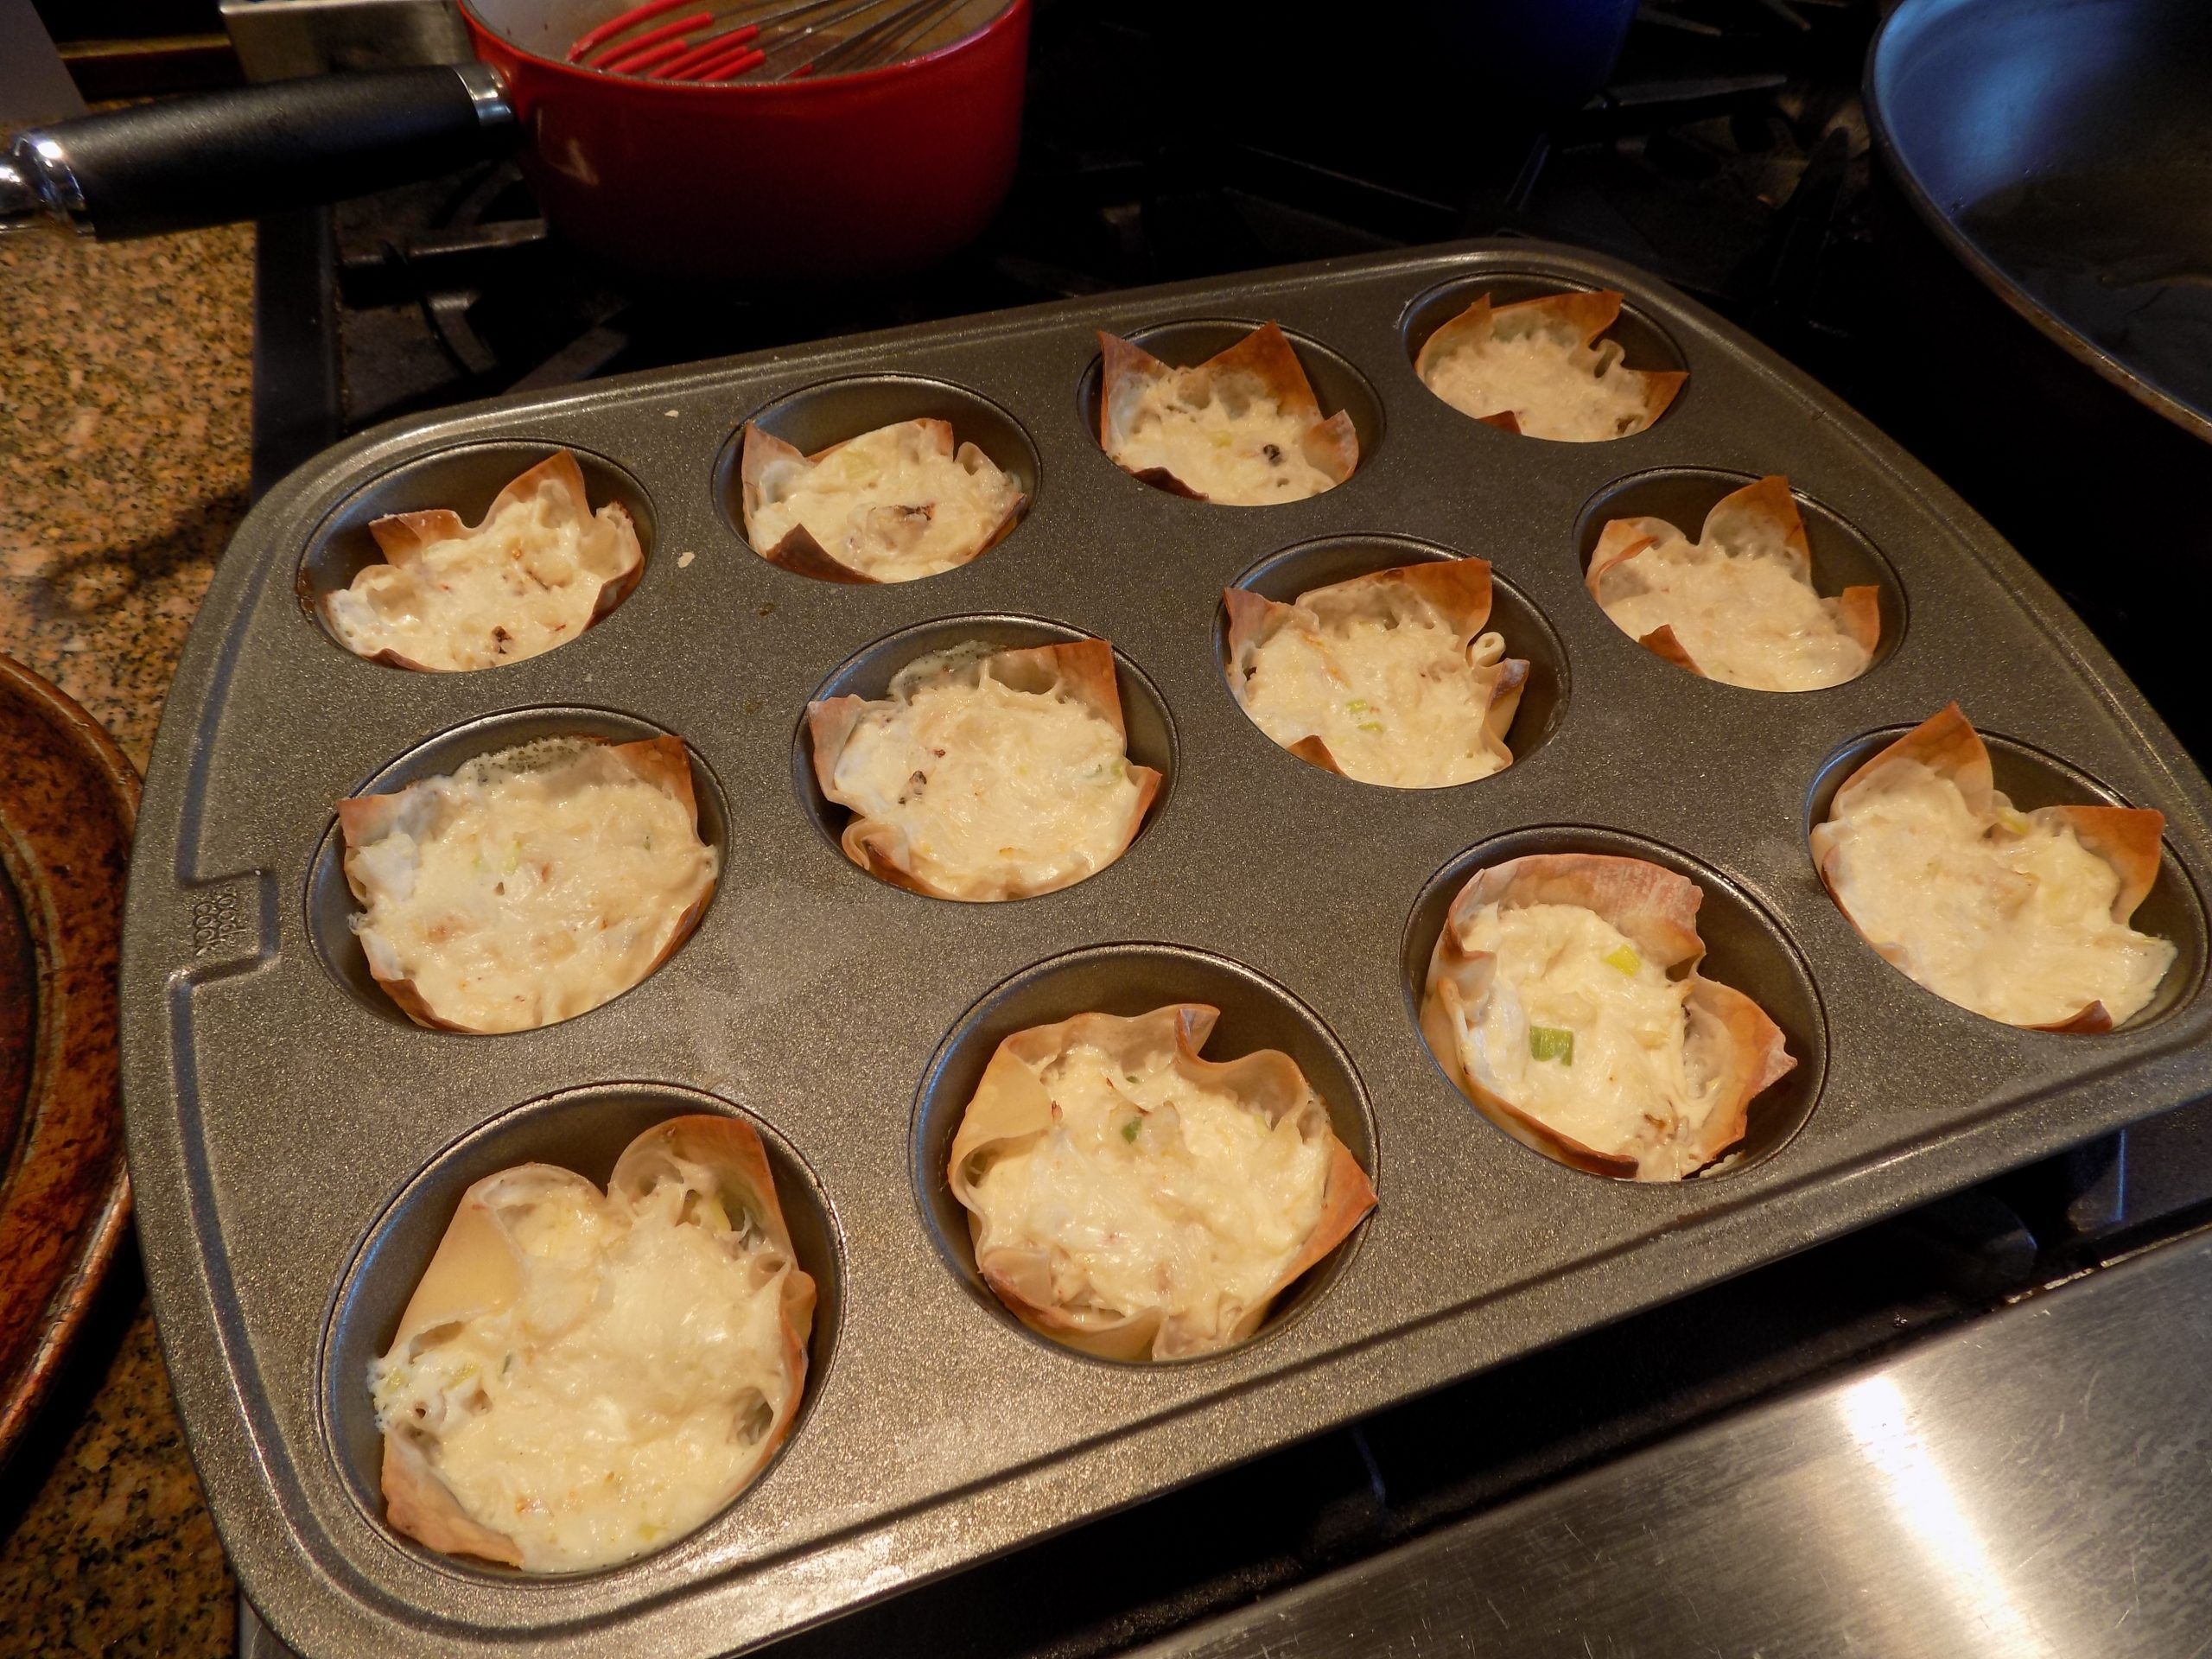
I have this tendency (a holdover from earlier years spent carefully watching my bank account balance), to see a leftover ingredient in my refrigerator and build a new dish around that ingredient. So, after making Baked Crab Rangoon with Sweet and Sour Sauce (recipe on site) a couple days before and having both leftover wonton wrappers and Sweet and Sour Sauce, I decided to try my hand at shrimp wonton cups. And boy am I glad I did!
I started with a recipe for wonton cups I found on the anerdcooks.com site. Then of course, I played with the recipe because I simply can’t help myself. But the result was terrific, so as in many cases, asking for forgiveness is so much easier than asking for permission. But Lauren, I do apologize for the changes I made to your perfectly fine recipe without your permission.
Anyway, the result was much better than expected. And even though there are still unused wonton wrappers in my refrigerator, I have reduced their number by 24. Of course, I have also used a half pound of large shrimp, 4 ounces of cream cheese, a bit of sour cream, and some grated mozzarella in the process. But I already had them in stock, so no visit to the grocery store was required to prepare this treat. (I still have left over Sweet and Sour Sauce too. But I have decided to let it go. There is a line over which even I refuse to cross!)
So, if you too love shrimp wonton cups with a truly delicious sauce, then I recommend these easy to prepare recipes. Perfect as an appetizer or accompaniment to other Chinese dishes.
As always, keep smiling. And keep your family and friends smiling too by preparing great food and serving it in beautiful serving dishes and on lovely dinnerware.
I don’t know about you, but food served on nice plates always seems more appealing. So, don’t save your good dishes for Thanksgiving or Christmas. Use them whenever you get the urge. Sure, a piece could get broken. It happens. But while the pieces are still around, they should be made to earn their keep, not tucked away for your inheritors to dispose of. Because realistically, your kids tastes and yours, when it comes to fine china that is, are probably quite different. So, enjoy them while you can. (That goes for the kids too!)
Peace and love to all.
2 tsp. unsalted butter
½ lb. lg. raw shrimp, shelled, deveined, and tails removed
freshly ground black pepper (just a bit)
24 square wonton wrappers
4 oz. (½ lg. pkg.) cream cheese, room temp.
2 T. sour cream
1 garlic clove, finely minced
½ tsp. Worcestershire sauce
2 green onions, finely chopped
½ c. grated mozzarella cheese
Heat the butter in a small frying pan. Cut the large shrimp into very small pieces. Add the shrimp, lightly sprinkled with black pepper to the frying pan and cook just until done. Remove from heat and set aside. Preheat oven to 350-degrees.
Lightly spray mini-muffin pans with nonstick cooking spray. Carefully press wonton wrappers into wells of pan. Lightly spray the wonton wrappers in the pan. Bake 7-8 minutes or until edges start to turn golden brown. Remove pan from oven.
Meanwhile, stir the cream cheese, garlic, and Worcestershire sauce together in a mixing bowl until well blended. Stir in the cooked shrimp, green onions, and mozzarella cheese; mix well. Using a #100 (2 teaspoons) ice cream scoop, plop the shrimp mixture into each wonton cup.
Bake for about 10 minutes or until wontons are golden brown and the filling is starting to bubble.
Serve hot, warm, or at room temperature. Great dunked in Sweet and Sour Sauce.
SWEET AND SOUR SAUCE
¼ c. lightly packed brown sugar
¼ tsp. kosher salt
2 T. ketchup
1 T. soy sauce
3 T. plain rice vinegar (not seasoned rice vinegar)
½ c. water
2 tsp. cornstarch dissolved in 2 tablespoons water
Combine the sugar, salt, ketchup, soy sauce, vinegar, and water in a small saucepan. Bring to a near boil over medium heat, stirring occasionally to dissolve the sugar. Give the cornstarch a stir and then add it to the pan. Continue cooking, stirring, for about 15 seconds, or until the sauce comes to full boil and thickens.
Remove from the heat. Serve warm or at room temperature. Can be made ahead.
The last time I ordered crab Rangoon in a restaurant I was terribly disappointed. (And yes Rangoon should be capitalized because it is from the city Yangon, also called Rangoon, the former capital of Burma, which is now Myanmar.) Anyway, the crab used in the making of the Rangoon at this otherwise fine Chinese cuisine dining establishment, was very sparingly used, to say the least. In fact, if there was any crab in the mix, I would be very surprised. If anything, there might have been a bit of surimi (fake crab) in the filling. And that not only scares me; it makes me madder than a wet hen! I hate fake crab! And everything about it! For interesting facts about imitation crab, skip to the bottom of this post. But back to this recipe.
The other day when I got a hankering for Chinese food, I decided to pull out my old recipe and build me some crab Rangoon with what I consider to contain the requisite amount of crab. And since I abhor deep fat frying anything, even something as delightful as crab Rangoon, my old standby recipe for baking the Rangoon seemed perfect for the occasion.
And there was much rejoicing at table that evening. Not only was the Rangoon terrific; the sauce was over the top delicious. And nary a spattering of hot fat to be seen on either me or the immediate vicinity around the stove!
So, the next time you are looking for just the perfect appetizer, please give this baked Rangoon recipe a try. And don’t even think about serving the Rangoon without the Sweet and Sour Sauce. Not only is this sauce perfect with Rangoon, it’s equally great with the next recipe I am going to post – Shrimp Wonton Cups with Sweet and Sour Sauce. Plus, this sauce is terrific with my recipes for Char Siu (Chinese BBQ Pork), Easy Chinese Dumplings/Potstickers, baked eggrolls (still working on the recipe), or as a glaze for grilled chicken or seafood. Plus both the recipe for the Rangoon and the sauce are very easy to prepare.
So, as always, have fun in your kitchen. We all must eat to stay alive. And eating can be such a pleasure. As cooks we can make this happen.
And believe me, I know there are times when even the thought of cooking one more meal is overwhelming. But cooking is a lot like exercising. Once you get started, the effort initiates a biological cascade of events that results in the release of endorphins — those chemicals that make you happy! So, stay happy. Keep cooking!
Peace and love to all.
8 oz. cream cheese, room temp.
1 clove garlic, very finely minced
1 green onion, finely diced
¼ tsp. Worcestershire sauce
1/8 tsp. sugar
pinch white pepper
8 oz. crabmeat (canned real crab is fine for this recipe)
¼ tsp. kosher salt, if needed
square wonton wrappers
Mix the cream cheese, garlic, green onion, Worcestershire sauce, sugar, and pepper together. Taste the crab meat. If it isn’t terribly salty, add the ¼ teaspoon salt to the cream cheese mixture. Then gently stir in the crab.
Grease 12-16 muffin cups with cooking spray. Gently place 1 won ton wrapper in each cup. Fill evenly with crabmeat mixture.
Bake in a pre-heated 350-degree oven for 15 to 18 minutes or until edges of wonton wrappers are golden brown and the filling is heated through.
Serve warm with Sweet and Sour Sauce.
SWEET AND SOUR SAUCE
¼ c. lightly packed brown sugar
¼ tsp. kosher salt
2 T. ketchup
1 T. soy sauce
3 T. plain rice vinegar (not seasoned rice vinegar)
½ c. water
2 tsp. cornstarch dissolved in 2 tablespoons water
Combine the sugar, salt, ketchup, soy sauce, vinegar, and water in a small saucepan. Bring to a near boil over medium heat, stirring occasionally to dissolve the sugar. Give the cornstarch a stir and then add it to the pan. Continue cooking, stirring, for about 15 seconds, or until the sauce comes to full boil and thickens.
Remove from the heat. Serve warm or at room temperature. Can be made ahead.
Imitation Crab (From webmd.com)
“Imitation crab is made with surimi, a paste made out of finely shredded or pulverized fish. After the fish is minced, it is heated and pressed into shapes that resemble meat from a crab leg. The resulting imitation crab looks similar to the original crab in its coloring and texture.
Binding agents, like egg white, starch, vegetable oil, or sugar, are added to the surimi paste to make the meat stick together. Occasionally, monosodium glutamate (MSG) is added to the surimi. Orange or red coloring is the key ingredient added to make the mixture resemble shellfish meat. For the preservation of the product, the makers vacuum seal and pasteurize the imitation crab meat.
Real crab has significantly higher nutrient levels than imitation crab. For example, imitation crab derives most of its calories from added carbs. The calories in an Alaskan king crab are derived from proteins, not from carbs. If you’re on a keto or low-carb diet and are trying to cut your carb intake, real crab would be the better choice.
Real crab provides a higher amount of vitamins and minerals. It’s a good source of vitamin B12, selenium, and zinc. When making surimi, these nutrients are lost during washing and processing when the fish meat is exposed to heat. Real crab also has a higher amount of omega-3 fatty acids than its mock substitute. Some packages of imitation crab may have added omega-3, but this isn’t always the case.
Imitation crab contains several processed ingredients. The largest component of the imitation crab product is surimi. It contributes 35% to 50% of the product’s weight. The other 50% to 65% that makes up imitation crab contains:
– Starches like wheat, potato, or tapioca starch make the surimi firm and freezable.
– Salt (sodium chloride) adds flavor and helps turn the minced meat into a sturdy gel. Sometimes, potassium chloride is used.
– Vegetable oil enhances texture, shelf life, and white coloring.
– Sugar and sorbitol add some sweetness and help imitation crab to freeze and thaw with ease.
– Egg whites or soy are often added for a boost of protein and to improve texture, color, and glossiness.
– Water takes up the biggest percentage of all the extra ingredients. It helps create the right texture.”
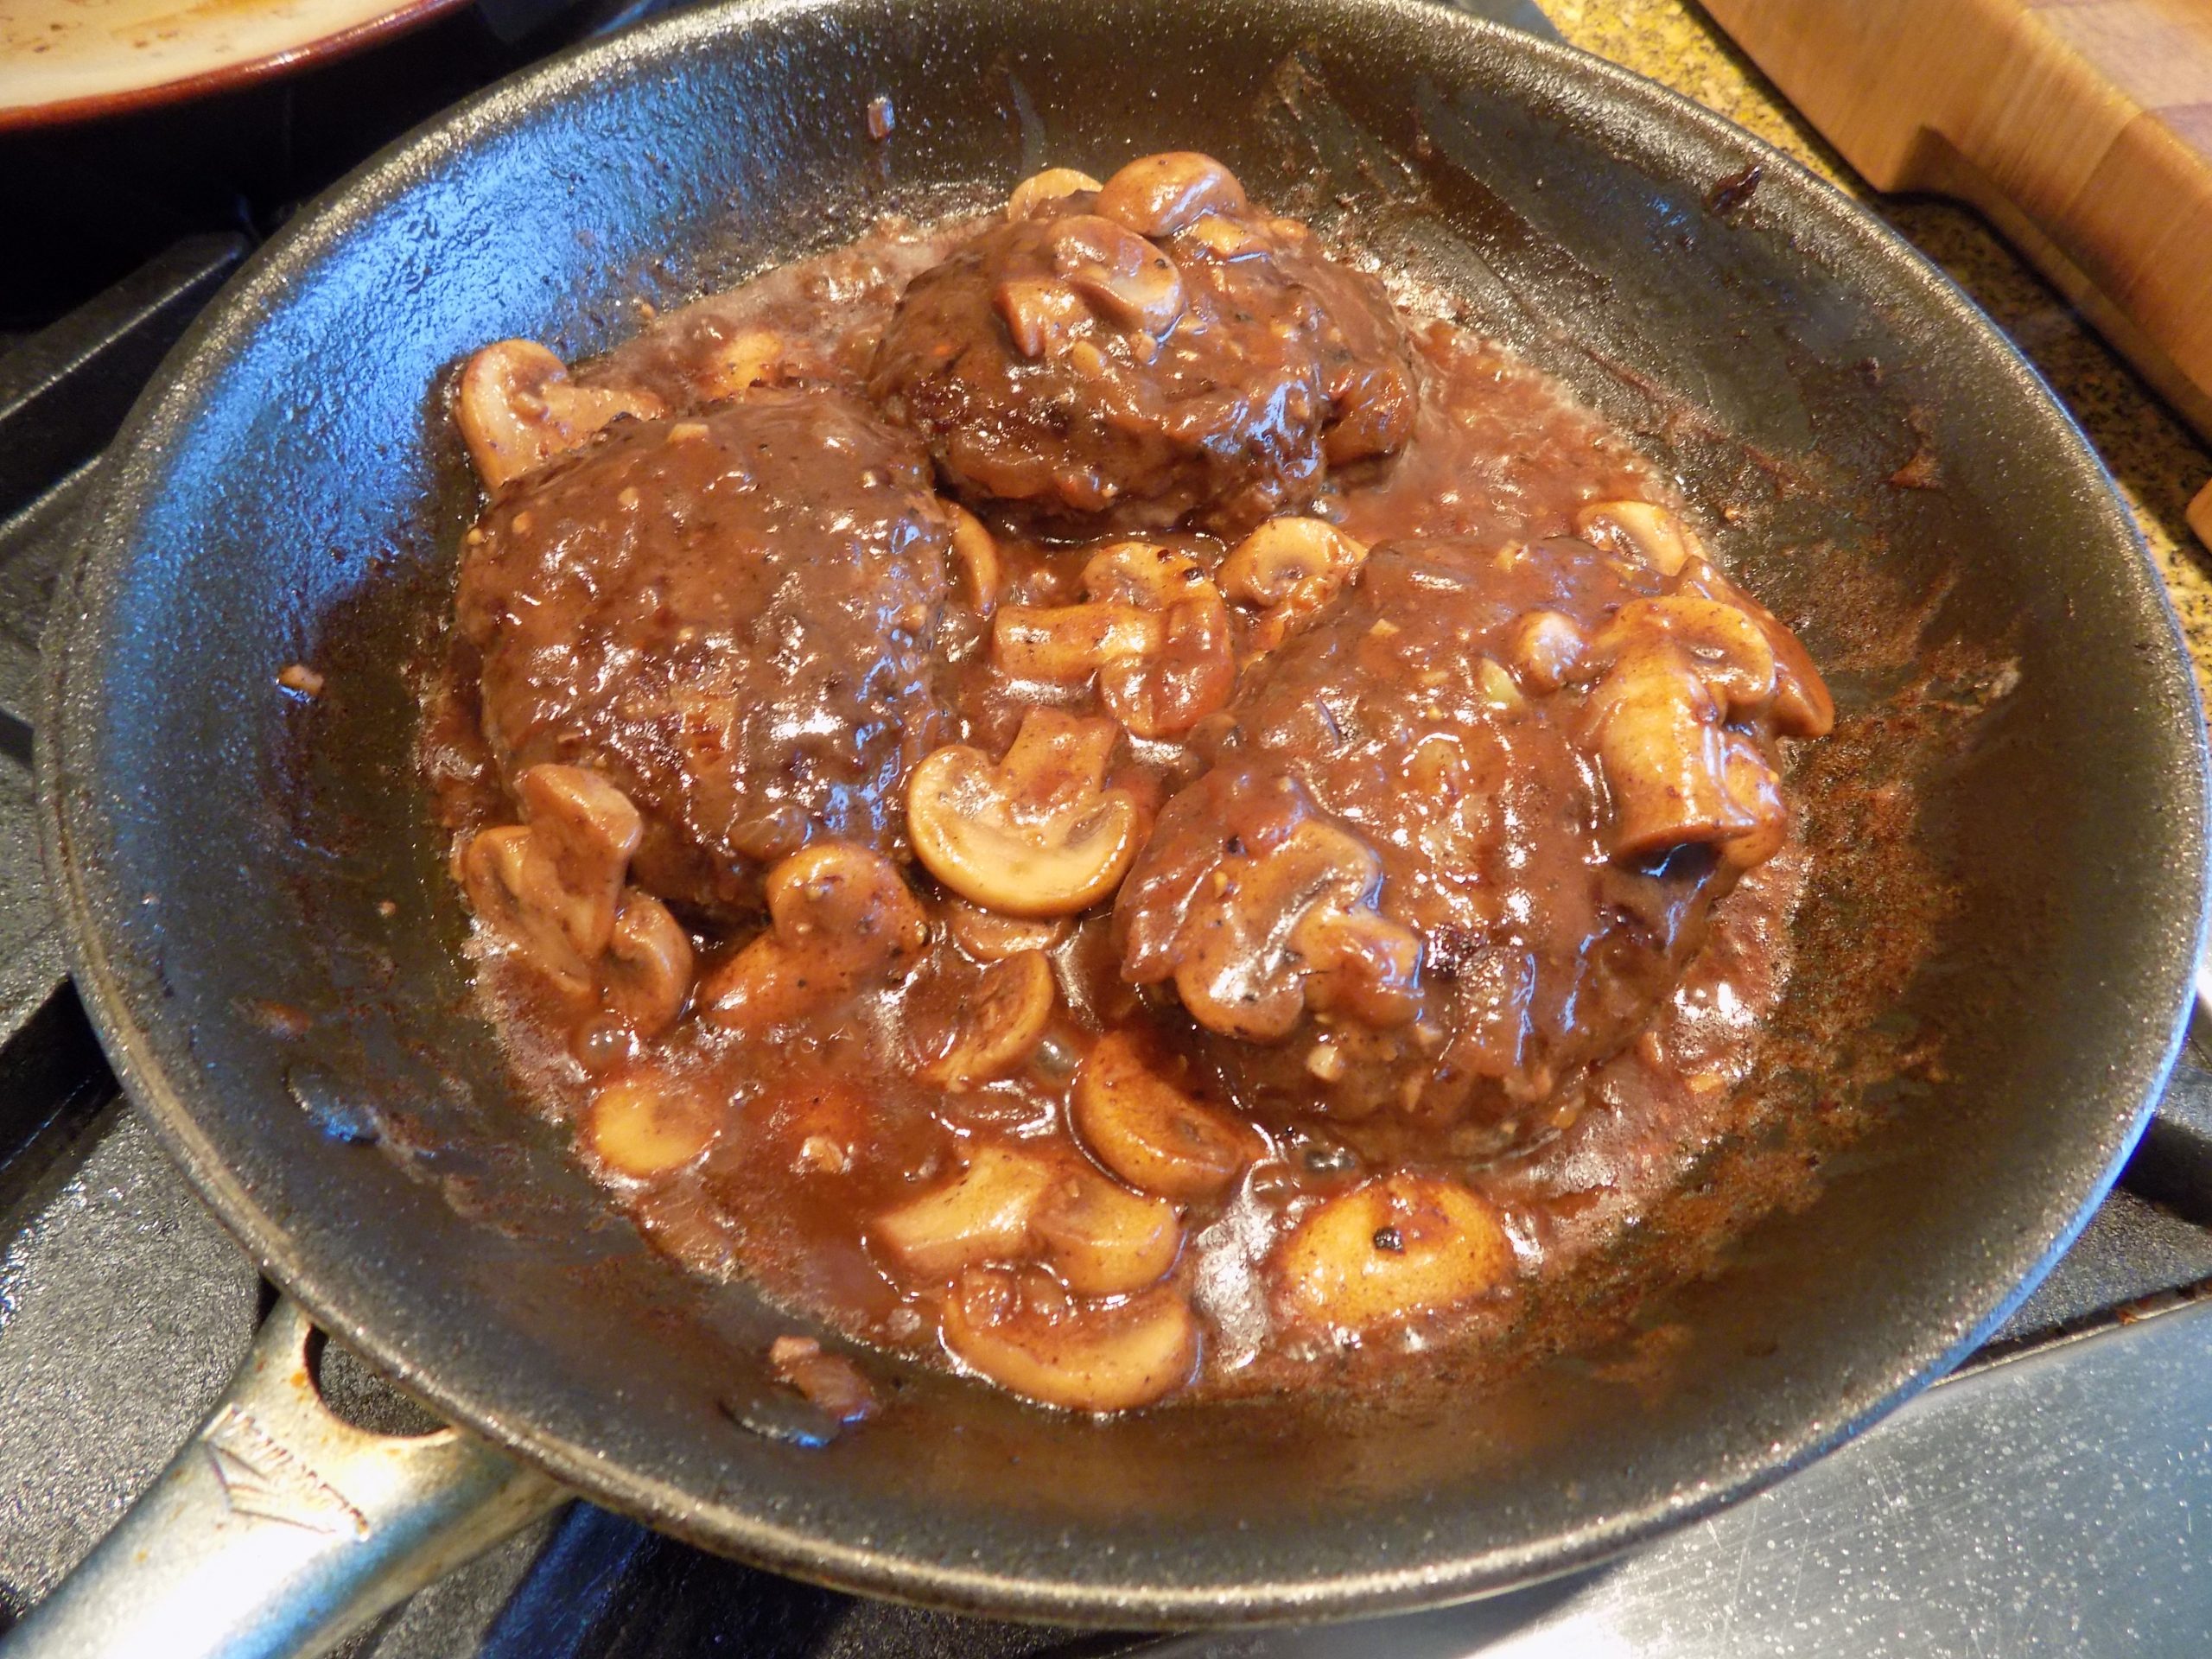
OK, as most of you are well-aware, I am a comfort food lover. Any dish that comes with a sauce or gravy immediately catches my attention. So, consequently, I often order a fancied-up ground beef pattie over a regular steak in a restaurant if given the choice. There’s just something that smacks of good home style cooking anytime a simple ingredient like ground beef is presented on the menu at a fine dining establishment. It means, someone in the kitchen thinks the way I do. So, an immediate bond is created regardless of the fact that in 99% of the cases, I won’t even be able to see the kitchen. Much less, who is doing the cooking. But that doesn’t matter. I instinctively know that he or she and I could be compadres. And that we are on the same wavelength when it comes to knowing that a doctored bit of good, fairly lean ground beef can be ever so much more flavorful than even a very well grilled hunk of beef.
And for those of us home cooks looking to save a bit of money and still produce a dinner that others will enjoy, there just isn’t anything easier to build or more delicious than a ground beef pattie smothered in a bit of sauce. And for the potato lovers in your family, a side of mashed potatoes should have your whole family bouncing up and down on their dining room chairs in anticipation. OK, maybe only coming to the table without their cell phones. But at least not hiding in their closets or threatening to leave home! Or worse yet – ordering in pizza!
So, next time you are in a hurry, or you and your kitchen are not on speaking terms, or you are just too burned out to even order take out, give this dish a try. It’s easy, it’s forgiving, and it tastes like you went to a great deal of trouble. But be advised. The sauce is very rich. So, if you have small children, you might want to offer them ketchup instead of the sauce. However, if your spouse asks for ketchup, please do me the honor of providing him or her with the driving instructions to the nearest McDonald’s!
Peace and love to all.
1 lb. lean ground beef
2 T. + ¼ c. finely chopped onion, divided
2 tsp. Montreal Seasoning
3 T. unsalted butter, divided
¼ c. finely chopped onion
8-10 button mushrooms, sliced
2 garlic cloves, finely minced
½ c. dry red wine
1 c. water
1 tsp. beef base (I use Better Than Bouillon Beef Base)
freshly ground black pepper
1 T. all-purpose flour
Combine the ground beef, 2 tablespoons finely chopped onion, and Montreal Seasoning. Form into 2 or 3 torpedo shaped patties. Heat 1 tablespoon of the butter in a medium sized frying pan. Add the patties and fry the first side until dark brown and about half cooked. Flip the patties and cook an additional couple of minutes or until desired doneness. (We like our patties with a bit of pink in the middle.)
Transfer the patties to a small plate; cover with aluminum foil to keep warm.
Melt 1 more tablespoon of the butter in the same pan. Add the remaining quarter cup of onion and the sliced mushrooms. Gently cook until the onion is soft, and the mushrooms are beginning to brown. Add the garlic and cook for 1 minute.
Add the wine, water, beef base, and black pepper. Bring to a boil. Reduce heat, and cook uncovered, for about 8 minutes, or until the liquid is reduced by about half.
While the liquid is reducing, mash the remaining tablespoon of butter with the flour to make a smooth paste. (Helps immensely if the butter is at room temperature.)
Once the wine mixture is reduced, whisk the flour paste, a teaspoonful at a time, into the simmering liquid. Cook for a few minutes or until the sauce is nicely thickened. Taste and adjust seasoning.
(And no, there is no salt in the list of ingredients. Beef base usually contains more salt than I would prefer. So, I’ve found, that it’s much easier to add salt if needed, than to get rid of too much!)
Add the beef patties back to the pan. Allow to heat through, then serve decorated with the delicious sauce. Great with mashed potatoes or our favorite – Perfect Stove Top Brown Rice. (See recipe below.)
PERFECT STOVE TOP BROWN RICE
1 c. uncooked long grain brown rice, well rinsed
2 c. water
¼ tsp. seasoned salt
freshly ground black pepper (just a pinch)
1 tsp. extra virgin olive oil
Combine the rinsed rice, water, seasoned salt, pepper, and olive oil in a pot; bring to a boil. Cover, reduce the heat to low, and simmer for 45 minutes.
Remove from the heat and let sit covered for 10 minutes more. Fluff with a fork.
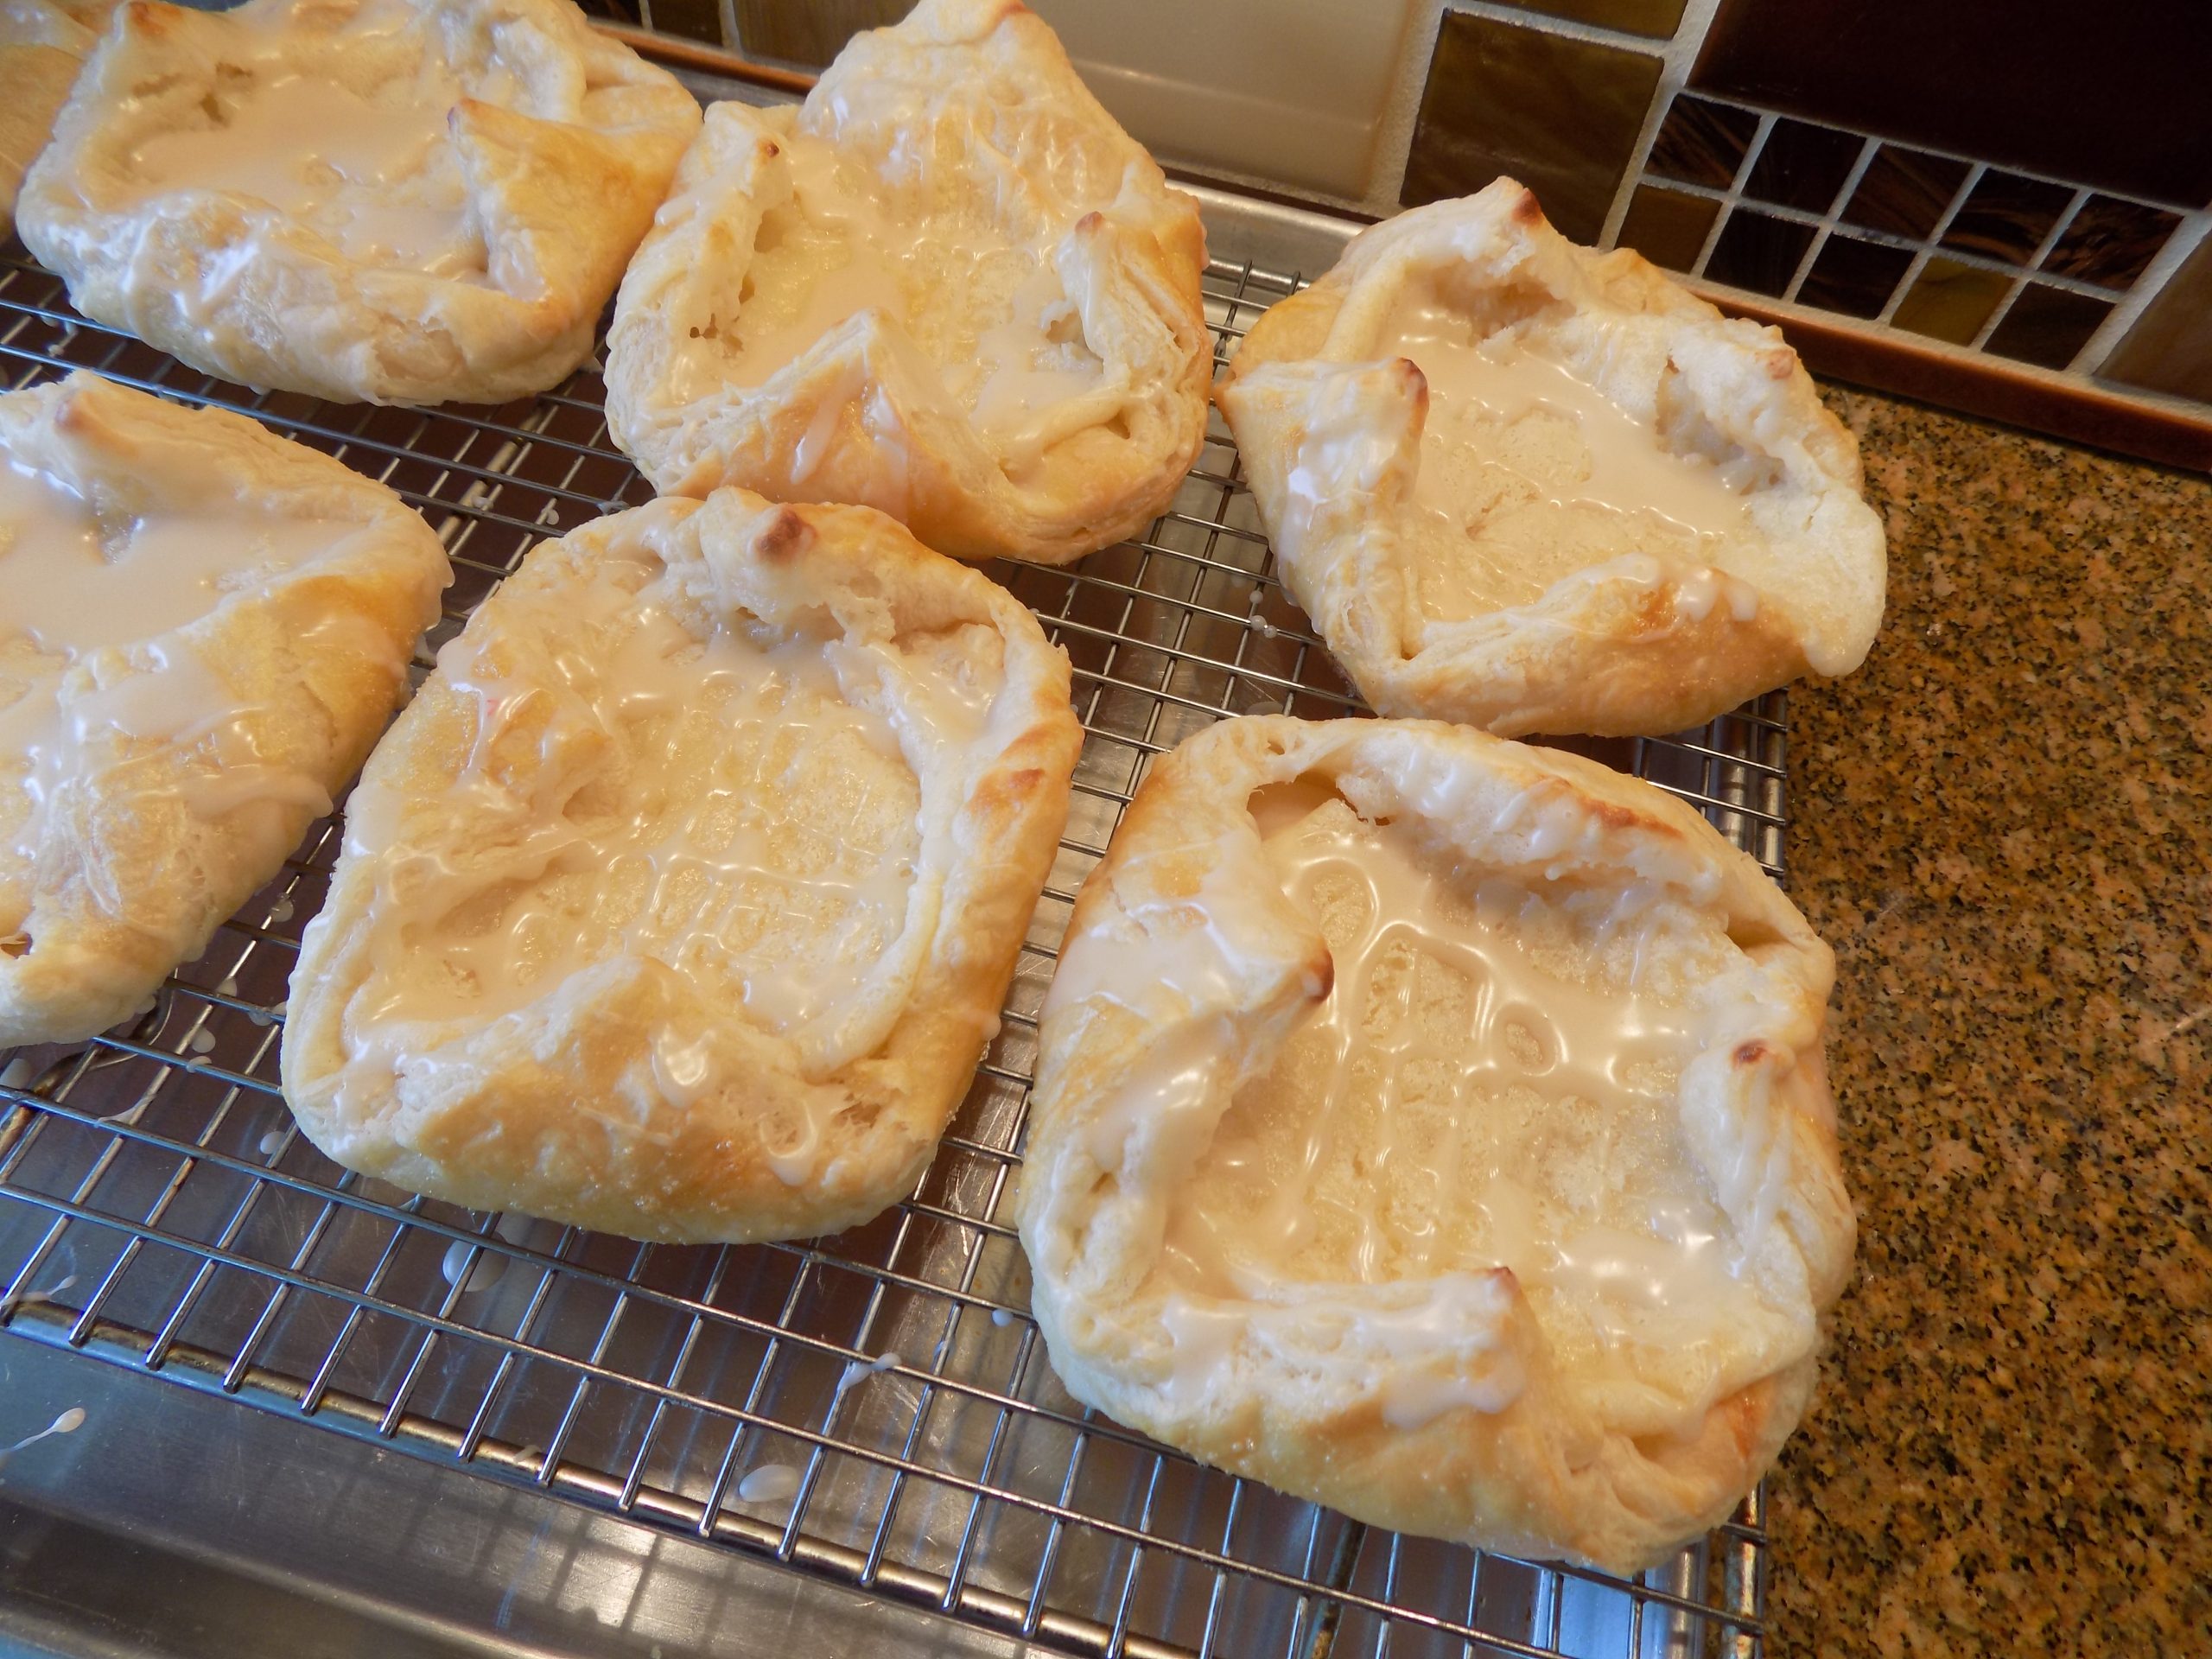
Here I go again offering another recipe some of you would never consider building. But if truth be known, I love Danishes (OK, pastry of any kind), so I keep on trying new ones. And this recipe produces what is undoubtedly the best example of a true cheese Danish that I have ever prepared. (And yes, I think about cheese Danishes way too much!) And maybe that’s why I already have three Danish recipes (Individual Jam Filled Cream Cheese Danish Pastry, Cream Cheese Danish, Dried Cranberry and Almond Braided Danish) already on this site.
When I say I consider the results of this recipe to be a true Danish, it’s because it’s made with puff pastry. Homemade puff pastry. Now don’t panic! Believe me, if I can make this easy puff pastry, you can too. All you need is some flour, butter, and a willingness to try anything once! And trust me, after you’ve made this puff pastry, you will wonder what the big deal was all about. And granted, a “real” pastry chef would probably laugh at this recipe. Chuckle all you want, is all I have to say. Because this recipe produces a pretty darn good puff pastry. Of course, I have had better in Paris, but for homemade, it’s darned acceptable. And don’t even get me started on the puff pastry that comes from the frozen section of your grocery store. Not an ounce of real butter in the whole thing. (For more on the reality of what you are really getting when you buy frozen puff pastry, read my post for Cinnamon Twists.)
So, now that I have you chomping at the bit to build your own puff pastry, let me further tempt your taste buds with the filling. It’s luscious. There’s nothing more that needs to be said. And the tiny bit of drizzle over the whole pastry – yum!
As always, treat yourself every so often to a new or lovingly remembered treat. We are only on this planet for a very short time. Religiously restricting yourself to only foods that are healthy and good for you is not going to prevent the onset of old age or prevent you from getting a debilitating disease. Of course, using moderation or not eating something that is truly harmful to you is simply being responsible. But a pastry or French fries or a cookie once in a while, simply makes life worth living.
Peace and love to all.
And thank you Sam at sugarspunrun.com for this marvelous recipe. And sorry for the couple of minor changes I made.
Homemade Puff Pastry: (equivalent of one box of puff pastry)
2¼ c. unbleached all-purpose flour, fluffed
1 T. granulated sugar
1 tsp. sea salt
1 c. (2 sticks) cold unsalted butter
8-9 T. ice water, or more as needed
Whisk the flour, sugar, and salt together in a large bowl. Using a box grater, grate the butter into the flour mixture, briefly tossing the butter each time you’ve shredded about ½ stick so that it doesn’t clump together.
Once you’ve grated all of your butter, stir briefly until all of the butter is evenly mixed into the flour mixture. (A table knife works great for this step.)
While stirring by hand, (do not use an electric mixer or over-mix this recipe) slowly drizzle ice water into the flour/butter mixture. Add just enough ice water so that if you pinch the dough it will hold its shape and not fall apart. (Start with 8 tablespoons.) All of the flour should be mixed into the dough, but the dough should still appear very dry and shaggy. If the mixture is still dry and crumbly and not sticking to itself when pressed after you have added 8 tablespoons, add additional water one teaspoon at a time. (My dough took 9 tablespoons.) Take care not to overwork the dough or it will be tough.
Transfer to a lightly floured surface and work the dough together with your palms to make dough cling together. Work (with your palm) into a 6×3” rectangle (it will almost look like a brick!). The dough will not look perfect. In fact, there should be chunks of butter showing. Cracks in the dough are fine too.
Wrap dough with plastic wrap and chill for at least 30 minutes.
Once dough has chilled, roll into an 8×12-inch rectangle.
Fold dough into thirds (like you are folding a letter), rotate 90 degrees, and then roll dough into an 8×12-inch rectangle again. (Use as little flour on your rolling surface as possible,)
Fold into thirds again and repeat this process of folding and rolling until you have done four turns of your dough.
Wrap dough with plastic wrap and return to refrigerator to chill for at least 30 more minutes before using as directed below. While the pastry is resting, prepare the filling and egg wash.
Please note: This puff pastry may be stored in the refrigerator for several days or it may be frozen (make sure to wrap it well) for several months and then thawed in the refrigerator before using.
Filling:
8 oz. (1 pkg.) cream cheese, room temp.
½ c. granulated sugar
1 tsp. fresh lemon juice
¾ tsp. vanilla extract
Stir all the ingredients together until smooth. Set aside.
Egg Wash:
1 egg white
1 tsp. water
Whisk together. Set aside.
Build the Danishes:
Divide the puff pastry into 2 even parts (If using homemade puff pastry cut the dough widthwise. If using store-bought dough it will already be divided into two even sheets for you).
Roll first half of puff pastry into a 12×12” square (about 1/16” thick). Cut into 4 even-sized squares. (I use a pizza cutter for this step.)
Transfer squares onto a parchment paper lined baking sheet. Using a #30 ice cream scoop (teal handle), drop balls of filling onto the center of each square of dough. If you don’t have an ice cream scoop, dollop about two tablespoons filling into the center of each square. Spread the filling out a bit using the back of a spoon. Fold the corners over the center of the filling, leaving a space about ¼” thick in the center and between corners. Brush egg wash generously over the top of the puff pastry dough.
Place in a pre-heated 400-degree oven for 18-20 minutes or until light golden brown. Pastries will puff up considerably while baking but will settle as they cool. Repeat steps with second half of puff pastry dough. Meanwhile, prepare the glaze.
Remove from oven and allow to cool before drizzling with glaze.
Vanilla Glaze:
1 c. powdered sugar
½ tsp. vanilla extract
3-5 tsp. whole milk
Whisk the powdered sugar, vanilla, and enough milk together until you have reached desired thickness. Drizzle glaze generously over cooled cheese Danishes.
Chocolate Glaze:
1 c. powdered sugar
2 T. cocoa powder
½ tsp. vanilla extract
3-5 tsp. whole milk
Whisk the powdered sugar, cocoa powder, vanilla, and enough milk together until you have reached desired thickness. Drizzle glaze generously over cooled cheese Danishes.
I take the worst pictures of any food blog I know. For this and many other things, like my random thoughts on all kinds of non-food issues, I humbly apologize. I simply can’t help myself.
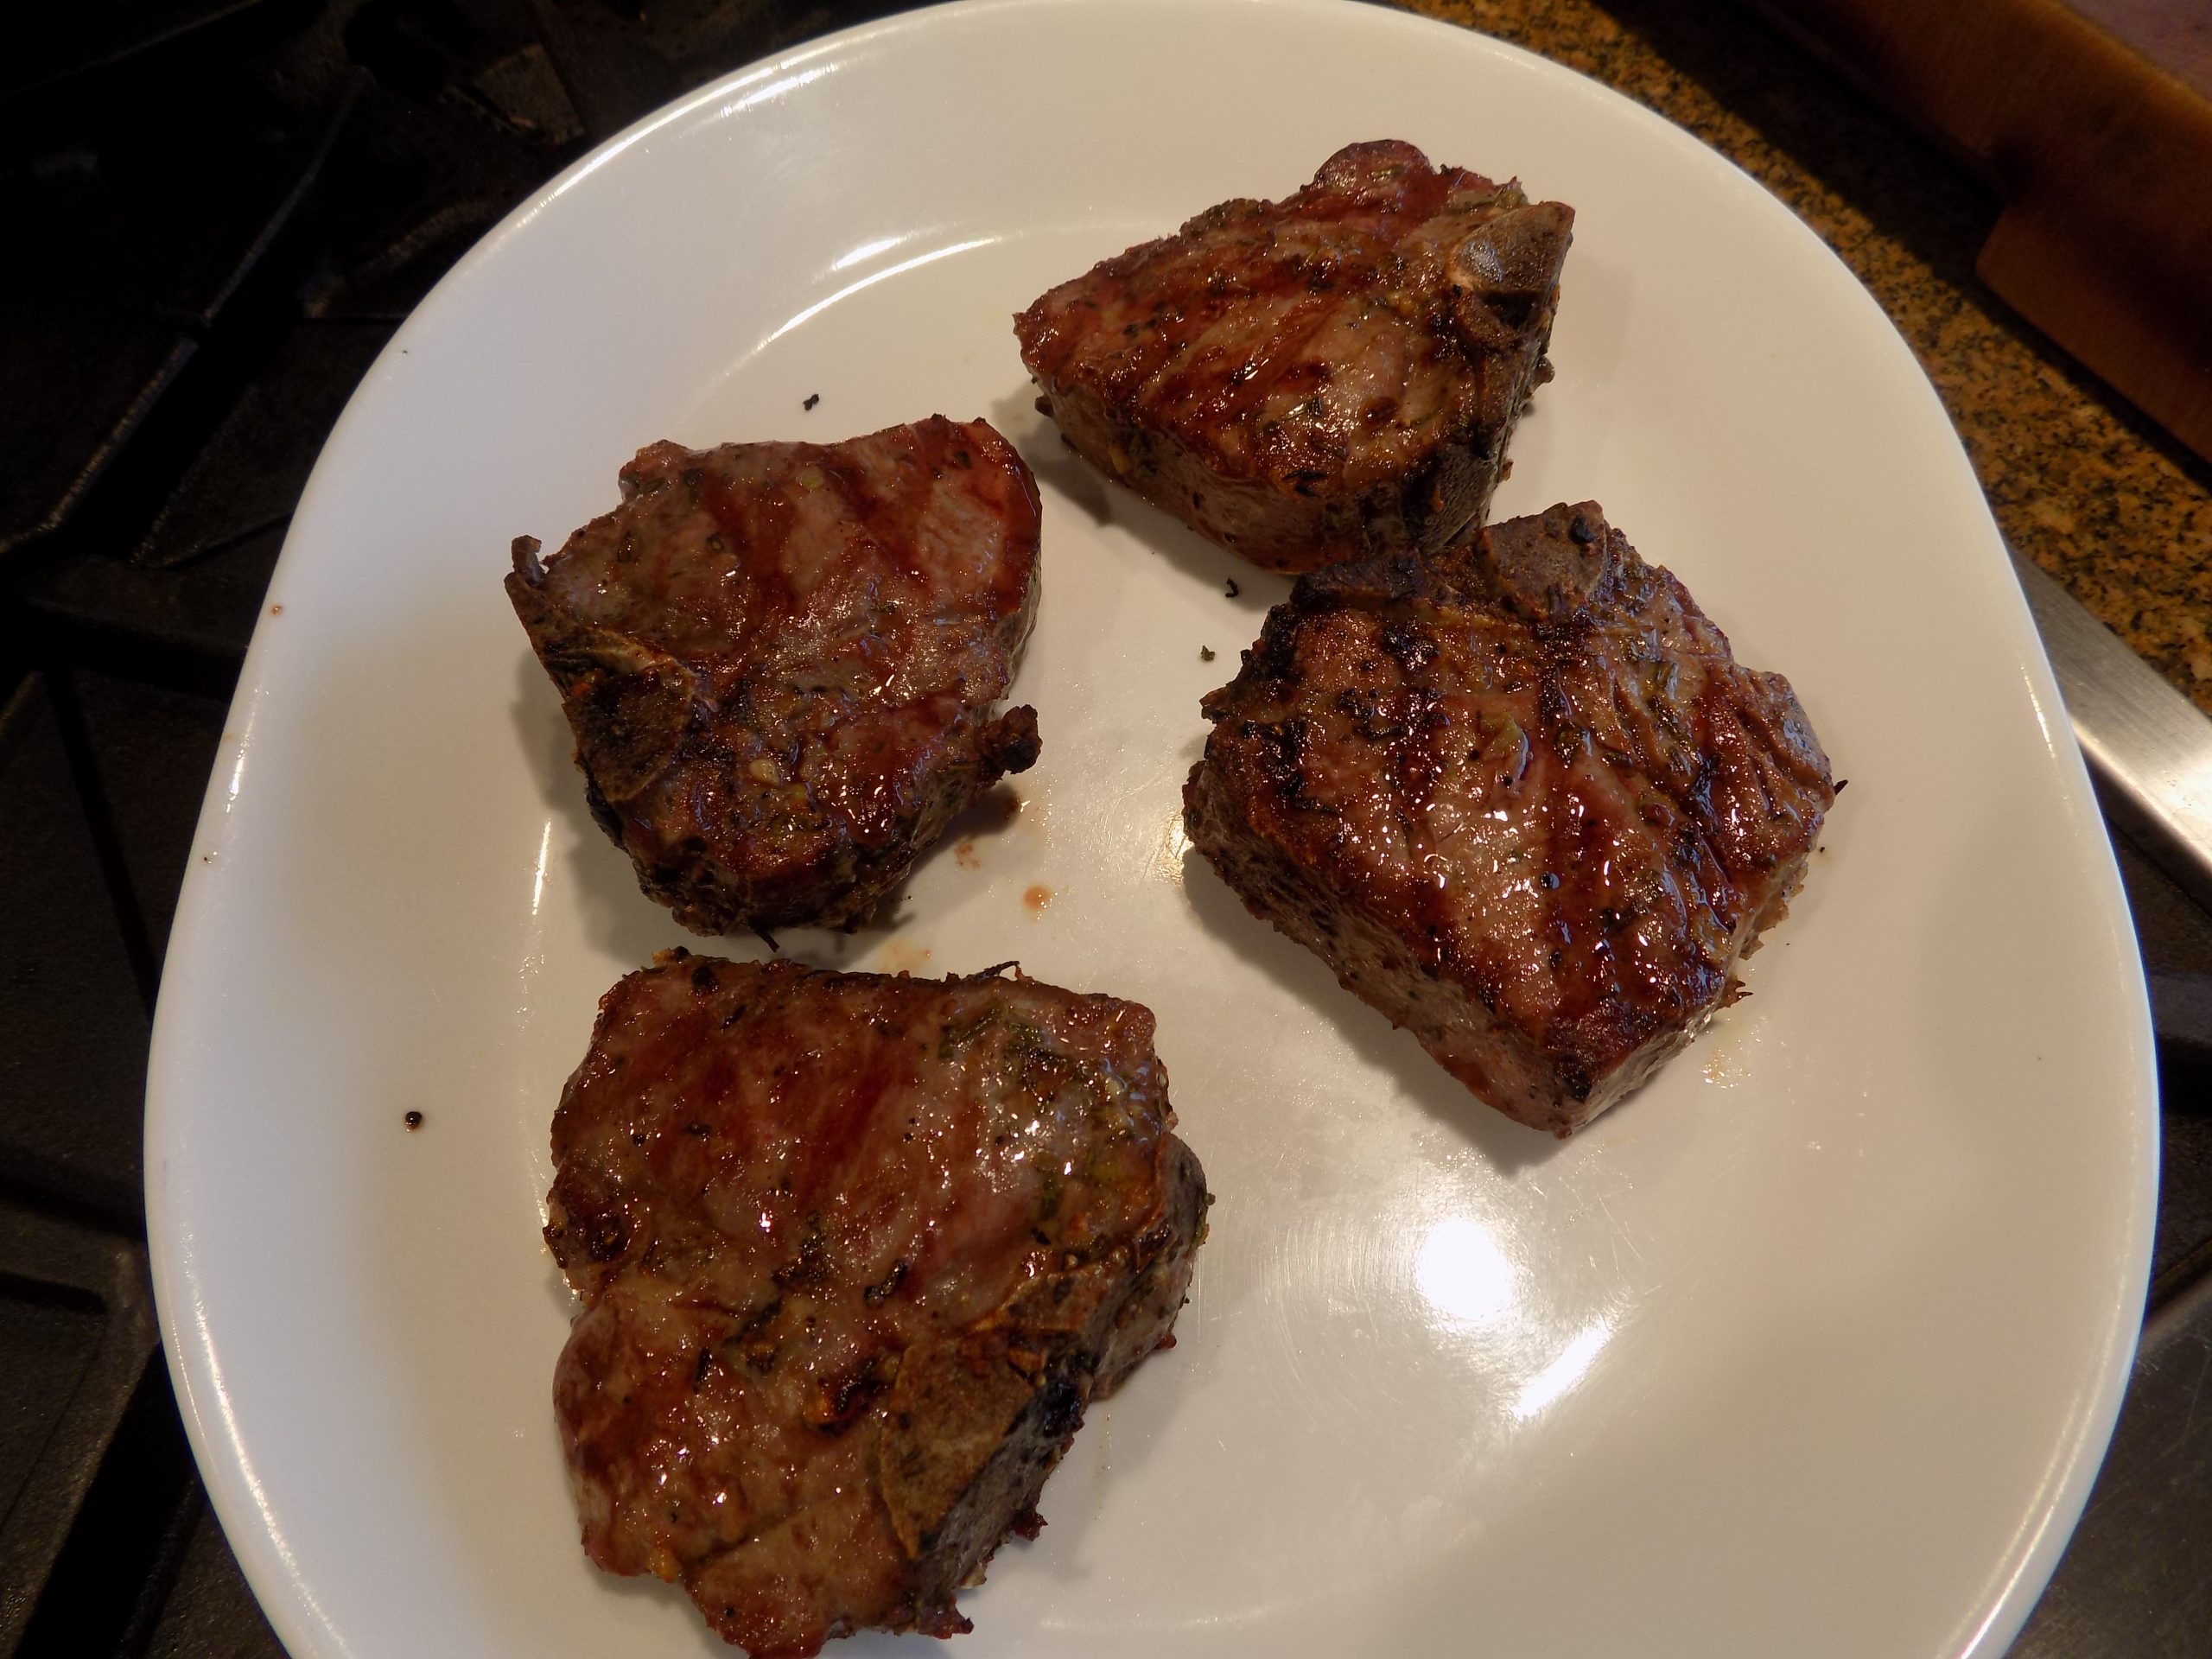
Now, I know what you all are thinking. Everyone knows that rosemary and garlic are very complimentary to the flavor of lamb. Yah, yah, yah – I get that. But, having known about this myself for years, and having prepared many a marinade for lamb using these lovely ingredients, I had never before, until the other evening, made a marinade as easy to prepare or that had afforded such delicious results.
The chops had just the right amount of background rosemary and garlic essence, which in no way masked the beautiful flavor of the meat itself. And I found that just two hours of “marinating” the chops at room temperature was the perfect amount of time.
I guess I should mention that technically the lamb is really slathered rather than marinated. But Grilled Rosemary and Garlic “Slathered” Lamb Chops as a name for this dish didn’t really sound very appetizing. So, I acquiesced to a more normal name, but only for marketing purposes. (Like I have any sponsors to answer to or even if I did, would give a flying fig what I called a dish!) Anyway, “marinated” it became and “marinated” it will remain.
And really, the only things you need to know about this recipe, regardless of what it is called, is that the results are delicious. And like I already stated, the marinade is terribly easy to prepare, and the chops, when not over cooked, are delicious.
Now for those of you who like your meat well done, please find another recipe. I say that with only your time and money as the upper most consideration. Because, if you like well-done meat, why bother buying lamb chops in the first place. They’re expensive and if you’re going to murder the meat anyway – go buy a cheap cut of beef, cook it until it resembles the hide of the animal it came from, and drown it in A-1 sauce. Dinners on the table!
OK, I got a little carried away there, but seriously, any cut of lamb is best when on the rare side of medium-rare. And you truly are wasting your money if you cook lamb, or any other really expensive cut of meat, to death. You are much better off making a lovely pot roast with a chuck roast, for example. Money saved and the outcome for a delicious meal, much higher.
So, as always, have fun in your kitchen. Prepare meals that not only you will enjoy, but everyone at table will find pleasing. And remember, food doesn’t have to be fancy to be delicious. Some of my favorites, like meatloaf, chili, beef stew, and spaghetti and meat balls are hardly what I would consider “fancy foods”. But there is nothing I like better. And if you feel like chili in August, build a batch. There is no Emily Post to tell you that chili should only be served in the winter. There are, of course, seasonal ingredients. But to my thinking, there is no such thing as a seasonal food. Whatever sounds good to you, you are much more likely to build. And your family and friends will always come along for the ride. So, chili in summer and chop salad in winter – make it happen!
Peace and love to all.
2 cloves garlic, minced
1½ tsp. finely chopped fresh rosemary
½ tsp. kosher salt
freshly ground black pepper
1 tsp. lemon zest
2 T. extra virgin olive oil
4 lamb chops, thick cut
Combine the garlic, rosemary, salt, pepper, lemon zest, and olive oil in a medium sized covered container. Add the lamb chops and turn them in the marinade so that all of the surface of the meat has been introduced to the marinade. Cover and place on your counter for a couple of hours, or if marinating longer, say overnight, place in the fridge. Bring to room temperature before grilling.
Grill the lamb chops on medium heat for 6-9 minutes, or until the internal temperature reads no more than 125-degrees. (For medium rare.)
Remove from grill, tent with aluminum foil, and let rest for 5 minutes before serving.