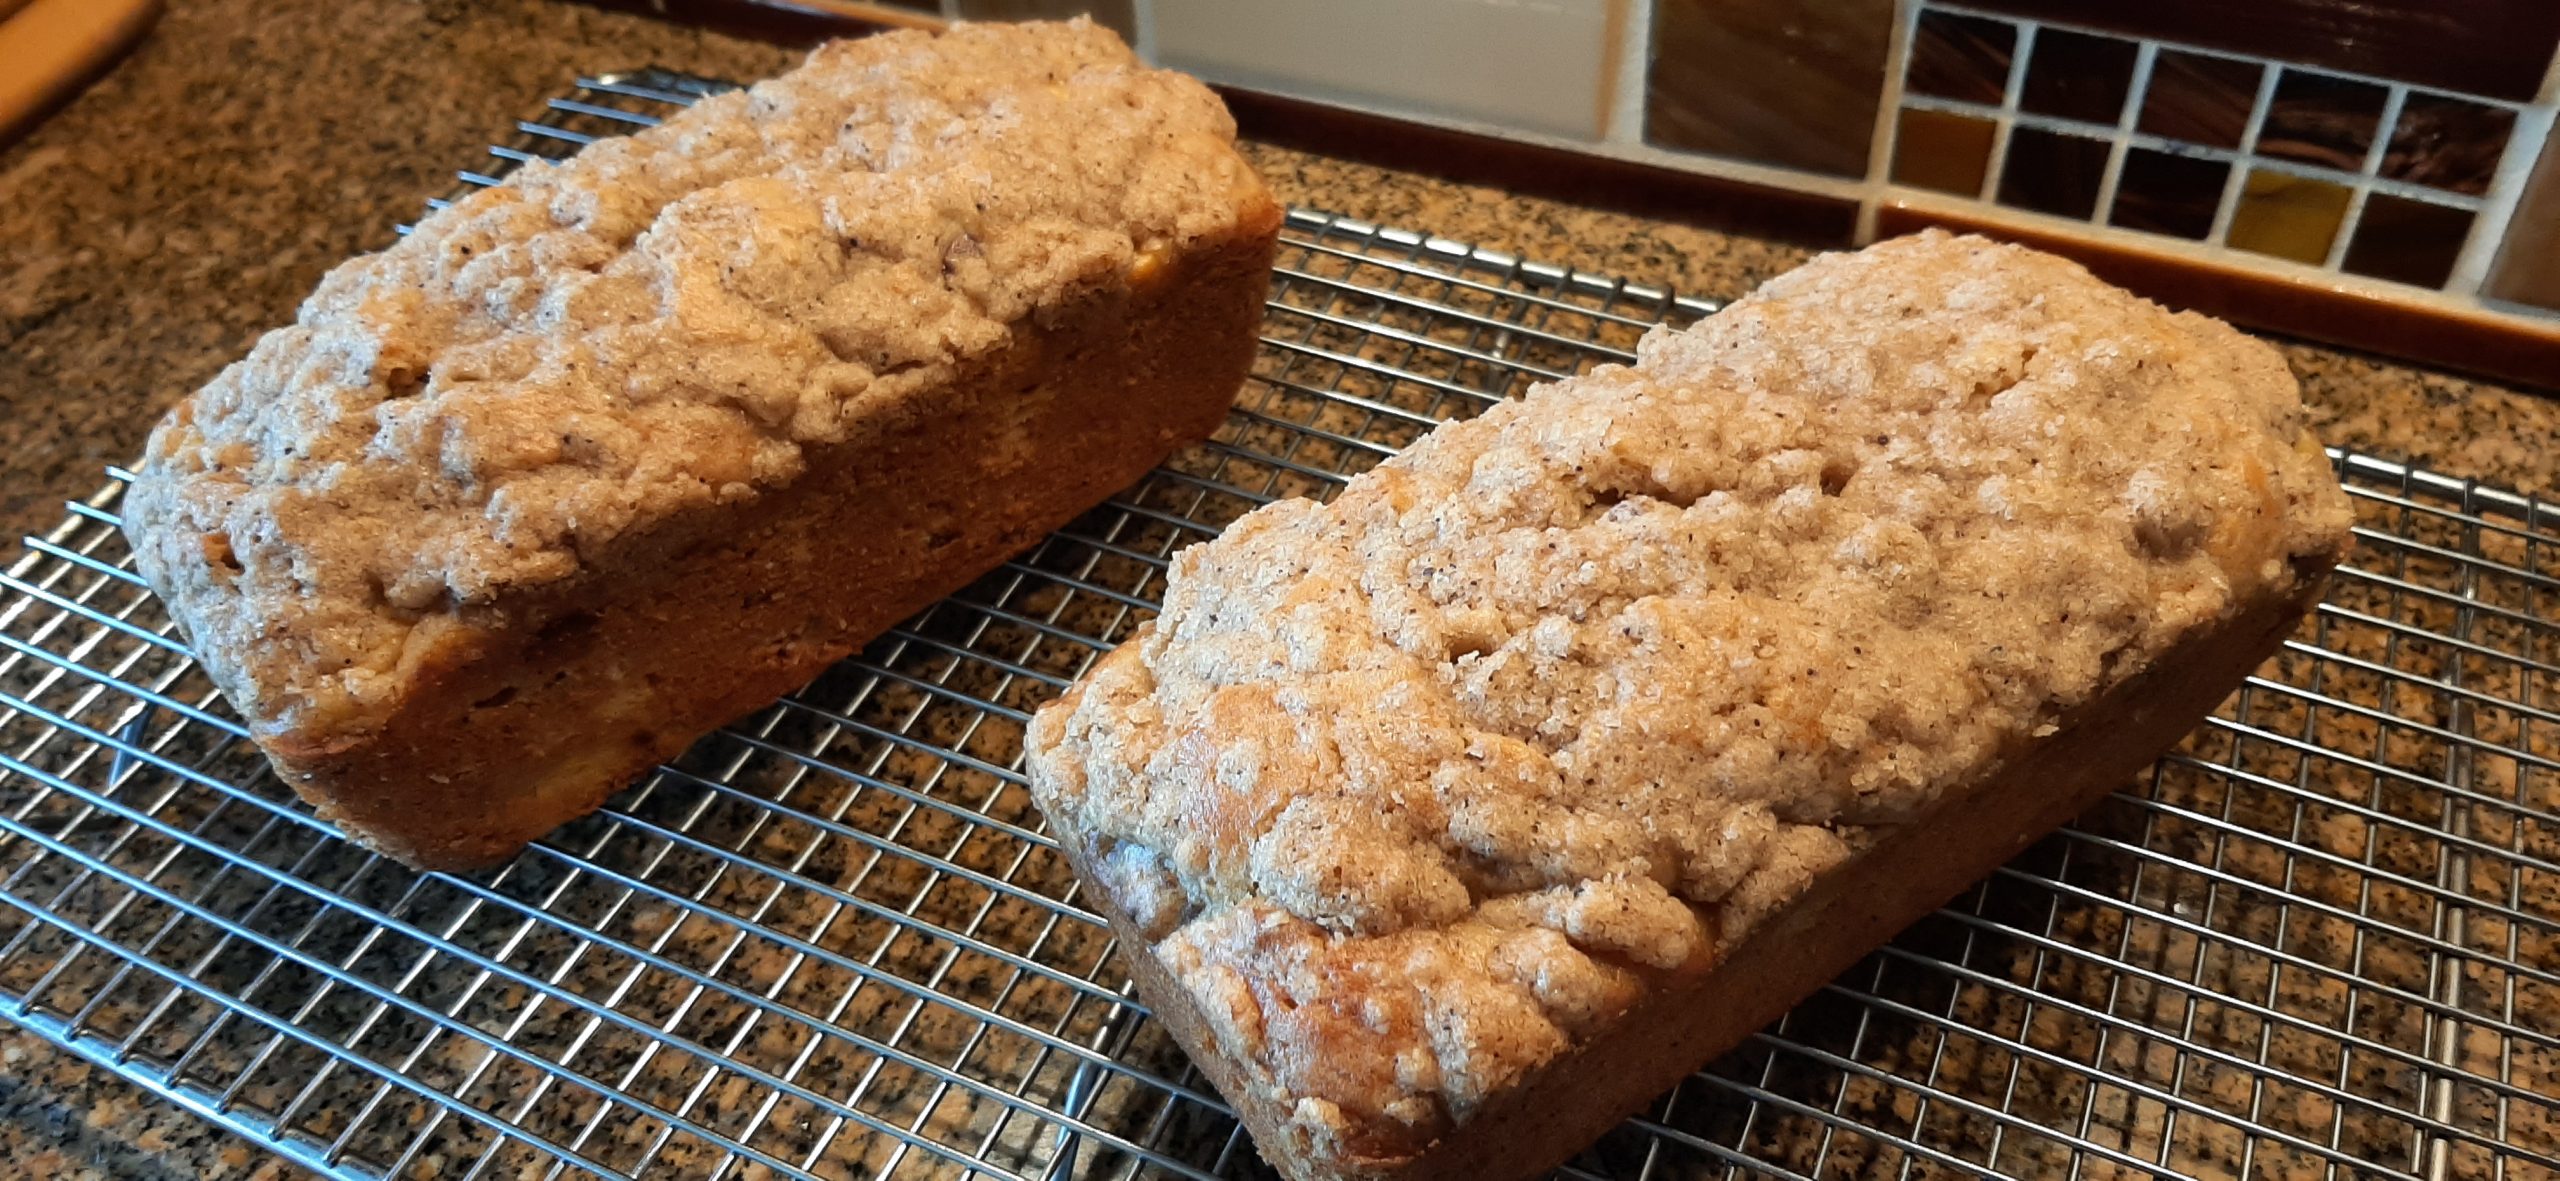
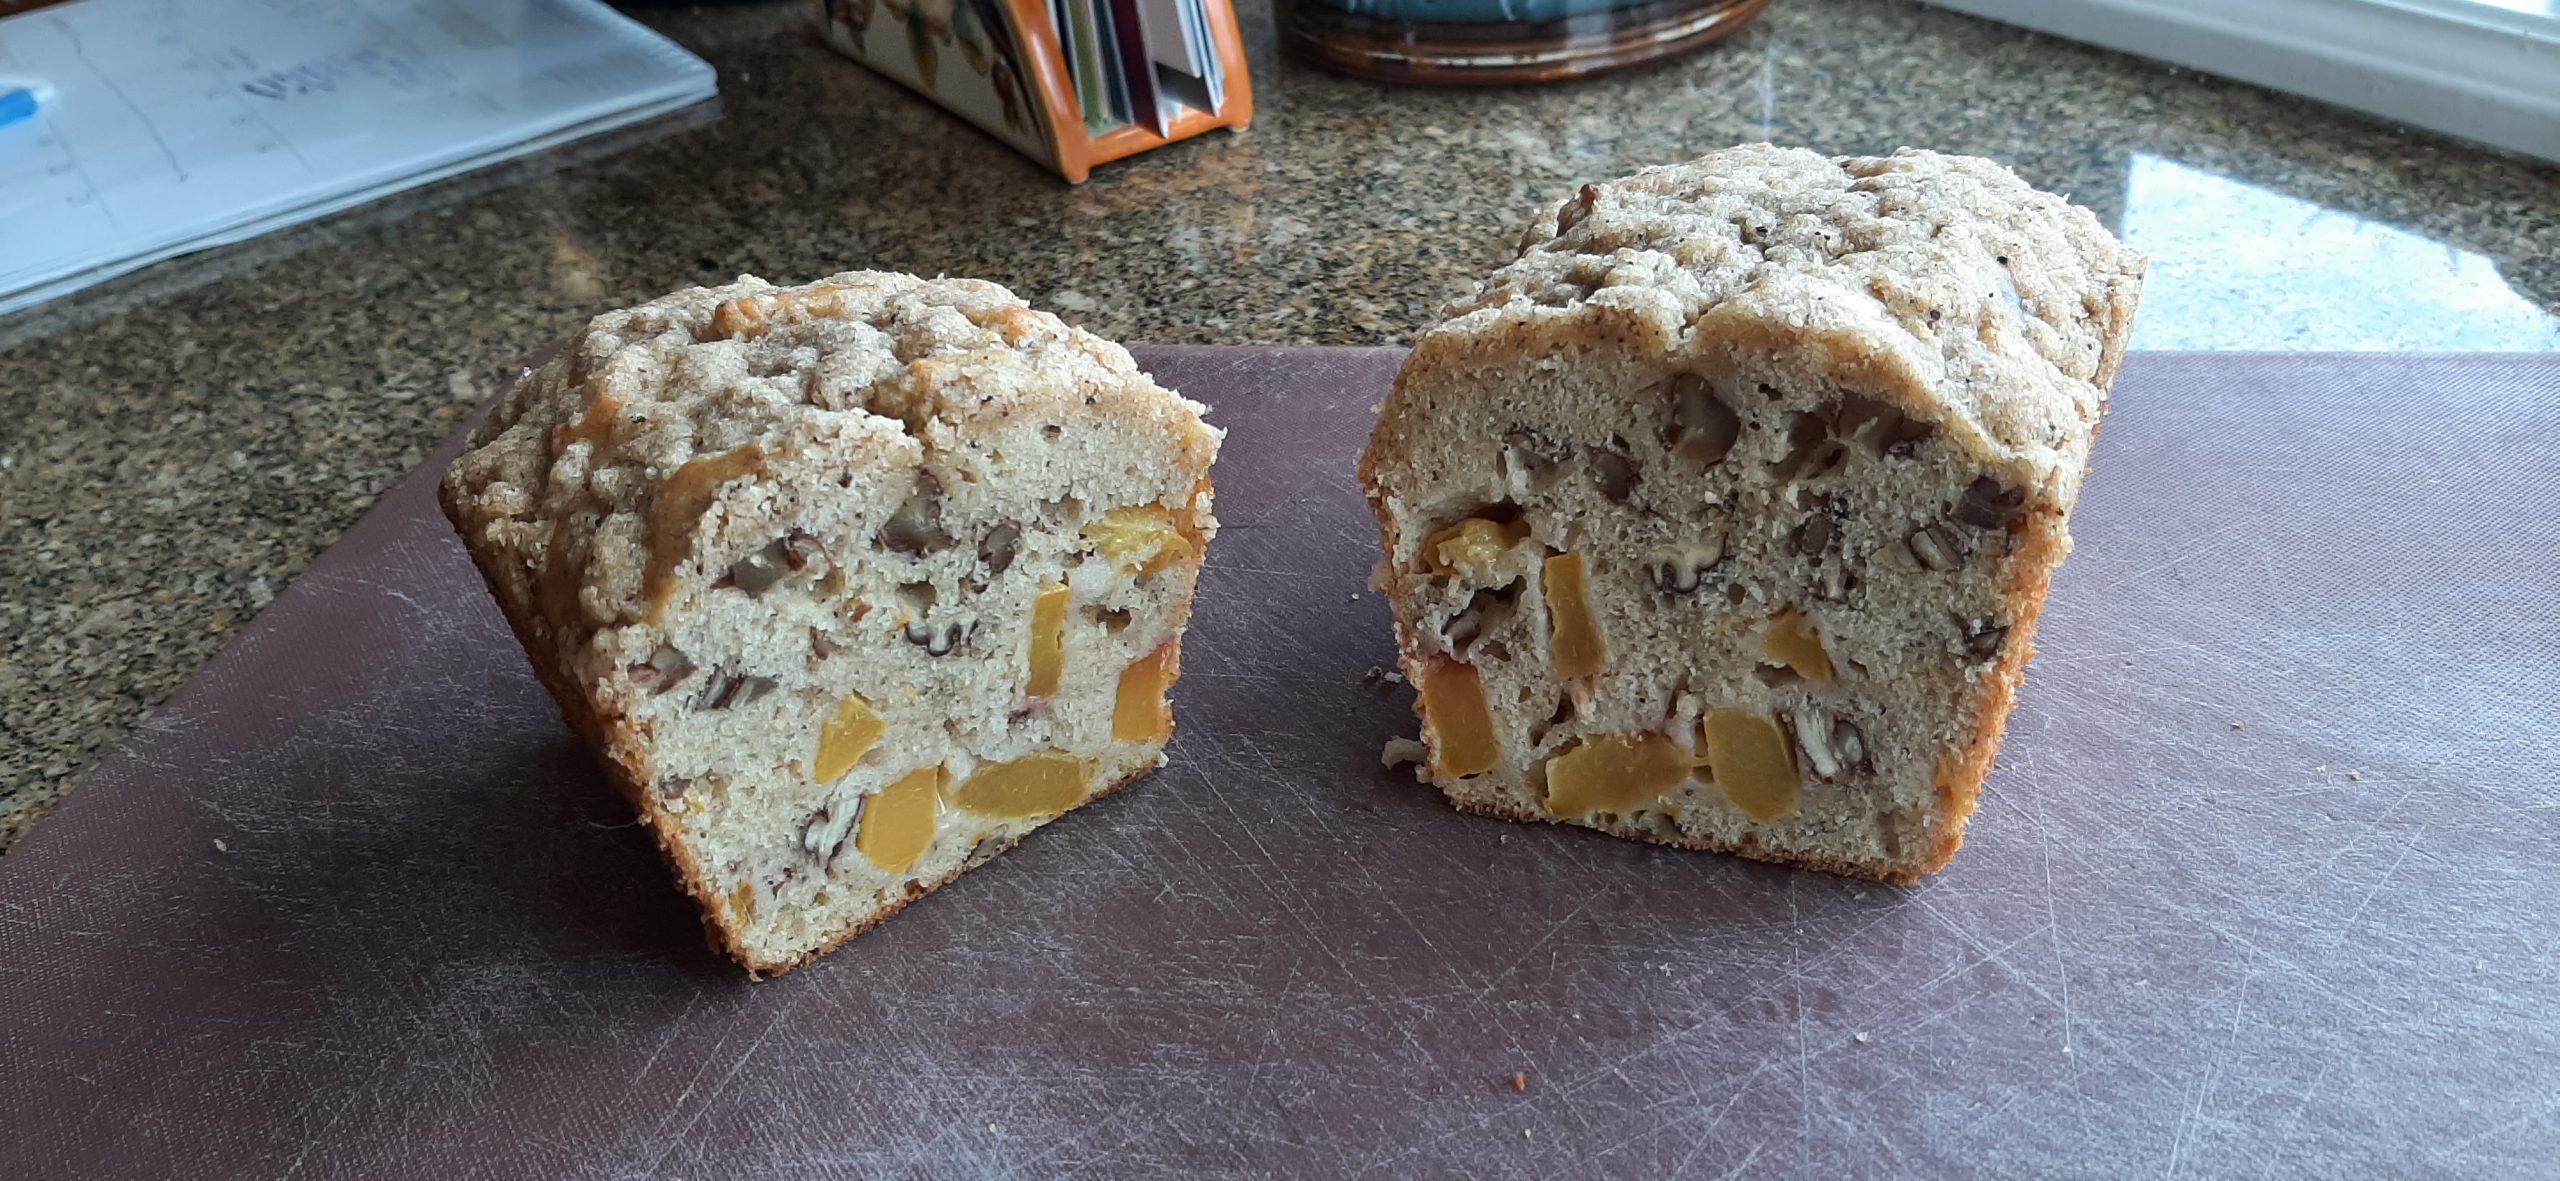
Well, while I still had a few of the fresh peaches Mr. C. brought home the other day, I decided to make a peach quick bread for our upcoming trailer trip. (I like to have tasty baked breakfast treats tucked away in our trailer freezer so that I can make each breakfast a bit different than the one I served the day before.) And no, I had never thought to make a peach quick bread before I came up with this recipe. But after going online and reading several recipes for peach bread and cake, I came up with the recipe you find below.
And oh my, it was such a lovely surprise when it actually worked. But then, how can you go wrong with fresh peaches, pecans, and a bit of bourbon to bring the whole taste sensation together?
So, if you too love peaches, bourbon, and a quick bread that is sweet, but not too sweet, then give this recipe a try. The bread is moist and very flavorful and easy to pull together. Who could ask for anything more?
Well, Labor Day is over and it’s back to school for all the kids in our neighborhood. And I’m sure I heard a big sigh of relief this morning from all the parents for whom the summer had been plenty long enough, thank you very much! I know if it had been my kids going back to school, I probably would have gone outside and joined the celebration. Not that I didn’t love my little darlings, but I would have taken it for granted that they would be safe and cared for at school. If only that were the case today. Today I would wonder if my kids really were safe at school. Cared for by their teachers – yes. Safe – not so much.
I can only hope that in my lifetime there will be action taken to help everyone in our society be safe. That mere condolences and prayers after a mass shooting, for example, become a thing of the past. That action replaces complacency (forget which political party you represent), compassion replaces greed (does any one person actually need billions of dollars), and that people start to work together for the common good. (I know this will never happen, but an old gal can dream.)
So, while I’m dreaming, I wish nothing for you but love and peace. (And a delicious quick bread in your future.)
For the crumb topping:
2 T. packed brown sugar
3 T. unbleached all-purpose flour
¼ tsp. ground cinnamon
2 T. unsalted butter, cold and cubed
Mix the brown sugar, flour, and cinnamon together. Add the cold butter and using a pastry cutter or fork, cut butter into the brown sugar mixture until pea-size crumbles form. Or dump the whole mess in a small food processor and whirl until chunks form.
Refrigerate until ready to use. (The colder the topping, the less likely it will sink into the bread while it is baking.)
For the bread:
⅓ c. granulated sugar
⅓ c. brown sugar
3 T. whole milk
1 T. bourbon (or more whole milk)
¼ c. canola oil
2 lg. eggs
2 c. unbleached all-purpose flour, fluffed
1 tsp. kosher salt
2 tsp. baking powder
½ tsp. ground cinnamon
1 c. pecans, coarsely chopped
2 lg. peaches, peeled, pitted, and cut into small chunks
In a large bowl, stir the sugars, milk, bourbon, oil, and eggs together. Whisk the flour, baking powder, and cinnamon together and add to the sugar mixture. (The batter will be quite thick.)
Carefully fold in the pecans and peaches until thoroughly blended.
Spoon the batter into 1 standard 9×5-inch loaf pan or 2 7-inch loaf pans that have been lightly greased and the bottom of the pan or pans lined with parchment paper.
Evenly top the dough with the cold crumb topping.
Bake in a pre-heated 350-degree oven for 50-60 minutes for a large pan or around 35 minutes for the smaller pans. Or until a pick inserted into the loaf or loaves comes out clean.
Remove from oven and allow to cool completely before slicing. (Don’t eat the parchment paper.)
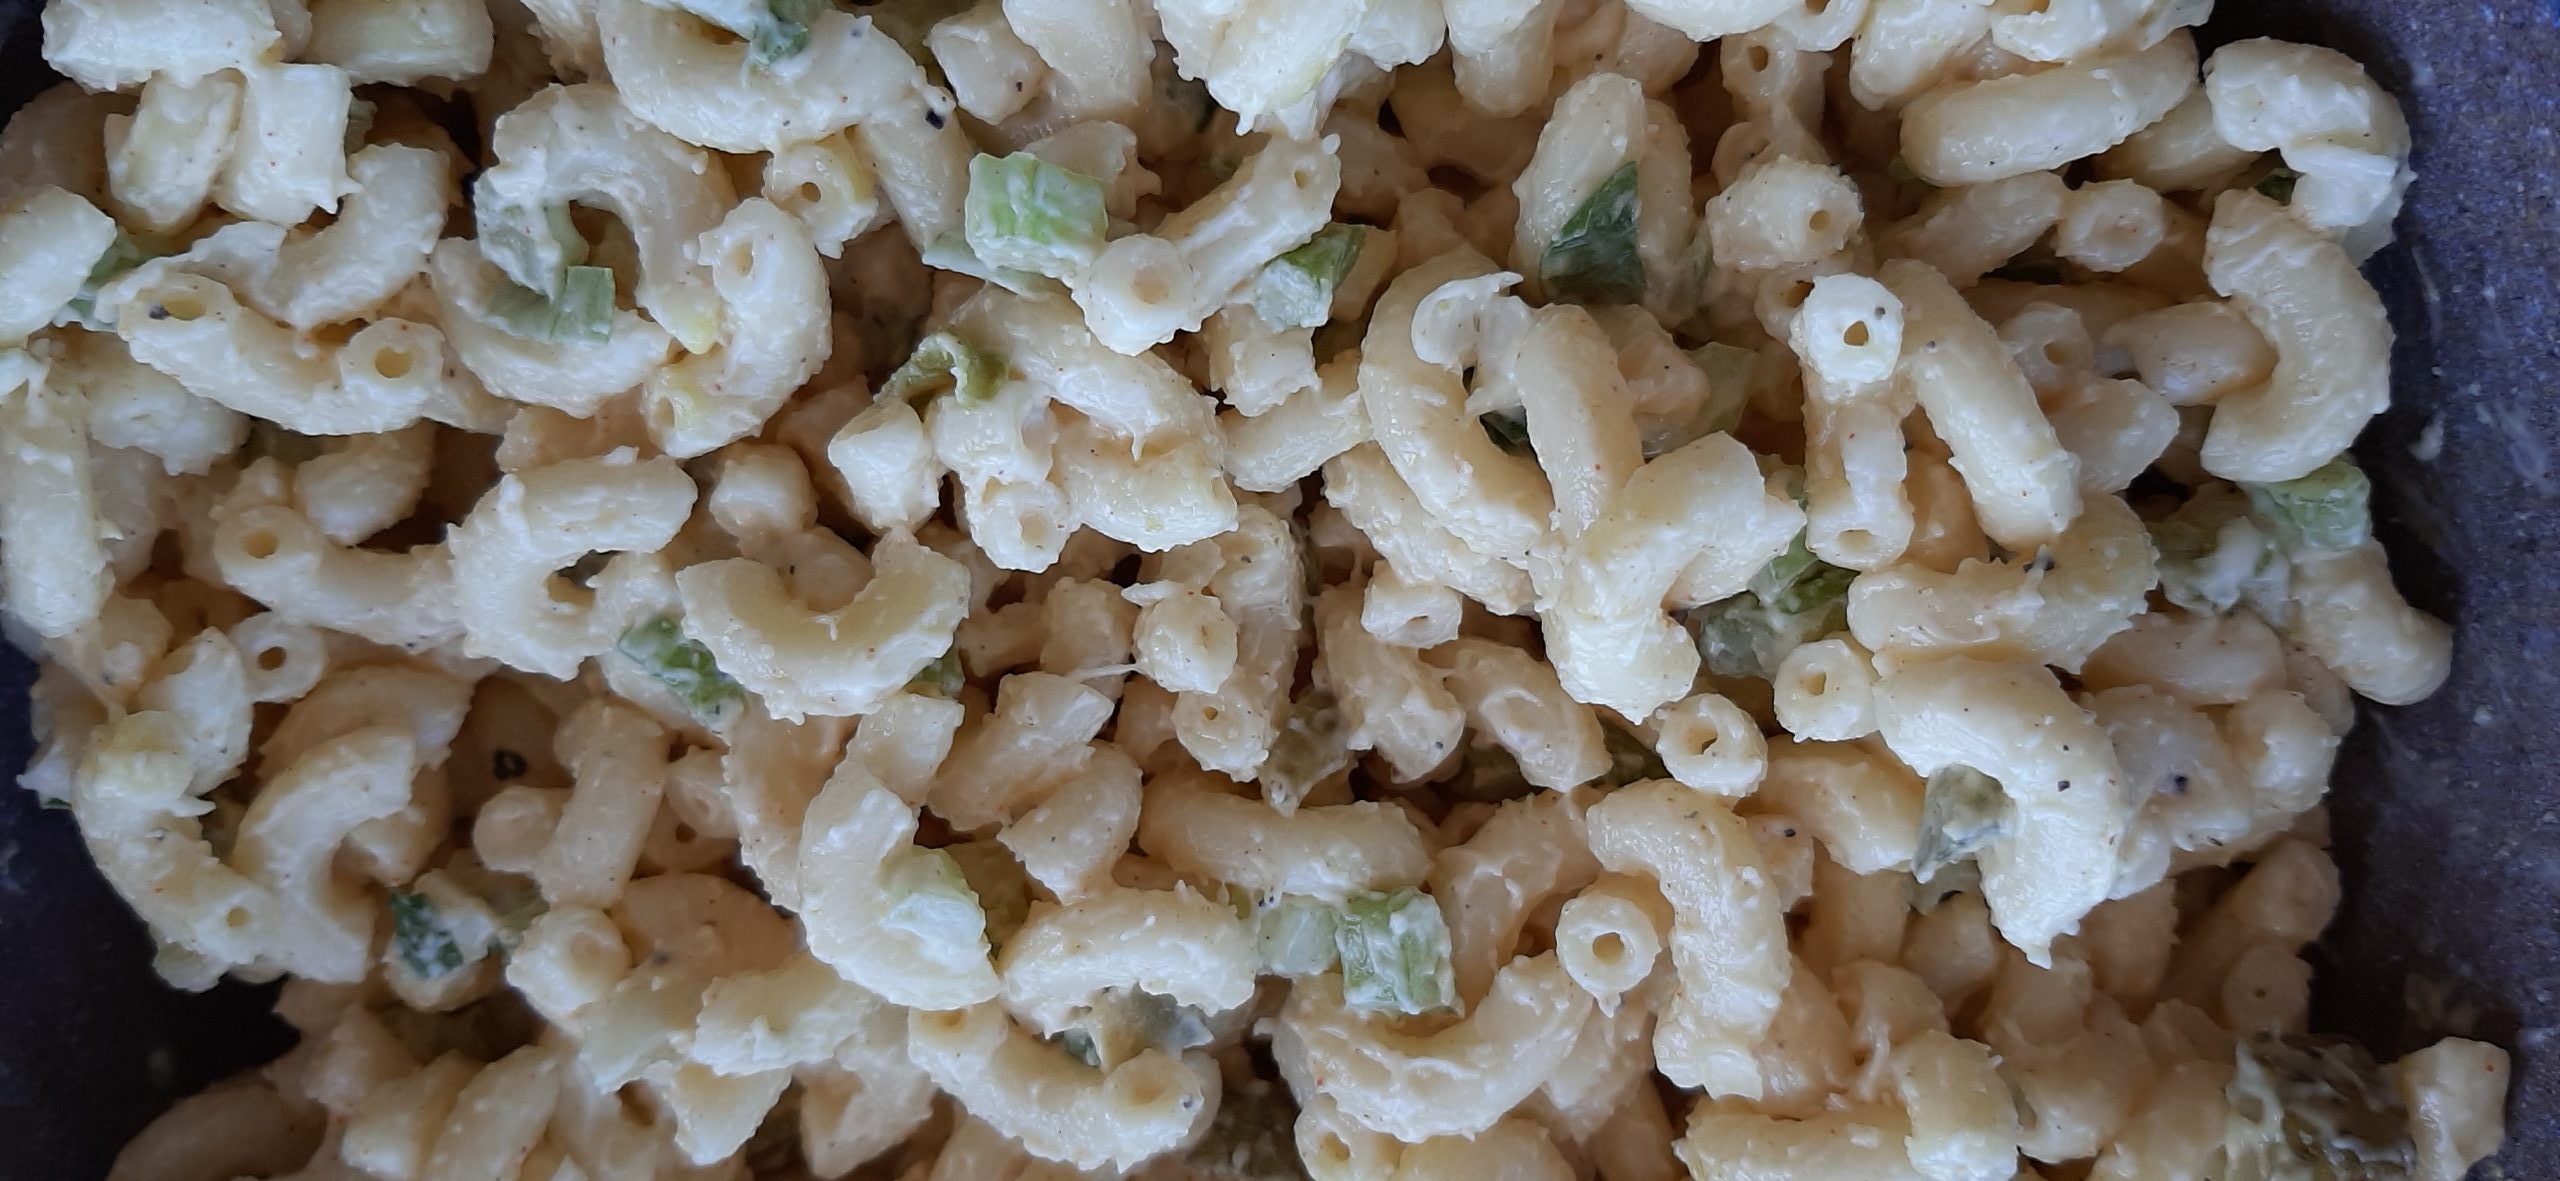
Yesterday I posted my recipe for Muffaletta Sandwiches. I included this salad recipe at the bottom of the post because I feel macaroni salad is the perfect side dish to serve with this classic New Orleans sandwich. But then I got to thinking; I really should post this recipe separately because a really tasty pasta salad is a hard thing to find.
It has been my experience that pasta salads, in general, are boring. They tend to lack flavor, crunch, and eye appeal. And I must admit, the salad I served the other evening fit the category of “lacking eye appeal” because I didn’t have a red onion on hand. But sometimes, you simply must go with what’s in your veggie larder. So, I used green onions instead of red onion because green onions were happily residing in my veggie crisper, and the closest red onion was marking time at our neighborhood IGA. (See how that works!)
So, the eye appeal could have been better. But the flavor and crunch were there in spades. And I could have added some fresh tomato for color, but I didn’t. Or some chopped pimento, but I didn’t have any. So, I went with what I had.
That’s the beauty of playing mad scientist in the kitchen. You can mix and match and sometimes come up with a new and better “whatever”. Of course, you can also blow the whole dish to hell. But as in this case, the appealing color factor was the only thing missing.
So, if you too love a good pasta salad, let me recommend this recipe. Also, my recipes entitled Pasta Salad, Veggie Macaroni Salad, Shrimp and Macaroni Salad, and Tuna Macaroni Salad are easy to make and delicious.
And because I so appreciate all the wonderful cooks who post their fantastic recipes that benefit all of us, many thanks to the southernbite.com site for this recipe. Slightly modified by me, of course.
Well, that’s it for today. Mr. C. is rehearsing for a gig this afternoon and playing at a gig this evening. I usually go along, but there are just those times when I need to stay home and play in the kitchen. Mr. C. brought home some lovely ripe peaches a couple of days ago. And if I don’t use them in the next couple of days, they will turn themselves into peach puree. So, why not tempt the fates by creating a recipe for a “crumble topped peachy bourbon-pecan quick bread”? So, that’s exactly what I am going to do after I post this recipe. Wish me luck!
Peace and love to all.
1 c. mayonnaise
1 T. yellow mustard
3 T. white vinegar (the old-fashioned kind)
1 tsp. granulated sugar
1 tsp. seasoned salt
freshly ground black pepper
½ tsp. granulated garlic
¼ tsp. granulated onion
½ c. finely chopped dill pickle
1 T. dill pickle juice
½ c. finely diced red onion* or green onion
½ c. finely diced celery (plus leaves)
3 c. uncooked small elbow macaroni, cooked al dente, drained and cooled by tap water
kosher salt, if needed
In a covered bowl, whisk the mayo, mustard, vinegar, sugar, seasoned salt, black pepper, granulated garlic, and granulated onion together. Then stir in the chopped dill pickle and pickle juice. Set aside.
Place the onion, celery, and cooked macaroni in a covered bowl. Add about 2/3rds of the dressing and toss to coat. Cover and refrigerate the pasta for at least 2 hours. (Refrigerate the remaining dressing too.)
When ready to serve, add remaining dressing and toss to coat. Taste and add kosher salt if needed.
*If you use diced red onion, before adding it to the rest of the ingredients, give it a bath for about 15 minutes in ice water. This will reduce the “bite” that is often associated with red onion. Be sure to drain and pat the diced onion dry with a paper towel before adding it to the salad.
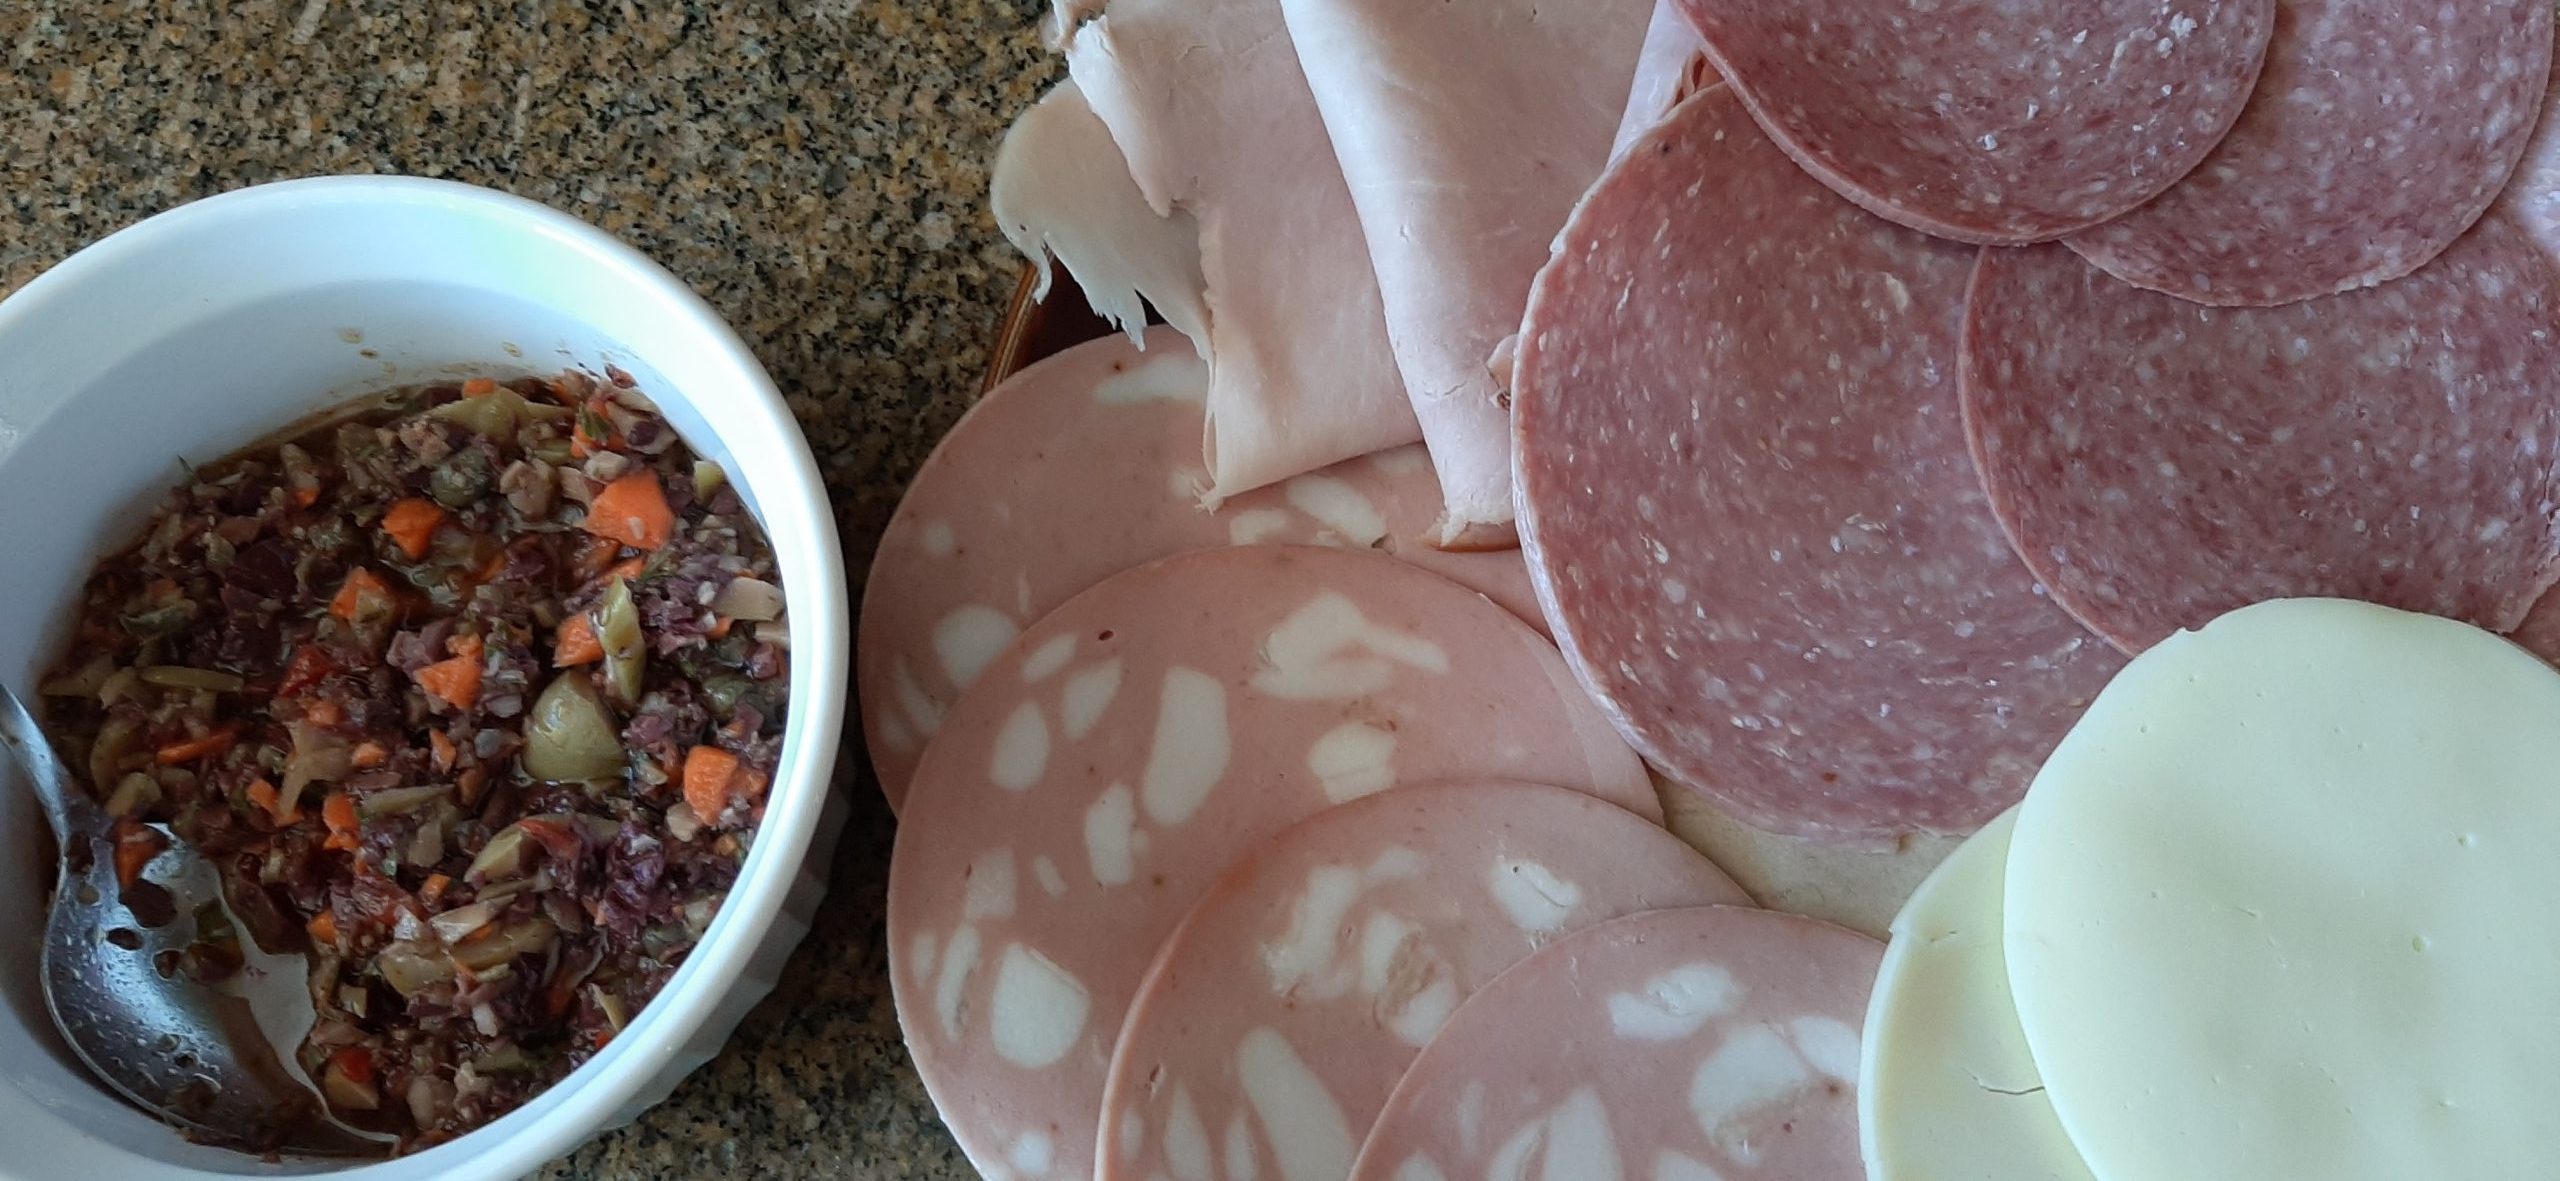
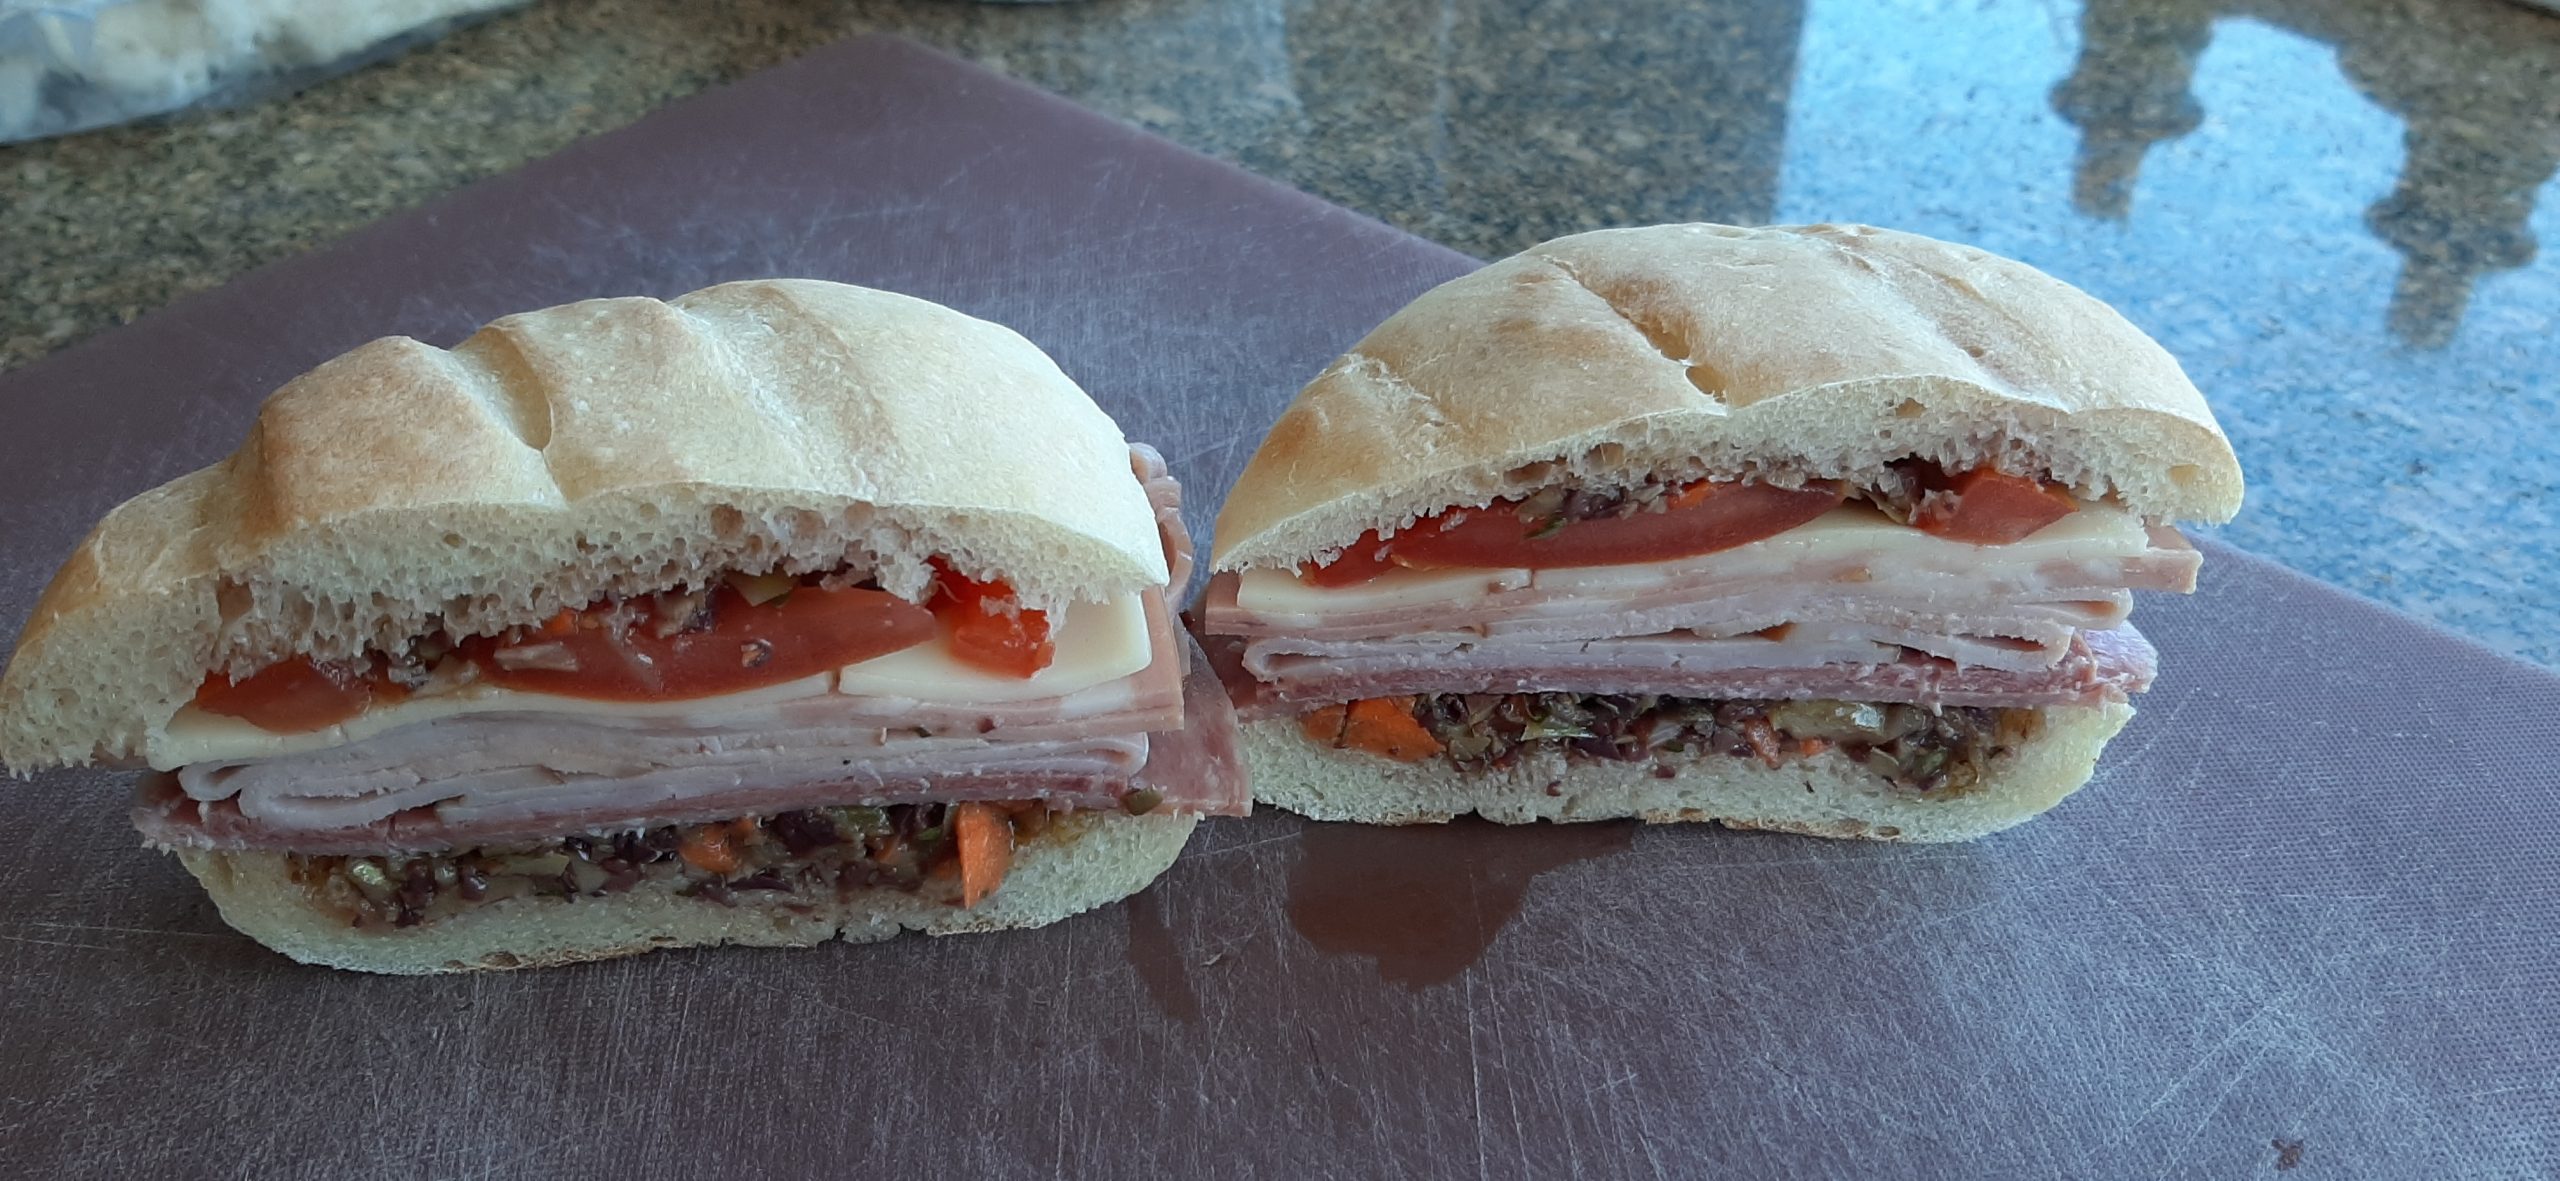
The olive and veggie “salad” and assorted meats and provolone cheese.
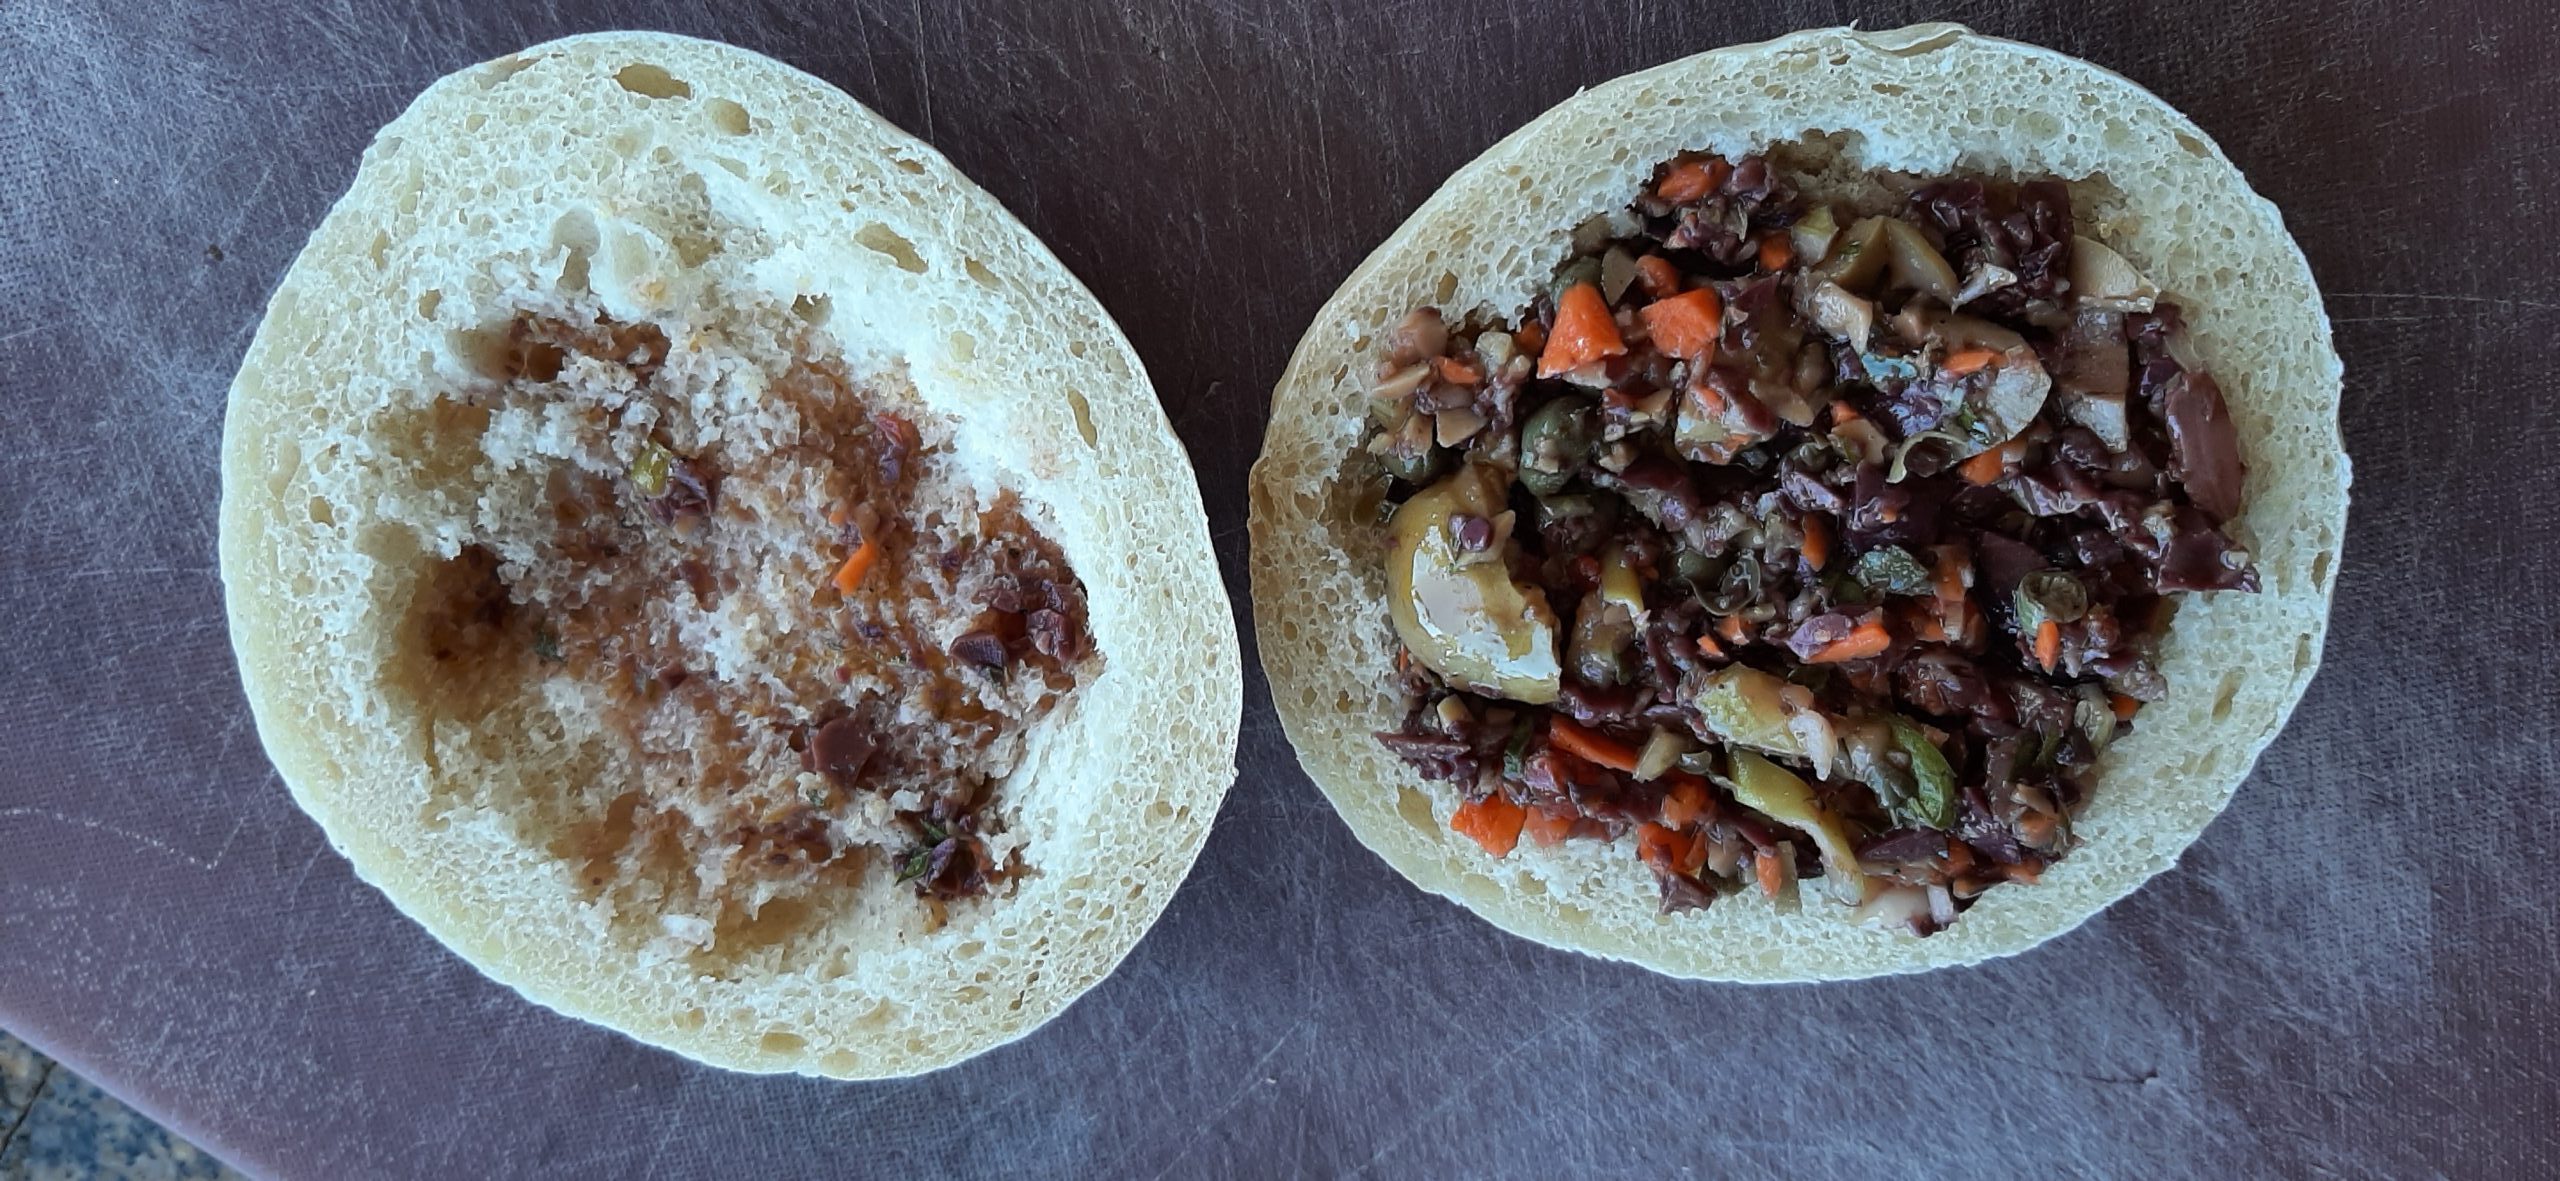
The top with a bit of olive oil and the bottom filled with “salad”.
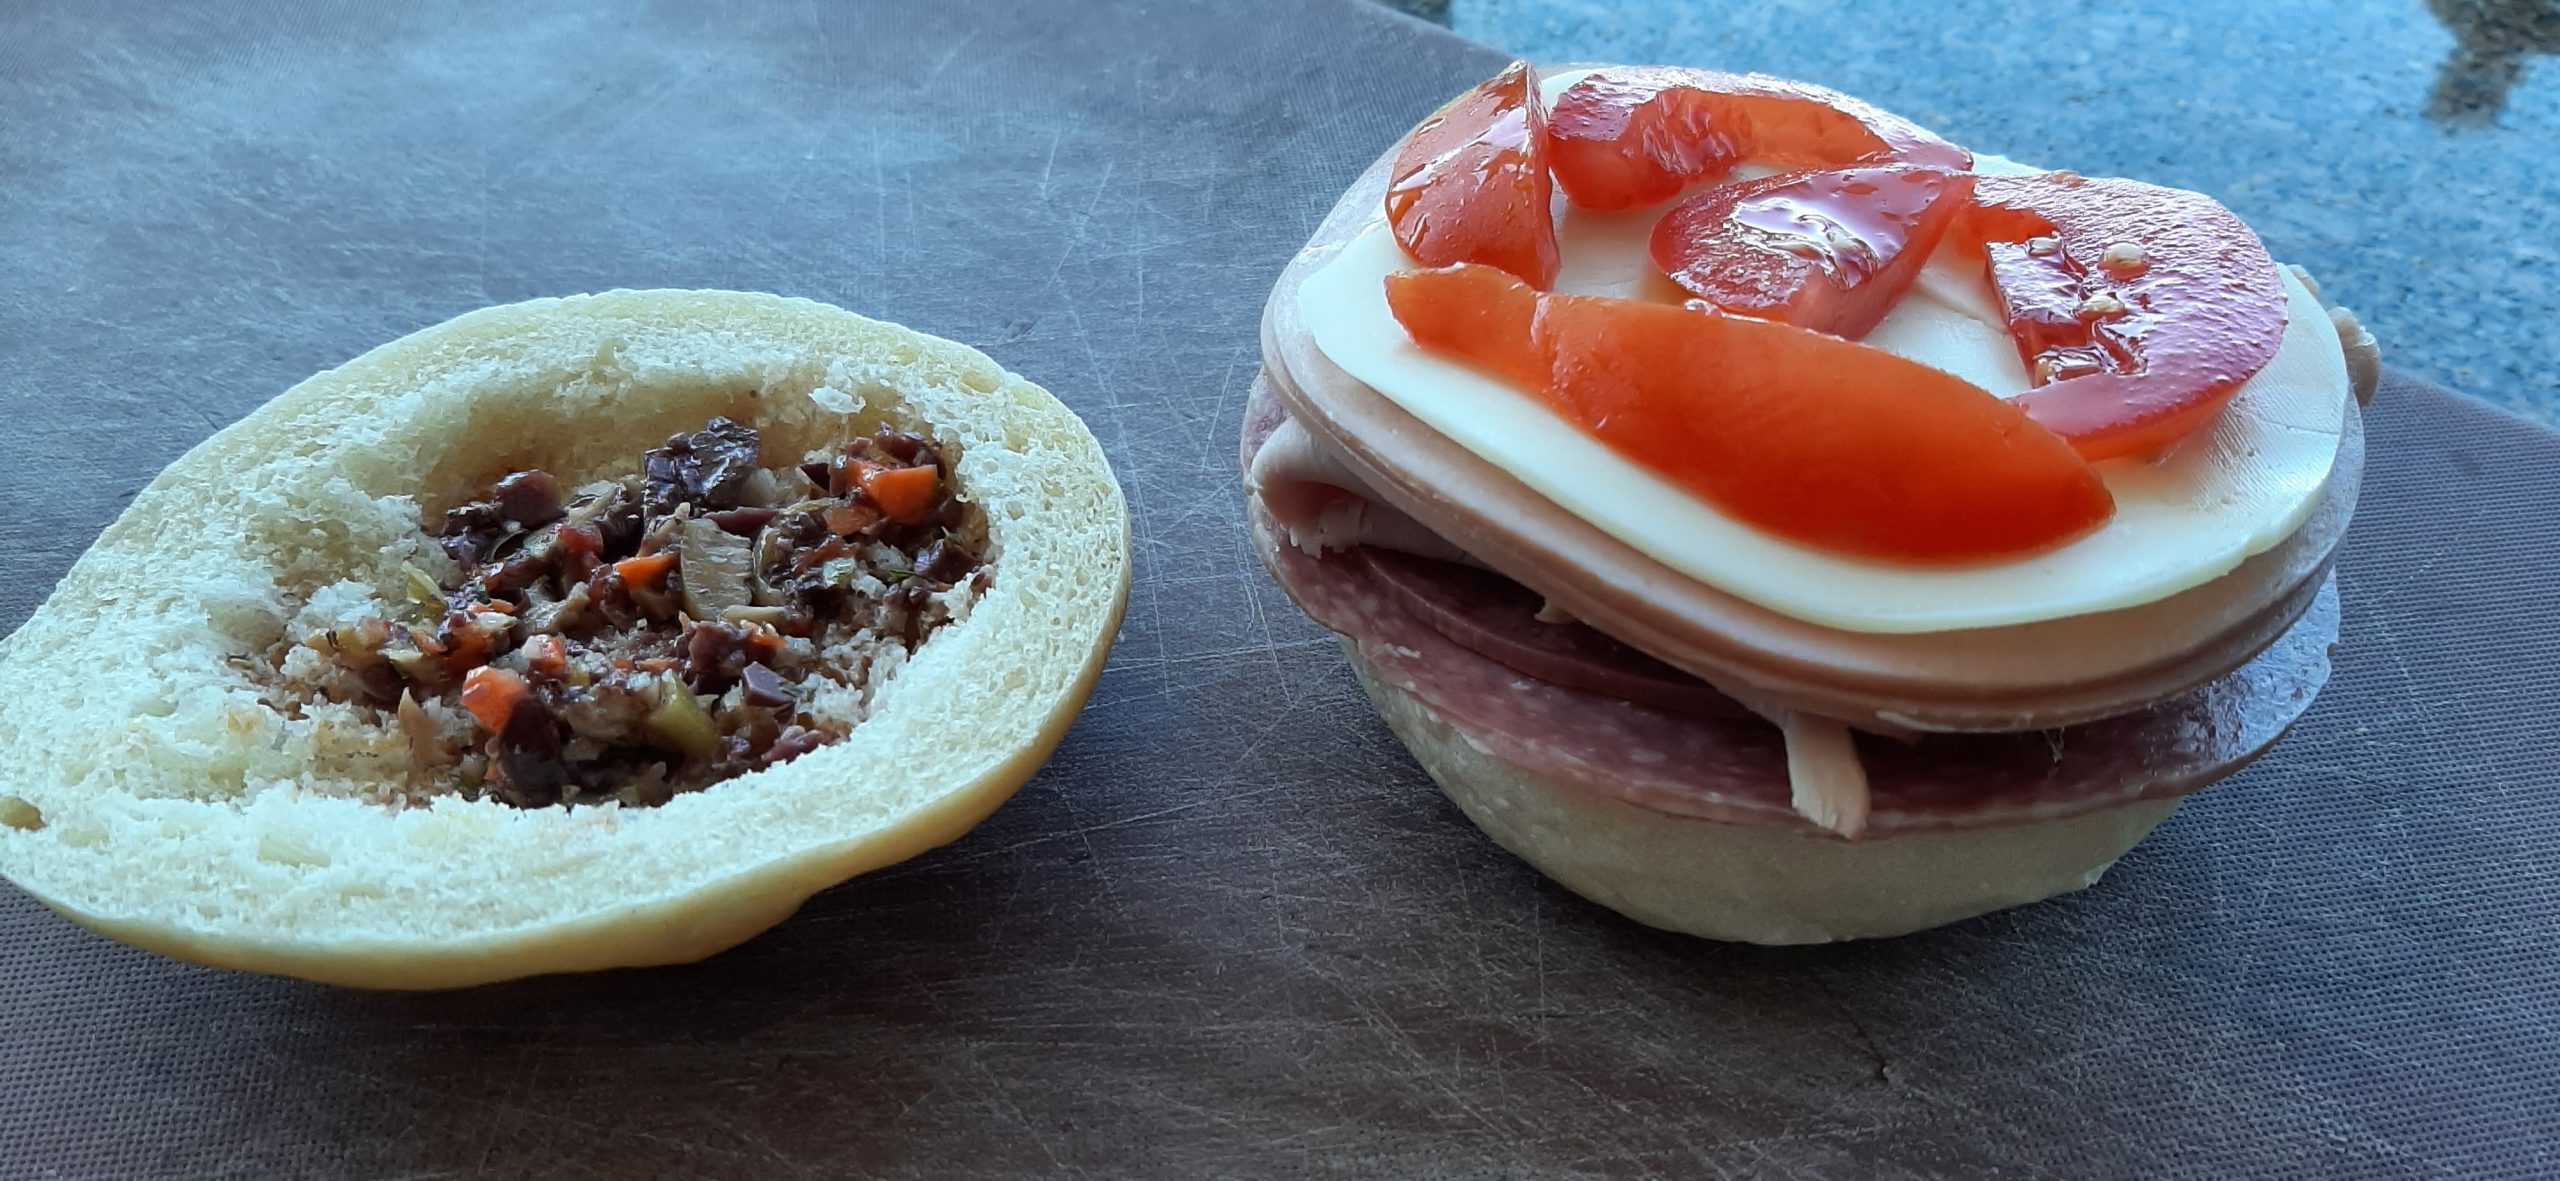
Add the meat, cheese, and tomato and the sandwich is ready to be put together.
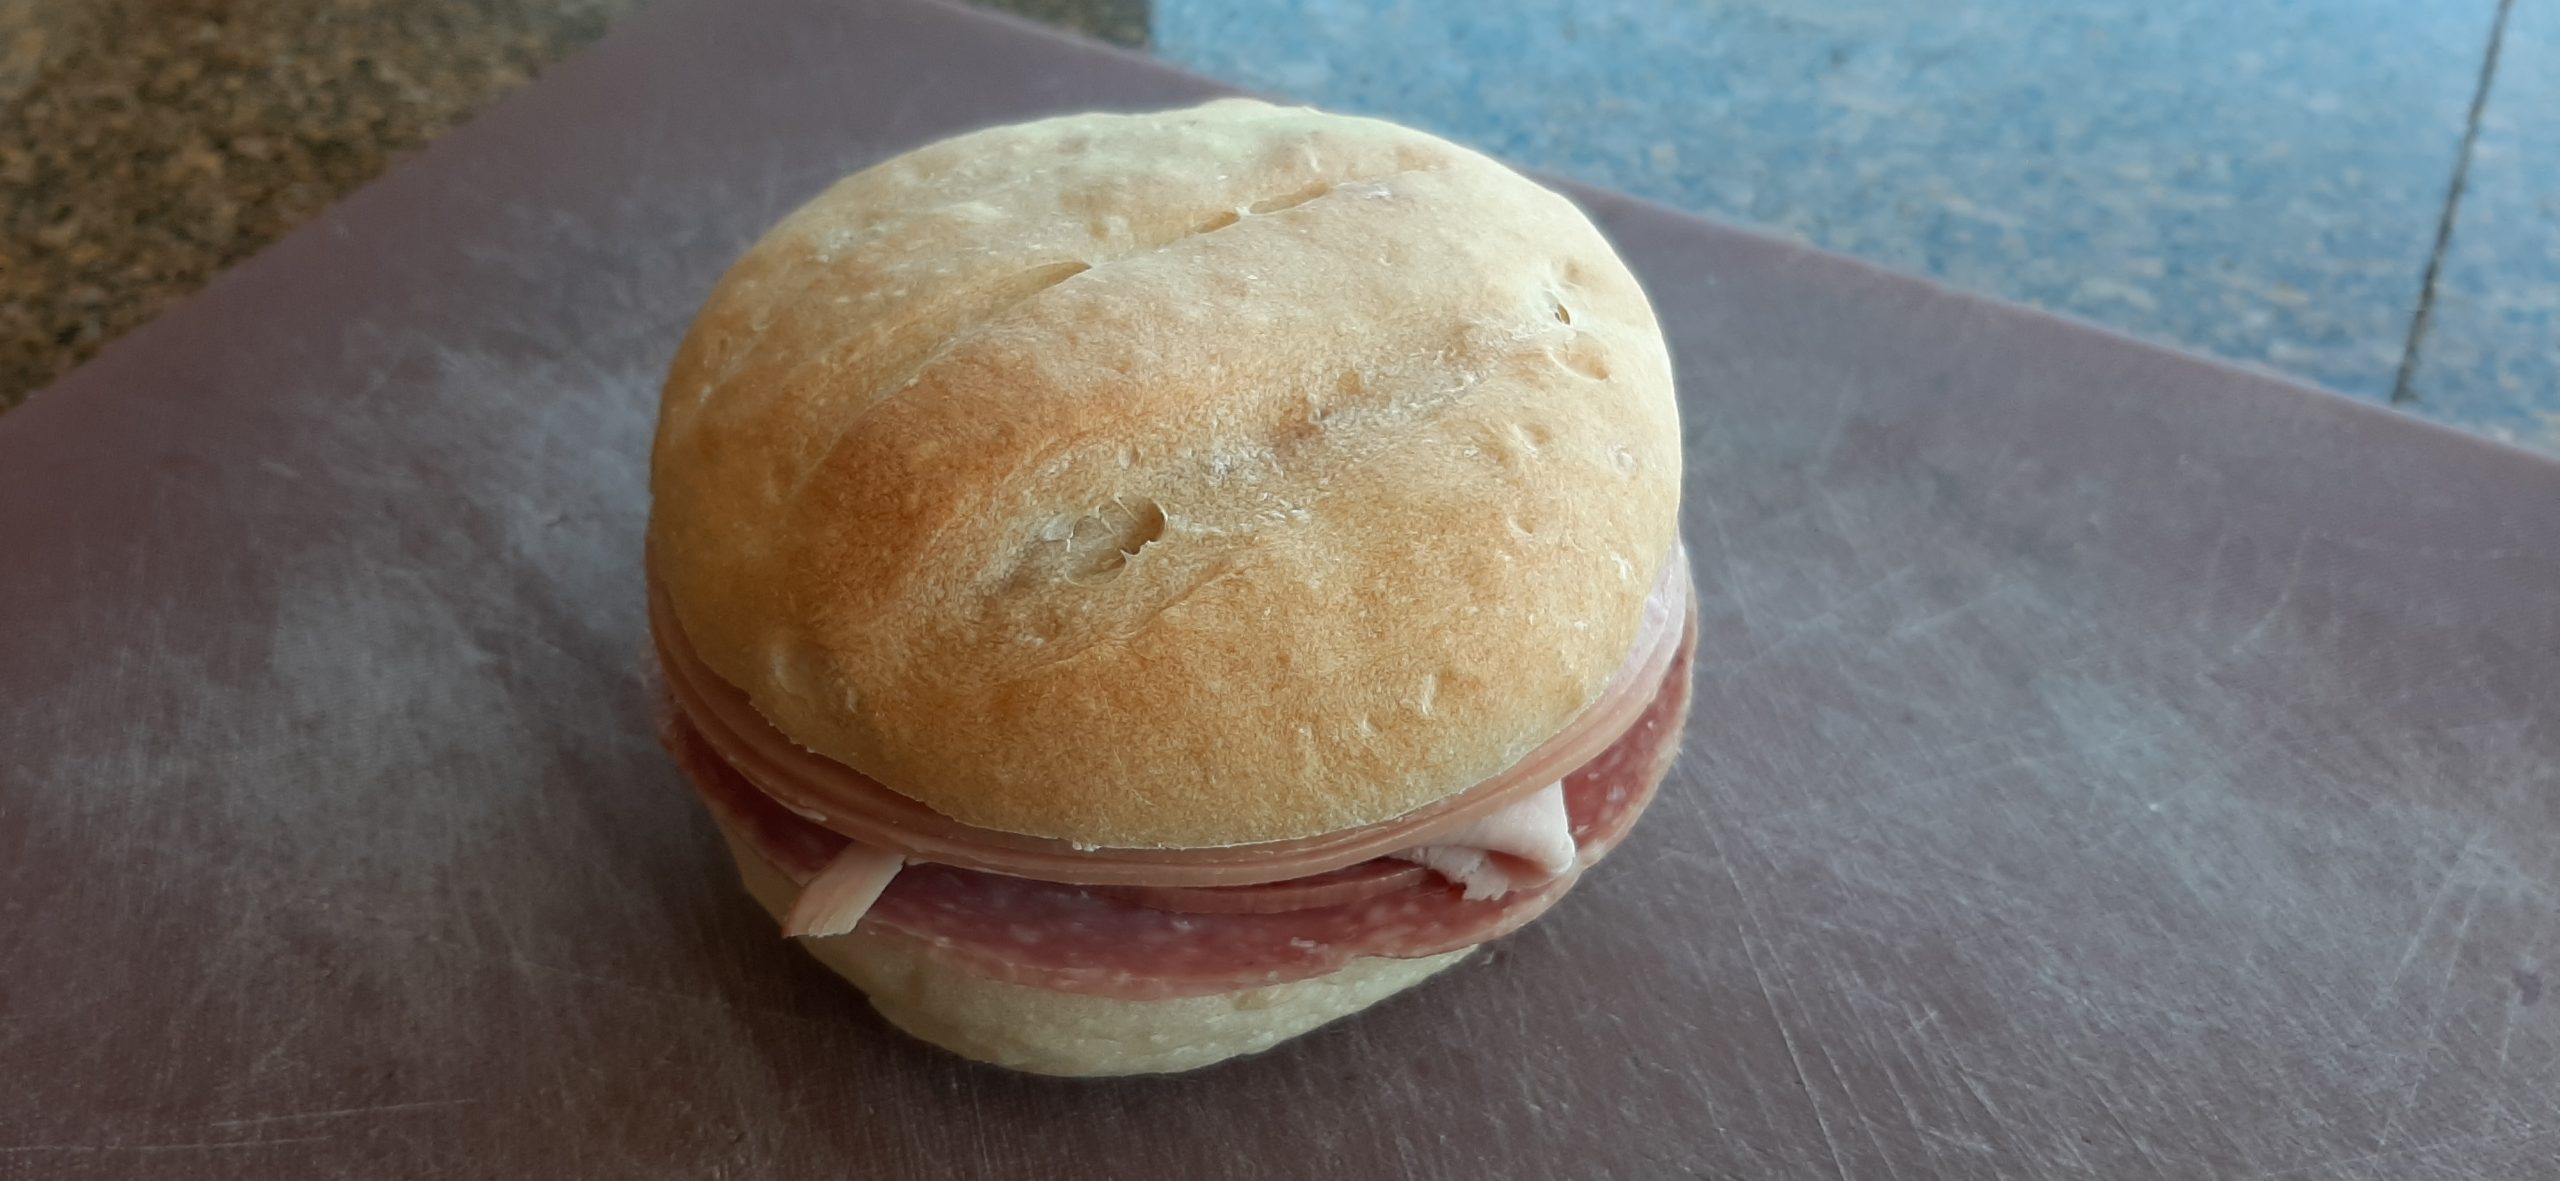
All together now, all together now…… (FEEL FREE TO SING ALONG)
Two halves of a whole.
Sorry about all the pictures. But in the case of this sandwich, I thought pictures would be better than a thousand words.
Several years ago, we joined our dear friends Dick and Eloise for a mini vacation to the great city of New Orleans for Mardi gras. We spent 10 days in this amazing city attending parades, eating as much great food as our tummies could accommodate, and of course listened to terrific jazz in small hole-in-the-wall cafes, famous eating establishments, and funky bars so dark you wondered if you had stumbled into a jazz infused spelunking adventure filled with really interesting (think kinda scary) critters.
And frankly, had we not been staying with Dick and Eloise’s son John, DIL Carol, and kidlets in their big, beautiful home, the entire trip would probably not have been such a wonderful experience. Because there’s only so much fun I can handle before I just want to bury my head under a pillow. So, staying in a hotel near the center of all the noise and 24-hour partying might have been more than I could handle. But since we had the great opportunity to stay in a private home, we enjoyed the heck out of our visit to “The Big Easy”.
And as I mentioned above, part of the reason we enjoyed New Orleans so much was the food. On one memorable occasion, Mr. C. and I took a walk around the neighborhood where we were staying and found a small corner market/deli that advertised “great muffaletta sandwiches made to order” or some such phraseology. Never ones to shirk our responsibility to embrace local cuisine, we wholehearted bought into the whole Creole/Cajun/Southern/Italian food scene. And OMG, we were immediately hooked on this famous Italian sandwich invented in New Orleans featuring cured meats, provolone cheese, olive and veggie salad, and great bread.
So, if you too would like to have a taste of what New Orleans has to offer in the way of fantastic food, then give this sandwich a try.
And if you ever get the opportunity to visit New Orleans, try as much of the local cuisine and listen to as much jazz as your body and soul can handle. Because N’awlins is the birthplace of jazz. And the jazz performers in New Orleans are top drawer. And while you are listening to these fabulous musicians, eat everything in sight.
For additional recipes that might take you back to or introduce you to some of the types of dishes you might experience in New Orleans and environs, go to the “Categories” area on this site and search under “Creole/Cajun Recipes”.
Well, that’s all I have to say today. Except of course, peace and love to all.
For the olive and veggie salad:
2/3 c. extra virgin olive oil, or more if needed
¼ c. red wine vinegar
1 c. pitted kalamata olives, chopped
¾ c. pimento-stuffed green olives, chopped
¼ c. chopped pepperoncini
2 garlic cloves, finely minced
2 T. drained capers, roughly chopped
2 T. finely chopped fresh parsley
½ c. finely chopped celery
¾ c. finely chopped carrot
1 tsp. dried oregano
freshly ground black pepper
Combine all ingredients in a glass container with a lid. If the olive oil doesn’t cover all the chopped ingredients, add a bit more until all is covered. Refrigerate until needed. Best made at least a day ahead.
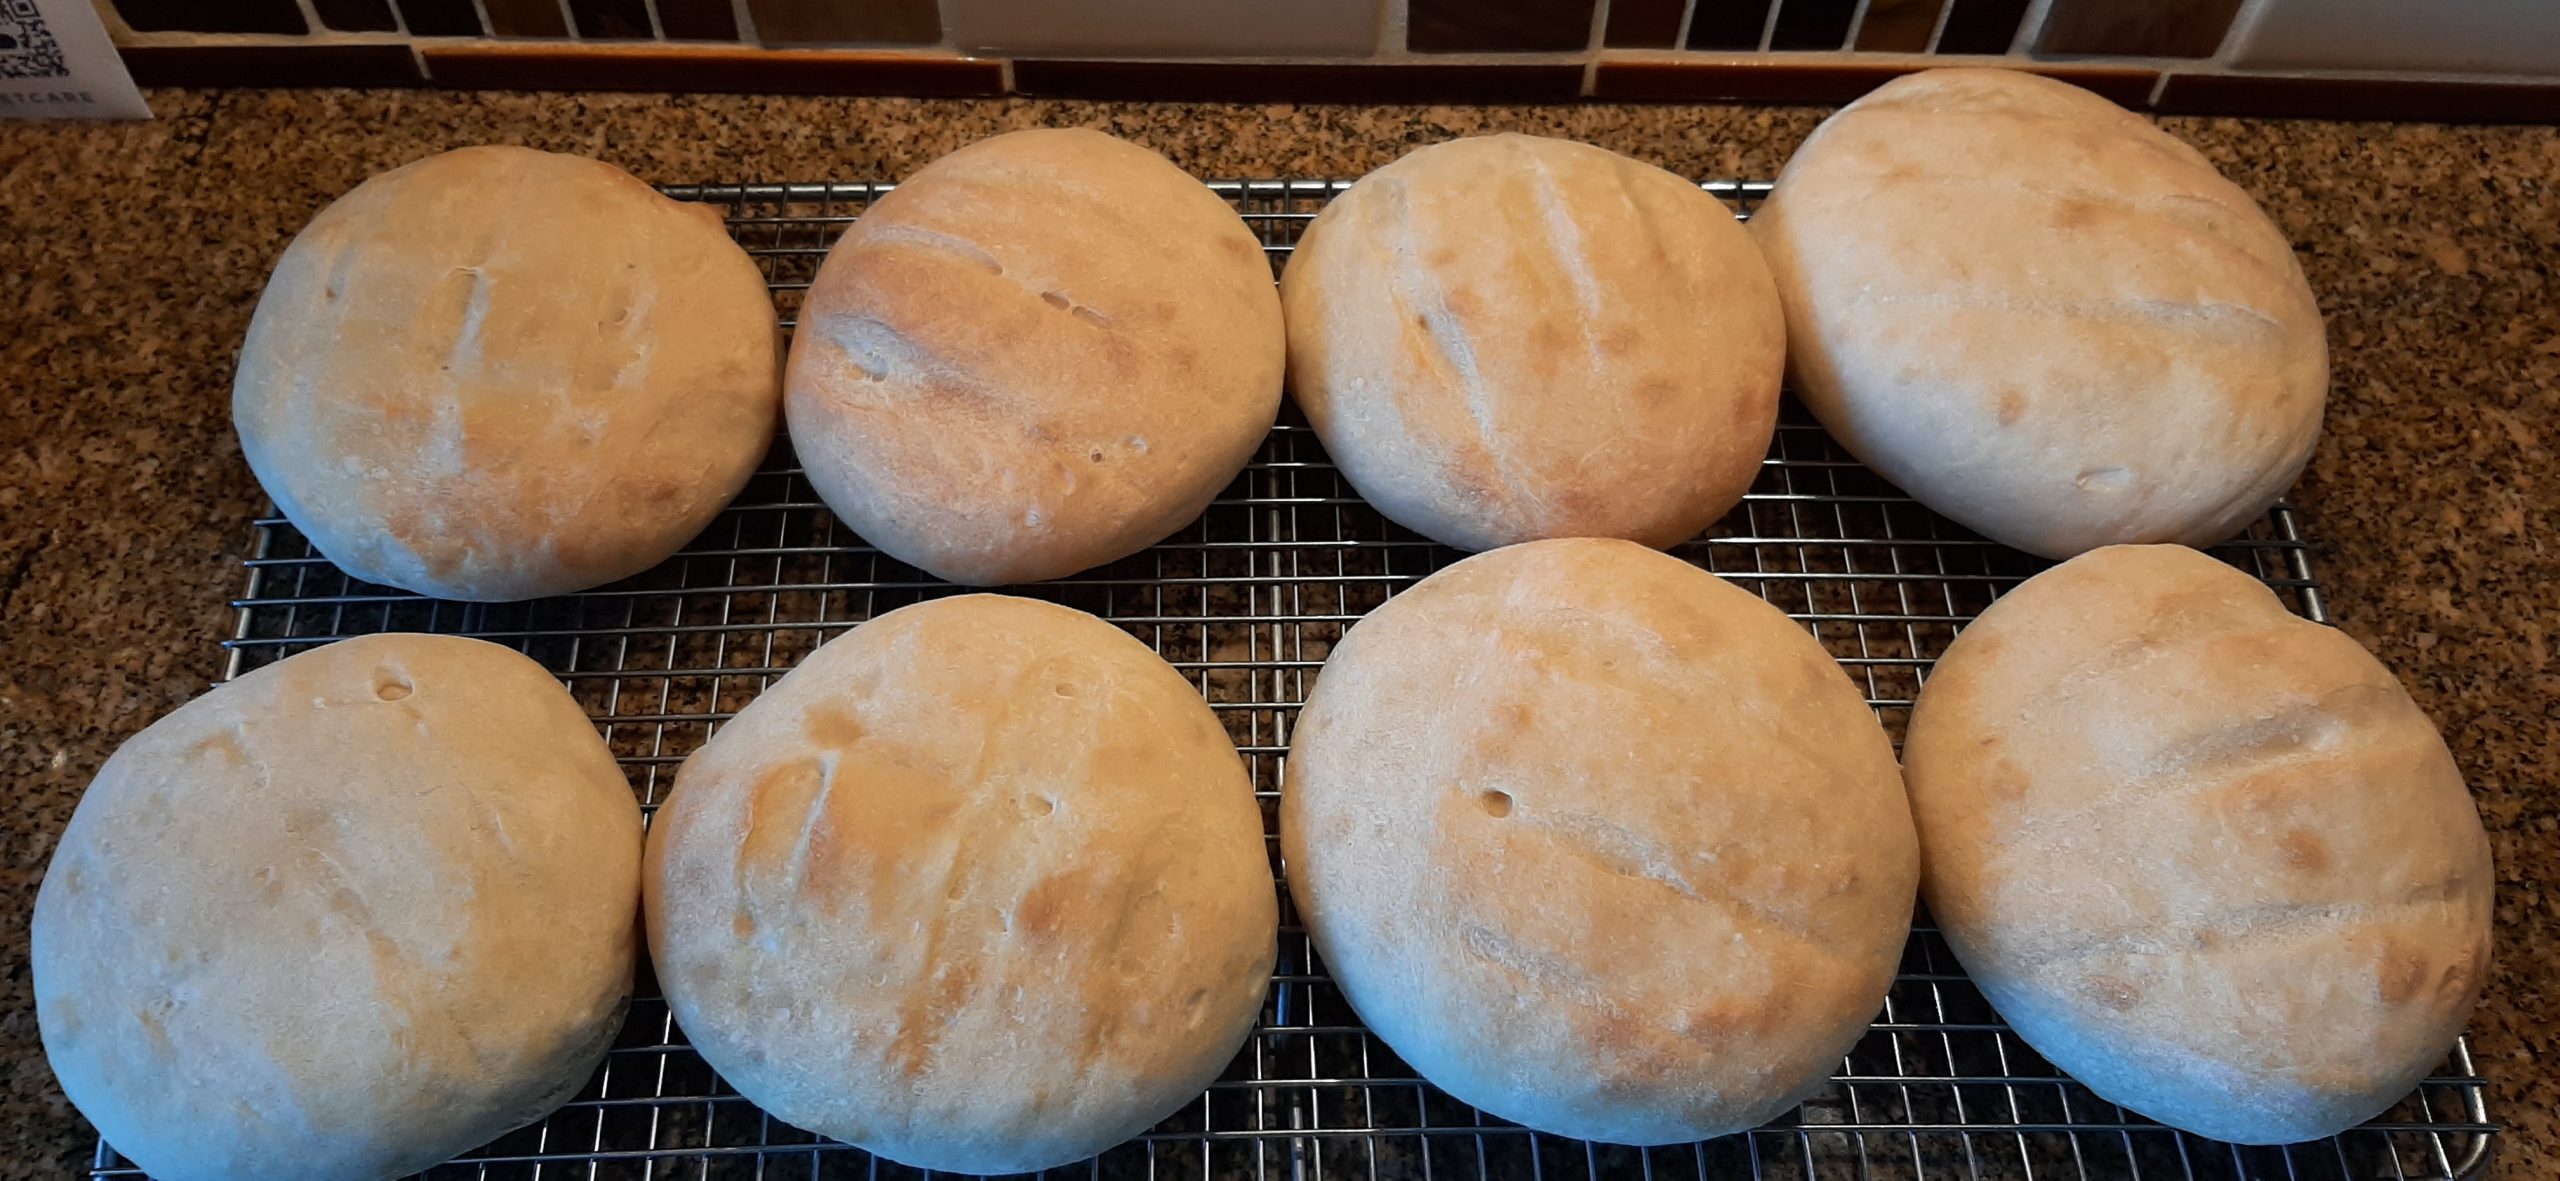
For 8 homemade individual round flat dinner rolls:
2¼ c. warm water
1 T. instant yeast
1 tsp. granulated sugar
1½ tsp. fine sea salt
5¼ c. unbleached all-purpose flour (more or less)
olive oil
In the bowl or your stand mixer, combine the water, yeast, and sugar. Ignore for 5 minutes.
Add the salt and a bit less than 5 cups of the flour. Mix with your bread hook until a soft dough has formed. Add additional flour as needed. (There should be a bit of dough hanging out on the bottom of the bowl. That’s what you want.)
Pour a bit of olive oil in the mixing bowl and using your hands and a stiff spatula form a dough ball covered in oil.
Cover the bowl loosely with plastic wrap. Allow the dough to rise at room temperature for about 80 minutes or until doubled in size.
Place a bit of flour on a pastry cloth or clean kitchen counter. Transfer the bread dough onto the floured surface using a stiff spatula. Then flour your hands and form the dough into 2 large equal sized balls. Then divide each ball into 4 pieces. Form each piece into a fairly flat round roll. (Do not knead the dough or handle it more than necessary.)
Place the formed bread dough on top of a parchment paper lined baking sheet and using a serrated knife, gently carve 2-3 diagonal cuts on the top of each loaf.
Rest the formed dough while you fill an oven proof pan with 2-inches of water and place it on the ovens’ bottom rack. This will create steam that will help the crust become a bit hard as it bakes. Then set the oven to heat at 450-degrees.
Once the oven has come to temperature, transfer the bread to the middle rack of your oven.
Bake for about 13 minutes or until golden brown all over and the internal temperature reaches about 200-degrees.
Remove from oven and transfer the loaves to a cooling rack. Allow to cool completely before slicing the loaves in half crosswise.
To put the muffaletta sandwich together:
8 round flat dinner rolls*or a large Italian loaf of bread (unsliced)
¾ lb. deli sliced Genoa salami
¾ lb. deli sliced ham
¾ lb. deli sliced mortadella
¾ lb. deli sliced provolone cheese
thin tomato slices
For each roll, hollow out the bread halves by pulling out about half of the insides. If using a long loaf, cut crosswise and into about 2½-inch wide pieces and remove about half of the soft bread. (Hint: Do not throw this nice lovely soft bread away. Toast it in your oven for the next time you need plain breadcrumbs.)
Coat the inside of each roll or sliced loaf with the olive oil marinade from the veggie salad. (Place most of the marinade on the top half since the salad goes in the bottom half.)
Spoon salad into the bottom halves.
Layer the salami, ham, mortadella, and provolone evenly over the salad. Add the tomato slices and place the top half of bread firmly on the tomato slices.
Serve immediately, or cover sandwiches tightly with plastic wrap and place in your fridge for several hours. Muffaletta sandwiches can be served cold, at room temperature, or slightly warmed.
Great served with thick potato chips, Classic Southern Macaroni Salad (see recipe below), and a cold beer.
*I like to use round, flat dinner rolls because I can “capture” the filling better than if I use sections from a long loaf of bread. Just a personal preference.
CLASSIC SOUTHERN MACARONI SALAD – based on a recipe I found on the southernbite.com site
1 c. mayonnaise, or a bit more if needed
1 T. yellow mustard
3 T. white vinegar (the old-fashioned kind)
1 tsp. granulated sugar
1 tsp. seasoned salt
freshly ground black pepper
½ tsp. granulated garlic
¼ tsp. granulated onion
½ c. finely chopped dill pickle
1 T. dill pickle juice
½ c. finely diced red onion* or green onion
½ c. finely diced celery (plus leaves)
3 c. uncooked small elbow macaroni, cooked al dente, drained and cooled by tap water
kosher salt, if needed
In a covered bowl, whisk the mayo, mustard, vinegar, sugar, seasoned salt, black pepper, granulated garlic, and granulated onion together. Then stir in the chopped dill pickle and pickle juice. Set aside.
Place the onion, celery, and cooked macaroni in a covered bowl. Add about 2/3rds of the dressing and toss to coat. Cover and refrigerate the pasta for at least 2 hours. (Refrigerate the remaining dressing too.)
When ready to serve, add remaining dressing and toss to coat. Taste and add kosher salt if needed.
*If you use diced red onion, before adding it to the rest of the ingredients, give it a bath for about 15 minutes in ice water. This will reduce the “bite” that is often associated with red onion. Be sure to drain and pat the diced onion dry with a paper towel before adding it to the salad.
Last evening I served a N’awlins style dinner to our dear friends Margo and Jim, Phyliss and Tim, and of course Mr. C. and yours truly. I made homemade Muffaletta Sandwiches (recipe soon to be posted), Classis Southern Macaroni Salad (recipe also soon to be revealed, and Tim’s (different Tim) potato chips. And for dessert – a Triple Bourbon Chocolate Brownie Ice Cream Cake. Well, the brownie part was so hard it made the dessert very difficult to eat. Tasty enough, but suffice it to say, this dessert is now an official “work in progress”.
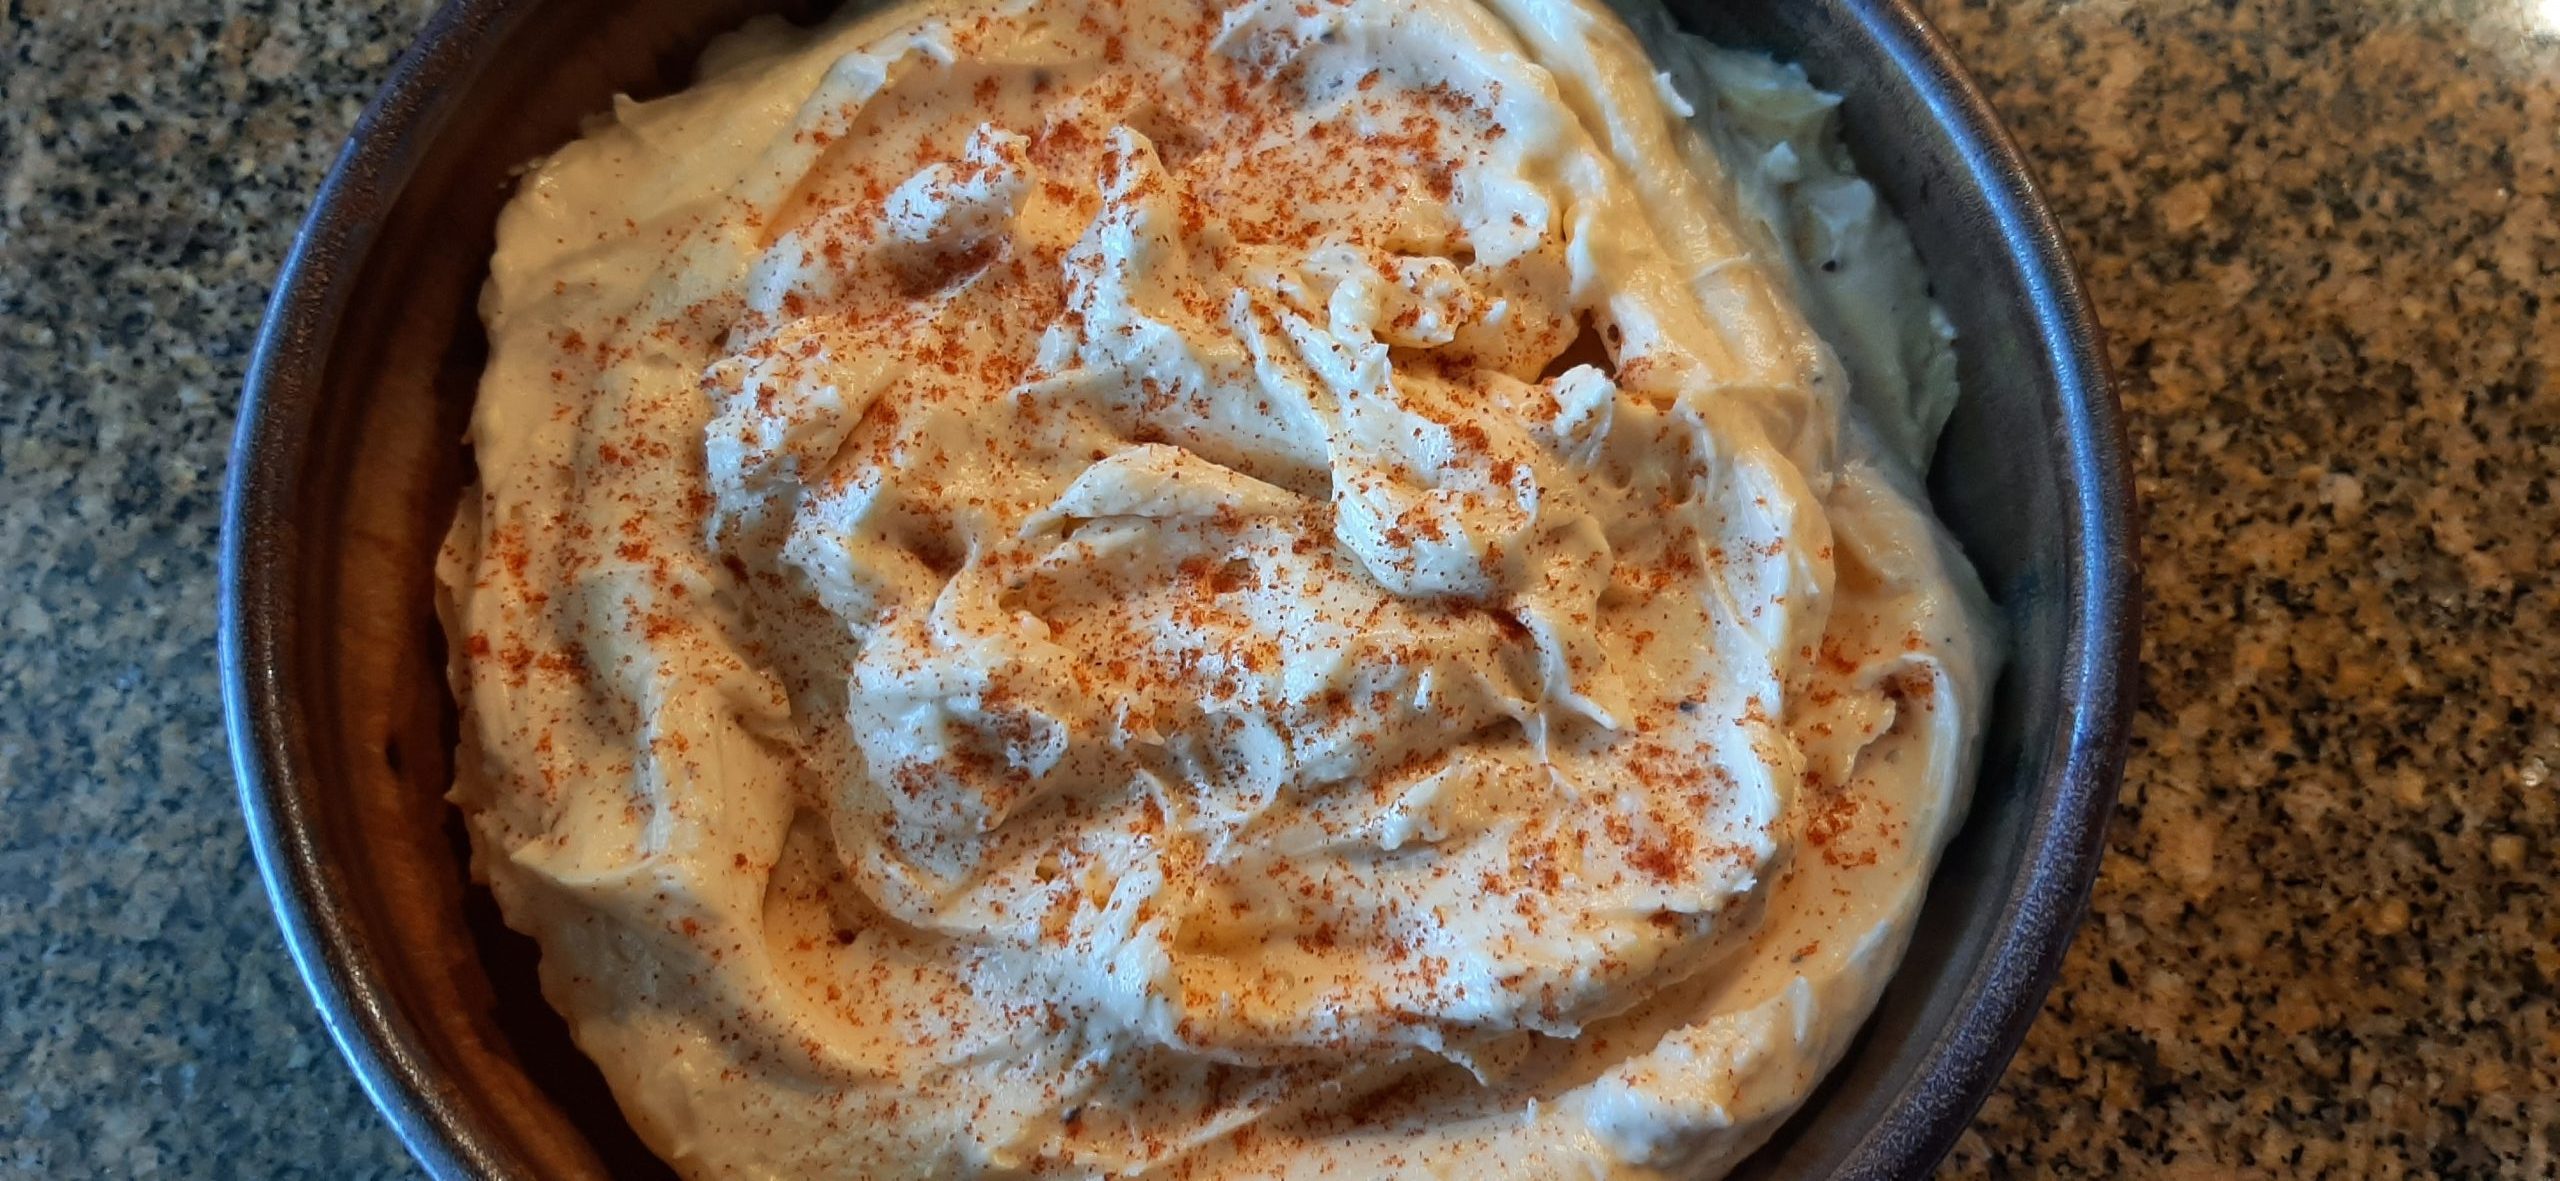
As I was putting the salad together, I decided I really needed a southern style appetizer to serve while people decided what adult beverage they would enjoy before dinner. And I decided on some sort of cheese spread.
I knew Jim and Margo were bringing an appetizer, but I wanted to make something too. So, I went online to find an easy cheese spread recipe. And I found one. I’m not even going to bother you with the owner of the “lifted” recipe I started with, because of the 5 original ingredients, I deleted one, changed the amounts on two of them, and added 4 ingredients of my own. So, I feel justified in not giving anyone else the credit.
But I will give credit to Jim for coming up with a sensational baked crab and shrimp appetizer with a creamy sour cream sauce. And when he writes down all the changes he made to the original recipe, I will publish that recipe too. It was freaking amazing!
Bottom line. We had a great time together eating, drinking, and planning.
After dinner we reviewed the spread sheets, Phyllis had prepared with two proposed itineraries for our next trailer trip together in the fall of 2025. And yes, anymore, you must plan trailer trips months in advance! But back to this cheese spread.
If you would like an easy to prepare but very tasty cheese spread, this is the recipe for you. And unlike many cheese-spread recipes, this can be made and served the same day. How great is that?
Well, that’s it for today. After posting this recipe I am going to sit down in our courtyard and read more of my book. I am currently reading The Handmaid’s Tale by Margaret Atwood. A dystopian (relating to or denoting an imagined state or society where there is great suffering or injustice) story if I ever read one. Beautifully written, but scary as hell! I’m only halfway through the book, but I just can’t imagine a happy ending. Almost like if a certain former president (not mentioning any name here) gets into office again. (In my humble opinion.)
Anyway, have a wonderful rest of your summer. And do make this spread. It’s terrific.
And if you haven’t read this book, do so. It’s an amazing read.
And as always, peace and love to all.
1 c. cubed sharp cheddar cheese
2 T. dry white wine
¼ c. whole milk
3 T. unsalted butter, softened
tiny clove of garlic
tiny pinch kosher salt
freshly ground black pepper
1/8 tsp. paprika, plus more for garnish
Place cheese, wine, milk, butter, garlic, salt, pepper, and paprika in a small food processor and blend until ultra smooth. Transfer to a nice serving dish and sprinkle lightly with paprika.
Cover and store in refrigerator but serve at room temperature with crackers or Crostini. (Check this site for how to make crostini.)
Mr. C. has been crazy busy with rehearsals and gigs this entire summer. And especially during the month of August. So, the other day we looked at each other with the same thought in mind. “Is it really too much to ask for a little boring from time to time?” And I know. We bring all this super busy life on ourselves.
But yesterday, we were actually going to be home for dinner after days and days of seemingly always being away from home for our evening meal. Hallelujah. And Mr. C. expressed a desire to be part of the thrilling experience of cooking dinner. And I remembered that my dear husband loves to grill.
Never having been much of a griller myself (as I’m sure my two cooking buddies Jim H. and Paul F. would attest to unanimously), I just don’t often think about grilling opportunities for Mr. C. But there was this lovely rack of lamb in our freezer that had been calling to me for weeks. And although I have several great baked rack of lamb recipes on this site, I decided this time I was going to find a recipe that called for the lamb to be grilled. So, online I proceeded and found this recipe on the saltpepperskillet.com site.
And oh boy was this recipe a great find. I made a few minimal changes, but then, that’s just how I roll. But the basic recipe is all on Justin.
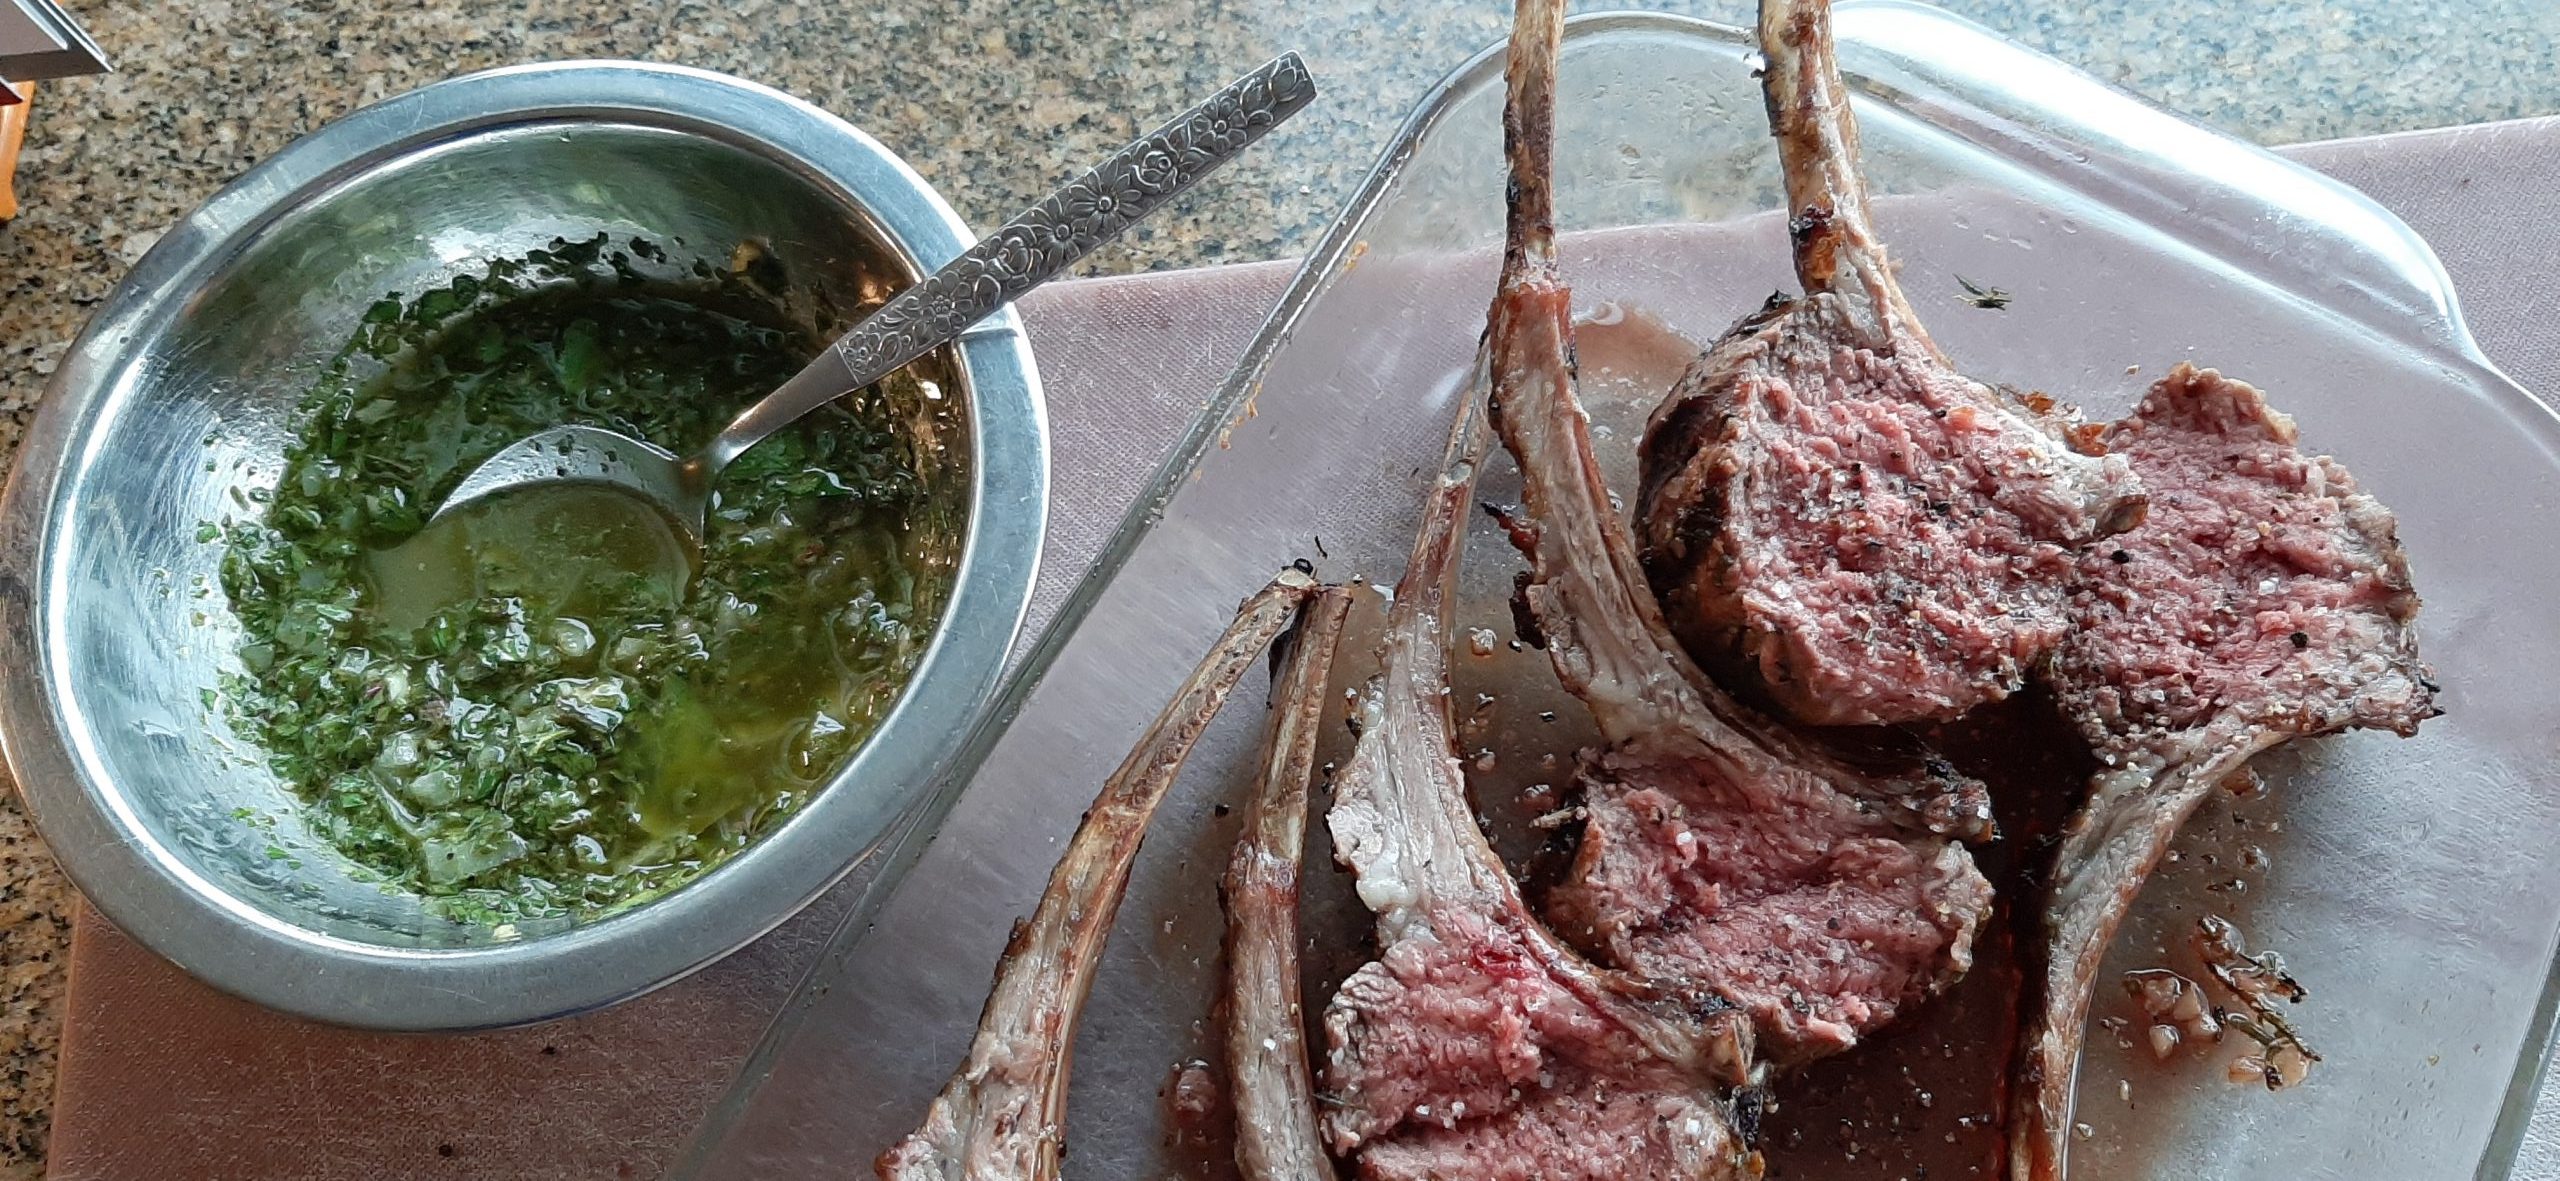
What really first drew my attention to this particular recipe was the Mint Chimichurri Sauce.
I had just posted a recipe (Cherry Tomatoes in an Argentine Chimichurri Sauce),and frankly, I was still on a “chimichurri high” when I found this amazing recipe. And it was just enough different from my other rack of lamb recipes, that I just had to give it a try. Yeah me!!!
So, if you too are a lamb lover as apposed to a landlubber (a person unfamiliar with the sea or sailing), I suggest you give this recipe a try. You will not be sorry.
Well, that’s it for now. We actually have some blue skies today, which we have not experienced for the last few days. But it’s quite windy and when I went out to water, it was darn right cold. I could actually feel fall in the air.
I AM NOT READY FOR IT TO BE FALL! (That sound you hear is me stomping my feet like any typical 4-year-old!) But really. We just have not had enough summer this year. And I’m not happy about the whole darn thing! (And yes, that’s still me stomping my feet!) But I must go with the flow. (But that doesn’t mean I have to like it!)
So, my wish for you is that the rest of your summer be warm, but not too warm, sunny, but not too sunny, rainy, if you need the rain, and free of wildfires, wildfire smoke, tornadoes, eruptions, landslides, and any other egregious condition brought on by Mother Nature.
And of course, as always, full to the brim with an abundance of peace and love.
For the Grilled Rack of Lamb:
1 garlic clove, chopped
1 tsp. chopped fresh thyme
1 tsp. chopped fresh rosemary
1 T. extra virgin olive oil
1 rack of lamb, extra fat removed
kosher salt
freshly ground black pepper
coarse sea salt
Combine the garlic, thyme, rosemary, and olive oil in a small bowl. Rub mixture over the lamb and let it sit covered in your refrigerator for about 1 hour. Then remove from fridge and allow it to come to room temperature.
Pre-heat your grill to medium-hot for about 15 minutes.
Before grilling the lamb, season the lamb al over lightly with kosher salt and freshly ground pepper.
Sear the rack of lamb, bone side down, with the lid closed for about 5 minutes. Turn and grill the meaty side for another 5 minutes with the lid down. Then move the rack to indirect heat to finish cooking until the internal temperature reaches 120 to 125-degrees for medium-rare, or 130 to 135-degrees for medium.
Remove from grill and rest the lamb for 7-10 minutes on a cutting board tented with aluminum foil, then slice between the rib bones.
Sprinkle coarse sea salt on each piece of lamb before serving with the mint chimichurri sauce.
For the Mint Chimichurri Sauce:
¼ c. packed fresh mint
¼ c. packed fresh Italian parsley
1 garlic clove
¼ c. extra virgin olive oil
1 T. red wine vinegar, or more to taste
tiny pinch crushed red pepper flakes, or to taste
¼ tsp. kosher salt
freshly ground black pepper
2 T. finely diced white onion
Place the mint, parsley, garlic, olive oil, red wine vinegar, crushed red pepper flakes, salt, and black pepper in a blender or food processor.
Pulse until the ingredients are well chopped, but not puréed.
Transfer the sauce to a small bowl and stir in the diced red onion.
Taste and adjust seasoning. Cover and store in the refrigerator until needed.
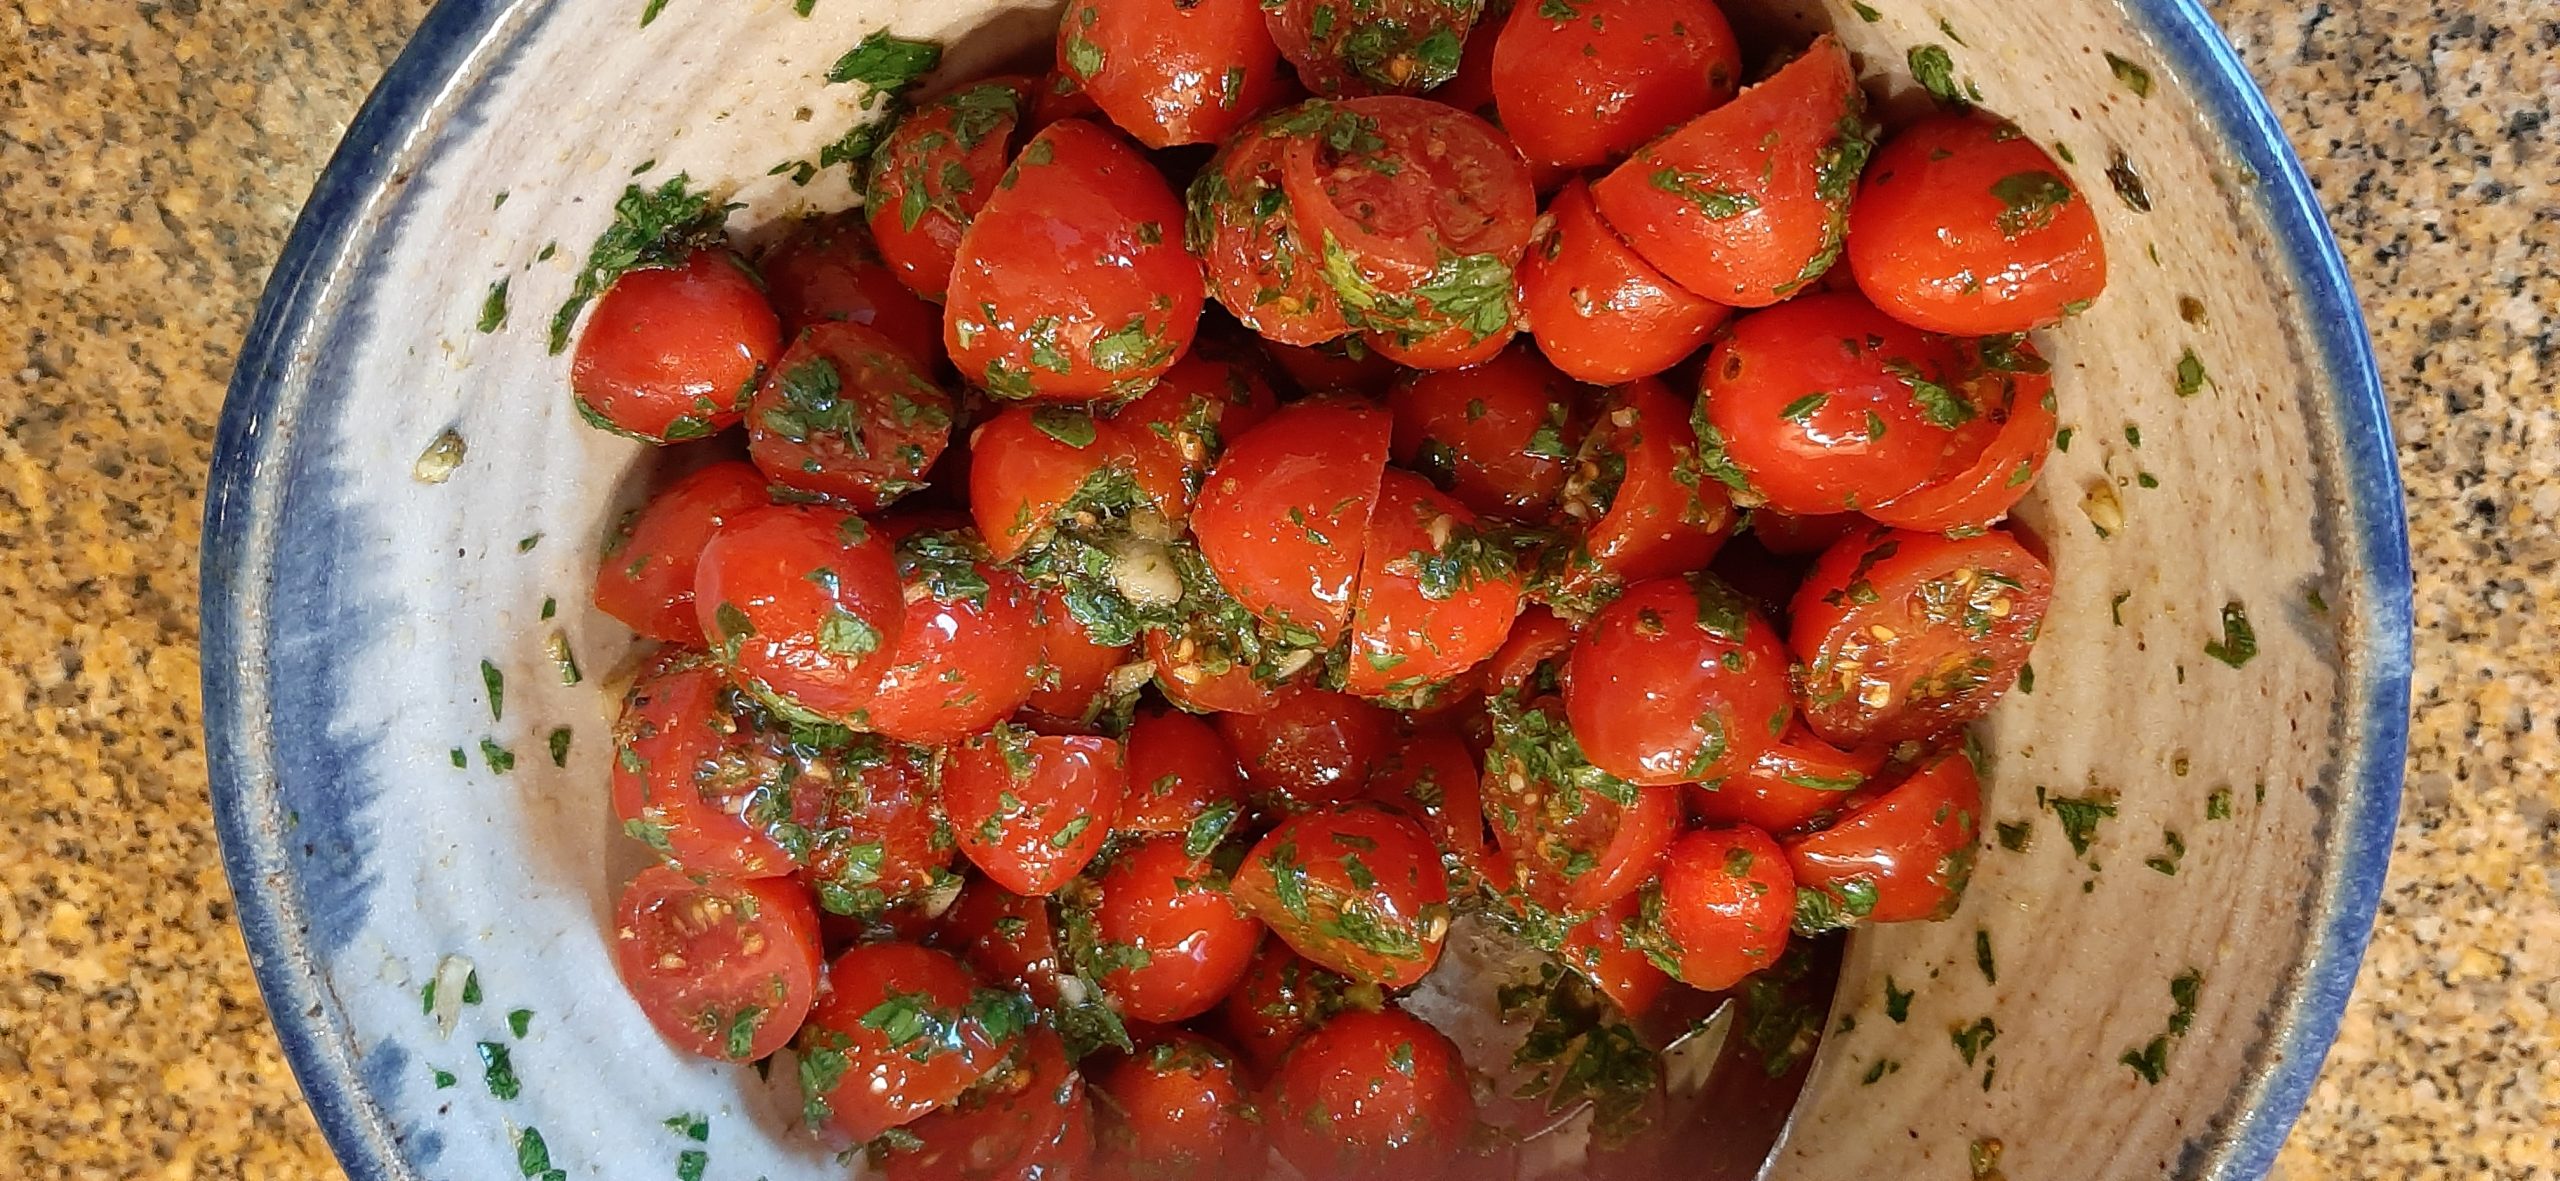
OK, I am always trying to find more and easier ways to serve fresh veggies. I love to cook, but salads have always been my least favorite dish to prepare. Especially green or raw veggie salads. I don’t know why, because I love fresh veggie salads. I think it’s because I have made so darn many of them that it’s just become a boring chore. So, when I find some new way to dress a veggie, I actually look forward to the new adventure. And when the salad is as easy to make and delicious as this recipe produces, I can’t wait to share it with you. And the best part, all the ingredients are refrigerator or pantry staples. (Or should be!)
This lovely recipe, with admittedly a few minor changes from me, comes from the aspicyperspective.com site. Great site BTW. And even though I have two recipes on this site already featuring chimichurri sauce – Grilled Argentine (Like) Marinated Flank Steak with Chimichurri Sauce and Argentine Picadillo Empanadas with Chimichurri Sauce, I never thought of using chimichurri as a salad dressing. But believe me, I will be using it on other salads, and on various grilled meats, over breakfast scrambles, and even in place of garlic butter on toasted baguette slices. The uses for this delicious sauce are endless. (And it’s bloody easy to make! Hurray!)
And not to worry. The sauce is not spicy hot. In fact, it’s perfectly seasoned.
So, grab some fresh parsley out of your fridge, peel a garlic clove, and throw all the ingredients in a food processor, and call it good. No, call it GREAT!
And in case you don’t own a small food processor, let me recommend the Waring Commercial Pro Prep Chopper-Grinder. They aren’t cheap ($171.97 on Amazon), but I have had mine for many years, and I absolutely find it to be the best tool in my kitchen. Well, right up there with my KitchenAid stand mixer, that is! And lest you forgot, I do not make money by recommending any product on my site. I just tell it like it is for me. And yes, I am as passionate about both my small food processor and my KitchenAid mixer as any other tool lovin’ fool! Because good tools are very important, no matter if its building homes, painting pictures, or enjoying the entire kitchen experience.
Well, that’s it for today. Mr. C. has another outdoor gig this evening. Last Friday, Saturday, Sunday, and Monday evenings he also had outdoor gigs. And yes, there were predictions of possible rain, thunderstorms, and heavy wind for each of those performances too. But the bands made it through, even though the chances of “raindrops keep falling on my head” was there. And just to keep everyone on pins and needles, that same chance of precipitation is looming its ugly head for this evening’s event. (Ah Western Washington. How do I love thee, let me count the ways!) (At least it’s not 116-dgrees. For which I am truly thankful!) And so far, the extreme weather predictions have happened. They have just held off until the bands stopped playing. (The weather gods must love jazz and upscale classic rock as much as I do!) But even if it had rained on these events, we would always be able to come home to a dry and safe place to get out of the storms.
May you too always have a place where you can escape the cold, hot, wet, unhealthy air quality, etc., that so many people on planet earth do not have the luxury of experiencing. We who have a safe haven are truly the lucky ones.
But we can all help. We can vote in the upcoming presidential election for decency, humanity, empathy, and a positive future for the United States. If you have doubts about our future, one way to learn more, from a historian’s perspective, is to follow Heather Cox Richardson.
And especially now, with so much at stake for our country, please learn about the candidates before just voting the party line. That approach might have made sense in the past, but it truly isn’t acting responsibly in today’s crazy political arena.
As always, peace and love to all.
¼ c. packed fresh Italian parsley leaves (I use Italian parsley exclusively)
1 sm. clove garlic, cut in half
2 T. extra virgin olive oil
1 tsp. red wine vinegar, or more to taste
1 tsp. dried oregano
¼ tsp. ground cumin
¼ tsp. kosher salt, or more to taste
freshly ground black pepper
4-6 crushed red pepper flakes
1 pint cherry or grape tomatoes (2 cups), cut in half
Place the parsley, garlic, olive oil, red wine vinegar, oregano, cumin, salt, black pepper, and crushed red pepper flakes in a small food processor. Process until the parsley and garlic are broken down a bit. (Chimichurri sauce is meant to be rustic.) Taste and adjust seasoning.
Pour the chimichurri sauce over the tomatoes and toss to coat. Cover and refrigerate until ready to serve. Remove from fridge about 30 minutes before serving. (I find tomatoes have more flavor when served at room temperature.)
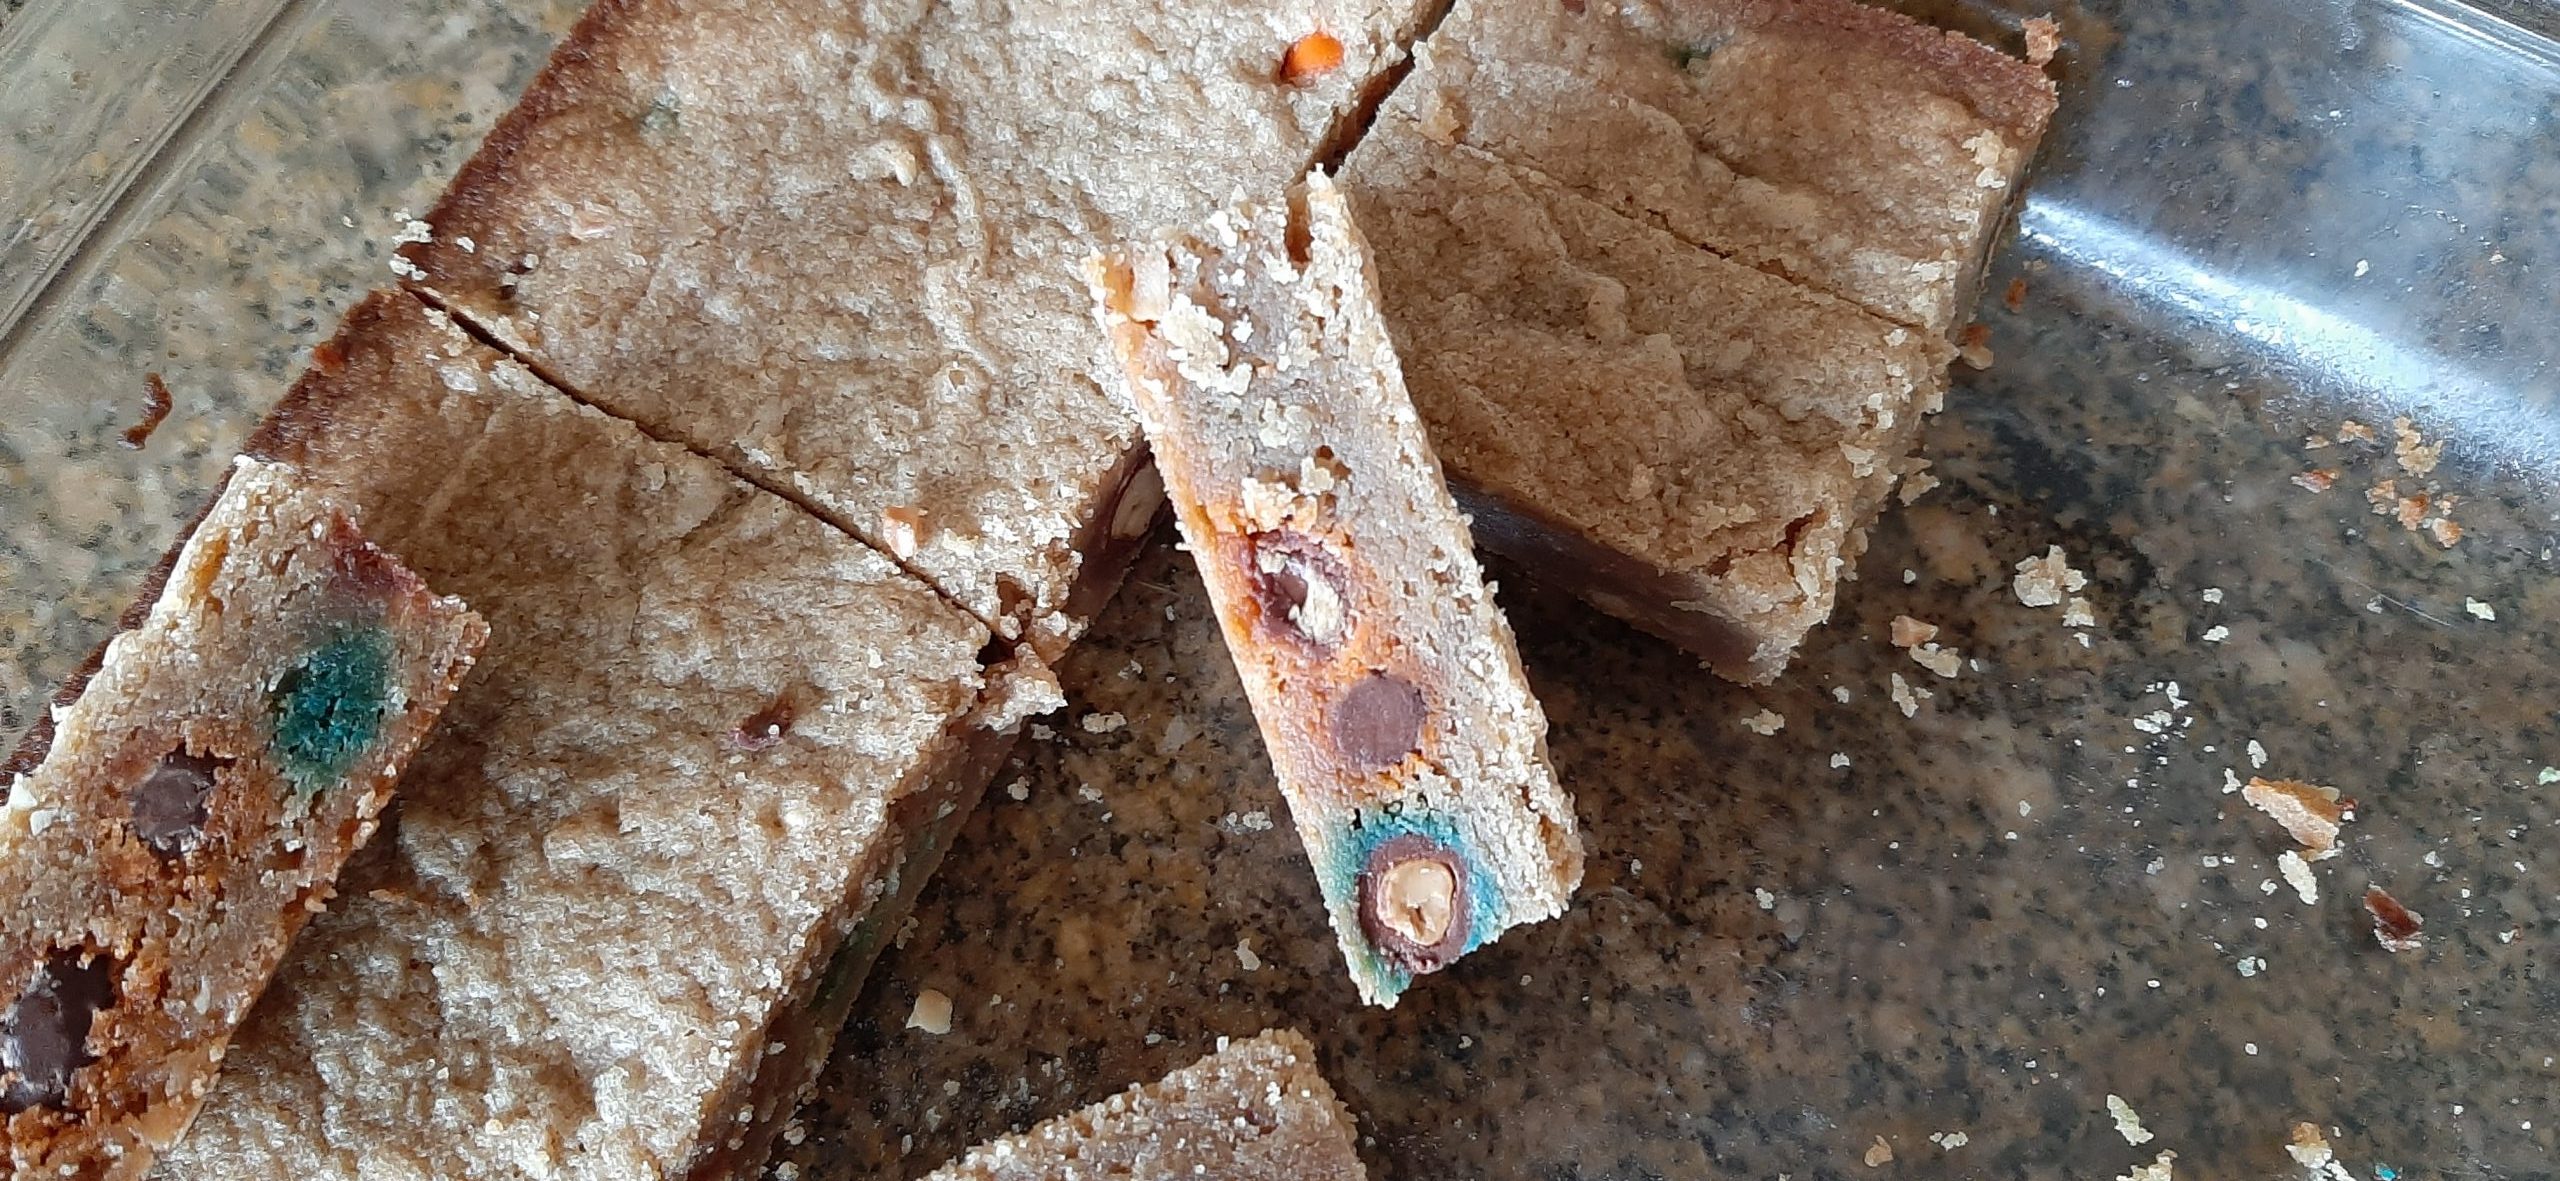
Hear ye, hear ye, all you peanut butter and Peanut M&M lovers out there. This is the bar cookie for you! But let me be perfectly clear about this cookie. If you don’t absolutely love peanut butter and chocolate or are of the persuasion that can take or leave either one, then this is not the cookie for you. Because these babies are super rich and absolutely chock full of chocolatey, peanut butter, and crunchy peanut goodness. So, consider yourself warned.
These cookies are not for wimps or people on a diet. These bar cookies are fattening, sugar laden, nutritionally challenged, decadent bites that should come with a dietary warning label. But good? OMG are they good! And the redeeming feature, if there is such a thing, is that you can’t eat more than one small square before your whole system screams – that’s enough! They are just that rich.
So, next time you get a hankering for a cookie that is easy to make, will feed an entire army of friends and family, and satisfy your peanut butter and chocolate craving for at least a week (or longer), get thee to your kitchen and bake up a pan of these tasty treats.
But please do not blame me if your family and friends keep requesting more, more, more. They are a bit addictive as I can attest to personally. But then, there are worse additions. (At least that is my justification for even passing the recipe on to you.)
But you are all adults and many with years of justifications of your own for eating food with no nutritional value. So, let your conscience be your guide.
And as always, peace and love to all.
1 c. (2 sticks) unsalted butter, melted
2 c. brown sugar
½ tsp. kosher salt
2 lg. eggs
1 T. vanilla extract
1 c. peanut butter (not natural) (I use crunchy, but creamy if fine too)
2 c. unbleached all-purpose flour, fluffed
2 c. Peanut M&Ms (10.05 oz. bag)
Lightly grease a 9×13-inch baking pan (glass is best) with cooking spray. Set aside.
Combine the melted butter, brown sugar, and salt in a large mixing bowl until well blended. Add the eggs, vanilla extract, and peanut butter and mix until thoroughly combined.
Mix in the flour just until smooth and then stir in the Peanut M&M’s.
Spread the batter evenly into the prepared baking pan. (I smooth out the top with a small offset spatula.)
Bake in a pre-heated 350-degree oven for 28-30 minutes or until a toothpick inserted in the center comes out clean. (Don’t overbake.)
Remove from oven and let cool completely before cutting into squares using a sharp knife.
Store in an airtight container in your refrigerator. Or freeze and let sit at room temperature for an hour or so before serving.
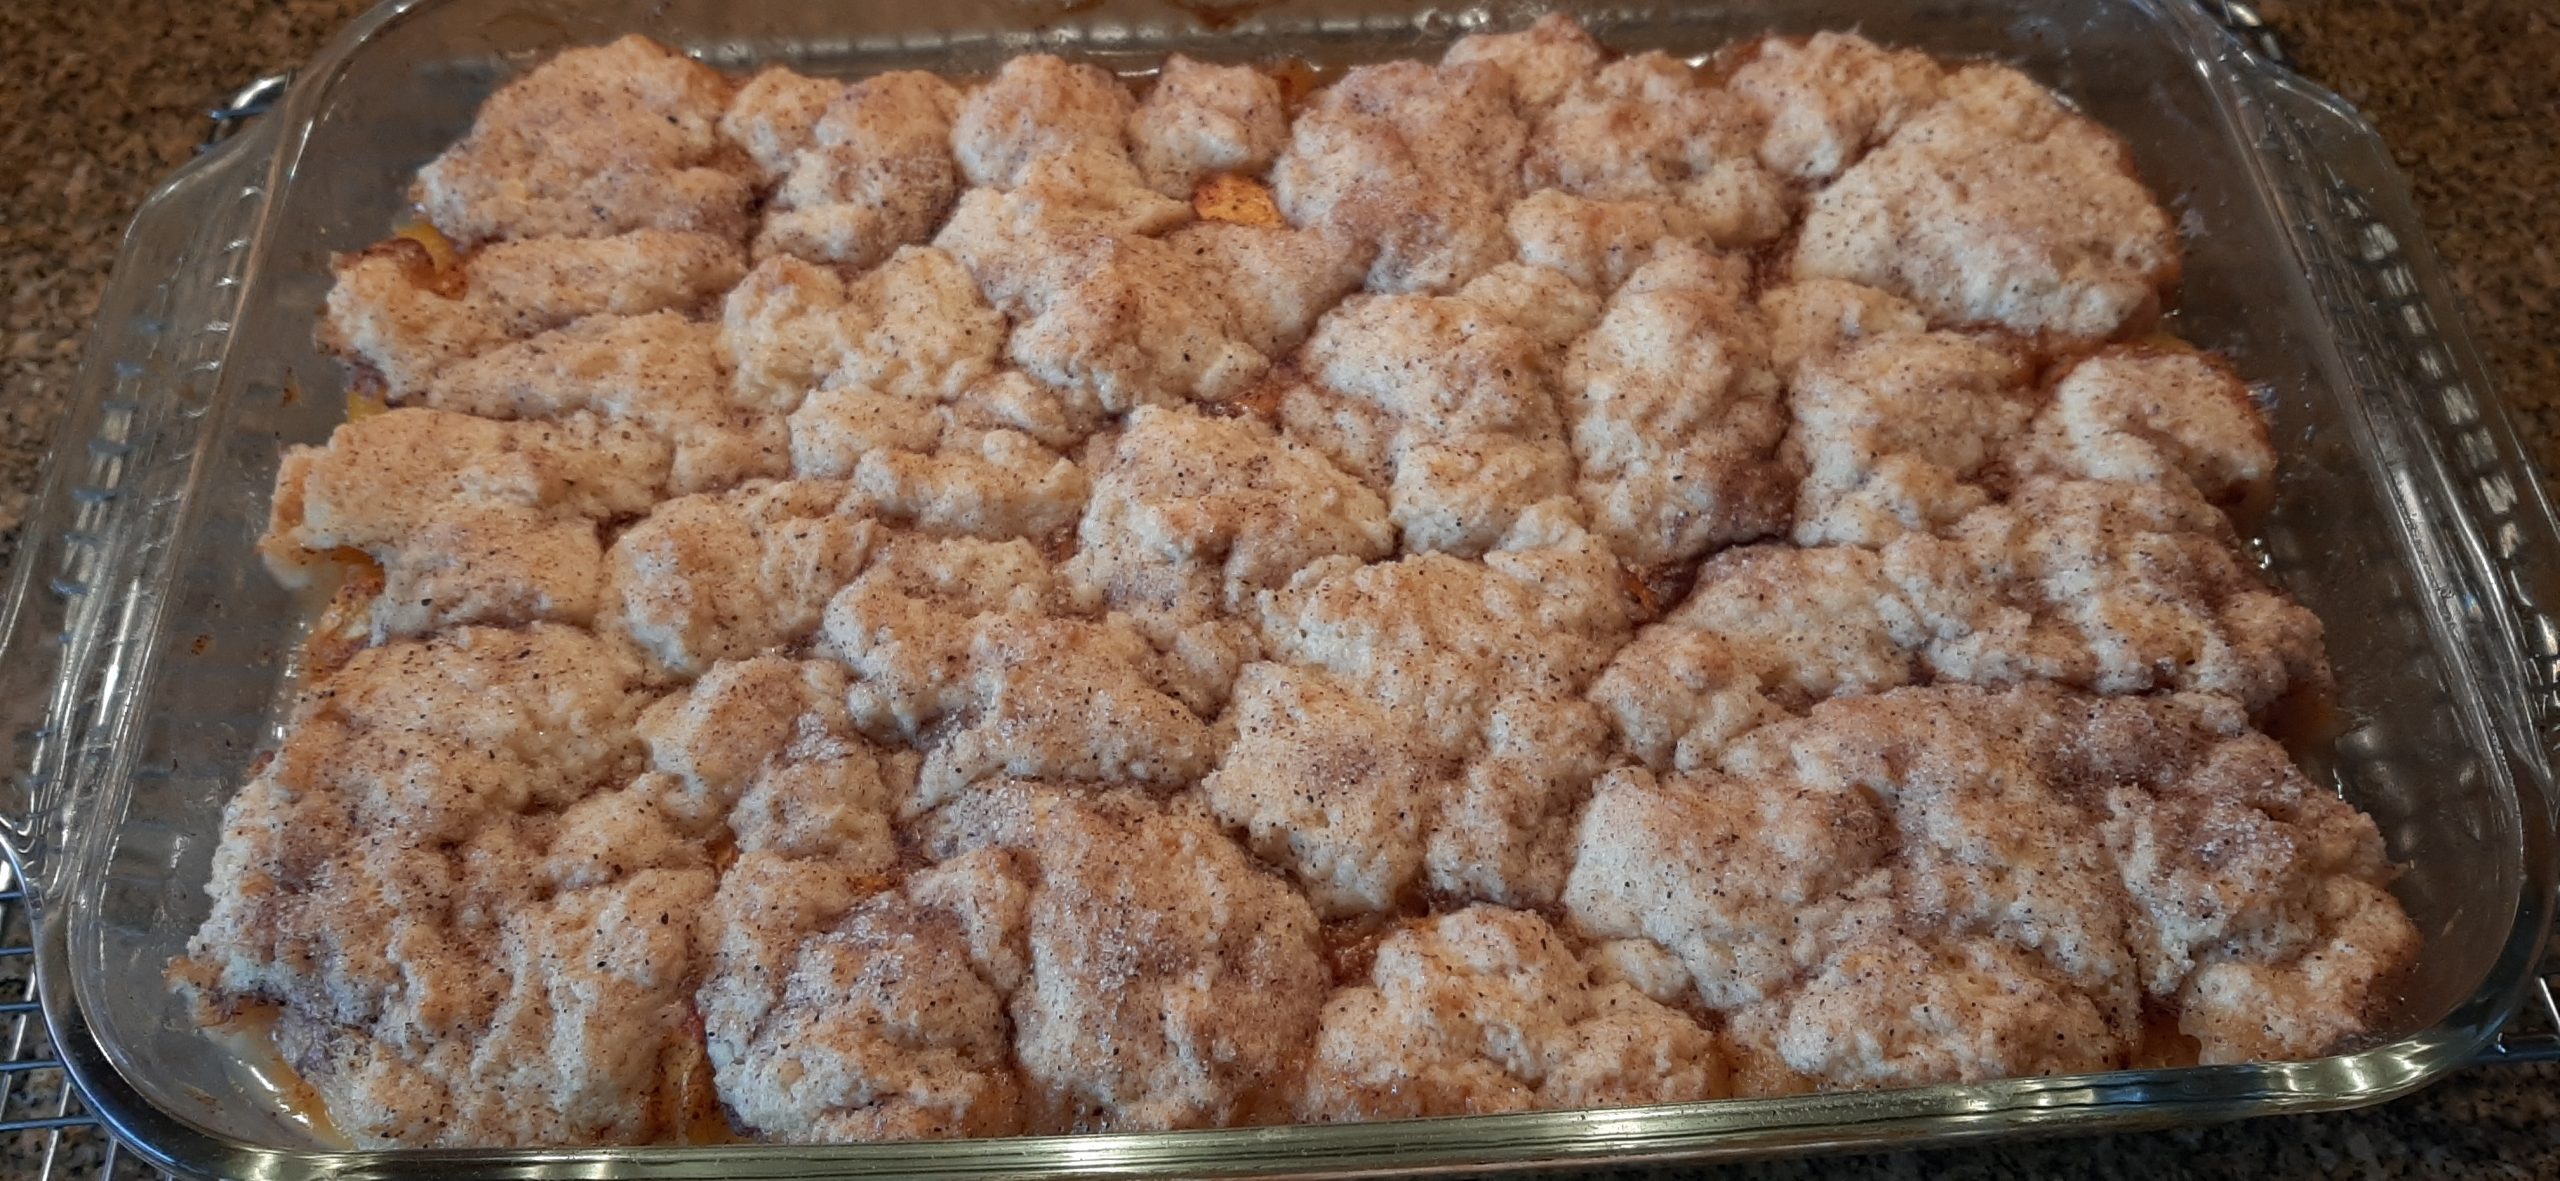
OK, you all, it’s fresh peach season. And as the old “Get Happy” song made famous by Judy Garland goes –
Forget your troubles, c’mon get happy, you better chase all your cares away. Shout “hallelujah”, c’mon get happy, it’s peaches in a pan today!
OK, I did change the last line but, I really believe it’s better than “Get ready for the judgement day”! (That’s a little too depressing for me to handle.) But fresh peaches, in a pan covered with tasty biscuits, baked and served with vanilla ice cream! That I can really get excited about. And this recipe (a bit adjusted by me) from sallysbakingaddiction.com is fabulous. So, I am totally thrilled to share it with you. (And BTW, Sally’s site is fantastic. She is the real deal. Check it out.)
Anyway, if you haven’t gathered by now that I am really happy I found this recipe, you are simply not paying attention. Because this is the best peach cobbler I have ever produced. And believe me, I have made a few cobblers in my day. But in my humble opinion, this is a perfect recipe. (Like I know anything about being humble!) Anyway, just make this cobbler. It’s worth every bit of effort.
So, enjoy this wonderful season of fresh fruit and veggies. And please support your local farmers by visiting their stands and putting some money directly into their hands. They work so hard. And you know the produce is going to be better than anything you can buy in a store.
And as always, peace and love to all.
For the peach filling:
¼ c. brown sugar, packed
1 T. cornstarch
1 T. fresh lemon juice
1 tsp. vanilla extract
½ tsp. ground cinnamon
1/8 tsp. ground nutmeg
pinch ground ginger
1/8 tsp. fine sea salt
10 c. peeled* and cut into 1-1½ Inch chunks fresh peaches
Stir the brown sugar, cornstarch, lemon juice, vanilla, cinnamon, nutmeg, ginger, and salt together in a mixing bowl. Stir in the peaches until each piece is coated. Scoop the mixture into a lightly buttered 9×13-inch baking pan. (Glass is best.)
Bake in a pre-heated 350-degree oven for 10 minutes. Meanwhile prepare the topping.
Remove from oven and set aside. Keep the oven on 350-degrees.
For the buttermilk biscuit topping:
2 c. unbleached all-purpose flour, fluffed
½ c. + 2 T. granulated sugar, divided
1½ tsp. baking powder
¼ tsp. baking soda
½ tsp. fine sea salt
½ c. (1 stick) unsalted butter, cold and cubed
½ c. buttermilk
½ tsp. cinnamon
Place the flour, ½ cup of sugar, baking powder, baking soda, and salt in the bowl of your food processor. Pulse until the mixture is well combined. Pour in the buttermilk, and pulse just until dough comes together.
Take handfuls of dough and gently flatten. Place dough all over the top of the warm peach filling until you have covered most of the peaches. Sprinkle with dough with remaining 2 tablespoons of sugar that has been mixed with the ½ teaspoon of cinnamon.
Bake in your already heated 350-degree oven for about 30 minutes, or until the biscuit topping is golden brown and peach filling is bubbling around the edges. (The top is done when you stick a toothpick into the biscuit topping and if it comes out clean.
Remove from oven and cool for 5 minutes before serving with vanilla ice cream or whipped cream.
Or serve slightly warmed with vanilla ice cream or whipped cream.
Cover and store leftovers in the refrigerator for up to 5 days.
*Peeling peaches can be a pain in the patootie.
For ripe peaches: I cut the peach in quarters with a pairing knife. Then I separate the sections and remove the pit. Then I start at one end of each piece and peel the skin away.
For peaches that aren’t quite ripe: Bring a large pan of water to a boil. Carefully add your peaches. (I lower the peaches into boiling water with a slotted spoon.) This technique, officially called blanching, helps to loosen the peach skins so they peel easily using either your fingers or a paring knife. The process is quick (about 30 seconds), so take care not to leave the peaches boiling for too long.
Using the same slotted spoon, remove the peaches into a large bowl filled with ice water. (You should set this up before starting the boiling process.) Shocking the peaches stops the cooking process and allows you to hold the peaches without scalding your hands.
Once the peaches are cooled, remove the peaches from the ice bath. Using your hands or paring knife, gently peel away the skin. The skin should release from the flesh with minimal effort.
I have found that cutting the peaches by making the initial cut around the middle rather than from stem to stern works best for me when I use this method. And I personally like Clingstone peaches best. But I take what’s available and always remember to say thank you. I love peaches just that much!
I am always looking for new quick bread recipes to take along on trailer trips or when we leave for a few days to visit family, friends, or stay in a condo on the ocean. I enjoy going out for breakfast occasionally, but much prefer to save my eating out experiences to lunches on the road or dinners where I can have a drink and leisurely enjoy my evening meal. Breakfast out simply does not carry the same cachet as having dinner at a restaurant. And frankly, except for the hashbrown potatoes, I can whip up breakfasts faster in our trailer or condo than getting in our truck and driving into whatever town may be close by. And of course, I always like to try new recipes.
For my birthday celebration I made Carrot Cake with Cream Cheese Frosting (recipe on site) because I truly love a good carrot cake. So, when getting ready to go to a family reunion in Oregon a couple of weeks ago, I decided to continue the “carrot cake” theme and made this bread to take along. And it was well received. Moist and tender with a lovely bit of crunch from the pecans and streusel topping.
So, if you too love carrot cake but feel guilty when you have a big old piece of carrot cake with cream cheese frosting for breakfast, then give this “bread” recipe a try instead. And yes, you might miss the cream cheese frosting. But I promise the streusel topping will make everything OK.
Well, it’s overcast here in Western Washington. And unfortunately, lightning storms are predicted for the Cascade Mountains. Which is always a problem. We already have a terrible wildfire burning close to the village of Stehekin, at the North end of Lake Chelan, in the heart of the North Cascades. And any lightning strike that hits land, especially in summer, is a fire just waiting to happen.
So, wherever you are, please be extra diligent in putting out your campfires, lighting and shutting down your outdoor grills, burning trash, or disposing of your cigarettes, etc. We are all in this together. And natural causes do enough damage without our avoidable assistance.
And sorry for no picture. I was so busy putting things together to take along, I failed to capture this bread on my camera. (Bad Patti!) But next time I make this bread I will rectify my error.
Peace and love to all.
1¾ c. unbleached all-purpose flour, fluffed
1 tsp. baking soda
½ tsp. baking powder
½ tsp. fine sea salt
1½ tsp. ground cinnamon
¼ tsp. ground ginger
¼ tsp. ground nutmeg
3 eggs, room temp.
½ c. vegetable oil
⅓ c. sour cream
1 med. apple, peeled and grated
2 c. grated carrot
1 c. light brown sugar packed
1 tsp. vanilla extract
¾ c. finely chopped pecans
Grease a 9×5-inch loaf pan or 2 7-inch loaf pans. Line the bottom(s) with parchment paper.
Whisk together the flour, baking soda, baking powder, salt, cinnamon, ginger, and ground nutmeg in a medium bowl. In a large bowl, stir together the eggs, vegetable oil, sour cream, grated apple, grated carrot, brown sugar, vanilla extract, and chopped pecans.
Stir the flour mixture into the carrot mixture just until combined. Pour into prepared pan(s). Top with streusel mixture.
Bake a 9×5-inch pan in a pre-heated 350-degree oven for 50-60 minutes or until a toothpick inserted in the center comes out clean. Bake 2 7-inch loaf pans for about 40 minutes or until a toothpick inserted in the center comes out clean. Do not overbake. Remove from oven and cool the bread in the pan on a wire rack for 5-7 minutes before removing from pan. (Also remove the parchment paper at this time.)
Streusel:
2 T. melted unsalted butter
½ c. brown sugar, packed
1 tsp. ground cinnamon
½ c. unbleached all-purpose flour
½ c. finely chopped pecans
Blend the butter, brown sugar, and cinnamon. Add the flour and nuts, mix until crumbly. Place the mixture on top of bread dough and bake as instructed above.
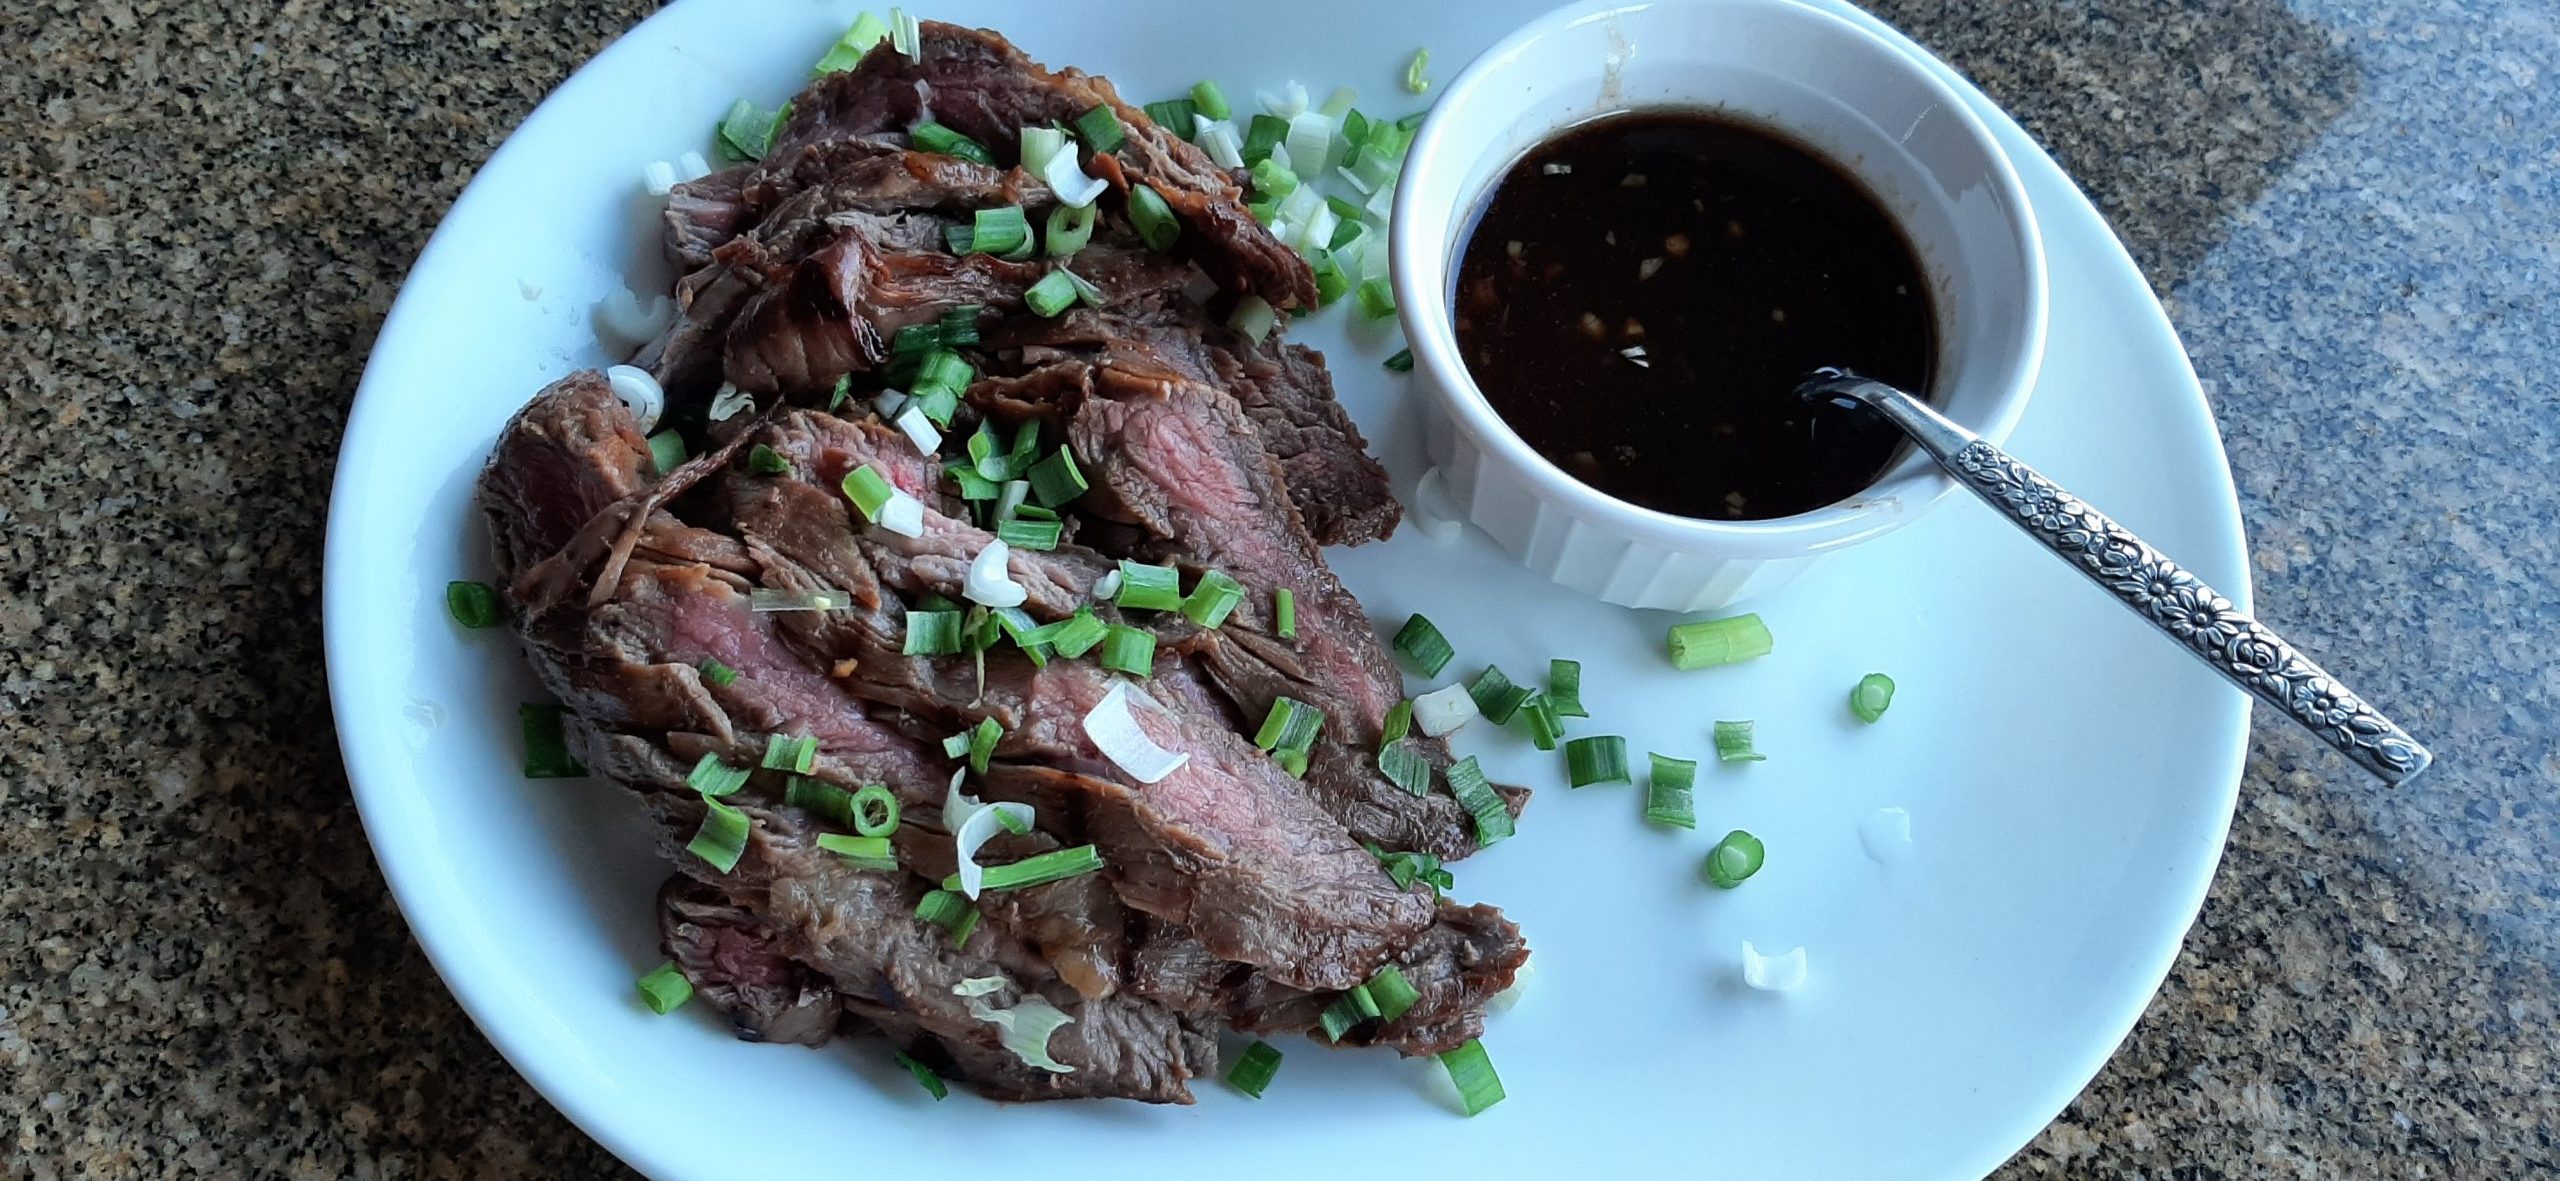
I love teriyaki. I don’t care if it’s chicken or beef, as long as the meat has lots of flavor and hasn’t been cooked to death. (Isn’t that a stupid statement. Anything you cook, be it meat or vegies, is already dead. But I digress.)
Anyway, I am currently on a mission to use up the meat in our freezer that Mr. C. has deemed “obviously abandoned”. And included in that category were two small packages of mystery meat. One contained a small piece of sirloin steak (as it turned out), and the other, half a flank steak.
So, while the meat was thawing, I went to work finding a new and exciting way to give this meat the respect it deserved. And I landed on this teriyaki marinade recipe from the heartnaptime.net site. (Great site BTW.)
And OMG, what a wonderful teriyaki dinner we had last evening. Along with steamed brown rice, I prepared Teriyaki Salad Dressing over Romaine, Carrot, Celery, and Green Onions. (Recipe to be published in the next few days.) (But get a preview by scrolling down to find the recipe below.)
Now, this is not a wimpy marinade/sauce recipe. It is bold, brazen, and any other word you might think of to mean “holy moly powerful”! So, go slowly into that good sauce when it comes time to decorate the grilled meat before serving.
Well, that’s all I have to say today. Mr. C. has a gig in Anacortes at 3:00 this afternoon. So, I am going to keep this preface short and sweet. Which reminds me, this teriyaki marinade/sauce is not too sweet. A taste of honey, as the old song title goes, but not in the least bit overpoweringly sugary. Perfectly balanced.
So, next time you get a hankering for teriyaki, give this recipe a try. Easy, and relatively inexpensive to make. And better than most beef teriyaki you can find in restaurants.
Happy Saturday to all. And of course, peace and love from our home to yours.
½ c. low-sodium Tamari or soy sauce
¼ c. water
2 T. toasted sesame oil
2 T. honey
2 T. Worcestershire sauce
2 garlic cloves, finely minced
2-3 tsp. minced fresh ginger
1½ lbs. flank steak, fat and silver skin removed
sliced green onions, garnish
Combine the soy sauce, water, sesame oil, honey, Worcestershire sauce, garlic, and ginger in a glass bowl. Whisk until combined. Pour 1/3rd of the marinade in a small pan. Set aside.
Add the flank steak to the remining marinade, cover, and place in the refrigerator for at least 30 minutes. (Best when marinated for 4-6 hours.) Remove from fridge at least 30 minutes ahead of grilling.
Preheat grill to medium-high heat.
Place the steak on the hot grill and cook for 3-4 minutes. Turn the steak over and grill another 2-3 minutes. For medium-rare (135-degrees).
Remove from grill and let rest for about 5 minutes before thinly slicing on the diagonal. Serve with remaining marinade (now teriyaki sauce) which has been brought to a boil, reduced to simmer, and cooked for about 5 minutes.
TERIYAKI SALAD DRESSING FOR ROMAINE, CARROT, CELERY, AND GREEN ONIONS
For the dressing:
½ c. mayonnaise
1 T. rice vinegar
2 tsp. granulated sugar
1 tsp. soy sauce
tiny pinch granulated garlic
1 tsp. toasted sesame oil
freshly ground black pepper (not too much)
Whisk together the mayo, rice vinegar, sugar, soy sauce, granulated garlic, sesame oil, and black pepper in a covered container. Refrigerate before serving.
For the salad:
3-4 c. chopped romaine or iceberg lettuce
½ c. shredded carrot
½ c. thinly sliced celery or cabbage
2 finely chopped green onions
Place in a bowl and toss lightly with salad dressing just before serving.