Author Archives: Patti

EASY SAME DAY FRENCH BAGUETTES

Bread, bread, bread. I know, I know, I know! Another bread recipe, but what can I say? I love bread and I have this compulsion to keep nagging at you to make your own bread for 2 very good reasons. 1) Homemade bread is delicious and doesn’t contain any nasty chemicals. 2) Homemade bread is inexpensive. (Using this recipe, the total cost of making this bread is under a dollar. About 64 cents for the flour, less than a penny for the salt, 20 cents (at the most) for the yeast, and about 4 cents for the olive oil.) Now, where can you buy 4 small loaves of French baguettes for that price? Amen!

Anyway, yesterday I was in the mood for French dip sandwiches. I had leftover flank steak (recipe to be posted soon), onions to caramelize, a couple of slices of pepper-Jack cheese that needed to be used, and a great recipe and makings for au jus (Homemade Au Jus – no Drippings Required). But what I didn’t have was baguettes. And you really cannot make French dip sandwiches without some kind of firm, crusty bread. So, that left only two choices. Send Mr. C. to the store for costly baguettes or make my own. No contest there. And since many of my favorite baguette recipes call for an overnight rise, I had to come up with a recipe that could be ready, start to finish, in less than 4 hours. And the recipe you find below is what I came up with.

So, if you too ever find yourself with no baguettes, but an urgent need for some, give this recipe a try. Easy to prepare, inexpensive, and perfect for French dip sandwiches.

Well, tonight we are going to a local production of the comic opera Falstaff. I can hardly wait. Not only do I love opera; I love that this production is in Mount Vernon rather than Seattle. (No offence, Seattle, but you do know you are becoming more difficult to navigate, with all your one-way streets, bus only lanes, bike only lanes, especially in the dark.) So, I am ready to have a nice dinner out, then drive to McIntyre Hall, park in an easy to enter and exit (and free) parking lot and arrive home 30 minutes later. Ah, the blessings of living in a rural area. Can’t be beat!

On that happy note – as always – peace and love to all.           

1½ c. warm water

2½ tsp. instant yeast*

1¾ tsp. kosher salt

4 c. bread flour, or more if needed

extra virgin olive oil 

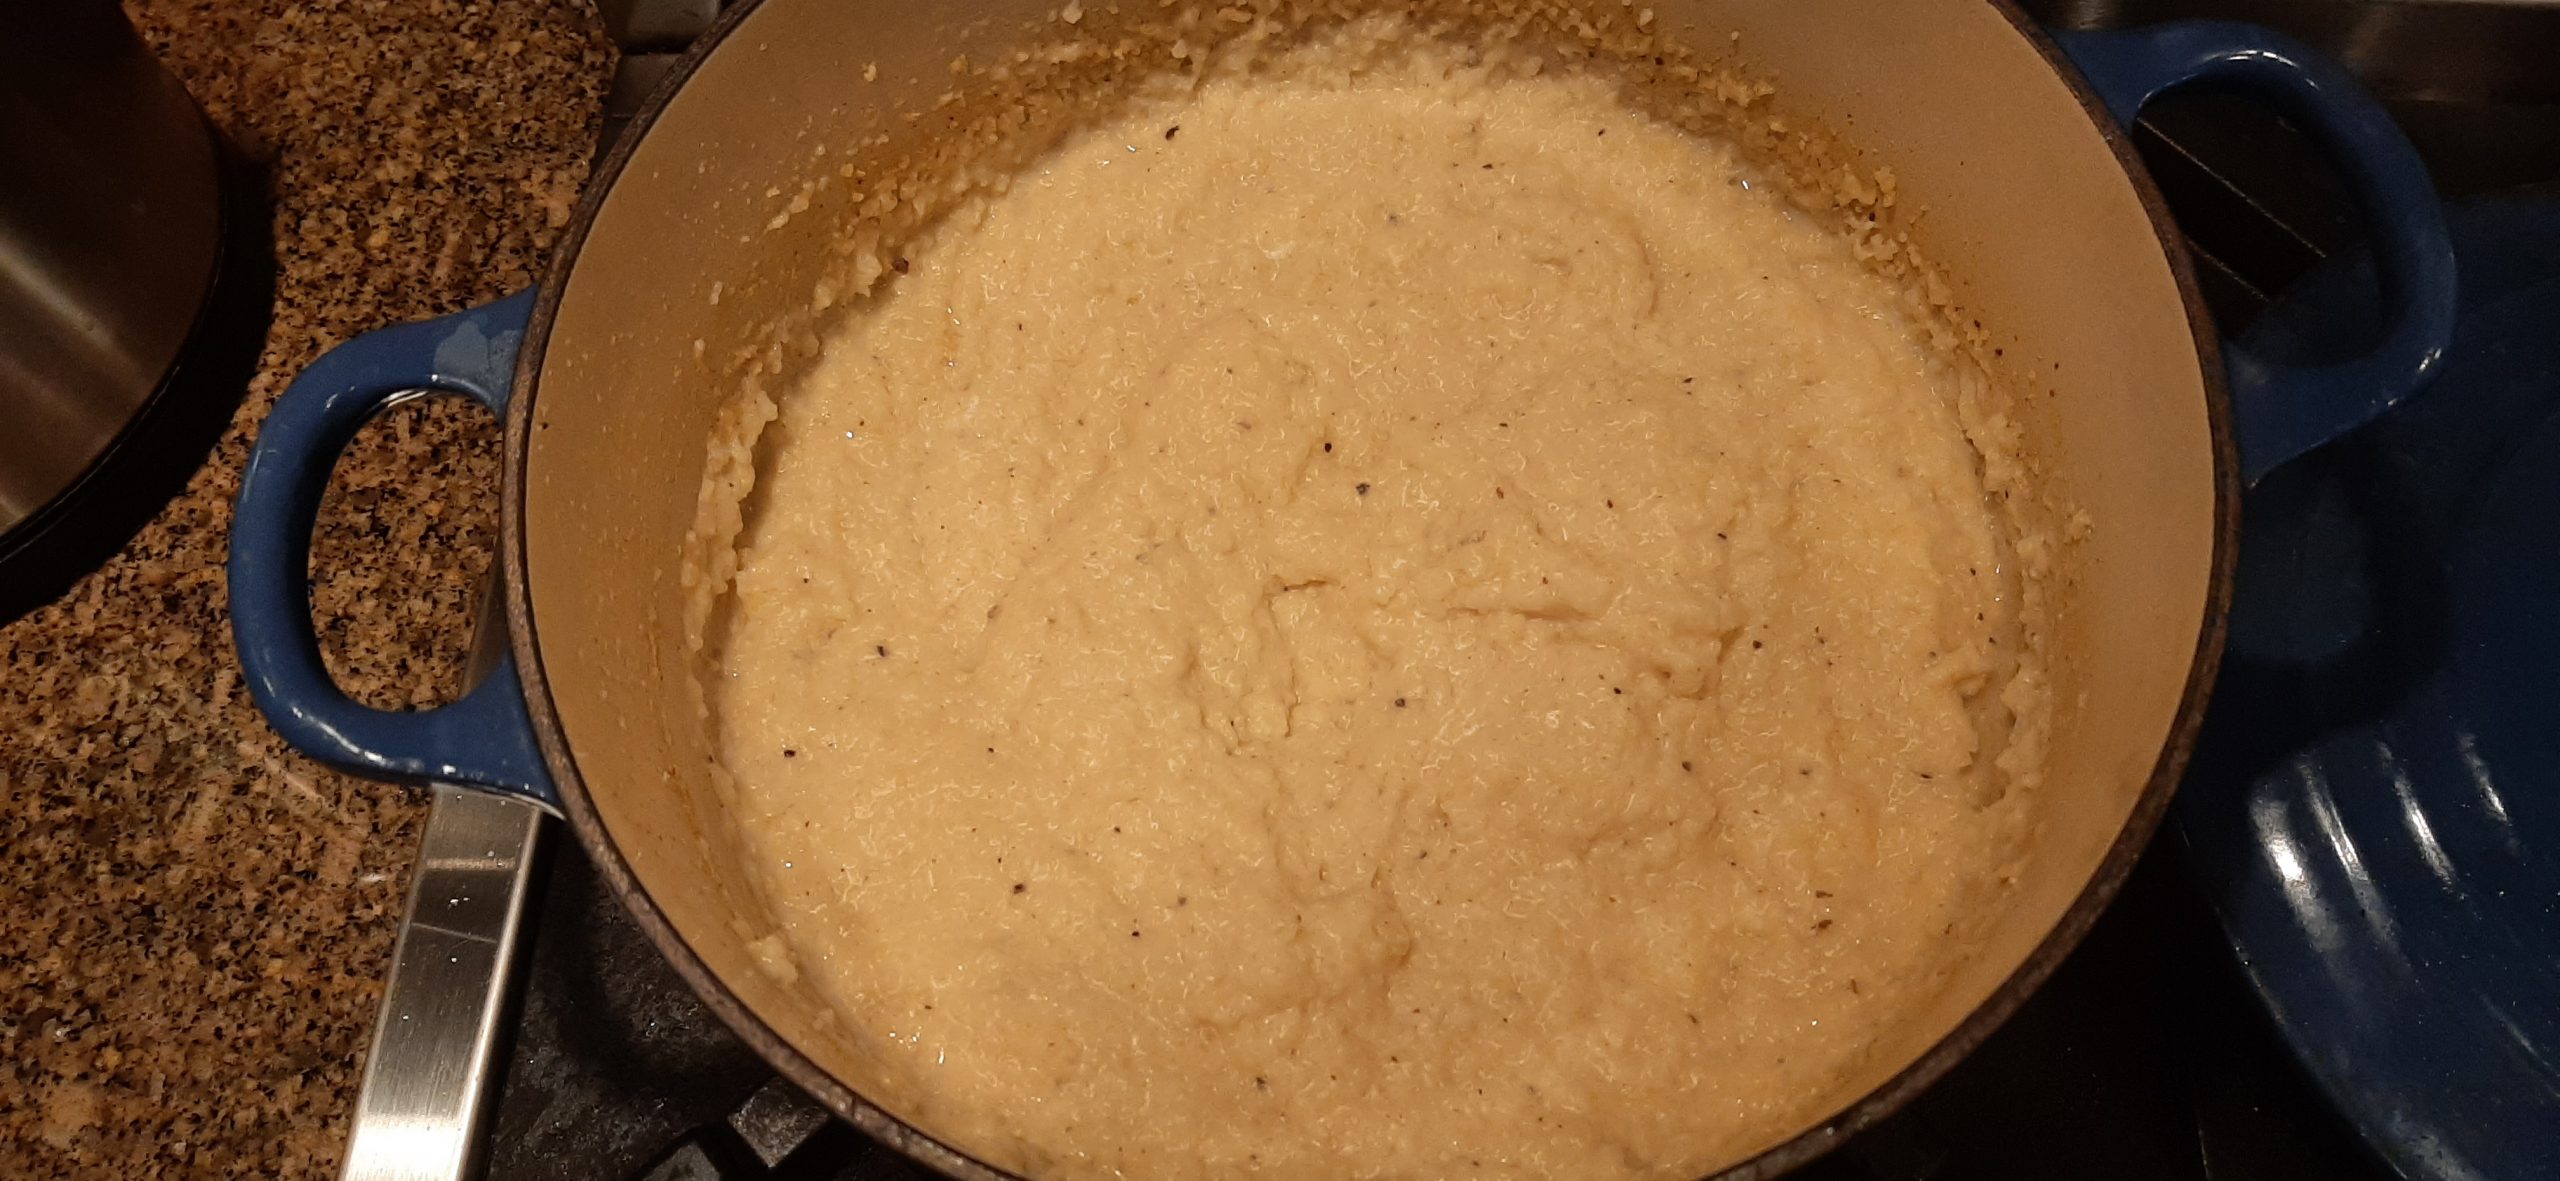
In the bowl of your stand mixer, combine the warm water and instant yeast with your dough hook and let sit for 5 minutes. Add the salt and enough flour to produce a shaggy dough. (The dough should be tacky but not sticky.)

Pour a bit of olive oil in the bowl, and using your hands and a stiff spatula, form the dough into an oil covered ball. Cover the bowl with plastic wrap and let rest for 30 minutes.

After 30 minutes, punch down the dough and cover with plastic wrap again and let rise for 1 hour.

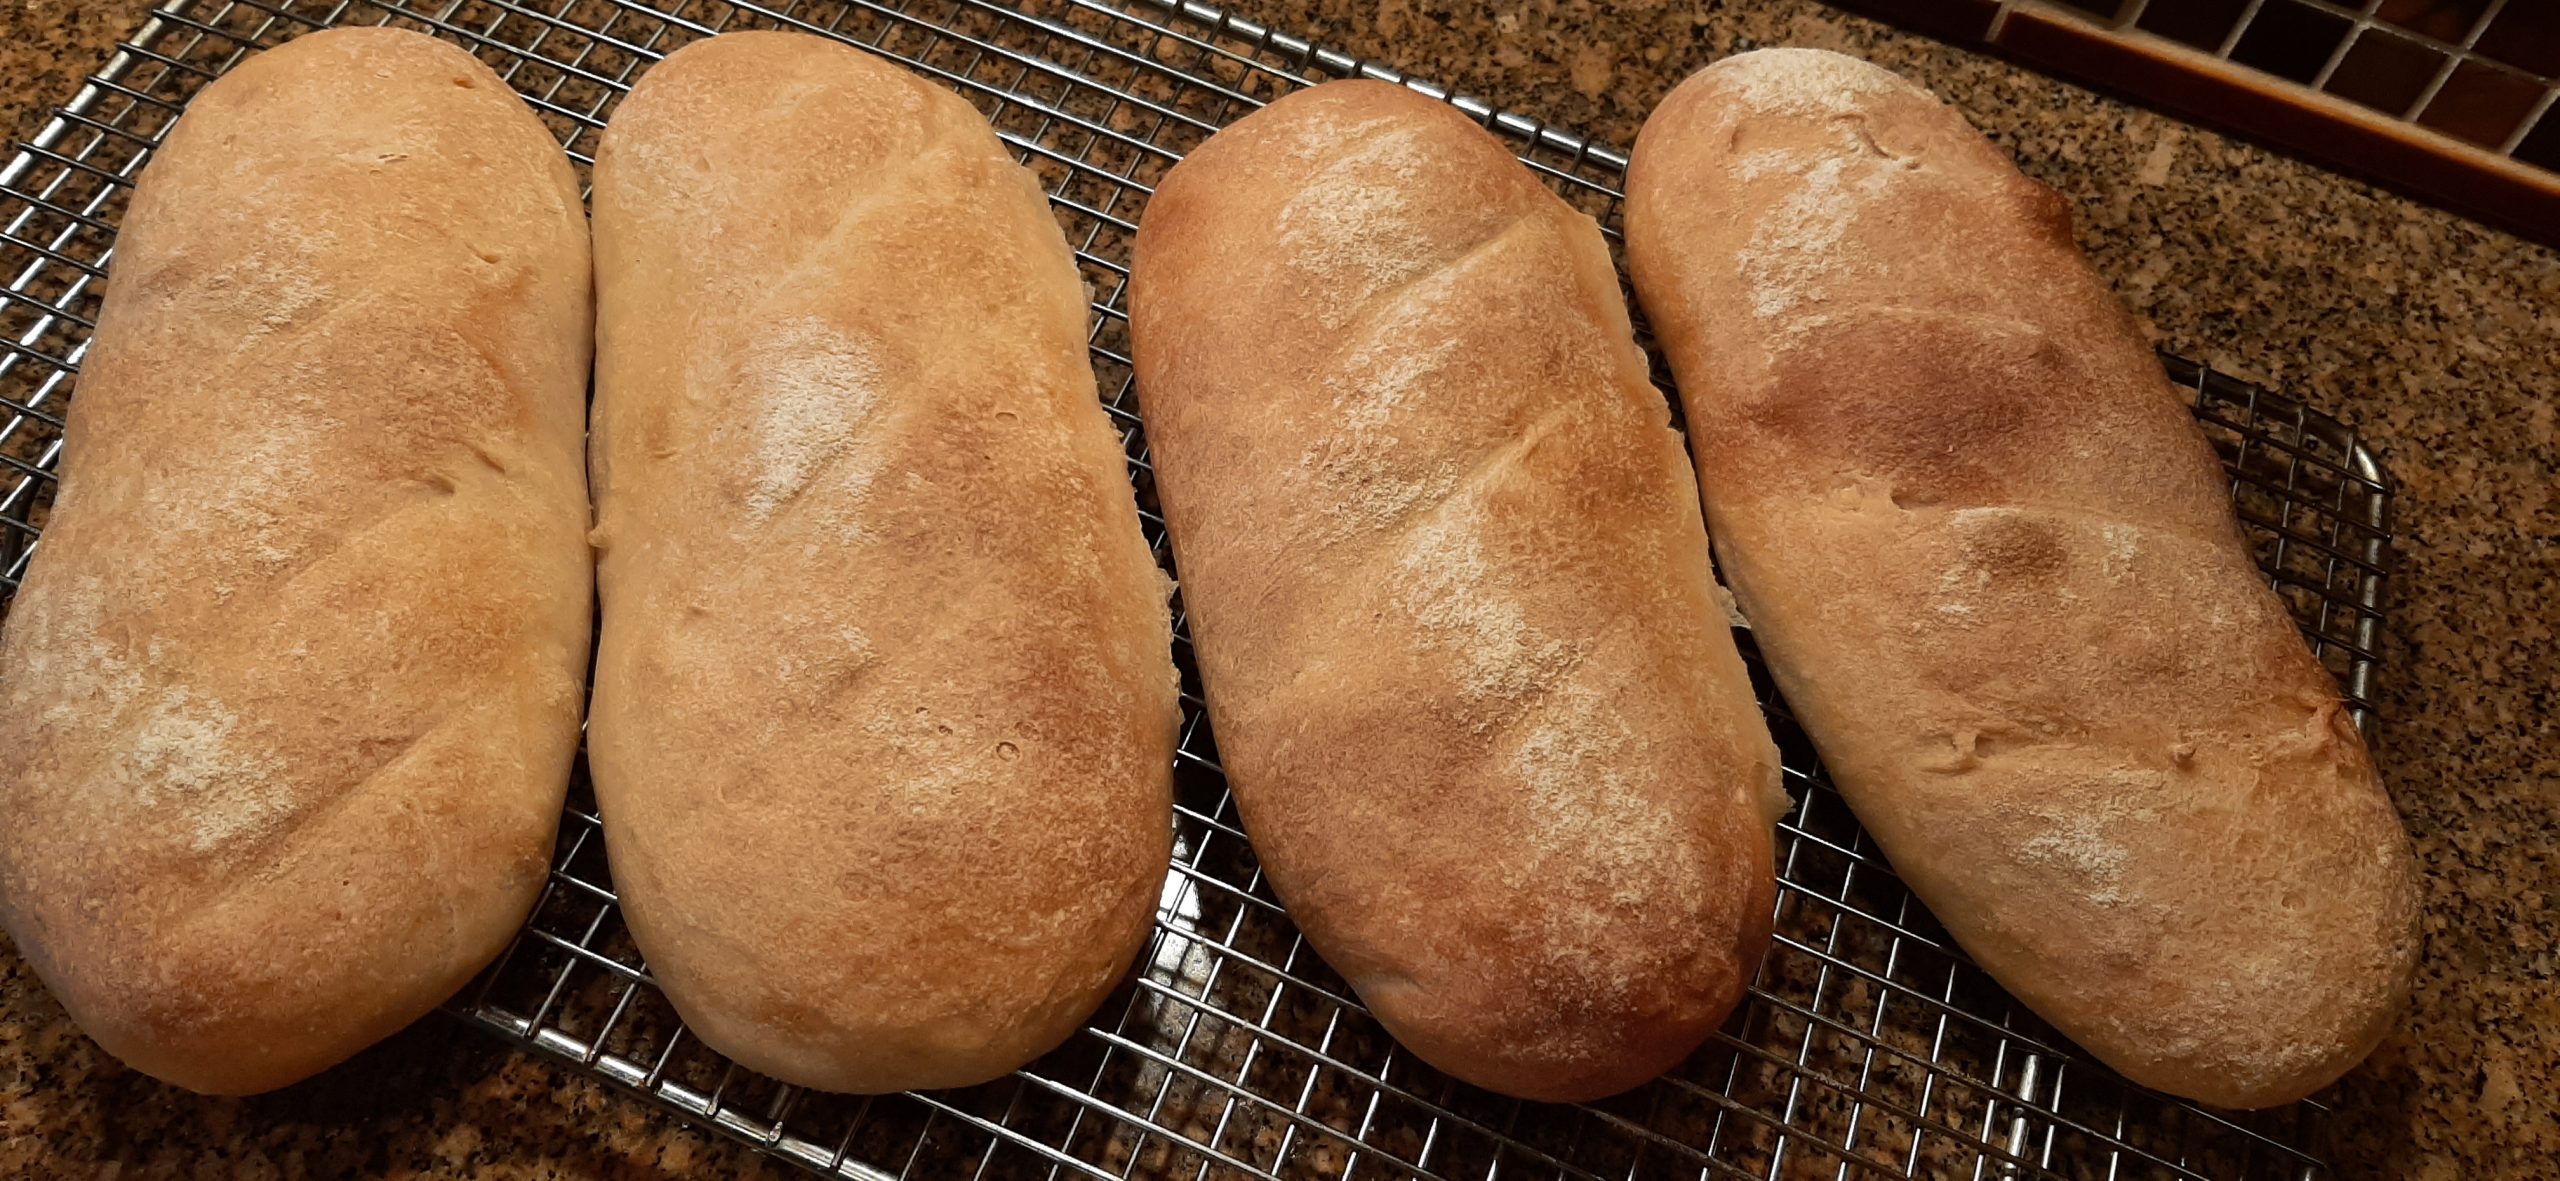
Divide dough in half. And then halve again. Shape dough into 4, roughly 10-inch-long loaves with rounded ends. Place on a parchment paper lined baking pan or pans, cover with plastic wrap that has been lightly coated with cooking spray, and let rise again until almost doubled – about 30-45 minutes.

Once doubled and just before placing in your pre-heated oven, sprinkle each baguette with flour and slash each top 3-4 times with a bread lame or serrated knife.

Spray loaves with water and place them in your pre-heated 450-degree oven. Set timer for 20-25 minutes. Bake for 5 minutes and spray with water again. After another 8 minutes spray again with water.

Bake for a total of 20-23 minutes or until baguettes are brown and crusty and have reached an internal temperature of 210-degrees.

Remove from oven and cool completely before storing them in an airtight container.     

To make the dough ahead, after forming the dough into an oiled ball, cover tightly with plastic wrap, and place in the fridge. The next day, punch it down, let it rest for about 10 minutes, and then shape.

*I always use instant yeast whether it is called for or not. But I also always treat it as just regular active yeast. This means allowing the liquid and yeast to mingle for a minute or two to prove to me that it (the yeast) is still alive and willing to work with me. Trust but verify.

BAKED SKINLESS HASSELBACK POTATOES

I sincerely hope that you are smarter than I am. Seriously. Because I keep forgetting that a potato exposed to light like the ones on my kitchen counter in a basket hanging out with the likes of onions, garlic, shallots, sweet potatoes, and acorn squash, start undergoing photosynthesis and converting those nutrients into energy. Photosynthesis then triggers the production of chlorophyll, and the potato turns green. Unfortunately, this process also creates solanine, a poison that can be dangerous if ingested in large quantities. So, whenever I find even a touch of “the green” it forces me to peel the potato, which in some cases is just fine.

But mainly I like to keep the skin on potatoes, because the skin contains fiber and Potassium, which can help lower blood pressure. Also Vitamin C – a large baked Russet potato with the skin on has 25 milligrams of vitamin C, which is more than 25% of the (RDA) recommended daily amount, Vitamin B6 – a large baked Russet potato with the skin on has 1 milligram of vitamin B6, which is 100% of the RDA, Iron – the skin of a whole baked potato provides 88% of the RDA amount of iron, Fiber – potato skins contains about half of the total dietary fiber in a potato and Folate (Vitamin B9) – the skin of a typical potato contains 30% more folate than the flesh. Folate helps the body create new cells, helps the body produce DNA, which carries genetic information, and works with vitamins B12 and C to help the body break down, use, and create new proteins

So, in summation – the skin of a potato is nutritionally good for us. Until you’re a dummy like me and realize those darling potatoes you had on your grocery shopping list 10 days ago, are still on your counter cuddled up with your onions etc. At which point you must carefully peel just a bit off one of the potatoes to see if there is danger lurking under the potato skin. If no green appears, you are free to use the whole potato, skin and all. However, if there’s a green tinge underneath the skin, you are pretty much obliged, for safety’s sake, to abandon all hope of baking the potato in its lovely nutritious skin.   

So, now, what to do when you really have a craving for a baked potato? Especially if you are like me, and the biggest appeal of baked potatoes is their ease of preparation. Well, you can do what I do. You bite the bullet, peel the little stinkers, and follow this recipe for a delicious and easy to prepare Hasselback potato.

Well, the sun is shining here in Western Washington. Even though outside the sky is blue, many of us are feeling rather blue inside. With every good reason, I might add. But I am going to force myself to just go on with life as if everything was just fine. Because I can’t make it OK for anyone but myself. I can’t prevent injustice. I can’t feed all the hungry children. I can’t insure health insurance for everyone. I can’t keep ugly men and women from doing everything possible to make life a living hell for anyone but themselves. But I can be a good friend. And I can take care of myself by trusting in the goodness of the people with whom I surround myself.

And that would be my advice for you too. Spend time with your friends. See your family members as often as possible. Go hear live music. Read good books*. Bake cookies and share them with your neighbors. Be that positive influence that defends our constitution. We need each other, and never more than in the next 4 years

*And speaking of books, I just finished The Leopard by Giuseppe Di Lampedusa. Set in the l860’s, it is (as the cover of the book implies), “a spellbinding story of a decadent, dying Sicilian aristocracy threatened by the approaching forces of democracy and revolution”. Beautifully written and although some of the characters are less than lovable, they certainly are entertaining and display foibles, some I recognize in others, and some I happen to possess myself. And all very, very real. And presented to us in the form of a lesson, rather than a dogma. I thoroughly enjoyed this book.

As always, peace and love from our home to yours.

3-4 Yukon Gold potatoes

kosher salt

freshly ground black pepper

2 T. unsalted butter, melted

Peel the potatoes and cut into ¼-inch slices, being careful not to cut completely through the bottom of the potato. (Placing pencils on each side of the potatoes when cutting, ensures you don’t slice all the way through the potato.) Place potatoes on a parchment paper lined baking sheet.

Using a pastry brush, slather each potato with half the melted butter and sprinkle with salt and pepper.

Bake in a pre-heated 450-degree oven for 40 to 45 minutes or until tender and golden brown. Baste with the rest of the butter about halfway through the baking process.

When tender and lightly browned, remove from oven and serve immediately. (And yes, you can serve these baked potatoes with all the trimmings as you would serve any other baked potatoes.) (And also, if you are smarter than me, you can leave the skins on the potatoes. Duh!)

CRUMBLE TOPPED PUMPKIN ZUCCINI CARROT PECAN BREAD

Well, it’s November 6th, and I am currently wearing black. I am in mourning for our nation and especially for the millions of people whom I fear will be adversely affected by the presumptive winner of the presidential election. And although I briefly considered starting my day with a double martini, I decided that it would in no way help our nation and might have some kind of adverse effect on how I make it through the rest of the day. I have really never started my day with alcohol except for adding a little Jack Daniels to my coffee while camping with Dan and Evelyn. (BTW – Thanks Uncle Dan and Auntie Evelyn (my kids’ auntie and uncle) for all the wonderful times we have shared over the years.)  

So, instead of feeling sorry for myself (and every other conscientious person I know), I’ve decided to dwell on the one bad thing that might not happen because of who won the election. There might not be any rioting or killing because some stupid idiots with guns and a feeling they had been cheated out of winning again, might just stay home and reflect on the many wonderful new things that might be coming their way. Like no social security, their affordable health plan revoked, school lunch programs for their children abolished, Medicaid eliminated, more people allowed to roam free with semi-automatic rifles, etc. etc. Now, isn’t that enough to make any “right” minded American happy?! OK, I’m done now. (Well, almost!) And no, I don’t really feel any better. But I had to say what I had to say anyway. But on to this recipe……

Every time I make Curried Pumpkin and Peanut Soup (recipe on site), I always have about a cup of pumpkin puree left over. And although I could just use it in the soup (no one would know the difference), that little bit of extra pumpkin becomes a challenge. And I love cooking challenges.

So, this time I decided it was time for a new breakfast bread. But one that also included chopped pecans, grated carrots, and zucchini, because, well, why not? (Plus, I had a small zucchini that needed to be used.) I went online and found the basic recipe on the whatsformeat.blogspot.com site. I made several changes, including adding a crumble topping, but thanks go to the owner of this site for the basic recipe.

So, if you too love a warm piece of quick bread for breakfast (or anytime really), then give this recipe a try. The bread is moist, tender, and full of flavor. And I promise you, your children will never know they are eating their veggies.

Well, that’s it for today. It’s going to take me a while to get used to the new regime. It probably isn’t going to affect people who have enough money to weather the storm. I’m not worried about that demographic. I fear for those who are poor, ill, aren’t white, not heterosexual, not happy in the body they were born with, pray to a God that isn’t recognized by some people in our country with narrow minds and no empathy, a women’s right to care for their own body, immigrants, and anyone who is in the least bit free thinking. Or has ever crossed paths in a negative way with our new ruler.

So, my hope for myself and all who share my worries is that we can divest ourselves of agony over situations out of our control, bitter feelings toward others with different perspectives, and just go on loving and taking care of each other like we always have. And that’s going to be hard. (At least it’s going to be very difficult for me to find forgiveness in my heart for people with only their own selfish agenda in mind.) But that’s really all we can do, my friends. Forgive, forget, stay positive, stay caring, and get on with our lives.

And as always, peace and love to all.

For the crumble topping: (I suggest you make this first so it can get cold in your fridge while you put the bread part together.)

2 T. packed brown sugar

3 T. unbleached all-purpose flour

¼ tsp. ground cinnamon

2 T. unsalted butter, cold and cubed

Mix the brown sugar, flour, and cinnamon together. Add the cold butter and using a pastry cutter or fork, cut butter into the brown sugar mixture until pea-size crumbles form. Or do what I do, dump the whole mess in a small food processor and whirl until chunks form.

Refrigerate until ready to use. (The colder the topping, the less likely it will sink into the bread while it is baking.)

For the bread:

½ c. vegetable oil
½ c. granulated sugar
½ c. brown sugar

3 lg. eggs
1 tsp. vanilla
1 c. grated zucchini, patted dry with paper towels
1 c. grated carrot, patted dry with paper towels
1 c. canned pumpkin puree

¾ c. chopped pecans
1 c. whole wheat flour
1 c. unbleached all-purpose flour, fluffed
1 T. ground cinnamon
1 tsp. ground nutmeg

¼ tsp. ground ginger

1/8 tsp. ground cloves
1 tsp. baking soda
¼ tsp. baking powder
½ tsp. kosher salt

(And I have no idea why the spaces. I can’t figure it out. And I’m too tired to play with it any longer.)

Grease a 9×5-inch loaf pan or 2 7-inch loaf pans. Line the bottom(s) with parchment paper. (After I place the parchment paper in the bottom of the pan or pans, I turn it over. This way the parchment paper is lightly greased on both sides to allow the baked bread to easily be lifted out of the pan and the parchment paper off the baked loaf.   
Beat the oil, granulated sugar, brown sugar, eggs, and vanilla together in the bowl of your stand mixer until smooth, creamy, and yellow.

Add the zucchini, carrot, pumpkin, and pecan pieces and mix until well incorporated. In a separate bowl whisk the whole wheat flour, all-purpose flour, cinnamon, nutmeg, ginger, cloves, baking soda, baking powder, and salt together. Add the dry ingredients to the wet ingredients until just combined, being careful not to overmix.

Scoop into prepared pan(s). Top with the crumble topping mixture.

Bake in a pre-heated 350-degree oven for 40-55 minutes or until a tester comes out clean. (You might want to check after 40 minutes, because all ovens are different and if the topping is getting too dark, you might want to cover it loosely with aluminum foil.)

Remove from oven and set on a wire rack. Let sit for about 15 minutes before carefully removing it from the pan or pans. Let cool completely before storing in a Ziplock bag or airtight container.

LEFTOVER BEEF, PORK, OR CHICKEN FAJITAS

So, here’s how this recipe originated.

The other evening, we had tickets to a musical in Everett. And as usual, we decided to have dinner at one of the local restaurants before attending the performance. We made our reservation, showed up on time, ordered a drink and our meal and were settled in our booth happily awaiting the pleasure of another great meal in this restaurant. And all was fine until I cut into my sirloin steak.

I had made a huge point about wanting my steak really, really rare. And the waitress had assured me it would be cooked as rare as the health department would allow. So, after a couple of bites I was less than happy. But I’m not one to make a fuss, because, what’s one medium rare steak in the grand scheme of things! (I mean really. It’s not like a certain felon winning the upcoming election. Now that would be a real reason to get upset. But over an unproperly cooked steak? Not that big a deal.)

But, when the waitress came around asking if everything was delicious, Mr. C. told her my steak was over cooked. She took one look at the steak on my plate and told me she was so sorry and would have a rare steak out to me ASAP. I demurred, but she would have none of that! She not only promptly brought me a rare steak, but also boxed up the first one for me to take home. So, this overcooked sirloin steak, currently residing in my refrigerator became a challenge. What to do with this small bit of cooked beef. And, what came immediately to mind? Well duh! Fajitas, of course! And at the mention of fajitas, Mr. C. immediately offered to go to the grocery store. He said I had him at the mere mention of “fajitas”! (He offered to go to the store because I don’t always have bell peppers on hand. I usually buy them only when needed.)  

So, then, for sure, it would be fajitas for dinner! And while I was at it, why not try out a new way to make fajitas using already cooked meat. Which then led me to realize, it didn’t have to be just cooked beef. Cooked pork or chicken would also work perfectly.

So, there you have it. The back story to this recipe. (And I know. You didn’t really need the back story. But I had fun writing about this adventure. And it’s my blog. So there!) So, I shall continue with the preface to this recipe as if I hadn’t already written anything at all about the recipe you find below.  

The main thing you should know about this dish is that it’s easy to prepare and quite economical. And you use leftover meat. Of course, if you want to make this dish with uncooked meat, that’s quite all right too. In fact, considering myself a decent human being, I’ve provided you with instructions for cooking the meat right along with the veggies.

And of course, you don’t have to make your own fajita seasoning or homemade flour tortillas. But of course, I always suggest that you at least make your own seasoning mix. Especially when the herbs and spices are as common as the ones used in this fajita seasoning mix.

Well, that’s all for today. It’s raining cats and dogs outside and the wind is playing havoc with the few leaves that are still valiantly clinging to our deciduous trees. But I must say, the wind is winning this battle.

Speaking of cats, I have included a picture of Max, one of our orange fuzzies. Although there are dozens of warm and cozy places for our kitties to spend their 20 hours a day napping, Max has decided the pillows on our guest bed provide him with maximum comfort. Or he just wants to drive me crazy in my effort to keep everything neat and tidy. Which is of course, my fondest hope! Regardless, he was most upset when I woke him from his slumbers. And having roused him, didn’t have the decency to stick around after taking his picture to cuddle with him. Life can be very trying if you are cat.

And speaking of critters, real or imagined, I just finished reading A Journey with Orvis, written by Mose Tuzik Mosley. Mr. Mosley is a travel writer. But this book, his first novel, copyright 2024, is a travel tale with Orvis, his imaginary dog. A delightful story and for me, a great way to look back on my own travels to places like Istanbul, Zagreb, and Paris. So, if you enjoy travel books, and learning about interesting places you too might like to visit, this is an excellent read. I enjoyed every page of this book.

On the happy thought of wonderful places yet to visit, as always, I wish you peace and love.   

For the Fajita Seasoning:

4 tsp. chili powder

2 tsp. ground cumin

2 tsp. paprika 

1 tsp. granulated sugar 

1 tsp. granulated garlic

1 tsp. granulated onion

½ tsp. kosher salt, or more to taste

pinch cayenne pepper 

freshly ground black pepper

Combine all ingredients and keep in a covered jar in your pantry.

For ALREAD COOKED meat and veggie tortilla filling:

2 T. extra virgin olive oil, divided

1 onion, quartered and thinly sliced

2 bell peppers, (I use one red and one yellow or orange) quartered and thinly sliced

1 sm. garlic cloves, finely minced

6 tsp. fajita seasoning (recipe above), or more to taste

6-8 oz. of very finely sliced cooked beef, pork, or chicken  

2 to 3 T. beef, chicken, or veggie broth

3-4 lg. flour tortillas (see my recipe for Flour Tortillas on this site)

Heat 1 tablespoon of the olive oil in a large skillet on medium high heat. Add the onion and cook, stirring occasionally, until the onion becomes soft.

Add the peppersalong with the 2nd tablespoon of olive oil to the skillet, stir occasionally, and cook until the peppers are crisp tender. Add the garlic and cook for one minute.

Add the fajita seasoning along with the sliced cooked meat and broth. Lower the heat to medium. Heat for 3 to 4 minutes, stirring all the time. (You want the meat to get heated through and the flavors to combine, but you don’t want to overcook the meat. Taste and add more fajita seasoning if needed.

Serve immediately in warmed* tortillas.

Offer a variety of toppings at the table.  

*To warm one or two flour tortillas, place them on a slightly damp paper towel in your microwave on high for about 15 seconds.  

For the table:

For example: sour cream, grated cheese (I use sharp cheddar cheese), sliced avocado or guacamole, salsa, lime wedges, finely chopped green onion.

For UNCOOKED meat and veggie tortilla filling:

2 T. extra virgin olive oil, divided

1 onion, quartered and thinly sliced

2 bell peppers, (I use one red and one yellow or orange) quartered and thinly sliced

1 sm. garlic cloves, finely minced

6-8 oz. of very finely sliced uncooked beef, pork, or chicken  

6 tsp. fajita seasoning (recipe above), or more to taste

2 to 3 T. beef, chicken, or veggie broth

3-4 lg. flour tortillas (see my recipe for Flour Tortillas on this site)

Heat 1 tablespoon of the olive oil in a large skillet on medium high heat. Add the onion and cook, stirring occasionally, until the onion becomes soft.

Add the peppersalong with the 2nd tablespoon of olive oil to the skillet, stir occasionally, and cook until the peppers are crisp tender. Add the garlic and cook for one minute.

Add the uncooked meat and stir fry beef or pork until your desired doneness and chicken until no pink remains.

Add the fajita seasoning along with your broth of choice. Lower the heat to medium. Heat for 3 to 4 minutes, stirring all the time. (You want the meat to get heated through and the flavors to combine, but you don’t want to overcook the meat. Taste and add more fajita seasoning if needed.

Serve immediately in warmed* tortillas.

Offer a variety of toppings at the table.  

*To warm one or two flour tortillas, place them on a slightly damp paper towel in your microwave on high for about 15 seconds.  

For the table:

For example: sour cream, grated cheese (I use sharp cheddar cheese), sliced avocado or guacamole, salsa, lime wedges, finely chopped green onion.  

BAKED ZUCCHINI ROUNDS

It’s hard for me to understand when I read about people opening their front door to find several fresh zucchinis on their porch and find fault. Or making jokes about offloading zucchini in the comics. If this bounty sharing ever happened to me, I’d be so very happy even one time, and darn right ecstatic if it happened several times. Why? Because I love zucchini. And for whatever reason, even though I have tried repeatedly, zucchini does not like our yard. Or me. Or “whatever” I am doing that results in “no zucchini again this year”. And frankly, I am tired of hearing – “anyone can grow zucchini” from well-intentioned people who have no idea how much they are hurting my delicate sensibility.

So, basically what I am saying is this. If you happen to be a neighbor or friend with an overabundance of zucchini, feel free to leave the darlings, large or small, on our front porch any time, night or day. But on to the real reason for this post. How to bake zucchini so that everyone in your family will be pleased to see it on the dinner table for the 5th straight day in a row.

And believe me, I am not unaware that some people find zucchini a bit lame in the flavor department. I get that. I too fell into that category until I discovered how the simple combination of butter, corn meal, seasoned salt, and pepper could turn zucchini into a terrific veggie side dish – Fried Zucchini. (Recipe on this site along with several other zucchini recipes.)

So, this is just one more simple way to turn zucchini (Cucurbita pepo), a summer squash that’s part of the gourd family Cucurbitaceae, into a tasty veggie addition to any dinner. BTW, it’s also known by other names, including courgette, a French word that means squash, and baby marrow, a term used in Great Britain. (Your botany lesson for today.)

Along with being easy to prepare, this recipe calls for baking the squash. And isn’t that nice. Less calories and more time to put the finishing touches on whatever else you happen to be serving. (I love it when I can just stick a dish in the oven and let this fantastic piece of engineering do the hard work.)

We are actually home today. I was wrong in a previous post and the ballet is not today but next Sunday. Hallelujah! It gives me time to write up this post and finish telling you about my latest book – Remarkably Bright Creatures by Shelby Van Pelt.

Well actually, I am not going to tell you anything more about this brilliantly written book. Except of course to say – read it! It is an endearing and inspiring story. And I must agree with the premise. I have found many critters who are characterized as mentally inferior to humans who show compassion, understanding, empathy, sincerity, and wisdom ever so much better than some members of the human species who appear to have no brain or charitable characteristics at all. Enough said!

But as always, peace and love to all. (Except mosquitos and horse flies!) (I must draw the line somewhere!)

1 med. zucchini, sliced into ¼-inch thick rounds 

¼ c. Italian breadcrumbs

¼ c. finely grated Parmesan cheese

¼ c. yellow cornmeal

½ tsp. granulated garlic

pinch seasoned salt

freshly ground black pepper

milk

Line a baking sheet with parchment paper.

In a shallow dish (I use an 8-inch cake pan), whisk the breadcrumbs, grated Parmesan cheese, cornmeal, granulated garlic, salt, and pepper together.   

Pour a bit of milk into another shallow dish (cake pan).

Place the cut zucchini rounds into the milk, making sure to coat both sides.

Transfer the slices to the crumb mixture and coat both sides.

Place on the prepared pan and bake in a pre-heated 400-degree oven for about 30 minutes or until the zucchini chips are very lightly golden. Serve immediately.

Note: No, baked zucchini is never going to be as crisp as fried zucchini. But it’s still delicious and better for us. Sigh…….

CREAMY OVERNIGHT COLESLAW  

OK, I know, I already have several coleslaw recipes on this site. But I love coleslaw. Good coleslaw! Not just shredded cabbage with no dressing or at best, a wimpy dressing, which is what I encounter so often in restaurants. What’s with these people? Do they not think that some of us actually like coleslaw? Hello! I mean really! Put some savory/sweet dressing on the cabbage and I promise to stand up and applaud the cook who actually shows some interest in what he or she is serving.

Actually, there is one restaurant that I know of in our area, that makes really good coleslaw. And that’s Orlando’s Southern Barbecue in beautiful Oak Harbor on Whidbey Island. They make great coleslaw, fabulous fried catfish (in case you are interested), and other terrific, barbecued items. And they have live music. Mr. C. plays in some of the bands that are featured on their stage. So, good on them for serving good food and good music. A winning combination. But back to this coleslaw.

When I was preparing the menu for our last JazzVox concert, I needed some crunch. And what is better at crunch than coleslaw. And of course, it’s a very inexpensive dish to serve. And that is always a consideration.

But enough about coleslaw. (Even if this post is all about coleslaw!) I need to get back to my current read – Remarkably Bright Creatures by Shelby Van Pelt. So far, I love this book. So, more to come about this delightful read when I have actually finished the book.

But the book I can write about is one we have had on our shelves for a very long time. The book is entitled Through the Looking-Glass by Lewis Carroll. And although I must have read this book at some time in the past, it just jumped out at me when I was perusing our bookcase. And since I really couldn’t remember the story, I decided to just sit down and open my mind to this wonderful piece of writing. And to once again enjoy the poetry of Charles Lutwidge Dodgson (his pen name was Lewis Carroll) and the fabulous illustrations by Sir John Tenniel.

So, if you have never read this fascinating tale or haven’t read it for a long time, I suggest you do so. And just to refresh your memory, I will give you a brief taste of what you will experience.

Jaberwocky.

“Twas brillig, and the slithy toves

Did gyre and gimble in the wabe:

All mimsy were the borogroves,

And the mome raths outgrabe.

Humpty Dumpty

Other wonderful illustrations in the book

Well, it’s Friday, and we actually have no plans for this evening. And that, my friends, does not happen very often. So, today I am trying out a recipe for arancini. (Italian rice balls.) I plan to serve them as an appetizer at an upcoming event at our home. And although I usually throw caution to the wind and try out new dishes on guests, I decided with these little darlings that I plan to bake rather than deep fat fry, I better use a bit of good sense and try them out on Mr. C. first. Wish me luck!

And as always, from our home to yours, peace and love to all.

¾ c. mayonnaise

2 T. apple cider vinegar 

1 T. Dijon mustard

1 T. pure maple syrup  

¾ tsp. celery seeds

¼ tsp. fine sea salt

freshly ground black pepper

6 c. thinly sliced and chopped green cabbage

2 c. thinly sliced and chopped red cabbage

2 carrots, grated

2 celery ribs, plus leaves, finely chopped

2 green onions, finely chopped

Whisk the mayonnaise, apple cider vinegar, Dijon mustard, maple syrup, celery seeds, salt, and pepper together in a covered container.

Toss the green cabbage, red cabbage, carrots, celery, and green onions together in a mixing bowl. Add half of the dressing and toss until every bit of vegetative matter is coated with the dressing. Cover and refrigerate overnight. Also place the remaining dressing in the fridge.

About an hour before serving, remove both salad and reserved dressing from fridge. Using a large, slotted spoon, lift the salad into a pretty serving dish. (You want as much of the liquid that accumulated overnight in the bottom of the bowl to stay in the bottom of the mixing bowl. Discard the liquid in the bottom of the bowl.)

Stir in the remaining salad dressing, taste, and adjust seasoning if required.

GROUND BEEF PATTIES IN A BEEFY, ONION, AND SOUR CREAM SAUCE

As I have written several times in my posts, I am getting lazier and lazier. And the other day I was in no mood to cook dinner. I’m currently recovering from cataract surgery, and it hasn’t gone as easily as predicted. Oh, not to worry. My eyes will eventually be just fine. They are just taking their own sweet time to stop being swollen. My eye doctor isn’t really concerned. (Of course he isn’t! They’re not his eyes!) But I trust him, and he is keeping a close eye (so to speak) on my progress.

But in the meantime, my “condition” is enough to keep me less than energetic when it comes to spending time in the kitchen. Or any other room besides my bedroom, for that matter. But I am getting better and I’m positive my energy will return after I stop feeling sorry for myself. But while I get my equilibrium back, I’m not terribly interested in trying new and amazing ways to tantalize our taste buds.

But dinner still must happen. So, with that in mind, I came up with the recipes you find below.

All three are easy to prepare, relatively inexpensive to make, and highly flavorful. And honestly, I have been making a variation of every one of these dishes for decades now. So, it was very easy for me to prepare this dinner combination.

After dinner, and I realized how yummy every part of our dinner had been, I decided I better pass the recipes along to you. Even if at most you would call them elementary efforts.  

None the less, below you will find three recipes that, as described above, would never be considered haute cuisine, but are perfect for a cold, fall repast. And I think everyone in your family would find this comfort food meal very tasty.

Well, that’s it for today. We are off to enjoy Village Theater’s production of Camelot this evening in Everett. This has turned out to be a week of cultural events. Last Sunday – ACT theaters Sunday matinee production of Mrs. Loman is Leaving. (Fantastic BTW). Tonight – Camelot. And this Sunday, we will be attending a ballet at McCaw Hall in Seattle. And no, we don’t always have weeks like this. But when they do happen, it’s like being on holiday.

In between caring for my eyes and attending cultural events, I have also managed to get in a bit of reading. I just finished reading Castle Skull by author John Dickson Carr. What a romp! The story is set in a castle on the Rhine River that happens to look like a skull from afar. Three inexplicable murders lead world-famous sleuth Bencolin into a strange case of twisted revenge. And to make things really fun, the characters include a fascinating list of suspects: a mad duchess, an actor with a Hamlet complex, a virtuoso who likes to play his violin in the dark, a glamorous young lady who paints in the modern manner, a dynamic Belgian financier and his beautiful, weak-willed wife, and a newspaperman whose job is to report on Europe’s haunted castles. Would I classify this work of fiction as a tour de force? Heck no! Is it a fun read? Absolutely!

And for maybe the last time before the 5th of November, please vote. If you have already voted – our nation thanks you. If you haven’t voted yet, get off your duff and do your civic duty.

But regardless, as always, peace and love to all.

GROUND BEEF PATTIES IN A BEEFY, ONION, AND SOUR CREAM SAUCE

1 lb. lean ground beef

1 T. + ¼ tsp. Montreal Steak Seasoning, divided

1 T. extra virgin olive oil

1 T. unsalted butter

1 onion, finely chopped

1 T. flour

1 c. water

1 tsp. beef base (I use Better Than Bouillon Beef Base)

2 tsp. Worcestershire sauce

¼ tsp. granulated garlic

¼ tsp. seasoned salt

freshly ground black pepper

⅓ c. sour cream

Combine the ground beef and 1 tablespoon of Montreal Seasoning in a mixing bowl. Divide into 4 balls and then form into four patties.

Heat the olive oil and butter together in a small frying pan. Add the ground beef patties and cook just until done. Remove from pan and set aside.

Using the same pan, cook the onion until soft and beginning to caramelize. Stir in the flour and cook for a couple of minutes.

Slowly add the water until smooth and no flour lumps remain. Then stir in the beef base, Worcestershire sauce, granulated garlic, seasoned salt, and pepper. Let simmer for a couple of minutes before stirring in the sour cream.

Place the cooked ground beef patties back in the pan and cook until they are once again warm.

The patties and gravy are just wonderful served with Easy Mixed-Rice Pilaf and Oven Baked Acorn Squash. (See recipes below.)

EASY MIXED-RICE PILAF (for 4)

The rice blend I used. (I like it a lot!)

2¼ c. water

2 tsp. beef base

2 tsp. dehydrated onion pieces

¼ tsp. granulated garlic

¼ tsp. seasoned salt

freshly ground black pepper

1 T. unsalted butter

1 c. mixed rice (not instant) (I used a blend of aromatic purple, red, and brown rice because that’s what I had on hand)

Combine all ingredients in a heavy, covered pan. Bring to a boil, stir, reduce heat, cover pan, and simmer for about 45 minutes. Stir occasionally.

Great served anytime you need a savory rice side dish.

OVEN BAKED ACORN SQUASH (for 2)

1 acorn squash, cut in two along the stem and all seeds removed

water

2 T. unsalted butter

2-4 T. brown sugar

kosher salt

freshly ground black pepper

Place the squash, cut side down, in a baking pan. Pour in enough water to bring the water to about ½-inch deep.

Bake the squash for 60-75 minutes in a pre-heated 400-degree oven.

Remove from oven when the squash is very soft. Turn off the oven.

Turn each half over and add a tablespoon of butter and 1-2 tablespoons of brown sugar to each. Then lightly sprinkle with salt and pepper. Place back in the cooling oven for about 5 minutes. (This allows the butter and brown sugar to melt together.)

FRIED CHICKEN IN A BASIL CREAM SAUCE  

I think these are pork chops. But the fried chicken cutlets looked a lot like this. (Hey, I’m old! So please, cut me some slack!)

Basil Cream Sauce. (I think.) Or it could be the sausage gravy. Whatever! (Same applies, I’m old and the trip was a couple of months ago.)

I always begin a trailer trip with a variety of already prepared food that I can stick in our trailer freezer and bring out whenever I want. I try to vary the recipe selection, but the following items always accompany our journeys – a quick bread or two, cookies (usually two kinds), chili, a couple of soups, and meat loaf. But the items I have found the most helpful, because they often take time to prepare, are homemade sauces and gravy. I have been bringing marinara sauce along now for years. But on this last trip I also brought sausage gravy (for biscuits and gravy), and this basil cream sauce.

I was a bit hesitant to freeze these cream sauces, but both warmed up perfectly.

In addition to the food I prepare, I always bring packages of breakfast meat (bacon, Sausage, and ham), ground beef, pork chops or pork tenderloin, chicken breasts, steak, Italian dinner sausages, frozen peas, fresh ravioli, and ice cream. (Always must have ice cream on board!)

And of course, we visit grocery stores along the way. But if I have most of the dishes that take a lot of time to prepare made ahead, or cuts of quality meat that may not be available in a grocery store the size of our guest bath, I can rest easier on the road.

But enough about my food insecurities, and back to this recipe.

I found this recipe on the life-in-the-lofthouse.com site. I made some slight changes, but mainly to accommodate preparing the sauce and frying the chicken at different times. And I must say, served with 4-cheese ravioli and frozen petite peas, we enjoyed a delightful meal. (A “gourmet-on-the-go meal” if I do say so myself!)

So, I hope you enjoy this simple chicken dish as much as we do. (And no, you don’t have to own a trailer or be on a trailer trip to make this dish!)

But if you are a fellow travel trailer owner, don’t hesitate to build sauces ahead of time and take them along with you on your next adventure. Homemade sauces are just so much better than most sauces that beckon to you from the shelves of your local grocery store.

Well, it’s early afternoon, and since I don’t need to plan or cook dinner (Mr. C. has a gig in a restaurant this evening), I’m going to help Lucas Davenport find a deranged killer. OK, I’m not really going to be of any assistance, but I’m going along for the ride anyway. My current read is by John Sandford entitled Rules of Prey. And even though I know in the end the killer is going to be found and punished, I’m still excited to find out he gets his! (If only in real life, bad people would get their comeuppance too. But unfortunately, no one has appointed me judge and jury! But if they had, I would make certain that a certain felon would never be able to cause so many people distress or continue to wreak havoc on our planet.) (Just sayin”!)

Peace and love to all.

Fried Chicken

1 lg.  boneless, skinless chicken breast, sliced into ½-inch thick cutlets and patted dry

2 T. whole milk

½ c. dried Italian breadcrumbs

3 T. unsalted butter

Place the milk in a shallow bowl, and the breadcrumbs in a separate shallow bowl. Dip each chicken cutlet thoroughly in milk, then coat with breadcrumbs.

In a large skillet, melt the butter over medium-low heat. Cook the coated chicken cutlets until golden-brown on each side and the internal temperature reaches 165-degrees.

Remove from pan and set aside.   

Basil Cream Sauce

3 T. unsalted butter

2 cloves garlic, minced

1 T. flour

½ c. chicken broth

½ c. heavy whipping cream or part whole milk

½ c. finely grated Parmesan cheese

¼ c. chopped fresh basil

freshly ground black pepper

Melt the butter in a frying pan. Add the garlic and cook for 1 minute over medium heat. Add the flour and cook for a couple of minutes. Add the chicken broth. Bring to a boil over medium-high heat. Stir in cream. Bring to a light boil and cook for about 5 minutes.

Remove from heat and stir in the Parmesan cheese, chopped basil, and pepper.

Serve over the fried chicken.   

CAJUN LEFTOVER SALMON CROQUETTES  

Salmon Croquettes

Cajun Sauce

I love having leftover salmon in my fridge. First of all, it means the salmon is already cooked. And of course I could just serve it as prepared, but what fun is that? Why not make it into something new and exciting? So, that’s exactly what I did the other evening.

But first I went online for inspiration. And I found this recipe (with a couple changes) on the africanbites.com site. Then I made a simple sauce to serve with croquettes, because what doesn’t taste better when dipped in a sauce? Right? Then what to serve with the salmon cakes? Well, in for a dime, in for a dollar (as the old saying goes), why not polenta and sugar snap peas? OK, now we’re talking. I had a plan.

And I’m telling you the truth, the combination of dishes was perfect. A bit of savory, a bit of heat, a bit of spicy, and a bit of crunch from the snap peas. All in all, a fine meal if I do say so myself!

And best of all, the dishes were easy to fix. Yes, a bit of time was required, but then what doesn’t take time to fix? Anyway, I managed, and I’d bet dollars to donuts you could too.

So, if you ever find yourself with leftover salmon, give this recipe a try. And if you have never tasted or cooked polenta, what in the wild world of sports are you waiting for? Polenta is food from the Gods! It goes with bloody everything!

OK, I’m done now. Just make these croquettes and be happy.

And as always, peace and love to all.   

3 eggs, divided

½ -1 tsp. hot sauce (I use Frank’s RedHot)

½ finely diced onion

1 garlic clove, finely minced

¼ tsp. seasoned salt

¼ tsp. white pepper

1 tsp. Cajun seasoning (see my recipe below)  

1 green onion, diced

1 c. plain breadcrumbs, divided, or more as needed

2 c. flaked cooked salmon 

¼ c. veggie oil

2 T. unsalted butter

Beat 2 of the eggs in a large mixing bowl. Then mix in the hot sauce, onion, garlic, seasoned salt, white pepper, Cajun seasoning, and green onion until well combined.

Add ¼ cup of the breadcrumbs and the flaked salmon. Mix until well combined.

Place in the fridge for a good half hour to let everything firm up a bit.

Using a large ice cream scoop, form the mixture into balls and place on a parchment paper lined baking sheet. Then gently flatten them a bit.  

Whisk the remaining egg in a flat container (I use an 8-inch round cake pan). Place the remaining ¾ cup breadcrumbs in another flat container. 

Lightly dip the croquettes into the egg mixture until completely coated. Then pat them in breadcrumbs. Set back on the same parchment paper lined baking sheet. Refrigerate until ready to fry.

Heat a medium sized cast iron skillet or non-stick frying pan over medium heat, then add the oil and butter. Let the oil and butter heat until it reaches about 350-degrees.

Gently place the croquettes in pan using a slotted spatula. Fry for about two minutes per side or until golden brown.  

Transfer to a plate lined with paper towels and serve hot with Cajun Mayo Sauce, Creamy Polenta, and Stir-Fried Sugar Snap Peas. (See recipes below.)

CAJUN MAYO SAUCE

¾ c. mayonnaise

1-3 tsp. Cajun seasoning

½ – 1 tsp. hot sauce (I use Frank’s RedHot)

Mix all together and refrigerate until ready to use.

CREAMY POLENTA

2½ c. chicken broth

1½ c. water

1 tsp. kosher salt

tiny pinch white pepper or freshly ground black pepper

1 c. yellow polenta (not instant) 

2 T. unsalted butter

4 oz. (½ pkg.) cream cheese

Bring the chicken stock, water, salt, and pepper to a boil in a heavy, covered 2 or 3-quart pan. Slowly whisk the polenta into the boiling liquid to prevent any lumps from forming.

Reduce the heat to a very low simmer. Continue to whisk the polenta until it just starts to thicken. Then cover the pan and let the polenta cook for about 25 minutes. Stir occasionally with a wooden spoon so that the polenta doesn’t stick to the bottom of the pan. The polenta should be soft and tender when done. If not, let it cook a little longer. Then stir in the butter and cream cheese. Serve immediately.

STIR-FRIED SUGAR SNAP PEAS

1 T. extra virgin olive oil

2 c. fresh sugar snap peas

¼ tsp. seasoned salt, or more to taste

freshly ground black pepper  

Rinse and dry the snap peas and (optionally) remove the tips and any strings that come off with them.

Heat the oil in a skillet over medium-high heat.

Once hot, add the snap peas and cook for 2-3 minutes, stirring constantly until the peas are bright green in color and barely fork tender (we prefer them to still have a little crunch).

Remove from the heat and stir in seasoned salt and pepper. Serve hot.

CAJUN SEASONING:

2 T. paprika

1 T. granulated onion

1 T. granulated garlic

1 T. dried oregano (Mexican oregano preferred) (If the dried oregano leaves are   large, break them down a bit in a mortar and pestle or spice grinder)

1 T. dried thyme

1 T. freshly ground black pepper

1 T. kosher salt

1 tsp. cayenne

Combine all the ingredients and store in an air-tight container.

CORNMEAL BISCUITS WITH HONEY OR MAPLE SYRUP COMPOUND BUTTER

It is never easy to figure out exactly what to serve with soup. But at our house, there are two options that always work for us – garlic bread or cornbread.

So, when I was planning to serve soup at a recent JazzVox concert at our home, I decided to use my recipe for Garlic Bread from Scratch (recipe on site) and instead of cornbread, I thought cornmeal biscuits would be easier to serve. (Spreading butter on cornbread can be kinda messy.) So, based on a bit of research, I came up with the recipe you find below for a biscuit containing cornmeal which provided our guests with a surface on which to easily spread soft butter. And then I thought, why not flavor the butter, because I can’t be the only person who loves not only butter on my cornbread, but a bit of honey or maple syrup too! So, there you have it. The method to my madness!

For this event, I made the biscuits quite small (I used a two-inch biscuit cutter), because they would be easy to eat and because they looked so darn cute on a serving plate.

So, next time you serve soup, you might want to give this recipe a try. Yummy biscuits and the compound butter is really delicious.

Well, my work here is done. And the rest of my day is free of encumbrance. The only decisions I need to make today are 1) which book to read next and 2) what to cook for dinner?

And speaking of books, I just finished (for the second time), Gail Honeyman’s novel entitled Eleanor Oliphant is Completely Fine. It is the kind of book that inspires the reader to strive to be a better person and to have compassion for others who might behave and act strangely. I absolutely suggest you read this book. And speaking of suggestions…..   

Please vote for the rights of others in the upcoming November election. For democracy, and civility, and compassion. Our nation is on the brink of losing the fundamental right to freedom. Freedom to believe as we choose, to care for our own bodies as we choose, and to assist those who were not born with the advantages that some of us take for granted.

Peace and love to all.   

CORNMEAL BISCUITS

2 c. unbleached all-purpose flour, fluffed  

1 c. yellow cornmeal

2 tsp. granulated sugar or maple sugar (if you are using maple syrup in your compound butter)

1 T. baking powder  

1 tsp. baking soda

1½ tsp. kosher salt  

½ c. (1 stick) cold unsalted butter, cubed

1⅓ c. whole buttermilk

Line a baking sheet with parchment paper.

In the bowl of your food processor, whirl the all-purpose flour, yellow cornmeal, sugar, baking powder, baking soda, and kosher salt together.

Add the cold butter and pulse until the dough resembles coarse crumbs. Slowly add the buttermilk to the flour mixture and pulse just until combined.

Place the dough on a lightly floured surface. Pat the dough with floured hands until about ½ inch thick.

Using a 2½ to 3-inch floured biscuit cutter, form and place the biscuits on the prepared baking sheet. (After cutting the first round of biscuits, pull the remaining dough into a ball, pat out again, and cut more biscuits until all the dough is gone.)     

Bake in a pre-heated 425-degree oven for 12-15 minutes, or until just set. Do not overbake.

Remove from oven and serve warm or at room temperature. Great smeared with Honey or Maple Syrup Compound Butter. See the recipe below.

HONEY OR MAPLE SYRUP COMPOUND BUTTER  

1 c. (2 sticks) unsalted butter, room temp.

⅓ c. honey or maple syrup

2 T. powdered sugar

¼ – ½ tsp. flaky sea salt  

Beat the butter in the bowl of your stand mixer using the paddle attachment for 1 minute on medium speed or until the butter is completely smooth and creamy. Add the honey or maple syrup, powdered sugar, and ¼ teaspoon of the flaky salt.

Beat at a medium-high speed until the mixture is completely smooth, about 1 minute. Scrape down the sides of the bowl and beat until the butter is completely smooth and creamy. Taste. Add more salt if desired. (For the creamiest and fluffiest compound butter, beat for 3-4 minutes.) Scoop into a pretty serving bowl.

Cover tightly and store it in your refrigerator.

Always serve the compound butter at room temperature.