Author Archives: Patti

CRUMBLE TOPPED PEACH MUFFINS  

Maybe you don’t know this, but I didn’t like muffins for many years. They were always dry. (They also were not homemade muffins.) But then, I had never made a muffin either except for bran muffins. (Which are marvelous, BTW.) But a few years ago, I decided to give other muffins a try. And low and behold, the muffins weren’t dry. They were flat out delicious.

And as I was writing up this preface, I decided to check which muffin recipe I posted first, after my favorite bran muffin recipe, that is. And I couldn’t find my go to, always delicious, decades old, the recipe given to me by my sister-in-law Evelyn for the best bran muffins ever, anywhere on my site. How could I possibly have been so remiss as to not have given you that recipe years ago? But no, I couldn’t find it anywhere. Granted, the Six Week Bran Muffin recipe can be found anywhere. But why hadn’t I posted it too?

Anyway, I plan to rectify my error soon. But I think I’ll halve the original recipe from making 5 dozen to only 2½ dozen. Or even better, third the recipe for my own convenience. (The original recipe was great when I had 4 kids at home. But not so much now.) Anyway, that recipe will be coming your way soon. Now, where was I?

Oh yes, I was about to expound on the glories of this fantastic recipe I found on the sallysbakingaddiction.com site. I did make a slight change, but then, that’s my prerogative.

Now that peaches are in every fruit stand, I see no reason why you shouldn’t rush right out, buy a few peaches, and make these muffins for your family and friends.

I could continue giving you all the reasons you should make these muffins at your earliest convenience, but I’m busy today. So, you’ll just have to find out for yourselves.

And as always, peace and love from our home to yours.  

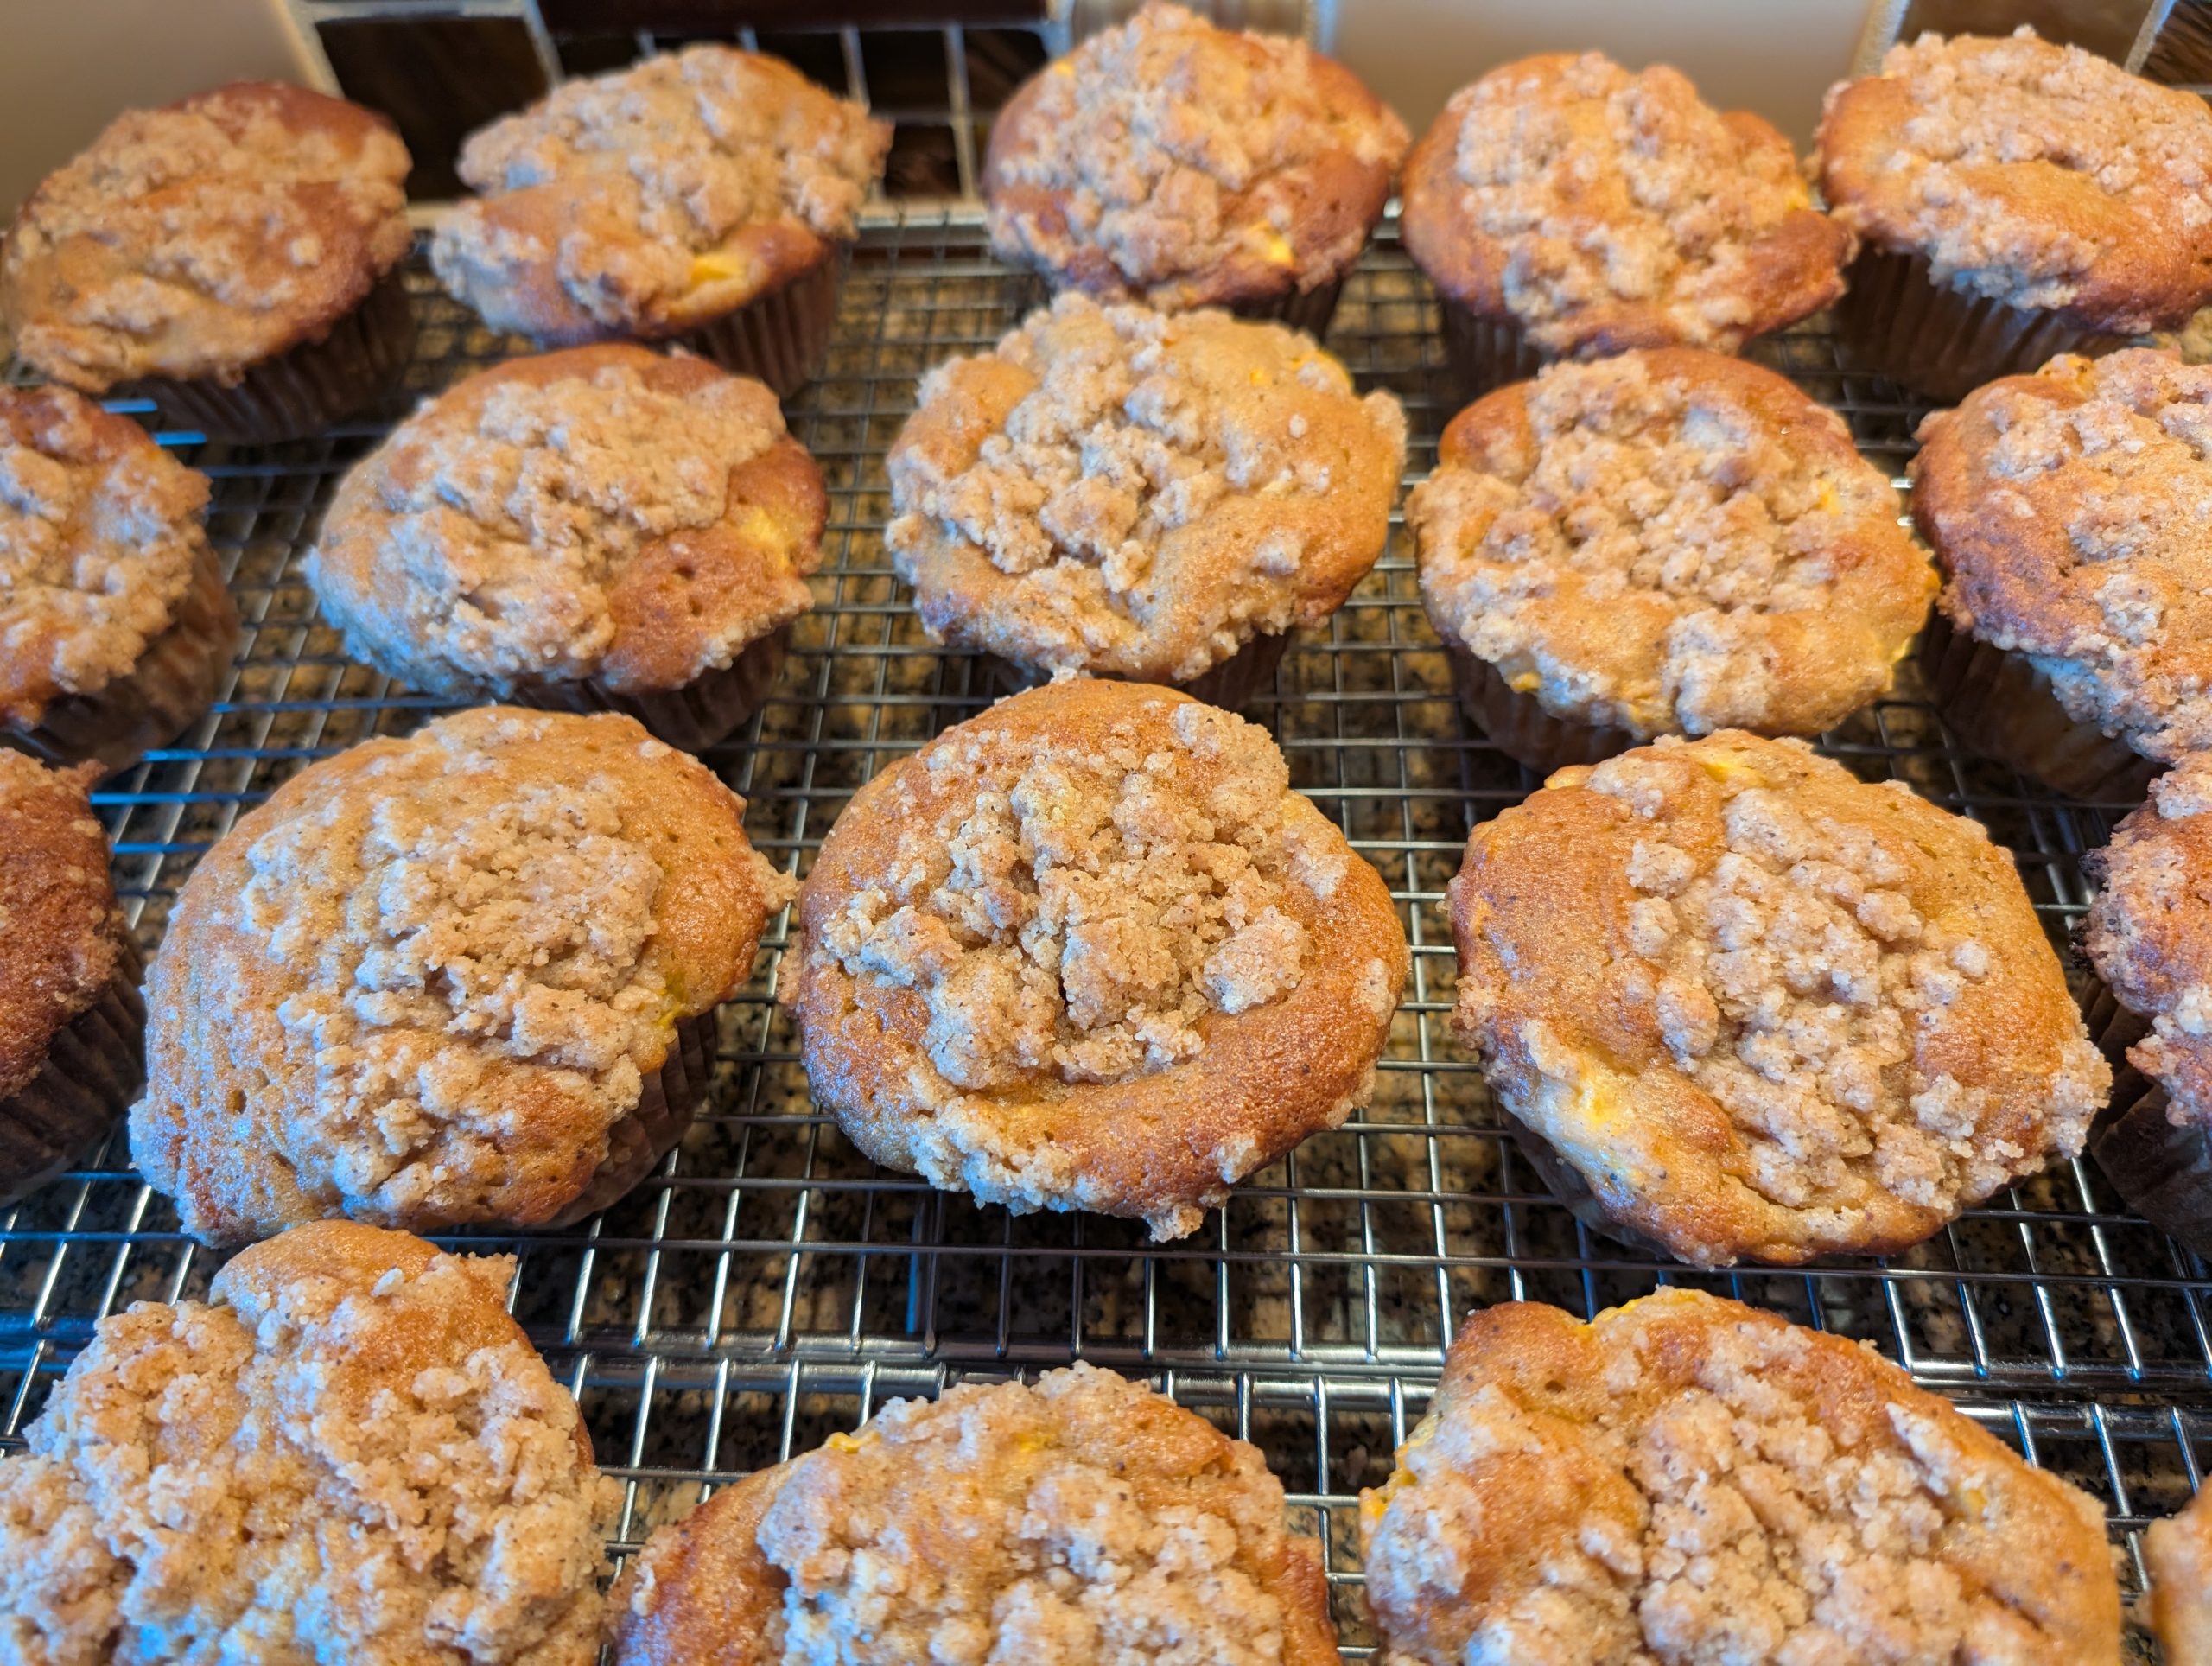
For the Crumble Topping:

⅓ c. brown sugar, packed

1 T. granulated sugar

½ tsp. ground cinnamon

¼ c. (½ stick) unsalted butter, melted

2/3 c. unbleached all-purpose flour, fluffed

Mix the brown sugar, granulated sugar, cinnamon, and melted butter together in a small bowl until combined. Add the flour and use a fork to gently mix until crumbs form. Don’t over-mix. Just mix until it is crumbly. Set aside.

For the Muffins:

1¾ c. unbleached all-purpose flour, fluffed 

1 tsp. baking soda

1 tsp. baking powder

½ tsp. ground cinnamon

½ tsp. kosher salt

½ c. (1 stick) unsalted butter, room temp.

½ c. brown sugar, packed

¼ c. granulated sugar

2 lg. eggs, room temp.

½ c. plain yogurt or sour cream, at room temp. (I use plain Greek yogurt.)

2 tsp. pure vanilla extract

2 T. whole milk or ½ & ½, room temp.

1¾ c. peeled and chopped peaches 

Line a 12-count muffin pan with cupcake liners*. Set aside. 

Whisk the flour, baking soda, baking powder, cinnamon, and salt together in a medium bowl. Set aside.

In the bowl of your stand mixer fitted with a paddle attachment, beat the butter, brown sugar, and granulated sugar together until smooth and creamy. Scrape down the sides and bottom of the bowl as needed.

Add eggs, yogurt or sour cream, and vanilla extract. Beat until the mixture is combined and mostly creamy. (It’s ok if it appears somewhat curdled.) Scrape down the sides and bottom of the bowl as needed. With the mixer running on low speed, add the dry ingredients and milk into the wet ingredients and beat until no flour pockets remain. Fold in the chopped peaches.

Use a large ice cream scoop or spoon the batter evenly into each cup or liner, filling each all the way to the top. Spoon crumb topping on each, gently pressing it down so it sticks.

Bake in a pre-heated 425-degree oven for 5 minutes. Reduce the oven temperature to 350-degrees and bake for an additional 16–19 minutes or until a toothpick inserted in the center comes out clean.

Remove from oven and allow the muffins to cool for 5 minutes in the muffin pan before transferring to a wire rack to cool completely.  

Store at room temperature for a couple of days and in your refrigerator for up to a week. Warm gently before serving.

These muffins can also be frozen. Thaw before gently warming in your microwave.  

*I use parchment paper liners. And no, they aren’t as darling as some liners, but muffins and cupcakes come out of parchment paper liners without sacrificing even one tiny little crumb. And when the muffins or cupcakes are delicious, I don’t want even one crumb left behind.

CREAMY BLUE CHEESE DRESSING

I have always loved blue cheese dressing. From the first time I tasted it at The Copper Kitchen located just across the street from Frederick and Nelson’s in downtown Seattle. That’s also where I learned there was nothing in the world tastier than a French dip sandwich, if it came with a green salad smothered in blue cheese dressing as it did at this marvelous restaurant when I was a child.

My mom would take me shopping at Frederick’s every year to pick out my new pair of shoes for the coming school year. (I suppose she bought me clothes too, but I only remember the shoes’ part.) And as a bonus, we would have lunch at The Copper Kitchen. Or sometimes, at the café that was right in the department store.

Now this was truly a treat because as a family we only went out for dinner once a year (Ivar’s for their Fried Northwest Platter) (still my favorite) or when we drove to Colorado and Nebraska every couple of years to visit both mom and dad’s families. So, you can imagine having lunch in a restaurant was something very special. And it was just mom and me. No pesky younger brothers tagging along to spoil the fun.  

I still cherish this memory. And I think this restaurant was the beginning of my love affair with really good food. Because it sure didn’t happen in my mom’s kitchen. Bless her heart, she did make sure we didn’t starve. But there was never passion expressed in whatever it was she set before us. It was getting the food on the table as quickly and as easily as possible. And this included canned Chun King chow mein over those horrid, dried noodles, canned chili, canned spaghetti, etc. etc. And of course, fresh from the garden veggies boiled until they resembled mush.

But obviously, I never went hungry. But now, when I think about those meals, I truly believe starvation might have been a better option! Anyway, all this blather just to tell you how much I still love blue cheese dressing.

And I know, I already have this recipe on my blog. But darn, it’s still the best and easiest recipe for blue cheese dressing.

So, that’s it for today. Except to once again encourage you to make your own salad dressing. It’s easy. It’s quick. And it’s much less expensive than buying dressing in a bottle. Of course, there aren’t all the preservatives that come with a purchased dressing. But I promise you won’t miss them.

Peace and love to all.   

¾ c. crumbled blue cheese, or more to taste (I use 1 cup of crumbled Gorgonzola that I get at Costco) (But roquefort and stilton are wonderful too.)

½ c. buttermilk

¼ c. sour cream

3 T. mayonnaise

2 tsp. white wine vinegar

¼ tsp. granulated sugar

1sm. garlic clove

¼ tsp. kosher salt

freshly ground black pepper

Combine all the ingredients in a food processor. That’s it!

THESE ARE A FEW OF MY FAVORITE THINGS (TO MAKE AHEAD FOR TRAILER ADVENTURES or TO BRING ALONG IN MY FREEZER FOR FOOD PREPARATION IN CAMP)

As promised, this is my list of the absolute basic “made ahead” or “purchased ahead” edibles I take with me on a 3 to 4-week trailer trip. I didn’t list condiments and items like eggs, bread, juice, milk, ice cream etc. because we all bring the basics. This is just a list of what I like to have on hand to make my trailer time even more pleasant. And my kitchen and grocery shopping time less stressful.         

The items that are highlighted are the recipes I am preparing for this trailer trip. All highlighted recipes are on this site.

PREPARED AHEAD:

BREAKFAST

granola (Fruit and Nut Granola with Olive Oil and Maple Syrup)  

sausage gravy and drop biscuits (Sausage Gravy Over Easy Buttermilk Drop Biscuits)

muffins (Streusel Topped Blueberry Breakfast Muffins)   

quick bread (Healthy Oatmeal Raisin Quick Bread)

Sun Dried Tomato and Fresh Basil Spread (for slathering on store bought bagels)

LUNCH

Hummus

BEFORE DINNER APPETIZERS

dips for veggies (Creamy Curry Dip)

spreads for crackers (Tapenade and Marinated Feta Cheese Cubes)

party mix (Quick and Easy Party Mix)

DINNER

Meat loaf

Ćevapčići

Marinara Sauce

Meatballs – used for spaghetti and meatballs (recipe for meatballs found under Old Fashioned Spaghetti and Meatballs or Swedish Meatballs)   

soup or stew (Italian Sausage, Veggies, and Cannellini Bean Stew)

chili

Sloppy Joe and buns

curry sauce (for Chicken, Shrimp, Beef, or Lamb)

DESSERT OR WHENEVER SUGAR IS REQUIRED

cookies (Peanut Butter Cookies & Oatmeal Raisin Cookies)

IN THE FREEZER* FOR USE WHEN AND IF NEEDED:

BREAKFAST

bacon

link sausage

DINNER

bulk Italian sausage

steak

pork tenderloin

pork chops

ground beef

dinner sausages

hot dogs

ground lamb

frozen shrimp or scallops

boneless, skinless, chicken breasts or thighs

frozen petite peas

And of course, all the other “stuff” that you need for meals. All the basics like eggs, bread, mayo, milk, veggies, fruit, lunchmeat, cheese, Cheetos, potato chips, gin, canned tuna, etc. etc.

All the ingredients to support or accompany the dishes you’ve already prepared or the ingredients you have in your freezer to use in camp. The more dishes you plan and make ahead, the more time you free up to just sit outside and read, or take a walk, or paddle around a lake, or sit and visit with friends and family, etc.

Remember, you’re on vacation for a reason. And that reason is to enjoy new surroundings and rest. We all need our downtime. So, the more cooking and baking you can get done before you leave, the more time you will have to do ANY OLD THING YOUR HEART DESIRES! (Within reason, of course!)

*You will soon learn as you become a seasoned boater or RV owner, that not all grocery stores have the quality items you have become accustomed to finding in your favorite neighborhood grocery store. And especially in rural areas. So, if you have available storage in your fridge, freezer, and pantry, make or purchase as much of what you think you might want and need before you leave home. You can always take it back with you if you don’t use it on your trip. And how nice is that!  

And as always, fellow travelers, peace and love to all.   

SAUSAGE GRAVY OVER EASY BUTTERMILK DROP BISCUITS

One of my favorite breakfast treats is a warm homemade biscuit smothered in sausage gravy. Now don’t get me wrong. I don’t fix this very often. (I did say “treat” above and that’s exactly what I meant.) Because as much as I might desire this combination more often than I prepare and serve it, I know it’s not the healthiest way to begin my day. But OMG, if calories didn’t count, and I had the metabolism of a Ruby-throated Hummingbird, I would gobble up this delicious combination every 3 or 4 days. It is just such a delightfully savory, creamy, tasty, and soul satisfying bundle of joy, that there would be no hesitation on my part. But then reality enters the picture. Bottom line: this is not what I should eat routinely, but only periodically as a special treat. So, ladies and gentlemen, that’s exactly what happens here at Chez Carr. Maybe once every 4 months and then usually for a trailer trip.

I make the biscuits and gravy and neatly pack them in small containers that fit perfectly in our trailer’s freezer. Then while on the road, I simply nuke the biscuits, and warm up the gravy on my lovely three burner propane stove. Breakfast ready.

So, if you too love biscuits and sausage gravy, this is the quickest and easiest recipe for this delicious breakfast treat.

BTW – my next post is for all of you out there who spend time in your trailers or boats. I’m going to share my list of prepared foods I make ahead of time to free up my time while on the road. Plus, the exact list of foods I plan to prepare for our upcoming trailer trip with dear friends Margo and Jim and Phyllis and Tim.  

Well, that’s it for now. My plan for today is to prepare the trailer food list, make Creamy Roquefort Dressing (see recipe below) for the green salad I plan to serve with Hamburger Dip Sandwiches with Onion and Dry Sherry Au Jus (recipe on site) this evening, and start the 5th book in the Louise Penny series featuring Chief Inspector Armand Gamache of the Sûreté du Québec. (And yes, I have already read the series, but I am enjoying each book just as much the second time around.)

So, may you too continue to plan and prepare new and not so new dishes for your family and friends. Spend quality time with the books you love and consider old friends but be open to new and exciting adventures. And always remember to count your blessings. We all have blessings just waiting to be acknowledged. A beautiful sunrise, a bit of rain on a summer day, a smile from a stranger, an unexpected call from a friend (thank you Ann B.) who was just thinking of you, etc. etc. These are the real things that matter.

Peace and love to all.

And if you are into cats, the latest picture of Miles, sleeping in a place only this magical guy could find for himself.   

For the drop biscuits:

2 c. unbleached all-purpose flour, fluffed 

1 T. baking powder

½ tsp. baking soda

½ tsp. kosher salt

6 T. (¾ stick) grated cold unsalted butter

1 c. cold buttermilk

Line a baking sheet with parchment paper.   

In a large mixing bowl, whisk the flour, baking powder, baking soda, and salt together.

Add the grated cold butter to the mixing bowl. Work the butter evenly into the flour mixture using a regular table knife.  

Pour in the cold buttermilk and stir with that same table knife just until combined. (This will be a slightly wet and very sticky dough.) (BTW, a plain old table knife is one of my favorite implements for mixing thick or heavy dough. Cuts (sorry) right into the ingredients and blends the dough much better than any spoon or spatula can accomplish.)  

Using a large ice cream scoop (about a quarter cup), plop balls of dough onto your prepared baking sheet about 2-inches apart.  

Bake in a pre-heated 450-degree oven for about 10-13 minutes or until the bottoms are golden brown.

Remove from oven and cool on the baking sheet.

Serve immediately (while still hot) or cool completely before storing in an airtight container in your refrigerator or freezer.

For the sausage gravy:

2 T. unsalted butter, divided

1 lb. bulk breakfast sausage

3 T. unbleached all-purpose flour

1½ c. whole milk, plus more if needed  

1½ tsp. Worcestershire sauce

½ tsp. dried thyme

¼ tsp. seasoned salt

freshly ground black pepper (not too much)

Melt 1 tablespoon of the butter in a medium sized pan. Add sausage, breaking it up as it cooks. Fry until the meat is a nice dark brown and there are tasty meat bits stuck to the bottom of the pan.

Add the remaining butter to the pan and whisk in the flour lifting the browned bits off the bottom as you stir the mixture. Let the whole mess burble for a couple of minutes.

Slowly whisk in milk, Worcestershire sauce, thyme, seasoned salt, and pepper.

Bring to a gentle boil, reduce heat and let simmer for about 5 minutes, stirring occasionally. (The sauce will thicken nicely during this time.) Taste and adjust seasoning. Add additional milk or water if the consistency is too thick.

CREAMY ROQUEFORT DRESSING

¾ c. crumbled roquefort cheese, or more to taste

½ c. buttermilk

¼ c. sour cream

3T. mayonnaise

2 tsp. white wine vinegar

¼ tsp. granulated sugar

1small garlic clove

¼ tsp. kosher salt

freshly ground black pepper

Combine all the ingredients in a food processor. That’s it!

Notice where Miles is and where the striped pillow is. Now look at the next picture (after I put the whole “pillow thing” back where it belonged) and tell me how this kitty moved the striped pillow out of the way without disturbing the one just in front of him. Which BTW is the backside of the pillow as you will see in the next picture. If this isn’t magic, I don’t know what else it could be!

The way the pillows are normally arranged on our guest bed.

ROSEMARY OVEN ROASTED POTATOES

OK, I know. Everyone loves oven roasted potatoes. And because I am a potato lover and Mr. C. not so much, I have to “jazz” things up a bit before he deigns to even give this lowly starchy tuberous vegetable a try. But to be fair, Mr. C. does love French fries, Twice Baked Potatoes (recipe on site) and an occasional baked potato if there is plenty of butter, sour cream, bacon, and chopped green onion to cover the fact that what he is eating is first and foremost a potato. Other veggies are OK with him, but he is never going to be the veggie lover I am. And never ever will he peruse a menu like I do to find the entrée that accompanies the potato preparation that best fits my fancy. And I know. I’ve got the whole selection process backwards. First, I should choose the protein and then look at what comes with it. But I’ve been looking at menus for a very long time. And the chances of me changing my ways at this juncture are unimaginable. Most people my age have hard and fast rules set in stone for ourselves. Even if the rules make no bloody sense to anyone else and often don’t even make sense to us. It’s called being “set in our ways”. Which BTW, I am a prime example. But enough about my foibles and more about this recipe.

I made this recipe when Andy’s sister Katie and brother-in-law Rick stayed with us for a couple of nights. Karie is a wonderful cook, and she felt the potatoes were a bit too greasy, so I made them again last evening and used far less olive oil. They were perfect.

So, I hope you enjoy this quick and easy to prepare roasted potato recipe. Every bite was just delicious.

And on that happy, savory, note, peace and love from our home to yours.  

scant T. extra virgin olive oil

¼ tsp. kosher salt, or more as needed

¼ tsp. seasoned salt

freshly ground black pepper

½ tsp. granulated garlic

1 lb. red, gold, or purple thin-skinned potatoes, (or a mixture) scrubbed clean

1 T. finely minced fresh rosemary leaves, or more to taste

Pre-heat the oven to 425 degrees. Line a baking sheet with parchment paper or thinly coat with cooking spray.  

Halve the potatoes and cut them into bite-sized pieces, leaving the skin on. Whisk the olive oil, kosher salt, seasoned salt, pepper, and granulated garlic together in a small bowl. Dry the pieces of potato completely before adding to the olive oil mixture. Stir the potatoes until they are evenly coated with oil.

Spread the potatoes out on the baking sheet. (Don’t wash the bowl.)

Bake for 35 minutes or until the potatoes are deeply golden brown and soft inside. While the potatoes are baking add the fresh rosemary to the mixing bowl. Stir until every bit of the rosemary is lightly coated with the residual oil. Set aside.

After the first 35 minutes bake, remove the baking pan from the oven and scoop the potatoes into the mixing bowl. Stir until every piece is coated with rosemary. Taste and add more salt if necessary. Bake for an additional 10 minutes.

Remove from oven and serve piping hot.

ITALIAN SAUSAGE, VEGGIES, AND CANNELLINI BEAN STEW

OK, I know. It’s August and this is my third post in a row (2 soups*) and now a recipe for stew*. And for many of you, this might bring into question my ability to understand how to take advantage of seasonal fruits and vegetables. But rest assured, I really do know that this is the time of year to buy ripe peaches, corn on the cob, fresh berries, etc. etc. But for this recipe for stew, there were extenuating circumstances. Or, should I say, the back story.

For my 81st birthday, our dear friends Jim and Margo gave me a beautiful new knife. And not just any kind of knife, but a professional series MTH-80 MAC Chef’s 8”-Dimpled, Subzero – made in Japan. They also gifted me with a Zwilling knife sharpener so I could keep my new treasure sharp.

Now I have been cutting up veggies, meat, cheese, bread, etc. for 61 years. And apparently, I have been holding my knives incorrectly all that time. So, yesterday, Jim and Margo came prepared with groceries (meat and various veggies) for me to learn how to use my new knife correctly. It took a few times to pick up the knife the correct way and let it do the hard work for me before it became instinctive.

To hold any knife properly, your thumb should be by the top edge of the knife blade right next to the handle, the finger next to your thumb should rest behind your thumb, while your other three fingers are wrapped around the handle. It feels awkward at first. But it makes all the difference in letting the knife do the hard work.

So, after cutting up several veggies, I had not only a wonderful new kitchen tool, but I also now had a mound of cut fresh veggies.

I knew we would be using the cut veggies to prepare some kind of main dish for dinner, but I had no idea what Jim had in mind. I had already prepared appetizers (Tapenade, Marinated Goat Cheese, and Guacamole), Garlic Bread from Scratch, and Easy Peach and Blueberry Crisp (recipe to be posted soon) served with vanilla ice cream for dessert. But the main dish that would contain the newly cut veggies had yet to be determined. But together, we decided a savory stew would fit the rest of the meal perfectly.

So, the result of our combined efforts is the recipe you find below.  

Well, that’s it for today. But before I let you go, I want to once again thank Margo and Jim for not only giving me such a nice knife but also for our years of friendship. For Jim to take the time to show me how to use the knife correctly made this gift even more special.

May you too have friends that go that extra mile for you. And may you be that family member or friend who makes someone else’s day better by giving of your time and expertise.

And as always, peace and love to all.    

1 T. extra virgin olive oil, opt.

1 – 1½ lb. bulk sweet Italian sausage

½ lg. white or yellow onion, diced

1 c. diced celery, leaves included

2 med. carrots, diced

3 garlic cloves, finely minced

⅓ c. dry white wine

1 28-oz. can diced or whole tomatoes (preferably Italian)

2 cans cannellini beans (Cento brand is best)

1 tsp. fennel seeds, partially ground

1 T. dried thyme leaves

1 T. dried oregano

2 bay leaves

1 tsp. kosher salt (I use Morton’s kosher salt)

freshly ground black pepper

2 c. diced zucchini or yellow squash (or combination)

2 c. roughly chopped fresh spinach or kale

If using, heat the olive oil in a large, covered Dutch oven or pan. Add the Italian sausage and break it up as it browns (Maillard reaction. Look it up!). (I use oil when the sausage is quite lean. If there is a lot of fat, I fry the meat as is. No oil needed.)

After the meat has browned, take half out of the pan and place it in a bowl. Set aside.

Add the onion, celery, and carrots and sauté until they are beginning to soften. Add the garlic and cook for one minute.

Pour in the dry white wine and cook until the liquid has evaporated.

Add canned tomatoes and cannellini beans. Break the tomatoes up if they are whole or in large chunks.) Rinse each can with a bit of water and add the water to the pot.

Stir in the ground fennel seeds, thyme, oregano, bay leaves, salt, and pepper.

Bring the mixture to a boil, reduce heat, cover, and let simmer for about 45 minutes, stirring periodically.

Just before serving, remove and discard the bay leaves, add the remaining cooked meat, squash, and spinach. Taste and adjust seasoning.

Cook for 3-4 minutes, then serve the stew piping hot.

Great with garlic bread on the side.

*The key difference between soup and stew lies in the proportion of liquid to solids and the cooking method. Stews typically have a higher proportion of solid ingredients (like meat and vegetables) to liquid, with the liquid often thickened to a gravy-like consistency. Soups, on the other hand, tend to have a greater amount of broth or liquid and can often be served cold. Soups can also be used as a first course, while stews are usually considered the main dish.

CREAMY ITALIAN SAUSAGE AND CHEESE TORTELLINI SOUP  

Yesterday I posted a soup recipe (Savory Cream of Portabella Mushroom Soup) and in the preface, I defended my right to serve soup year-round. In retrospect, I should have stated more adamantly why soup is perfect any time of year. First of all, it’s so versatile and adaptable. In the winter when served piping hot, soup provides both warmth and comfort. In the summer, it can be very refreshing when served cold. (Not that I would recommend serving this soup chilled. That would just be wrong on so many levels.) But my Tomato Soup with Lemon Cream, Cold Tomato Basil Soup, Cold Tomatillo and Avocado Soup, or yesterday’s Savory Cream of Portabella Mushroom Soup would be perfect for a scorching evening repast.

So, why did I decide to make this soup last evening? Well, for several reasons. The soup was easy to prepare. I had all the ingredients. And I was still feeling the effects of sitting on the world’s most uncomfortable chairs while listening to live jazz at the Anacortes Arts Festival. Even though theoretically I don’t have a bad back, those damn chairs did me in! So, an easy to build dinner was just what the doctor ordered.

And boy oh boy the soup was soooo delicious. I found the recipe on the pinchofyum.com site but made a couple of minor changes along the way.

So, if you too need a new soup recipe, I definitely recommend you give this soup a try. It is simply a perfect mix of ingredients.

Well, that’s it for today. I’m going to read for a while. Then hang the picture I bought at the Arts festival and generally putter my day away until it’s time to gussy up a bit for Mr. C’s gig at the Rockfish Grill in Anacortes with Joan Penney. I am such a lucky lady.

Peace and love to all.    

2 tsp. extra virgin olive oil

1 lb. ground mild/sweet Italian sausage

¾ c. diced yellow onion

1 celery stalk, diced

1 lg. carrot, diced

2 garlic cloves, minced

¼ c. unbleached all-purpose flour

½ tsp. kosher salt

freshly ground black pepper

½ tsp. Italian seasoning

½ tsp. fennel seed, crushed

tiny pinch crushed red pepper flakes, opt.

2-3 T. tomato paste

¼ c. dry white wine

3 c. water

1 T. chicken bouillon

7-10 oz. cheese tortellini

1 c. whole milk

2 c. roughly chopped fresh spinach

freshly grated Parmigiano-Reggiano  

Heat the olive oil in a large, heavy stockpot. Add the sausage and cook until nicely browned, breaking up the sausage into small pieces. Remove half of the sausage and set aside.

Add the onion, celery, and carrot. Sauté for a few minutes until the veggies are soft.

Add the garlic and cook for 1 minute.

Stir in the flour and let cook for about a minute. Then add the salt, pepper, Italian seasoning, fennel seed, crushed red pepper flakes, tomato paste, and dry white wine. Cook for a couple of minutes, stirring all the while.

Gradually add the water and bouillon and bring the soup to a simmer, reduce the heat, and let burble for about 15 minutes.

Add the milk and bring to a low simmer. Add the remaining cooked sausage, tortellini, and spinach. Cook until the tortellini are al dente.

Pass the grated Parmigiano-Reggiano at table. (Garlic bread too!)

SAVORY CREAM OF PORTABELLA MUSHROOM SOUP

Not exciting to look at but wait till you taste this soup. Heaven in a bowl.

OK, you should all know by now (if you know me at all) that I love soup. So, I serve soup year-round. It doesn’t matter to me if it’s hot outside, or if it’s snowing up a blizzard. I’m going to build a batch of soup and if you happen to be around, that’s what you’re going to get too. Luckily Mr. C. loves soup as much as I do. But even if he didn’t, tough noogies! (It’s really just all about me. Right?) (Not!) Anyway, not only is soup delicious, usually easy to prepare, often healthy, and a ONE POT WONDER; it is undeniably comfort food to the max. Add a biscuit, garlic bread, maybe a salad if you are feeling energetic, and you, as the cook, are home free.

So, now that I’ve provided, ad nauseum, my justification for serving soup in August, I can tell you more about this very simple to prepare, vegetarian soup.

It’s fantastically delicious. I mean, over the top good. I found the recipe on food.com but made several changes that resulted in the final product being less caloric, used celery rather than 2 leeks, added a garlic clove, did not add sugar, used veggie stock rather than chicken stock which made the soup vegetarian, and less dried thyme than originally written.

So, if you too happen to bring home a four pack of portabella mushrooms from Costco like I did recently, then do not wait for cold weather to make this soup. Make it immediately and serve it as a first course or the main dish. It is going to rock your world.

Well, that’s it for now. I am way behind posting recipes because I had other things to occupy my time that took precedence. Like attending concerts at the “jazz” stage at the Anacortes Arts Festival this past Friday, Saturday, and Sunday. Mr. C. was in two bands on Friday, one on Saturday, and one on Sunday. So, of course I had to be there to listen to and enjoy the music with friends. Then of course I had to go check out all the booths to make sure I didn’t miss any piece of art that really belonged in our home. (I can be quite diligent when necessary.)

Anyway, it was a wonderful weekend. Listening to live music is always such a treat. Being with good friends while doing so is like frosting on a cake. Sweet! And we truly do have the best friends any couple could ask for. We are well and truly blessed.

May you too have live music in your life and great friends to share it with.

Peace and love to all.    

4 T. (½ stick) unsalted butter

1 lg. onion, chopped

¾ c. chopped celery (plus leaves)

1 lg. garlic clove, roughly chopped

4 portabella mushrooms, dark gills removed and cut into small pieces 

3 T. unbleached all-purpose flour  

½ tsp. dried thyme leaves  

1 bay leaf

4 c. veggie broth

½ tsp. kosher salt

freshly ground black pepper

½ c. whole milk

½ c. heavy cream (or more whole milk)

¼ c. dry sherry

2 T. chopped fresh parsley

croutons, opt. (see my recipe for homemade croutons below)

Heat the butter in a large pot over medium-low heat. Add the onion and celery and sauté until the onion and celery are tender. Add the garlic and cook for 1 minute. Add the mushrooms, and cook for about 10 minutes longer, covered, stirring occasionally.

Stir in the flour, and cook for 2-3 minutes, then add the thyme, bay leaf, broth, salt, and pepper.

Simmer, partially covered, for about 10 minutes. Remove from heat and cool the soup slightly.

Remove the bay leaf and puree the soup using an immersion blender or food processor.

Return the pureed soup to the pan and add the whole milk, heavy cream, and sherry.

Cook over low heat until just heated through, but do not boil.

Taste and adjust seasonings, if necessary, and serve warm or cold garnished with parsley. Offer croutons at table.

EASY BAKED GARLIC CROUTONS

3 T. extra virgin olive oil 

¼ tsp. seasoned salt

¼ tsp. granulated garlic

freshly ground black pepper

about 6 c. cubed crusty bread (crusts and all)

Line a rimmed baking sheet with parchment paper. Pre-heat your oven to 400-degrees.

Whisk the olive oil, seasoned salt, granulated garlic, and black pepper together in a mixing bowl.

Add the cubed bread and gently toss until each cube of bread is coated with oil.

Place the coated bread on the prepared baking sheet.  

Bake, tossing every 5 minutes, for about 10 to 12 minutes, or until the croutons are turning golden brown but still offer a bit of chew in the center. 

Remove the croutons from the oven and allow them to cool on the pan. Once cool, taste and season with additional salt and pepper, if desired.

Store in an airtight container at room temperature.  

MOCHA BUTTERCREAM FROSTING

These are roughly the equivalent of a 9×13-inch pan. I used 2 8-inch square pans because I wanted one to take to our good friends Marsha and Craig to help celebrate their 50th wedding anniversary. And the other for my dear husband who is blessed with not only one sweet tooth, but a whole mouth full!

Well, I’m not going to take much time on this post because if you too are a buttercream frosting fan and love the combination of chocolate and coffee, I don’t want you to spend a lot of time reading a long introduction when you could be in your kitchen whipping up this frosting. I mean truly, do not read any more of my stream of consciousness rhetoric and get thee to the kitchen post haste.

Because I don’t care if you slather this frosting on brownies, blondies, cupcakes, chocolate cake, yellow cake, vanilla cake, your favorite sugar cookies, etc., you are in for a treat.

I found this amazing recipe on the sugarandsparrow.com site. I did change the powdered sugar amount by a tad bit, but then I can hardly ever leave a recipe alone.

But we all have Whitney to thank for sharing this easy to make, fuss free, delicious mocha recipe with us.

So, my work here is done. You now have the power to become the mocha frosting queen or king of your neighborhood or possibly your entire state or country. This frosting is just that good! (And BTW, it’s OK to be a queen or king if we are talking frosting. Head of our nation, not so much!)

And as always, peace and love to all.  

½ c. (1 stick) unsalted butter, room temp.

2 c. powdered sugar

2 T. unsweetened cocoa powder (I use Ghirardelli Premium Cocoa Powder)  

¾ tsp. espresso powder (I use Medaglia D’Oro Espresso Instant Coffee)

pinch of fine sea salt

1 T. whole milk, or more as needed

½ tsp. vanilla extract

In the bowl of your stand mixer, using the paddle attachment, cream the butter on med-high until light and fluffy (about 5 minutes). Scrape down the bowl and paddle when necessary.

Add the powdered sugar a bit at a time, scraping down the bowl and paddle when needed.

Push the cocoa powder and espresso powder through a fine mesh sieve to make sure there are no lumps, then mix them, along with the salt, into the butter mixture.

With the mixer on low speed, add the whole milk and vanilla. Mix on low until fully incorporated and smooth, 1-2 minutes, scraping down the bowl and paddle as needed. If you want softer frosting, add a bit more milk.

Recipe can easily be doubled or tripled.

BTW, this is the perfect amount of frosting for a 9×13-inch pan of brownies, chocolate cake, or whatever your creative mind can envision. Happy days are here again.  

BLONDIES WITH MILK CHOCOLATE CHIPS AND PECANS OR WALNUTS

There is just something special about bar cookies. First of all, they are less work than refrigerator (icebox), rolled (cut out), drop (even if you use an ice cream scoop), or molded (pressed into a mold, thus creating cookies with intricate patterns and shapes difficult to achieve by hand) cookies. So, when push comes to shove, and I want quick and easy, it’s bar cookies every time. Plus, you can cut bar cookies into good sized pieces, or bite sized. Your choice. And for this bar cookie, you don’t even need a mixer. How great is that!

So, when I offered to bring cookies for our dear friend Vicki’s birthday celebration, I decided at least one of the offerings would be a bar cookie. And this is what I came up with.

Now, the one drawback to bar cookies is that they are best when served the same day. Or at least within a couple of days because they can become kind of dried out if they are not eaten within a day or two. Which, frankly, hardly ever happens in most homes. Especially if they are as chocolatey, caramelly, and nutty as these bars. But it is certainly something to consider when other types of cookies provide a bit more longevity.  

So, along with these bar cookies, I baked – Candied Ginger Shortbread, Speculaas (Danish ginger cookies), and White Chocolate Dipped Coffee Bean Shortbread, which were perfect because I could make them ahead of time. Vicki and her sister Sam made chocolate shortbread, walnut bar cookies, macaroons (GF), a delicious GF cookie which included pineapple, and a lovely fresh fruit platter. So, as you can imagine, the dessert table was very popular.

The entire event was a wonderful celebration which included family, old friends, new friends, band mates, bridge players, artists, various and sundry other acquaintances, and a lone party crasher. (We think the young lady was drawn to the music. The Fat Fridays, a fantastic dance band, led by Vicki’s husband Mark was playing, and who could blame this young woman for wanting to dance with the rest of us!)

Anyway, it was a great day. And a great reason to get together. And frankly, all of us need to celebrate with each other. Especially now. The political scene all over the world is scary. Our planet seems to be either flooding or burning. Essential American governmental departments and agencies that are for the betterment of all, are being decimated right before our eyes. So, we need to spend time with each other, celebrate with each other, and share our resources as best we can with each other. Even a smile, or a kind word, or a simple thank-you can make someone’s day better.

And I know, being a cook, you already make your family, and your friends’ lives better just by providing them with healthy and delicious food. All I can say is – keep up the good work.   

Peace and love to all.  

And just because I was feeling benevolent, I provided the recipe for both a large and a really large pan of these blondies. (My good deed for the day!)  

For a 9×13-inch pan:

½ c. (1 stick) unsalted butter, melted

2 c. brown sugar, packed

2 lg. eggs

2 tsp. vanilla extract

2 tsp. baking powder

1 tsp. kosher salt

2 c. unbleached all-purpose flour, fluffed

1½ c. milk chocolate chips

1 c. chopped pecans or walnuts  

Stir the melted butter, brown sugar, eggs, vanilla, baking powder, and salt together using a whisk. Using a rubber spatula, stir in the flour just until combined. Stir in the chocolate chips and nuts.

Spread the dough out evenly in a lightly buttered 9×13-inch pan (glass is best). Bake in a pre-heated 325-degree oven (350-degree if you are using a metal pan) for 30-35 minutes or until a toothpick inserted in the center comes out clean or with just a few fudgy crumbs and the top looks set. Resist overbaking.   

Remove from oven and cool on a wire rack. Cut into whatever size pieces you want. Store in an airtight container at room temperature or freeze for longer storage.

For a 10×16-inch pan:

¾ c. (1½ sticks) unsalted butter, melted

3 c. brown sugar, packed

3 lg. eggs

1 T. vanilla extract

1 T. baking powder

1½ tsp. kosher salt

3 c. unbleached all-purpose flour, fluffed

2¼ c. milk chocolate chips

1½ c. chopped pecans or walnuts 

Stir the melted butter, brown sugar, eggs, vanilla, baking powder, and salt together using a whisk. Using a rubber spatula, stir in the flour just until combined. Stir in the chocolate chips and nuts.

Spread the dough out evenly in a lightly buttered 10×16-inch pan (glass is best). Bake in a pre-heated 325-degree oven (350-degree if you are using a metal pan) for 34-38 minutes or until a toothpick inserted in the center comes out clean or with just a few fudgy crumbs and the top looks set. Resist overbaking.   

Remove from oven and cool on a wire rack. Cut into whatever size pieces you want. Store in an airtight container at room temperature or freeze for longer storage.