Category Archives: GLUTEN FREE RECIPES

GF PEANUT BUTTER, CHOCOLATE CHIP, AND WALNUT OATMEAL COOKIES

So having just posted a recipe for a healthy (relatively speaking) carrot bread, I thought I would follow that recipe with a “less-bad-for-you” chocolate chip cookie option. I found this recipe on the Cookie and Kate web site.  

Now, if you didn’t happen to catch my last post, let me just explain that in my endeavor to keep us as healthy as possible as we grow older (at an ever increasing rate of speed I might add), I’m trying to cook and bake with our over-all health in mind.

But it’s not easy. We are very, very spoiled. We love good food and drink, and don’t at all appreciate not being able to eat and drink as we please. But Mother Nature is not on our side in this regard. “She who must be obeyed” has made it abundantly clear that we are not in charge – “she” is! For instance, my stomach doesn’t handle refined sugar very well anymore. And wine – suffice it to say I usually don’t partake. Grrrrr!

But, and here’s the good part – I know how to cook. And there are a world of great recipes out there written by health conscience (and yes I know it should be health-conscious, but I like my word for it better) people much more creative than me. And they take their healthy cooking very, very seriously. (And bless them for it!) And this recipe is proof of what I speak.

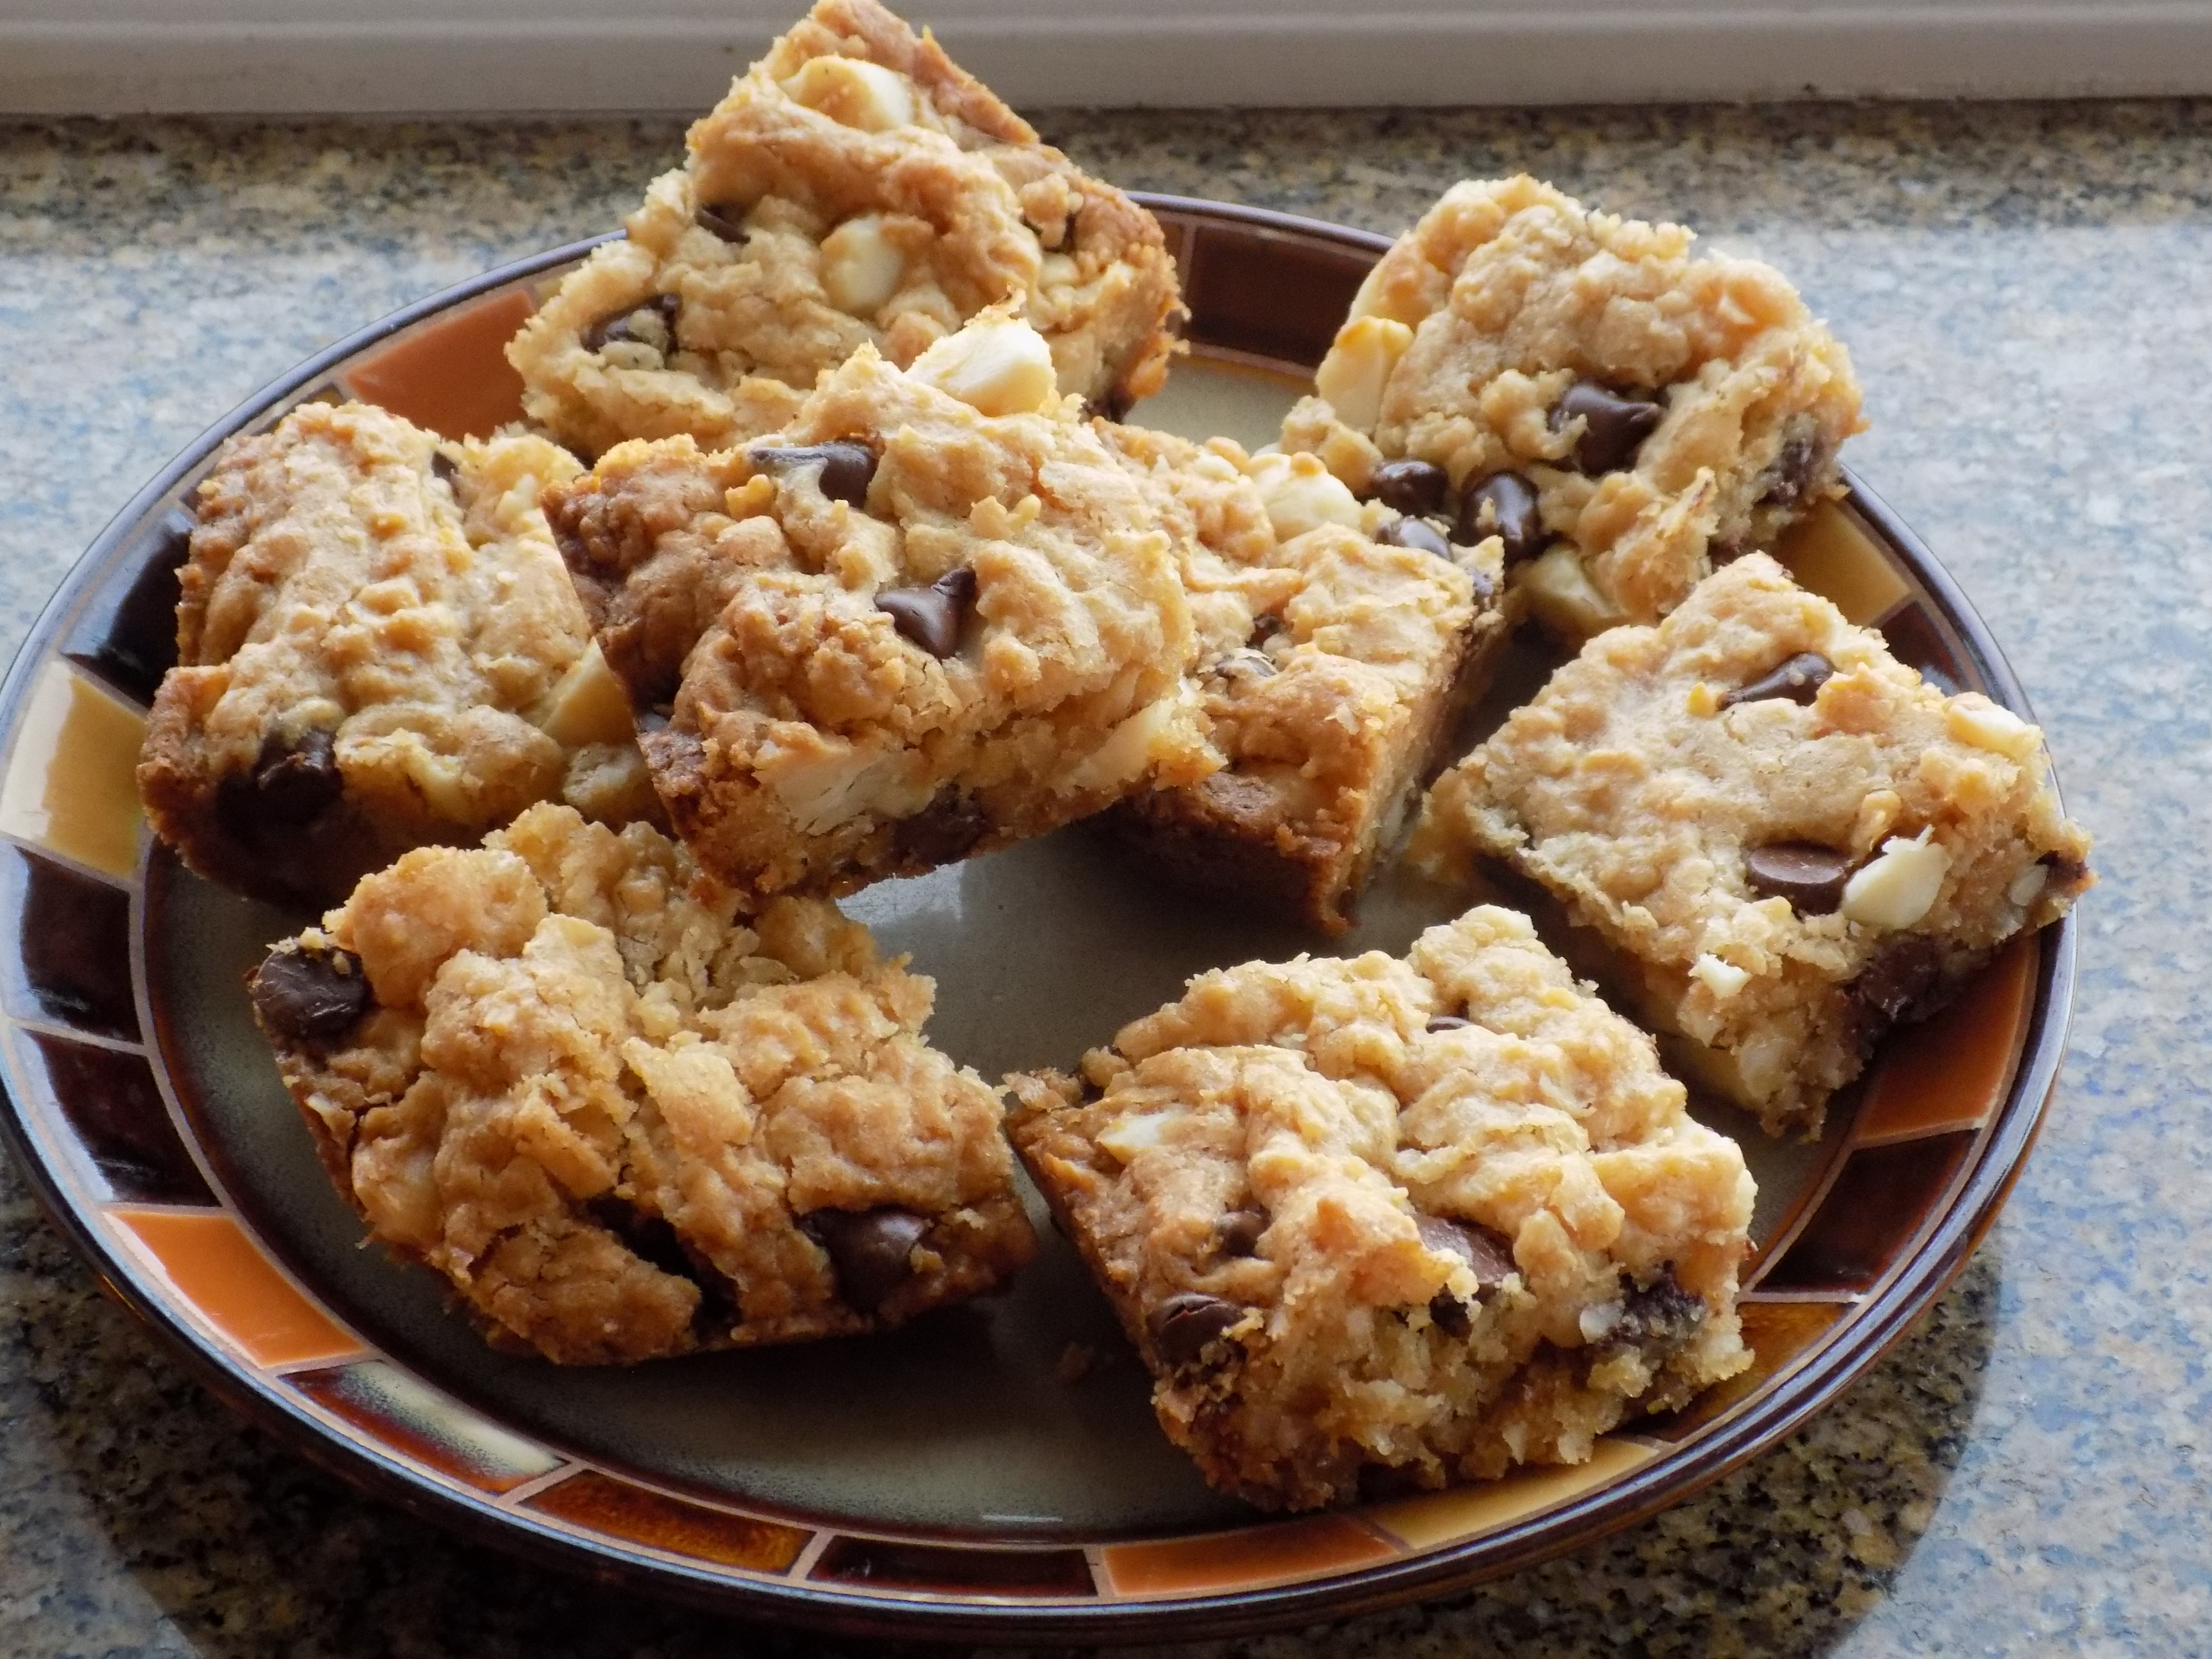
The only change I made to Kates recipe was to substitute dark chocolate chips for semi-sweet chocolate chips and add coconut and nuts.

So I made these cookies for our trailer trip. And they were so darn good I couldn’t believe there was no flour, brown or white sugar, and just 4 tablespoons of butter in the whole darn mess. Amazing.

So if you want to continue to feel like you can eat anything you want, I would recommend you give these cookies a try. They are really good and since you should keep them in the freezer, you might not be as tempted to eat as many since they won’t be in the heart of your kitchen – the cookie jar!

So go on. Take a chance. But no, they won’t ever replace a butter rich, soft and chewy cookie loaded with chocolate chips. But they don’t taste like sawdust either. And – they are better for you. Of course, these cookies will never be considered good for you. That’s a given. But better works for me. Hope it works for you too.

2/3 c. real maple syrup

2/3 c. natural peanut butter

4 T. (½ stick) unsalted butter, melted

1 lg. egg

1 tsp. vanilla extract

½ tsp. baking soda

½ tsp. baking powder

½ tsp. fine-grain sea salt

1¼ c. old-fashioned rolled oats*, ground for 30 seconds in a food processor or blender

1½ c. old-fashioned rolled oats*

½ c. coconut

1 c. dark chocolate chips

1 c. chopped walnuts

Whisk the maple syrup, peanut butter, and melted butter together in a mixing bowl. Beat in the egg, scraping down the side of the bowl once it’s incorporated. Stir in the vanilla, baking soda, baking powder, and salt. Using a large heavy spoon, stir in the ground oats, rolled oats, coconut, chocolate chips, and walnuts until they are evenly combined.

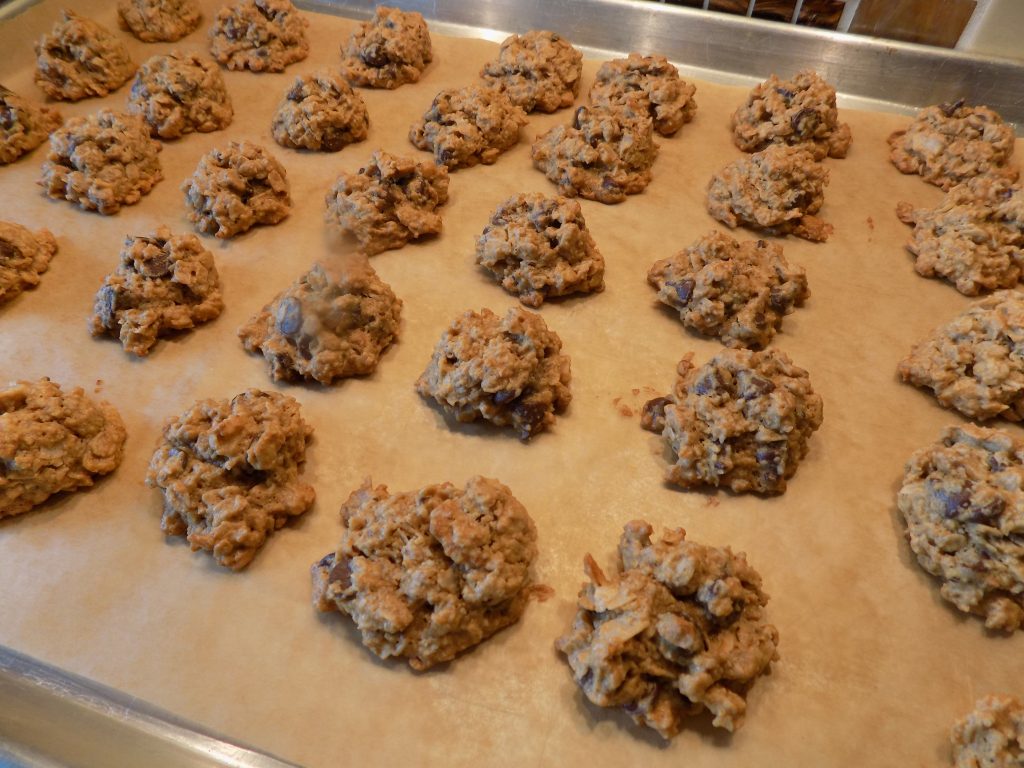
Using an ice cream scoop, drop the dough onto parchment paper lined baking sheets.

Bake the cookies in a pre-heated 350 degree oven until they are barely set and just beginning to turn golden around the edges, about 12 minutes. Remove the cookies from the oven and let cool completely on the pans. Store in an airtight container in your freezer.

*Reminder: If you are gluten intolerant, make sure you buy oats that have been certified as gluten free.

CHICKEN ENCHILADA SUIZAS CASSEROLE

So, depending on whether or not you are trying to eat healthier, you are in for a treat with this recipe (slightly modified by yours truly) from the Joyful Healthy Eats site. And in case you have never enjoyed an enchilada suizas, you probably don’t know that most of the time the key ingredients are a various combination of butter, sour cream, heavy cream, crème fraiche, half & half, and cheese. Lots of cheese. (I mean really, what’s not to like?) But in this recipe, there is nary a mention of butter, sour cream, heavy cream, crème fraiche, or half & half. There is of course cheese in this recipe, but then how could it not contain cheese, since the very definition of suizas means Swiss and alludes to its copious use of cheese and other dairy products.

But, using only non-fat Greek yogurt along with both Mozzarella and Monterey Jack cheese, the total fat content in this recipe is far lower than in typical recipes for this amazing dish.

Also, layering the tortillas rather than rolling them up, reduces the amount of time it takes to prepare these enchiladas. And any time I can save time as well as calories, I say hurray to that!

So what you are left with is a delicious casserole filled with tender chicken pieces, tortillas and cheese that simply melt into the lovely green chili sauce. If it sounds delightful, you would not be wrong. This casserole is really, really amazing. And the best part. You don’t have to feel guilty eating it! Of course, it still has calories. But about half as many as most enchiladas suiza. And it’s gluten free. And isn’t that always special!

So do yourself a favor. Next time you want Mexican food, make it at home. Paired with my recent post for Mexican Black Beans, you have a healthy, nutritious, and delectable meal you can serve your family and friends that is every bit as good, if not considerably better than you can find in most Mexican restaurants.

Now, if you are the kind of person who doesn’t feel a Mexican meal is complete without rice, I have a great recipe for you to try that’s already on this site. And if you guessed that the recipe would be entitled Mexican Rice, give yourself a gold star. Just be for-warned. There are no tomatoes in my recipe. (Just throwing that out there so you won’t be surprised when you read the ingredient list.) I just don’t happen to like most tomato flavored rice recipes. So my recipe is completely different. (Pretty darn delicious too.) So give all three of these recipes a try. Throw a Mexican dinner for your family and friends. Just don’t forget the Guacamole and Margaritas. (And yes, I have recipes for them too. So make that – five new recipes to try.) But wait, there’s one more recipe you need to make for your family and friends – Tres Leche (Three Milks) Cake. (Actually there are even more Mexican recipes if you search under Mexican Food Recipes.) OK, I’m done now. You may be excused. Buen provecho.

Chicken:

2 boneless skinless chicken breasts

1 tsp. extra virgin olive oil

½ tsp. seasoned salt

freshly grated black pepper

¼ tsp. granulated garlic

¼ tsp. paprika

Place chicken breasts in an 8×8-inch baking pan. Pour on the olive oil. Using your hands, best tool in the kitchen BTW, massage the oil all over the chicken. Wash your hands and mix together the seasoned salt, pepper, granulated garlic, and paprika. Sprinkle the mixture evenly over both sides of the chicken.

Bake in a pre-heated 450 degree oven for 20-25 minutes or until the chicken is cooked through and no longer pink.  If you use an instant read thermometer to measure the temperature at the thickest part of the breast, it should read about 170 degrees. Remove from oven and allow to cool completely before dicing into small cubes. (Save the juices that have accumulated in the bottom of the pan as the chicken cools. You are going to add them to the sauce.)

Green Chili Sauce:

1 T. extra virgin olive oil

1 c. chopped yellow onion

2 garlic cloves, minced

¼ tsp. ground coriander

½ tsp. ground cumin

¼ tsp. kosher salt

freshly ground black pepper

4 c. (1 qt.) chicken stock

7-8 oz. canned diced green chilies

2 T. water

2 T. cornstarch

2/3 c. plain non-fat greek yogurt

Heat the oil in a large skillet. Add the onion. Sauté until translucent, about 3-4 minutes. Add the garlic and sauté for 30 seconds. Add the ground coriander, ground cumin, salt, and pepper. Stir in the chicken stock and green chilies. Bring to a boil, and simmer for 10 minutes or until the chicken stock has reduced a bit.

In a medium sized bowl, whisk together the water and cornstarch. Add to the skillet along with the juices from baking the chicken, and cook until the sauce thickens. Remove pan from heat and whisk in the yogurt. Taste and adjust seasoning. 

Building the Casserole:

15 small white corn tortillas or 10 regular sized

1½ c. shredded low-fat mozzarella cheese

1 c. shredded Monterey Jack cheese

avocado chunks, opt.

diced fresh tomatoes, opt.

Spread a very small amount of the sauce on the bottom of a lightly greased 9×13-inch baking pan. Add a layer of tortillas (feel free to cut them to fit the pan), then 1/3rd of the remaining sauce, cooked chicken, and cheeses. Repeat 2 more times. Finish with the last of the shredded cheese on top. (If it looks like a little more cheese on top would be nice, you know where your grater lives!)

Bake in a pre-heated 350 degree oven for 30-40 minutes or until the cheese on top is starting to brown and is nice and melted, and the sauce around the edges of the pan is bubbly. Let sit for about 5 minutes before serving.

Serve garnished with freshly diced avocado and tomatoes.


QUINOA, KALE, AND SHALLOT PILAF

Now I know what you’re thinking. Patti is trying to sneak kale into our diet again in order to help us eat healthier. And by golly, you’d be absolutely spot on! But it’s not just for your sake that I came up with this recipe. It’s for our sake too!

Mr. C. and I need to remain ever steadfast in our pursuit of good health. And since I do most of the meal planning in our wonderful partnership, it’s up to me to help him stay healthy too. (See how that works!)

Fact: Mr. C. likes quinoa. Fact:  Mr. C. is never, ever going to beg me to fix a cruciferous veggie for dinner. But, if I sneak in a bit of cruciferous (in this case kale) with other ingredients that he admires, I usually can get away with upping his consumption of this healthy group of vegetables.

And indeed he thought this pilaf was just fine! (He’s a big fan of shallots, garlic, and slivered almonds.)

So next time you want to serve a healthier side dish to your family, get out the box or bag of quinoa, chop up a few veggies, and sit down to dinner with a smile on your face. You might even forget to mention the “H” (healthy) word when you describe this dish’s many virtues. I know I forgot to mention the “K” (kale) word to Mr. C. the other evening, and in doing so it didn’t seem to harm him one bit. Oh who am I kidding? He knew exactly what was in this recipe. He’d glanced at the ingredient list as it came off the printer.

But we’re not so old that we don’t still appreciate a little harmless “detail omission” in the name of marital bliss. And speaking of marital happiness, it’s after 5:00 pm. It’s martini time. And my dear husband has just delivered a coupe glass containing the requisite amount of gin, vermouth, and ice to my desk.

So here’s to marital harmony, delicious and healthy food, and to our family, friends (and spouses) who eat kale without making a fuss!

1½ c. quinoa, well rinsed and drained

3 c. water

3 tsp. vegetable base (I use Better Than Bouillon Vegetable Base)

¼ tsp. seasoned salt

freshly ground black pepper

2 T. extra virgin olive oil   

1 lg. shallot, finely minced

2 cloves garlic, finely minced

2 c. chopped kale leaves, massaged

¼ c. slivered almonds

In a medium pot over high heat, bring the quinoa, water, veggie base, seasoned salt, and pepper to a rolling boil, stirring occasionally. Reduce the heat to low and simmer until the quinoa has fully absorbed the water, about 20 minutes. Stir periodically while cooking. 

Meanwhile, heat the olive oil in a large sauté pan over medium heat. Add the shallot to the pan. When the shallot become translucent, after about 4 minutes, add the garlic and the kale. As the kale begins to wilt and reduce, continue to stir. It should take about 2 minutes for the kale to wilt.  

Stir in the cooked quinoa, taste, and adjust seasoning. Remove from heat and stir in the slivered almonds. Serve warm or at room temperature.

GF PEANUT BUTTER COOKIES

One of the amazing spots we were lucky enough to snag on our recent trailer trip. KOA in Placerville, CA
Another view of this site plus Mr. C. enjoying a drink and his book before dinner.
The island on the pond.

Just before leaving on a trailer trip, I always make granola, a couple of main dish entrees for the trailer freezer, and cookies. (One simply can’t go on holiday without cookies!) But this time my right foot was giving me trouble, so standing too long was painful. I remembered that I had been wanting to try a gluten free peanut butter cookie, so no time better than the present to see what I could come up with.

And because I needed enough cookies to make it through 4 weeks, I made certain that the recipe I glommed together from several recipes posted on the internet would be large enough to accommodate my needs. And oh am I glad I did! These were the best peanut butter cookies I ever made, or tasted for that matter. They were so crunchy and so flavorful. And ever so simple and quick to fix. I didn’t even need my mixer. So not only was my foot happier, my mouth was seriously pleased with the results.

So next time you want a simple and perfect cookie, and don’t have the time or energy to spend getting out your mixer, creaming the butter and sugar, etc. etc., this is the recipe for you.

Mr. C’s only comment: “I think they would be great with chocolate chips in them too!” So next time, there will be mini chocolate chips in the mix. Still only 6 ingredients! Can’t be much simpler than that!

2 c. chunky peanut butter (not the old fashioned or freshly ground kind)

1 c. brown sugar, firmly packed

2 tsp. baking soda

2 lg. eggs

1 tsp. vanilla extract

Preheat oven to 350 degrees. Line a large baking sheet with parchment paper. Set aside.

Stir the peanut butter, brown sugar, and baking soda together in a medium sized bowl. (I use a regular table knife for this process. Works great!)  

In a small bowl, beat the eggs and vanilla together. Add the egg mixture to the peanut butter mixture and stir until well blended.

Drop balls of dough using a small ice cream scoop onto prepared baking sheet 2-inches apart. Press down lightly with your fingers to flatten cookies a bit. Bake for 14-17 minutes or until edges and tops start to brown. If you prefer crunchier cookies, bake a minute or two longer. 

Remove pan from oven and allow cookies to cool on baking sheet for 2-3 minutes before transferring to a wire rack to cool completely. Store in an airtight container.

Note: For chocolate chip peanut butter cookies, add ½ cup mini chocolate chips to the batter.

And sorry about no picture of these cookies. Just too busy getting ready to leave on our trip to even think about snapping a picture. That, and my camera was already at the trailer anyway!

FRIED TOFU AND SHRIMP OR CHICKEN CHOW MEIN

Yes I know, I already have an Asian inspired recipe on this site that is very similar to this one. However, it (Seafood and Fried Tofu Low Mein) has a few different ingredients and takes a bit longer to prepare. (It’s really good too!)

So one evening a few days ago I was in a hurry. I wanted chow mein but I didn’t want to spend much time in the kitchen. (You know, there are just some days like that!) So I went to one of my favorite sites for inspiration. And Nagi didn’t let me down. Of course I changed things up from her original recipe, but I still felt it only fair to acknowledge her contribution. You too might want to check out RecipeTin Eats. But back to this recipe.

I loved how easy this one-dish meal came together. And man was the chow mein good! But then I am absolutely crazy about fried tofu. I could eat it almost every day. And in combination with either a bit of shrimp or chicken, this dish is like the best chow mein you could ever hope to find in a restaurant. And not greasy. Not in the least!

So if you need to create a quick one-dish meal some evening, give this chow mein a try. It really is easy and fairly quick to prepare. Plus you can add as many veggies to this basic recipe as you desire. Don’t like tofu, leave it out. Want the chow mein to be meat free, leave out the chicken or shrimp. (The dish as written won’t ever be strictly vegetarian because oyster sauce actually does contain oyster extract or essence.) Want to make the dish GF, use rice noodles and make sure your soy sauce is GF. (GF Tamari is really good for that purpose.)

Anyway you prepare this dish, you are going to be pleased with the results. And this dish warms up beautifully. Which BTW, is almost essential here at Chez Carr. We simply don’t eat as much as we used to and planned-overs are now a regular part of our life.

Note: If you are still cooking for a large family, you just might want to double the recipe. And even then you still might not have any leftovers to warm up for lunch the next day. Believe me, I understand all too well. I still remember feeding my kids when they were teenagers. Leftovers! Huh! It was only a distant dream in those days. Now I’m living the dream, in many more ways than leftovers! Happy cooking my friends.

  • ¼ c. soy sauce
  • generous 1/3 c. oyster sauce
  • ¼ c. dry sherry
  • 2 T. cornstarch
  • 1½ tsp. sugar
  • 1 T. sesame oil
  • freshly ground black pepper
  • ½ tsp. Sriracha, or more to taste
  • 1 pkg. firm tofu, sliced and cut into cubes
  • 2 T. vegetable oil
  • 4-5 c. thinly sliced napa cabbage
  • 1 sm. carrot, chopped fairly small
  • 5-6 lg. uncooked shrimp, shelled and cut in thirds or ½ chicken breast, cut into small pieces
  • 3 garlic cloves, minced
  • 6 oz. chow mein noodles, cooked al dente
  • 4 green onions, sliced diagonally
  • 2 c. bean sprouts

Whisk the soy sauce, oyster sauce, dry sherry, cornstarch, sugar, sesame oil, black pepper, and Sriracha together in a small bowl. Set aside.

Gently combine the tofu cubes with 3 tablespoons of the chow mein sauce while you chop the veggies and shell the shrimp or cube the chicken.

When all of the ingredients are prepped, heat the oil in a wok or large non-stick fry pan over medium-high heat. Add the tofu cubes and fry until brown on at least 3 sides. (Reserve the sauce mixture remaining in the bowl after you remove the tofu.) Remove the browned tofu from the pan and set aside. Start noodles cooking.

Add the cabbage and carrot to the pan and stir fry until the cabbage starts to wilt. Add the shrimp or chicken and cook just until done. Add the garlic and cook for 1 minute.

Add the cooked noodles, (I lift them directly from the pasta water into the fry pan with a pair of tongs), fried tofu, green onions, bean sprouts, and sauce. (Don’t forget the sauce in which you marinated the tofu). Gently stir fry until the noodles are warmed through and sauce is thickened, about 1 minute. Don’t over-cook. Serve immediately.


CHOCOLATE CHIP, MACADAMIA NUT, AND TOASTED COCONUT BARS

I love bar cookies because not only are they delicious, they are just so darned easy to prepare. And I needed an easy treat to serve the guys who would be rehearsing in our home later that afternoon.

So having just returned from Hawaii where macadamia nuts are considered a staple, I decided to include them with a couple of my other favorite tropical ingredients to create a simple bar cookie that would remind all of us of warm and sunny places. I also wanted to be able to leave my stand mixer in the pantry and while I was at it, make the cookies GF (gluten free). (I sometimes ask a lot of myself!)     

So I started with a basic Blondie (a butterscotch or vanilla flavored bar cookie) recipe and went from there.        

Now I know what you are thinking. Not an inexpensive cookie to make. And of course, you are right. But these are quite rich so you really don’t need to eat a very large bar to feel like you have just eaten a rare treat.

So if some day you find yourself short of time, but need a really good cookie to serve your family or friends, I would recommend you give this recipe a try. If you want to fancy up your bars to look like an expensive dessert that just came from the kitchen of a fine restaurant, place 1 bar on top of (at an angle) a second bar placed on a lovely small plate. Surround the bars with 2-3 small scoops of vanilla ice cream, dollop with a small amount of real whipped cream, sprinkle with finely chopped macadamia nuts, and finally top with a shave or two of dark chocolate. If that doesn’t impress your family and friends, I don’t know what would? Komoika (enjoy)

  • ¾ c. unsalted butter
  • 1½ c. GF flour (I use Cup4Cup) or unbleached, all-purpose flour
  • 1 tsp. baking powder
  • ¼ tsp. kosher salt
  • 1½ c. brown sugar
  • 2 eggs
  • 1½ tsp. vanilla extract
  • 1 c. semi-sweet chocolate chips
  • 1 c. lightly salted macadamia nuts, chopped
  • 1½ c. toasted coconut

Melt the butter in a large glass bowl. Remove from microwave and set aside to cool. Meanwhile whisk the flour, baking powder, and salt together in a separate bowl. Set aside.

When the melted butter is cool, stir in the brown sugar and mix until well combined and smooth. Add the eggs and vanilla. Add the dry ingredients to the butter mixture and mix just until combined. Do not overmix. Gently stir in the chocolate chips, nuts, and coconut. Scoop the batter into a greased 9×13-inch baking pan and level with an offset spatula.

Bake in a pre-heated 325 degree oven (for glass) or 350 degree oven (if using a metal baking pan) for 30 to 40 minutes (takes longer when you use GF flour) or until the bottom is a nice golden brown and the top feels set when touched.

Remove from oven and place on a wire rack to cool. When completely cooled and the chocolate chips have once again hardened, cut into bars. Store in an airtight container.   


GF BLUEBERRY CREAM CHEESE MUFFINS

OK, I’ve said it before and I’ll say it again – I am not a muffin lover. But, and isn’t there always a but, these muffins are delicious. My friend Peggy described them as having a consistency reminiscent of angel food cake, but not quite as soft. And the nice little crunch provided by the sprinkling sugar just adds to the overall appeal. And blueberries, who doesn’t love blueberries? One of those guilty pleasures that is actually really, really good for you. Did I mention that these babies are really, really tasty?

Now the original recipe I found on Mel’s Kitchen website did not call for GF flour. But my friend Marsha, who suffers from celiac disease, turned me on to Cup4Cup, her favorite GF flour. She uses it in place of regular flour with amazing results. So I decided for my JazzVox brunch yesterday, I would give Cup4Cup a go in this recipe. And of course what usually happens when I think I am doing the right thing like offering up a GF dish, I read the very next day that I am playing into the hands of people who may be harming themselves by adopting a GF lifestyle. (I really can’t win!) 

According to Peter Green, MD, director of the Celiac Disease Center at Columbia University, “The gluten-free diet is a trendy diet. It will save someone’s life if they have celiac disease, but its role in the general public is nonexistent. Many people who go on a gluten-free diet do so for “bogus reasons.”

So now what do I do? Throw the muffins out as not to pander to someone’s uninformed idea of what is good for them? Or do I simply serve the muffins knowing that they are delicious and who the heck cares anyway if they are made from something other than wheat flour? I tell you – it ain’t easy keeping up with everyone’s food allergies, likes and dislikes, vegetarianism, veganism, etc. etc. It’s like checking out alternate facts! What the heck is an alternate fact anyway? Isn’t a fact a fact? Has the dictionary definition (a thing that is indisputable) changed over the last 3 weeks? Should I start preparing alternate recipes in case we happen to find ourselves in an alternate universe? A universe without basil, for example. (God forbid!)  

Anyway, the thing to know is that these muffins are wonderful. They are easy to prepare, and regardless of whether or not you use GF flour or “the real thing”, you are going to be very happy with me for turning you on to this recipe. Enjoy the muffins my friends and thank you Mel for this amazing recipe.

  • 8 oz. (1 pkg.) cream cheese, room temperature
  • 4 T. (½ stick) unsalted butter, room temperature
  • 1½ c. granulated sugar
  • 2 lg. eggs
  • 1 tsp. vanilla extract
  • 2 c. Cup4Cup GF flour (or your favorite GF flour or if necessary, regular unbleached flour)
  • 1 tsp. baking powder
  • ¼ tsp. baking soda
  • ¼ tsp. fine sea salt  
  • ½ c. buttermilk
  • 2 c. fresh blueberries
  • sprinkling sugar, opt.

Cream the cream cheese, butter, and sugar together until light and fluffy. Add the eggs, vanilla, and buttermilk; mix until well-combined. In a separate bowl, whisk together the flour, baking powder, baking soda, and salt. Add the dry ingredients to the cream cheese mixture and mix just until combined. Do not over-mix. Gently stir in the blueberries.

Using a medium sized ice cream scoop, plop dough into 2 – 12 cup paper lined muffin tins. Top each muffin with a light sprinkling of sprinkling sugar. Bake in a pre-heated 350 degree oven for 14-16 minutes or until the tops spring back lightly to the touch and the bottoms are a nice golden brown. Don’t overbake.  

Remove the muffins to a wire rack to cool completely. Store in a covered container at room temp. or in the refrigerator for several days.

Thanks to the Mel’s Kitchen website for this delicious recipe. Makes 24 muffins.   

FRIED RICE

dscn0010

Yesterday while trying to decide what to fix for dinner, I remembered that I had some cooked white rice in the fridge. When I serve rice, it’s usually brown rice or some kind of pilaf. But the night before I had served a chicken curry, and I like curry best over white rice. (FYI – For my curry recipe, go to Curry Sauce for Chicken, Shrimp, Beef, or Lamb.) So with about 2 cups of cooked rice literally staring me in the face, I decided to make fried rice.

I have been making this recipe for decades. It is so tasty and the best part is that you can use as many or as few veggies as you happen to have on hand. I didn’t have any fresh mushrooms for example, so I used dry mushrooms. (Actually I prefer dried mushrooms in fried rice anyway. So no problem there.) Then I simply used the combination of veggies listed below, because they were what was in my veggie drawer. But you could add celery, bean sprouts, Fried Tofu (see recipe below), edamame, broccoli, or any other vegetable your little heart desires or you simply need to use up. (Soup and fried rice have a lot in common when it comes to using up fresh vegetables that scream at you every time you open the veggie crisper drawer!)

And the amounts listed below are merely a guideline. If you are crazy nuts about peas for example, add as many as you like. Hate mushrooms, leave them out. This recipe should be used as a simple road map to preparing a delicious side dish that is simple to make, inexpensive, and pretty to boot. And it goes well with just about any type of meat.

So do yourself and your family a favor. Get your wok out of storage, or your largest fry pan from its resting place, and build a treat for your family. Fried rice is simply an amazing dish. Kids don’t even realize they are eating veggies when they are gulping down this rice with its subtle Asian flavor. And what parent doesn’t like a little harmless subterfuge when it comes to providing their offspring with nutritious food? Or wife for that matter trying to get cruciferous veggies down her husband’s throat. (Not mentioning any names here, but I’m pretty sure you can figure out to which husband and wife team I am alluding!)

  • 2 eggs
  • ½ tsp. kosher salt, divided
  • 3 T. vegetable oil, divided
  • 3 tsp. sesame oil, divided
  • ½ c. chopped yellow onion
  • ¾ c. chopped button mushrooms or ½ c. chopped dry mushrooms, rehydrated and squeezed semi-dry
  • 2 c. cold cooked rice
  • 1/3 c. shredded carrot
  • ½ c. diced zucchini
  • ¾ c. finely sliced green cabbage
  • 2 T. vegetable, chicken, or beef broth
  • freshly ground black pepper
  • 3 T. Tamari, or more to taste (use GF Tamari to make this a GF dish)
  • ¼ c. frozen petite peas or fresh peapods, sliced
  • ½ c. sliced green onions

Beat eggs with ¼ teaspoon of the salt. Heat 1 tablespoons of the vegetable oil over medium heat in a wok or large fry pan. Pour in beaten eggs. Stir eggs continuously until cooked dry and separated into small pieces. Remove from pan and set aside.

Add the remaining 2 tablespoons vegetable oil and 1 teaspoon of the sesame oil to the pan. Turn burner to medium heat. Add the yellow onion, mushrooms, and rice to the pan. Stir fry for 5 minutes. Add the carrot, zucchini, and cabbage; stir fry for an additional 4 minutes. Add the broth, remaining ¼ teaspoon salt, pepper, and Tamari. Stir to mix well. Add the peas, green onion, cooked eggs, and remaining 2 teaspoons sesame oil. Bring up to heat. Adjust seasoning and serve immediately.

Please note: If you want to include meat in your fried rice, add as much cooked meat or cooked shrimp as you would like along with the peas, green onions, etc.

FRIED TOFU

  • ½ block extra firm tofu
  • 2 T. cornstarch, or more as needed
  • 2 tsp. vegetable oil
  • 1 tsp. sesame oil

Wrap tofu in a clean, absorbent towel and set something heavy on top, such as a cast iron skillet, to press out the liquid. Let sit for a few minutes. Cut tofu into ¼-inch slices and coat with cornstarch.  Combine the vegetable oil and sesame oil in a medium frying pan. Bring oil to medium heat and fry the tofu until both sides are a nice golden brown. Remove from pan and drain on a paper towel. When cool cut into bite size pieces. Set aside. Add to the fried rice along with the peas, green onions, etc. Stir gentle so the tofu doesn’t break up.


GF CARROT CAKE WITH CREAM CHEESE FROSTING

20161016_104821

In an effort to include recipes for everyone, young and old, sober or otherwise, vegetarians, gluten avoiders, spicy lovers, and even those poor souls who only eat meat and potatoes, I offer up this adaptation of a Bette Hagman GF recipe for all of my readers who are gluten intolerant. (Usually I can’t abide intolerance, but for gluten, I make an exception!)
And if ever there was a cake that almost everyone loves and should be able to enjoy, it’s carrot cake. My feeling is, if there’s a way around a problem like gluten flour, then let’s go for it. And Bette Hagman, one of the pioneers in GF cooking, did just that.
Now of course, I couldn’t leave even a Bette Hagman recipe alone! (I’d apologize to Bette, but she now resides with the angels, and my direct line to heaven seems to have been severed.) But even if I could apologize I would argue in my own defense. I simply like a spicier base cake, and I happen to think toasted coconut in a carrot cake is essential.
So if you and/or yours happen to be gluten intolerant or simply want to try giving gluten a rest, give this lovely cake a try. It’s moist and delicious, and I promise you, no one will miss the gluten. And really, when you think about it, who knows what gluten tastes like anyway? No one I know walks into my home and begs to be fed a soup spoon full of wheat flour. Or runs up to me, grabs me by the arm, leads me to the pantry screaming “give me flour, or give me death”! So who really gives a buttery French croissant if there is or is not a spec of gluten in a recipe? As long as the end result is delicious, which incidentally is the goal of everyone who spends any time in the kitchen, then life is good. So experiment my friends. And if you have a favorite GF recipe you would like to share with the world, please write it down and send it to my email address www.chezcarrcuisine@wavecable.com. I will gladly prepare the recipe and if it meets the exacting standards of Mr. C., I will post it and take all the credit. Just kidding. The glory and recognition will be all yours. And of course, the undying thanks from my GF readers.

  • 16 oz. crushed pineapple
  • 1 c. golden raisins
  • 2 c. granulated sugar
  • 4 eggs, room temperature
  • 1 c. mayonnaise (yes – mayonnaise)
  • 1 tsp. vanilla
  • 3 c. grated carrots
  • 1½ c. toasted chopped walnuts, divided
  • 1½ c. toasted coconut, divided
  • 1½ c. white rice flour
  • ½ c. soy flour
  • ½ c. potato starch
  • 2 tsp. baking soda
  • ½ tsp. salt
  • 2 tsp. ground cinnamon
  • 1 tsp. ground mace
  • ¼ tsp. ground cloves
  • ¼ tsp. ground nutmeg

Pour the pineapple plus juice into a small saucepan. Add the raisins and simmer over low heat until the raisins are plump and juicy. Remove from heat and allow to cool.

In a large mixing bowl cream the sugar, eggs, and mayonnaise together. Add the vanilla, carrots, 1 cup of the toasted walnuts, 1 cup of the toasted coconut, and the cooled pineapple/raisin combination.

In another bowl, whisk together the flours, soda, salt, cinnamon, mace, cloves, and nutmeg. Stir the flour mixture into the carrot mixture until well blended.

Pour into a lightly buttered and rice floured 10×16-inch glass baking dish*. Smooth top with an offset spatula or table knife. Bake in a pre-heated 325 degree oven* for approximately 40-45 minutes. If already getting brown after 20 minutes or so, gently tent with aluminum foil to prevent further browning. Remove from the oven when a pick stuck in the middle of the cake comes out clean. Place pan on a wire rack. Cool completely before topping with Cream Cheese Frosting (recipe below). Garnish with remaining half cup of toasted coconut and half cup of toasted walnuts.

Please note: Most of the time when I bake cakes or breads that contain veggies or fruit, I freeze them for a couple of days before I frost and serve them. But with this cake, because I am a novice at working with flours other than wheat, I have not frozen the cake before serving. If any of you are GF experts, I would welcome your thoughts on the subject. Thank you.

*If using a metal baking pan, increase heat to 350 degrees and check if done after 35 minutes.

CREAM CHEESE FROSTING

  • ½ c. (1 stick) unsalted butter, room temperature
  • 8 oz. cream cheese, room temperature
  • 1 tsp. vanilla
  • pinch salt
  • 3½ c. powdered sugar or more if needed

Cream butter and powdered sugar together until well blended. Add the vanilla and salt and enough powdered sugar to make a firm but not stiff consistency. Beat until smooth and easy to spread.

GF OATMEAL COOKIES

20161019_130126

My friend and neighbor Marsha made these cookies to share at our annual homeowners meeting. I had been on the board for 6 years serving as president the last year. And Marsha was on the board for my last year serving as a director-at-large. She is a most delightful woman, with a sterling intellect, logical mind, and a terrific sense of humor. In other words, an absolute delight! And, BTW, a fabulous addition to our homeowners board of directors, as well as being a great baker. And speaking of delightful – these cookies definitely fit that category. They are crisp, light, and full of flavor. You would never guess they were GF.

So if you or someone you know needs to stay away from gluten, then these are the oatmeal cookies for you or them. And a wonderful addition to a dessert table when you have no idea whether or not some of your guests might be gluten intolerant. Your only trouble is going to be keeping your non gluten challenged guests from keeping them all to themselves! A bit of hand slapping might be necessary. Or maybe baking a double batch would be the more politically correct course of action. I’m not sure. I used to have a pretty good idea what was and wasn’t politically correct. But this year’s presidential election has thrown everything I felt defined common decency or political correctness right out the window.  (I know, I promised no more commentary on politics, but I set myself up without any intention of going politically postal on all of you again!)

I’m OK now, but I think I need a cookie. And since I just happen to have baked a batch of these cookies for Mr. C. and the other members of the seven piece jazz group (Seabreeze Jazz Band) that are, as I write, rehearsing in our living room, I’m going to leave you now and grant myself an attitude adjustment. You’re on your own. But if you too need your attitude adjusted, these little darlings just might be the ticket. And no, I’m not going to say anything about tickets, political or otherwise! I’m simply going to stop now while I’m ahead.

Thanks again Marsha for this wonderful recipe.

  • 1 c. (2 sticks) unsalted butter
  • 1 c. granulated sugar
  • 1 tsp. vanilla
  • 1 c. GF flour (see note about GF flours below)
  • 1 tsp. baking soda
  • ½ tsp. salt
  • ¼ tsp. nutmeg
  • 2 c. GF oats* (some of them aren’t!)

Cream butter and sugar until pale yellow. Add the vanilla. Whisk the flour, soda, salt, and nutmeg together. Add to the butter mixture and beat just until the dry ingredients are thoroughly blended. Mix in the oats. Drop by small ice cream scoop or rounded teaspoons onto lightly greased cookie sheet two inches apart. Flatten slightly with your fingers.

Bake in a pre-heated 350 degree oven for 12 to 14 minutes or until edges are golden and middle is mostly set. (I found that it helped to turn on the convection option on my oven for the last 3-4 minutes to help brown the center of the cookies.)

Please note: For this recipe, Marsha uses what she calls her “Cookie Flour Blend”. (See recipe below.) It has a sweeter taste overall and is not as dry as other gluten free mixes. For all other cooking she uses GF Cup 4 Cup flour. It is the closest to wheat flour she has ever found. In place of her cookie flour and for easy baking she would have no qualms about using Cup 4 Cup in this or any other cookie recipe. GF flour can usually be found among the other flour varieties, or if not there, the grocery store might have a separate area dedicated to GF products. At least, the GF area is where I found my bag of Cup 4 Cup flour at our local Haggen.

COOKIE FLOUR BLEND (recipe found in a Washington Post article)

Equal parts:

  • mochiko flour
  • sorghum flour
  • tapioca flour
  • cornstarch
  • almond flour

Whisk all together and store in an airtight container. Use in any of your favorite cookie recipes.

*According to the University of Chicago Celiac Disease Center, “oats are technically gluten-free since they aren’t a type of wheat, barley, or rye grain, the three groups of whole grains that naturally contain the protein gluten.

So pure oats themselves are GF and safe for most people with gluten-intolerance. The problem with oats in gluten-free eating is contamination. Most commercial oats are processed in facilities that also process wheat, barley, and rye. So unless the packaging specifically states “GF”, you might not be safe eating just any old oats if you truly suffer from celiac disease. However, many people with just an intolerance to gluten are fine eating oats that are not specifically rated as being “GF”.