GRANOLA WITH OATS, NUTS, SEEDS, DRIED FRUIT, AND COCONUT

OLYMPUS DIGITAL CAMERA

There is just nothing better than waking up to a lovely Americana handed to you by your husband along with the morning paper. This is how I start every morning. (Not a bad gig, right?) Well, to make it up to him, I usually fix him a breakfast that is both nourishing and delicious. And one of the ways I do this is by making my own granola. Now granted, I don’t serve granola every morning because that would get too monotonous. (And as you well know, breakfast can be a bit tedious if you don’t change things up every day.) So when our dear friend Peggy offered me her granola recipe, plus a sample, I jumped at the chance to taste another person’s homemade version of this very expensive (off the grocery shelf) breakfast staple. And oh was it good! So of course I had to make some for us, and share her basic recipe with you. (And yes I changed a couple of things, but I simply can’t help myself!)

At this point, I really should explain what constitutes a typical breakfast at Chez Carr. I basically like to serve a variety of items for breakfast in much the same way I would serve several small tapas at a dinner party. Small portions, but a nice variety. So breakfast at our home usually consists of a piece of whole wheat toast, a small piece of breakfast meat (one slice of very lean bacon or 2-oz. of chicken breakfast sausage), an easy over or scrambled egg, a half piece of fruit, and a small bowl of granola with either a dollop of Greek yogurt and blueberries (for example), or a small amount of milk. And when I say a small amount of granola, I mean about 3 tablespoons. And the dollop of yogurt is about 2 tablespoons. Just enough granola to add crunch to our meal, and just enough yogurt to give us that delightful creamy mouth feel we so dearly love. So all in all, really not a heavy breakfast. Once in a while I go nuts and fix us pancakes. But they’re made with whole grain or oat flour, so they really do have some protein and therefore some redeeming nutritional value! Oh, and Mr. C always has a small glass of juice every morning with breakfast. (Can’t leave that out!)

So if you too would like to add a bit of excitement to your morning meal, make up a batch of this healthy granola. Your whole family will appreciate the delicious flavor and crunch. And even though they might not equate their newfound energy with eating this protein rich cereal for breakfast, they should be able to make it to lunch now with energy to spare. This is simply not Captain Crunch my friends! This is the real deal. And no preservatives with names only a biology professor can pronounce. Just healthy ingredients that are easy to assemble and ever so easy to get everyone in your family to eat. Word of warning to you parents with school age children: Don’t be surprised if your children start wanting this granola for an afternoon snack. This grandma advises – let them! Granola is sure a lot better for your kids than candy, cookies, chips, or any form of frozen after school snack.

Thanks again Peggy for this wonderful recipe. And for my recipe for granola, search under Granola, and mine will magically appear.
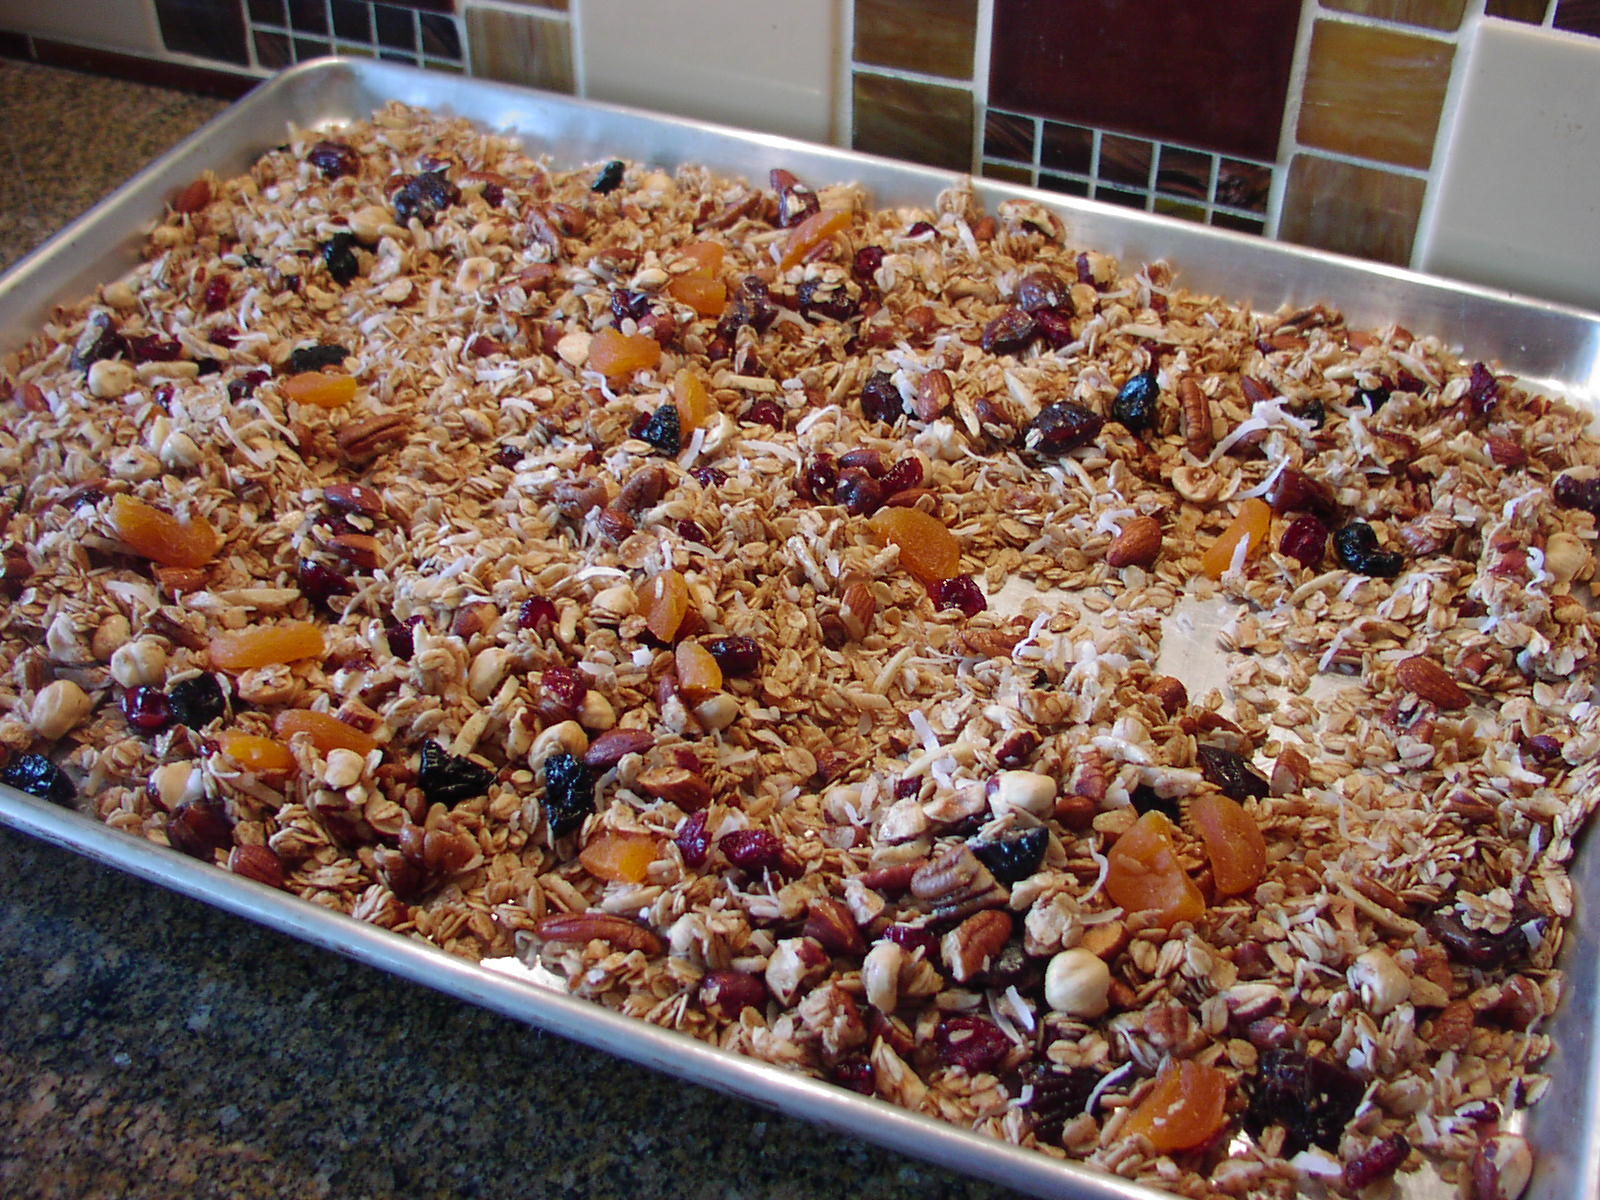
  • 3 c. rolled oats
  • 2 c. nuts & seeds (almonds, cashews, pecans, hazelnuts, pepitas, sunflower seeds, etc.)
  • 1 c. shredded unsweetened coconut or whatever coconut happens to be in your pantry at the time 
  • ¼ c. vegetable oil
  • ½ c. honey
  • ½ tsp. kosher salt
  • 1-2 tsp. ground cinnamon
  • 1 tsp. ground ginger
  • ¼ tsp. nutmeg
  • 1/8 tsp. ground cardamom
  • ¼ c. roughly chopped candied ginger
  • 1 c. dried fruit (golden raisins, chopped dates, dried blueberries, cranberries, strawberries, apricots, etc.)

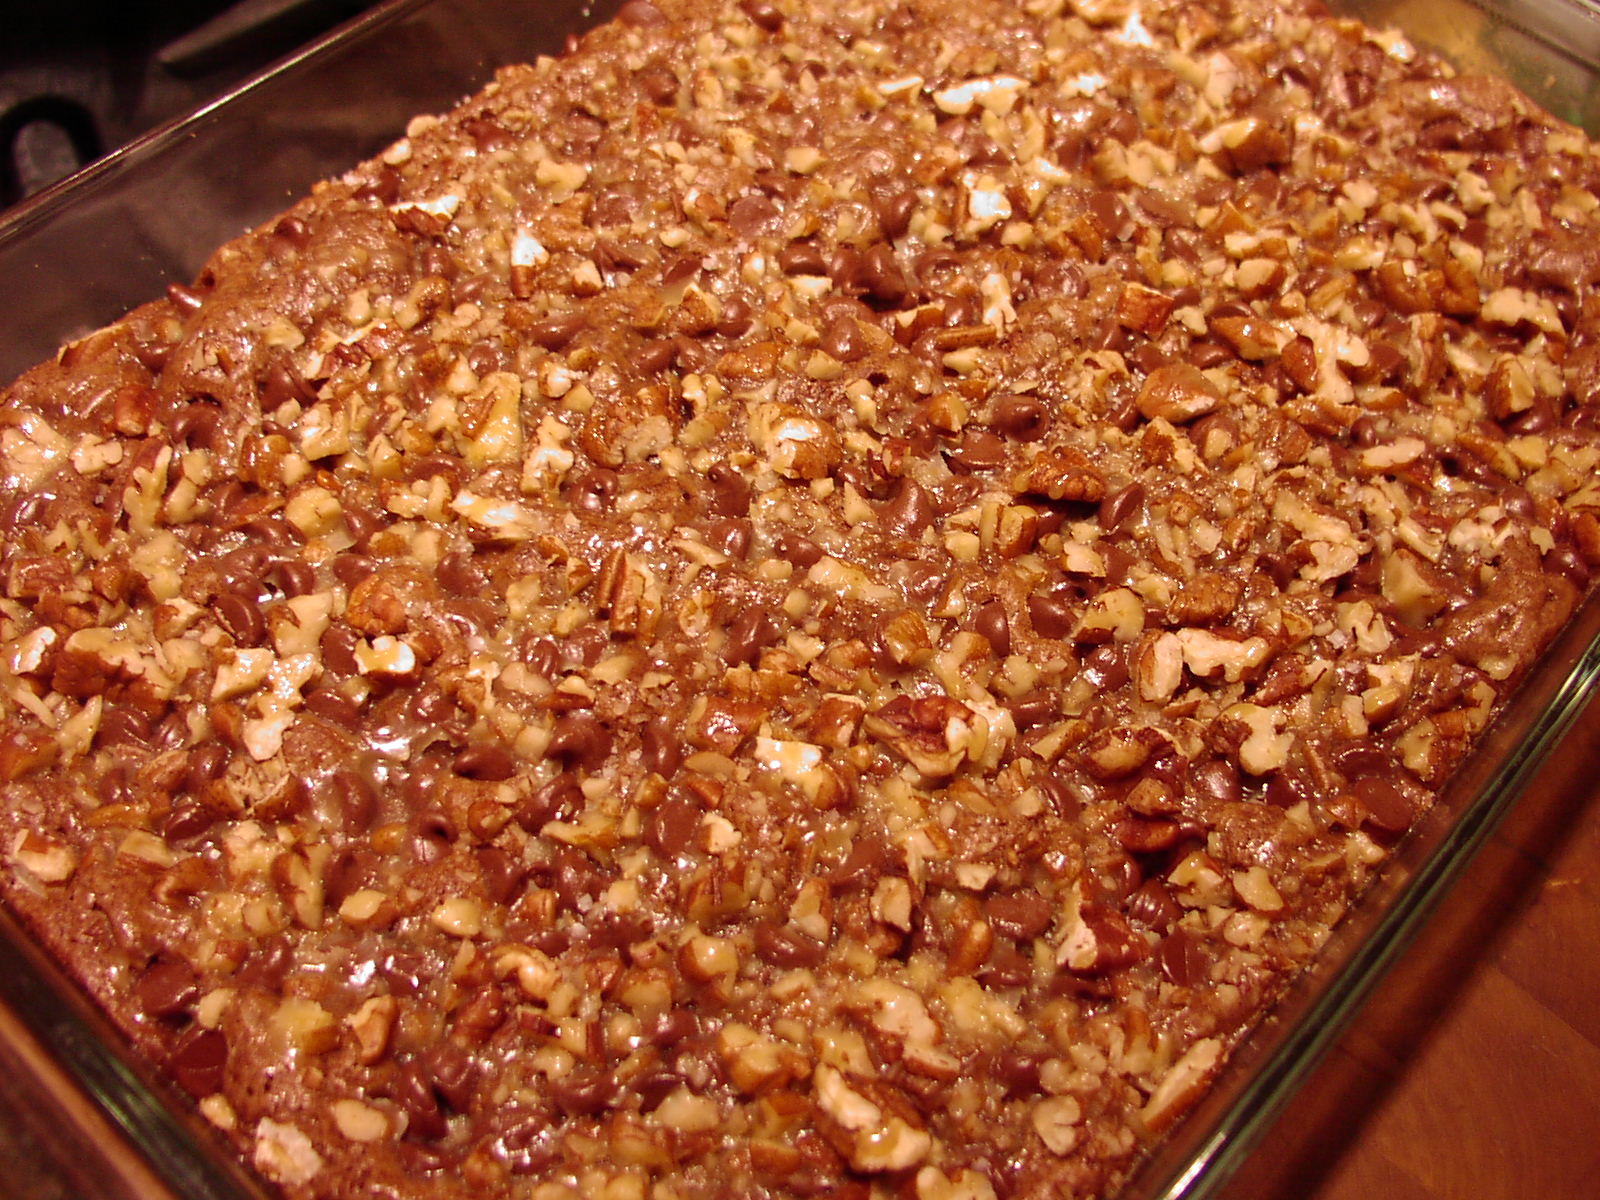
In a large bowl mix together the oats, nuts, seeds, and coconut. In a small bowl whisk together the oil, honey, salt, cinnamon, ginger, nutmeg, and cardamom; pour over the dry ingredients and stir until well combined. Spread evenly on 2 large baking sheets. Bake in a pre-heated 250 degree oven for 30 minutes, stirring after 15 minutes. Remove from oven and stir in the candied ginger and mixed dried fruit. Return to the oven and bake for another 15 minutes. (Total baking time – 45 minutes.) Remove from oven and place baking sheets on wire racks. Let cool completely before storing in an airtight container. Serve with yogurt and fresh berries or simply with milk.


ASIAN GROUND BEEF OR GROUND CHICKEN SALAD (OR WRAPS)

OLYMPUS DIGITAL CAMERA


I love salads and am always looking for new ways to serve healthy salad ingredients in a more interesting and tasty fashion. So when I was also trying to think up exciting ways to use ground beef, I immediately thought of Asian wraps.  But there is something you should know about Mr. C and me. We are messy eaters. And trying to keep even an ingredient as ordinary as taco meat corralled in a crisp tortilla can be daunting for us. And don’t even get me started on what kind of a mess we can make when eating a really good and juicy hamburger!

So the thought of deliberately setting us up for another messy food experience just for the sake of presenting this set of ingredients in a trendy culinary manner, fairly screamed for an alternate solution. So last evening, when all the usual wrap suspects were assembled as a salad, we actually looked like two adults enjoying a wonderful meal, rather than two children left unsupervised to make as much of a mess as possible! After all, the same ingredients were in the salad as would have been presented in a wrap. So there really was no taste difference. The ingredients were simply presented in a much more dignified manner! (Plus we didn’t need to spend any time after dinner cleaning up after ourselves.)

So if you too are inept with hand held food, give this recipe a try as a salad. If you are able to walk and talk at the same time and eat wraps in a decorous fashion, by all means serve this delicious meat filling and veggie additives (inspiration from PF Chang’s recipe for Chicken Lettuce Wraps) in darling little lettuce leaf cups. Just please don’t tell me about it. I know I’m uncoordinated, but I hate to have that reality stuffed in my face. (Actually, if any stuffing is to be done, I want it to be another one of these wholesome and delightful SALADS, thank you very much! And in the near future too!)

  • 2 tsp. vegetable oil
  • 1 tsp. sesame oil
  • 1 lb. lean ground beef or chicken
  • 1 medium onion, diced
  • 2 cloves garlic, minced
  • 1 T. grated ginger
  • ¼ c. hoisin sauce
  • 2 T. peanut butter
  • 2 T. soy sauce
  • 1 T. rice wine vinegar
  • 1 T. water
  • 1 tsp. Sriracha, or more to taste
  • 6 green onions, thinly sliced, divided
  • 1½ lg. romaine hearts, cut into bite sized pieces or 1 head butter lettuce, washed and individual leaves removed at the root
  • 1/3 c. chopped salted peanuts
  • 1 small carrot, shredded
  • 1 c. very thinly sliced English cucumber, cut into half moons

Heat vegetable oil and sesame oil in a large frypan over medium high heat. Add the ground beef and cook until browned, about 3-5 minutes, making sure to crumble the meat as it cooks. Stir in the onion and cook until translucent. (Don’t let it get brown.) Add the garlic and ginger and stir fry for one minute. In a small bowl combine the hoisin sauce, peanut butter, soy sauce, rice wine vinegar, water, Sriracha, and 1/3rd of the sliced green onions. Pour over the meat just before you are ready to serve. Let simmer for about 1 minute.

To serve, place romaine on two good sized dinner plates. Spoon as much of the meat mixture (you will probably have extra) onto the lettuce as desired. Garnish with the remaining green onions, chopped peanuts, shredded carrot, and cucumber.

OLYMPUS DIGITAL CAMERA

Serve immediately. No dressing required.

To serve as wraps, spoon several tablespoons of the beef mixture into the center of lettuce leaves. Sprinkle on the peanuts, remaining sliced green onions, shredded carrot, and cucumber. Crump the leaves together at the top and eat like a messy taco. (The very reason I serve this as a salad.)

The meat mixture can also be served over rice if the whole healthy “lettuce and veggies” thing is unappealing. (No guilt trip intended!)


GREEN AND BLACK OLIVE TAPENADE

OLYMPUS DIGITAL CAMERA

I first made this tapenade using only green olives, but it was just way too salty. Flavorful, but overwhelmingly salty. So I decided to use half black olives the next time I made it because black olives have about half the amount of sodium as their unripe counterparts. And I was ever so pleased with the result. The wonderful green olive flavor was still there, and although it was still salty, it wasn’t so inordinately salty that it demanded a water chaser every time you took a bite!

Now, if you are like me and firmly believe that every dinner party, be it for 2 or 60 must start with at least 3 little nibbles that are ready when guests arrive, this is going to make your job as hostess very easy. First of all, this spread is delicious. It is also easy to prepare, should be made at least a day ahead, and very pretty to look at. Surround a small bowl of this spread with plain crackers or baguette slices, set out a small dish of grapes, and a small plate of something with high protein content like sliced pepperoni, cheese, and cornichons (for color and crunch), hand your guests their beverage of choice, and your dinner party is well on its way to becoming a hit.

I know I have stated this obvious fact before, but people who have been invited to your home for dinner arrive hungry and expect to be fed. Sounds reasonable, right? So not ever wanting my guests to worry that maybe I was just kidding about the “dinner aka food” part, like I said before, I have a little something waiting for them when they arrive. This way it sets their mind at ease immediately. They know from the get-go that I plan to stave off any imminent chance of starvation happening while they are under my roof. And that most likely, if I have fed them a little something already, there will probably be more goodies to follow. Like I said, it sets their mind at ease. I figure it’s the least I can do for my friends.

Of course, there is also the practical side to getting food into your guest’s tummies immediately. Especially a food containing protein. Having food in your stomach helps slow the processing of alcohol. FYI: Parmesan cheese has the highest protein content of all cheeses, followed by other low moisture cheeses such as Swiss, cheddar, Gouda, and blue cheese.

So next time you have guests over for dinner, even if it’s just a spontaneous get-together with your neighbors, have a little something for them to munch on while they crack open a beer or pour themselves a glass of wine. It can be as simple as munchies that you pour out of a box. Or it can be some of this spread you prepared earlier in the week in case there was a spontaneous occasion when a nice nibble would be appreciated. (This spread travels well too. So even if you are the invited, you can quickly put together a little something to contribute to the cause.) Being prepared isn’t just for boy scouts any more. It should be our new aphorism for life!

  • 1 (2-oz.) can anchovy fillets, well drained
  • 2 garlic cloves, rough chopped
  • 1½ tsp. fresh lemon juice, or more to taste
  • pinch cayenne pepper
  • freshly ground black pepper
  • 1 c. pimento stuffed green olives, well drained
  • 1 c. pitted black olives, well drained
  • 1 tsp. drained capers
  • pinch dried thyme
  • 5 T. extra virgin olive oil

Whirl the anchovy, garlic, lemon, cayenne, and black pepper until well blended. Add the olives, capers, thyme, and olive oil. Pulse until all the olive pieces are roughly the same size. Do not let the mixture become a paste. Store in an airtight container. Serve over plain, not too salty, crackers or toasted baguette slices. Best made at least a day ahead.


SALTED CARAMEL TURTLE BROWNIES

OLYMPUS DIGITAL CAMERA

One of the latest food trends is salted caramel. And although I often refrain from becoming a culinary sheep, I think in the case of salted caramels, I was the first person to follow the leader on this one. (Actually I would have jumped off a cliff with the rest of the sheep, metaphorically speaking of course, had it been necessary to do so!) Because if there ever was a combination made in heaven, it’s the salty sweet caramel. And I am a caramel lover. Milk chocolate covered nut filled caramels are my favorite, but caramel sauce on vanilla bean ice cream runs a close second. (Of course my picky stomach doesn’t appreciate either any longer, but a girl can still dream in caramel, right?)

So last week when I was looking for just that special dessert to serve on Valentine’s Day, I decided to make a turtle brownie. And of course, since I was topping the brownie with chocolate chips, pecans, and caramel – why not go one step further and sprinkle the caramel with a wee bit of finishing salt. So I did and it did. (I salted the top and it tasted mighty fine.)

So if you are ever in the mood for a brownie, (as if there was ever a time when you weren’t in the mood for a brownie), whip up a batch of these little darlings. The brownie itself has a wonderful flavor of its own, with a texture that is both cakey and fudgy at the same time. Then top the brownie batter as described above, pop the whole mess into the oven, let cool completely, (the only hard thing about making these brownies), and cut into desired size pieces. Voilà! You have just created an easy to make, easy to serve, and most definitely, easy to eat brownie. Congratulations!

Brownie batter:

  • 2 c. semi-sweet chocolate chips, divided
  • ½ c. (1 stick) unsalted butter, cut into pieces
  • 3 eggs
  • 1 tsp. vanilla extract
  • 1¼ c. unbleached all-purpose flour
  • 1 c. granulated sugar
  • 1 tsp. espresso powder (I use Medaglia D’oro)
  • ¼ tsp. salt
  • ¼ tsp. baking soda
  • ¾ c. chopped pecans

Caramel drizzle:*

  • ½ c. light brown sugar
  • 3 T. unsalted butter
  • ¼ c. heavy cream
  • ½ tsp. vanilla extract

Finishing touch:

  • coarse finishing salt (like Fleur de Sel or coarse sea or kosher salt)

Brownies: Melt 1 cup of the chocolate chips and butter together in a medium sized saucepan over low heat until the chocolate is melted and the mixture is smooth. Remove from heat and allow to cool. Mix in the eggs and vanilla. In a bowl whisk together the flour, sugar, espresso powder, salt, and baking soda. Add to the chocolate mixture and stir only until the batter is well blended. Pour into a buttered 13 x 9-inch baking pan. (Glass preferably.)

Sprinkle with remaining cup of chocolate chips and the pecans. Bake in a pre-heated 325 degree (for glass) or 350 degrees (for metal) oven on the middle rack for 30-40 minutes or until a tooth pick inserted into the center has just a few moist crumbs clinging to it. Meanwhile, prepare the caramel sauce. When the brownies are done, remove from oven and drizzle with the warm caramel. Very lightly sprinkle with finishing salt. Cool on a wire rack. Can be made up to three days ahead.

Caramel drizzle: While the brownies bake, combine the light brown sugar, butter, and heavy cream in a small saucepan. Cook over medium-low heat whisking constantly until the sugar completely melts and the sauce burbles and just starts to thicken, about 8 minutes. Remove from heat and whisk in vanilla. Allow to partially cool and thicken a bit while the brownies finish baking. (You might have a bit of extra sauce. This is not a bad thing. The sauce is wonderful in coffee or dolloped over ice cream.)

*If you prefer, you can melt 12 caramels with 2 tablespoons of milk in your microwave and drizzle your brownies with this mixture. It is quicker than making your own caramel, but more costly.


“PINK COOKIES”

OLYMPUS DIGITAL CAMERA

I frankly don’t feel there is anything I should have to write about “Pink Cookies”. However, since I can rarely, if ever, keep my thoughts to myself, I feel duty bound to elucidate on the many virtues of this quintessential NW favorite. And yes, I know there are other areas of the world like Provo, Utah and some obscure place in Denmark that claim they were the inspiration for these feel good cookies. Regardless, I have decided to hold firmly to the belief that Uncle Seth, beloved coffee cart cookie guru here in Seattle is behind my whole love affair with these pink frosted delectable sugar cookies. So because I know I am not alone in loving these delightful creations, I decided that Valentine’s Day was the perfect time to share them with our home concert guests. And because it was Valentine’s Day, they simply had to be heart shaped and lightly adorned with multi-colored sprinkles. (Could they really be anything but?)

So I took my favorite sugar cookie recipe, added a cream cheese frosting (tinted pink in deference to the holiday) and whipped up a double batch. And as expected, they were gobbled up by one and all. (Even by my husband who doesn’t like “pink cookies”, or so he says!)

Now for those of you who live in the Pacific NW and don’t know about “pink cookies”, all I can say is – where have you been these last few years? Do you not drink coffee, or ever buy an espresso drink from a coffee cart or stand? I mean really, how could you have missed this treat from heaven? Now of course, if you are from somewhere like Omaha or Cleveland, I can totally understand that coffee may not be an integral part of your life! But you still should know the real reason people drink so much coffee in the Seattle area. That’s right. It’s simply to justify having a nice hot liquid to go with their heavenly pink frosted cookie. There is no other reason that could possibly justify why a sane person (are you listening Mr. C) would spend $4.75 for a drink that actually costs less than $.50 to make at home!

So, if you too are fans of this delightful cookie, bake up a batch at your earliest convenience. And forget making them small. They should be big, and thick, with lots of frosting. And although Uncle Seth doesn’t usually add sprinkles, I personally feel it should be mandatory. There’s just something about sprinkles that smacks of good times and fun. And these cookies are nothing if not fun. Fun to bake, fun to look at, and definitely fun to eat! Thanks Uncle Seth.

Cookies:

  • 1½ c. powdered sugar
  • 1 c. (2 sticks) unsalted butter, room temperature
  • 1 egg, room temperature
  • 1 tsp. vanilla
  • ½ tsp. almond flavoring
  • 2½ c. unbleached all-purpose flour
  • pinch of salt
  • 1 tsp. baking soda
  • 1 tsp. cream of tartar

Cream sugar and butter until light and fluffy. Mix in egg, vanilla, and almond extract. Whisk together the flour, salt, soda, and cream of tartar in a small bowl. Stir into the butter mixture. Place dough on a long piece of plastic wrap. Using your hands, wrap the dough into the plastic gently shaping it into a round log about 2 plus inches wide. Refrigerate for 1 hour. Preheat oven to 375 degrees. Un-wrap log and slice dough a generous 1/3-inch thick. Arrange slices, about 2 inches apart on parchment paper lined or lightly greased baking sheets. Bake until delicately golden, 12-15 minutes. (Do not under-bake.) Cool on baking sheets 1 to 2 minutes; carefully transfer to a wire rack to cool completely before frosting. Add sprinkles if desired. Store in a tightly covered container hidden away from your family.

Note: if you prefer to cut the cookies into shapes, refrigerate dough for 2 hours. Roll out to generous 1/3-inch. (Do not roll any thinner. The thicker the cookie, the better the flavor.) Cut into favorite shapes. Arrange cookies, about 2 inches apart on parchment paper lined or lightly greased baking sheets. Bake until delicately golden for 12-15 minutes in a pre-heated 375 degree oven. (Do not under-bake.) Cool on baking sheets 1 to 2 minutes; transfer to a wire rack to cool completely before frosting.

Cream Cheese Frosting:

  • ¼ c. (½ stick) unsalted butter, room temperature
  • 4-oz. cream cheese, room temperature
  • pinch salt
  • ½ tsp. almond extract
  • 2-3 c. powdered sugar, or more as needed
  • 2-3 drops red or pink food coloring, opt.
  • ¼ c. sprinkles, opt.

While the cookies cool, cream the butter, cream cheese, salt, and almond extract until completely smooth. Slowly add in powdered sugar to taste and consistency. Slowly add pink or red food coloring, one small drop at a time, until you are happy with the color. Blend until color is evenly distributed throughout the frosting. Frost the cookies and add sprinkles if desired. Allow frosting to harden. Store in an airtight container. Can be made 3-4 days ahead.

Note: If you are storing your cookies in layers, make sure the frosting is good and set before placing between sheets of waxed paper. (I usually let frosting set for at least 2 hours.)   


SALADE DE CAROTTES RÂPÉES (FRENCH GRATED CARROT SALAD)

OLYMPUS DIGITAL CAMERA

This grated carrot salad recipe that I found on Jennifer Segal’s Once Upon a Chef web site is just amazingly delicious. I was looking for a fresh carrot recipe, and I just didn’t want the old carrot with raisins combination. (In truth, I have always found a carrot and raisin salad moistened with a slightly sweet dressing underwhelming, to say the least.) But when I studied the ingredients in Jennifer’s recipe for this French favorite, I was hooked. I mean really, who doesn’t like a fabulous Dijon mustard and fresh lemon juice vinaigrette to begin with? And fresh Italian parsley? (I use fresh parsley as often as possible. And to think people used to use parsley only as a garnish!)

So for yesterday’s JazzVox pre-concert meal, I decided to take a chance and serve this salad. Well, I am here to tell you, it was a success. So much so that several people asked for the recipe. And why wouldn’t they? It’s a very economical salad to prepare and contains a vegetable that is crunchy, tasty, a wonderful color, and highly nutritious. Carrots, as everyone knows, are a very good source of beta-carotene, fiber, vitamin K, potassium, and antioxidants. Carrots are also associated with lowered cholesterol levels, improved eye health, and a reduced risk of cancer. I say everyone knows about carrots, because didn’t all of us have parents that told us that carrots were good for our eye sight? Along with the fact that spinach would help us grow up big and strong! And by the time my children had young children of their own, good old broccoli was also added to the “vegetable manipulation” list. (Broccoli is supposed to make us smarter! Never did me any good in that regard, and George H. W. Bush knows I ate and still eat a lot of this cruciferous vegetable!) But I digress….

So if you want a taste treat that uses some very humble ingredients and is very easy to prepare, this is the recipe for you. And it’s French! What more is there to say?

  • 2 tsp. Dijon mustard
  • 1 T. freshly squeezed lemon juice, or more to taste
  • 3 T. extra virgin olive oil
  • 1 tsp. honey
  • ¼ tsp. kosher salt, or more to taste
  • freshly ground black pepper
  • 1 lb. carrots, both ends removed, washed and dried (peeling not necessary)
  • ¼ c. roughly chopped fresh parsley
  • 2-3 finely chopped green onions

Combine the mustard, lemon juice, olive oil, honey, salt, and pepper in a small jar. (Dressing can be made several days in advance.) Grate the carrots in a food processor or on a hand grater. Dry on a paper towel lined baking sheet for about 20 minutes. Transfer to a large mixing bowl. Add enough dressing to moisten the carrots. Don’t overdress the salad; the carrots should not be swimming in dressing. Stir in the parsley and green onions. Cover the bowl and refrigerate for an hour or two before serving. Add salt and/or lemon juice, if needed, just before serving. 

CHICKEN POT PIE – HAVE IT YOUR WAY!

OLYMPUS DIGITAL CAMERA

I just couldn’t decide which recipe for chicken pot pie I liked the best. So I decided to share my three favorite recipes (Chicken Pot Pie, Chicken and Parmesan Pot Pie, and Chicken, Broccoli, and Cheddar Pot Pie) and let you peruse the ingredient list for yourself. Of course you could fix all three at once, but I would suggest just starting with one. After all, these babies are loaded with calories. (I’m not proud of this you realize. It’s just a matter of fact!) So why am I posting these recipes tempting you to be naughty? Because my dear friends, there’s a time and a place for comfort food. (To my thinking, it’s anytime and anyplace!) But even a foodie hedonist like myself, can’t advocate eating comfort food all the time. (I would of course if I were 25 and still had the metabolism of a pigmy shrew. But alas those days are long gone. Sigh…)

So once in a while, when Mr. C and I have been particularly good, I reward us with a comfort food. And isn’t that the way it should be? A little reward here and there to act as an incentive for good behavior? I know it always works well for our cats after we’ve trimmed their toenails. So I figure if it’s good enough for our kitties, it should be good enough for us! And then, of course, there are those times when life gets a little rough. You know. Like when your favorite sports team loses a game, or your favorite TV show gets preempted by a presidential debate. Rough times for sure!

So when you too need a little comforting, bake yourself up one of these pies. They really are quite easy to build and absolutely fool proof. And if you are wondering why I mainly bake a big pot pie rather than a couple smaller ones, it’s my nod to being good. It’s much easier for me to cut myself a reasonable portion from a large pie, than to have a large individual pie in front of me that fairly demands to be eaten right down to the last crumb. That, and it’s a lot easier to build a large pie than several small ones. (The real reason is the latter, but the first reason sounded so virtuous, I just had to include it!)

CHICKEN POT PIE

  • 1 c. chicken broth
  • 2 boneless, skinless chicken breasts, diced  
  • ¼ c. unsalted butter
  • 1 small onion, chopped
  • 1 stalk celery, diced
  • 1 medium carrot, chopped
  • 1 medium potato, cubed
  • 1/3 c. all-purpose flour
  • 1 c. milk
  • ½ tsp. kosher salt
  • freshly ground black pepper
  • 1/8 tsp. granulated garlic
  • ¼ rounded tsp. dried rosemary, crushed
  • ¼ rounded tsp. ground sage
  • ¼ tsp. ground savory  
  • ½ c. frozen petite peas
  • 2 T. chopped fresh Italian parsley
  • 1 recipe Pie Crust (recipe given below)
  • 1 egg
  • 1 T. milk

Pour chicken broth into a small sauce pan. Add the chicken and cook only until the chicken is almost cooked through. Turn off heat. With a slotted spoon, remove chicken pieces to a small bowl. Set aside. (The chicken will finish cooking as it cools.) Reserve the broth.

Meanwhile, melt the butter in a large saucepan over medium-low heat. Add the onion, celery, carrot, and mushrooms. Sauté until the onion is soft. Whisk in the flour and cook for a couple of minute. Add the reserved chicken broth and whisk to blend. As the sauce starts to thicken, add the milk, salt, pepper, granulated garlic, rosemary, sage, and savory. Add the reserved chicken and peas and cook until heated through. Remove from heat and stir in the parsley. Adjust seasoning.

Butter a shallow casserole dish*. (I use a 9×11-inch casserole dish.) Pour the filling into the dish and smooth the top. Set aside while you prepare the crust.

CHICKEN AND PARMESAN POT PIE

  • 1 c. chicken broth
  • 2 boneless, skinless chicken breasts, diced
  • ¼ c. unsalted butter
  • ½ onion, chopped
  • 1 stalk celery, diced
  • 1 carrot, chopped
  • 4-6- mushrooms, sliced
  • 1/3 c. all-purpose flour
  • 1 c. whole milk
  • ½ tsp. kosher salt
  • freshly ground black pepper
  • ½ tsp. dried sage
  • ½ tsp. dried thyme
  • ½ c. frozen petite peas
  • 1 c. finely grated Parmesan cheese, divided
  • 2 T. chopped fresh Italian parsley
  • 1 recipe Pie Crust (recipe given below)
  • 1 egg
  • 1 T. milk

Pour chicken broth into a small sauce pan. Add the chicken and cook only until the chicken is almost cooked through. Turn off heat. With a slotted spoon, remove chicken pieces to a small bowl. Set aside. (The chicken will finish cooking as it cools.) Reserve the broth.

Meanwhile, melt the butter in a large saucepan over medium-low heat. Add the onion, celery, carrot, and mushrooms. Sauté until the onion is soft. Whisk in the flour and cook for a couple of minute. Add the reserved stock and whisk to blend. As the sauce starts to thicken, add the milk, salt, pepper, sage, and thyme. Add the cooked chicken and peas and cook until heated through. Remove from heat and stir in ¾ cup of the Parmesan cheese and the parsley. Adjust seasoning.

Butter a shallow casserole dish*. (I use a 9×11-inch casserole dish.) Pour the filling into the dish and smooth the top. Sprinkle with the remaining ¼ cup Parmesan cheese. Set aside while you prepare the crust.

CHICKEN, BROCCOLI, AND CHEDDAR POT PIE

  • 1 c. chicken broth
  • 2 boneless, skinless chicken breasts, diced  
  • ¼ c. (½ stick) unsalted butter
  • 1 small onion, chopped
  • 1 stalk celery, diced
  • 1 medium carrot, chopped
  • ½ crown broccoli, cut in small pieces
  • 1/3 c. all-purpose flour
  • 1 c. milk
  • ½ tsp. kosher salt
  • freshly ground black pepper
  • 1½ c. grated sharp cheddar cheese
  • 2 T. chopped fresh Italian parsley
  • 1 recipe Pie Crust (recipe given below)
  • 1 egg
  • 1 T. milk

Pour chicken broth into a small sauce pan. Add the chicken and cook only until the chicken is almost cooked through. Turn off heat. With a slotted spoon, remove chicken pieces to a small bowl. Set aside. (The chicken will finish cooking as it cools.) Reserve the broth.

Meanwhile, melt the butter in a large saucepan over medium-low heat. Add the onion, celery, and carrot. Sauté until the onion is soft. Add the broccoli and sauté for 2 minutes. Whisk in the flour and cook for a couple of minute. Add the reserved stock and whisk to blend. As the sauce starts to thicken, add the milk, salt, and pepper. Add the cooked chicken and cook until heated through. Remove from heat and stir in the cheddar cheese and parsley. Adjust seasoning.

Butter a shallow casserole dish*. (I use a 9×11-inch casserole dish.) Pour the filling into the dish and smooth the top. Set aside while you prepare the crust.

*Please note: If you prefer individual pot pies, just follow the directions except use smaller casserole dishes or ramekins. Then simply roll the pie crust to the appropriate size for the dishes you are using. Also, if you wish to freeze your pot pie(s), do so before baking. Then remove from freezer about 30 minutes before you stick it or them in the oven.

PIE CRUST

  • ½ c. (1 stick) cold unsalted butter
  • 1 1/3 c. unbleached all-purpose flour
  • ¼ tsp. kosher salt
  • 3 T. ice cold water

Cut the butter into 16 pieces and place in the bowl of your food processor with the sharpest blade you own. (The first time I made this I used the dull blade. Bad mistake. The cold butter just laughed at the blade and nothing really happened. So I swapped it out for the one I use when I’m pulverizing ingredients, and life got a lot better!) Add the flour and salt. Pulse about 10-15 times or until the mixture looks like small peas. With the processor running, add the water, 1 tablespoon at a time. Process until the dough begins to look like it might want to clump together. (The only way I know to make sure the dough is ready to form a decent ball, is to use my fingers and pinch a bit of the dough. If the dough ingredients feel like they might be growing fond of spending time together, I call it good!). Sprinkle a little flour on a pastry cloth or clean, dry surface. Pour the mixture on the floured surface and form it into a ball. Roll the dough out until it is about 1-inch on all sides larger than the casserole dish containing the filling. Gently set the crust on the filling. Tuck the pastry edges into the dish. With a paring knife, make several cuts, or steam vents, in the pastry. In a small bowl whisk together the egg and 1 tablespoon milk. Brush the pastry lightly with the egg glaze. (You will have extra glaze. I cover the bowl, add more eggs the next morning, and enjoy a nice dish of scrambled eggs. Frugal? Who me?) Bake the pot pie in a pre-heated 400 degree oven for 45-50 minutes or until the crust is golden brown and the filling is bubbly. Remove from oven and let sit about 10 minutes before serving.

WILD AND BROWN RICE PILAF WITH DRIED CRANBERRIES AND TOASTED PECANS

OLYMPUS DIGITAL CAMERA

I love to cook and bake with both fresh and dried cranberries, especially during the holidays. There is just something about the sweet/tart flavor of the cranberry that beautifully offsets the richness of about everything else being served. (And yes I know I am not the first person to realize that cranberries go extremely well with such dishes as roast turkey! As a child, did I not hate that red jelly like stuff that came in a can and was on our dinner table every Thanksgiving and Christmas?) Well of course I did. I was a smart child! Even at the ripe old age of 5, I knew that anything that jiggled was sure to be awful. Even at that early an age I had already developed a loathing for Jell-O that, BTW, has never wavered. To the point where my own sweet darlings never experienced Jell-O as children. So as a child myself, that red stuff that wiggled when you plopped it out of the can never really had a chance.

As a young adult however, being entertained by people with more sophisticated palates than my parents, and learning how to prepare cranberry sauce myself from fresh berries, I never looked back on that canned jellied stuff I hated as a kid. But back to this recipe. (I have no idea how or why I get off on some of my tangents, but eventually I get back on track, so please bear with me. Perhaps I have this problem because I didn’t eat enough Jell-O as a child? I can’t for the life of me think of any other possible reason!)

Anyway – this recipe for pilaf is especially wonderful when served with a rich main dish. Be it roast chicken, pork, or beef, the sweet and savory flavor and subtle tartness are just a wonderful accompaniment to the rich flavor of the meat. Served with a simple green salad or green veggie, this side dish is bound to become one of your favorites. And the fact that it bakes in the oven leaving you free to finish the other dishes you are serving or sit down and enjoy a glass of wine, is just an added bonus. So give it a try. You will not be disappointed.

  • 2 T. unsalted butter
  • ½ c. minced shallots
  • 1 c. wild rice
  • 1 c. short-grain brown rice
  • 4 c. chicken or vegetable stock
  • ½ c. dried cranberries
  • 1 bay leaf
  • ¾ tsp. chopped fresh thyme leaves or ¼ tsp. dried thyme
  • ½ tsp. kosher salt
  • freshly ground black pepper
  • ½ c. pecans, toasted and coarsely chopped
  • ¼ c. minced fresh flat-leaf parsley

In a heavy 2-qt. saucepan over medium heat, melt the butter. Add the shallots and sauté until translucent, 2 to 3 minutes. Add the wild rice and the brown rice and stir until the grains are well coated, about 3 minutes. Stir in the stock, dried cranberries, bay leaf, thyme, salt, and pepper. Bring to a simmer, stir and cover. Transfer the pan to a pre-heated 375 degree oven and bake until all the liquid has been absorbed and the rice is tender, 50-60 minutes. Remove from the oven. Discard the bay leaf. Adjust seasonings. Stir in the pecans and parsley. Serve hot or warm.

Recipe Adapted from Williams-Sonoma Collection Series, Christmas, by Carolyn Miller (Simon & Schuster, 2003).


CAMBOZOLA CHEESE APPETIZER WITH HONEY, ROSEMARY, AND BLACK PEPPER

OLYMPUS DIGITAL CAMERA

And I know what you’re thinking. How can you improve on Cambozola cheese right out of the package? And why would you even want to mess with an already perfect delicacy? Well the answers to your questions are as follows: a touch of sweetness from the honey, a bit of savory from the fresh rosemary, and a touch of heat from the black pepper work perfectly with the richness of the cheese. And why mess with Cambozola in the first place? Well, because it was in my refrigerator and that’s what I do!

So last weekend for our cooking club dinner, I served this recipe that I found on the Reluctant Entertainer web site. I added a sprinkle of black pepper to the original recipe because I thought it was needed to complete the whole slightly bitter (Cambozolo), sweet (honey), savory (rosemary), and heat (black pepper) flavor package. And I believe I was right, because everyone, except Ken who doesn’t care for the blues (cheese that is), thought it was wonderful.

So if you too like to mess with a good thing, give this recipe a try next time you need a quick and easy appetizer. It is just ever so delicious.   

  • 1 wedge Cambozola cheese, room temperature
  • 1 T. honey, or more to taste
  • 1 tsp. finely chopped fresh rosemary
  • freshly ground black pepper

Slice wedge in half lengthwise and place on a serving plate. Allow to come to room temperature. (You want it very soft.) Just before serving, drizzle with honey, sprinkle with rosemary, and dust lightly with black pepper. Serve with toasted baguette slices and crackers.


EAST INDIAN OR THAI CURRIED CHICKEN NOODLE SOUP

OLYMPUS DIGITAL CAMERA

East Indian Curried Chicken Noodle Soup

OLYMPUS DIGITAL CAMERA

Thai Curried Chicken Noodle Soup

I first started making the East Indian version of this soup over 20 years ago using regular old fashioned, available in every grocery store curry powder.  So when Mr. C invited the other 2 members of the Tim-E3 Jazz trio to rehearse at our place on Sunday, I offered to make lunch for the guys since they would be here from 11:00 am till about 3:00 pm. I decided to use Tim and Todd, along with Mr. C of course, as my taste testers (aka Guinea Pigs) to see if using red curry paste would work to create a Thai variation of this soup. So I served the guys a bowl of each and had them decide which they liked better or even if they liked the soups at all? Well, all three of the guys decided both were keepers. So I decided to post both recipes and let you decide which version better suited your taste.

The base ingredients are exactly the same in both soups. But what makes the difference is the curry used. And for people like Mr. C and myself, who BTW are curry “nuts”, we probably like the East Indian curry better. Only because that’s the curry flavor we grew up with. OK, I didn’t actually experience curry until after I was out of my parent’s home. In fact, I doubt either of my parents even knew what curry was until the latter part of their lives. But I started making curry in my early 20s. And since I don’t really feel I achieved adulthood until I was about 28 (some would say I’m still not there!), I feel comfortable saying that I grew up loving curry. But enough about my latent development!

Both soups are very easy to prepare and don’t have to be simmered for hours to achieve a lovely blended flavor. And truly, both are really delicious! Both exotic and down home at the same time. Each would make a really delightful first coarse soup to either an Indian or Thai meal.

So is you too love soup and would like to prepare one, or in this case two, that are both different, easy, and fairly quick to prepare, give either one of these a try. Kripyā bhojan kā ānnaṅd lijīyai (please enjoy your meal) in Hindi and taan hâi a-ròi in Thai.

East Indian:

  • 2 tsp. coconut oil or canola oil
  • 2 c. bite-sized pieces of uncooked chicken
  • ¼ tsp. kosher salt
  • freshly ground black pepper
  • 2 garlic cloves, minced
  • ¼ tsp. crushed red pepper flakes
  • 2 T. regular curry powder (like McCormick)
  • 2½ c. chicken stock
  • 1 can light (reduced fat) coconut milk
  • 4 T. fish sauce
  • 1 T. low sodium Tamari or soy sauce
  • juice of ½ lime or more to taste
  • 6-8 oz. cooked egg noodles (I use Rose brand Chinese Egg Noodles)
  • 4 green onions, thinly sliced, garnish
  • 1 T. chopped fresh cilantro, garnish
  • lime wedges, garnish

Heat the coconut oil in a medium large covered soup pot. Add the chicken, salt, and pepper. Sauté the chicken just until cooked through. Remove from pan and set aside. Add the garlic, crushed red pepper flakes, and curry powder to pan; cook for about one minute. Add the chicken stock, coconut milk, fish sauce, and Tamari. Bring to just under a boil, reduce heat, cover, and cook for 30 minutes. Stir occasionally. Add the reserved chicken and cook for 1 minute or until the chicken pieces are hot. Remove the pot from heat and stir in the lime juice and cooked noodles. Adjust seasonings. Serve hot garnished with green onions, cilantro, and lime wedges.

Thai:

  • 2 tsp. coconut oil or canola oil
  • 2 c. bite-sized pieces of uncooked chicken
  • ¼ tsp. kosher salt
  • freshly ground black pepper
  • 2 garlic cloves, minced
  • ¼ tsp. crushed red pepper flakes
  • 2 T. Red Curry Paste
  • 1 tsp. turmeric
  • 2½ c. chicken stock
  • 1 can light (reduced fat) coconut milk
  • 2-3 T. fish sauce
  • 1 T. low sodium Tamari or soy sauce
  • juice of ½ lime or more to taste
  • 6-8 oz. cooked egg noodles (I use Rose brand Chinese Egg Noodles)
  • 4 green onions, thinly sliced, garnish
  • 1 T. chopped fresh cilantro, garnish

Heat the coconut oil in a medium large covered soup pot. Add the chicken, salt, and pepper. Sauté the chicken just until cooked through. Remove from pan and set aside. Add the garlic, crushed red pepper flakes, curry paste, and turmeric to pan; cook for about one minute. Add the chicken stock, coconut milk, 2 tablespoons of the fish sauce, and Tamari. Bring to just under a boil, reduce heat, cover, and cook for 30 minutes. Stir occasionally. Add the reserved chicken and cook for 1 minute or until the chicken pieces are hot. Remove the pot from heat and stir in the lime juice and cooked noodles. Adjust seasonings. Serve hot garnished with green onions, cilantro, and lime wedges.