

One weekend a month Mr. C. and I provide food (or help provide food) for in-home jazz concerts. The first concert of the weekend is at someone else’s home Friday or Saturday night. The second concert of the weekend is at our own home on Sunday. Often the Sunday concerts begin at 2:00pm, preceded by a large lunch at 1:00pm. (By-the-way, for more information on these in-home jazz concerts, please visit www.jazzvox.com.) And most of the time when I do my planning for the Sunday meal, I include some sort of homemade bread. As was the case this past weekend, I was not home at all on Saturday (I absolutely hate it when that happens), so I needed to do as much of the prep work as possible on Thursday and Friday for both the Saturday night concert at our friend’s home, and the Sunday afternoon concert in our home. (Did I not casually mention on an earlier post that I am just ever so slightly out of my flippin mind?) Well keeping that in mind, and knowing that I wanted to serve hearty whole wheat rolls at Sunday’s luncheon, I decided to be brave and mix my dough on Friday, place it in the refrigerator, and bake it off Sunday morning before my guests arrived. (Why I always further stress myself out by not trying my little ideas in advance, I will never know. But luckily for me, the rolls turned out beautifully. One of these days however, that is not going to be the case, and I am going to find myself up that proverbial creek without a KitchenAid paddle!) But like I stated, the rolls worked. I did get a bit of a shock however when I removed the plastic wrap Sunday morning and got a whiff of the dough. It smelled fermented. I think it’s because the dough contained buttermilk. That and the fact that I had used locally grown and milled organic whole wheat flour, with nary a trace of anything in it that I couldn’t pronounce. (I always try to stay away from products that contain words in the ingredient list with more than 16 letters or that require a degree in chemistry to decipher!) So between the buttermilk and the whole wheat flour that contained no preservatives or additives, I think we had a little party happening right there in my very own refrigerator. Whatever happened, the result was fabulous. So next time you know you are going to be short on time but would still like to serve homemade rolls, make room in your refrigerator and try this recipe. Your dough may not start to party in your refrigerator like mine did, but when you bite into one of these rolls, your taste buds will feel like it’s party time for them!
- 1/2 c. warm water
- 2 T. active dry yeast (or 2 packages)
- 1/2 c. honey
- 1 ½ tsp. salt
- 1/2 c. butter, room temperature
- 3 eggs, room temperature
- 1 c. buttermilk or milk, room temperature
- 4 c. course or stone ground whole wheat flour
- unbleached white flour
- 1 T. olive oil
- kosher salt or course sea salt for sprinkling
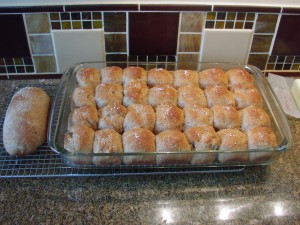
Place warm water in a large mixing bowl or the bowl of your stand mixer. Add yeast, honey, salt, butter, eggs, and buttermilk. Mix just until blended. Let rest (proof) for 5 minutes. Add the 4 cups of whole wheat flour and mix thoroughly. Knead dough for 15 minutes by hand or a few minutes by machine, adding white flour as needed to prevent sticking or until dough no longer sticks to the bottom of the mixing bowl. (Don’t add too much flour at this point. You want a fairly soft dough for this recipe.) When fully kneaded, pour the olive oil into the bowl, and using your hands, pull dough away from the sides and bottom of the bowl until dough is in a ball and all sides are greased. Cover with plastic wrap and let rise until doubled or place in refrigerator for up to two days. When ready to bake, punch down the dough and form into 28 balls of equal size. (The easiest way to divide dough into equal parts is to roll it first into a rectangle on a lightly floured surface. Then cut the dough by either using a bench scraper (my choice) or a buttered knife into the desired number of equal sized pieces.) With your hands, roll each piece of dough into a ball and place in a buttered 10×16-inch baking dish. The pieces should be close to each other, but just not quite touching. If, while placing the dough balls in the pan you find you have extra dough, form it into a loaf and place in an appropriate sized buttered loaf pan. Sprinkle each roll with a tiny bit of course salt. Cover pan with a tea towel and let rise in a warm place until about doubled (about an hour) or up to 2 hours if the dough has just come out of the refrigerator. Tip: When the rolls are ready to be baked they will look soft and bloated. When you touch the dough, it will feel soft and your finger will leave an indentation when the dough is lightly pressed. Bake in a pre-heated 350 degree oven for 20-25 minutes or until golden brown.