Category Archives: ITALIAN CUISINE

GLAZED EGGNOG FLAVORED BISCOTTI    

Since eggnog is a favorite of my husbands, and for him Christmas just isn’t the same without a bottle of the stuff in our refrigerator starting around Thanksgiving, I thought an eggnog flavored biscotti might just be a perfect treat for him. So, I went online to find a recipe. What I found were recipes that contained eggnog as an ingredient. And I thought to myself, what a waste of good eggnog when all the flavors of eggnog can so easily be duplicated by ingredients I always have on hand. Plus, then if he wanted eggnog biscotti in July for example, I wouldn’t have to build some homemade eggnog just for this recipe. I could basically make these delightful biscotti any old time I chose. (Or Mr. C. ever so nicely requested.)

So, the recipe below is what I came up with. And if I do say so myself, the biscotti were (they’re all gone now) delicious. And quite different from all the other biscotti I make. And yes, we love biscotti, so you will find several recipes on this site. They are all fabulous, and very easy to make.

Well, that’s all for today. Mr. C. has a rehearsal this evening, so dinner needs to be on the table by 5:30, which is much earlier than when he doesn’t have a rehearsal or gig. Usually, we get around to eating dinner around 7:00 pm. Then it’s reading time for me and reading and/or practicing the piano for Andy. In other words, very sedentary after dinner pursuits, which are not only consistent with our ages but also our inclinations. And doesn’t that make us lucky people.

May you also be able to follow your inclinations and enjoy some quality down time each and every day.

And as always, peace and love to all.  

For the biscotti:

½ c. (1 stick) unsalted butter, room temp.

1 c. granulated sugar

2 eggs

½ c. whole milk

1 tsp. dark rum

1 tsp. cognac

1 tsp. vanilla paste or extract

3½ c. unbleached all-purpose flour, fluffed

2 tsp. baking powder

2 tsp. ground nutmeg

½ tsp. ground cinnamon

½ tsp. kosher salt

Line a large baking sheet with parchment paper.

In the bowl of your stand mixer, combine butter, sugar, and eggs until well blended. Mix in milk, rum, cognac, and vanilla bean paste.   

In a separate bowl, whisk the flour, baking powder, nutmeg, cinnamon, and salt together. Mix the flour mixture into the butter mixture until well blended.

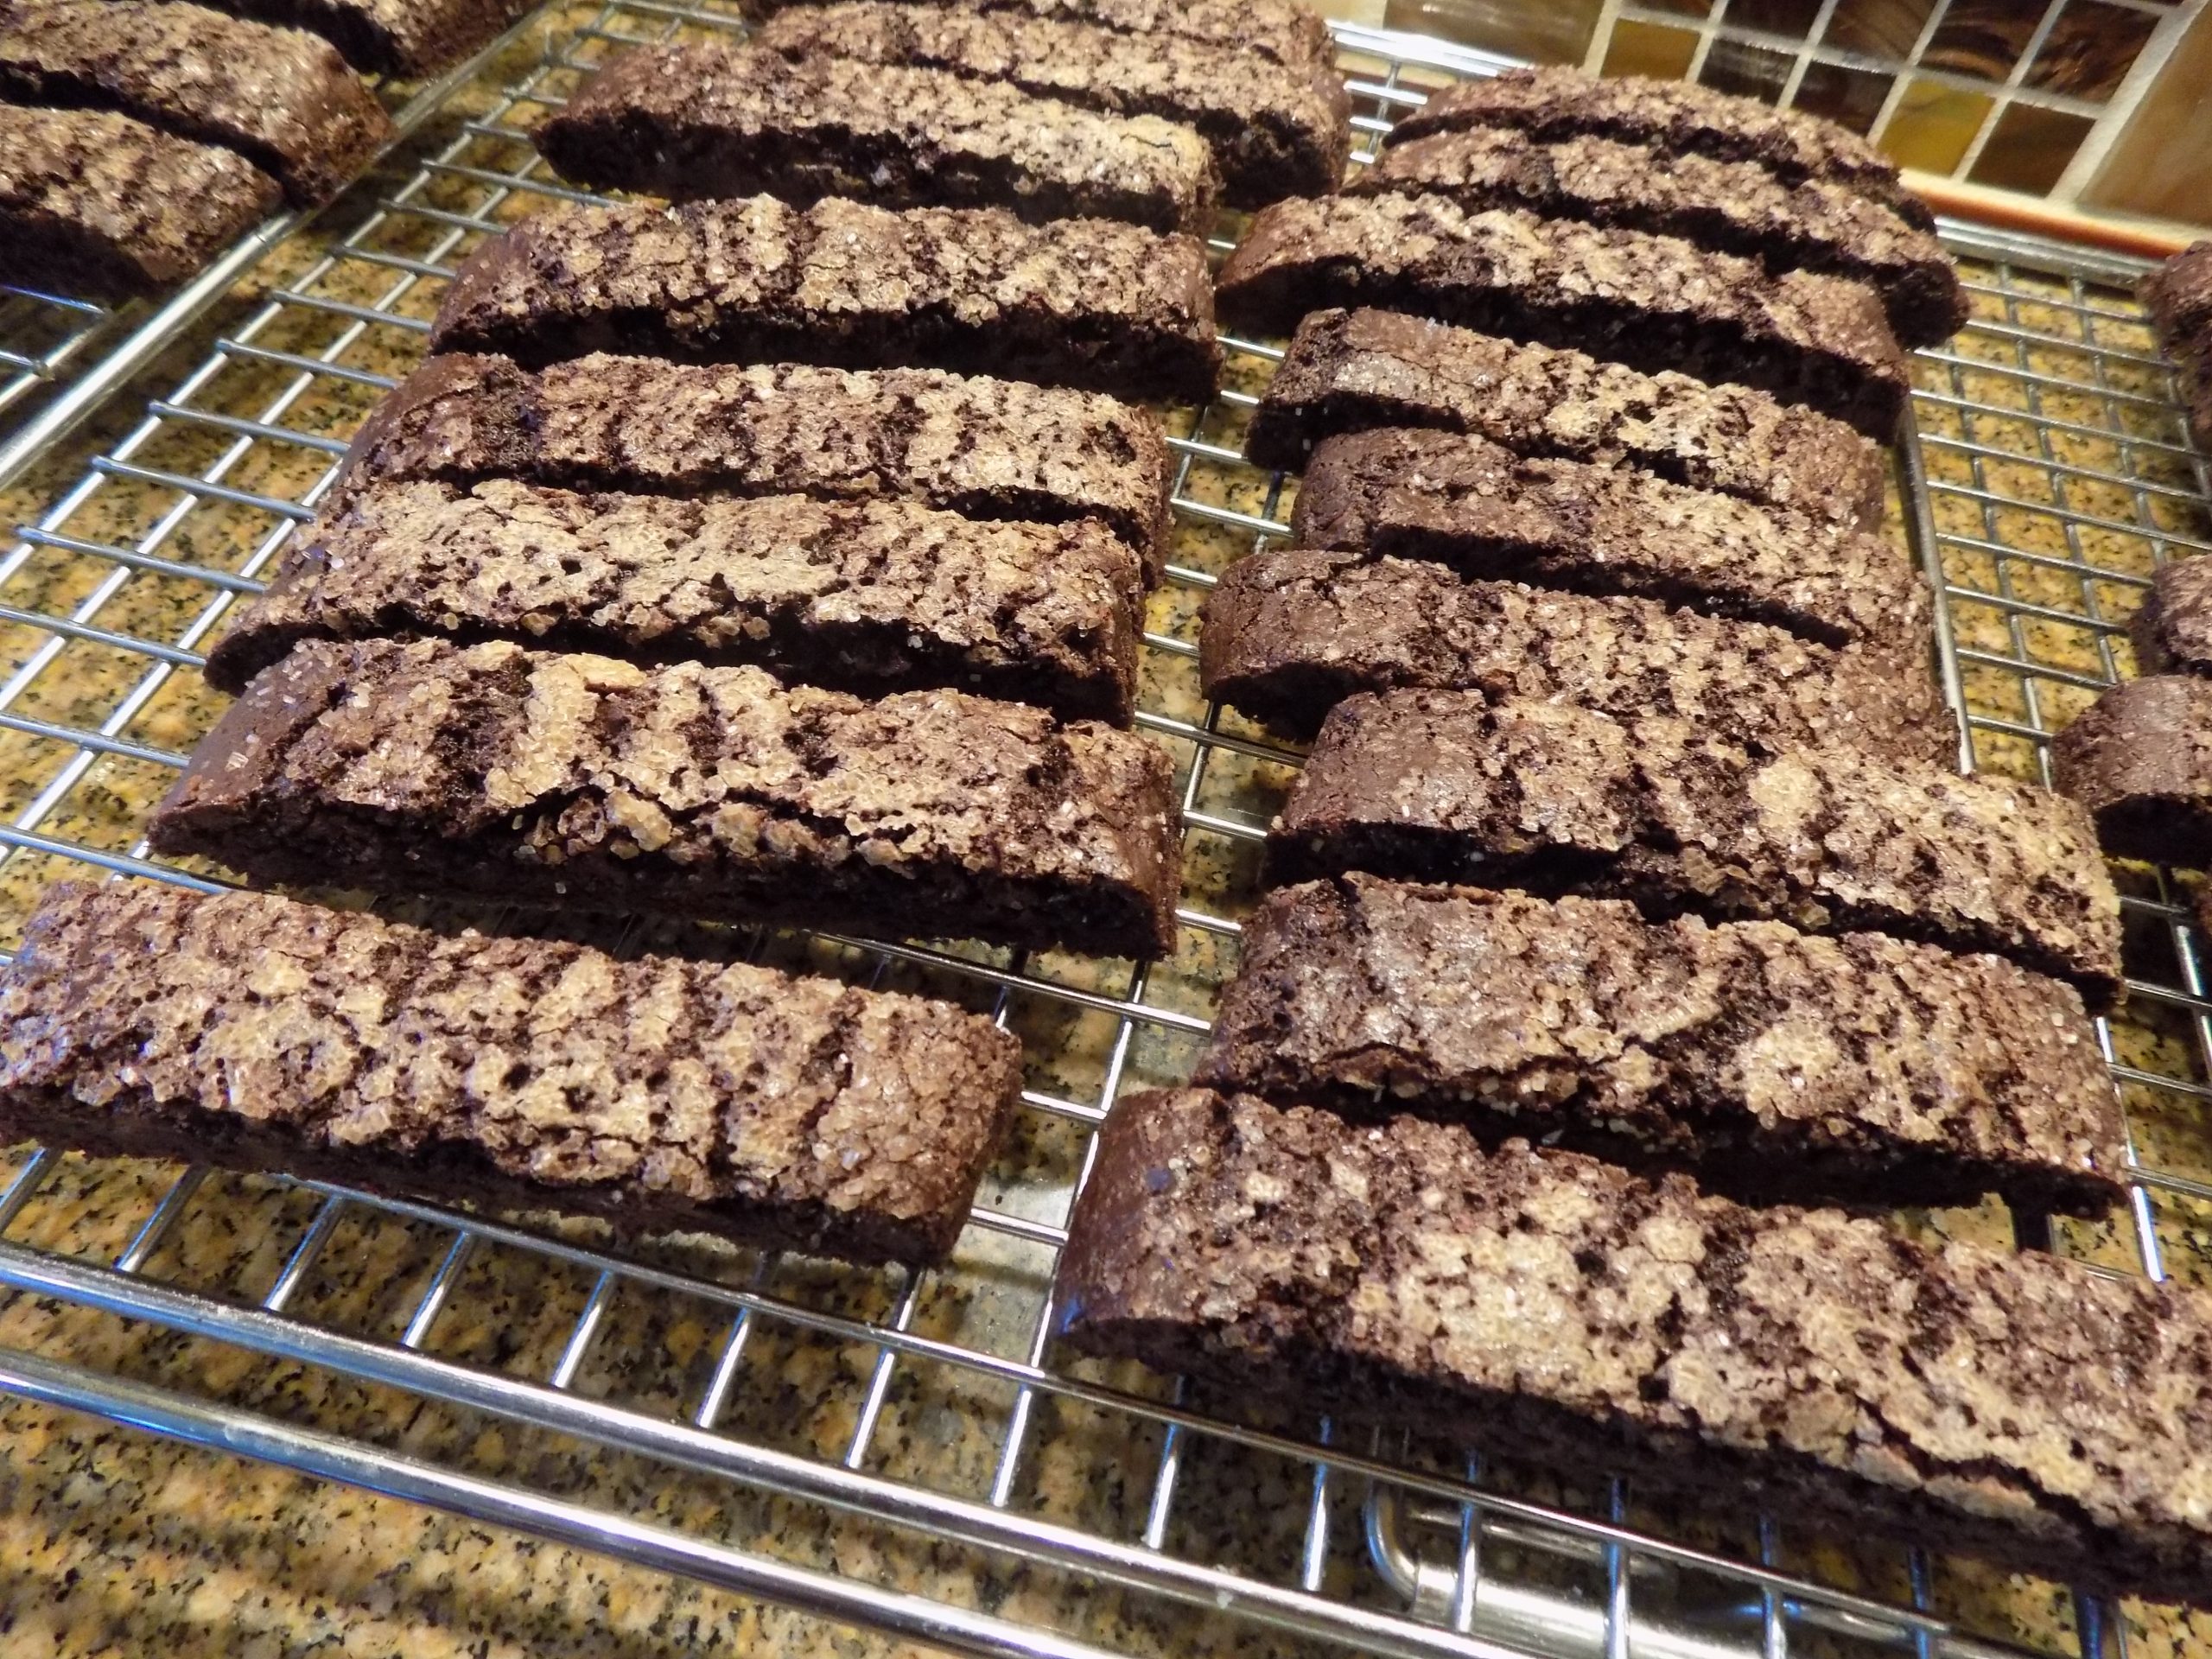
Roughly divide dough in half. Using buttered hands, shape each dough half into a long roll, approximately 14″ long. Carefully place rolls on prepared baking sheet, about 3-inches apart. With your fingers, lightly flatten each roll so that they are approximately ¾-inch thick.

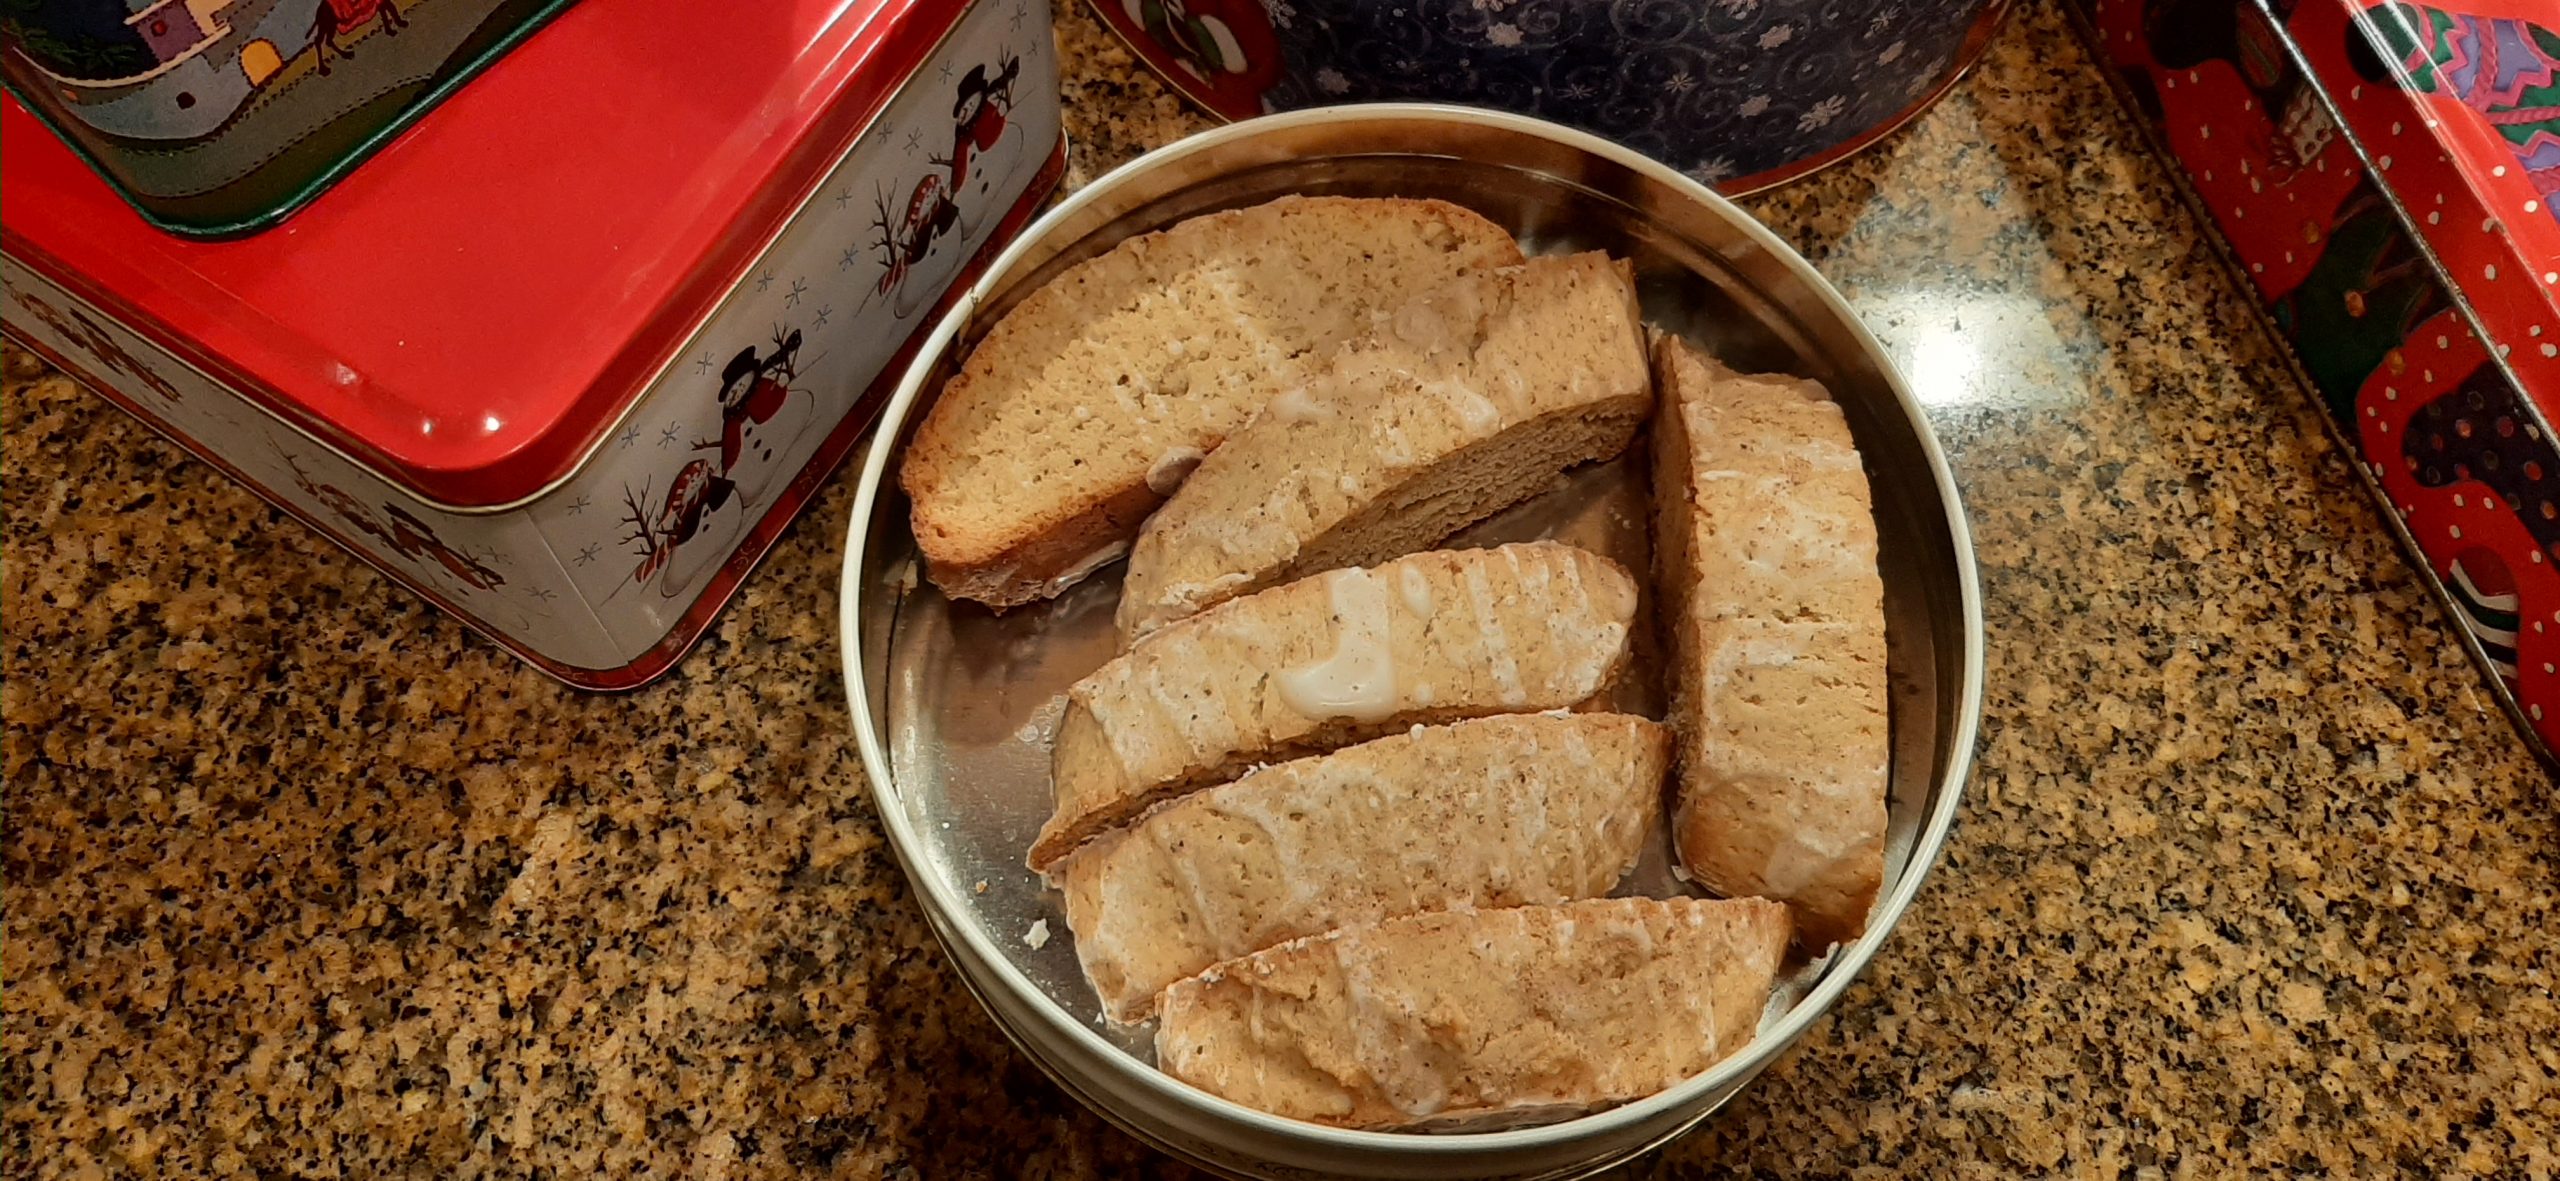
Bake in a pre-heated 350-degree oven for 25 minutes or until golden brown. Remove from oven and place pan on wire rack for about 15 minutes. Carefully move the logs to a cutting board and cut diagonal slices (approximately ¾-inch thick).

Place slices, cut side down, back on original baking sheet. Bake for 10 minutes. Turn slices over and return to oven to bake for another 10 minutes or until firm to the touch and lightly browned. Remove from oven and transfer to wire racks to cool completely before glazing.

For the glaze:

1 c. powdered sugar

1 tsp. rum

tiny pinch cinnamon

tiny pinch nutmeg  

2–3 T. whole milk

In a small bowl, whisk the powdered sugar, rum, cinnamon, nutmeg, and 2 tablespoons milk together. If needed, add more milk to achieve desired consistency.  

Place completely cooled biscotti pieces, top side up, about a half inch apart on your large baking sheet. Drizzle the glaze over the biscotti. (You may not use it all. That’s OK.) Allow glaze to harden before storing biscotti in an airtight container.  


DOUBLE CHOCOLATE ESPRESSO BISCOTTI

I had so much fun this past December making biscotti to give to relatives and friends for Christmas. And if truth be known, biscotti is so darned easy to make, I felt a bit guilty not spending more time on these edible gifts. I quickly got over any remorse. Because dunking a biscotti in your morning coffee or tea or softening one of these Italian cookies in Vin Santo* as an after dinner or late evening treat, is just about as close to actually being in Italy as you can get. And isn’t even a temporary reminder of the joy associated with visiting Italy one of the greatest feelings on earth. At least it is for us.

So, being able to share these twice baked treasures with our friends and family helped make the holidays extra special for me.

Now, something you should know. These are very flavorful cookies. Nothing bland or quiet about their flavor. And probably a cookie your children would not appreciate. But for a chocolate lover, these are perfect.

So, next time you need an easy to prepare cookie that will make you shout yum, this is the recipe for you. I found the recipe on the cooking.nytimes.com site. I did make a couple of changes, but the inspiration was all on the Union Square Café’s Chocolate Biscotti via Alex Witchel.

Well, it’s rainy here in NW Washington. But we really have nothing to complain about. California is being hit with horrendous weather, as are other parts of the country. So, a bit of inconvenient rain is just an accepted consequence of living in this natural paradise. I can still see Barnum Point (here on the island), Port Susan Bay, and the low foothills as I write. But the snowcapped mountains are hidden under low hanging clouds. Hopefully the cloud covering is dumping snow all over the Cascades. Our state can use all the water reserves we can get.

As always, peace and love to all.

2 c. unbleached all-purpose flour, fluffed

¾ c. plus 2 T. good cocoa powder

1 tsp. fine sea salt

1 tsp. baking soda

1 tsp. espresso powder (I use Medaglia D’oro instant espresso)

4 T. (½ stick) unsalted butter, room temperature

1¾ c. lightly packed brown sugar

⅓ c. granulated sugar

1 T. vanilla extract

4 lg. eggs, divided

1 rounded c. mini chocolate chips

1 T. water, for egg wash

2 T. raw sugar

Line a large baking sheet with parchment paper.

In a mixing bowl, whisk the flour, cocoa powder, salt, baking soda, and espresso powder together; set aside.

Using a heavy-duty electric mixer, cream the butter, brown sugar, and granulated sugar together for 3 to 5 minutes at medium speed. Add the vanilla extract. Mix for 10 seconds. Add 3 of the eggs, one at a time, mixing well after each addition. Add the flour mixture and mix at low speed until dough comes together, 1 to 2 minutes. Add the mini chocolate chips and mix just until chips are evenly incorporated.

Using buttered hands, shape half of the dough into a log roughly 1½ to 2 inches wide. Place log on prepared baking sheet and flatten slightly. Form the second half of the dough the same way and place on the baking sheet about 3-inches away from the first log. Brush tops of logs with egg wash made from whisking the remaining egg with the water. Then, sprinkle each log with 1 tablespoon raw sugar.

Bake in a pre-heated 350-degree oven until the biscotti have spread and bounce back slightly when pressed with fingertips, about 30 minutes. Remove from oven and let cool completely, about 1½ hours.

Preheat oven to 325-degrees. Using a sharp serrated knife, cut logs into ½-inch diagonal slices. Place each slice, cut side down on the same parchment paper lined baking sheet. Bake until firm, crisp and slightly dry, about 15 minutes.

Remove from oven and allow to cool completely before storing in an airtight container at room temperature or in your freezer for up to three months.

*According to winefolly.com “Vin Santo (or Vino Santo) is a viscous, typically sweet dessert wine made in Italy, predominantly in Tuscany. The wine is loved for its intense flavors of hazelnut and caramel. When paired with biscotti, Vin Santo becomes “Cantucci e Vin Santo” which is inarguably Italy’s most famous welcoming tradition. What makes Vin Santo truly special is the natural winemaking process which gives it a unique taste.”

CREAMY POLENTA WITH CREAM CHEESE

Sometimes, what you really need for a main dish that is plenty flavorful, but really needs to be served on a bed of something fairly innocuous, is a dish like this creamy polenta. So, this is possibly the recipe you have needed all your life too without knowing how much you needed it! That is, if you are anything like me.

Because, until recently, I tended to be the kind of cook who often got carried away with too much flavor or richness. Fortunately, I have realized the error of my ways, even if it has come a bit late in my cooking career. Take last night for an example of holding back on flavor and richness for the betterment of the finished product.

Jim and Margo were coming to dinner to help us celebrate the 14th anniversary of moving into our home here on Camano Island. And because they had been with us all that move-in day, Jim cooking dinner, and Margo helping daughter Paula put things away in the kitchen, I decided that fixing dinner for them was absolutely called for. Plus, we wanted to see them anyway.

As I was planning the menu, I realized that Parmesan cheese was already going to be used in both the salad (Italian Salad) and as a garnish for the Chicken Cacciatore with Parmesan Polenta. So, to prove an old cook can learn new tricks, I decided not to use Parmesan in the polenta. But how to make it flavorful enough, while possibly skimming off a few calories, but still providing a creamy, tasty base for the chicken.

I had read somewhere that cream cheese would work well in polenta. So, I took my regular recipe, used water instead of milk, lowered the butter by 1 tablespoon, and used half a package of cream cheese in place of the Parmesan. And I was really pleased with the result. Creamy to the max. And delicious without adding more richness or flavor to the already very savory sauce that surrounds the chicken pieces. So, all in all a screaming success if I say so myself!

So, next time you are in a quandary about what to use for a base or side dish instead of pasta or mashed potatoes, give this simple to prepare polenta recipe a try.

Well, it’s sunny and beautiful here in the northwestern part of Washington. Mt. Baker appears to be happily basking in the sun surrounded by a few puffy white clouds who have obviously come to show their respect for this most glorious stratovolcano. Port Susan Bay is so calm it looks like a sheet of light blue glass. Our yard is full of happy looking plants, many of which are in bloom, and I have leftovers to serve for dinner tonight. This is what I define as a perfect day.

May you too have a perfect day. And as always, peace and love to all.

4 c. water

1 tsp. kosher salt

tiny pinch white pepper or freshly ground black pepper

1 c. yellow polenta (not instant) 

2 T. unsalted butter

4 oz. (½ pkg.) low fat, Neufchatel, or regular cream cheese

Heat salted water to a boil in a heavy, covered 2 or 3-quart pan. Slowly whisk the polenta into the boiling water to prevent any lumps from forming.

Lower the heat to a very low simmer and add the pepper. Continue to whisk the polenta until it starts to thicken. Then cover the pan and let the polenta cook for 25 minutes. Stir occasionally with a wooden spoon so that the polenta doesn’t stick to the bottom of the pan. The polenta should be soft and tender when done. If not, let it cook a little longer.

Stir in the butter and cream cheese. Taste and add more salt if necessary.

LASAGNE SOUP

Of course, I know it’s technically summer. And finally, and I do mean FINALLY it appears that summer has landed here in the beautiful northwestern part of the great state of Washington. The fact of which I am quite sure my outdoor potted plants will readily attest. (They were really thirsty when I watered them yesterday morning. To the extent that a couple were drooping from lack of turgor pressure.)

Your botany lesson (reminder) for today:  Turgor pressure – the pressure exerted by fluid in a cell that presses the cell membrane against the cell wall. Turgor is what makes living plant tissue rigid. Loss of turgor, resulting from the loss of water from plant cells, causes flowers and leaves to wilt. (Actually, turgor pressure is one of the only things I remember from the college freshman botany class I took in 1962. That and the difference between herbaceous and woody plants. And only then because my lab partner and I gave each other the nicknames “Herby” and “Woody”. But I digress….

Anyway, I served this terrific soup last evening for dinner. Even though the temperature had been in the mid-eighties. Because, basically, I enjoy a good soup year-round. And this, dear friends, is a very good soup. And let me tell you right here and now, that compared with making lasagna from scratch, this dish is a snap to prepare.

I can’t tell you how many times over the years, I have finished making lasagna and swearing never to do it again. And then several months later, forgetting the time involved, end up vowing to not make the same mistake again. Basically, I have been repeating this process for decades now. And yes, you would think the girl could learn. But apparently not! (At least now, I have a reasonable alternative that tastes divine and only takes about a fourth of the time to assemble.)

Now don’t get me wrong. I still love lasagna in all it’s iterations. And because I do love this quint essential Italian dish, I plan to develop other soups that include the basic ingredients from my favorite lasagna recipes. (Roasted Mushroom Lasagna with Béchamel Sauce immediately comes to mind.)

So, a big thank you to Lauren from the tastsbetterfromscratch.com site for the bones of this recipe. I changed her recipe dramatically, but the basic premise is all Laurens.

Well, that’s it for today. You’ve had your botany lesson for today and been provided with a simple recipe for a great soup that I know your entire family will enjoy. Hopefully your day will be wonderful, productive, and bring you pleasure.

If you are like most people, life can get in the way of taking care of yourself. This is something I have only come to realize as I’ve gotten older. Before it was rush, rush, rush to make everyone’s life around me perfect. Nothing is perfect, no matter how hard we as cooks and care givers try to make it so. But when we take good care of ourselves, we have a basis for taking good care of others. Taking care of ourselves should always be a top priority. (Well, that and having fun in our kitchens.)  

Peace and love to all.

1 c. cottage cheese (run through your food processor to make it smooth)

1 c. grated mozzarella cheese

¾ c. freshly grated Parmesan cheese

½ c. roughly chopped fresh basil

1 lb. lean ground beef

1 lb. bulk Italian sausage

1 lg. yellow onion, chopped

5 garlic cloves, finely minced

1 (28-oz.) can tomatoes (preferably Italian)

2 T. tomato paste

6 c. water

1 T. beef base (I use Better Than Bouillon Beef base)  

½ tsp. kosher salt

freshly ground black pepper

2 bay leaves

¼ tsp. crushed red pepper flakes

1 tsp. Italian seasoning 

2 tsp. dried oregano leaves

1 tsp. dried basil

1 tsp. fennel seed

1-2 Parmesan rinds, opt.

4-6 lasagna noodles, broken into small bite sized pieces

3 c. roughly chopped baby spinach leaves 

In a small bowl, stir the processed cottage cheese, mozzarella, Parmesan, and basil together. Set aside.

In a large heavy covered pot over medium-high heat, cook ground beef and sausage until browned. Remove meat from the pot and drain as much grease off as possible. Set meat aside.

In the same pot, add the diced onion and sauté for about 5 minutes, stirring occasionally. Add the minced garlic and cook for another minute.

Stir in the canned tomatoes (plus juice), tomato paste, water, beef base, salt, pepper, bay leaves, crushed red pepper flakes, Italian seasoning, oregano, dried basil, fennel seed, and Parmesan rinds.

Bring to boil, then reduce heat, cover and simmer gently for about 40 minutes. Stir occasionally. After about 40 minutes, remove the bay leaves and Parmesan rind(s), taste and adjust seasoning before increasing heat and adding the broken lasagna noodles. Cook, stirring occasionally, until noodles are al dente.  

Add the spinach and cooked meat. Cook for about 2 minutes, or until the spinach is wilted and the meat is hot.

Ladle the hot soup into bowls and dollop a scoop of the cheese mixture on top.  

BAKED ITALIAN SAUSAGE MEATBALLS

Yesterday when I asked Mr. C. what he would like for dinner, he gave not a moment’s hesitation before uttering those three little words I love to hear. Spaghetti and meatballs. Now you have to admit, those are three words that can almost always elicit a positive response from everyone. Because who doesn’t love spaghetti and meatballs? Right?? So, with no hesitation on my part, I said – “your wish is my command, or words to that effect”. Anyway, I got right on it.

But always being one to change things up a bit, I decided to make the meatballs using only bulk Italian sausage rather than my usual half and half ground beef and sausage. But stay with my no fail, always delicious, stinkin’ easy to build, why mess with perfection, favorite Marinara Sauce recipe. (See recipe below.) So, that’s just what I did. And there was much rejoicing at our dinner table last evening.

So, it you too are a spaghetti and meatballs fan, and who in their right mind isn’t, give this quick and easy recipe a try. No fancy ingredients, not a lot of fuss and bother to prepare, and a dish that is sure to please everyone in your family.

Well, today is the 4th of July. And I wish I could say that I was looking forward to all the fireworks. But I just can’t get into a celebratory mood this year. I guess I am finally coming to the realization that as a liberal, I am quickly becoming part of the minority. Or so it seems. And even if liberal leaning is still embraced by the majority of our citizens, some conservative politicians and their followers/appointees are making changes regardless of who or what gets hurt in the process. Women’s rights, our environment, deaths by unlimited numbers and types of guns, etc. etc.

So, I am staying home tonight and celebrating in my own way. I’m going to think about the wonderful life I have been blessed with thus far. I am going to remember the friends and family members who are no longer living. And I am going to pray that our nation can once again be represented by people who uphold the constitution and everything it has always stood for. Imperfections notwithstanding!

And lest any of us have forgotten why we even have a constitution, and why we should fight diligently to keep our constitution alive, I will leave you with our constitutions Preamble:

“We the People of the United States, in Order to form a more perfect Union, establish Justice, insure domestic Tranquility, provide for the common defence, promote the general Welfare, and secure the Blessings of Liberty to ourselves and our Posterity, do ordain and establish this Constitution for the United States of America.”

Peace and love to all.

1 lg. egg

1 T. milk

1 lg. clove garlic, finely minced

¼ tsp. fennel seed

tiny pinch crushed red pepper flakes

freshly ground black pepper

¼ c. rolled oats

½ c. finely grated Parmesan cheese

1 lb. bulk Italian sausage

Lightly grease a low sided baking sheet.

In a large bowl stir the egg, milk, garlic, fennel seed, crushed red pepper flakes, and black pepper together. Add the rolled oats and Parmesan cheese. Mix well. Add the sausage and mix until well blended. 

Using a #60 (1 tablespoon) ice cream scoop, plop the meatballs onto the prepared baking sheet. If you don’t have an ice cream scoop, use your hands to form balls.    

Bake in a pre-heated 400-degree oven for 15 minutes. Remove from oven and drop into your favorite marinara sauce or soup just before serving. If you don’t have a favorite marinara sauce or Italian meatball soup recipe, my recipes for both are provided below.     

MARINARA SAUCE

3 T. extra-virgin olive oil

1 c. chopped onion

4 cloves garlic, chopped

2 (28-oz.) cans chopped, whole, or diced tomatoes (Italian tomatoes preferably)

2 bay leaves

pinch crushed red pepper flakes

2 tsp. dried oregano (I use Mexican dried oregano)

1 tsp. kosher salt

freshly ground black pepper

½ c. loosely packed chopped fresh basil leaves

1-2 T. butter, opt.

In a large, covered saucepan, heat the oil over medium heat. Add the onion and sauté until soft and translucent, about 6 minutes. Stir in the garlic and cook for an additional minute. Add the tomatoes, bay leaves, red pepper flakes, oregano, salt, and pepper. Stir to combine ingredients.

Bring to a boil, reduce heat, cover, and simmer for about 30 minutes. (Take the lid off part way if the sauce is thinner than you prefer. As the sauce gently burbles away, it will thicken quickly. So, keep a close eye on it as it reaches your desired thickness.)

Remove from heat, discard bay leaves, add the basil, and adjust seasoning. If the sauce tastes acidic, add butter 1 tablespoon at a time to round out the flavor.  

ITALIAN MEATBALL SOUP

2 tsp. extra virgin olive oil

½ c. diced onion   

2 carrots, thinly sliced

2 stalks celery, thinly sliced

2 garlic cloves, finely minced

½ c. dry red wine (I use Gallo Hearty Burgundy)

4 c. beef broth, or more if the soup appears too thick      

¼ tsp. kosher salt

freshly ground black pepper

1 bay leaf

1 tsp. dried Italian seasoning

½ tsp. dried basil

pinch crushed red pepper flakes

1 tsp. Worcestershire sauce

1 (14.5 oz.) can diced tomatoes (preferably Italian)  

4 T. tomato paste, again preferably Italian

meatballs

1 c. dry macaroni

2 T. chopped parsley

grated Parmesan cheese, for serving (or Pecorino Romano or Asiago)

Heat oil in a medium sized covered pan. Add the onion, carrots, and celery. Cook until the onion is translucent. Add the garlic and cook for 1 minute. Pour in the red wine and cook until almost all the liquid is evaporated. Add the beef broth, salt, pepper, bay leaf, Italian seasoning, dried basil, crushed red pepper flakes, Worcestershire sauce, canned tomatoes (don’t drain), and tomato paste.

Bring to a boil, reduce heat, cover pan, and simmer gently for 30 minutes. Stir periodically. After the soup has simmered for 30 minutes, taste and adjust seasoning (may need more salt).

Add meatballs and dry pasta, and simmer for about 10 minutes or until the macaroni is al dente. Add parsley. Serve piping hot. Pass the grated Parmesan cheese.  


CROSTINI

OK, this is going to be the easiest recipe I ever shared with you. But this may be one of the best recipes I ever shared with you. And why is that you might ask? Well, for several reasons. Not only is crostini easy to prepare and delicious, it’s crunchy. And who doesn’t love crunchy! Crostini (meaning “little crusts” in Italian; singular crostino (but who could ever eat just one) are simply that much needed crunch so often missing in a meal of soup or stew and bread. And we all know how wonderful soup and stew are when served with a nice soft roll or baguette slices. But with crostini, you have the lovely bread, but also the delightful crunch.

So, what types of bread make the best crostini? Glad you asked. Rustic peasant bread, ciabatta, and different types of baguettes all work great. If you are into baking your own bread, I would recommend Chewy Sourdough Baguettes, Thin Sourdough Baguettes, Overnight Sourdough Baguettes, Soft French Baguettes, or Classic Italian Baguettes. All found on this site.

And then guess what else is great about crostini? You can top the little darlings with any old thing you want. For example – Kalamata Olive Spread, Creamy Feta Cheese Dip, Mushroom Pâté, Herbed Cream Cheese with Black Pepper Spread, and of course bruschetta. (See recipe below.) Or provide a variety of different toppings for family and friends to smear on crostini all by themselves. (Sounds like a party to me.)

Speaking of parties, I’ve had the pleasure of listening to the Whistle Lake Jazz Quartet rehearse in our living room. Furniture scattered to the four winds. Beer glasses everywhere, and happy, wonderful guys truly enjoying themselves making beautiful music. I feel like I’m in heaven. Just sitting in our den, writing up this recipe, it feels like magic happening all around me. There is simply nothing better than live music. And when it’s in your own living room – well, nothing compares. For pictures of the quartet practicing, see the bottom of the post.

So, as always, bring a little magic into your life. Be it listening to beautiful music, looking at fabulous art, reading good books, playing with your children, making someone else’s life a little bit better, or whatever feeds your soul. If it makes you smile, then it’s worth the effort.

Peace and love to all.

baguette

extra-virgin olive oil

flaky or fine sea salt, to taste

Pre-heat your oven to 450-degrees. Line a rimmed baking sheet with parchment paper for easy clean-up. 

Slice the baguette on the diagonal into pieces no wider than ½-inch. Lightly brush both sides of each slice with olive oil.

Place the slices in a single layer on your prepared baking sheet and bake them on the middle rack for about 9 minutes, until they are crisp and nicely golden on top. Remove from oven and sprinkle lightly with salt. Serve immediately.

Bruschetta

crostini – just out of the oven

1 garlic clove

extra virgin olive oil

chopped fresh basil

chopped tomato

freshly ground black pepper

Scrape the warm crostini with a garlic clove. Drizzle on a bit of olive oil, then top with diced tomato, chopped fresh basil, kosher salt, and freshly ground black pepper. Serve to only those who deserve the best.

Mr. C. on piano

Mr. C. and Todd on drums
Tim on bass and Jamie on guitar
All together now, all together now……..


OVERNIGHT SOURDOUGH DISCARD BÂTARD (added yeast)  

Bread made into crostini

For those of you for whom French is not your first, second, or even third language, a “bâtard” is essentially just an oval shaped loaf of bread. It just sounds so much more sophisticated to call it a bâtard rather than referring to it as just an oval loaf of bread. And you know, I am nothing if not the very essence of sophistication. Yah right?!?!

But when it comes to bread, I can get quite high on my horse about it. Especially good homemade bread. Because, frankly, there is nothing more delicious. And this bread is a perfect example of really good bread. Absolutely perfect for toast in the morning and especially fabulous when served as crostini. (See recipe below.)

It is however, a bit of a pain in the patootie to make. And probably not a good bread for a beginner to tackle. Unless of course, you are one of those people who overachieves at everything you have ever tried. On the first try! Then go for it. For the rest of us, I would say a bit of bread baking experience would be wise.

I found this recipe, much changed by me, on the King Arthur baking site. The instructions from the good folks at King Arthur would have me start the process with “fed” sourdough starter. For me, that would make it a three-day process. I simply don’t think that far in advance. As it is, even with my changes, it takes two-days to produce this lovely loaf. That much I can handle. And totally worth the effort.

But my way does require the addition of a small amount of active dry yeast. And even though not called for in the original recipe, I managed to slip in a bit of olive oil action too. (I love olive oil with this type of bread.)

So, in conclusion, if you have the time, discipline, and fortitude, please give this bread recipe a try.

As with everything, you will never achieve if you don’t first try. It always amazes me when people can’t believe I made the bread they are enjoying. When actually, homemade bread is one of the easiest and most forgiving baked good you can produce. But then, if you don’t try, you don’t know. So, try things folks. We are only on this planet for a very short time. Who knows, you might find that collecting the elusive chanterelle mushroom from its hiding place under a Douglas fir to be the best and most rewarding fun you ever had. Or learning to play the ukulele or the joys of down hill skiing in your mid 40’s. There are an infinite number of possibilities. But each require that first step. And with first steps, as in first steps taken by babies, you might fall on your face. Pick yourself up, dust yourself off, and start all over again. It’s called life. And life is meant to be lived! And cherished. Baby steps, successes, failures, and everything in between!

Peace and love to all.

1 c. sourdough starter discard, room temperature

1½ c. lukewarm water

½ tsp. active dry yeast

2½ tsp. kosher salt

5 c. unbleached all-purpose flour, plus more if needed

extra virgin olive oil

In the bowl of your stand mixer, stir together the starter, water, yeast, and 3 cups of the flour. Beat vigorously for 1 minute. (I use my paddle attachment for this rather than my dough hook.)

Cover and let rest at room temperature for 3 hours. Refrigerate overnight, or for at least 12 hours. (The dough will expand some during it’s time in your refrigerator.)  

The next day, add the salt and enough flour to form, with your bread hook, a smooth firm dough. For me, this took the full 5 cups of flour, and then some. Just be sure to touch the dough. Because, when I first started adding additional flour, 5 cups looked like too much. But when I actually touched the dough after 4½ cups, I quickly realized that the look of this dough is deceiving. It looked like it had enough flour, pulled away from the bottom of the mixer bowl like it had enough flour, but when I poked the dough and actually felt its density, in no way would it have held its shape. Simply not enough flour. So, I added enough more flour to create the dough required to hold a shape.   

When your dough is nicely kneaded and ready for the next rise, pour a bit of olive oil in the bowl, and using your hands and a stiff rubber spatula, work the dough into a ball entirely coated with the oil.

Cover the bowl with plastic wrap and allow the dough to rise until it’s light and airy, with visible gas bubbles. Depending on the starter you use and the temperature of your kitchen, this may take 4 to 5 hours. (Mine took 4 hours.) For best results, gently deflate the dough once an hour.   

Cover a large baking sheet with parchment paper. Then pour a bit of olive oil in a small container and lightly grease your hands. (Take your rings off first. Don’t forget where you left them!) Gently pat the dough to deflate it slightly and remove any large bubbles. Divide the dough in half, right in the bowl. Form each half into a loose ball, then gently stretch the dough while tucking the dough under itself as you form an oval. (I know there are fancy ways to shape a Bâtard, but frankly, I don’t have time or the inclination for fancy-schmancy loaves of bread. I just shape the loaves as best I can in my hands, then plop the darn things on the prepared pan! If they look a little misshapen, I mess with them a bit more on the baking sheet.) (If you have any leftover olive oil gently smear it on the loaves.)    

Cover and let rise until very puffy, about 2 hours. Don’t worry if the loaves spread more than they rise; they’ll pick up once they hit the oven’s heat. Toward the end of the rising time, preheat the oven to 425-degrees. While the oven heats, place a pan of water on the bottom rack. I use a 9-inch cake pan half full of water.

Spray the bâtards with lukewarm water; this will help them rise in the oven by initially keeping their crusts soft and pliable. 

Slash the bâtards. Try one slash down the length of the loaf, two diagonal slashes, or another symmetrical pattern of your choice. Make the slashes fairly deep; a serrated bread knife or lame, wielded firmly, works very well. 

Bake the bâtards for 25 to 30 minutes or until they are a nice golden brown and  the internal temperature reaches 208-degrees. Remove from oven and cool on a rack before slicing. 

Store bâtards, loosely wrapped, for several days at room temperature. Freeze for longer storage.

This bread makes great crostini. (See recipe below.)

CROSTINI

crusty bâtard (like this one) or a French baguette

extra-virgin olive oil

flaky or fine sea salt

Pre-heat oven to 450-degrees. Line a rimmed baking sheet with parchment paper.  

Slice the bread on the diagonal into pieces no wider than ½-inch. Lightly brush both sides of each slice with olive oil.

Place the slices in a single layer on your prepared baking sheet and bake them on the middle rack for about 9-11 minutes, or until they are crisp and nicely golden on top. Remove from oven and sprinkle lightly with salt. Serve immediately.


ITALIAN SAUSAGE AND PENNE RIGATE SOUP WITH CROSTINI   

Soup
Crostini made with Tangy Overnight Sourdough bread – recipe to follow within the next couple of days

OK, at first glance it looks like a lot of ingredients in this recipe. And your first glance would be correct. But other than frying the Italian sausage, chopping the mirepoix (onion, carrot, celery), garlic, spinach, fresh parsley, and basil, the rest of the preparation is quick and easy. Just a matter of adding a bit of this and a bit of that to the pot. Then the soup burbles for a while, and soups on!

And what you get for this effort, is a truly rich and delicious soup. And a meal unto itself. Nothing else required. Of course, if you want to take the meal to an even higher level, while the soup simmers away, you can build crostini to serve with the soup. (See recipe for crostini below)

And now, my friends, you have a meal fit for a king or queen. (Or even company!)

So, frankly, there is nothing left to say. I want this soup to speak for itself!

Peace and love to all.

1 T. extra virgin olive oil

1 lb. bulk Italian sausage 

1 c. chopped onion 

1 med. carrot, chopped 

2 ribs celery, sliced

3-4 cloves garlic, finely minced

¼ c. dry red wine

4 c. chicken broth

1 (28-oz) can tomatoes (preferably Italian)

2 T. tomato paste

2-3 Parmigiano-Reggiano rinds*, opt.

1 bay leaf

2 tsp. paprika

2 tsp. Italian seasoning

1 tsp. fennel seed, coarsely cracked

pinch crushed red pepper flakes

½ tsp. seasoned salt

freshly ground black pepper

½-1 c. penne or penne rigate** pasta (or pasta of choice)   

2 c. chopped fresh spinach, chard, or kale

2 T. chopped fresh parsley

⅓ c. chopped fresh basil (or 1 T. pesto)

freshly grated Parmigiano-Reggiano or Pecorino-Romano (or combination)

freshly baked crostini or baguette slices (see recipe for crostini below)

Heat olive oil in a large, covered soup pot over medium heat. Add the sausage and break into chunks as it browns. When brown, remove from pan and set aside***.

Add onion, carrot, and celery to the pot. Sauté until onion starting to soften, about 6 minutes. Add garlic and sauté 1 minute longer. Add the red wine and cook until liquid is all but evaporated.

Add the broth, canned tomatoes (plus juice), tomato paste, Parmigiano-Reggiano rinds*, bay leaf, paprika, Italian seasoning, fennel seed, crushed red pepper flakes, seasoned salt, and black pepper.

Bring to a boil, cover, reduce heat to medium-low, and let simmer for about 30 minutes.

Add penne rigate. Cover and let simmer, stirring occasionally (while scraping along bottom of pot as pasta will tend to stick). Cook until pasta is nearly al dente. About 8 minutes. Stir in cooked Italian sausage and cook for 2 minutes. Taste and adjust seasoning. Remove from heat. Stir in spinach, fresh parsley, and basil.

Serve hot. Pass grated Parmigiano-Reggiano or Pecorino-Romano. Great with crostini or fresh, chewy sourdough bread.

*Parmesan rinds

I used to feel cheated by having to pay for the thick rind on Parmigiano-Reggiano. Heaven knows, the stuff was expensive enough without having to discard the rind. But I love the flavor of Parmigiano-Reggiano, so, I would pay the price. But a few years ago, I read that Parmigiano-Reggiano rinds are packed with flavor and can enrich the taste of tomato-based sauces, ragù, and soups. So, I have been using them ever since. (When I remember to use them, that is!)

**Penne and penne rigate

The shape of penne comes from the Italian word for “quill.” There are generally two variations of penne: smooth (lisce) and ridged (rigate). Thanks to its ridges, the rigate version is a bit sturdier and tends to soak up more sauce than smooth penne.

But either are perfect in this soup. As are elbow macaroni or any other small pasta.

***Setting cooked sausage aside

I have found that when I cook sausage for soups like this one and leave the meat in the pot while is simmers to blend all the other wonderful flavors, the meat loses it’s unique flavor in the process. And I want that burst of sausage flavor when I enjoy my soup. So, I remove the meat just after it’s been cooked and add it at the end. You, of course, can leave the meat in the entire cooking time if you prefer. It’s a personal choice.

CROSTINI

crusty French or Italian bread

extra-virgin olive oil

flaky or fine sea salt, to taste

Pre-heat your oven to 450-degrees. Line a rimmed baking sheet with parchment paper for easy clean-up.  

Slice the baguette on the diagonal into pieces no wider than ½-inch. Lightly brush both sides of each slice with olive oil.

Place the slices in a single layer on your prepared baking sheet and bake them on the middle rack for about 9 minutes, until they are crisp and nicely golden on top. Remove from oven and sprinkle lightly with salt. Serve immediately.


THIN PIZZA CRUST

We love homemade pizza. And I especially love thin crust pizza. Not so much for the overall taste, but more for the reduction of carbs. Less dough, less carbs and calories. So, I decided to come up with a crust that I could pat out very, very thin. Just enough crust to support all the yummy topping ingredients. And while I was at it, I decided for the pizza I was building that evening, and because I had some fresh basil in the fridge that was quickly becoming tired, I would work up a pesto like sauce. So, you will find that recipe below too.

So, nothing more to say except I didn’t take a picture of the finished product. (Hard to take a picture of the bottom crust of a pizza after it’s been baked. If you don’t believe me, try it yourself sometime. But only if you plan to serve upside down pizza!)

As always, peace and love to all.  

1 c. warm water

½ tsp. granulated sugar

1 pkg. or 1 scant T. active dry yeast

½ tsp. kosher salt

1 T. extra virgin olive oil

½ c. whole wheat flour

1½ c. unbleached all-purpose flour, more or less

Combine the water, sugar, and yeast in the bowl of your stand mixer. Let sit for 10 minutes. Add the salt, olive oil, whole wheat flour, and 1 cup of the all-purpose flour.

Using your dough hook, mix/knead until the dough is smooth and elastic using as much flour as required.   

Cover and let rise for 20-30 minutes. Divide dough in half. (Dough can be used immediately or a portion frozen for later use.)

To bake your pizza on a pizza pan or baking sheet:

Lightly grease a 12-inch pizza pan. Sprinkle with a bit of cornmeal. Place one of the half pieces of dough on the prepared pizza pan and pat it with your fingers until it stretches over the whole pan. Make sure the edge is a bit thicker than the rest.

Place in a pre-heated 475-degree oven for about 8 minutes to set the crust. Remove from oven and spread with pizza sauce and toppings of your choice.

Return to the oven and continue baking for 10-20 minutes longer or until the crust is a nice golden color and the cheese is melted and starting to brown. Remove from oven and let sit for 5 minutes before cutting into slices.  

To bake your pizza on a pizza stone:

Pre-heat your oven and pizza stone to 475-degrees. (This takes longer than just heating your oven. So, you may want to start heating your oven at the same time you start making your dough. Rise time and all.)

Place a piece of parchment paper on top of a pizza peel or a baking sheet with only one edge. Pat one of the half pieces of dough out as thin as possible. Then, place your topping ingredients over the crust.

Transfer the pizza (parchment paper and all) off the pizza peel or baking sheet onto your pre-heated pizza stone and bake for 10-15 minutes or until the crust is golden brown and the cheese is bubbly. Remove from oven and wait 5 minutes before cutting. (I don’t have a pizza peel. I use a one-sided baking sheet. When the pizza is ready to come out of the oven, I just slide the pizza, parchment paper and all, back on to the baking sheet.)

BASIL PESTO PIZZA SAUCE  

2 garlic cloves

2 c. packed basil leaves

tiny pinch kosher salt

a couple grinds black pepper

¼ c. extra virgin olive oil

½ c. freshly grated Parmesan cheese

Place all the ingredients in your food processor. Whirl until you reach desired consistency.

Slather the sauce on unbaked or partially baked crust. Use as much of the sauce as you want. That may be only half of the sauce, or every last bit scraped out of the food processor.   


SIMPLE ITALIAN VINAIGRETTE

Made this dressing last evening. Simple to prepare, and because I was feeling lazy, the only thing I had to mess with was the fresh lemon juice. No chopping onion or fresh garlic, etc. etc. And while I was juicing the lemon, I remembered that I hadn’t shared my new “trick” with you. So, today before I started writing up this post, I took a few pictures.

Now you know I don’t usually take an abundance of pictures. Because to my thinking, there is nothing worse than going to a blog and seeing at a minimum, 9 pictures of the same thing. I don’t have that kind of time. I just want a few choice words, then give me the darn recipe thank you, and let me be on my way! (And yes, I’m getting cranky in my old age!)

So, if you aren’t interested in getting more juice from your lemons, then don’t go all the way to the bottom of this post. But if you are intrigued by the shear idea of more juice per lemon, I’ll forgive you if you stop reading at this point and jump right to the juicy part of this post.

I assume you’re back now, so I’ll tell you how much we enjoyed this dressing on a simple salad of romaine, arugula, baby spinach, grape tomatoes, and sunflower seeds. We were practically fighting over the last little bits. (OK, not really, but every little bit of the salad was enthusiastically eaten.)

So, even if you have been making your own salad dressing since God was child, I think you will find this delicious dressing (compliments of Christina at thewholecook.com website with a couple minor changes by me) to be a great addition to your salad dressing recipe collection.

As always, have fun in your kitchen. And eat salads like they are going out of style. Veggies are good for us. And although green salads will never be my favorite dish to prepare, salads are still one of my favorite dishes to eat. So, you do the math!

Peace and love to all.  

¾ c. extra virgin olive oil

¼ c. red wine vinegar

2 tsp. fresh lemon juice

1 tsp. granulated garlic  

1 tsp. dried oregano

1 tsp. dried basil

¾ tsp. kosher salt, or more to taste

½ tsp. granulated onion

freshly ground black pepper

pinch crushed red pepper flakes

Place all ingredients in a covered jar. Then shake like crazy. Store in fridge.

How to get more juice from a lemon. (At least this method works for me!)

Cut the nub end off half a lemon.
Then cut off the rind. Be careful to cut off only the yellow part.
Place the cut end down in your lemon squeezer gismo. (At least, I believe that’s the technical name for this helpful tool.)
What’s left after you extract the juice.

I don’t know if I actually get that much more juice cutting off the rind. But I sure know my arthritic hands appreciate not having to squeeze the juicer as hard.