Category Archives: EASTER DINNER RECIPES

ROASTED MUSHROOM CREAM SOUP

I found this recipe in Bon Appetite years ago and it has been my favorite creamy mushroom soup ever since. (Of course I made a couple of tweaks, but that’s what I do!) The first time I made this delicious soup was for Mr. C. and the other members of the “Tangoheart” orchestra. It was for one of the many rehearsals we held at our Bellevue home. (You’ve heard the term “starving musicians”. Well this group could have been the poster children for starving musicians everywhere!) I usually served soup for these rehearsals because it could remain happily simmering on the stove until the group was ready to take a food break. Soup is also quick and easy to eat, so the group never had to take too much time away from rehearsing. Along with a nice chewy loaf of bread, a glass of wine, and a brownie perhaps (no, not the kind that is now legal in Washington state), soup was always the perfect way to provide a simple meal for our musician friends. This soup is also lovely when served as the first course at a dinner party. It is ever so rich, and a cup or so is just perfect. So next time you plan a dinner party, consider serving a lovely rich soup like this, just after the appetizers and before the main course. Your guests will love everything about this soup. It is creamy, a little chunky, and tastes like heaven in a bowl. It’s also meatless. That’s especially nice when planning a dinner party for associates or new friends. Even if one of your guests happens to be a vegetarian, and unable to partake of the meat portion of the entree, they can always have more of this wonderful soup. Your guests may not be musicians when they arrive at your home for dinner, but serve them this soup and they will be singing your praise by the time they leave!

  • 1 lb. Portobello mushroom, stemmed, dark gills removed, caps cut into ¾-inch pieces
  • ½ lb. shiitake mushrooms, stemmed, caps cut into ¾-inch pieces
  • 3 T. extra virgin olive oil
  • 1 ½ tsp. kosher salt
  • freshly ground black pepper
  • 1 ½ T. butter
  • ½ medium onion, finely chopped
  • 3 garlic cloves, minced
  • 6 T. Madeira
  • 3 T. flour
  • 6 c. vegetable broth
  • 1 c. heavy cream
  • 1 ½ tsp. chopped fresh thyme
  • chopped fresh parsley, opt.

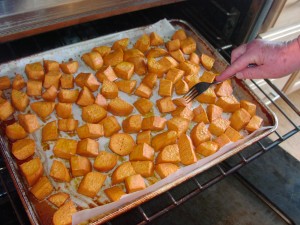
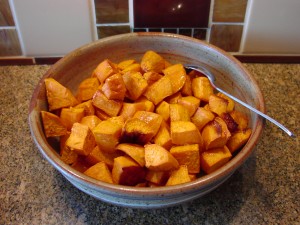
Place cut mushrooms on a large short sided baking sheet. Drizzle with olive oil and sprinkle with salt and pepper. Toss to coat. Cover with aluminum foil and bake in a pre-heated 400 degree oven for 30 minutes. Remove foil and bake an additional 15-30 minutes or until the mushrooms are tender but still moist. Meanwhile, melt butter in a heavy large pot. Add onion and garlic and gently sauté until the onion is very soft. (Do not cook too quickly. The onion and garlic should not be allowed to brown.) Add Madeira and simmer until almost all of the liquid has evaporated. Add flour; stir for 2 minutes. Add 4 cups of the broth, cream, and thyme. Remove from heat. When the mushrooms have finished baking, puree half of them with the remaining 2 cups of vegetable broth. Chop the remaining mushrooms into small pieces and add them, along with the mushroom puree to the pot. Return pot to heat and simmer over medium heat until slightly thickened, about 10 minutes. Adjust seasoning. Ladle into serving bowls/cups and garnish with a light sprinkle of chopped parsley.


BREAD PUDDING WITH SPICED RUM SAUCE

OLYMPUS DIGITAL CAMERA

There are few desserts as delicious as bread pudding. But it has to be good bread pudding. For decades I shied away from this incredible dessert because of my grandmother. Please allow me to explain. I think I’ve already told you that both my mother and maternal grandmother were not good cooks. My grandmother however, was excellent at homemade bread and pies. So you would think, since bread pudding is made from bread, she should have been able to make at least a passable bread pudding. Absolutely not the case. And since I never watched her put one together, I actually don’t know how hers was prepared. (Even from the ripe old age of 4 or so, I knew instinctively when to say no thank you to food that I had once tasted and knew was of poor quality. Why then would I even want to know how it was prepared? I was no dummy, even as a kid!) But, to the best of my recollection, grandma’s bread pudding starred plain old bread, soaked in a combination of milk, eggs, and a pinch of cinnamon and liberally laced with raisins. Now I like raisins, but not when they are burnt. And that was my grandmother’s forte. She could burn a raisin better than anyone I have ever known. And even if there had been some kind of warm sauce to serve with the pudding, it sure as heck didn’t contain liquor. (Not that I would have even known about cooking with liquor when I was a child. My parents weren’t teetotalers, but by any stretch of the imagination, they weren’t drinkers either. So spring forward several decades to when I left my bad memories behind and became a true devotee of bread saturated with milk, cream, and eggs and studded with little golden jewels of flavor. New Orleans. Marti Gras. Good friends (Dick, Eloise, son John and daughter-in-law Carol), fun parades, great music, and amazing food. So you know the old saying, when in Rome, well when in New Orleans you eat anything placed in front of you because it is bound to be delicious. So in order not to appear a prig (yes, I spelled it right) I went along with the crowd and ordered bread pudding for dessert one evening. Any resemblance to what I had experienced as a child was merely coincidental!  I had discovered heaven in a bowl. As soon as we got home after our 10 day adventure in Louisiana, I went to work finding the perfect recipe for bread pudding. I finally ended up with the recipe below, an amalgam of several recipes I found in cookbooks. I hope you enjoy this lovely dessert as much as we do. This bread pudding has actually made believers of others like me who, until they tried really good bread pudding, just couldn’t understand what all the fuss was about. But I get it now. This recipe could make a bread pudding believer out of you too. Give it a try.

Bread Pudding Ingredients:

  • ¼ c. spiced rum
  • 1 c. golden raisins
  • 8 lg. eggs, room temperature
  • 3 ½ c. whole milk
  • 1 ½ c. heavy cream
  • 1 ½ tsp. vanilla
  • 1 tsp. cinnamon
  • 1 (1-lb.) loaf Challah or other dense egg bread, cut into 1-inch cubes

Spiced Rum Sauce Ingredients:

  • 1 c. packed brown sugar
  • ½ c. butter
  • ½ c. heavy cream
  • 2 T. spiced rum
  • ¼ tsp. cinnamon

Whipped Cream Topping Ingredients:

  • 1 c. heavy cream
  • 2 T. powdered sugar
  • 1 tsp. spiced rum

Bread Pudding: Combine spiced rum and golden raisins in a small heavy pan. Bring to a boil and simmer until all liquid evaporates. Remove from heat and cool. Meanwhile combine eggs, milk, cream, vanilla, and cinnamon in a large bowl. Gently stir in bread cubes and cooled raisins. Pour mixture into a buttered 9×13-inch baking dish. Cover and refrigerate for at least 2 hours. Bake uncovered in a pre-heated 350 degree oven for about 75 minutes or until golden brown and puffed. (Watch carefully the last 30 minutes or so. If the pudding starts to get too brown before it is set, gently tent with aluminum foil.) Serve warm with Spiced Rum Sauce and a dollop of Whipped Cream Topping.

Spiced Rum Sauce: Combine brown sugar and butter in a medium sized heavy saucepan. Cook over medium heat for about 2 minutes or until butter completely melted and mixture is smooth. Add heavy cream, spiced rum, and cinnamon. Bring to a simmer and cook for approximately 5 minutes or until mixture thickens and is reduced to about 1 ½ cups. Serve warm over pudding. Can be made ahead and refrigerated. Bring to a simmer again before serving.

Whipped Cream Topping:  Whip heavy cream to stiff peaks; add powdered sugar and spiced rum. Serve dolloped over top of Spiced Rum Sauce.


PROSCIUTTO WRAPPED PORK TENDERLOIN

It isn’t very often that I get to prepare a braised meat dish where the first step isn’t to dredge the meat in seasoned flour and fry said meat until brown all over in hot vegetable or olive oil. Or pat the meat all over until it is very dry, season it with salt and pepper and fry it in a small amount of oil or butter over fairly high heat. So when I find a recipe for braised meat without this step, I am naturally suspicious! After all, how in the name of all things caramelized or browned is my meat going to have any taste? Then of course, what about the sauce? How is my sauce going to have any depth of flavor without all those wonderful little browned bits in the bottom of the pan? (And really, isn’t a braised meat recipe all about the sauce?) Well fret not. This recipe is living (well not really living anymore) proof that browning and caramelizing meat is not the only way to assure extraordinary flavor in braised dishes. I can’t truly begin to describe how tender and flavorful pork is when it has been prepared this way. And the sauce, oh, it is truly out of this world. So next time you want an easy recipe for pork tenderloin that does not require marinating the meat for hours or browning it before adding the other ingredients, give this dish a try. It is quick and easy enough to prepare even on a weeknight. I know that for a fact. (I wasn’t always a retired lady of leisure you know. I too know what it is like to come home from a long day of work to a cold empty kitchen and a hungry family.) I wish I had some words of wisdom to offer you at this point which would miraculously make your life easier when it came to fixing supper after a long day. But unfortunately I paid good money to have my memories of the first hour at home after work blocked, so you will just have to figure it out for yourself. However, I have retained a couple of little hints that I can share with you. Make your dinners fairly simple, packed full of good nutrition and made with love. Love is actually the best ingredient you can ever add to any dish.

  • 1 T. Dijon mustard
  • ¾ tsp. dried thyme
  • 1 tsp. kosher salt
  • freshly ground black pepper
  • 2 pork tenderloin
  • 6-8 slices prosciutto
  • 1 T. vegetable oil
  • ¾ c. dry Riesling
  • ½ c. half & half
  • 2 T. chopped fresh Italian parsley

Combine mustard, thyme, salt, and pepper in a small bowl. Remove all silver skin, connective tissue, and fat from tenderloins. Dry completely with paper towels. Lay 3-4 pieces of prosciutto next to each other (long sides together) on a flat surface. Slather about a fourth of the mustard mixture on one side of a pork tenderloin. Place it mustard side down on the prosciutto. Slather another fourth of the mustard on the top and wrap the prosciutto around the pork. Repeat the process with the second tenderloin. Pour the vegetable oil in an oven proof baking pan (about the right size for the two tenderloins) and lay the tenderloins, seam side down in the pan. Pour the wine over the meat and bake uncovered in a pre-heated 350 degree oven until meat reaches an internal temperature of 145 degrees (35-45 minutes). Remove meat from pan and cover with aluminum foil for at least 15 minutes before slicing. Meanwhile add half & half to remaining meat juices and simmer while meat is resting. The sauce should thicken a bit as it is simmering, so watch carefully. After the meat has rested, slice to desired thickness and place on serving platter. Spoon sauce on meat and sprinkle with parsley. Hint: An electric knife works best when slicing the tenderloins.

Side Dish Suggestions:  baked sweet potatoes and a green veggie or green salad

Wine Pairing: chilled Pinot Grigio or Sauvignon Blanc


ROASTED GARNET OR RUBY SWEET POTATO CHUNKS

OLYMPUS DIGITAL CAMERAOLYMPUS DIGITAL CAMERA

Until a few years ago, I only thought about serving sweet potatoes at Thanksgiving and Christmas. And then, only mashed up with butter, brown sugar, and topped with marshmallows. Now don’t get me wrong, I still serve a variation of the above for the holidays, but we now eat sweet potatoes at least once a week. And why? Because we love the flavor and they are good for us.

FYI: Even though garnet and ruby sweet potatoes are often labeled as yams, they are not indeed yams. They are sweet potatoes, and as such are rich in vitamin C, thiamine, niacin and potassium. And although a sweet potato is known to be moderately high in protein, about 5 grams of protein in an 8 ounce serving, as with most plant sourced protein, the proteins in sweet potatoes do not provide all the essential amino acids your body needs. So bear that in mind when you are considering your body’s daily nutritional requirements.

A little bit of history about sweet potatoes.  Sweet potatoes come in two varieties, firm and soft. The soft varieties such as Garnet, Ruby, and Jewel are easy to find and are perfect when you want a soft and creamy texture. Firmer varieties such as Kotobuki and Yellow Jersey (grown in the Mid-Atlantic States) are favored for Asian and East Indian cuisine. Apparently the term “yam” came into the common vernacular when sweet potatoes were first grown commercially.  To differentiate between the soft varieties and the firm varieties, soft sweet potatoes were labeled as “yams”, while the firmer varieties retained the sweet potato name.  Today, about 95% of real yams are grown in Asia and Africa. Unless you specifically search for yams, which are usually only found at an international market, you are probably buying sweet potatoes!

(To my mind, the delectable Ipomoea batatas tuber can call itself anything it wants.  As long it continues to appear at farmer’s markets, produce stands, and in the produce section of my local grocery store, I will remain a happy camper. And over the next few weeks and months I will share more wonderful recipes for sweet potatoes with you. But for now, give this delightful recipe a try. It is incredibly easy to prepare and even easier to eat.)

  • 1 tsp. fresh lemon juice
  • 1 T. honey
  • 1 T. extra virgin olive oil
  • 2 large ruby or garnet sweet potatoes, peeled and cut into 1-inch pieces
  • kosher salt
  • freshly ground black pepper

In a medium sized bowl, whisk together the lemon juice, honey, and olive oil. Add the sweet potato pieces and stir until every surface is lightly coated. Pour onto a parchment paper lined rimmed baking sheet. Sprinkle with kosher salt and a very light sprinkling of pepper. Bake in the middle of a pre-heated 350 degree oven for 60 minutes or until potatoes are tender and the bottom of each piece is a nice golden brown. Serve hot out of the oven.


WHITE CHEDDAR CHEESE GRITS

So, you’re asking yourself, why is Patti, the highly sophisticated world traveler and lover of the arts, posting a recipe for something as ordinary as grits? I believe that to be a very fair question and worthy of a dignified answer. Because they’re darned good honey, that’s why! Allow me to elaborate. A few years ago when Mr. C. and I were visiting daughter Eden and her family, Eden fixed grits for us one morning for breakfast. This was about the same time polenta started appearing on every menu in America. I had tried polenta several times while dining, and frankly had not been very impressed. So I wasn’t coming to the table (so to speak) with much hope that grits would taste any better. Ho baby, was I wrong! And I have to tell you when I am wrong, I am usually very, very wrong. This time was no exception. Eden’s grits were so amazing I could not stop eating them.  I was absolutely blown away. I immediately begged for the recipe. As soon as I checked out the ingredient list I knew why this dried ground hominy dish had stolen my heart. Butter, heavy cream, and sharp white cheddar cheese! The unholy trinity of health conscious people everywhere. So, needless to say, White Cheddar Cheese Grits do not grace our table on a frequent basis. But when I want to impress the socks off guests or am feeling particularly in need of a good pampering, I fix this recipe. And for those readers who love polenta, I must confess that over the years I too have come to love it as much as I do any other starchy food. That is to say, with a passion!  I just know that had “carbohydrate” been one of the 12 signs of the zodiac, I would have been born under it (with “dairy” ascending, of course)!

  • 2 c. milk
  • 1 c. water
  • ¾ c. quick grits (like Albers)
  • 1/3 c. butter
  • ¾ c. heavy cream or evaporated milk
  • 2 ½ c. grated sharp white cheddar cheese
  • ½ tsp kosher salt
  • freshly ground black pepper
  • 2 large eggs
  • 6-12 drops hot sauce
  • 1/3 c. chopped fresh chives, opt.
  • paprika

Bring the milk and water to a boil in a medium sized covered sauce pan. Slowly whisk in the grits. Cover pan and reduce the heat to low. Cook, stirring occasionally, for 6 minutes. Remove from heat and whisk in the butter, cream, cheese, salt, and pepper to taste. In a small bowl, whisk together the eggs, hot sauce, and chives. Gradually add the egg mixture to the hot grit mixture, stirring vigorously to prevent eggs from curdling. Pour into a buttered casserole dish, sprinkle with paprika, and bake in a pre-heated 375 degree oven for 40-45 minutes or until golden brown and puffy. Serve for breakfast, lunch, or dinner.

DEVILED EGGS

OLYMPUS DIGITAL CAMERA

Please bear with me, but I am going to take a giant step back from the sophisticated recipes I usually present (like Pea Salad and Refrigerator Mashed Potatoes) and briefly journey back to the good old days. (I used to hate hearing my parents and grandparents make reference to the “good old days”. And now, in black and white for all to witness, I am saying the same thing. Yikes!) But, when I was a child (another annoying phrase I find myself using) in the mid 40s and 50s, life was simpler, less frantic, and a mouse was a critter you found in your attic happily building a nest in an old dresser drawer.  Some of you too may remember those days (hopefully without the mouse in the attic part). And if you were any kind of a benign rascal like I was in my youth, your worst discretion would have been something like mine. I loved to listen in on my neighbor’s party line conversations. (If you don’t know what a “party line” is, ask a grandparent or someone over the age of 65.) But truthfully, I’m quite sure those of you who don’t even know how to use a dial telephone, can’t begin to imagine how exciting it was to be a 6 or 7 year old listening, unbeknownst, to old Mrs. Taylor discuss her best recipe for deviled eggs or the state of her varicose veins with her good friend Ethel! Pure heaven, I’m tellin’ you! But by now you’re probably asking yourself, what in the name of all things Bell Telephone has any of this ancient history to do with deviled eggs? Well my dear friends, it has everything to do with deviled eggs. Deviled eggs, one of the best taste treats ever invented, are fast becoming as yesterday as cathode ray tube televisions! And I simply can’t allow that to happen. I have to tell you, when I serve deviled eggs to guests as one of several appetizers, they are the first to go. People love them. They practically start purring. And the best part, eggs are cheap. So next time you throw a cocktail party or are asked to bring an appetizer, consider deviled eggs. People may look at you funny at first, but after they bite into one of these babies, their skepticism will melt away as fast as cold butter on a hot biscuit!

  • 8 hard boiled eggs
  • 4 tsp. minced dehydrated onion
  • 4 tsp. white wine vinegar
  • 4 tsp. Dijon mustard
  • 1/4 tsp. kosher salt
  • freshly ground black pepper
  • 1/3 to ½ c. light mayonnaise
  • parsley or paprika for garnish, opt.

Peel and cut hard-boiled eggs in half. Gently scoop the yolks into a small bowl. Add onion, vinegar, mustard, salt, and pepper. Mash together with fork until ingredients are well blended and paste like. Stir in just enough mayonnaise to make a creamy consistency that holds its shape when scooped or spooned into egg white. (I use a tiny ice cream scoop for a size consistency.) Place eggs on platter and sprinkle with chopped parsley or paprika. Refrigerate until ready to serve.


BREAD AND BUTTER PICKLES

OLYMPUS DIGITAL CAMERA

There are few foods as evocative of my childhood as bread and butter pickles. When I was young every holiday meal had to include “the relish tray”. And said relish tray had to offer at the very least black olives, carrot and celery sticks, and pickles. Sometimes the pickles were homemade dill pickles, but more often they were bread and butter pickles, because they were my dad’s favorite. It was always my job to assemble the “tray” which I gladly did with nary a “mom, do I have to?”  It was simply the best chore ever! I got to cut the carrot and celery sticks, open the can of olives and drain the pickles.  And, I was allowed to arrange the tray any way I wanted! Of course arranging the tray was really the fun part, well that and eating most of the olives and a considerable portion of the pickles before they ever hit the tray! So when I found this simple recipe years later and it didn’t even involve the “C” word (canning), I was very excited.  (And yes, I would gladly give credit to the awesome author of this recipe if I had any recollection. But I’m certain that when I saw bread and butter pickles, easy, and 24 hours all in the same sentence, the recipe could have been handed down from Moses for all I would have noticed.) So if you too love a good bread and butter pickle, give this recipe a try. I have actually observed grown men hover over a bowl of these pickles mumbling mine, mine, mine! I could easier accept such behavior from a flock of seagulls, for example, than grown men. But truth be told, I do understand. These lovely pickles are just that good.

  • 2 English cucumbers, partially peeled and thinly sliced
  • 1 ½ T. kosher salt
  • 1 c. thinly sliced yellow onion
  • 1 c. granulated sugar
  • ¼ c. packed brown sugar
  • 1 c. white vinegar
  • ½ c. cider vinegar
  • 1 ½ tsp. mustard seed
  • ½ tsp. celery seed
  • 1/8 tsp. turmeric

Combine cucumber slices and salt in a large non-reactive bowl (glass works best); cover and chill for 90 minutes. Drain and rinse under cold water. Drain again and return cucumbers to bowl. Add onion. Combine sugars, vinegars, mustard seed, celery seed, and turmeric in a medium sized saucepan; bring to a simmer over medium heat, stirring until sugars dissolve. Pour hot mixture over cucumbers and onion; let stand at room temperature for 1 hour. Cover and refrigerate for 24 hours. At this point the pickles can be transferred to an airtight container and refrigerated for up to 2 weeks. (Good luck on that! They have yet to last that long in our refrigerator.)


CHERRIES JUBILEE

OLYMPUS DIGITAL CAMERA

I am not the biggest lover of sweets. But don’t get me wrong, like everyone else, I enjoy a really good piece of pie, or a perfectly baked cookie. But sweets are not the reason I am filled to the brim of slimness. That dubious honor belongs to bread and sauces! But even though desserts aren’t my thing, I almost always prepare one when I am having guests over for dinner. And luckily for Mr. C. that is quite often. (Unlike me, Mr. C. was blessed with not just one sweet tooth, but several!) So give this take on an old classic a try. The great thing about my version is that it is prepared ahead of time and only warmed at the last minute. Of course you will lose points because this way of serving Cherries Jubilee is not flamed at the table. But having to possibly invite the fire department to join your dinner party isn’t all that appealing either!

  • 1 can cherries, drained, juice reserved
  • 2 tsp. Demerara sugar
  • 2 tsp cornstarch
  • 1 tsp. orange zest
  • 2 T. Kirschwasser (cherry flavored liqueur)
  • vanilla ice cream

Whisk together the cherry juice, sugar, cornstarch, and orange zest in a small sauce pan. Place over medium heat and cook until smooth and thick. Add the drained cherries. Turn off the heat, turn off your fan and pour liqueur over mixture. Torch the liqueur and allow the flame to go out on its own. If you are not going to serve within a few hours, refrigerate until ready to use. When ready to serve, gently warm the sauce and layer with ice cream in pretty glasses or small bowls. Serve immediately. Believe me, even without the showy presentation, your guests will love this not too sweet dessert.


NOODLES ROMANOFF

IMG_5546

I have been making this pasta dish (my version of an old Betty Crocker recipe) for over 40 years. I love it. It’s rich and ever so creamy. But a dish with a name that literally smacks of Russian aristocracy absolutely demands at least a small nod to its origin. And since my blog is intended for a learned and sophisticated audience, I knew you too would be interested in any information I could glean on the subject. So off to Wikipedia I went (my favorite source for semi-accurate information on the most obscure subjects imaginable).  Like I said above, I really thought the name “Romanoff” must have something to do with The House of Romanov, which was the second and last imperial dynasty to rule (1613-1917) over Russia. But nothing I read seemed conclusive enough to point in that direction. What I did learn however, was that “Noodles Romanoff” was a gangster and head of an evil organization N.A.S.T.Y. (National Association of Spies, Traitors and Yahoos) in an animated  American children’s television comedy series that first aired in 1965. Starring Roger Ramjet and the American Eagle Squadron, the show was known for its crude animation, frenetic pace, and frequent references to popular culture, which allowed the show to entertain various age groups.

Along with the villainous “Noodles”, there was another gangster name in the series that caught my eye – Tequila Mockingbird. So once again it was off to my favorite search engine to learn if “Tequila Mockingbird” produced any results. Turns out it’s a drink containing (you guessed it!) – rum! Well no, but it does sound like a drink that could either be really, really delicious, or absolutely horrid. (I think this might be one of those drinks you either love or hate!) As there were quite a few recipes for a “Tequila Mockingbird” provided on line, I felt absolutely duty bound to pick one and share it with you. The concoction that sounds the most appealing, and not coincidentally less lethal than some of the others, contains 1 ½-oz. tequila, ¾-oz. green Crème de Menthe, and the juice of 1 lime. Shake ingredients with ice and strain into a cocktail glass. Now mind you, I have yet to try this drink, but I plan to put the resident mixologist to work in the very near future. I will let you know how it tastes, if I survive that is! And if per chance you are a fan of this drink and have the perfect recipe you are willing to share, please send me an email with preparation instructions. Can’t promise I will post your recipe, but I am always willing to perform empirical research, at least when tequila is involved! Cheers!

  • 2 T. butter
  • 2 T. flour
  • 1 ¾ c. milk
  • ¼ c. dry white wine (I use Pinot Grigio)
  • 2 T. dehydrated chopped onion
  • 1 tsp. granulated garlic
  • freshly ground black pepper
  • 1 c. low fat sour cream
  • 1 c. grated sharp cheddar cheese
  • 2-3 c. dry noodles cooked al dente

Melt the butter in a medium large saucepan. Add flour and let cook for about 2 minutes. Whisk in milk, wine, onion, garlic, and pepper. Add sour cream and bring just to a boil. Remove from heat and stir in cheese and cooked noodles. Serve immediately or spoon into a buttered casserole and keep warm in the oven set on the lowest temperature.

Side Dish Suggestion (if serving as a Main Dish): green salad, steamed veggie, and a crusty baguette

Wine Pairing: Well that should be obvious – the rest of the Pinot Grigio you used in the recipe!


PICNIC BUNS

OLYMPUS DIGITAL CAMERA

There are just some recipes that bring back memories that make you feel good. This recipe and this way of shaping dinner rolls (my grandmother always called them picnic buns) take me back to my childhood. I grew up on 2 ½ acres in Kenmore, Washington. There were two homes on this parcel of land. One home was occupied by my dad, mom, two younger brothers and me; the second residence belonged to my maternal grandfather and grandmother. We had fruit trees, various types of berries, a couple of cows, a lot of chickens (my grandfather sold eggs for a living), a creek, a copse of trees, and the biggest vegetable garden you could ever imagine. My mom, the dear woman, could not find her way out of a recipe if her life depended on it (in other words, she was not a good cook). And my grandmother, who on a regular basis could not make jello, did make two types of food that were sensational. She made the best bread and pies imaginable. Why she could bake a pie that tasted like heaven and cookies that were almost unpalatable will forever remain a mystery? But her Banana Split Pie and Mince Meat Pie were heaven sent. Also, any kind of bread she baked was perfect in every respect. So in memory of my grandmother, who was patient, loving, taught me to appreciate art, kittens, clouds, and how to bake bread, I offer you her signature rolls.  I hope this recipe brings back good memories of special food you too once shared with loved ones.


  • ¼ c. warm water
  • 1 T. or 1 pkg. active dry yeast
  • ¾c. warm, scalded milk (not too warm or your yeasty beasties won’t be happy)
  • ¼ c. sugar
  • 1 tsp. salt
  • 1 egg, room temperature
  • ¼ c. Crisco (sometimes I use butter – sorry grandma)
  • 3 ½ c. or more flour
  • Vegetable oil

In a large mixing bowl, (I use the bowl of my Kitchen Aid mixer), combine the water, yeast, milk, sugar, salt, egg, and Crisco. Let proof for about 10 minutes. Add 2 cups of the flour and mix thoroughly. Add enough remaining flour to form a medium stiff dough. Pour about a teaspoon of oil over the dough and roll into a ball. When dough ball is completely greased, cover the mixer bowl with a tea towel, let rise for about 90 minutes or until doubled. Punch down and let rise again until doubled, about 30 minutes. Butter a 9×13-inch pan. Punch down dough again and divide into 18 pieces. (I just squeeze off small balls of dough as I place them into the prepared pan.) Cover with a tea towel again, and let rise for 30 minutes or until doubled in size. Bake in a pre-heated 400 degree oven for 12-15 minutes or until a nice golden brown. Serve warm.