Last evening was November 3rd. And frankly what I thought Mr. C. and I needed more than anything else, was comfort food to the max. Well that and a couple of good stiff drinks! I knew the election results wouldn’t be in until later this week (or maybe longer than that), but none the less, I was worried and I wanted as much positive in my life as I could get. At the same time, I didn’t want to spend a lot of time in the kitchen. So grilled chicken sausages, mac and cheese, and more of my delicious Oven Roasted Delicata Squash “Fries” with Buttermilk Herb Dipping Sauce. (I tell you true, I am totally addicted to this recipe for delicata squash. Can’t seem to get enough.)
Anyway, like I said, I didn’t want to spend any more time than necessary in the kitchen last evening. I wanted fast and easy. So I went on line and found the bones for this recipe on the joyfoodsunshine.com site. I changed the preparation instructions a bit and added a couple of ingredients (black pepper and Dijon mustard) that I felt the dish needed, but mainly I followed Laura’s great recipe. (Oh, I lowered the amount and type of salt too. I really can’t help myself!)
And before you ask, of course I had made stovetop mac and cheese before. But I was feeling particularly lazy yesterday and didn’t want to have to think too hard. I wanted someone else to do the heavy lifting, while I just supplied a bit of my years of cooking experience to the mix. So that’s just what happened.
Now I know you too must have several great recipes for mac and cheese. But I would be willing to wager up to a nickel, that none of your recipes are as fast or as easy to prepare as this recipe. Or as delicious! I’m serious. This recipe makes one fabulous pan of creamy mac and cheese.
So give this recipe a try. I’m sure you will be pleasantly surprised.
As always, keep having fun in your kitchen and keep being adventurous. Peace and love to all.
2 T. unsalted butter
2 T. unbleached all-purpose flour
¼ tsp. kosher salt
freshly ground black pepper
¼ tsp. granulated garlic
1 c. whole milk
¼ c. sour cream
1 tsp. Dijon mustard
2 c. dry (8 oz.) elbow macaroni, cooked al dente*
2 c. grated sharp cheddar cheese** (fairly packed down)
Melt the butter in a medium sized saucepan. Whisk in the flour, salt, pepper, and granulated garlic. Cook for a couple minutes or until lightly browned.
Remove from heat and whisk in the milk, sour cream, and Dijon mustard until smooth.
Return to heat and cook until the mixture is thickened (about 3-5 minutes) whisking the entire time. Do not let the sauce boil.
Once the mixture is thick, transfer the just cooked al dente pasta into the sauce using a large slotted spoon. Remove from heat and add the cheese. Stir until smooth. If the sauce is too thick, add a small amount of the pasta water. Taste and adjust seasoning if required. Let sit for a couple of minutes before serving. (This helps the sauce stick to the pasta.)
*Remember, if the sauce has to wait for the pasta to be cooked perfectly, so be it. No problem. Just don’t make the pasta wait for the sauce. In other words, don’t cook the pasta ahead of time.
**I use Tillamook Sharp Cheddar for this recipe. (The one in the red package.)
So whatever possessed me to ask Mr. C. to pick up some Swiss cheese and a big old container of spinach last time he made a grocery run was both prescient and fortuitous. Because twice this week already, I have wanted to use both ingredients. And there they were. Just waiting to be discovered in my refrigerator.
I used the Swiss cheese in my Shrimp, Sautéed Onion, and Swiss Chard Quiche. And last night I used it in this dish. I sautéed the spinach a couple nights ago as a side veggie, and used it again last evening in this glommed together chicken casserole. So it truly does pay to be well prepared. Even if, as in this case, my having both of these wonderful ingredients on hand can only be attributed to old fashioned blind luck.
But whatever the reason, it was great fun yesterday piecing this dish together. I read a few chicken casserole recipes before starting, but most of them either contained ingredients like cream of chicken soup or stuffing mix that I didn’t have on hand. Or didn’t include ingredients I did have on hand like various kinds of cheese and fresh spinach. So I stopped researching recipes and decided to wing it. And I’m so glad I did. It forced me to invent my own version of a can of condensed cream of chicken soup, and it allowed me to use some more of the fresh spinach and most of my remaining Swiss cheese. And the result? Magnifique!
So if you too would enjoy owning a recipe that features chicken, Swiss cheese, and spinach – I highly recommend this one. It’s quite easy to prepare. And yes, if you must, you can substitute a can of condensed cream of chicken soup and a bit of dry white wine for the first 9 ingredients in this recipe.
Since the first 9 ingredients are basically the equivalent of undiluted cream of chicken soup, I replicated the recipe at the bottom of this post in case you would like to print it as a stand-alone recipe. It is really tasty and would be a fine substitute in any recipe calling for a can of C of C soup. I also posted my Condensed Cream of Mushroom soup recipe, just in case you might want to make your own C C of M soup rather than opening a can.
Since I am being magnanimous today, I am going to spare you my thoughts concerning our current government leaders, racist idiots, bigots, gun freaks, maskless morons, and other groups of people who absolutely do not meet my non-prejudicial, accurate, and reasonable assessment of their value in today’s society. In other words – it’s your lucky day!
As always, peace and love to all.
8 T. (1 stick) unsalted butter, divided
6 T. flour
¼ tsp. seasoned salt, plus a pinch more for topping
freshly ground black pepper
lg. pinch granulated garlic
lg. pinch granulated onion
1 c. chicken stock or 1 c. water and 1 tsp. Better Than Bouillon Chicken Base
½ c. whole milk or ¼ c. heavy cream, ¼ c. water
¼ c. dry white wine
2 lg. boneless, skinless chicken breasts, cut in half, then sliced in half again lengthwise (you want all the chicken to be about the same thickness)
2 c. roughly chopped fresh spinach
generous 1/8-inch thick slices Swiss cheese (enough to cover the chicken pieces)
1 c. Panko bread crumbs
In a small sauce pan, melt 6 tablespoons of the butter over medium low heat. Add the flour and whisk together to make a roux. Add the ¼ teaspoon seasoned salt, pepper, granulated garlic, and granulated onion. Add the chicken broth, milk, and white wine. Whisk together to smooth out the lumps, bring to a boil, reduce heat and simmer until mixture thickens, about 2 to 3 minutes. Remove from heat and set aside. (The sauce will be very thick. That’s what you want. And it can be made ahead.)
Lightly grease a 9×13-inch baking dish or 8×10-inch casserole dish with cooking spray. Place chicken pieces in pan in a single layer, top with the raw spinach, and then the Swiss cheese slices. Smooth the sauce evenly over all. Bake in a pre-heated 350 degree oven, uncovered, for 45 minutes. Meanwhile, prepare the topping.
To make the Panko topping, melt the remaining 2 tablespoons of butter in a small pan. Remove from heat. Add the Panko bread crumbs and a pinch of seasoned salt; stir to combine.
After the 45 minutes of baking time, remove from oven and evenly sprinkle the Panko topping over the casserole. (I turn on my ovens convection option at this time to help brown the Panko topping.)
Bake another 15 minutes, remove from oven, and let sit for about 5 minutes before serving. I served the chicken last evening with seasoned brown rice (see recipe below) and steamed fresh green beans. Made for a lovely meal.
SEASONED BROWN RICE (made in a rice cooker)
1 c. brown rice
1¾ c. water
¼ tsp. seasoned salt, or more to taste
freshly ground black pepper
1 tsp. extra virgin olive oil
Throw everything in your rice cooker. Set the rice cooker on GO. Takes about an hour.
CONDENSED CREAM OF CHICKEN SOUP (homemade version = roughly 1 can)
6 T. (¾ stick) unsalted butter
6 T. flour
¼ tsp. seasoned salt
freshly ground black pepper
lg. pinch granulated garlic
lg. pinch granulated onion
1 c. chicken stock or 1 c. water and 1 tsp. Better Than Bouillon Chicken Base
½ c. whole milk or ¼ c. heavy cream, ¼ c. water
¼ c. dry white wine
In a small sauce pan, melt 6 tablespoons of the butter over medium low heat. Add the flour and whisk together to make a roux. Add the seasoned salt, pepper, granulated garlic, and granulated onion. Add the chicken stock, milk, and white wine. Whisk together to smooth out the lumps, bring to a boil, reduce heat and simmer until mixture thickens, about 2 to 3 minutes. Remove from heat and set aside. (The sauce will be very thick. That’s what you want. And it can be made ahead.)
CONDENSED CREAM OF MUSHROOM SOUP (homemade version = roughly 1 can)
3 T. unsalted butter
½ c. chopped button mushrooms, or mushrooms of choice
3 T. flour
¼ tsp. seasoned salt
freshly ground black pepper
pinch granulated onion
pinch granulated garlic
¼ – ½ tsp. dried mushroom powder*, opt., but really makes a difference
1½ c. whole milk
1 tsp. Better Than Bouillon Vegetable Base
In a small saucepan, melt the butter and add the chopped mushrooms. Sauté slowly until the mushroom start to brown.
Add the flour and whisk together to make a roux. (If it feels like a little more butter would be nice, add a bit.) Add the seasoned salt, pepper, granulated onion, granulated garlic, and ¼ teaspoon of the dried mushroom powder. (You can always add more mushroom powder when you taste and adjust seasonings later in the recipe if you would like a stronger mushroom flavor.)
Slowly whisk in the milk and vegetable base. Bring to a boil, reduce heat and simmer until mixture thickens, about 2 to 3 minutes. Remove from heat and adjust seasoning as required. Use in any recipe calling for an a can of cream of mushroom soup.
* Dried Mushroom Powder: Can be purchased online or you can make mushroom powder at home. Start with any type of dried mushrooms. Place in your blender or spice grinder and let it whirl. (My spice grinder is an inexpensive coffee grinder dedicated just for the purpose of grinding herbs, spices, and anything other than coffee!)
Store mushroom powder in an airtight container. Great for adding depth of flavor to almost any dish that calls for mushrooms.
Cauliflower is one of those veggies that I don’t serve very often. And yes I know that I should fix it more regularly because it’s relatively inexpensive, easy to prepare, and is an extremely healthy vegetable. It’s basically full of nutrients. It also contains unique plant compounds that may reduce the risk of several diseases, including heart disease and cancer. But even with its impeccable pedigree, cauliflower is still a cruciferous vegetable and therefore a bit disdained by my dear husband. And of course there is always the consideration that cauliflower can cause gastrointestinal distress (gas and bloating). Which can be a little disconcerting if you are at a social gathering. But since the onslaught of covid-19, social gathering are prohibited anyway! So really not a problem, at least for now! But I digress…..
So last evening faced with a really large head of cauliflower that definitely needed to be eaten, I went in search of a way to disguise the potent flavor of this veggie.
Now don’t get me wrong. Mr. C. is a really good sport about eating his veggies. Even the ones I know he would never eat if I weren’t around. But because I know that Mr. C. endures rather than enjoys some of the vegetables I serve, I always try my best to make them as palatable for him as possible. And last evening, this recipe I cobbled together received Mr. Cs unsolicited comments expressing overall approval of the dish. (Sometimes the stars really are aligned perfectly.)
So if you too have someone at your table for whom cauliflower is not their favorite vegetable, give this recipe a try. With all the cheesy, creamy goodness going on, your picky eater may not even notice the “white veggie” hidden under the luscious sauce. Just call it “Cheese Casserole”. That should do the trick.
As always, keep cooking, keep playing well with others, keep taking care of yourself, and keep wearing a mask when necessary. We are all in this together. And until every single one of us works as a team, we are never going to reap the benefits of a positive united front against anything, be it Covid-19, racial and social injustice, or a decaying political system. Peace, love, and understanding to all.
1-1½ lg. head(s) of cauliflower, cut into small florets
2 T. extra virgin olive oil
1 tsp. kosher salt
freshly ground black pepper
½ c. sour cream
2 T. whole milk
1 tsp. Dijon mustard
generous pinch granulated garlic
couple squirts hot sauce (I use Frank’s RedHot sauce)
1½ c. grated sharp cheddar cheese, divided
paprika
2-3 sliced green onions or 2-3 T. chopped fresh chives
Preheat oven to 425 degrees. Line a large rimmed baking sheet with parchment paper.
In a greased 9×13-inch baking dish, combine the cauliflower with the olive oil, salt, and pepper. Make sure every bit of the cauliflower is coated with the seasoned oil. Transfer the cauliflower to the prepared baking sheet making certain the cauliflower is in a single layer. (Do not wash the baking dish.) Roast the cauliflower until crisp-tender, about 12-16 minutes.
Meanwhile, mix the sour cream, milk, Dijon mustard, granulated garlic, hot sauce, and ¾ cup of the grated cheddar cheese in the 9×13-inch baking dish. (Yes the same one you mixed the raw cauliflower with olive oil, salt, and pepper. And you’re right, I hate to wash dishes as much as the next gal!)
When the cauliflower is crisp-tender, transfer it back into the 9×13-inch baking dish. Stir it into the sour cream mixture until well combined. Top with the remaining shredded cheddar and sprinkle with paprika. Return to the oven and bake just until the cheese is melted, about 10 minutes.
Remove from oven and sprinkle with the green onions or chives. Serve hot out of the oven.
OK, what do you get when you combine béchamel sauce, three beautiful cheeses, perfectly cooked pasta, and a seasoned bread crumb topping? Well in this case you get a dish that is perfect in every respect. At least, this mac and cheese lover finds it absolutely delightful. And I happen to be extremely picky when it comes to mac and cheese! (After all, if I’m going to consume masses of calories, those calories better taste like they came straight down from heaven. Because otherwise, there’s no way for me to justify the guilt I’m going to feel after enjoying every mouthful!)
So when our dear friends Chip and Linda sent me this recipe from chef/owner Rick Mahan of the Waterboy Restaurant in Sacramento, having first prepared and loved the dish themselves, I just had to give it a try. And oh am I glad I did. What a relatively easy and delicious way to up my calorie intake with barely any redeemable nutritional value to warrant my doing so! Except of course, for the flavor, texture, and culinary happiness that came with every bite of this delectable dish. But I can’t say I wasn’t warned.
In Chip’s email to me which included this recipe and his comments about it, he pretty much said it all in one sentence. And I quote – “The recipe includes the Nutrition Facts, but really, that’s better left uncontemplated”. Good way to tell me that ignorance is bliss on this one. So a big thank you to Chip for sparing me the unpleasant details of fat and sodium content, etc. in this wonderful pasta dish. And to both Linda and Chip for sharing this wonderful recipe so that I could pass it along to you.
Now that you know I am absolutely sold on this recipe, you must taste this dish for yourself. It is just a perfect blend of ingredients. But it is a very rich pasta dish. So a small portion goes a long way. But in these difficult times, I firmly believe that spoiling ourselves with extra special food is justified. Now if only my bathroom scale would be a bit more supportive, my relationship with food could be even more expansive. But unfortunately, the only things expanding around here is my waist.
But through all, even being forced to live with a mendacious bathroom scale, we remain well and happy. We continue to hope and pray for an end to covid-19, that true social justice will soon become a reality in our country, and more than ever, fervently desire to once again experience political leadership that embraces humanity rather than inhumanity.
In the meantime, I cook, Mr. C. plays the piano, and we live comfortably in place. As always, peace and love to all.
3 T. unsalted butter
3 T. flour
1½ c. + 2 T. milk
½ tsp. kosher salt
½ tsp. white pepper
pinch nutmeg
pinch granulated onion
2 tsp. Dijon mustard
2/3 c. (2 oz.) grated Gruyére cheese
2/3 c. (2 oz.) grated sharp cheddar cheese
¼ c. grated Parmigiano-Reggiano cheese
2 c. uncooked macaroni, cooked al dente (I use large elbow macaroni)
½ c. (4 oz.) heavy cream
1/3 c. unseasoned dried bread crumbs
2 tsp. extra virgin olive oil
pinch seasoned salt
freshly ground black pepper
Melt the butter in a heavy saucepan. Whisk in the flour and cook, stirring constantly until the roux cooks for about 2 minutes. Do not let the roux get brown.
Heat the milk in a small pan until bubbles appear along the edge. Pour the hot milk in with the roux and continue to whisk as the sauce thickens. Bring to a boil. Add salt, white pepper, nutmeg, and granulated onion. Lower the heat, and cook, stirring for 2 to 3 minutes more. Remove from heat and stir in the Dijon mustard and cheeses. Taste and adjust seasoning.
Place the cooked macaroni in a lightly buttered baking dish. (I just lift the al dente macaroni right out of the salted water with a large slotted spoon directly into the prepared casserole dish.) Stir in half of the sauce, then top with the remaining sauce. Drizzle on the heavy cream.
Mix the breadcrumbs, olive oil, seasoned salt, and pepper together. Scatter evenly over the whole casserole.
Bake in a pre-heated 400 degree oven for about 30 minutes or until the top is nicely browned and the sauce is bubbly. Remove from oven and let sit for about 5-7 minutes before serving.
I think this is a first! The “twins” and the resident princess all three on our bed together. Maybe there’s hope yet!
OK, before you get all hot and bothered about the can of cream of mushroom (c. of m.) soup used in this recipe, let me just say that I stopped buying cream of mushroom soup by the case after my kids were all out of the house. But as a working mother, c. of m. soup really came in handy. And to this day, I always have at least one can in my pantry. Why you ask, when it’s so easy to build a white sauce? Well, in case you are new to reading my blog, you know that on occasion I welcome a little help as much as the next cook. And of more importance, some of my favorite recipes, like this decades old standby, are perfect as written. So who am I to choose culinary purity over recipe integrity?
And yes I understand there are unpronounceable ingredients in canned c. of m. soup. But I probably only use c. of m. soup a couple times a year. So don’t bother writing me defending your choice to never use this scary ingredient laden product. I understand your position. But I’m going to pigheadedly ignore the facts and stick to my guns on this one. (Hey – if our political leaders can ignore facts, and crazy people can bear arms, I feel it’s acceptable for me to defend my use of c. of m. soup on a very sporadic basis!)
Anyway, now that I have explained myself, I can get back to telling you about this great dish. It’s really easy to prepare. And it tastes like you have been slaving in the kitchen for hours. And it’s comfort food to the max. And it’s company worthy. (When it’s once again safe and sane to entertain guests, that is!) So now’s the time to make this delightful chicken dish in preparation for serving it to guests in (hopefully) the near future.
As always – stay safe, stay positive, and who knows? Maybe someday food scientists will discover that disodium inosinate and disodium guanylate are actually good for us!
And sorry about no picture. Some days I just space out on parts of my duty as keeper of the blog. I blame it on my age.
8 pieces of chicken (boneless, skinless thighs or halved breasts)
kosher salt
freshly ground black pepper
1 c. sour cream
2 T. fresh lemon juice
1/3 c. chicken broth or water
1 can cream of mushroom soup
8-10 sliced button or cremini mushrooms
paprika (Hungarian sweet paprika is best for this dish)
Place chicken in a shallow, lightly buttered baking dish. Lightly sprinkle chicken with salt and pepper. Whisk the sour cream, lemon juice, chicken broth, and soup together. Stir in the mushrooms.
Pour evenly over the chicken. Sauce should coat and almost cover the pieces. Sprinkle generously with paprika.
Bake in a pre-heated 350 degree oven for 90 minutes or until the chicken pieces are done and the top is lightly browned.
Great served with Simple Baked Rice Pilaf (recipe on site) and a steamed green veggie. A nice chilled Semillon is also perfect with this meal.
Sometimes you just have to shake things up a bit. And the other evening I wanted to use some of the potatoes we received in our last farm box. We had recently enjoyed a baked potato, but Mr. C. is not the potato lover that I am. So I really needed to come up with a way to use the potatoes that would appeal to him. And what better way than to use a couple of his favorite flavors to entice him over to my side. The right side! (I mean really. What’s not to like about potatoes?!?!) So….. Mr. C. loves cheese. And Mr. C. loves Mexican food, especially if the dish includes chilies. So why not combine potatoes with some cheese and a smattering of both canned green chilies (not hot) and a jalapeño (pretty darn hot). So I found the basis for this recipe on the boulderlocavore.com site. I changed the recipe to accommodate what I had on hand, and also to better reflect our tastes, but the bones of the recipe come directly from this new to me site.
So, armed with a new concept for flavoring au gratin potatoes, I prepared the recipe you find below. And no, the jalapeño was not overpowering or created too spicy a dish. It just added a lovely and unexpected flavor that even Mr. C. admitted was pretty darn tasty. (He had seconds that evening and chose to have the potatoes for lunch the next day.)
So if you too want to shake things up a bit in your kitchen, give this recipe a try. It is really lovely and really quite different than most au gratin potatoes. Although I have seldom met a homemade potato concoction that I didn’t like, this new au gratin dish is now right up there with my all-time favorites. Hope you like it too.
As always, stay safe, stay aware of what’s going on in the world, but please continue to represent love rather than hate. Not easy right now. But needed more than ever.
1½ lbs. thinly sliced Yukon gold potatoes (no need to peel the potatoes)
¾ c. whole milk
1 (4 oz.) can diced green chiles
1 small jalapeño pepper, seeded, veins removed, and very finally minced
generous ½ c. grated sharp cheddar cheese
generous 1 c. grated Monterey Jack cheese
½ c. finely diced onion
3 T. unsalted butter
kosher salt
freshly ground black pepper
paprika
Layer 1:
Line the bottom of a buttered 9×13-inch pan or casserole with a third of the potatoes. Drizzle with ¼ cup of the milk. Top with 1/3 of the chiles, 1/3 of the minced jalapeño, 1/3 of each cheese, half of the onion, 1 tablespoon of the butter evenly doted over the onion like you would when preparing a fruit pie, and a light sprinkling of salt and a larger sprinkle of black pepper.
Layer 2:
Repeat layer 1.
Layer 3:
Repeat layer 1, except no onion in the final layer. Sprinkle with paprika and bake in a pre-heated 350 degree oven for 70-85 minutes or until the potatoes slices are tender and the top is a lovely golden brown. (If the top gets too brown before the potatoes are tender, cover the pan with aluminum foil.)
Remove from oven and allow the au gratin to sit for 10 minutes before serving.
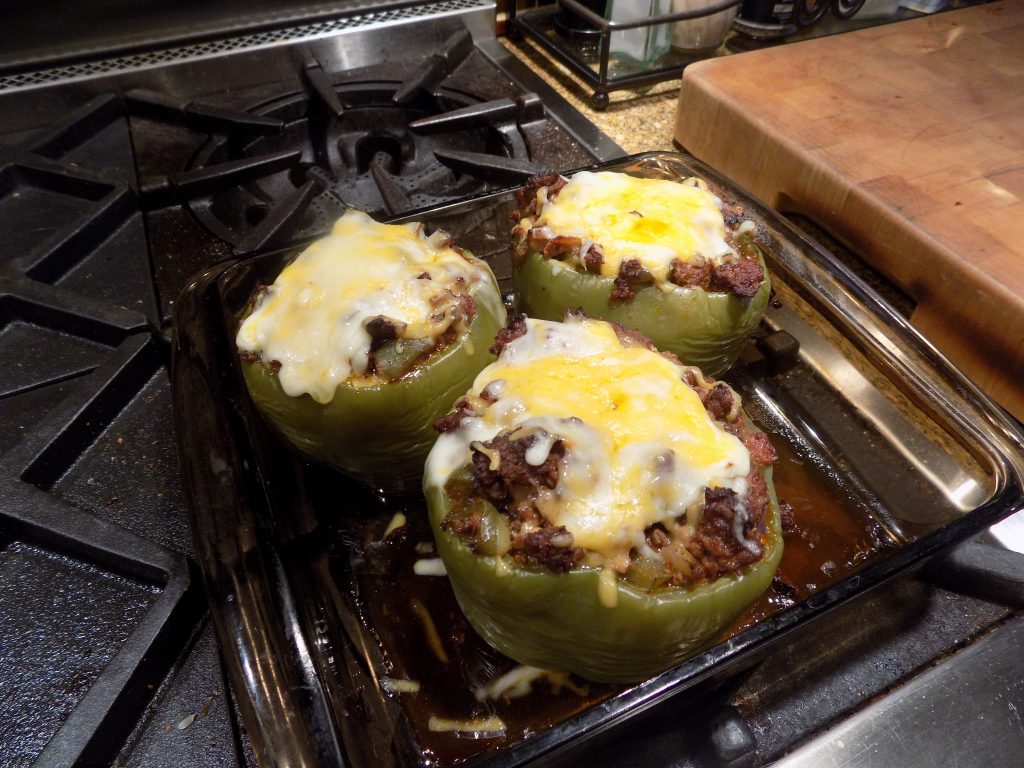
Well I’ve said it
before, but it bears repeating. I LOVE stuffed bell peppers. Love them I tell
you. With a passion even. Could eat them every week for the rest of my life! So
there. Now you know how I really feel about stuffed peppers. But have I ever mentioned
that I like preparing them too? No, probably not. But it’s true. I like fixing
them as much as I like eating them! And why is that you might wonder? Well……they
are quick and easy to prepare. And really you can’t go wrong with whatever you
choose to plop into the mix. Oh OK, chocolate chips might not work so well. But
anything in the savory, cheesy, meaty, vegetative, starchy arena most likely
would work. Stuffed peppers are kind of the quintessential “clean out your
refrigerator baby!” dish for the masses. (Can you really ask more from a lowly
vegetable than that? I think not too.)
So yesterday, while
I was wondering what to stuff the last two beautiful green peppers I had in my
fridge, I decided to “shop” my freezer and fridge. (God knows I don’t want to
go to a grocery store any more than absolutely necessary during this
coronavirus crisis. I don’t want Mr. C. to have to go either. We only have 3
masks to our name, and we want to save them in case of an emergency. But I
digress….)
Anyway, I started
with some frozen bulk Italian sausage I had been meaning to use for a while
now. The sausage led to mushrooms, which led to the scant remains of a large plastic
container of spinach, which naturally paved the way for cheese to enter the
game. The rest as they say is history. But unlike some of the horrific history
that is currently being made, I plan to repeat this dish in the future. Maybe
not until I can get my well-scrubbed hands on more bell peppers, but as far as
I’m concerned, the sooner the better!
So if you happen
to have a couple of bell peppers in your fridge (who cares what color they may
be), stuff those suckers with either this mix of ingredients, or go shopping in
your freezer or refrigerator as I did and come up with your own combination of
ingredients. Just don’t add chocolate chips. Trust me on this one.
As always – peace, love, and happy cooking to all.
2 lg. bell peppers (green, red, orange, or yellow)
2 tsp. extra virgin olive oil
½ lb. bulk Italian sausage
¼ c. finely chopped onion
4 medium sized button mushrooms, chopped
1 garlic clove, finely minced
2 tsp. chopped fresh parsley
2 tsp. tomato paste
½ c. dry white wine
½ tsp. paprika
¼ tsp. seasoned salt
freshly ground black pepper
1 c. baby spinach leaves, roughly chopped
½ c. cooked rice (I use whatever leftover rice mix I have in the fridge)
⅓ c. grated Parmesan, Pecorino-Romano, or Asiago cheese
1 c. shredded mozzarella cheese, plus more for on top
Cut the bell
peppers in half lengthwise. Discard the seeds. Place in a lightly greased shallow
baking pan, preferably one with a lid. (If you don’t have a pan with a lid, you
can cover the pan with aluminum foil.)
Heat
the olive oil in a large fry pan. And the sausage and crumble as it cooks until
it’s nicely browned. Add the onion and chopped mushrooms. Cook until the onion
is starting to soften. Add the garlic and parsley. Cook for one minute.
Add
the tomato paste and white wine. Cook until no liquid remains.
Add
the paprika, seasoned salt, black pepper, spinach, and cooked rice. Stir to
blend all the ingredients.
Remove
from heat and stir in the Parmesan and mozzarella cheeses. Taste and adjust
seasonings. Stuff the half peppers with sausage mixture, dividing equally and
gently packing the mixture down.
Bake
covered in a preheated 350 degree oven for 60 minutes or until the peppers are
tender. Remove from oven, remove lid, and add a bit more mozzarella on top of
the peppers. Return to the oven uncovered, and bake for a few minutes until the
cheese is melted. Serve hot out of the oven.
Bonus – pictures of 2 of our cats
Squeaky (on stairs) and Max (behind bars) diggin’ the sunshine. And yes, the sun does shine in this part of the world! Max thinking – “yes I am a good boy. After all, I’m “letting” her sleep on the carpeted stairs while I have to sit on the hardwood. Heavy sigh….”Suns gone away – might as well just sleep on mom and dad’s bed. Later on – Max (forefront) and brother Miles enjoying the sunshine on the guest bed. Close up of Miles
During
this stressful time of social distancing, self-imposed house arrest, and possible
feelings of grief over the future, I want to remind everyone that there are
some really easy and delicious recipes on this site. And if there was ever a
time to spend some quality time in your kitchen, it’s now. And if there is any
food combination that absolutely smacks of home and hearth it’s soup and bread.
I
am not going to list all of the soups and bread/muffin/roll recipes that appear
on my blog. All you have to do is search under “soup” or “bread” and all will
be revealed. But I do want to encourage you to spend time in your kitchen. And
if you have children, this is an absolutely perfect time to provide your kids
with some rudimentary cooking skills.
However,
I have enclosed one recipe for any of you who like me are currently unable to
find yeast at your local grocery store or on-line. Luckily I still had a bit in
my fridge, so on recommendation from my dear friend Vicki, I mixed up a
sourdough starter which is currently residing in my fridge. (And yes the recipe
for sourdough starter is already on this blog.) Now I am researching sourdough
bread recipes that do not require additional yeast. Will keep you posted. Along
with more bread recipes that don’t include yeast at all.
But
back to todays’ recipe. I made this soda bread yesterday. It’s stinkin’ easy to
prepare and really tasty. And even though you might not have the cheeses
mentioned in the recipe on hand, you could use any cheese that can be grated.
OK, maybe not Velveeta. But you would want to save your Velveeta for mac and
cheese anyway! (Another kid pleaser!)
So
build some soup for your family. And of course, some of this delicious and easy
to prepare bread.
And if you live on Camano Island or the Stanwood area and have a large family, I have a couple of pans of BAKED PUTTANESCA WITH BÉCHAMEL SAUCE in my freezer I am willing to give away. The casseroles are in disposable pans and big enough to serve 12 or so hungry people. They were prepared for a before concert meal in January. So no way could they be contaminated. And since we won’t be entertaining large groups of people in the near future, I really don’t want to see them go to waste. But please read the recipe on this site before you make a decision. The ingredients might not be right for your family. These are meatless casseroles, but believe me, they are really tasty. So first come, etc. etc. My email address is: apcarr08@wavemail.com. Peace, love, and good health to all.
PARMESAN AND BLACK PEPPER SODA BREAD
2 c. all-purpose flour, plus more for kneading (I use unbleached all-purpose flour)
1 tsp. baking soda
¼ tsp. kosher salt
¼ tsp. freshly ground black pepper, plus more to sprinkle
¾ c. grated Parmesan, Pecorino-Romano, or Asiago cheese
1 c. buttermilk or buttermilk substitute (see “how to” below)
3 T. melted butter, divided (I use unsalted butter)
In a large bowl, whisk the flour, baking soda, salt, and pepper together. Stir in the Parmesan cheese.
In a small bowl,
whisk the buttermilk and 2 tablespoons of the melted butter together. Add to
flour mixture; mix just until combined. Sprinkle the top with a bit of additional
flour, then carefully turn the dough so it is coated on all sides with flour. Then
knead it a few times just to bring the dough together. Shape the dough into a
6-inch domed round. Place the dough on a baking sheet lined with parchment
paper.
Using a serrated knife, score the top of the round into 8 pieces. The cuts should be quite deep. Brush the top with the remaining 1 tablespoon of melted butter. Lightly sprinkle with just a grind or two of pepper.
Bake in a pre-heated 375 degree oven for about 30-35 minutes or until nicely browned and the internal temperature reaches 210 degrees. (I use my instant-read thermometer to take the breads temperature.) Remove from oven and set aside to cool before cutting into wedges and serving.
Please note: If you are a rosemary lover, you could add 1-2 teaspoons of chopped fresh rosemary to the flour mixture. Yum!
BUTTERMILK SUBSTITUTION
To replace 1 cup of buttermilk, pour 1 tablespoon of fresh lemon juice or white vinegar in a 1 cup measurer. Pour enough milk (preferably whole milk) to reach the 1 cup mark. Stir and allow to sit for about 5 minutes.
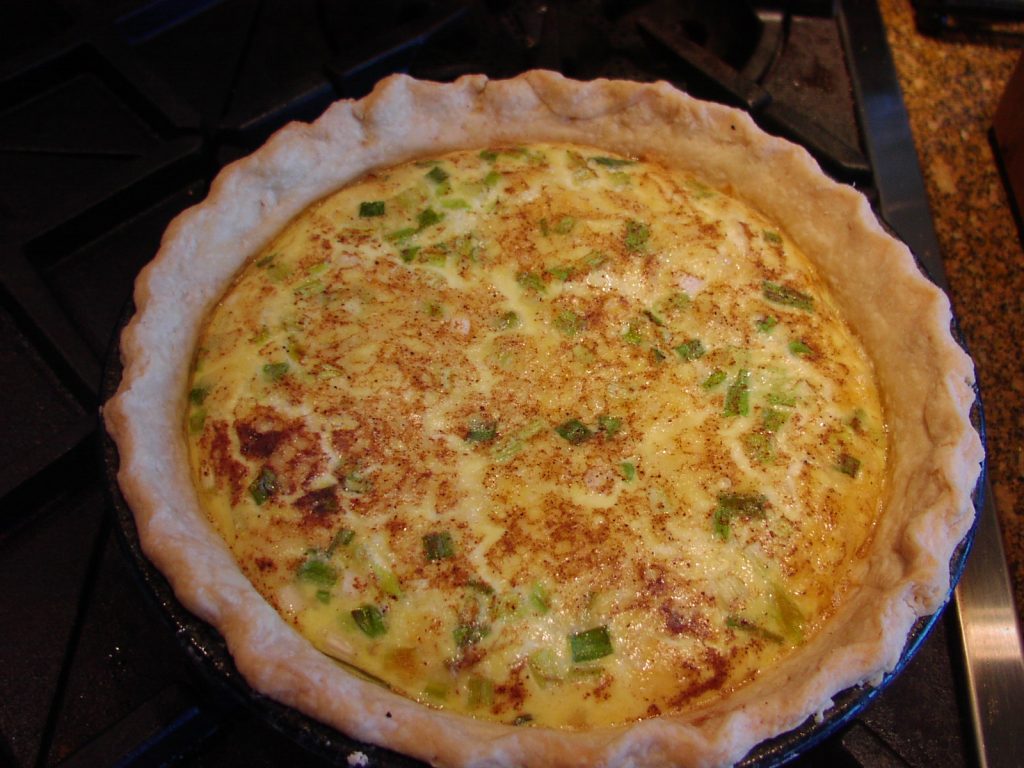
This
quiche recipe calls for a homemade crust. But I know what it’s like to be short
on time (and energy) in the kitchen. So if you must – start with a crust you
purchased at your favorite grocery store. Or use your own favorite crust
recipe. It really makes no never-mind. But if you intend to make your own crust
or want to try a new recipe for crust, the recipe below is about as easy as it
gets. So much so, that I never plan to build another quiche with any other
recipe. (You heard it here first folks!)
Anyway,
what drives my choice of what to cook for dinner a lot of times is what’s in my
fridge. And the other day what I had at my disposal was a half-pound of bacon,
a big container of fresh spinach, a couple sad looking (starting to get kind of
slimy) green onions, and part of a large bag of shredded Mexican blend cheese.
OK Patti, you’re fairly smart (on a good day), so what to do with these prime
ingredients?
To
my astonishment, quiche popped into my mind. I consulted Mr. C. about my choice
for our dinner that evening, and as usual he was receptive to my suggestion. No
dummy Mr. C.! But, and here’s the interesting part, I didn’t have any Crisco for
my pie crust. Horror of horrors. How could this have happened? So now what to
do? Well – when times get tough, the tough get going. So I got on line and did
me some research. And I found an abundance of recipes for pie crust that were
made with a fat other than Crisco or lard. Imagine my delight! But do I dare
make a pie crust not using the same recipe I’ve been making for 55 years? Would
a bolt of lightning hit me? (We do live on Lightning Way after all!) Or would I
have to turn in my Girl Scout baking badge? I even feared retribution from some
unknown deity. (There could be a God of pastry. Well there could!!) But I
decided to flaunt my desire for quiche in the face of whatever unknown force
might take exception. And I’m proud to say, I came out the other side
unscathed. And, this is the good part too, a lot wiser about pie crust in
general.
Not
that I am going to throw away my old recipe. Because in 55 years it has never
failed me. Never! But, for something like a quiche, this new recipe is going to
make it possible for us to enjoy quiche more often. It’s just that much less
effort to prepare.
I
guess I should mention that not only was the crust really tasty, the filling
stood up to our demanding standards as well. So if you love quiche as much as
we do, get thee to your kitchen and rattle those pots and pans. And remember,
you don’t have to use all the same ingredients I used. Be bold. Use ham or
smoked salmon, cooked breakfast or Italian sausage, or whatever you happen to
have on hand. And vary the type of cheese you use. Swiss, Gruyère, or Emmenthaler cheese are absolutely perfect
in quiche. And the true beauty of quiche is that it is great for breakfast,
lunch, or dinner. Pretty cool huh?
And if you are interested in preparing my No-Fail Pie Crust, I have printed it at the bottom of this post for your convenience. And yes I know it’s a strange recipe. You have only to consider the source and all will make perfect sense. Enjoy and Happy Thanksgiving.
8-inch
pie crust (see recipe for No-Roll Pie Crust
recipe below)
8
slices thick, meaty bacon, chopped and cooked until crisp
1½
c. chopped fresh baby spinach
1½
c. Mexican-blend shredded cheese
1/3
c. thinly sliced green onions
freshly
ground black pepper
¾
tsp. dry mustard
1
1/3 c. milk (whole milk is best)
4
eggs
ground nutmeg
Scatter cooked bacon over pie crust. (If you are using the recipe
below, remember it has to semi-bake before you add this filling.)
Layer spinach and cheese on top of bacon. Add sliced green onions.
Whisk together the pepper, dry mustard, milk, and eggs. Hint: Place pepper and dry mustard in bowl and add just a tiny
splash of the milk. Whisk until there are no mustard powder lumps. Then add the
remaining milk and eggs; whisk all together. (If you add all the ingredients
together at once, you often end up with mustard lumps that, trust me, are very
hard to incorporate with the other ingredients.)
Pour liquid mixture over all. Sprinkle lightly with nutmeg. Bake in a pre-heated 375 degree oven until set, about 30-40 minutes.
NO-ROLL PIE CRUST
2 c. unbleached
all-purpose flour
heaping ½ tsp.
salt
1 tsp. sugar
scant ¼ tsp.
baking powder
7 T. vegetable or
canola oil
¼ c. cold water +
1 T. if the mixture seems dry
Whisk the flour, salt, sugar, and baking powder together. Whisk the oil and 1/4 cup water together. Pour over the dry ingredients. Stir with a fork until the dough is evenly moistened. Add additional tablespoon water if necessary.
Pat the dough
across the bottom of the pie pan and up and a little over the sides. Crimp or
mold the pie crust around the edge to make it pretty.
Bake in a
pre-heated 400 degree oven for 12 minutes. Remove from oven and let cool while
you prepare the filling for your quiche. Reduce oven temperature to 375
degrees.
For great “how to
crimp piecrust” instructions visit www.thespruceeats.com/how-to-crimp-pie-crust-4123830
NO-FAIL PIE CRUST (makes a double crust)
¼
c. very cold water
2
c. flour
1
tsp. salt
heaping
2/3 c. Crisco
Step
1 – Pour cold water into a small bowl.
Step
2 – Measure flour and salt into a mixing
bowl.
Step
3 – Take 1/3 cup of the flour back out of
the mixing bowl and stir it into the water. Make a paste. Set aside.
Step
4 – Add the Crisco (heaping 2/3 cup) to
the flour and salt mixture. Mix together. (I use my KitchenAid mixer.)
Step
5 – Add the water/flour paste to the
flour/shortening bowl and mix just until blended. Do not over-mix. Roll out
dough and place in pie plate. This recipe makes enough dough for a double crust
8-inch pie, or one large bottom crust with a little left over for pastry
cookies or a free-form small tart.
Helpful hint: Use a
pastry cloth to roll out your pie crust. It really makes a difference. You can
find pastry cloths in almost any kitchen wares shop. Well worth the $10 or so.
For
me, there is nothing that says “fall is really here” better than large, relatively
inexpensive green peppers in the produce section of our local IGA. And every
fall I buy the biggest and most gorgeous peppers I can find to fix one of my
favorite dishes – stuffed green peppers. I absolutely love stuffed peppers. And
of course, most years I decide that yet another stuffed pepper recipe on this
site wouldn’t be a problem because everyone likes choices – so here goes with another
option for this perennial favorite.
Since
I’m still on my “let’s get healthier” kick (please may it last forever God), I
decided to come up with a recipe that contained no starch. (Of course it still
contains fat, because really, could you even conceive of a stuffed green pepper
without cheese? I didn’t think so!) Anyway, this recipe does contain cheese,
and plenty of it. But remember – cheese
is a great source of calcium, fat, and protein. It also contains high amounts
of vitamins A and B-12, along with zinc, phosphorus, and riboflavin. So
to my thinking, all things considered, if I am going to push the boundaries of
healthy eating, cheese is still better for me than say – a chocolate chip
cookie even if it’s made with whole wheat flour. But if you are still concerned
about the amount of cheese in this recipe, you can always reduce the quanity.
Just don’t tell me about it or I will feel guilty. In other words, don’t spoil
my self-delusion that cheese is really good for us. Thank you.
But
back to this recipe. For starters, let me just say that McCormick’s Grill Mates
Montreal Steak Seasoning is a really great item you should consider adding to
your spice collection. I use it a lot. Just a tablespoon added to a pound of ground
beef makes for truly delicious hamburger patties. And I often sprinkle it on
steaks before I throw them on the grill. It’s also fabulous in meatloaf. Or
added to the braising liquid for pot roast. And the best part. If you buy it at
Costco in the 1 lb., 13-oz. container, it is very inexpensive. If you don’t
want to start with as large an amount, Bartell’s (drug store) usually carries
the small bottles in various flavors at a very good price. (FYI: I buy the
small jars in several flavors for my trailer collection of spices and herbs.)
Anyway,
give this recipe for peppers a try. Or check out my other stuffed green pepper
recipes on this site. All are really tasty. And if you have never eaten a
stuffed green pepper because you think that every bite would include green
pepper – you’re right. But also know that cooked peppers are milder in flavor
than when they are raw, and are a perfect partner with savory sauces and nicely
seasoned meat.
Now you will have to excuse me. There’s half of a stuffed pepper in the refrigerator. And I’m hungry. And Mr. C. is at a rehearsal. So it’s mine. All mine. Life is good!
3
large or 4 small green peppers
1
T. extra virgin olive oil
1
lb. lean ground beef
½
c. chopped onion
1
lg. stalk celery, finely diced
3
garlic cloves, finely minced
8-oz.
tomato sauce
pinch
crushed red pepper flakes
1
T. Montreal Steak Seasoning
1
T. dried parsley
freshly
ground black pepper
1
T. Worcestershire sauce
1½-2 c. shredded cheese (whatever combination of cheese you happen to have on hand)
Slice
the tops off the peppers and remove the seeds and membranes. Set peppers aside.
Discard the stem, and chop the pepper tops into small pieces.
Heat the olive oil in a large frying pan and sauté the ground beef until it’s starting to brown. Add the chopped pepper tops, along with the onion and celery; cook until onion is translucent. Add the garlic and cook for 1 minute. Add the tomato sauce, crushed red pepper flakes, Montreal Steak Seasoning, parsley, black pepper, and Worcestershire sauce. Simmer for a few minutes to blend flavors. Remove from heat.
While
the meat sauce is simmering, bring a pan of water to a boil. Add the green
peppers and cook for 5 minutes. Remove from water and drain. Place in a lightly
greased baking dish.
Fill
each pepper half way, add half the cheese; add remaining meat mixture until it
reaches the top of the pepper. (If you have extra
filling, tuck it in among the peppers. Makes for great nibbles for the cook!)
Bake
in a pre-heated 375 degree oven for about 40-50 minutes or until the peppers
are soft and the filling is brown. (If the top is browning too quickly, gently
lay a piece of aluminum foil over the whole mess.)
Remove
from oven, top with remaining cheese and return to oven until cheese is melted.
Great served with a side of brown rice and/or a salad.