So, Mr. C. brought a package of flanken-style ribs (I thought he said “Frankenstein”) (my hearing just isn’t what it used to be) home after a provisioning trip to one of our local butcher shops. As he was rattling off all the meat products he had procured, including the ribs, I promptly forgot everything he said and went on with what I was doing. (I was probably deep into researching a recipe, and not paying Mr. C. the attention he should have been accorded. My bad!) Anyway, jump forward a couple of months, and he casually asks me when I plan to use the ribs? Well, of course I said, “how about tomorrow night”? OK then. Bring them on up from the freezer and let them thaw overnight so I can throw some rib rub on them before you place them in the smoker for a couple of hours and finish them off with a quick fling on the grill. I mean really, isn’t that how I like to fix ribs? Well, when he brought up the package, these ribs didn’t look like anything I had ever seen, much less cooked before. And they weren’t Frankenstein ribs, they were flanken-style ribs. So, how to cook these babies?
Basically, flanken-style ribs are pieces of meat thinly sliced across the rib section of beef bones. Each piece consists of 3-4 small pieces of bone, between sections of flavorful meat. They are marbled with fat and connective tissues and are super tender after being marinated for a short time or as in this recipe, baked after being sprinkled with a dry rub. And then finished off with BBQ sauce.
Another tidbit that you might already know, but I never stopped to consider. Short ribs are beef. The pork equivalent of beef short ribs are spareribs, and are not typically referred to as short ribs. (Why am I only learning this after 57 years of being chief cook and bottle washer in my own home!) Anyway, now I know! But back to this recipe.
For a nice change from a regular “English” cut short rib, give this ridiculously easy to prepare, tender, and delicious short rib recipe a try. Really yummy.
And if you live in the Stanwood/Camano Island area, Del Fox Custom Meats carry “Frankenstein” cut short ribs. Tell them Victor sent you.
Peace and love to all.
Rib Rub:
2 T. paprika
2 tsp. freshly ground black pepper
2 T. kosher salt
2 tsp. granulated garlic
1 tsp. cayenne
1 tsp. ancho chili powder (found in most upscale grocery stores in bulk)
2 tsp. dried oregano
2 tsp. dried thyme
Combine all ingredients together. Store in an airtight container.
Ribs:
4-8 bone-in flanken-style short ribs
dry rub
BBQ sauce (see recipe for my favorite BBQ sauce below)
Cover a sheet tray with aluminum foil and a generous amount of nonstick cooking spray. Place the ribs, evenly spaced, on the tray. Coat one side of each rib with a half teaspoon of the dry rub mixture. Flip, and coat the other side with a half teaspoon more of the Rib Rub. Place the ribs in a pre-heated 275-degree oven for 1 hour.
After one hour, remove the ribs from the oven and using tongs, flip them over. Place back in the oven for 1 hour, or until nicely browned.
After the second hour has passed, remove the ribs from the oven and turn the oven temperature up to 450-degrees. Generously coat each side of the ribs with barbecue sauce. Once the oven has reached 450-degrees, place the ribs back into the oven for 2-3 minutes, or until they are crisp on the outside. Serve immediately.
BOURBON BBQ SAUCE
¼ c. unsalted butter
¼ c. minced onion
3 cloves garlic, minced
¼ c. brown sugar
2 tsp. whole grain mustard
1 c. ketchup
1/3 c. Worcestershire sauce
¼ c. fresh lemon juice
¼ tsp. hot sauce, or to taste
¼ tsp. cayenne
2 T. bourbon
Melt butter in a medium sized covered saucepan. Sauté onion until translucent; add garlic and cook until garlic releases its aroma, about 1 minute. Add remaining ingredients, bring to a boil, reduce heat, cover pan, and simmer gently for 30 to 60 minutes, stirring occasionally. Basically, cook the sauce until it reaches your desired thickness. (Sauce will thicken as it simmers. If the sauce is still too thin after 60 minutes, remove the lid. But be warned – simmer at a very low temperature or you will have BBQ sauce all over you and your kitchen!) Serve sauce warm or at room temperature.
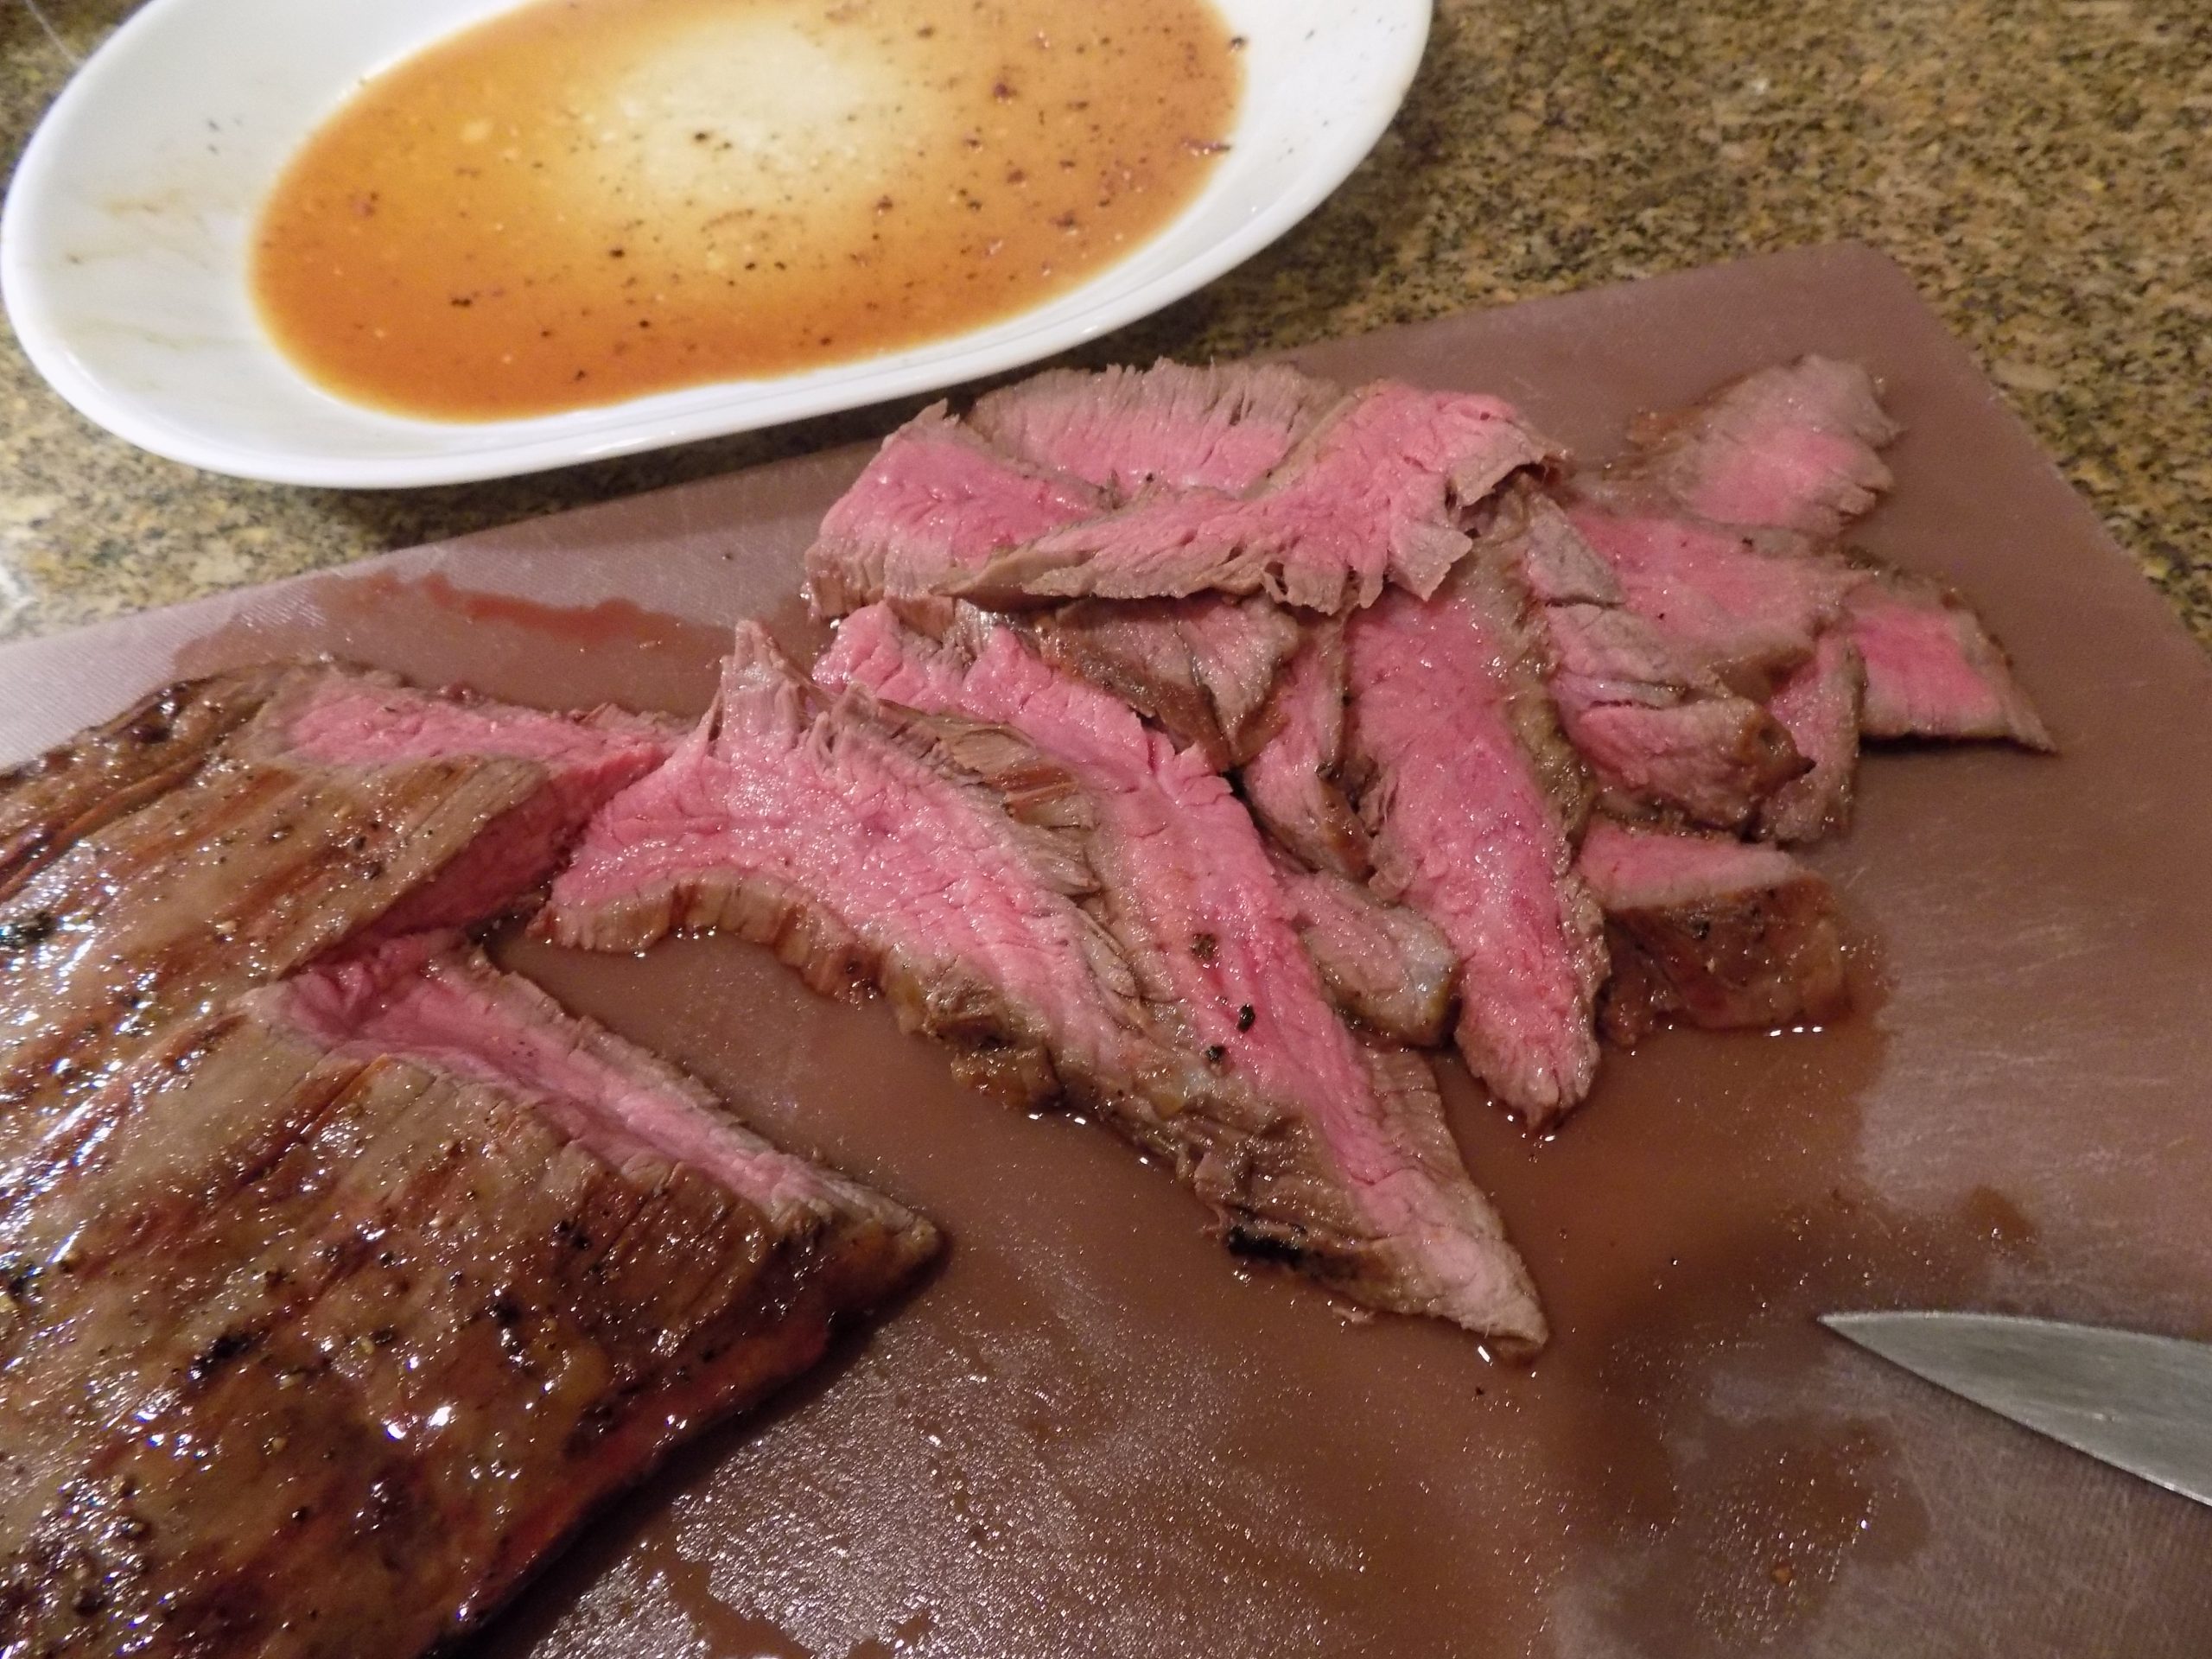
In keeping with my new cooking philosophy, which BTW I fail to adhere to most of the time, I am never-the-less endeavoring to adopt the KISS (Keep It Simple Sister) principle. Which means, I’m trying to spend less time on my feet in the kitchen. So far, my brain still thinks I’m 37, while my legs and feet tell a different story. But every so often the whole team comes together, and I manage to produce a dish that takes little time to prepare but tastes like I’ve been slaving away in the kitchen for hours. And one of the best ways I know to accomplish this feat, is by serving grilled meat that has been marinated. Because while the meat is marinating, not only are the muscle fibers being tenderized, but flavor is also being added to the meat. And well, not to put too fine a point on it, for not much prep time, I still appear to have my cooking act together. And isn’t that a grand thing! But really, it’s the marinade and Mr. C. in front of the grill that does all the heavy work. While I take the credit. (See how that works!)
So, yesterday, while a nice old hunk of flank steak was in the last throes of defrosting, I went in search of a simple marinade recipe. And I found the perfect recipe on the delish.com site. 4 ingredients. (You can’t get much easier than that.) And the result was fantastic. The meat was tender. The flavor was wonderful.
I served the thinly sliced meat with Mediterranean Pearl (Israeli) Couscous Salad. (Recipe to be posted soon.) And the combination worked very well together.
So, once again, I pulled off dinner with a minimal amount of work. And for tonight’s dinner, I have leftover meat and salad. Win/win. Of course, I will mess with the meat and make it into a dish that hopefully takes little effort. (I’m actually thinking of steak burritos. We’ll see what I come up with.)
As far as last night’s dinner, I’m giving myself a B+. An A+ for the meat, but a C+ for the length of time it took me to make the salad. But I can live with a B+. My feet can too.
Peace and love to all.
⅓ c. extra-virgin olive oil
¼ c. reduced-sodium soy sauce
2 T. fresh lime or lemon juice
2 T. brown sugar
2 lb. flank steak, all fat and silver skin removed
kosher salt
freshly ground black pepper
In a large flat container, whisk the olive oil, soy sauce, lime juice, and brown sugar together. Add steak and toss until coated. Marinate for at least 2 hours in the refrigerator. (I marinated mine for 4 hours, and it was perfect.)
Remove steak from marinade. Season lightly with salt and pepper.
Preheat grill to medium-high. Place steak on grill and cook to your liking. For the perfect medium-rare flank steak, grill for 8-12 minutes (depending on thickness of meat), turning about 1 minute before the halfway point. A meat thermometer should read no higher than 130-degrees.
Remove from grill and rest the steak lightly covered with foil for 5 minutes before thinly slicing on the diagonal.
These days, for me, when given a choice, 90% of the time I prefer a dish featuring lean ground beef over steak. Why this is I have no idea. Except that, ground beef can be flavored easier than steak. And ground beef just smacks of comfort food. And most of you know, I am all about comfort food.
Of course, I would never turn down a rare steak, especially when grilled by our dear friend Jim. But when I think about fixing beef for dinner, it usually involves a package of lean ground beef.
But how to turn a pound of ground beef into a delicious dish? Quite easy, as this recipe will attest. A few simple ingredients. A modicum of time. And a spirit of adventure.
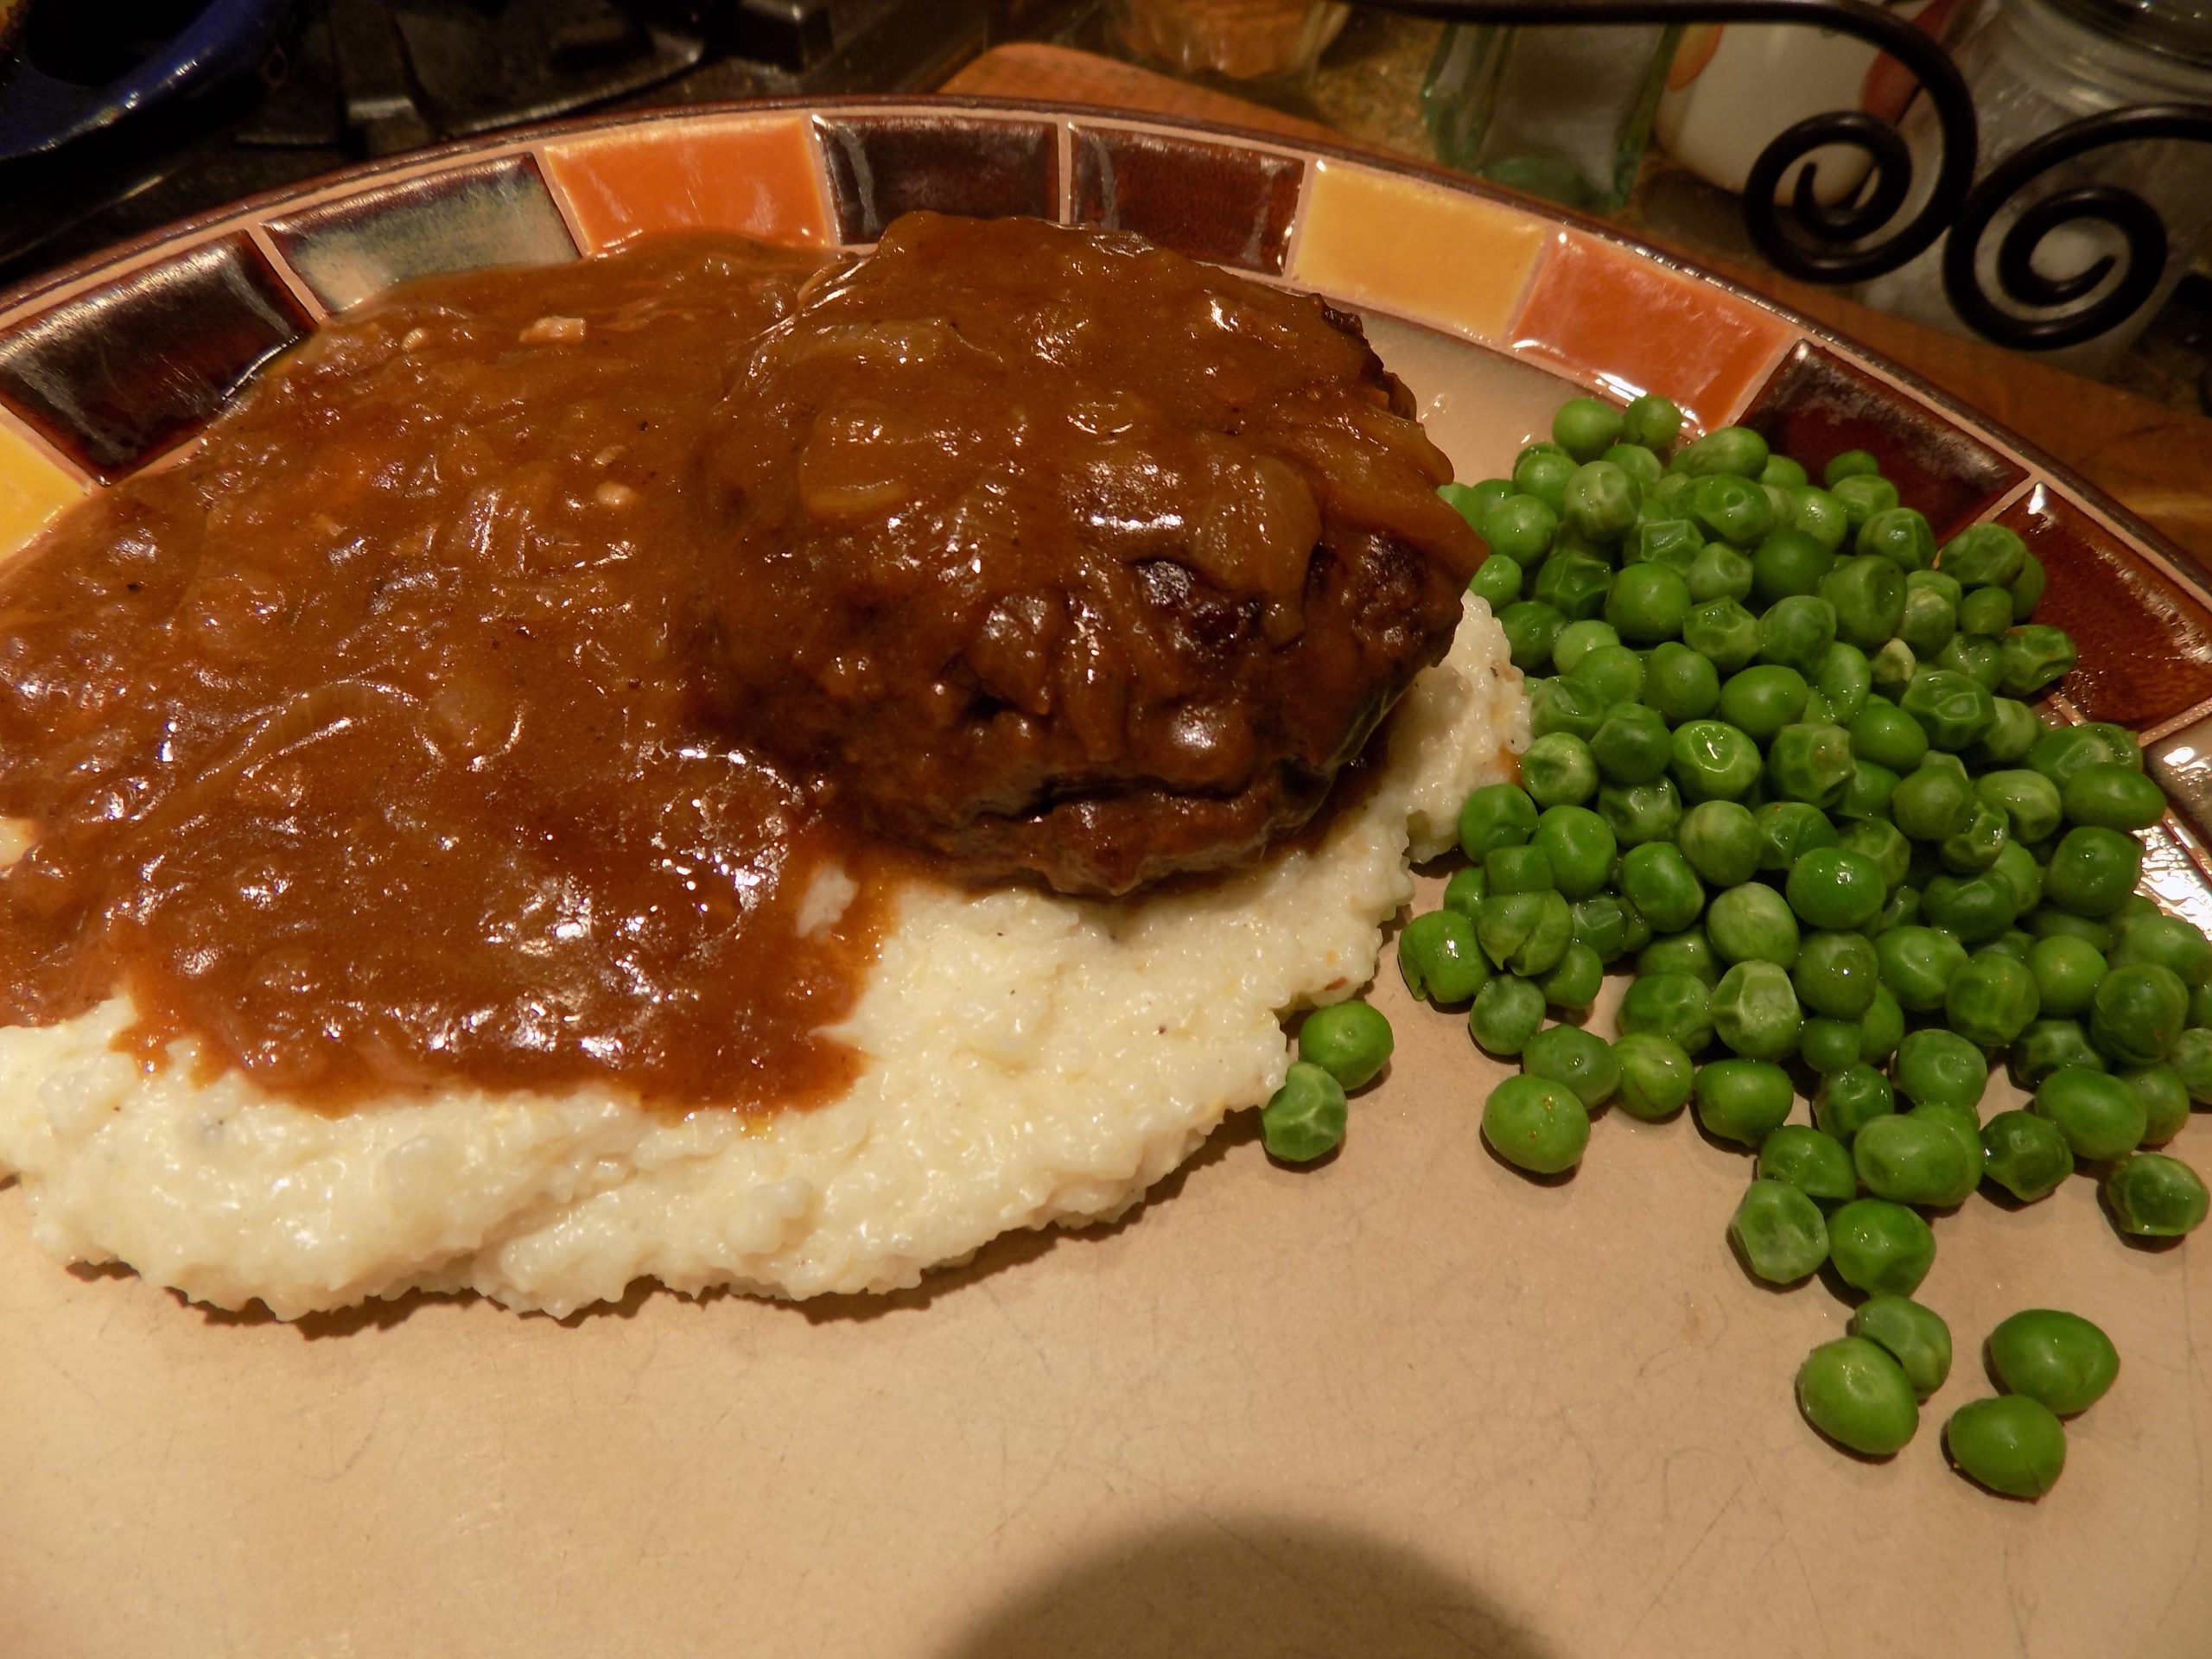
And what do you get for your time and energy preparing this dish? A hearty meal that is delicious and quite inexpensive to produce. And a sure winner that your entire family will enjoy. I mean really! Who doesn’t love gravy? No one I know, that’s for darn sure! And nothing could be easier to prepare than the gravy for this dish. And served over grits – well boy howdy, nothing could be finer! Southern comfort to the max.
I found the bones of this recipe on the themccalumsshamrockpatch.com site. Of course, I changed the original recipe a bit. But the true hero is Heidy, who thunk up this recipe in the first place. Hat off to you Heidy. And thanks, of course!
So, without further ado, I present this amazing comfort food recipe for your gastronomic delight. (You may thank me later!)
As always, peace and love to all.
For the Patties:
1 lb. lean ground beef
¼ c. Panko breadcrumbs
¾ tsp. Cajun seasoning
½ tsp. granulated onion
¼ tsp. granulated garlic
¼ tsp. seasoned salt
freshly ground black pepper
1 T. extra virgin olive oil
Combine the ground beef, Panko breadcrumbs, Cajun seasoning, granulated onion, granulated garlic, seasoned salt, and freshly ground black pepper. Form into 3-4 equal sized patties.
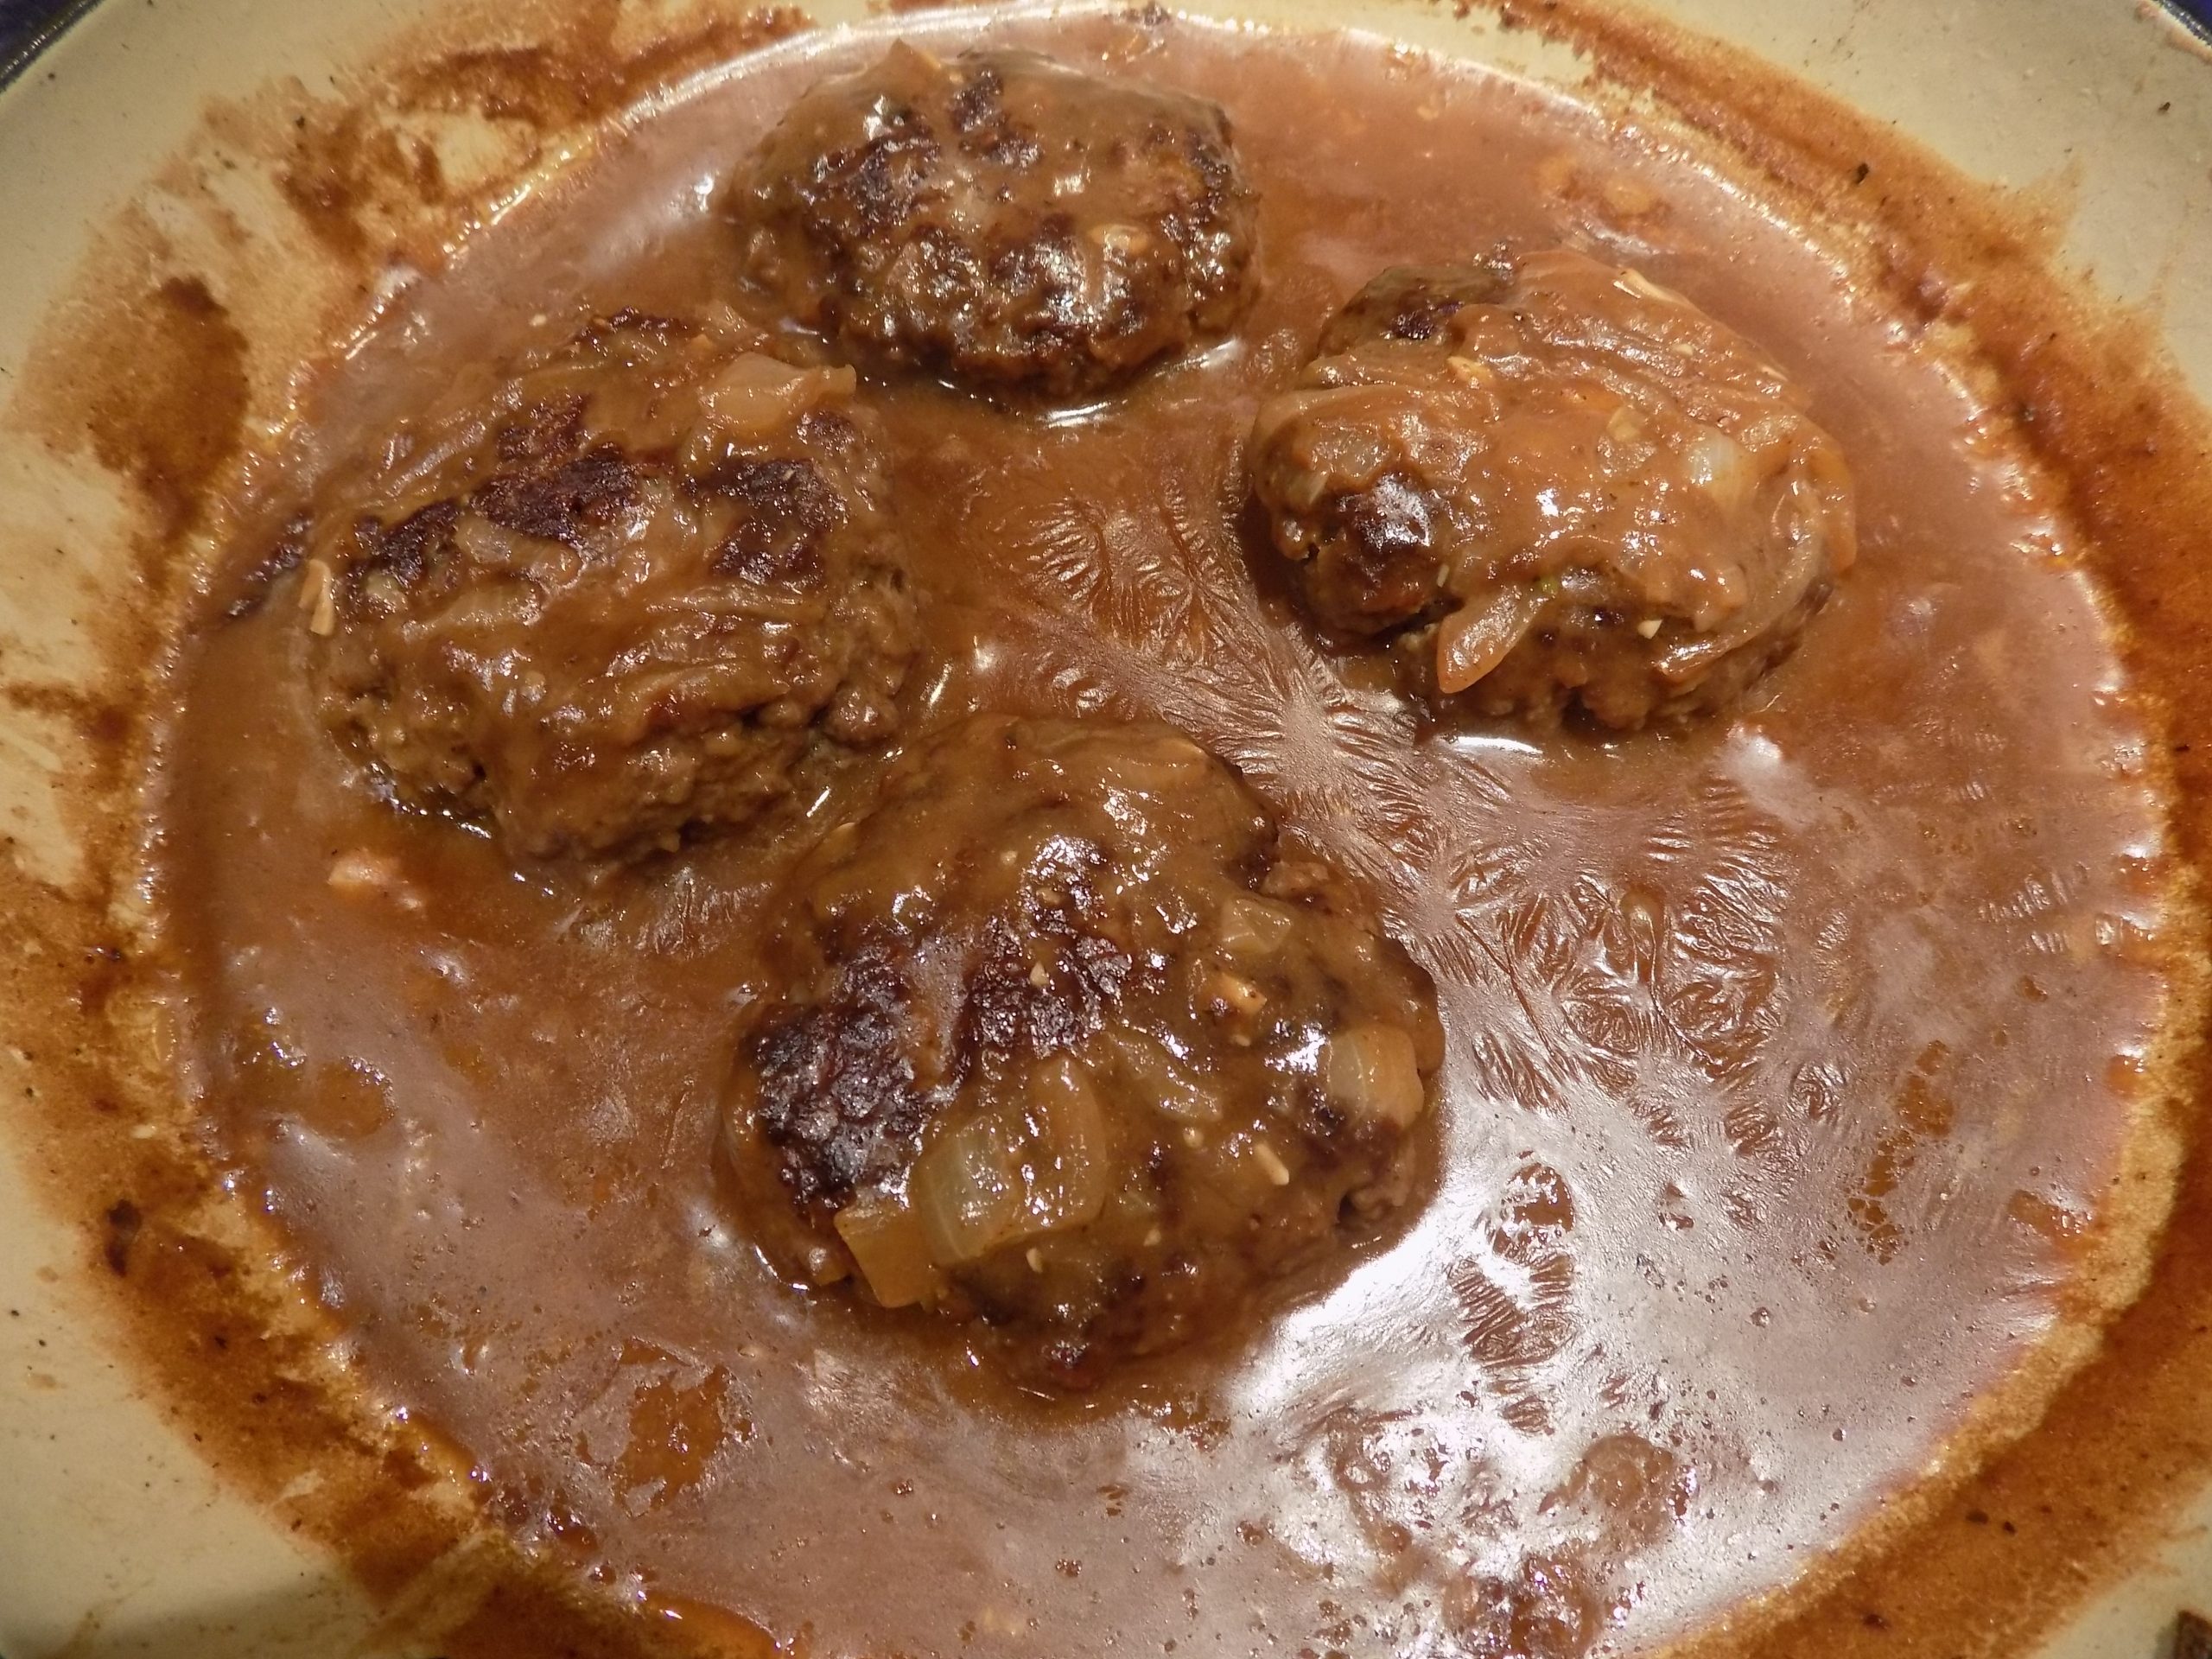
Heat the olive oil in a large fry pan. Place the patties in the hot oil and fry until the bottom of each patty is dark brown. (You want a nice crust on these babies.) Flip and brown the second side. When browned, remove from pan. Do not remove the dripping from the pan.
For the Gravy:
3 T. pan drippings or unsalted butter
1 yellow or white onion, halved then thinly sliced
2 garlic cloves, finely minced
3 T. flour
½ tsp. Cajun seasoning
freshly ground black pepper
pinch crushed red pepper flakes
2 c. water
1 T. beef base (I use Better Than Bouillon Beef base)
1 T. Worcestershire sauce
kosher salt, to taste
If less than 3 tablespoons of drippings left in the pan, add unsalted butter to make up the difference. Add the sliced onion and cook on medium-low heat for about 8 minutes or until the onion is tender. Add the garlic and cook for 1 minute. Add the flour, Cajun seasoning, black pepper, and tiny pinch of crushed red pepper flakes. Allow to cook for a couple of minutes. Then whisk in the water, beef base, and Worcestershire sauce. Whisk until the gravy starts to thicken. Taste and add salt or other seasoning as needed. Add the hamburger patties back to the skillet, reduce heat to the lowest setting, and cook for about 10 minutes. Stir occasionally and flip patties once or twice during this time.
Remove from heat. Serve the hamburger patties and gravy over grits. (See recipe below.) Or, if you prefer, serve the patties and gravy over rice, mashed potatoes, or thick al dente egg noodles.
GRITS
1½ c. milk
1½ c. water
¼ tsp. kosher salt
freshly ground black pepper (just a bit)
¾ c. regular or quick-cooking grits
1 T. butter
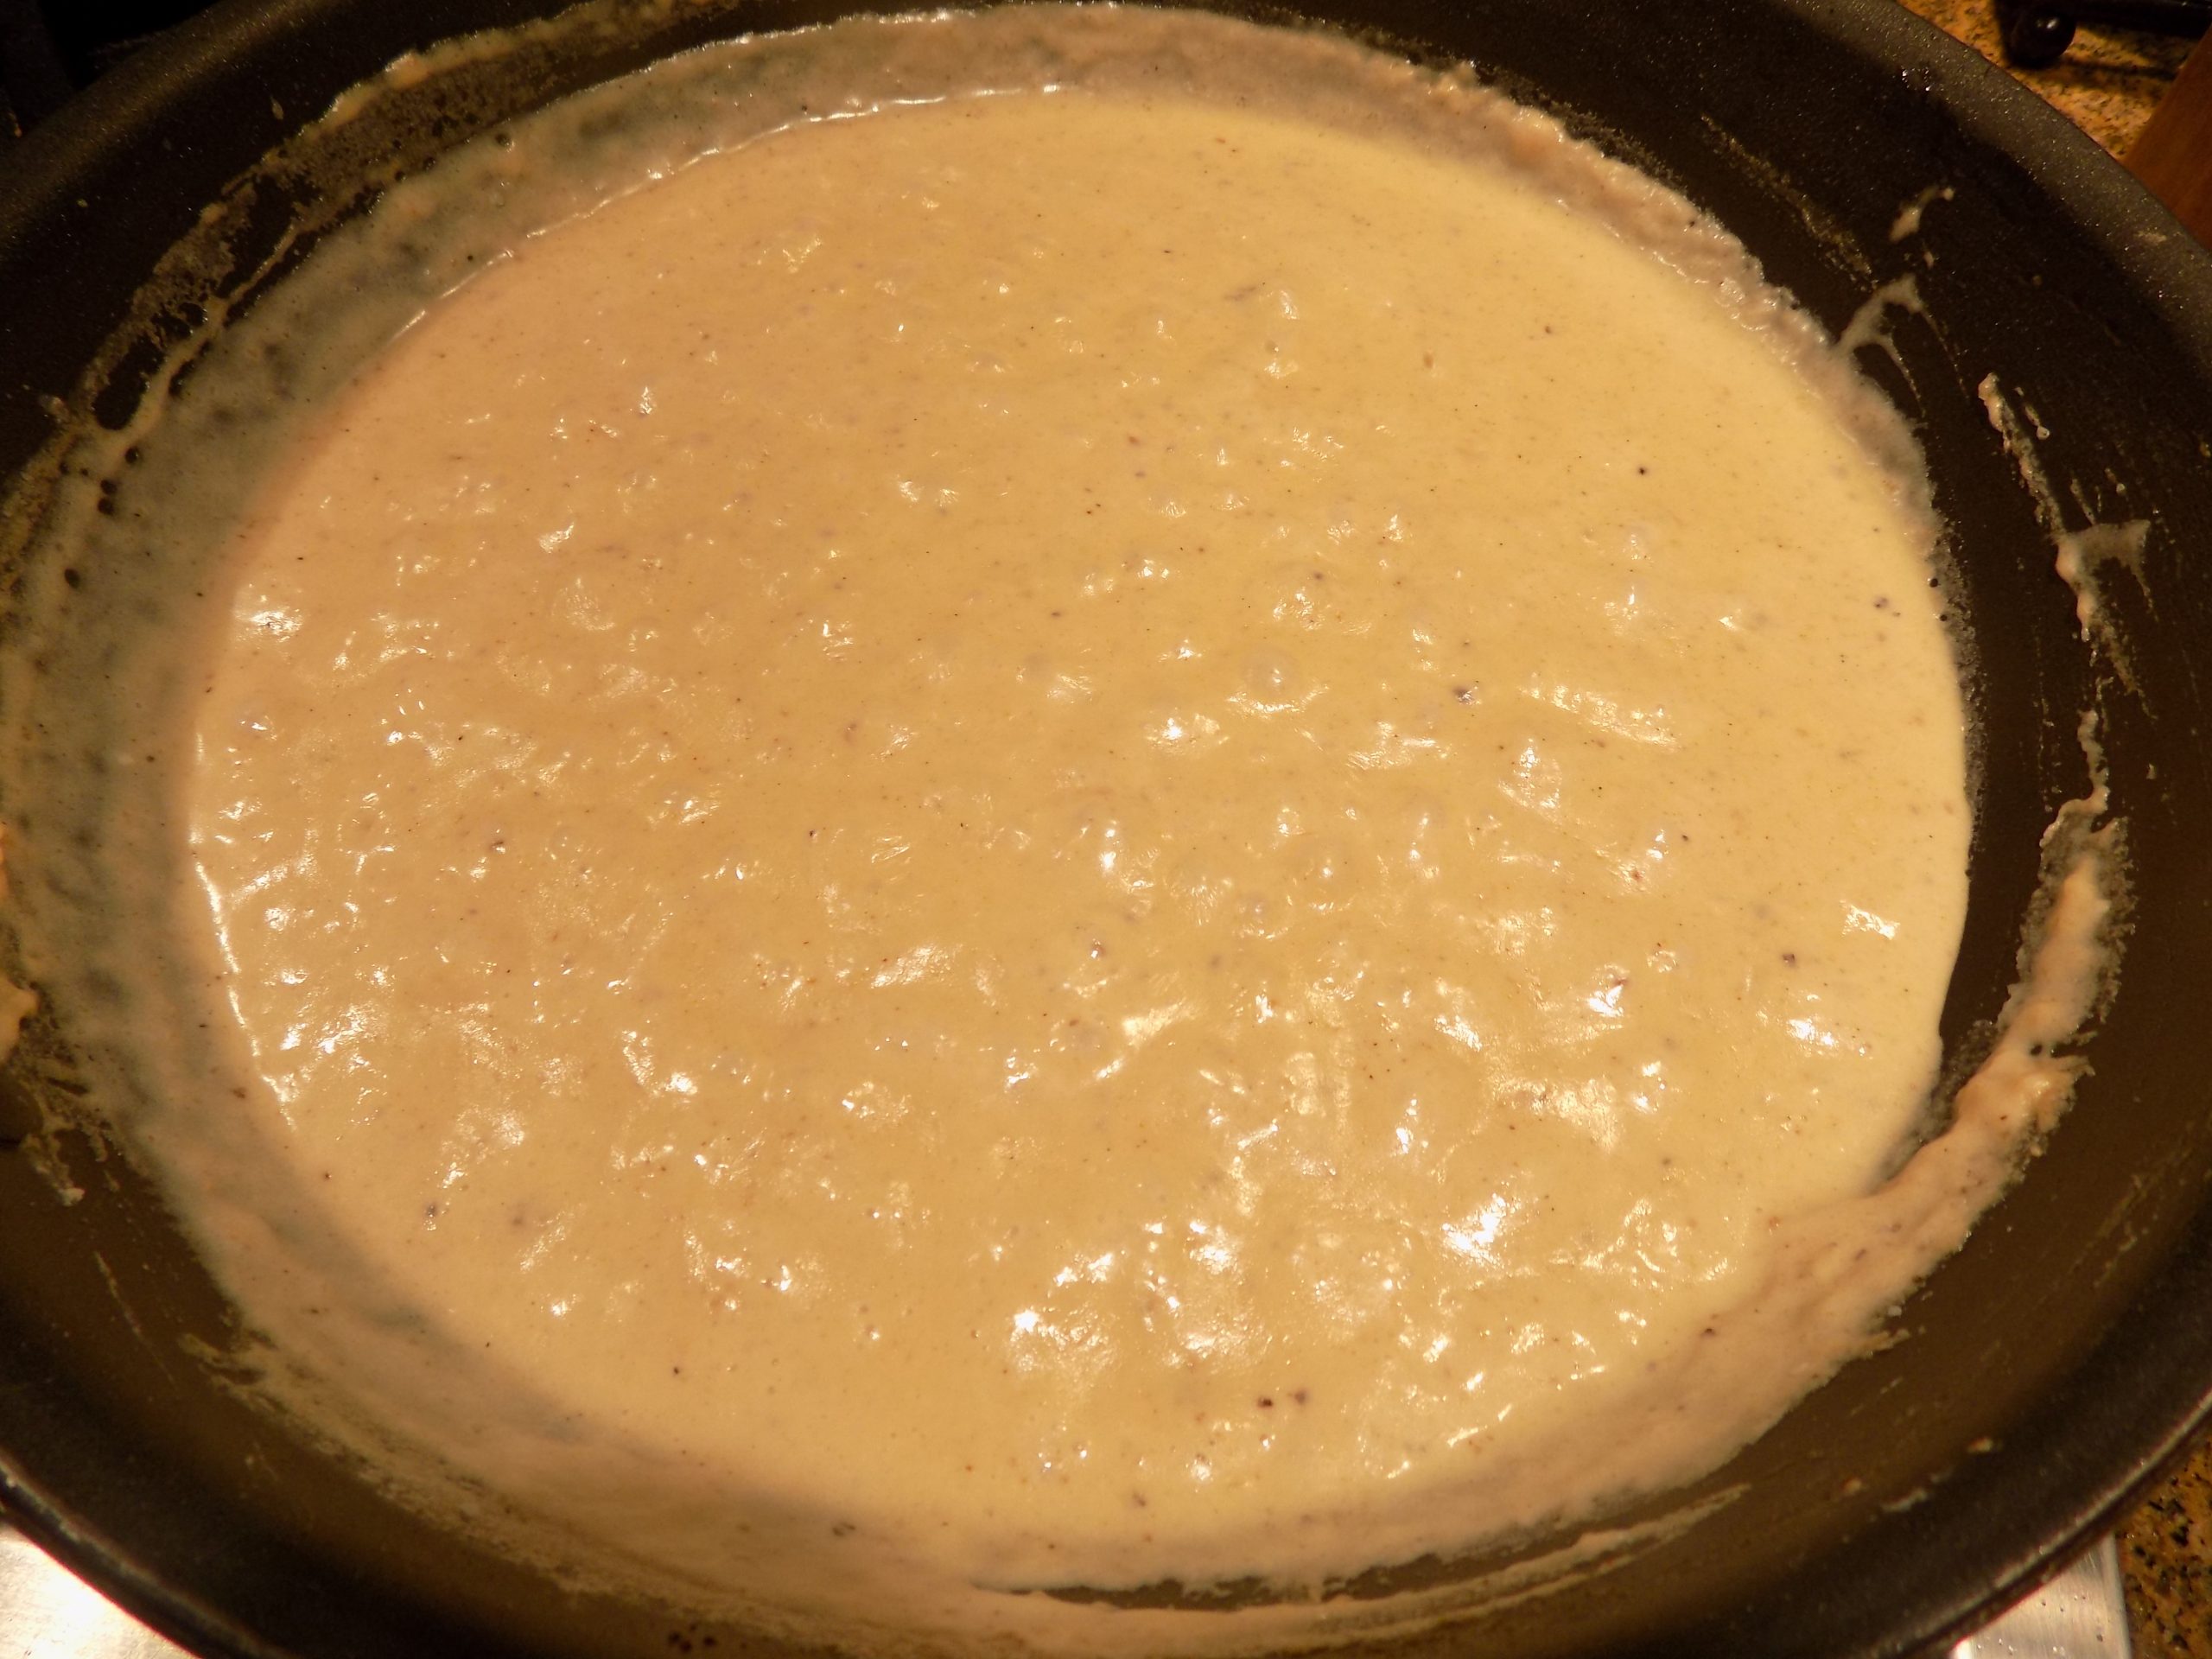
Bring milk, water, salt, and pepper to a simmer over medium heat in a covered pan. Slowly whisk in the grits. (Whisking helps to avoid lumps.)
Cook grits covered over medium-low heat, stirring frequently (about 15 minutes for regular grits, 5 minutes for quick-cooking grits).
Remove from heat and stir in butter. Taste and adjust seasoning if necessary.
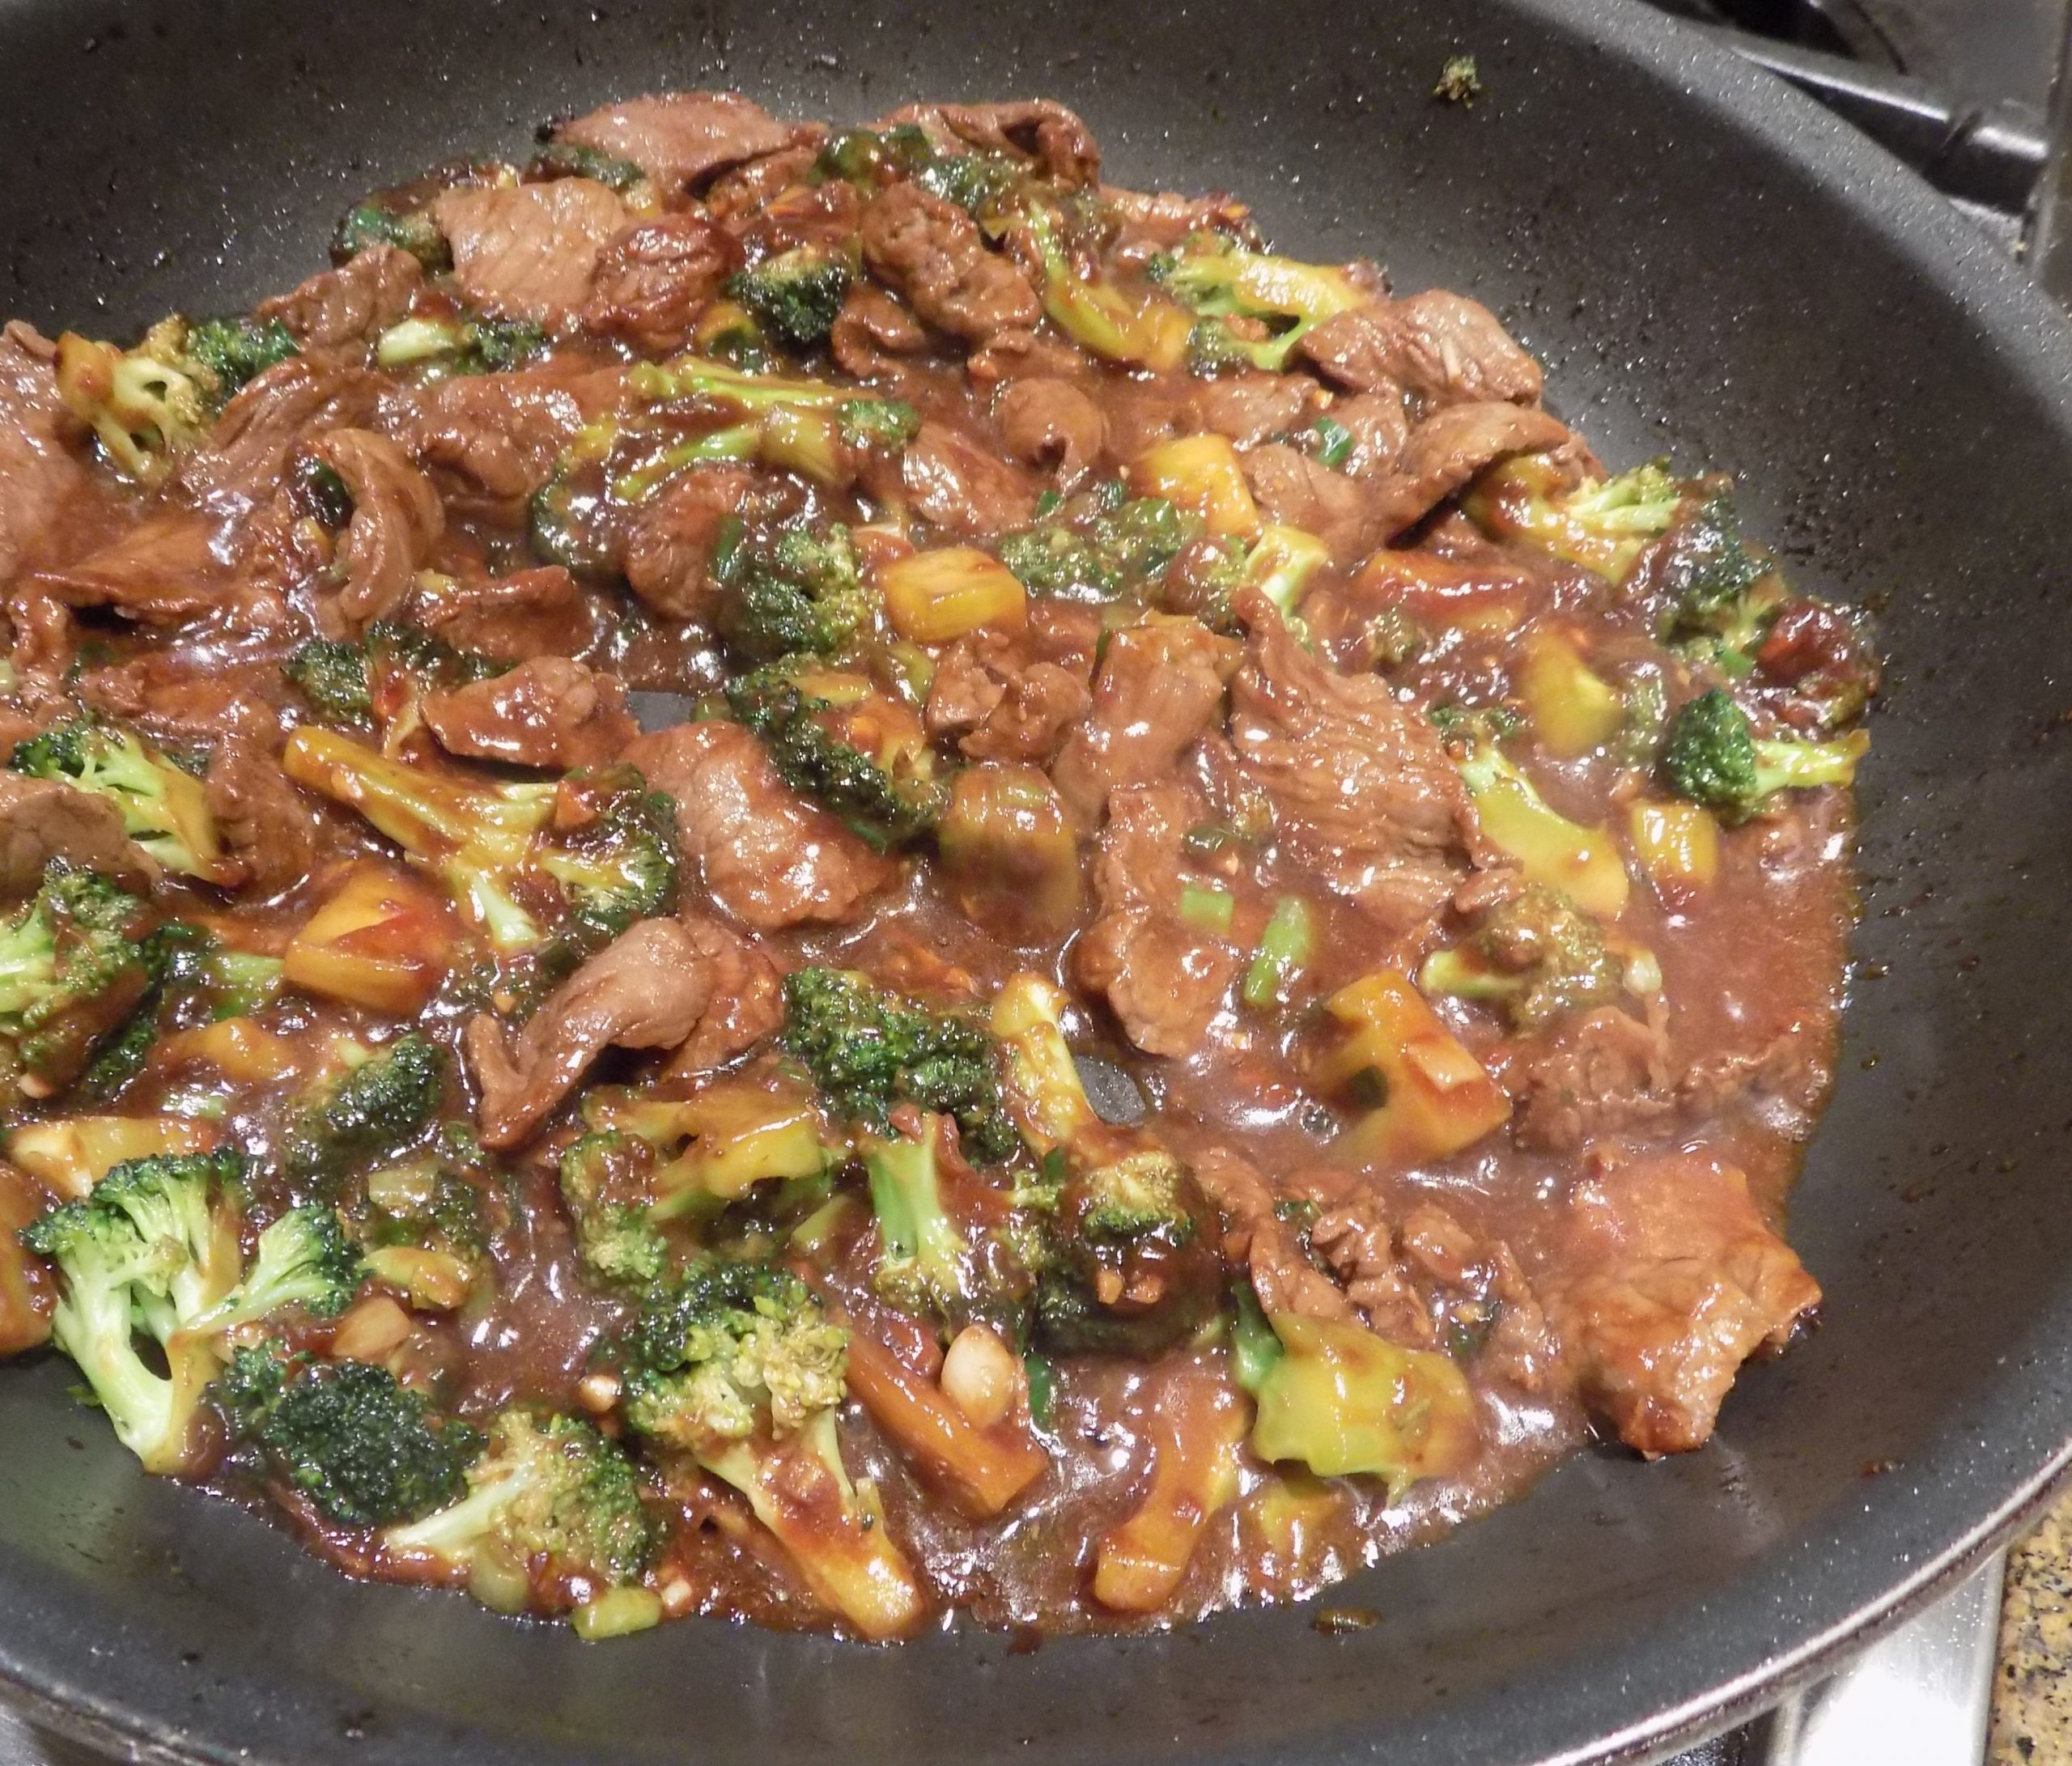
I am always happy when I make any kind of Asian dish for dinner. And over the years, Mr. C. has learned to enjoy Asian dishes just about as much as I do. Of course, he will never truly appreciate a dish containing bok choy, but as far as I’m concerned, that’s his loss! More for me! And although broccoli is never going to make Mr. C. want to do cartwheels on our front lawn (we don’t even have a front lawn), he has learned to enjoy broccoli in its many culinary iterations. And to say that I love broccoli is an understatement. I could eat broccoli every day, in one form or another, and be perfectly content. So, when we sat down to this dish recently, we both loved every bite.
And for all of you out there who know how labor intensive many Asian dishes are to prepare; this easy recipe is going to please you no end. And as far as I’m concerned, this is a one dish meal when served over rice. You got your meat, veggie, and side all there on your dinner plate. What else would you need?
If you prefer ground beef to steak, you might like to check out my recipe for Ground Beef and Broccoli Stir-Fry.
Well, that’s it for today. I have some emails to answer, the protagonist in the book I’m reading to tag along with, my daily 20-minute workout to perform, and the recipe for tonight’s dinner still needs a bit of revising.
So, I wish you all a lovely weekend. And please be extra careful while you are away from the safety of your own home. We have several friends and relatives who have recently contracted covid. And even though they are fully vaccinated, and super careful when they are with others, they are never-the-less ill from this disease. No one needing hospital assistance (at least yet thank God), but still feeling poorly and confined to their homes. So, stay vigilant.
And as always, peace and love to all.
3 T. soy sauce or tamari
1 T. dark soy sauce (or another tablespoon of regular soy sauce)
2 tsp. sesame oil
2 tsp. finely grated ginger
3 garlic cloves, finely minced
crushed red pepper flakes, to taste
½ lb. sirloin steak, very thinly sliced
2 T. cornstarch
¼ c. beef broth
1 T. brown sugar
3 T. veggie oil, divided
3 c. broccoli florets and peeled stems
4-6 sliced green onions, plus more for garnish
steamed brown or white rice
Whisk the regular soy sauce, dark soy sauce, sesame oil, ginger, garlic, and crushed red pepper flakes together in a bowl. Add the sliced steak and let marinate for 1 to 4 hours.
Place the cornstarch in a bowl. Remove steak from marinade, letting the marinade drip off a little, and drop the meat in the cornstarch. Stir the meat around until it is totally coated with cornstarch. Reserve any liquid remaining after the steak has been removed from the bowl. Stir in the beef broth and brown sugar. Set aside.
Heat 2 tablespoons of the oil in a large wok or heavy frying pan over medium-high heat. Add the steak and cook until the first side is nicely browned. Flip and only cook the beef for a minute more. Remove to a bowl and set aside.
Add the remaining 1 tablespoon oil to the pan along with the broccoli. Stir fry, stirring occasionally, until the broccoli is crisp tender, about 2 minutes. Stir in the green onions and cook, stirring the whole time, until fragrant, about 30 seconds.
Add the marinade to the pan and bring to a boil. Let burble for a minute or so until the sauce thickens up a bit. Then taste and adjust seasoning.
Serve over rice. Garnish with additional green onions, if desired.
OK, as most of you are well-aware, I am a comfort food lover. Any dish that comes with a sauce or gravy immediately catches my attention. So, consequently, I often order a fancied-up ground beef pattie over a regular steak in a restaurant if given the choice. There’s just something that smacks of good home style cooking anytime a simple ingredient like ground beef is presented on the menu at a fine dining establishment. It means, someone in the kitchen thinks the way I do. So, an immediate bond is created regardless of the fact that in 99% of the cases, I won’t even be able to see the kitchen. Much less, who is doing the cooking. But that doesn’t matter. I instinctively know that he or she and I could be compadres. And that we are on the same wavelength when it comes to knowing that a doctored bit of good, fairly lean ground beef can be ever so much more flavorful than even a very well grilled hunk of beef.
And for those of us home cooks looking to save a bit of money and still produce a dinner that others will enjoy, there just isn’t anything easier to build or more delicious than a ground beef pattie smothered in a bit of sauce. And for the potato lovers in your family, a side of mashed potatoes should have your whole family bouncing up and down on their dining room chairs in anticipation. OK, maybe only coming to the table without their cell phones. But at least not hiding in their closets or threatening to leave home! Or worse yet – ordering in pizza!
So, next time you are in a hurry, or you and your kitchen are not on speaking terms, or you are just too burned out to even order take out, give this dish a try. It’s easy, it’s forgiving, and it tastes like you went to a great deal of trouble. But be advised. The sauce is very rich. So, if you have small children, you might want to offer them ketchup instead of the sauce. However, if your spouse asks for ketchup, please do me the honor of providing him or her with the driving instructions to the nearest McDonald’s!
Peace and love to all.
1 lb. lean ground beef
2 T. + ¼ c. finely chopped onion, divided
2 tsp. Montreal Seasoning
3 T. unsalted butter, divided
¼ c. finely chopped onion
8-10 button mushrooms, sliced
2 garlic cloves, finely minced
½ c. dry red wine
1 c. water
1 tsp. beef base (I use Better Than Bouillon Beef Base)
freshly ground black pepper
1 T. all-purpose flour
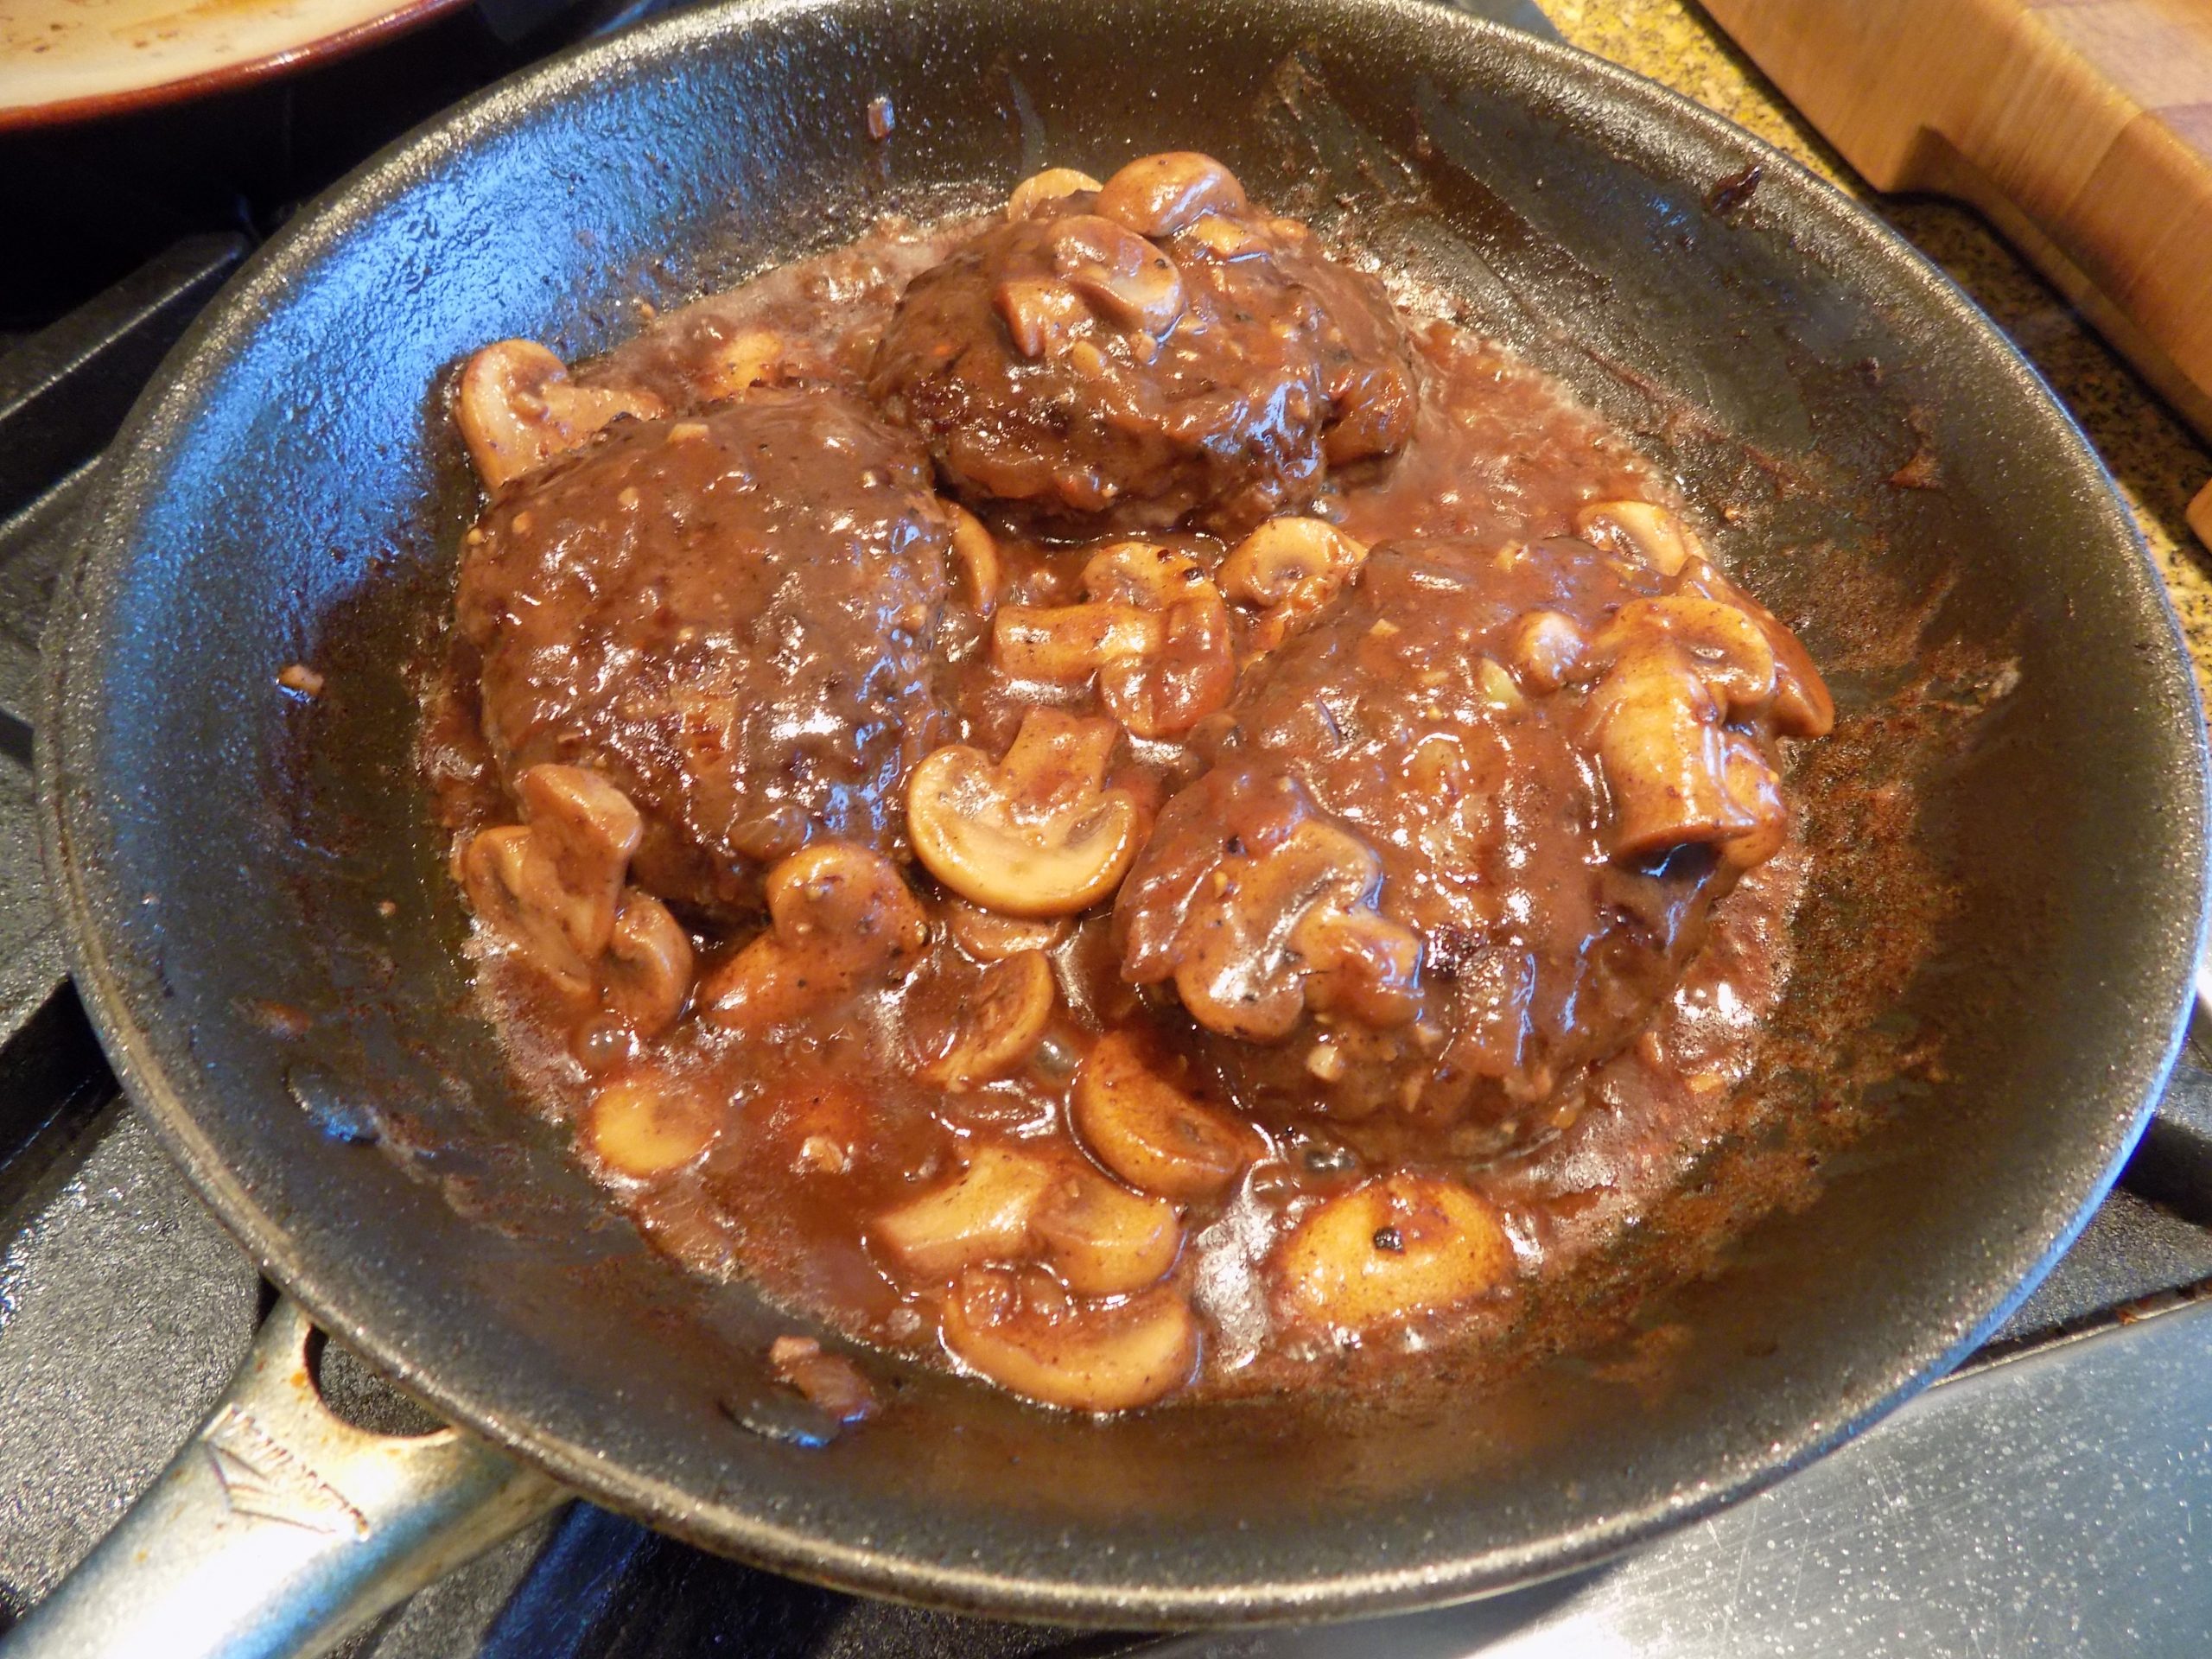
Combine the ground beef, 2 tablespoons finely chopped onion, and Montreal Seasoning. Form into 2 or 3 torpedo shaped patties. Heat 1 tablespoon of the butter in a medium sized frying pan. Add the patties and fry the first side until dark brown and about half cooked. Flip the patties and cook an additional couple of minutes or until desired doneness. (We like our patties with a bit of pink in the middle.)
Transfer the patties to a small plate; cover with aluminum foil to keep warm.
Melt 1 more tablespoon of the butter in the same pan. Add the remaining quarter cup of onion and the sliced mushrooms. Gently cook until the onion is soft, and the mushrooms are beginning to brown. Add the garlic and cook for 1 minute.
Add the wine, water, beef base, and black pepper. Bring to a boil. Reduce heat, and cook uncovered, for about 8 minutes, or until the liquid is reduced by about half.
While the liquid is reducing, mash the remaining tablespoon of butter with the flour to make a smooth paste. (Helps immensely if the butter is at room temperature.)
Once the wine mixture is reduced, whisk the flour paste, a teaspoonful at a time, into the simmering liquid. Cook for a few minutes or until the sauce is nicely thickened. Taste and adjust seasoning.
(And no, there is no salt in the list of ingredients. Beef base usually contains more salt than I would prefer. So, I’ve found, that it’s much easier to add salt if needed, than to get rid of too much!)
Add the beef patties back to the pan. Allow to heat through, then serve decorated with the delicious sauce. Great with mashed potatoes or our favorite – Perfect Stove Top Brown Rice. (See recipe below.)
PERFECT STOVE TOP BROWN RICE
1 c. uncooked long grain brown rice, well rinsed
2 c. water
¼ tsp. seasoned salt
freshly ground black pepper (just a pinch)
1 tsp. extra virgin olive oil
Combine the rinsed rice, water, seasoned salt, pepper, and olive oil in a pot; bring to a boil. Cover, reduce the heat to low, and simmer for 45 minutes.
Remove from the heat and let sit covered for 10 minutes more. Fluff with a fork.
OK, let me just say this before I start writing about this recipe. It is hot outside. Terribly hot. And I live in Western Washington where it’s not supposed to be this hot! But it is! And I guess I’m only mentioning this new development because if you are anything like me, you do not do well in hot weather. I tend to get cranky, and my inherent laziness just seems to blossom when I become too warm. And any thought of too much effort in the kitchen leads me to want to tear into anyone whose ideas differ from mine with the vengeance of a mother bear protecting her cubs. So those of you who are anti-vaxxers, believe you are superior to others because of the color of your skin, want to deny others the right to have control over their own body, or feel your own true God is the one true God – please stay a safe distance from me so that no one will get hurt! It’s only for your own good that I admit to this uncharacteristic tendency of mine to verbally assault anyone with beliefs I find abhorrent when the weather outside becomes unbearable. Lucky for us we had a heat pump installed when we built our house. Or I would probably get into our air-conditioned car and vandalize any Trump sign I found still on display. Like I said, I don’t do well when it’s too damn hot!
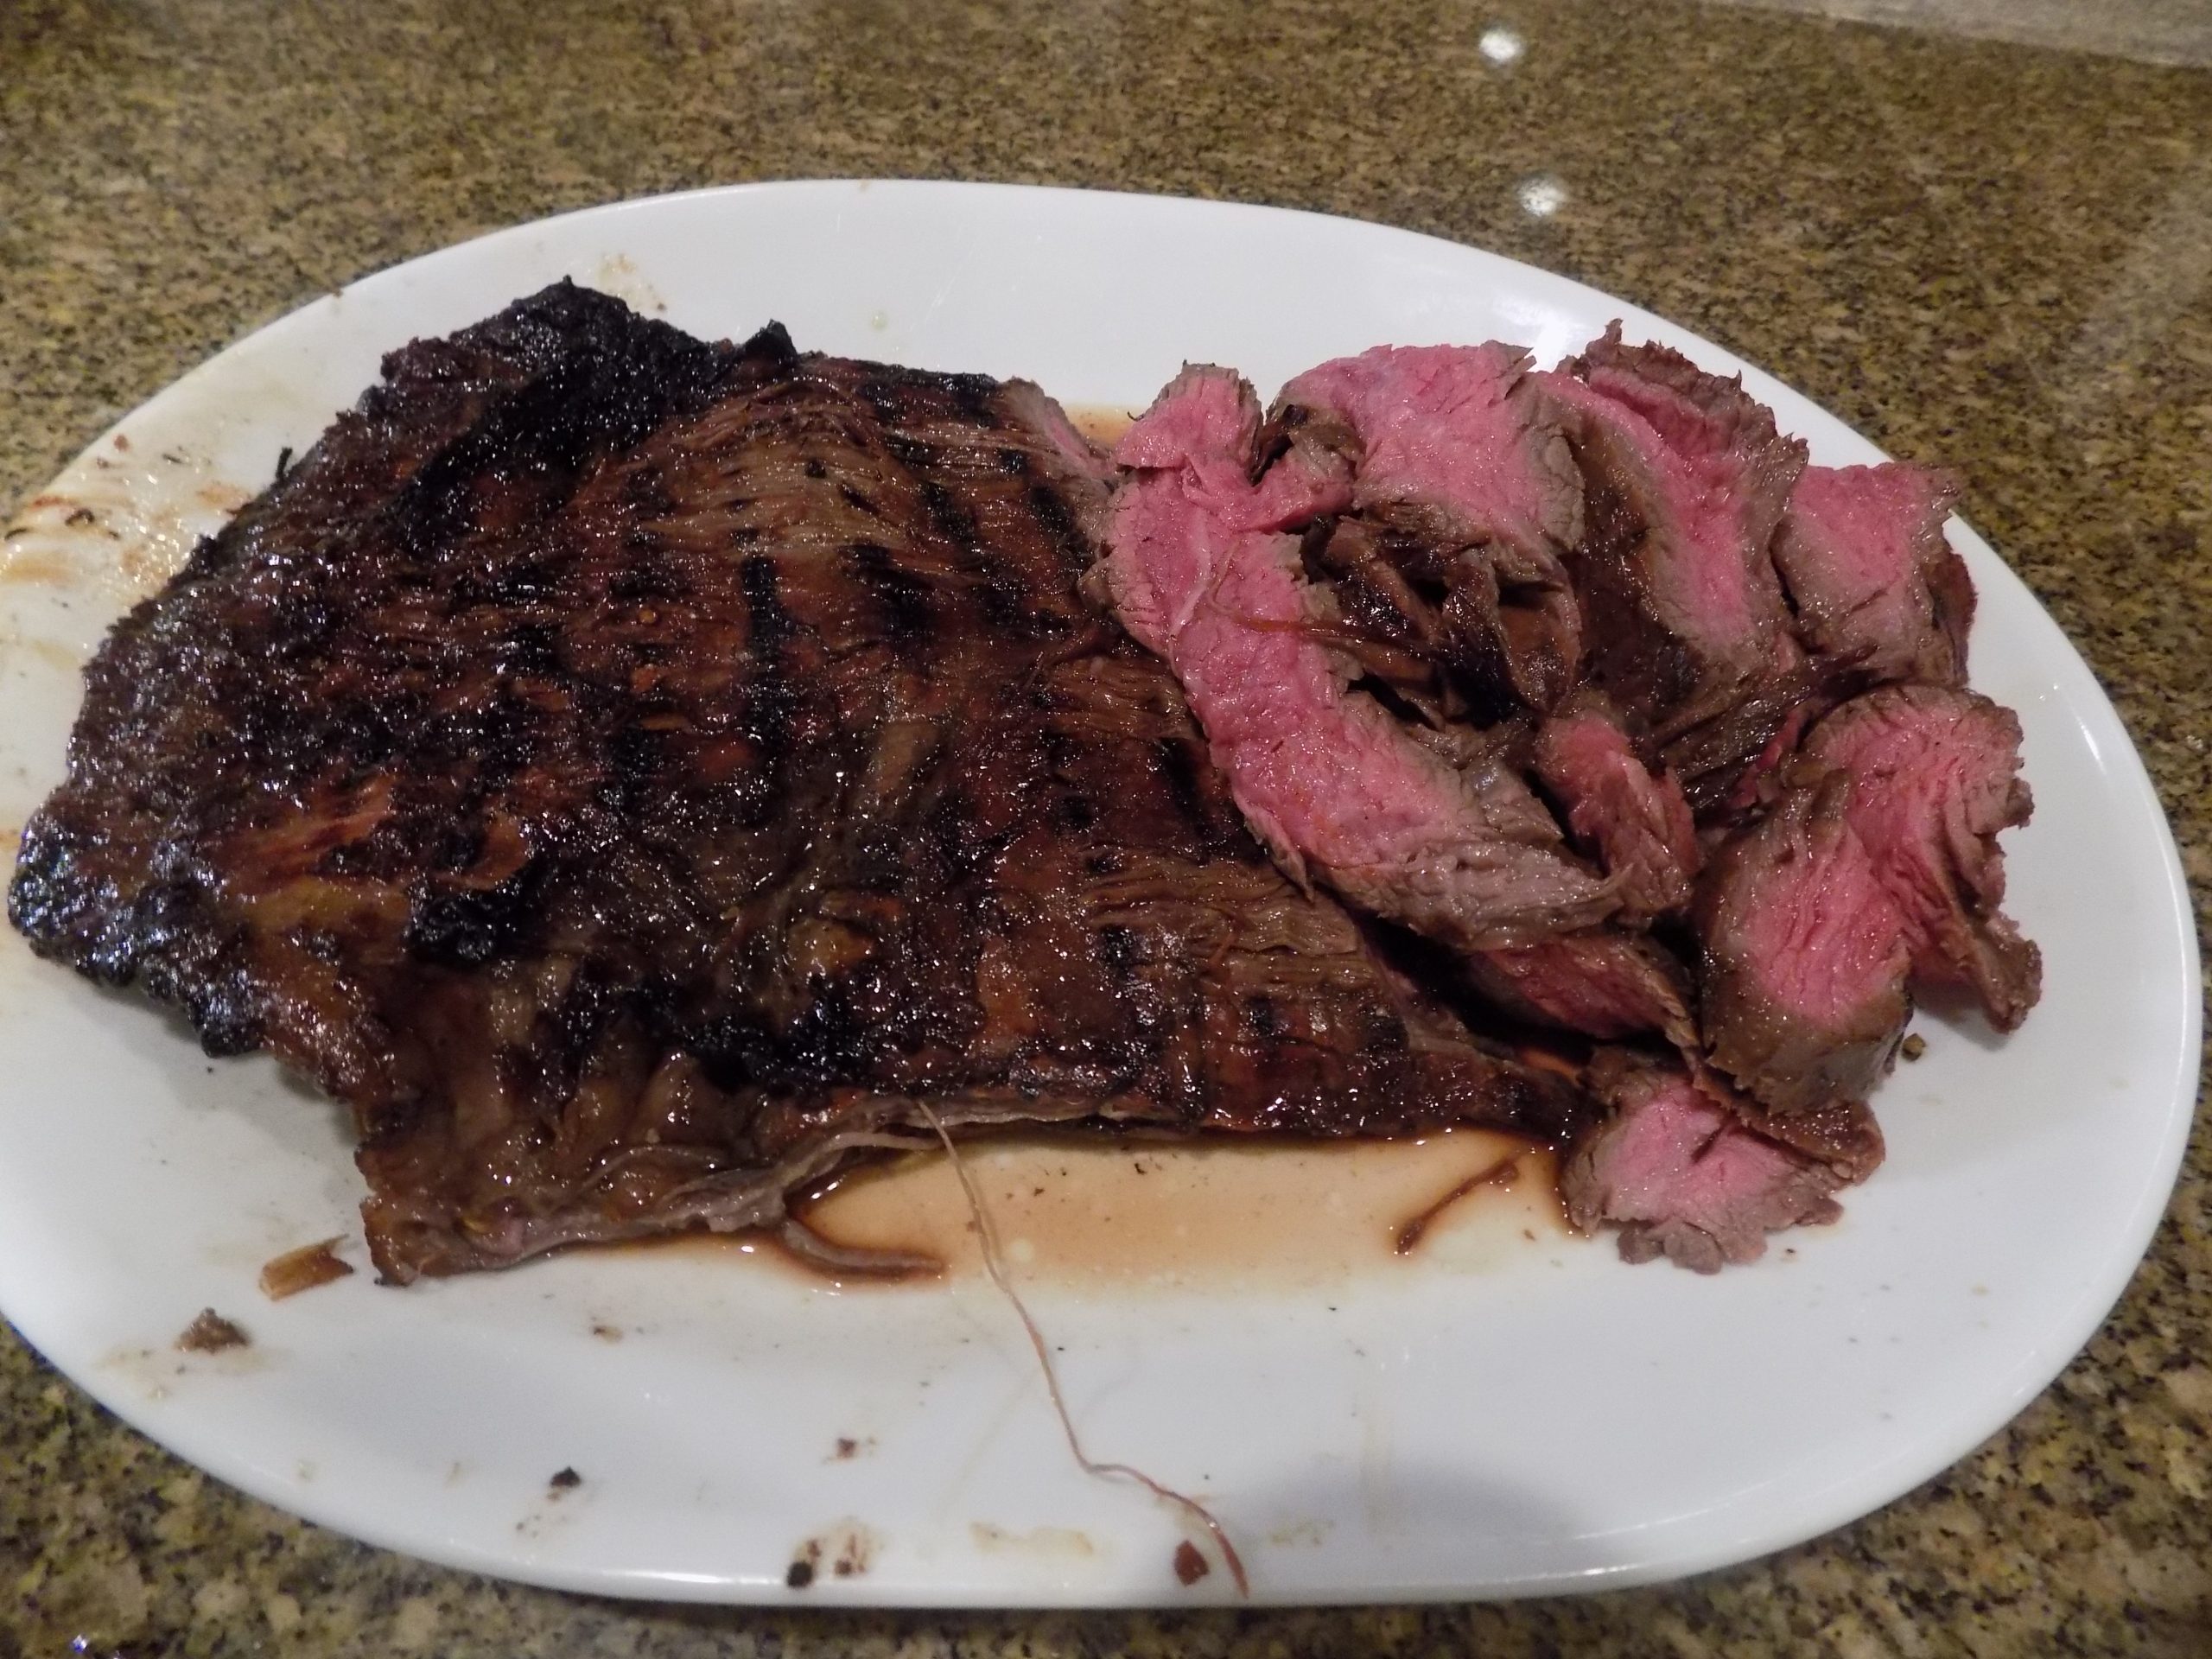
So, with ease of preparation in mind, I offer up my rendition of a simple marinade for flank steak. I modified the original recipe I found on the simplyrecipes.com site to make the marinade even easier to prepare. And perfect for camping or trailering where kitchen and workspace can be limited. Throw a few ingredients into a Ziplock bag, along with the flank steak of course, and place it in your fridge or cooler overnight. Then place it on a hot grill, take it off the grill, let it rest a few minutes, then slice and serve. Terribly easy and terribly delicious.
So, that’s it for today. Have a great day and stay cool. And if you were appalled at my rant about people who have a different idea of humanity than I do, so be it. There are millions of great cooking sites out there. Be my guest.
Peace and love to all.
⅓ c. extra virgin olive oil
⅓ cup soy sauce
¼ c. honey
2 T. red wine vinegar
2 tsp. granulated garlic
1 tsp. granulated onion
1 flank steak
kosher salt
freshly ground black pepper
Combine the marinade ingredients in a large non-reactive bowl.
Place steak in the bowl and turn so that it is completely coated with the marinade. (You can also place the steak and marinade in a freezer bag and place it in a bowl.)
Chill and marinate for at least 2 hours and up to overnight. (Overnight is best.)
Heat your grill until very hot. (The grill is hot enough when you can hold your hand about an inch over the grill only for about a second.)
Remove the steak from the marinade and gently shake off the excess marinade from the steak (but make sure there is still a thin coating because the oil in the marinade helps to keep the steak from sticking to the grill).
Generously sprinkle steak with kosher salt and freshly ground pepper. (The salt and pepper will help form a savory crust on the steak.)
Place steak on the hot grill. Grill for a minute or two on each side to get a good sear, then turn down the heat on the grill, cover and cook a few more minutes or until the internal temperature reaches about 135-degrees for medium-rare. Remove from grill and cover with aluminum foil to hold in the heat while the steak rests for 10 to 15 minutes. Then slice diagonally against the grain into thin pieces with a very sharp knife and serve immediately.
OK, I know there are hundreds of new recipes out there for corned beef, especially since corned beef is usually on sale and plentiful at this time of year. (Something to do with celebrating the patron saint of Ireland, or some such thing!) But somehow, I always seem to be a step or two behind everyone else, so I just fixed this dish last evening. And even though you have undoubtedly just finished eating the leftover corned beef you served on the 17th to celebrate all things Irish, I decided you needed this ever so simple way to prepare corned beef, whether you were presently sick of corned beef, or not.
Now the only thing I don’t like about corned beef is that it can tend to be a bit salty. (Now, in case you didn’t recognize it for what it is, my last sentence is commonly referred to as an understatement!) And the one way I have discovered to combat the problem of too much sodium left in the meat after it has been cooked, is to braise the corned beef in water. (Not an unusual recipe so far, right?) But where this recipe differs, is that I change the water 2 times while it braises its way to becoming the flavorful, tightly grained meat we all adore. And changing the water truly does work to remove a lot of the salt problem. And yes, it’s a bit of a bother to keep changing the water. But the proof is in the pudding, as the old saying goes!
When you read the ingredient list below, you will also learn that I have discovered a new way to up the flavor quotient in corned beef. I have begun preparing my own pickling spices. And I truly believe it makes a big difference.
So, that’s it for today. I’m sorry I couldn’t get my act together enough to post this recipe ahead of St. Patrick’s Day. But you now have a great new way to fix corned beef any time of year. Because corned beef is very versatile. (Think a great Reuben Sandwich. Recipe on site – of course!) And, using this simple recipe, the meat comes out delicious every time. For more recipes search under St. Patrick’s Day Recipes.
And in case you are wondering why I didn’t cook cabbage and carrots with the corned beef last evening, it’s because I didn’t have any cabbage on hand. But even if I had, I would have prepared my favorite recipe for cabbage and carrots – Braised Green Cabbage. (Yes of course the recipe is on this site.) Over the years, I have served this delightful vegetable dish to many guests, and they have all raved about it! In fact, one dear friend (Todd) even went so far as to inform his son (Miles) that he was actually eating vegetables as he was happily spooning them into his mouth. Apparently, Miles replied, “I don’t care what this is – it’s really good.” (High praise coming from an 18-year-old young man!)
So, what did I serve with the corned beef and sauce? Oven Roasted Sweet Potatoes (recipe will be posted within the next few days) and Salade de Carottes Rapées (French Grated Carrot Salad). And if you have never prepared or eaten this salad, you are in for a treat. Both from a cook’s perspective because of the ease of preparation, but also from the standpoint of the lucky person who gets to eat this delicious salad. And of course, this recipe is available on this site with just a few simple keystrokes.
As always, have fun in your kitchen. And remember, certain meats that we only think of at holiday time are perfect year-round. So, corned beef isn’t just for the 17th of March. And it’s still legal to serve turkey any time of year. Ham makes a yummy any time entrée and doesn’t take offence if served other than as the star of your Christmas feast. And baked heart isn’t just for Valentine’s Day. (Oh wait – maybe I’m the only one who thinks baked heart is perfect for Valentine’s Day. Never mind!)
Just don’t limit your entrée possibilities by forgetting about all those wonderful meats we tend to think of only once a year. Because some of these protein sources are quite affordable and the leftovers perfect for use in other simple to prepare dishes. And as we all know – variety is the opiate of the culinary elite. (Who said that you might ask?) I did – just now!
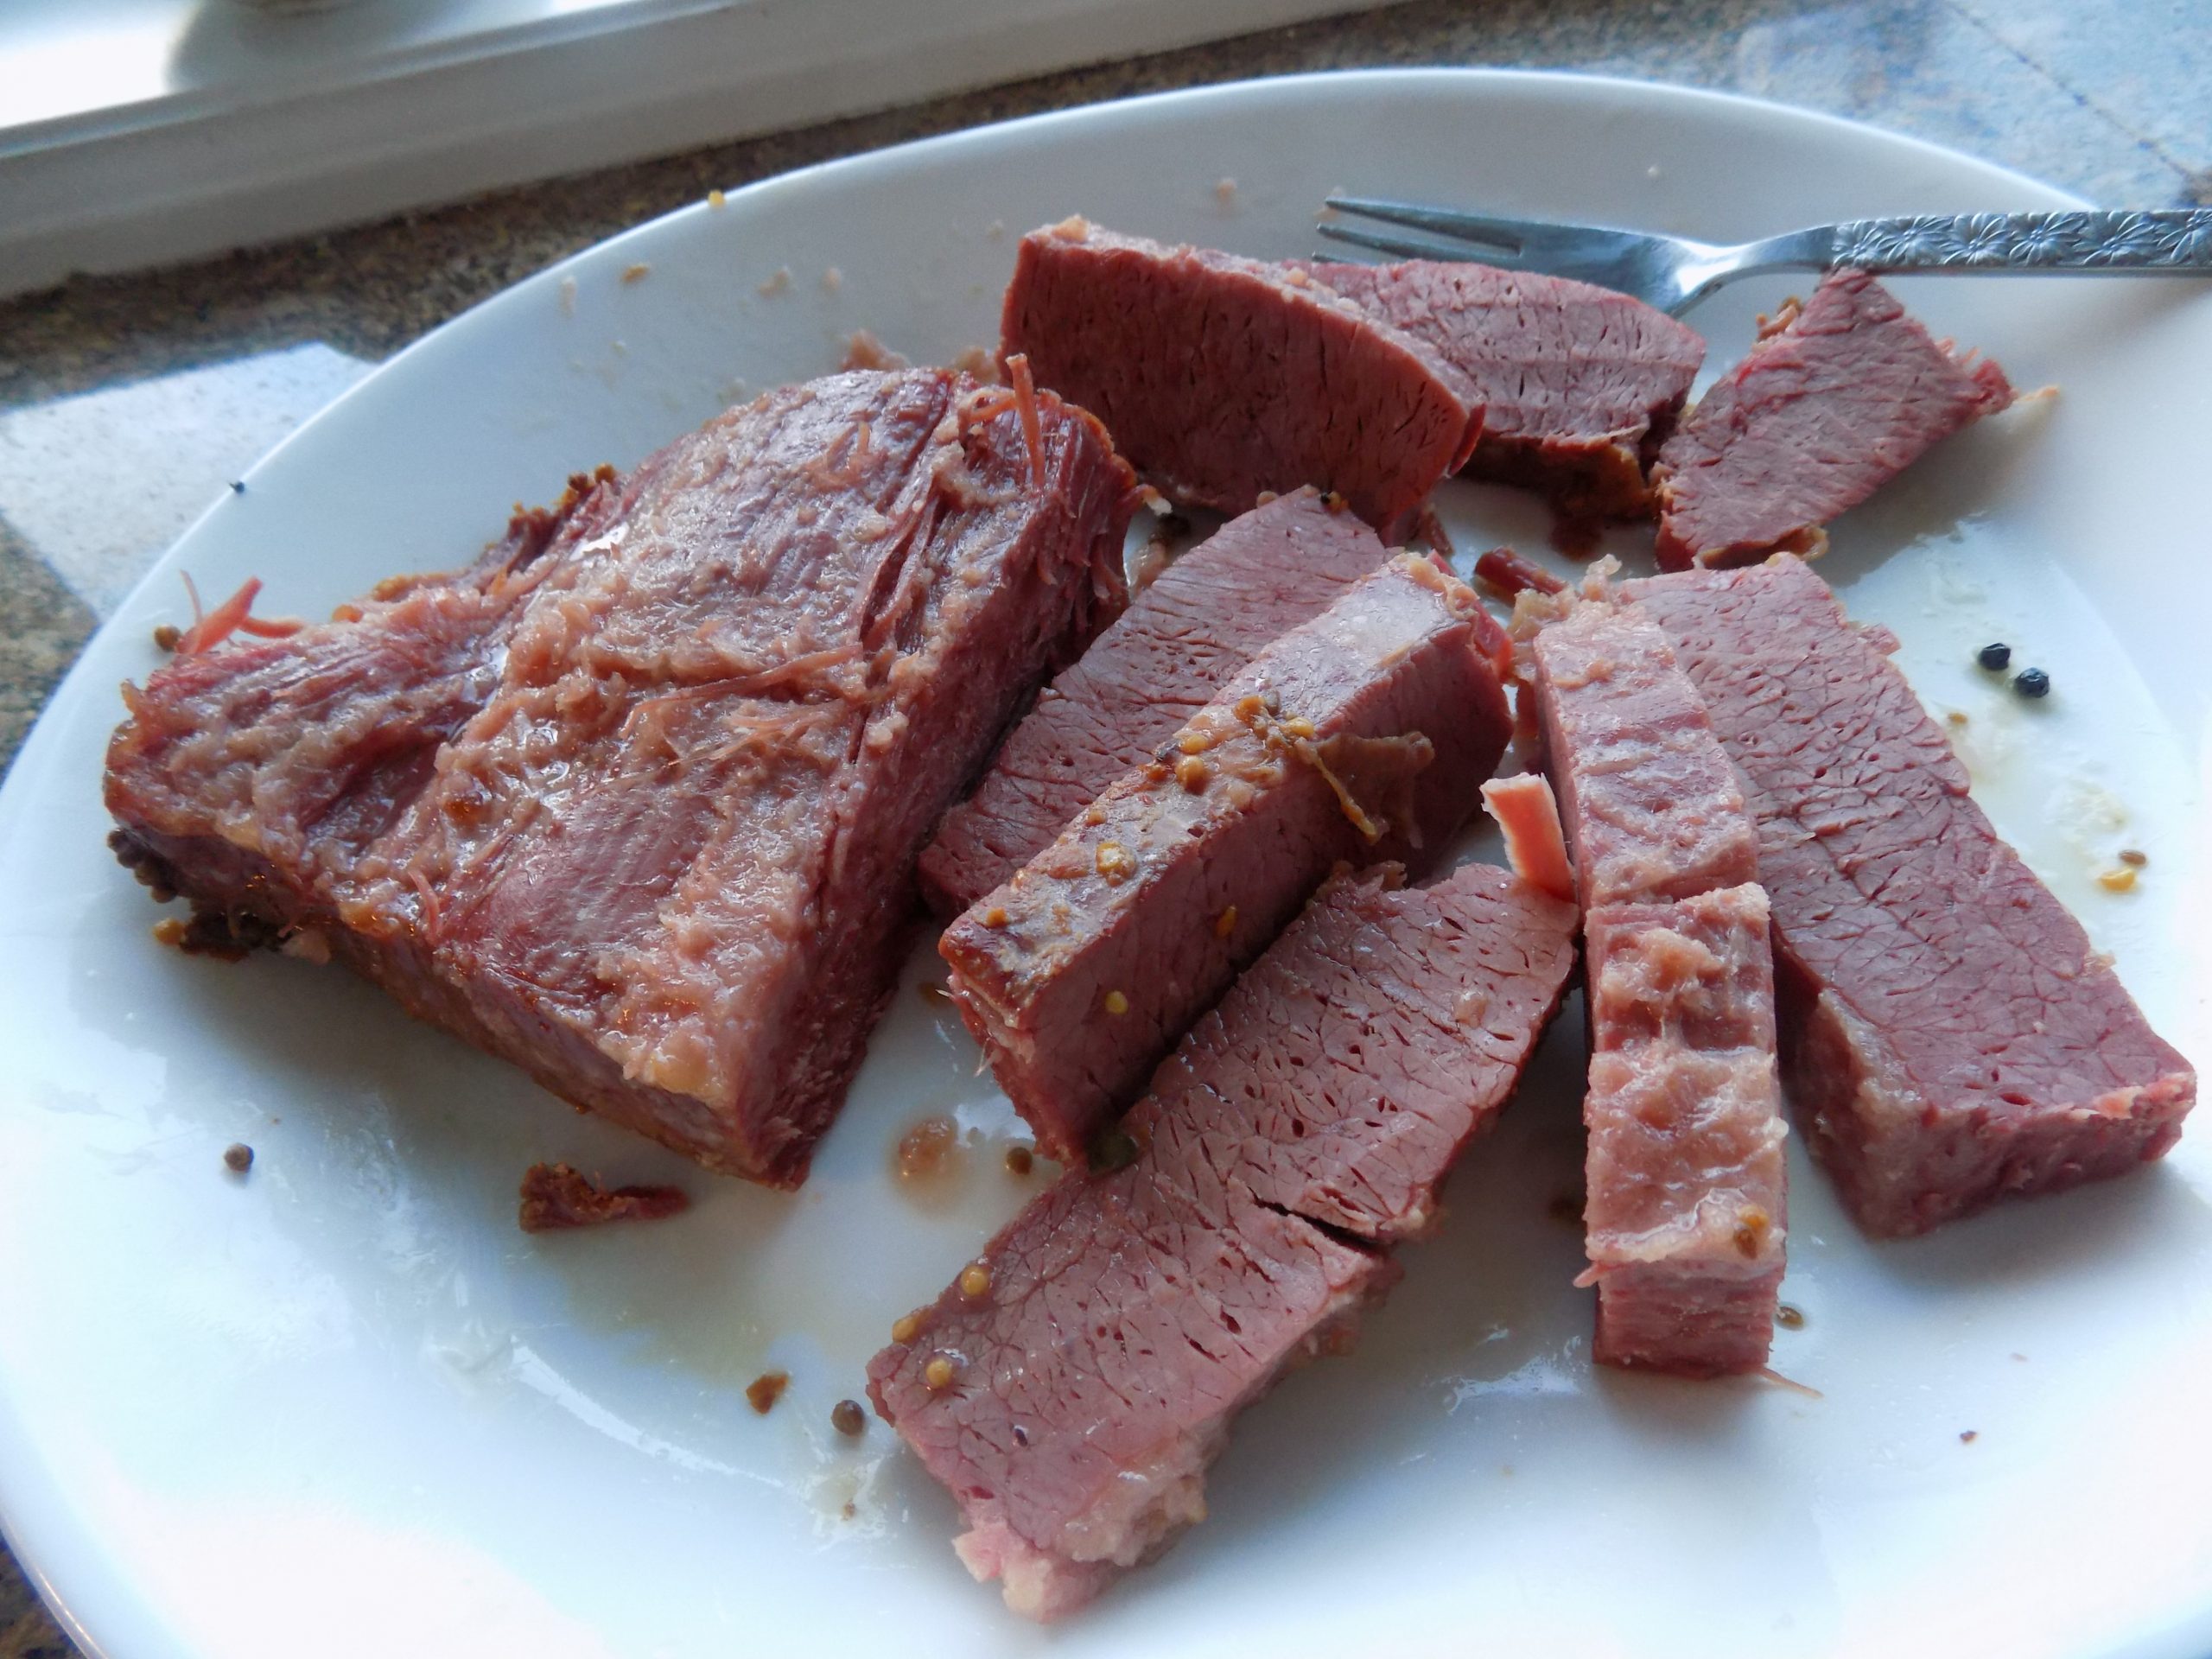
1 (4-lb.) flat-cut corned beef (do not trim the fat)
Toast the coriander, peppercorns, mustard seeds, and anise seeds in a skillet until fragrant. Add the crumbled bay leaves and crushed red pepper flakes; toast for another minute. Pour the warm spices into a covered roasting pan. (I use my Le Creuset Braiser.) Preheat the oven to 325-degrees. (If you don’t use the entire spice mix, store the remainder in an airtight container.)
Please note: You can use the packet of spices that comes with the corned beef instead of preparing your own mix. I simply prefer to make my own spice mix because I think my blend of spices flavors the meat better.
But be warned: You might want to use only half of the homemade spice mix the first time you prepare corned beef this way. Using all of the spice mix makes for very, deeply flavored corned beef.
Rinse the corned beef thoroughly under running cold water. (This helps remove excess salt.) (No need to dry the meat.) Place the washed corned beef fat side up in the roasting pan with the spice mix. (You’ll trim the fat off after the meat is cooked.) Pour 2 cups of water into the pan. Cover tightly with lid or heavy duty foil and bake for 1 hour. After 1 hour, remove from oven and using a turkey baster, suck up most of the liquid and discard. (Try to leave as much of the spice as possible undisturbed.) Add 2 cups fresh water, and cover. Bake for another hour. After the second hour, drain off the liquid again. Then add 2 more cups of water, cover, and return once again to the oven. Total braising time – 3 hours or until the meat shreds easily.
Remove from oven and transfer the corned beef to a cutting board and let sit until cool enough to handle. Cut off the layer of fat on top of the corned beef and discard. Slice the meat against the grain into ½-inch slices. Arrange the meat on a platter and serve with the Horseradish Cream Sauce. (recipe below)
Please note: If you wish to cook cabbage wedges, small red potatoes, and/or carrots with the corned beef, simply add them the third hour of braising. Then remove them to a serving bowl, cover to keep warm, and serve them along side the sliced corned beef. And yes, there will still be enough flavor in the water to produce delectable veggies.
Horseradish Cream Sauce
1 c. sour cream
2 T. prepared horseradish, plus more if desired
1 T. Dijon mustard
1 tsp. white wine vinegar
¼ tsp. kosher salt
freshly ground black pepper
¼ tsp. granulated sugar
Combine all of the ingredients in a small bowl. Taste and adjust seasoning, adding more horseradish, if desired.
It’s all my daughter Paula’s fault! I know it’s usually all the mother’s fault, but not this time. My preparing this way too caloric, cholesterol laden, fattening, crazy delicious comfort food dish is all on Paula! And even though I don’t plan to serve chicken fried steak (CFS) very often, I must say thank you to my dear daughter for reminding me of this lovely Southern delicacy. (You might know it better as country-fried steak.) And for those of you with more discerning palates, just consider CFS the poor man’s wiener schnitzel. (Veal and breadcrumbs prepared in a similar manner.) But in my humble opinion, CFS is every bit as delicious. (And a whole lot cheaper to produce!)
It all started with a simple phone conversation. Paula happened to mention that she was making one of her husband’s favorite dishes for dinner that evening. And of course, I had to ask which of Mark’s favorites was she preparing? And as she described how she fixed this dish my mouth started to water. Holy guacamole! I hadn’t eaten CFS for years. And it sounded just so tempting. And as you well know, I give in to culinary temptation way more than is good for me. But hey, if I only eat it once every 10 years, how much can that hurt? (As if I can refrain from making CFS now that I know how wonderful the homemade version can be. I’d never actually fixed it at home before. I’d only had it on a few rare occasions for breakfast when traveling.) But now, who knows how frequently this might appear on our dinner table. I’m only human after all! And it’s still all Paula’s fault!
But in her defense, she doesn’t usually fix gravy to slather on their CFS. Nor does she make sinfully rich grits to go along with the steak. That part is all on me! But I figure, in for a dime, in for a dollar. If I’m going to sin, let it be a big one and then be done with it! So, the following recipe is not a low-calorie wonder. But boy of boy is it delicious. And a dish I guarantee everyone in your family will adore.
I found most of this recipe compliments of the momontimeout.com site. (Great site BTW.) The modifications came from several suggestions Paula shared with me, with a couple thrown in by me for good measure. So, this recipe is definitely a team effort. (Look for my recipe for Creamy and Savory Grits soon to come to your very own computer.)
As always, make every meal special. And while I totally advocate eating healthy nutritious food most of the time, I also believe that there are times when nothing but a big old meal of comfort food helps keep people happy and content. Too much depriving ourselves of food that brings us pleasure just can’t lead to a well-balanced mind. I mean really, who can remain sane when all they can think about is a hamburger and fries? I’m not sure the previous statement speaks well to my mental stability, but never-the-less, it’s how I feel. It’s the old “moderation in all things” thing! And I am a firm believer in “moderation in all things”, in moderation of course! So, to that end, I must also tell you, that along with our CFS, gravy, and grits last evening, I also served plain old steamed fresh green beans. No frills attached.
Peace and love to all.
Chicken Fried Steak
1½ c. all-purpose flour
1 tsp. kosher salt
freshly ground black pepper (quite a bit)
1 tsp. paprika
1 tsp. granulated garlic
1 tsp. granulated onion
½ tsp. baking soda
½ tsp. baking powder
¾ c. buttermilk
1 tsp. hot sauce (I use Frank’s RedHot original cayenne pepper sauce)
1 egg
4 cube steaks
Montreal Seasoning
vegetable oil
In a shallow container (I use an 8-inch cake pan), whisk the flour, salt, black pepper, paprika, granulated garlic, granulated onion, baking soda, and baking powder together. Set aside.
In a separate shallow container (yup, another cake pan), whisk the buttermilk, hot sauce, and egg together. Set aside.
It the cube steaks appear moist, pat them dry with a paper towel, removing as much moisture as possible. Season one side of each cube steak with a sprinkling of Montreal Seasoning. Let sit for 5 minutes.
While the cube steaks are resting, scatter a bit of the flour, the same size as the cube steaks, on a baking sheet.
Dredge the cube steaks in the flour mixture, shaking off excess, then dredge in the buttermilk-egg mixture, letting excess drip off, and then once again in the flour mixture, shaking off excess. (This is a messy process, so plan on washing your hands several times as you coat the steaks.)
Place the breaded cube steaks on the floured areas of your baking sheet. (Having a bit of flour before you set the breaded steaks down, allows the steaks to absorb a bit more flour as they rest. And also, not stick to the baking sheet.) When all 4 steaks have been breaded, press a bit more flour into the top of each one. (Save the remaining flour for use in the gravy.) Let the breaded steaks rest for 10 minutes.
Preheat oven to 225-degrees.
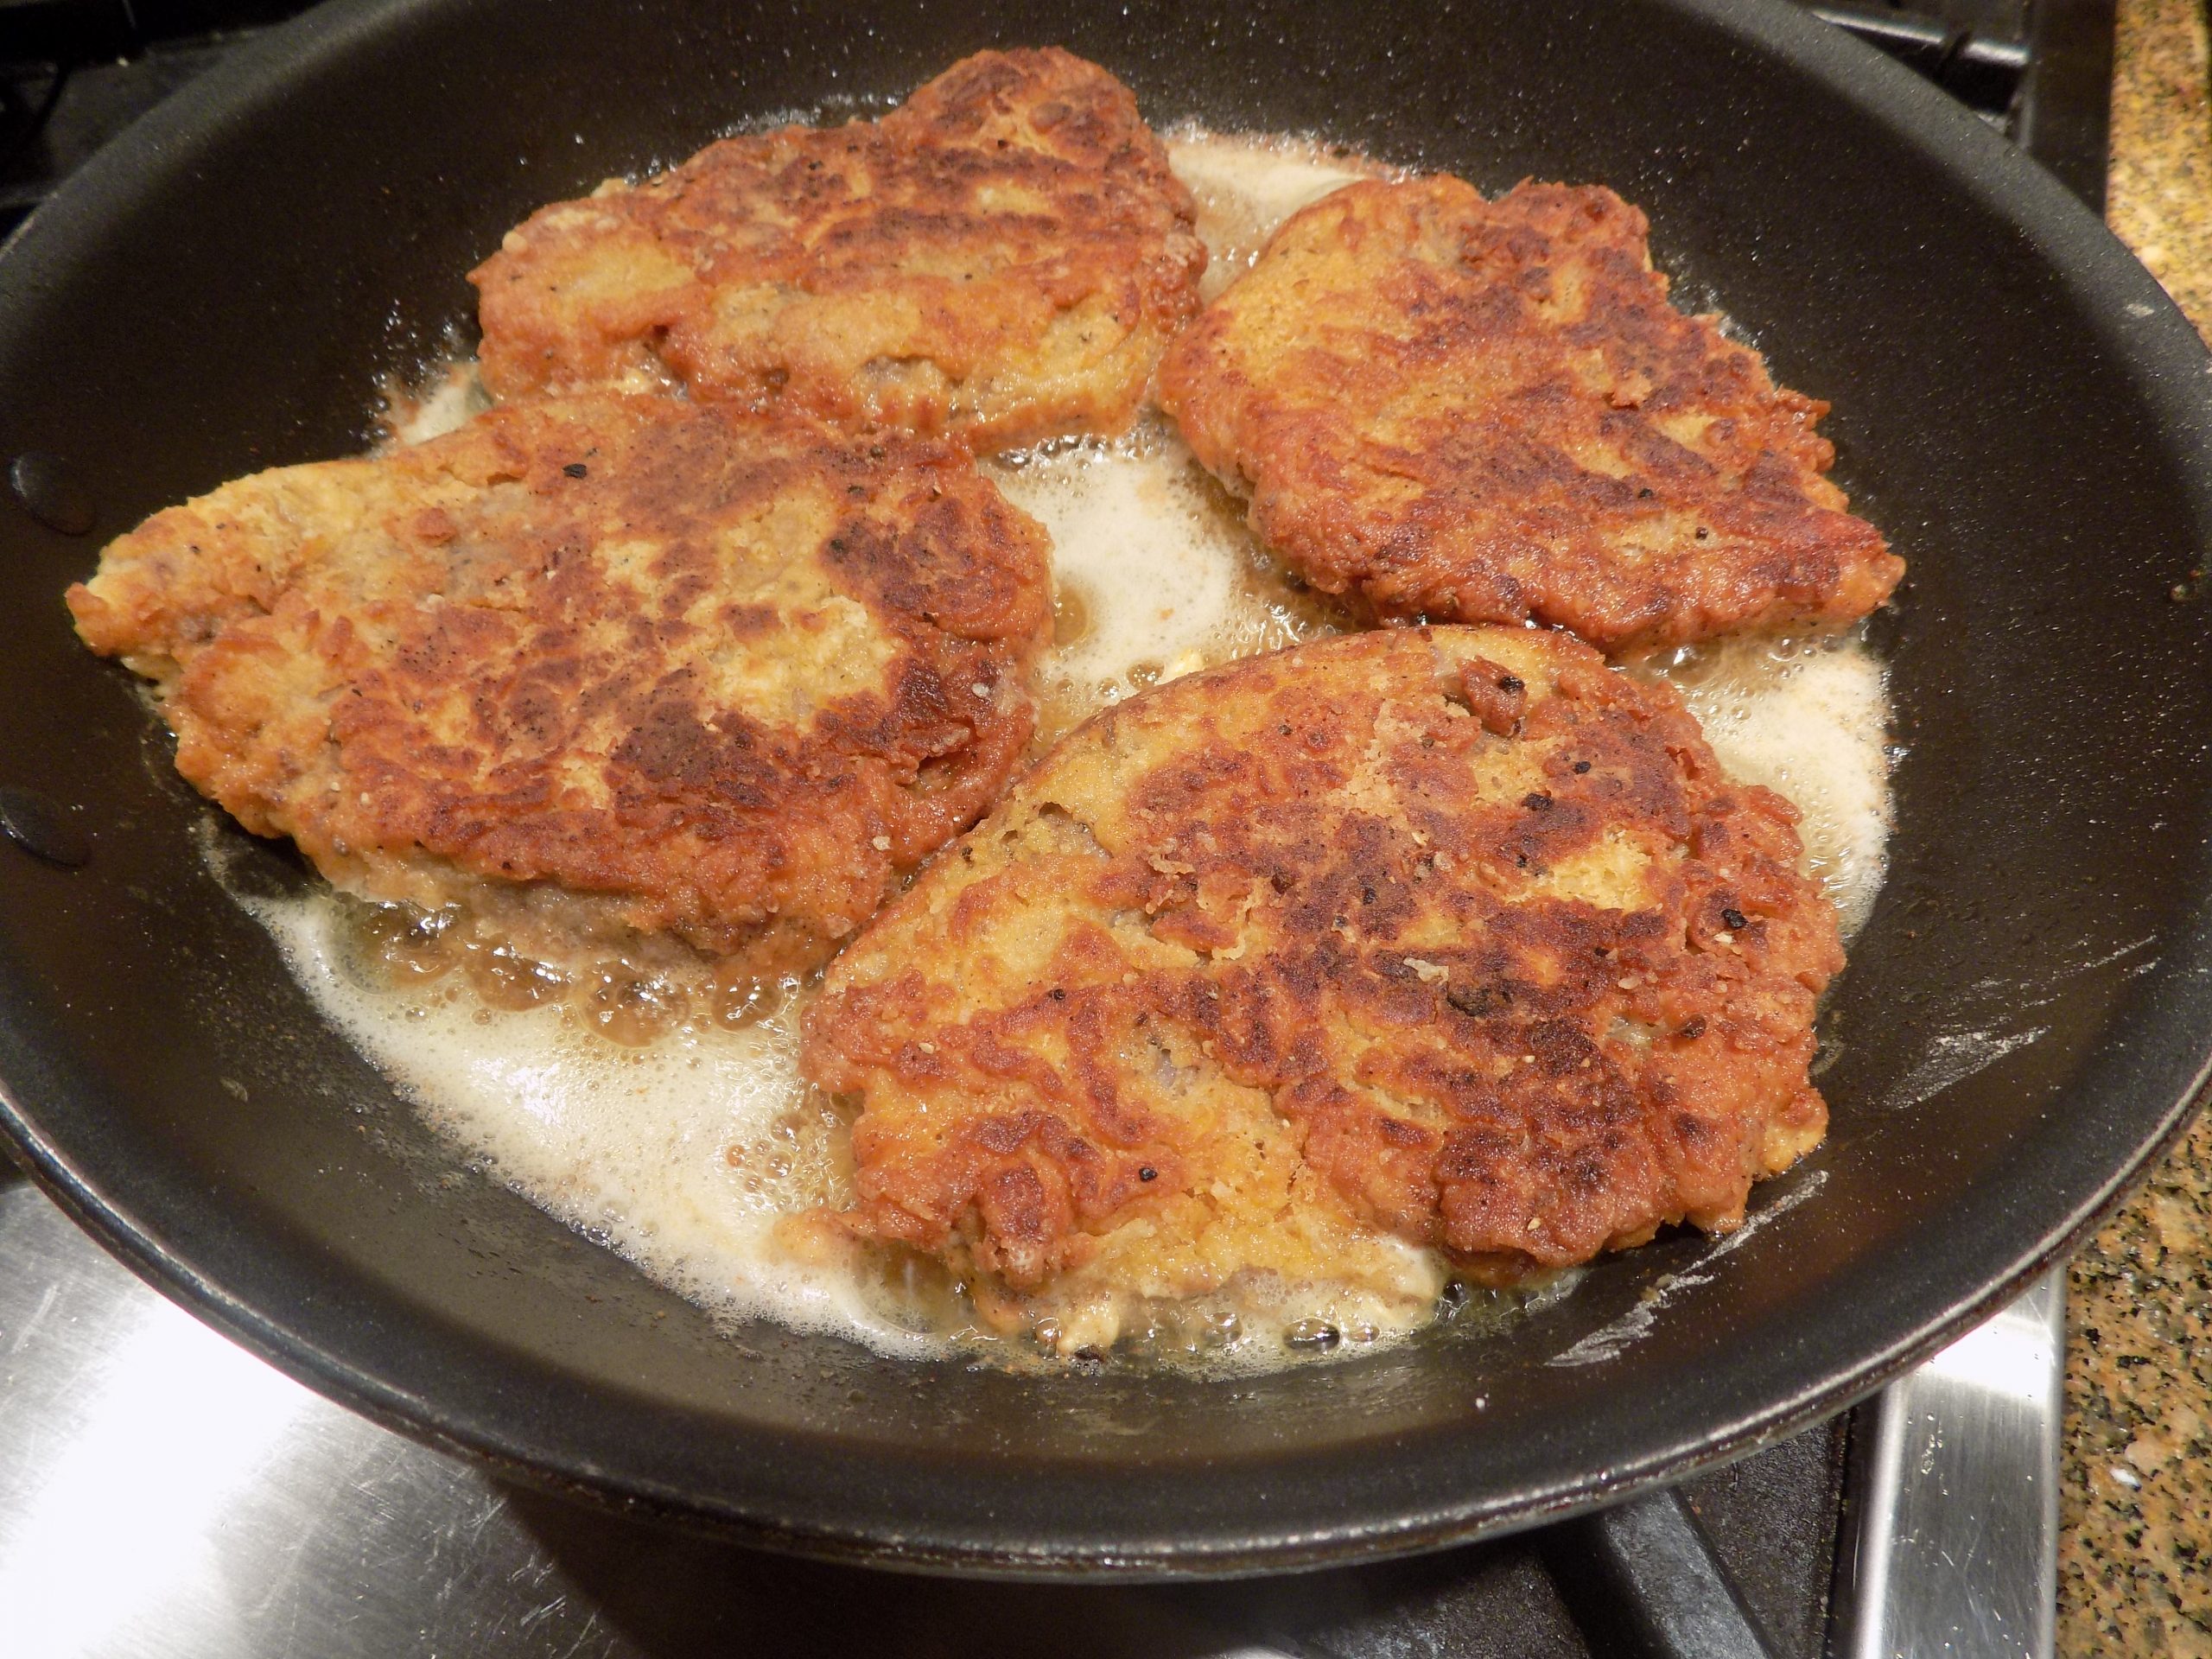
Heat about an eighth inch of vegetable oil in a large heavy skillet over medium high heat. How much oil you need depends on the size of your skillet. And if possible, use a fry pan that will accommodate all 4 steaks. If not, fry 2 at a time.
Test the oil by dropping a bit of the breading into the oil. The oil should sizzle and bubble around the breading. (The oil should glisten, but not be hot enough to start smoking.)
Place the steaks into the pan and fry for 3 to 4 minutes on each side or until golden brown. After the steaks have browned on both sides, carefully flip them back to the first side. Only fry for an additional minute or so.
Remove steaks from pan and drain on paper towels. Place in the preheated oven to stay warm while you make the gravy. (I place the paper towels and fried steaks on the the same baking pan I used to hold the breaded steaks before they were fried. Washed first, of course!)
Pan Gravy
2 T. vegetable oil from frying the steaks
2 T. seasoned flour (from breading the steaks) or if none left, just regular flour
1½ c. whole milk
¼ c. heavy cream
seasoned salt, if more salt is required
freshly ground black pepper
Save about 2 tablespoons of the grease in your pan. Discard the rest. Do NOT scrape the skillet clean. You want all of those brown bits for added flavor in the gravy.
Over medium-low heat, whisk in the seasoned flour and continue whisking for two to three minutes or until the flour is nice and golden brown.
Slowly whisk in the milk and heavy cream and bring gravy to a simmer. Cook until the gravy is smooth and creamy, about 5 to 7 minutes. If the gravy gets too thick, add in a little more milk. Taste and add seasoned salt, if necessary, and lots of fresh ground pepper.
Serve the CFS with a drizzle of gravy and a side of Creamy and Savory Grits (recipe to follow in the next few days) or mashed potatoes. Add your favorite green veggie and dinner is served. A perfect comfort food dinner.
Please note: To re-heat leftover CVS, place on a low-sided baking pan fitted with a wire rack in a pre-heated 400-degree oven and bake for about 20 minutes. Remove from oven and let cool a couple of minutes before serving.
Do not microwave. The breading will get soggy and yicky. (And yes, yicky is a technical term used by culinary experts everywhere!)
You know what they say about butter. That “butter makes everything better”. And in the case of a beautifully cooked tenderloin or filet mignon, they are 100% correct.
Now some would argue that the meat alone is perfect and should be enjoyed au naturale. To this I say – phooey! If they truly want their meat “naked”, then try cooking it without as much as a sprinkle of salt and pepper. Now, that’s “natural”. But I’d bet my last pound of unsalted butter that no one would admit to enjoying a good steak without the requisite liberal sprinkling of salt and pepper just before cooking begins. Especially salt. Because salt stays on the surface of meat without dissolving. This helps the meat juices stay within the muscle fibers thus helping ensure a juicy steak. Of course, along with the salt, it is important to cook the steak at a very high temperature. The high heat helps form an evenly distributed and crispy brown crust. And in the case of meat cooked using this recipe, a lovely buttery crisp crust.
FYI: Our good friend Jim, who is truly a meat expert, prepares his steaks a bit differently. He brings the meat to room temperature, then at least an hour before he cooks the meat, he liberally sprinkles it with salt and presses it into the meat. Then he sets it aside. Salting ahead of time like this ensures the entire cut gets evenly flavored. When salt is applied to raw meat, juices inside the meat are drawn to the surface. The salt then dissolves in the exuded liquid, forming a brine that is eventually reabsorbed by the meat.
Anyway, my point is, au naturale meat can be over-rated. Of course, I’m a lover of creamy and savory. So, for me, a lovely, flavored butter melting on a perfectly cooked steak is pure heaven. I could eat a great steak prepared this way weekly except for the obvious reasons. A) too much red meat is not good for me. B) Too much butter is not good for me. C) Expensive meat is not good for our budget! So, I prepare this kind of an entrée only for very special occasions.
So, if you too have a special occasion coming up, I would recommend serving this steak. And I know. For special occasions we love to go out for dinner too. But with Covid, dining in one of our favorite restaurants has not been possible. So, I have made sure that any special occasions are still celebrated with as much fanfare and fine dining as possible. But, like you, I am really looking forward to having someone else do the cooking, table clearing, and dishes. But even as write that sentence, I’m reminded that the slight annoyance of not being able to dine out is only a problem to people for whom poverty is not a reality. And then I sit back, say a thank you prayer to every deity imaginable, and then lift my butt out of my comfortable chair and walk into my well-stocked kitchen and fix us something good to eat. We are the lucky ones. We have food in our freezer, clean water, a warm home, and enough of everything necessary to live happy and productive lives. I hope and pray the same for you.
Peace and love to all.
2 beef tenderloin or filet mignon steaks (at least 1½-inches thick)
kosher salt
freshly cracked black pepper
2 T. unsalted butter
Remove the steak from the fridge at least 30 minutes before cooking. (Having the steak at room temperature helps ensure that your cooking times are more accurate and the meat cooks more evenly.) Season both sides generously with salt and pepper. Cook immediately.
Or use Jim’s method: salt the steak at least an hour before cooking. Then proceed to either cook as described below, or grill over high heat. Either way produces a really good product.
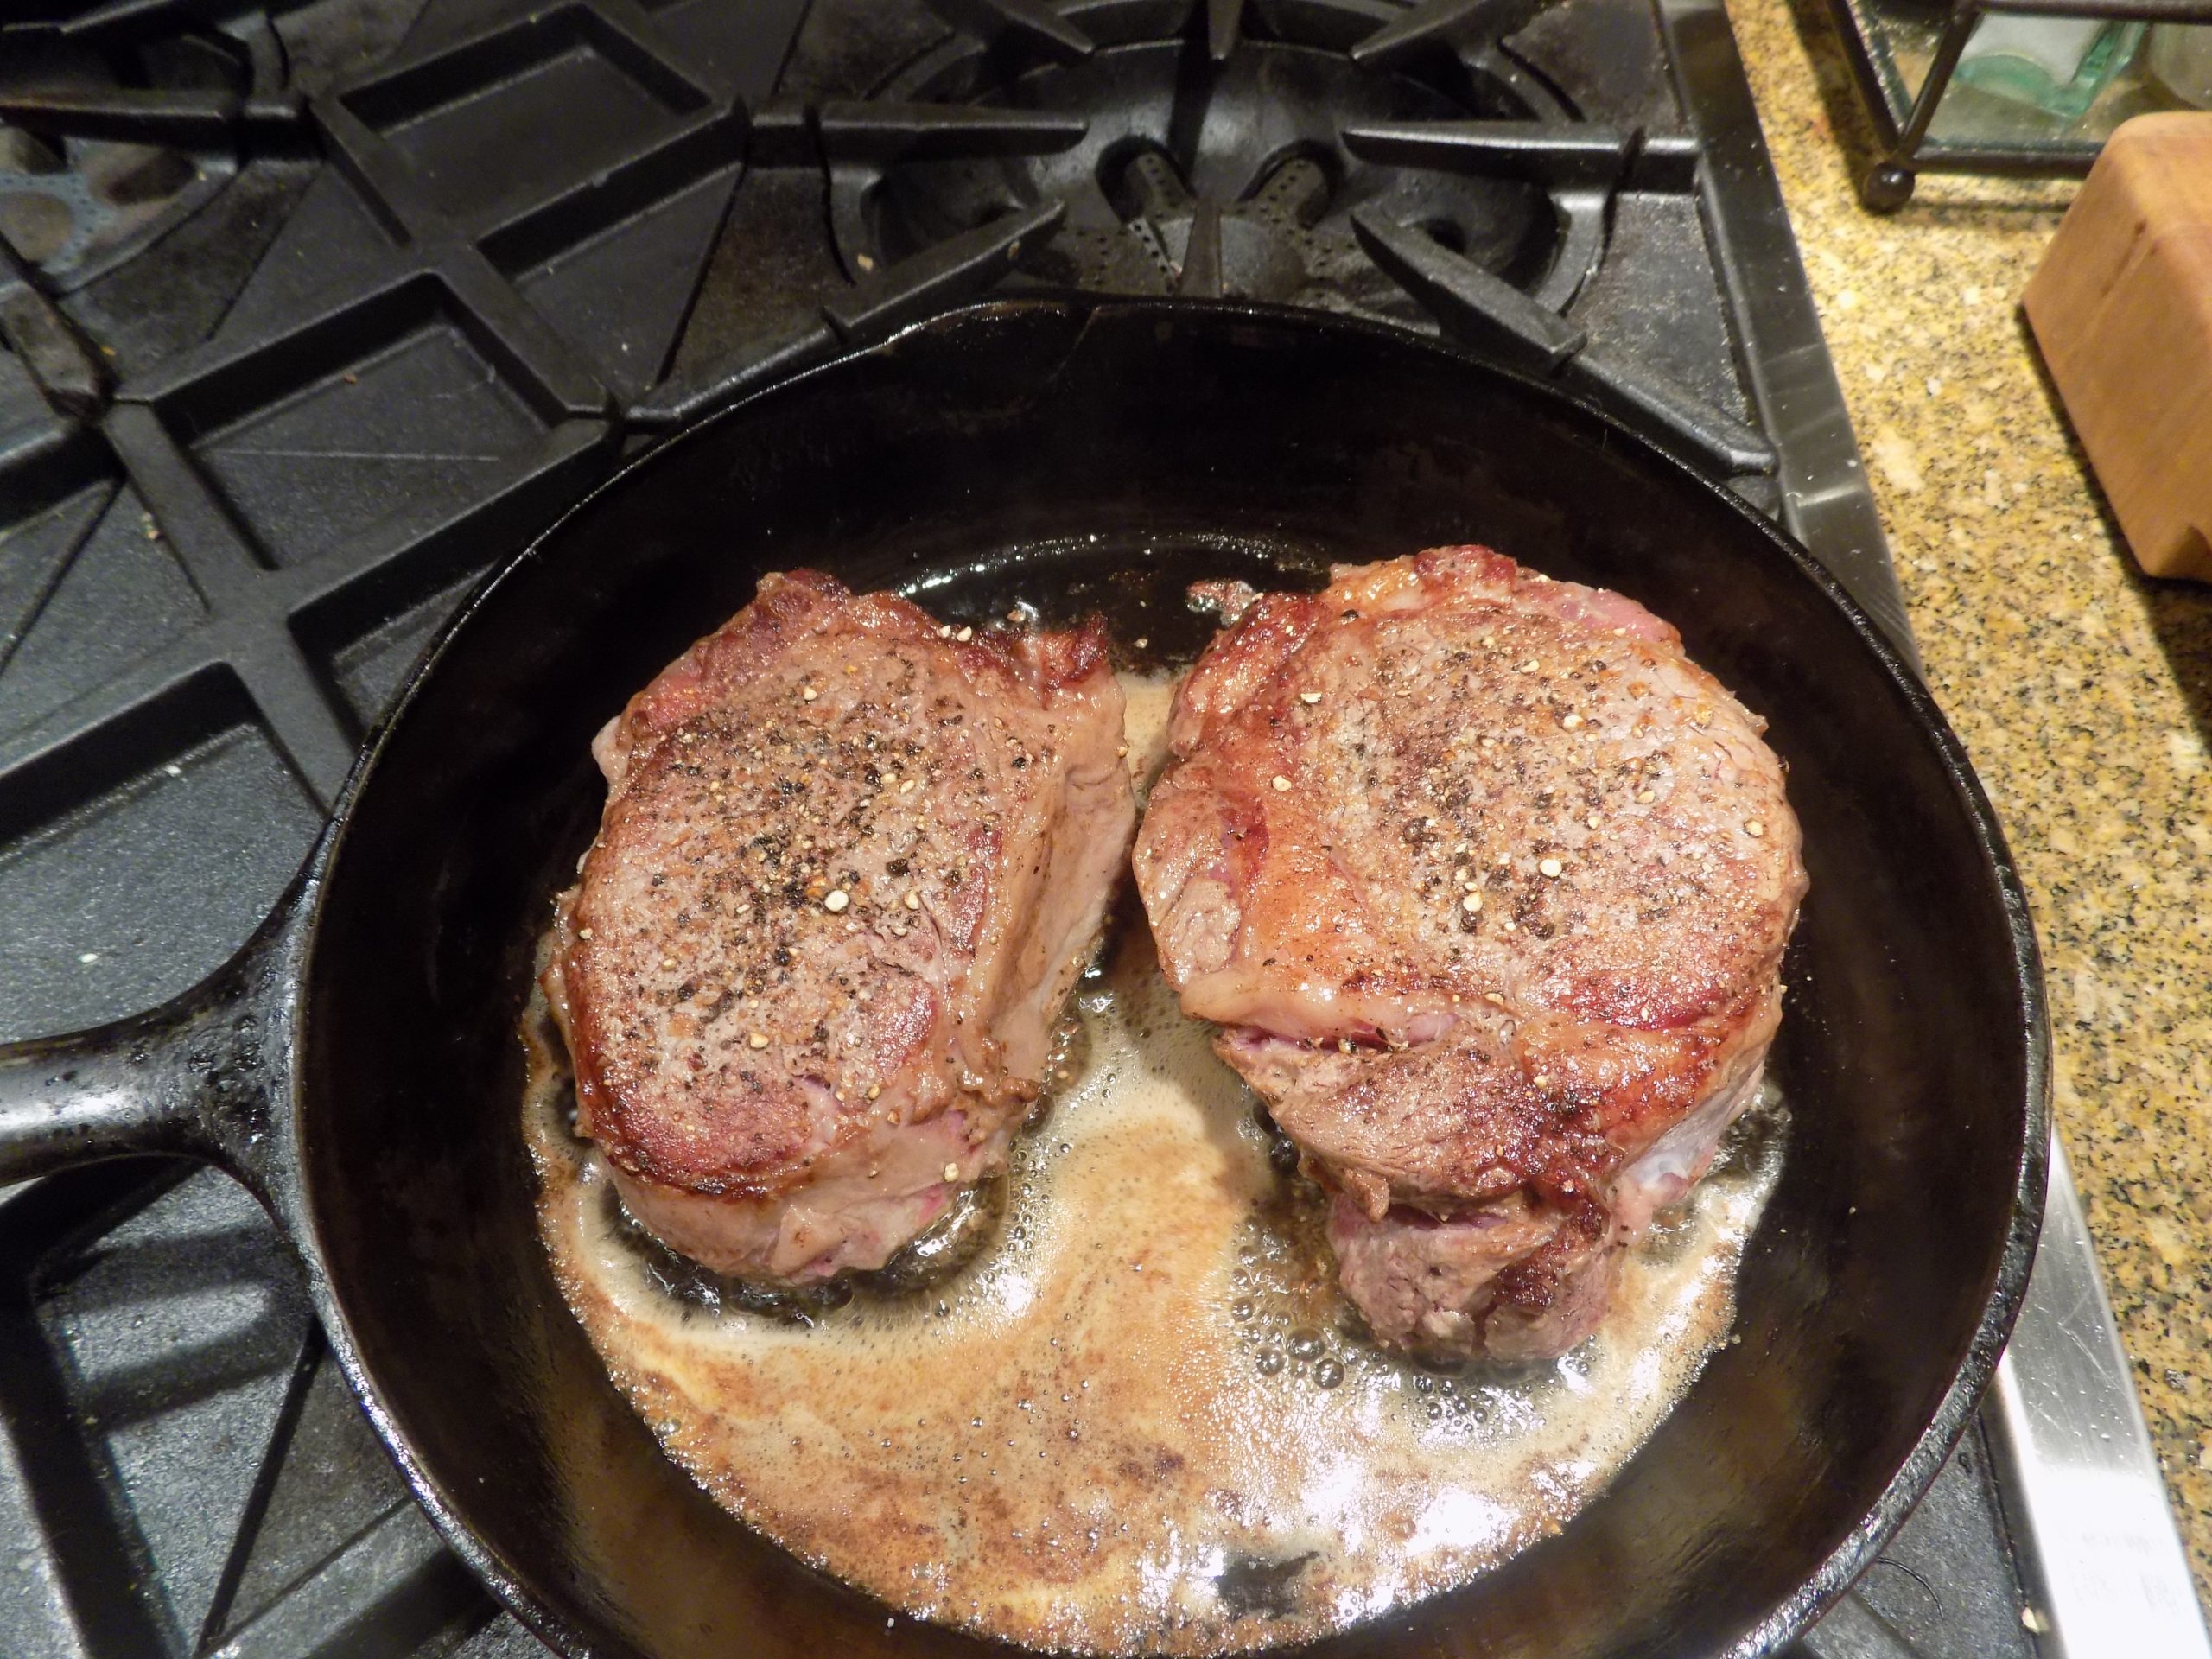
Using a cast iron pan if possible, add the 2 tablespoons of butter to the pan and allow the skillet to become scorching hot before placing the steaks in the pan. Sear the first side undisturbed for 2 minutes. Carefully flip the steaks and sear the second side for 2 minutes. (This will give your steaks a lovely and tasty crust.)
Transfer the skillet directly to your pre-heated 425-degree oven. (The skillet handle may be hot, so work carefully.) For rare, bake for 3½ minutes. The internal temperature should reach 120 – 125-degrees. Medium rare, roughly 4-5 minutes to an internal temperature of 125-130-degrees. After that, don’t bother spending your hard-earned money on tenderloin or filet mignon. Might just as well buy a cheaper cut of beef and make stew!
When your steaks reach the desired internal temperature, remove from the oven, transfer to a platter, and lightly cover with aluminum foil. Leave alone for about 5 minutes.
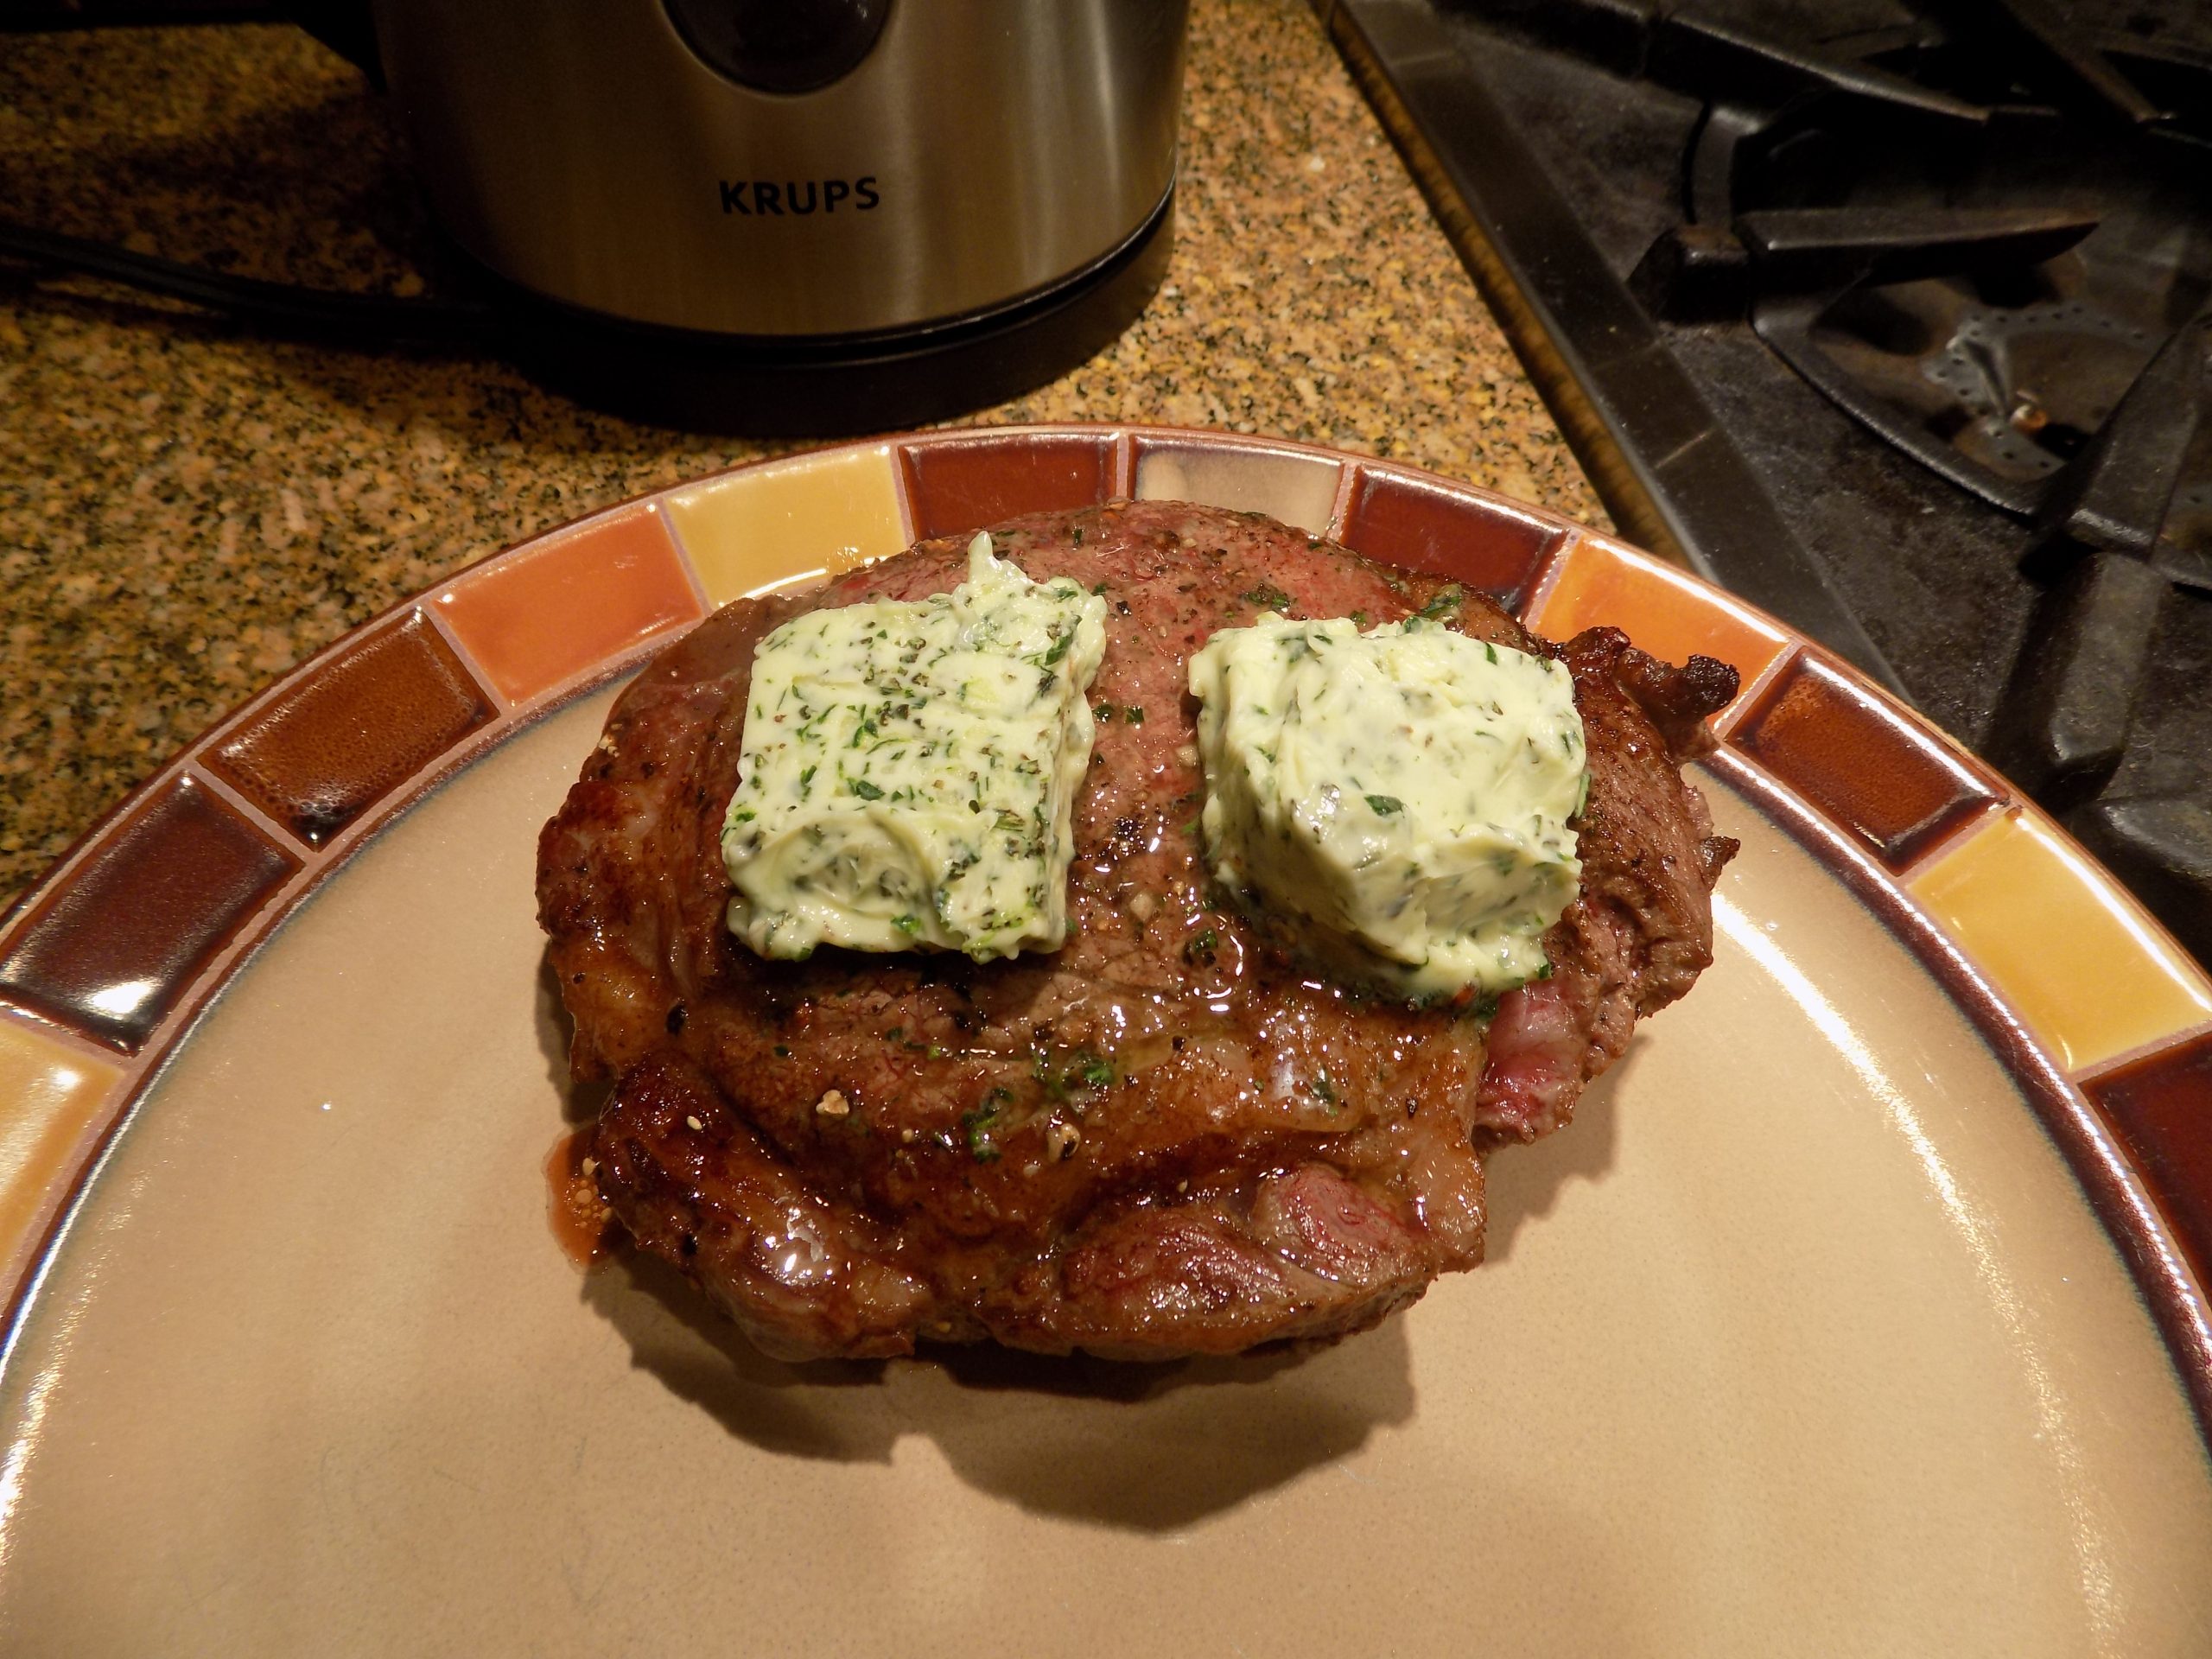
To serve, plate the steaks topped with slices of your choice of flavored butter. (See choices below.)
Garlic Rosemary Butter
4 T. (½ stick) unsalted butter
1½ tsp. chopped fresh rosemary
1½ tsp. chopped fresh parsley
1 lg. garlic clove, finely minced
pinch sea salt
freshly ground black pepper
Soften the butter in a microwave safe bowl until malleable, 10-15 seconds. (Don’t melt the butter.) Using a regulate table fork, mash in the rosemary, parsley, garlic, salt, and pepper. Scoop onto a piece of plastic wrap forming it as much as possible into a half stick of butter. Place in refrigerator until the steak comes out of the oven and is resting. (If you make the flavored butter way ahead of time, take it out of the refrigerator a good 30 minutes before you plan to use it.)
Garlic Lemon Butter
4 T. (½ stick) unsalted butter
2 garlic cloves, finely minced
2 T. minced fresh Italian parsley
1 tsp. lemon zest
pinch sea salt
freshly ground black pepper
Soften the butter in a microwave safe bowl until malleable, 10-15 seconds. (Don’t melt the butter.) Using a regulate table fork, mash in the garlic, parsley, lemon zest, salt, and pepper. Scoop onto a piece of plastic wrap forming it as much as possible into a half stick of butter. Place in refrigerator until the steak comes out of the oven and is resting. (If you make the flavored butter way ahead of time, take it out of the refrigerator a good 30 minutes before you plan to use it.)
Blue Cheese and Fresh Thyme Butter
4 T. (½ stick) unsalted butter
2 T. crumbled blue cheese, or more to taste
1 tsp. finely chopped fresh thyme
pinch sea salt
freshly ground black pepper
Soften the butter in a microwave safe bowl until malleable, 10-15 seconds. (Don’t melt the butter.) Using a regulate table fork, mash in the blue cheese, fresh thyme, salt, and pepper. Scoop onto a piece of plastic wrap forming it as much as possible into a half stick of butter. Place in refrigerator until the steak comes out of the oven and is resting. (If you make the flavored butter way ahead of time, take it out of the refrigerator a good 30 minutes before you plan to use it.)
Dried Porcini Mushroom, Garlic, and Fresh Chive Butter
4 T. (½ stick) unsalted butter
1 sm. garlic clove, finely minced
4 tsp. chopped fresh chives
1 T. dried porcini mushroom powder*
pinch sea salt
Soften the butter in a microwave safe bowl until malleable, 10-15 seconds. (Don’t melt the butter.) Using a regulate table fork, mash in the garlic, chives, mushroom powder, and salt. Scoop onto a piece of plastic wrap forming it as much as possible into a half stick of butter. Place in refrigerator until the steak comes out of the oven and is resting. (If you make the flavored butter way ahead of time, take it out of the refrigerator a good 30 minutes before you plan to use it.)
*Porcini mushroom powder can be purchased online or you can make it at home. Place dried mushrooms in your blender or spice grinder and let it whirl. (My spice grinder is an inexpensive coffee grinder dedicated just for the purpose of grinding herbs, spices, and anything other than coffee!)
Store mushroom powder in an airtight container. Great for adding depth of flavor to almost any dish that calls for mushrooms. And of course, any dried mushroom can be ground into powder.
Horseradish and Fresh Chive Butter
4 T. (½ stick) unsalted butter
2 tsp. horseradish, or more to taste
4 tsp. chopped fresh chives
pinch sea salt
freshly ground black pepper Soften the butter in a microwave safe bowl until malleable, 10-15 seconds. (Don’t melt the butter.) Using a regulate table fork, mash in the horseradish, chives, salt, and pepper. Scoop onto a piece of plastic wrap forming it as much as possible into a half stick of butter. Place in refrigerator until the steak comes out of the oven and is resting. (If you make the flavored butter way ahead of time, take it out of the refrigerator a good 30 minutes before you plan to use it.)
For the last several days, weather predictors have been threatening Northwestern Washington with snow. (Like that’s a big threat for people like me!) Because those of us for whom snow is the coolest thing ever, would be overjoyed to see big old fluffy flakes of precipitation fall from the sky. Even though, in our case, almost any amount of snow will render us house bound. (Our driveway and road leading out of our neighborhood are anything but level.)
Lots of snow on Mt. Baker, but so far, none on the deck from which I am taking this picture. That’s Barnum Point in the foreground surrounded on three sides by Port Susan Bay.
But for retired folks like Mr. C. and me, who are already basically tethered to our house because of covid-19, so what? And snow is so pretty. And so much fun to play in. (OK, it used to be fun to play in when I was still skiing. Now however, I stick to admiring it from the comfort of my well heated and comfortable home.) But you understand what I mean. And besides all of which, even though I fervently wish for snow, I have as much say in the matter as my fellow thinking Americans who would like to see one of our former presidents (no name given to avoid a lawsuit) airlifted to a tiny island in the middle of a vast sea of sharks, never to be heard of again! But for reasons unknown to me, I was not handed the responsibility for weather in our region, or for mandating punishment even if said punishment is richly deserved! So, I do the next best thing.
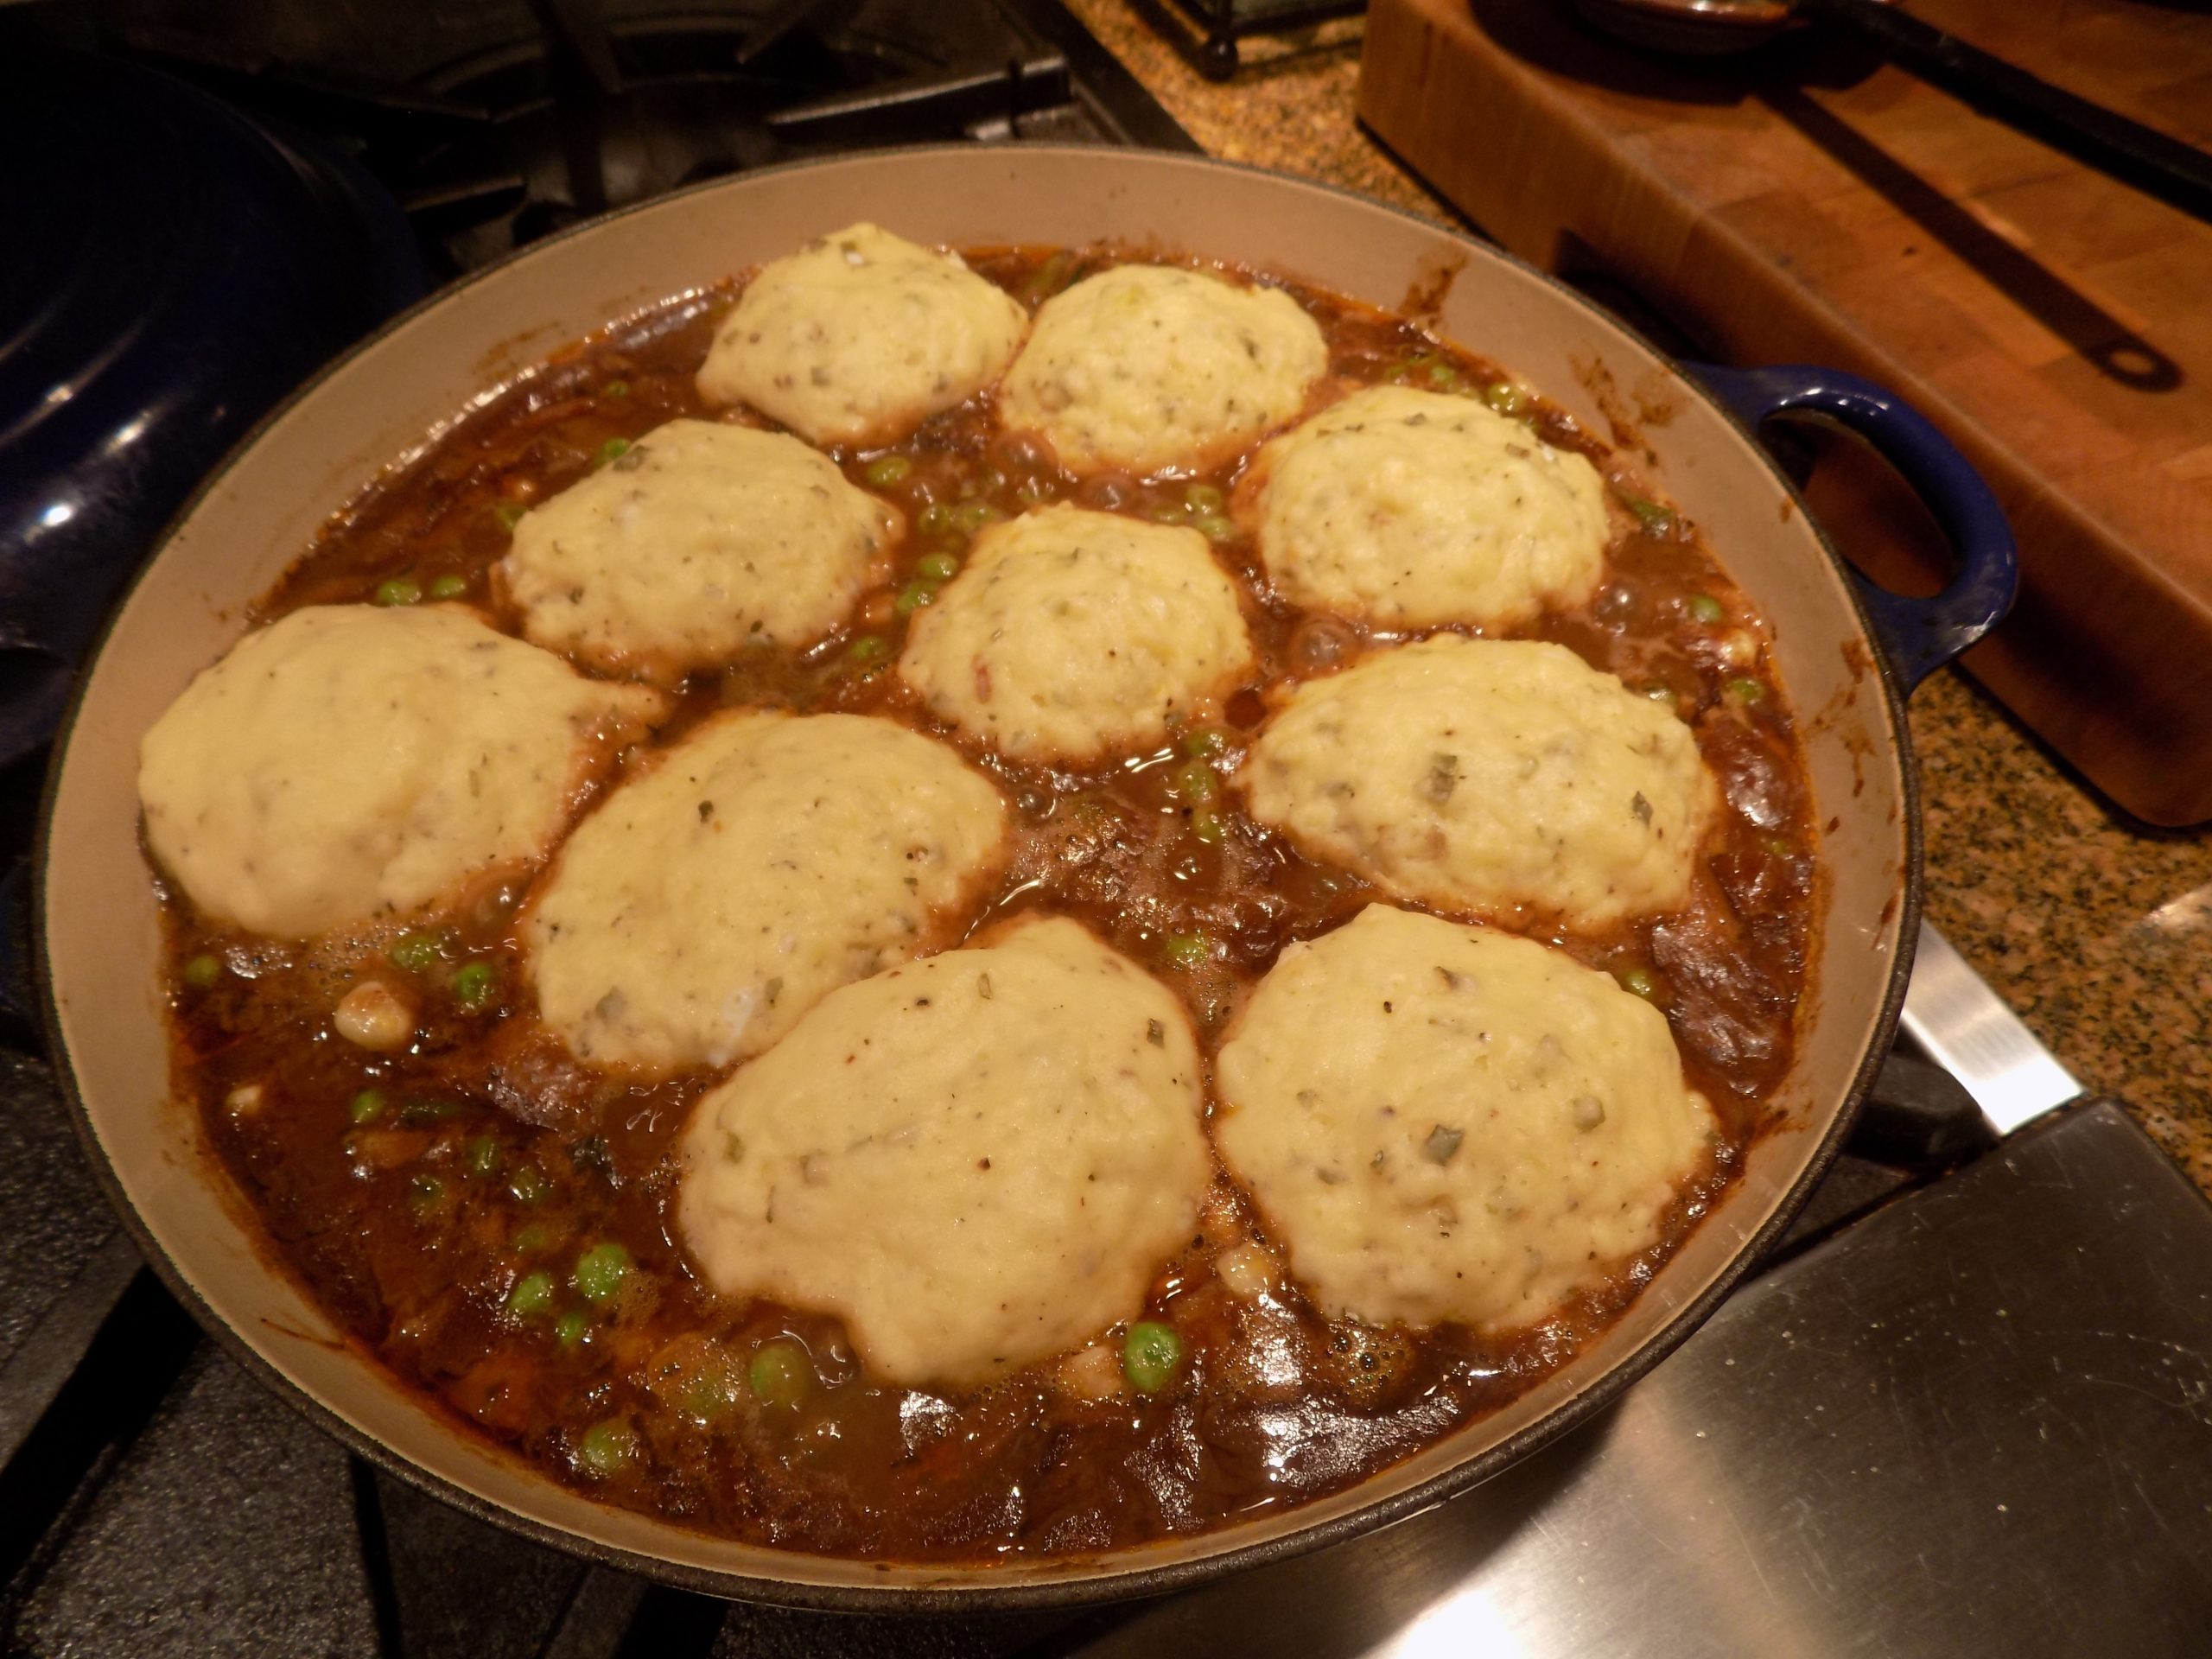
I prepare hearty comfort food that makes us feel like there must be snow on the ground. Which, of course there is. Somewhere. And beef stew, with light as feather dumplings nestled on top, is perfect “snow weather” food. So, of course I hope you give this recipe a try. The stew is delicious. And when topped with dumplings, your entire family will feel like it must be a special occasion. (Snow, or no snow.)
So as always, make each meal a special occasion. And don’t hate snow. None of us can either stop it from falling or hasten its appearance. It simply is what it is. So, stock up on hot chocolate mix and marshmallows. Whip up a batch of chocolate chip cookies or brownies. And graciously accept the inevitable. And after all that effort, and if you still have a modicum of energy left, prepare a hearty and tasty meal to top off another great day of just being alive.
Peace and love to all.
For the Stew:
4-6 slices thick lean bacon, diced
1 lb. lean beef (round steak or top sirloin is great)
2 tsp. seasoned salt
freshly ground black pepper
1½ tsp. paprika
½ c. flour
1 lg. onion, chopped
3 garlic cloves, minced
1 c. chopped celery
2 carrots, sliced ¼-inch thick
3 c. beef stock
1 c. red wine (I use Gallo Hearty Burgundy)
1 T. tomato paste
1 bay leaf
2 tsp. dried thyme leaves
½ tsp. dried rosemary, crushed
1 T. dried parsley
2 medium potatoes, diced
4-6 c. fresh or frozen vegetables (corn, beans, peas, broccoli, mushrooms, zucchini, etc.)
Fry bacon until crisp in a large, covered soup pot. Remove bacon to medium sized bowl. Don’t discard bacon fat. Meanwhile, remove any fat or grizzle from meat and cut into bite size pieces. Sprinkle meat with seasoned salt, pepper, and paprika. Place flour in a bag and add meat cubes. Shake until well coated. Brown meat in bacon fat. As pieces brown, remove to the same bowl as bacon. If more fat is needed to brown all the meat cubes, add a teaspoon or so of vegetable oil.
After all the meat has been browned, add onion, garlic, celery, and carrot slices to the pot. Stir fry for about 5 minutes, lifting brown bits off the bottom. Add beef stock, red wine, tomato paste, bay leaf, thyme, rosemary, and parsley. Bring to boil and add cooked bacon, meat cubes and any accumulated meat juices. Reduce heat to low, cover, and simmer for about 90 minutes or until the meat is almost tender. Stir periodically.
Add potatoes and simmer until they are almost done, about 30 minutes. Add fresh vegetables and cook until crisp tender. Add frozen vegetables and continue cooking until the stew is simmering gently.
Using a spoon or ice cream scoop, drop dumpling balls into the stew. (The dumplings will double in size while they cook, so make them as big or small as you wish.)
Cook dumplings at a slow simmer for 10 minutes with pan uncovered. Then cover the pot and simmer for about 10 more minutes or until the dumplings are cooked through. (Make sure you don’t peek while the dumplings are cooking for the last 10 minutes. They need to steam in order to be nice and fluffy and lifting the lid will release the steam.) To check if the dumplings are ready, use a toothpick to test if the dumplings are cooked through. The toothpick will be clean if the dumplings are cooked enough. Then serve the stew immediately.
For the Garlic, Onion, and Chive Dumplings:
1 egg
6 T. whole milk
2 T. veggie oil
1 c. all-purpose flour, fluffed
1½ tsp. baking powder
½ tsp. kosher salt
freshly ground black pepper
1 garlic clove, finely minced
1 T. chopped dried onion
2 T. finely chopped fresh or 1 T. dried chives
In a bowl whisk the egg, milk, and oil together. In another bowl, whisk the flour, baking powder, salt, pepper, garlic, dried onion, and chives together. Stir the dry ingredients into the egg mixture just until combined. Do not over-mix.